user manual - produktinfo.conrad.com · press the mode button to mute the sound and only record the...
TRANSCRIPT

Braun B-Box T4
User Manual

User Manual
Bedienungsanleitung
Mode d’emploi
Manuale dell'utente
1-8
9-16
17-25
26-33
1
For getting the most out of your new car DVR, read all use instructions carefully before using this product.
Note: 1. Observe the relevant local laws strictly.
2. Insert the memory card before taking a video. Observe the correct orientation to avoid damaging the card or the device.
3. Transfer your files to computer to avoid loss of files.
4. After installation check that the suction cup works properly.
5. With time the battery capacity will decrease. Charge the battery before use.
6. Do not place the product in humid environs, it is not waterproof.
7. Do not take pictures directly into the sun; this can damage the lens.
8. Do not use the camera in excessive dusty environs. Clean the lens regularly.
9. This is a precision electronic product; do not subject to strong impact, vibration and do not use it in strong magnetic fields.

2
A. Controls and components
1. Stand connector 2. USB port 3. Reset 4. TF card slot 5. Speaker 6. Status LED 7. Charge LED 8. On/Off button
9. Mode button 10. Menu button 11. LCD 12. Down button 13. Record button 14. Up button 15. Lens
3
B. Product features 1. Supports 1080p, 720p, 480p and a variety of video formats, superior image effects
2. Built-in microphone/speaker
3. Quick recording
4. Quick screensaver
5. Supports high capacity TF card
6. Charge during video recording, video loop, seamless video
7. Idling engine starts automatic boot video function, time-lapse video automatic shut down after 5 seconds
8. Motion detection
9. SOS and G_SENSOR file forced preserving evidence, not to be deleted
C. Operation 1. Switching on and off:
A) Press the ON/OFF button, the DVR automatically enters video mode and starts recording, the green LED flashes. If connected to the car charger, the DVR automatically enters video mode and starts recording, when the engine is started. It automatically switches off and saves the video file 5 seconds after the engine is stopped.
If no TF card is inserted the LCD displays "no card". Insert a TF card after switching the device off.
B) Press and hold the ON/OFF button to turn the DVR off.
If the battery capacity is insufficient, the DVR will automatically switch off and save the video file.
2. Charging the battery
You can charge the battery in two ways:
1) Use the USB charger for charging.
2) Use the car charger.
During charging the red LED lights up; it extinguishes as soon as the battery is fully charged.
3. Inserting a memory card
Insert a TF card according to the arrows until you hear a confirmation sound.
4. Recording a video
Press ON/OFF to immediately record videos, the green LED flashes. Press the REC button to stop recording and save the file; the DVR enters standby mode. Press the REC button to start recording, press the button again to stop recording. Press the MODE button to mute the sound and only record the pictures in video mode. Press the UP button to switch the LCD on/off to save power.
5. Taking pictures
Press the MODE button to enter photo mode, press the REC button to take a photo. Press the UP button to turn night vision on/off.
6. Playback and delete
In standby mode, press the MODE button to enter the playback mode. Press the UP/DOWN button to select preview, press the REC button to play or stop the file. Too delete the file, press the MENU button to enter the Delete menu, press the button again to select the option "Delete current" or "Delete all". Press the REC button to confirm and press the MENU button to exit the Delete menu to return to playback mode.
7. SOS function
In video recording mode, press the MENU button to force save the file in order to prevent important information

4
being deleted. Mandatory saving method: during the first 10 seconds of the current video, press the MENU button to force save the current and the previous segment; during 10 seconds back counted of the video, press the MENU button to force save the current and the next segment; in the current video between the first 10 seconds and the last 10 seconds, press the MENU button to force save the current file.
8. G_SENSOR function
In video recording mode, if the car brakes suddenly or there is an impact, the accelerometer force saves the current file in order to prevent important information from being deleted. The sensitivity can be set as high, medium or low. The filing is similar to the SOS G_SENSOR filing method.
9. Motion detection
In video standby mode, press the DOWN button when moving objects are detected, the video starts recording. If within 5 seconds no moving object enters the motion detection area, the function deactivates.
D. System settings In standby mode, press the MENU button to enter the Settings menu. Press the UP/DOWN button to select and press the REC button to confirm. After setting up the parameters, press the REC button. Press the MENU button to exit the Settings menu. The layout of the Settings menu is as follows:
Image S
ettings
Mode Menu Select Settings Remark
Video
Resolution
1080FHD 1920x1080
1080p 1440x1080
720p 1280x720
WVGA 848x480
VGA 640x480
Resolution: 1080FHD is 25fps,
others are 30fps
Cycle Recording Off/30 seconds/1 min/2mins
Exposure
Compensation
+2.0>, +5/3, +4/3, +1.0, +2/3, +1/3, +0.0,
-1/3, -2/3, -1.0, -4/3, -5/3, -2.0
Motion Detection Off/On
Video & Audio Off/On
Photo
Date Label Off/On
REC Mode Single shooting / 2 second timer / 5 second
timer / 10 seconds timer Can set the time
Resolution
12M 4032*3024 / 10M 3648*2736
8M 3264*2448/ 5M 2592*1944
3M 2048*1536 / 2M 1920*1080
VGA 640*480 / 1.3M 1280*960
The greater the number of
pixels, the larger the file

5
Continuous
Shooting Off/On
Image Quality High quality / standard / economy
Sharpness Strong / standard / soft Can change image effects
White Balance Auto / Daylight / Cloudy / tungsten lamp /
fluorescent lamp Can change image effects
Colour Colour / black & white / tan Can change image effects
ISO Auto/100/200/400 Can change image effects
Exposure
Compensation
+0.0, -1/3, -2/3, -1.0 , -4/3, -5/3 , -2.0, +2.0,
+5/3, +4/3, +1.0, +2/3, +1/3
Can change image brightness
and effects
Anti-shake Off/On
Quick Preview Off/2 seconds/5 seconds/
Date Label Off, Date, Date/time
Playback
Cancel Delete current / Delete all
Protection Lock current / Unlock current / Lock all /
Unlock all
Slide Show 2 seconds/5 seconds /8 seconds
System Settings
Date/Time MM/DD/YY,DD/MM/YY,YY/MM/DD
Automatic
Shutdown off/1min/3mins
Key Sound off/on
Fill Light off/on Use UP button to turn on/off
Language
English/Français/Español/Português/Deut
sch/Italiano/简体中文/繁體中文/Русский
язык/日本語/한국어
TV Mode NTSC/PAL
Optical
Frequency 50Hz/60Hz

6
Format SD card
Default Settings Restore Default Settings / Cancel / OK
Automatic
Off-Screen OFF/1 min/2mins/5mins Use UP button to turn on/off
G-Sensor Vision Off/low / medium / high
E. Connecting to PC Downloading video and photo files 1. After connecting the USB cable to the computer, the camera's red status LED turns on, on screen appear the
menu setting options: memory card/ PICTBRIDGE / webcam.
2. After selecting memory card the screen turns black and the computer will automatically identify the camera as "Removable Disk".
3. Use the computer to browse and manage the files.
4. When selecting PICTBRIDGE, you can print the files from the TF card.
5. When selecting webcam the camera can be used for instant video messaging. At the end, press the ON/OFF button and unplug the USB cable to automatically switch the camera off.
6. When the data cable or car charger is connected, the status LED lights up red. It turns off after the battery is fully charged.
Note: In case of malfunction, press and hold the ON/OFF button for 5 seconds to shut down. Press the RESET button and then switch the camera on again, it will return to normal function.
F. Specifications
Screen 2.0" TFT screen
Pixels 1.2M
Lens 120 degree HD wide-angle lens
Camera rotation 180 degree
Minimum illumination 1LUX
Video resolution 1080P/720P/480P
Video format AVI /MJPG

7
Frames 30fps
Image resolution 12M/10M/8M/5M/3M/2M/VGA/1.3M
Photo format JPG
Motion detection Supported
Cycle recording Off/30s/1min/2mins
Memory card type TF card
Capacity Maximum supported 32G
USB port USB2.0
Power port USB5V/500mA
Current frequency 50Hz/60Hz
Battery capacity 350mAh
Microphone/speaker Built-in
Language English/Deutsch/Français/Español/Italiano/简体中文/繁體中文/日本語
/Português/Русский язык/한국어
Note: Specifications subject to change without prior notice.

8
G. Accessories:
The following accessory list is for reference. We reserve the right to modify accessories.
BDK-611 Suction cup Manual
Car charger USB cable

Lesen Sie alle Anleitungen vor der Verwendung dieses Geräts aufmerksam durch, um das Beste aus Ihrem neuen Car DVR herauszuholen.
Hinweis: 1. Beachten Sie alle örtlichen Gesetze.
2. Setzen Sie die Speicherkarte ein, bevor Sie ein Video aufnehmen. Achten Sie auf die korrekte Ausrichtung, um die Speicherkarte und das Gerät nicht zu beschädigen.
3. Übertragen Sie Ihre Aufnahmedateien auf Computer, um Datenverlust zu vermeiden.
4. Vergewissern Sie sich nach der Installation, dass der Saugnapf ordnungsgemäß funktioniert.
5. Über einen längeren Zeitraum lässt die Akkukapazität nach. Laden Sie den Akku vor Gebrauch.
6. Bewahren Sie das Gerät nicht in feuchter Umgebung auf, es ist nicht wasserdicht.
7. Richten Sie das Objektiv nicht direkt auf die Sonne aus; das kann zu Schäden führen.
8. Verwenden Sie die Kamera nicht in übermäßig staubiger Umgebung. Reinigen Sie das Objektiv regelmäßig.
9. Das Gerät ist ein elektronisches Präzisionsprodukt; setzen Sie es keinen starken Stößen oder Vibration aus und verwenden Sie es nicht in starken Magnetfeldern.
9

A. Bedienelemente und Komponenten
1. Saugnapfanschluss 2. USB-Port 3. Rücksetztaste 4. TF-Kartenschacht 5. Lautsprecher 6. Status-LED 7. Lade-LED 8. Ein/Aus
9. Modus 10. Menü 11. LCD 12. Navigation abwärts 13. Aufnahme 14. Navigation aufwärts 15. Objektiv
10

B. Schlüsselmerkmale 1. Unterstützt 1080p, 720p, 480p und eine Vielfalt von Videoformaten, überlegene Bildeffekte
2. Integriertes Mikrofon/Lautsprecher
3. Schnelle Aufnahme
4. Schneller Bildschirmschoner
5. Unterstützt TF-Karte mit hoher Kapazität
6. Laden während Videoaufnahme, Videoschleife, Nahtlos-Video
7. Laufender Motor startet automatisch die Videofunktion, Zeitraffer, Video schaltet automatisch nach 5 Sekunden ab
8. Bewegungserkennung
9. SOS und G_SENSOR zwangsweise Speicherung zur Beweisführung, kann nicht gelöscht werden
C. Bedienungshinweise 1. Ein- und ausschalten:
A) Drücken Sie ON/OFF, der DVR begibt sich automatisch in den Videomodus und startet die Aufnahme, die grüne LED blinkt. Bei Anschluss am Fahrzeug-Ladegerät begibt sich der DVR automatisch in den Videomodus und startet die Aufnahme, sobald der Motor angelassen wird. Das Gerät schaltet sich automatisch aus und speichert die Videodatei 5 Sekunden nachdem der Motor ausgeschaltet wurde.
Ist keine TF-Karte eingesetzt, so wird im LCD „no card“ angezeigt. Setzen Sie eine TF-Karte ein, nachdem Sie das Gerät ausgeschaltet haben.
B) Halten Sie ON/OFF gedrückt, um den DVR auszuschalten.
Bei unzureichender Akkukapazität schaltet sich der DVR automatisch aus und speichert die Videodatei.
2. Akku laden
Der Akku kann auf zweierlei Weise geladen werden:
1) Verwenden Sie das USB-Ladegerät.
2) Verwenden Sie das Fahrzeug-Ladegerät.
Während des Ladezyklus leuchtet die rote LED; sie erlischt, sobald der Akku voll geladen ist.
3. Speicherkarte einsetzen
Setzen Sie eine TF-Karte in Pfeilrichtung ein, bis Sie einen Bestätigungston hören.
4. Video aufnehmen
Drücken Sie ON/OFF, um sofort Videos aufnehmen zu können; die grüne LED blinkt. Drücken Sie REC, um die Aufnahme zu beenden und die Datei zu speichern; der DVR begibt sich in den Stand-by-Modus. Drücken Sie REC, um die Aufnahme zu starten und drücken Sie die Taste erneut, um die Aufnahme zu beenden. Drücken Sie MODE, um das Mikrofon stummzuschalten und nur die Bilder im Videomodus aufzunehmen. Drücken Sie Navigation aufwärts, um das LCD ein- und auszuschalten, um Energie zu sparen.
5. Fotos aufnehmen
Drücken Sie MODE, um den Fotomodus aufzurufen dann drücken Sie REC, um ein Foto aufzunehmen. Drücken Sie Navigation aufwärts, um die Nachtsicht ein- und auszuschalten.
6. Wiedergabe und löschen
Im Stand-by-Modus drücken Sie MODE zum Aufrufen des Wiedergabemodus. Drücken Sie Navigation aufwärts/abwärts zur Auswahl der Vorschau, dann drücken Sie REC, um die Datei abzuspielen oder zu beenden.
11

Zum Löschen der Datei drücken Sie MENU, um das Menü Delete aufzurufen, dann drücken Sie die Taste erneut, um die Option „Delete current“ oder „Delete all“ zu wählen. Drücken Sie REC zur Bestätigung und drücken Sie MENU, um das Menü Delete zum Wiedergabemodus zu verlassen.
7. SOS-Funktion
Im Videoaufnahmemodus drücken Sie MENU, um die Datei zwangsweise zu speichern, damit keine wichtigen Informationen gelöscht werden. Zwangsweise speichern: Während der ersten 10 Sekunden des aktuellen Videos drücken Sie MENU, um das aktuelle und das vorherige Segment zu speichern; während der letzten 10 Sekunden des Videos drücken Sie MENU, um das aktuelle und das nächste Segment zu speichern; im aktuellen Video zwischen den ersten und letzten 10 Sekunden drücken Sie MENU, um die aktuelle Datei zu speichern.
8. G-SENSOR-Funktion
Im Videoaufnahmemodus, wenn Sie das Fahrzeug plötzlich abbremsen oder im Fall eines Anstoßes speichert der Beschleunigungsmesser die aktuelle Datei zwangsweise, damit wichtige Informationen nicht gelöscht werden. Die Empfindlichkeit kann als hoch, mittel oder niedrig eingestellt werden. Die Speicherung ist ähnlich wie beim SOS G-SENSOR.
9. Bewegungserkennung
Im Video-Stand-by-Modus drücken Sie Navigation abwärts, wenn Sie Bewegung erkennen; die Aufnahme beginnt unverzüglich. Begibt sich innerhalb von 5 Sekunden kein Objekt in den bewegungsüberwachten Bereich, so wird die Funktion deaktiviert.
D. Systemeinstellungen Im Stand-by-Modus drücken Sie MENU, um das Einstellungsmenü aufzurufen. Drücken Sie Navigation aufwärts/abwärts zur Auswahl und dann REC zur Bestätigung. Nachdem Sie die Parameter eingestellt haben, drücken Sie REC. Drücken Sie MENU, um das Einstellungsmenü zu verlassen. Das Layout des Einstellungsmenüs ist wie folgt aufgebaut:
Bildeinstellungen
Modus Menü Einstelloptionen Anmerkungen
Video
Auflösung
1080FHD 1920x1080
1080p 1440x1080
720p 1280x720
WVGA 848x480
VGA 640x480
Auflösung: 1080FHD ist
25fps, andere sind 30fps
Schleifenaufnah
me Aus/30 sec/1 min/2min
Belichtungsausgl
eich
+2.0>, +5/3, +4/3, +1.0, +2/3, +1/3, +0.0,
-1/3, -2/3, -1.0, -4/3, -5/3, -2.0
Bewegungserken
nung Aus/Ein
Video & Audio Aus/Ein
Foto Datum Aus/Ein
12

Aufnahmemodus Einzelaufnahme/2 sec Timer/5 sec
Timer/10 sec Timer Zeit kann eingestellt werden
Auflösung
12M 4032*3024/10M 3648*2736
8M 3264*2448/5M 2592*1944
3M 2048*1536/2M 1920*1080
VGA 640*480/1,3M 1280*960
Je größer die Anzahl der
Pixels, desto größer ist die
Datei
Mehrfachaufnah
me Aus/Ein
Bildqualität Hoch/Standard/Economy
Schärfe Stark/Standard/Weich Kann Bildeffekte ändern
Weißabgleich Auto/Tageslicht/Bewölkt/Kunstlicht/Neonlic
ht Kann Bildeffekte ändern
Farbe Farbe/Schwarz & Weiß/Sepia Kann Bildeffekte ändern
ISO Auto/100/200/400 Kann Bildeffekte ändern
Belichtungsausgl
eich
+0.0, -1/3, -2/3, -1.0 , -4/3, -5/3 , -2.0, +2.0,
+5/3, +4/3, +1.0, +2/3, +1/3
Kann Bildeffekte und
Helligkeit ändern
Anti-Shake Aus/Ein
Schnellvorschau Aus/2 sec/5 sec
Datum Aus, Datum, Datum/Zeit
Wiedergab
e
Abbrechen Aktuell löschen/Alle löschen
Schutz Aktuell sperren/Aktuell entsperren/All
sperren/Alle entsperren
Diashow 2 sec/5 sec/8 sec
Systemeinstellun
gen
Datum/Zeit MM/DD/YY,DD/MM/YY,YY/MM/DD
Automatische
Abschaltung Aus/1min/3min
Tastenton Aus/Ein
Fill Light Aus/Ein Mit Navigation aufwärts ein-
und ausschalten
13

Sprache
English/Français/Español/Português/Deut
sch/Italiano/简体中文/繁體中文/Русский
язык/日本語/한국어
TV-Modus NTSC/PAL
Optische
Frequenz 50Hz/60Hz
Formatieren SD-Karte
Standardeinstellu
ngen Standard wiederherstellen/Abbrechen/OK
Bildschirm
automatisch aus AUS/1 min/2min/5min
Mit Navigation aufwärts ein-
und ausschalten
G-Sensor Aus/hoch/mittel/niedrig
E. Anschluss am PC Video- und Fotodateien herunterladen 1. Bei Anschluss über USB-Kabel am Computer leuchtet die rote Status-LED der Kamera und auf dem Monitor
werden die Menüoptionen angezeigt: memory card/PICTBRIDGE/webcam.
2. Bei Auswahl von memory card schaltet sich das LCD aus und der Computer erkennt die Kamera als „Wechsellaufwerk“.
3. Auf dem Computer durchsuchen und verwalten Sie die Dateien.
4. Bei Auswahl von PICTBRIDGE können Sie die Dateien direkt von der TF-Karte drucken.
5. Bei Auswahl von webcam können Sie die Kamera für Instant Video Messaging verwenden. Am Ende drücken Sie ON/OFF und ziehen Sie das USB-Kabel ab, die Kamera schaltet sich automatisch aus.
6. Bei Anschluss eines Datenkabels oder Fahrzeug-Ladegeräts leuchtet die Status-LED rot. Sie schaltet sich aus, sobald der Akku voll geladen ist.
Hinweis: Bei Fehlfunktionen halten Sie ON/OFF für 5 Sekunden gedrückt, um das Gerät herunterzufahren. Drücken Sie RESET und schalten Sie die Kamera wieder ein, sie funktioniert wieder normal.
14

F. Technische Daten
Display 2,0-Zoll TFT-LCD
Pixel 1,2 MP
Objektiv 120 Grad HD-Weitwinkelobjektiv
Kamerarotation 180 Grad
Mindestausleuchtung
1 LUX
Videoauflösung 1080P/720P/480P
Videoformat AVI/MJPG
Bilder/Sekunde 30 fps
Bildauflösung 12M/10M/8M/5M/3M/2M/VGA/1,3M
Fotoformat JPG
Bewegungserkennung
Unterstützt
Schleifenaufnahme Aus/30s/1min/2min
Speicherkarte TF-Karte
Kapazität Bis zu 32 GB
USB-Port USB2.0
USB-Ausgang 5 V/500 mA
Frequenz 50Hz/60Hz
Akkukapazität 350 mAh
Mikrofon/Lautsprecher
Integriert
Sprache English/Deutsch/Français/Español/Italiano/简体中文/繁體中文/日本語
/Português/Русский язык/한국어
Hinweis: Änderungen der Spezifikationen vorbehalten.
15

G. Zubehör:
Die nachstehende Zubehörliste dient nur als Referenz. Wir behalten uns das Recht vor,
Zubehörteile zu ändern.
BDK-611 Saugnapf Bedienungsanleitung
Fahrzeug-Ladegerät USB-Kabel
16

Pour tirer entièrement profit de votre nouvel enregistreur vidéo numérique (DVR), lisez attentivement toutes les instructions avant l’utilisation de ce produit.
Remarque : 1. Respectez strictement les lois locales en vigueur.
2. Insérez la carte mémoire avant de filmer. Respectez le sens d’insertion pour éviter d’endommager la carte ou l’appareil.
3. Transférez régulièrement vos fichiers sur un ordinateur pour éviter toute perte de fichiers.
4. Après installation, vérifiez que la ventouse soit fixée convenablement.
5. La capacité de la batterie se réduira dans le temps. Chargez la batterie avant utilisation.
6. Ne placez pas l’appareil dans un environnement humide, il n’est pas étanche.
7. Ne dirigez pas l’objectif directement vers le soleil, vous risqueriez de l’endommager.
8. N’utilisez pas la caméra dans des environnements excessivement poussiéreux. Nettoyez régulièrement l’objectif.
9. Cet appareil est un produit électronique de précision ; ne l’exposez pas à des chocs importants, des vibrations et ne l’utilisez pas à proximité de champs magnétiques forts.
17
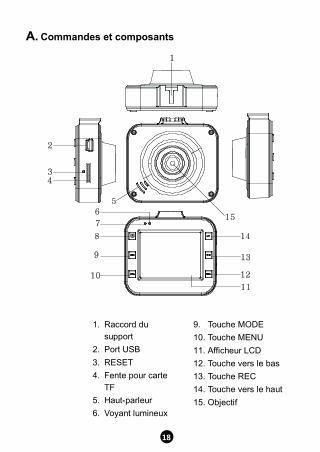
A. Commandes et composants
1. Raccord du support
2. Port USB 3. RESET 4. Fente pour carte
TF 5. Haut-parleur 6. Voyant lumineux
9. Touche MODE 10. Touche MENU 11. Afficheur LCD 12. Touche vers le bas 13. Touche REC 14. Touche vers le haut 15. Objectif
18

d’état 7. Voyant lumineux
de charge 8. Touche ON/OFF
B. Caractéristiques du produit 1. Prise en charge des résolutions 1080p, 720p, 480p, d’une grande variété de formats vidéo et d’effets d’image
avancés.
2. Haut-parleur et microphone intégrés
3. Enregistrement rapide
4. Économiseur d’écran rapide
5. Prise en charge de carte mémoire SD de haute capacité
6. Charge au cours de l’enregistrement vidéo, vidéo en boucle, vidéo sans coupure
7. Un moteur qui tourne au ralenti lance les fonctions vidéo de démarrage automatique, de coupure automatique d’une vidéo intermittente après 5 secondes
8. Détection de mouvement
9. Conservation forcée des preuves de fichier SOS et G_SENSOR, à ne pas supprimer
C. Fonctionnement 1. Allumer et éteindre :
A) Appuyez sur la touche ON/OFF. Le DVR entrera automatiquement en mode vidéo et démarrera l’enregistrement. Le voyant lumineux vert se mettra à clignoter. S’il est connecté au chargeur de voiture, le DVR entrera automatiquement en mode vidéo et démarrera l’enregistrement lorsque le moteur est allumé. Il s’éteindra automatiquement et enregistrera le fichier vidéo 5 secondes après avoir éteint le moteur.
Si aucune carte de mémoire SD est insérée, l’afficheur LCD affiche « no card ». Insérez la carte de mémoire SD après avoir éteint l’appareil.
B) Appuyez et maintenez la touche ON/OFF enfoncée pour éteindre le DVR.
Si la capacité de la batterie est insuffisante, le DVR s’éteindra automatiquement et enregistrera le fichier vidéo.
2. Chargement de la batterie
La batterie se charge de deux manières :
1) Le chargeur USB est utilisé pour la charge.
2) Le chargeur de voiture est utilisé pour la charge.
Pendant la charge, le voyant lumineux rouge est allumé ; il s’éteindra dès que la batterie est complètement chargée.
3. Insertion d’une carte de mémoire
Insérez une carte de mémoire SD en suivant la direction des flèches jusqu’à entendre un son de confirmation.
4. Enregistrement d’une vidéo
Appuyez sur la touche ON/OFF lance immédiatement l’enregistrement vidéo, le voyant lumineux vert se met à clignoter. Appuyez sur la touche REC pour arrêter l’enregistrement et enregistrer le fichier ; le DVR passera en mode veille. Appuyez sur la touche REC pour lancer l’enregistrement. Appuyez de nouveau sur la touche pour arrêter l’enregistrement. Appuyez sur la touche MODE pour couper le son et enregistrer uniquement des images
19

en mode vidéo. Appuyez sur la touche vers le haut pour activer ou désactiver l’afficheur LCD à des fins d’économie d’énergie.
5. Prendre des photos
Appuyez sur la touche MODE pour accéder au mode photo. Appuyez sur la touche REC pour prendre une photo. Appuyez sur la touche vers le haut pour activer ou désactiver la vision nocturne.
6. Lecture et suppression
En mode veille, appuyez sur la touche MODE pour accéder au mode lecture. Appuyez sur la toucher vers le haut/bas pour sélectionner un aperçu, puis appuyez sur la touche REC pour lancer ou stopper la lecture du fichier. Pour supprimer le fichier, appuyez sur la touche MENU pour accéder au menu de suppression, puis appuyez de nouveau sur cette touche pour supprimer le fichier actuel « Delete current » ou supprimer tous les fichiers « Delete All ». Appuyez sur la touche REC pour confirmer votre sélection, puis la touche MENU pour quitter le menu de suppression « Delete » et revenir au mode de lecture.
7. Fonction SOS
En mode d’enregistrement vidéo, appuyez sur la touche MENU pour forcer l’enregistrement du fichier afin d’éviter la suppression d’informations importantes. Méthode d’enregistrement forcé : pendant les 10 premières secondes de la vidéo actuelle, appuyez sur la touche MENU pour forcer l’enregistrement du segment actuel et précédent. Après avoir fait passer 10 secondes de la vidéo, appuyez sur la touche MENU pour forcer l’enregistrement du segment vidéo actuel et suivant. Dans la vidéo actuelle entre les 10 premières secondes et les 10 dernières secondes, appuyez sur la touche MENU pour forcer l’enregistrement du fichier actuel.
8. Fonction G_SENSOR
En mode d’enregistrement vidéo, si le véhicule freine soudainement ou en cas d’impact, l’accéléromètre forcera l’enregistrement du fichier actuel pour éviter la suppression d’informations importantes. Il est possible de régler la sensibilité de l’accéléromètre à un niveau élevé, moyen ou faible. Le fichier de la fonction G_SENSOR est géré de manière identique à la méthode de fichier SOS.
9. Détection de mouvement
En mode veille vidéo, appuyez sur la toucher vers le bas lorsque des objets en mouvement sont détectés pour démarrer l’enregistrement vidéo. Si, dans les 5 secondes suivantes, plus aucun objet ne pénètre dans la zone de détection de mouvement, la fonction sera désactivée.
D. Réglages système En mode veille, appuyez sur la touche MENU pour accéder au mode des réglages. Appuyez sur la toucher vers le haut/bas pour sélectionner un réglage, puis appuyez sur la touche REC pour confirmer. Une fois les paramètres réglés, appuyez sur la touche REC. Appuyez sur la touche MENU pour quitter le menu des réglages. Le menu des réglages « SETTINGS » est organisé de la façon suivante :
Réglages de l’im
age
Mode Menu Paramètres au choix Remarque
Vidéo Résolution
1080FHD 1920x1080
1080p 1440x1080
720p 1280x720
WVGA 848x480
VGA 640x480
Résolution : La résolution
1080FHD est à une fréquence
de 25 images/s, les autres
sont à 30 images/s
20

Enregistrement
en boucle Arrêt / 30 s / 1 min / 2 min
Compensation de
l’exposition
+2.0>, +5/3, +4/3, +1.0, +2/3, +1/3, +0.0,
-1/3, -2/3, -1.0, -4/3, -5/3, -2.0
Détection de
mouvement Marche / arrêt
Vidéo et audio Marche / arrêt
Photo
Date incrustée Marche / arrêt
Mode
d’enregistrement
Simple / intervalle de 2 s / intervalle de 5 s
/ intervalle de 10 s Peut changer l’heure
Résolution
12M 4032 x 3024 / 10M 3648 x 2736
8M 3264 x 2448 / 5M 2592 x 1944
3M 2048 x 1536 / 2M 1920 x 1080
VGA 640 x 480 / 1,3M 1280 x 960
Plus élevé est le nombre de
pixels, plus le fichier est grand
Prise de vue
continue Marche / arrêt
Qualité d’image Qualité élevée / normale / économique
Netteté Forte / normale / douce Peut changer les effets
d’image
Balance des
blancs
Automatique / lumière du jour / nuageux /
lampe tungstène / lampe fluorescente
Peut changer les effets
d’image
Couleur Couleur / noir et blanc / beige Peut changer les effets
d’image
ISO Automatique / 100 / 200 / 400 Peut changer les effets
d’image
Compensation de
l’exposition
+0.0, -1/3, -2/3, -1.0 , -4/3, -5/3 , -2.0, +2.0,
+5/3, +4/3, +1.0, +2/3, +1/3
Peut changer les effets et la
luminosité de l’image
Anti-secousses Marche / arrêt
Aperçu rapide Arrêt / 2 s / 5 s
Date incrustée Arrêt, date, date/heure
21

Lecture
Suppression Supprimer actuel / supprimer tout
Protection Bloquer actuel / débloquer actuel / bloquer
tout / débloquer tout
Diaporama 2 s /5 s /8 s
Réglages
système
Date / heure MM/JJ/AA, JJ/MM/AA, AA/MM/JJ
Arrêt automatique Arrêt/ 1 min / 3 min
Son des touches Marche / arrêt
Lampe de poche Marche / arrêt Utilisez la touche vers le haut
pour activer/désactiver
Langue
English/Français/Español/Português/Deut
sch/Italiano/简体中文/繁體中文/Русский
язык/日本語/한국어
Mode TV NTSC/PAL
Fréquence
optique 50Hz/60Hz
Formater Carte mémoire SD
Réglages par
défaut
Restaurer réglages par défaut / annuler /
OK
Désactivation
automatique de
l’écran
Arrêt /1 min/2 min/5 min Utilisez la touche vers le haut
pour activer/désactiver
Sensibilité
accéléromètre Arrêt / faible / moyenne / élevée
E. Connexion à un ordinateur Télécharger des fichiers vidéo et photo 1. Après avoir connecté le câble USB à un ordinateur, le voyant lumineux d’état de la caméra s’allume et le menu
des options de réglage apparaît à l’écran : carte mémoire / transfert d’images / caméra Web.
2. Si vous sélectionnez « carte mémoire », l’écran s’éteindra et l’ordinateur reconnaîtra automatique la caméra comme un « disque amovible ».
22

3. Utilisez l’ordinateur pour explorer et gérer les fichiers.
4. Si vous sélectionnez « transfert d’images», vous pourrez imprimer les fichiers à partir de la carte de mémoire SD.
5. Si vous sélectionnez « caméra Web », la caméra pourra être utilisée pour la messagerie vidéo instantanée. Une fois terminé, appuyez sur la toucher ON/OFF et débranchez le câble USB pour éteindre automatiquement la caméra.
6. Si le câble de données ou le chargeur de voiture est connecté, le voyant lumineux d’état s’allumera en rouge. Il s’éteindra à la fin de la charge de la batterie.
Remarque : En cas de mauvais fonctionnement, appuyez et maintenez la touche ON/OFF enfoncée pendant 5 s pour éteindre l’appareil. Appuyez sur la touche RESET, puis rallumez la caméra, elle reviendra en mode de fonctionnement normal.
F. Caractéristiques techniques
Écran écran TFT 5,1 cm (2,0")
Nb. de pixels 1,2 mégapixels
Objectif Objectif grand angle HD 120°
Angle de rotation de la caméra
180°
Illumination minimale 1LUX
Résolution vidéo 1080p / 720p / 480p
Format vidéo AVI / MJPEG
Fréquence d’image 30 images/s
Résolution de l’image
12M / 10M / 8M / 5M / 3M / 2M / VGA / 1,3M
Format des photos JPG
Détection de mouvement
Pris en charge
Enregistrement en boucle
Arrêt / 30 s / 1 min / 2 min
Type de carte de mémoire
Carte SD
Puissance Jusqu’à 32 Go max.
Port USB USB2.0
23

8
Port d’alimentation USB5V/500mA
Fréquence de rafraîchissement
50 Hz / 60 Hz
Capacité de la batterie
350 mAh
Microphone / haut-parleur
Intégré
Langue English/Deutsch/Français/Español/Italiano/简体中文/繁體中文/日本語
/Português/Русский язык/한국어
Remarque : Les spécifications sont sujettes à des modifications sans préavis.
24

G. Accessoires :
La liste des accessoires suivante est donnée à titre de référence. Nous nous réservons le
droit de modifier les accessoires.
BDK-611 Ventouse de fixation Manuel
Chargeur de voiture Câble USB
25

Per ottenere le prestazioni migliori dal DVR per auto, leggere attentamente tutte le istruzioni prima dell'uso.
Nota: 1. Rispettare rigorosamente tutte le normative vigenti.
2. Inserire la scheda di memoria prima di registrare un video. assicurandosi di inserirla nella direzione corretta per evitare di danneggiare la scheda stessa o il dispositivo.
3. Per evitare una possibile perdita dei file, trasferirli su un computer.
4. Dopo l'installazione, controllare che la ventosa funzioni correttamente.
5. La capacità della batteria diminuisce con il passare del tempo. Caricare la batteria prima dell'uso.
6. Non lasciare il prodotto in ambienti umidi in quanto non è impermeabile.
7. Non scattare le foto alla luce solare diretta; ciò potrebbe danneggiare l'obiettivo.
8. Non utilizzare la videocamera in ambienti eccessivamente polverosi. Pulire regolarmente l'obiettivo.
9. Il presente prodotto è un dispositivo elettronico di precisione; non sottoporlo a vibrazioni o impatti eccessivi e non utilizzarlo in ambienti con un forte campo magnetico.
26

A. Controlli e componenti
1. Raccordo per treppiede
2. Porta USB 3. Ripristino 4. Slot scheda TF 5. Altoparlante 6. LED indicatore di stato 7. Spia LED di carica 8. Pulsante On/Off
9. Pulsante Modalità 10. Pulsante Menu 11. Display LCD 12. Pulsanti giù 13. Pulsante di
registrazione 14. Pulsante su 15. Obiettivo
27

B. Caratteristiche del prodotto 1. Supporta 1080p, 720p, 480p e diversi formati video, effetti immagine di alta qualità
2. Microfono/altoparlante integrato
3. Registrazione rapida
4. Screensaver rapido
5. Supporta schede TF ad alta capacità
6. Caricamento batterie durante registrazione video, video in loop e video continuo
7. Avvio automatico della funzione video con il motore al minimo, spegnimento automatico della funzione di video timelapse dopo 5 secondi.
8. Rilevamento movimento
9. File contenenti i dati SOS e G_SENSOR resi incancellabili ai fini della preservazione delle prove
C. Funzionamento 1. Accensione e spegnimento:
A) Premere il pulsante ON/OFF; il DVR entrerà automaticamente in modalità video e comincerà la registrazione mentre la spia LED lampeggerà con luce verde. Se connesso al caricabatteria dell'auto, il DVR entrerà automaticamente in modalità video e, una volta avviato il motore, comincerà a registrare. Si spegnerà automaticamente e salverà il file video 5 secondi dopo aver spento il motore.
Se non è stata inserita una scheda TF, sul display LCD apparirà "no card". Inserire una scheda TF dopo aver spento il dispositivo.
B) Premere e tenere premuto il pulsante ON/OFF per spegnere DVR.
Se il livello della batteria è troppo basso, il DVR salverà il file video e si spegnerà automaticamente.
2. Caricamento della batteria
È possibile caricare la batteria in due modi:
1) utilizzando il caricatore USB
2) con il caricatore per auto
Il LED rosso si accende durante il caricamento, per poi spegnersi appena la batteria è completamente carica.
3. Inserimento della scheda di memoria
Inserire una scheda di memoria spingendola nella direzione indicata dalle frecce fino a quando si sente un clic.
4. Registrazione video
Premere il pulsante ON/OFF per registrare immediatamente un video; la spia verde lampeggerà. Premere il pulsante REC per terminare la registrazione e salvare il file; il DVR entrerà nella modalità standby. Premere il pulsante REC per avviare la registrazione, premerlo di nuovo per terminare la registrazione. Premere il pulsante MODE per azzerare il suono e registrare solo le immagini in modalità video. Premere il pulsante SU per accendere o spegnere il display LCD per risparmiare energia.
5. Fotografie
Premere il pulsante MODE per accedere alla modalità Foto, poi premere il pulsante REC per scattare una fotografia. Premere il tasto SU per attivare o disattivare la visione notturna.
6. Riproduzione ed eliminazione dei file
In modalità standby, premere il pulsante MODE per accedere alla modalità di riproduzione. Premere i pulsanti SU/GIÙ per selezionare l'anteprima, premere il pulsante REC per avviare o interrompere la riproduzione di un file.
28
Per cancellare un file, premere il pulsante MENU per accedere al menu Delete, poi premere di nuovo il pulsante per selezionare l'opzione "Delete current" o "Delete all". Confermare premendo il pulsante REC e poi premere il pulsante MENU per uscire dal menu Delete e tornare alla modalità di riproduzione.
7. Funzione SOS
Nella modalità di registrazione video, premere il pulsante MENU per forzare il salvataggio del file e prevenire l'eliminazione di informazioni importanti. Metodo di salvataggio obbligatorio: durante i primi 10 secondi del corrente video, premere il pulsante MENU per forzare il salvataggio del segmento corrente e di quello precedente; durante gli ultimi 10 secondi del video, premere il pulsante MENU per forzare il salvataggio del segmento corrente e di quello successivo; nel video corrente, tra i primi 10 e gli ultimi 10 secondi, premere il pulsante MENU per forzare il salvataggio del file corrente.
8. Funzione G_SENSOR
Nella modalità di registrazione video, se l'auto frena improvvisamente o si verifica un impatto, l'accelerometro forza il salvataggio del file corrente per impedire che informazioni importanti siano eliminate. La sensibilità può essere impostata come alta, media o bassa. L'archiviazione è simile al metodo di archiviazione per l'SOS G_SENSOR.
9. Rilevamento movimento
Nella modalità video standby, premere il pulsante GIÙ quando oggetti in movimento vengono rilevati per avviare la registrazione video. La funzione sarà disattivata se entro 5 secondi nessun oggetto in movimento entra nell'aria di rilevamento dei movimenti.
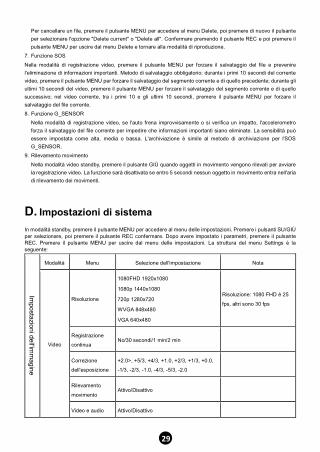
D. Impostazioni di sistema In modalità standby, premere il pulsante MENU per accedere al menu delle impostazioni. Premere i pulsanti SU/GIÙ per selezionare, poi premere il pulsante REC confermare. Dopo avere impostato i parametri, premere il pulsante REC. Premere il pulsante MENU per uscire dal menu delle impostazioni. La struttura del menu Settings è la seguente:
Impostazioni dell'im
magine
Modalità Menu Selezione dell'impostazione Nota
Video
Risoluzione
1080FHD 1920x1080
1080p 1440x1080
720p 1280x720
WVGA 848x480
VGA 640x480
Risoluzione: 1080 FHD è 25
fps, altri sono 30 fps
Registrazione
continua No/30 secondi/1 min/2 min
Correzione
dell'esposizione
+2.0>, +5/3, +4/3, +1.0, +2/3, +1/3, +0.0,
-1/3, -2/3, -1.0, -4/3, -5/3, -2.0
Rilevamento
movimento Attivo/Disattivo
Video e audio Attivo/Disattivo
29

Foto
Etichetta data Attivo/Disattivo
Modalità REG Scatto singolo / timer 2 secondi / timer 5
secondi / timer 10 secondi È possibile impostare il tempo
Risoluzione
12 M 4032 x 3024 / 10 M 3648 x 2736
8 M 3264 x 2448/ 5 M 2592 x 1944
3 M 2048 x 1536 / 2 M 1920 x 1080
VGA 640 x 480 / 1,3 M 1280 x 960
Quanto maggiore è il numero
di pixel, tanto più grande è la
dimensione del file.
Scatti in
sequenza Attivo/Disattivo
Qualità
dell'immagine Alta qualità / standard / ridotta
Nitidezza Forte / standard /soffice Può modificare gli effetti
dell'immagine
Bilanciamento del
bianco
Auto / Luce diurna / Nuvoloso / Lampada al
tungsteno / Lampada fluorescente
Può modificare gli effetti
dell'immagine
Colore Colore / bianco e nero / seppia Può modificare gli effetti
dell'immagine
ISO Auto/100/200/400 Può modificare gli effetti
dell'immagine
Correzione
dell'esposizione
+0.0, -1/3, -2/3, -1.0 , -4/3, -5/3 , -2.0, +2.0,
+5/3, +4/3, +1.0, +2/3, +1/3
Può modificare la luminosità e
gli effetti dell'immagine
Stabilizzatore Attivo/Disattivo
Visualizzazione
rapida No/2 secondi/5 secondi/
Etichetta data No, Data, Data/ora
Riproduzio
ne
Annulla Elimina corrente / Elimina tutti
Protezione Blocca corrente / Sblocca corrente / Blocca
tutti / Sblocca tutti
Presentazione 2 secondi/5 secondi /8 secondi
Impostazioni di Data/Ora MM/GG/AA, GG/MM/AA, AA/MM/GG
30

sistema Spegnimento
automatico no/1 min/3 min
Suono tasti Attivo/Disattivo
Luce di
riempimento Attivo/Disattivo
Usare il pulsante SU per
attivare o disattivare
Lingua
English/Français/Español/Português/Deut
sch/Italiano/简体中文/繁體中文/Русский
язык/日本語/한국어
Modalità TV NTSC/PAL
Frequenza ottica 50Hz/60Hz
Formattazione Scheda SD
Impostazioni
predefinite
Ripristino delle impostazioni predefinite /
Annulla / OK
Spegnimento
automatico
schermo
NO/1 min/2 min/5 min Usare il pulsante SU per
attivare o disattivare
Visione G-Sensor No/bassa / media / alta
E. Connessione a un computer Download di file video e audio 1. Dopo aver collegato il cavo USB al computer, il LED di stato rosso della videocamera si accenderà e sullo
schermo appariranno le opzioni del menu di impostazione: scheda di memoria/ PICTBRIDGE / webcam.
2. Dopo avere selezionato la scheda di memoria, lo schermo di spegnerà e il computer identificherà automaticamente la videocamera come "disco rimovibile".
3. Utilizzare il computer per navigare e gestire i file.
4. Selezionando PICTBRIDGE e possibile stampare i file dalla scheda TF.
5. Selezionando webcam, la videocamera può essere utilizzata per i servizi di messaggistica istantanea con video. Al termine, premere il pulsante ON/OFF e scollegare il cavo USB: la videocamera si spegnerà automaticamente.
6. Se il cavo dati o il caricatore per auto è collegato, il LED di stato emette una luce rossa che si spegnerà quando la batteria è completamente caricata.
Nota: In caso di malfunzionamento, premere e tenere premuto il pulsante ON/OFF per 5 secondi per spegnere il dispositivo. Premere il pulsante RESET e poi riaccendere la videocamera che desso dovrebbe funzionare correttamente.
31

F. Specifiche tecniche
Schermo Schermo TFT da 2"
Pixel 1,2 M
Obiettivo Obiettivo HD con grandangolo a 120 gradi
Rotazione videocamera
180 gradi
Illuminazione minima 1LUX
Risoluzione video 1080 P/720 P/480 P
Formato Video AVI /MJPG
Fotogrammi 30 fps
Risoluzione immagine
12 M/10 M/8 M/5 M/3 M/2 M/VGA/1,3 M
Formato foto JPG
Rilevamento movimento
Supportato
Registrazione continua
No/30 s/1 min/2 min
Scheda di memoria Scheda TF
Capacità Capacità massima supportata 32 GB
Porta USB USB2.0
Porta di alimentazione
USB5V/500mA
Frequenza corrente 50 Hz/60 Hz
Capacità batteria 350 mAh
Microfono/Altoparlante
Integrato
Lingua English/Deutsch/Français/Español/Italiano/简体中文/繁體中文/日本語
/Português/Русский язык/한국어
Nota: Le specifiche tecniche sono soggette a modifica senza preavviso.
32

G. Accessori:
Il seguente elenco di accessori è fornito solo a titolo indicativo. Ci riserviamo il diritto di
modificare gli accessori.
BDK-611 Ventosa Manuale
Caricabatteria da auto Cavo USB
33

Subject to changes without prior notice!