model s600 digital sound level meter - home - anaheim ... hold button press max/min button to enter...
TRANSCRIPT

Model S600 Digital Sound Level Meter

2
anaheimscientific.com Technical data subject to change without notice ©Anaheim Scientific 2013. 20130718
Table of Contents 1 INTRODUCTION ............................................................................... 3 2 SAFETY SUMMARY ......................................................................... 3 3 COMPLIANCE STATEMENTS ......................................................... 5 4 PRODUCT CONTENTS AND INSPECTION .................................... 5 5 DEVICE DESCRIPTION ................................................................... 7
5.1 Parts and Description ................................................................. 7 5.2 LCD Description ......................................................................... 9
6 DEVICE OPERATION ....................................................................... 9 6.1 Preparations ............................................................................... 9 6.2 Making Measurements ............................................................. 10 6.3 Calibration Procedures ............................................................. 11
7 SPECIFICATIONS .......................................................................... 12 8 SERVICE, REPAIRS, CALIBRATION ............................................ 13 9 LIMITED TWO-YEAR WARRANTY ............................................... 15

3
anaheimscientific.com Technical data subject to change without notice ©Anaheim Scientific 2013. 20130718
1 Introduction
Thank you for purchasing the S600 Digital Sound Level Meter from Anaheim Scientific. The S600 is a handheld Class 2 Sound Meter that features: • A/C Frequency Weighting • 4 digit LCD Display • MAX/MIN Value Display • Data Hold • Resolution: 0.1dB • Accuracy: ±1.5dB • Range: 30 – 130 dB (Auto Range)
2 Safety Summary
CAUTION Adhere to the following conditions for safe and effective usage of this meter
• Do not operate the meter in an environment filled
with combustible gas, liquids, dust or fibers
4
anaheimscientific.com Technical data subject to change without notice ©Anaheim Scientific 2013. 20130718
• In order to avoid reading incorrect data, please replace the battery immediately when the symbol “ " appears on the LCD
• In order to avoid damage caused by contamination or static electricity, do not touch the circuit board before taking adequate precautions
• Operating Environment: This instrument has been designed for usage within an environment of Pollution Degree 2
• Operation altitude: Up to 2000M • Operation temperature & humidity: 5°C~40°C,
below 80%RH • Storage temperature&humidity: -10°C ~60°C,
below 70%RH • Avoid shaking the meter, particularly while in operation.
• Keep microphone dry. • For cleaning the instrument use a soft dry cloth.
Never use a wet cloth, solvents or water, etc. • When the meter is not in use, please take out the
battery and keep the instrument in a low humidity environment.
• Weather conditions outside the specified limits and improper handling may adversely affect the accuracy and function of the meter.

5
anaheimscientific.com Technical data subject to change without notice ©Anaheim Scientific 2013. 20130718
3 Compliance Statements
This unit conforms to the following standards: • IEC 61672-1 Class 2 • IEC651 Type2 • ANSI S1.4 Type2 for Sound Level Meters
Caution: This symbol indicates that the equipment and its accessories are subject to special collection and disposal procedures
4 Product Contents and Inspection
This unit is tested prior to shipment. It is therefore ready for immediate use upon receipt. An initial physical inspection should be made to ensure that no damage has been sustained during shipment. Inspect the packing box on receipt for any external damage. If any external damage is evident, remove the instrument and visually inspect its case and parts for any damage. If damage to the instrument is evident, a description of the damage should be noted on the carrier’s receipt and signed by the driver or carrier agent. Save all shipping packaging for inspection.

6
anaheimscientific.com Technical data subject to change without notice ©Anaheim Scientific 2013. 20130718
Forward a report of any damage to the agent through which the unit is procured. Retain the original packing in case subsequent repackaging for return is required. Use of the original packing is essential. After the mechanical inspection, verify the contents of the shipment. The items included in this package are:
• S600 Meter • User manual • 9V battery • Carrying case • Windscreen

7
anaheimscientific.com Technical data subject to change without notice ©Anaheim Scientific 2013. 20130718
5 Device Description
5.1 Parts and Description
1. Windscreen. If you operate at wind speed over 10m/sec, please put protective accessories-windscreen in front of the microphone.
2. Display 3. Power button.
Press the key for 1 sec. to turn the sound level meter ON or OFF. The auto power-off will engage automatically after 5 minutes of idle time
1. Windscreen 2. Display 3. DATA HOLD
button 4. Frequency
weighting select button
5. Time weighting select button
6. Max/Min hold button
7. Backlight button 8. Power button 9. Microphone 10. Battery Cover 11. Tripod socket

8
anaheimscientific.com Technical data subject to change without notice ©Anaheim Scientific 2013. 20130718
4. MAX/MIN hold button Press MAX/MIN button to enter the maximum and minimum recording mode. Press once to select MAX value. Press again to select MIN value. Press again to exit the MAX/MIN mode.
5. Frequency Weighting selection button. A: A-Weighting. For general sound level measurements. C:C-Weighting. For checking the low-frequency content of noise.(If the C-Weighted level is much higher than the A-weighted level, then there is a large amount of low-frequency noise)
6. Time weighting select button. FAST: For normal measurements. SLOW: For checking average level of fluctuation noise.
7. HOLD button. The reading data shown on LCD can be locked while pressing the button.
8. Backlight button. Press the button you enable the display backlight to easy readings in dark environments. Press more than 1 second to disable backlight, which however it automatically OFF after 15 seconds.
9. Microphone 1/2 inch Electret Condenser microphone.
10. Battery cover
9
anaheimscientific.com Technical data subject to change without notice ©Anaheim Scientific 2013. 20130718
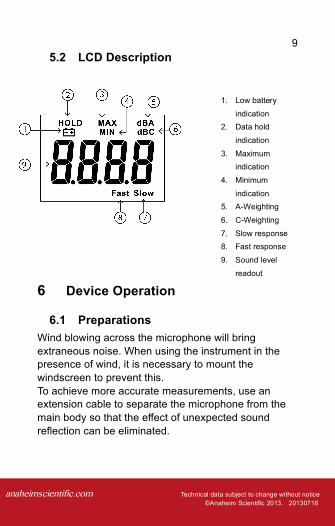
5.2 LCD Description
6 Device Operation
6.1 Preparations Wind blowing across the microphone will bring extraneous noise. When using the instrument in the presence of wind, it is necessary to mount the windscreen to prevent this. To achieve more accurate measurements, use an extension cable to separate the microphone from the main body so that the effect of unexpected sound reflection can be eliminated.
1. Low battery
indication 2. Data hold
indication
3. Maximum indication
4. Minimum
indication 5. A-Weighting
6. C-Weighting
7. Slow response 8. Fast response
9. Sound level
readout
10
anaheimscientific.com Technical data subject to change without notice ©Anaheim Scientific 2013. 20130718
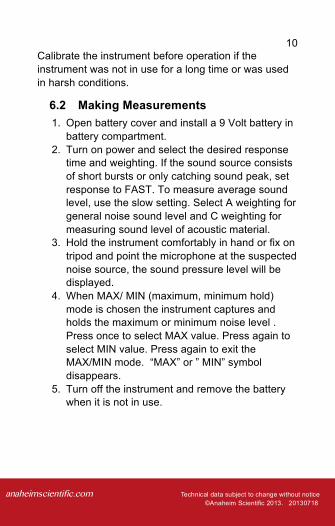
Calibrate the instrument before operation if the instrument was not in use for a long time or was used in harsh conditions.
6.2 Making Measurements 1. Open battery cover and install a 9 Volt battery in
battery compartment. 2. Turn on power and select the desired response
time and weighting. If the sound source consists of short bursts or only catching sound peak, set response to FAST. To measure average sound level, use the slow setting. Select A weighting for general noise sound level and C weighting for measuring sound level of acoustic material.
3. Hold the instrument comfortably in hand or fix on tripod and point the microphone at the suspected noise source, the sound pressure level will be displayed.
4. When MAX/ MIN (maximum, minimum hold) mode is chosen the instrument captures and holds the maximum or minimum noise level . Press once to select MAX value. Press again to select MIN value. Press again to exit the MAX/MIN mode. “MAX” or ” MIN” symbol disappears.
5. Turn off the instrument and remove the battery when it is not in use.
11
anaheimscientific.com Technical data subject to change without notice ©Anaheim Scientific 2013. 20130718
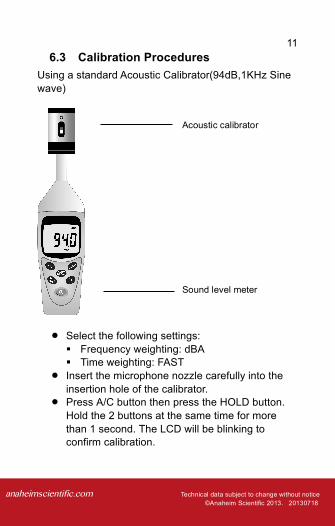
6.3 Calibration Procedures Using a standard Acoustic Calibrator(94dB,1KHz Sine wave)
• Select the following settings: Frequency weighting: dBA Time weighting: FAST
• Insert the microphone nozzle carefully into the insertion hole of the calibrator.
• Press A/C button then press the HOLD button. Hold the 2 buttons at the same time for more than 1 second. The LCD will be blinking to confirm calibration.
Acoustic calibrator
Sound level meter

12
anaheimscientific.com Technical data subject to change without notice ©Anaheim Scientific 2013. 20130718
• When the LCD has blinked, release the A/C and the HOLD buttons. The sound level meter will display 94.0 dBA . The calibration is complete.
• The 94 dB calibration process can be repeated until the meter reads 94.0 dB.
• Recalibration cycle: 1 year.
7 Specifications
Display 4 digits LCD Resolution 0.1dB Display Update 0.5 sec Frequency range 31.5Hz~8KHz Measuring level range
A Weighting 30 ~130dB C Weighting 35~130dB
Frequency weighting A/C Microphone 1/2 inch electret condenser
microphone Time weighting FAST(125mS), SLOW(1 sec) Level ranges 30 ~130dB(Auto Range) Accuracy ±1.5dB Dynamic range 50dB Power Supply 9V battery Power Life About 50 hours (alkaline Battery) Dimensions 200mm(L) x 55mm(W) x 38mm(H) Weight About 170g (Including batteries)

13
anaheimscientific.com Technical data subject to change without notice ©Anaheim Scientific 2013. 20130718
8 Service, Repairs, Calibration
• The following are instructions regarding policies for servicing, repairing or calibrating Anaheim Scientific products. Turnaround time is usually less than ten (10) working days unless expedited service is requested and pre-arranged.
• Send an email to [email protected] requesting an RMA number specifying your request for either service/repair and/or calibration with your product’s model number.
• Once you receive a reply from [email protected], you will be asked to ship prepaid to the address below. Package the unit carefully using filler or bubble wrap, and if possible, ship in the original box. Ship each unit separately. (Anaheim Scientific is not responsible for any shipping damage that may occur.)
• Include a packing list with each unit shipped stating what type of service is required and include the return shipping information: name, address and telephone number.
• If the unit is in warranty, please provide the following: proof of purchase or copy of the original invoice.
• If the unit is out of warranty, prepayment is required by Check, Money Order or Credit Card.
• Return all merchandise to Anaheim Scientific with pre-paid shipping. The flat-rate repair charge for Non-Warranty Service does not include return
14
anaheimscientific.com Technical data subject to change without notice ©Anaheim Scientific 2013. 20130718
shipping. Return shipping to locations in North American is included for Warranty Service.
• For overnight shipments and non-North American shipping fees please contact Anaheim Scientific
Anaheim Scientific
ATTN: Service/Repair 22820 Savi Ranch Parkway
Yorba Linda, CA 92887
www.anaheimscientific.com
15
anaheimscientific.com Technical data subject to change without notice ©Anaheim Scientific 2013. 20130718
9 Limited Two-Year Warranty
• Scientific warrants to the original purchaser that its products and the component parts thereof, will be free from defects in workmanship and materials for a period of two years from date of purchase.
• Anaheim Scientific will, without charge, repair or replace, at its option, defective product or component parts. Returned product must be accompanied by proof of the purchase date in the form of a sales receipt.
• To help us better serve you, please complete the warranty registration for your new instrument via our website www.anaheimscientific.com
• Exclusions: This warranty does not apply in the event of misuse or abuse of the product or as a result of unauthorized alterations or repairs. The warranty is void if the serial number is altered, defaced or removed.
• Anaheim Scientific shall not be liable for any consequential damages, including without limitation damages resulting from loss of use. Some states do not allow limitations of incidental or consequential damages. So the above limitation or exclusion may not apply to you.
• This warranty gives you specific rights and you may have other rights, which vary from state-to-state.

16
anaheimscientific.com Technical data subject to change without notice ©Anaheim Scientific 2013. 20130718
22820 Savi Ranch Parkway Yorba Linda, CA 92887
www.anaheimscientific.com
© 2013 Anaheim Scientific