user manual - home - bissett fasteners
TRANSCRIPT

USER MANUALSAFETY/OPERATIONMAINTENANCE/TROUBLESHOOTING
Located on the tool housing are the model and serial numbers of your tool, please record these.
Model Number:
EC Machinery directive – EN 792-13 ANSI SNT — 101
Serial Number:
IMPROPER AND UNSAFE USE OF THIS TOOL MAY RESULT IN DEATH OR SERIOUS INJURY. IT IS VERY IMPORTANT THAT THE INTENDED OPERATOR OF THIS TOOL READS AND UNDERSTANDS THIS MANUAL BEFORE OPERATING THIS TOOL. KEEP THIS MANUAL AVAILABLE FOR OTHERS BEFORE THEY USE THE TOOL.
IMPORTANT:
BISSETTFASETENERS.CA
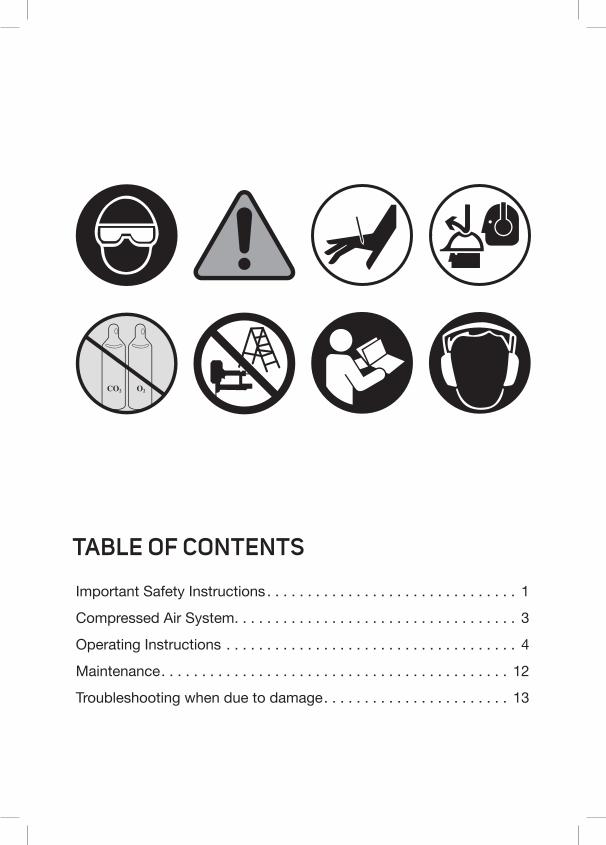
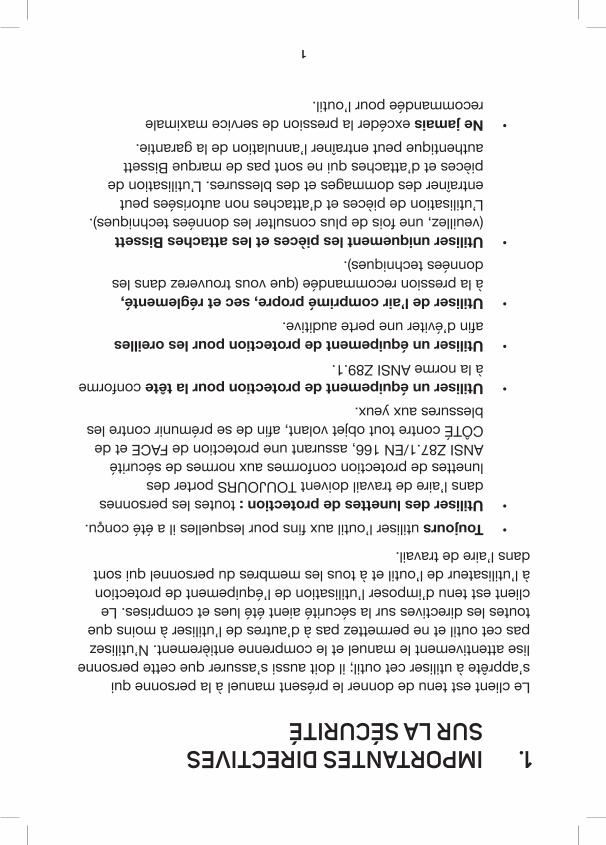
TABLE OF CONTENTS
Important Safety Instructions . . . . . . . . . . . . . . . . . . . . . . . . . . . . . . . 1
Compressed Air System. . . . . . . . . . . . . . . . . . . . . . . . . . . . . . . . . . . 3
Operating Instructions . . . . . . . . . . . . . . . . . . . . . . . . . . . . . . . . . . . . 4
Maintenance. . . . . . . . . . . . . . . . . . . . . . . . . . . . . . . . . . . . . . . . . . . 12
Troubleshooting when due to damage. . . . . . . . . . . . . . . . . . . . . . . 13
1. IMPORTANT SAFETY INSTRUCTIONS
It is the customer’s responsibility to give this manual to the person intending to operate this tool, and to make sure that it is read carefully and understood completely by that person. Do not use the tool or allow others to use the tool until all safety instructions have been read and understood. The customer is responsible for enforcing the use of safety protection equipment by the tool operator and all other personnel in the work area.
• Always use the tool only for the intended purpose for which it was designed.
• Use safety glasses: all persons in the work area must ALWAYS wear safety glasses complying with ANSI Z87.1/EN 166withFRONTandSIDEprotectionagainstflyingobjectinordertopreventeyeinjuries.
• Use head protection complying with ANSI Z89.1.• Use ear protection to prevent possible hearing loss.• Use clean dry regulated compressed air at the
recommended pressure (given in the technical data).• Use only Bissett parts and fasteners (refer also to the
technical data). Using unauthorized parts and fasteners may resultindamageandinjury.Theuseofnon-genuineBissettparts and fasteners may void your warranty.
• Never exceed the maximum recommended operating pressure of the tool.
• Never use oxygen, carbon dioxide, combustible gases or any bottled gas to operate the tool.
• Always disconnect the air supply when loading fasteners, doinganytoolmaintenance,cleaningajam,movingworklocations, leaving the work area or passing the tool.Do not assume that the tool is empty of fasteners.
• Always disconnect the tool from the air supply when not in use or when the tool is being left unattended.
1
• Regularly inspect the safety, the trigger and the springs for free unhindered movement, never use a tool that requires servicing.
• Connectthemalefreeflownippletothetoolsideoftheairsupply so that the tool is depressurized when disconnected from the hose. Never install female quick disconnect couplings on the tool, as this may trap air in the tool when disconnectedandresultinafastenerbeingfired.
• Never load fasteners with the triggering device depressed as thismayresultinafastenerbeingfired.
• Never carry the tool with the safety depressed as this may resultinafastenerbeingfired.
• Never tamper with, modify or permanently engage the triggering device.
• Never point the tool at yourself or at anyone else. The tool is not a toy. Do not engage in horseplay with the tool.
• Neverfireafastenerintoahard,brittlesurfacesuchasconcrete, steel or tiles.
• Do not drive fasteners too close to an edge or at too great an angleasthefastenermayflyfreeorricochetcausingpersonalinjuryanddamage.
• Always ensure that the work area is amply lit so as to avoid possibleaccidentscausedbyinsufficientlighting.
• Never remove, tamper with or otherwise cause the tools operating controls to become inoperable.
• Dress properly.Donotwearlooseclothingorjewelryastheycanbecaughtinmovingparts.Rubberglovesandnon-skidfootwear are recommended when working outdoors. Wear protective hair covering to contain long hair.
2
2. COMPRESSED AIR SYSTEM
Proper use of the tool requires an adequate quantity of clean dry compressed air.
All compressed air contains moisture and other contaminants that may be detrimental to the tool, so it is recommended to use an airsupplyfilterregulatorlubricatorasclosetothetoolaspossible(within4.5meters/15feet).Thefiltershouldbewellmaintainedsoasto ensure optimum performance and power. All parts of the air supply system should be clean and contaminant free.
The tool shall only be connected to a compressed air supply where the maximum allowable pressure of the tool cannot be exceeded by a factor of more than 10%. This can be achieved, for example, by a pressure reduction valve which includes a downstream safety valve.
Amalefree-flowcouplingshouldbeconnectedtothetoolsideofthe system with the female coupling providing a seal to prevent air loss from the compressor tank upon disconnection. Never connect a female disconnect coupling to the tool side as this may trap air in the tool when the air supply is disconnected, leaving the tool charged andcapableoffiringafastener.Donotmountaswivelconnectorinthe air supply line.
Differentworkpieceswillrequiredifferentoperatingpressures.Neverexceed the maximum recommended operating pressure of the tool as indicated on the tool.
Warning: Keep hands, body and loose clothing and jewelry away from the discharge area of the tool when connecting the air supply and always disconnect the tool before loading, servicing, adjusting, cleaning and when the tool is not in use.
3

3. OPERATING INSTRUCTIONS
3.1 LOADING FASTENERS
Refer also to the technical data.
3.1.1 SIDE LOADING MAGAZINE
Open the magazine cover, load the fasteners, and close the magazine.
3.1.2 REAR LOADING MAGAZINE
For 2 step type, slide the fasteners into the magazine and pull the pusher until it is behind the fasteners. Then release the pusher and ensure its proper engagement on the fasteners.
For 3 step type, pull the pusher to the back and keep it on the latch mechanism. Load the fasteners and release the pusher.
3.1.3 TOP LOADING MAGAZINE
Pull the pusher to the back of the magazine and keep it on the latch mechanism. Load the fasteners, then release the pusher and guide it to the fasteners. Never allow the pusher to snap back towards the fasteners as it will damage the pusher spring.
3.1.4 BOTTOM LOADING MAGAZINE
Push the release, catch and then slide back the magazine. Load the fasteners into the magazine cover. Then slide the magazine back closed.
Warning: Point away the nozzle when loading or unloading the fasteners. Always disconnect the air supply before loading fasteners.
4
3.2 GENERAL OPERATING INSTRUCTIONS
3.2.1 TYPES OF ACTUATING AND TRIGGERING SYSTEMS
FOR TOOLS WITHOUT A CONTACT SAFETY:
Single action actuation: The tool contains an actuating system where the triggering device has to be actuated for each driving operation.
Single action with simple safety: The tool contains a safety latch that is built into the triggering device enabling the user to disengage it when it is not in use.
FOR TOOLS WITH A CONTACT SAFETY INSTALLED:
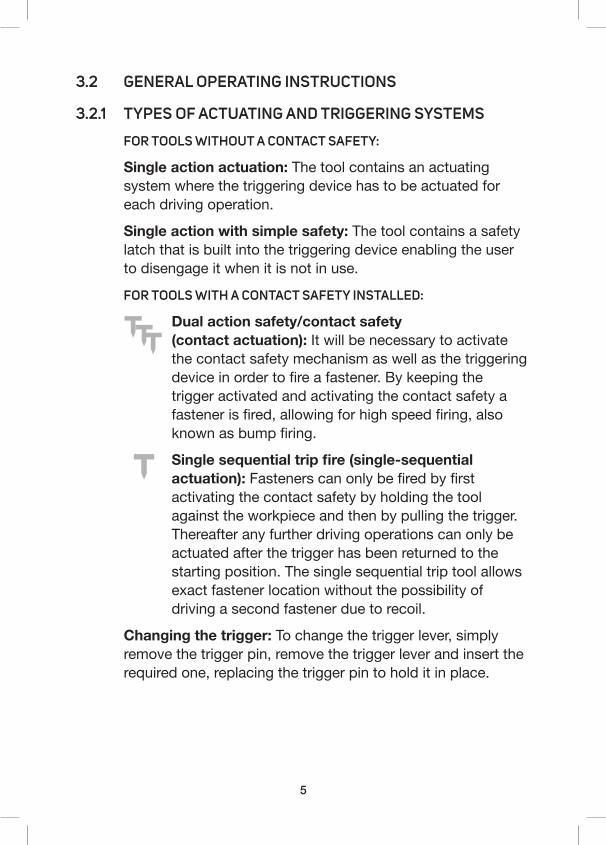
Dual action safety/contact safety (contact actuation): It will be necessary to activate the contact safety mechanism as well as the triggering deviceinordertofireafastener.Bykeepingthe trigger activated and activating the contact safety a fastenerisfired,allowingforhighspeedfiring,also knownasbumpfiring.
Single sequential trip fire (single-sequential actuation):Fastenerscanonlybefiredbyfirst activating the contact safety by holding the tool against the workpiece and then by pulling the trigger. Thereafter any further driving operations can only be actuated after the trigger has been returned to the starting position. The single sequential trip tool allows exact fastener location without the possibility of driving a second fastener due to recoil.
Changing the trigger: To change the trigger lever, simply remove the trigger pin, remove the trigger lever and insert the required one, replacing the trigger pin to hold it in place.
5
3.2.2 OPERATING PROCEDURES
Protective Equipment:Beforeusingthetoolalwaysensure that the user and those in the work area are using the appropriate personal protective equipment.
Firing a fastener:Tofireafastener,placethenoseofthetool against the workpiece and pull the trigger. If the tool has a contact safety it will be necessary to press the tool against the workpiece so as to activate the contact safety, before pullingthetriggertofireafastener.
Exhaust air: Each time a fastener is driven a blast of air is exhausted from the top front area of the tool. Keep your face clear of the exhaust area. Some tools incorporate a 360° exhaustdeflector,whichenablesyoutocontrolthedirection of the exhaust air.
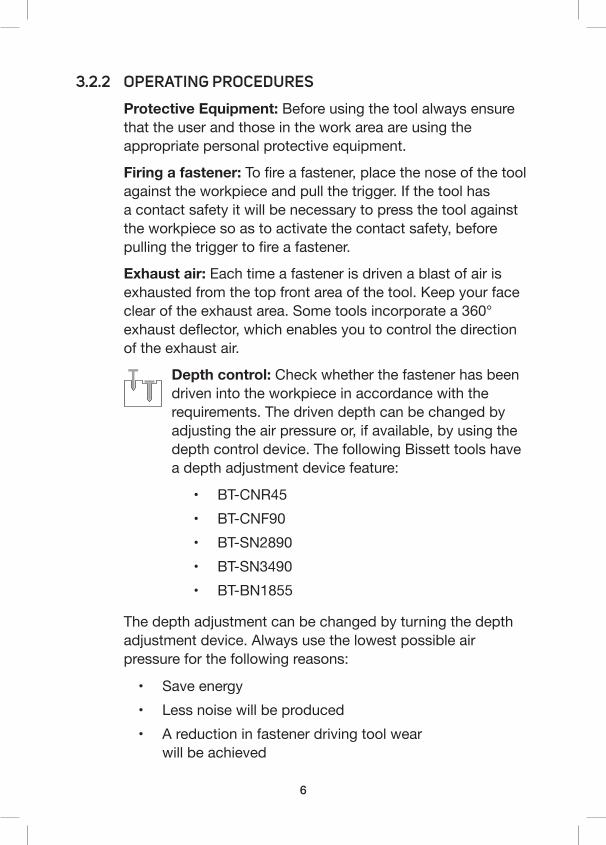
Depth control: Check whether the fastener has been driven into the workpiece in accordance with the requirements. The driven depth can be changed by adjustingtheairpressureor,ifavailable,byusingthe depthcontroldevice.ThefollowingBissetttoolshave adepthadjustmentdevicefeature:
Thedepthadjustmentcanbechangedbyturningthedepth adjustmentdevice.Alwaysusethelowestpossibleair pressureforthefollowingreasons:
• BT-CNR45• BT-CNF90• BT-SN2890• BT-SN3490• BT-BN1855
• Save energy• Less noise will be produced• A reduction in fastener driving tool wear
will be achieved
6
If any unusual, defective, or improper functioning occurs, disconnect the tool immediately from the compressed air supply before inspecting the tool.
Cold weather tested:ThefollowingBissettToolsareratedfor usageintemperaturesaslowas-30DegreesCelsius.
• BT-CNR45• BT-CNF90• BT-SN2890• BT-SN3490• BT-MCN38• BT-MCN65
• BT-BN1855
Cold weather care & operation: Do not store the tool in a cold weather environment. Keep the tool in a warm and dry area until beginning the work. If the tool is already cold, bring it into a warm area and allow the tool to warm up before use. Do not use the tool in cold weather conditions for extended periods of time.
LED light: The following tool(s) are equipped with an LED light.Thelightmustbemanuallyturnedonoroffwhen needed. The battery is not covered by warranty.
3.3 PRECAUTIONARY MEASURES
“Respect your tool and never engage in horseplay.”
3.3.1 ACTUATION SYSTEMS
Refer to 3.2.1 and 3.2.2.
3.3.2 FLAMMABLE ATMOSPHERES
Do not operate the tool in explosive atmospheres, such asinthepresenceofflammableliquids,bottledairorgases, or combustible dust.
7
3.3.3 TOOL MODIFICATION
Thetoolmustnotbemodifiedinanyway.Nevertamperwith or disable the trigger so that it is set in an operating position, asthismaycauseafastenertofireatanytime.
3.3.4 TOOL MAINTENANCE
The tool must be inspected regularly to ensure safe and proper usage. Refer to the tool maintenance instructions for detailed information on the proper maintenance of the tool.
3.3.5 RECOMMENDED FASTENERS AND ACCESSORIES
UseonlyBissettpartsandfasteners.Usingunauthorized partsandfastenersmayresultindamageandinjury.The useofnon-genuineBissettpartsandfastenersmayvoid your warranty.
3.3.6 PERSONAL PROTECTIVE EQUIPMENT
Appropriate personal protective equipment must be worn.
3.3.7 INSPECT THE TOOL BEFORE OPERATING
Beforeeachuse,inspectthetooltoensurethatitisinproper working order. Check for misalignment or binding of moving partsandanyotherconditionthatmayaffecttooloperation.
• Eye protection: Warning: Eye protection must be worn by the operator and other people in the work area. Warning: It is the customer’s responsibility to provide and enforce the use of eye protection by the operator and other people in the work area.
• Hearing protection: Warning: Hearing protection must be worn by the operator and other people in the work area. Warning: It is the customer’s responsibility to provide and enforce the use of hearing protection by the operator and other people in the work area.
8
3.3.9 OPERATING CONTROLS
• Do not use a tool with missing or damaged safety warning label(s).
• A tool that is not in proper working order must not be used.
• Do not remove, tamper with, or otherwise cause tool operating controls to become inoperable.
• Do not operate the tool if any portion of the tool operating controls is inoperable, disconnected, altered, or not working properly.
• Only persons who have read and understood the tool operating/safety instructions should operate the tool. It is the customer’s responsibility to give this manual to the person intending to operate the tool, and to make sure that it is read carefully and understood completely by that person.
• Never assume that the tool is empty of fasteners.• Never point the tool at yourself or at anyone else.
The tool is not a toy. Do not engage in horseplay with the tool.
• Keep bystanders and children away while operating the tool.
• Donotactuatethetoolunlessthetoolisplacedfirmlyagainst the workpiece.
• Stay alert, focus on your work and use common sense when working with tools.
Select the appropriate air pressure determined by the type of fastener used, the workpiece, and other conditions of use. Never exceed the maximum recommended operating air pressure of this the tool. If a regulator fails, the pressure delivered to a tool must not exceed 1.5 times the maximum air pressure or 200 psi (13.8 bar), whichever is greater.
3.3.8 OPERATING CONTROLS
9
• Do not use the tool while tired, after having consumed drugs or alcohol, or while under the influenceofmedication.
• Do not overreach. Keep proper footing and balance at all times.
• Donotholdorcarrythetoolwithafingeronthetrigger.• Drive fasteners into proper workpieces only.• Do not drive fasteners into other fasteners.• After driving a fastener, the tool may spring back
(“recoil”) causing it to move away from the workpiece. Toreduceriskofinjuringalwaysmanagerecoilby:
• When working close to the edge of a workpiece or at steep angles use care to minimize chipping, splitting or splintering,orfreeflightorricochetoffasteners,whichmaycauseinjury.
• Keep hands and body away from fastener discharge area of tool.
• Do not load the tool with fasteners while attached to the air supply, or when any one of the operating controls is activated.
• Do not operate the tool with any air supply other than thatspecifiedinthetooloperating/safetyinstructions.
» Always maintaining control of the tool. » Allowing recoil to occur by allowing the tool to
move away from workpiece and not resisting the recoil such that the tool will be forced back into the workpiece. In “Contact Actuation Mode”, if the toolisallowedtore-contacttheworkpiecebeforethe trigger is released, an unintended discharge of a fastener will occur.
» Keeping face and body parts away from tool.
10
• Loading fasteners• The tool is not in use• Performing any maintenance or repairs• Clearingajam• Elevating, lowering or otherwise moving the tool to
a new location• The tool is outside of the operator’s supervision or
control or• Removing fasteners from the magazine
3.3.10 DISCONNECTING THE TOOL
Alwaysdisconnectthetoolfromtheairsupplywhen:
• Operate the tool only within the recommended operating air pressure range. Never exceed the maximum recommended operating pressure of the tool.
• Use extra caution when driving fasteners into existing walls or other blind areas to prevent contact with hidden objectsorpersonsontheotherside(e.g.,wires,pipes).
• Do not lift, pull or lower the tool by the hose.
11
4. MAINTENANCE“Clean and inspect your tool every time you use it.”
4.1 TOOL MAINTENANCE
The customer is responsible for assuring that the tool is kept in safe working order. Furthermore, only service personnel trained by the manufacturer or distributor shall repair the tool andshallonlyuseBissettpartsandaccessories.
Caution: Always disconnect the tool from the air supply before commencing any cleaning, inspection, or maintenance work.
• Wipe the tool clean and inspect tool for wear or damage.Usenon-flammablecleaningsolutionstowipethe tool. Never soak the tool in these solutions as they can cause internal damage.
• Always ensure that all screws are kept tight as loose screwscancauseinjuryorcandamagethetool.
• Toolsrequiringlubricant:Ifthetoolisusedwithoutanin-linelubricant,besuretoputinabout5dropsoflubricant at the start of each workday and 3 drops for every1,000fastenersfiredthereafter.
• ToolsshallberepairedorequippedonlywithBissettparts or accessories.
• Never use the tool if there is any doubt that it is not in safe working order.
• Always use pneumatic tool oil or pneumatic gun oil —do not use air tool oil.
4.2 TOOL STORAGE
Storage: When not in use for an extended period, apply a thin coat of the lubricant to the steel parts of the tool to avoid rust. Make sure the tool is dry before storing. Do not store the tool in a cold weather environment. When not in use, the tool from children.
12
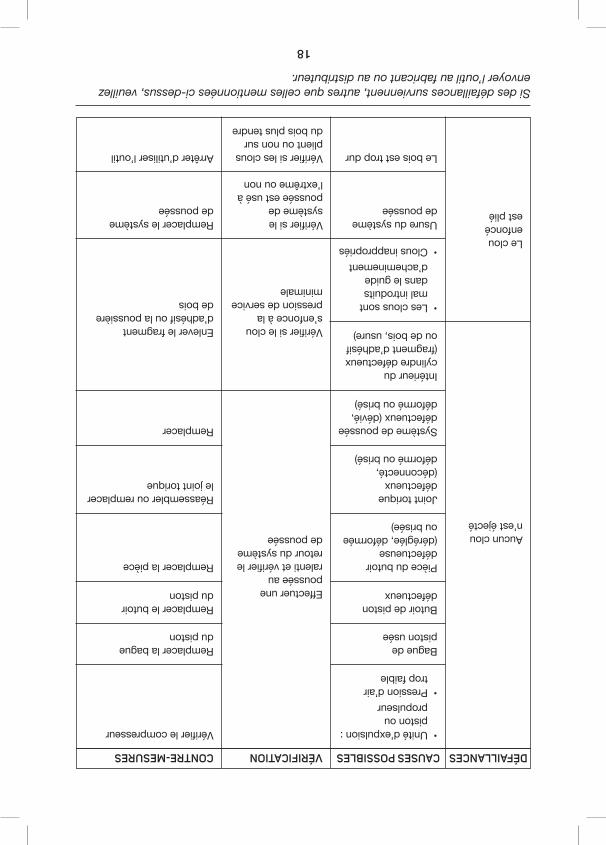
5. TROUBLESHOOTING AND COUNTERMEASUREMENTS
FAILURE POSSIBLE CAUSES CHECK METHOD COUNTERMEASURES
No nail ejected
Adhesive fragment or wood dust sticking on the magazine or nail feeder
Check if recommended nails are loaded.
Check for abnormalities of the nail feeding portion(deflected,worn, deformed, and or broken)
Check push lever movement
Replace
Remove adhesive fragment or wood dust
• Use recommended nails• Remove abnormal nails
and load normal nails
• Repair deformed parts• Replace defective parts
Push lever
Nail
Magazine Unit
• Incorrect nails are loaded
• Abnormal nails are loaded (large-sizedhead,bent incorrectly, chained, etc.)
• Push lever• Defective nail feeder(deflected,bent, or broken)
• Defective feed spring (worn or broken)
• Narrow or wide width of the magazine groove
• Worn nail head supporting the portion of the magazine
• Abnormal nail guide groove ofBladeGuide(deflected,deformed, or broken)
13
FAILURE POSSIBLE CAUSES CHECK METHOD COUNTERMEASURES
No nail ejected
The driven nail is bent
Carry out idle driving and check the return of the driver blade
Check for abnormalities of the nail feeding portion(deflected,worn, deformed, and or broken)
Check if the nailer drives at minimum operating pressure
Check if the driver blade is extremely worn or not
Check if the nails bend on softer wood or not
Check compressor
Replace piston ring
Replace the piston bumper
Replace the piece
Reassemble or replace theO-ring
Replace
Remove adhesive fragment or wood dust
Remove the adhesive fragment or wood dust
Repair the driver blade
Stop using the tool
Worn driver blade
The wood is too hard
• Outputunit: piston or driver
• Air pressure too low
Worn piston ring
Defective piston bumper
Defective bumper piece (defective, deformed, or broken)
DefectiveO-ring(disconnected, deformed, or broken)
Defective driver blade(deflected,deformed, or broken)
Defective inside cylinder (adhesive or wood fragment, worn)
• Nails are inaccurately fed into the BladeGuide
• Incorrect nails are loaded
14
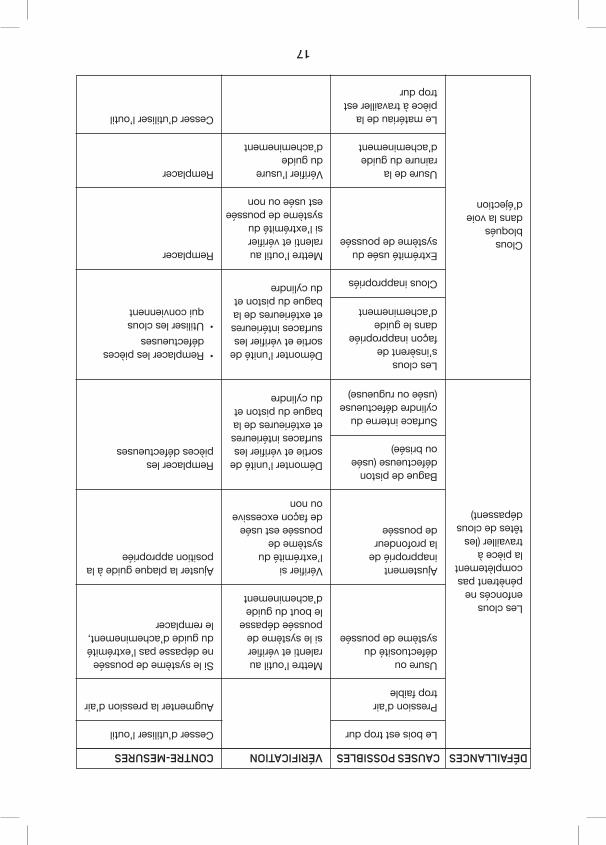
FAILURE POSSIBLE CAUSES CHECK METHOD COUNTERMEASURES
The driven nails do not fully penetrate the work piece (heads protrude)
Nails clog within the ejectinggate
Carry out idle driving and check if the driver blade protrudes from the blade guide nose
Check if the tip of the driver blade is excessively worn or not
Check the wear of the blade guide
Stop using the tool
Adjusttheairpressure
If the driver blade does not protrude from the blade guide replace
Adjusttheguideplatetothe appropriate position
Replace the defective parts
• Replace the defective parts
• Use designated nails
Replace
Replace
Stop using the tool
Worn guide groove of the blade guide
Workpiece material is too hard
The wood is too hard
Air pressure too low
Worn or broken driver blade
Incorrect driving depthadjustement
Defective piston ring (worn or broken)
Disassemble the output unit and check the inside and outside surfaces of the piston ring and cylinder
Disassemble the output unit and check the inside and outside surfaces of the piston ring and cylinder
Carry out idle driving and check if the blade tip is worn or not
Defective inner surface of cylinder (worn or rough
Nails are inaccurately fed into the blade guide
Incorrect nails are loaded
Worn tip of the driver blade
Please send the tool back to the tool manufacturer/distributor if failure other than those as tabulated above occurs.
15

BISSETT PNEUMATIC TOOLS
WARRANTY AND LIMITATIONSBissettFastener’sLimited(Bissett)warrantiesthatnewBissettfastening tools, parts and accessories will be free from defects in material and workmanship for the periods shown below, after from the date of purchase by the original user from the original retail purchaser only. Proof of purchase must be provided. This warranty is nottransferable.Thiswarrantygivesyouspecificlegalrightsandyoumay have other rights which vary in certain provinces.

ONE-YEAR LIMITED WARRANTY
90-DAY LIMITED WARRANTY
SIX-YEAR EXTENDED LIMITED WARRANTY
Exclusion after 90 days: Normal wear parts—as listed above within the90-daylimitedwarranty.
Asix-yearextendedlimitedwarrantywillapplyfromthedateofpurchasebytheoriginalretailpurchasertoBissettfasteningtoolsand will include the frame and magazine to be free from defects in material and workmanship with the exception of any items specificallycoveredbyanextendedorlimitedwarrantyas listed below.
Aone-yearwarrantywillapplyfromthedateofpurchasebytheoriginal retail purchaser to all parts, except those listed below as normalwearingparts,orpartswhicharespecificallycoveredbyan extended or limited warranty. It does not cover conditions or malfunctions resulting from neglect, abuse, accident or repairs attempted or made by other than authorized service centers in Canada.
A90-daylimitedwarrantyappliesfromthedateofpurchasebytheoriginal retail purchaser to the following parts, which are considered normalwearingparts:
AlwaysusegenuineBissetttools,partsandaccessories.
• Bumper• DriverBlades• O-Rings• Seal Rings

WARRANTY STATEMENTThiswarrantyislimitedtoBissettfasteningtools,partsandaccessories sold by authorized dealers and serviced by authorized service centers in Canada. Customer to return the tool, parts, and or accessories to the nearest authorized service center or original dealer at own cost. Proof of purchase date is required. This warranty isnottransferable.Thiswarrantygivesyouspecificlegalrightsandyou may have other rights which vary in certain provinces. To obtain informationonwarrantyserviceinCanada,pleaserefertotheBissettwebsite at www.bissettfasteners.ca.
Bissett’ssolediscretionandliabilityhereunderwillbetoreplaceany part or accessory which proves to be defective in material or workmanshipwithinthespecifictimeperiod.Anyreplacementpartor accessory provided in accordance with this warranty will carry a warranty for the balance of the period of warranty applicable to the part it replaces. This warranty does not apply to part replacement required due to normal wear.
Thiswarrantyisvoidastoanytoolwhichhasbeensubjectedtomisuse, abuse, accidental or intentional damage, or which results fromalterationswithnon-conformingpartsorunauthorizeddealers,use with fasteners, or anything other than pneumatic tool/gun oil, thatdoesnotmeetBissettspecifications,size,orquality,improperlymaintained,repairedwithotherthangenuineBissettreplacementparts,damagedintransitorhandling,orwhich,inBissett’sopinion,hasbeenalteredorrepairedinawaythataffectsordetractsfromtheperformanceofthetool.ThecoldweatherratingforselectBissetttoolsisbasedoffofthetoolsbeingabletooperateinacontrolled,isolated environment.

BISSETTMAKESNOWARRANTY,EXPRESSEDORIMPLIED,RELATINGTOMERCHANTABILITY,FITNESS,OROTHERWISE,EXCEPTASSTATEDABOVE,andBissett’sliabilityASSTATEDABOVEANDASASSUMEDABOVEisinlieuofallotherwarrantiesarising out of, or in connection with, the use and performance of the tool, except to the extent otherwise provided by applicable law. BISSETTSHALLINNOEVENTBELIABLEFORANYDIRECT,INDIRECT,SPECIAL,PUNITIVE,INCIDENTALORCONSEQUENTIALDAMAGESARISINGFROMTHESALEORUSEOFTHISPRODUCT,INCLUDING,BUTNOTLIMITEDTO,DAMAGESWHICHMAYARISE FROM LOSS OF ANTICIPATED PROFITS OR PRODUCTION, SPOILAGEOFMATERIALSINCREASEDCOSTOFOPERATION, OROTHERWISE.
Bissettreservestherighttochangespecifications,equipment,ordesigns at any time without notice and without incurring obligation or liability.


deBissett,ontétéaltérésouréparésd’unefaçonquiauneincidencesurlerendementdel’outilouledétournedesafonction.LacoterelativeàlatempératurefroidepourlesoutilsBissettestbaséesurlacapacitédesoutilsdefonctionnerdansunenvironnementcontrôlé etisolé.
BISSETTNEFORMULEAUCUNEGARANTIE,EXPLICITEOUIMPLICITE,RELATIVEMENTÀLAQUALITÉMARCHANDE,ÀL’ADAPTATIONÀUNUSAGEPARTICULIER,OUAUTREMENT,SAUFCEQUIESTMENTIONNÉCI-DESSUS;LARESPONSABILITÉDEBISSETT,COMMEAFFIRMÉEETSUPPOSÉECI-DESSUS,ESTENREMPLACEMENTDETOUTESLESAUTRESGARANTIES,ENRELATIONAVECL’UTILISATIONDEL’OUTILOUENDÉCOULANT,SAUFDANSLAMESUREOULESLOISENVIGUEURENDÉCIDENTAUTREMENT.ENAUCUNCAS,BISSETTN’ASSUMEDERESPONSABILITÉRELATIVEMENTÀDESDOMMAGESDIRECTS, INDIRECTS, PARTICULIERS, PUNITIFS, ACCESSOIRES OUCONSÉCUTIFSDÉCOULANTDELAVENTEOUDEL’UTILISATIONDECEPRODUIT,NOTAMMENTLESDOMMAGESRELATIFSÀLAPERTEDEPROFITSANTICIPÉSOUDEPROJETSDEPRODUCTION,ÀLADÉTÉRIORATIONDEMATÉRIAUX,ÀL’AUGMENTATIONDESCOÛTSD’EXPLOITATIONOUDEQUELQUEAUTRE FAÇON.
Bissettseréserveledroitdemodifierlescaractéristiques,l’équipementoulaconception,etce,entouttemps,sanspréavisetsansassumerquelqueobligationouresponsabilité.

DÉCLARATION DE GARANTIELaprésentegarantienecouvrequelesoutilsdefixation,piècesetaccessoiresdemarqueBissettvenduspardesfournisseursagréésetdontleserviceaprès-venteesteffectuéparlescentresdeserviceagréésauCanada.Leclientdoit,àsesfrais,retournerl’outil,lespiècesetlesaccessoiresaucentredeserviceleplusprèsouaufournisseur d’origine. Une preuve de la date d’achat est requise. Laprésentegarantienepeutêtretransférée.Cettegarantievousdonnedesdroitsjuridiquesparticuliers;vouspouvezaussiavoird’autres droits qui varient selon les provinces. Pour obtenir des informations sur le service de garantie au Canada, veuillez consulter lesiteWebdeBissettauhttp://bissettfasteners.ca/fr/accueil.
LeseulengagementvolontaireetlaseuleresponsabilitédeBissett,envertudesprésentes,estderemplacertoutepièceoutoutaccessoirequis’avèrentdéfectueuxenmatérielouenfabricationpendantlapériodedéterminée.Toutepièceoutoutaccessoirefournisconformémentàlaprésentegarantieestgarantipourlapériodeapplicableàlapièceremplacée.Cettegarantienes’appliquepasauxpiècesremplacéesenraisondel’usurenormale.
Cettegarantieestnullepourtoutoutilquiaétésoumisàunmésusage,àunusageabusif,àundommageaccidentelouintentionnel,ouquirésulted’altérationseffectuéesavecdespiècesnonconformesoupardesfournisseursnonagréés,d’utilisationavecdes attaches ou quoi que ce soit d’autre que de l’huile pour outils pneumatiquesouarmes,quinerespectentpaslesspécificationsdeBissett,quantàlatailleouàlaqualité,dontl’entretienn’estpasconformeauxexigences,quisontréparésavecdespiècesderemplacementnonconformesauxexigencesdeBissett,endommagésdansletransportoulamanutention,ouqui,del’avis
GARANTIE LIMITÉE (1 AN)
GARANTIE LIMITÉE (90 JOURS)
GARANTIE LIMITÉE PROLONGÉE (SIX ANS)
Exclusion après 90 jours : piècessoumisesàl’usurenormale,énuméréesci-dessusdansleparagraphesurlagarantielimitée (90jours).
Unegarantielimitéeprolongée(sixans)estenvigueursurlesoutilsdefixationdeBissettachetésparledétaillantacheteurd’origine,etce, à compter de la date d’achat, garantissant que le châssis et le magasinsontexemptsdedéfautsdematérieletdefabrication,àl’exceptiondetoutélémentspécifiquementcouvertparunegarantieprolongéeoulimitée,seloncequiestmentionnéci-dessous.
Une garantie d’un an est en vigueur à compter de la date d’achat parl’acheteurdétaillantd’origine;cettegaranties’appliqueàtouteslespièces,àl’exceptiondespiècesénuméréesci-dessous(commelespiècessoumisesàl’usurenormale)oudespiècesquisontexplicitementcouvertesparunegarantieprolongéeoulimitée.Laprésentegarantienecouvrepaslesconditionsnilesmauvaisfonctionnementsrésultantdenégligence,d’utilisationabusive,d’accident,detentativesderéparationouderéparations effectuéesparquelqu’und’autrequelescentresdeservice autorisésauCanada.
Unegarantiede90joursestenvigueuràcompterdeladated’achatparl’acheteurdétaillantd’origine;cettegaranties’appliqueauxpiècesénuméréesci-dessous,quisontconsidéréescommepiècessoumisesàl’usurenormale:
Toujoursutiliserlesoutils,piècesetaccessoiresBissettauthentiques.
•Butoir•Systèmedepoussée
•Jointstoriques•Jointsd’étanchéité
OUTILS PNEUMATIQUES BISSETT
GARANTIES ET LIMITATIONSBissettFastenersLimited(ci-après«Bissett»)garantitquelesnouveauxoutilsdefixationetaccessoiresainsiquelesnouvellespiècesdeBissettsontexemptsdedéfautsdematérieletdefabricationpourlespériodesmentionnéesci-dessous,àcompterdeleurdated’achatparl’utilisateurd’origineauprèsdudétaillantacheteurd’origine,uniquement.Unepreuved’achatdoitêtreprésentée.Laprésentegarantienepeutêtretransférée.Cettegarantievousdonnedesdroitsjuridiquesparticuliers;vouspouvezaussi avoir d’autres droits qui varient selon les provinces.
DÉFAILLANCESCAUSES POSSIBLESVÉRIFICATIONCONTRE-MESURES
Aucun clou n’estéjecté
Le clou enfoncé estplié
Vérifiersilesystèmedepousséeestuséàl’extrêmeounon
Vérifiersilesclousplient ou non sur du bois plus tendre
Remplacerlesystème depoussée
Arrêterd’utiliserl’outil
Intérieurducylindredéfectueux(fragmentd’adhésifou de bois, usure)
Usuredusystèmedepoussée
Le bois est trop dur
Effectuerunepousséeau ralentietvérifierleretourdusystème depoussée
Vérifierlecompresseur •Unitéd’expulsion:piston ou propulseur
•Pression d’air trop faible
Baguede pistonusée
Butoirdepistondéfectueux
Piècedubutoirdéfectueuse(déréglée,déforméeoubrisée)
Jointtoriquedéfectueux(déconnecté,déforméoubrisé)
Systèmedepousséedéfectueux(dévié,déforméoubrisé)
•Les clous sont mal introduits dans le guide d’acheminement
•Clousinappropriés
Vérifiersileclous’enfonce à la pression de service minimale
Remplacer la bague du piston
Remplacer le butoir du piston
Remplacerlapièce
Remplacer
Réassemblerouremplacerlejointtorique
Enlever le fragment d’adhésifoulapoussièrede bois
Si des défaillances surviennent, autres que celles mentionnées ci-dessus, veuillez envoyer l’outil au fabricant ou au distributeur.
18
DÉFAILLANCESCAUSES POSSIBLESVÉRIFICATIONCONTRE-MESURES
Les clous enfoncésnepénètrentpascomplètementlapièceàtravailler (les têtesdeclousdépassent)
Clous bloquésdans la voie d’éjection
Mettre l’outil au ralentietvérifiersil’extrémitédusystèmedepousséeestuséeounon
Vérifierl’usuredu guide d’acheminement
Remplacer
Remplacer
Cesser d’utiliser l’outil
Surface interne du cylindredéfectueuse(uséeourugueuse)
Clousinappropriés
Extrémitéuséedusystèmedepoussée
Usure de la rainure du guide d’acheminement
Lematériaudelapièceàtravailleresttrop dur
Mettre l’outil au ralentietvérifiersilesystèmedepousséedépassele bout du guide d’acheminement
Vérifiersil’extrémitédusystèmedepousséeestuséedefaçonexcessiveou non
Démonterl’unitédesortieetvérifierlessurfacesintérieuresetextérieuresdelabague du piston et du cylindre
Cesser d’utiliser l’outil Le bois est trop dur
Pression d’air trop faible
Usure ou défectuositédusystèmedepoussée
Ajustementinappropriéde la profondeur depoussée
Baguedepistondéfectueuse(uséeoubrisée)
Les clous s’insèrentdefaçoninappropriéedans le guide d’acheminement
Démonterl’unitédesortieetvérifierlessurfacesintérieuresetextérieuresdelabague du piston et du cylindre
Augmenter la pression d’air
Silesystèmedepousséenedépassepasl’extrémitédu guide d’acheminement, le remplacer
Ajusterlaplaqueguideàlapositionappropriée
Remplacer les piècesdéfectueuses
•Remplacerlespiècesdéfectueuses
•Utiliser les clous qui conviennent
17
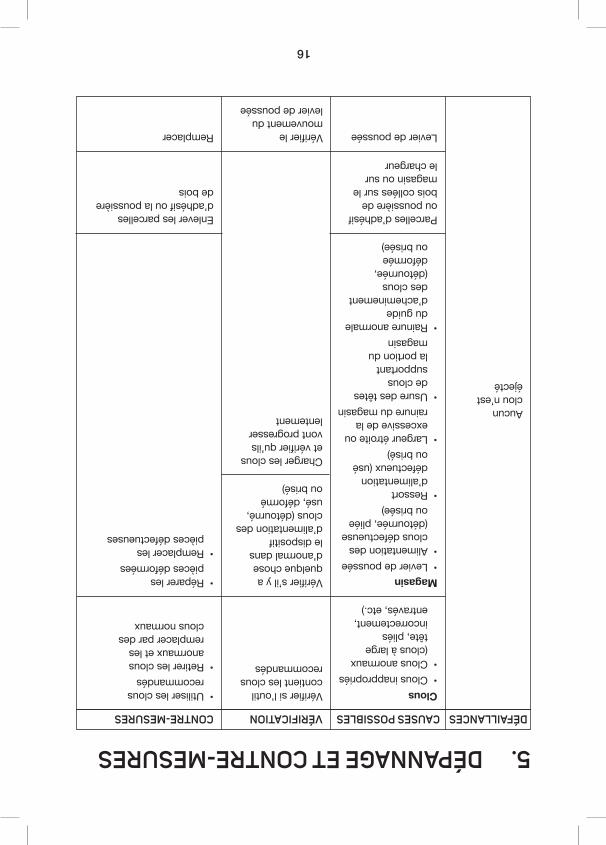
5. DÉPANNAGE ET CONTRE-MESURESDÉFAILLANCESCAUSES POSSIBLESVÉRIFICATIONCONTRE-MESURES
Aucun clou n’est éjecté
Vérifierlemouvement du levierdepoussée
Remplacer
Enlever les parcelles d’adhésifoulapoussièrede bois
Parcellesd’adhésifoupoussièredeboiscolléessurlemagasin ou sur le chargeur
Levierdepoussée
Vérifiersil’outilcontient les clous recommandés
•Utiliser les clous recommandés
•Retirer les clous anormaux et les remplacer par des clous normaux
Clous•Clousinappropriés•Clous anormaux
(clous à large tête,pliésincorrectement, entravés,etc.)
Vérifiers’ilyaquelque chose d’anormal dans le dispositif d’alimentation des clous(détourné,usé,déformé oubrisé)
Charger les clous etvérifierqu’ilsvont progresser lentement
•Réparerles piècesdéformées
•Remplacer les piècesdéfectueuses
Magasin•Levierdepoussée•Alimentation des clousdéfectueuse(détournée,pliéeoubrisée)
•Ressort d’alimentation défectueux(usé oubrisé)
•Largeurétroiteouexcessive de la rainure du magasin
•Usuredestêtes de clous supportant la portion du magasin
•Rainure anormale du guide d’acheminement des clous (détournée,déformée oubrisée)
16

4.2 ENTREPOSAGE DE L’OUTIL
Entreposage :lorsquel’outiln’estpasutilisépendantune longuepériode,appliquerunefinecouchedelubrifiant surlespiècesdemétaldel’outil,afindeprévenirlarouille. Avant d’entreposer l’outil, vous assurer qu’il est sec. Ne pas entreposer l’outil dans un environnement froid. Lorsque l’outil n’estpasutilisé,ildoitêtreentreposédansunendroitchaud etsec.Tenirhorsdeportéedesenfants.
15
4. ENTRETIEN« Nettoyer et inspecter l’outil lors de chaque utilisation »
4.1 ENTRETIEN DE L’OUTIL
Leclientdoits’assurerquel’outilestmaintenuenbonétatde marche.Deplus,seullepersonneldeserviceforméparle fabricantouledistributeurestautoriséàréparerl’outilet seuleslespiècesetaccessoiresBissettdoiventêtreutilisés.
Mise en garde : toujours débrancher l’outil de l’alimentation d’air avant d’entreprendre tout travail de nettoyage, d’inspection ou d’entretien.
•Nettoyerl’outilavecunchiffonetprocéder àuneinspectionenvued’évaluerl’usureoules dommages. Pour nettoyer l’outil, utiliser des solutions denettoyageininflammables.Nejamaistremperl’outildans ces solutions, car elles pourraient causer des dommages internes.
•Toujourss’assurerquelesvissontbienserrées;lesvismalfixéespeuventcauserdesblessuresouendommager l’outil.
•Outilsexigeantdulubrifiant:sil’outilestutilisé sanslubrifiant,vousassurerdemettreenvironcinq gouttesdelubrifiantaudébutdechaquejournéedetravailet,parlasuite,troisgouttesaprèsavoirutilisé 1 000 attaches.
•Lesoutilsdoiventêtremunisdepièceset accessoiresBissettetréparésenutilisantles mêmespiècesetaccessoires.
•Nejamaisutiliserl’outils’ilexisteundoutequ’ilnesoitpasenbonétatdemarche.
•Toujoursutiliserdel’huilepouroutilsoupistoletspneumatiques;nepasutiliserd’huilepouroutilsàair.
14
•Lors du chargement des attaches•Lorsquel’outiln’estpasutilisé•Lorsdel’entretienouderéparations•Pendantl’éliminationd’unblocage•Enélevant,abaissantoudéplaçantl’outil•Lorsquel’outilesthorsdelasupervisionouducontrôle
de son utilisateur•Au moment de retirer les attaches du magasin
3.3.10 DÉBRANCHEMENT DE L’OUTIL
Toujoursdébrancherl’alimentationd’airdel’outildans lescassuivants:
•Utiliser l’outil uniquement en se conformant à la pressiond’airrecommandéepourl’utilisationde cetoutil.Nejamaisexcéderlemaximumde pressionrecommandée.
•Pendrelemaximumdeprécautionspourenfoncerdesattachesdansunmurdéjàconstruitouautrezoneinvisibleafind’éviteruncontactavecdespersonnesoudesobjetsquisontdel’autrecôté(p.ex.fils,tuyaux).
•Nejamaistirer,souleverouabaisserl’outilenseservantdu tuyau d’alimentation d’air.
13
•Netendezpaslesbras.Toujoursgarderunepositionstableetenéquilibre.
•Nejamaistenirl’outilenayantledoigtsurlagâchette.•Enfoncerlesattachesuniquementsurlespièces
à travailler.•Nejamaisenfonceruneattachesuruneautreattache.•Aprèsavoirenfoncéuneattache,l’outilpeutrebondir
(effetderecul),cequil’éloignedelapièceàtravailler.Afinderéduirelerisquedeblessure,apprendreàgérerl’effetderecul:
•Entravaillantsuruneborduredelapièceàtravaillerousil’outilestplacédansunangleaigu,prenezsoinderéduirel’écaillage,lefractionnementoulemorcellementetd’empêcheruneattached’êtreéjectéeoudericocher, ce qui pourrait causer des blessures.
•Garderlesmainsetautrespartiesducorpsàdistancedelazonedel’outiloùlesattachessontéjectées.
•Nepaschargerlesattachesdansl’outils’ilestbranchésur l’alimentation d’air ou lorsque l’un des dispositifs de réglageestactivé.
•Ne pas utiliser l’outil avec une alimentation d’air autre que celle qui est prescrite dans les directives sur son utilisationetsurlesmesuresdesécurité.
»Toujoursgarderlecontrôledel’outil. »Laisser le recul se produire en laissant l’outil
reculer,sansrésister,demanièreàcequel’outilreprennesaplacesurlapièceàtravailler.En «modededéclenchementparcontact»,sil’outils’appliquedenouveausurlapièceàtravailleravantquelagâchettenesoitrelâchée,uneattacheseraenfoncéeinvolontairement.
»Maintenir l’outil loin du visage et autres parties du corps.
12
3.3.9 MANIPULATION DE L’OUTIL
•Seules peuvent utiliser l’outil les personnes qui ont lu et compris les directives sur son utilisation et sur les mesuresdesécurité.Leclientesttenudedonnerleprésentmanuelàlapersonnequis’apprêteàutilisercetoutil;ildoitaussis’assurerquecettepersonneliseattentivementlemanueletlecomprenneentièrement.
•Nejamaissupposerquel’outilnecontientpasd’attaches.
•Nejamaispointerl’outilverssoi-mêmeouversquelqu’und’autre.Cen’estpasunjouet.Nepasvousamuser à faire des pitreries avec l’outil.
•Tenir loin de la zone de travail les passants et les enfants.
•Nepasactiverl’outils’iln’estpasappuyésolidementsurlapièceàtravailler.
•En travaillant, rester alerte, se concentrer sur le travail et fairepreuvedejugement.
•Nepasutiliserl’outillorsquevousêtesfatigué,aprèsavoirconsommédeladrogueoudel’alcool,ousivousêtessousl’influenced’unmédicament.
•Nepasutiliserunoutildontlaoulesétiquettesdemiseengardesurlasécuritésontabsentesouendommagées.
•Nepasutiliserunoutilquin’estpasenbonétatdefonctionnement.
•Nepasenlevernialtérerlescontrôlesdefonctionnement, ni faire quoi que ce soit qui pourrait rendre les outils inutilisables.
•Nepasutiliserunoutildontunepartiedescontrôlesdefonctionnementesthorsd’usage,débranchée,altéréeou ne fonctionne pas normalement.
3.3.8 CONTRÔLES DE L’UTILISATION
11
3.3.7 INSPECTER L’OUTIL AVANT DE L’UTILISER
Avant chaque utilisation, inspecter l’outil pour s’assurer qu’il estenétatd’êtreutilisé.Vérifierquelespiècesmobilesne sontpasmalalignéesnitorduesoudansunétatquipourrait avoir une incidence sur le fonctionnement de l’outil.
Sélectionnerlapressiond’airdéterminéeparletype d’attachesutilisées,letypedepièceàtravailleretautres conditionsd’utilisation.Nejamaisexcéderlemaximum depressiond’airrecommandépourl’utilisationdecetoutil.Si unrégulateurestinopérant,lapressionprovenantde l’alimentationd’airnedoitpasexcéder1,5foislemaximum depressiond’airou200psi(13,8bars),selonlaplusélevée des deux.
•Protection des yeux : Mise en garde : l’utilisateur doit porter des protecteurs pour les yeux; il en est de même pour les personnes qui sont dans la zone de travail. Mise en garde : le client doit fournir à l’utilisateur et aux personnes qui sont dans la zone de travail des protecteurs pour les yeux et il doit s’assurer que tous les utilisent.
•Protection des oreilles : Mise en garde : l’utilisateur de l’outil doit porter des protecteurs pour les oreilles; il en est de même pour les personnes qui sont dans la zone de travail. Mise en garde : le client doit fournir à l’utilisateur et aux personnes qui sont dans la zone de travail des protecteurs pour les oreilles et il doit s’assurer que tous les utilisent.
3.3.6 ÉQUIPEMENT DE PROTECTION PERSONNELLE
L’utilisateurdoitporterunéquipementdeprotection personnelleapproprié.
10
Éclairage DEL :leoulesoutilsci-dessoussontmunisd’un éclairageDEL.L’éclairagedoitêtrealluméetéteint manuellement selon les besoins. La pile n’est pas couverte par la garantie.
3.3 MESURES DE PRÉCAUTION
« Respectez votre outil et ne faites pas de pitreries. »
3.3.1 SYSTÈMES DE DÉCLENCHEMENT
Consulterlesalinéas3.2.1et3.2.2.
3.3.2 ATMOSPHÈRES INFLAMMABLES
Nepasutiliserl’outildansdesatmosphèresinflammables,par exempleenprésencedeliquidesinflammables,debouteilles d’airoudegaz,oudepoussièrecombustible.
3.3.3 MODIFICATIONS APPORTÉES À L’OUTIL
L’outilnedoitêtremodifiéd’aucunefaçon.Nepasaltérerni désactiverlagâchettedemanièreàcequ’ellesoitrégléeen position de fonctionnement, car cela pourrait, à tout moment, causerledéclenchementd’uneattache.
3.3.4 ENTRETIEN DE L’OUTIL
L’outildoitêtreinspectérégulièrementpourqu’ilpuisse êtreutilisédefaçonsécuritaireetappropriée.Veuillez consulter les directives d’entretien pour obtenir des informationsdétailléessurl’entretienappropriédel’outil.
3.3.5 ATTACHES ET ACCESSOIRES RECOMMANDÉS
UtiliseruniquementlespiècesetlesattachesBissett. L’utilisationdepiècesetd’attachesnonautoriséespeut entraîner des dommages et des blessures. L’utilisation de piècesetd’attachesquinesontpasdemarqueBissett authentique peut entraîner l’annulation de la garantie.
•BT-BN1855
9
Lerajustementdelaprofondeurpeutêtreeffectuéen tournantledispositifdecontrôledelaprofondeur.
Toujoursutiliserlaplusfaiblepressiond’airpossible,aux motifssuivants:
•Économied’énergie•Réductiondubruit•Réductiondel’usuredel’outilenfonçantlesattaches
Utilisation et précautions par temps froid : ne pas entreposer l’outil dans un environnement froid. Le garder dansunendroitchaudetsecjusqu’aumomentde commencerletravail.Sil’outilestdéjàfroid,l’apporterdans unendroitchaudetattendrequ’ilseréchauffeavantde l’utiliser. Par temps froid, ne pas utiliser l’outil pendant de longuespériodes.
S’ilseproduitunfonctionnementinhabituel,défectueux ouinapproprié,débrancherimmédiatementl’outilde l’alimentationenaircompriméavantdeprocéderà l’inspection de l’outil.
Testé par température froide :lesoutilsBissettci-dessous sontcotéspourutilisationàdestempératuresaussibasses quemoins30degrésCelsius.
•BT-CNR45•BT-CNF90•BT-SN2890•BT-SN3490•BT-MCN38•BT-MCN65
8
Changement de gâchette : pour changer le levier de la gâchette,ilsuffitd’enleverlagoupilledelagâchette,deretirer le levier de la gâchette et de le remplacer par celui qui convient, puis de replacer la goupille pour retenir le levier.
3.2.2 PROCÉDURES OPÉRATIONNELLES
Équipement de protection personnelle : avant que l’outil soitutilisé,toujoursvousassurerquel’utilisateur,ainsique toutes les personnes qui sont dans la zone de travail, utilisent l’équipementappropriédeprotectionpersonnelle.
Lancer une attache : pour lancer une attache, placer le nez del’outilsurlapièceàtravailleretappuyersurlagâchette. Sil’outilestmunid’unmécanismeanti-éjection,ilsera nécessaired’appuyerl’outilsurlapièceàtravailler,de manièreàactivercemécanisme,avantd’appuyersurla gâchette pour lancer une attache.
Air d’évacuation :chaquefoisqu’uneattacheestlancée, unjetd’airs’échappeparlehautdel’outil,surledevant. Veillerànepasrecevoircejetd’airauvisage.Certainsoutils sontmunisd’undéflecteurd’échappementde360°qui permetàl’utilisateurdedéterminerl’orientationde l’échappementd’air.
Contrôle de la profondeur :vérifiersil’attache apénétrédanslapièceàtravaillerd’unemanière conforme aux exigences. La profondeur atteinte peutêtremodifiéeenajustantlapressiond’airou, lecaséchéant,enutilisantledispositifdecontrôle delaprofondeur.LesoutilsBissetténumérésci- dessoussontmunisd’undispositifdecontrôle delaprofondeur:
•BT-CNR45•BT-CNF90•BT-SN2890
•BT-SN3490•BT-BN1855
7
3.2 CONSIGNES GÉNÉRALES D’UTILISATION
3.2.1 TYPES DE SYSTÈMES D’ACTIVATION
ET DE DÉCLENCHEMENT
POUR LES OUTILS QUI N’ONT PAS DE MÉCANISME ANTI-ÉJECTION :
Activation d’une seule action :L’outilestmunid’unsystème d’activation;ledispositifdedéclenchementdoitêtreactivé pourchaqueactivitédepercussion.
Une seule action avec sécurité simple : L’outil est muni d’unloquetdesécuritéintégréaudispositifde déclenchement,cequipermetàl’utilisateurdedébrayer leloquetlorsquel’outiln’estpasutilisé.
POUR LES OUTILS SUR LESQUELS A ÉTÉ INSTALLÉ UN MÉCANISME ANTI-ÉJECTION :
Sécurité à double action / mécanisme anti-éjection (activation des éjections) :Ilseranécessaire d’activerlemécanismeanti-éjection,demêmequele dispositifd’enclenchement,afind’éjecteruneattache. Enmaintenantlagâchetteactivéeetenactivantle mécanismeanti-éjection,uneattacheestéjectée, permettantdestirsàhautevitesse,aussiappeléstirs enenfilade.
Série de tirs un coup à la fois (déclenchements à l’unité) : On peut lancer les attaches uniquement en activantd’abordlemécanismeanti-éjectionentenant l’outilappuyésurlapièceàtravailleretenappuyant ensuite sur la gâchette. Par la suite, toute nouvelle manœuvrepeutêtreeffectuéeuniquementlorsque lagâchetteestrevenueàsapositiondedépart. Cetoutilpermetdedéterminerl’emplacementexact del’attache,sansquel’effetdereculpuisseenlancer unedeuxième.
6

3. CONSIGNES D’UTILISATION
3.1 CHARGEMENT DES ATTACHES (VEUILLEZ CONSULTER
AUSSI LES DONNÉES TECHNIQUES)
3.1.1 MAGASIN À CHARGEMENT LATÉRAL
Ouvrir le couvercle du magasin, charger les attaches, puis refermer le couvercle.
3.1.2 MAGASIN À CHARGEMENT ARRIÈRE
Pourlemodèleàdeuxétapes,glisserlesattachesdansle magasinettirerlepoussoirjusqu’àcequ’ilsoitderrièreles attaches.Puis,dégagerlepoussoirets’assurerqu’ilaune bonne emprise sur les attaches.
Pourlemodèleàtroisétapes,tirerlepoussoirversl’arrièreet legardersurlemécanismedeverrouillage.Chargerles attaches et relâcher le poussoir.
3.1.3 MAGASIN À CHARGEMENT PAR LE HAUT
Tirer le poussoir au dos du magasin et le maintenir sur le mécanismedeverrouillage.Chargerlesattaches,puis relâcherlepoussoiretleguiderverslesattaches.Nejamais laisser le poussoir revenir vers les attaches, car cela endommagerait le ressort du poussoir.
3.1.4 MAGASIN À CHARGEMENT PAR LE BAS
Pousserladétente,saisirleloquetetfaireglisserlemagasin versl’arrière.Chargerlesattachesdanslecouvercledu magasin. Puis, refermer le magasin en le faisant glisser.
Mise en garde : au moment de charger ou de décharger les attaches, pointer la lance loin de vous; toujours débrancher l’alimentation d’air avant de charger les attaches.
5
2. SYSTÈME D’AIR COMPRIMÉ
L’utilisationappropriéedel’outilexigeunequantitéadéquated’aircomprimépropreetsec.
Toutaircomprimécontientdel’humiditéetautrescontaminantspouvantendommagerl’outil.Ilestdoncrecommandédemunirl’alimentationd’aird’unensemblefiltre-régulateur-lubrificateur aussiprèsquepossibledel’outil(àunedistancede4,5mètres/15pieds).Lefiltredoitêtrebienentretenu,demanièreàobtenirunepuissanceetunrendementoptimisés.Touteslespiècesdu systèmed’alimentationd’airdoiventêtrepropresetexemptes de contaminants.
L’outildoitêtrebranchéàunsystèmed’alimentationenaircompriméne permettant pas que le maximum de pression de l’outil soit dépassédeplusde10%.Cequipeutsefaire,parexemple,aumoyend’unesoupapederéductiondepression,combinéeàunesoupapedesécuritéenaval.
Unraccordmâleàfluxlibredevraitêtreconnectéausystèmeducôtédel’outil,unraccordfemelleservantdescellantafindepréveniruneperted’airlorsdudébranchementducompresseur.Nejamaisbranchersurlecôtédel’outilunraccordfemellededébranchement,car cela emprisonnerait l’air dans l’outil lorsque l’alimentation d’air estdébranchée,laissantl’outilchargé,capabledelanceruneattache.Nejamaisinstallerunraccordpivotantsurlaligned’alimentationd’air.
Chaquepièceàtravaillerexigelapressionquiluiconvient.Nejamaisexcéderlemaximumdepressionrecommandépourlefonctionnement,telqu’indiquésurl’outil.
Mise en garde : éloigner les mains, le corps, les vêtements amples et les bijoux de la zone de décharge de l’outil lorsque vient le temps de brancher l’alimentation d’air. De plus, toujours débrancher l’outil avant de le charger, d’en faire l’entretien, de l’ajuster, de le nettoyer et lorsque l’outil n’est pas utilisé.
4
•Ne jamais enfonceruneattachetropprèsdubordouàunangletropprononcé,carl’attachepeuts’élancerouricocheretcauserdes blessures ou des dommages.
•Toujourss’assurerquel’airedetravailesttrèsbienéclairée,demanièreàéviterlesaccidentscausésparlemanqued’éclairage.
•Ne jamaisenlevernialtérerlescontrôlesdefonctionnement,nifaire quoi que ce soit qui pourrait les rendre inutilisables.
•Se vêtir de façon appropriée.Neporternivêtementsamplesnibijoux,carilspourraientsecoincerdanslesélémentsenmouvementdel’outil.Pourtravailleràl’extérieur,ilestrecommandédeporterdesgantsdecaoutchoucetdeschaussuresàsemelleantidérapante.Porterunchapeauprotecteur pour retenir les cheveux longs.
3
•Ne jamais utiliser, pour faire fonctionner cet outil, de l’oxygène,dudioxydedecarbone,desgazcombustiblesoutout gaz en bouteille.
•Toujours débrancher l’alimentation d’air lorsque vous chargez les attaches, que vous faites l’entretien de l’outil, quevousdémêlezdesattachescoincées,quevousêtesendéplacementversunautrelieudetravail,lorsquevousquittezletravailouquevousremettezl’outilàquelqu’un.Nejamaisprésumerquel’outilestvided’attaches.
•Toujoursdébrancherl’outildel’alimentationd’airlorsqu’iln’estpasutiliséoulorsqu’ilestlaissésanssurveillance.
•Faire de façon régulière une inspection quant à lasécurité,àlagâchetteetauxressorts,pourquelefonctionnementsoitsansentrave.Nejamaisutiliserun outil qui a besoin d’entretien.
•Brancher,surlecôtédel’outiloùsetrouvel’alimentationd’air,l’emboutmâleàfluxlibre,demanièreàcequel’outilsoitdépressurisélorsquedébranchédutuyau.Nejamaisinstallersurl’outildesraccordsfemellesàdébranchementrapide,carl’airpourraitdemeurerenfermédansl’outilaumomentdudébranchementetdéclencherletird’uneattache.
•Ne jamais charger des attaches lorsque le dispositif de déclenchementestenfoncé,carcelapourraitprovoquer le tir d’une attache.
•Ne jamaistransporterl’outillorsqueledispositifdesécuritéestenfoncé,carcelapourraitprovoquerletird’uneattache.
•Ne jamaisaltérer,modifierouenclencherenpermanenceledispositifdedéclenchement.
•Ne jamaispointerl’outilverssoi-mêmeouversquelqu’und’autre.Cen’estpasunjouet.Nepasvousamuseràfairedespitreries avec l’outil.
•Ne jamais enfoncer une attache sur une surface dure et cassantecommelebéton,l’acieroulestuiles.
2
1. IMPORTANTES DIRECTIVES SUR LA SÉCURITÉ
Leclientesttenudedonnerleprésentmanuelàlapersonnequis’apprêteàutilisercetoutil;ildoitaussis’assurerquecettepersonneliseattentivementlemanueletlecomprenneentièrement.N’utilisezpas cet outil et ne permettez pas à d’autres de l’utiliser à moins que touteslesdirectivessurlasécuritéaientétéluesetcomprises.Leclientesttenud’imposerl’utilisationdel’équipementdeprotectionà l’utilisateur de l’outil et à tous les membres du personnel qui sont dans l’aire de travail.
•Toujoursutiliserl’outilauxfinspourlesquellesilaétéconçu.•Utiliser des lunettes de protection : toutes les personnes
dansl’airedetravaildoiventTOUJOURSporterdes lunettesdeprotectionconformesauxnormesdesécuritéANSI Z87.1/EN 166, assurant une protection de FACE et de CÔTÉcontretoutobjetvolant,afindeseprémunircontrelesblessures aux yeux.
•Utiliser un équipement de protection pour la tête conforme à la norme ANSI Z89.1.
•Utiliser un équipement de protection pour les oreilles afind’éviteruneperteauditive.
•Utiliser de l’air comprimé propre, sec et réglementé, àlapressionrecommandée(quevoustrouverezdanslesdonnéestechniques).
•Utiliser uniquement les pièces et les attaches Bissett (veuillez,unefoisdeplusconsulterlesdonnéestechniques).L’utilisationdepiècesetd’attachesnonautoriséespeutentraîner des dommages et des blessures. L’utilisation de piècesetd’attachesquinesontpasdemarqueBissettauthentique peut entraîner l’annulation de la garantie.
•Ne jamaisexcéderlapressiondeservicemaximalerecommandéepourl’outil.
1
TABLE DES MATIÈRES
Importantesdirectivessurlasécurité ........................1
Systèmed’aircomprimé ..................................4
Consignes d’utilisation....................................5
Entretien..............................................14
Dépannageetcontre-mesures.............................16
MANUEL DE L’UTILISATEURSÉCURITÉ/FONCTIONNEMENTENTRETIEN/DÉPANNAGE
Voustrouverezsurleboîtierlesnumérosdemodèleetdesériedevotreoutil;veuillezlessauvegarder.
Numéro de modèle :
Directive EC concernant la machinerie – EN 792-13 ANSI SNT — 101
Numéro de série :
L’UTILISATION INAPPROPRIÉE ET NON SÉCURITAIRE DE CET OUTIL PEUT CAUSER DES BLESSURES GRAVES ET MÊME LA MORT. IL EST TRÈS IMPORTANT QUE L’UTILISATEUR DE CET OUTIL LISE ET COMPRENNE LE PRÉSENT MANUEL AVANT D’UTILISER L’OUTIL. VEUILLEZ RENDRE CE MANUEL ACCESSIBLE À L’AVANCE POUR CEUX QUI SE PRÉPARENT À UTILISER L’OUTIL.
REMARQUE IMPORTANTE :
BISSETTFASETENERS.CA