user maintenance kit - oce display graphics systems inc. · user maintenance kit ... microsoft word...
TRANSCRIPT

AP-40303 – Rev 1.0 Page 1/10
IMPORTANT INSTALLATION INFORMATION
User Maintenance Kit Océ CS9200 Low Solvent Series Printers
Dear Customer, This document will guide you through the daily, weekly and monthly maintenance which is needed for the CS9200 Low Solvent Series Printers. All necessary tools, accessories and parts are collected in one kit: the “User Maintenance Kit”. Every six months you have to order a new kit. For more details regarding pricing and availability, please contact an Océ representative.
It is very important to perform the daily, weekly and monthly maintenance very strictly, this to ensure stable quality and to prevent that some parts get broken or become congested.
Nr Description Qty 1 Sponge plate 6 2 Wipers 24 3 Spitting box sponge 12 4 Cleaning Liquid 250 ml 3 5 Instruction sheet 1 6 Good shape kit (contents below) 1
Nr Description Qty 1 Gloves 300 2 Pipette 60 3 Swabs 150 4 Polyknit wiper 300
AP-40303 – Rev 1.0 Page 2/10
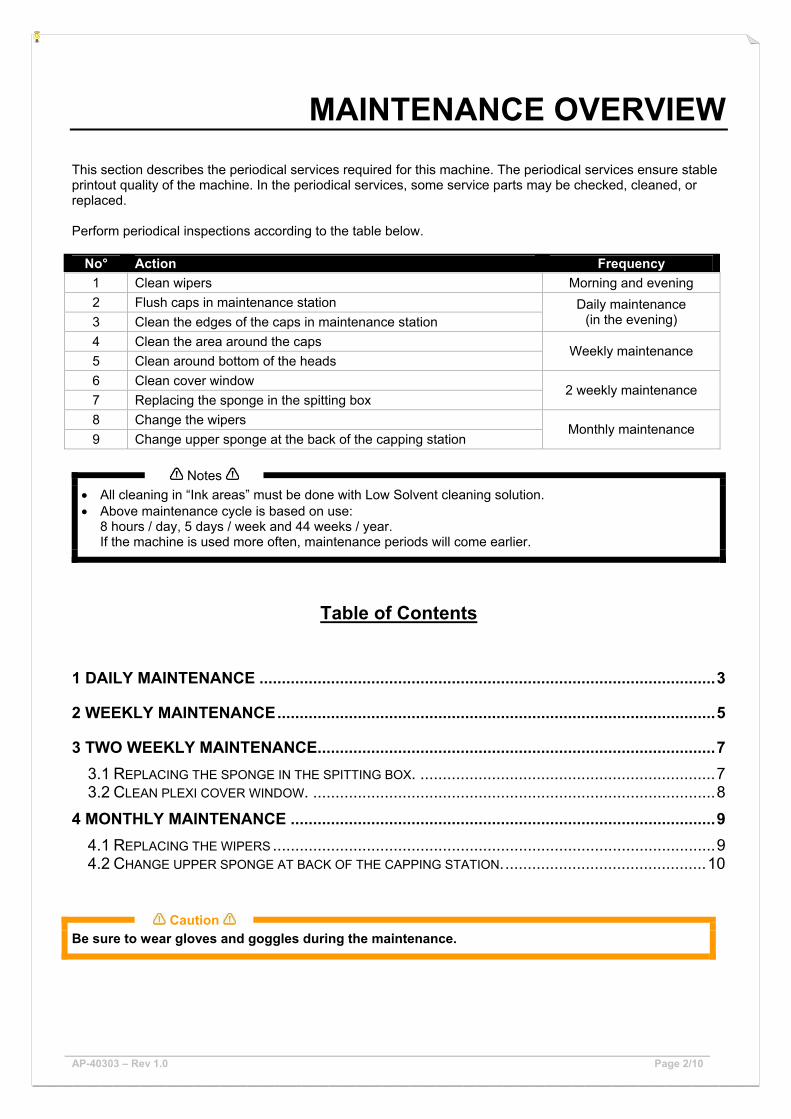
MAINTENANCE OVERVIEW This section describes the periodical services required for this machine. The periodical services ensure stable printout quality of the machine. In the periodical services, some service parts may be checked, cleaned, or replaced. Perform periodical inspections according to the table below.
No° Action Frequency 1 Clean wipers Morning and evening 2 Flush caps in maintenance station 3 Clean the edges of the caps in maintenance station
Daily maintenance (in the evening)
4 Clean the area around the caps 5 Clean around bottom of the heads
Weekly maintenance
6 Clean cover window 7 Replacing the sponge in the spitting box
2 weekly maintenance
8 Change the wipers 9 Change upper sponge at the back of the capping station
Monthly maintenance
Notes
• All cleaning in “Ink areas” must be done with Low Solvent cleaning solution. • Above maintenance cycle is based on use:
8 hours / day, 5 days / week and 44 weeks / year. If the machine is used more often, maintenance periods will come earlier.
Table of Contents
1 DAILY MAINTENANCE ......................................................................................................3
2 WEEKLY MAINTENANCE..................................................................................................5
3 TWO WEEKLY MAINTENANCE.........................................................................................7
3.1 REPLACING THE SPONGE IN THE SPITTING BOX. ..................................................................7 3.2 CLEAN PLEXI COVER WINDOW. ..........................................................................................8
4 MONTHLY MAINTENANCE ...............................................................................................9
4.1 REPLACING THE WIPERS ...................................................................................................9 4.2 CHANGE UPPER SPONGE AT BACK OF THE CAPPING STATION..............................................10
Caution
Be sure to wear gloves and goggles during the maintenance.

AP-40303 – Rev 1.0 Page 3/10
1 DAILY MAINTENANCE
If some nozzles are missing or misfiring, perform cleaning cycles until all nozzles are in good shape. We advise to run a normal or a powerful cleaning cycle to recover the nozzles. At the beginning of the day, be sure to clean the wipers. This is required to make the wipers more elastic and to be sure that all dried ink particles are gone before the first wipe in the morning. Please see below to know how to clean the wipers. At the end of the day, when you will shut down the printer, the ink also needs to be removed from other parts, so it cannot harden. Otherwise, some parts will break down or cause bad print quality.
NOTES
In the box you will find a Good Shape Kit to perform the daily maintenance. Normally this is enough for 6 months.
Step 1 : Power ON the printer and go to the “WiperClean-Menu” in SetupMenu 6/7 and press [F2]
I) This will cause the unlocking of the carriage.
Step 2 : Open the front cover. Step 3 : Clean the wipers with a polyknit wiper. Use some Low Solvent Cleaning Liquid to remove the ink.
Step 4 : Close the front cover
Step 5 : Press the ENTER key to make the carriage go back to its home position.

AP-40303 – Rev 1.0 Page 4/10
Step 6 : Flush the caps with Océ Low Solvent cleaning liquid. ► Start a TubingFlush in SetupMenu 6/7.
► The head will unlock and following message will be displayed:
► Wait until the pumps start operating.
► Open the front cover.
► Inject cleaning liquid in cap 1-4 (Cycle 1) by way of a pipette until the caps do not change colour. Be careful not to spoil cleaning near the caps.
► When done, press the ENTER key and inject cleaning in cap 5-8 (Cycle 2) by way of a pipette until the caps do not change colour.
► When done, press the ENTER key to END the TubingFlush.
Step 7 : Clean the edges of the caps with a cleaning swab and if necessary use some Océ Low Solvent
cleaning liquid.
Step 8 : Close the front cover. Step 9 : The daily maintenance has been finished.

AP-40303 – Rev 1.0 Page 5/10
2 WEEKLY MAINTENANCE
At the end of the week, ink has to be removed from some parts, so it cannot harden. Otherwise, some parts will break down or cause bad print quality. After performing a weekly maintenance, do not forget to perform the daily maintenance ass well. Step 1 : Power ON the printer, go to the “H. Unlock menu” and press [F2].
► This will cause the unlocking of the carriage.
Step 2 : Open the front cover. Step 3 : Clean the area around the caps with a polyknit wiper. If you see ink, dust or something else, clean
it immediately so it cannot influence the print quality.
Step 4 : Open the left maintenance cover.

AP-40303 – Rev 1.0 Page 6/10
Step 5 : Slide the carriage into the left maintenance area. Step 6 : Clean the edges of the heads with a cleaning swab wetted with Océ Low Solvent Cleaning Liquid.
Make sure you do not touch nor clean the nozzle plate; this would lead to poorer print quality.
NOTES
PUSH THE CARRIAGE TO THE RIGHT TO EASE CLEANING OF THE LEFT HEADS.
Step 7 : Close the front and left maintenance cover. Step 8 : Press the ENTER key when done. The carriage will automatically go to its home position.
Step 9 : Now perform the daily maintenance as explained in the previous chapter.
AP-40303 – Rev 1.0 Page 7/10
3 TWO WEEKLY MAINTENANCE
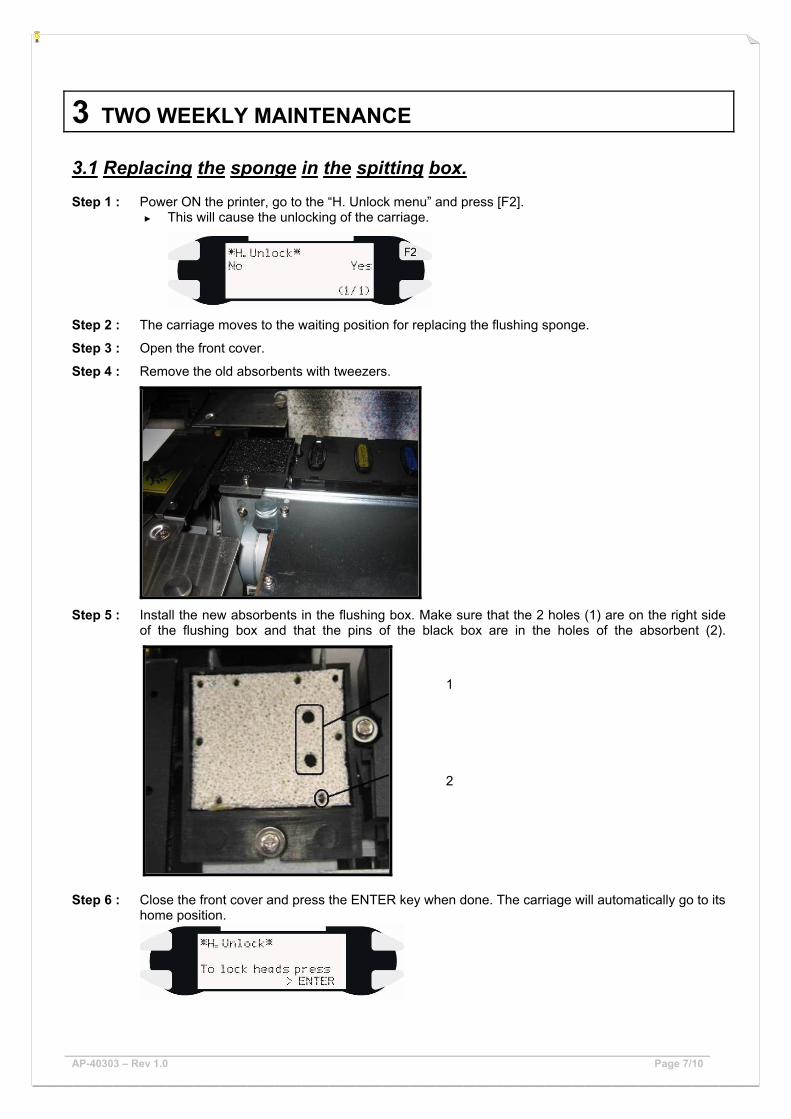
3.1 Replacing the sponge in the spitting box.
Step 1 : Power ON the printer, go to the “H. Unlock menu” and press [F2]. ► This will cause the unlocking of the carriage.
Step 2 : The carriage moves to the waiting position for replacing the flushing sponge.
Step 3 : Open the front cover.
Step 4 : Remove the old absorbents with tweezers.
Step 5 : Install the new absorbents in the flushing box. Make sure that the 2 holes (1) are on the right side of the flushing box and that the pins of the black box are in the holes of the absorbent (2).
1
2
Step 6 : Close the front cover and press the ENTER key when done. The carriage will automatically go to its
home position.

AP-40303 – Rev 1.0 Page 8/10
3.2 Clean plexi cover window. To be sure you can see the all details printed, it is necessary to clean the cover window every two weeks. Step 1 : Put on a set of gloves. Step 2 : Clean the cover at the outside with a dry towel or polyknit wiper.
NOTES
Do NOT clean the cover with cleaning liquid!! The liquid could leave marks on the cover.
Step 3 : Open the front cover. Step 4 : Clean the cover at the inside with a dry towel or polyknit wiper.
NOTES
Do NOT clean the cover with cleaning liquid!! The liquid could leave marks on the cover.
AP-40303 – Rev 1.0 Page 9/10
4 MONTHLY MAINTENANCE
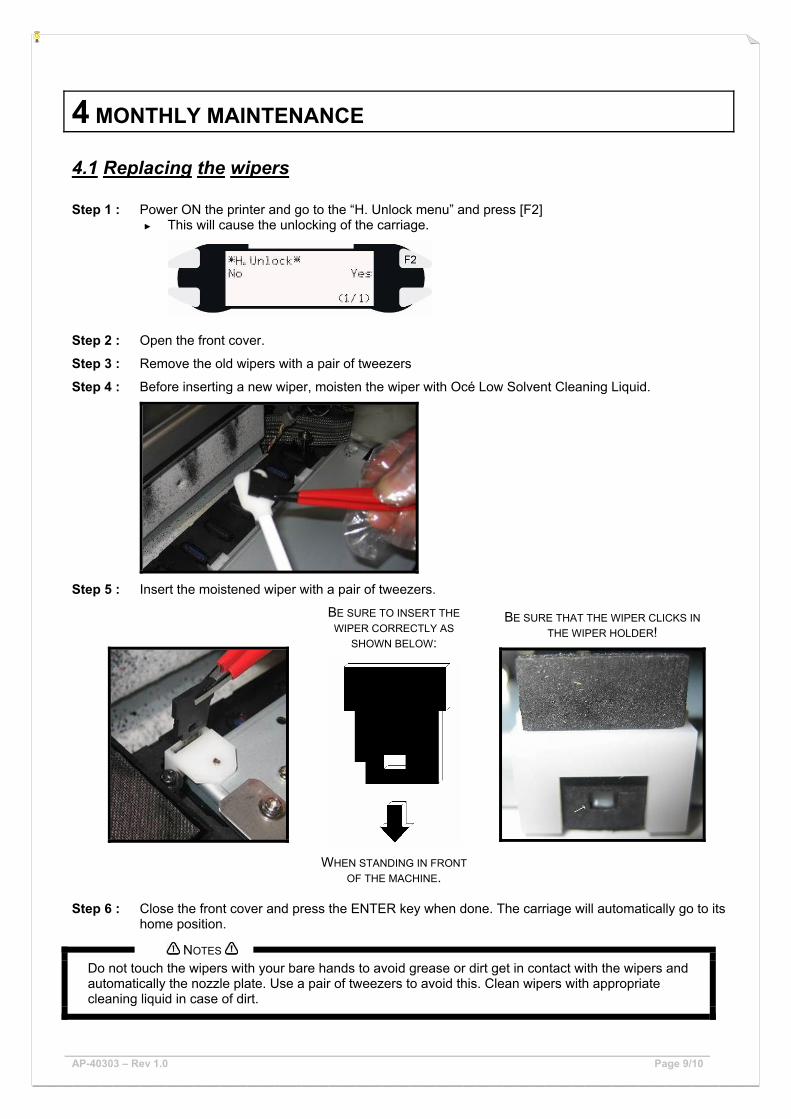
4.1 Replacing the wipers Step 1 : Power ON the printer and go to the “H. Unlock menu” and press [F2]
► This will cause the unlocking of the carriage.
Step 2 : Open the front cover.
Step 3 : Remove the old wipers with a pair of tweezers
Step 4 : Before inserting a new wiper, moisten the wiper with Océ Low Solvent Cleaning Liquid.
Step 5 : Insert the moistened wiper with a pair of tweezers.
BE SURE TO INSERT THE WIPER CORRECTLY AS
SHOWN BELOW:
WHEN STANDING IN FRONT OF THE MACHINE.
BE SURE THAT THE WIPER CLICKS IN THE WIPER HOLDER!
Step 6 : Close the front cover and press the ENTER key when done. The carriage will automatically go to its
home position.
NOTES
Do not touch the wipers with your bare hands to avoid grease or dirt get in contact with the wipers and automatically the nozzle plate. Use a pair of tweezers to avoid this. Clean wipers with appropriate cleaning liquid in case of dirt.

AP-40303 – Rev 1.0 Page 10/10
4.2 Change upper sponge at back of the capping station. Step 1 : Power ON the printer and go to the “H. Unlock menu” and press [F2]
► This will cause the unlocking of the carriage.
Step 2 : Open the front cover. Step 3 : Remove the two screws (1) fixing the sponge.
Step 4 : Replace the sponge and tighten it again to the plate with the two screws.
1
2
Step 5 : Close the front cover and press the ENTER key when done. The carriage will automatically go to its
home position.