ucla physics bal lab manual - campbell...
TRANSCRIPT

Physics 4BL: Electricity and MagnetismLab Manual
UCLA Department of Physics andAstronomy
Last revision July 1, 2017
1

Introduction
The objective of this course is to teach electricity and magnetism (E&M) by observationsfrom experiments. This approach complements the classroom experience of Physics 1B,Cwhere you learn the material from lectures and books designed to teach problem solvingskills. Historically, E&M evolved from many observations that called for a theoretical ex-planation. It is a great achievement that all classical E&M phenomena can be explainedby four equations, the so-called Maxwell’s equations. This laboratory course is designed toperform experiments showing the validity of these equations.
In the laboratory, you will have different experiences than in the classroom. In the realworld, there are no point sources, no infinities, all measurements have errors, and sometimesthings don’t work out as expected. A broken instrument or wire can be as frustrating andtime consuming as trying to solve a seemingly impossible homework problem. You will haveto learn patience and persistence to make good measurements.
For solving theoretical problems you first need to learn the appropriate mathematicaltools. For performing experiments you first need to become familiar with measurementtools, called instruments. These include multimeters, oscilloscopes, signal generators, aGaussmeter, digital scale, power supplies and computers. The first lab session is devotedto acquaint you with modern digital data acquisition methods. It is expected that you arealready familiar with basic software such as spreadsheets. In the lab you will save your data,copy the files to USB sticks and evaluate the results at home or a computer lab.
Each lab report will have a worksheet portion and a presentation portion (much likephysics 4AL). The worksheet portion will contain brief answers to questions about your datataking in the lab. For the presentation portion, some experiments will require only partsof a lab report and some will be full reports. A laboratory report should contain a verybrief description of your experiment (no need to copy the lab manual), the data obtained(usually in the form of graphs) and evaluations such as line, surface and volume integrals,curve fitting, circuit analysis, and any questions raised in the lab manual. The report shouldbe written concisely in a scientific language; it is not an essay where you admire the beautyof science or express your frustrations with the equipment. The TA has no time to readexcessively long lab reports. He/she will only look for correct answers and understanding ofthe results. The reports are due a week after the experiments have been done.1 Data areshared within an experimental team but the reports should be written individually. Copyingother reports constitutes plagiarism and will be reported to the Office of the Dean of Studentswith unpleasant consequences. It is recommended that students bring a personal notebookto the lab to keep a record of what you did. The lab manual will be asking you questions asyou go – you will need the answers when you write your report, so be sure to record themfor your future use.
1Students taking 4BL in the summer sessions may have sooner deadlines than 7 days. From this pointforward in this manual, the school year schedule will be assumed; summer students should consult their TAsfor the summer deadlines.
2
Experiment 1: Circuits
The goal of this lab is for you to become familiar with some of the equipment and techniquesyou will be using this quarter. You will also investigate both simple and more complicatedelectronic circuits. Record your results and the answers to the questions below to use whenyou write your report. There is some linear regression at the end that will be part of this.If you need to review error analysis, please see appendix A, especially propagation of errorsand equation (A.14).
1.1 The Digital Oscilloscope
The oscilloscope is a basic tool in any physics or engineering lab. Modern digital “scopes”sample the input voltage at around 1 GHz, or 1 analog to digital conversion (ADC) everyns. The scope provides its own calibration signal, a 1 kHz, 5 V amplitude square wave. Inthis lab exercise, you will perform three tasks to help familiarize yourself with the scope andits functions.
1.1.1 Calibration Signal
Press the Default Setup button near the top right hand side of the scope (it is one buttondown and in from the right corner). Clip the leads from channel 1 (yellow) to the probecompensation (PROBE COMP) terminals at the lower right corner of the scope. The redclip should connect to the probe compensation terminal (upper), and the black clip shouldconnect to ground (lower). The signal is not steady because the trigger level is set to 0 Vby default. You can fix this by adjusting the trigger level to some small positive voltageusing the Level knob on the right hand side of the scope in the Trigger panel. While you’readjusting it, the trigger level is shown on the screen and the trigger channel and voltage isalways indicated at the bottom right. When the signal is steady, adjust the channel 1 Vertical(i.e. voltage) Scale knob until you can see the whole trace on the scope. You may need tokeep turning up the trigger level to keep the signal steady. What is the voltage amplitudeshown on the scope? The volts per division for channel 1 is indicated at the lower left of thescreen in yellow. The time per division is shown in the lower center of the screen in white.(The manufacturer probably should have programmed this to read “per div.”)
3

If the square wave shows ≈ 50 Vpp (volts peak-to-peak) instead of 5 Vpp, which is whatthat signal should be, it is because the default oscilloscope probe is a 10× attenuating probe.1
We are not using a 10× (times 10) probe but rather a direct, low-resistance connection withno attenuation. From the Ch. 1 menu (yellow 1 button), choose the Probe 10X Voltagesetting, then Attenuation 10X and use the Multipurpose knob to change it from 10X to 1X(push the knob to select the highlighted menu item) so the voltage will display correctly.
1.1.2 Triggering
The trigger indicator is shown at the top center screen as a T in a little orange arrow thatsits above the trigger point on the waveform. Some of the data displayed (to the left of thetrigger indicator) is taken pre-trigger. Note that you are triggering on a rising edge whichlooks pretty steep at this timescale. Turn the Horizontal Scale knob to 1 µs per division. Youwill record two measurements of how long it takes for the pulse to rise to its full value. Firstestimate this value by eye, using the convention that “rise time” means the time requiredfor a digital signal to move from 10% of its maximum value to 90% of its maximum value.Then, using the Measure button on the scope, setup the scope to measure the Rise Time ofCh. 1. These numbers should be fairly close.
Use the Ch. 1 Scale button to change the voltage scale to 5 mV per division. The pre-trigger signal should be close to 0 volts. Estimate the noise or uncertainty in this 0 Vmeasurement. Hit the Single button on the top right hand side a few times to see singletraces. You can also use the Run/Stop button.
1.1.3 Autoset
Another way to set up the scope for an unknown signal is to use the Autoset button. Itanalyzes the signal and sets the trigger and channel gains automatically to display the fullsignal. Try it and note the additional helpful information presented on the screen. (Autosetdoes not change the probe attenuation setting so it may still need to be set manually).
1.2 Potentiometer
A potentiometer, sometimes called a trim pot, a variable resistor, or a voltage divider, is athree-terminal resistor with a knob that can be used to change the resistance between pairsof terminals. They are available with linear or logarithmic knob action. In this lab youwill use a 10-turn, 10 kΩ wirewound linear potentiometer. With one turn of the knob, thesliding connector (often called the “wiper”) moves 1/10 of the way along the wire resistor. Apotentiometer can be thought of as a voltage divider with the wiper tapping into the circuit
1A 10× attenuating probe is a special tool that can be plugged into an oscilloscope and divides the voltageby 10. This is useful not because it reduces the voltage, but because the impedance it presents to the circuitit is probing is higher and it therefore perturbs the behavior of the circuit the less than a lower impedance,particularly at high frequency.
4

between two variable resistors in series whose resistances are related such that their sum isalways a constant (R1 + R2 = Rtotal = constant), as shown in Fig. 1.1. If a voltage source(Vin) were connected to a trim pot as shown in Fig. 1.1(a), what voltage would we read atthe the wiper? Derive an expression for Vout in terms of Vin, R1 and R2.
Figure 1.1: Circuit model of a potentiometer. (a): R1 and R2 are variable resistors whose re-sistances are changed by turning the potentiometer knob. (b): An equivalent representationof this circuit, where the wiper arrow along the side of the resistor indicates that some ofthe resistance is allocated to R1 (above arrow) and some to R2 (below arrow). The diagramon the right is typically how potentiometers are down in circuit diagrams.
The potentiometer you will use in this experiment has 3 leads and a knob on top asshown in Fig. 1.2
You will now investigate how Vout changes as the potentiometer knob position is changed,and determine the functional form of Vout(θ). Here, θ will be the angle through whichthe potentiometer knob has been rotated. To do this, first build the circuit depicted inFig. 1.1(b), with Vin ≈ 5 V coming from the regulated power supply applied to the red andblack jacks (see Appendix D for details of how to use the regulated power supply).
Besides the digital oscilloscope, you will also use a computer based data acquisition(DAQ) system called the myDAQ from National Instruments. The myDAQ also can be usedas a multimeter and function generator.
To use the myDAQ to measure Vout, connect the CH0 red port (the Analog Input AI0+,henceforth called CH0+) on the myDAQ to Vout, and the black port on the potentiometer tothe CH0 black port (CH0-) on the myDAQ. To read the voltages measured by the myDAQ,open the 4BL Application on your computer. Set the Acquisition Modes to measure FixedTime and set the Channel Limits to ±10 V. In this setting, the myDAQ will sample thevoltage every ∆t, which is determined by the number of points and sample rate you choose.Set the number of samples (Number of points to acquire) to 100 points, and use the Scan Ratebar to set the sample rate at 1000 points per second.
5

Figure 1.2: Photos of a potentiometer like the one you will use for this week’s experiment.The potential difference is applied across the outer two banana jacks (black and red), andVout is measured from the center wiper banana jack (white) relative to the black bananajack.
Turn the potentiometer knob all the way one direction until it stops (this may take quitea few turns). Use the myDAQ to measure Vout. To determine what the output voltage valueis, press the Statistics button on the 4BL Application. If the mean is around 5 V, turn thepotentiometer knob all the way in the other direction so the output voltage is ≈ 0 V.
We will call this position our starting angle, and define the voltage that it is readingout as Vout(θ = 0) ≡ Vo (which may be zero). Record Vo in your lab notebook. Withoutchanging Vin, rotate the potentiometer knob in ∆θ = 180 steps and record Vout at each stepby reacquiring data on the 4BL Application. Note that in this case, 360 6= 0 because Vout(θ)is not a periodic function of θ. So when you record your angles, keep adding ∆θ withoutwrapping around the angle at 360 (i.e. 540 6= 180, 720 6= 360 6= 0, etc.) Record all ofyour voltage and angle data in Microsoft Excel. Once finished, be sure to retainthe Excel file somehow (email, USB stick, etc.) for your use when writing yourreport. Take note of the data’s form as you collect it. What does the functional form ofVout(θ) seem to look like? For your report, you will need to create a plot of the Vout vs. θdata, perform a linear regression (linear fit), and present the plot with a figure caption andfit line including uncertainties, so be sure to record all of the information you will need tobe able to do this.
1.3 Magnetic Levitator
Next, we will investigate a more complicated circuit that has already been assembled ona printed circuit board (PCB), shown in Fig. 1.3. This circuit is designed to control a
6

levitation apparatus, and you should take a little time to look at it to get a feel for howmany components there are and so forth even though you may not know what the componentsare or what they do. You will not be expected to understand all of the details for how thiscircuit works, but it will provide you with a realistic example of the types of circuits onemight find in useful electronics devices.
Figure 1.3: Magnetic levitation PCB. On the left side, a 9 V voltage regulator supplies stableDC voltage to the sensor unit and op amps. On the right side, output from the second opamp controls the coil current through a Darlington transistor pair. The two diodes aroundthe coil drive are designed to protect the circuit from voltage spikes. The coil is inductiveand generates large positive and negative voltage spikes when it is switched on and off bythe transistors.
1.3.1 Equilibrium
To begin your exploration of the magnetic levitation circuit, at the board, unplug the powercable and the white cable to the copper coil. Detach the magnet from everything and raiseit near the bottom of the coil. At a certain height it is attracted to the steel bolt thatruns through the center of the coil. Below that point, gravity is dominant and it falls. Try
7

to measure how far below the coil is the equilibrium point? Is the equilibrium stable orunstable?
1.3.2 Infrared LED and Phone Cameras
Plug in board power and the black sensor cable but not the white coil wire. The sensor ismade up of an infrared light-emitting diode (LED) that projects a beam of infrared (IR) light(below the visible red frequency) and a dark IR sensor on the other side whose conductivitychanges with the amount of IR light falling on it. Block the beam with your finger andnotice that the red LED light on the board comes on when the sensor is blocked (if the redLED on the board does not light up, check the wiring and that the plugs are fully inserted,etc.). While one cannot see whether the clear IR emitter is on by eye, many digital camerasare sensitive to IR. If you put a Samsung phone camera in front of the clear LED, you cansee it shining in the IR. Try it, see whether your phone camera is sensitive to IR or has anIR blocking filter installed. Try both the front-facing and rear-facing cameras. Note resultsof your groups phone tests.
1.3.3 Levitate
Plug the white coil wire into the board. Now the red LED also indicates when current runsthrough the coil. Place the magnet onto the hex head of the steel bolt (with a nut on thebottom), and hold it with the magnet side up. The energized electromagnet should attractthe magnet. If it repels, flip the magnet over. The idea here is to adjust the sensor so thebottom of the bolt and nut just half blocks the IR beam when the magnet is just below theequilibrium position. You can adjust this by raising or lowering the sensor in its slot, or bylengthening or shortening the bolt assembly by adjusting the nut on the bottom.
1.3.4 Feedback Control, PID
This is an example of a feedback (or “servo”) circuit. The position of the bolt assembly issensed and fed back to control the coil current. If the magnet falls and blocks more of thebeam, the coil is turned on to pull it back up. This is called proportional feedback. Afterit reaches the desired height or setpoint, the coil is turned off and the magnet begins tofall again. For stable control though, we don’t want the magnet ping-ponging through thesetpoint. We need some damping so that the velocity is also near 0 when the magnet isnear the setpoint. To add damping we also feedback on the velocity of the bolt assemblywhich is the derivative of the position signal. The faster it is moving, the more importantto damp the motion. In terms of feedback circuits, this is a PD controller, a form of PID(Proportional, Integral, Derivative) controller.
8

1.3.5 Circuit Description
The circuit diagram in Figure 1.4 shows the magnetic levitation PD controller, and worksapproximately as follows. The sensor signal, which carries the position data, goes to opAmp 1 where it is subtracted from the setpoint voltage connected to the other op amp 1input. The difference between the setpoint and the position sensor, called the error signal, isamplified by op amp 1 and output to where the “magic” happens. There is of course nothingmagical or surprising about a circuit that controls something, but you may agree that thefact that such a simple circuit can levitate something is pretty cool.
The proportional and differential gains are set by the values of the capacitor and resistorin parallel before op amp 2. The voltage appearing across the resistor path (were thereno capacitor in parallel with it) is proportional to the error signal. The voltage appearingacross the capacitor path (in the absence of the parallel resistor) is proportional to thederivative of the error signal and is phase shifted. These two added signals are effectivelyadded together and amplified by op amp 2, whose output is used to control the coil outputtransistors. One way to think about the capacitor is to consider its impedance |Zc| = 1
ωC
where ω is the angular frequency of the signal being analyzed. The capacitor has a very highimpedance (think of it like resistance – it has dimensions of resistance) for low frequency(slow) signals but acts like a short circuit for high frequencies. At about 10 Hz the resistanceand impedance paths are equal, doubling the signal. Signals faster than 10 Hz are boostedeven more by the capacitive path.
1.3.6 Trim pot
Find the trim pot on Figures 1.3 and 1.4. In this circuit the potentiometer is used to fine tunethe position setpoint on op amp 1. The setpoint voltage is determined by the voltage dividermade up of fixed 5 kΩ resistors and a 10 kΩ trim pot. The trim pot voltage is comparedto the sensor signal at op amp 1, and the difference is amplified. The 10 kΩ trimpot is lessthan one turn for full range and adjusts the floating bolt assembly’s height by about 1 mm.
1.4 Lab Report
Your lab report this week (like most weeks) will consist of two parts – a worksheet and apresentation report. These will be two parts of a single document that you will turn in onTurnItIn, nominally 7 days after the start of your lab section.2
The worksheet will consist of a series of questions intended to be answered essentiallyin list form in the first part of your report. Please use the numering and lettering schemeshown and answer in complete sentences so that your grader knows which question you’reanswering (some parts have more than one question).
2Please consult your TA to learn the actual due date, particularly if you are taking this course in thesummer.
9

Figure 1.4: Diagram of the PD control circuit for magnetic levitation. The proportional andderivative gains are set by the resistor and capacitor in parallel between the op amps (thetriangles called U1A and U1B), labeled “magic happens.” The resistor contributes a voltagedrop across the pair that is proportional to the distance the magnet is from the equilibriumpoint. The capacitor acts as a differentiator, adding the velocity information with a phaseshift. This differential term adds necessary damping, so that the magnet slows to a stopnear the equilibrium setpoint instead of overshooting.
1.4.1 Worksheet
1. Oscilloscope
(a) What is the measured amplitude of the scope’s calibration signal? (Be sure totake any scope attenuation into account to report the real voltage of the signal.)
(b) What is the risetime of the calibration signal as measured by eye? What is itwhen using the risetime measure function on the scope?
(c) Estimate the uncertainty in the ≈ 0 V signal from the pre-triggered portion ofthe signal.
2. Potentiometer and myDAQ
(a) Derive an expression for Vout on the potentiometer wiper as a function of the inputvoltage, R1, and R2 (Fig. 1.1(a)).
(b) What was the voltage you applied across the potentiometer?
(c) What is the apparent functional form of the potentiometer’s output voltage as afunction of the turning angle θ?
(d) Is the potentiometer Ohmic (does it follow Ohm’s Law, V = IR)?
10

3. Magnetic Levitator
(a) About how far below the magnetic coil is the equilibrium position of the boltassembly (measured to the top of the magnet on top)?
(b) Is this equilibrium stable or unstable? How can you tell?
(c) Which cell phone cameras (if any) in your group were sensitive to the IR light?
1.4.2 Presentation Report
Using the data you saved in Excel, you will determine how the potentiometer’s outputvoltage depends on the angle through which the control knob has turned. Additionally, youwill calculate what is called the Independent Linearity of the potentiometer to compare tothe manufacturer’s claim. You can find this rating listed on the bottom of the potentiometerin Fig. 1.2. The way you will present this analysis in your presentation report this week isby presenting it as two, separate plots on separate pages with figure captions and a little bitof body text. The guidelines for making figures were covered in Physics 4AL, and you mayconsult the lab manual from that course (typically found on Prof. Campbell’s homepage)for guidelines if you need a refresher.
Briefly, you will need to:
1. Create a raw data plot
• In Excel, place all your output voltage data in one column, and their correspondingθ values in the column to the right. You do not need to present this step in yourreport.
• Create a scatter plot of all the Vout vs. θ data, and run a linear regression on thedata as well. Present your plot the fit line on the same graph as the data on adedicated page in your labreport.
• Provide a formal figure caption below the plot as per the Physics 4AL manualthat includes the results of your linear regression.
• In a sentence or two of body text below the figure caption, discuss the significanceof the intercept and slope of the fit line.
2. Independent linearity calculation
• Plot the normalized output voltage Vout/Vin vs. θ and run a linear regression toget the fit parameters with uncertainties. Present this plot on a dedicated pagein your report with a proper figure caption that includes the results of your fit.
• In a separate column, calculate the differences between the normalized voltage ofeach data point and the value of the normalized voltage given by the fit line forthat θ. These differences are called the “residuals” of the fit. This means if thefit line is y(x) = mx + b, for each x value, calculate the difference between whatthe fit line produces y(x) and what was observed in the lab (a single y data pointassociated with that x). You do not need to present this step in your report.
11

• Find the minimum and maximum of the absolute values of the residuals. Then,calculate the maximum and minimum percentage deviation from the fit line withrespect to the applied voltage (% deviation = (deviation×100)/Vin). Below yourplot, provide a few sentences of body text describing this analysis, includinganswers to the following item (below).
• The manufacturing company claims a maximum tolerable independent linearityof ±0.25%. Do your results fall within this tolerance range? What does this sayabout the potentiometer you used?
12
Appendix A: Determining andReporting Measurement Uncertainties
Throughout this course, we will be making and reporting quantitative measurements ofexperimental parameters. In order to interpret the results of a measurement or experiment,it is crucial to specify the uncertainty (often called the “error” or “error bars”) with whichthe measurement claims to be a report of the “true value” of the quantity being measured.This chapter is designed to be a quick reference for the assignment and propagation of errorsfor your lab reports. For a more detailed treatment, I recommend the excellent books byTaylor [5] or Bevington and Robinson [1].
A.1 Statement of measured values in this course
Every measurement is subject to constraints that limit the precision and accuracy with whichthe measured “best value” corresponds to the “true value” of the quantity being measured.It is fairly standard in physics to use the following notation to specify both the measuredbest value and the uncertainty with which this value is known:
q = qbest ± δq. (A.1)
Here, q is the quantity for which we are reporting a measurement, qbest is the measuredbest value (often an average, but not infrequently generated in other ways) and δq is theuncertainty in the best value, which is defined to be positive and always has the same unitsas qbest. For our purposes in this course, the uncertainty will always be symmetric about themeasured best value, so the notation of Eq. A.1 will be used throughout.
For example, the most accurately measured quantity in the world is currently the ratioof the energy splittings between pairs of special states in two atomic ions [4], which is givenby
νAl+
νHg+
= 1.052 871 833 148 990 44± 0.000 000 000 000 000 06. (A.2)
Here, the measured best value is 1.052 871 833 148 990 44 and the uncertainty is 6 × 10⁻¹⁷.This level of precision and accuracy is far beyond anything we will be measuring in this
13

course, but the notation in nonetheless understandable because it is given in the form ofEq. A.1.
In this course, you will almost exclusively be measuring quantities with units. Measuredvalues for quantities that have units must be stated with their units. Failing to do so resultsin complete nonsense, the loss of $300 million space probes [3], dogs and cats living together,mass hysteria [2], not to mention the loss of points on your lab report grade. It is fine for theunits to appear as abbreviations, words, in column headers, after the numerical values, or insome combination of these just so long as it is clear what the units are. A good example ofhow to report a measured value is given by the 2010 CODATA recommended value for theproton mass:
mp = (1.672 621 78± 0.000 000 07)× 10−27 kg. (A.3)
Note that the parentheses are used around the measured best value and the uncertaintybecause they have the same units (which is always true) and are written with the sameexponential factor (which can help to make it easy to read).
There are two last points to make here about reporting measured values. First, in thesetwo examples, the uncertainties are written with the same precision (in scientific notation,the number of digits where we include any leading zeros) as the measured best value. Thisshould always be the case, and when you report a measured value with an uncertainty, youmust make sure the uncertainty is reported with the same precision as the measured bestvalue.
Second, if we disregard all of the leading zeros, the uncertainty is presented with onenonzero digit. There are times when it is appropriate to use up to two digits for this(particularly when the first digit of the uncertainty is small, say, a 1 or 2), but uncertaintiesshould never have three significant digits. This is because the size of the uncertainty itself setsthe scale of where the measurement can no longer claim to be providing useful information.
A.1.1 Other notation you will encounter
A quick glance at Eq. A.2 and A.3 reveals that it is difficult to read off the absolute value ofthe uncertainty, since one has to count a lot of zeros. For this course, you will be expected toreport your measurements in the form of Eq. A.1, but you should be aware of other methodsthat are used so that you can interpret their meaning.
Concise notation is useful when the fractional uncertainty becomes very small (as in theexamples above). In concise notation, only the significant digit or digits of the uncertainty arewritten, and they are written in parentheses directly after the best value, which is written tothe same precision. For example, the following shows two ways to express the same measuredvalue for the frequency of a laser
ν = (3.842 30± 0.000 02)× 1014 Hz (A.4)
ν = 3.842 30(2)× 1014 Hz. (A.5)
The second line uses concise notation, where since the number in parentheses has one digit,we are being told that this is the uncertainty in the last digit of the best value. This gets
14

more complicated when uncertainties are quoted with two digits, which seems to be gettingmore common in the literature. As a concrete example, the mass of the electron reportedby CODATA is actually reported in the following form:
me = 9.109 382 91(40)× 10−31 kg (A.6)
Here, we are being told that the last two digits have an uncertainty given by the two digitsin parentheses. This notation can seem somewhat confusing for a number of reasons, but ifwe always think of writing the digits in parentheses below the best value so that they endat the same place, it is easier to keep from getting confused, as in
me = 9.109 382 91× 10−31 kg
± 0.000 000 40× 10−31 kg (A.7)
Asymmetric uncertainties are also sometimes encountered in the scientific literature,where the upper uncertainty may have a different size than the lower one. In this case, thefollowing three examples show how one may see this written, using an example of a measuredradiative decay lifetime:
τ = (37.0 +2.0/−0.8) ms (A.8)
τ = (37.0 +2.0−0.8) ms (A.9)
τ = 3.70(+20−08)× 10−2 s (A.10)
A.1.2 “Sig Figs”
There is a system for implicitly including the order of magnitude of the uncertainty of ameasured quantity by simply stating the value with a certain number of digits, which isoften called the “sig figs” method for reporting uncertainty. Since our uncertainties will bedetermined with higher precision than their order of magnitude, we will not be using thisshorthand method in this course, and you will be expected to explicitly write the uncertaintyof your measured quantities, either in the form of Eq. A.1 or as a separate column entryin a table. However, you should be aware of this shorthand since it does get used, thoughtypically outside of formal scientific literature.
Aside from its lack of specificity, an additional drawback of the sig figs method for report-ing uncertainties is that all too often it leads to laziness and people reporting numbers withimplicit uncertainties far better than are actually merited. Your author starts to becomesuspicious that this might be happening when measurements of continuous quantities arereported to 4 or more digits, particularly by non-scientists. At or after the 4th digit, onehas to think seriously about things such as the calibration and resolution of measurementequipment, thermal expansion of tape measures and rulers, finite response time and jitter oftiming systems, the linearly and stability of spring constants, surface roughness and cleanli-ness, not to mention whether it makes sense at all to define the quantity you’re measuringto that scale.
15

Example A.1 Your author just looked at espn.com and noticed that they report thespeeds of NASCAR racers to 6 digits. They claim that, for instance, Kyle Busch justcompleted a lap with an average speed of 126.648 mph. Can you think of reasonsto suspect that some (perhaps half) of these digits should not be believed? Hint:was the length of the track even known to 6 digits at that particular time on thatparticular day [6]?
A.1.3 Accuracy and Precision
In physics and other sciences, the words accuracy and precision mean different things, andit is important to distinguish between them. The accuracy of a measurement is how closethe measured value is to the true value of the quantity being measured. If the true value iswithin the uncertainty that is reported, we find that the measurement was accurate.
Estimating the accuracy of a measurement is notoriously difficult without knowing thetrue value. The standards that must be met to produce quantitative accuracy estimates varyfrom field to field, but they generally consist of trying to estimate the size of the impact ofevery possible source of error.
One cheap way to make a measurement that won’t be inaccurate is to construct themeasurement poorly on purpose so that the uncertainty is gigantic and is thereby highlylikely to overlap with the true value. However, this illustrates the point that accuracy is notvery useful without another key ingredient of a good measurement: precision.
The precision of a measurement is how small the range is that a statistical spread ofrepeated measurements will fall into. The precision tells us nothing about the accuracy ofa measurement, and is determined entirely without knowing the true value of the quantitybeing measured. Measurement precision is often determined by the statistical spread ofrepeated measurements, and it will be fairly standard in this course to use the standarddeviation of a collection of repeated measurements to set the precision of the reported mea-sured value (see § A.1.6 for a more sophisticated treatment). However, the resolution of themeasurement tool itself could be larger than this spread, in which case the quoted precisionwill be dominated by the instrument resolution.
Exercise A.1 A researcher needs to determine the diameter of a 10 cm long quartzrod to make sure it will fit the mirror mounts for an optical cavity. The calipersused have a digital display whose most-precise digit is in the 0.01 mm place. 10measurements along the length of the rod all yield the same reading on the display,5.98 mm. It is clear that the measured best value is dbest = 5.98 mm, but how canthe uncertainty δd of the measurement be determined?
A.1.4 Computer use and too many digits
A common mistake that students make in reporting measured values is to have too many(way too many) digits on their numbers. After all, the computer will report a measured valueoften to 16-bit precision, which gives a relative precision of 10−5. However, just because a
16

computer gives you a number with 5 digits of precision does not mean that the measurementis accurate at that level. If you have a computer multiply a raw measured value of somethingby π, for instance, the computer will happily tell you the answer to 50 digits. This may lookimpressive at first, but if the original number is only measured to 2 digits, all of that extrastuff is nonsense.
For example, if you see that repeated measurements of the same quantity fluctuate atabout the 3rd decimal place, there is not going to be much useful information in the 8thdecimal place and it should probably not find its way into your report in any form. In thiscase, it would make sense to hang on to maybe 4 or 5 digits during the calculations and formaking tables of your raw data. However, the uncertainty is likely to be in the 3rd digit inthe end, in which case you will be throwing out everything after the 3rd digit in your finalreported number and there is no reason to keep hauling those 8th digits around, clutteringup your spreadsheets and implying an unrealistic uncertainty in your numbers. If you keepthings simple, you will find that the physics is easier to see!
A.1.5 Sources of uncertainty
There are many factors that can contribute to uncertainty in measured quantities. Thesesources are often separated into two types, systematic uncertainty and statistical uncertainty.This is a slight oversimplification, but for our purposes in this course, sources of statisticaluncertainty tend to produce a random distribution of data points about the mean uponrepeated measurements of the same quantity. As such, statistical uncertainty affects theprecision of measured values, but not the accuracy.
Systematic uncertainty, on the other hand, affects all of the measured data points in thesame way and therefore does not contribute to the statistical spread. Systematic uncertaintylimits the accuracy of a measurement, but not the precision of the measured value. If youneed to compare your measured value to a known true value (for instance, perhaps in ameasurement of the charge of the electron, e), you will need to consider systematic effects,particularly if you find that your measurement was inaccurate (the true value does not fallwithin your uncertainty of your measured best value).
However, we will primarily be concerned with quantitative assessments of statistical un-certainty in this course. To reiterate an earlier point, you are likely to encounter two maintypes of statistical uncertainty in this course, those due to finite instrument resolution andthose due to “noise” sources that cause repeated measurements of the same quantity to fluc-tuate. The quantitative method for combining multiple sources of uncorrelated uncertaintiesis covered in section A.2.
A.1.6 Estimation of Statistical Uncertainty in a Mean
One way to estimate the statistical uncertainty in a measurement is to repeat the mea-surement many times and to look at the spread in measured points. This method is onlyapplicable in cases where the precision is limited by statistics (instead of, for instance, in-strument resolution), but will be commonly encountered and so we provide a summary of
17
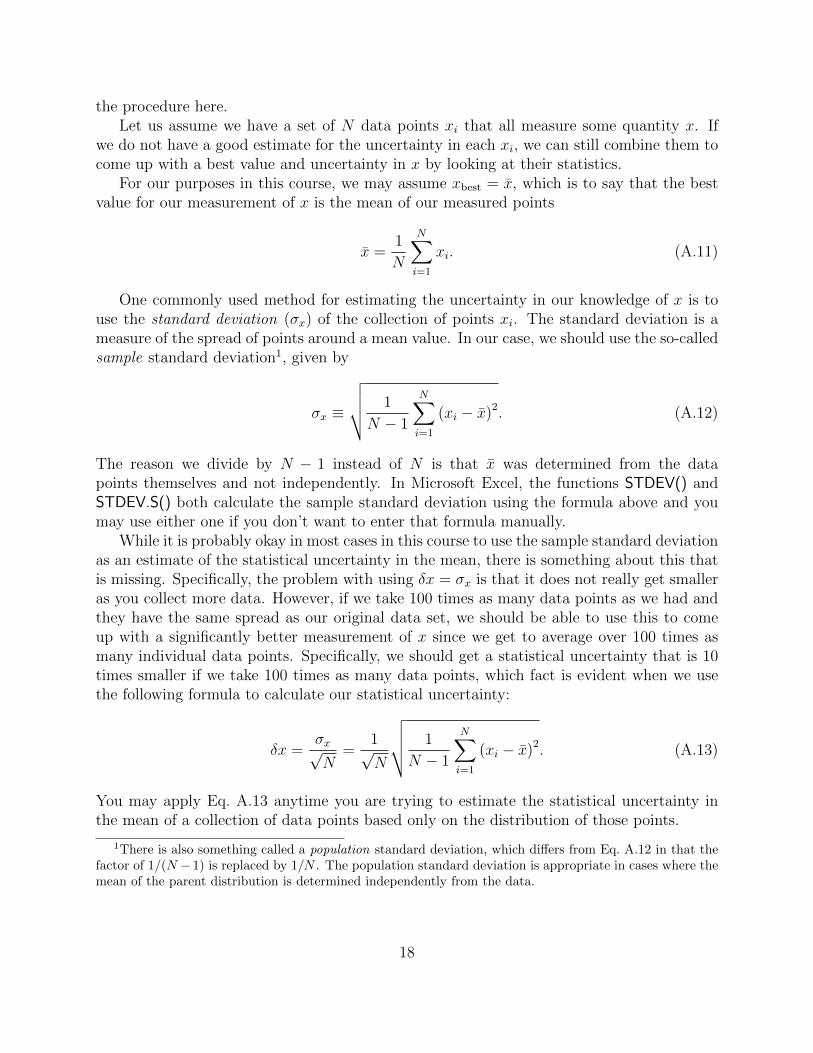
the procedure here.Let us assume we have a set of N data points xi that all measure some quantity x. If
we do not have a good estimate for the uncertainty in each xi, we can still combine them tocome up with a best value and uncertainty in x by looking at their statistics.
For our purposes in this course, we may assume xbest = x, which is to say that the bestvalue for our measurement of x is the mean of our measured points
x =1
N
N∑i=1
xi. (A.11)
One commonly used method for estimating the uncertainty in our knowledge of x is touse the standard deviation (σx) of the collection of points xi. The standard deviation is ameasure of the spread of points around a mean value. In our case, we should use the so-calledsample standard deviation1, given by
σx ≡
√√√√ 1
N − 1
N∑i=1
(xi − x)2. (A.12)
The reason we divide by N − 1 instead of N is that x was determined from the datapoints themselves and not independently. In Microsoft Excel, the functions STDEV() andSTDEV.S() both calculate the sample standard deviation using the formula above and youmay use either one if you don’t want to enter that formula manually.
While it is probably okay in most cases in this course to use the sample standard deviationas an estimate of the statistical uncertainty in the mean, there is something about this thatis missing. Specifically, the problem with using δx = σx is that it does not really get smalleras you collect more data. However, if we take 100 times as many data points as we had andthey have the same spread as our original data set, we should be able to use this to comeup with a significantly better measurement of x since we get to average over 100 times asmany individual data points. Specifically, we should get a statistical uncertainty that is 10times smaller if we take 100 times as many data points, which fact is evident when we usethe following formula to calculate our statistical uncertainty:
δx =σx√N
=1√N
√√√√ 1
N − 1
N∑i=1
(xi − x)2. (A.13)
You may apply Eq. A.13 anytime you are trying to estimate the statistical uncertainty inthe mean of a collection of data points based only on the distribution of those points.
1There is also something called a population standard deviation, which differs from Eq. A.12 in that thefactor of 1/(N − 1) is replaced by 1/N . The population standard deviation is appropriate in cases where themean of the parent distribution is determined independently from the data.
18
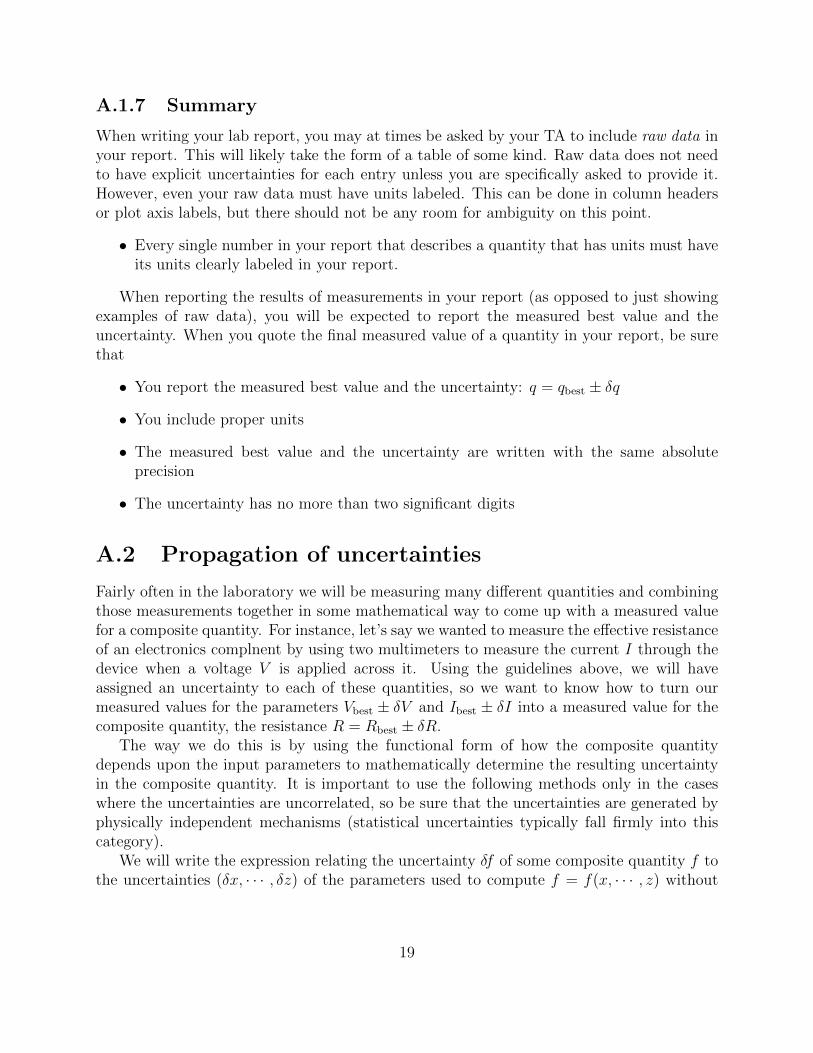
A.1.7 Summary
When writing your lab report, you may at times be asked by your TA to include raw data inyour report. This will likely take the form of a table of some kind. Raw data does not needto have explicit uncertainties for each entry unless you are specifically asked to provide it.However, even your raw data must have units labeled. This can be done in column headersor plot axis labels, but there should not be any room for ambiguity on this point.
• Every single number in your report that describes a quantity that has units must haveits units clearly labeled in your report.
When reporting the results of measurements in your report (as opposed to just showingexamples of raw data), you will be expected to report the measured best value and theuncertainty. When you quote the final measured value of a quantity in your report, be surethat
• You report the measured best value and the uncertainty: q = qbest ± δq
• You include proper units
• The measured best value and the uncertainty are written with the same absoluteprecision
• The uncertainty has no more than two significant digits
A.2 Propagation of uncertainties
Fairly often in the laboratory we will be measuring many different quantities and combiningthose measurements together in some mathematical way to come up with a measured valuefor a composite quantity. For instance, let’s say we wanted to measure the effective resistanceof an electronics complnent by using two multimeters to measure the current I through thedevice when a voltage V is applied across it. Using the guidelines above, we will haveassigned an uncertainty to each of these quantities, so we want to know how to turn ourmeasured values for the parameters Vbest ± δV and Ibest ± δI into a measured value for thecomposite quantity, the resistance R = Rbest ± δR.
The way we do this is by using the functional form of how the composite quantitydepends upon the input parameters to mathematically determine the resulting uncertaintyin the composite quantity. It is important to use the following methods only in the caseswhere the uncertainties are uncorrelated, so be sure that the uncertainties are generated byphysically independent mechanisms (statistical uncertainties typically fall firmly into thiscategory).
We will write the expression relating the uncertainty δf of some composite quantity f tothe uncertainties (δx, · · · , δz) of the parameters used to compute f = f(x, · · · , z) without
19

proof or derivation (see, e.g., [1]):
δf =
√(∂f
∂xδx
)2
+ · · ·+(∂f
∂zδz
)2∣∣∣∣∣xbest,··· ,zbest
(A.14)
where the vertical line on the right side instructs us to evaluate the resulting expression atx = xbest, · · · , z = zbest.
2
If you are not familiar with the notation of those derivatives (∂f/∂x), they are calledpartial derivatives and simply instruct you to treat everything except the variable of differ-entiation as a constant when taking the derivative. If we come back to our example of themeasurement of the resistance of an electronics component, we first identify f = R = V/I.We need to determine δR in terms of Vbest, δV , Ibest, and δI. We can begin by taking thepartial derivatives:
∂R
∂V=
∂
∂V
(V
I
)=
1
I(A.15)
and∂R
∂I=
∂
∂I
(V
I
)= −V
I2. (A.16)
This gives us
δR =
√(1
IδV
)2
+
(−VI2δI
)2∣∣∣∣∣Vbest,Ibest
=1√I2
√(δV )2 +
V 2
I2(δI)2
∣∣∣∣∣Vbest,Ibest
=
√V 2
I2
√(δV
V
)2
+
(δI
I
)2∣∣∣∣∣Vbest,Ibest
. (A.17)
Normally, we would say that√V 2/I2 = ±V/I to reflect the two solutions of that equation.
However, we have defined all uncertainties (δq in Eq. A.1) to be positive, so here we takethe absolute value: ∣∣∣∣∣
√V 2
I2
∣∣∣∣∣ =
∣∣∣∣VI∣∣∣∣ . (A.18)
We can now evaluate our expression at V = Vbest and I = Ibest to give us
δR =
∣∣∣∣VbestIbest
∣∣∣∣√(
δV
Vbest
)2
+
(δI
Ibest
)2
. (A.19)
2The assumption we are going to invoke here is that fbest = f(xbest, · · · , zbest). This is sometimes notstrictly correct, but will serve for the purposes of this course.
20

We have identified Rbest = Vbest/Ibest, so dividing both sides by the absolute value of thisquantity and noting that we can add an absolute value sign to both terms under the radicalsince they are squared anyway gives us the following symmetric-looking form:
δR
|Rbest|=
√(δV
|Vbest|
)2
+
(δI
|Ibest|
)2
. (A.20)
The quantity δq/|qbest| is called the fractional uncertainty or relative uncertainty of somemeasurement of q, so we can restate Eq. A.20 in words by saying that the fractional uncer-tainty in a ratio of two quantities is given by the quadrature sum of the fractional uncer-tainties of the two quantities.
A.2.1 Specific formulas
While the form given in Eq. A.14 is sufficiently general to allow it to be applied directly forevery case encountered in this course, we can summarize some of the most common resultsthat can be derived from it as follows.
• Measured quantity (x) times an exact number (A): f = Ax
δf = |A| δx (A.21)
• Sums and differences (they follow the same rule): f = x+ y − z + · · ·
δf =√
(δx)2 + (δy)2 + (δz)2 + · · · (A.22)
• Products and ratios (they follow the same rule): f = x×···×zu×···×w
δf
|fbest|=
√(δx
|xbest|
)2
+ · · ·+(
δz
|zbest|
)2
+
(δu
|ubest|
)2
+ · · ·+(
δw
|wbest|
)2
(A.23)
• Measured quantity raised to an exact number power (n): f = Axn
δf
|fbest|= |n| δx
|x|(A.24)
• Exponential with measured quantity in the exponent f = Aeax
δf
|fbest|= |a| δx (A.25)
You may recognize that Eq. A.20 is a special case of Eq. A.23, as is Eq. A.21. And, ofcourse, all of these are special cases of Eq. A.14. These cases are not the only possibilitiesfor functional forms of the relationships between measured values, but they are the mostcommon for us in this course. You should be sure to keep in mind that these formulas arevalid only for uncertainties that are uncorrelated.
21

Appendix B: Linear Regression inExcel
A Linear regression is done by the either “least squares” or minimum Chi Squared method.Suppose you have some set of data that you have plotted against each other, x and y, and youwant to run a regression line through it. You write the equation of a line: y = m[x]+b. In thiscase you can have at most two parameters that you can vary to completely describe the line.These parameters are m and b. When a linear regression is performed, the parameters areset usually randomly and the sum of the square of the residuals is computed. The residualsare the difference between your data point y, and what you expect to calculate from yourregression line at that x value so m[x] + b. You do that for every data point then squarethem and you have the sum of the residuals squared. The program will then change theparameters m and b and calculate the sum of the residuals squared repeatedly over a certainrange of values. It will then take the parameters m and b that correspond to the minimumvalue of the sum of the residuals squared, and take that for the slope of the final regressionline. Notice that this method neglects the uncertainties (error bars) on each point.
To make the least squares regression line appear on the plot, right click on any data pointthen select Add trendline. Highlight linear and click on the options tab. Here you can selectwhether or not to set the Intercept to zero, which will be discussed in more detail later whenI talk about all of the regression data. Click ok to add the line.
• Make sure that you have an internet connection and add the Analysis package to Excel.You can do this by going to the menu and clicking tools then Add-ins. Next check thebox next to Analysis toolpack and hit ok. Follow the instructions and the package willbe installed.
• We can now use the analysis package. After you have made your plot for your analysis,make sure that you click an empty cell, go to Tools, Data Analysis. This will opena window with several analysis functions you can use. Scroll down until you findRegression. Highlight it by clicking it and hit ok.
• This will open a new window. In the Input Y Range, drag a box around your y datavalues. In the Input X range, drag a box around your x data values. You need tomake a decision as to whether or not you want the constant to be fixed at zero. For
22

Figure B.1: Regression output in Excel
example, if we were to do a regression on a plot of Q versus V of a capacitor, we knowthat if there is no charge on the capacitor, there should be no voltage across it. So inthat case we would want to check the constant is zero box.
• On the output options, you can check Output range and select an empty cell or justleave it on new worksheet (default) to get all of the regression data on a new worksheet.Sorting through all of the data in B.1, we see some values of interest. These valuesare the X Variable 1 Coefficients and Standard Error, as well as the df and SS valuesfor the Residuals. The Coefficients for X Variable 1 are in fact the value of the slopeof the line, and the Standard Error is the uncertainty on it. So the slope would bem = 1.58± .11. the “R square” value as a goodness of fit parameter. To use r squared,simply know that the closer to 1 it is, the better the goodness of fit.
23

Appendix C: Data Acquisition
A desktop computer is provided on each station. The operating system is some flavor ofWindows. Available software includes Microsoft Office and custom-written modules basedon National Instruments LabVIEW. A limited internet connection is provided so that youcan access webmail for emailing data. Alternatively, you may use a USB flash drive fortransporting your data.
C.1 DAQ
A data acquisition card from National Instruments (NI6024E) is installed in the computer. Itcontains a 12 bit, 200 ksample/sec Analog to Digital Convertor (ADC). Up to 8 differentialinput signals can be measured. Multiplexing between several input signals decreases theconversion speed. The maximum input voltage range is ±10 V. The common-mode voltage(voltage of each channel to ground) is also limited to 10 V.
C.1.1 Input
The inputs for the ADC are at a connector box. The BNC coax connector on the left sideof the front panel is the input for an external trigger signal (TTL, ±5 V). To provide thetrigger signal, connect the TTL output on the signal generator and this trigger signal inputwith a BNC cable.
Three input channels (±10 V maximum) are marked on the front panel as three pairs of+ and −. From left to right, we name them Channel 1, 2, and 3. The inputs are differential,i.e., neither electrode is connected to ground, and what the computer measures is the voltagedifference between + and − terminals at each channel. Connections are made by alligatorclips.
C.1.2 Software
The data acquisition is controlled by LabVIEW Virtual Instruments modules. The modulesare accessed via a software, called ”4BL Main Menu”, whose shortcut icon is on the screen.If it has been removed, the full path is C:\Program Files\4BL\Main Menu. Once we open
24

the software by double-clicking the icon, a main menu for this data acquisition software willbe displayed. We can then further choose different functions to perform according to thetask we would like to complete. The following two functions will be frequently used in thiscourse.
Acquire waveforms
This program is used to measure voltages at one or more channels as a function of time forrepetitive waveforms. In order to synchronize the data acquisition a trigger input is required.The program works like a digital oscilloscope.
To start acquiring waveform on only one channel (Channel 1), single-click “Acquire Wave-form (1 Channel)” on the main menu. There are a couple of parameters we should specify.
1. Set the expected limits of the measured voltages. Voltages higher than the limit willbe truncated in the measurement.
2. Choose the scan rate, i.e., how many samples are acquired within a second.
3. Set the total number of points to acquire.
4. Choose the time limit for acquiring data.
First, we should When every setting is ready, click “Acquire” and you will see the waveformon Channel 1 displayed as a function of time. The time span is given by the ratio of thenumber of points acquired and the number of points per second. The default displayedvoltage range (5 V) can be changed by highlighting the upper or lower voltage limit, typingin the desired value followed by “Enter”. When satisfied, single-click “Save to file”. Itprompts for a file name (e.g., Oct29-2.xls) to be saved. To get out of the data acquisitionprogram, click on “Stop?”, “Done”.
If we would like to sample two channel waveforms simultaneously, single-click “AcquireWaveforms (2 Channel)” on the main menu. This will enable us to sample the waveforms onboth Channel 1 and 2. The sampling procedure is the same as in sampling only one channel.Signals on different channels are identified by the displayed curve colors.
After acquired the waveforms on two channels, we could also study the statistical prop-erties of the two channels by single clicking the ”Statistics”. A new window will pop up,showing the mean value and standard deviation for both channels, and the covariance, cor-relation between channels as well.
Sample signals continuously
This program is used to record a slowly varying signal. It records data at specified timeintervals, writes continuously to file until stopped by terminating the program. No triggeris required. The program is also called a ”data logger”.
To call the program double-click ”4BL Main Menu”, single click ”Sample 1 channel(continuously)” which prompts for various parameter choices:
25

1. Single-click on ”Reset limits” and adjust high and low values in units of 1 V or fractionsthereof by typing over the displayed numbers. Press ”Done” to exit.
2. Single-click on ”Time between points” and increment in units of 1 sec or fractionsthereof by typing over the displayed numbers.
3. Single-click on ”Acquire” and specify a file name (e.g., Oct29-3.xls). When you press”Save” the program starts to record.
The waveform is displayed on a screen with 64 horizontal data points. It will scroll in time.The vertical scale changes automatically to display the signal at any amplitude. However,it saturates when the specified voltage limits are exceeded. When satisfied single-click on”Stop acquiring” to end the data file. If you want to take another file press ”Acquire” again.You can overwrite (replace) an existing file but you cannot append to a file. If you want toget out of the program to process the file, press ”Done?” to quit.
We could also sample more than one channel signals continuously by choosing ”Sample 2channel (continuously)”, for example for 2 channels. The procedure is the same as describedabove.
26

Appendix D: DC Power Supply
D.1 Description
The power supply in each station is able to provide a constant DC voltage during theexperiments, see Fig. D.1. There are three terminals on the right hand side of the frontpanel. The voltage output can be obtained from the red + and the black - terminals, whilethe green one in the middle is grounded at all times.
Figure D.1: A photo of the power supply.
D.1.1 On and Off
The main control knob locates at the center of the front panel. To turn on the power supply,simply turn this knob clockwise. After a click sound a green light named POWER abovethis knob will be turned on, indicating the power supply is working properly. When theexperiment is finished, please remember to power off the supply by turning this knob all theway counterclockwise until a click sound.
27

There is also a switch on the top of the front panel. The switch could be on either STBYor DC ON positions. During the experiments, if you would like to power off the supplytemporarily, you could simply put the switch on STBY position.
D.1.2 Adjust Voltage
The output voltage could be adjusted by turning the main knob mentioned above. Theoutput voltage range, either 0 − 50 V or 0 − 25 V, is set by a switch next to the knob.There is also a voltmeter on the right side of the front panel, which enables us to monitorthe output voltage.
D.1.3 Overload
The power supply can afford only a certain amount of current flowing through it. Themaximum amount of current can be set by another knob on the left side of the front panel,and the current level can be monitored from the amperemeter next to this knob.
If the current is above the maximum current we set, the power supply will automaticallyshut down, and a red OVERLOAD light next to the amperemeter will be turned on at thesame time. In this case, you should reduce the current to the correct range, and press thered RESET button on the upper left corner of the front panel to reset the power supply.
28

Bibliography
[1] Philip R. Bevington and D. Kieth Robinson. Data Reduction and Error Analysis for thePhysical Sciences. McGraw-Hill, Inc., 2nd edition, 1992.
[2] William J. Murray, 1984.
[3] Tony Reichhardt. NASA reworks its sums after Mars fiasco. Nature, 401:517, 1999.
[4] T. Rosenband, D. B. Hume, P. O. Schmidt, C. W. Chou, A. Brusch, L. Lorini, W. H.Oskay, R. E. Drullinger, T. M. Fortier, J. E. Stalnaker, S. A. Diddams, W. C. Swann,N. R. Newbury, W. M. Itano, D. J. Wineland, and J. C. Bergquist. Frequency ratio ofAl+ and Hg+ single-ion optical clocks; metrology at the 17th decimal place. Science,319:1808, 2008.
[5] John R. Taylor. An Introduction to Error Analysis. University Science Books, Sausalito,California, 2nd edition, 1997.
[6] Menglan Zeng and Donald H. Shields. Nonlinear thermal expansion and contraction ofasphalt concrete. Can. J. Civ. Eng., 26:26, 1999.
29