table of contents general aspects of adhesion 4
TRANSCRIPT

1

2
TABLE OF CONTENTS General aspects of adhesion 4 Adhesion forces Tension and superficial energy Surface preparation Surface treatments Adhesives
Adhesives for acrylic 13 Types of adhesive Selection of solvent Selection of cement-solvent Selection of a polymerizable adhesive
Plastiglas service products
19
AD-CRYL Adhesives Storage of Adhesives First aid
Equipment for the adhesion or bonding process
23
Adhesion or bonding techniques
25
Capillarity Immersion or soaking Polymerizable Adhesive
Binding types
28
Design of joints or unions Types of union
Other techniques for joining or fastening
33
Union by mechanical elements Union by ultrasound Union by welding

3
Special cases
42
Pigmentation in acrylics Embedments in acrylics
Machining of bonded pieces
45
Preparation and cleaning Final finish
Practical adhesion exercises
53
Pencil holder Memoholder Waste bin Frames with photo embedded Cube of acrylic or capelo Corner wall protector
Problems and Solutions Guide 68
Appendix 71
Conditioning of acrylic sheet Glossary of terms

4
General aspects of adhesion
Adhesion forces
Adhesion is based on two types of forces-bonds: van der Waals and chemical bonds.
Van der Waals forces are the base for adhesion. These attractive forces act between the adhesive and the substrate.
The chemical bonds produce the stronger type of adhesion. These forces develop when the substrate has chemical groups which react with the adhesive.
Mechanical locking has a role in adhesion; however, it is not usually the primary mechanism.
Some chemical groups are known for their ability to form of Van der Waals bonds. These groups can improve adhesion when present in the adhesive or in the substrate. Table No. l includes these groups in approximate descending order of adhesion properties.
Polymers with low adhesion properties can be improved by adding a small percentage of an organic acid or acrylonitrile.
Organic acid
Nitrite
High
Amide
Hydroxyl
Esther
Intermediate
Acetate
Chloride
Ether
Low
Ethylene
Table No. 1 Groups with Van Der Waals attractions

5
Tension and superficial energy
All materials, whether liquid or solid, having surface forces; these forces are called "surface tension" in liquids and "surface energy" in solids. One drop of any liquid on a flat surface will form a mound due to surface tension.
The solid, however, will try to extend it to a flat shape. If the surface energy is greater than that of the liquid, the drop will extend (drawing no. 1)
Drawing No. 1
Surface tension regulates the intimacy of contact can be achieved with an adhesive on a solid surface. All surfaces have a degree of microscopic texture that must be covered for good adherence, as shown in the drawing no. 2.
This approach shows that the wetting can be achieved either by increasing the surface energy of the solid or the surface tension of the liquid (drawing no. 3)
Drawing No. 2 Wetting of a solid substrate by a fluid adhesive
The surface energy of solids can also be expressed as "critical surface tension", that is, the surface
tension in the required in the liquid to wet the solid. The critical surface tensions of the pure metals
and metal oxides are higher than those of water and organic materials. Solid organic polymers have
critical surface tensions lower than those of water. Polyethylene, fluorocarbons and silicones have
little adhesion, because their critical surface tensions are lower than those of most adhesives.

6
Therefore, in these materials, no degree of cleaning with a solvent, or roughening of the surface,
will produce good adhesion.
Drawing No. 3
Surface preparation
In general, the surfaces to be glued must be clean and dry; free of any adhesive, films or labels and, particularly, of substances that interfere with dampness such as oil, grease, mold release agents or silicones. For any material, the surfaces should be clean, dry and free of grease, oil and corrosion products. Plastic surfaces must also be free of mold release or antistatic agents. The optimum adhesion strength depends on the surface preparation. Cleaning a surface increases critical surface tension and therefore adhesion.
Surface preparation in acrylic
It is desirable that the surfaces are not forced to bond; it is easier to work when they are flat or straight. Sheet areas that are part of the original surface do not need additional preparation, as well as a clean cut with a saw.
But if the area to be bonded is flawed, it is necessary to sand it or give it some other finish until it is flat, smooth and square. The sides to be bonded should not be polished, as the surface will be rounded and the contact area will decrease and crack the bond.
It is always advisable to remove the protective paper from the area to be joined. It is good to protect the surface near the bonding area with adhesive tape that is not affected by the solvent or adhesive and press it well so that these do not see under it. The tape should be removed after the joining has been done.
Use solvents such as methylene chloride, ethylene dichloride, trichlorethylene, chloroform, ether or acetone. Your PLASTIGLAS authorized dealer has the right adhesive to meet your needs.
For specific materials, the following recommendations are very useful.

7
Surface treatments
Metals
First, it is necessary to remove grease and oil with solvent. If not enough, it will be necessary to treat the surface with chemical or mechanical means to remove oxides, etc.
The most suitable method is chemical treatment with chromic mixture, which achieves better results than metal abrasion. Chromates react with the surface, thus providing protection against oxidation. It is important that the surfaces are stuck together immediately after cleaning. Contaminants in the air can reduce adhesion by half in less than an hour.
Below, the typical procedure for treating aluminum and stainless steel with chromic mixture is described:
The potassium dichromate is dissolved in 500 ml of water, then sulfuric acid is added slowly and made up with water.
Procedure:
PRODUCT PROPORTION
a) Clean the steam-based parts Sodium or potassium 28.5 gr. dichromate
b) Submerge in the chromic mixture at 65 °C for ten to fifteen minutes (bain-marie on electric grill). Sulfuric acid 285 gr. c) Rinse thoroughly with water. Distilled water Complete to one liter d) Dry at 65 °C. Note: The handling of the chromic mixture is risky because it is highly corrosive, so it should be done with the required safety measures: a well-ventilated room, extraction hoods, ne oprene gloves, neoprene apron, goggles or mask. Also, the regulations regarding waste material should be subject to the regulations set by the authorities.
Wood
The wood surface should be clean and smooth, and the moisture content must be within the range of service, to minimize the development of efforts by contraction or expansion. Some types of wood, particularly tropical or too resinous types should be treated with solvents or given alkaline surface treatment.

8
Rubber
The vulcanized rubber to be glued to hard surfaces must first end its vulcanizing cycle on the surface. The following is the most common method for vulcanizing:
- The rubber is submerged in sulfuric acid at 9%, for five to ten minutes, in the case of natural rubber; or ten to fifteen minutes, in the case of synthetic rubber. Plastics It is absolutely necessary that the plastic surfaces to be bonded are clean and free of moisture, oil, mold release agents, antistatic agents or any other contaminant. A simple treatment with detergents or solvents (those not darkening or fissuring it) generally provide a clean, smooth surface; but with plastics, perfect cleaning does not ensure optimum bonding. The smooth surfaces of most plastics can hinder bonding where high bonding strength is required. A smooth surface has a minimal contact area and, in fact, the adhesion strength is a function of the two surfaces in contact and the chemical nature of the surface (polarity); considering it is possible to change surface composition to increase the adhesion strength, either by chemical treatment or mechanical abrasion, or both. The most common mechanical abrasion techniques are: hand sanding, or with electrical or mechanical tools and sand-blast. Chemical treatment for plastics is generally used for polyolefins such as polyethylene, polypropylene; fluorocarbons such as polytetrafluoroethylene (teflon), and polychloro trifluoroethylene. For other plastics it is not in fact necessary to give them chemical treatment; it is more than enough with a suitable solvent or light curing.

9
Adhesives An adhesive is a substance capable of holding or joining materials together by a surface fastening. The term "adhesion" is generally used to refer to the action of a body joined to another by means of an adhesive. There is a wide variety of adhesives for bonding or joining same or different materials; in general we can say that materials produce adherence by one or more of the following processes: a) Curing of an adhesive resin over a solid. b) Evaporation of a solvent solution of a thermoplastic polymer. e) Evaporation of water from polymeric latex. d) Cooling of a polymer (such as melt adhesives and plastic welding).
Groups of Adhesives
Curing Adhesives:
a) Epoxy
Epoxy resins are probably the most versatile group of adhesives. High temperature systems can be formulated using cycloaliphatic polymers. More resistant semiflexible adhesives are based on epoxy resins with polyamide or polyamine curing agents. Most epoxy systems have good adhesion without the need for additives. Cure times can be adjusted from seconds to days, depending on the catalysts and temperature.
b) Epoxy Phenolics
Epoxy phenolics allow achieving stabilities at temperatures of up to 315 °C.
c) Polyesters
The best way to describe polyesters is mentioning that they are low cost and fast curing. Usually, they are fragile; however, there are flexibilized formulations with good impact resistance. Polyester adhesives can be cured with heat or at room temperature.
d) Silicones
These adhesives are flexible over a wide temperature range. They have excellent adhesion to many materials. There are one and two materials components with useful resistance to 260 °C.
e) Polyamides
Polyamides allow obtaining good resistance at temperatures above 105 °C. Curing is required at high temperatures or drying, to be effective.

10
f) Polyurethanes
Polyurethanes produce highly resistant adhesives for cryogenic applications or moderate temperatures. Service temperatures range from -268 °C to 121 °C. Polyurethanes are useful for bonding difficult to bond plastics such as nylon, polyesters, mylar and polyurethanes themselves. Substrate or air moisture can react with isocyanate, causing undesirable foaming.
g) Cyanoacrylates.
Modified acrylics known as cyanoacrylates can only be cured in the absence of air. They use substrate moisture as a catalyst to form a very hard adhesive. The curing time is usually less than one minute. Cyanoacrylates are used by applying a drop of adhesive to one surface, then holding both surfaces together for one minute.
The first cyanoacrylates only cured in narrow sections on very smooth surfaces. Recent products can cure on porous surfaces and thick layers. The typical use temperature is about 121 °C. There are high temperature materials that can be used up to 246 °C.
h) Acrylics
There are different types of curing acrylics. One of these consists of a cured polymer dissolved in the monomer. The addition of peroxide will cause the monomer and polymer to complete polymerization. A modification of this process has been developed that allows a fast curing time. Three components are used: an acrylic resin, a peroxide type curing agent and an activator (catalyst). The peroxide is mixed with the acrylic and does not react faster when the activator is added.
Adhesives with solvents Polymerized materials can be dissolved in suitable solvents to obtain very useful adhesives. Evaporation of the solvent produces the solid thermoplastic polymer. Some typical examples are described below: a) Nitrocellulose Solutions of 10% to 25% solids of a solvent have been marketed for many years as scale aircraft models glue and home glue; but recently, cellulose has been replaced by less flammable adhesives. b) Acrylics Solutions of acrylic resins cured in the appropriate solvent, are a good plastic adhesive. They are very effective for bonding ABS, polystyrene and acrylic. c) Rubber cements Rubber-based adhesives are often used as contact cement; that is, with applications to both surfaces to be bonded. Intimate pressure on the surfaces produces adhesion. Some types can be cured with heat, so that the joints are more resistant.

11
Latex adhesives
Latex consists of small particles of cured polymer suspended in water.
When dry, the particles are synthesized and are joined by Van der Waals forces. The dry resin is insoluble in water. Heating melts the polymer and improves the physical properties.
a) Polyvinyl acetate
Latex polyvinyl acetate adhesives are excellent for bonding wood and other materials.
These water-based adhesives, also known as "RESISTOL 850" are manufactured by Industrias Resistol.
Hot melt adhesive
A hot melt adhesive may be any polymer that melts at the appropriate temperature and has considerable attraction forces. For this type of adhesive various thermoplastic polyesters, polyamides, polyethylenes, etc. can be used. The usual method of application is to melt the adhesive and place it on one of the surfaces. The seal is closed and held that way for some time to cool. The maximum strength is achieved in approximately one day.
Melt adhesives are also available as film. In this way, the seal is closed by pressing the film. Upon heating, the film melts and flows. Some garments are stuck today in this manner, instead of sewing them.
Welding
Plastic welding involves the softening and melting thermoplastics. Heat can be applied by means of a hot gas, a heated tool, inductive heat, friction welding and ultrasonic bonding. Many plastics can be stuck quickly using these fusion techniques, obtaining high strength adherence.
Adhesive selection
It is important to consider some factors in the selection of the adhesive:
a) The adhesive must be able to wet the substrate.

12
b) If the substrate is impervious or non-absorbent, the adhesive should be free of water or organic solvent.
c) Low cost is essential, not only of the adhesive, but also the method of application.
d) The adhesive should not be more rigid than the substrate, otherwise efforts can concentrate.
e) After performing the adhesion, the union or seal must be able to withstand the conditions to which it will be subjected.
The particular and/or specific instances of work that the piece will be exposed to must be taken into account such as: high temperature, prolonged efforts, water, chemicals, electrical conductivity, etc.
An adhesive is useful or appropriate when it has a sufficient degree of permanence, cohesive strength, specific adhesion and physical and chemical strength from the environment in which it will work and which significantly contributes to the structural strength of the assembly during the lifetime of the piece.
The classification of plastics, according to their crystallinity and polarity (measured by the solubility parameter), can be very useful in predicting the behavior with solvents, adhesives and the most suitable type of seal. The study of these factors can be summarized as follows.
• Crystalline thermoplastics bond better by heat than by adhesives; these fuse faster than amorphous plastics, and this property can be used with the welding technique. Example: polyethylene, polypropylene, etc. • Amorphous thermoplastics may be very well glued with adhesives or suitable solvents. • Thermoset plastics which are definitely insoluble and cannot be melted can be glued with adhesives and cannot be adhered to one another with solvents or welding.

13
Adhesives for acrylic
Types of adhesive The most commonly used adhesives for bonding acrylic can be classified into three groups: The application of these adhesives depends on the type of union, piece shape, volume to be produced, stress resistance and technique to be used.
We can see that, as a general rule, solvents are used for production of pieces in high volumes, such as promotional and/or exhibitor items. They are inexpensive adhesives and very good strength can be obtained, in addition to being of fast application.
Solvent-cements can be used for a bit more delicate pieces, in the order of up to fifty pieces per batch. In some cases where the piece has not been completely soaked, strength may be a little lower than adhesion with a solvent by the soaking method.
Polymerizable adhesives provide unmatched transparency and stress and weather resistance; their use for furniture, decoration items and structural parts is recommended, particularly if they will be exposed to the elements.
TYPE
EXAMPLE
CHARACTERISTICS
Solvents Acetones
Methylene chloride
Chloroform
Toluene
Low viscosity, softening
acrylic in a short time,
quick evaporation, stick
fast.
Solvent cements The same solvents +
shavings
of acrylic or AD - CRYL EXTRA
Desired viscosity, fill
holes, stick relatively
quickly.
Polymerizable adhesives AD - CRYL
III PG-
PLUS
Same raw material as
acrylic, more stable to the weather, very strong bond.

14
Selection of solvent
The solvent should be selected carefully for the plastic with which work will be done; there must be adequate dissolving to soften the plastic surface, so that when pressure is applied, a small excess of material is displaced out at each point of the surface. To achieve high adhesion strength, the solvent must meet the following requirements:
a) It must be a good solvent b) It must not degrade the plastic c) It must not evaporate too quickly.
Selecting the best solvent for bonding plastic is facilitated by considering the solubility parameters
of polymers.
Table No. 4 Solubility parameters Defining the solubility parameter ( ) to the square root of the cohesive energy density, that is the amount of energy required to vaporize one cubic centimeter of the liquid to be evaluated. The solubility parameters of solvents and polymers can be found in specialized literature; some of these are listed below as a reference. Plastic materials are best dissolved in a solvent where their solubility parameters are as close to each other as possible.
POLYMER SOLVENTS
Xylene
Toluene
Ethyl acetate Methyl
Ethyl Ketone
Perchloroethylene
(Trichloroethane)
Trichloroethylene
Methyl acetate
Dichloromethane
(Methylene chloride)
Dioxane (Ketone)
Acetone
Isopropyl alcohol
Acetic acid
8.5
8.9
9.1
9.3
9.3
9.4
9.6
9.7
9.8
10.0
11.5
12.1
Polyethylene
Polystyrene
Polymethyl -
Methacrylate (Acrylic)
Polyvinyl Chloride
(PVC) Epoxy Resin
Trovicel
Nylon 6.6
7.9
9.1
9.5
9.7
10.9
13.6

15
Using the solubility parameters, we can better understand why an acrylic (= 9.5) is soluble in trichloroethane (= 9.3) or in a methylene chloride (= 9.7); but with an acetone (= 10.0) even a possible degradation occurs.
There is also the possibility of mixing two solvents with different solubility parameters, in order to match the parameter of the polymer. For example:
1/ = 1/ A + 1 / B
Where:
= Solubility parameter A = solubility parameter of liquid B = solubility parameter of liquid B
Assuming we want to mix 75% of methylene chloride and 25% of trichloroethane, then:
1/ = 0.75/ 9.7 + 0.25/ 9.3 1/= 0.0773 + 0.0268
1/ = 0.1041 = 1/0.1041 = 9.6
We can summarize that, in a solvent, if the solubility parameter is lower than that of the polymer, there will only be swelling; if it is very close to the value of the polymer, there will be a solution; and if it is higher, there will be a degradation of the polymer.
Solvents such as toluene, acetone and, especially, the group of chlorine, such as methylene chloride, trichlorethylene, chloroform and carbon tetrachloride work well for acrylic.
We can say that the more chlorine atoms contained in the molecule, the more aggressive the attack will be on the acrylic and, therefore, there will be a better adhesion, although it also runs the risk of cracking the union due to solvent vapors and eventually, stress concentration can be caused.
Warning: All solvents are volatile substances that can be toxic if inhaled in sufficient concentrations for long periods of time, or if ingested. In fact, methylene chloride in reagent or analytical grade can be a carcinogen in humans.

16
Selection of the cement-solvent
A cement-solvent comprises a solution of a polymer (that for acrylics is Polymethyl Methacrylate) in a solvent and thus a medium viscosity adhesive is obtained.
The preparation of a cement-solvent is easy; it is enough to dissolve glass acrylic shavings or, more conveniently, glass acrylic pellets in any solvent such as toluene, acetone, methylene chloride or chloroform, to achieve the required viscosity.
In the market there are few brands of cement-solvent to glue acrylic. When these are required, it is necessary to consider the following:
a) That it is not very light (that it has viscosity). b) Ensure that it has no impurities.
c) That it does not present yellowing and/or excessive viscosity.
Using a cement-solvent reduces the possibility of cracking in the workpiece; one advantage is the viscosity application and being able to fill small holes left by the imprint of the saw or router when cutting.
Selection of a polymerizable adhesive
A polymerizable adhesive consists in prepolymerization or partial polymerization of a compatible and preferably identical monomer to the polymer (plastic material) to which it will be stuck.
All polymerizable adhesives have a catalyst system and promoters or initiators, which must be mixed in proportions recommended by the manufacturer. Generally the mixture of the components to be polymerized may be carried out at room temperature (20 °C - 25 °C); but at low temperature polymerization time may be prolonged and/or vice versa, a high temperature can reduce the curing or polymerization time.
One of the differences of polymerizable adhesives relative to solvents or cements-solvents is that the reactivity that is caused when mixing the components generating an exothermic reaction; that is, a temperature increase that can even reach up to 120 °C. This exothermic reaction is due to the chaining of the monomer containing the adhesive, this chaining produces friction and this in turn generates heat.
There polymerizable adhesives that may even present yellowing, bubbles or contraction; this is due in most cases, to excessive of catalyzation, and can only be controlled at the beginning of the formulation.
There is little variety of polymerizable adhesive on the market, for its selection the following points should be considered:

17
Viscosity
An average viscosity cannot be talked about, because there are those of low viscosity, and others too dense. The decision will depend on the type of union and the degree of freedom the application has.
Stress resistance
In general all have good resistance, in practice it is difficult to measure each one of them; however, there are reports that AD-CRYL III presents a resistance higher to others.
Crystallinity
The crystallinity in a polymerizable adhesive may be lost as a result of an over catalyzation. There are adhesives that in spite of an excess of catalyst or initiator, do not present yellowing; there are even some that, by incorporating the component (catalyst) to the resin, turn yellow, but once the reaction is complete they recover their crystallinity.
Ease of formulation
There are adhesives that are very functional but require a very exact formulation, even with a microbalance.
Availability
It refers to the ease of acquiring the adhesive on the market.
Curing Time
It depends on the production times there are (considering that it may vary).

18
Cost
It should be evaluated according to the type and quality of the piece.
As a general recommendation for bonding acrylic, especially if the piece has been exposed to excessive frictional heating, or when it is bent or thermoformed, it is very important that the aforementioned piece is subjected to a conditioning to reduce residual stresses, otherwise the seal may be susceptible to cracking.

19
Plastiglas service products
Adhesives AD-CRYL
PLASTIGLAS offers the AD-CRYL adhesives line, especially designed for you to make strong bonds with maximum transparency, in line
with the characteristics of your product.
Ad-Cryl Extra
It is a cement-solvent type adhesive that acts on PLASTIGLAS acrylic, softening the surfaces that come into contact with it, ideal for bonding all kinds of acrylic items for indoor applications.
It is composed of a single component of quick application. It contains PMMA and solvents. It is desirable that the adhesive be used at temperatures between 20° - 25 °C. It is applied directly to the parts to be joined. We recommend using the capillarity bonding technique or with brush.
Ad-Cryl lll
It is an ideal polymerizable adhesive for bonding all kinds of acrylic items for interior or exterior applications.
It is made up of three components:
a) A polymer solution.
MMA (methyl methacrylate monomer) and stabilizers.
b) An initiator system.
Initiators for polymerization.
c) A catalyst system.
Polymerization catalysts.
These three components must be mixed in the recommended proportion and at the time it will be used.

20
It is desirable that the adhesive be used at temperatures between 20° C - 25° C. The polymer solution (component A) is mixed with the initiator system (component B) and, once the latter is dissolved, the catalyst system (component C) is added, depending on the curing time (Table No. 5). A suitable proportion is 98% of component A, 1% of component B, and 1% of component C (this proportion is through weight calculation).
Important:
Never mix component B and C, as a violent and explosive reaction will be caused. Bonds made with this mixture may be machined or working in eight hours, approximately. In bonds where thick layers of adhesive are used, it is best to wait twelve to twenty four hours. These bonds will appear like a single piece.
Table No. 5 Recommended formulating proportions
Ad-Cryl Pg-Plus
It is a polymerizable adhesive of maximum transparency. For bonding all kinds of acrylic items for interior or exterior applications. It is made up of two components:
a) A polymer solution.
MMA (methyl methacrylate monomer) and stabilizers. b) A catalyst system.
Dibutyl phthalate and catalysts.
These two components must be mixed in the recommended proportion and at the time it will be used.
COMPONENT
CURING TIME
A POLYMER SOLUTION
B INITIATOR SYSTEM
C CATALYST SYSTEM
75 min.
60 min.
45 min.
98%
98%
96%
1%
1%
2%
5%
1%
2%

21
It is desirable that the adhesive is used at temperatures between 20° C - 25° C. The polymer solution (A) and the catalyst system (B) are mixed, depending on the curing time (Table No. 6). A suitable proportion is 95% of polymer solution and 5% of the catalyst system (by weight or volume).
Table No. 6 Recommended formulating proportions
If preparing 100 ml. of adhesive is required, 5 ml. of catalyst system must be added to 95 ml. of polymer solution; considering that 25 drops of the catalyst system are about 1 ml. Bonds made with this mixture may be machined or working in eight hours, approximately. In bonds where thick layers of adhesive are used, it is best to wait twelve to twenty four hours. These bonds will appear like a single piece.
Storage of Adhesives
The properties and characteristics of these adhesives will be maintained for a period of three months, provided that they are stored at temperatures not above 18° C. For greater durability and better performance, storing in refrigeration is recommended.
Precautions
AD-CRYL adhesives are flammable. Keep away from heat sources or electric sparks; wear in well ventilated areas, avoid the inhalation of its vapors.
First aid
After contact with skin, wash the affected area with plenty of water. If swallowed, induce vomiting with 5% saline and seek immediate medical attention. In case of contact with eyes, rinse with clean
COMPONENT
CURING TIME
A
POLYMER SOLUTION
B
INITIATOR SYSTEM
75 min.
60 min.
45 min.
97%
95%
93%
3%
5%
7%
22
running water for ten or fifteen minutes and consult a doctor immediately. Keep out of reach of children.

23
Equipment for the adhesion or bonding process
The materials and equipment for bonding are very simple and the expense is not really very representative.
It is very important to consider that the area or room where this operation is performed,
is a spacious and airy space, with an ambient temperature of 20° C- 25° C, and is clear of operations producing dust or shavings.
A worktable of 1.20 X 2.40 mts. well leveled and covered with a 6 mm thick sheet of polyethylene or glass will be a good work surface; as these materials are not exposed to attack by solvents and when polymerizable adhesives are used they may easily be detached from the surface.
Below the equipment and accessories required are listed:
1. Table of 1.20 X 2.40 mts. covered with a sheet of polyethylene or glass (6 mm. thick)
2. Trays of different sizes, of polyethylene and low
3. Mosquito net type wire mesh
4. Hypodermic syringes and needles of several diameters (from insulin type gauge
25 to gauge 20)
5. Polyethylene dispenser of different capacities (bottles used for applying hair dyes are suitable for this purpose) or empty silicone dispensers.
6. Glass and polyethylene containers with lids
7. Scissors
8. Hair brushes and brushes of various sizes
9. Plastic spatula or wedges (preferably polyethylene)
10. Type "C" presses of various sizes
11. Eye-glasses
12. Organic vapor mask

24
13. Apron
14. Running water tap or eyewash
15. Extinguisher
16. Paper cone for water
17. Cellophane tape (Scotch tape) 1" and 2" wide
18. Masking-tape 1" and 2" wide (tape to cover)
19. Alcohol, hexane
20. Bands of different sizes
21. Polyethylene beaker
22. Graded beakers

25
Adhesion or bonding techniques
There are basically three types of methods for bonding with any adhesive of the aforementioned groups. These are: capillarity bonding; immersion or soaking; and polymerizable adhesives. This chapter presents several techniques depending on the type of binding or piece characteristics.
Capillarity
Capillarity bonding is probably the most popular method for bonding PLASTIGLAS acrylic sheet. This technique works because of the ability of a liquid (or low viscosity solvent) to flow through the area to be joined by capillary action. Properly done, it will produce a strong and transparent bond. Capillarity bonding will not work if the parts do not settle properly.
It must be ensured that the pieces settle properly and place the adhesive tape in the area to be protected; fasten the pieces, if necessary, to a template, with tape or clamps. The pieces to be joined can also be shored up with some cyanoacrylate-based adhesive on the ends, this will give the position and strength to be able to manipulate the pieces and bond them.
It is important that the union is kept horizontal or otherwise, the adhesive will seep out of it.
Carefully apply the adhesive along the joint and on both sides, if possible, on
a plane. Use a hypodermic syringe or a thin nozzle bottle, although a brush or dropper may also be used, if done with caution (Drawing no. 4).
If the adhesive does not completely flow into the joint, the vertical piece should be tilted slightly (about one degree) to the outside, this will allow the solvent or adhesive to flow freely within the joint. Let the joint dry thoroughly before removing the adhesive tape or clamps.
Drawing No. 4

26
Immersion or soaking
This method of bonding PLASTIGLAS acrylic sheet requires immersing the side of one of the pieces to be joined directly in the solvent. It is important that only the edge is immersed.
Use a shallow aluminum, stainless steel, galvanized steel, glass or polyethylene tray to immerse the acrylic. Place a wire mesh inside the tray, so that the edge of the sheet does not touch the bottom. Ensure that the tray is level and pour solvent in it only to uniformly cover the wire mesh. Then carefully position the edge of the work piece to be bonded into the tray until it rests on the mesh and hold it with a support or with your hands as it soaks.
PLASTIGLAS acrylic sheet should be rested in the solvent for one to five minutes, depending on the thickness thereof, the type of solvent and the bonding strength required. The soaking time (immersion) should be sufficient for the side of the sheet to swell; as soon as this happens, the sheet must be removed. Allow the excess solvent to drain, but quickly place the soaked piece precisely over the other part to be joined. Keep the parts joined, but without pressing, for about thirty seconds to allow the solvent to act on the surface of the other piece.
Immediately apply pressure to remove air bubbles that may be trapped, being careful not to remove the solvent. When the pieces are joined, keep them in firm contact, holding them for five to fifteen minutes without moving.
Drawing No. 5

27
Polymerizable adhesive is used in joints that cannot be bonded by the capillarity or immersion methods, because the parts do not settle correctly, the area to be bonded is hard to reach or the piece will be exposed to the weather or requires a maximum stress resistance. This viscous adhesive is able to fill small holes, obtaining strong and transparent unions where other adhesives cannot. This viscous or polymerizable adhesive is available with PLASTIGLAS authorized distributors This type of adhesive requires mixing two or three components; see the instructions attached to the containers. Remove the protective paper from the area to be joined and apply the adhesive carefully with a brush, spatula or directly from the container (Drawing no. 6). Place adhesive or masking tape around the area to be bonded to protect it, this can be removed before the adhesive begins to polymerize. Once the adhesive is polymerized it is no longer possible to remove the adhesive tape. Carefully place adhesive on one side of the joint and then put the pieces together and keep them still for a minimum of ten minutes.
Drawing No. 6

28
Types of union Design of joints or unions
The design of joints must meet two basics: a) The joint should be done with the maximum amount of bonding area. b) A favorable geometry must be used in the design of the joint. There are five kinds of stress, which are tension, compression, shear, bending and torsion. You can know the kind of stress which a piece is under by the deformation produced (Diagram 1), and compound stresses (such as in the case of bending or torsion) should never be confused with the combination of stresses that can act at the same time on the workpiece.
Diagram No. l

29
Maximum area
Of these five kinds of efforts, there are three that are derived from the bonding of plastic, and they are: tension (or traction), shearing and detachment.
In tension stress
The forces are perpendicular to the plane of the joint, these being evenly distributed over the whole area. When this happens, the joint is under stress at the same time and all the adhesive is working at the same time. There is no part of the joint or union that is subject to a greater or lesser share of the load.
In shear stress
The stress is parallel to the plane of the joint. The stress is also distributed uniformly over the whole area of the joint or union and all the adhesive is working at the same time.
In detachment stress
Not all the adhesive is working at the same time. When the force is applied, one side of the joint is under a great stress and other areas remain free. This type of union may not be as strong in a comparable area on the tension or shear stress and, of course, is best avoided.
Geometry of the union
The design of a joint or union is usually more complicated than has been illustrated. A union is rarely subject to only one type of stress. In practice, different additional stresses generally combine with a misapplication and/or adhesive degradation (aging, ultraviolet rays, etc.). In some cases, the distortion of the adhesives under load can induce secondary stresses.

30
Effort direction
Diagram No. 2
Usually, loads acting on the adhesives are of shear type but there may also be traction or tension stresses. In the following drawing illustrates the stresses in a simple joint subjected to shear forces.
Drawing No. 8
Bending forces in a overlapped joint subjected to a shear force can cause a failure initiated by tension. A change in design can reduce or eliminate this problem. The following drawings illustrate the way to get maximum strength, with a favorable geometry. In practice, some of these joints are not possible, due to high cost. In general it can be said that such unions are used for pieces that require high resistance to stresses, such as illuminated advertising, aquariums, structural pieces, etc.

31
Diagram No. 2.
Drawing No. 9

32
Another practice to eliminate stress failures, is to paste and rivet or screw (floating fastening technique). In this design, the rivets or screws should be located near the edge of the union and the holes must be greater than the diameter of the rivet or screw, such that the adhesive will resist the load or shear while the rivets or screws provide tensile strength.
The union types that can be applied to glue acrylic have different modalities, depending on the characteristics of the piece, stresses to which it will be subjected, ease and/or difficulty of production, etc. The most common types of union can be seen in the following illustrations.
Diagram No. 2
TYPES ILLUSTRATION
Sandwich
Overlap
Angled at 90°
Angled at 45°
Perpendicular
In "V"
Straight or bone

33
Other techniques for joining or fastening
Union by mechanical elements
This technique is, of course, suitable for all plastic materials, depending on the stresses permitted by the configuration of the union or joint, screws, bolts, lag screws, inserts and any similar mechanical device, providing a purely mechanical force on a specific area.
Still, the advantages are greater with bonding techniques than with mechanical element unions, which in some cases cannot be used. In general it is assumed that:
a) Plastics are used, the most cases, in applications where metals may suffer rusting or corrosion, and this obviously excludes the use of hardware or mechanical elements.
b) Mechanical elements are likely to concentrate stress, so they should be evaluated in structural design, considering the forces in the components.
c) Adhesive bonding is capable of bonding different materials and, if compared with mechanical elements, provides a uniform stress distribution over the total bonding area. A clean surface without edges, eliminates weight, acts as a seal and can absorb vibrations.
In acrylic metal screws (which are self-tapping), screws passed or threaded and metal inserts are commonly used.
Self-tapping screws
It is necessary to drill slightly less than the diameter of the screw so that the thread can be formed, and with the same length. This type of union is not recommended, because there is the possibility that the acrylic cracks.
Screws
Passed
When passed screws are used, they are usually bolted to a structural part (which may be another material, a structural profile, an expansion wall plug, etc.).
We recommend using pan head or Allen type screws and place a double washer, one rubber on the acrylic, and the other steel between the rubber and head of the screw; after tightening the screw, turn it back half a turn. It is not advisable to use flat head screws as they can damage the material.

34
Drawing No. 10
It is important to note that in these cases, the hole should be 3/32" or 1/8" larger than the screw diameter.
Threads
The acrylic can be threaded as any material and the same considerations that are generally observed must be taken.
A hole slightly less than the diameter of the screw should be drilled. It is advisable to use oil or a soapy water solution to avoid cracking; it will
also be necessary drill in steps and remove the drill bit several times to remove the burrs or excess material. When the piece is screwed, it is important to loosen it so stresses are not concentrated.
Metal inserts
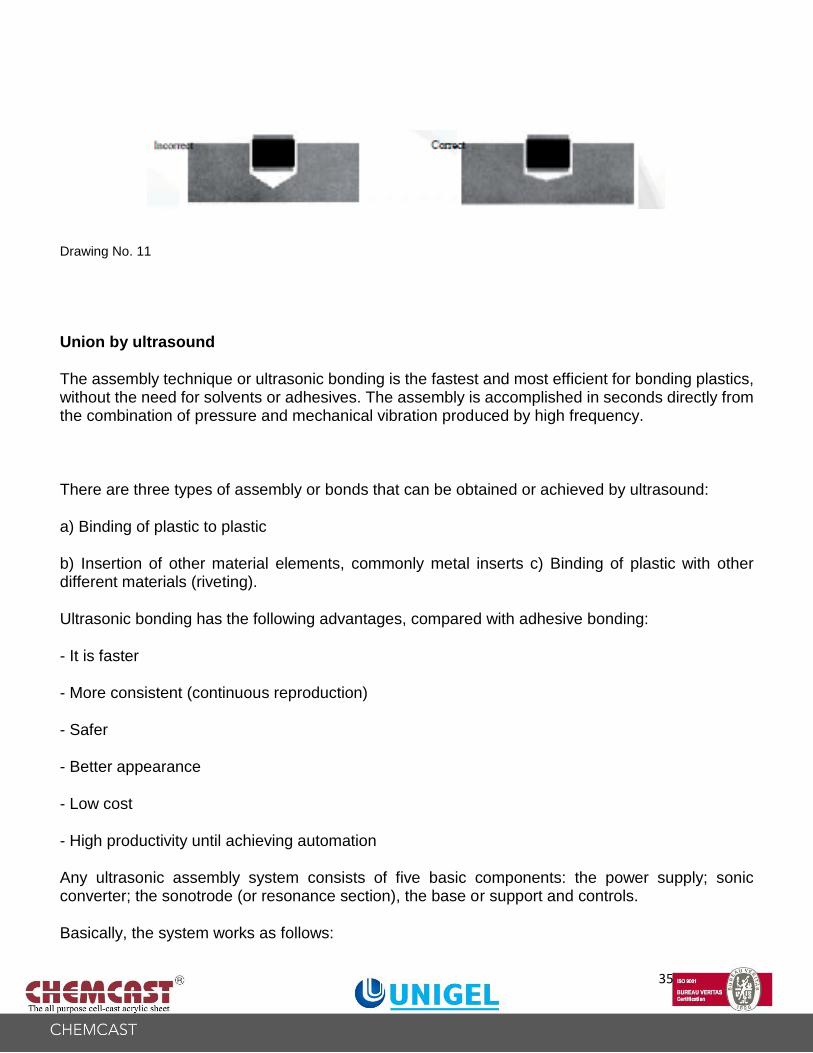
There is a great variety of inserts for different purposes. In the case of acrylic, it is best to drill slightly smaller than the diameter of the insert and use the ultrasound equipment to seal. Otherwise, the most convenient is it is snapped into place or
stuck with a bit of cyanoacrylate. Because the attack angle of a drill bit is 120°, for a better appearance it will be necessary to redrill them with another bit that is almost flat, or change the attack angle of the bit.
35
Drawing No. 11
Union by ultrasound
The assembly technique or ultrasonic bonding is the fastest and most efficient for bonding plastics, without the need for solvents or adhesives. The assembly is accomplished in seconds directly from the combination of pressure and mechanical vibration produced by high frequency.
There are three types of assembly or bonds that can be obtained or achieved by ultrasound:
a) Binding of plastic to plastic
b) Insertion of other material elements, commonly metal inserts c) Binding of plastic with other different materials (riveting).
Ultrasonic bonding has the following advantages, compared with adhesive bonding:
- It is faster
- More consistent (continuous reproduction)
- Safer
- Better appearance
- Low cost
- High productivity until achieving automation
Any ultrasonic assembly system consists of five basic components: the power supply; sonic converter; the sonotrode (or resonance section), the base or support and controls.
Basically, the system works as follows:

36
The power supply converts the line voltage of sixty cycles per second to radio frequency waves of twenty thousand cycles per second. The sonic converter changes this radio frequency signal to mechanical oscillations at the same frequency. Then the sonotrode transmits the mechanical vibrations to the workpiece; these vibrations travel through the plastic to the assembly or union area, where it is generated by frictional heating. The plastic melts at the union and immediately solidifies
when the vibrations stop. The result is the fusion of the two parts. The whole process takes less than a second.
Ultrasonic Welding
For ultrasonic bonding or welding, high intensity oscillations travel from the sonotrode through one of the plastic pieces towards the surface of the other piece. The heat generated by friction creates a constant flow of molten plastic through the joint or union. When the molten plastic solidifies, the cohesion is made.
Drawing No. 12 Drawing No. 12 A
Ultrasonic Insertion
In this operation, an insert is positioned in a machined or molded borehole, slightly less than the diameter of the insert. The sonotrode transfers the mechanical energy, causing frictional heating and melting the plastic at this interface.
This part of the melted material allows the insert to be placed in its final position. The plastic solidifies in its new form around the insert.
Drawing No. 13 Drawing No. 13 A

37
Riveting
This process is generally used for joining metal and plastic. A hole or borehole in the metal part receives a plastic extrusion and a sonotrode with a special profile makes contact with the protrusion, and when ultrasound is applied it melts taking shape (commonly mushroom), holding the workpiece.
Drawing No. 13 Drawing No. 13 A
Union by welding
Plastic welding is not so different from the metal welding. Both techniques use a heat source, welding rod and similar types of union. The joints are prepared and beveled in the same way for similar stresses; but despite this, there are differences between metal welding and plastic welding. Among others, thermoplastics have a very small fusion range between the temperature at which they soften and temperature at which they burn or degrade. They are also poor heat conductors, so it is difficult to heat them evenly; due to this, the plastic or bar surface can burn before the material surface becomes completely soft. The degradation time to the welding temperature is shorter than that required to complete the softening of the most thermoplastics for welding or fusion bond.
Therefore, plastic welding equipment must work with a much smaller temperature range than metal welding equipment. The temperature range which is employed in thermoplastics is between 250° C and 500° C.
Welding equipment for plastics
Basically it can be divided into two types, depending on its heat source:
a) Electric
b) Gas

38
The two types use gas (either compressed air or an inert gas), which passes through a heat source which raises the gas temperature from 250° C to 500° C. It is preferable to use welding equipment whose heat source is electric, because it is more compact and easier to handle. In addition, it does not requires flammable gas for heating, there is no danger of explosion and exchanging special tanks.
Types of union
Despite having different procedures, the same types of unions are used for metals and plastics. The union types most commonly used in plastics are shown in the following illustrations.
Surface preparation
The surfaces to be joined must be free of dust, oil or particulate matter. They can be cleaned with a soft cloth. It is not recommended cleaning with solvents because they tend to soften the edge causing a poor weld finish.
Acrylic welding
Most acrylics can be welded to themselves or PVC using PVC bars.
Acrylics require a high temperature for welding. A slightly plasticized bar is employed and must be welded with compressed air. Acrylic is susceptible to cracking by stresses and tends to foam and flow during the operation; the flow lines, when finished, usually show entrapped air.
The temperature range is 260° C to 290° C for the PVC bar, and 310° C to 350° C for the acrylic bar.

39
Welding Rules
With electrical equipment
a) Ensure that the supplied gas is clean; moisture or oil in the line may cause short circuit in the heating element and can prevent a good weld to be achieved.
b) Ground equipment to prevent a short circuit, electric shock or damage to the heating element.
c) Never turn on the electrical system first while the gas is closed, always open the gas first and close when finished.
d) The volume of compressed gas passing through the heating element determines the welding temperature. To increase the temperature, the volume flow of gas per minute should be reduced; to lower the temperature, the volume flow of gas per minute should be increased.
e) Never touch the tip of the nozzle when the equipment is turned on. f) For maximum shelf life of the heating element, always use the recommended temperatures.
g) Read the manufacturer's operating manual before using the equipment for the first time. With Gas Equipment
a) When gas equipment is used for welding, it is essential to ensure that it is equipped with proper installation for the gas to be used (tanks, hoses, clamps, gauges, etc.).
b) Ensure that the supplied gas is clean; moisture or oil in the line may have unsatisfactory results.
c) When it is required to regulate the temperature, reduce the volume of welding gas, or increase the heating gas pressure to increase the temperature. c) To lower the temperature, the volume of welding gas should be increased, or the heating gas pressure reduced.
d) Never touch the tip of the nozzle when the equipment is turned on.
e) Always open the welding gas system before lighting the flame.
f) Never leave the flame on if the welding gas is off, always turn off the flame before closing the welding gas.
g) Read the manufacturer's operating manual before using the equipment for the first time.

40
Application procedure for plastics welding
In plastics welding, the materials are welded by means of a suitable combination of heat and pressure. This combination can be achieved with the conventional method of hand welding by applying pressure on the welding bar with one hand and at the same time, heating the bar and the material base with hot air.
For a successful weld, it is required that heat and pressure are maintained constant at a proper balance. Too much pressure on the bar will tend to create stresses in the drop. Too much heating will carbonize, melt or distort the material.
Preparation
With the torch ready for welding, the temperature must be checked by holding the thermometer bulb at the end of the nozzle. When PVC is being welded it is easy to determine the correct temperature by just holding the nozzle 1/4" from the material and counting four seconds, after this time, the material must display a slightly yellowish tint; otherwise, the temperature must be adjusted.
The welding bar must be selected and cut slightly larger than the length to be welded. For a best start to welding, one end must be cut at an angle of 60 degrees.
Starting to weld
Hold the torch with the nozzle 5 to 20 mm from the material to be welded, preheating
the area at the base of the material and at the bar until it starts to glow and get sticky; it is necessary to hold the bar at an angle of 90° from the base of the material and move it up and down slowly and hardly touching the material base.
To maintain the proper heating balance, the torch must be moved in such a way that heat is applied equally to the bar and the material base. At the same time, the bar should press the material base with a slight downward pressure of about 1.3 kg. (3 pounds); when it is clear that the bar begins to melt, then it should be moved forward.
Overheating the bar will make it rubberized and cause it to be virtually impossible to weld. Overheating the material will cause it to char or melt, causing improper bonding.

41
Drawing No. 16 Drawing No. 16 A
Once welding has started, the torch must continue blowing from the bar to the material base, with approximately two oscillations per second. Because the welding bar swells less than the material and is heated faster it is necessary to focus the heat in the material to compensate. An approximate operating speed is 15 to 20 cm. per minute, depending on the plastic. It is important to keep the angle of the bar with respect to the base, which should be 90°; a variation in the operation will produce cracking stresses in the union. To complete the union, you have to stop at the end of the piece and apply direct heating at the intersection of the bar and the material; remove the torch and keep downward pressure on the bar for several seconds; allow the bar to cool for a few seconds to prevent the possibility that it may lift from the cavity, then twist the bar until it breaks; finally, remove excess material with a knife.

42
Special cases
In this chapter, two concrete and specific cases are posed, but at the same time, they are not common: pigmentation in adhesives and embedments in acrylic. The application of these two techniques can give an entirely different approach as far as adhesion is concerned.
Pigmentation in adhesives
Pieces to be be adhered or glued may b pigmented, but there are limits for the use of adhesives to be pigmented. It is not recommended to pigment adhesives of the solvent and cement-solvent groups as they tend to degrade, reducing their ability to adhere, and it is difficult to achieve the desired color.
Pigmentation generally requires more extensive research and specific level development on what is being worked; therefore, only the most feasible techniques will be suggested to be able to perform this procedure on bonding of acrylic pieces
In the case of acrylic, pigmentation may take place only in polymerizable type adhesives.
If a transparent color is required, organic dyes and pigments must be used. If opacity is required, dyes may be incorporated directly in the adhesive by stirring, preferably with a motorized propeller at 4,500 rpm Inorganic pigments should first be integrated into a vehicle (which in this case may be organic plasticizers); subsequently MMA (Methyl methacrylate monomer) use is required for the paste not to be too thick; this pigment is incorporated into the adhesive in a proportion of 1 to 10 ml. of pigment for 100 ml. of adhesive, considering the degree of concentration of color required. This is done with a motorized impeller at 4,500 rpm; even a drill with propeller can be used for this purpose.
This pigmentation can present problems such as poor color homogeneity, low incorporation of pigments, density not compatible with the adhesive, incomplete polymerization of the adhesive, etc.
If pigmenting an adhesive is required, it is easier to acquire a dye for polyester resin and incorporate it directly into the adhesive by stirring. Such dyes for polyester resin have good compatibility with the acrylic resin. It is simpler to obtain already prepared pigments and incorporate them into the adhesive.

43
Embedments in acrylics
It is very common to find articles based on acrylic embedments, because it is more difficult to achieve a polyester resin-based embedment. However, one of the outstanding characteristics of acrylic is its transparency, crystallinity and UV resistance; but at the same time there could be contractions of up to 20% of the volume, a greater exotherm that will cause bubbles and more delicate preparation.
Here, the most convenient, is to use the PG-PLUS adhesive and formulate it over the longest possible curing or polymerization time and follow the for embedment and treatment of objects, this is the easiest and fastest way to obtain acrylic embedments. Another way to do them is from MMA (Methyl methacrylate monomer); but this process involves a bit deeper knowledge of chemistry. This process is described below. Embedments from MMA Presentation The monomer is inhibited with two stabilizers which may be hydroquinone or topanol. Separation
a) When the monomer has hydroquinone, this must be separated by decanting, adding a solution of sodium hydroxide (40 g. NaOH in one liter of H20) to the monomer at a rate of one liter of monomer per half liter of solution.
This mixture is stirred and allowed to stand in a separating funnel, separating the monomer by decantation which will be on top. After, the monomer is filtered to clean it of impurities, with filter paper.
b) When the monomer has topanol there is no need to separate it, as this is removed during the polymerization, it is only filtered to clean it of impurities.
Preparation To prepare the prepolymer, a catalyst, VAZO-64 or benzoyl peroxide, is added to the monomer in a proportion of 2 grams. per liter of monomer. Once the peroxide is added, it is mixed well with stirring in a PYREX beaker and placed in a bain-marie (75 - 85° C) for one or two hours until it reaches a viscosity of 20 poises (like honey). Embedment Then it is cooled to 20° C and is poured into a mold (preferably aluminum, ceramic or glass) to half full.

44
This mold is again placed in a bain-marie (37-40° C) and when the prepolymer has hardened more (like rubber), the object to be embedded is placed and covered with another layer of viscous prepolymer, completing the filling of the mold. Once the mold is full, it is covered with a polyethylene film and left in a constant temperature bain-marie of 37-40° C for a period of six hours or more, until it becomes hard. Finally, once the polymerization is complete, the bain-marie temperature is raised to 90° C for about half an hour. Treatment of objects
a) Metal objects first require cleaning with the same monomer. b) When objects are made of wood, clay, fabric or silicates, they need to be submerged for
twenty four hours, at least, in pure monomer. c) For insects with soft parts, these should be filled with self-polymerizable acrylic (AD CRYL III
PG PLUS). d) For flowers and fruits, these need to be subjected to a pretreatment to set the colors; a fairly
complicated process, because they must be dehydrated for changing the water for monomer. For this, silica-gel is used.
Notes
a) Multiple embedments can be made when the objects are small, to later cut the pieces. Objects can also be placed at different levels, according to the heights of the prepolymer layers.
b) When there are several embedment tasks, and the prepolymer mixtures exceed four or more liters, it is necessary to use a vacuum pump to remove bubbles from the honey.
c) In very large volumes, the exothermic polymerization reaction is violent. d) It is possible to eliminate bubbles in the final part if nitrogen is bubbled and placed in an
autoclave; the time and pressure depend on the volume and number of pieces.

45
Machining of bonded pieces Machining is an additional step to a successful outcome in the bonding of pieces. Although not necessarily an operation that has to be done in most bondings; in some cases it will be greatly useful, because it can minimize the most common errors such as bubbles, bad seating of the pieces to be joined, incorrect assembly and poor adhesion. For practical purposes, the machining operation has been divided into two stages: the preparation of the piece and the final finishing. Cleaning preparation As mentioned above, the following factors should be considered:
a) That surfaces are not forced when joined. b) It is easier to bond flat or straight sheets. c) An additional preparation to the sheet area forming part of the original surface is not
necessary, as well as a clean cut with a saw (provided it is in good condition and does not chip or leave ripples).
d) The sides to be bonded should not be polished, as the surface will be rounded and the contact area will decrease and crack the bond.
In short, to achieve the best result in bonding, contact surfaces must provide the best possible seating. While it is feasible to bond pieces with a finish given by the simple saw cut, using solvent type adhesives by the capillarity method can cause bubbles to become trapped in this case, it is also recommended to seat the saw cuts with the router or sander. For a better understanding of how to prepare a piece for bonding, this process has been divided into several groups: plane pieces, bent pieces, thermoformed pieces and the combination between them. Flat pieces Sandwich This type of piece requires no preparation or machining for bonding of the surfaces (the bonding technique will be discussed in Chapter 10).
46
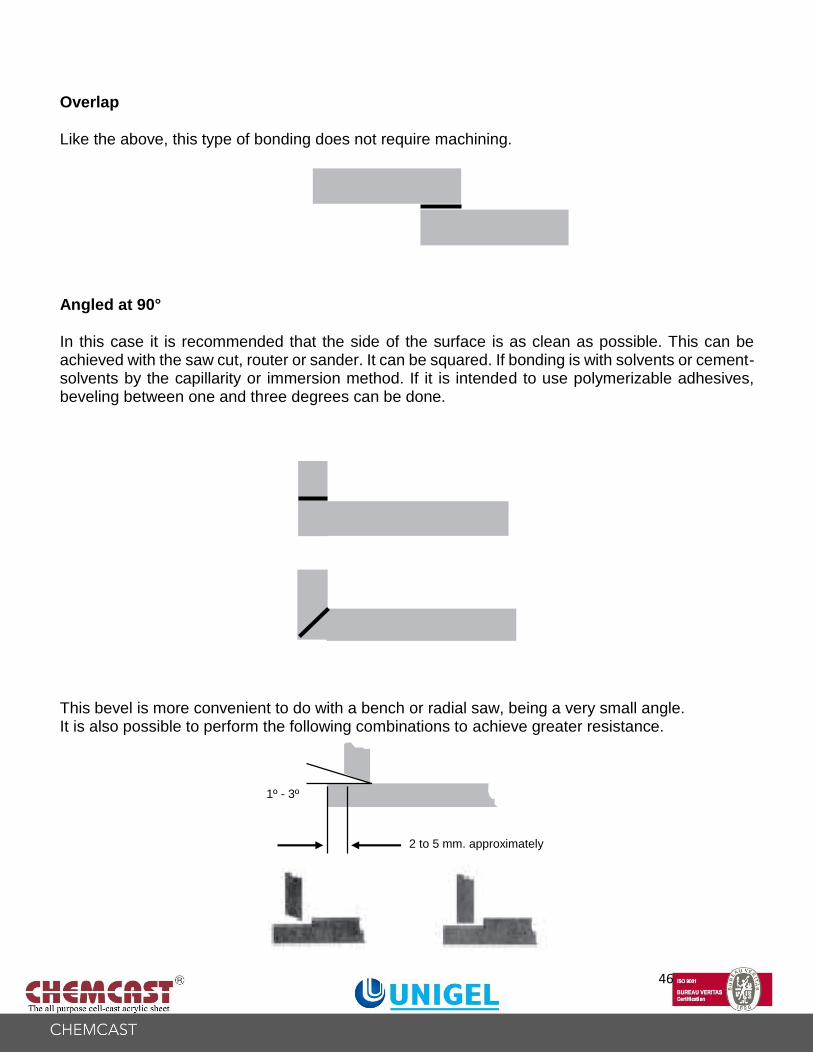
Overlap
Like the above, this type of bonding does not require machining.
Angled at 90°
In this case it is recommended that the side of the surface is as clean as possible. This can be achieved with the saw cut, router or sander. It can be squared. If bonding is with solvents or cement-solvents by the capillarity or immersion method. If it is intended to use polymerizable adhesives, beveling between one and three degrees can be done.
This bevel is more convenient to do with a bench or radial saw, being a very small angle. It is also possible to perform the following combinations to achieve greater resistance.
1º - 3º
2 to 5 mm. approximately

47
Such assemblies can be machined with the bench, radial or router saw. For ease of operation, it is preferable to machine it in a router with 90° bit, as illustrated.
When thicknesses are greater than 6 mm, it is advisable to do them in steps so that the material is not chipped or the bit "pulls" the material, making the operation risky.
Perpendicular This type of bonding, like the previous ones, can be done with the bench or radial saw; but these have the disadvantage that the disc thickness must be 3/32" (2.38mm.), 1/8" (3.175 mm.) or 5/32" (3.96 mm.), being a limiting factor for some greater thicknesses and having to perform a double grooving, besides the tooth type, either combined or alternate, it will always leave irregularities in the groove, as illustrated. It is better to use the router with a straight bit, as the irregularity will be minimal, plus special bits can be made with the desired groove width at an affordable cost.

48
In "V" This is the same case as machining at an angle, the bench, radial or router saw can equally be used. If saws are used, the desired angle can be given. With the router only 90°, 45° and 30° bits may be used. The bevel or tilt range will depend on the viscosity of the polymerizable adhesive, and can be from 3° to 25°
Straight or bone In bone bonding machining is not required, but it is possible to increase the bond strength by increasing the bonding area or surface. A bench, radial or router saw may be used with a small angle of 1° to 3°, it can even be staggered to create better resistance.
Bent pieces
When acrylic pieces of any thickness are bent, the fold always presents a wrinkle. This wrinkle can cause a piece not to settle well and cause it not to get wet with adhesive, having trapped air. Most of the items that are seen on the market have this defect.
A feasible recommendation is to seat the edge to be bonded with a belt sander, grinding between one to two millimeters. Another way is to rectify the finished piece, this way it will not give problems when bonding, and solvents, cement-solvents or polymerizable adhesives may be used with the capillarity, immersion, brush or any other methods.
In pieces like the one illustrated, which serve as brochure holders, displays, etc., when two or three flaps are bent, it is likely that the heating line is not equal in the two or three cases, presenting a variation in the measurement and, therefore, an improper seating. In these cases what can be done is seat the piece with a belt, circular sander or with a router.
Straight or bone

49
It is more convenient to perform this operation with a router as with a sander it is not possible to have absolute control. With a router, this operation gives optimum results, but an excess of 10% should be planned due to shrinkage of the material.
This machining, combined with the immersion or soaking method and using solvent, has superior strength and optimum quality.
Thermoformed pieces
In fact, the goal of a thermoforming, is to obtain a practically finished piece. Very rarely these pieces need to be bonded, and if this were the case, it is likely to be considered in any of the two previous groups, with slight variations.

50
Final finishing
In some types of bonding, after this, a cutting operation must be performed. As in the preparation of the piece and for a better understanding of the final finish, we will divide the process into several groups: flat pieces, bent pieces and thermoformed pieces.
Flat pieces Sandwich 100% of pieces bonded in this way require sawing, preferably radial, so that the two pieces are the same size. This is done because this bonding always presents adhesive runoff or, in some cases, the upper piece is slightly smaller than the bottom one.
Radial saw disc
In cases in which a surplus of material has been left, it is advisable to cut flush with a bearing drill bit or
with a guide.
Sandwich
Angled at 90°
Radial saw disc
Bench saw disc

51
In "V" For this type of bonding, the surplus adhesive can be removed by rectifying with a router and straight bit, as can be seen in the drawing
Perpendicular, angled at 45 degrees, straight or bone and overlap
No additional machining is required.
In "V"
Fixed router on
work bench
Manual router

52
Bent pieces In the case of bonded parts, such as pencil holders that need the base flush with the main body, the fastest and most effective way is to use the router with bearing bit. Practically, this is the most common case in the finishing of folded and bonded pieces. Any other case that could present is likely to adapt to this or one of the above.
Thermoformed pieces It is possible that isolated cases arise; these can be treated by using any of the above techniques.

1
Practical adhesion exercises
This chapter provides cases of typical examples of acrylic items in which the application of the different groups of adhesives (solvent, cement-solvents and polymerizable adhesives) are used, with different bonding techniques and types of union that can be performed.
Pencil holder
Product characteristics
1) The edge may have the following finishes: sawing, routing, knifing, flame brightening or mechanical polishing.
2) Screen printing, may be before or after folding.
3) The base will be cut flush with a router bearing bit.
4) It is advisable to use a drill at 90° in the router to make a "V" canal; when folding, it will be easier to control the measurement.
5) Flush cut. On this side a surplus (approximately 5 mm. maximum) should be left to cut flush using fixed router and bearing bit.
Once the piece No.1 is bent, the two sides will have to be bonded through the capillarity technique with solvent; in this case, a rubber band can be used to help the parts remain in firm contact and the solvent is applied on both sides with the help of a syringe or dispenser and allowed to stand for one hour*. To achieve better contact and greater strength, the ends can be shored up with any cyanoacrylate based adhesive; this should be before applying the solvent.
PRODUCT PENCIL HOLDER
Adhesion technique: Capillarity and Soaking
Adhesive group: Solvents
Adhesive used: Methylene chloride or
Weld-On No. 4 Type of Union: Angle at 90°
1 4
2 5
3

2
*Many of the solvents achieve maximum bond strength between 12 and 24 hours.
Once allowed to stand, the excess material is cut with a fixed router and a bearing drill bit, which will cut exactly flush with the surface where the drill bit is supported.
This operation can also be done with a guide and a straight cut drill bit.
Once the piece is bonded and routed, the surface that will be seated on piece No. 2, can be sanded or routed, because the folding radius causes a rising, which does not allow the piece to be properly seated.

3
This can be eliminated by sanding with a belt, circular sander or fixed router.
To bond piece No.1 with No. 2 by soaking method, it is proceeded to superimpose piece No.1 on a shallow metal, glass or polyethylene tray and with a mosquito net or chicken coop mesh cutout on the bottom.
The piece is allowed to soak, it is not necessary for the solvent to cover the mesh; in fact it is only required that the solvent level is slightly lower than the thickness of the mesh.
By the effect of solid and liquid surface energy and tension contact is achieved and this will be seen visually.

4
Once it has stood for two to five minutes, the acrylic swells slightly (becoming a whitish color), it is removed and the excess solvent allowed to drain and proceeded to bond with piece No. 2 that has been cut slightly larger to absorb position errors in the bonding.
For more effective bonding, it is possible to add a light weight on the workpiece and the solvent allowed to evaporate for at least two hours.
Subsequently, it is proceeded to cut the excess from the base in the same way as previously done, by means of a fixed router and a bearing drill.
Acrylic
Solvent level
Wire mesh
Swelling

5
Observations.
The capillarity and immersion or soaking with solvent methods can be used separately or together, mainly in publicity, point of sale, promotional, etc. materials; in itself, high volume pieces which require good mechanical strength at low cost and with high productivity.
Memo Holder
Product Memo holder
Adhesion technique Soaking
Adhesive group: Solvents
Adhesive used: Methylene chloride or
Weld on No. 4
Type of union:
Angle at 90°
Product characteristics
The piece No. 1 is smaller in size than piece No. 2. An adequate bonding is one in which the piece No. 1 is well bonded and centered with respect to piece No. 2.
In pieces where the radius is generous, often the material shrinks causing air to enter the bonding, having a poor quality and little strength.
For piece No. 1 to correctly fit, it will be necessary to seat it with the circular or router belt sander. Just as is done in the pencil holder.
Piece No. 1

6
To bond piece No. 1 with the No. 2 it is necessary to build a fixture for bonding; this should be sufficiently simple and practical for the operation.
Soak the piece in the tray with solvent, leave for the necessary time and remove, placing piece No. 1 over the No. 2 using the fixture.
Waste bin
PRODUCT WASTE BIN
Adhesion technique: Capillarity or brush
Adhesive group: Cement-solvent or
polymerizable
adhesive Adhesive used: Ad-Cryl Extra,
Ad-Cryl III, Weld-On 16,
Weld-On 40
Type of Union: Perpendicular or at
an angle at 90°
(1)

7
Product characteristics
(1) A stronger union can be obtained if a channel is made with router and straight bit.
The problem that can occur in this type of bonding, is that it does not remain square; for this, it will be necessary and important to have fixtures to set the piece before bonding.
To apply the adhesive by capillarity technique, the piece must be fixed with rubber bands and check that it has been squared. Subsequently, the adhesive is applied with a special dispenser or a hypodermic syringe, allowing the bonded portion to stand for an hour in order to proceed to bond the opposite side in the same way.
To bond with a brush, a template or bonding fixture will be required and the adhesive will be applied on the piece attached to the template until it is firmly bonded, repeating the process as often as necessary.

8
Frames with photo embedded
PRODUCT FRAME
Adhesion technique Polymerizable Adhesive
Adhesive group: Polymerizable Adhesive
Adhesive used: Ad-Cry1 111; Ad-Cry1 Pg
Plus; Weld-On 40
Type of Union: Sandwich
Product characteristics For sandwich type bonds there is only one process with two variants. In this type of bonding the most important thing is to eliminate any bubbles which can be generated in the operation itself; these can be removed by pouring the adhesive with a very well defined flow pattern.
The two variants in the bonding process refer to how to place the cellophane and/or masking tape (covering tape) to mask and protect the area.
The first involves placing cellophane tape around one of the pieces to be joined, as illustrated, forming a dam which will prevent the adhesive from overflowing on the sides and also preventing its wastage, since the excess can be returned to the container.
The second involves placing masking tape to the bottom side, leaving the adhesive in sight. In this option there is adhesive waste, plus it will run off the sides.

9
The procedure for making a sandwich type bond consists in: 1) Masking one of the two pieces to be
joined (with either of the options).
2) Pouring the adhesive with the flow pattern, as illustrated.
3) Placing the other piece with a downward movement supporting at one end.
Adhesive
Correct
Incorrect

10
This type of bonding is one of the most difficult, because the following defects may occur: a) Bubbles b) The adhesive is not enough to cover the surface c) The thickness of the adhesive is not uniform.
a b c
These defects can be corrected as follows:
a) Bubbles It is possible to remove small bubbles by pressuring from the center outwards, making the bubble "walk". If air is observed entering the piece, it will be necessary to maintain the pressure until the adhesive polymerizes.
b) If the adhesive did not cover the entire surface: in some cases, exerting pressure can eliminate it. If this does not work, it will be necessary to detach and add more adhesive.

11
c) If the thickness of the adhesive is not uniform: it is usually necessary to place a weight on the piece; in the first exercises it will be convenient to use a heavy object (leads, bricks, etc.) or set the pressure with type "C" clamps or presses.
For machining the workpiece, it must be allowed to fully polymerize; it is recommended to wait 24 to 48 hours, depending on the formulation used and room temperature conditions.
For laminating a photograph, paper or bill it is desirable that this surface is free from dust or grease and is completely flat. It is also highly desirable that the acrylic piece is two or three centimeters larger than the final dimension of the piece. If it is printed paper a test will have to be performed to see if the adhesive does not
attack the ink. This can be done by placing a drop of adhesive on the printout; if after
between five and fifteen minutes the ink does not run means that it is suitable for the
laminate.

12
To paste a picture or paper this should be masked with bondable cellophane tape or masking tape, as mentioned above.
Once the adhesive is prepared, pour a
sufficient amount on the center of the
acrylic to paste the picture.
The picture is placed and the excess
adhesive is removed with a rubber
roller (printer or typesetter type) or a
polyethylene spatula, and allowed to
polymerize or harden (approximately
fifteen minutes).
Subsequently, the adhesive is poured as noted Above with the same flow pattern and the other piece is placed with a depression on the edge or axis of movement.
13
Observations To perform machining operations, it is necessary to let stand for a period of 24 to 48
hours.
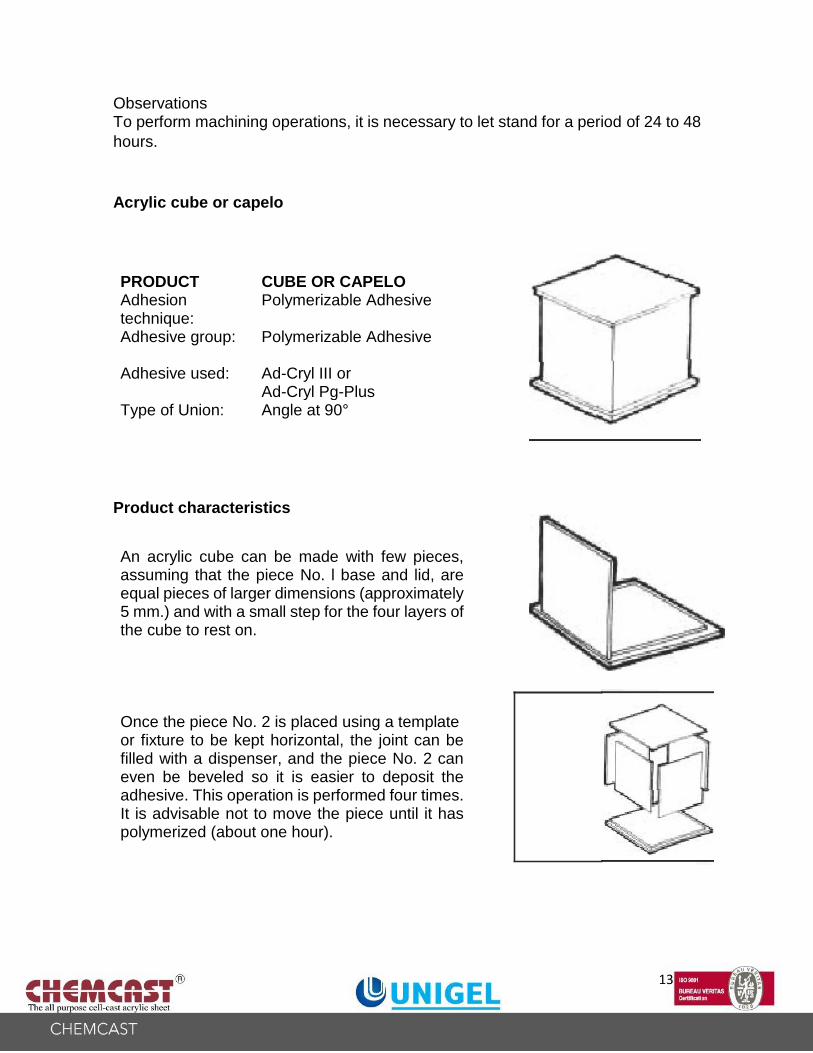
Acrylic cube or capelo
PRODUCT CUBE OR CAPELO Adhesion technique:
Polymerizable Adhesive
Adhesive group: Polymerizable Adhesive
Adhesive used: Ad-Cryl III or Ad-Cryl Pg-Plus
Type of Union: Angle at 90°
Product characteristics
An acrylic cube can be made with few pieces, assuming that the piece No. l base and lid, are equal pieces of larger dimensions (approximately 5 mm.) and with a small step for the four layers of the cube to rest on.
Once the piece No. 2 is placed using a template or fixture to be kept horizontal, the joint can be filled with a dispenser, and the piece No. 2 can even be beveled so it is easier to deposit the adhesive. This operation is performed four times. It is advisable not to move the piece until it has polymerized (about one hour).

14
After the piece is rotated to fill with adhesive on the outer and inner joint, repeating the process as many times as necessary. The last step is to bond the base, for which the semibonded cube must be turned over and proceed with the dispenser, as was done at the beginning of the operation. Observations. For machining the workpiece it will be necessary to wait eight to twelve hours. The edges should be rectified with the router and bearing bit.
Corner wall-protector
PRODUCT CORNER Adhesion technique: Polymerizable Adhesive Adhesive group: Polymerizable Adhesive Adhesive used: Ad-Cryl III or
Ad-Cryl Pg-Plus Type of Union: Angle at 45°
In general, an angle union at 45° is always more convenient to be done in thicknesses above 4 mm, especially if the piece is very long.
The piece No. l must be beveled at 45°, either with router and 90° bit or bench saw and disc rotated at 45°
As a second step, it is necessary to mask with cellophane tape (Scotch tape), as illustrated in the drawing.

15
It is important that the pieces are not completely stuck; it is better that they are approximately one to two millimeters apart.
With the pieces placed on a plane, the adhesive is deposited with the dispenser and placed in an aluminum profile with supports (as shown). It is important that the table where the bonding is done is well leveled.
Once the adhesive starts to react (this can be determined by the degree of viscosity it has), the cellophane tape must be removed before it completely polymerizes, otherwise it will not be able to be removed and will remain as part of the piece. In this type of bonding it is more advisable to work with Ad-Cryl Pg-Plus which is more viscous, or Ad-Cryl III, once the reaction starts to increase viscosity.
Observations. For machining the workpiece, it will be necessary to let it stand for eight to twelve hours.

16
Problems and Solutions Guide
DEFECT POSSIBLE CAUSE SUGGESTED SOLUTION
• Cracking
• Polished or shined
surface or edges • Over catalyzed
polymerizable adhesives
• Excessive pressure when bonding • Residual stresses in
the sheet •Very ggressive
adhesives or solvents
• Do not polish or shine
surface and edges • Check formulation, change for a
slower formulation • Reduce pressure • Condition the sheet in
oven (tempered) • Change Adhesive
• Bubbles in edges • Edge with too much cutting groove • Solvent used is not
appropriate • Poor bonding technique • Low pressure • Excess pressure for
a short time • Inadequate adhesive
and/or type of union • Inadequate seating
• Excess pressure for little time
• Seat with sander or router
• Change to other more
viscous adhesive type • Perform bonding tests • Practice technique • Maintain pressure for
longer • Change to other more viscous adhesive and/or union type
• Rectify edges
• Keep pressure constant for longer

17
• Bubbles on surfaces
• A solvent type adhesive is being used
•Poor bonding
technique •Low pressure
•Excess pressure for a short time
• Contact with solvent vapors
Change to a Polymerizable adhesive type
• Perform bonding tests • Practice technique
• Increase pressure • Maintain pressure for
longer • To remove entrapped
bubbles apply pressure from the center outwards
• Shorter contact time with
solvent
• Haze or cloudiness • Surface with grease or silicones
• Presence of moisture
• Over catalyzed
polymerizable adhesive
• Clean with soap and water or hexane
• Dry surface
• Check formulation
• Yellowing of the union
• Cracking
• Polished or shined
surface or edges • Over catalyzed
polymerizable adhesives
• Excessive pressure when bonding • Residual stresses in
the sheet • Very aggressive
adhesives or solvents
• Do not polish or shine
surface and edges • Check formulation, change for a
slower formulation • Reduce pressure • Condition the sheet in
oven (tempered) • Change Adhesive

18
• Bubbles in edges • Edge with too much cutting
Groove
• Solvent used is not appropriate
• Poor bonding technique • Low pressure • Excess pressure for
a short time • Inadequate adhesive
and/or type of union • Inadequate seating
• Excess pressure for little time
• Seat with sander or router
• Change to other more viscous adhesive type • Perform bonding tests • Practice technique • Maintain pressure for
longer • Change to other more viscous adhesive and/or union type
• Rectify edges
• Keep pressure constant for longer
• Bubbles on surfaces • A solvent type
adhesive is being used
• Poor bonding
technique
• Low pressure
• Excess pressure for a short time
• Contact with solvent vapors
• Change to a
polymerizable adhesive type
• Perform bonding tests • Practice technique
• Increase pressure • Maintain pressure for
longer • To remove entrapped
bubbles apply pressure from the center outwards
• Shorter contact time with
solvent
• Haze or cloudiness • Surface with grease or silicones
• Presence of moisture
• Over catalyzed
polymerizable adhesive
• Clean with soap and water or hexane
• Dry surface
• Check formulation
• Yellowing of the union

19
Appendix
CHEMICAL RESISTANCE OF PLASTIGLAS ACRYLIC SHEET
RESISTS DOES NOT RESIST
Water: Even with normal treatment
of chlorine for swimming
pools Alkalis: Sodium hydroxide (caustic
soda) Potassium hydroxide
(caustic potash) Inorganic
salts: Sodium chloride Magnesium chloride Potassium chloride Carbonates
Diluted acids: Acetic acid
Aliphatic
hydrocarbons: White Gasoline benzine Simple esters: Flavorings and
artificial flavoring butyrates Acrylates Mineral oils Petrolatum
Organic
solvents: Toluene Benzene Methylene chloride
Aromatic hydrocarbons: Thinner
Benzene Toluene
Ketones: Methyl Ethyl Ketone Propyl ketone Ketone Acetones
Complex
esters: Sodium heptanoate
Chlorinated hydrocarbons:Carbon tetrachloride
Chloroform

20
CHEMICAL PROPERTIES OF PLASTIGLAS ACRYLIC SHEET
PRODUCT
CONCENTRATION
RESISTANCE
EXPOSURE
TIME
OBSERVATIONS
20º C
60º C
Acetaldehyde 100% NR
NR
Acetic acid 10% 100% glacial
S NR NR
5 years 1 day 3 days
Swollen / dissolved
Acetic anhydride UL
Acetone 100% NR 1 day Dissolved
Acetonitrile NR
Acetophenone NR 28 days Cracked,
swollen,
dissolved

21
CHEMICAL PROPERTIES OF PLASTIGLAS ACRYLIC SHEET
PRODUCT
CONCENTRATION
RESISTANCE
EXPOSURE
TIME
OBSERVATIONS
20º C
60º C
Allyl Alcohol
NR
1 day Cracked and dissolved
Amyl Alcohol
NR
Benzyl Alcohol
NR
Normal Butyl Alcohol
NR
1 year
Cracked and disintegrated
Ethyl Alcohol 10% 50%
100%
UL
UL
NR
1 year 1 year 1 year
Light Attack Light Attack
Light attack, swelling and softening
Isopropyl Alcohol 10% 50%
100%
UL
UL
UL
1 year 1 year 1 year
Cracked Cracked
Clouded with light attack
Methyl Alcohol 10% 50%
100%
UL
UL
NR
1 year 168 days 168 days
Light attack Swollen
Swollen 10% Weight increase
Aluminium sulphate
Saturated solution S
5 years
Ammonia
0.880 solution liquid S
NR
UL
NR
Ammonium Chloride
Solution saturated
S
5 years
Amyl Acetate NR
28 days
Cracked and dissolved
Anthracene NR
7 days
Aniline
Solution in paraffin S
Cracked and dissolved
Benzaldehyde NR
7 days
Benzene NR
1 day
Dissolved

22
Benzoyl Chloride NR
7 days
Dissolved
Normal Butyric Acid
Concentrate NR
7 days
Dissolved
Butyl Acetate NR
10 days
Dissolved
Butyraldehyde NR 7 days
Butyl acetyl ricmoleato
UL
ul 2 years
Normal butyl chloride
NR
7 days
Butyl stearate UL
5 years
Calcium chloride Saturated attack on edges
S
3 years
Carbon disulphate NR
84 days
Carbon tetrachloride
NR
1 day
Chlorine 2% in water UL
5 years
Chloroform NR
1 day
Chromic acid 10% S
S
Stained
Satured Solution 5 years
6
months
3 years
Dissolved 1/3 of saturated weight
NR
S
S

23
Citric acid Satured Solution 5 years
6
months
Meta-cresol NR 7 days Cracked and dissolved
Cyclohexane NR
NR 2 years No attack until 168 days
Cyclohexanol NR
NR 7 days Swollen and dissolved
Cyclohexanone NR
NR 7 days Swollen and dissolved
Cyclohexene NR 84 days Softened, swollen and
dissolved
Decaludro naphthalene
NR 7 days Cracked and softened
(Decalin) UL
NR 2 years Light disintegration

24
CHEMICAL PROPERTIES OF PLASTIGLAS ACRYLIC SHEET
PRODUCT
CONCENTRATION
RESISTANCE
EXPOSURE TIME
OBSERVATIONS 20º
C 60º C
Dialkylphthalate
UL
NR Cracked surface
Dibutyl phthalate (DBP)
2 years
8 days
Dissolved
UL 2 years Light disintegration
Dinonyl phthalate UL UL 2 years Light disintegration
Dioctyl phthalate (DOP)
UL UL 2 years Light disintegration
Dialkyl sebacate UL UL 2 years Cracking and light
disintegration
Dibutyl sebacate UL UL 2 years Light disintegration
Dioctyl sebacate UL 168 days Swollen and softened
Diethyl ether NR 1 day
Dissolved
Ethylene dibromide
NR 5 years
Ethyl Glycol S 1 day
Dissolved
Ethylene dichloride
NR 3 days Dissolved
Ethyl acetate NR 1 day
Dissolved
Epichlorohydrin NR 1 year
Ferric chloride 10%
S 5 years
Formaldehyde 40%
S NR
Formic acid 10%
S
40%
5 years
168 days
90%
NR 7 days
Glycerin S 5 years
Hexane S 168 days Very slight cracking
Hydrochloric acid 10%
S S 168 days Slight cracking
concentrated
S S 168 days Slight cracking
Hydrogen cyanide NR 1 day
Dissolved

25
CHEMICAL PROPERTIES OF PLASTIGLAS ACRYLIC SHEET
PRODUCT
CONCENTRATION
RESISTANCE
EXPOSURE TIME
OBSERVATIONS 20º
C 60º C
Hydrofluoric acid concentrated
NR 1 day
Swollen and softened
Fluoboric acid UL
Hydrogen peroxide
10 vol S 1 year
Hydrogen peroxide
90%
NR
Iron perchloride UL
Lactic acid S 3 years Light attack in edges
Lanolin S 3 years Slight cracking
Mercury S 5 years
Methyl quinone S 2 years
Methylamine S
Methyl benzoate NR 5 years Clouded and cracked
Methyl hexanol cycle
NR 7 days Dissolved
Methylene dichloride
NR 7 days Cracked after a few hours
Methyl naphthalene
NR 1 day
Dissolved
84 days
NR
1 day
Dissolved
Methyl Salicilatode
NR 7 days Dissolved
Benzene monochloride
NR 7 days Dissolved
Naphtha NR 168 days Cracked and softened
Naphthalene Crystals UL
Satur
ated
soluti
on
28 days
in paraffin UL
Nitric acid I0%
S S
40%
5 years
168 days

26
CHEMICAL PROPERTIES OF PLASTIGLAS ACRYLIC SHEET
PRODUCT
CONCEN TRATION
RESISTANCE
EXPOSURE TIME
OBSERVATIONS 20º
C 60º C
100%
NR
24 hours Swollen
Nitrobenzene NR 7 days Cracked and dissolved
Regular octane UL 168 days Slight cracking
100 octane aviation
fuel
UL 168 days Slight cracking
Transformer oils S 5 years Stained
Diesel S 2 years Clouded surface
Olive S 5 years Slight cracking
Silicone R220
UL 1 year
F130
UL 1 year
M441 NR 1 year
Swollen
F110 UL 1 year
Oxalic acid
Satur
ated
soluti
on
S
S
5 years
168 days
Medicinal paraffin S 5 years
Perchlorethylene NR 5 years Cracked
Petroleum ether 100-120 S 5 years Slight cracking
Phenol NR 7 days Dissolved Phosphoric acid
10%
S
S
40%
5 years
168 days
95%
NR
7 days Cracked
Piperidine
NR
1
day
Potassium chlorate Satur
ated
solutio
n
S 5 years
Potassium dichromate
10%
S
5 years
Slightly stained

27
CHEMICAL PROPERTIES OF PLASTIGLAS ACRYLIC SHEET
PRODUCT
CONCEN TRATION
RESISTANCE
EXPOSURE TIME
OBSERVATIONS 20º
C 60º C
Potassium hydroxide
Satur
ated
soluti
on
S
S
168 days
Potassium permanganate
N/10 solution
S 5 years Stained
Polypropylene
Adipate
S
UL
2 years
Light attack
Laurate
S
UL
2 years
Light attack
Sebacate S UL 2 years
Sebacic acid S 2 years
Sodium carbonate
Satur
ated
soluti
on
S S
5 years
168 days
Sodium chlorate Satur
ated
soluti
on
S 5 years
Sodium hydroxide Satur
ated
soluti
on
S S 5 years
5 years
168 days
Sodium hypochlorite 10% chlorine
S 5 years
Sodium thiosulfate 40%
S 5 years
Sulfuric acid 10%
S
S
5 years
168 days
30%
S
S
1
year
Light attack in edges
98%
NR
NR
1
day
Swollen
Tartaric acid
Satur
ated
soluti
on
S
S
5 years
168 days
Tetra hydrofuran NR 1 day
Dissolved

28
CHEMICAL PROPERTIES OF PLASTIGLAS ACRYLIC SHEET
PRODUCT CONCENTRATION RESISTANCE EXPOSURE TIME
OBSERVATIONS
20º C 60º C
Tetrahydronaphthalene
NR
After 168 days
Cracking and softering
After 1 year
Dissolved superficies
Toluene
NR
7 days Dissolved
Trichloroethane
NR
1 day Dissolved
Trichloroethylene
NR
1 day Dissolved
Tricresyl phosphate
NR NR
Atack on surface
2 years 28 days
Water
S
5 years
Solvent gas
S
5 years
Light cracking
Xylene
NR
7days
Dissolved
Conditioning of acrylic sheet
Most materials such as metal, ceramic, wood, glass and plastic, modify their internal structure when processed. Thus, in acrylic the same thing happens when we execute cutting operations with conventional equipment such as saws and routers; often the heat generated by the friction of the cutting tool with the material, produces an accumulation of internal stresses in the polymer chains. When these internal stresses are excessive and parts are bonded, cracking occurs, that is no more than the rearrangement of the polymer chains to relieve stress.
With unconventional cutting equipment, such as laser cutting or water pressure, this does not happen because the heating that could be generated in the area is minimal.
When conventional cutting equipment is used, these internal stresses can be eliminated from the start by selecting the tools recommended specifications, and that they are in good condition and suitable sharpness.
Since acrylic has a lower thermal conductivity than metals, it will tend to soften if excess heat is generated; accordingly, it is necessary to select the cutting

29
equipment, tool and feed rate. Cooling by means of air, water, oil or special liquids, is an effective way to prevent overheating.
In the PLASTIGLAS acrylic sheet (made with the cell-cast process) cooling is not necessary during the cutting process when working with thin thicknesses (1.5 to 6.0 mm.), however, in extruded acrylic sheet of the same thickness range it is easier to generate internal stresses that will cause cracking.
In thick thicknesses it is necessary to select suitable cutting equipment (industrial saws with motors of 3 to 5 HP), and having a disc of 12 to 14 inches in diameter and with fewer teeth (from 48 to 52) with tungsten carbide pellets, decreasing the feed rate and cooling by air, water or coolants.
A practical way to determine whether the acrylic sheet has internal stresses after cutting, is placing the piece on a screen (any light source may be used).
A glass or polarized acetate is placed between the light source and the acrylic piece and finally, on the other acrylic piece another polarized glass or acetate; the latter will need to be rotated. If any change is observed in shade of the polarized, then there will be internal stresses.
The acrylic sheet conditioning consists in relieving or reducing internal stresses through heat treatment to the material. Below is a table for PLASTIGLAS acrylic sheet conditioning.
This acrylic sheet conditioning or tempering will effectively help the dimensional stability of the piece, as well as a better resistance to cracking.
Drawing No. 10
Polarized acetate
Acrylic
Polarized acetate
Glass
Light source

30
Conditioning or tempering of PLASTlGLAS acrylic sheet

31
APPENDIX
Glossary of terms
ADHERENCE When a body is joined to another by means of an adhesive. ADHESIVE Substance capable of joining materials by a surface bond. ADHESION Phenomenon where the surfaces are joined by interface forces. CEMENT See "Adhesive" or "Cement-solvent". CEMENT-SOLVENT
Dissolving of a polymer in a solvent.
COHESION Phenomenon where particles of a substance are joined by primary or secondary valence forces. CRACKING Very fine cracks, like hairs, which extend in the bonding area, whether on the surface of the material or the adhesive layer. DELAMINATION Separation of the layers in a laminate, given by an adhesive defect. ASSEMBLY Group of materials or parts, including the adhesive, which are joined by bonding. JOINT Place where two materials are joined.

32
LAMINATE The product made by bonding of two or more layers of a material or materials. LAMINATION The process of preparing a laminate. GLUE Generic term and synonymous with "adhesive". Originally a hard gelatin obtained from tendons, cartilage and bones of animals. STORAGE TIME The period of time during which an adhesive can be stored in its container under the specific temperature conditions, without losing its characteristics of use. UNION The bonding of a material with another, by means of an adhesive.

33
IMPORTANT: PLASTIGLAS de Mexico SA de CV assumes no legal responsibility for the suggestions and data provided in this manual, which are based on information that we consider accurate, offer in good faith, but without guarantee, since the conditions for transformation and use of the product are beyond our control.