stewmac electric guitar kitwith the fretboard centered, temporarily clamp it in place, tape or...
TRANSCRIPT

Sheet #i-5280 Updated 12/16
Assembly InstructionsWelcome to guitar building! If you’re a first-time builder, this kit is a great way to start. You’ll have fun and learn a lot.
You can build this guitar using simple tools, but it’s much more than a bolt-together kit. Following these instructions you’ll cut your own peghead shape, inlay your fretboard and install the frets. You’ll glue fretboard on the neck and spray the finish. When your guitar’s completed, we’ll show you how to set it up to play the way you like it.
Let’s get started!
GUITAR KITELECTRIC
StewMac
S-TYPE BODY WITH3 SINGLE-COIL PICKUPS
SOLIDBODY

stewmac.com2
Table of contents
Tools and supplies you’ll need . . . . . . . . . . . . . . . . . . . . . . . . . 2Parts list . . . . . . . . . . . . . . . . . . . . . . . . . . . . . . . . . . . . . . . . . . . . . . 3Create your peghead shape . . . . . . . . . . . . . . . . . . . . . . . . . . . 4Prep the fretboard . . . . . . . . . . . . . . . . . . . . . . . . . . . . . . . . . . . . 4Install the frets . . . . . . . . . . . . . . . . . . . . . . . . . . . . . . . . . . . . . . . . 6Glue the fretboard on . . . . . . . . . . . . . . . . . . . . . . . . . . . . . . . . . 7Install the bridge and spring claw . . . . . . . . . . . . . . . . . . . . . . 8File the sides of the neck . . . . . . . . . . . . . . . . . . . . . . . . . . . . . . 10Install the tuners . . . . . . . . . . . . . . . . . . . . . . . . . . . . . . . . . . . . . . 10Install the neck . . . . . . . . . . . . . . . . . . . . . . . . . . . . . . . . . . . . . . . . 11Install the pickguard . . . . . . . . . . . . . . . . . . . . . . . . . . . . . . . . . . 11Do a preliminary setup . . . . . . . . . . . . . . . . . . . . . . . . . . . . . . . . 12Install the string retainers . . . . . . . . . . . . . . . . . . . . . . . . . . . . . 12Level the frets . . . . . . . . . . . . . . . . . . . . . . . . . . . . . . . . . . . . . . . . . 13Prep for finishing . . . . . . . . . . . . . . . . . . . . . . . . . . . . . . . . . . . . . . 13Spray the finish . . . . . . . . . . . . . . . . . . . . . . . . . . . . . . . . . . . . . . . 14Wire the electronics . . . . . . . . . . . . . . . . . . . . . . . . . . . . . . . . . . . 14Set the neck relief . . . . . . . . . . . . . . . . . . . . . . . . . . . . . . . . . . . . . 14Adjust the tremolo . . . . . . . . . . . . . . . . . . . . . . . . . . . . . . . . . . . . 15Set the action (string height) . . . . . . . . . . . . . . . . . . . . . . . . . . 15Adjust the pickup heights . . . . . . . . . . . . . . . . . . . . . . . . . . . . . 15
Tools you’ll need
Electric hand drillDrill bit, 4mm brad point Drill bits: 1/16", 5/64", 3/32", 1/8" (aircraft bit optional)10mm nut driver or crescent wrenchSaw for peghead: bandsaw, jigsaw or coping saw Center punch or awlScrapersFlat machine fileRulerStraightedgeFretting hammerClamp or vise for securing neckSoldering iron
Supplies you’ll need
Titebond glueGlue brushesSuper glue, #20 medium viscosityDouble-stick tapeMasking tapeSandpaper: 120, 220, 320, 400 gritsSteel wool, 0000 gauge
ColorTone Aerosol Lacquer
1 can Aged Clear or Vintage Amber4-6 cans of Clear Satin

stewmac.com 3
Parts list
Basswood guitar body (1)
Tuners with bushings, washers and screws (6 each)
Maple neck with installed truss rod (1)
Rosewood fretboard (1)
Pickguard assembly, prewired (1)
Tremolo arm (1)
Tremolo bridge (1)
Tremolo springs (3)
Tremolo claw with 2 mounting screws (1)
Tremolo cavity cover (1)
Neck plate, metal, with plastic gasket (1 each)
Neck mounting screws (4)
Jack plate with output jack installed (1)
Guitar cord (1)
String nut, plastic, preslotted (1)
Tremolo pivot screws (6)
String retainers (2)
Fretwire pieces, cut to length (22)
Fretboard inlay dots (10)
Pickguard screws, chrome (20)
Strap buttons, with 2 felt washers and 2 screws (2)
Side dot material strip (1)
Bridge mounting hole drilling jig (1)
Truss rod wrench, 4mm Allen style (1)
Indexing pins (2)
Included but not pictured:
Radius sanding block, 16" radius (1)
Rubber clamping band, wide, 84" long (1)
Practice piece of fretboard (1)
Practice piece of fretwire (1)
Set of Strings

stewmac.com4
Create your peghead shape
You can trace a favorite peghead or come up with a look all your own. You’ll be cutting your design from the blank peghead on the kit’s neck.
Mark out your designSketch out your peghead design using a pencil. Use a light touch that doesn’t dent or compress the wood which could make sanding out any unwanted lines difficult. Don’t use ink, because it leaves permanent stains that can even bleed up through an opaque guitar finish. Cut the peghead to shape.
It’s important that your saw stays square to the face of the peghead while you cut. If it tilts to an angle, you’ll get a sloppy result that takes a lot of sanding to correct. Use a bandsaw if you have one; a jigsaw is also good. A hand-held coping saw can also be used, but it’s tough to hand-saw smooth clean curves.
Never cut on the lineAlways cut just outside the line, so you can sand to the line afterward.
Smooth your saw cuts to create your final peghead shape using rasps, files and sandpaper. Don’t rush: rough patches will disappear into a good final shape if you take your time.
When you’re happy with your peghead shape, sand it smooth using 150-grit sandpaper followed by 220-grit, then 320-grit.
Prep the fretboard
Measure to find the center of the maple neck. With a pencil, mark the centerline on the flat surface of the neck at both the nut and the heel. At the heel end, also extend the centerline onto the butt end of the neck.
Also draw a centerline on the fretboard bottom and ends. With these lines you can align the fretboard to the neck, keeping it centered when gluing it on.
Install the fretboard inlays
Use a small amount of super glue to install your inlays in the fretboard. The dots are a tight fit, so you’ll need to press them in or tap them in with a hammer. Be careful not to put dents in the board.
When the glue has dried, the inlays will need to be leveled. Using a machine file, bring the tops of the inlays down, stopping just shy of the fretboard. You’ll be bringing them down flush with the fretboard in the next step.

stewmac.com 5
Sand the fretboard
Use double-stick tape to attach 220-grit sandpaper to the 16" radius sanding block. With the neck laid on a flat work surface, sand the fingerboard using end-to-end lengthwise strokes. A few strokes will be enough to make the inlays flush with the surface of the board. This sanding also trues up the board’s 16" radius, preparing it for fretting.
Clean out any sawdust or debris from the fret slots. Anything left in the slots will block the frets from seating properly.
On some guitars, the fret slots are cut across the entire board, leaving the open ends of the slots exposed. The slots on this fretboard are different: we’ve filled the ends of each slot, to give your installed frets a clean look. Be careful not to cut through the filled ends of the slots when you’re cleaning out debris.
Drill holes for the index pins
Later, when you glue the fretboard to the neck, their two flat surfaces will want to slide around due to the wet glue. To prevent this, we’ve provided small metal index pins that insert through the fretboard into the neck. At this step, you’ll drill two holes for the pins; the pins themselves will be installed later.
Place the fretboard on the neck, lining up your centerlines. When board is aligned with end of the flat of the neck at the peghead, the other end of the board will extend slightly beyond the heel of the neck to accommodate the 22nd fret.
With the fretboard centered, temporarily clamp it in place, tape or spring clamps work well for this. The the neck will be slightly wider than the fretboard; this will be sanded later to create a smooth joint where the maple meets the rosewood.
Drill a 1/16" hole in the 1st fret slot, through the fretboard and 1/8" deep into the neck. Drill this hole somewhere toward the bass side of the neck. Be sure to set a drill stop to the proper depth to keep from drilling through the back of the neck.
Drill a similar 1/16" hole at the 21st fret slot, toward the treble side. These holes will be hidden by the frets when they’re installed.

stewmac.com6
Install the frets
The frets come pre-cut, bent and individually numbered and bagged. The tangs that fit into the slots have already been notched to allow for the uncut slot ends. The fret crowns will extend over the sides for a nice, clean look.
Before installing each fret, clean the fret with naphtha to remove any oils.
Don’t install the 1st and 21st frets. Keep those fret slots open to access the index pin holes. You’ll install those two frets after the fretboard is attached.
Lay the neck on a hard work surface that won’t bounce when you tap the frets with the fret hammer.
Start with the 2nd fret. Place it in the slot and hold it so that it won’t tip or wobble. This helps keep the wood around the slot from chipping.
Some folks like to super glue their frets in. The glue does help keep the frets tight, but it’s not necessary for a new build. There’s also a debate: some think that glued-in frets give better tone. The choice is yours.
If you decide to use glue, it’s a good idea to put a light coat of wax on the sides of each fret slot to prevent any glue squeeze out from sticking to the board. One slot at a time,
work the glue through the slot with a razor knife to ensure full coverage before installing your fret. Promptly wipe away any excess glue before it has a chance to dry.
We’ve included a short section of fretboard with extra fretwire for practicing. Use these to get a feel for hammering in frets before fretting your fingerboard.
Seat the fret ends first, with one hammer blow at each end. Then hammer back and forth across the fret. Hammer from your wrist, in short precise blows.
Installing the frets will cause the fretboard to backbow a little as you work down the neck, so be sure to hold the fretboard flat down on your work surface while hammering.
Reminder: don’t install the 21st fret. The 1st and 21st frets will go in after fretted board has been glued to the neck.
Once fretted, carefully massage the backbow out of the fingerboard by lightly flexing it in the opposite direction as the bow. With a cautious, light touch so you don’t crack the board, work up and down the fretboard. You won’t be able to work all of the backbow out, but get it as close to flat as you can.

stewmac.com 7
Glue the fretboard on
Hold the peghead in a swivel-jawed repair vise, or clamp it to your benchtop, so the neck is held out in the air. With a straightedge as a guide, check the neck to make sure it is straight, it will be close right out of the box. (The truss rod wrench is included with your kit.)
If the straightedge “rocks” on the neck, the neck is back-bowed and the truss rod needs to be loosened. Slowly turn the adjusting nut counterclockwise to straighten the neck. You’ll see the neck come into level contact with the straightedge.
If the neck is upbowed, slowly turn the truss rod nut clock-wise until the rule rests flat on the neck.
Install the two index pins in the 1st and 21st fret slots so they protrude through the bottom of the fretboard by about 1/16".
Before applying glue, tape off the truss rod slot to keep glue from getting into the slot.
Use a glue brush to spread glue evenly over the surface of the neck, then remove the tape from the truss rod slot.
Place the fretboard on the neck, using the index pins for alignment.
Tightly wrap the neck/fretboard assembly with a rubber clamping band. Clean away glue squeeze-out using a damp cloth. Allow the neck to dry overnight.
stewmac.com8
Before installing the bridge, flip the body over and install the tremolo spring claw. The two holes for the claw are already drilled. For now, don’t tighten these screws against the cavity wall; leave a gap of about 1/8". A small amount of thread lubricant or bar soap on the ends of your screws will help them go in easier.
Install the bridge using the 6 pivot screws. Don’t tighten them all the way down, just enough so they sit just proud of the top of the baseplate, allowing it to sit flat on the body.
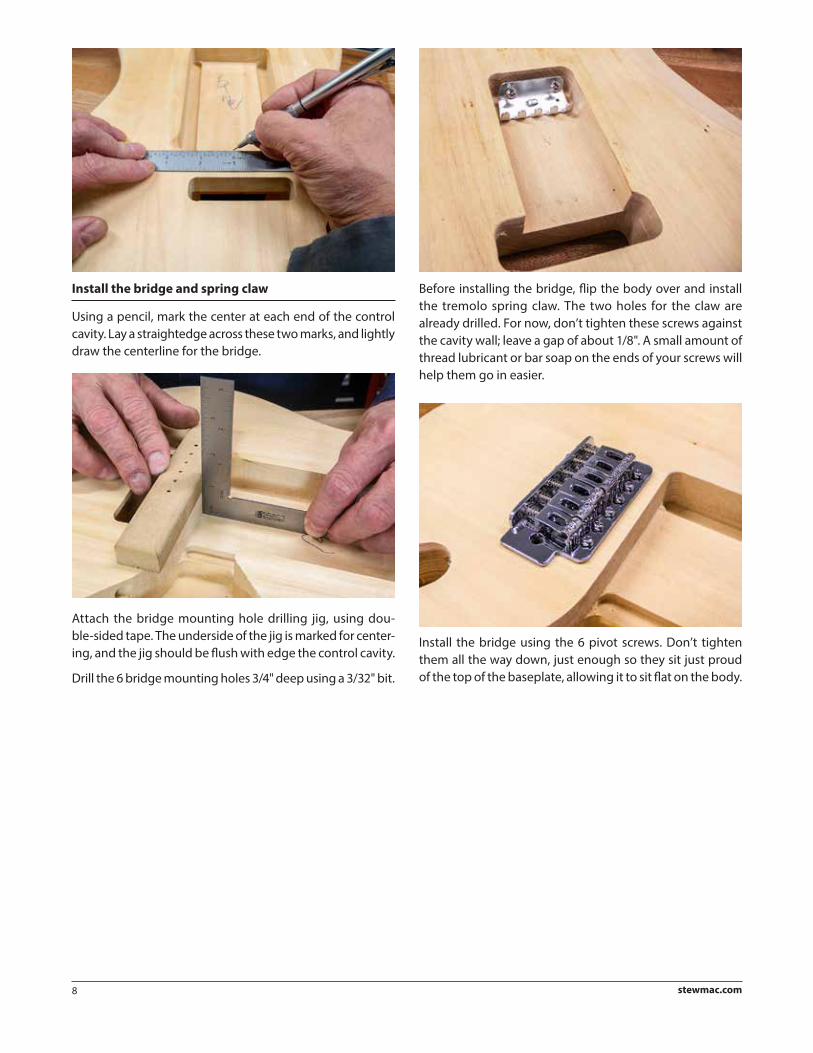
Install the bridge and spring claw
Using a pencil, mark the center at each end of the control cavity. Lay a straightedge across these two marks, and lightly draw the centerline for the bridge.
Attach the bridge mounting hole drilling jig, using dou-ble-sided tape. The underside of the jig is marked for center-ing, and the jig should be flush with edge the control cavity.
Drill the 6 bridge mounting holes 3/4" deep using a 3/32" bit.

stewmac.com 9
Drill a 1/8" hole for the ground wire between the control cavity on the front of the guitar and spring cavity on the back. A long aircraft type bit is helpful for this.
Connect the tremolo springs between the tremolo block and the claw.
Completing the neck
When the neck/fretboard joint has dried, remove the rubber clamping band and pull out the index pins. Inspect the two empty fret slots and remove any glue or debris so these frets will seat properly. Install these two remaining frets.
Cut the stick of side dot material into 10 equal pieces. Put a drop of super glue into one of the the holes, followed by a piece of side dot material. You should see some glue squeeze out. Don’t push the material all the way flush to the fretboard; let it stick out slightly. It will become flush to the surface when you file the neck. Repeat these steps to install the remaining side dots.

stewmac.com10
File the sides of the neck
Use a machine file to bring the fret ends and side dots flush with the fretboard edge. When filing the fret ends, stroke the file from the fretboard side toward the back of the neck. Filing in the opposite direction could pull out a fret.
Add a slight bevel to the ends of the frets as you file. Most players like fret ends beveled to an angle of between 45° and 60°.
Work slowly; it’s easy to go too far. As you file, also smooth the transition between the rosewood fretboard and the maple neck.
The neck has a heavy C-shape profile with a pronounced heel and distinct thickness where the back of the neck meets the peghead (this thickening is called the volute). The feel is quite comfortable for most players, but the option is there to smooth away the volute and heel for a more traditional look and feel if you prefer.
Install the tuners
Once you have the neck shaped the way you like it, lay out the tuners. Use a ruler to make sure they’re in line with one another and square to the edge of the peghead.
Also, mark out your mounting holes with a scribe or punch. Tuner mounting screws are very delicate, and will break if forced into a too-small hole. Use a 5/64" drill bit to make the screw holes; if these holes are any smaller you risk shearing off the screw heads. Slightly lubricating the screw threads by dragging them across soap or wax is recommended for smooth installation. Fasten the threaded tuner bushings to the peghead using a 10mm nut driver.
Temporarily install the string nut in its slot. This is just for the preliminary setup, it will get glued in later.

stewmac.com 11
Install the neck
The neck is a tight fit in the pocket, which is good for transfer of tone from the strings through the body. Press the neck into the pocket, making sure the heel is flush against the bottom of the neck pocket.
Use the holes in the body to mark the neck. A scribe, nail, or transfer punch will make clean marks in the neck to show you where to drill. A 4mm brad point drill bit turned by hand also works well for making these marks.
Drill out your mounting holes. It’s important that these holes are drilled square to the neck, so a drill press works best for this job. Use a 1/8" bit and drill the holes 11/16" deep.
Don’t have a drill press? If you know someone who does have one, you can make a set of guide blocks out of scrap wood. Drill through the blocks and mark the hole size on each one. Keep these in your shop to help you hold your hand drill square to your work.
Use a sharp screwdriver to install the neck mounting screws through the neck mounting plate. The plate sits on a plastic backer.
Install the pickguard
Using a scribe or transfer punch, lay out the pickguard screw holes using the neck and bridge for reference.
Also mark the mounting holes for your jack plate. Drill the pickguard and jack plate screw holes with a 1/16" drill bit.

stewmac.com12
Line up the spring cavity cover so the holes match the string-through holes of the tremolo block. (This alignment lets you change strings without having to remove the plate.) Mark the locations of the mounting holes and drill them with a 1/16" bit.
Choose the locations for your strap buttons, and drill holes for them with a 3/32" bit. Drill these holes 1/2" deep.
Do a preliminary setup
String up the guitar to make sure everything is aligned properly, and to do a preliminary setup. Adjust the truss rod so that the neck as straight as possible under string tension and set your action.
A good starting point for action is 1/16" between the top of the 12th fret to the bottom of the string on the low and high E strings. Use a radius gauge to adjust the remaining strings to match the radius of the fretboard. You’ll fine-tune your setup later; for now, you just want to get it in the ballpark. Play the guitar and check for buzzing and false notes caused by uneven frets. These will be addressed before finishing the instrument.
Install the string retainers
While the strings are on, mark the locations for the string re-tainers on the peghead. These retainers maintain the proper string angle over the nut for the D, G, B, and E strings. Locate the D/G string retainer between the E and A string posts, approximately 2" from the nut. Place the B/E string retainer between the D and G posts, approximately 3" from the nut.

stewmac.com 13
Level the frets
Newly-installed frets always need to have their tops leveled. The more evenly your frets have been hammered in, the less leveling work there is to do.
Adjust the truss rod to make sure the neck is straight.
Before leveling, color the fret tops with a blue permanent marker. The blue ink shows you your progress: your frets are level when the sanding has removed blue from all the fret tops.
Use double-stick tape to attach 320-grit sandpaper to the 16" radius sanding block. With this, level the frets using full-length strokes down the fretboard.
After leveling expect to do some re-shaping of the fret tops to return the crown to its proper shape. Re-blue the fret tops and bring in the edges of the flats that were created during leveling until you have a thin line running down the center of the fret top. Then polish them with 400-grit and 600-grit sandpaper wrapped around a foam block, running up and down the entire length of the fretboard. Follow up with 0000 steel wool for a final finish.
Prep for finishing
Disassemble the guitar and remove all hardware to prepare it for finishing.
We recommend that you spray your guitar with clear, sat-in-finish aerosol guitar lacquer. Aerosol guitar lacquers are a relatively foolproof way to achieve a professional finish. They’re ready to spray right out of the can, and you don’t have to invest in spraying equipment. They go on fast with-out much sanding, and the satin finish doesn’t require any buffing.
If aerosol finishing seems too complex, a brushed-on finish like tung oil, waterbase lacquer, or shellac works great too. Any of these finishes will seal and protect the wood from dirt and moisture.
Spraying a glossy colored finish involves more steps than this clear satin finish. For help with any kind of finish, see our book, Guitar Finishing, Step-By-Step.
Practice on scrap! That’s the best advice for spraying a fin-ish. By test-spraying on scrap wood first, you can see what you’ll get before applying it to your guitar.
Fix chips and dents. Inspect the body and neck for any dings, chips, or other imperfections. Small dents can be steamed out by placing a damp cloth over dent and applying heat with a soldering iron. Chips and knotholes will need to be filled. Our ColorTone grain filler works great for fills right out of the jar.
Sand the body
Using 120-grit sandpaper on a flat sanding block, sand the entire body working only in the direction of the grain. After a complete sanding, wipe the body with a damp cloth to raise the grain. Let it dry, then sand with 220-grit sandpaper. Raise the grain with a damp cloth again and sand a third time, using 320-grit sandpaper.
Sand the neck
Sand the neck similarly to the body, until you’ve reached 320-grit smoothness. Then wipe with a damp cloth, which will “raise the grain” to reveal fibers that need more sanding. Allow it to dry, then sand it again with 320-grit.
Handle with gloves only to prevent contaminating the finish. When you’ve finished sanding, wipe the body and neck with a naphtha-dampened rag to remove any oils or grease. From this point on, wear clean gloves to handle these so you won’t contaminate the wood.
Screwing pieces of scrap wood to the neck mounting holes creates handles to hold the body and neck while spraying. These handles are also useful for hanging the parts to dry.

stewmac.com14
Spray the finish
Use warm lacquer, not cold. Professional finishers spray heat-ed lacquer because cold lacquer spatters, requiring extra sanding. You should warm up your aerosol lacquer too, by setting the cans in a sink of warm tap water.
A clear satin finish can be applied in as little as two days, following this spray schedule:
Aerosol finishing, day 1 Body: Spray 3-4 coats of clear satin lacquer on the body, with 1-2 hours between coats. Leave it to dry overnight.
Neck: An amber-tinted or aged clear lacquer will give the neck a nice, older look to offset the light-colored basswood of the body. Spray one coat of the tinted clear to get the ambered or aged lacquer and let it dry for 1 hour. Follow that with 2-3 coats of satin clear, 1-2 hours apart. Let dry overnight.
Aerosol finishing, day 2 Go over both the body and neck with 400-grit sandpaper to remove any finish spatter or dust.
Body and Neck: Spray 3-4 additional coats of satin clear on the body, 1-2 hours apart. Allow the finish to dry for a week.
After the finish has dried for a week, go over the entire in-strument with 0000 steel wool for a nice satin appearance.
Now you can reassemble the guitar.
Wire the electronics
Three easy solder connections are necessary to wire up the guitar: two for the jack and one for the tremolo spring claw.
Locate the two-strand hookup wire that is soldered to the volume pot. Thread this wire through the hole from the control cavity to the output jack.
Solder the inner (white) wire to the tip lug of the output jack. Solder the braided shield to the ring lug of the output jack.
The remaining loose wire (black) is the string ground. Run it through the ground hole you drilled earlier and solder it to the tremolo spring claw. If the spring claw resists soldering, roughen the surface with a file or sandpaper to accept the solder.
Set the neck relief
Neck relief refers to adjusting a neck so that it has a very slight upbow, rather than being perfectly straight. This relief allows a little more room for string vibration, reducing the chance of hitting the lower frets and causing fret buzz.
Depending on your playing style, and how perfectly level your fret tops are, a neck should be anywhere from perfectly straight to having 0.012" of relief. This measurement refers additional string height over the 12th fret, compared to a perfectly straight neck.
A straight neck tends to play and sound better, but very few guitars end up with no relief at all, and several thousandths of an inch or more is perfectly normal.
Turn the truss rod nut counterclockwise to bring the neck up, adding relief.
Measure string reliefat the 12th fret.
Turn clockwise to pull the neck back, reducing relief.Go slow: a little does a lot!
stewmac.com 15
Adjust the tremolo
Many players use the tremolo to drop the pitch only, with the bridge sitting flat against the body. This can yield better tone and tuning stability, especially if you break a string. If you prefer this setup, screw both of the claw screws as tight as they will go.
If you like to drop and also raise the pitch using the tremolo, you will need to adjust the tremolo springs so the back of the bridge sits off the body by about 3/32" to 1/8". Once you have the springs adjusted, install the cover plate over the spring cavity.
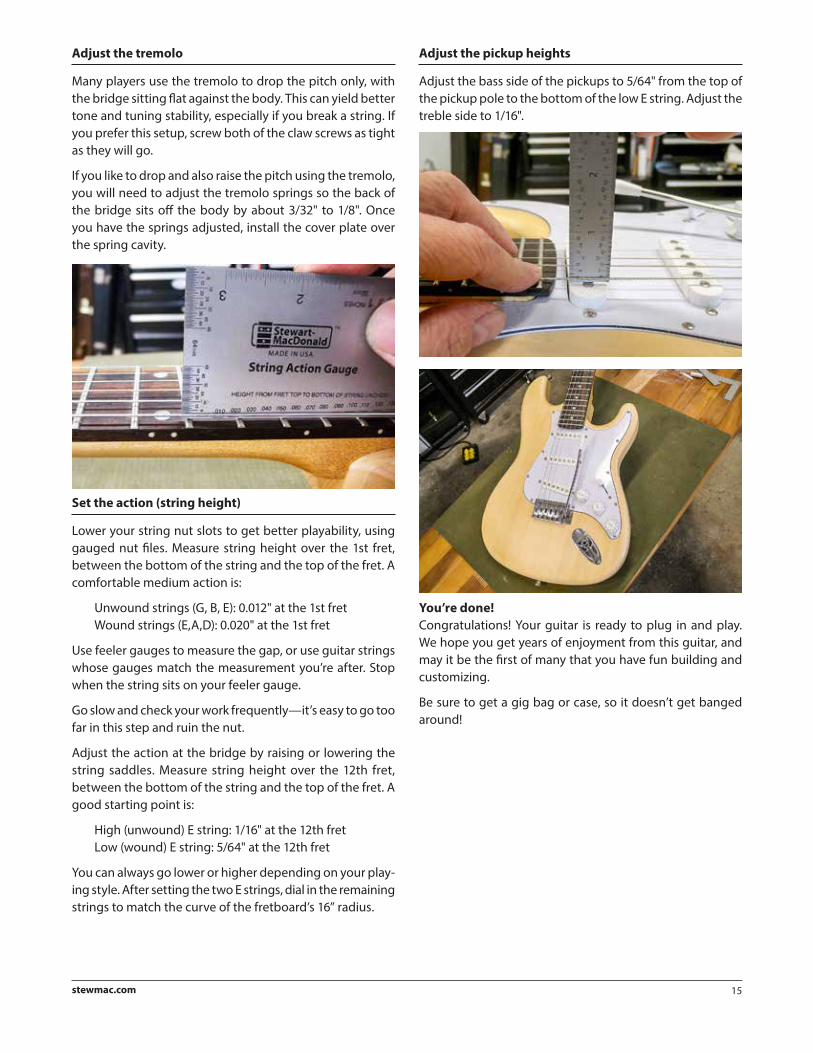
Set the action (string height)
Lower your string nut slots to get better playability, using gauged nut files. Measure string height over the 1st fret, between the bottom of the string and the top of the fret. A comfortable medium action is:
Unwound strings (G, B, E): 0.012" at the 1st fret Wound strings (E,A,D): 0.020" at the 1st fret
Use feeler gauges to measure the gap, or use guitar strings whose gauges match the measurement you’re after. Stop when the string sits on your feeler gauge.
Go slow and check your work frequently—it’s easy to go too far in this step and ruin the nut.
Adjust the action at the bridge by raising or lowering the string saddles. Measure string height over the 12th fret, between the bottom of the string and the top of the fret. A good starting point is:
High (unwound) E string: 1/16" at the 12th fret Low (wound) E string: 5/64" at the 12th fret
You can always go lower or higher depending on your play-ing style. After setting the two E strings, dial in the remaining strings to match the curve of the fretboard’s 16” radius.
Adjust the pickup heights
Adjust the bass side of the pickups to 5/64" from the top of the pickup pole to the bottom of the low E string. Adjust the treble side to 1/16".
You’re done!Congratulations! Your guitar is ready to plug in and play. We hope you get years of enjoyment from this guitar, and may it be the first of many that you have fun building and customizing.
Be sure to get a gig bag or case, so it doesn’t get banged around!

GUITAR KITELECTRIC
StewMac
S-TYPE BODY WITH3 SINGLE-COIL PICKUPS
SOLIDBODY21 N. Shafer St • Athens, Ohio 45701 • USA
USA & Canada call toll-free: 800-848-22739am-6pm weekdays Eastern time
24-hour fax: 740-593-7922
stewmac.com