step-by-step guide document search and exportcrimsoncorner.ou.edu/training/training_guides/document...
TRANSCRIPT

Step-by-Step Guide Document Search and Export
University of Oklahoma
Page 1 of 8
In This Guide
This guide explains how you can search for all types of documents within CrimsonCorner, save the
searches and export the results.
This guide discusses:
Searching for documents Advanced search
Saving searches Exporting search results
Procedure
1. Begin by accessing Document Search from the main navigation menu by selecting Orders &
Documents » Document Search » Search Documents.
2. Use the All Documents dropdown menu to specify whether you want to search all documents or
narrow your search to particular types of documents like requisitions, purchase orders, invoices
or receipts.

Step-by-Step Guide Document Search and Export
University of Oklahoma
Page 2 of 8
3. Use the All Dates dropdown menu to search across all date ranges or a particular time period like
the last 7 days, month-to-date or last month.
4. Type in the Search field the information that you have about the particular document.
5. Once you have made your selections, click Go and you will be taken to the search results page.
6. The left side of the page will show you your filter options and the right side of the page will show
you the documents that were returned for your search.

Step-by-Step Guide Document Search and Export
University of Oklahoma
Page 3 of 8
7. You can choose to narrow down your results even further by selecting other filter options on the
left side of the page.
8. To access the document in question, click on the document number.
9. You can also easily access your recent requisitions, purchase orders and invoices by using the
hyperlinks on the main Document Search page.
10. From Document Search, navigate to the Go To section under the main searching toolbar.
Step-by-Step Guide Document Search and Export
University of Oklahoma
Page 4 of 8
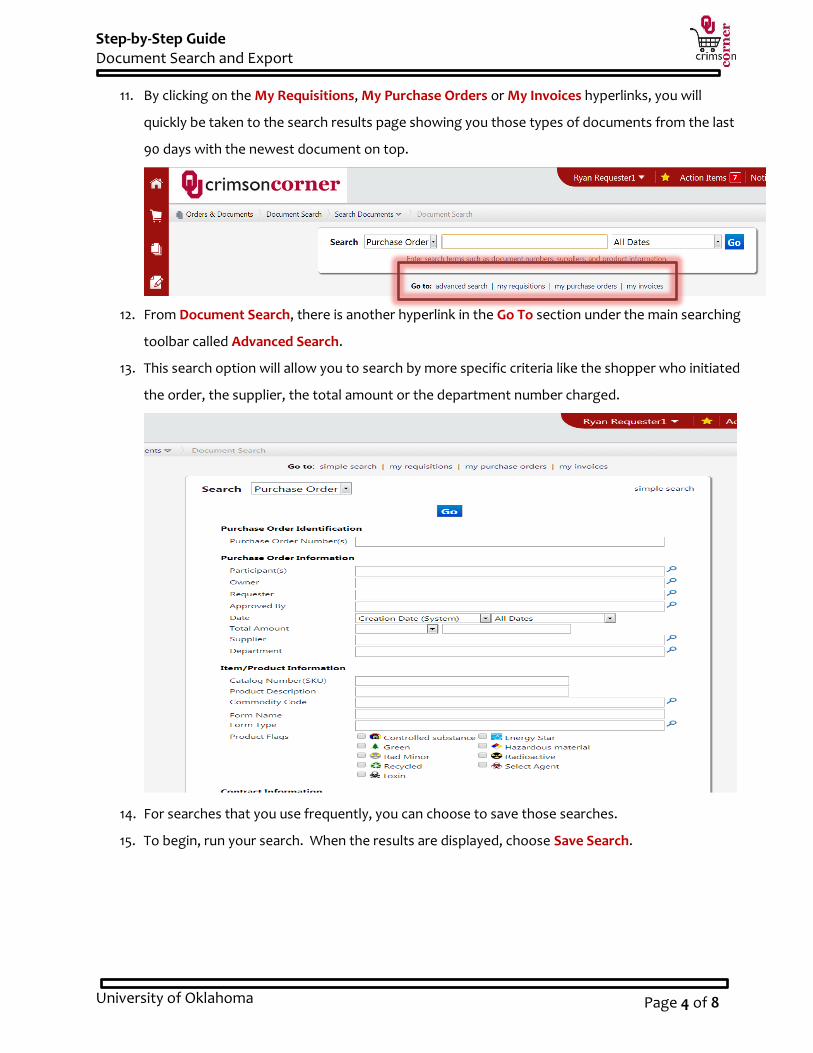
11. By clicking on the My Requisitions, My Purchase Orders or My Invoices hyperlinks, you will
quickly be taken to the search results page showing you those types of documents from the last
90 days with the newest document on top.
12. From Document Search, there is another hyperlink in the Go To section under the main searching
toolbar called Advanced Search.
13. This search option will allow you to search by more specific criteria like the shopper who initiated
the order, the supplier, the total amount or the department number charged.
14. For searches that you use frequently, you can choose to save those searches.
15. To begin, run your search. When the results are displayed, choose Save Search.

Step-by-Step Guide Document Search and Export
University of Oklahoma
Page 5 of 8
16. A popup box will appear that will allow you to enter in a nickname for your search.
17. You can choose to save this search in a new folder or an existing folder. To create a new folder,
click the New button and choose Top level personal folder.

Step-by-Step Guide Document Search and Export
University of Oklahoma
Page 6 of 8
18. Create a name for your folder and click Save.
19. To access your saved searches in the future, menu by selecting Orders & Documents » Document
Search » View Saved Searches.
20. Your list of saved searches will appear. Choose the report from the appropriate folder and select
Go to run the search.
21. To export the search results, run the search and then select Export Search.

Step-by-Step Guide Document Search and Export
University of Oklahoma
Page 7 of 8
22. A popup box will appear and you should name the file, select an Export Type and then click
Submit Request.
23. Export Types:
a. Screen Exports: Screen exports will export the search results exactly as they appear on
the results screen with no additional data. The data in the screen results will vary based
on the document type you have searched for.
b. Transaction Exports: Transaction exports will export all information available about the
transaction associated with each document. Transaction exports cannot be used for All
Document searches.
c. Full Exports: Full exports will export all information available about the transaction
associated with each document. Full exports also include document history such as
approvals, comments and more. Transaction exports cannot be used for All Document
searches.
24. A message at the bottom of the screen will appear noting that your request has been submitted.
25. Close out of the popup window and from Search Documents, select Download Export Files.
26. Once your export has processed, click on the file name to download the zip file.

Step-by-Step Guide Document Search and Export
University of Oklahoma
Page 8 of 8
27. Depending on the export type selected, you may see one or more CSV files available for your
review.