starting with proteus professionalengsareehy.weebly.com/uploads/5/9/5/4/5954364/starting...starting...
TRANSCRIPT


Starting with proteus professional
Introduction
Proteus Professional design combines the ISIS schematic capture and
ARES PCB layout programs to provide a powerful, integrated and easy
to use tools suite for education and professional PCB design.
As a professional PCB design software with integrated shape based
auto router, it provides features such as fully featured schematic
capture, highly configurable design rules, interactive spice circuit
simulator, extensive support for power planes , industry standard
CADCAM and OD++ output , and integrated 3D viewer .
We will use ISIS for simulating PIC response, it has many variety
modeling libraries, and its powerful concentrates in MCUs and MPUs
modeling, along with wide range of supporting chips such that AVR
MCU series, 8051 MCU series, Basic stamp, HC11 MCU series, ARM
CPU, Z80, Motorola 68K CPU, and most PIC's families, also it has a
debugger, registers contents viewer and many other features.

Designing circuit using ISIS
To be able to start the simulation you must build your schematic circuit on ISIS
professional.
The following steps are used to design your circuit:
Run ISIS professional program by clicking ISIS professional icon on desktop
or go to start windows > all programs > proteus professional >ISIS
professional.
A splash screen will appear.
A window appears once ISIS professional is running, asking user whether to
view example of functional circuits or not. Since we going to design a new
circuit then choose No.

Next, a workspace with interface buttons for designing circuit will appear as
shown in figure below. Note that there is a blue rectangular line in the
workspace; make sure the whole circuit is designed inside this rectangular
space.

The next step is to select all components needed, to choose a
component click the icon button for component mode.
Then click on P to pick from library
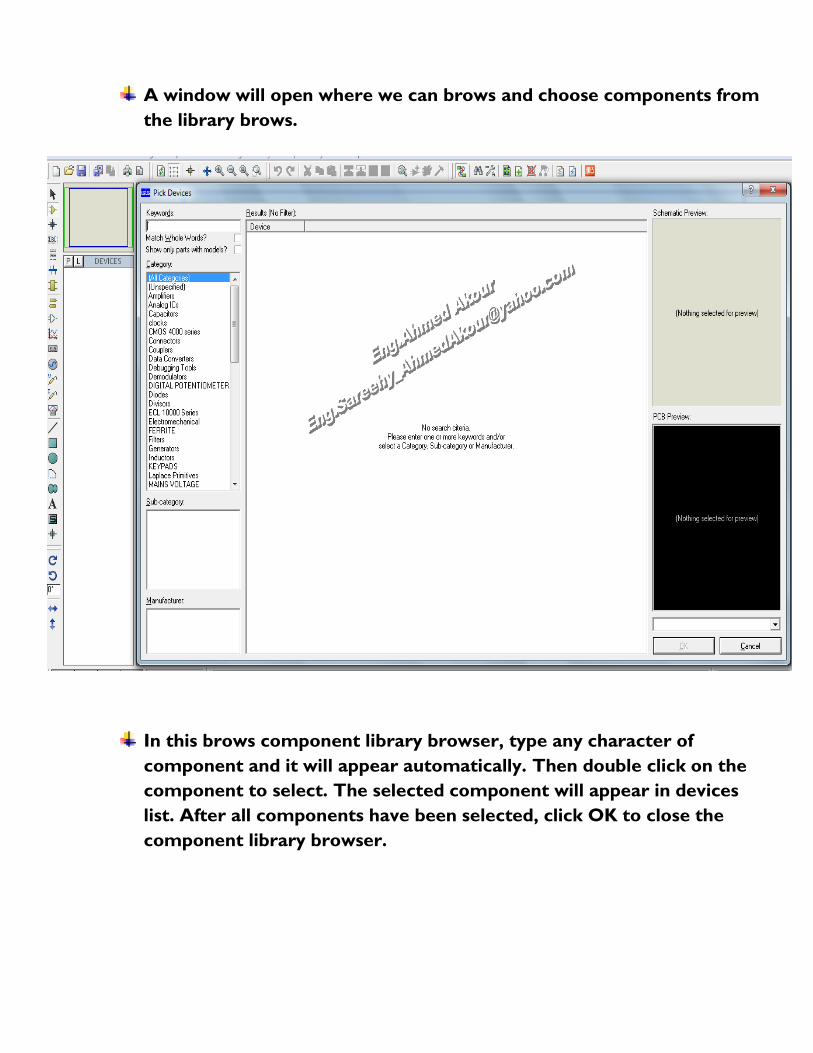
A window will open where we can brows and choose components from
the library brows.
In this brows component library browser, type any character of
component and it will appear automatically. Then double click on the
component to select. The selected component will appear in devices
list. After all components have been selected, click OK to close the
component library browser.

To place components, click on the selected component list in devices
box then single click on the drawing area. The image of the selected
component will appear. Then just click on any part of drawing area to
place the component.
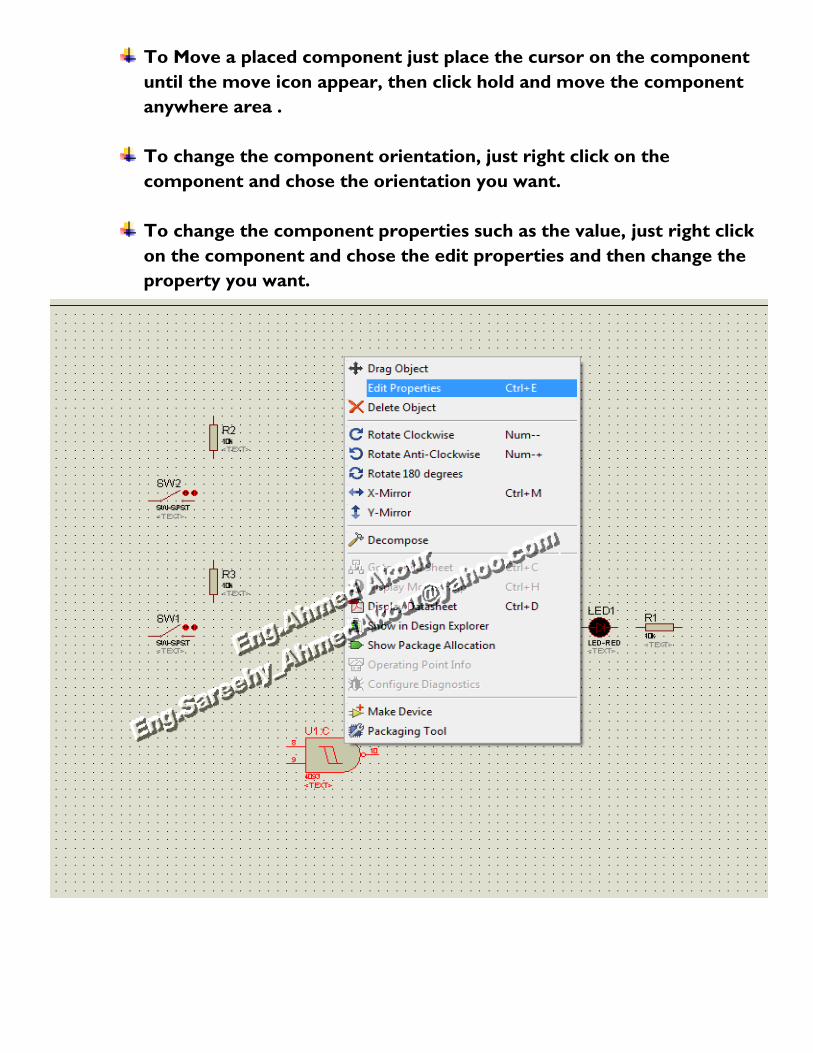
To Move a placed component just place the cursor on the component
until the move icon appear, then click hold and move the component
anywhere area .
To change the component orientation, just right click on the
component and chose the orientation you want.
To change the component properties such as the value, just right click
on the component and chose the edit properties and then change the
property you want.

Now place all the components needed in drawing area with right quantities
to design circuit.
To make wire connection, just place the cursor on component pin until red
square appear, then click on the component to join the wire. Join the wires
to all components according to the circuit design.

To remove the wrong connection made, right click on the wire connection
and choose delete wire or just double right click on the wire.
The next step is to select power and ground terminal needed, to choose a
terminal click the icon button for Terminal mode.
To place terminals, click on the selected terminal list in terminal box then
single click on the drawing area. The image of the selected terminal will
appear. Then just click on any part of drawing area to place the terminal.

After you finish drawing the schematic circuits you want to start simulation
process to s test your circuit design. To start the simulation process just click
on play button on simulation bar and show the response of your circuit
design.
To stop the simulation just click on stop button on simulation bar.

Eg: Suppose now that you want to choose PIC16F877A to make a simulation then
you must follow the following steps:
1. Click on Components Mode.
2. After that click on letter P, P stands for Pick, show figure below.
3. A new window will be displayed; it contains all components, with a powerful search
engine, as shown in figure below.
4. In the Keyword fields, type 16f877a as a whole word, or simply type 16f87 to list all
PIC16F87xx proteus supported devices in this range, show figure in the next page.
5. In Results list, make sure to highlight PIC16F877A, then press OK button. If you want
to pick another component, without pressing OK button; simply double click on
PIC16F877A will be listing it automatically into devices list, and then delete the contents
of the Keyword text box and make your new search again.
Run pause stop

After choosing all components for your design, put the components on the
model screen, simply by choosing any components and clicking anywhere on
the sheet, after that you must wire all components as drawn in your
schematic, note that if your simulation contains MCUs, MPUs, FPGAs… or
any programmed device; then you must load the firmware or program into
the device, for MCUs say PIC16F877A; double click on it, or right click on
the device and choose Edit Properties (Ctrl+E); after that load the HEX file
from Edit Component window, show figure below.

Also from the same window i.e. Edit Component shown above, you must set the used
MCU's frequency clock for example 1 MHz, 4 MHz, 32 KHz, etc…; the crystal is connected by
default.
Very important note: In PIC16F877A pin_1 (MCLR; Master clear) is used
for reset. It is active low and this is mean that it must connected to 5 volt
(VCC, VDD) in normal mode, and to make a reset for the PIC it must connected
to 0 volt (GND, VSS) . In simulation you have a choice to connect it or not
(for PIC16F only), but in reality you must connect it. In the same way the
crystal oscillator (XTAL) on pins 13 and 14, it is optional in proteus simulation
but a must in reality. Finally, don’t forget to fed the PIC with 5 volt and
GND on pin_32 (VDD) and pin_31 (VSS) respectively. In proteus simulator they
are connected by default!

GOoD LuCk
Eng Ahmed Akour