standard analytical procedures new hplc · pdf filenew hplc cleanup and revised extraction...
TRANSCRIPT

STANDARD ANALYTICAL PROCEDURES
OF THE
NOAA NATIONAL ANALYTICAL FACILITY, 1988
NEW HPLC CLEANUP AND REVISED EXTRACTION PROCEDURES
FOR ORGANIC CONTAMINANTS
Prepared for
The NOAA National Status and Trends Program
and
The Outer Continental Shelf Environmental Assessment Program
BY
Margaret M. Krahn, Catherine A. Wigren, Ronald W. Pearce,
Leslie K. Moore, Richard G. Bogar, William D. MacLeod, Jr.,
Sin-Lam Chan, and Donald W. Brown
Environmental Conservation DivisionNorthwest and Alaska Fisheries Center
National Marine Fisheries ServiceNational Oceanic and Atmospheric Administration
2725 Montlake Boulevard, EastSeattle, WA 98112
October 1988

This document is available to the public through:
National Technical Information ServiceU.S. Department of Commerce5285 Port Royal RoadSpringfield, VA 22161

iii
CONTENTS
Page
Preface . . . . . . . . . . . . . . . . . . . . . . . . . . . . . . . . . . . . . . . . . . . . . . . . . . . . V
Introduction . . . . . . . . . . . . . . . . . . . . . . . . . . . . . . . . . . . . . . . . . . . . . . . . .. 1
Section 1.
Section 2.
Section 3.
Section 4.
Materials .................................................................. 5
Sediment Extraction .................................................. 11
Tissue Extraction ...................................................... 17
HPLC Cleanup ......................................................... 25
Acknowledgments ................................................................... 37
Literature Cited ....................................................................... 39
Appendix’ 1. Autosampler and Fraction Collector Programs ........ 41
Appendix 2. Operation of the HPLC System ................................ 47

THIS PAGE INTENTIONALLY LEFT BLANK

PREFACE
The Environmental Conservation (EC) Division of the Northwest andAlaska Fisheries Center conducts broad-ranging research into the natureand extent of pollution and its effects on marine and estuarine fish and
While functioning within the National Marine FisheriesDivision maintains a strong research relationship with
Oceanography and MarineNOAA’s National Status and
or 4 years the EC Divisionhas participated in the NS&T Program, which monitors marineenvironmental quality at approximately 200 sites along the nation’scoastlines.
-Hundreds of chemical analyses are needed annually by the NS&TProgram to document the quality of the marine environment and assesstrends. Wherever possible, standard methods are used to minimize theanalytical variability among the participating laboratories.procedures, such as those for aromatic hydrocarbons andhydrocarbons in sediments and tissues, are relatively laborious. Toexpedite these analyses the EC Division’s National Analytical Facility hasd e v e l o p e d a n e w instrumental method for the cleanup of sample extracts.
up as effective as by former methods-(2)better precision: (3)less time required; (4) capability of monitoring thechromatographic conditions;(5) capability of being automated; and (6) lesshighly pure solvent req
Memorandum, the new cleanup and reviseextraction procedures are being made available to NS&T laboratories. Thelaboratory manual should also be useful to other federal, state, and localenvironmental programs which analyze for organic chemicals insediments and organisms. These new procedures supersede Sections 7, 8,10, and 11 of NOAA Technical Memorandum NMFS F/NWC-92 (MacLeodet al. 1985).
I

INTRODUCTION
Since its inception in 1976, NOAA’s National Analytical Facility
(NAF) of the Environmental Conservation Division, Northwest and Alaska
Fisheries Center, has been at the forefront in developing and employing
advanced methods to analyze samples from the aquatic environment for
traces of toxic chemicals. These activities have focused on methods for
determining anthropogenic organic compounds such as aromatic
hydrocarbons (AHs) and chlorinated hydrocarbons (CHs) both in sediments
and in organisms.
Most analytical methods which determine these organic compoundsincorporate 3 steps:
l Removal of the organic chemical contaminants of interest(analytes) from the sample matrix by solvent(s) extraction.
l Isolation of the analytes of interest (“cleanup”) frominterfering compounds present in the extract, generally by oneor more chromatographic techniques.
l Qualitative and quantitative instrumental analysis by gaschromatography (GC), high-performance liquidchromatography (HPLC), or mass spectrometry (MS).
The cleanup step is critical for accurate identification and quantitation of
the analytes. Biogenic or other interfering compounds present in the
extract can coelute with analytes of interest and prevent accurate
quantitation. Some interfering compounds can also affect the
reproducibility of the GC analyses by degrading the column or building up a
deposit in the inlet. A variety of cleanup procedures have been developed.
MacLeod et al. (1985) -published a laboratory manual detailing the use of

2
two gravity-flow chromatography steps for cleanup: separation on (1)
silica/alumina packing and (2) a gel-permeation column.
Here, we describe a rapid, simple HPLC method, using a size-
exclusion column. We developed this method to improve on the gravity-flow
method by increasing efficiency, reducing costs, automating the analyses,
and monitoring chromatographic conditions (Krahn et al. 1988).
Improvements to the previous extraction procedures (MacLeod et al. 1985)
are also described herein.
Summary of Analytical Procedures
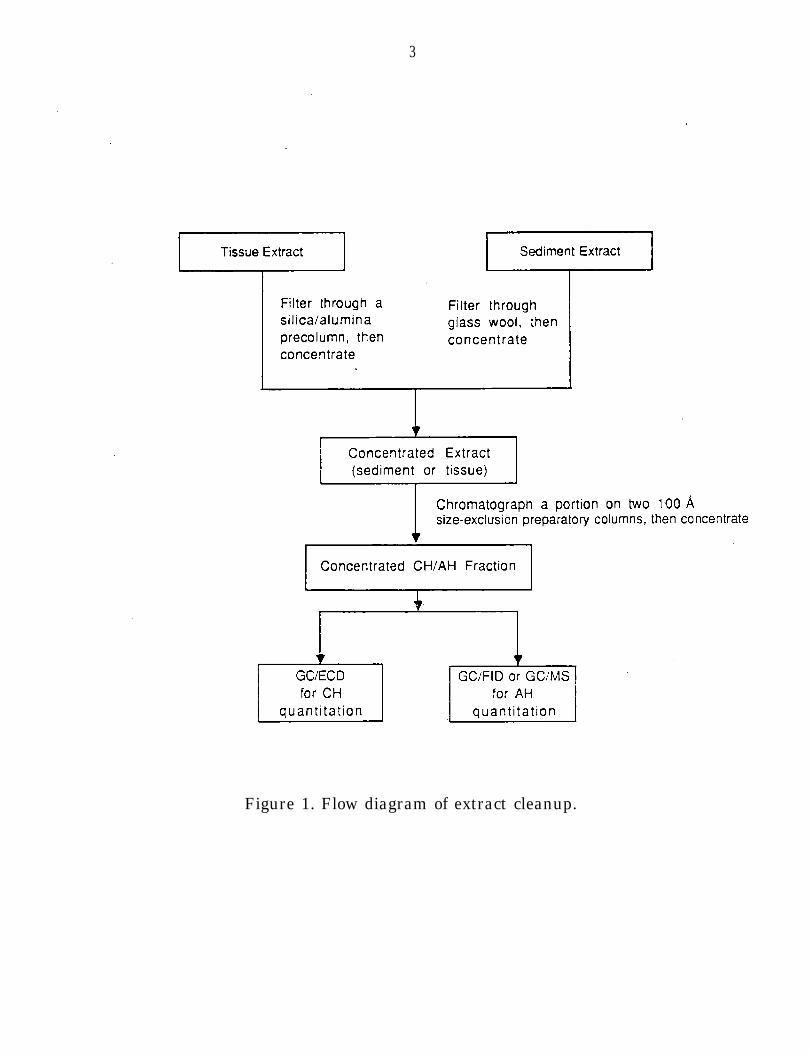
The cleanup of sediment and tissue extracts follows the scheme
shown in Figure 1, as summarized below. Sediment and tissue are
extracted largely as described in MacLeod et al. (1985), then the sediment
extracts are filtered through glass wool and the tissue extracts through a
silica/alumina precolumn. The extracts are concentrated, and a portion of
each extract is chromatographed on a 100-A size-exclusion HPLC column
using methylene chloride as the mobile phase. A fraction containing AHs
and CHs is collected, and the solvent volume is reduced to 250 µL. The
concentrated extract is analyzed by GC with an electron capture detector
(GC/ECD) to determine CHs and with a flame ionization detector (GC/FID)
or mass spectrometer (GC/MS) to determine AHs. For quality assurance,
sample sets are run so that in a set of 12 analyses there are (1) a blank, (2) a
sample of reference material or a spiked blank, and, frequently, (3) a
replicate of one of the samples.
- - - -
3
Figure 1. Flow diagram of extract cleanup.

THIS PAGE INTENTIONALLY LEFT BLANK

5
Section 1
MATERIALS
Disclaimer: Reference to trade names does not imply endorsementby the National Marine Fisheries Service, NOAA.
Note: All chemicals and solvents must be of the highest purity available.
A. Solvents
hexane, nonspectro
methylene chloride
B. Reagents
sodium sulfate
copper
alumina
silica gel
sand
C. Miscellaneous
boiling chips
Burdick and Jackson, distilled in glass
Burdick and Jackson, distilled in glass
Reagent Grade, anhydrous granular
Reagent Grade, fine granular
Sigma F-20, 80-200 mesh
Amicon No. 84080
Ottawa, MCB, kiln-dried, 30-40 mesh
Teflon, Norton Chemplast, Chemware
D. Standards - Those from the National Bureau of Standards (NBS) are sodesignated; others are prepared in this laboratory (NAF).
Instrument calibration
HPLC-AH/CH calibration-check solution (NAF)
biphenyl (-3 ng/pL)
4,4’-dibromooctafluorobiphenyl (-1.5 ng/µL)(DOB)
perylene (-1.5 ng/µL)

6
GC calibration-check solutions (NAF)
AHs (~ 5 ng/µL); see list in Table 1
CHs (~ 0.1 ng/µL); see list in Table 1
COP (~ 5 ng/µL); see list in Table 1
Internal Standards (I-Stds) for analyte quantitation by GC or GUMS
AH I-Std (NBS, 100 µL added to each sample before extraction andto each AH analvte-calibration solution):
naphthalene-d8 (~50 ng/µL)
acenapthene-dl0 (~50 ng/µL)
perylene-dl2 (~50 ng/µL)
CH I-Std (NAF, 100 µL added to each sample before extraction andto each CH analvte-calibration solution):
4,4’-dibromooctafluorobiphenyl(DOB, -1 ng/µL)
COP I-Std (NAF, 100 µL added to each sediment sample beforeextraction and to each COP analvte-calibration solution):
5a-androstan-17B-ol (-50 ng/µL)
Spike solutions
PAH Std solution (NBS, 750 µL added to each reagent spike beforeextraction and to each AH analvte-calibration solution):
AHs (~ 6 ng/µL); see list in Table 2
Pesticides Std solution (NBS, 500 µL added to each reagent spikebefore extraction and to each CH analvte-calibration solution):
PESs (~ 0.2 ng/µL); see list in Table 2
PCB Congeners Std solution (NBS, 500 µL added to each reagentspike before extraction and to each CH analvte-calibrationsolution):
PCBs (-0.2 ng/µL); see list in Table 2

7
COP Spike solution (NBS, 100 µL added to each sediment reagent spikebefore extraction and to each COP analvte-calibration solution):
coprostanol (-50 ng/µL)
Recovery I-Stds
HPLUI-Std (NAF, 100 µL added to each extract just prior toHPLC cleanup and to each AH and CH analvte-calibrationsolution):
phenanthrene-dl0 (~50 ng/µL)
1,2,3-trichlorobenzene (~1 ng/µL)
COP HPLUI-Std (NAF, 100 µL added to each sediment extract justprior to HPLC cleanup and to each COP analvte-calibrationsolution):
benzo[e]pyrene-dl2 (~50 ng/µL)
HMB GUI-Std (NBS: 30 µL added to each concentrated AH/CHfraction and to each AH and CH analvte-calibrationsolution; 10 µL added to each concentrated COP fraction;and 30 µL added to each COP analvte-calibration solution):
hexamethylbenzene (~80 ng/µL)
TCMX GC/I-Std (NBS, 50 µL added to each concentrated AH/CHfraction and
E. Purified gases
nitrogen
helium
F. Tube heater
G. Steam table
H. Vortex Genie
I. Syringes
to each CH analvte-calibration solution):
tetrachloro-m-xylene (~2 ng/µL)
Prepurified Grade
Prepurified Grade
‘Modified Kontes: aluminum inserts boredto fit the l-mL tube tip; glass shroud
Precision Scientific, 8-hole, 120 v AC, 2 kw
American Scientific Products, Model S8223
Hamilton, 50-PL through l,OOO+L sizes (optional,VWR Scientific, Digital Microdispenser, 100~PL)

8
Table 1. Analytes in GC calibration-check solutions
AH GC plibmtion-check
naphthalene2-methylnaphthalene1-methylnaphthalenebiphenyl2,6-dimethylnaphthaleneacenaphthenefluorenephenanthreneanthracene1-methylphenanthrenefluoranthene
pyrenebenz[a]anthracenechrysenebenzo[e Jpyrenebenzo[a]pyreneperylenedibenz[a,h]anthracenenaphthalene-d8acenaphthene-dl0perylene-dl2hexamethylbenzene
COP G-C @ibrationcheck
CH GC &brationcheck
hexachlorobenzenelindaneheptachloraldrinheptachlor epoxidealpha-chlordanetrans-nonachlordieldrinmirexo,p’-DDEp,p’-DDEo,p’-DDDp,p’-DDDo,p’-DDTp,p’-DDT2, 4’-dichlorobiphenyl2, 5, 4’-trichlorobiphenyl2, 4, 2’, 4’-tetrachlorobiphenyl2, 4, 5, 2’, 5’-pentachlorobiphenyl2, 4, 5, 2’, 4’, 5’-hexachlorobiphenyl2, 3, 4, 5, 2’, 4’, 5’-heptachlorobiphenyl2, 3, 4, 5, 2’, 3’,4’, 5’-octachlorobiphenyl2, 3, 4, 5, 6, 2’, 3’,4’, 5’-nonachlorobiphenyl4, 4’-dibromooctafluorobiphenyl (DOB)
coprostanol5cl-androstan-17p-olbenzo[e]pyrene-d12hexamethylbenzene
=..

9
Table 2. Analytes in spike solutions
PAH Std
naphthalene2-methylnaphthalene1-methylnaphthalenebip henyl2,6-dimethylnaphthaleneacenaphthyleneacenaphthene2,3,5-trimethylnaphthalenefluorenephenanthreneanthracene1-methylphenanthrenefluoranthene
pyrenebenz[a]anthracenechrysenebenzo[b]fluoranthenebenzo[k]fluoranthenebenzo[e]pyrenebenzo[a]pyreneperyleneindeno[1,2,3cdlpyrenedibenz[a,h]anthracenebenzo[ghilperylene
hexachlorobenzenelindaneheptachlorheptachlor epoxidealdrindieldrina-chlordanetrans-nonachlormirexo,p’-DDEp,p’-DDEo,p’-DDDp,p’-DDDa,~‘-DDTp,p’-DDT

10
Table 2. Continued.
PCB Congeners Std
2, 4-dichlorobiphenyl2, 4, 4’kichlorobiphenyl2, 2, 5’kichlorobiphenyl2, 3, 2’, 5’-tetrachlorobiphenyl2, 5, 2’, 5’-tetrachlorobiphenyl2, 4, 3’, 4’-te trachlorobiphenyl2, 4, 5, 2’, 5’-pentachlorobiphenyl2, 3, 4, 3’, 4’-pentachlorobiphenyl2, 4, 5, 3’, 4’-pentachlorobiphenyl -2, 3, 4, 2’, 3’, 4’-hexachlorobiphenyl2, 3, 4, 2’, 4’, 5’-hexachlorobiphenyl2, 4, 5, 2’, 4’, 5’-hexachlorobiphenyl2, 3, 4, 5, 2’, 3’, 4’-heptachlorobiphenyl2, 3, 4, 5, 2’, 4’, 5’-heptachlorobiphenyl ’2, 3, 5, 6, 2’, 4’, 5’-heptachlorobiphenyl2, 3, 4, 5, 6, 2’, 3’,4’-octachlorobiphenyl2, 3, 4, 5, 6, 2’, 3’,4’, 5’-nonachlorobiphenyldecachlorobiphenyl

11
Section 2
SEDIMENT EXTRACTION
A. Equipment List
Note: wash all glassware and materials contacting the sample orextract with methylene chloride.
Glassware (per sample)
250-mL bottle (amber, Boston round) with Teflon cap (Savillex,24-mm) for the tumbler/centrifuge
500-mL bottle (amber, Boston round) with Teflon-lined cap
50-mL conical centrifuge tube with Teflon-lined cap (low-cost,disposable)
25-n& serological pipet with top sawed off (low-cost, disposable)
2-mL GC vial (for HPLC samples)
powder funnel
Solvents and Reagents (per sample)
300 mL methylene chloride (not including washes)
60 g sodium sulfate: methylene chloride-washed, dried, heatedto 7000C for 18 hr, stored at 12OoC, and cooled to roomtemperature in a desiccator just prior to use
7.5 cc activated copper (MacLeod et al. 1985, Section 5, Part A,page 39): use immediately or store under methylenechloride for 5 1 hr
hexane (as needed)
Internal Standard (I-Std) Solutions
NBS: AH I-Std solution
NAF: CH I-Std solutionCOP I-Std solutionHPLC/I-Std solutionCOP HPLC/l-Std solution

Spike solutions
NBS: PAH Std solutionPesticides Std solutionPCB Congeners Std solutionCOP spike solution
Other Materials and Apparatus
1 spatula per sample
modified rock tumbler: Model NF-1, Lortone, Inc., 2856 NWMarket St., Seattle, WA 98107
glass wool
masking tape
desiccator Iboiling chips
1000~pL, 500-pL, 250-PL and 100~PL syringes (optional: lOO+Lmicrodispenser)
6 ea 2-mL GC vials
Kontes tube heater: inserts modified to accept the 50-mL tubesand a glass cylinder shroud
transfer pipets (Pasteur style) with bulbs
steam table
500-n& Teflon wash-bottle (methylene chloride-filled)
centrifuge (to accommodate the tumbler/centrifuge bottles)
drying oven (12OoC)

13
B. Sediment Extraction
Note: Sediments are customarily analyzed in 12-sample sets, In addition tothe 8-9 regular sediment samples in each set there are
1 blank (“reagent blank”) sample
1 spiked blank (“reagent spike”) sample m 1 reference
sediment sample
1 field blank (“sediment blank”) sample, if called for
1 duplicate sediment sample
1. Assemble the 250-mL bottles, 1 for each sample described above.
2. Prepare the field blank by washing down the empty sample container 3
times with 10 mL of methylene chloride (fresh each time), and adding-
the combined washes to a, 250-mL bottle, then add 70 mL more methylene
chloride. To all other bottles add 100 mL of methylene chloride.
3. To each bottle also add:
a. 60 g of sodium sulfate
b. 7.5 cc of activated copper
c. 100 µL of AH.I-Std solution into the methvlene chloride
d. 100 µL of CH I-Std solution into the methvlene chloride
e. 100 µL of COP I-Std solution into the methvlene chloride
4. To the spiked blank bottle also add into the methvlene chloride:
a. 750 µL of PAH Std solution
b. 500 µL of Pesticides Std solution
c. 500 µL of PCB Congeners Std solution
d. 100 µL of COP spike solution
5. The blank, spiked blank, and/or field blank bottles receive nothing
more.
14
6. Prepare 2 AH analvte-calibration solutions by adding to each of 2 GC
vials:
a. 250 µL of hexane
b. 750 µL of PAH Std solution
c. 100 µL of AH I-Std solution
7. Prepare 2 CH analvte-calibration solutions by adding to each of 2 GC
vials:
a. 500 µL of Pesticides Std solution
b. 500 µL of PCB Congeners Std solution
c. 100 µL of CH I-Std solution
8. Prepare 2 COP analvte-calibration solutions by adding to each of 2 GC
vials:
a. 800 µL of hexane
b. 100 µL of COP spike solution
c. 100 µL of COP I-Std solution
9. Decant the excess water from the sediment and stir it to homogenize.
Discard all pebbles, seaweed, wood, crabs, etc.
10. Set aside ~ 10 g of the homogenized sediment for the Dry Weight
Determination (MacLeod et al. 1985, Section 9, page 67).
11. Using a spatula and powder funnel, and being careful not to splash
from the bottle, weigh 10 + 0.5 g of sediment to the nearest 0.01 g into
all the tared bottles from Step 3, except the blanks. Record the weight
in the log book. Store the remaining sample in a freezer.
Note: To avoid clumping and hardening of the sodium sulfate, performSteps 12-15 immediately after adding the sediment to the bottle.
12. Cap each bottle, screwing the Teflon cap on just tight enough to
prevent leakage.
Note: Do not over-tighten the cap so as to deform the seal and cause leakage.
13. Manually shake each bottle until the contents are loose.
14. Tape the cap to the bottle crosswise over the top with 2 strips of
masking tape.
15.
16.
17.
18.
19.
20.
21.
Roll each bottle 16 hr (overnight) on the tumbler at 100-250 rpm.
Centrifuge each bottle for 5 min at 1500 rpm.
Decant each extract into a labeled 500-mL bottle.
Add 100 mL of methylene chloide to each sample, and repeat Steps
12 through 16, except roll each bottle for 6 hr (i.e., during the day).
Decant the 2nd extract into the bottle from Step 17.
Repeat Step 18, except roll each bottle for 16 hr (i.e., overnight).
Decant the 3rd extract from Step 20 into the bottle from Step 19.
C. Extract Precleanup
1.
2.
3.
4.
5.
Add 8-10 boiling chips to the bottle containing the combined
methylene chloride extract from Step B.21.
Concentrate the extract on a steam table to 15-20 mL, and set it aside
for Step 6.
Prepare a cleanup column by adding a 30- to 40-mm glass wool plug
to a 25-n& pipet and tamping it down firmlv with a glass rod.
Wash down the pipet with - 5 mL of methylene chloride, and drain
the washings into a waste container. ;
Repeat Step 4 twice, then rinse the tip of the pipet with methylene
chloride.

16
6. Place a labeled centrifuge tube under the pipet and slowly decant the
concentrated extract from Step 2 into the pipet.
7. Wash down the bottle with ~ 5 mL of methylene chloride and decant
the washings into the pipet.
8. Repeat Step 7 twice.
9. Wash down the pipet wall with ~ 5 mL of methylene chloride.
10. Repeat Step 9 once.
D. Extract Concentration
1. Add a boiling chip to the tube from Step C. 10 and concentrate the
extract to > 0.9 mL, < 1.0 mL on the tube heater.
2. Add activated copper to the tube, a few grains at a time, until no
further discoloring of the copper occurs. Cover the tube and store it
overnight in a refrigerator.
3. Add 100 µL each of HPLCA-Std and COP HPLC/I-Std solutions to the
tube. Mix the extract on the Vortex Genie for 2 set at setting 4-6.
4. Add 100 µL of HPLC/I-Std solution to each of the AH analvte-
calibration and the CH analvte-calibration solutions from Steps B.6,
and B.7. Mix the solution on the Vortex Genie for 2 set at setting
4-6.
5.. Add 100 µL of COP HPLC/I-Std to each of the COP analvte-calibration
solutions from Step B.8; mix the solutions on the Vortex Genie for 2
set at setting 4-6.
6. Using a pipet, carefully transfer the concentrated, extract from Step 3
to a GC vial labeled EXTRACT, in addition to the sample number.
7. Proceed to Section 4 (HPLC Cleanup) with the vials from Step 6.

17
Section 3
TISSUE, EXTRACTION
A. Equipment List
Note: wash all glassware and materials contacting the sample orextract with methylene chloride.
Glassware (per sample, low-cost disposable, use one time onlv)
100-mL centrifuge tube with Teflon-lined cap
2 ea 250-mL bottles (amber, Boston round) with Teflon-linedcap
50-mL conical centrifuge tube with Teflon-lined cap
22-mm ID x 25-cm plain chromatography column, Ace Glassmodel 5884-998.
2-mL GC vial (for HPLC samples)
Solvents and Reagents (per sample)
205 mL methylene chloride (not including washes)
hexane (as needed)
25 g sodium sulfate (methylene chloride-washed, dried, heatedto 700º C for 18 hr, stored at 120º C, and cooled to roomtemperature in a desiccator just before use)
10 cc alumina (heated to 700º C for 18 hr, stored at roomtemperature, then activated at 120º C for 2 hr and cooledto room temperature in a desiccator just before use)
20 cc silica gel (heated to 700º C for 18 hr, stored at 170º C, andcooled to room temperature in a desiccator just before use)
5 cc sand (MacLeod et al. 1985, Section 5, Part A, page 39)
Internal Standard Solutions
NBS: AH I-Std solution
NAF: CH I-Std solutionHPLC/I-Std solution

18
Spike Solutions
NBS: PAH Std solutionPesticides Std solutionPCB Congeners Std solution
Other Materials and Apparatus
1 spatula per sample
Tekmar Tissumizer with probes
desiccator
centrifuge (to accommodate the 100-mL centrifuge tubes)
boiling chips
500-mL Teflon wash-bottle (methylene chloride-filled)
l000-µL, 5OO-µL, 25O-µL and lOO-µL syringes (optional:l00-µL microdispenser)
2-mL GC vials (for analvte-calibration solutions)
steam table
modified Kontes tube heater (see Section 2)
Vortex Genie
Teflon sheeting (to line centrifuge bottle caps)
Pasteur transfer pipets with bulbs (as needed)
glass wool
glass rod
5-CC measuring spoon
B. Extraction for CH Analysis Only (Liver, Muscle, etc.)
Note: Tissues are customarily analyzed in 12-sample sets. In addition tothe 8-9 regular tissue samples in each set there are
1 blank (“reagent blank”) sample
1 spiked blank (“reagent spike”) sample or 1 reference tissue
sample
1 field blank (“tissue blank”) sample, if called for
1 duplicate tissue sample
1. Assemble the 100-mL centrifuge tubes, 1 for each sample described
above.
2. Using a spatula, and being careful to place the sample on the bottom
and not the sides, weigh 3 + 0.5 g of sample to the nearest 0.01 g into
the centrifuge tubes reserved for tissue samples. Record the weight
in the log book.
3. Set aside ~ 0.5 g for Dry Weight Determination (MacLeod et al. 1985,
Section 9, page 65) and store the remaining sample in a freezer.
4. Prepare the field blank by washing down the- empty sample container
3 times with 10 mL of methylene chloride (fresh each time) and
adding the combined washings to an empty centrifuge tube. Add 5
mL more of methylene chloride to the tube. To all the other tubes add
35 mL of methylene chloride.
5. To each sample tube, blank tube, and spiked blank tube add 100 µL of
CH I-Std solution into the methylene chloride.
6. To the spiked blank tube add into the methylene chloride:
a. 500 µL of PCB Congeners Std solution
b. 500 µL of Pesticides Std solution

7. For each set of samples prepare 2 CH analvte-calibration solutions by
adding to each of 2 GC vials:
a. 500 µL of Pesticides Std solution
b. 500 µL of PCB Congeners Std solution
c. 100 µL of CH I-Std solution
8. Add 25 g of sodium sulfate to each tube from Steps 4-6.
9. Macerate/extract the sample in the tube for 0.5 min with the
Tissumizer at setting 80, then reduce the speed to setting 60 and
continue for 1.5 min. Avoid spattering the tissue.
10. Wash down the probe with ~ 5 mL of methylene chloride, and collect
the washings in the centrifuge tube.
11. Centrifuge the sample for 5 min at 2,000 rpm.
12. Decant the extract into a labeled bottle.
13. Add 35 mL of methylene chloride to the tube.
14. Repeat Steps 9-11 once.
15. Decant the extract into the bottle from Step 12.
16. Wash the sodium sulfate/sample mass by adding 10 mL of methylene
chloride to the tube and mixing on the Vortex Genie for 5-10 seconds
at setting 5-6.
17. Decant the extract into the bottle from Step 15, then set the bottle aside
for Step D.5.

21
C. Extraction for AH/CH Analysis (Stomach Contents, Molluscs, etc.)
Note: Tissues are customarily analyzed in 12-sample sets. In addition tothe 8-9 regular tissue samples in each set there are
1 blank (“reagent blank”) sample
1 spiked blank (“reagent spike”) sample or 1 reference tissue
sample
1 field blank (“tissue blank”) sample, if called for
1 duplicate tissue sample
1. Assemble the 100-mL centrifuge tubes, 1 for each sample described
above.
2. Using a spatula, and being careful to place the sample on the bottom
and not the sides, weigh 3 + 0.5 g of sample to the nearest 0.01 g into
the centrifuge tubes reserved for tissue samples. Record the weight
in the log book.
3. Set aside ~ 0.5 g for Dry Weight Determination (MacLeod et al. 1985,
Section 9, page 65), and store the remaining. sample in a freezer.
4. Prepare the field blank by washing down the empty sample container
3 times with 10 mL of methylene chloride (fresh each time) and
adding the combined washings to an empty centrifuge tube. Add 5
mL more of methylene chloride to the tube. To all the other tubes add
35 mL of methylene chloride.
5. To each sample tube, blank tube, and spiked blank tube add:
a. 100 µL of AH I-Std solution into the methylene chloride
b. 100 µL of CH I-Std solution into the methylene chloride
6. To the spiked blank tube add into the methylene chloride:
a. 500 µL of PCB Congeners Std solution
b. 500 µL, of Pesticides Std solution
c. 750 µL of PAH Std solution
7. For each set of samples prepare 2 CH analvte-calibration solutions by
adding to each of 2 GC vials:
a. 500 µL of Pesticides Std solution
b. 500 µL of PCB Congeners Std solution
c. 100 µL of CH I-Std solution
8. For each set of samples prepare 2 AH analvte-calibration solutions by
adding to each of 2 GC vials:
a. 750 µL of PAH Std solution
b. 100 µL of AH I-Std solution
c. 250 µL of hexane
9. Add 25 g of sodium sulfate to each tube from Steps 5-6.
10. Proceed as in Steps B.9 through B.17.
D. Extract Precleanup
1. Prepare a cleanup column by plugging a chromatography column
with glass wool (tamped down with a glass rod), then adding 10 cc of
alumina, followed by 20 cc of silica gel and 5 cc of sand.
2. Slowly add 50 mL of methylene chloride to the column, and drain it
into a waste container.
3. Repeat Step 2 once, then rinse the column tip with methylene
chloride.
4. Place a second labeled bottle under the column.
23
5. Slowly decant the extract from Step B.17 into the column, and allow it
to drain from the column.
6. Wash down the 1st bottle with - 5 mL of methylene chloride, and
slowly decant the washings into the column.
7. Repeat Step 6 twice.
8. Wash down the column wall with 25 mL of methylene chloride, and
allow the washings to drain from the column.
E. Concentration of the Extract
1.
2.
3.
4.
5.
6.
7.
8.
9.
Add 6-8 boiling chips to the bottle containing the extract from Step D.8.
Concentrate the extract on a steam table to 15-20 mL, and transfer it
to a labeled conical centrifuge tube.
Wash down the bottle with - 5 mL of methylene chloride, and add the
washings to the tube.
Repeat Step 3 twice.
Add 1 boiling chip to the tube and, using the tube heater, concentrate
the extract 2 0.9 mL, I 1.0 mL.
Add 100 uL of HPLCI-Std solution to the tube and mix the extract on
the Vortex Genie for 2 set at setting 4-6.
Add 100 PL of HPLC/I-Std solution to each of the analvte-calibration
solutions from Step B.7 or Steps C.7 and C.8 and mix each on the
Vortex Genie for 2 set at setting 4-6.
Using a pipet, carefullv transfer the extract from Step 6 to a 2-mL GC
vial labeled EXTRACT, in addition to the sample number.
Proceed to Section 4 (HPLC Cleanup) with vials from Step 8.

THIS PAGE INTENTIONALLY LEFT BLANK

25
Section 4
HPLC CLEANUP
A. Instruments and Equipment
High-performance liquid chromatograph (HPLC)
Spectra-Physics 8000B (or equivalent) including:oven (optional)recorder-integratordata systemultraviolet (UV) detector (254 nm)6-port valve, Rheodyne, model 7030in-line filter, Rheodyne, model 7302, 2-pm meshhelium degas system
helium, prepurified graderegulator, 2-stage, stainless-steel diaphragmhydrocarbon trap, Alltech Associates, no. 1463402/H20 indicating tube, Supelco, model OMI-1
Automatic sampler
Gilson 231/401 (or equivalent), capable of reproducible injections withminimal waste and negligible contamination
Automatic fraction collector
Gilson 201C (or equivalent), programmable to collect different volumes(times) of fractions and capable of collecting fractions into 50-n&conical centrifuge tubes with negligible contamination or loss
HPLC columns
preparatory, 2 used in series, Phenomenex Phenogel 100-Asize-exclusion packing, 22.5 x 250 mm.
guard, Phenomenex Phenogel 100-A size-exclusion packing,7.8 x 50 mm. ,
Glassware
2-mL GC vials (for autosampler)
50-mL conical centrifuge tubes with screw-tops and Teflon-lined caps(for fraction collector)

26
2-mL GC vial with 250-G insert (or conical GC vial), 1 foreach HPLC fraction to be analyzed by GC.
Pasteur transfer pipets with bulbs
Internal Standard Solutions
NBS: HMB GUI-Std solutionTCMX GUI Std solution
Solvents
methylene chloride
hexane (as needed)
Other Apparatus
nitrogen gas (piped through only methylene chloride-washed Teflon,stainless-steel, or glass tubing)
B. Setup of Instruments
Note: The flow diagram and timetable must be adjusted for the user’sparticular instruments.
1. Time Table
Time (min) Instrument Activitv/Instruction
<o
0
0
O - 2 0 HPLC
1 autosampler
-1419 fraction collector
18 autosampler
20 HPLC
autosampler
HPLC
autosampler
Sample loop loaded; see 18 min below
Flow = 7 mUmin; oven = 40°C;solvent = 100% methylene chloride
Sample injected; signal sent toHPLC to start data system
Isocratic elution
Injection port rinsed; needle rinsed
Fraction collected
New sample picked up; loop loaded
Data system ends integration

27
2. Setup of HPLC system
FORWARD
In- l ine HPLC SYSTEM
Size-exclusion (100 A)preparatory column(s)
UV detectorI
/ - - - - {Recorder/ integrator ]
I 1
Fraction Collector 1 1 Waste 1 1 Report (
BACKFLUSH
In- l ine HPLC SYSTEM
Size-exclusion (I 00 A)preparatory column(s)
fUV detector
I} - - - { - ]
arrows = solvent flow; dashed lines = electrical connections
28
C. Operating Parameters of Instruments
Note: These parameters pertain to NAF instruments. Users of otherinstruments should make appropriate adjustments.
1. Automatic sampler
Sample size = 250 fi
Programs (see Appendix 1)
program 1 = standards
program 2 = fraction collecting
1-mL syringe
Code #O rack
2. HPLC
Oven temperature = 40°C
Data system: Run time = 20 min
Channel 1 = ultraviolet detector (254 nm)
Chart speed = 0.5 cmmin
Isocratic elution: 100 % methylene chloride
3. Fraction collector
Programs (see Appendix 1)
program 1 = standards
program 2 = fraction collecting
Code #24 rack to hold 50-mL conical centrifuge tubes
D. Initial and Periodic Calibration of Instrument System
1. Prepare a svstem-calibration solution by adding to a GC vial
(a) 900 uL of methylene chloride and (b) 100 PL of HPLC
calibration-check solution.

2. Select programs for each component of the HPLC instrument system
(i.e., the HPLC, the autosampler, and the fraction collector) for running
standards (see Appendix 1).
3. Prime the HPLC system and establish a stable flow rate and temperature
(see Appendix 2, Part A).
4. Load the autosampler rack with - 6 vials of HPLC-AHCH calibration-
checks o l u t i o n .
5. Load the fraction collector with 6 empty tubes.
6. Start the programs/instruments and run the HPLC-AWCH calibration-
check solution. Consult the log from the previous day(s) to determine the
retention time at which DOB has stabilized. When the system is working
well, 3-4 runs of this standard should be sufficient to obtain retention time
stability to within - + 0.05 min of the retention times of the previous
day(s). If not, corrective maintenance is needed (e.g., install new
precolumn, clean in-line filter, fix plugged lines, etc.). The peaks of the 3
calibration standards (DOB, biphenyl, and perylene) should be sharp with
baseline resolution and retention times that are stable up to weeks at a
time.
7. For the initial calibration, program the fraction collector to collect 10
consecutive, O.l-min fractions, starting 1 min before the retention time of
DOB. Starting at the HPLUUV retention time of perylene, make a
similar 1-min collection of O.l-min fractions (see Appendix 1, Part B,
Program. 3).
8. Load the fraction collector rack with 20 empty GC vials.
9. Load the autosampler rack with the svstem-calibration solution from Step 1.
10. Start the programs/instruments.

30
11. Add 50 µL of TCMX solution to each of the 1st 10 fractions collected and
50 µL of HMB solution to each of the 2nd 10 fractions collected. Label
and cap the vials.
12. Analyze the 1st 10 fractions by GC/ECD for DOB and the 2nd 10 fractions
by GC/FID for perylene according to Section 12, MacLeod et al. (1985).
This initial calibration will not have to be repeated unless some component
(e.g., length of tubing, fraction collector valve, etc.) of the system is changed.
13. Determine the difference between the start of the AWCH fraction and the
HPLCUV retention time for DOB as follows (see Fig. 2):
a. By GUECD, determine the starting time (min) for the 1st
fraction in which DOB appears, t1, Subtract 0.2 min from tl (for
extra margin) to obtain t2, and enter the value for t2 as the initial
“1 DRAIN” in Appendix 1, Part B, Program 2.
b. Also record the HPLUUV retention time for DOB, t3, and the
initial difference in time (min), t4, between t2 and t3.
c. Each day, record the new HPLUUV retention time for DOB for that
day, t5, Subtract t4 from t5 to redetermine the start of the AH/CH
fraction, t6 (Part E , Step 7) and reenter daily this new value for
“1 DRAIN” in Appendix 1, Part B, Program 2.
14. Determine the collection span of the AH/CH fraction as follows:
a. By GUFID, determine the ending time (min) for the last
fraction in which perylene appears, t7. Add 2 0.5 min to t7 (for extra
margin) to obtain t8, Subtract t2 from tg to obtain tg and enter the
value for t9 as the initial “1 COLL” in Appendix 1, Part B, Program 2.
b. Also record the HPLC/UV retention time for perylene, t10, and the
initial difference in time (min) tll, between t8 and t10.


32
c. Onlv if the daily HPLUUV retention time for perylene, t12, has shifted
> 0.05 min with respect to the HPLC/UV retention time for DOB, t5 (for
the same day), recalculate a new collection span, as follows:
Add tll to t12 to redetermine the end of the AHXH fraction, t13.
Subtract t6 from t13 to obtain the collection span, t14 (Part E, Step 7),
and enter this value for “1 COLL” in Appendix 1, Part B,
Program 2.
E. Fractionation and Collection
1. Select programs for each component of the HPLC system (definition in
Step D.2) to run the standards (see Appendix 1).
2. Prime the HPLC system and establish a stable flow rate and temperature
(see Appendix 2, Part A).
3. Load the autosampler rack with - 6 vials of HPLC-AH/CH calibration-
check solution.
4. Load the fraction collector with empty tubes. .5. Start the programs/intruments and run the HPLC-AWCH calibration-
check solution (see Part D, Step 6 and Appendix 2, Part B).
6. Select programs for each component of the HPLC system for cleanup
of sample-extracts from Section 2 or Section 3 (see Appendix 1).
7. Redetermine the start of the AH/CH fraction and, if necessary, the
collection span (Part D., Steps 13.c and 14.c).
8. Edit the fraction collector program appropriately (see Appendix 1, Part B,
Program 2 and Appendix 2, Part C, Steps 2 and 3).
33
9. Load the autosampler rack with sample-extracts, plus an HPLC-AH/CH
calibration-check solution inserted after every 6 sample-extracts and also
after the last sample-extract.
10. Load the fraction collector rack with empty tubes labeled to correspond
with the sample numbers in the autosampler.
11. Start the programs/instruments (see Part B.l for sequence of events):
12. Monitor the following parameters:
HPLC backpressure
UV detector signal
Oven temperature
Solvent flow rate.
13. As the sample-extracts are chromatographed for cleanup, label the
chromatograms, and enter the sample numbers in the HPLC log book.
14. After the sample-extracts are run, recap the sample vials, and cap the
tubes containing the collected AH/CH fractions. Store the fractions in
a refrigerator.
15. Proceed to Part F, G, or H.
F. Concentration of Sediment AH/CH Fractions from HBLC
1. Add a boiling chip to the tube containing the AWCH fraction and
concentrate it to ≥ 0.9 mL, ≤ 1.0 mL on the tube heater.
2. Add 2 mL of hexane to the tube and concentrate the fraction to
≥ 0.9 mL, ≤ 1.0 mL.
3. Add 30 µL of HMB GC/I-Std solution and 50 µL of TCMX GC/I-Std solution
to the tube, and mix the contents on the Vortex Genie for 2 set at setting 4-6,
34
4. Add 30 µL of HMB GC/I-Std solution to the AH analyte-calibration
solutions from Section 2, Part D, Step 4. Mix the solutions on the
Vortex Genie for 2 set at setting 4-6 and store them in a freezer.
5. Add 50 µL of TCMX GC/I-Std solution to the CH analyte-calibration
solutions from Section 2, Part D, Step 4. Mix the solutions on the
Vortex Genie for 2 set at setting 4-6 and store them in a freezer.
6. Transfer the fraction from Step 3 to a GC vial. Place this under a gentle
stream of nitrogen gas, and slowly evaporate the solvent until the volume
is ~ 250 µL.
7. Transfer ~ half of the fraction to a GC vial with an insert. Cap the vial,
label it, and store it in a freezer.
8. Cap the vial containing the remainder of the fraction. Add an “R” (for
“reserve”) to the label and store the vial in the freezer.
9. Proceed to Part I.
G. Concentration of Tissue AH/CH Fractions from HPLC
1. Add a boiling chip to the tube containing the AWCH fraction and, using
the tube heater, concentrate the AHKH fraction to c 0.9 mL, c 1.0 mL.
2. Add 2 mL of hexane to the tube and concentrate the fraction to ≥ 0.9 mL,
≤ 1.0 mL on the tube heater.
3. Add 50 µL of TCMX GC/I-Std solution to the tube and mix the contents on
the Vortex Genie for 2 set at setting 4-6.
4. If the samples were extracted for AHs, also add 30 µL of HMB GC/I-Std
solution to the tube and mix the contents on the Vortex Genie for 2 set
at setting 4-6.
35
5. Add 50 a of TCMX GC/I-Std solution to each of the CH analyte-
calibration solutions from Section 3, Part E, Step 7. Mix the solutions on
the Vortex Genie for 2 set at setting 4-6 and store them in a freezer.
6. ‘If the samples were extracted for AHs, also add 30 µL of HMB GC/I-Std
solution to each of the AH analyte-calibration solutions from Section 3,
Part E, Step 7. Mix the solutions on the Vortex Genie for 2 set at setting
4-6, and store them in a freezer.
7. Using a pipet, transfer the AH/CH fraction from Step 3 or Step 4 to a
labeled GC vial, Place this under a gentle stream of nitrogen gas and
slowly evaporate the solvent until the volume is either ~ 250 µL
(for moderate to heavy contamination) or ~ 100 µL (for light
contamination).
8. Transfer the fraction to a labeled GC vial with an insert, cap the vial, and
store the vial in a freezer.
9. Proceed to Part I.
I. GC Analysis
The contents of the GC vial(s) are to be analyzed according to Section 12,
pp. 85-110 of MacLeod et al. (1985), with the following modifications:
1. Determine the percent recovery of the HPLC/I-Std. using equation 12-2,
p, 109 (MacLeod et al. 1985) and Substituting; the term HPLCYI-Std
everywhere the term I-Std appears. Make no other substitutions.
2. Determine the percent recovery of the I-Std, using equation 12-2, p. 109
(MacLeod et al. 1985) and substituting; the term HPLC/I-Std everywhere the
term GC/I-Std appears. Make no other substitutions.
THIS PAGE INTENTIONALLY LEFT BLANK

37
ACKNOWLEDGMENTS
The analytical methods in this publication result from research,
development, and application by chemists at the National Analytical
Facility (NAF) of the NWAFC Environmental Conservation Division.
We are pleased to acknowledge extensive support from a number of
organizations and individuals. Foremost has been the Outer Continental
Shelf Environmental Assessment Program (OCSEAP), an interagency
program between the Office of Oceanography and Marine Assessment
(OMA) of the National Ocean Service and the Department of Interior’s
Minerals Management Service. In addition, NOAA’s National Status and
Trends Program has provided a unique opportunity to test state-of-the-art
analytical methods developed at the NAF. In particular, we are indebted to
Dr. Usha Varanasi, Director, NWAFC Environmental Conservation
Division and to Dr. Carol-Ann Manen, Project Officer for OMA/OCSEAP.
NAF chemists Douglas Burrows, Karen Tilbury, Susan Pierce, and Jennie
Bolton provided valuable assistance in the development of this method and
the preparation of this manual.

THIS PAGE INTENTIONALLY LEFT BLANK

LITERATURE CITED
Krahn, M. M., L. K. Moore, R. G. Bogar, C. A. Wigren, S-L. Chan, and
D. W. Brown. 1988. A rapid high-performance liquid
chromatography method for isolating organic contaminants from
tissue and sediment extracts. J. Chromatogr. 437:161-175.
MacLeod, W. D., Jr., D. W. Brown, A. J. Friedman, D. G. Burrows,
0. Maynes, R. W. Pearce, C. A. Wigren, and R. G. Bogar. 1985.
Standard analytical procedures of the NOAA National Analytical
Facility, 1985-1986: Extractable toxic organic compounds, Second
edition. U.S. Dep. Commer. NOAA Tech. Memo. NMFS F/NWC-92,
121 p. (Available from U.S. Dep. Commer., Natl. Tech. Inf. Serv.,
Springfield, VA as PB 86-147873).

THIS PAGE INTENTIONALLY LEFT BLANK

41
Appendix 1
AUTOSAMPLER AND FRACTION COLLECTOR PROGRAMS
Spectra-Physics 8000B HPLC/ Gilson Autosampler/ Gilson Fraction Collector
A. Autosampler

42

43
Program 2 (File 2); Runs 14 extracts for isolation of AHs/CHs (20 min each)
Same as Program 1 except for the following:
Line Command Explanation
5 FOR A = 1/14 Program will run 14 samples
1 0 PRINT 1816 “WAIT TIME = 1800” is printed on the display
12 WAIT 1800 Wait 18 min before continuing
B. Programmable Fraction Collector
Program 1 (File 1): Standards; collects toxics for separate disposal
MODE
RACK CODE.
WASTE
INJECT
WAIT
NB COLL
1 DRAIN
0
0.01
0
1
14.5
1 COLL 4.0
SAFETY 0
RINSE 0
NB CYCLES 6
POSIT/CYCLE
TIME PROG
24
Time program mode used in thisprogram
Rack which holds 50-mL conicalcentrifuge tubes
Not used (default 0)
Needed to recycle
Not used (default 0)
Number of fractions collected
Time from the beginning of the run tothe start point for the collection ofthe calibration solution
Collect for 4 min
Not used (0 = no effect)
Not used (0 = no rinse)
Number of cycles; instrument willrepeat the same sequencebeginning with injection
Number of positions (tubes) coveredby the collection head in each cycle

44
Program 2 (File 2): collects AWCH fraction
Parameter Setting Explanation
MODE TIME PROG
RACK CODE 24
WASTE 0
INJECT 0.01
WAIT 0
N-B COLL 1
1 DRAIN value for t2 or t6[Section 4,
Part D,step 131
1 COLL value for t9 or t14[Section 4,
Part D,step 141
SAFETY 0
RINSE 0
NB CYCLES 14
POSIT/CYCLE 1
Time program mode used in thisprogram
Rack which holds 50-mL conicalcentrifuge tubes
Not used (default 0)
Needed to recycle
Not used (default 0)
Number of fractions collected
Time from the beginning of therun to the start point for collectionof the fraction
Collection span for the fraction
Not used (0 = no effect)
Not used (0 = no rinse)
Number of cycles; instrument willrepeat same sequence,beginning with injection
Number of positions (tubes) coveredby the collection head in each cycle

45
Program 3 (File 3): Initial and Periodic Calibration of the System
Parameter Setting Exnlanation
MODE TIME PROG + TIME Both time and time programmodes used in this program
RACK CODE 0 Rack which holds 2-mL GC vials
WASTE 0 Not used (default 0)
INJECT 0 Not used (default 0)
WAIT 0 Not used (default 0)
NB COLL 2 Number of fractions collected
1 DRAIN adjust Time from the beginning of the HPLCrun to the start point for the collectionof the first fraction. This is 1.0 minbefore the HPLCXJV retention timefor DOB, t3 (see Section 4, Part D,Step 13.b)
1 SUB-FR 0.1 Collect 0.1 min subfractions
1 COLL 1.0 Collect subfractions for 1 min fora total of 10 subfractions
2 DRAIN adjust Time from the end of collectingthe first fraction to the start pointfor collection of the secondfraction. This is the HPLCIWretention time for perylene, t10,
minus the HPLUUV retention timefor DOB, t3 (see Section 4, Part D,Steps 13-b and 14.b)
2 SUB-FR 0.1
2 COLL 1.0
SAFETY 0
RINSE 1
Collect 0.1 min subfractions
Collect subfractions for 1 min fora total of 10 subfractions
Not used (0 = no effect)
Rinse for 1 min to clean out lines

46
NB CYCLES 1 Number of cycles; instrument Willrepeat same sequencebeginning from injection
POSIT/CYCLE 20 Number of positions (vials) coveredby the collection head in each cycle
a

47
Appendix 2
OPERATION OF THE HPLC SYSTEM
Spectra-Physics 8000B HPLC/ Gilson Autosampler/ Gilson Fraction Collector
A. Instrument Start-up
1.
2.
3.
4.
5.
6.
7.
8.
9.
10.
11.
12.
13.
14.
Note:
Check the fans in the HPLC (two above the board cage and one behind
the oven).
Install a bottle of methylene chloride in the solvent reservoir holder, and
fill the autosampler dilutor reservoir.
Turn on the helium to 3 psi, and check for bubbles flowing through the
solvent. Degas the solvent for 15 min.
Turn on the W detector.
Check to see that the backflush valve is in the RUN position.
Enter the valve corresponding to the HPLC solvent line (e.g., valve B: VB
ENTER).
Open the column by-pass valve and the priming valve.
Using the syringe, prime the pump slowly to remove bubbles.
Close the priming valve.
Start the solvent flowing at 7 mL/min: F:7 ENTER.
Close the column by-pass valve.
Close the oven door, and set the temperature at 40°C: T:40 ENTER.
Set the W range to 0.04.
Plot the pressure: GB1 ENTER. Monitor the pressure plot for bubbles.
If the graph doesn’t stabilize, stop plotting: GX ENTER. Stop the flow:VX ENTER; then repeat Steps 7 -14.

48
15. When the plot stabilizes and bubbles are gone, calibration can begin.
Stop plotting: GX ENTER. Leave the flow at 7 mL/min and the oven at
40°C.
16. Turn on the dilutor.
17. Prime the dilutor until the bubbles are out of the lines: PRIME; to stop
prime when through: PRIME.
B. Daily HPLC Calibration
1.
2.
3.
4.
5.
6.
7.
8.
9.
Check that the autosampler rack (code #0) is sitting properly in place.
Put clean, empty GC vials in the 1st row (back row), filling the slots
from left to right.
Take 6 vials of HPLC-AH/CH calibration solution from the freezer,
remove the cloth labels, and label the vials with a felt pen. Put the vials
in the 2nd row, filling the slots from left to right.
Load the autosampler File 1: EDIT FILE 1 ENTER ENTER ENTER .
Put 6 conical centrifuge tubes into a rack (code # 24), positions 1-4, in the
fraction collector:1 4 5 8 9 1 2 1 3 (Numbering system2 3 6 71011 14 for rack code # 24)
Load the fraction collector File 1: RESET 1 ENTER.
Set the W range to .04.
Start File 1 of the autosampler: START.
Start HPLC Parameter Set 1: SB1 ENTER. Note that the autosampler
will put the fraction collector and the HPLC data system into run
automatically. For the first run, the printer will start plotting before
injection. After injection, the HPLC run light will stop blinking

49
10.
11.
12.
13.
14.
15.
16.
17.
(indicating that the d ta a system is in RUN), and Run Time can be
displayed on the LED: E - ENTER.
Adjust the W baseline by rotating the range balance knob until the
detector level reads 1000 on the LED. To observe the detector level on
the LED: D1L ENTER.
As the calibration solutions are run, record the retention times of
4,4’-dibromooctafluorobiphenyl (DOB; first peak) and perylene (last peak)
in the HPLC log book, and label the chromatograms “AHKH calib.”
After retention times have stabilized (3-6 runs), the system is ready to
run samples. Wait until the autosampler displays “WAIT TIME =
1600,” then stop the program: PAUSE HOME.
Allow the HPLC to finish the run, then while it is printing, reset: SX
ENTER, Immediately restart the flow: F:7 ENTER, and set the oven
temperature: T:40 ENTER.
Stop the fraction collector program: PAUSE HOME.
Empty the collection tubes from the fraction collector into the TOXIC
WASTE receptacle.
Empty and discard the rinse vials from the autosampler.
Replace the cloth labels on the calibration solutions vials. Store the vials
in the freezer.
C., Cleanup of Samples and Isolation of an AH/CH Fraction
1. Load Fraction Collector File 2: RESET 2 ENTER.
2. Edit “1 DRAIN” in File 2: EDIT ENTER. Continue pressing ENTER
until “1 DRAIN” is displayed. Enter the value of t6 calculated in Section
4, Part E, Step 7.

50
3.
4.
5.
6.
7.
8.
9.
10.
11.
12.
13.
14.
Onlv if necessarv, edit “1 COLL” in File 2 by entering the value of t-14
calculated in Section 4, Part E, Step 7. Continue pressing ENTER until
“READY - HIT START” is displayed.
Put clean, labeled conical centrifuge tubes in positions l-6 and 8-13 of
rack code # 24. Put a used tube in positions 7 and 14 for the calibration
solutions.
Put 15 clean, empty GC vials in the 1st row of the autosampler rack code
#O (left to right). Remove the cloth labels from the sample vials, and
label the vials with a felt pen. Put sample vials in positions 116 and 8-13
(left to right) in the 2nd row (from the back) of the rack. Put calibration
solutions in positions 7 and 14.
Load Autosampler File 2: EDIT FILE 2 ENTER ENTER ENTER.
Start Autosampler File 2: START.
Set the W detector range at 0.64 for sediment samples and 0.32 for
tissue samples.
Start HPLC Parameter Set 2: SB2 ENTER.
Record the fraction collection time in the HPLC log book.
As the samples are run, label the the chromatograms and log the
sample numbers.
After the samples are run, recap and relabel vials, then store them in
the freezer.
Empty and discard the rinse vials from the autosampler.
Cap the collected fractions and give them to the chemist who will
prepare them for GC analysis. Store the samples in the freezer if
necessary.
‘ I
51
15.
16.
17.
18.
19.
Empty the collection tubes containing the fraction from the calibration
runs into the TOXIC WASTE receptacle.
If another cycle of samples is to be run, reload the autosampler with
samples as described above. Then, without turning off the HPLC, reset
the autosampler: PAUSE HOME EDIT FILE 2 ENTER ENTER
ENTER START.
Reload the fraction collector with collector tubes as described above.
If the new HPLCKJV retention time for DOB has changed ~0.05 min,
reedit the fraction collector “1 DRAIN” value (see Step 2).
If the new HPLCAJV retention time for perylene has changed 2 0.05 min
with respect to the new HPLC/UV retention time for DOB in Step 18,
reedit the fraction collector “1 COLL” value (see Step 3).
D. Instrument Shut-down
1. While the last run is being plotted and the autosampler displays “WAIT
TIME = 1800,” send the autosampler home: PAUSE HOME.
2. After the plotting of the last run is completed, open the oven door, and
stop the HPLC program: SX ENTER.
3. Start the flow at 2 mL /min: F:2 ENTER.
4. Send the fraction collector home: PAUSE HOME.
5. After 5 min, switch the backflush valve to the “BACKFLUSH” position.
6. After another 5 min, stop the flow: VX- ENTER.
7. Turn off the W detector.
8. Turn off the helium at the tank, not at the regulator.
9. Turn off the dilutor.
10. Turn off the ventilation fan.

52
11. Replace the waste bottles with empty bottles.
12. Check the recorder paper supply (add more if necessary).
13. For each set of samples run, file the labeled chromatograms in a folder.