skype for business for office 365 presence....skype for business skype for business is a...
TRANSCRIPT
TELSTRA CALLINGFOR OFFICE 365Skype for BusinessFeature Guide
Telstra Calling for Office 0365 Skype for Business - Feature Guide | March 2018 Page 1
Skype for Business Skype for Business is a communication platform that allows you to interact with your contacts by using Instant Messaging (IM), Audio and Video calls and Skype for Busines Meetings. You can also send files to your contacts and share your desktop.
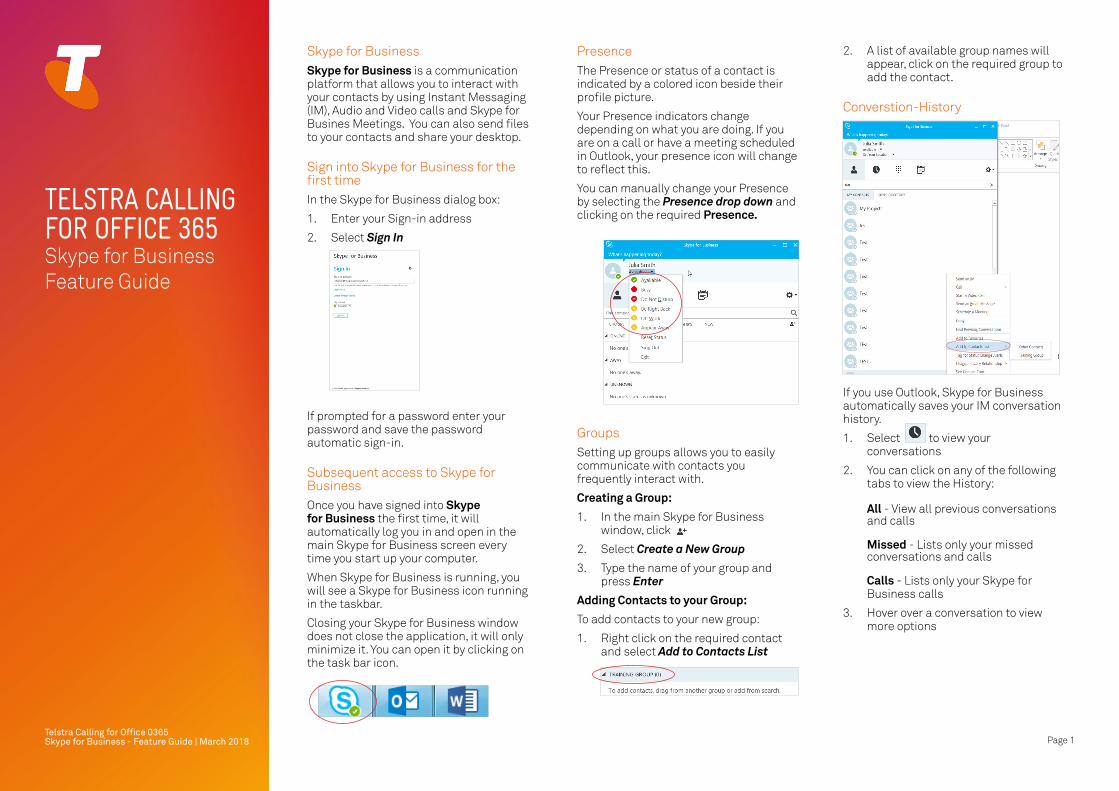
Sign into Skype for Business for the first time In the Skype for Business dialog box:
1. Enter your Sign-in address
2. Select Sign In
If prompted for a password enter your password and save the password automatic sign-in.
Subsequent access to Skype for BusinessOnce you have signed into Skype for Business the first time, it will automatically log you in and open in the main Skype for Business screen every time you start up your computer.
When Skype for Business is running, you will see a Skype for Business icon running in the taskbar.
Closing your Skype for Business window does not close the application, it will only minimize it. You can open it by clicking on the task bar icon.
PresenceThe Presence or status of a contact is indicated by a colored icon beside their profile picture.
Your Presence indicators change depending on what you are doing. If you are on a call or have a meeting scheduled in Outlook, your presence icon will change to reflect this.
You can manually change your Presence by selecting the Presence drop down and clicking on the required Presence.
GroupsSetting up groups allows you to easily communicate with contacts you frequently interact with.
Creating a Group:
1. In the main Skype for Business window, click
2. Select Create a New Group
3. Type the name of your group and press Enter
Adding Contacts to your Group:
To add contacts to your new group:
1. Right click on the required contact and select Add to Contacts List
2. A list of available group names will appear, click on the required group to add the contact.
Converstion-History
If you use Outlook, Skype for Business automatically saves your IM conversation history.
1. Select to view your conversations
2. You can click on any of the following tabs to view the History: All - View all previous conversations and calls Missed - Lists only your missed conversations and calls Calls - Lists only your Skype for Business calls
3. Hover over a conversation to view more options
Telstra Calling for Office 0365 Skype for Business - Feature Guide | March 2018
View a previous conversation with a contact:
1. Right click on the Contact whose previous conversation you want to view
2. Select Find Previous Conversations
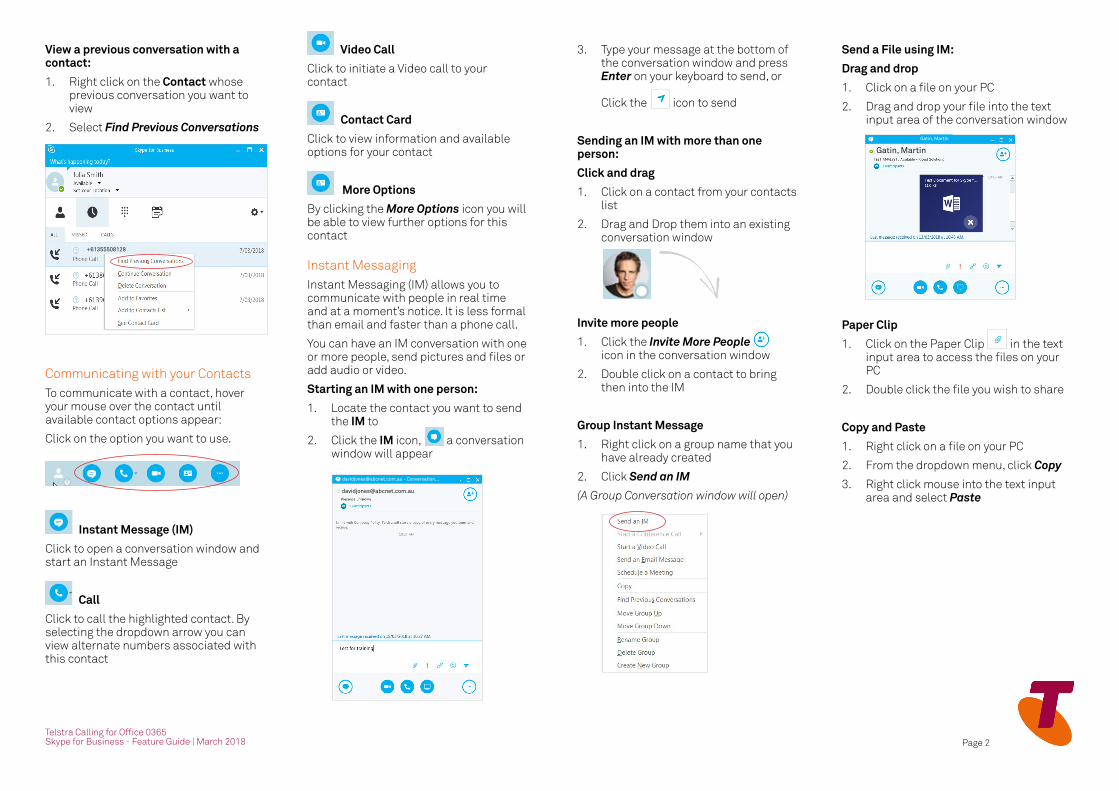
Communicating with your ContactsTo communicate with a contact, hover your mouse over the contact until available contact options appear:
Click on the option you want to use.
Instant Message (IM)
Click to open a conversation window and start an Instant Message
Call
Click to call the highlighted contact. By selecting the dropdown arrow you can view alternate numbers associated with this contact
Video Call
Click to initiate a Video call to your contact
Contact Card
Click to view information and available options for your contact
More Options
By clicking the More Options icon you will be able to view further options for this contact
Instant Messaging Instant Messaging (IM) allows you to communicate with people in real time and at a moment’s notice. It is less formal than email and faster than a phone call.
You can have an IM conversation with one or more people, send pictures and files or add audio or video.
Starting an IM with one person:
1. Locate the contact you want to send the IM to
2. Click the IM icon, a conversation window will appear
3. Type your message at the bottom of the conversation window and press Enter on your keyboard to send, or Click the icon to send
Sending an IM with more than one person:
Click and drag
1. Click on a contact from your contacts list
2. Drag and Drop them into an existing conversation window
Invite more people
1. Click the Invite More People icon in the conversation window
2. Double click on a contact to bring then into the IM
Group Instant Message
1. Right click on a group name that you have already created
2. Click Send an IM
(A Group Conversation window will open)
Send a File using IM:
Drag and drop
1. Click on a file on your PC
2. Drag and drop your file into the text input area of the conversation window
Paper Clip
1. Click on the Paper Clip in the text input area to access the files on your PC
2. Double click the file you wish to share
Copy and Paste
1. Right click on a file on your PC
2. From the dropdown menu, click Copy
3. Right click mouse into the text input area and select Paste
Page 2
+61355508128
[email protected] - Conversation...
Gatin, Martin
Gatin, Martin
Telstra Calling for Office 0365 Skype for Business - Feature Guide | March 2018
View conversation
If you have several conversations or meetings going on at the same time, they will be displayed in the active conversation window. You can toggle between conversations.
1. Click on a conversation tab to view the conversation
Incoming Message
When someone starts a new IM conversation with you an alert pops up on your screen.
1. Click anywhere on the pop up to accept the IM (The IM conversation window opens)
2. To reject the IM invite, click Ignore
Making Audio Calls If you have a microphone, a headset (or speakers) and a webcam attached to your computer you can use Skype for Business to make and receive audio and video calls.
Start an Audio Call (Option 1):
1. Hover your mouse on a contact until the Quick menu appears
2. Click the Phone icon
Start an Audio Call (Option 2):
When someone starts a new IM conversation with you an alert pops up on your screen:
1. Hover your mouse on a contact until the Quick menu appears
2. Click the Phone icon
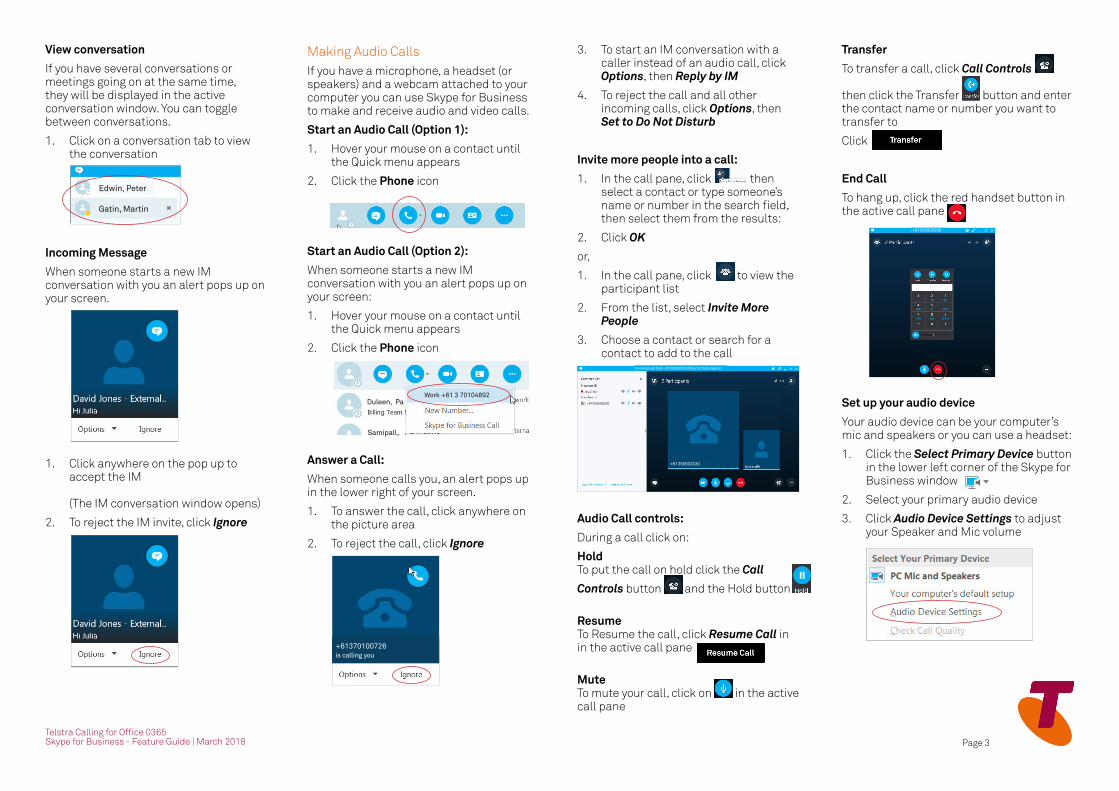
Answer a Call:
When someone calls you, an alert pops up in the lower right of your screen.
1. To answer the call, click anywhere on the picture area
2. To reject the call, click Ignore
3. To start an IM conversation with a caller instead of an audio call, click Options, then Reply by IM
4. To reject the call and all other incoming calls, click Options, then Set to Do Not Disturb
Invite more people into a call:
1. In the call pane, click then select a contact or type someone’s name or number in the search field, then select them from the results:
2. Click OK
or,
1. In the call pane, click to view the participant list
2. From the list, select Invite More People
3. Choose a contact or search for a contact to add to the call
Audio Call controls:
During a call click on:
Hold To put the call on hold click the Call
Controls button and the Hold button
Resume To Resume the call, click Resume Call in in the active call pane
Mute To mute your call, click on in the active call pane
Transfer
To transfer a call, click Call Controls then click the Transfer button and enter the contact name or number you want to transfer to
Click
End Call
To hang up, click the red handset button in the active call pane
Set up your audio device
Your audio device can be your computer’s mic and speakers or you can use a headset:
1. Click the Select Primary Device button in the lower left corner of the Skype for Business window
2. Select your primary audio device
3. Click Audio Device Settings to adjust your Speaker and Mic volume
Page 3
Edwin, Peter
Gatin, Martin
Work +61 3 70104892 Duleen, Pa
Samipall,
+61370100726 is calling you
+61355502030
+61355502030
Incoming call from +61355502030 (Other) (2 Participants)
+61355502030
Telstra Calling for Office 0365 Skype for Business - Feature Guide | March 2018
Answer a Video Call:
1. From the incoming call pop up, click anywhere on the picture area
2. To reject the call, click Ignore
Add Video to an IM conversation:
1. In the conversation pane, click Adjust the camera (or yourself), then click Start My Video
2. To stop sharing your video, click Stop My Video
Start a Video Meeting:
You can start an ad-hoc video meeting any time:
1. While in an active video call, click then search for a contact to invite into the meeting
2. Click OK
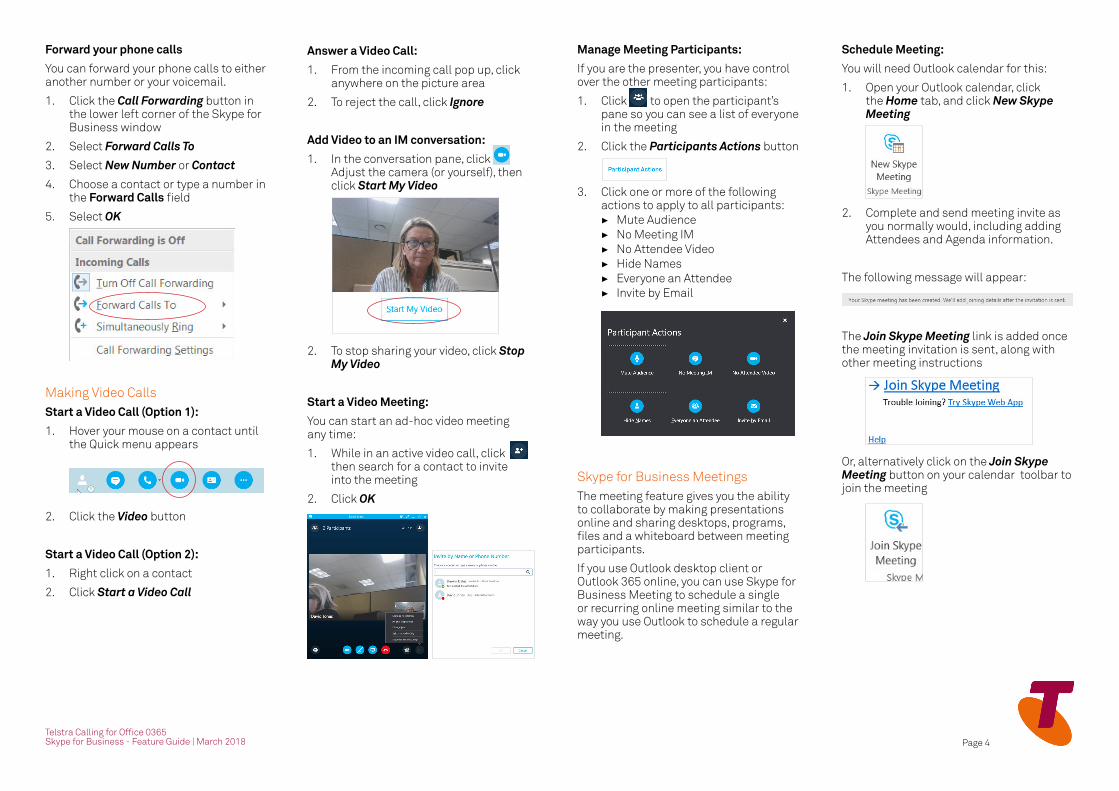
Manage Meeting Participants:
If you are the presenter, you have control over the other meeting participants:
1. Click to open the participant’s pane so you can see a list of everyone in the meeting
2. Click the Participants Actions button
3. Click one or more of the following actions to apply to all participants: ▶ Mute Audience ▶ No Meeting IM ▶ No Attendee Video ▶ Hide Names ▶ Everyone an Attendee ▶ Invite by Email
Skype for Business MeetingsThe meeting feature gives you the ability to collaborate by making presentations online and sharing desktops, programs, files and a whiteboard between meeting participants.
If you use Outlook desktop client or Outlook 365 online, you can use Skype for Business Meeting to schedule a single or recurring online meeting similar to the way you use Outlook to schedule a regular meeting.
Schedule Meeting:
You will need Outlook calendar for this:
1. Open your Outlook calendar, click the Home tab, and click New Skype Meeting
2. Complete and send meeting invite as you normally would, including adding Attendees and Agenda information.
The following message will appear:
The Join Skype Meeting link is added once the meeting invitation is sent, along with other meeting instructions
Or, alternatively click on the Join Skype Meeting button on your calendar toolbar to join the meeting
Page 4
Forward your phone calls
You can forward your phone calls to either another number or your voicemail.
1. Click the Call Forwarding button in the lower left corner of the Skype for Business window
2. Select Forward Calls To
3. Select New Number or Contact
4. Choose a contact or type a number in the Forward Calls field
5. Select OK
Making Video CallsStart a Video Call (Option 1):
1. Hover your mouse on a contact until the Quick menu appears
2. Click the Video button
Start a Video Call (Option 2):
1. Right click on a contact
2. Click Start a Video Call
Telstra Calling for Office 0365 Skype for Business - Feature Guide | March 2018
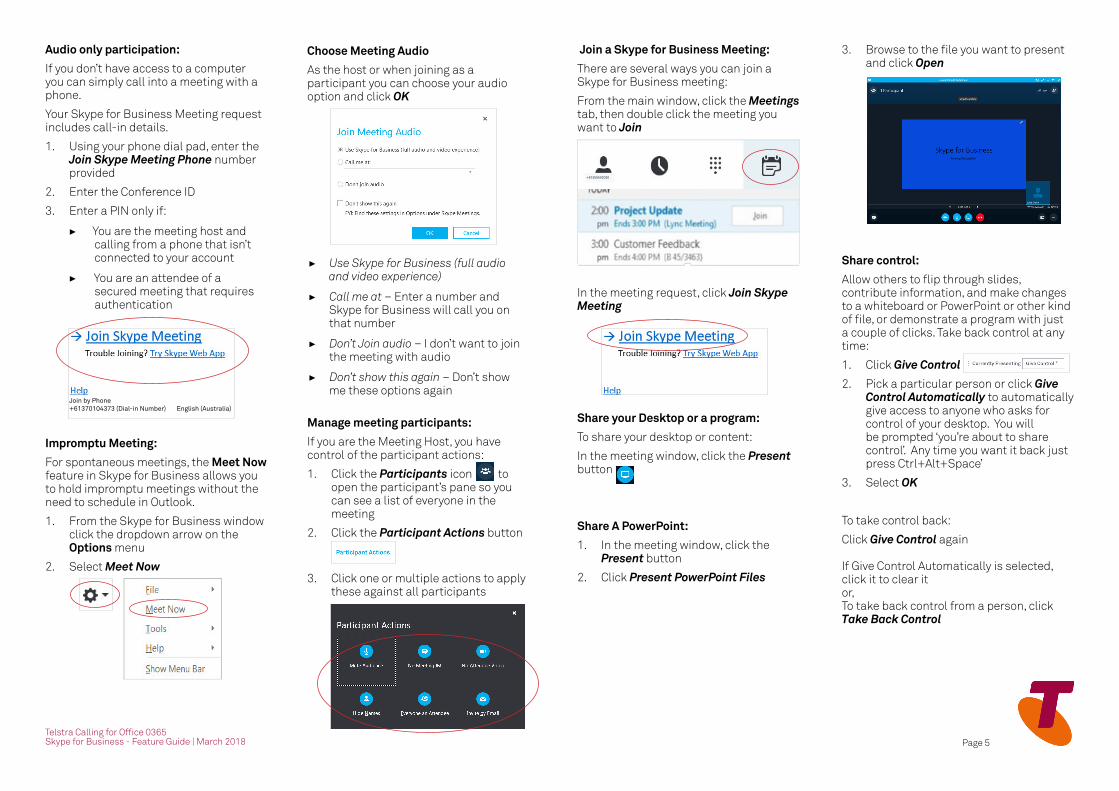
Audio only participation:
If you don’t have access to a computer you can simply call into a meeting with a phone.
Your Skype for Business Meeting request includes call-in details.
1. Using your phone dial pad, enter the Join Skype Meeting Phone number provided
2. Enter the Conference ID
3. Enter a PIN only if:
▶ You are the meeting host and calling from a phone that isn’t connected to your account
▶ You are an attendee of a secured meeting that requires authentication
Impromptu Meeting:
For spontaneous meetings, the Meet Now feature in Skype for Business allows you to hold impromptu meetings without the need to schedule in Outlook.
1. From the Skype for Business window click the dropdown arrow on the Options menu
2. Select Meet Now
Choose Meeting Audio
As the host or when joining as a participant you can choose your audio option and click OK
▶ Use Skype for Business (full audio and video experience)
▶ Call me at – Enter a number and Skype for Business will call you on that number
▶ Don’t Join audio – I don’t want to join the meeting with audio
▶ Don’t show this again – Don’t show me these options again
Manage meeting participants:
If you are the Meeting Host, you have control of the participant actions:
1. Click the Participants icon to open the participant’s pane so you can see a list of everyone in the meeting
2. Click the Participant Actions button
3. Click one or multiple actions to apply these against all participants
Join a Skype for Business Meeting:
There are several ways you can join a Skype for Business meeting:
From the main window, click the Meetings tab, then double click the meeting you want to Join
In the meeting request, click Join Skype Meeting
Share your Desktop or a program:
To share your desktop or content:
In the meeting window, click the Present button
Share A PowerPoint:
1. In the meeting window, click the Present button
2. Click Present PowerPoint Files
3. Browse to the file you want to present and click Open
Share control:
Allow others to flip through slides, contribute information, and make changes to a whiteboard or PowerPoint or other kind of file, or demonstrate a program with just a couple of clicks. Take back control at any time:
1. Click Give Control
2. Pick a particular person or click Give Control Automatically to automatically give access to anyone who asks for control of your desktop. You will be prompted ‘you’re about to share control’. Any time you want it back just press Ctrl+Alt+Space’
3. Select OK
To take control back:
Click Give Control again If Give Control Automatically is selected, click it to clear it or, To take back control from a person, click Take Back Control
Page 5
Join by Phone +61370104373 (Dial-in Number) English (Australia)
+61355502030
Telstra Calling for Office 0365 Skype for Business - Feature Guide | March 2018
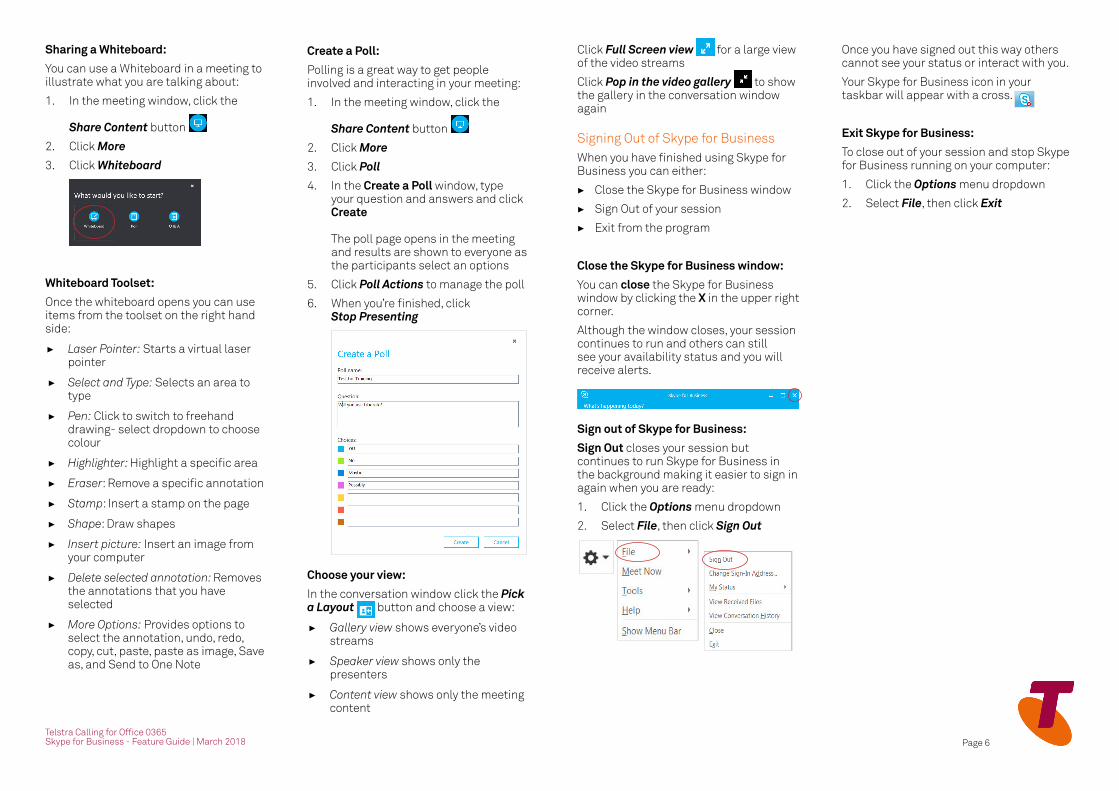
Sharing a Whiteboard:
You can use a Whiteboard in a meeting to illustrate what you are talking about:
1. In the meeting window, click the Share Content button
2. Click More
3. Click Whiteboard
Whiteboard Toolset:
Once the whiteboard opens you can use items from the toolset on the right hand side:
▶ Laser Pointer: Starts a virtual laser pointer
▶ Select and Type: Selects an area to type
▶ Pen: Click to switch to freehand drawing- select dropdown to choose colour
▶ Highlighter: Highlight a specific area
▶ Eraser: Remove a specific annotation
▶ Stamp: Insert a stamp on the page
▶ Shape: Draw shapes
▶ Insert picture: Insert an image from your computer
▶ Delete selected annotation: Removes the annotations that you have selected
▶ More Options: Provides options to select the annotation, undo, redo, copy, cut, paste, paste as image, Save as, and Send to One Note
Create a Poll:
Polling is a great way to get people involved and interacting in your meeting:
1. In the meeting window, click the Share Content button
2. Click More
3. Click Poll
4. In the Create a Poll window, type your question and answers and click Create The poll page opens in the meeting and results are shown to everyone as the participants select an options
5. Click Poll Actions to manage the poll
6. When you’re finished, click Stop Presenting
Choose your view:
In the conversation window click the Pick a Layout button and choose a view:
▶ Gallery view shows everyone’s video streams
▶ Speaker view shows only the presenters
▶ Content view shows only the meeting content
Click Full Screen view for a large view of the video streams
Click Pop in the video gallery to show the gallery in the conversation window again
Signing Out of Skype for BusinessWhen you have finished using Skype for Business you can either:
▶ Close the Skype for Business window
▶ Sign Out of your session
▶ Exit from the program
Close the Skype for Business window:
You can close the Skype for Business window by clicking the X in the upper right corner.
Although the window closes, your session continues to run and others can still see your availability status and you will receive alerts.
Sign out of Skype for Business:
Sign Out closes your session but continues to run Skype for Business in the background making it easier to sign in again when you are ready:
1. Click the Options menu dropdown
2. Select File, then click Sign Out
Once you have signed out this way others cannot see your status or interact with you.
Your Skype for Business icon in your taskbar will appear with a cross.
Exit Skype for Business:
To close out of your session and stop Skype for Business running on your computer:
1. Click the Options menu dropdown
2. Select File, then click Exit
Page 6