skype for business (lync) - boston...
TRANSCRIPT

MPH Modules Site Map
Next »
Skype for Business(Lync)For Online Meetings
Introduction
This module focuses on the use of Skype forBusiness also known as Lync, which aresynonymous. Lync was the name of the originalproduct, but the name changed in 2015. SomeBoston University support information may still referto Lync, but these are identical. Note also thatSkype for Business is NOT the same as the freeversion of Skype for home. The free version ofSkype is good for personal use, but has manylimitations compared to Skype for Business. Skypefor Business lets you host up to 250 people in onlinemeetings, and it provides a more secure onlineenvironment.
This module will refer to Skype for Business (Lync)as "SfB".
SfB is quite versatile and easy to use. This moduleis designed to walk you through using some of itskey features as well as some general guidelines onhow to teach an online session using SfB. While theexplanations and illustrations are fairly detailed,most users will find SfB to be fairly intuitive anduserfriendly.
n their BUowned machines.
ion about setup,ides all the information you will need to
Many BU faculty and staff already have Lync installed on their BU-owned machines.
If you do not have Lync installed or need additional information about set-up, Get Lync is a resource provided by BU Information Services & Technology. It provides all the information you will need to download and install Lync on your computer.
Module Outline
Introduction
Getting Started on a PC
Initiating or Creating a Meeting
Inside the Online Meeting
Presentation Options
Running a Lync for Mac Meeting
Tips for Online Teaching
Join a Meeting as a Guest
On This Page (1 of 8)
Resources
Authors
Page 1

• Enable you to meet online and bring together participants from multiple geographiclocations
• Provide a means of meeting or teaching online when weather precludes traveling.
• Provide a convenient means of conducting "office hours" for your students or advisees.
• Enable you to host webinars.
• Provides a screen sharing tool that facilitates trouble shooting for a distant guest; aparticipant can also give remote control of their computer to the host
• Provides a way of bringing guest speakers into a classroom or meeting
• Enables you to record and post meetings and presentations
To create online meetings an instructor or staff member must have the SfB "client" installed on their computer or laptop. Faculty and staff may install the client at no charge as described on the next page.
Web Access
Attendees (guests) must have web access to attend SfB meetings via Internet Explorer 7, 8, 9, or 10; Mozilla Firefox; Safari;
Student access
Note that students are not covered by the site license and cannot download the SfB client. However, students and nonBU attendees can participate in your SfB meetings as "guests" after they install the SfB Web App, which is a free plugin.
Voice communication
The best option for voice communication is the integrated SfB Voice over Internet Protocol (VoIP) which provides free, highquality audio. You can set up an optional tollfree teleconference bridge, but you will be charged extra for this. The VoIP option works well if you and the attendees have a computer/laptop with a built in microphone or if an external microphone is plugged into your computer/laptop. Built-in speakers are fine, but an optional headset or ear buds can also be used.Web camUse of a web cam is optional. If a web cam is installed, some instructors like to begin the meeting by turning the web cam on in order to establish"presence", but then they turn the web cam off so that it isn't a distraction. The web cam can easily be turned on or off with a toggle control in the meeting screen.
Uses
SfB and similar software packages (e.g., Adobe Connect) have a number of potential uses for collaboration and teaching:
Page 2

Features
• Organize AV meetings with up to 250 participants
• Instant Messaging
• Transfer files between the participants
• Share desktop, slides or any other program on your computer
• Use an online whiteboard feature with drawing and annotation tools
• Designate Presenters
• Remote Desktop Control
System RequirementsThe table below provides an overview of system requirements for SfB based on the computing device. These requirements do not apply to guests, just to the hosting faculty and staff.
System Requirements based onComputing Device
PC Client Windows 7 or 8 (Not supported on Windows Vista or Windows XP)
See PC client software support details
Mac Client Operating System Versions: Mac OS X version10.5.8(Leopard) or a later version of Mac OS (To verify that your computer meets these minimum requirements, go to Apple menu, and select "About This Mac".)
See Mac OS detailed requirements
Mobile Client See Microsoft's mobile clients requirements for more devicespecific requirements (e.g. iPhone, Android, iPad).
Page 3

Getting Started on a PC
When you open SfB, a window should open similar to the one shown below. Note that there are icons for contacts, conversations, and meetings (your daily schedule). In the image below the CONTACTS and GROUPS tabs have been selected, as indicated by the light blue shading.
PC OptionsThe most important items in the Options menu are the following:
Meet NowTools, which has the following submenu selections:
Recording Manager
Audio Device Settings
Video Device Settings
Dialin Conferencing Settings
Additional Options
Help
Adding Contacts to the Contact ListIf using Microsoft Outlook for email, contacts, and a calendar, SfB can integrate entries from Outlook quite easily. For example, the Meeting icon will show you the entries in your Outlook calendar for the current day.
Suppose you want to add someone on Boston University's Global Address List to your contacts list in SfB. If you have selected the Contacts icon (the head and shoulders silhouette), you will see two categories:
• Favorites• Other contacts
Type the name of someone from the BU directory into the search box, then right-click on the person you want to add, and select either Add to Favorites or Add to Contacts, which will give you the option to add them to Other Contacts.
Page 4

Creating a New SfB Group
By default SfB creates two groups: Favorites and Other Contacts. However, you can create and define your own groups. Suppose, for example, that you wanted to create a group that consisted of all of the students in a particular course.
• From the Contacts screen in SfB, select Groups and then select the add icon on the right.• Then select Create a New Group and then proceed to add the individual students to that group.
Selecting and Checking Your MicrophoneAt the lower left corner of the SfB window, there is an audio icon. Selecting the chevron to the right of the icon opens a dropdown menu with options to select and check your audio input and output. Note that some of the options may be different depending on your computer's available audio devices.
Select Audio Device Settings, which defaults to showing the Audio Device, i.e., the microphone that is selected. If your microphone is functioning, you should see an indication of the volume from the width of the horizontal blue bar that appears when you speak into the microphone. There are other options that can be accessed from the menu on the left, but it is very unlikely that you will need to change any of these settings.
Page 5
Initiating or Creating a Meeting
There are two ways to create a meeting.
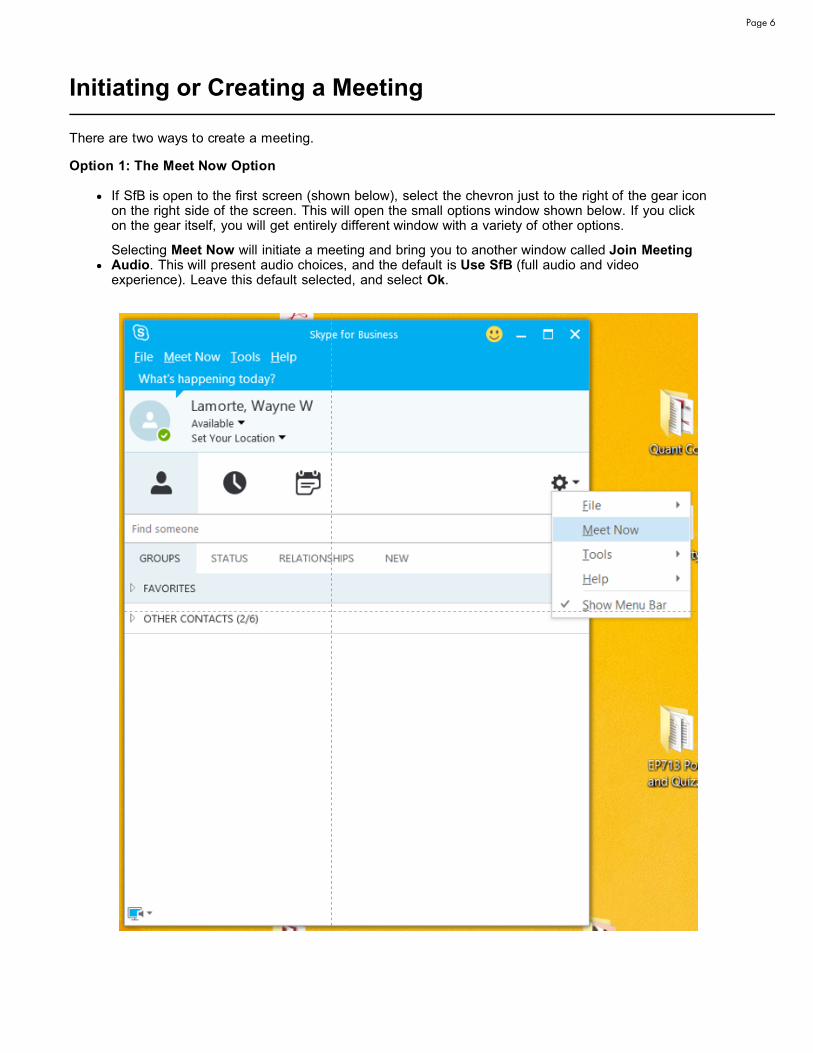
Option 1: The Meet Now Option
If SfB is open to the first screen (shown below), select the chevron just to the right of the gear icon on the right side of the screen. This will open the small options window shown below. If you click on the gear itself, you will get entirely different window with a variety of other options.
Selecting Meet Now will initiate a meeting and bring you to another window called Join Meeting Audio. This will present audio choices, and the default is Use SfB (full audio and video experience). Leave this default selected, and select Ok.
Page 6

Option 2: Creating a Meeting from an Outlook Calendar
To create a SfB meeting from an Outlook calendar, select a New Meeting Request. Then Select New Skype Meeting, which will be located in the tool bar at the top of your new meeting request.
This option will enable you the create a new SfB meeting. Consider an example in which an instructor needs to create an online class meeting because of an impending snow storm.
Page 7
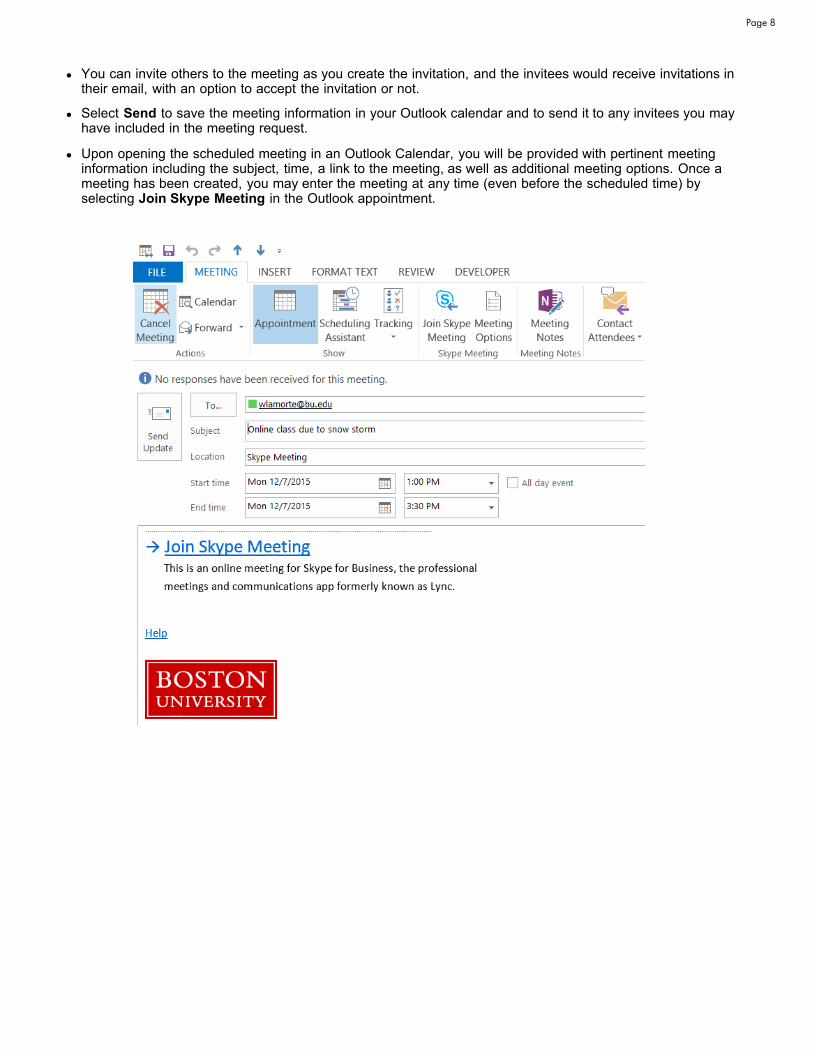
You can invite others to the meeting as you create the invitation, and the invitees would receive invitations in their email, with an option to accept the invitation or not.
Select Send to save the meeting information in your Outlook calendar and to send it to any invitees you may have included in the meeting request.
Upon opening the scheduled meeting in an Outlook Calendar, you will be provided with pertinent meeting information including the subject, time, a link to the meeting, as well as additional meeting options. Once a meeting has been created, you may enter the meeting at any time (even before the scheduled time) by selecting Join Skype Meeting in the Outlook appointment.
Page 8

Distributing the Meeting URL Address
Regardless of which option you use for initiating or scheduling a meeting, SfB creates a specific URL address for a given meeting.
• If using the Meet Now option to open a meeting, select the ellipsis icon at the lower right of the SfB Meeting screen as shown below and select Meeting Entry Info. This will display the URL for the meeting, which can be copied in order to email it or post it to all who you want to invite.
• Also note that if you mouse over the Join the Meeting hyperlink , you can see the URL, and, if you rightclick on it, you will get a popdown menu that allows you to copy the hyperlink.
• An easy way to invite a large number of students to the online meeting is to send the URL to them via Blackboard's email function. The URL and instructions can also be posted on Blackboard.
The URL for Recurring Meetings
In some cases, you may wish to create recurring meetings. Consider the example of an online Help Session to be held every Wednesday evening from 8:009:00 PM.
• Go to your Outlook Calendar and select New Skype Meeting as described earlier. Indicate the subject of the meeting.
• Select Recurrence, which will be available in the top toolbar of the Meeting request window. The screenshot below sets the recurrence to every Wednesday evening from 8:009:00 until May 5.
• Select Send and the meeting will be entered in the calendar every Wednesday until May 5.
Page 9

A key advantage to this is that once a recurring meeting is scheduled, the URL for the meeting remains the same for the whole series. In other words, an instructor can send the URL to students as soon as she creates the meeting and/or post it on Blackboard, and students will be able to go to the same URL address every week.
Inside the Online Meeting on a PC
When you first enter the SfB meeting you have created, you will see a fairly empty screen. The following options are available to begin setting up the meeting and creating usable content:
The PARTICIPANTS window, which can be expanded or collapsed on the left by selecting the participant's list icon.
The CONVERSATION window, which can be expanded or collapsed on the left byselecting the IM icon.
The main meeting area, which contains settings at the top and bottom of the window.
Page 10

Participants and Instant Messaging Window
The space on the left will list the meeting participants. The instructor's name should be marked as "Presenter." Next to your name should be icons indicating the status of the following components:
IM (enabled/disabled)
Microphone (muted/unmuted)
Web Cam (on/off)
Presentation (on/off)
These icons will appear next to each of the participants who enter the meeting, and you (as the host) can control their microphone and web cam privileges by selecting the icons next to their name.
Under PARTICIPANTS, you can also invite others and control participant actions using the following buttons:
Invite More People takes you to the contacts section of SfB.
Participant Actions provides options including muting/unmuting the entire audience, turning off/on the IM (instant messaging), turning off/on the web cams of the participants, hiding the names of the participants, and inviting participants by email.
Page 11

CONVERSATION is the instant messaging (IM) window which allows presenters and the participants to communicate via text messages. To send a text message to participants, enter it into the lowermost part of the window and select Enter to submit it.
Presentation Window Icons for PCIn the meeting presentation window, there are several icons located at the bottom of the window.
IM expands and collapses the IM window.
Web Cam turn your web cam (if you have one) on and off.
Microphone allows you to mute (or unmute) your microphone. If your
microphone is muted, there will be a diagonal line across the icon.
Page 12

Presentation provides a number of presentation options that will be described in detail on the next
page.
Exit allows you to "hang up" and exit the meeting.
The phone icon on the left is largely irrelevant for us since it controls dial in options for audio. Most of us will be using Voice Over IP (Internet audio via the computer or tablet).
Ellipsis is the icon for more options. Selecting it will provide the following additional options:
o Start Recording turns recording on and creates a message on the screen alerting users that thesession is being recorded. Announcing that the session is being recorded is recommended aswell. To STOP recording, select More Options again, and the first option will now be StopRecording.
o Manage Recordings provides access to saved recordings. When you initiate recording, thevideo is saved on your local computer as an .mp4 file. The recording manager allows you to playrecordings, browse the folder where your recordings are stored, and publish, rename, or deleterecordings. Selecting Publish to choose a specific folder to save recordings.
o IM Text Display Size can increase or decrease the size of IM text.
o Change Font allows the font of the IM to be modified including color, size, and type.
o Meeting Entry Information includes the name of the meeting organizer as well the the meetingURL.
o Skype Meeting Options offers additional permissions and/or restrictions for participantsincluding who can be a presenter, annotate PowerPoint presentations, and look at contentindependently.
o End Meeting ends the SfB online meeting. An alertwindow will open asking if you are sure you wish toend the meeting.
o Skype for Business Help provides someadditional instructions and guidance.
Page 13

Presentation Options for PC
The Presentation icon located at the bottom of the presentation window provides several options. The Notes options are only relevant if you are using OneNote, which will not be described in this module.
• Present Desktop shows your entire desktop to all participants, so you want to make sure that there isn't anything you don't want shown. This option also allows you to give control of your computer to a specific participant. This is useful if you wanted a participant to show you or all meeting members how to use a particular program. For example, you could give control of your computer to a participant who was skilled at using SAS statistical analysis, so they could show basic skills.
• Present Programs allows a presenter to share a particular program or application on his/her computer. To share a program, it must be running and visible on the Windows task bar. If you don't see the program you want to share in Skype for Business (Lync), use desktop sharing instead.
• Present PowerPoint Files allows a presenter to upload and display PowerPoint files. Once you have selected a file, it may take a minute to upload and display the file. The PowerPoint display provides a variety of whiteboard options, such as allowing a presenter to point at certain aspects of a slide or annotate the slide. If you are recording the session, these annotations will be recorded and saved.
• Manage Presentable Content enables presenters to upload PowerPoint files before the meeting begins. Then go to Manage Presentable Content to begin presenting one of them.
• Add Attachments can be used if you want to provide a hand out or file to your meeting participants, such as a copy of the presentation being sharing or a document that they need to review. If you wish to include attachments prior to the meeting, sign in to the meeting after scheduling it and add the handouts. Select Manage Attachments if you wish to specify permissions regarding who can download the file, or remove it.
Page 14

• More provides access to the whiteboard, multiple choice polling questions, as well as the Q&A session.
• Whiteboard provides a blank presentation space with drawing tools arrayed vertically on the right side.
• Poll allows a presenter to create poll questions. Enter a name for the poll and a question. Select Create to activate the poll question. There does not seem to be an option for saving a series of poll questions beforehand as you can do in Adobe Connect.
Page 15
• Q&A allows the attendees to ask questions and for attendees to answer them. Attendees cannot answer questions in this mode, which they are able to in IM. The Q&A session is presented right in the presentation window compared to the IM window which is off to the left of the presentation window. Once the presenter enters and submits an answer, all attendees will be able to see it. The IM is also turned off when Q&A session is active, which minimizes confusion as to which text messaging option to use.
Note on Confidential Information
SfB/Lync meets Boston University's security requirements for Public, Sensitive and Confidential Information, but does not meet the requirements for Restricted Use data. If you routinely handle Restricted Use data such as Credit Card numbers, Social Security numbers, Financial Account numbers for external financial institutions, Protected Health Information (PHI) or HIPAA data, you must be careful not to share this information over SfB/Lync.
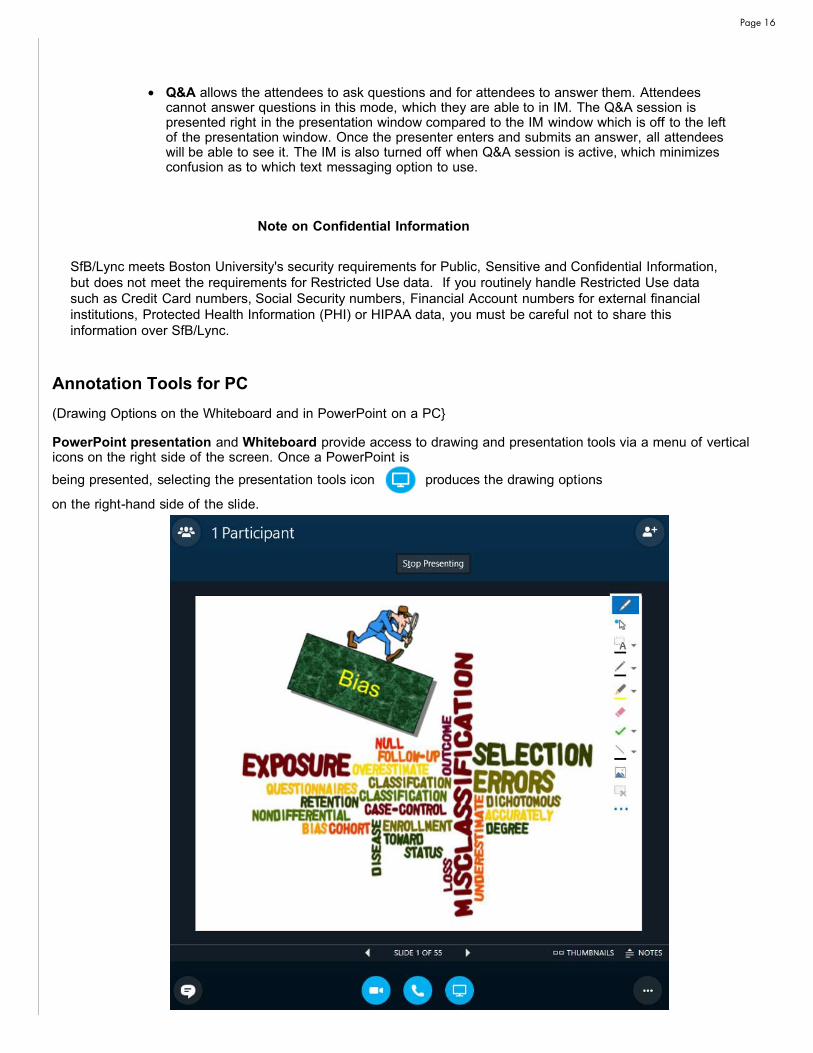
Annotation Tools for PC(Drawing Options on the Whiteboard and in PowerPoint on a PC
PowerPoint presentation and Whiteboard provide access to drawing and presentation tools via a menu of vertical icons on the right side of the screen. Once a PowerPoint is
produces the drawing optionsbeing presented, selecting the presentation tools icon
on the righthand side of the slide.
Page 16
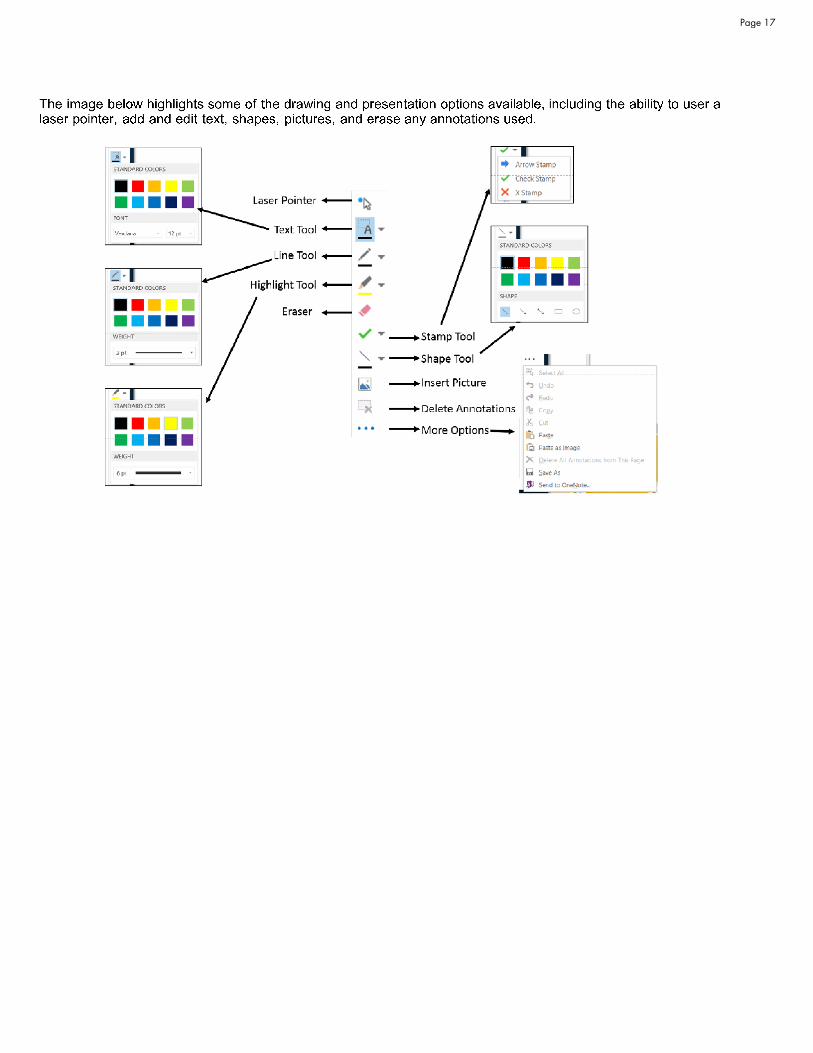
The image below highlights some of the drawing and presentation options available, including the ability to user a laser pointer, add and edit text, shapes, pictures, and erase any annotations used.
Page 17

Running a Lync for Mac Meeting
Lync for Mac has limited capabilities compared to SfB/Lync on a PC, but still can be an effective teaching/meeting tool. Once signed in, the contacts window will be the default window opened.
• Selecting the chevron to the right of the search box provides some additonal options for viewing contacts.
Page 18

• Pinned Contacts refers to contacts with whom you most frequently converse. Expanding the Pinned Contacts list allows you to see all of the contacts and their status (e.g. offline, busy, available, etc.).
• Additional Meeting and Communications Settings are available at the bottom of the window, including the following:
Audio device provides options to set up and test an audio device priorto a meeting
IM can be used to message contacts
Audio Only Meeting is an option to create an audio only meeting
Web Cam Meeting create an online meeting with both audio andvideo functionality
Email can be used to email contacts. It requires that Outlook beinstalled.
Calendar can be used to schedule a meeting in advance
Page 19
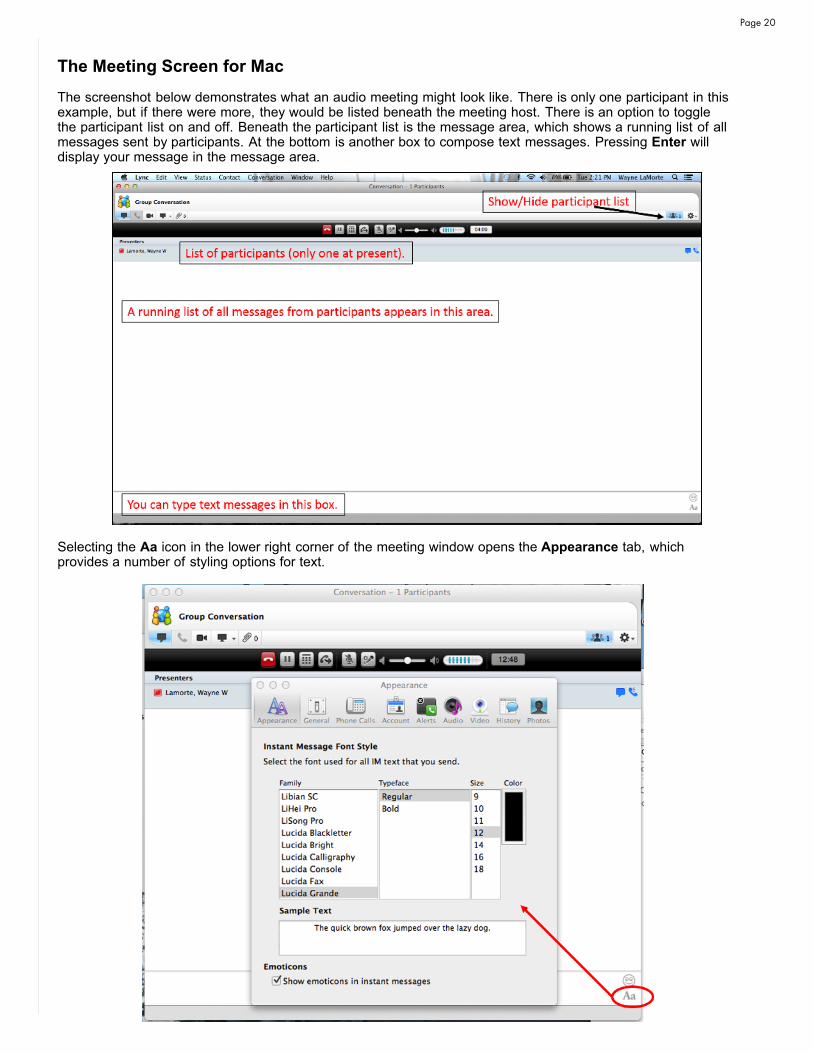
The Meeting Screen for Mac
The screenshot below demonstrates what an audio meeting might look like. There is only one participant in this example, but if there were more, they would be listed beneath the meeting host. There is an option to toggle the participant list on and off. Beneath the participant list is the message area, which shows a running list of all messages sent by participants. At the bottom is another box to compose text messages. Pressing Enter will display your message in the message area.
Selecting the Aa icon in the lower right corner of the meeting window opens the Appearance tab, which provides a number of styling options for text.
Page 20

Selecting the Audio tab will open the Audio Device Settings Window, which enables testing of and adjustments to the volume of the microphone.
Presentation Options for MacThe image below illustrates a number of control options in the meeting window.
The top bar has the following options:
The IM icon expands and collapses the IM area when toggled.
The phone icon and video icon enable a presenter to toggle betweenaudio only (no web cam) and audio plus web cam
The monitor icon enables a presenter to share his/her screen to presentvisual material.
The attachment icon enables a presenter to attach files that participants areable to download.
The participant icon indicates the number of participants and expands andcollapses the participant list when toggled.
The gear icon which opens a dropdown menu with options to invite moreparticipants, mute the audience, meeting information including meeting url, and endthe meeting. There also are settings to control admission to the meeting. Ingeneral, it is best to use the default option, which is to allow invited participants intothe meeting immediately.
Page 21

Sharing Desktop or Showing the Stage
There are only two options available upon selecting the presentation icon.
Share Your Desktop should be selected if the presenter wishes to share.
Show Stage should be selected if someone else is sharing their desktop
If you elect to share your desktop, you will receive an alert requesting confirmation that you wish to share your desktop. Make sure nothing is open on your desktop that you do not wish for participants to see, such as email.
To stop sharing, select Desktop followed by Stop Sharing
Closing the Lync window or selecting the red phone icon at top of the meeting window will exit the meeting.
Page 22

Teaching online can be effective, but technical problems on either the instructor's end or the students' end can be extremely frustrating. Here are a few things you should do before you teach a class online.
• Send participants the meeting URL and instructions on downloading and installing the Web App for guests, which are available on the next page. Send instructions to students well before the class. It is also recommended to post the instructions or a link to the instructions on Blackboard in case they lose them.
• Schedule a brief test session before you teach a full class in order to identify and fix any technical problems.• Encourage students to join the meeting 10 minutes prior to the scheduled starting time, so they can orient
themselves to the online classroom and check to see that their microphone is working.• Join the meeting early and post a short greeting in the Instant Messaging box to let them know that you are in
the classroom.• Establish ground rules for use of the Instant Message section. It should be clear that they must adhere to
standard courteous behavior and they should not use the IM box for trivial messages unrelated to the discussion.• Confirm that the students can hear you before you start the class.• If you are going to record the meeting, notify attendees before you begin recording and remind them to be
courteous.• If there are a lot of questions and comments in the IM box, it can become difficult for the instructor to keep track
of them. Ask a Teaching Facilitator to be present for the online meeting and to address questions that come up in the IM window or at least draw the presenter's attention to any unanswered questions. Make sure that the Teaching Facilitator has a functioning microphone.
• Unless the number of participants is small, it is probably better to not use web cams, because with a large number of them being used, the bandwidth will be taken up and it will create transmission lags. Additionally, web cams may become distracting.
• Presenters may turn their web cam on at the beginning of the class in order to greet the students and introduce the subject. This enables a presenter to establish presence in the online classroom and provide the students with a more personal experience. As a presenter, you may want to turn the web cam off once the class gets started to avoid any unnecessary distraction.
• Keep your email open or provide students with your phone number so that they have an alternate way to contact you if they are having technical problems.
Tips for Teaching OnlinePage 23

Join a Meeting as a Guest
Can I join a SfB meeting even if I don't have SfB software installed?
Yes, but you will have to join the meeting as a guest.
In order to join a meeting as a guest, you have to receive a url to the meeting. You mayreceive the url via an email invitation from the host
1. An invitation from the meeting host which contains a hyperlink that says Join SkypeMeeting, OR
2. The URL for the meeting may be posted with your course materials or . If themeeting host sends you the URL address for the meeting, copy it and paste it intoyour browser. This will also take you to the web app link below.
3. Please enter your full name, and select Join the meeting
You should be able to record the presentation to your local computer, but remind the presenter to record and post the recording of the meeting.
Inside the Online Meeting for GuestsThe key controls you will use are at the lower left on your screen. Note that if you hoverover the icons at the lower left with your mouse, you will see the underlying options.
Meeting Controls
The IM icon lets you toggle the CONVERSATION open or closed. The IM windowallows participants to send messages or ask questions during the meeting. Keep inmind that everyone in the meeting can see all the instant messages. If you want tosend someone a private message, click the people icon, rightclick a name, andselect the IM option.
The audio icon allows you to mute or unmute your voice. If there is a red slashacross the icon, it means you are currently muted. Select the icon again to unmute.
The webcam icon allows you to turn your web cam (if you have one) on and off.
The present icon enables you to choose what and how you present if you have beengiven privileges as a Presenter. For example, you could share your desktop orpresent a PowerPoint, or go to the whiteboard to present something.
The Participants icon enables you to turn the window with the list of participants onand off.
Page 24