six steps - dental ce coursesaacd.com/proxy/files/students and faculty/aacd_6_steps.pdf · six...
TRANSCRIPT

Six StepS to Consider When Closing diastemas
Many clinicians are faced with the challenge of how to close a diastema esthetically, and without the presence of “black triangles.” Dr. Marcos Vargas, a professor at the University of Iowa College of Dentistry, believes freehand direct resins composites provide an esthetic and conservative approach for closing diastemas and should be a part of the armamentarium for every cosmetic dentist.
This article summarizes the technique demonstrated by the author, published in Volume 26, No. 3, Fall 2010 issue of the Journal of Cosmetic Dentistry.

Step 1: Shade and Opacity SelectionTooth shade should be obtained by comparing the center middle-third of the tooth against the middle of the shade tab (Fig 1). An enamel-like opacity material is usually selected when closing diastemas up to 2 mm. Larger diastemas may require layering of a dentin-like opacity material to prevent show-through, followed by an enamel-like opacity material.
Step 2: IsolationRubber dam isolation with ligatures is recommended. The rubber dam keeps the operatory field dry and free of contaminants. The ligatures help the rubber dam push the gingiva apically, to allow access to the proximal gingival areas for ideal contouring and polishing of the restorations.
Here are tHe Six StepS to conSider wHen uSing tHiS approacH:
Proper treatment options should always be carefully
analyzed and presented to the patient in detail before
moving forward with any treatment plan. The following
approach may be an option and is best used for closing
a diastema with non-slumping and non-sticking
materials.
The case here describes the treatment plan performed on
a 27-year-old female concerned with the space between
her front teeth. She agreed to the following treatment
after all options were investigated and presented to her.
The presence of “black triangles” around the teeth can make it difficult for practitioners to close anterior diastemas.
Figure 1: The appropriate shade of direct composite is selected.
1.
2.

Step 4: Material SelectionComposite resin materials for this technique must demonstrate handling char-acteristics that enable placement without slumping or sticking to placement instruments. Few commercially available resin composites (e.g., Estelite Sigma, Tokuyama [Tokyo, Japan]; Filtek Supreme Ultra, 3M ESPE [St. Paul, MN]; Prem-ise, Kerr [Orange, CA]; Renamel Microfill, Cosmedent [Chicago, IL]) demonstrate the handling characteristics for this particular diastema closure technique.
Step 5: Material Placement• A small incrementof theappropriately shaded
composite resin that corresponds to the facial half of each diastema is placed over the mesio-facial aspect of each tooth. These increments are placed simultaneously and contoured to ensure optimal contour and identical width for both central incisors (Fig 5). Attention should be given to blending the increments over the facial surface.
• Usinga thin-bladed interproximalcarver(IPC)instrument, contour the increments to match each other’s profile and ensure adequate gingival embrasure and emergence profile (Fig 6).
• Ametalmatrixissometimesutilizedtoproducea small separation between the two increments. A small brush is used to smooth the composite resin surface and approximate the increments (Fig 7). Light-cure the increments (Fig 8).
Step 3: Tooth PreparationAlthough, tooth preparation is not required when clos-ing a diastema there may be situations where the teeth are slightly misaligned (Fig 2) and a minor recontour-ing may be necessary when the teeth are positioned fa-cially. On the other hand, no preparation is necessary when the teeth are lingually positioned. Roughening of the enamel is recommended only when self-etch adhesives are to be used. Following tooth preparation, the enamel surface of both teeth is etched for at least 30 seconds (Fig 3), after which the adhesive bonding agent is placed and cured (Fig 4).
3.Figure 2: The enamel surface of the teeth is minimally prepared for composite placement.
Figure 3: The enamel surface of teeth #8 and #9 is etched.
Figure 4: An adhesive bonding agent is applied to the preparations and light-cured.
4.
Figure 5: Two increments of nano-composite resin are applied to the diastema simultaneously and contoured to optimal proportion on the mesial aspect.
Figure 6: An IPC instrument is used to adapt the resin to the proper contour.
Figure 7: A small brush is used to smooth the composite.
Figure 8: These increments of composite are light-cured.
5.
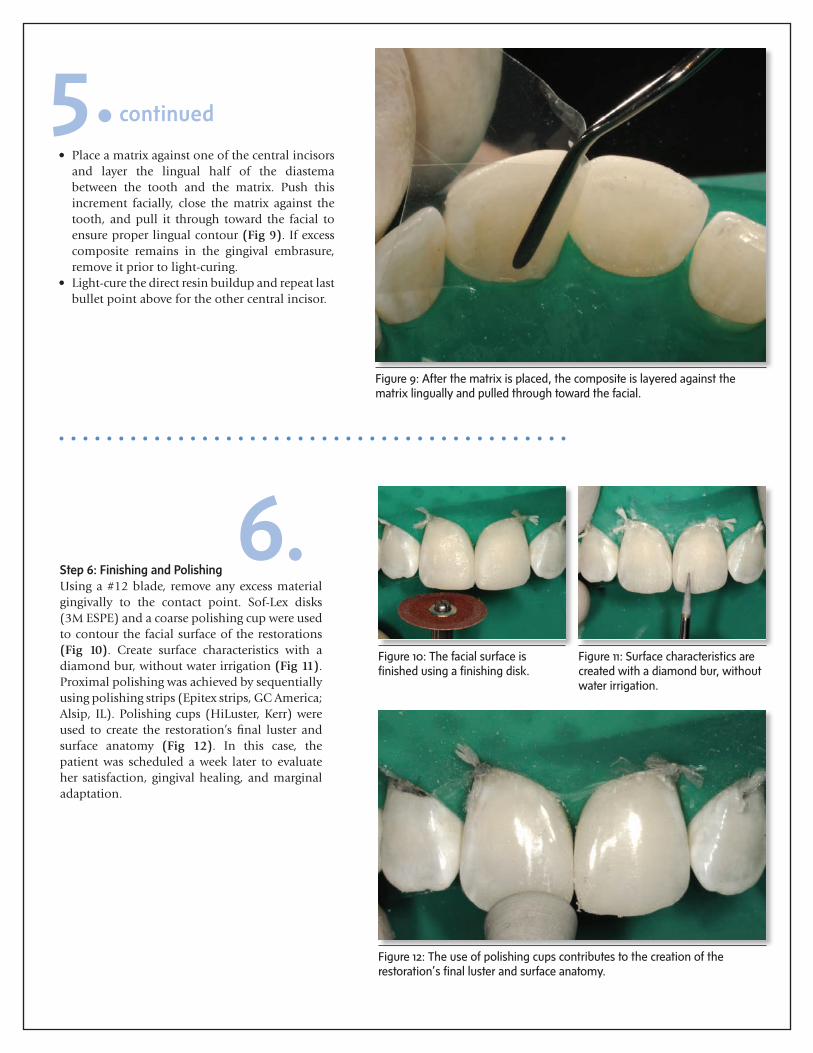
Step 6: Finishing and PolishingUsing a #12 blade, remove any excess material gingivally to the contact point. Sof-Lex disks (3M ESPE) and a coarse polishing cup were used to contour the facial surface of the restorations (Fig 10). Create surface characteristics with a diamond bur, without water irrigation (Fig 11). Proximal polishing was achieved by sequentially using polishing strips (Epitex strips, GC America; Alsip, IL). Polishing cups (HiLuster, Kerr) were used to create the restoration’s final luster and surface anatomy (Fig 12). In this case, the patient was scheduled a week later to evaluate her satisfaction, gingival healing, and marginal adaptation.
6.Figure 10: The facial surface is finished using a finishing disk.
Figure 11: Surface characteristics are created with a diamond bur, without water irrigation.
Figure 12: The use of polishing cups contributes to the creation of the restoration’s final luster and surface anatomy.
Figure 9: After the matrix is placed, the composite is layered against the matrix lingually and pulled through toward the facial.
• Placeamatrixagainstoneofthecentralincisorsand layer the lingual half of the diastema between the tooth and the matrix. Push this increment facially, close the matrix against the tooth, and pull it through toward the facial to ensure proper lingual contour (Fig 9). If excess composite remains in the gingival embrasure, remove it prior to light-curing.
• Light-curethedirectresinbuildupandrepeatlastbullet point above for the other central incisor.
5.continued

ConclusionOne of the biggest challenges practitioners face in esthetic dentistry is the presence of “black triangles” around the teeth when closing anterior diastemas.1 However, this difficulty can be effectively managed. While the success of a restorative treatment in anteri-or teeth depends on the esthetic integration between soft and hard tissues, direct restorative techniques de-scribed here can be applied to avoid “black triangles” for an optimal result. (Fig 13).2
Resources
1. De Araujo EM Jr., Fortkamp S, Baratierri LN. Closure of diastema
and gingival recontouring using direct adhesive restorations: a
case report. J Esthet Restor Dent. 2009;21(4):229-40.
2. Lacy AM. Application of composite resin for single-appointment
anterior and posterior diastema closure. Pract Periodont Aes-
thet Dent. 1998;10(3):279-86.
Figure 13: Postoperative view after the diastema between teeth #8 and #9 was closed with direct composite resin.
Conclusion.
The American Academy of Cosmetic Dentistry® (AACD) is dedicated to advancing excellence
in the art and science of cosmetic dentistry and encouraging the highest standards of ethical
conduct and responsible patient care. The AACD fulfills its mission by: offering superior
educational opportunities; promoting and supporting a respected Accreditation credential;
serving as a user-friendly and inviting forum for the creative exchange of knowledge and ideas;
and providing accurate and useful information to the public and the profession.
For more information or to join AACD, visit www.AACD.com