silicon valley 2013 - worcester polytechnic institute
TRANSCRIPT

WORCESTER POLYTECHNIC INSTITUTE
Silicon Valley 2013
Hydrospace
Michael Brigham, Catherine Waple, Gabriel Stern-Robbins
3/9/2013
Advisor: David Finkel

1
Contents 0. Abstract ..................................................................................................................................................... 3
1. Introduction .............................................................................................................................................. 4
2. Background ............................................................................................................................................... 7
2.1 Company History ................................................................................................................................. 7
2.2 Tools and Processes ............................................................................................................................ 8
2.2.1 Art Tools ....................................................................................................................................... 8
2.2.2 Technical Tools ........................................................................................................................... 11
2.2.3 zSpace ........................................................................................................................................ 13
2.2.4 Project Organization and File Sharing ........................................................................................ 14
3. Game Treatment ..................................................................................................................................... 17
3.1. Game Overview ................................................................................................................................ 17
3.2 Background Story .............................................................................................................................. 17
3.3 Appearance ....................................................................................................................................... 19
3.4 Player Roles ....................................................................................................................................... 28
3.5 Strategies and Motivations ............................................................................................................... 30
3.6 Level Summary/Story Progression .................................................................................................... 33
4. Development Process ............................................................................................................................. 38
4.1 Sprint One 1/14/13 – 1/18/13 .......................................................................................................... 38
4.1.1 Art .............................................................................................................................................. 38
4.1.2 Technical .................................................................................................................................... 39
4.2 Sprint Two 1/21/13 – 1/25/13 .......................................................................................................... 46
4.2.1 Art .............................................................................................................................................. 46
4.2.2 Technical .................................................................................................................................... 49
4.3 Sprint Three 1/28/13 – 2/1/13 ......................................................................................................... 58
4.3.1 Art .............................................................................................................................................. 58
4.3.2 Technical .................................................................................................................................... 59
4.4 Sprint Four 2/4/13 – 2/8/13 ............................................................................................................. 70
4.4.1 Art .............................................................................................................................................. 70
4.4.2 Technical .................................................................................................................................... 71
4.5 Sprint Five 2/11/13 – 2/15/13 .......................................................................................................... 74
4.5.1 Art .............................................................................................................................................. 74
4.5.2 Technical .................................................................................................................................... 76

2
4.6 Playtesting ......................................................................................................................................... 81
4.6.1 Playtesting Session 1, February 13, 2013 ................................................................................... 82
4.6.2 Playtesting Session 2, February 25, 2013 ................................................................................... 83
4.7 Sprint Six 2/18/13 – 2/22/13 ............................................................................................................ 85
4.7.1 Art .............................................................................................................................................. 85
4.7.2 Technical .................................................................................................................................... 86
4.8 Sprint Seven 2/25/13 – 3/1/13 ......................................................................................................... 88
4.8.1 Art .............................................................................................................................................. 88
4.8.2 Technical .................................................................................................................................... 88
5. Analysis and Results ................................................................................................................................ 94
6. Conclusion and Future Development ..................................................................................................... 97
Bibliography ................................................................................................................................................ 99
Acknowledgements ................................................................................................................................... 101
Appendix ................................................................................................................................................... 103
A.1 Playtesting Session 1 Survey ........................................................................................................... 103
A.2 Playtesting Session 2 Survey ........................................................................................................... 103
A.3 run130062928169112586.txt, Data File ......................................................................................... 104
A.4 User Manual ................................................................................................................................... 111
A.4.0 Controls .................................................................................................................................... 111
A.4.1 Introduction ............................................................................................................................. 111
A.4.2 Starting the Game .................................................................................................................... 111
A.4.3 Main Menu .............................................................................................................................. 112
A.4.4 Tutorial ..................................................................................................................................... 113
A.4.5 Level Introductions .................................................................................................................. 113
A.4.6 Weapon Menu ......................................................................................................................... 114
A.4.7 HUD .......................................................................................................................................... 117
A.4.8 Pause Menu ............................................................................................................................. 118
A.4.9 Level Summary ......................................................................................................................... 119
A.4.10 Weapons ................................................................................................................................ 119
A.5 Maintainer Manual ......................................................................................................................... 122

3
0. Abstract Hydrospace is a three dimensional first person space shooter created by the Worcester
Polytechnic Institute Silicon Valley 2013 Major Qualifying Project group, sponsored by zSpace
Inc. It was built to demonstrate the unique attributes that zSpace Inc.'s flagship product, a 3D
monitor called the zSpace, could bring to the gaming world. This was accomplished through an
immersive 3D environment, laser pointer aiming and grabbing, and changing the view via head
tracking.

4
1. Introduction
In October 2012, three Worcester Polytechnic Institute (WPI) students gathered together to
complete their Major Qualifying Project (MQP) required to graduate. We have all signed up to
complete our MQP in WPI’s Silicon Valley Project Center in January and February 2013.
Our project advisor, Professor David Finkel, informed us that we would be working for zSpace
Inc. for our MQP. Our assignment was to build a game exclusively for their zSpace system. The
zSpace system is a stereoscopic 3D monitor that displays a genuine 3D environment that can be
interacted with a stylus and head-tracking glasses. zSpace Inc. needed this project so that it could
have an application that would demonstrate the unique capabilities of the zSpace system in
respects to gaming. After drafting a game treatment, and planning out what we would do to solve
this problem, we developed Hydrospace.
The Hydrospace project was needed to demonstrate the capabilities of the zSpace system’s
potential for gaming. A project of this nature had never been created for the system before, so
this was an important tool in determining the directions in which the innovative zSpace would
travel and grow. In addition, a game was needed to get potential customers or anyone seeing the
system for the first time an introduction to the zSpace and its key functions. Thus, Hydrospace
was required to revolve around game mechanics that could only be useable on the zSpace
system.
Our game is a first-person space shooter in which players aim and fire into a three dimensional

5
environment. In this game players take on the role of the commander of the Stern-Robbins Space
Station, who is charged with the daunting task of protecting Earth from the Wapalian aliens who
are attacking the Earth, desperate for its water, after running out of water on their home planet.
As a demo game for the zSpace system, Hydrospace is focused on utilizing game mechanisms
that only the zSpace can provide. The zSpace’s immersive and fully interactive stereoscopic 3D
environment, precise stylus manipulation, and head-tracking, provide the perfect grounds for a
futuristic space-themed game such as this one.
In this paper, we will begin by talking about the history behind zSpace, Inc., the makers of the
zSpace system. We will then discuss the tools and processes that were used during the
development of our project, to show how we created and organized it.
Following the background is the game treatment, which details the workings of Hydrospace,
beginning with a broad overview of it including the in-game story and history. This leads into the
aesthetics of the game in the Appearance section where the look and feel of the game is
introduced. Following this is a description of the player roles, or what the player can do in the
world of Hydrospace. This is followed by the Strategies and Motivations section where we talk
about how players can play the game and what actions will lead them to play on. The final part
of the game treatment is in the Level Summary and Story Progression section, where details of
how players advance through the game and story, as well as win and loss conditions are
described.

6
Following the game treatment is section covering the development process of this project. Here
we explain the decision-making process while creating the game, which includes details on what
choices we made, why we made them, and how the game grows and changes from week to week
as shown in the tech and art weekly sprints section in that chapter.
After the development process section is the analysis and results portion of the paper where we
look at the final build of Hydrospace and discuss the overall outcome of the project, including
what worked well or what could be improved.
Next is the whole conclusion on the project, whether we feel we succeeded or failed in our
mission and why, including ideas on how this project could be expanded should it be developed
further in the future.
Following that are the bibliography and appendix of the project, where references and resources
can be found. A user’s manual is included, which describes how to run our game, and lastly is a
maintainer’s manual should others wish to expand our project.

7
2. Background
2.1 Company History
zSpace Inc. (recently changed from Infinite Z) is an eleven year old company based in Mountain
View, California, that specializes in stereoscopic 3D hardware and software development. They
are a privately held company, with backing from outside sources such as the CIA's venture
capital fund In-Q-Tel (Henn, 2012). Since its founding in 2001, the company has filed over thirty
patents related to its flagship product, also named zSpace (Marketwire, 2012). zSpace is, as their
website describes, “a revolutionary, immersive, interactive 3D environment for computing,
creating, communication and entertainment.” Released in December of 2011, this product is
currently in use across a wide variety of fields, including education, medicine, and engineering
(Reeves, 2011). A zSpace system includes a 24 inch LCD monitor with a built in tracking
system, 3D glasses, and stylus with which to control it all, zSpace is priced upwards of six
thousand dollars (zSpace, 2012).
In recent news, zSpace Inc. has demonstrated its product at multiple conferences over the past
year. Their first demonstration was at the Game Developers Conference, held in early March.
This presentation caused quite a stir in the graphical design community, with zSpace receiving
the Silver Edge Award from the popular magazine Computer Graphics World (Best Of Show At
GDC, 2012). Following that, in August, zSpace Inc. attended the SIGGRAPH 2012 conference,
allowing those interested to try out its platform. Attendees could dissect a human lung, take apart
a house, or play a third person shooter, among other things (The0therbk, 2012). The product
received a great amount of attention and rave reviews from this conference. Labeled a

8
“transformative experience” by develop3d.com, and a product “that can make a difference for
the next generation” by the Tech on the Edge blog on wordpress.com, it’s clear that the
company’s young product has only just begun to touch upon its potential. In September, zSpace
was also demonstrated at the SAE 2012 Aerospace Manufacturing and Automated Fastening
Conference & Exhibition (Marketwire, 2012). Other positive news on zSpace came with the
2012 Core77 Design Awards, where the company was honored for their innovative product
(Core77 Design Awards, 2012).
zSpace Inc. is invested in advancing not just their own product, but research on stereoscopic 3D
in general, having established partnerships with several esteemed universities. In their first
announcement on the subject, the company declared as partners Olin College, the University of
Southern California, and the University of California San Diego (Marketwire, 2012). Along with
providing students at these universities an excellent new tool to utilize, the company in return
receives feedback on its product, and has the potential to identify new features through expressed
needs.
2.2 Tools and Processes
2.2.1 Art Tools
Creating a video game usually requires a significant set of tools, which can include art programs,
integrated development environments (IDEs), and compilers, among many others. Our game was
created using Unity (Home, 2013). For art development, a pipeline is established that goes from
art asset creation to getting those assets into the game. For this project, the model of an asset was
first created in either ZBrush (ZBrush, 2013) or Maya (Autodesk Maya, 2013). Once completed,

9
it was exported and brought into Unity, where the team created interactions for the objects in the
environment of the game.
For art tools, mostly ZBrush, Maya, and Photoshop were used. Aside from editing photos,
Photoshop can also be used to alter texture maps, bump maps, normal maps, or digitally paint
images with the use of a pen tablet (more on texture, bump, and normal maps later). Photoshop
was crucially important for creating the skybox and User Interface (UI) art elements of this
project, like the Heads Up Display (HUD) graphics or the layout of the menus.
ZBrush is a specialized 3D modeling program that focuses primarily on modeling detailed,
individual objects such as humans or creatures, and objects with very fine details such as the
asteroids, which are a focal point in our game.
ZBrush (or any similar sculpting program) is an important digital sculpting tool for any game
artist. Rather than use a keyboard and mouse, most artists choose to use a pen-tablet system
which allows for more precise and controlled manipulations of digitally sculpted models, such as
adding fine detail to a human face. With this program, an artist can use the precision and natural
feel of the pen tablet to sculpt a game object from a lump of digital clay. A variety of brushes are
available to create different kinds of clay strokes, carve lines, move parts of the sculpture around,
and do many other things.

10
Once a high poly and detailed version of an object was made for our game using ZBrush, it was
painted on directly in the program. After painting was done, the object was optimized for game
by reducing its poly count.
Reducing the polygonal count of an object is usually done through a process called
retopologizing (also called optimization), where the artist draws a new low-poly shell over the
detailed and high-poly object. For a quick solution, the artist can choose to use the Decimation
Master plugin in ZBrush, where the artist sets the amount of points the object should be reduced
to, and ZBrush does the rest of the work, without the need to manually retopologize. For the
purposes of this project, Decimation Master was easier to use and faster than manually
retopologizing roughly shaped objects like asteroids.
In computer graphics, 3D objects are composed of triangles that make up polygonal faces of an
object. It is crucial for artists to be mindful of the number of polygons on an object, called the
poly count. In a game, or any interactive environment, trying to render too many triangles at
once will cause undesirable slowdown or could even crash a game. Models created in ZBrush
often have over a million triangles once the artist is finished sculpting and adding details. Trying
to put it directly into a game would likely break the game. ZBrush has a means for the artist to
create a lower polygon version of the model over the high quality one through retopologizing.
Once an object is sufficiently optimized for game with a reduced poly count, ZBrush then bakes
the fine detail into what is called a normal map for the game engine to use which give the object
the appearance of surface detail while having exponentially fewer polygons (polys) to render,
which optimizes the game to run faster without sacrificing much detail.

11
Once an art asset was optimized for our game, the low-poly object was exported as an .obj file
format which can be read by essentially any program that handles 3D objects, Maya and Unity in
particular. In addition to a normal map, a texture map was also generated from the paint on the
object in ZBrush. Texture maps tell a program where to put color data on an object, while normal
maps tell a program where surface detail like bumpy or smooth areas go on an object. These
maps can be exported as .png, .jpeg, .tga, .psd, and countless more file types. The .psd file format
is most useful because it can be readily opened in Photoshop and thus retains the most
information in the file. Once the maps were exported from ZBrush, they were sometimes edited
in Photoshop for touch-ups, or to upgrade a texture map to a specular map by adding an alpha
channel to the texture map, in addition to the red, green, and blue channels in the images. The
alpha channel allows Unity to make an object shiny based on how white or black a given part of
the alpha channel is. Once an object is created, optimized, and had its maps exported and
possibly edited, it was imported into Unity.
If the object needed to be animated, it went into Maya. For this project no objects needed to be
animated, since asteroids, projectiles, and spaceships would be floating in space and their
movement would be directed by code rather than specific animations of their meshes. Instead,
Maya was primarily used to construct simple mechanical objects like the projectiles and lasers
for the purposes of this game.
2.2.2 Technical Tools
The technical tools we used were Unity and MonoDevelop. Unity is an artist-friendly game
engine and development environment. Unity allows for easy integration of various art assets and

12
scripts to control them. MonoDevelop is an IDE designed for code development for Unity. It has
a very robust code editor which makes debugging very easy to do.
For Unity game development, most of the time is spent inside the Unity Editor. The Unity Editor
is essentially a what-you-see-is-what-you-play editor. We imported models created in Maya and
ZBrush, usually in exported from Maya in the .fbx format which contained materials, or .obj
models for non-animated objects from either Maya or ZBrush, then place them into the game
world. The editor let us easily position, rotate, and scale models. The editor also let us assign
materials to objects. This allowed for things such as giving an asteroid a bump map and making a
metal object shiny. Unity also includes a means of version control using metafiles. Metafiles
allowed us to update and maintain individual elements of a Unity project such as materials or
scripts. The most important aspect of a game object is the scripts associated with it. Scripts
allowed us to define how an object behaves, such as how it moves, or what happens when the
player shoots it.
Unity ships with MonoDevelop, which is an open source implementation of the .net framework.
Unity supports a variety of scripting languages, but the most common and one we used is C#, for
its robustness and speed. Mono has Intellisense, partial auto-completion of key words. For
example if you type “object.tra”, Mono will suggest “object.transform”. It also has a simple, yet
powerful debugger which lets you pause the game while it’s running and inspect anything you
want. Overall, it is a well-designed IDE and relatively easy to learn and use.

13
2.2.3 zSpace
We used the zSpace platform to make our game. zSpace is a virtual holographic display that uses
stereoscopic 3D to achieve a sense of reality. Physically, it is a DVI (digital visual interface) 24
inch 1080p monitor that also plugs into the host computer via USB and the DVI port. zSpace
also comes with a stylus that plugs into the monitor and polarized glasses. Once it is wired up to
the host PC, the user can then download and install the drivers required to make it work from
their website.
Stereoscopic 3D is a technique of generating 3D images on a 2D screen. Basically, a 3D scene is
drawn twice, from two slightly different camera angles. Since each screen only projects light in
one alignment, the polarized glasses cause the user to only see one version of the scene in each
eye. The brain gets fooled and lets the user perceive depth. The glasses that come with zSpace
have a unique feature: they are equipped with several reflectors which a camera array in zSpace
can detect. Based on the glasses’ position, the user can ‘look around’ a 3D scene. The stylus is
also detected by a camera array, and zSpace outputs its location and orientation. Using all of this
data, true 3D games are possible.
zSpace also provides a plugin for Unity that allows for the use of the zSpace system from within
Unity. In addition to all the features that Unity normally has, users now have the tools to make
3D games. The plugin automatically handles the stereo 3D projection. It also allows for easy
acquisition of the stylus’ position and rotation. All position data is properly scaled; where one
Unity unit is equal to one physical meter. We scaled the world down to combat decimal precision
loss with the physics engine at small scale. For example, a world scale of ten sets one Unity unit

14
to ten centimeters (0.1 meters). The Unity plugin also allows for control of miscellaneous
functions such as the stylus vibration or LED color. The plugin also provides data for the 'zero
parallax plane.' When translated into the real world, this plane is the physical screen itself. It is
the point where objects appear directly on screen instead of inside it or 'floating' above it.
2.2.4 Project Organization and File Sharing
For the duration of our project, we used the Scrum development process to efficiently create
ourselves a set of goals each week (Scrum (development), 2013). Scrum follows the guidelines
of the agile framework, meaning that it is meant to handle constantly changing objectives in a
fast paced environment, with constant feedback from the customer. A Scrum project is run in
sprints, which, in our case, are one week iteration cycles, starting on Monday and ending on
Friday. Each sprint consists of a number of user stories that the development team has created. A
user story is a goal or feature for the product, structured from the point of view of a user. Every
user story should be small enough to be completed in a day or two, broken down as far as
possible, with a broad description of what is needed, giving the developers freedom to program it
as they see fit. An example of one of our user stories is the one below written for the ‘Fire a laser
weapon’ feature. The story reads as follows:
“As a player who wants to be able to combat onscreen enemies, I want to be able
to fire a laser weapon.
Given that I have selected the laser as my weapon,
When I press the corresponding fire button,
Then a laser projectile should fire in the direction of where I am aiming.”
15
At the beginning of each sprint, a number of these user stories are estimated in difficulty by the
project team. The sprint is then filled with enough to be considered completable in a week’s
time. The goal at the end of each sprint is to have these completed, but if that is not possible, to
at least have the product in a deliverable state.
To keep record of our user stories and sprints, we used an online bug tracking system called
Bugzilla. This system was designed to specifically report bugs, and was thus not a perfect fit for
Scrum development, but this was what zSpace Inc. used for its sprint tracking. Each user story is
filed as a bug on a product, our product being called “WPI”. Each product was broken down into
components, each with a default assignee. Brigham was assigned to the Gameplay component,
Stern-Robbins to the UI, and Waple to the Art. Every user story was assigned to one of these
components, and also to a certain version number. Versions are Bugzilla’s way of tracking
sprints. For our purposes, our versions were numbered from .1 to .9, with 1 being the final
deliverable. As stories were completed, they could be marked as “fixed,” Bugzilla’s way of
saying “complete.”
In order to share materials for our project, the team used a couple different technologies. In the
first week, all of the art assets were being shared over Dropbox, an online storage and file
sharing system. However, this would be impractical in the long run, as it did nothing with
version tracking, and could not solve conflicts in code or other materials, so we converted our
storage over to Subversion (SVN). zSpace Inc. has their own SVN server on which all company
materials are accessed, only accessible from within their intranet. To interact with this, our team
used TortoiseSVN, a free resource downloadable from their website that interfaces directly with

16
Windows Explorer, allowing for easy uploading and downloading from a SVN repository. We
put in two directories for our section of the repository, one for art assets, and the other for the
game’s main project folder. This could be opened and edited directly with Unity, and art assets
could be imported into the Unity project file as we saw fit, though we produced all of our code
and art assets first on test projects prior to inserting them into the repository.

17
3. Game Treatment
3.1. Game Overview
Hydrospace is a three dimensional first person space shooter. In Hydrospace, the user takes over
as the defender of Earth with a high-tech battlement on a space station, protecting the Earth and
her/himself against asteroids and alien spaceships using a variety of weapons, from tractor beams
to lasers to a black hole cannon.
3.2 Background Story
As Earth labels it, it is the year 3013. The Wapalian planet is now at least 90% desert. Satellite
images show a pool of precious water near the north pole of their planet, bordered by the only
lush forests on that planet. It’s an oasis of what is left, called Saraset (meaning Serpent’s
Sanctuary in Wapalian). On the opposite end of the oasis there is a dark area, called the Dark
Tower (no relation to the Stephen King series), surrounded by the Forests of Fear. The Wapalians
are not the only race on the planet. Due to the lack of water, the Shadow People are gaining
numbers and slowly expanding their territory. They feed off of fear and anxiety, though no
reports of direct harm to anyone exist yet. They are rumored to be led by a figure called the Top
Hat Man. Nothing else is known about them.
The red patch on the planet is a storm area surrounding the Wapalian place of worship, called
Kadriel, named after the god of the Wapalian people (they also worship their goddess, Hjuki).
The storm surrounding Kadriel is a protective red storm that fends off those who mean to do
18
harm. This area and the Great Oasis will act as a safe zone should the Shadow People take over
Waple. There are myths that that a third place of worship contained a portal between Waple and
Earth and it is now located in the place that the Shadow People have called home since, but there
is no proof for this, other than the possible sightings of shadow people on Earth.
Waple was much of a desert to begin with, but living space is becoming rather tight with the lack
of water. Hjuki, once another place of worship, has become a city as the Wapalians began to
make their homes there over time. It is now the only city on the planet, though officials are
considering naming Kadriel a second city since many people are making their homes there as
well. And underground passage connects the two locations.
Wapalians have to go through much training to learn to survive the harsh desert on their planet.
They are born and raised in either Kadriel or Hjuki, or in a desert clan, (and Erika’s Legend tells
of someone raised from the Shadow People who went through their portal to Earth but that is
beyond the scope of this project), and once they learn to survive in the harsh climate on their
own only then can they roam freely through the desert, but with the lack of water that has
become far more difficult than it used to be.
The Wapalian planet is blanketed by sand-colored dust clouds and red storms, but for the
Wapalians who live below the clouds and see underneath them, the Wapalian deserts and sand
are actually blue.

19
The Wapalians desperately need to acquire more water with which to quench their people’s thirst,
lest they resort to drinking each other’s blood. They need to end their suffering fast to hold back
the Shadow People. They look to Earth.
Earth, with its salt water, largely unused by its humans, is the last hope for the Wapalians. The
Wapalians are a brilliant people, who have developed technology with which to survive the harsh
deserts of their planet and have the knowledge to build efficient space crafts. They know how to
easily convert all of this salt water to drinkable fresh water, and how to quickly transport it to
their home through the use of manipulating space-time to create wormholes to transport the vast
amount of water with. They will even give the salt back to Earth and use it to construct gifts of
thanks for them.
But the humans do not understand. In their eyes, the Wapalians are invaders and attackers. Your
job, as commander of the Brigham Battlement, is to eliminate the Wapalian threat and protect
your planet from the aliens. Can you “save” yourself and your planet?
3.3 Appearance
Hydrospace, given that it is on the 3D zSpace system and is a space shooter, necessitated a
futuristic art style. Featuring fully 3D interfaces and combat, the game required a futuristic
setting to make the most of the unique capabilities of the zSpace system and best immerse the
player in the game’s futuristic setting.
20
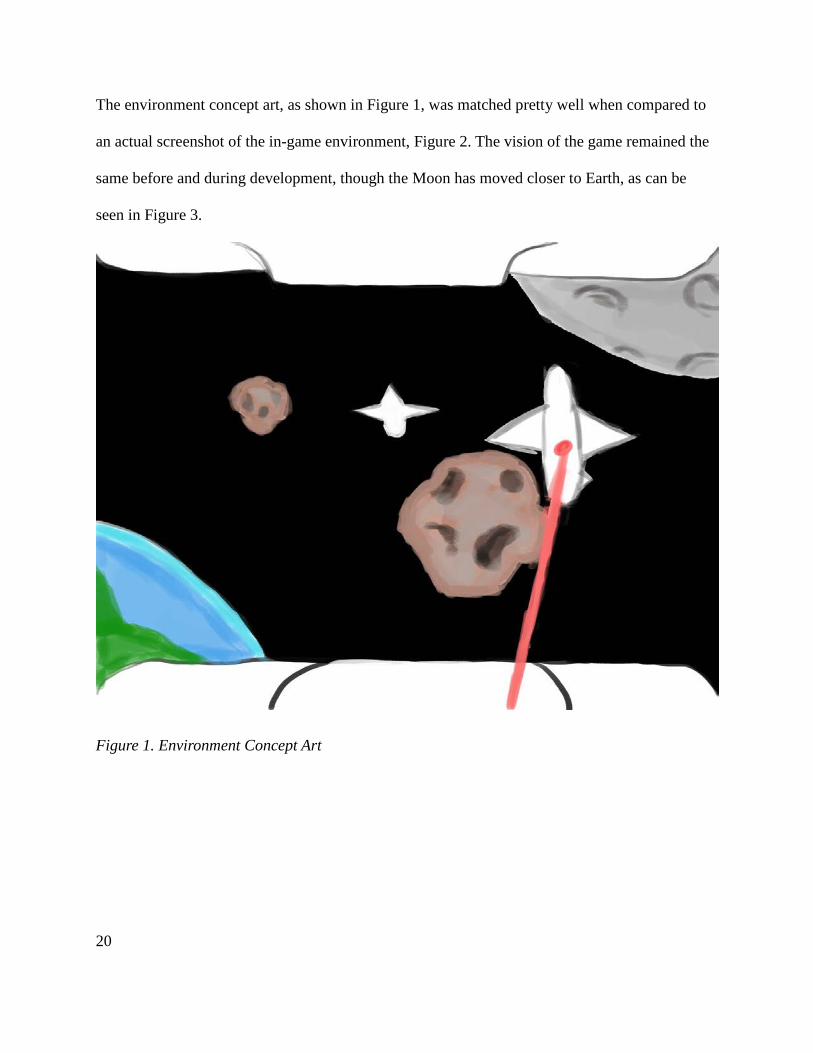
The environment concept art, as shown in Figure 1, was matched pretty well when compared to
an actual screenshot of the in-game environment, Figure 2. The vision of the game remained the
same before and during development, though the Moon has moved closer to Earth, as can be
seen in Figure 3.
Figure 1. Environment Concept Art

21
Figure 2. Environmental Screenshot

22
Figure 3. Earth and Moon
The enemies turned out rather different than initially thought. Initially, the enemies looked rather
penguin-like, but this enemy theme was discarded in favor of more diverse, organic-mechanic
enemy models.

23
Figure 4. Enemy Concept Art

24
Figure 5. An Asteroid Model

25
Figure 6. Scout Model

26
Figure 7. Brute Model

27
Figure 8. Elite Model
The new enemy models turned out to be much better than the original concept art (Figure 4).
They have more detail, better suit the environment, and are more interesting to see rather than
different colored versions of the same enemy like in the first ideas.
The interface menus have the same futuristic style prevalent throughout the game, as can be seen
in Figure 15 in section 4.7.1. All menus have a similar look to keep them unified and maintain
the artistic theme of the game.
The appearance for the game has worked quite well, and supports the gameplay and setting in the
way it that was originally intended.
28
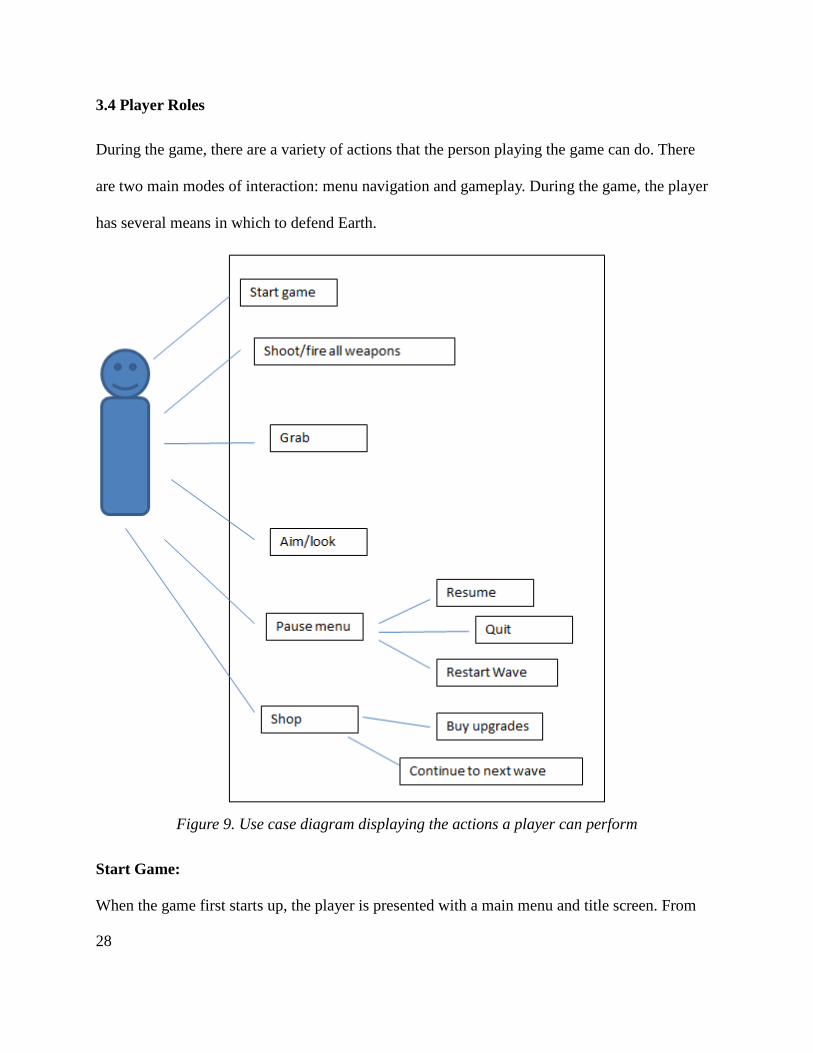
3.4 Player Roles
During the game, there are a variety of actions that the person playing the game can do. There
are two main modes of interaction: menu navigation and gameplay. During the game, the player
has several means in which to defend Earth.
Figure 9. Use case diagram displaying the actions a player can perform
Start Game:
When the game first starts up, the player is presented with a main menu and title screen. From

29
there, they can start the game, view options, or exit.
Shoot Weapons:
The player has two weapons equipped at a time. Pressing the left stylus button shoots the left
equipped weapon and the right button shoots the right. The same weapon cannot be equipped on
both sides.
Choose Weapons:
At the beginning of each level, the player can choose their left and right weapons. The same
weapon cannot be equipped on both sides.
Grab Objects:
The player has the ability to grab physics objects. Aiming the stylus at an object and pressing and
holding the big button locks that object to the stylus. The held object can be used to block enemy
bullets, be thrown at enemies or simply thrown away. The tractor beam can be upgraded with
extended range, and the ability to grab heavier objects.
Pause:
At any point during the game, the player can press ‘P’ to pause the game. From there, they can
resume, quit the game, or restart the current wave. Restarting the wave lets the player reselect
their weapons.
Upgrade Shop:
After a level is completed, the player can upgrade their weapons or battlement. The shop offers a
variety of upgrades for each weapon such as increased fire rate or damage. The battlement can be
upgraded as well in areas such as defense or regeneration rate. For a complete and detailed list of
upgrades, refer to table 1. When the player is done shopping, they can continue to the next level.

30
3.5 Strategies and Motivations
Hydrospace has five levels of play, with the objective being to survive through all five for
victory. The motivation that players will have to complete this goal is set up through the
gameplay. By starting out with a simple tutorial level, players are able to get a feel for the game
without the frustration of repeatedly dying. Each level following increases in difficulty, with a
new enemy type added at each. The feel of an increasing challenge, along with the reward and
intrigue of constantly fighting a new enemy type, keeps the player interested, and drives them to
continue forward and complete the game. Another source of motivation to keep players invested
in the game is the reward and upgrade system. For each enemy the player destroys, they receive
a certain amount of money. The incentive to destroy as many enemies as possible, and thus be
able to better upgrade their weapons, keeps the player fueled as they play. At the end of each
level, the player gets to spend their earnings on the upgrades of their choice. Being able to
control increasing powerful weapons, creating more and more destruction, entertains the player
and drives them to continue playing.
The different strategies the player can use will be largely based on their choice of weapons and
upgrades. The laser is the most straightforward of the weapon selections. At its lowest level, it
fires at a mild pace and deals low damage per shot. As it progresses, it begins to fire in a spread
pattern, deals more damage per shot, and begins to rapid fire. At its lowest level, it provides the
most accurate, well-rounded weapon choice. At its top, players can use it as crowd control,
destroying numerous targets in an area quickly.

31
The homing missile provides a powerful weapon for fast moving enemy ships. To start out, the
missile deals modest damage with an equally modest cooldown, and is only fairly accurate. As it
is leveled up, it becomes the second fastest firing weapon, dealing massive damage over a large
radius, and almost never misses its target. At its lowest level, it is useful for taking down the
elusive Scouts and off screen enemies. At its top, it will effectively take out opponent after
opponent, eliminating the need for aiming.
The black hole cannon is potentially the most powerful weapon in the game, sucking in all
enemies within a certain radius, dealing massive amounts of damage, but giving the player a
reduced amount of money for each kill. When the player starts out, the cooldown for this is a
massive nine seconds, and only gives the player a third of the money per kill. Fully upgraded, the
cooldown is lowered significantly, sucks in most enemies on screen, and gives the player full
money. This weapon is to be utilized as an effective crowd control weapon, wiping clear an
entire streak of the playing field.
Table 1. Upgrades
Laser Level Cooldown (s) Damage Speed (1/update) Spread (# shots)
0 0.5 1 3 1 1 0.45 1.125 4 2 2 0.4 1.25 5 3 3 0.35 1.375 6 4 4 0.3 1.5 7 5
Homing Missile Level Cooldown (s) Damage Explosion Radius Homing (force)

32
0 1.5 3 3 120 1 1.375 3.5 5 220 2 1.25 4 7 320 3 1.125 4.5 9 420 4 1 5 11 520
Black Hole Cannon Level Cooldown (s) Radius Speed (1/update) Money Received
0 9 10 1 1/3
1 8.25 12 1.5 1/2 2 7.5 14 2 2/3 3 6.75 16 2.5 5/6 4 6 18 3 1
Inertia Sphere Level Cooldown (s) Homing Radius Bounces Explosion Radius
0 2.75 50 2 3 1 2.625 75 3 6 2 2.5 100 4 9 3 2.375 125 5 12 4 2.25 150 6 15
The final weapon, the inertia sphere, is a unique projectile that bounces from target to target until
it explodes, dealing out a large chunk of damage. The inertia sphere has a slightly higher
cooldown than the missile. The player must aim to hit their first target, after that, the sphere
automatically targets a new enemy within range and always hit it. Once out of bounces, it
explodes. At its lowest level, the sphere bounces twice before detonating, and a short homing
radius. Fully upgrading, the ball bounces six times, will almost always find a target, and has a
massive explosion radius. At its lowest level, it is effective at taking out a handful of weak
enemies. At its peak, the ball wreaks havoc across the playing field, weakening numerous

33
opponents, killing most.
The strategy of Hydrospace lies in how the players mix and match their weapons and upgrades.
One can choose a largely defensive strategy, choosing a pairing of crowd control weapons like
the laser and black hole cannon, and upgrading their spread and range. They may also choose to
take a more aggressive approach, choosing weapons with damage spread over a large area, like
the inertia sphere and homing missile, upgrading their damage and area of effect.
Upgrades are not the only way for players to define their strategy. The way they play the game
also matters in that regard. To play more to a defensive end, heavier use of the tractor beam
could be utilized. In this way, players could use enemies as shields against fire, throw them away
out of range of their target, preventing them from firing, catch enemy fire and knock it off
course, and other such actions. An aggressive offensive player may never use the tractor beam,
relying solely on spray and pray. Hydrospace is built to accommodate for many play styles, and
provides methods to utilize any strategy.
3.6 Level Summary/Story Progression
Hydrospace is made up of five levels, with each progressively more difficult than the last. To
start each level, the player is shown a level introduction. These provide the story line for the
game, and also give hints on how to fight the new enemies in that level. After the introduction,
the player is able to select which two weapons they wish to use, and are able to upgrade them.
After each level is completed, the player is able to view the level summary. This contains how
many of each enemy type the player destroyed, along with how much money they made, and

34
how much health the player and the Earth each lost. At the end of the last level, the player is able
to view her/his statistics from the entire game. If the player dies, he/she restarts the level she/he
is currently on, with ability to again upgrade and select their weapons.
The first four levels are all structured the same, beginning with the two asteroid spawners that
last the length of the level, one targeting Earth and the other the player. A second after these are
created, the first wave begins, targeting the player. Once this wave is over, the second wave
targets the Earth. After this wave, two more asteroid spawners are created, also lasting the length
of the level, one targeting Earth and the other the player. After a small breather, the third and
final wave begins, with enemies targeting both the player and Earth. The enemies that are
contained in each wave are the main difference between the levels.
The first level is an introductory one, with the only enemy being asteroids. Asteroids are simple,
unintelligent objects. They are fired from a spawner at semi-random intervals towards their
target, which is either the player or Earth. They travel in a straight line in the general direction of
their target at a randomly defined speed, dealing physics damage to any damageable object they
make contact with. They are the easiest to kill of all opponents.
The first wave of level one consists of two asteroid spawners, both targeting the player. Once
these end their time limit, the second wave begins. This also has two asteroid spawners, these
targeting Earth. The final wave for this level has one asteroid spawner targeting Earth, and
another the player. Once these finish, there is a short delay allowing for the player to eliminate
all of the asteroids, and then victory is declared.

35
Level two introduces the Scout. The Scout is the simplest of the enemy ships. They fly towards
their target, and fly around a certain distance away at a medium, firing quick, weak, accurate
lasers at their targets frequently. They take slightly more damage than asteroids, but are still easy
to destroy. Wave one of the second level consists of two Scout spawners, both targeting the
player. The second wave also has two scout spawners, these both targeting Earth. There is a short
break before the final wave, which also contains two Scout spawners, with one targeting Earth
and the other the player. There is less of a delay after the spawners end in levels two through four
than in level one, because the level cannot be ended until all enemy ships are destroyed.
The Brute is the new enemy of the third level. This ship is slow moving but powerful, focused
entirely on offense. It fires large, slow moving bombs that deal massive damage on impact. It
may be the easiest target in the sky, being the largest and slowest moving of all the basic
enemies, but it also takes more damage than any other basic ship.
One Scout spawner and two Brute spawners are created in the first wave of level three, all
targeting the player. Shortly after the first set of spawners are finished, the second wave is
initiated, with again one Scout spawner and two Brute spawners targeting Earth. The final wave
begins after a short delay, with one Scout spawner and one Brute spawner targeting the player,
and one of each also targeting the Earth. Once all these enemies are destroyed, victory is granted.
The fourth level introduces the Elite. The Elite is the fastest, most agile ship in the game, and it
also takes more to destroy than the Scout. It fires moderately intelligent homing missiles at its

36
target. These fly in a random pattern, making it difficult to destroy them before impact. The first
wave consists of one Scout spawner, one Brute spawner, and two Elite spawners all targeting the
player. The same set of spawners is made in the second wave, but all targeting the Earth. After a
short breather, the final wave begins. Wave three consists of one of each of the ship spawners -
Scout, Brute, and Elite - targeting the player, and another one of each targeting Earth. If the
player manages to destroy all of these enemies, they can pass on to level five.
The fifth and final level is completely unique from the other four, featuring the Mothership,
Hydrospace’s final boss. There are two asteroid spawners that do not target the Earth or player,
but fire randomly into the playing field for use by the player. The Mothership is a massive,
screen filling ship that fires bombs and missiles, and spawns Scouts, Brutes and Elites. When it
targets the player, it looks at the player. When targeting the Earth, it moves over and rotates to
look at Earth. The stages for the Mothership can be seen in Table 2 below. The % Health column
refers to how long the level lasts. In other words, once the Mothership loses this percent of
health, it moves on to the next stage.
Table 2. Mothership Level Progression
Stage % Health Mothership Actions
1 10 Fires a light weapon volley at player 2 8 Light spawn wave at player 3 9 Light weapon volley at Earth 4 9 Light spawn wave at Earth 5 12 Heavy weapon volley at player
6 12 Medium weapon volley at player Light spawn wave at Earth
7 15 Medium spawn wave and weapon volley at Earth

37
8 25 Heavy weapon volley and medium spawn wave at player

38
4. Development Process
4.1 Sprint One 1/14/13 – 1/18/13
4.1.1 Art
3D modeling was limited in the first week of development since ZBrush was not available until
the second week of the project, and all other art tools were available from the start. Therefore,
assets requiring Photoshop were made first. The skybox was created using Photoshop. The
skybox is a six-sided cube that has six images mapped onto its inside. These images, edited to
appear believable and seamless across the sides of the cube, are what is seen in the distance in
most video games. Aside from the fact that this important asset had the tools to be created first,
the skybox’s early addition to the Unity project would give the team the opportunity to see from
early on how art assets and lighting would look in the space setting right from the very start.
Having this early advantage helped keep the focus of the game in sight, and provide a more
immersive space experience.
The next asset that was made was the model for all lasers in the game, since this could be made
using Maya. The lasers in the game all use the same model, and the colors and effects on them
were changed from within Unity. For example, the scout’s laser was blue while the player’s laser
was red, and these materials could be created and assigned to different laser models from within
Unity.
More Maya modeling was done to make the targeting reticle. A triangular pyramid was
constructed, and it was assigned bright colorful materials on each side. This pyramid’s top point

39
would face the player, and spin, giving each differently colored side a turn to catch the player’s
eye rapidly. The player would then know where he or she is aiming, as indicated by this eye-
catching reticle that was placed on the end of the stylus beam. This reticle grows and shrinks
with changes in distance, also helping players get a better sense of depth in the environment.
More Photoshop work was needed to begin making some of the heads-up display (HUD)
elements, like health bars and icons to go with them. A window model was also made in Maya to
better give the impression of looking out of the ship window in the game.
While waiting for ZBrush, a free but less extensive version of it called Sculptris was downloaded
so that modeling on asteroids and planets could begin. Five different asteroid models were
created, along with the Earth, Moon, and the enemy’s home planet, Waple. Later in the week
ZBrush was finally installed and these models were finalized, painted, and optimized. After that,
the scout enemy ship was created and finished, since ZBrush was now available to make high-
quality models with.
4.1.2 Technical
For the beginning of the first sprint, it was critical that we get a feel for zSpace and how it works,
and most importantly, how it integrates with Unity. The zSpace Unity plugin provides a very
simple interface for retrieving data from the stylus. It also automatically handles rendering the
scene in stereo 3D, leaving us to only have to worry about game design. The Unity plugin also
scales the stylus position into Unity units with a scale factor of one meter equal to one Unity
unit.

40
The first feature implemented was the ability to grab objects with the stylus. The grabbing
system was designed such that the stylus does a raytrace from its position in the direction it is
aiming. A raytrace could be comparable to aiming a laser pointer in a given direction and seeing
where and what the red dot hits. If the raytrace hits something and the user presses the big button
on the zSpace stylus and that object is marked as grabbable, force is applied to that object in a
manner that positions it a fixed distance from the tip of the stylus, allowing the user to easily
move and throw that object.
Code Example 1. Raycast Example
Physics.Raycast (stylus.stylusPosition, stylus.stylusForward, out hit, maxDistance);
The above code is how to do a raycast in Unity. Raycast takes four arguments. The first is the ray
origin, in this case the stylus' position. The second is a direction, in this case, the stylus' forward
direction. The third argument is a data structure which contains raycast hit information such as
the object that was hit. The fourth argument is the maximum distance to cast the ray. In this case,
it is just a fixed value of 100 Unity units. The 'hit' object is used later on for the actual grabbing
of objects.

41
Code Example 2. Retrieve Object from Raycast
if (stylus.buttons [0]) { if (hit.rigidbody != null) { if (obj == null) { obj = hit.rigidbody; targetDis = hit.distance; } } } else { obj = null; }
This code is used for getting the game object out of the raycast. If the big button is pressed, and
the object that was hit has a rigid body (the object is part of the Unity physics system), then set
the object to apply force to that of the raycast hit and set the distance to hold that object the
raycast distance. After there is an object to grab, the physics code takes over.
Code Example 3. Physics
targetPos = stylus.stylusPosition + stylus.stylusForward * targetDis; obj.AddForce ((targetPos – currentPos) * grabForce * obj.mass
- obj.velocity * obj.mass * grabDampeningFactor);
This code is executed each physics update that there is an object being held. It applies force
instead of setting the object's position to allow it to be tossed. Before finishing the stylus grab
mechanic, we agreed to scale the world down by a factor of ten such that one Unity unit would
now be equal to ten centimeters. This was decided because Unity’s physics engine loses
precision at small scales, and objects have a tendency to pass through other objects or not
register collisions. After finishing the stylus grab system, the stylus data was abstracted into

42
another game object so that it could be accessed easily from other places in the game.
Once the drag feature was in place, the next game mechanic to be implemented was the ability to
fire weapons. To begin, this was first created as a separate script to be attached to the zSpace Inc.
stylus controller, listening for the fire button and instantiating a given projectile object. Through
the course of the sprint, due to the creation of a player controller, which will be described later,
and decisions on the control system, this was decided to be an ineffective method of
implementation. The drag feature was implemented via the custom stylus controller described in
the last paragraph , and the current fire weapons script would have to be heavily modified to
attach to the custom stylus object. This implementation would also require four separate scripts
to represent each of the four weapon choices. The script was instead transferred into the player
controller as a function designed specifically to fire laser projectiles, with place-holders for each
of the other weapons.
With the ability to fire a laser in place, the laser object and behavior was created. The behavior
script defined the damage that would be done by the laser on contact, and what it could target.
The script also destroyed the laser if it did not make contact within four seconds. This script was
attached to the laser model created by our artist. This object was given a Rigidbody, Unity’s way
to define a physical object. The projectile’s velocity, cool down in between shots, and number of
shots to be fired in a spread were defined in the fire laser function described above. To define
speed and direction, data was taken from the custom stylus and given to the Rigidbody. This was
later found to have too many bugs, and was refactored, as described in Sprint Two.

43
Once the main game mechanics were completed, the player controller object was created.
Initially, it was simply a container object that contained various stats such as health, money, and
laser speed upgrade level. This object would later control everything that the player would do.
In a video game, the HUD is used to portray information to the player, such as their health and
score. We needed a means to show the status of Earth, the hull of the battlement, and how much
money the player had acquired. Before starting on the HUD, a means to find the “zero parallax
plane,” the point on the screen where the left eye image is the same as the right one, was needed.
After a bit of research, it was found that zSpace Inc. had a script which did just that. The HUD
base object, which always sits at the zero parallax plane, was then created. Due to how it was set
up, 3D HUD elements could easily be made by offsetting them from the plane.
A method to display how much money the player had was needed. It turned out that Unity had a
built in object called a text mesh which was essentially free floating 3D text. By adding a text
mesh to the plane, 3D text was easily able to be shown on the screen. The text mesh on the HUD
had a script attached to it which simply found the player object and retrieved the money value
from it. Work on the health bar for Earth began next. Rather than a numerical display, we agreed
on a horizontal bar display. Originally, it was going to be a plane that changed its size based on
the current health. This proved difficult due to how the zero parallax plane scales to fit the
screen. In the end, a custom shader was made which hid a fraction of the health bar based on the
current health of earth. It worked properly no matter what the scale. The player’s ship health bar
used the same technique.

44
As the player controller and HUD were being created on one side of development, the objects
required for the first level were being created and defined on the other side. The layout was the
first step in this process. To begin, the skybox was implemented into the scene. Once this was
completed, the Earth and Moon were then entered in, properly scaled and placed. The Earth also
required a behavior script, which defined its health, and destroyed it if its health dropped below
zero. After the layout of the scene was finished, the construction of asteroids began.
Asteroids were the most complex non-player object to be created up to this point, and were to be
the basis for all other enemies that would be implemented. To begin, they were given a general
damage controller script. This script would be attached to every enemy in the game, and defined
the health of the object, and destroyed it when its health dropped to or below zero. A specific
asteroid behavior script was also attached to each asteroid model. This was used to define
damage that the object would do on contact with specific targets. It was decided that the asteroids
would do significantly more damage to the player and Earth than to other enemies, as the former
player and Earth two have significantly more health than regular enemies.
Once the asteroid objects were completed, there needed to be a way to insert them into the scene.
For this, an asteroid spawner was implemented. The spawners we designed are invisible objects
that instantiate particular enemies aiming at a given target at partially random intervals for a set
amount of time. It takes in minimum and maximum interval values, start and end times, and a
target. Once the level hits the given start time, the spawner will recursively randomly choose a
time between the given minimum and maximum, and instantiate an object at that time. For the
asteroid spawner, the asteroid is given a speed in the general direction of either the Earth or

45
player, defined by the given target.
With all of the objects necessary for the first level completed, work then began on creating the
format to be used to run each level. This was implemented by way of a ‘level loader’ object and
script, with accompanying text files. The text files were formatted in a way designed to pass the
necessary information to the loader. The first line contains only a number, which defines the
length of time the player needs to survive to pass the level. This it gives to the player controller.
The second line contains the name of the next level file. Every line after contains comma
separated values that define a spawner for the loader to instantiate. The first field in the line is
always the type of spawner. The next three are the desired x, y, and z coordinates for the
spawner. The two following that are the minimum and maximum interval times, with the start
and end times after that. The final field is the target. The level loader iterates through each line,
instantiating the correct spawner at the desired location with the given variables. The full first
level script is shown in the figure below.
Code Example 4. level1.txt
163.0 level2.txt asteroidSpawner,90,0,200,5,7,3,145,Player asteroidSpawner,120,0,100,5,7,3,145,Earth asteroidSpawner,70,0,200,3.5,5,21,56,Player asteroidSpawner,80,20,200,3.5,5,21,56,Player asteroidSpawner,120,-20,110,5,6,64,100,Earth asteroidSpawner,120,0,120,5,6,64,100,Earth asteroidSpawner,120,20,110,5,6,109,145,Earth asteroidSpawner,80,-20,200,5,6,109,145,Player asteroidSpawner,120,-10,90,5,6,123,145,Earth asteroidSpawner,100,10,200,5,6,123,145,Player

46
4.2 Sprint Two 1/21/13 – 1/25/13
4.2.1 Art
The first assets that were made in week two were very low-poly versions of the asteroids to be
used as mesh colliders. A mesh collider is an approximation for the collision of an object that
Unity uses. It was easier to make the colliders this way since the asteroids themselves are rather
detailed. Making a mesh collider out of the ZBrush models would have too much detail and
would simply not work in Unity.
Once those were made, the projectiles were constructed. The lasers had already been modeled in
Maya the previous week, so what remained to make were the black holes, bouncing bombs, and
homing missiles. The black hole projectiles would largely depend on Unity effects, so a simple
black ball was made in Maya for that. The homing missile was also created in Maya, with a
simple shape in mind, yet detailed enough to give an impression of a flying weapon. It had fins,
and was smooth and gray, except at the tail, the end of it that the player would see the most. The
tail was made to end at a point, and have red and yellow coloring, such that looking at the tail
directly would look like a gray, red, and yellow target. This would help players tell what kind of
projectile they had fired. The bouncing bomb was modeled in ZBrush, as it would have more
detail than the other projectiles. At first it followed the same simplicity that the other projectiles
had, but it did not work as well with the bouncing bomb since it is spherical, has no special
lighting effects, and will be on screen a little longer than other weapons. This weapon was
changed from an orange and purple ball into a spiked metallic orange ball with a dividing line
down its middle. This design worked much better than the simpler one for this weapon.

47
After finishing the projectiles, all the art assets for levels one and two were ready. The next goal
was to make all of the assets for the in-game menus. Photoshop was solely used for developing
these.
The first menu made was the main title screen. The in-game menus needed to have a uniform
look and feel, so the main title screen was the best place to start as it would give players the first
impression of the game. Right away it became apparent that each asset in any given menu
needed to be in a separate file, since the menus would be best made in 3D. The goal of this game
is to demonstrate the zSpace system, so it would have been detrimental to ignore the ability to
have 3D text and layers in the menus.
A HUD element was created in week 1 so that the health bars and icons for Earth, but this was
never used, so it was adapted for extensive use as a menu window indicator. The title of any
given menu in the game would appear on this bar. To go with this bar, a font for the game was
created to match the game’s futuristic and space shooting style. This font style was used for all
the menu text. A background gradient was then created to match the window element and the
text, and icons were made for every weapons and upgradeable for the game’s shop menu system.
All menus for the game were created using the same style, to unify them and tie them to the
game.
Once all the menu assets were finished, a screen damage graphic was made. It is an image that
looks like cracked glass, divided into four panes: one space for nothing showing no damage and

48
three spaces for progressively worse damage and a more spread out glass crack.
After that it was time to leave Photoshop and go back to modeling work. During testing, it
became apparent that using a Unity skybox was not working well with the game. Unity skyboxes
did not play nice with zSpace’s stereo 3D and looked wrong. While every object in the game
moved with the head tracking, the skybox remained stationary in the background, and this looked
very strange and out of place. So, a cube was constructed in Maya to place the skybox textures
on the inside of, and this cube was placed in the Unity project in place of the built-in skybox, and
the cube looked and felt much better and more natural in the game.
It became apparent during testing that while the player could visibly tell via the screen crack
effect if they are taking damage, there was no visible way to tell if Earth was taking damage
aside from the health bar. So, more textured versions of Earth were made, which consisted of
three progressively worse looking versions of Earth. Photoshop was revisited for this as it was
much quicker to directly make new texture maps based off of the old one rather than repaint the
Earth in ZBrush and export the different texture maps each time.
The last thing to be accomplished on the second week was modeling the Elite ship in ZBrush. A
distinctive circular structure and sleek and powerful appearance set the Elite ship apart, letting
players know that they are dealing with a higher class and higher damaging ship.

49
4.2.2 Technical
One of the first tasks done in week two was to complete the HUD. Instead of simply displaying
information on screen, we decided to make it appear to be a window on the spaceship. To add to
this, a window model was created which was placed on the display plane. To add more detail to
this window, the cracked glass texture was used. This image was then overlaid on the display
plane at different offsets based on the current player health. At low health, there is a very large
crack on screen. When play testing, the HUD appears as part of the game world, creating greater
immersion.
With all of the objects and formatting in place from the first sprint, the first playable demo of the
first level was created early in this iteration, and modified multiple times through the week. In
creating the levels, it was discovered that defending the Earth from attacks was significantly
more difficult than defending the player, and as such enemy focus on the player was increased to
match. The first level was repeatedly toned down in difficulty until it was to a point where it was
felt that any new player would be able to pass.
Shortly after the first playable of level one was made, it was decided that it would be appropriate
to implement the reward system for the player on destruction of enemies. As this was a trait that
all enemies would share, it was intuitive to implement this into the damage controller. Upon
death by loss of health (as opposed to dying upon hitting the player or Earth), the enemy object
would increment the player’s money by whatever reward value it was given. This would be
defined by the enemy type’s behavior script.
50
The laser projectile behavior needed to be refactored. Previously, the laser was a physics object
and could be grabbed by the tractor beam. Also, if the laser went too fast, it would sometimes
pass through objects without hitting and damaging them. To remedy this, their physics system
was completely reworked. Instead of creating the laser and applying force to it, it moves with
custom physics. Each physics update, the projectile does a spherecast from where it is to where it
will be on the next update. A spherecast is similar to a raycast, except that the ray has a width so
it can’t pass through things such as a tiny hole. It was a perfect technique for the laser. If the
spherecast hits something, the laser projectile is moved to the hit position and the code that
damaged things remained unchanged from before. Also, lasers could now go as fast as needed
and they never missed a collision.
Homing missiles were decided to be one of the player’s weapons. The basic idea was that the
missiles would seek out a target and steer towards it until they exploded or hit their target. The
homing technique consisted of applying a force in the direction of the target. Balancing how it
homed in on targets proved very difficult. If it simply forced itself towards targets, it usually
ended up orbiting around them without hitting them. Speed dampening was then factored into
their movement behavior. Speed dampening is where in each physics update the missile’s
velocity is multiplied by a number very close to one, such as 0.91. With too small a dampening
value, the missiles got too smart and never missed. In the end, a smaller amount of dampening
that decreased as the player’s missile homing level increased was picked. The homing behavior
was then modified such that if the player is aiming at an object when they shoot the missile, it
homes in on that object. If a missile does not have a target, it chooses the one closest to it.

51
The strongest player weapon is the black hole launcher. The basic idea behind this weapon would
be that it sucks in all nearby enemies, and if upgraded, projectiles as well. Appearance for this
projectile required programming more than modeling, as a simple black sphere would be difficult
to see and unexciting to look at. A custom shader proved to be the answer. It created a glowing
ring around the black hole that also refracts the objects behind it. Once its appearance was
satisfactory, work began on its functionality. The black hole works by finding all objects in a
radius around it. If an object is within its radius, a force is applied on that object towards the
center of the black hole. An object that touches the center part takes massive damage. Initially,
objects had a tendency to get shot around the black hole and in some cases, smash into Earth at
high speed, destroying it. The gravity behavior was then refactored. Instead of only pulling in
objects near it, if an object comes within the black hole’s radius, it is added to a list of objects to
pull in. Once on that list, force is applied no matter what, which fixed the slingshot effect and
made it better to use.
Also created in this sprint was the bouncing bomb weapon, later renamed the inertia sphere. A
Rigidbody and a behavior script were attached to the model, while the player controller was
modified to be able to fire these projectiles. The player controller’s fire method was responsible
for setting the cool down time and velocity of the bomb, while passing the homing range,
number of bounces, and explosion range into the behavior script. The behavior then used these to
define the bomb’s behavior and damage. It was decided that the main challenge of the bomb
would be to hit the initial shot, and that each subsequent bounce would automatically home in on
a new target, and always hit. Each bounce does a certain amount of physics damage based on the
relative velocity of the two objects. After a bounce, it finds a new target in range, and tracks it at

52
a fixed rate. Once the bomb is out of bounces, it detonates, doing double the physics damage to
anything within radius. If there is no target in range, it flies in a random direction for two
seconds and detonates.
With all of the weapons now defined, it was sensible to look ahead to the second level. For the
second level, the Scout enemy ship needed to be defined, along with all it required to work. After
giving it health and the ability to die and reward the player, the first goal in the development of
the Scout was to get it to correctly focus on and fire at its given target. To begin with this
objective, the Scout’s laser projectile was created, and attached to it was a Rigidbody and
behavior script. This script defines how much damage each shot does, along with what it can do
damage to. Once this object was completed, the next goal was to get the Scout to shoot it. For
this, the ship’s behavior script calls a fire function randomly between two and three seconds. This
function locates the Scout’s target, and, given that it is within range, instantiates a new laser
projectile at a fixed speed in that direction. The code for this is shown below. The Scout’s shot is
very accurate.

53
Code Example 5. Scout Fire Behavior
void Fire () { if (target != null) { float r = (float)Random.Range (2f, 3f); if ((target.transform.position - transform.position).magnitude < range) {
Vector3 spawnLocation = transform.position; if (target.tag == "Player") spawnLocation.z -= 4f; else spawnLocation.x -= 4f; GameObject shot = (GameObject)Instantiate (laser,
spawnLocation, Quaternion.identity); shot.transform.LookAt (target.transform); shot.transform.Rotate (new Vector3 (90, 0, 0)); shot.rigidbody.velocity = 70f * (target.transform.position – shot.transform.position).normalized; } Invoke ("Fire", r); } }
After the firing mechanism was completed, it was necessary to make the Scout give out physics
damage on collision with other objects in order to hold up the tractor beam functionality. The
Scout gives out significantly less damage than the asteroid, as this is not its primary form of
attack. It also dies upon collision with the Earth or player.
Once all the basics of the Scout were finished, the challenge of getting it to fly began. The first
approach to this was largely unsuccessful. In this method, Scouts would lock in on their target,
and fly towards it. This made the enemies appear to be unintelligent, and trying to get them to fly
away from their target once having gotten too close was very difficult to get working without

54
them flying out of the visible area. This approach was scrapped, and the idea of “flight centers”
instead of targets was implemented. In this way, two flight center objects are defined in the
layout of the level. These are two invisible points, one roughly near the Earth, the other by the
player. Upon initializing, a Scout chooses one of these based upon its given target, and picks a
random point within a ten unit sphere as its flight target. It flies straight at this point until it is
within ten units. From then on, the scout randomly flies between ten and twenty five units of its
specified flight target. These ranges give the Scouts enough room where it is highly unlikely that
any two will collide in space, while making it appear as though they are intelligently
maneuvering within range of their target. The initial flight towards the flight target is specified as
a velocity defined in the Rigidbody. All flying following that worked as forces being added to the
Rigidbody, so that they would correctly work with the tractor beam. The code for the Scout's
flight is shown in the figure below.

55
Code Example 6. Scout Flight Behavior
void FixedUpdate () { if (target != null) { float min = 10; float max = 25; dist = (targetPos - transform.position).magnitude; if (!tooClose) { // rotate towards target transform.rotation = Quaternion.Slerp (transform.rotation, Quaternion.LookRotation (targetPos - transform.position) * Quaternion.Euler (0, 180, 0), .025f); if (tooFar) { // move towards flight center if (rigidbody.velocity.magnitude < 25f) rigidbody.AddForce (transform.forward * -180f); rigidbody.velocity *= .95f; } else { // move around flight center rigidbody.AddForce (transform.forward * -160f); rigidbody.velocity *= .95f; } if (dist <= min) { tooClose = true; tooFar = false; randomRot = Random.rotation; } } else { // rotate towards target transform.rotation = Quaternion.Slerp (transform.rotation, randomRot, .01f); // move towards target rigidbody.AddForce (transform.forward * -160f); rigidbody.velocity *= .95f; if (dist >= max) tooClose = false; } } }

56
With the Scout object completed, focus then turned to its spawner. The spawner for the Scout
ended up being significantly simpler than the one for the asteroids. Both took the five same
arguments, but the Scout spawner did not have to fire its objects. All it had to upon instantiation
was to give the Scout its target. During this iteration, it was also decided that spawn points
should be partially randomized. This was done in the same way that the Scout chose its flight
target, within a ten unit sphere of the spawner. This added to the difficulty, and the look and feel
of the gameplay.
The pause menu was a required element to the game. Most games have a means to quickly pause
and resume in case the player needs to take a break. Pausing the action in a Unity game is
relatively easy. There is a built in variable called timescale which controls the speed of the
physics engine and fixed updates. Setting timescale to zero pauses all game elements, but still
runs normal update scripts, which is perfect for menu interaction. Pausing was implemented by
having the player controller check if the ‘P’ key was pressed and setting timescale to zero and
creating the pause menu if it was.
When creating the pause feature, we agreed that a generalized menu system was needed.
Initially, events and delegates were used, but due to how they worked in Unity with zSpace, the
end result would have been a cluttered mess of scripts. A cleaner way to do it was to create a
single, centralized menu handler object which checks for button presses. A button is simply a
Unity game object with a tag of ‘button’ and a unique name. The menu handler object does a
raytrace from the stylus similar to the stylus grab object. If the raytrace hits an object tagged as a
button and the user presses the big button, the button object’s name is passed to the button click

57
handler. The click handler simply does a different action depending on the button name passed to
it.
Code Example 7. Click Handler
public void onButton (string s){ switch (s) { case "pauseResume": Time.timeScale = 1f; //destroy the pause menu Destroy (GameObject.FindGameObjectWithTag ("pauseMenu")); break;
In the above code, if 'pauseResume' is passed, timescale is set to one and the pause menu is
destroyed. The button system is also able to be expanded for any other menu system.
After the menu system’s functionality was established, work on the pause menu functionality
began. When the game is paused, the pause menu is created on the display plane. The pause
menu consists of three buttons; resume, quit, and restart wave. The resume button simply
destroys the menu and sets the timescale back to one. The quit button exits the game. Finally, the
restart wave button restarts the current level.
The level loader previously used a text asset object for handling the external level file. For
whatever reason, text assets cannot dynamically open text files, which was a critical feature
needed for the game. The level loader was refactored to use a streamreader object which is
capable of dynamically opening files. The level loader was then refactored to have a specialized

58
load function which first cleans up the scene by destroying all enemies and projectiles, and then
takes a given level file and runs it. The restart wave feature of the pause menu simply reloads the
current level and resets the player’s money to what it was at the start of the level.
Production of the second level began next, having all the objects necessary available. With the
format already in place, the first playable for this level was finished quickly. It took much of the
iteration to correctly tune it for difficulty, however. In creation of level two, it was realized that
there was a severe lack of balance between the four weapons, and it was decided that this was an
important enough issue to need to be addressed immediately.
The first weapon to be balanced was the black hole, which was ultimately too powerful. This had
its cooldown time almost tripled, and its attraction range mildly shrunk. The homing missile also
had turned out to be too strong a weapon. To combat this, the cooldown was increased by more
than half, while accuracy and lifetime were greatly reduced. On the opposite end, the bouncing
bomb was nearly useless against the fast flying ships of level two. To help with this, the speed of
the projectile was increased, thus making it easier to target an enemy. The only weapon left
untouched was the laser.
4.3 Sprint Three 1/28/13 – 2/1/13
4.3.1 Art
This week started off with creating projectiles specific to the enemy ships. While the Scout had a
different colored laser, the Brute, Elite, and Mothership would all have weapons parallel to the
player’s own weapons, excluding the black hole. The Brute ship fires a spiky, more threatening

59
version of the inertia sphere and the Elite ship fires a homing missile that is designed to match
that ship’s characteristics. The enemy projectiles were redesigned to suit the more dangerous
appearance of the enemy ships. In addition, the Mothership was given projectiles similar to those
of the Brutes and Elites but redesigned to look darker and more painful than the basic enemy
ships’. Once these projectiles were finished, low-poly mesh colliders were made and exported to
use as a better mesh collider for them than Unity could provide.
After the projectiles were done, the Brute ship was created. The Brute ship needed to be bulky,
slow, and a heavy hitter. So it was given large arm-like attachments and a long scorpion-like tail
reaching over its head and arms. It had excessive size in its design to convey its character. It was
then painted with earthy colors; greens, yellows, and browns, with a touch of red for contrast.
This natural color scheme reflects its more brutal nature. Once the Brute ship was finished, a
mesh collider was made in the same way as the ones for the projectiles.
Towards the end of the week some more art assets were added for menu graphics as the menu
system was nearing completion. These included text and buttons.
4.3.2 Technical
A large portion of this sprint was invested in the creation of various in-game menus. Menus are
used in game and pause combat to allow the player to make choices. Luckily, a generalized menu
system was created in the previous sprint, so adding new menus was a relatively simple task.
The first menu to be added this sprint was the weapon select menu. At the beginning of each

60
wave, the player is able to choose their left and right weapons. For this game, it was imperative
that a player be able to navigate menus with only the stylus. Following the technique used on the
pause menu, a functional weapon select menu was created.
Figure 10. Weapon Select (First Version)

61
There are two four-button columns, one on each side of the menu for left and right weapons.
Each button is an icon for the weapon it represents. Clicking on a weapon button puts a green
highlight over it and a red X over that same weapon on the opposite side. The X shows that the
same weapon cannot be put on both the left and right side. The red X is also solid in game so it
physically blocks the button raycast which saved the trouble of programmatically checking for
doubles. In the center of the menu, there is the weapon title as well as rotating models of the
weapon projectile. While working on the weapon select menu, it was decided that to be clearer to
the player, any menu item that can be clicked on should have a common appearance to prevent
confusion. A white rounded rectangle texture was made for this purpose and can be seen behind
every button. Finally, the ‘Start’ button destroys the menu and begins the level.
After the weapon select menu was finished, work on the most complex menu system, the
upgrade shop, began. When a level is cleared, the player can spend money earned during the
wave to upgrade the various weapons.
62
Figure 11. Initial Upgrade Menu
The shop menu was designed with a tab-based interface in mind. Clicking on one of the buttons
at the top changes the middle menu to that of the selected item. The selected item to be upgraded
also has a green glow around it for clarity of what item will be upgraded. Clicking on a plus
button subtracts the corresponding amount of money from the player’s total money and adds one

63
upgrade level to the corresponding attribute. Clicking on a minus button does the opposite of the
plus button. It adds to player money while subtracting from the attribute level. The current
upgrade level for an attribute is shown by number of filled in circles. Each attribute has five
levels (zero to four). The circles are actually drawn using a pixel shader similar to the health bars
on the HUD. The shader clips the pixels based on the current upgrade level. The means that the
circles get their value to display is worth mentioning. Rather than make a script for each
individual circle display, a single script was made which takes a string which is assigned in the
unity editor.
Code Example 8. Reflection
float lvl = (float) player.GetType ().GetField (varName).GetValue (player); gameObject.renderer.material.SetFloat ("_Clip", lvl);
Using C# reflection, the ability to retrieve a variable based on a string, this string is then used to
grab the correct value from the player controller. With this value, the shader then uses this value
to perform its clipping. Reflection is also used for the plus and minus buttons. Rather than create
40 scripts, each button is assigned a variable name and a cost value from within the Unity editor.
When a plus or minus button is clicked, the menu handler object checks if the player has the
money and then performs the upgrade. After the shop menu was finished, the pause menu was
refactored to use the button texture on its buttons to maintain consistency.
During this sprint, the official names for the player’s weapons were decided upon. The laser is
now referred to as the destructor beam, the homing missile changed to the space torpedo, the

64
bouncing bomb to the inertia sphere, and the black hole bomb to the singularity cannon. These
changes were only implemented in interface, not within the code, as this would have taken major
and unnecessary refactoring.
As the shop menu was being created, the functionality for the battlement upgrades was also
being implemented. The majority of the code for this was created in the player controller script.
At the start of each level, when the player controller is initialized, the maximum health, health
regeneration, and damage resistance are set based upon the given upgrade levels. Health is
regenerated in very small amounts in every fixed update. Damage resistance is applied by each
opponent whenever they are lowering the player’s health. The money multiplier is implemented
in the damage controller script, affecting the award given to the player upon the enemies’ death.
While the menus were being created on one end, the behaviors for the final two basic enemies
were being created on the other. The Brute, being the next enemy up from the Scout, was created
first. It was decided at this point that the Brute would fire slow moving bombs, and Elites would
fire evasive, mildly intelligent homing missiles. The flight behaviors for both are only mildly
adapted versions of the Scout’s, with the numbers for force and speed lowered in the case of the
Brute, and raised for the Elite. Both ships also deal physical damage on collision in the same way
that the Scout does. All three spawners are also identical in function.
To implement the Brute’s bomb, a fair amount of code was recycled from the inertia sphere. The
way that Brute bombs are aimed and fired is the same, along with the definition for detonation.
Obviously, the code for bouncing was left out. On collision, the Brute bomb, like the inertia

65
sphere, does physics based damage to the object it collides with, and then detonates, doing
double damage to all targets within a fifteen unit sphere. If it does not collide with any object
within seven seconds, it detonates. The Brute fires this projectile randomly between every four
and five seconds at a speed of thirty units per second.
The Elite’s missile runs on a more complex functionality loosely based on the flight behaviors of
the space torpedoes (homing missile) and enemy ships. It locates its target’s position in every
update, and applies force in that direction. To implement the elusiveness, a small force is also
applied to a random side of the missile. This random direction is set every 1.35 seconds. This
causes the missile to move in a random pattern towards its target, making it difficult to target.
The force for elusiveness is no longer applied once the missile is within 22.5 units of its target, as
this was occasionally making it fly out of the player’s field of vision. The code for this can be
seen in the figure below. Like the Brute bomb, the Elite missile also detonates on contact, but
rather than physics based damage, the missile always deals six units of damage to all targets in a
ten unit radius. If the missile does not make contact within nine seconds, it detonates.

66
Code Example 9. Elite Missile Flight Behavior
void setRandMove ()
{
if (target.tag == "earf") // don’t apply force towards or away
from the target
randMove = new Vector3 (0, Random.Range (-3, 3), Random.Range (-
3, 3)).normalized;
else
randMove = new Vector3 (Random.Range (-3, 3), Random.Range (-3,
3), 0).normalized;
Invoke ("setRandMove", 1.35f);
}
void FixedUpdate ()
{
rigidbody.AddForce (110f * tdir);
// if far enough away, employ evasive maneuvers
if ((tpos - transform.position).magnitude > 22.5)
rigidbody.AddForce (45f * randMove);
rigidbody.velocity *= .96f;
transform.rotation = Quaternion.Slerp (transform.rotation,
Quaternion.LookRotation (tpos - transform.position) *
Quaternion.Euler (0, 180, 0), .05f);
}
Once all of the basic ships were completed, it was decided that part of the flight behavior had to
be refactored. Previously, when a ship was first initialized, it would fly towards it flight target
with a constantly assigned velocity, rather than a constantly added force. This made grabbing

67
ships at this point awkward, and throwing them became impossible. This was changed so that a
constant force was added instead.
With the Brutes and Elites completed, levels three and four could now be created. Before this
could be done, though, it was discussed and decided that the first two levels were too short to be
effective in either learning or enjoying the game. Each level was doubled in length, with only a
small increase in the number of enemies. In lengthening the level, it also made it possible to now
have the enemies come in waves. The first wave focuses on the player, the second on Earth, and
the last on both. Considering defending the player is easiest, this helps the player to get used to
the new enemies before having to struggle in defending Earth. All four levels ended up being
between one hundred and sixty and one hundred and seventy seconds long.
Level three introduces the Brute, and level four the Elite. They are created in the same format as
the other two, with three waves targeting first the player, then the Earth, and finally both. To keep
up with weapon and hull upgrades on the part of the player, each level has more enemies, each
more difficult than the last.
With the weapon selection and shop menus completed, and the first four levels in place, it was
now sensible to work on level transition. To do this, new functions were added to the player
controller, level loader, and button handler to create a mid-level flow. The functions in this flow
are shown in the figure below. Once a level is completed, the player controller calls an end level
function that passes on the correct level file to the level loader, while reinitializing the player and
Earth. It ends by calling load level in the level loader. From here, the level loader sets the time

68
scale to zero, creates the shop menu, and proceeds to load in the level file. The Continue button
on the upgrade menu destroys the shop menu, and creates the weapon selection menu, where the
level then continues as it did previously. The final level text file tells the level loader that it is the
last file by loading ‘end’ into its next file line. When the level loader receives this, it currently
only displays that the player has beat the game, but this will eventually be updated.

69
Code Example 10. playerController.EndLevel(), buttonHandler case “shopContinue”
// playerController
void EndLevel ()
{
EmptyText ();
init ();
GameObject.FindGameObjectWithTag ("earf").
GetComponent<EarthBehavior> ().health = 100f;
LevelLoader lev = GameObject.Find("LevelLoader").
GetComponent<LevelLoader> ();
lev.upgradeMenu = upgradeMenu;
lev.levelFile = lev.nextFile.Trim ();
lev.loadLevel (lev.levelFile);
}
// buttonHandler
case "shopContinue":
//destroy the shop menu and start the next level
Destroy (GameObject.FindGameObjectWithTag ("shopMenu"));
destroySubMenus ();
Time.timeScale = 1f;
player.init ();
GameObject.Find ("LevelLoader").GetComponent<LevelLoader> ().
createWeaponMenu ();
break;
In the first attempt at level transition, the upgrade menu was initialized by the player controller,
and the button handler called the load level function. This was deemed to be insufficient though,
as the upgrade menu was then not accessible upon level restart or failure. By moving the creation
of the shop into the beginning of each level, it would always be accessible through restart or
70
failure, and the player would not have to be worried about being stuck in a situation where
incorrect upgrades choices prevented them from passing a level.
4.4 Sprint Four 2/4/13 – 2/8/13
4.4.1 Art
In week 4 of the project the Mothership was created, as seen in Figure 12 below. The Mothership
needed to be large and take up most of the screen, plus it needed places on the model to spawn
enemy ships and weapons. As the final boss of the game, it needed to look powerful, menacing,
and nasty.
Figure 12. The Mothership

71
After the Mothership model was created, a mesh collider was made for it using a similar
procedure to the previous enemy ship models. However, the Mothership was so large that its
collider had to be divided up into smaller pieces in Maya, and these pieces were assembled
together in Unity to create the Mothership's collision mesh.
4.4.2 Technical
One of the most difficult features implemented in Sprint Four was Hydrospace’s final boss, the
Mothership. In flight, the code is almost identical to that of the smaller ships, except that the
Mothership will at times switch from one flight center to the other. The flight centers are also
uniquely defined for the boss. It was decided that the final battle should be fought in stages, with
the Mothership changing behaviors based upon health loss. For a full description of the level,
look into the Level Summary, Section 3.6. Programmatically, this was done through a stage
incrementer and switch statement, which can be seen in Code Example 11 below.

72
Code Example 11. Mothership.Update () & Mothership.EnterStage ()
// void Update ()
curHealth = self.health / maxHealth;
if (curHealth <= .85 && stage < 2) {
stage = 2;
EnterStage ();
} else if (curHealth <= .75 && stage < 3) {
stage = 3;
EnterStage ();
} else if (curHealth <= .65 && stage < 5) {
stage = 5;
EnterStage ();
} else ...
// void EnterStage ()
switch (stage) {
case 1: // light weapon barrage on player
fireWeapons = true;
fireRate = 3.5f;
fireTarget = player;
FireBomb ();
FireMissile ();
break;
case 2: // light spawn wave on player
fireWeapons = false;
spawnTarget = "Player";
min = 7;
max = 11;
InitScoutSpawner ();
Invoke ("InitBruteSpawner", 1.5f);
Invoke ("InitEliteSpawner", 3f);
break;
...

73
One of the biggest issues with the Mothership early on was hit detection. Because the model is so
detailed and large, when we used a single mesh collider, projectiles were going through its wings
without collision, while exploding on the empty space above them. To correct this, we decided
that multiple meshes would have to be constructed for each unique part of the ship. This at first
was also problematic, however, as Unity only allows one mesh collider per object. To deal with
this, several empty game objects were creating and put as children to the Mothership, each one
holding a mesh collider. Fortunately, Unity detects these colliders as those of the Mothership, so
it is as if it is all one complete mesh.
During this sprint, zSpace Inc. requested that we provide a three to five minute demo of our
game to be displayed on the college tour our company was doing. Considering each level takes
roughly three minutes to play, it made sense to just use a version of one of these. We decided that
it would be best to use the fourth level, given that it displayed all four of the basic enemies. We
designed a simple set of instruction slides to help the player to get started, and the spawn rate
was lowered to make the level easier to play. The player also started with all upgrades at level
three.
After a few play-throughs by a handful people in the office, we determined that the game was
going to be too difficult for the playtesting that was to be held the following week. To lower the
difficulty, the fire rate of the Elites and Brutes were reduced, and the spawn rate was lowered on
the third and fourth levels.
We decided early on that there should be visual effects for when various events happen, such as

74
homing missile explosions. The first effect to be created was an explosion. The explosion effect
is actually an object that is instantiated wherever an explosion is desired. It was decided that the
explosion would be created using a complex vertex and pixel shader. The actual 3D model of the
explosion is a simple sphere that was made in Maya. This sphere had a high level of tessellation,
a large number of triangles, in order to produce a higher quality effect. Using a combination of a
noise texture, a texture that appears to be random dots of grey, and a vertex shader, the sphere is
deformed according to the noise texture. The deformation factor is controlled via a C# script
attached to the explosion object. A pixel shader controls the color of the explosion. The color of a
given pixel is based on its distance from the center of the explosion. The color is picked from a
gradient with several colors defined in it. The color ranges from bright blue at the center to dark
red at the edge. The pixel shader also makes the sphere additive so that it appears to glow. In
addition to the sphere, a particle emitter was attached to the effect to enhance its appearance.
After the explosion was completed, work on impact effects began. Previously, when the player’s
laser weapon hit something, the laser projectile simply disappeared, which looked awkward in
game. It was agreed upon that an effect was needed for this. Now, when the laser hits something,
right before the laser projectile is destroyed, a ray is traced from the projectile in the projectile’s
direction and a glowing red circle is created where this ray hits. The circle then expands and
fades out over a short period of time.
4.5 Sprint Five 2/11/13 – 2/15/13
4.5.1 Art
After playtesting, we decided that the font for our game was too blocky and hard to read, and that

75
a new font for the game was needed. The first half of the week was focused on changing every
text menu asset over to the new font, as well as adding new menu assets as the user interface (UI)
was being redesigned. For comparison, our old weapon menu is shown in Figure 13, and the new
system in Figure 14.
Figure 13. Original Weapon Menu

76
Figure 14. New Weapon Menu
Once all the new menu assets were in place, the next thing to do was sound. Since we didn’t have
any sound creation software at work, we were limited to downloading sounds off of
freesound.org, a database of Creative Commons licensed sounds, and putting those sounds into
the game. Sounds obtained for the game include explosions, enemy engines, Mothership noises,
and many more.
4.5.2 Technical
In order to prepare for the playtesting for this week, a metric tracking system needed to be
implemented. In order to help us get as much as we could out of the playtesting, the metric
tracking system recorded the success or failure of each play of level, along with tracking how
much health was lost for both the player and Earth, how much money was gained, how much
time elapsed, and what upgrades were purchased. These were all saved to a file inside the data
folder in the parent directory of the application.

77
In order to make Hydrospace feel more like a ship quality game, we decided that it would be
proper to include summaries of how the player did at the end of each level, and at the end of the
game. The end of level summaries included how many of each enemy they killed, how much
health they and the Earth lost, and how much money they gained. The end of game summary has
this information for the entirety of the game, and also shows how many shots the player fired.
During playtesting, we learned very quickly that Hydrospace was much too difficult, with only
two people passing the second level. To combat this, we decided to implement dynamic
difficulty. Dynamic difficulty is the feature in which a game adjusts to a player’s skill level. For
this game, the difficulty adjusts whenever a player passes or fails a level. Considering that we
have two different ‘characters’ for the player to defend in themselves and Earth, and different
players had more difficulty defending one than the other, it was decided that the difficulty would
adjust differently for each target. For example, if a player failed a level because the Earth’s
health hit zero, it would become easier to defend Earth, but not the player. The function for
lowering the difficulty of the game is displayed in Code Example 12 below.

78
Code Example 12. playerController.LowerDifficulty ()
void LowerDifficulty ()
{
if (health <= 0) {
output.text = "Level Failed...\nYour Hull Was Destroyed!";
playerFails ++;
SetPlayerDifficulty ();
} else {
output.text = "Level Failed...\nEarth's Force Field was
Destroyed!";
earthFails ++;
SetEarthDifficulty ();
}
}
To make the game easier, the player or Earth can gain damage resistance, health regeneration,
money multipliers, the ability to retain some money on death, and a lower enemy spawn rate. To
increase difficulty, the spawn rate can raise, a damage multiplier can be added, and the money
multiplier can drop below one. To see the distribution of difficulty levels, reference Table 2
below.
Table 3. Dynamic Difficulty
Level Number (lower numbers are
more difficult)
Earth Difficulty Settings
Player Difficulty Settings
-8 Enemy Damage Multiplier: 2
Money Multiplier: .75 Spawn Modifier: -1.5 s
Enemy Damage Multiplier: 2 Money Multiplier: .75 Spawn Modifier: -1.5 s

79
-7 Enemy Damage Multiplier: 1.875
Money Multiplier: .75 Spawn Modifier: -1s
Enemy Damage Multiplier: 1.875 Money Multiplier: .75 Spawn Modifier: -1s
-6 Enemy Damage Multiplier: 1.75
Money Multiplier: .75 Spawn Modifier: -1s
Enemy Damage Multiplier: 1.75 Money Multiplier: .75 Spawn Modifier: -1s
-5 Enemy Damage Multiplier: 1.625
Money Multiplier: .875 Spawn Modifier: -1s
Enemy Damage Multiplier: 1.625 Money Multiplier: .875
Spawn Modifier: -1s
-4 Enemy Damage Multiplier: 1.5
Money Multiplier: .875 Spawn Modifier: -.5s
Enemy Damage Multiplier: 1.5 Money Multiplier: .875 Spawn Modifier: -.5s
-3 Enemy Damage Multiplier: 1.375
Money Multiplier: .875 Spawn Modifier: -.5s
Enemy Damage Multiplier: 1.375 Money Multiplier: .875 Spawn Modifier: -.5s
-2 Enemy Damage Multiplier: 1.25
Money Multiplier: 1 Spawn Modifier: -.5s
Enemy Damage Multiplier: 1.25 Money Multiplier: 1 Spawn Modifier: -.5s
-1 Enemy Damage Multiplier: 1.125
Money Multiplier: 1 Spawn Modifier: 0s
Enemy Damage Multiplier: 1.125 Money Multiplier: 1 Spawn Modifier: 0s
0
Health Regeneration: 0 Enemy Damage Multiplier: 1
Money Keep Rate: 0 Money Multiplier: 1 Spawn Modifier: 0s
Health Regeneration: 0 Enemy Damage Multiplier: 1
Money Keep Rate: 0 Money Multiplier: 1 Spawn Modifier: 0s
1
Health Regeneration: 0 Enemy Damage Multiplier: .875
Money Keep Rate: 0 Money Multiplier: 1 Spawn Modifier: 0
Health Regeneration: 0 Enemy Damage Multiplier: .875
Money Keep Rate: 0 Money Multiplier: 1 Spawn Modifier: 0s
2
Health Regeneration: 0 Enemy Damage Multiplier: .75
Money Keep Rate: 0 Money Multiplier: 1.25 Spawn Modifier: +.5s
Health Regeneration: 0 Enemy Damage Multiplier: .75
Money Keep Rate: 0 Money Multiplier: 1.25 Spawn Modifier: +.5s

80
3
Health Regeneration: .5/s Enemy Damage Multiplier: .75
Money Keep Rate: 10% Money Multiplier: 1.25 Spawn Modifier: +.5s
Health Regeneration: .25/s Enemy Damage Multiplier: .75
Money Keep Rate: 10% Money Multiplier: 1.25 Spawn Modifier: +.5s
4
Health Regeneration: .5/s Enemy Damage Multiplier: .625
Money Keep Rate: 10% Money Multiplier: 1.5 Spawn Modifier: +.5s
Health Regeneration: .25/s Enemy Damage Multiplier: .625
Money Keep Rate: 10% Money Multiplier: 1.5 Spawn Modifier: +.5s
5
Health Regeneration: 1/s Enemy Damage Multiplier: .625
Money Keep Rate: 10% Money Multiplier: 1.5 Spawn Modifier: +1s
Health Regeneration: .5/s Enemy Damage Multiplier: .625
Money Keep Rate: 10% Money Multiplier: 1.5 Spawn Modifier: +1s
6
Health Regeneration: 1.5/s Enemy Damage Multiplier: .625
Money Keep Rate: 20% Money Multiplier: 1.5 Spawn Modifier: +1s
Health Regeneration: .75/s Enemy Damage Multiplier: .625
Money Keep Rate: 20% Money Multiplier: 1.5 Spawn Modifier: +1s
7
Health Regeneration: 1.5/s Enemy Damage Multiplier: .5
Money Keep Rate: 20% Money Multiplier: 1.5 Spawn Modifier: +1s
Health Regeneration: .75/s Enemy Damage Multiplier: .5
Money Keep Rate: 20% Money Multiplier: 1.5 Spawn Modifier: +1s
8
Health Regeneration: 2/s Enemy Damage Multiplier: .5
Money Keep Rate: 20% Money Multiplier: 1.5 Spawn Modifier: +1s
Health Regeneration: 1/s Enemy Damage Multiplier: .5
Money Keep Rate: 20% Money Multiplier: 1.5 Spawn Modifier: +1s
As more effects were being designed, it was decided to abstract effects into their own object
rather than have them created from the player controller. This made code easier to read and
maintain. With explosions in their own object, it was much easier to create the explosion effect
on demand, such as when an enemy ship was destroyed. The laser impact effect was also moved
here for usage later on.
One of the biggest issues based on feedback so far was that players had trouble learning how to

81
play the game. It was decided that an interactive tutorial was needed. Rather than have the
tutorial take place in the main scene, it existed in its own separate scene. It was separated
because maintaining code and objects that would only exist for one specific part of the game
would have added unnecessary overhead. It also gave us precise control over how the tutorial
was structured. The tutorial consisted of around 20 different parts. Each part explained a concept
from the game and usually required player interaction to continue. For example, when the player
was taught how to grab and throw objects, the tutorial would not continue until the player
dragged a sphere through a hoop. The tutorial explained how to grab and throw objects, what the
various HUD elements represented, how to use the various player weapons, how to use the
weapon select and shop menus, and what the player’s objectives were. The tutorial was accessed
from the title screen.
Early on, it was decided that a title screen with a main menu would be needed for the game. The
title screen simply consisted of a single menu where that player could access the main game,
tutorial, or view the credits.
4.6 Playtesting
An integral part of the game development process is playtesting, where people who know
nothing about our game play it. We observe them and see what we did well or not so well in our
game, based on player reactions. Developers cannot test their own games because they know too
much about them. People who know nothing about our game need to be able to pick it up and
play it without our guidance. This is so that players will not be confused or frustrated and they
can simply enjoy our game and the zSpace.

82
4.6.1 Playtesting Session 1, February 13, 2013
For our first playtesting session, we had a group of five people play our game. These people were
fellow students at Worcester Polytechnic Institute who were in the Silicon Valley area working
on projects, but not on our own project. They were perfectly fit for playtesting, as they had no
prior experience with our game.
Before we had them play Hydrospace, we first introduced them to the zSpace system through a
program developed by zSpace, Inc. called The zSpace Experience. This is a demo that shows all
the functionality of the zSpace system, particularly grabbing objects and looking around the 3D
environment. We showed the playtesters this because we did not want to throw them straight into
our game without knowing how to use the system at all. Player feedback from The zSpace
Experience was very positive, they enjoyed the demo and ended up spending a half hour with it,
playing with objects, taking apart watches, and playing a spaceship sorting game that involved
drawing 3D paths.
After that it was time to get them to play Hydrospace. Players were given instructions for
launching the program, and then we observed their actions and noted anything that confused
players. After 30 minutes of playing, players were given a survey to fill out which is viewable in
A.1 Playtesting Session 1 Survey in the Appendix.
Once playtesting was finished, all notes, survey feedback, and log data taken during playtime
were compiled. The log data recorded how players died, how often they died, what weapons they
chose, and much more that we could use to better assess player actions. A sample data file can be

83
viewed in the Appendix, A.3 run130062928169112586.txt, Data File.
From observation alone, it was obvious that the game was too difficult. Only a couple playtesters
made it to level three out of five, after failing several times on level two. For everyone else, level
two was unbeatable. This made it obvious that Hydrospace was too difficult, and led us to
consider adding dynamic difficulty, which was soon implemented afterwards.
We also discovered the user interface, particularly in the upgrade and weapon select screens, was
not clear to our players. This is what led to our redesigning of the menu system. We created an
easier to read font, and merged the weapon select and weapon upgrade screens, so that players
would be upgrading the weapons that they were actually going to use.
The tutorial of the game was confusing players and was not actually helping them like we
thought it would. This led to scrapping the virtual world themed tutorial level and instead adding
a more step-by-step in-game walkthrough which was added into the first level.
Other feedback we received included indicating player progress in the level, showing weapon
cooldown bars, indicating enemy health, showing more feedback on how close to death either the
player or the Earth is, or even having a force field around the Earth to withstand asteroids.
Eventually the player’s level progress and weapon cooldown indicators were implemented later.
4.6.2 Playtesting Session 2, February 25, 2013
For our second playtesting session, we had three students and our project advisor, Professor

84
Finkel, test our game. In addition to the game, we gave our playtesters the survey that is
viewable in the Appendix, A.2 Playtesting Session 2 Survey.
This survey was very similar to our previous one, with the only changes being the second and
third questions. These reflected the two most significant changes for the playtesters between their
first test and this one.
Overall feedback was very positive. Players whose game did not exit out of full screen due to a
Unity bug were able to beat the game. The difficulty was finally corrected, and the dynamic
difficulty was found to help immensely, so this was a huge success.
However, we encountered a bug where the OK buttons on the new walkthrough would randomly
become unclickable, and this was a game-breaking bug. We attributed this cause to an issue with
default plane mesh colliders in Unity, and fixed it by replacing these with thin box colliders.
The walkthrough was a huge improvement over the tutorial, although few of our playtesters
bothered to read it. We decided that we should make this available at any time based on this, so
that players can click on a “?” button on the weapon select and upgrade menu when they have a
question about how the upgrade system works.
The weapon cooldown bars were added at this time, and this helped players because they could
see when they could fire next, as well as what weapons they had equipped. The constantly
moving bars brought more attention to the heads-up display as well, making the players more

85
aware of the health of both themselves and Earth.
Once players were done with the game they finished the survey and then handed it in to us. The
following day the whole team looked at notes taken during playtesting, data collected during
gameplay, and the surveys, and made changes including developing an auto-save system and a
level progress bar based on player feedback and observations.
4.7 Sprint Six 2/18/13 – 2/22/13
4.7.1 Art
In this sprint more menu assets were needed as the new UI was nearing completion. These assets
were made as needed. Part of these assets included the credits. All text and logos for the credits
was made and added at this time.
The buttons were also changed, as the former white backgrounds were causing undesirable visual
effects. The finished weapon menu, demonstrating these new features, can be viewed in Figure
15 below.

86
Figure 15. Completed Weapon Menu
4.7.2 Technical
One of the biggest complaints from playtesting was that the user interface was unintuitive and
difficult to use. For this reason, this became the main focus of the technical side of Sprint Six.
One of the easier fixes was to change the font, which players had had difficulty reading. All new
menus were built to reflect this, and old ones were updated. After this was completed, the
weapon selection and weapon upgrade screens were merged into one menu. Multiple playtesters
complained that they did not know which weapons they had equipped while they were
upgrading, so this was determined to be the most efficient fix. A screenshot of the new menu can
be seen in Figure 15 in the Art section above. The weapons’ images were used on the left and
right sides of the screen for selection. This was deemed to be better than just names, as
playtesters had trouble remembering the names more than the images. These are autoselected on
loading the menu to what the player currently has equipped. Selection brings up the related

87
upgrade menu, where some adjustments also had to be made.
Having just the name of the upgrade also proved to be ineffective, as playtesters often did not
understand what exactly was changed. To combat this, the name was replaced by the ‘Info’
button, which when clicked, provides the name of the upgrade and a description. To reaffirm that
the player knows what weapons they have selected, they are displayed to the left and right of the
‘Continue’ button. These are also clickable to provide more information about the respective
weapon.
Considering the tutorial was ineffective at teaching players what to do - often frustrating them
more than helping - and that changing scenes often caused the builds to crash, it was decided to
scrap the title and tutorial scenes and start from scratch. A new informative screen is now the first
thing a player will see upon opening the game, telling them the name and purpose of the game.
After this, the player is now walked through the first level with a brief tutorial. The tutorial
teaches the player how to click through menus, select and upgrade weapons, and gives brief
instructions on controls. After the walk through is completed, the game just continues on as
normal.
To help players with strategy, and to make the game more ship quality, level introductions were
also implemented this sprint. These provide insight into what new enemy the player is going to
see in the next level, while also providing a storyline and extra motivation to continue forward.

88
4.8 Sprint Seven 2/25/13 – 3/1/13
4.8.1 Art
In the final week of development, most of the art assets for the game had already been created.
This week involved creating many last-minute menu assets as the programmers needed them.
These were quick and easy to make. Also, a quick rock model was made in ZBrush to be used as
the asteroid bits that would fly out of an asteroid during its destruction.
Sadly, due to the time required to work on this paper and the project’s two presentations, we no
longer had time to implement or even create assets for Finkel Mode. Finkel Mode was intended
to be our game’s big fun Easter egg, where Professor Finkel would hover around the credits on a
jetpack. If a player clicked on him then it would initiate Finkel mode, which was going to be a
mode of the game where the player was invincible and all weapons had Professor Finkel’s face
on them and they would all deal one-hit kills. We were really excited about this fun idea but by
this far towards the end of the project we no longer had time to implement it.
4.8.2 Technical
Considering the playtesting was the Monday to start this sprint, we thought it imperative that we
complete the credits immediately to finish the last of the menu assets. To create the credits, text
assets were made for each individual person, and the WPI and zSpace logos were used, and these
were all put on a long plane that was then scrolled over. We decided it was important to include
thanks and acknowledgements to all of those who playtested our game, and gave us feedback
along the way. From the credits screen, a player can either exit the game or start again from level
one. A screenshot of the credits can be seen in Figure 16.

89
Figure 16. Credits
Due to some bugs that were discovered during playtesting, there were a few times that players
had to exit their games and either start from the beginning or just give up. As a result of this, we
decided that it would be worthwhile to implement an autosave feature. Now, at the beginning of
each level, the game is saved. Game summary tracking data and player money, upgrades, and
difficulty setting are written to a text file. We realize that this is not secure, but due to time
constraints this is how we had to implement it. At the beginning of the game, on the opening
menu, players can now choose either to load their previous game, or to start a new game. If they
choose to load a game and do not have any save data, then they will just be sent to a new game.
Data is written to the file in the same way as it was for the metric recording, and read out in the
same way it is for the level loader.

90
Another thing learned from playtesting was that players often skip over tutorials, and come to
regret it later. Because people often had questions that were answered in the tutorial they did not
read, we decided that it would be best for it to be constantly available. The walkthrough of the
weapon is now available at any time by the help button labeled with a question mark in the
corner, shown in Figure 17.
Figure 17. Help Button
For the walkthrough of the HUD and control system, a ‘Controls’ option was added to the pause
menu. The new pause menu can be seen in Figure 18 below.
Figure 18. Pause Menu

91
A large issue that was discovered during this sprint was that Hydrospace was causing severe
stereo discomfort in certain players. Due to the distance away from the player of the majority of
objects, the left and right eye images were far apart, meaning that some players had to strain in
order to put them into focus. Several methods were attempted in trying to fix this. First, we
attempted adding in fog to the game. This blocked the sky box, however, and made the whole
game backdrop black. This was deemed to be too bland and not helpful enough to be worth
keeping. After this, we attempted to implement a stereo cutoff package that zSpace Inc. had
made in-house. Though this did work in relieving stereo discomfort, it ruined several aspects of
gameplay. When the laser hit the cut off plane, it kinked sharply, making it nearly impossible to
aim. Also, when any enemy approaching the player hit the plane, it suddenly appeared to change
direction, which interrupted aiming. Finally, we decided that the best way to deal with the issue
was to shrink the entire game to half size, while also implementing the stereo cutoff just beyond
the furthest spawn point. This was done manually, rather than through a world scale. Also, a sky
dome was implemented to replace the sky box. With a sphere, all points are at a relative distance
to the viewer, rather than a wall like with a cube.
One important feature that had been ignored up to this point was implementing sound. In most
video games, sound plays a key role in enhancing the gameplay experience. Most events in game
needed sound such as the player firing their weapons, enemies exploding, asteroids hitting
things, and much more. Unity has an interesting way of handling sound playback. When a sound
is imported into Unity, it can either be marked as a 2D sound or a 3D sound. A 2D sound has
constant volume and stereo panning and is commonly used for ambient sounds, background
music, or any sound that should always be heard. A 3D sound takes its position in the world into

92
account when playing. It also handles stereo panning and attenuation. For example, if an
explosion happens far away from the player, the sound will be much quieter than if it occurs
right in front of them. Also, if a sound occurs to the right of the player, they will only hear it in
their right ear. Sound emitters must be attached to game objects in order to work in Unity. For the
various enemy ships, a sound emitter was attached to them with the appropriate ‘ship engine’
sound. Sound emitters were also attached to missiles and other objects that emit a continuous
ambient sound. This method did not work well for explosion sounds because the explosion visual
effect was on screen for less time than the explosion sound effect and resulted in the sound being
cut off. Unfortunately, Unity does not have a simple way to emit sound out of a point in space. In
order to implement this functionality, a function was added to the effects factory which
instantiates a prefab that plays a sound and then self-destructs. This helped with the sound cut off
problem. It was also used for all sounds that played on a specific event such as the player firing a
weapon, an asteroid hitting something, any event based action that only occurs in one frame.
Proper sound usage can give the player clues to the locations of enemies that may be off-screen
as well as assist the player in understanding what was going on.
During sprint 7, a few effects were revised. The asteroid explosion effect was revised to include a
mesh particle emitter which made asteroids look better when they broke. Also, the textures and
materials for all menu assets were updated. When Unity imports a texture, it defaults the texture
to compressed and generates mipmaps which are used to optimize the texture for 3D game
objects. Since menu textures are displayed facing the camera and are close to the screen, these
optimizations to the texture degrade its quality when viewed up close. To alleviate this, all menu
textures had their import settings changed to be uncompressed without mipmaps. When a texture

93
is applied directly to an object, Unity automatically generates a material for it. The default
material is ‘transparent diffuse’ which is normally used on 3D game objects that receive lighting
and are transparent. This material would be used on grass or tree leaves for example. For menu
assets, this material has several problems. First of all, receiving lighting made it hard to control
the brightness of the menu asset without changing the global light for the whole scene. Second,
Unity has trouble properly sorting transparent materials. A result of this is that sometimes menu
objects could appear ‘behind’ others when they were physically in front of them. Luckily there
was a material that fixed all these problems, ‘unlit transparent cutout’. This material receives no
lighting and uses a different transparency method that doesn’t create sorting problems.

94
5. Analysis and Results
From the time development on Hydrospace first began, it was a requirement that it revolved
around game mechanics that could only be possible on the zSpace system. This game serves as
an application that will help to sell the zSpace system, and so it carried the responsibility of
displaying what zSpace could do should it be used as a gaming system. We were provided with
the time to make this game ship quality, so it stands completely finished and playable on its own,
and is much more than just a tech demo.
The gameplay revolves around the use of the zSpace stylus. The stylus pierces like a laser pointer
into the depths of the stereoscopic space environment we created. It serves as an aiming reticule,
a path of travel for artillery, and a visual manifestation of the player reaching into the system and
the game. During gameplay, players use the stylus to aim their equipped weapons, and press
either the left or right smaller button on the stylus to fire. This allows for precise and free aiming,
and makes the player more immersed in the game.
Taking advantage of the aiming and the zSpace system, we saw it was imperative that players
could have the ability to grab spaceships and asteroids and freely move them about as they hold
onto it with the stylus, giving a better connection to the environment than with firing weapons
alone. For this, we implemented the tractor beam. Players use the tractor beam by aiming at an
asteroid or a spaceship and press the large center button to hold onto their target. Then it can be
freely swung about by moving the stylus around, and this is often used to fling objects away
from Earth, or bash them into each other.

95
The environment itself responds to the player’s head movements as the zSpace glasses track
these movements through the use of reflectors on the glasses. In turn, this head tracking triggers
objects in the environment to follow, so that players could look around Earth or turn to anticipate
the arrival of more enemies from off screen. The menu system perpetuates this feature, and
contributes to the setting itself and the style of the game, because it also exists in full 3D. Players
can equip and upgrade weapons at the same time they are looking at the information window for
the weapon or upgrade. The menus stay true to the futuristic space theme of the game.
None of these actions are possible on a 2D computer screen, or with a mouse. Everything that
was so important to our game could only be done on the zSpace system. No computer could
support an interactive 3D environment that could be precisely manipulated with a stylus, or
support the depth of field that our gameplay depends on. Nor could a computer track head
movements or allow for a true foreground and background that is visually as discernible as in
real life. Our gameplay depended on these features. Through these features alone we have
certainly accomplished the goal of making our game exclusive to the zSpace system.
But the goal of the project was not just to make an exclusive title. An exclusive title alone cannot
sell a system. Every one of our playtesters clearly enjoyed our game. We could not stop feeling
proud of our project and watching it grow and evolve. We had no problem having to play the
game all day. We enjoyed it, and everyone else who played it did as well. We really had to make
an exclusive game that was also fun to play, while demonstrating what the zSpace can add to the

96
gaming world. Based on what we have seen, our feedback, our playtesting data, and our pride in
the game we can safely say that we have truly reached for the stars and accomplished the goals
we set out to do with Hydrospace.

97
6. Conclusion and Future Development
The Hydrospace project was first begun to create a game that could only be playable on the
zSpace system, and to show the gaming capabilities for the system. With this focus in mind, we
looked at the things that only the zSpace could do: create a true 3D environment and use a stylus
to fully interact and manipulate objects within that environment. While simultaneously achieving
this goal, we also wanted to walk away with a game on the system that was high quality, a
shippable title.
We certainly feel that our game has achieved ship quality status. It features impressive visuals,
sound within the 3D environment, and it is fully finished with no loose ends, broken code, or
unfinished features. There are no bare bones visible. It can be played without a developer
standing by, which is vital in all shippable games. In fact, this game is currently being planned to
be shown at Pax East in Boston this year, as well as at Showfest at Worcester Polytechnic
Institute. Our game is finished and polished enough to be shown at these events.
This game could only be played on the zSpace system, because a core gameplay mechanic is the
sheer depth of field - relying on objects in the game to be at certain distances within the
environment and hitting them with missiles, other ships, and asteroids. This environment could
only be produced on a zSpace system. The ability to move your head and look around the
environment was also a key feature. Furthermore, players need to reach in and grab objects using
the stylus, to fire weapons, to drag enemies into black holes, and to interact with this
environment in more ways such as this that cannot be replicated with a keyboard and mouse.

98
Based on these results, our project can be deemed a success. Our project will be repeatedly used
by zSpace, Inc. as a demonstration of the capabilities of the zSpace system in terms of gaming. It
is an application that will help sell the system. One of the hardships of the zSpace’s
innovativeness is that it displays such a wow factor - all of our playtesters were mesmerized by
the genuine 3D simulation and what the system can do - yet people are not sure what exactly to
do with the system yet. We are all so used to 2D monitors and mice that people will have
difficulty figuring out what the zSpace can initially be used for. Our project’s true goal was to
help alleviate this problem, and display the zSpace’s capabilities for entertainment and
interaction.
Looking further, and looking at how far our game has come, we know that with enough time and
dedication, full-fledged games could be developed successfully for this system. However, the
zSpace stylus, with its three small close buttons, is not an ideal gaming controller unless a game
only requires the use of one or two buttons. Even Hydrospace required a keyboard button to
pause the game, since we ran out of buttons on the stylus. People were struggling to figure out
whether to hold the stylus like a pen, with one hand, with two hands, or even almost flute-like
with one hand. So long as an input device that is created with gaming in mind sees the light of
day on the zSpace, then a whole world of possibilities and games can open up for this system. As
for Hydrospace, we can look forward to showing the game at Pax East and Showfest this year.

99
Bibliography
(n.d.). Retrieved from Unity3.
(n.d.).
(2012). Retrieved December 5, 2012, from zSpace: http://zspace.com/
Best Of Show At GDC. (2012, March 29). Retrieved December 5, 2012, from Computer Graphics
World: http://www.cgw.com/Press-Center/Online-Exclusives/2012/Best-Of-Show-At-
GDC.aspx#.UL9iwoPAdsm
Autodesk Maya. (2013). Retrieved January 22, 2013, from Autodesk:
http://usa.autodesk.com/maya/
Home. (2013). Retrieved January 22, 2013, from Unity3D: http://unity3d.com/
Scrum (development). (2013). Retrieved from Wikipedia.
Scrum (development). (2013, January 18). Retrieved January 22, 2013, from Wikipedia:
http://en.wikipedia.org/wiki/Scrum_(development)
ZBrush. (2013). Retrieved January 22, 2013, from Pixologic: http://www.pixologic.com/zbrush/
Core77 Design Awards. (2012, August 10). Core77 Design Awards 2012: zSpace, Professional
Notable for Consumer Products. Retrieved December 5, 2012, from Core77 Design
Magazine & Resource:
http://www.core77.com/blog/core77_design_awards/core77_design_awards_2012_zspac
e_professional_notable_for_consumer_products_23105.asp
Cramblitt, B. (2012, August 8). SIGGRAPH 2012 #6: report from the show floor - part 1.
Retrieved December 5, 2012, from Develop3D:
http://develop3d.com/blog/2012/08/siggraph-2012-6-report-from-the-show-floor-part-1
Henn, S. (2012, July 16). In-Q-Tel: The CIA's Tax-Funded Player In Silicon Valley. Retrieved

100
December 5, 2012, from NPR:
http://www.npr.org/blogs/alltechconsidered/2012/07/16/156839153/in-q-tel-the-cias-tax-
funded-player-in-silicon-valley
Marketwire. (2012, September 2012). Aerospace Industry Introduced to Infinite Z's zSpace
During 2012 SAE Conference. Retrieved 12 5, 2012, from Yahoo! Finance:
http://finance.yahoo.com/news/aerospace-industry-introduced-infinite-zs-
130000423.html
Marketwire. (2012, October 24). Infinite Z Announces Academic Advisory Council Olin College,
USC and UCSD Partner With Infinite Z to Educate Students Around 3D Technology and
Drive Research. Retrieved December 5, 2012, from pr-inside.com: http://www.pr-
inside.com/infinite-z-announces-academic-advisory-council-r3441526.htm
Muwanguzi, M. (2012, August 7). SIGGRAPH 2012 – Day 1 (News). Retrieved December 5,
2012, from MicroFilmmaker Magazine:
http://www.microfilmmaker.com/wordpress/2012/08/siggraph-2012-day-1-news/
Reeves, J. (2011, December 5). Infinite Z Launches zSpace at Autodesk University. Retrieved
December 5, 2012, from zSpace: https://support.zspace.com/entries/20727756-infinite-z-
launches-zspace-at-autodesk-university
The0therbk. (2012, August 16). zSpace and the Future of 3D Visualization. Retrieved December
5, 2012, from Tech on the Edge: http://techontheedge.wordpress.com/2012/08/16/zspace-
and-the-future-of-3d-visualization/

101
Acknowledgements
We owe much of our gratitude towards our advisor for this project, Professor David Finkel.
Without him Hydrospace would not have happened at all. We would also like to thank our
mentor from zSpace for this project, John Ware.
Everyone at zSpace was immensely helpful, kind, and supportive towards us, and we would like
to thank them for not only providing an open and welcoming work environment but also for
helping us with our many questions we had for them, and the playtesting they have done for us
and the feedback they have given us.
Our fellow students from Worcester Polytechnic Institute (WPI) who also traveled with us to
work on projects in the Silicon Valley area at SRI and NVIDIA were wonderful roommates,
apartment-mates, and friends. We have all shared many fun and memorable times together to
make our internship at zSpace even more special.
Of course, we would like to thank WPI for giving us this opportunity of a lifetime and for letting
our potential shine.
Personally, we would like to thank from the WPI students who have also playtested our game
and given us valuable feedback: Alex Rangel, Alex Tran, Xianjing Hu, Ricky Lu, Fabrice Kegne,
and Rohit Mundra.

102
The people at zSpace who playtested our game, given us support, and answered our many
questions that we would like to thank in particular are: David Borel, Eric Tripp, Gordon Zhou,
James Reeves, Louis Boileau.
And a special thank you to Poes the cat from Catherine, for being her adorable and loving friend
during the time of working on this project. Catherine would also like to thank all the other cats
around Oakwood/Archstone apartments, as well as the dogs, for being adorable and influencing
her decision to adopt a cat from a local animal shelter as soon as she is able.
Shortly before development on Hydrospace began, just before Christmas 2012, the world said
goodbye to a wonderful woman who reached the golden age of 90. Catherine T. Waple will
forever live on in the hearts and memories of the Waple family, and this project is dedicated to
her. She is certainly very proud of what her granddaughter Catherine A. Waple accomplished
during her stay in California. Not a day passes that she is not missed.
This project is also dedicated in loving memory of Eitan Stern-Robbins, whose passing during
Hydrospace’s development was both heartbreaking and sudden. Michael and Catherine wish
Gabriel Stern-Robbins and his family our deepest condolences for the loss of Gabriel’s brother.
Although the pain of loss is unbearable at first, in time that pain will heal and the good memories
and stories will remain.

103
Appendix
A.1 Playtesting Session 1 Survey
We appreciate your help with our playtesting phase. To help us make our game better, please
answer 10 easy questions.
1. About how many hours a week do you typically play videogames?
2. What types of games do you most often play, if any?
3. What did you enjoy most about the game?
4. What were you confused about while playing?
5. Were you stuck at any point in the game? Did you progress past that?
6. What did you dislike about the game?
7. Was there a particular weapon or weapon combination that you stuck with or liked the
best? Or did you try them all? Why?
8. Did you feel like some weapons or strategies in the game were better than others? If so,
why?
9. Any suggestions, ideas, or recommendations?
10. Thanks for playing! <3 =^-^=
A.2 Playtesting Session 2 Survey
Name ______________________________
Survey Questions
We appreciate your help with our playtesting phase. To help us make our game better, please
answer 10 easy questions.

104
1. What did you enjoy most about the game?
2. Did you find the walkthrough helpful?
3. Was the new weapon menu helpful?
4. What were you confused about while playing?
5. Were you stuck at any point in the game? Did you progress past that?
6. What did you dislike about the game?
7. Was there a particular weapon or weapon combination that you stuck with or liked the
best? Or did you try them all? Why?
8. Did you feel like some weapons or strategies in the game were better than others? If so,
why?
9. Any suggestions, ideas, or recommendations?
10. Do you like cats? =^-^= I do!!!!! Meow! lol guess who wrote this survey! Muahahahaha!
A.3 run130062928169112586.txt, Data File
2/26/2013 3:06:56 AM level1.txt Left Weapon: laser Right Weapon: ball Passed? True Player Health: 80 Earth Health: 148.0697 Time Elapsed: 163.0051 Asteroids Left: 68 Asteroids Killed: 26 Money Made: 78 Upgrades: Difficulty Adjustments: Player Level: 0 Earth Level: 0 level2.txt Left Weapon: laser Right Weapon: ball Passed? False

105
Player Health: 37.25 Earth Health: -0.5743575 Time Elapsed: 134.8165 Asteroids Left: 55 Asteroids Killed: 19 Money Made: 137 Upgrades: Laser Cooldown Level: 2 Sphere Homing Radius Level: 1 Difficulty Adjustments: Player Level: -1 Player Resistance Level: -1 Earth Level: -1 Earth Resistance Level: -1 level2.txt Left Weapon: laser Right Weapon: blackHole Passed? True Player Health: 21.5 Earth Health: 7.016321 Time Elapsed: 173.832 Asteroids Left: 34 Asteroids Killed: 38 Money Made: 229.6667 Upgrades: Laser Cooldown Level: 2 Sphere Homing Radius Level: 1 Difficulty Adjustments: Player Level: -1 Player Resistance Level: -1 Earth Level: 0 level3.txt Left Weapon: laser Right Weapon: blackHole Passed? False Player Health: -7.332285 Earth Health: 145.7733

106
Time Elapsed: 79.28177 Asteroids Left: 15 Asteroids Killed: 20 Money Made: 195.1667 Upgrades: Laser Cooldown Level: 4 Sphere Homing Radius Level: 1 Black Hole Money Level: 3 Difficulty Adjustments: Player Level: -1 Player Resistance Level: -1 Earth Level: 0 level3.txt Left Weapon: laser Right Weapon: blackHole Passed? False Player Health: 70 Earth Health: -11.2442 Time Elapsed: 115.3831 Asteroids Left: 35 Asteroids Killed: 25 Money Made: 201 Upgrades: Laser Cooldown Level: 4 Sphere Homing Radius Level: 1 Black Hole Money Level: 3 Difficulty Adjustments: Player Level: 0 Earth Level: 0 level3.txt Left Weapon: laser Right Weapon: blackHole Passed? True Player Health: 42.5 Earth Health: 38.07255 Time Elapsed: 158.5488 Asteroids Left: 24

107
Asteroids Killed: 46 Money Made: 415.3333 Upgrades: Laser Cooldown Level: 4 Sphere Homing Radius Level: 1 Black Hole Money Level: 3 Difficulty Adjustments: Player Level: 0 Earth Level: 1 Earth Resistance Level: 1 level4.txt Left Weapon: laser Right Weapon: blackHole Passed? False Player Health: 2 Earth Health: -8.567568 Time Elapsed: 113.3377 Asteroids Left: 20 Asteroids Killed: 30 Money Made: 423 Upgrades: Laser Cooldown Level: 4 Sphere Homing Radius Level: 1 Black Hole Money Level: 4 Difficulty Adjustments: Player Level: 0 Earth Level: 1 Earth Resistance Level: 1 level4.txt Left Weapon: laser Right Weapon: blackHole Passed? False Player Health: 52 Earth Health: -0.1487198 Time Elapsed: 128.4489 Asteroids Left: 34 Asteroids Killed: 33

108
Money Made: 608.75 Upgrades: Laser Cooldown Level: 4 Laser Damage Level: 1 Laser Speed Level: 2 Sphere Homing Radius Level: 1 Black Hole Cooldown Level: 2 Black Hole Speed Level: 2 Black Hole Money Level: 4 Difficulty Adjustments: Player Level: 0 Earth Level: 2 Earth Resistance Level: 2 Earth Money Multiplier Level: 1 Earth Spawn Modifier: 0.5 level4.txt Left Weapon: laser Right Weapon: blackHole Passed? True Player Health: 66 Earth Health: 84.1259 Time Elapsed: 153.7285 Asteroids Left: 8 Asteroids Killed: 67 Money Made: 595.8334 Upgrades: Laser Damage Level: 1 Laser Speed Level: 2 Sphere Homing Radius Level: 1 Black Hole Cooldown Level: 4 Black Hole Speed Level: 3 Black Hole Radius Level: 2 Black Hole Money Level: 2 Difficulty Adjustments: Player Level: 0 Earth Level: 3 Earth Health Regen Level: 1 Earth Resistance Level: 2 Earth Money Multiplier Level: 1

109
Earth Money Keep Level: 1 Earth Spawn Modifier: 0.5 level5.txt Left Weapon: laser Right Weapon: blackHole Passed? False Player Health: -75.39253 Earth Health: 117.8377 Time Elapsed: 309.3027 Asteroids Left: 21 Asteroids Killed: 50 Money Made: 1212.5 Upgrades: Laser Cooldown Level: 4 Laser Damage Level: 3 Laser Speed Level: 3 Sphere Homing Radius Level: 1 Black Hole Cooldown Level: 4 Black Hole Speed Level: 4 Black Hole Radius Level: 4 Black Hole Money Level: 4 Difficulty Adjustments: Player Level: -1 Player Resistance Level: -1 Earth Level: 3 Earth Health Regen Level: 1 Earth Resistance Level: 2 Earth Money Multiplier Level: 1 Earth Money Keep Level: 1 Earth Spawn Modifier: 0.5 level5.txt Left Weapon: laser Right Weapon: blackHole Passed? False Player Health: -3.1208 Earth Health: 113.8404 Time Elapsed: 325.5583 Asteroids Left: 32 Asteroids Killed: 58

110
Money Made: 1150 Upgrades: Laser Cooldown Level: 4 Laser Damage Level: 3 Laser Shot Level: 1 Laser Speed Level: 3 Sphere Homing Radius Level: 1 Black Hole Cooldown Level: 4 Black Hole Speed Level: 4 Black Hole Radius Level: 4 Black Hole Money Level: 4 Difficulty Adjustments: Player Level: 0 Earth Level: 3 Earth Health Regen Level: 1 Earth Resistance Level: 2 Earth Money Multiplier Level: 1 Earth Money Keep Level: 1 Earth Spawn Modifier: 0.5 level5.txt Left Weapon: laser Right Weapon: blackHole Passed? True Player Health: 55.5 Earth Health: 160 Time Elapsed: 384.1073 Asteroids Left: 0 Asteroids Killed: 68 Money Made: 4803.75 Upgrades: Laser Cooldown Level: 4 Laser Damage Level: 3 Laser Shot Level: 3 Laser Speed Level: 4 Sphere Homing Radius Level: 1 Black Hole Cooldown Level: 4 Black Hole Speed Level: 4 Black Hole Radius Level: 4 Black Hole Money Level: 4

111
Difficulty Adjustments: Player Level: 1 Player Resistance Level: 1 Earth Level: 3 Earth Health Regen Level: 1 Earth Resistance Level: 2 Earth Money Multiplier Level: 1 Earth Money Keep Level: 1 Earth Spawn Modifier: 0.5
A.4 User Manual
A.4.0 Controls
Menus:
Center button (stylus): Press button
Gameplay:
Center button (stylus): Tractor beam
Left button (stylus): Fire left weapon
Right button (stylus): Fire right weapon
P (keyboard): Pause game
A.4.1 Introduction
Welcome to Hydrospace! You must be here to learn how to play. Don’t worry, we won’t take up
too much of your time. You’ll soon be tossing away asteroids and blowing up Brutes like you
were born doing it!
A.4.2 Starting the Game
This is a simple as double clicking the start-up icon, seen in Figure 19 below.

112
Figure 19. Icon
If there are issues on start-up, close the window and try again. There is a recorded occasional bug
with the Unity engine that causes the game to become windowed and flicker black and white.
A.4.3 Main Menu
Once you have the game open, you will have the option to load a previous save or start a new
game, as seen in Figure 20 below. Hydrospace automatically saves at the beginning of each level.
If you would like to return to your last play, aim the stylus pointer at the ‘Load Game’ button,
and press the large center button on the stylus. Otherwise, do the same on the ‘New Game’
button. WARNING: Starting a new game overwrites the previous save!
Figure 20. Opening Menu
113
A.4.4 Tutorial
Upon starting a new game, you will be taken through a brief walkthrough. In order to progress
through, read each screen and press the ‘OK’ button upon completion. You can return to these
tutorials at any time. For the weapon menu walkthrough, press the ‘?’ help icon in the top left
corner. For the gameplay walkthrough, pause the game using ‘P’ on the keyboard, and press the
‘Controls’ button.
A.4.5 Level Introductions
Level introductions, as seen in Figure 21 below, are incoming transmissions from back on Earth.
The people back home will give you as much information as they can on what you are about to
face, and about exactly what is happening in all of this.
Figure 21. Level Introduction

114
A.4.6 Weapon Menu
Figure 22. Weapon Menu
The weapon menu is where you will select and upgrade your weapons at the beginning of each
level, as seen in Figure 22 above. To select your weapons, use the stylus in the same way as
when pressing buttons, and choose from the icons in the left and right columns. The left side
corresponds to the weapon set to the left stylus button, and the right to the right.
Figure 23. Weapon Selection
Figure 23 is a close up of where you select your weapons. The green glow indicates that this is

115
the currently selected weapon. The red circle indicates that this weapon is already equipped on
the other side. You cannot equip the same weapon twice.
Figure 24. Laser Upgrade Menu
Figure 24 displays the upgrade menu for the laser. The upgrade menu shown will always be for
the weapon you have equipped on that side.
Figure 25. Upgrade Menu Title
At the top of the menu is the name of the weapon you are upgrading.
Figure 26. Icon and Info
The icon for each upgrade is displayed on the left side of the menu. In order to read about what
this upgrade is and what it does, press the info button to the right of the icon.

116
Figure 27. Upgrade Prices
Displayed on the right side of the menu are the prices of each upgrade. If you wish to purchase
the corresponding upgrade, and you have enough money, press the plus button shown below.
Figure 28. Buy Upgrade
You can upgrade a feature of a weapon a total of four times. If you decide that you no longer care
for an upgrade you bought, or accidently clicked plus on something you didn’t want, you can
receive a full refund by click on the minus button, pictured below. WARNING: If you are going
to change which weapons you are using, be sure to refund your upgrades first!
Figure 29. Refund Upgrade
Once you are finished selecting and upgrading weapons, press the ‘Continue’ button to start the
level.

117
A.4.7 HUD
Figure 30. Interface Walkthrough
Pictured in Figure 30 is what you will see as you are playing the game. Each number corresponds
to an element that you should know about and utilize as you play.
1. Earth Health Bar • This displays the health of Earth. If it’s empty, you lose.
2. Player Health Bar • This displays your health. If this is empty, you also lose.
3. Money • Look here to see how much money you have. This is how you purchase upgrades. You
make money by destroying enemies. Throwing them away will get you nothing. 4. Equipped Weapon
• This is your left equipped weapon, with your right weapon icon mirrored on the other side. Just in case you forgot what you’re shooting.
5. Weapon Cooldown • Look here to see how long until you can fire your weapon again. This may trivial on the
laser, but for the black hole it can be quite useful. 6. Aiming Reticule

118
• This laser pointer shows just where you are aiming. It will shorten if you are targeting an enemy.
7. Earth (and Moon) • Protect the Earth! Don’t let things hit it, kill the things that are shooting at it. Nobody
cares about the Moon though. 8. Asteroids
• Kill asteroids! And other enemies. Enough of these hit you or Earth and you lose. 9. Level Progress Bar
• Kill enough asteroids and these will fill up. Once it’s full, destroy all remaining ships and you’ll pass the level.
10. Inertia Sphere • One of the weapons that you can fire. This is what it looks like. Use it.
A.4.8 Pause Menu
Figure 31. Pause Menu
The pause menu, shown in Figure 31, can be accessed in game by pressing ‘P’ on the keyboard.
Its functions are basic and most self-explanatory. ‘Resume’ closes the pause menu and resumes
gameplay. ‘Restart Wave’ sends you back to the beginning of the level, so you can again go
through the introduction and weapon menu. This will not reset the upgrades you chose.
‘Controls’ brings up the gameplay walkthrough. ‘Exit Game’ closes Hydrospace.
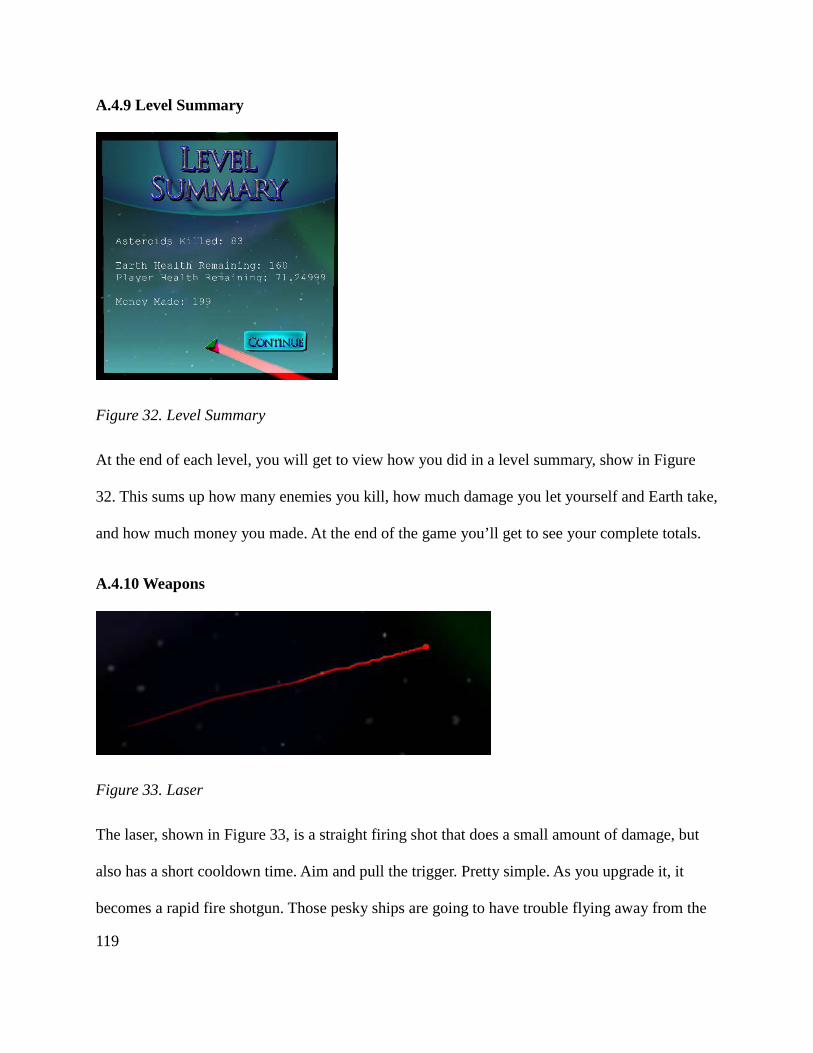
119
A.4.9 Level Summary
Figure 32. Level Summary
At the end of each level, you will get to view how you did in a level summary, show in Figure
32. This sums up how many enemies you kill, how much damage you let yourself and Earth take,
and how much money you made. At the end of the game you’ll get to see your complete totals.
A.4.10 Weapons
Figure 33. Laser
The laser, shown in Figure 33, is a straight firing shot that does a small amount of damage, but
also has a short cooldown time. Aim and pull the trigger. Pretty simple. As you upgrade it, it
becomes a rapid fire shotgun. Those pesky ships are going to have trouble flying away from the

120
wave of red you’re about to rain down on them.
Figure 34. Homing Missile
The homing missile, Figure 34, is a semi intelligent projectile that picks a target and attempts to
chase it down. It can be rather inaccurate at its early stages, but fully upgraded this baby never
misses.

121
Figure 35. Inertia Sphere
The inertia sphere, pictured above, bounces from enemy to enemy until it finally explodes,
dealing massive damage. The catch is that you need to land the first shot yourself. Fully
upgraded this thing flies around the entire playing field, bouncing almost endlessly before finally
releasing a massive warhead of an explosion.
Figure 36. Black Hole Cannon
The black hole cannon fires a projectile that sucks in everything within its radius, which includes
the money you would normally get from killing an enemy. Unfortunately, the cooldown on this
weapon is massive, so use it wisely. Fully upgraded, this clears the screen.

122
A.5 Maintainer Manual
This document presents all of the aspects for maintaining, updating, and expanding Hydrospace.
The game takes place inside of a single Unity scene. Transitioning between scenes does not play
nicely with the zSpace system. This is currently being worked on at the time of this writing and
may no longer be an issue. Inside the main scene, there are several prefabs that must exist in the
scene in order for the game to function properly. They are ‘DisplayPlane’, ‘Earth’, ‘Earth Flight
Center’, ‘effectsFactory’, ‘LevelLoader’, ‘menuHandler’, ‘MothershipEarthCenter’,
‘MothershipPlayerCenter’, ‘myStylus’, ‘Output’, ‘Player Flight Center’, ‘stylusGrabThings’, a
main camera (though it is not a prefab), and finally ‘ZSCore’.
In order for zSpace’s stereo 3D to function inside Unity, the ‘ZSCore’ prefab must be in the
scene. ‘ZSCore’ also provides a means to retrieve data from the stylus as well which is used from
within other scripts. The ‘ZSCore’ also configures the various stereo 3D and world settings. One
value we changed was the ‘worldScale’ which we increased from 1 to 10. With a world scale of
1, one Unity unit translated into one meter. Initially, the default scale was used, but this led to
problems with the physics engine. In order to provide the player with close interactions with
objects, everything was shrunk down and as a result, objects sometimes did not collide with each
other and behaved strangely. To remedy this, the world scale was increased to 10 where 1 Unity
unit was 10 centimeters. This let all the objects have their scale increased by 10 which resulted in
much better physics performance. So as a basic rule of thumb, keep in mind the 1:10 centimeter
scale for the scene.
The ‘myStylus’ prefab was created by us in order to simplify retrieving stylus data. It also

123
initializes the LED and vibration motor for easier access from other scripts. The script attached
to it gives the stylus’ position, rotation, forward, up, and right direction vectors, and the status of
the buttons as an array of booleans. This object is used by everything that communicates with the
stylus.
The ‘stylusGrabThings’ prefab is responsible for everything having to do with the grabbing
mechanic. The ‘stylusGrab’ script has a few configurable variables. ‘Can Grab’ turns on/off the
ability to grab things. For example, while the game is paused, the player shouldn’t be able to
grab things. ‘stylusTip’ is an optional game object that is simply positioned to where the tip of
the stylus is in 3D space. This can be useful for debugging the scale of the scene. The
‘stylusPoint’ is the game object that is positioned to the point where the stylus is aiming. This is
used for the aiming reticle. The ‘pushOutAmount’ is how many Unity units to have the
‘stylusPoint’ object above the surface it hits. This is used to keep the reticle from going too far
inside objects it hits. The ‘maxDistance’ value is simply how far in Unity units to trace for
objects to grab. The grab force and grab dampening factor control how the grabbed object
behaves. Increasing the force increases how quickly the object goes to the stylus’ position and
increasing the dampening factor reduces how far the object ‘overshoots’. A dampening factor
that is too high makes throwing objects difficult.
Code Example 13. Code that applies force
obj.AddForce((tpos-cpos)*grabForce*obj.mass- obj.velocity*obj.mass*grabDampeningFactor);
The red and green lines drawn from the stylus are also handled here. In Unity, the same

124
component cannot be attached to the same game object twice, so the red line is in a child game
object. The red line is drawn constantly from the tip of the stylus to where it is aiming. The green
line is only drawn if the stylus is grabbing something and is drawn from the tip of the stylus to
the grabbed object.
The ‘DisplayPlane’ is a multipurpose object. It contains several of the core scripts to
Hydrospace. On the main ‘DisplayPlane’ object, the ‘Display Bounds’ script scales the entire
object to fit the screen. This script is provided by zSpace. It was modified to keep the scale in the
Z direction at 1 for collision detection reasons. The ‘TestPattern’ child gameobject contains all of
the player logic and HUD elements. It also exists physically in the game world and is the object
that collides with asteroids and enemy fire. This object contains the ‘playerController’ script
which has a long list of functionality and requirements. Ideally, it would be refactored to be less
obfuscated. Unfortunately, in C# there is no way to make a variable accessible to other scripts
without making it public. ‘playerController’ keeps track of the players current upgrade level for
all of their weapons, how much money they have, dynamic difficulty settings, and level status. It
also handles firing weapons, pausing the game and logging player metrics. What the player
shoots is determined by the left and right shot type variables.

125
Code Example 14. Firing Mechanism
switch (currentShot) { case shotTypes.laser: shootLaser (button); break; case shotTypes.missile: shootMissile (button); break; case shotTypes.blackHole: shootBlackHole (button); break; case shotTypes.ball: shootBouncingBomb (button); break; default: break; }
The switch statement in Code Example 14 handles the different shot types which call their
corresponding functions. The button parameter simply tells the shoot function if the left or right
fire button was pressed. The various weapon shoot functions instantiate the corresponding
projectile and initialize the parameters of that projectile. For example, when the laser projectile is
shot, its speed value is set from within its function. After a weapon is shot, the left or right
cooldown time is set to the corresponding cooldown level of that weapon.
Level status is also monitored here in the ‘playerController.’ When the player’s or Earth’s health
hit 0, the current level is reset and dynamic difficulty settings are applied. When the level is
passed, the results are displayed and the next level is loaded. In order to determine if a level is
passed, the time since the level start must be greater than the level end time and all non asteroid
enemies must be destroyed. Once both of these conditions are met, the level ends in success.
Since enemies will always fly towards points in view of the player, the level will never be stuck.

126
Since the ‘DisplayPlane’ is always at a fixed point on the screen, all of the HUD elements were
placed there. This allows them to easily be seen by the player. All elements on the HUD have a
script attached which keeps the scale of the elements consistent so elements don’t appear
stretched at different screen sizes. The money display is a text mesh which simply gets the
current money from the player and displays it. All of the bars use a custom shader which clips
pixels based on a certain threshold value which is between 0 and 1. Their corresponding scripts
retrieve their values from their appropriate values and set the clip threshold. The level progress
bar shares its location with the mothership health bar. A script attached to these objects
shows/hides them when the mothership is in the game. The level name is also here which gets its
value from the level loader.
The ‘LevelLoader’ is responsible for taking level text files and configuring the game to them.
Level files are organized by newlines and comma separated lists of values. The first line is the
level length in seconds. After level time exceeds this value, the level is over unless there are non-
asteroid enemies on screen. The next line is the file name for the next level. Note that all level
files must be in the levels folder. After that, every line is a spawner descriptor.

127
Code Example 15. Level 1 Text File
163.0 level2.txt asteroidSpawner,20,10,80,5,7,1,145,Player asteroidSpawner,60,0,50,5,7,1,145,Earth asteroidSpawner,30,5,80,3.5,5,21,56,Player asteroidSpawner,40,10,80,3.5,5,21,56,Player asteroidSpawner,60,-10,60,5,6,64,100,Earth asteroidSpawner,60,0,40,5,6,64,100,Earth asteroidSpawner,60,10,55,5,6,109,145,Earth asteroidSpawner,50,-5,80,5,6,109,145,Player asteroidSpawner,60,-5,45,5,6,123,145,Earth asteroidSpawner,70,10,80,5,6,123,145,Player
This is what level one looks like. The line:
asteroidSpawner,20,10,80,5,7,1,145,Player
Creates an asteroid spawner at position 20,10,80 which spawns an asteroid every 5-7 seconds
from 1 second in the level to 145 seconds in, and sends the asteroids towards the player. Spawner
objects for enemies behave and are declared similarly. With overlapping spawners, a level
designer can easily create a level that starts easy and progresses to very difficult. Note that the
spawn intervals for an object are affected by dynamic difficulty. At maximum difficulty, the
spawn range is decreased by 3 seconds so the smallest spawn delay should be greater than 3
seconds. There is a special case if the next level is ‘end’ then the game will enter its end state
when the level is passed. This is used for the Mothership.
The player and earth flight center prefabs are simply empty game objects that enemies fly around
based on their target. For example, a Scout spawner with a target of Earth will spawn Scouts that
fly towards and then hover around the Earth flight center. All non-Mothership enemy ships
follow a similar behavior. They fly towards and around their designated flight center. Enemies

128
will also occasionally shoot at their target. Enemy projectiles also have their own behaviors. The
Mothership earth and player flight centers function similarly to the non-Mothership ones, but
they are positioned differently in the scene.
The output prefab is a free floating text mesh that displays the name of the level, if the player
succeeds, and if the player fails with the reason for failure.
The ‘menuHandler’ prefab has the ‘buttonHandler’ script which is responsible for all menu
interaction. Its main functionality is doing a raytrace from the tip of the stylus in the direction of
the stylus. If the raytrace hits an object that is tagged as a ‘button’, it then checks for the middle
button being pressed. If it is, the button’s name is passed into the onButton() function. It also
handles resetting the clicked state so adding a new button doesn’t have to worry about repeating
action as it is held. onButton() is a horribly massive switch statement for each button name that
does something. It also contains a massive list of menu type assets to instantiate such as weapon
stat info boxes for the shop menu.
The effectsFactory prefab is responsible for creating special effects such as explosions and
sounds. For any object to make an explosion effect it must first get the effects factory and call the
create explosion function.
Code Example 16. Code for how to make an explosion
GameObject.Find("effectsFactory").GetComponent<effectsFactory>().createExplosion (transform.position,rad,0.02f);

129
This code creates an explosion at the position of the object calling it with a radius of rad with a
delta value of 0.02 (will stay on screen for 1 second). Due to Unity lacking the ability to
arbitrarily emit a sound from a point in space, the effects factory also has a function to play a
sound.
Code Example 17. Effects Factory Sound
public void createSound(Vector3 pos, AudioClip snd, float vol)
The function in Code Example 17 plays the sound clip snd at location pos with a volume of vol
(0-1). Effects factory also is used for creating the asteroid breaking effect and laser impact
effects.
Weapon behavior for both the player weapons and enemy weapons is mostly handled in their
corresponding projectile scripts. Projectiles that explode create the explosion effect and damage
all appropriate objects in range. Some projectiles such as player and enemy missiles have basic
steering behaviors.
On rare occasions, Unity can ‘forget’ sounds that are attached to prefabs. The list below displays
all of the sounds that should be attached to objects. Prefabs/hydrospace/foldername/Prefab->childObject Script name sound array: length soundfile1 soundfile2

130
Controlprefabs/DisplayPlane -> TestPattern Player controller Laser sounds: 4 lazer lazer2 lazer3 lazer4 Missile sounds: 4 missileLaunch1 missileLaunch2 missileLaunch3 missileLaunch4 Ball sounds: 4 bouncyBombLaunch bouncyBombLaunch2 bouncyBombLaunch3 bouncyBombLaunc4 Blackhole sounds: 4 blackHoleLaunch blackHoleLaunch2 blackHoleLaunch3 blackHoleLaunch4 Hit Sounds: 8 crash1 crash2 crash3 crash4 crash5 crash6

131
crash7 crash8 effects/asteroidExplode Asteroid explode script Sounds: 4 asteroidDestroy1 asteroidDestroy2 asteroidDestroy3 asteroidDestroy4 effects/explosion Explosion script Sounds: 4 explosion1 explosion2 explosion3 explosion4 Enemies/asteroids/asteroid1-5 Asteroid Behavior Sounds: 2 rockBump rockBump2 Enemies/Brute/Brute Brute Behavior Sounds: 4 bruteBomb2 bruteBomb3

132
bruteBomb4 bruteBomb5 Enemies/Scout/Scout Scout Behavior Sounds: 4 scoutLazer scoutLazer2 scoutLazer3 scoutLazer4 Enemies/Mothership/deathray Death ray Sounds: 4 mothershipOmegaHit mothershipOmegaHit2 mothershipOmegaHit3 mothershipOmegaHit4 Enemies/Mothership/Mothership Mothership Behavior Enemy Spawn Sounds: 4 mothershipSpawn mothershipSpawn2 mothershipSpawn3 mothershipSpawn4 Missile sounds: 4 mothershipMissile mothershipMissile2 mothershipMissile3

133
mothershipMissile4 Bomb sounds: 2 mothershipBomb3 mothershipBomb4 Deathray fire sounds: 3 mothershipOmegaFire2 mothershipOmegaFire3 mothershipOmegaFire4