section title · web viewvendor numbers will not delete if files exist in the document file, error...
TRANSCRIPT
Agency Financial Reporting System
AGENCY VENDOR FILE MAINTENANCE
March 20181 | P a g e

2 | P a g e
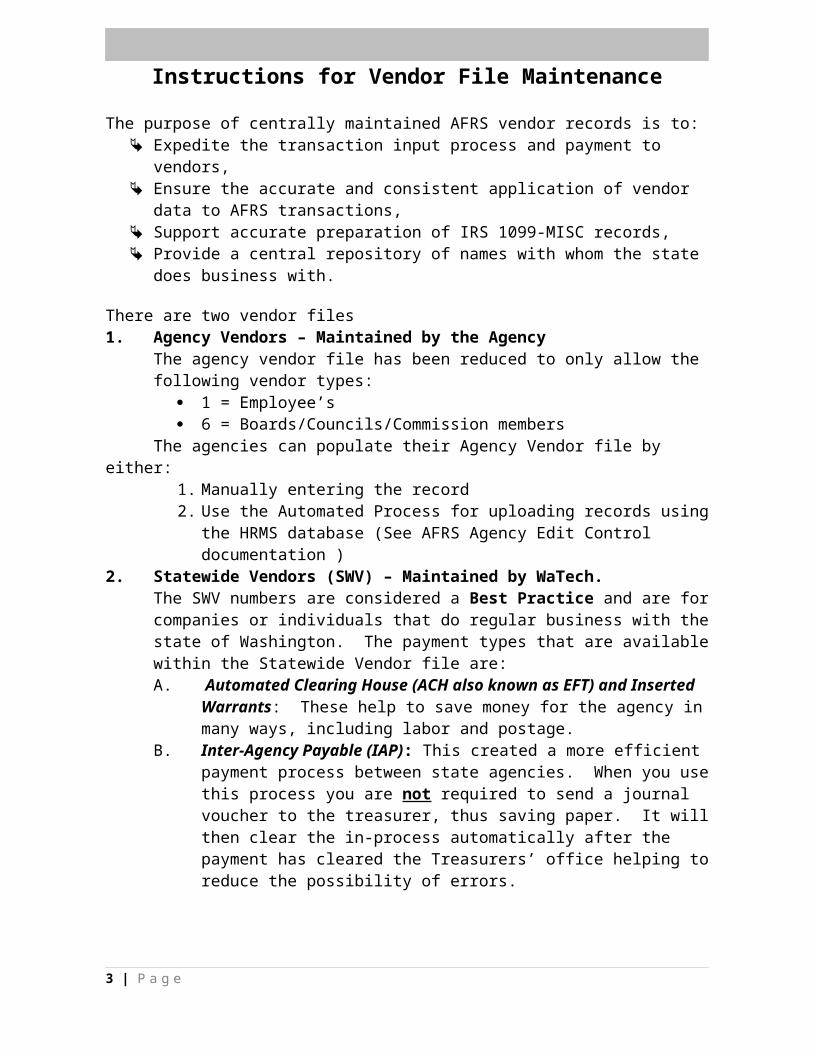
Instructions for Vendor File Maintenance
The purpose of centrally maintained AFRS vendor records is to: Expedite the transaction input process and payment to vendors, Ensure the accurate and consistent application of vendor data to AFRS transactions, Support accurate preparation of IRS 1099-MISC records, Provide a central repository of names with whom the state does business with.
There are two vendor files1. Agency Vendors – Maintained by the Agency
The agency vendor file has been reduced to only allow the following vendor types: 1 = Employee’s 6 = Boards/Councils/Commission members
The agencies can populate their Agency Vendor file by either:1. Manually entering the record2. Use the Automated Process for uploading records using the HRMS database
(See AFRS Agency Edit Control documentation )2. Statewide Vendors (SWV) – Maintained by WaTech.
The SWV numbers are considered a Best Practice and are for companies or individuals that do regular business with the state of Washington. The payment types that are available within the Statewide Vendor file are:A. Automated Clearing House (ACH also known as EFT) and Inserted
Warrants: These help to save money for the agency in many ways, including labor and postage.
B. Inter-Agency Payable (IAP): This created a more efficient payment process between state agencies. When you use this process you are not required to send a journal voucher to the treasurer, thus saving paper. It will then clear the in-process automatically after the payment has cleared the Treasurers’ office helping to reduce the possibility of errors.
Using vendor numbers when doing payments and/or corrections to expenditures will help to leave a trail of what happened to a particular payment.
3 | P a g e

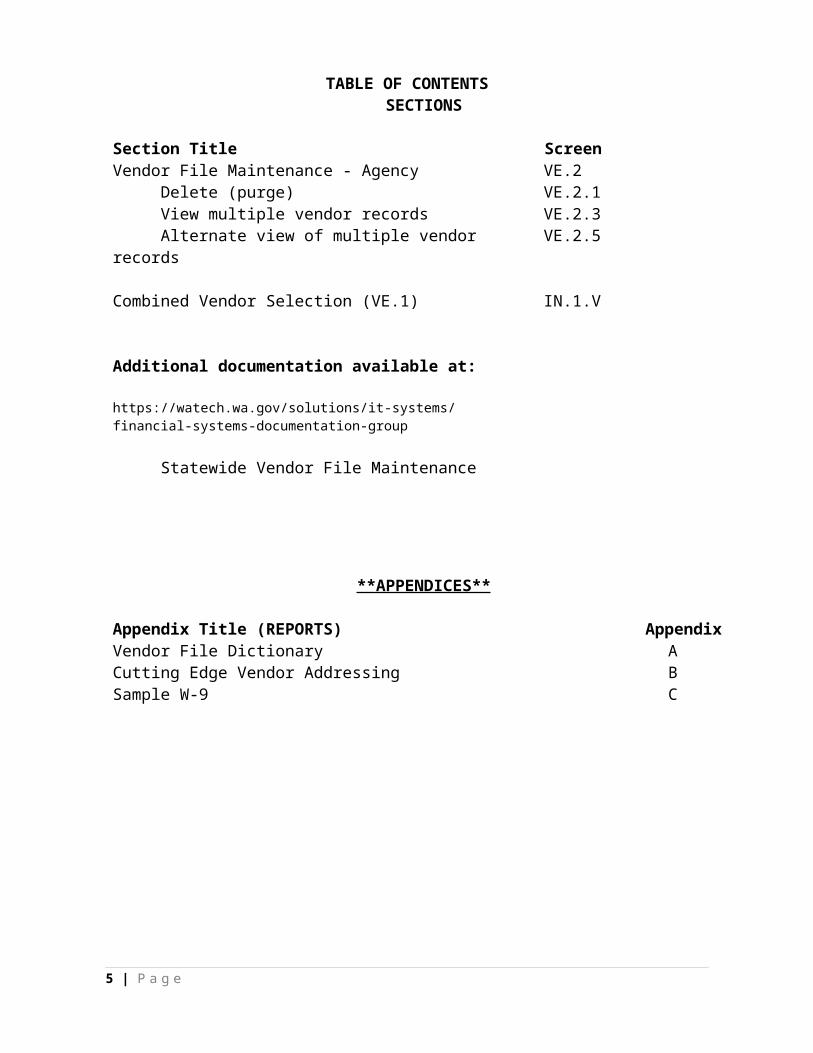
TABLE OF CONTENTSSECTIONS
Section Title ScreenVendor File Maintenance - Agency VE.2 Delete (purge) VE.2.1 View multiple vendor records VE.2.3 Alternate view of multiple vendor records VE.2.5
Combined Vendor Selection (VE.1) IN.1.V
Additional documentation available at:
https://watech.wa.gov/solutions/it-systems/financial-systems-documentation-group
Statewide Vendor File Maintenance
**APPENDICES**
Appendix Title (REPORTS) AppendixVendor File Dictionary ACutting Edge Vendor Addressing BSample W-9 C
4 | P a g e
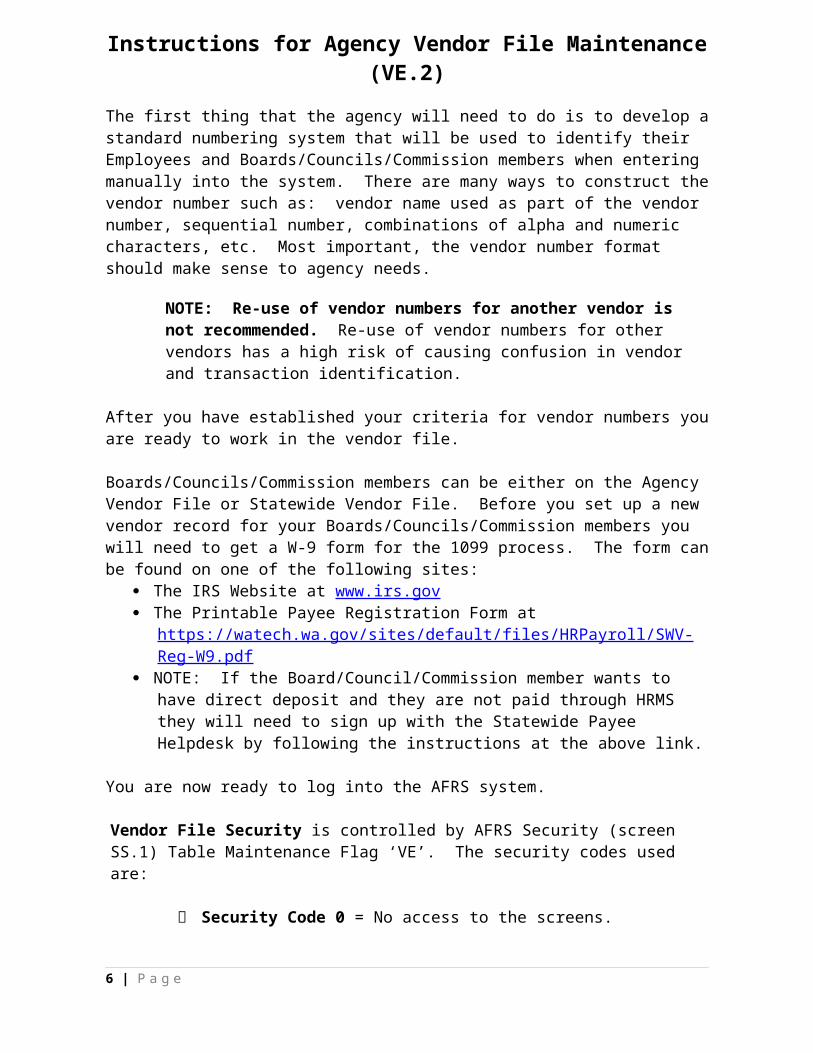
Instructions for Agency Vendor File Maintenance (VE.2)
The first thing that the agency will need to do is to develop a standard numbering system that will be used to identify their Employees and Boards/Councils/Commission members when entering manually into the system. There are many ways to construct the vendor number such as: vendor name used as part of the vendor number, sequential number, combinations of alpha and numeric characters, etc. Most important, the vendor number format should make sense to agency needs.
NOTE: Re-use of vendor numbers for another vendor is not recommended. Re-use of vendor numbers for other vendors has a high risk of causing confusion in vendor and transaction identification.
After you have established your criteria for vendor numbers you are ready to work in the vendor file.
Boards/Councils/Commission members can be either on the Agency Vendor File or Statewide Vendor File. Before you set up a new vendor record for your Boards/Councils/Commission members you will need to get a W-9 form for the 1099 process. The form can be found on one of the following sites:
The IRS Website at www.irs.gov The Printable Payee Registration Form at
https://watech.wa.gov/sites/default/files/HRPayroll/SWV-Reg-W9.pdf NOTE: If the Board/Council/Commission member wants to have direct deposit and
they are not paid through HRMS they will need to sign up with the Statewide Payee Helpdesk by following the instructions at the above link.
You are now ready to log into the AFRS system.
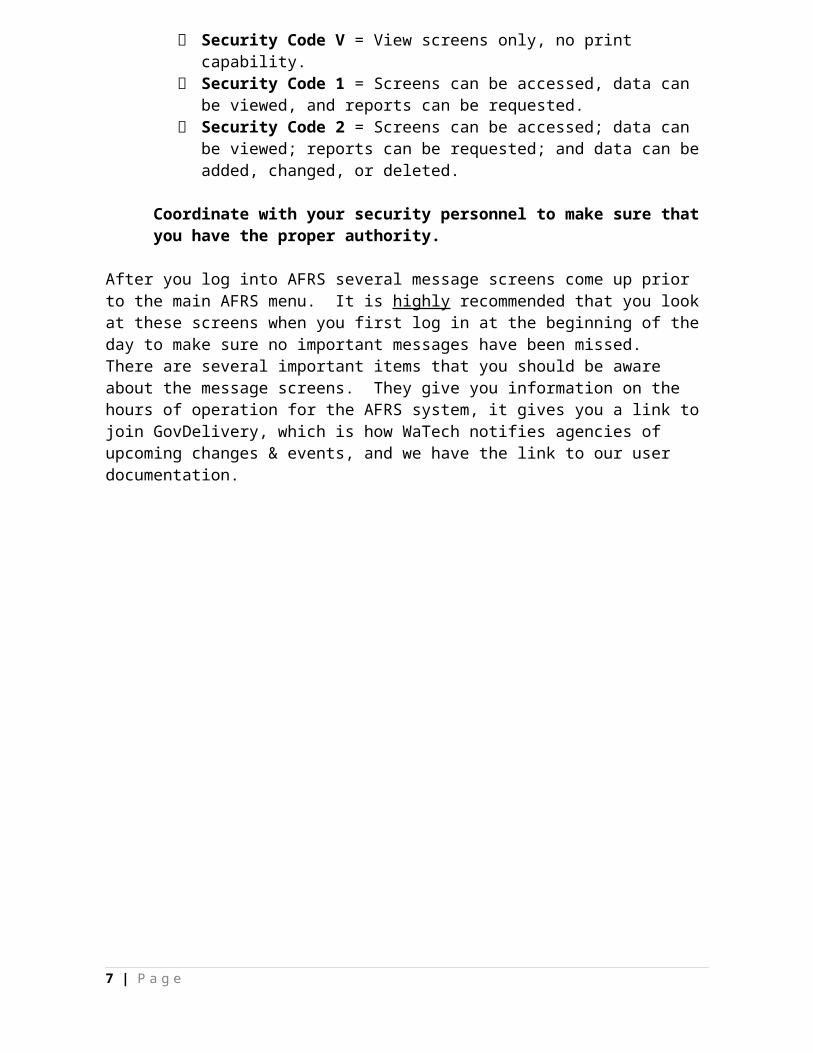
Vendor File Security is controlled by AFRS Security (screen SS.1) Table Maintenance Flag ‘VE’. The security codes used are:
Security Code 0 = No access to the screens. Security Code V = View screens only, no print capability. Security Code 1 = Screens can be accessed, data can be viewed, and reports
can be requested. Security Code 2 = Screens can be accessed; data can be viewed; reports can
be requested; and data can be added, changed, or deleted.
Coordinate with your security personnel to make sure that you have the proper authority.
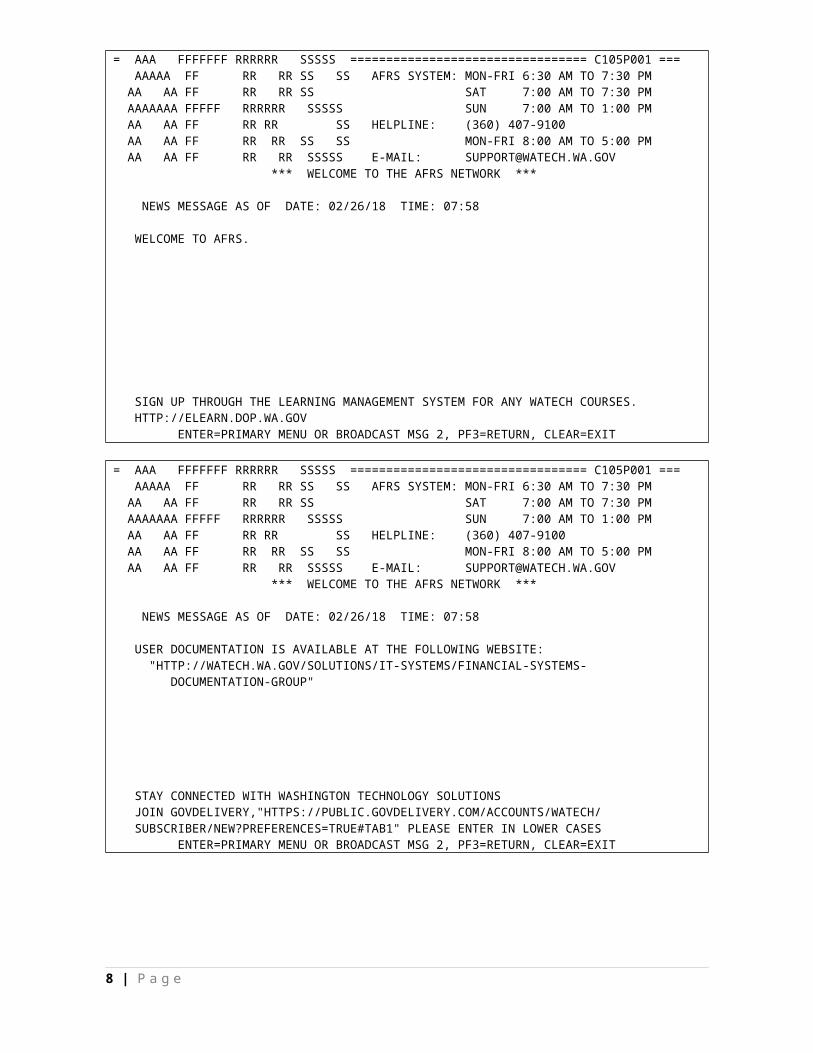
After you log into AFRS several message screens come up prior to the main AFRS menu. It is highly recommended that you look at these screens when you first log in at the beginning of the day to make sure no important messages have been missed.There are several important items that you should be aware about the message screens. They give you information on the hours of operation for the AFRS system, it gives you a link to join GovDelivery, which is how WaTech notifies agencies of upcoming changes & events, and we have the link to our user documentation.
5 | P a g e
= AAA FFFFFFF RRRRRR SSSSS ================================= C105P001 === AAAAA FF RR RR SS SS AFRS SYSTEM: MON-FRI 6:30 AM TO 7:30 PM AA AA FF RR RR SS SAT 7:00 AM TO 7:30 PM AAAAAAA FFFFF RRRRRR SSSSS SUN 7:00 AM TO 1:00 PM AA AA FF RR RR SS HELPLINE: (360) 407-9100 AA AA FF RR RR SS SS MON-FRI 8:00 AM TO 5:00 PM AA AA FF RR RR SSSSS E-MAIL: [email protected] *** WELCOME TO THE AFRS NETWORK *** NEWS MESSAGE AS OF DATE: 02/26/18 TIME: 07:58 WELCOME TO AFRS. SIGN UP THROUGH THE LEARNING MANAGEMENT SYSTEM FOR ANY WATECH COURSES. HTTP://ELEARN.DOP.WA.GOV ENTER=PRIMARY MENU OR BROADCAST MSG 2, PF3=RETURN, CLEAR=EXIT
= AAA FFFFFFF RRRRRR SSSSS ================================= C105P001 === AAAAA FF RR RR SS SS AFRS SYSTEM: MON-FRI 6:30 AM TO 7:30 PM AA AA FF RR RR SS SAT 7:00 AM TO 7:30 PM AAAAAAA FFFFF RRRRRR SSSSS SUN 7:00 AM TO 1:00 PM AA AA FF RR RR SS HELPLINE: (360) 407-9100 AA AA FF RR RR SS SS MON-FRI 8:00 AM TO 5:00 PM AA AA FF RR RR SSSSS E-MAIL: [email protected] *** WELCOME TO THE AFRS NETWORK *** NEWS MESSAGE AS OF DATE: 02/26/18 TIME: 07:58 USER DOCUMENTATION IS AVAILABLE AT THE FOLLOWING WEBSITE: "HTTP://WATECH.WA.GOV/SOLUTIONS/IT-SYSTEMS/FINANCIAL-SYSTEMS- DOCUMENTATION-GROUP" STAY CONNECTED WITH WASHINGTON TECHNOLOGY SOLUTIONS JOIN GOVDELIVERY,"HTTPS://PUBLIC.GOVDELIVERY.COM/ACCOUNTS/WATECH/ SUBSCRIBER/NEW?PREFERENCES=TRUE#TAB1" PLEASE ENTER IN LOWER CASES ENTER=PRIMARY MENU OR BROADCAST MSG 2, PF3=RETURN, CLEAR=EXIT
6 | P a g e
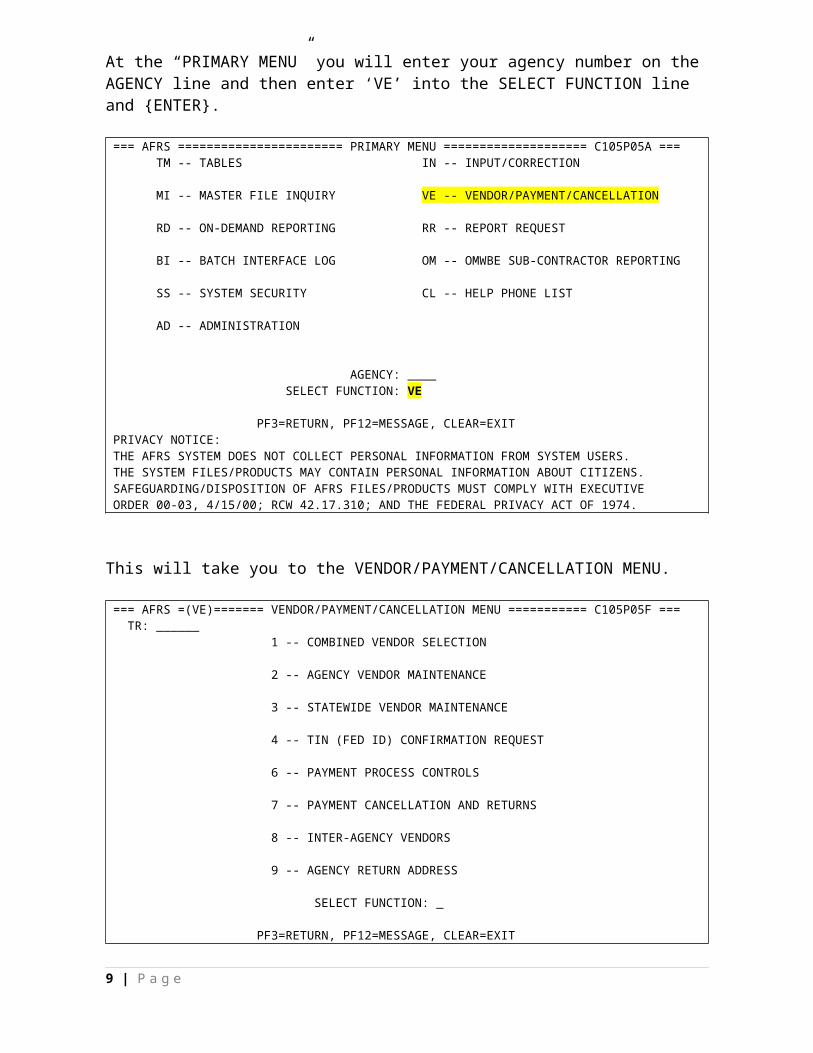
At the “PRIMARY MENU” you will enter your agency number on the AGENCY line and then enter ‘VE’ into the SELECT FUNCTION line and {ENTER}.
=== AFRS ======================= PRIMARY MENU ==================== C105P05A === TM -- TABLES IN -- INPUT/CORRECTION MI -- MASTER FILE INQUIRY VE -- VENDOR/PAYMENT/CANCELLATION RD -- ON-DEMAND REPORTING RR -- REPORT REQUEST BI -- BATCH INTERFACE LOG OM -- OMWBE SUB-CONTRACTOR REPORTING SS -- SYSTEM SECURITY CL -- HELP PHONE LIST AD -- ADMINISTRATION AGENCY: ____ SELECT FUNCTION: VE PF3=RETURN, PF12=MESSAGE, CLEAR=EXITPRIVACY NOTICE:THE AFRS SYSTEM DOES NOT COLLECT PERSONAL INFORMATION FROM SYSTEM USERS.THE SYSTEM FILES/PRODUCTS MAY CONTAIN PERSONAL INFORMATION ABOUT CITIZENS.SAFEGUARDING/DISPOSITION OF AFRS FILES/PRODUCTS MUST COMPLY WITH EXECUTIVEORDER 00-03, 4/15/00; RCW 42.17.310; AND THE FEDERAL PRIVACY ACT OF 1974.
This will take you to the VENDOR/PAYMENT/CANCELLATION MENU.
=== AFRS =(VE)======= VENDOR/PAYMENT/CANCELLATION MENU =========== C105P05F === TR: ______ 1 -- COMBINED VENDOR SELECTION 2 -- AGENCY VENDOR MAINTENANCE 3 -- STATEWIDE VENDOR MAINTENANCE 4 -- TIN (FED ID) CONFIRMATION REQUEST 6 -- PAYMENT PROCESS CONTROLS 7 -- PAYMENT CANCELLATION AND RETURNS 8 -- INTER-AGENCY VENDORS 9 -- AGENCY RETURN ADDRESS SELECT FUNCTION: _ PF3=RETURN, PF12=MESSAGE, CLEAR=EXIT
7 | P a g e
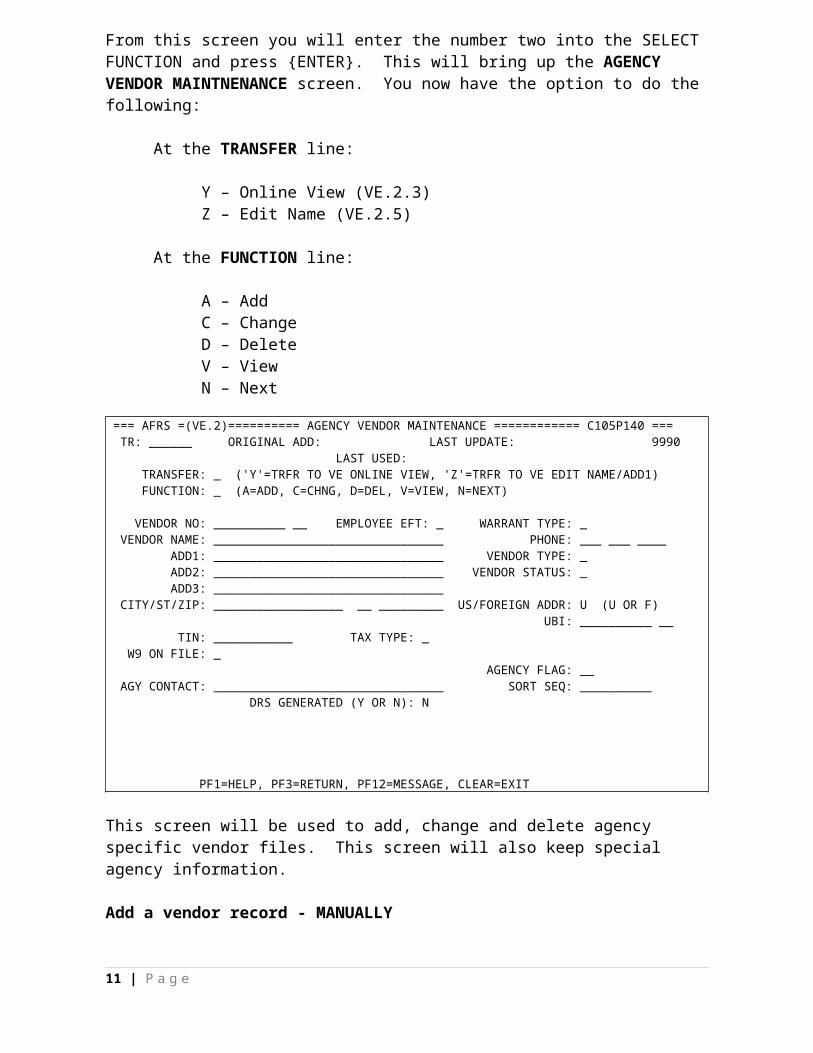
From this screen you will enter the number two into the SELECT FUNCTION and press {ENTER}. This will bring up the AGENCY VENDOR MAINTNENANCE screen. You now have the option to do the following:
At the TRANSFER line:
Y – Online View (VE.2.3)Z – Edit Name (VE.2.5)
At the FUNCTION line:
A – AddC – ChangeD – DeleteV – View N – Next
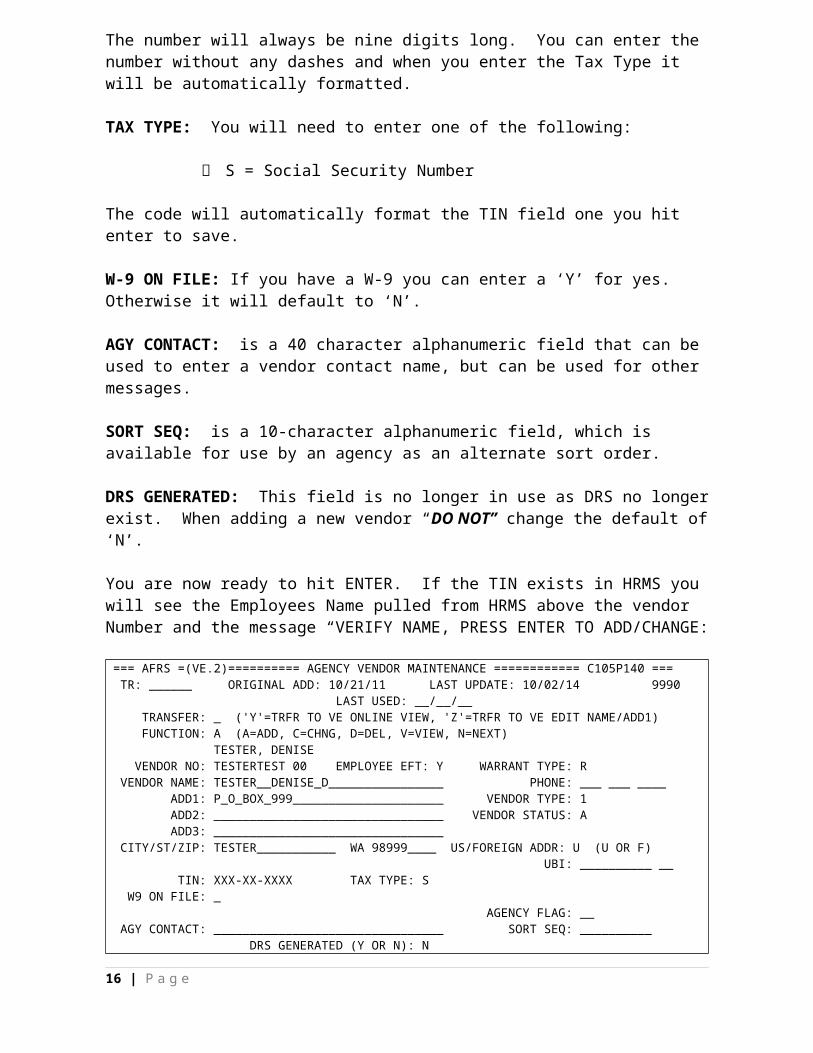
=== AFRS =(VE.2)========== AGENCY VENDOR MAINTENANCE ============ C105P140 === TR: ______ ORIGINAL ADD: LAST UPDATE: 9990 LAST USED: TRANSFER: _ ('Y'=TRFR TO VE ONLINE VIEW, 'Z'=TRFR TO VE EDIT NAME/ADD1) FUNCTION: _ (A=ADD, C=CHNG, D=DEL, V=VIEW, N=NEXT) VENDOR NO: __________ __ EMPLOYEE EFT: _ WARRANT TYPE: _ VENDOR NAME: ________________________________ PHONE: ___ ___ ____ ADD1: ________________________________ VENDOR TYPE: _ ADD2: ________________________________ VENDOR STATUS: _ ADD3: ________________________________ CITY/ST/ZIP: __________________ __ _________ US/FOREIGN ADDR: U (U OR F) UBI: __________ __ TIN: ___________ TAX TYPE: _ W9 ON FILE: _ AGENCY FLAG: __ AGY CONTACT: ________________________________ SORT SEQ: __________ DRS GENERATED (Y OR N): N PF1=HELP, PF3=RETURN, PF12=MESSAGE, CLEAR=EXIT
This screen will be used to add, change and delete agency specific vendor files. This screen will also keep special agency information.
Add a vendor record - MANUALLY
At the FUNCTION line type in ‘A’ and the system will automatically TAB to the next field.NOTE: When you fill in the entire field the system will automatically TAB to the next available field.
8 | P a g e
You are now ready to enter the vendor information. There are six fields that are required to add a new vendor and they are the:
Vendor Number & Suffix Vendor Name Address1 Address2 City/State/Zip Vendor Type
All other areas are optional or have a default. You will want to get familiar with what the optional items do as it will make it easier for you to process payments, and reduce handling time.
VENDOR NUMBER: You will enter your agency unique vendor number and suffix. (Example: 0000ATKINS-EM, 0000000167-00)
EMPLOYEE EFT can be updated with a ‘Y’ if you are adding or changing staff that has a record within HRMS for travel payments. Otherwise the default will be ‘N’.
WARRANT TYPE is an optional field and can be used to override batch types when a specific vendor receives payment by warrant and always wants payments a specific way. The default is BLANK, you can enter an ‘I’ for inserted (mailed directly by CMS) or an ‘R’ for regular (warrant returned to agency for mailing) if you need to.
VENDOR NAME: You will need to enter the vendor’s name on this line. There are 32 characters available. You will need to TAB to the next field when complete.
PHONE NUMBER is an optional field if you do not want to use this field TAB through until you get to the first address line. This field can be helpful if you need to contact a vendor.
ADD1 (Address 1) is used to continue the vendor names, or for the first line of an address. You will need to TAB to the next field when complete.
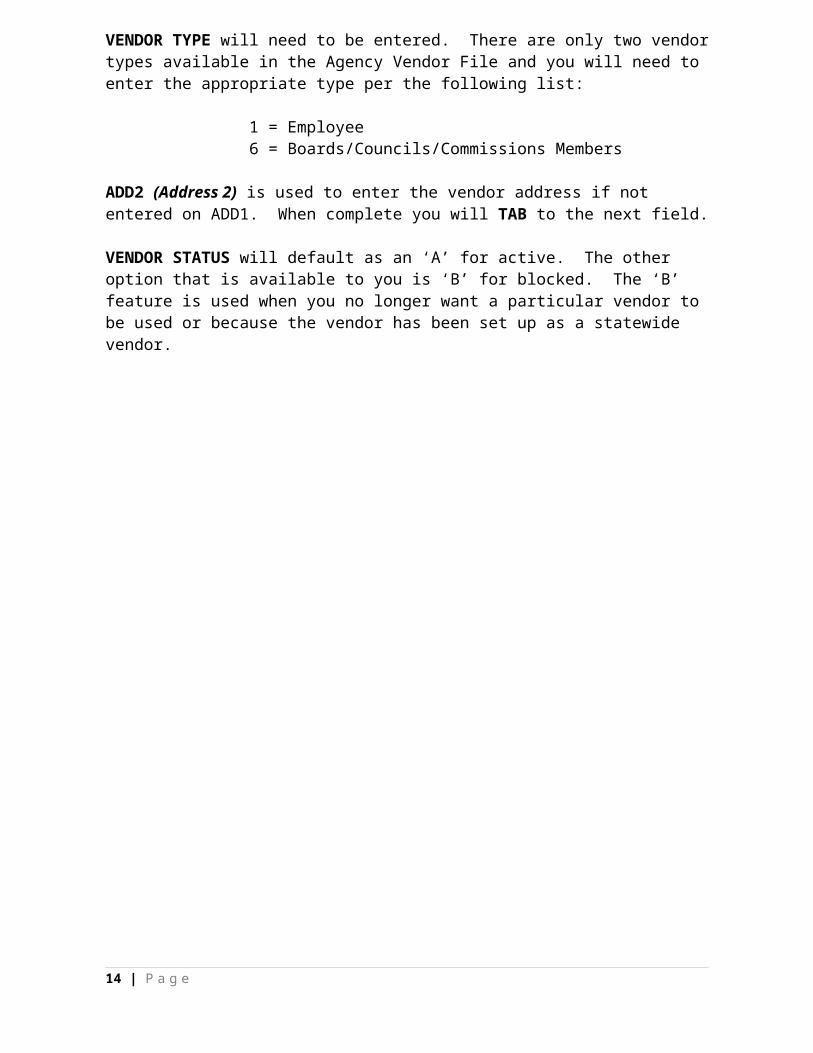
VENDOR TYPE will need to be entered. There are only two vendor types available in the Agency Vendor File and you will need to enter the appropriate type per the following list:
1 = Employee6 = Boards/Councils/Commissions Members
ADD2 (Address 2) is used to enter the vendor address if not entered on ADD1. When complete you will TAB to the next field.
VENDOR STATUS will default as an ‘A’ for active. The other option that is available to you is ‘B’ for blocked. The ‘B’ feature is used when you no longer want a particular vendor to be used or because the vendor has been set up as a statewide vendor.
9 | P a g e

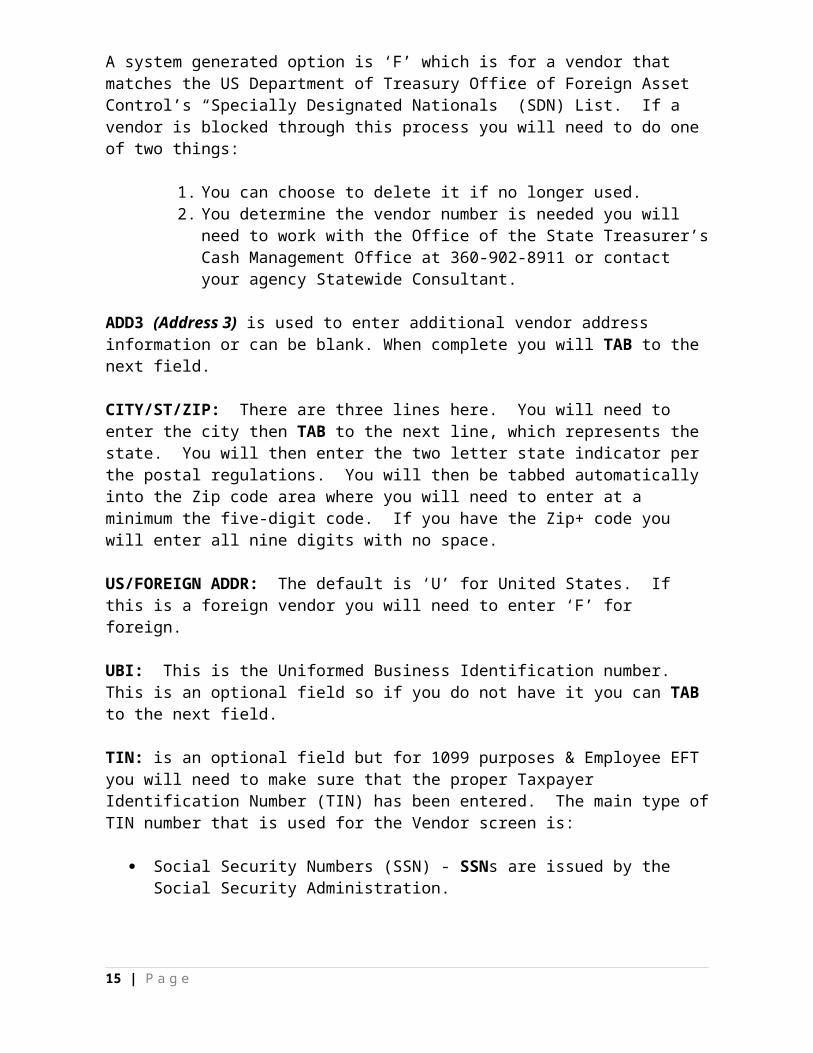
A system generated option is ‘F’ which is for a vendor that matches the US Department of Treasury Office of Foreign Asset Control’s “Specially Designated Nationals” (SDN) List. If a vendor is blocked through this process you will need to do one of two things:
1. You can choose to delete it if no longer used.2. You determine the vendor number is needed you will need to work with the
Office of the State Treasurer’s Cash Management Office at 360-902-8911 or contact your agency Statewide Consultant.
ADD3 (Address 3) is used to enter additional vendor address information or can be blank. When complete you will TAB to the next field.
CITY/ST/ZIP: There are three lines here. You will need to enter the city then TAB to the next line, which represents the state. You will then enter the two letter state indicator per the postal regulations. You will then be tabbed automatically into the Zip code area where you will need to enter at a minimum the five-digit code. If you have the Zip+ code you will enter all nine digits with no space.
US/FOREIGN ADDR: The default is ‘U’ for United States. If this is a foreign vendor you will need to enter ‘F’ for foreign.
UBI: This is the Uniformed Business Identification number. This is an optional field so if you do not have it you can TAB to the next field.
TIN: is an optional field but for 1099 purposes & Employee EFT you will need to make sure that the proper Taxpayer Identification Number (TIN) has been entered. The main type of TIN number that is used for the Vendor screen is:
Social Security Numbers (SSN) - SSNs are issued by the Social Security Administration.
The number will always be nine digits long. You can enter the number without any dashes and when you enter the Tax Type it will be automatically formatted.
TAX TYPE: You will need to enter one of the following:
S = Social Security Number
The code will automatically format the TIN field one you hit enter to save.
W-9 ON FILE: If you have a W-9 you can enter a ‘Y’ for yes. Otherwise it will default to ‘N’.
AGY CONTACT: is a 40 character alphanumeric field that can be used to enter a vendor contact name, but can be used for other messages.
SORT SEQ: is a 10-character alphanumeric field, which is available for use by an agency as an alternate sort order.
10 | P a g e
DRS GENERATED: This field is no longer in use as DRS no longer exist. When adding a new vendor “DO NOT” change the default of ‘N’.
You are now ready to hit ENTER. If the TIN exists in HRMS you will see the Employees Name pulled from HRMS above the vendor Number and the message “VERIFY NAME, PRESS ENTER TO ADD/CHANGE:
=== AFRS =(VE.2)========== AGENCY VENDOR MAINTENANCE ============ C105P140 === TR: ______ ORIGINAL ADD: 10/21/11 LAST UPDATE: 10/02/14 9990 LAST USED: __/__/__ TRANSFER: _ ('Y'=TRFR TO VE ONLINE VIEW, 'Z'=TRFR TO VE EDIT NAME/ADD1) FUNCTION: A (A=ADD, C=CHNG, D=DEL, V=VIEW, N=NEXT) TESTER, DENISE VENDOR NO: TESTERTEST 00 EMPLOYEE EFT: Y WARRANT TYPE: R VENDOR NAME: TESTER__DENISE_D________________ PHONE: ___ ___ ____ ADD1: P_O_BOX_999_____________________ VENDOR TYPE: 1 ADD2: ________________________________ VENDOR STATUS: A ADD3: ________________________________ CITY/ST/ZIP: TESTER___________ WA 98999____ US/FOREIGN ADDR: U (U OR F) UBI: __________ __ TIN: XXX-XX-XXXX TAX TYPE: S W9 ON FILE: _ AGENCY FLAG: __ AGY CONTACT: ________________________________ SORT SEQ: __________ DRS GENERATED (Y OR N): N PF1=HELP, PF3=RETURN, PF12=MESSAGE, CLEAR=EXIT VERIFY NAME, PRESS ENTER TO ADD/CHANGE
If you do not match a name in HRMS you will see one of the following:
A different employee’s name above the vendor number, if this is the case you can F3 out and it will not add. You will need to follow up on the TIN number to get the appropriate one.
You will get the message “RECORD EXISTS” which means that you have used the vendor number already and you can F3 out.
If you change the Employee EFT to a “Y” the system will search the HRMS database to see if they have an active EFT record.
If the employee does, it will allow you to complete the add process. If it does not you will get an error that no EFT record was found and you will need to
change it back to “N”. Reasons why EFT not found:o Not set up in HRMS for EFTo Changed EFT recently in HRMS and not through the Pre-note Processo Wrong TIN number and they have no EFTo HRMS is missing the data (This happens rarely and would have to wait until
next payroll run.)
Once you have been able to add in the vendor successfully you are now ready to make payments to this vendor.
11 | P a g e
ADDITIONAL FEATURES:
Once you have set up a vendor in your vendor file you can now do additional functions that are described below.
View a single vendor recordOn the VE.2 type ‘V’ in the function.
Then type in the specific vendor number or name of the record to be viewed and press ‘ENTER’. The record will appear if the vendor number entered is valid.
View the next vendor record in the file from the vendor currently being viewedOn the VE.2 type an ‘N’ in the function.
Then press ‘ENTER’ to display the next vendor record in vendor number sequence.
View multiple vendor records by vendor number, vendor name, zip code or TIN (Federal ID)
On the VE.2 type ‘Y’ in the TRANSFER field.Then press ‘ENTER’ to access the VE.2.3 screen.
NOTE: Refer to instructions for VE.2.3.
Alternative to view multiple vendor records by vendor number, vendor name, or add1 (address)
On the VE.2 type ‘Z’ in the TRANSFER field.Then press ‘ENTER’ to access the VE.2.5 screen.
NOTE: Refer to instructions for VE.2.5.
Change a vendor name
When a vendor changes their name or you need to correct the name because of incorrect spelling you should always create a new vendor number and/or suffix so that you can keep track of your vendor history of payments and not simply type over as they will not match in AFRS history. You can correct your AFRS History by using a Journal Voucher (JV) to transfer the payment to the correct name as long as you have not crossed biennium.
Change a vendor number
You must create a new vendor number and/or suffix through the Add process.
Change Employee to receive regular warrant when set up for EFT
On the VE.2 type ‘V’ in the function field to initially view the record you want to change.After you have viewed the vendor record you wish to change type a ‘C’ in the function field.
Then TAB to the Employee EFT field and enter an “N”. Then TAB to the Warrant Type field. This field will override the Batch Type (VE.6) Process when you enter one of the following:
R = Create a Regular Warrant that will be returned to the agency. I = Create an Inserted Regular Warrant that will be mailed to Employee by
CMS.
12 | P a g e
Change vendor information other than vendor number or name
On the VE.2 type ‘V’ in the function field to initially view the record you want to change.After you have viewed the vendor record you wish to change type a ‘C’ in the function field.
Then TAB to the appropriate area within the vendor record type in the change. Note: If this is a change of TIN or Vendor Type you should create a new number and/or suffix rather than type in the change.
After you have completed all the changes press ‘ENTER’ to update.
Delete (purge) vendor records
If you have vendors that you have not used for at least the last two years you can delete (purge) these records to help reduce your storage costs.
On the VE.2 type ‘D’ in the FUNCTION field.Then press ‘ENTER’ to access the VE.2.1 screen.
NOTE: Refer to instructions for VE.2.1.
13 | P a g e
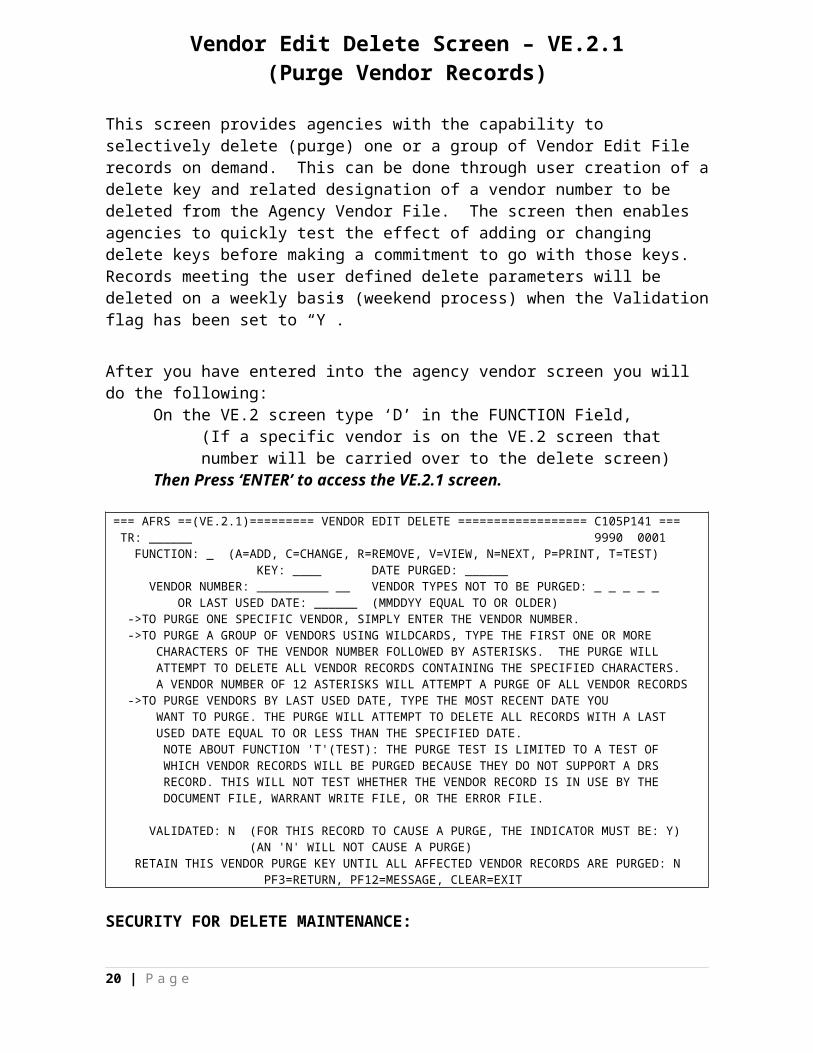
Vendor Edit Delete Screen – VE.2.1(Purge Vendor Records)
This screen provides agencies with the capability to selectively delete (purge) one or a group of Vendor Edit File records on demand. This can be done through user creation of a delete key and related designation of a vendor number to be deleted from the Agency Vendor File. The screen then enables agencies to quickly test the effect of adding or changing delete keys before making a commitment to go with those keys. Records meeting the user defined delete parameters will be deleted on a weekly basis (weekend process) when the Validation flag has been set to “Y”.
After you have entered into the agency vendor screen you will do the following:On the VE.2 screen type ‘D’ in the FUNCTION Field,
(If a specific vendor is on the VE.2 screen that number will be carried over to the delete screen)
Then Press ‘ENTER’ to access the VE.2.1 screen.
=== AFRS ==(VE.2.1)========= VENDOR EDIT DELETE ================== C105P141 === TR: ______ 9990 0001 FUNCTION: _ (A=ADD, C=CHANGE, R=REMOVE, V=VIEW, N=NEXT, P=PRINT, T=TEST) KEY: ____ DATE PURGED: ______ VENDOR NUMBER: __________ __ VENDOR TYPES NOT TO BE PURGED: _ _ _ _ _ OR LAST USED DATE: ______ (MMDDYY EQUAL TO OR OLDER) ->TO PURGE ONE SPECIFIC VENDOR, SIMPLY ENTER THE VENDOR NUMBER. ->TO PURGE A GROUP OF VENDORS USING WILDCARDS, TYPE THE FIRST ONE OR MORE CHARACTERS OF THE VENDOR NUMBER FOLLOWED BY ASTERISKS. THE PURGE WILL ATTEMPT TO DELETE ALL VENDOR RECORDS CONTAINING THE SPECIFIED CHARACTERS. A VENDOR NUMBER OF 12 ASTERISKS WILL ATTEMPT A PURGE OF ALL VENDOR RECORDS ->TO PURGE VENDORS BY LAST USED DATE, TYPE THE MOST RECENT DATE YOU WANT TO PURGE. THE PURGE WILL ATTEMPT TO DELETE ALL RECORDS WITH A LAST USED DATE EQUAL TO OR LESS THAN THE SPECIFIED DATE. NOTE ABOUT FUNCTION 'T'(TEST): THE PURGE TEST IS LIMITED TO A TEST OF WHICH VENDOR RECORDS WILL BE PURGED BECAUSE THEY DO NOT SUPPORT A DRS RECORD. THIS WILL NOT TEST WHETHER THE VENDOR RECORD IS IN USE BY THE DOCUMENT FILE, WARRANT WRITE FILE, OR THE ERROR FILE. VALIDATED: N (FOR THIS RECORD TO CAUSE A PURGE, THE INDICATOR MUST BE: Y) (AN 'N' WILL NOT CAUSE A PURGE) RETAIN THIS VENDOR PURGE KEY UNTIL ALL AFFECTED VENDOR RECORDS ARE PURGED: N PF3=RETURN, PF12=MESSAGE, CLEAR=EXIT
SECURITY FOR DELETE MAINTENANCE:Delete maintenance should be done with great care and understanding of the impact that deletes will have on the vendor edit file records. A security level of ‘2’ for ‘Vendor Edit’ (VE) will allow vendor edit delete.
The vendor edit delete process will:a. Delete the selected vendor records. b. Delete the vendor edit delete keys used in the delete process.
NOTE: If you put a ‘Y’ into the “Retain Vendor Delete Key” the key will be retained.
14 | P a g e
The vendor edit delete process will NOT delete:a. The vendor edit delete key, if you put a ‘Y’ into the “Retain Vendor Delete Key”.
Deleted records will be saved on a tape and kept for 3 months. If you need to restore records that were previously deleted, and the delete occurred less than three months ago, send a request to WaTech Support Center by email [email protected] and specify the records that need to be restored.
FUNCTION Field: You have several options available for you once you have arrived at the VE.2.1 Screen. In order to use many of the functions a KEY record must be created or already exist. Below are the functions available:
A= Add – If no key has been established to do the delete you must add the key first. The ‘KEY’ field must be filled in, and the vendor number should be entered (with or without wildcards).
C= Change – This allows you to change the vendor number to be deleted. You will need to view the key prior to changing or updating information within the key.
R= Remove – This allows you to remove the entire ‘KEY’. You will need to view the key prior to removal.
V= View – This allows you to view a specific ‘KEY’.N= Next – This allows you to view the next ‘KEY’.P= Print – This will print a detailed report (WPD933P) of all the keys set up for
the delete process.T= Test – This will provide a report “Vendors to be Deleted Preview (TEST)”
(WPD931P) for a specific ‘KEY’.
KEY Field: This is an agency assigned reference number (ALPHA-NUMBERIC) to identify the vendor record (s) to be deleted. A unique key must be assigned for each vendor number or group of vendor numbers to be deleted.
DATE DELETED Field: The date will be automatically updated when the delete is processed. This process happens during the weekend and only when the ‘KEY’ has been validated. It will remain on the Vendor Edit Delete until the following weekend.
VENDOR NUMBER Field: The vendor number to be deleted can be expressed as a complete number or as a partial number followed by one or more asterisks (wildcards). The delete job will attempt to delete the vendor number as described by a complete or a partial number. Vendor numbers will not delete if files exist in the Document File, Error File, or Warrant Write File. NOTE: If the vendor number is a complete wildcard (12 asterisks) it will attempt to delete the entire agency vendor record file.
VENDOR TYPES NOT TO BE DELETED Field: In this field you can type in the vendor type codes of records that are not to be deleted. You may enter one or up to five (5) codes (there are currently on two types available at this time). The primary intent of this feature is to allow you the opportunity to protect certain vendor records from delete. Any vendor record marked with the vendor type you specify in these fields will not be considered for delete.
15 | P a g e
LAST USED DATE Field: This field was created to allow agencies the ability to delete documents by their last date used. If the field is left blank all records are eligible to be deleted based on the vendor number information. If the field is given a date all records prior to the last used date will be considered for deletion. The system will look at all records and compare it to the last used date versus the vendor records last used and last updated dates. This can be very useful when you are trying to clean up old agency vendor files.
VALIDATED Field: The default for this field is ‘N’ and will not allow the delete key to process. This gives the agency the ability to verify the delete. You should do a test report before you change the validation field to ‘Y’. When you are sure the ‘KEY’ specifies the correct delete you will change the indicator to ‘Y’ (yes) and it will process over the weekend.
RETAIN THIS VENDOR DELETE KEY UNTIL ALL AFFECTED VENDOR RECORDS ARE DELETED Field: The default setting for this field is ‘N’ (no) and must be changed to ‘Y’ (yes) to activate the retention of the delete key. A ‘Y’ will cause an activated (VALIDATED ‘Y’) delete key to be processed each week until the vendor number is deleted or the delete key is removed by the agency. NOTE: If a delete key seems to hang around for an unusually long time you should check if the “Retain” field is set to ‘Y’.
CAUTIONBefore you go home at the end of the workweek, be very sure that you are comfortable with the existing delete keys. Delete keys that exist can be TESTED.
If the TEST results of a delete key are what you expected, you do not have to do anything more to the delete key, if you want the delete to happen.If the TEST results of a delete key are not what you expected, you should immediately ‘remove’ or ‘change’ the delete key and ‘re-test’ so there will be no chance the unwanted delete key will cause the wrong agency vendor records to be deleted.
DELETE (PURGE) VENDOR RECORDS
View a Delete KeyOn the VE.2.1 screen you will type ‘V’ (view) in the function field
Type the desired key in the ‘KEY’ field. (Refer to ‘KEY’ in Appendix A.)Press ‘ENTER’ and the ‘KEY’ will be displayed if it exists.
Find the Next Delete KeyOn the VE.2.1 screen you will type ‘N’ (next) in the function field
Press ‘ENTER’ until the desired ‘KEY’ is displayed.
16 | P a g e
Delete a single vendor record when the vendor number is carried over from VE.2.Add a Delete Key
On the VE.2 screen you will type ‘V’ (view) in the function field to view a specific record, then
Type ‘D’ in the function field.Press ‘ENTER’.
The VE.2.1 screen will appear. The vendor number that you were viewing will be carried over.
Type ‘A’ (add) in the Function field.Type a four-character key into the ‘KEY’ field.
Press ‘ENTER’. A delete key will be added. Test the delete key and if all looks good and you desire the delete to occur during the weekend processing you will need to set the ‘VALIDATED’ field to ‘Y’ by using the Change process.
Delete a single vendor record when the vendor number is not carried over from VE.2Add a Delete Key
On the VE.2 screen you will type ‘D’ in the function field making sure that the screen is blank.
Press ‘ENTER’.The VE.2.1 screen will appear. The screen will be blank.
Type ‘A’ (add) in the Function field.Type a four-character key into the ‘KEY’ field, then,
TAB to the ‘VENDOR NUMBER’ field and type in the correct vendor number to be deleted.
Press ‘ENTER’. The delete key will be added. Test the delete key and if all looks good and you desire the delete to occur during the weekend processing you will need to set the ‘VALIDATED’ field to ‘Y’ by using the Change process.
Delete Multiple Vendor RecordsAdd a Delete Key to delete multiple records using a wild card
On the VE.2 screen you will type ‘D’ in the function field making sure that the screen is blank.
Press ‘ENTER’.The VE.2.1 screen will appear. The screen will be blank.
Type ‘A’ (add) in the Function field.Type a four-character key into the ‘KEY’ field, then,
TAB to the ‘VENDOR NUMBER’ field and type in the wild card vendor number to be deleted. Use asterisks in the number to indicate the portion of the vendor number for which every record should be considered for deletion. (Refer to ‘WILD CARD’ in Appendix A.)At this point you may want to use the ‘VENDOR TYPES NOT TO BE DELETED’. TAB to this area and type in the vendor type number or numbers that you do not want to delete.
Press ‘ENTER’. The delete key will be added. Test the delete key and if all looks good and you desire the delete to occur during the weekend processing you will need to set the ‘VALIDATED’ field to ‘Y’ by using the Change process.
17 | P a g e
Change a Delete Key - Vendor NumberOn the VE.2.1 screen you will type ‘V’ (view) in the function field
Type the desired key in the ‘KEY’ field.Press ‘ENTER’. The ‘KEY’ will be displayed if it exists.
After you have viewed the key type a ‘C’ (change) in the function field.TAB to the Vendor Number field and type the correct vendor number.Press ‘ENTER’. The vendor number used in the delete key will be changed. Test the delete key and if all looks good and you desire the delete to occur during the weekend processing you will need to set the ‘VALIDATED’ field to ‘Y’ by using the Change process.
OR,On the VE.2.1 screen you will type ‘N’ (next) in the function field
Press ‘ENTER’ until the desired ‘KEY’ is displayed.Type a ‘C’ (change) in the function field.
TAB to the Vendor Number field and type the correct vendor number.Press ‘ENTER’. The vendor number used in the delete key will be changed. Test the delete key and if all looks good and you desire the delete to occur during the weekend processing you will need to set the ‘VALIDATED’ field to ‘Y’ by using the Change process.
Remove a Delete Key.
On the VE.2.1 screen you will type ‘V’ (view) in the function fieldType the desired key in the ‘KEY’ field.
Press ‘ENTER’. The ‘KEY’ will be displayed if it exists.Type ‘R’ (remove) in the function field.
Press ‘ENTER’. The message ‘PRESS ENTER TO REMOVE ABOVE RECORD’ should be displayed.
Press ‘ENTER’ again.The delete key record will be removed from the delete file and the message ‘ABOVE RECORD REMOVED’ will be displayed. SUGGESTION: View the ‘removed’ deleted key to ensure it no longer exists. Use the “View Key” process to verify that it is gone. The message ‘RECORD NOT FOUND’ should be displayed.
OR
On the VE.2.1 screen you will type ‘N’ (next) in the function fieldPress ‘ENTER’ until the desired ‘KEY’ is displayed.
Type ‘R’ (remove) in the function field.Press ‘ENTER’. The message ‘PRESS ENTER TO REMOVE ABOVE RECORD’ should be displayed.
Press ‘ENTER’ again.The delete key record will be removed from the delete file and the message ‘ABOVE RECORD REMOVED’ will be displayed. SUGGESTION: View the ‘removed’ deleted key to ensure it no longer exists. Use the “View Key” process to verify that it is gone. The message ‘RECORD NOT FOUND’ should be displayed.
18 | P a g e
Print a list of existing Delete KeysOn the VE.2.1 screen you will type ‘P’ (print) in the function field
Press ‘ENTER’.The Batch Job Submission screen will appear. Complete the fields as necessary.
Press ‘ENTER’.A WPD933P – VENDOR DELETE RECORD REPORT will be ordered. Refer to ‘DELETE REPORTS’ below.
Test a Delete Key to determine if the delete will achieve the desired results.On the VE.2.1 screen you will type ‘V’ (view) in the function field
Type the desired key in the ‘KEY’ field.Press ‘ENTER’. The ‘KEY’ will be displayed if it exists.
Type ‘T’ (test) in the function field.Press ‘ENTER’.
The Batch Job Submission screen will appear. Complete the fields as necessary.Press ‘ENTER’.
A WPD931P – VENDOR DELETE RECORD PREVIEW (TEST) will be ordered. Refer to ‘DELETE REPORTS’ below.
SUGGESTION: Use the test feature for any action done. It is especially encouraged for the wild card feature because use of the wild card could delete records that you did not intend to be part of the delete. The 'TEST' will run the parameters of the 'Key' against the Vendor Edit File records on file at the time of the 'Test' and print a WPD931P - VENDORS TO BE DELETED PREVIEW (TEST).
DELETE REPORTS: Three types of reports are generated from the delete maintenance process:
WPD931P - VENDORS TO BE DELETED PREVIEW (TEST): This report lists the records, which would be deleted if the delete record were added to the vendor delete file. Function ‘T’ orders this report.
WPD932P - VENDOR EDIT RECORDS DELETED: This report lists the records that were deleted during the weekly (Saturday night) delete process as a result of adding the delete record to the vendor delete file.
WPD933P - VENDOR DELETE-RECORD REPORT: This report lists all of the existing vendor edit delete keys (and associated vendor numbers). Function ‘P’ orders this report.
CAUTIONARY NOTES!!THE DELETE PROCESS CAN BE A POWERFUL TOOL IN YOUR ABILITY TO REMOVE RECORDS FROM THE AGENCY VENDOR FILE. BESIDES THE ABILITY TO SPECIFICALLY DEFINE THE VENDOR NUMBER TO BE DELETED, USE OF THE "WILD CARD" CAN ADD POWER TO A DELETE BY PURGING MULTIPLE VENDOR NUMBERS DEFINED BY THE WILDCARD.
19 | P a g e
***NOT RECOMMENDED!! ***COMPLETELY FILLING THE VENDOR NUMBER FIELD WITH ASTERISKS IS VERY RISKY. ALL VENDOR EDIT FILE RECORDS WILL BE DELETED.
*RECOMMENDED!! *OBTAIN A DELETE ‘TEST’ (WITH A FUNCTION 'T') FOR EACH DELETE KEY BEFORE YOU ALLOW THE KEY TO REMAIN IN THE DELETE FILE. THIS WILL ALLOW YOU TO ASSESS THE IMPACT OF THE DELETE THAT WILL OCCUR IF YOU ALLOW THE KEY TO REMAIN IN THE DELETE FILE. IF YOU SET UP DELETE KEYS EARLY IN THE WEEK YOU WILL HAVE MORE TIME TO TEST AND ANALYZE DELETE KEYS BEFORE THE DELETE OCCURS.
20 | P a g e
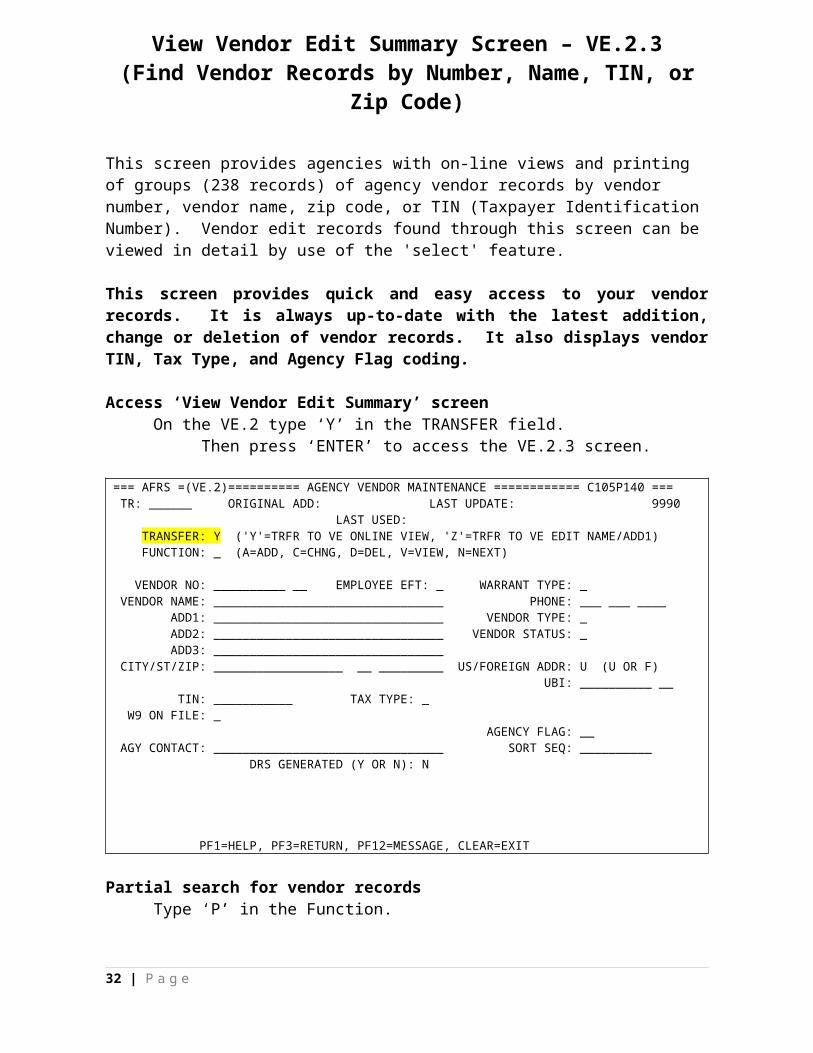
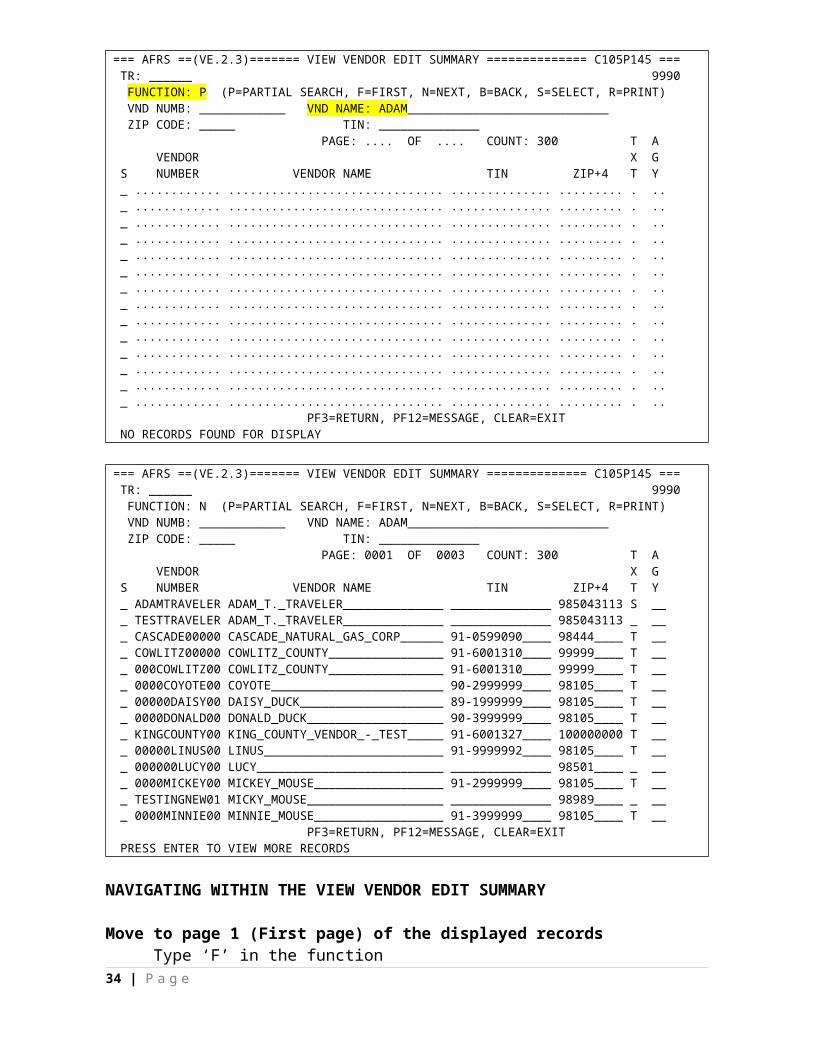
View Vendor Edit Summary Screen – VE.2.3(Find Vendor Records by Number, Name, TIN, or Zip Code)
This screen provides agencies with on-line views and printing of groups (238 records) of agency vendor records by vendor number, vendor name, zip code, or TIN (Taxpayer Identification Number). Vendor edit records found through this screen can be viewed in detail by use of the 'select' feature.
This screen provides quick and easy access to your vendor records. It is always up-to-date with the latest addition, change or deletion of vendor records. It also displays vendor TIN, Tax Type, and Agency Flag coding.
Access ‘View Vendor Edit Summary’ screenOn the VE.2 type ‘Y’ in the TRANSFER field.
Then press ‘ENTER’ to access the VE.2.3 screen.
=== AFRS =(VE.2)========== AGENCY VENDOR MAINTENANCE ============ C105P140 === TR: ______ ORIGINAL ADD: LAST UPDATE: 9990 LAST USED: TRANSFER: Y ('Y'=TRFR TO VE ONLINE VIEW, 'Z'=TRFR TO VE EDIT NAME/ADD1) FUNCTION: _ (A=ADD, C=CHNG, D=DEL, V=VIEW, N=NEXT) VENDOR NO: __________ __ EMPLOYEE EFT: _ WARRANT TYPE: _ VENDOR NAME: ________________________________ PHONE: ___ ___ ____ ADD1: ________________________________ VENDOR TYPE: _ ADD2: ________________________________ VENDOR STATUS: _ ADD3: ________________________________ CITY/ST/ZIP: __________________ __ _________ US/FOREIGN ADDR: U (U OR F) UBI: __________ __ TIN: ___________ TAX TYPE: _ W9 ON FILE: _ AGENCY FLAG: __ AGY CONTACT: ________________________________ SORT SEQ: __________ DRS GENERATED (Y OR N): N PF1=HELP, PF3=RETURN, PF12=MESSAGE, CLEAR=EXIT
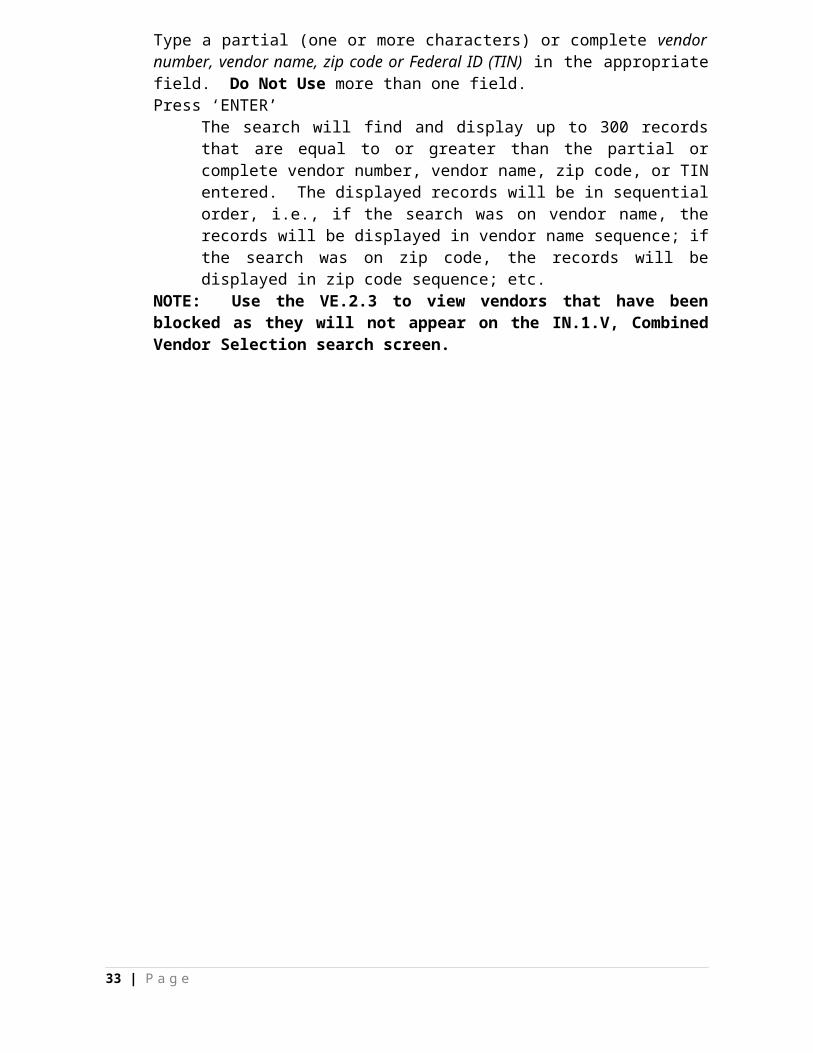
Partial search for vendor recordsType ‘P’ in the Function.Type a partial (one or more characters) or complete vendor number, vendor name, zip code or Federal ID (TIN) in the appropriate field. Do Not Use more than one field.Press ‘ENTER’
The search will find and display up to 300 records that are equal to or greater than the partial or complete vendor number, vendor name, zip code, or TIN entered. The displayed records will be in sequential order, i.e., if the search was on vendor name, the records will be displayed in vendor name sequence; if the search was on zip code, the records will be displayed in zip code sequence; etc.
NOTE: Use the VE.2.3 to view vendors that have been blocked as they will not appear on the IN.1.V, Combined Vendor Selection search screen.
21 | P a g e
=== AFRS ==(VE.2.3)======= VIEW VENDOR EDIT SUMMARY ============== C105P145 === TR: ______ 9990 FUNCTION: P (P=PARTIAL SEARCH, F=FIRST, N=NEXT, B=BACK, S=SELECT, R=PRINT) VND NUMB: ____________ VND NAME: ADAM____________________________ ZIP CODE: _____ TIN: ______________ PAGE: .... OF .... COUNT: 300 T A VENDOR X G S NUMBER VENDOR NAME TIN ZIP+4 T Y _ ............ .............................. .............. ......... . .. _ ............ .............................. .............. ......... . .. _ ............ .............................. .............. ......... . .. _ ............ .............................. .............. ......... . .. _ ............ .............................. .............. ......... . .. _ ............ .............................. .............. ......... . .. _ ............ .............................. .............. ......... . .. _ ............ .............................. .............. ......... . .. _ ............ .............................. .............. ......... . .. _ ............ .............................. .............. ......... . .. _ ............ .............................. .............. ......... . .. _ ............ .............................. .............. ......... . .. _ ............ .............................. .............. ......... . .. _ ............ .............................. .............. ......... . .. PF3=RETURN, PF12=MESSAGE, CLEAR=EXIT NO RECORDS FOUND FOR DISPLAY
=== AFRS ==(VE.2.3)======= VIEW VENDOR EDIT SUMMARY ============== C105P145 === TR: ______ 9990 FUNCTION: N (P=PARTIAL SEARCH, F=FIRST, N=NEXT, B=BACK, S=SELECT, R=PRINT) VND NUMB: ____________ VND NAME: ADAM____________________________ ZIP CODE: _____ TIN: ______________ PAGE: 0001 OF 0003 COUNT: 300 T A VENDOR X G S NUMBER VENDOR NAME TIN ZIP+4 T Y _ ADAMTRAVELER ADAM_T._TRAVELER______________ ______________ 985043113 S __ _ TESTTRAVELER ADAM_T._TRAVELER______________ ______________ 985043113 _ __ _ CASCADE00000 CASCADE_NATURAL_GAS_CORP______ 91-0599090____ 98444____ T __ _ COWLITZ00000 COWLITZ_COUNTY________________ 91-6001310____ 99999____ T __ _ 000COWLITZ00 COWLITZ_COUNTY________________ 91-6001310____ 99999____ T __ _ 0000COYOTE00 COYOTE________________________ 90-2999999____ 98105____ T __ _ 00000DAISY00 DAISY_DUCK____________________ 89-1999999____ 98105____ T __ _ 0000DONALD00 DONALD_DUCK___________________ 90-3999999____ 98105____ T __ _ KINGCOUNTY00 KING_COUNTY_VENDOR_-_TEST_____ 91-6001327____ 100000000 T __ _ 00000LINUS00 LINUS_________________________ 91-9999992____ 98105____ T __ _ 000000LUCY00 LUCY__________________________ ______________ 98501____ _ __ _ 0000MICKEY00 MICKEY_MOUSE__________________ 91-2999999____ 98105____ T __ _ TESTINGNEW01 MICKY_MOUSE___________________ ______________ 98989____ _ __ _ 0000MINNIE00 MINNIE_MOUSE__________________ 91-3999999____ 98105____ T __ PF3=RETURN, PF12=MESSAGE, CLEAR=EXIT PRESS ENTER TO VIEW MORE RECORDS
NAVIGATING WITHIN THE VIEW VENDOR EDIT SUMMARY
Move to page 1 (First page) of the displayed recordsType ‘F’ in the functionPress ‘ENTER’
Page one of the selected vendors will be displayed.
22 | P a g e

Move to the next page of the displayed vendors.Type ‘N’ in the function.Press ‘ENTER’
The next page of the selected vendors will be displayed. If you are on last page of the vendor list (usually the last page is 22), you will see the message ‘LAST RECORD FOR AGENCY DISPLAYED’. If you enter ‘Next’ again the result will be that the first page will start over.
Move to the previous page of the displayed vendors.Type ‘B’ in the function.Press ‘ENTER’
The previous page of the selected vendors will be displayed. If you are already on page 1, the screen message ‘PAGE 1 PRESENTLY DISPLAYED, BACK COMMAND IGNORED’ will be displayed.
Select a specific page of the displayed vendors.Type ‘S’ in the function.TAB to the page field and type in the page number you desire.Press ‘ENTER’.
The selected page of the vendors will be displayed.
View the entire vendor recordType ‘S’ in the column at the left of the screen that has the column heading ‘S’. Be sure to place it next to the vendor record that you wish to view.Press ‘ENTER’.
The selected vendor record (screen VE.2) will be displayed. Any necessary changes can be made to the vendor record. You can then return to screen VE.2.3 by pressing the F4 key. (If you have left the VE.2 screen you will need to start over.)
The “R” function for Print Vendor Records NO LONGER WORKS & WILL BE REMOVED IN THE FUTURE.
23 | P a g e
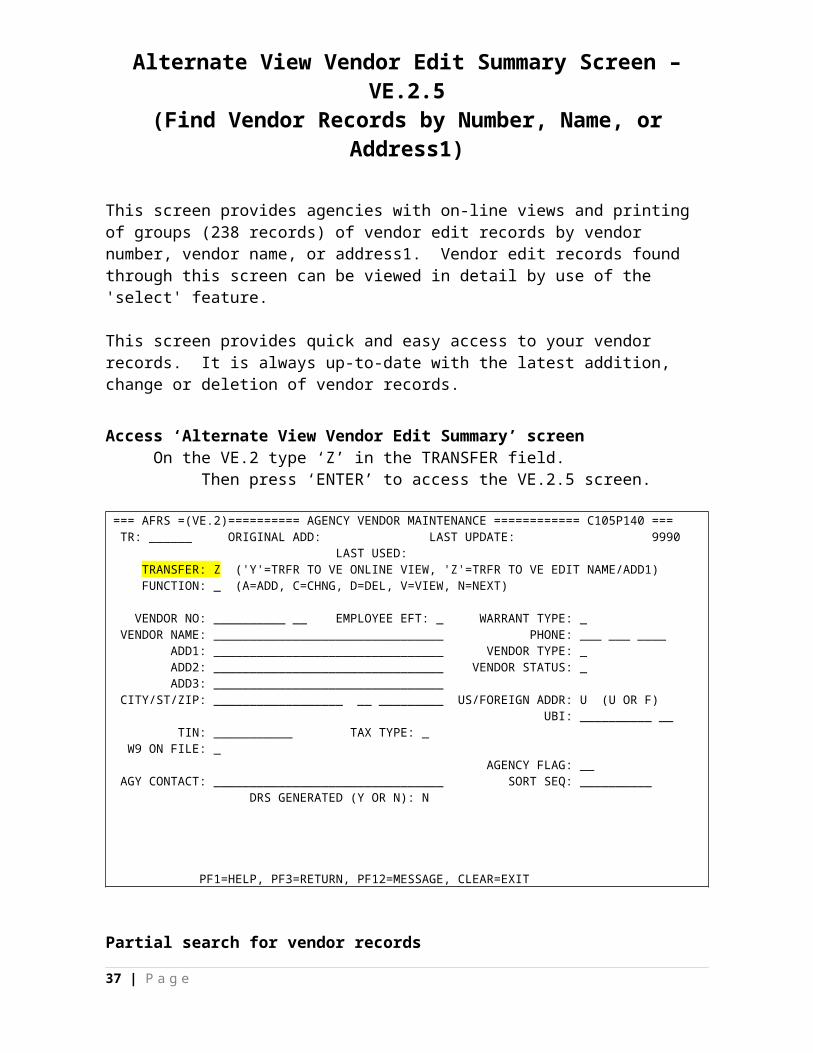
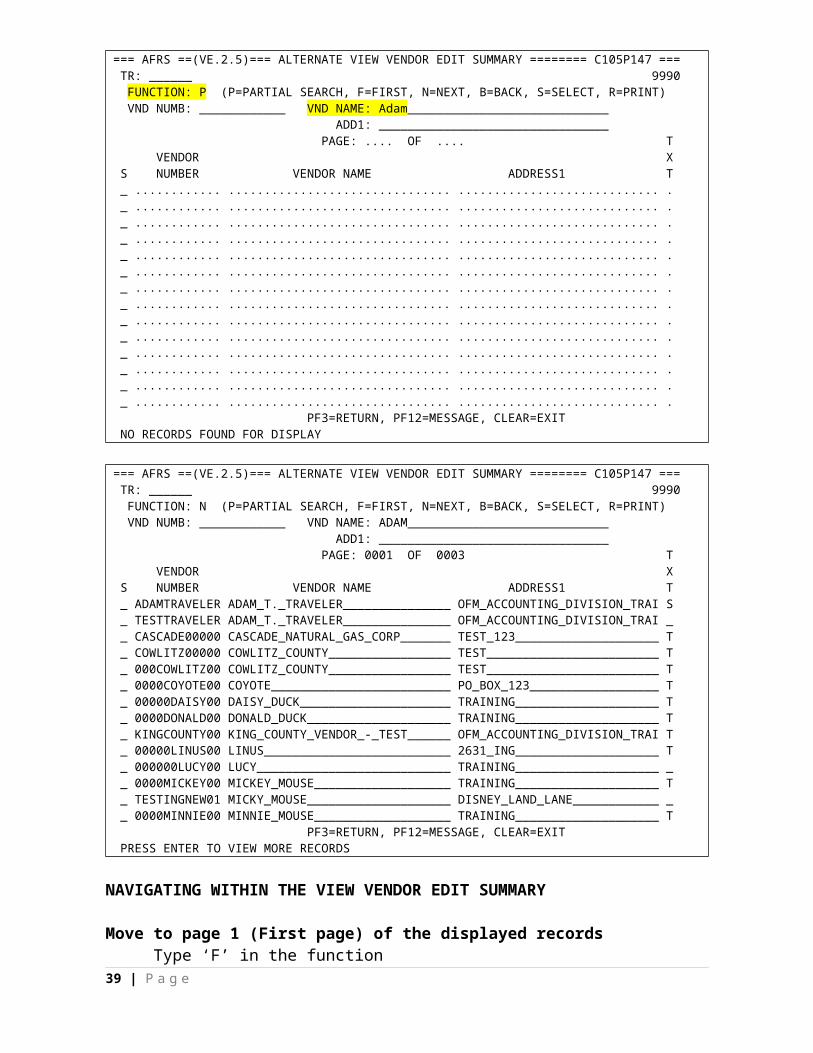
Alternate View Vendor Edit Summary Screen – VE.2.5(Find Vendor Records by Number, Name, or Address1)
This screen provides agencies with on-line views and printing of groups (238 records) of vendor edit records by vendor number, vendor name, or address1. Vendor edit records found through this screen can be viewed in detail by use of the 'select' feature.
This screen provides quick and easy access to your vendor records. It is always up-to-date with the latest addition, change or deletion of vendor records.
Access ‘Alternate View Vendor Edit Summary’ screenOn the VE.2 type ‘Z’ in the TRANSFER field.
Then press ‘ENTER’ to access the VE.2.5 screen.
=== AFRS =(VE.2)========== AGENCY VENDOR MAINTENANCE ============ C105P140 === TR: ______ ORIGINAL ADD: LAST UPDATE: 9990 LAST USED: TRANSFER: Z ('Y'=TRFR TO VE ONLINE VIEW, 'Z'=TRFR TO VE EDIT NAME/ADD1) FUNCTION: _ (A=ADD, C=CHNG, D=DEL, V=VIEW, N=NEXT) VENDOR NO: __________ __ EMPLOYEE EFT: _ WARRANT TYPE: _ VENDOR NAME: ________________________________ PHONE: ___ ___ ____ ADD1: ________________________________ VENDOR TYPE: _ ADD2: ________________________________ VENDOR STATUS: _ ADD3: ________________________________ CITY/ST/ZIP: __________________ __ _________ US/FOREIGN ADDR: U (U OR F) UBI: __________ __ TIN: ___________ TAX TYPE: _ W9 ON FILE: _ AGENCY FLAG: __ AGY CONTACT: ________________________________ SORT SEQ: __________ DRS GENERATED (Y OR N): N PF1=HELP, PF3=RETURN, PF12=MESSAGE, CLEAR=EXIT
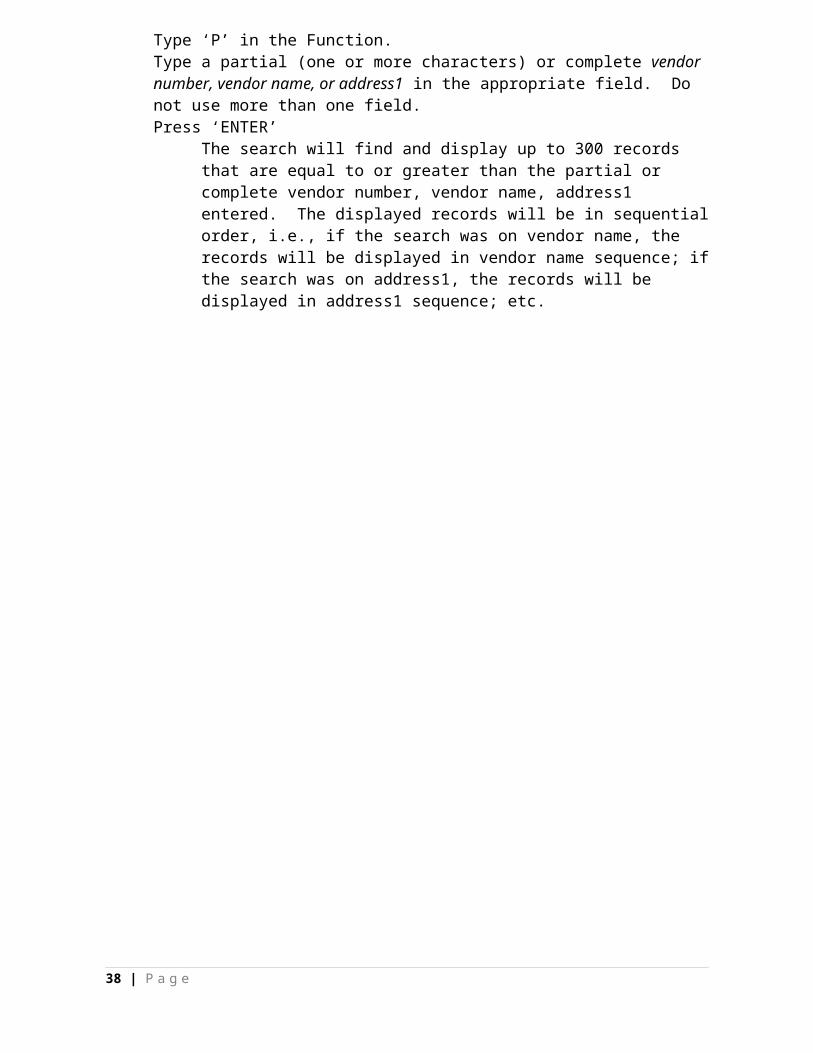
Partial search for vendor recordsType ‘P’ in the Function.Type a partial (one or more characters) or complete vendor number, vendor name, or address1 in the appropriate field. Do not use more than one field.Press ‘ENTER’
The search will find and display up to 300 records that are equal to or greater than the partial or complete vendor number, vendor name, address1 entered. The displayed records will be in sequential order, i.e., if the search was on vendor name, the records will be displayed in vendor name sequence; if the search was on address1, the records will be displayed in address1 sequence; etc.
24 | P a g e
=== AFRS ==(VE.2.5)=== ALTERNATE VIEW VENDOR EDIT SUMMARY ======== C105P147 === TR: ______ 9990 FUNCTION: P (P=PARTIAL SEARCH, F=FIRST, N=NEXT, B=BACK, S=SELECT, R=PRINT) VND NUMB: ____________ VND NAME: Adam____________________________ ADD1: ________________________________ PAGE: .... OF .... T VENDOR X S NUMBER VENDOR NAME ADDRESS1 T _ ............ ............................... ............................ . _ ............ ............................... ............................ . _ ............ ............................... ............................ . _ ............ ............................... ............................ . _ ............ ............................... ............................ . _ ............ ............................... ............................ . _ ............ ............................... ............................ . _ ............ ............................... ............................ . _ ............ ............................... ............................ . _ ............ ............................... ............................ . _ ............ ............................... ............................ . _ ............ ............................... ............................ . _ ............ ............................... ............................ . _ ............ ............................... ............................ . PF3=RETURN, PF12=MESSAGE, CLEAR=EXIT NO RECORDS FOUND FOR DISPLAY
=== AFRS ==(VE.2.5)=== ALTERNATE VIEW VENDOR EDIT SUMMARY ======== C105P147 === TR: ______ 9990 FUNCTION: N (P=PARTIAL SEARCH, F=FIRST, N=NEXT, B=BACK, S=SELECT, R=PRINT) VND NUMB: ____________ VND NAME: ADAM____________________________ ADD1: ________________________________ PAGE: 0001 OF 0003 T VENDOR X S NUMBER VENDOR NAME ADDRESS1 T _ ADAMTRAVELER ADAM_T._TRAVELER_______________ OFM_ACCOUNTING_DIVISION_TRAI S _ TESTTRAVELER ADAM_T._TRAVELER_______________ OFM_ACCOUNTING_DIVISION_TRAI _ _ CASCADE00000 CASCADE_NATURAL_GAS_CORP_______ TEST_123____________________ T _ COWLITZ00000 COWLITZ_COUNTY_________________ TEST________________________ T _ 000COWLITZ00 COWLITZ_COUNTY_________________ TEST________________________ T _ 0000COYOTE00 COYOTE_________________________ PO_BOX_123__________________ T _ 00000DAISY00 DAISY_DUCK_____________________ TRAINING____________________ T _ 0000DONALD00 DONALD_DUCK____________________ TRAINING____________________ T _ KINGCOUNTY00 KING_COUNTY_VENDOR_-_TEST______ OFM_ACCOUNTING_DIVISION_TRAI T _ 00000LINUS00 LINUS__________________________ 2631_ING____________________ T _ 000000LUCY00 LUCY___________________________ TRAINING____________________ _ _ 0000MICKEY00 MICKEY_MOUSE___________________ TRAINING____________________ T _ TESTINGNEW01 MICKY_MOUSE____________________ DISNEY_LAND_LANE____________ _ _ 0000MINNIE00 MINNIE_MOUSE___________________ TRAINING____________________ T PF3=RETURN, PF12=MESSAGE, CLEAR=EXIT PRESS ENTER TO VIEW MORE RECORDS
NAVIGATING WITHIN THE VIEW VENDOR EDIT SUMMARY
Move to page 1 (First page) of the displayed recordsType ‘F’ in the functionPress ‘ENTER’
Page one of the selected vendors will be displayed.
25 | P a g e

Move to the next page of the displayed vendors.Type ‘N’ in the function.Press ‘ENTER’
The next page of the selected vendors will be displayed. If you are on the last page of the vendor list (usually the last page is 22), you will see the message ‘LAST RECORD FOR AGENCY DISPLAYED’. If you enter ‘Next’ again the result will be that the first page will start over.
Move to the previous page of the displayed vendors.Type ‘B’ in the function.Press ‘ENTER’
The previous page of the selected vendors will be displayed. If you are already on page 1, the screen message ‘PAGE 1 PRESENTLY DISPLAYED, BACK COMMAND IGNORED’ will be displayed.
Select a specific page of the displayed vendors.Type ‘S’ in the function.TAB to the page field and type in the page number you desire.Press ‘ENTER’.
The selected page of the vendors will be displayed.
View the entire vendor recordType ‘S’ in the column at the left of the screen that has the column heading ‘S’. Be sure to place it next to the vendor record that you wish to view.Press ‘ENTER’.
The selected vendor record (screen VE.2) will be displayed. Any necessary changes can be made to the vendor record. You can then return to screen VE.2.5 by pressing the F4 key. (If you have left the VE.2 screen you will need to start over.)
The “R” function for Print Vendor Records NO LONGER WORKS & WILL BE REMOVED IN THE FUTURE.
26 | P a g e
View Combined Vendor Selection Screen – IN.1.V (VE.1)(Find Vendor Records by Number, Name, TIN, or Zip Code)
This screen provides agencies with on-line view capability for all agency and statewide vendor records by vendor number, vendor name, zip code, or TIN. Vendor records found through this screen can be viewed in detail by use of the 'select' feature.
NOTE: Use the VE.2.3 or VE.1.S to view vendors that have been blocked as they will not appear on the IN.1.V, Combined Vendor Selection search screen.
This screen provides quick and easy access to all active vendor records. It is always up-to-date with the latest addition, change or blocking of vendor records. It also provides a quick view of the vendor TIN, Pay Flag, and Zip.
Access ‘Combined Vendor Selection’ screenOn the VE screen type ‘1’ in the SELECT FUNCTION field.
Then press ‘ENTER’ to access the IN.1.V screen.
=== AFRS =(IN.1.V)======== COMBINED VENDOR SELECTION ============= C105P2VC === TR: ______ 9990 FUNCTION: _ (P=PARTIAL SEARCH, F=FIRST, N=NEXT, B=BACK) VND NAME: ________________________________ VND NUMB: ____________ TIN: ___________ ZIP CODE: _________ LINE FUNCTION: T=ADD VENDOR TO TRANSACTION, S=SELECT TO VIEW DETAIL P A=1099 IR.2 A S VENDOR NO VENDOR NAME TIN ZIP+4 Y _ ............ ................................ ........... ......... . _ ............ ................................ ........... ......... . _ ............ ................................ ........... ......... . _ ............ ................................ ........... ......... . _ ............ ................................ ........... ......... . _ ............ ................................ ........... ......... . _ ............ ................................ ........... ......... . _ ............ ................................ ........... ......... . _ ............ ................................ ........... ......... . _ ............ ................................ ........... ......... . _ ............ ................................ ........... ......... . _ ............ ................................ ........... ......... . _ ............ ................................ ........... ......... . _ ............ ................................ ........... ......... . F1=HELP, F3=RETURN, F12=MESSAGE, PAUSE/BREAK=EXIT NO RECORDS FOUND FOR DISPLAY
Partial search for vendor records. Type ‘P’ in the Function.Type a partial (one or more characters) or complete vendor number, vendor name, zip code or TIN (Taxpayer Identification Number) in the appropriate field. Do Not Use more than one field.Press ‘ENTER’
The search will find and display up to 999 records that are equal to or greater than the partial or complete vendor number, vendor name, zip code, or TIN entered. The displayed records will be in sequential order, i.e., if the search was on vendor name, the records will be displayed in vendor name sequence; if the search was on zip code, the records will be displayed in zip code sequence; etc.
27 | P a g e
=== AFRS =(IN.1.V)======== COMBINED VENDOR SELECTION ============= C105P2VC === TR: ______ 9990 FUNCTION: P (P=PARTIAL SEARCH, F=FIRST, N=NEXT, B=BACK) VND NAME: BOB_____________________________ VND NUMB: ____________ TIN: ___________ ZIP CODE: _________ LINE FUNCTION: T=ADD VENDOR TO TRANSACTION, S=SELECT TO VIEW DETAIL P A=1099 IR.2 A S VENDOR NO VENDOR NAME TIN ZIP+4 Y _ ............ ................................ ........... ......... . _ ............ ................................ ........... ......... . _ ............ ................................ ........... ......... . _ ............ ................................ ........... ......... . _ ............ ................................ ........... ......... . _ ............ ................................ ........... ......... . _ ............ ................................ ........... ......... . _ ............ ................................ ........... ......... . _ ............ ................................ ........... ......... . _ ............ ................................ ........... ......... . _ ............ ................................ ........... ......... . _ ............ ................................ ........... ......... . _ ............ ................................ ........... ......... . _ ............ ................................ ........... ......... . F1=HELP, F3=RETURN, F12=MESSAGE, PAUSE/BREAK=EXIT NO RECORDS FOUND FOR DISPLAY
=== AFRS =(IN.1.V)======== COMBINED VENDOR SELECTION ============= C105P2VC === TR: ______ 9990 FUNCTION: N (P=PARTIAL SEARCH, F=FIRST, N=NEXT, B=BACK) VND NAME: BOB_____________________________ VND NUMB: ____________ TIN: ___________ ZIP CODE: _________ LINE FUNCTION: T=ADD VENDOR TO TRANSACTION, S=SELECT TO VIEW DETAIL P A=1099 IR.2 A S VENDOR NO VENDOR NAME TIN ZIP+4 Y _ SWV002032002 BOBAGGINS_DAYCARE_INC___________ 42-1633326_ 98324____ E _ SWV002032000 BOBAGGINS_DAYCARE&_LRNG_CT_DBA__ 42-1633326_ 98362____ E _ SWV014847000 BOBB__ANDREA_TERRI______________ ***-**-2165 989200014 E _ SWV014555500 BOBB__MARY_ELLEN________________ ***-**-9820 98951____ E _ SWV006762300 BOBBIES_BEAUTY_BAR_________DBA__ ***-**-7445 98586____ I _ SWV011500300 BOBBITT__SHIRLEY_F______________ ***-**-3004 98513____ E _ SWV014339400 BOBBY_CARPENTER_________________ 51-0549761_ 98685____ E _ SWV010410400 BOBBY_JAYZ_OB2_CAFE________DBA__ 91-1672109_ 98516____ I _ SWV008942200 BOBBY_WOLFORD_TRUCKING_&_SALVA__ 91-1333261_ 98072____ I _ SWV016638100 BOBCAT_BOOSTER_CLUB_____________ 91-1337050_ 98520____ E _ SWV004825800 BOBCHINSKAYA__OLGA______________ ***-**-7335 98034____ E _ SWV007502500 BOBEK_ENTERPRISES_______________ 93-1230570_ 97103____ I _ SWV015456000 BOBLICK__RAYMOND________________ ***-**-4075 99003____ I _ SWV005612500 BOBO__BRENDA____________________ ***-**-0545 98092____ E F1=HELP, F3=RETURN, F12=MESSAGE, PAUSE/BREAK=EXIT PRESS ENTER TO VIEW MORE RECORDS
NAVIGATING WITHIN THE COMBINED VENDOR SELECTION
Move to page 1 (First page) of the displayed recordsType ‘F’ in the functionPress ‘ENTER’
Page one of the selected vendors will be displayed.
28 | P a g e
Move to the next page of the displayed vendors.Type ‘N’ in the function.Press ‘ENTER’
The next page of the selected vendors will be displayed. If you are on last page of the vendor list, you will see the message ‘LAST RECORD DISPLAYED’. If you enter ‘Next’ again the result will be that the first page will start over.
Move to the previous page of the displayed vendors.Type ‘B’ in the function.Press ‘ENTER’
The previous page of the selected vendors will be displayed. If you are already on page 1, the screen message ‘PAGE 1 PRESENTLY DISPLAYED, BACK COMMAND IGNORED’ will be displayed.
View the entire vendor recordType ‘S’ in the column at the left of the screen that has the column heading ‘S’. Be sure to place it next to the vendor record that you wish to view.Press ‘ENTER’.
The selected vendor record (screen VE.2 or VE.3) will be displayed. Any necessary changes to Agency records can now be made to the vendor record. You can then return to screen IN.1.V by pressing either the F3 or F4 key.
29 | P a g e
APPENDIX
Vendor Edit Dictionary – Appendix AAlphabetical order
ADD 1/ADD 2/ADD 3 (VE.2 – Agency Vendor Maintenance)The Three Address Fields are 32-character alphanumeric fields that identify titles, street address information or mail stops in lieu of street addresses. Edit rules for the name, address lines, vendor name and address construction suggestions are discussed in ‘Vendor Name’ below.
AGY CONTACT (VE.2 – Agency Vendor Maintenance)The Agency Contact Name is an optional 32-character alphanumeric field designed to allow entry of the name of the specific person with whom the agency deals at the vendor's office. However, any notation can be entered in this field. Anything entered in this field is generally only meaningful to the agency. Information in this field is not included on any transactions or other files.
AGENCY FLAG (VE.2 – Agency Vendor Maintenance)Valid codes are: blank, 0 - 9, A - Z. The agency flag must be registered in Descriptor Table 94
CITY/ST/ZIP (VE.2 – Agency Vendor Maintenance)The first 5 digits of the zip code are required when the vendor is marked as a U.S. vendor. Agencies are urged to also enter the last four digits (+4) of a vendor’s zip code. The +4 defines an address to the proper side of a street within a city block. Such identification can be important in specific vendor identification, especially when combined with the TIN.
DRS GENERATED (VE.2 – Agency Vendor Maintenance)Agency created vendor records will contain an ‘N’.
EMPLOYEE EFT (VE.2 – Agency Vendor Maintenance)This is an optional field that allows employees to elect Electronic Fund Transfer (EFT/ACH) for non-payroll payments. This allows payments such as travel reimbursement to be directly deposited into the employees’ bank account. The allowable codes are:
Y = YesN = No (Default)
30 | P a g e
FUNCTION (VE.2 – Agency Vendor Maintenance)A = Add a new vendor edit record. Fill in the appropriate and required vendor data
on the record before pressing 'Enter'.C = Change a vendor edit record. The data in any field of the vendor edit record
can be changed, EXCEPT the vendor number. Before a record can be changed it must be displayed through the 'View' process (Function 'V') or the 'Next' process (Function 'N').
D = Delete a vendor edit record through the vendor edit delete process. Use of this function will cause a transfer to screen VE.2.1 - Vendor Edit Delete.
V = View a vendor edit record. A record can be 'viewed' by use of this function and entry of a complete valid vendor number in the vendor number field.
N = View the next vendor edit record. Use of this function will find the next sequential vendor edit record (based on vendor number sequence). Use of 'Next' on a blank screen will find the first vendor record in the file (based on vendor number sequence).
FUNCTION (VE.2.1-Vendor Edit Delete)A = Add the designated Key and delete parameters to the vendor edit delete file.C = Change existing delete parameters of the specified Key.R = Remove the specified Key from the vendor edit delete file.V = View a specified Key and accompanying delete parameters.N = Move to the next Key in the delete file.P = Print a report of the vendor edit delete key file (WPD933P - DELETE
TRANSACTION REPORT). T = Test the delete action by ordering a report (WPD931P-VENDORS TO BE
DELETED PREVIEW) of the effect the delete will have on the vendor edit file.
FUNCTION (VE.2.3-View Vendor Edit Summary)P = Partial Search on Vendor Number, Vendor Name, TIN or Zip Code.F = First Page. Return to the first page of the displayed records.N = Next Page. Move to the next page of the displayed records.B = Previous Page. Move back to the previous page of the displayed records.S = Select page. Select and move to a specific page of the displayed records.R = Print Vendor Records (NO LONGER WORKS & WILL BE REMOVED IN
THE FUTURE.)
FUNCTION: (VE.2.5-Alternate View Vendor Edit Summary)P = Partial Search on Vendor Number, Vendor Name, or Address1.F = First Page. Return to the first page of the displayed records.N = Next Page. Move to the next page of the displayed records.B = Previous Page. Move back to the previous page of the displayed records.S = Select page. Select and move to a specific page of the displayed records.R = Print Vendor Records (NO LONGER WORKS & WILL BE REMOVED IN
THE FUTURE.)
31 | P a g e
KEY (VE.2.1)A ‘KEY’ is a four-character (any number or letter) agency assigned name for a delete action added by an agency. The ‘KEY’ identifies a unique combination of vendor edit records to be deleted. The computer uses this key to identify and process each delete action ordered by an agency. The delete process runs each Saturday night.
LAST USED (VE.2-Agency Vendor Maintenance)Information in this field is added by the system. This will indicate the date the record was last used.
LAST UPDATE (VE.2-Agency Vendor Maintenance)Information in this field is added by the system. This will indicate the date the record was last updated.
ORIGINAL ADD (VE.2-Agency Vendor Maintenance)Information in this field is added by the system. This will contain the date the vendor record was first added to the file.
PHONE (VE.2-Agency Vendor Maintenance)This is an optional field for the vendor's business telephone number.
SORT SEQ (VE.2-Agency Vendor Maintenance)The Sort Sequence is a 10-character alphanumeric field that is available for use by an individual agency as alternate or second sort orders in which vendors are listed on a vendor edit report, or if a vendor edits report is limited to records with a sort sequence. Anything entered in this field is generally only meaningful to the agency. Information in this field is not included on any transactions or other files.
STATEWIDE VENDOR (VE.3-Statewide Vendor Maintenance)This is a listing of common vendors for all state agencies to use in the processing of payments. The Department of Enterprise Services maintains this listing.
TIN (VE.2-Agency Vendor Maintenance)This is the Taxpayer Identification Number that is the umbrella term used for the following federal ids:
SSN = Social Security NumberEIN = Employer Identification NumberITIN = Individual Taxpayer Identification Number
A TIN always is a nine-digit number, no exceptions. TINs should be entered without dashes as the “TAX TYPE” will format the number.
TAX TYPE (VE.2-Agency Vendor Maintenance)This is a data element used to indicate whether the TIN shown is a social security number (Tax Type ‘S’), individual taxpayer identification number (Tax Type ‘R’) or employer identification number (Tax Type ‘T’). Correct tax type designation of a TIN is important when the vendor is included in reports to the Internal Revenue Service
32 | P a g e
TR Screen Transfer. Enter the screen number (e.g. RR.1, IN.6, etc.) of the AFRS screen that you wish to transfer to and press 'Enter'.
TRANSFER (VE.2)VE.2 = Enter a 'Y' at the transfer line and you will be transferred to the VE.2.3 – View Vendor Edit Summary screen or Enter a ‘Z’ at the transfer line and you will be transferred to the VE.2.5 – Alternate View Vendor Edit Summary screen.
UBI (Unified Business Identifier) (VE.2-Agency Vendor Maintenance)This should be entered if provided by the vendor. The UBI is a code that is unique to each vendor. The UBI is assigned by the State of Washington when a vendor applies for a business license.
US/FOREIGN ADDR (VE.2-Agency Vendor Maintenance)The US/Foreign Address is a 1-character alpha character that identifies whether the vendor has a US or foreign address. The codes are:
U = US AddressF = Foreign Address
Foreign Addresses: Enter 'F' in the US/Foreign Address field. This will turn off edits on the address fields. The foreign address can then be entered in the address fields in any format as long as the 'City' field contains characters (such as the name of the country). APO/FPO addresses and addresses in Puerto Rico, US Virgin Islands, Guam, American Samoa, Federated States of Micronesia, Marshall Islands, Northern Mariana Islands, and Palau Island are US addresses and should use the US Postal Service abbreviations and zip codes.
VALIDATED (VE.2.1)Any action that requires a weekend process must be VALIDATED before it will run. The most common screens that require this are the delete screen.
VENDOR NAME (VE.2-Agency Vendor Maintenance)The vendor name is assigned by the agency. If the vendor name exceeds the length of this field, the 'ADD 1' line can be used for a continuation of the name.
NOTE: -Position 1 of the vendor name line must be an alpha or numeric character. No special characters are permitted.-Position 2 of the vendor name line must be an alpha character, a numeric character, a space, or certain special characters such as a period.-Position 3 cannot be a space if position 2 is a space.
VENDOR NUMBER (VE.2-Agency Vendor Maintenance)The format is a 10-character vendor number and a two-character suffix. The vendor number is the primary identification of the vendor in the vendor edit file. The suffix is used to define vendor record coding variations (such as different addresses, different PO boxes, etc.) The format of vendor numbers is an agency decision. The format used should be consistently applied and meet the needs of the agency.
*****Agencies are not allowed to use Social Security Numbers for vendor numbers and an edit will stop you from trying to input this type of entry.
33 | P a g e
NOTE: Reassignment (re-use) of vendor numbers is not recommended. Research of historical financial records would be complicated if vendor numbers were re-used.
VENDOR STATUS (VE.2-Agency Vendor Maintenance)Use of this field is mandatory. Valid codes are:
A = ActiveB = BlockedF = System Generated - Vendor blocked because it matched a name on the US Dept. of Treasury Office of Foreign Asset Control’s Specially Designated Nationals (SDN) List.
VENDOR TYPE (VE.2-Agency Vendor Maintenance)This is used to distinguish vendors. Valid codes on the agency vendor file are:
1 = Employee 6 = Boards/Councils/Commissions Members
WARRANT TYPE (VE.2-Agency Vendor Maintenance)This field is optional and allows for a choice about how the warrant is to be handled. Valid codes are:
I = Warrant is to be inserted.R = Warrant is to be returned to the agency for mailing.
WILD CARD (VE.2.1-Vendor Edit Delete)The ‘Vendor Edit Delete’ process allows multiple records to be deleted by use of a wild card (an asterisk ‘*’ is used to denote the wild card). A wild card means ‘select any character that is in the position represented by the wild card’.
ON-LINE ERROR MESSAGESVendor Edit maintenance transactions are entered and edited directly on-line. Transactions must pass the on-line edits before they are added to the Vendor Edit Table. A transaction that is rejected by the on-line edits must be corrected while performing on-line data entry.
**See AFRS Error Code Documentation**
34 | P a g e
CUTTING EDGE VENDOR ADDRESSING!Plus other Vendor Naming and Addressing Information
You May Want to Know – Appendix B
AFRS users need to construct vendor addresses that will be readable by the USPS OCR equipment. Readable mail helps the USPS process mail in a more efficient manner that, in turn, helps them hold down costs and future mail rate increases. The primary ingredient to make all of this work is vendor naming and addressing that meets USPS mail addressing standards.
A major part of the USPS automated processing system for letter mail is high speed optical character readers ... “(OCRs) that read machine printed addresses on letter mail, print a postal (POSTNET) bar-code in the lower right corner of each mail piece and perform an initial sort.” Some of the key ingredients of addressing for automation include:
Recommended Address Format:Name of Recipient WARNER DANDelivery Address 357 COLCHESTER DR SECity, State, ZIP VANCOUVER WA 98612-3456
The order of importance to the OCR is bottom to top.
City, State, ZIP is the most important OCR line. The City/State/Zip line in the AFRS vendor record is this line. Correct spelling of the city is essential. Use of Zip+4 is encouraged to maximize readability. The total amount for the Zip+4 codes is 9 digits, i.e. 12345-6789. The standard two-letter state abbreviation is required in AFRS US vendor addresses.
Always use the postal service standard two-letter state abbreviations for the state name. This includes the 50 states, Puerto Rico, US Virgin Islands, Guam, American Samoa, Federated States of Micronesia, Marshall Islands, Northern Mariana Islands, and Palau Island. APO and FPO addresses are US addresses and the appropriate state and zip code should be used. A more complete explanation of addressing and abbreviations can be found in the USPS.COM Official USPS Abbreviations or at https://www.usps.com/send/official-abbreviations.htm.
The Delivery Address line should include ... “the street address, post office box number, rural route number and box number, or highway contract number and box number.” “Mail addressed to occupants of multi-unit buildings should include the apartment, suite, or room number, or other unit designation, immediately after the street address. If it’s necessary to reduce the length of the delivery address line, the apartment number or other designator, should be placed on the line immediately above the Delivery Address Line.”
35 | P a g e

“When addressing mail to a rural route, highway contract route, or post office box, the information should be printed as shown in these examples:
Rural RouteRR 6 BOX 92
Highway Contract RouteHC 2 BOX 10
Post Office BoxPO BOX 184
“The use of two delivery addresses, such as a street address and a post office box, is not recommended. If dual addressing is used, one delivery designation should be placed on the Delivery Address Line and the other on the line immediately above. It’s important to note that the mail will be delivered to the address on the Delivery Address Line and, for that reason, the ZIP Code or ZIP+4 should always reflect that address.” The last non-blank address line in the AFRS vendor record would be the delivery address.
Example of Dual AddressingGRAND PRETTY100 MAJOR ST
Mail will be delivered here --------->PO BOX 200NEW YORK NY 10001-0200
Some addressing abbreviation and punctuation rules are: N (North), S (South), E (East), W (West), NE, NW, SE OR SW, AVE (Avenue), ST (Street), DR (Drive), RD (Road), PL (Place) or CIR
(Circle), RM (Room), STE (Suite) or APT (Apartment) number, No Punctuation is preferred.
The Name of Recipient Line should contain the name of the intended recipient. In the AFRS vendor record this is the Vendor Name Line.
The Information/Attention Line and the Non-Address Line are not currently supported by the AFRS vendor record format.
MILITARY ADDRESSES “APO” or “FPO” is the equivalent of a city name. “AE”, “AP”, and “AA” are the
equivalents of state abbreviations. AE - (Zip Codes 090-098) designates Armed Forces in Europe, the Middle East,
Canada, and Africa. AP - (Zip Codes 962-966) designates Armed Forces in the Pacific. AA - (Zip Code 340) designates Armed Forces in Central and South America (Except
Canada).
FOREIGN ADDRESSES “Mail addressed to foreign countries should include the country name (no
abbreviations) as the only information on the bottom line” (the City/State/Zip line). For example:
LEWIS DAVID247 HOWE LANELONDON, WIP8HQENGLAND
36 | P a g e
“EXCEPTION: Mail addressed to Canada may use either of the following formats when the postal delivery zone is included in the address:” For example:
AMBROSE FRANK724 FRONT STREETOTTAWA, ONTARIO K2B OA1CANADA
AMBROSE FRANK 724 FRONT STREETOTTAWA, ONTARIO CANADAK2B OA1
AFRS VENDOR ADDRESSING EDIT RULESThe three address fields on the AFRS Vendor Edit Maintenance screen VE.2 are 32-character alphanumeric fields that identify titles, street address information or mail stops in lieu of street addresses. Some of the AFRS edit rules for the name and address lines are:
1. The minimum required fields per US Postal System are & AFRS edits that are in place are:* US Postal-Address line 1 must not be blank
* AFRS EDIT-Address line 1 must contain a name or a character (some agencies will use a '.' or a '*' if they do not intend to put a name on this line)
* US Postal-'City' must be entered, * AFRS EDIT-'City' must contain a name or a character (some agencies
will use a '.' or a '*' if they do not intend to put a city name on this line* US Postal-'State' must contain a valid state abbreviation
* AFRS EDIT-'State' must contain a valid US Postal Service state abbreviation (e.g. WA=Washington) if the US/Foreign Address field is set to 'U'
* US Postal-'Zip Code' should contain at least a five-digit zip numeric code (a full Zip +4 code is recommended). * AFRS EDIT-'Zip' must be alpha/numeric (US Postal Service Zip
codes are numeric). NOTE: Other AFRS on-line screen edits for the address lines are:
* Address lines 2 and 3 can be blank* The US/Foreign Indicator defaults to “U” for US* Any format can be used in reporting a foreign mailing address by changing the
US/Foreign Indicator to ‘F’ for Foreign
2. The Internal Revenue Service has some naming and addressing conventions that should be considered when building an agency vendor record that will be used in an IRS 1099-MISC form:* The vendor name must not exceed two lines (vendor name line and address 1
line),* The vendor name line should contain the taxpayer name that corresponds with
the taxpayer identification number (TIN) on the record,
37 | P a g e
* If there are multiple payees, only the name of the payee whose TIN has been provided should be entered in the name field - The names of the other payees may be entered in the second payee name line (ADD1),
* Preferably, the surname of the payee should appear first.
3. There can be multiple addresses for the same Vendor Name. The reason for this is that multi-location vendors can also have multiple billing addresses. Each different address will require a separate vendor record. One way to do this is to assign a ten-character vendor number to the vendor and use a different vendor number suffix (two characters) to differentiate between addresses and other vendor edit coding variations for that vendor.
38 | P a g e
SAMPLE OF W9 USED BY STATEWIDE PAYEE HELPDESKAppendix C
39 | P a g e