safety recall
TRANSCRIPT

The repair information in this document is intended for use only by skilled technicians who have the proper tools, equipment and training to correctly and safely maintain your vehicle. These procedures are not intended to be attempted by “do-it-yourselfers,” and you should not assume this document applies to your vehicle, or that your vehicle has the condition described. To determine whether this information applies, contact an authorized Volkswagen dealer. 2019 Volkswagen Group of America, Inc. and Volkswagen Canada. All Rights Reserved. April 2019 42J5 Page 1 of 29
Safety Recall Code: 42J5 REVISION
Subject Rear Axle Coil Springs
Release Date April 10, 2019
REVISION SUMMARY Updated claiming and repair instructions to include Criteria 02-10.
Affected Vehicles U.S.A. and Canada: Certain 2015-2019 MY Volkswagen Golf, 2017-2019 MY Golf SportWagen, 2019 MY Jetta and 2018-2019 MY Tiguan
Check Campaigns/Actions screen in Elsa on the day of repair to verify that a VIN qualifies for repair under this action. Elsa is the only valid campaign inquiry & verification source.
Campaign status must show “open.” If Elsa shows other open action(s), inform your customer so that the work can also be completed at the
same time the vehicle is in the workshop for this campaign.
Problem Description The rear axle coil springs in affected vehicles may not have met factory specifications due to a defect in materials or because of problems in the spring production process. These issues can impact the long-term durability of the rear axle coil springs. Affected coil springs can break. A broken coil spring can damage a rear tire, become a hazard on the roadway and lead to a loss of vehicle control without warning, putting people at risk and possibly causing damage to other vehicles on the road.
Corrective Action Replace the rear axle coil springs.
Vehicle Repair Availability:
Criteria Models Repair Status 02
Tiguan
Repair Available
03 04 05 07
Golf/Golf SportWagen
08 09 10 12 Jetta/Golf TDI 13
Parts Information Parts will be allocated to dealerships based on a percentage of the number of vehicles registered in their primary area of influence (PAI) prior to owner notification. Parts will be placed on Upper Order Limits. If your dealership is at the weekly Upper Order Limit and requires more inventory, please submit the backordered sales document number to [email protected] to have additional parts released.

The information in this document is intended for use only by skilled technicians who have the proper tools, equipment and training to correctly and safely maintain your vehicle. These procedures are not intended to be attempted by “do-it-yourselfers,” and you should not assume this document applies to your vehicle, or that your vehicle has the condition described. To determine whether this information applies, contact an authorized Volkswagen dealer. 2019 Volkswagen Group of America, Inc. and Volkswagen Canada. All Rights Reserved.
April 2019 42J5 Page 2 of 29
42J5 Coil Spring Part Tag Guide
Several part numbers used in Safety Recall 42J5 were consolidated under one (1) part number.
Before filing a factory mis-box claim, and to help avoid repair delays, please refer to the table below to identify an acceptable coil spring part tag.
Coil spring tag (1) does not match the packaging label (2). This is OK if your parts align with the chart below.
Crit. Ordering Part Number OK (Acceptable) Spring Tag Part Number
02 5QN-511-115-C 5QN-511-115-C 5QF-511-115-BE
03 5QN-511-115-D 5QN-511-115-D 5QF-511-115-BF
04 5QN-511-115-E 5QN-511-115-E 5QF-511-115-BG
05 5QN-511-115-F 5QN-511-115-F 5QF-511-115-BH
07 5QM-511-115-AJ 5QM-511-115-AJ 5Q0-511-115-BG
08 5QM-511-115-AK 5QM-511-115-AK 5Q0-511-115-BH
09 5QM-511-115-C 5QM-511-115-C 5Q0-511-115-JT
10 5QM-511-115-D 5QM-511-115-D 5Q0-511-115-BE
12 5QM-511-121-D 5QM-511-121-D 5Q0-511-121-AE 5QD-511-121-D
13 5QM-511-121-E 5QM-511-121-E 5Q0-511-121-AF
Code Visibility On or about April 09, 2019, all affected vehicles will be listed on the Inventory Vehicle Open Campaign Action report under My Dealership Reports (found on www.vwhub.com & OMD Web). A list will not be posted for dealers who do not have any affected vehicles.
On or about April 09, 2019, this campaign code will show open on all affected vehicles in Elsa.
On or about April 09, 2019, all affected vehicles will be identified with this campaign code in the VIN Lookup tool at www.vw.com and on the NHTSA VIN lookup tool at www.safercar.gov.
Owner Notification Owner notification will take place in April 2019. Owner letter examples are included in this bulletin for your reference.
Additional Information
Please alert everyone in your dealership about this action, including Sales, Service, Parts and Accounting personnel. Contact Warranty if you have any questions. IMPORTANT REMINDER ON VEHICLES AFFECTED BY SAFETY & COMPLIANCE RECALLS
New Vehicles in Dealer Inventory: It is a violation of federal law for a dealer to deliver a new motor vehicle or any new or used item of motor vehicle equipment (including a tire) covered by this notification under a sale or lease until the defect or noncompliance is remedied. By law, dealers must correct, prior to delivery for sale or lease, any vehicle that fails to comply with an
1 2

The information in this document is intended for use only by skilled technicians who have the proper tools, equipment and training to correctly and safely maintain your vehicle. These procedures are not intended to be attempted by “do-it-yourselfers,” and you should not assume this document applies to your vehicle, or that your vehicle has the condition described. To determine whether this information applies, contact an authorized Volkswagen dealer. 2019 Volkswagen Group of America, Inc. and Volkswagen Canada. All Rights Reserved.
April 2019 42J5 Page 3 of 29
applicable Federal Motor Vehicle Safety Standard or that contains a defect relating to motor vehicle safety.
Pre-Owned Vehicles in Dealer Inventory: Dealers should not deliver any pre-owned vehicles in their inventory which are involved in a safety or compliance recall until the defect has been remedied.
Dealers must ensure that every affected inventory vehicle has this campaign completed before delivery to consumers.
Fill out and affix Campaign Completion Label (CAMP 010 000) after work is complete. Labels can be ordered at no cost via the Compliance Label Ordering portal at www.vwhub.com.

The repair information in this document is intended for use only by skilled technicians who have the proper tools, equipment and training to correctly and safely maintain your vehicle. These procedures are not intended to be attempted by “do-it-yourselfers,” and you should not assume this document applies to your vehicle, or that your vehicle has the condition described. To determine whether this information applies, contact an authorized Volkswagen dealer. 2019 Volkswagen Group of America, Inc. and Volkswagen Canada. All Rights Reserved. April 2019 42J5 Page 4 of 29
Claim Entry Instructions
The labor times listed here may differ from the labor operations and labor times listed in ELSA.
After campaign has been completed, enter claim as soon as possible to help prevent work from being duplicated elsewhere. Attach the Elsa screen print showing action open on the day of repair to the repair order. If customer refused campaign work:
U.S. dealers: Submit request via WISE under the Campaigns/Update/Recall Closure option. Canada dealers: Upload the repair order [signed by customer] to Volkswagen WIN/Operations/Campaign Closure.
Service Number 42J5
Damage Code 0099
Parts Vendor Code WWO
Claim Type Sold vehicle: 7 10
Unsold vehicle: 7 90
Causal Indicator Mark coil spring as causal part*
Vehicle Wash/Loaner Do not claim wash/loaner under this action
U.S.A.: Loaner/rental coverage cannot be claimed under this action. However, loaner/rental may be covered under the mobility program. Please refer to section 3.30 in the Volkswagen Warranty Policy and Procedures Manual for loaner claims information and reimbursement details.
Canada: Loaner/rental coverage cannot be claimed under this action. Please refer to the Volkswagen Service Loaner Program to determine loaner eligibility.
Criteria I.D. 02
Replace rear coil springs
Labor operation: 4272 20 99 120 T.U.
Quantity Part Number Description 2.00 5QN511115C Coil spring* 4.00 N 10106402 Nut – Wheel bearing housing to control arm
& shock to control arm 2.00 N 10628301 Bolt - Shock to control arm 2.00 N 10640501 Bolt – Wheel bearing housing to control arm 2.00 N 10776501 Bolt – Stabilizer link to control arm 2.00 N 90183804 Nut - Stabilizer link to control arm
Criteria I.D. 03
Replace rear coil springs
Labor operation: 4272 20 99 120 T.U.
Quantity Part Number Description 2.00 5QN511115D Coil spring* 4.00 N 10106402 Nut – Wheel bearing housing to control arm
& shock to control arm 2.00 N 10628301 Bolt - Shock to control arm 2.00 N 10640501 Bolt – Wheel bearing housing to control arm 2.00 N 10776501 Bolt – Stabilizer link to control arm 2.00 N 90183804 Nut - Stabilizer link to control arm
Continued on next page.

The repair information in this document is intended for use only by skilled technicians who have the proper tools, equipment and training to correctly and safely maintain your vehicle. These procedures are not intended to be attempted by “do-it-yourselfers,” and you should not assume this document applies to your vehicle, or that your vehicle has the condition described. To determine whether this information applies, contact an authorized Volkswagen dealer. 2019 Volkswagen Group of America, Inc. and Volkswagen Canada. All Rights Reserved. April 2019 42J5 Page 5 of 29
Criteria I.D. 04
Replace rear coil springs
Labor operation: 4272 20 99 120 T.U.
Quantity Part Number Description 2.00 5QN511115E Coil spring* 4.00 N 10106402 Nut – Wheel bearing housing to control arm
& shock to control arm 2.00 N 10628301 Bolt - Shock to control arm 2.00 N 10640501 Bolt – Wheel bearing housing to control arm 2.00 N 10776501 Bolt – Stabilizer link to control arm 2.00 N 90183804 Nut - Stabilizer link to control arm
Criteria I.D. 05
Replace rear coil springs
Labor operation: 4272 20 99 120 T.U.
Quantity Part Number Description 2.00 5QN511115F Coil spring* 4.00 N 10106402 Nut – Wheel bearing housing to control arm
& shock to control arm 2.00 N 10628301 Bolt - Shock to control arm 2.00 N 10640501 Bolt – Wheel bearing housing to control arm 2.00 N 10776501 Bolt – Stabilizer link to control arm 2.00 N 90183804 Nut - Stabilizer link to control arm
Criteria I.D. 07
Replace rear coil springs
Labor operation: 4272 20 99 120 T.U.
Quantity Part Number Description 2.00 5QM511115AJ Coil spring* 4.00 N 10106402 Nut – Wheel bearing housing to control arm
& shock to control arm 2.00 N 10628301 Bolt - Shock to control arm 2.00 N 10640501 Bolt – Wheel bearing housing to control arm 2.00 N 10776501 Bolt – Stabilizer link to control arm 2.00 N 90183803 Nut - Stabilizer link to control arm
Continued on next page.

The repair information in this document is intended for use only by skilled technicians who have the proper tools, equipment and training to correctly and safely maintain your vehicle. These procedures are not intended to be attempted by “do-it-yourselfers,” and you should not assume this document applies to your vehicle, or that your vehicle has the condition described. To determine whether this information applies, contact an authorized Volkswagen dealer. 2019 Volkswagen Group of America, Inc. and Volkswagen Canada. All Rights Reserved. April 2019 42J5 Page 6 of 29
Criteria I.D. 08
Replace rear coil springs
Labor operation: 4272 20 99 120 T.U.
Quantity Part Number Description 2.00 5QM511115AK Coil spring* 4.00 N 10106402 Nut – Wheel bearing housing to control arm
& shock to control arm 2.00 N 10628301 Bolt - Shock to control arm 2.00 N 10640501 Bolt – Wheel bearing housing to control arm 2.00 N 10776501 Bolt – Stabilizer link to control arm 2.00 N 90183803 Nut - Stabilizer link to control arm
Criteria I.D. 09
Replace rear coil springs
Labor operation: 4272 20 99 120 T.U.
Quantity Part Number Description 2.00 5QM511115C Coil spring* 4.00 N 10106402 Nut – Wheel bearing housing to control arm
& shock to control arm 2.00 N 10628301 Bolt - Shock to control arm 2.00 N 10640501 Bolt – Wheel bearing housing to control arm 2.00 N 10776501 Bolt – Stabilizer link to control arm 2.00 N 90183803 Nut - Stabilizer link to control arm
Criteria I.D. 10
Replace rear coil springs
Labor operation: 4272 20 99 120 T.U.
Quantity Part Number Description 2.00 5QM511115D Coil spring* 4.00 N 10106402 Nut – Wheel bearing housing to control arm
& shock to control arm 2.00 N 10628301 Bolt - Shock to control arm 2.00 N 10640501 Bolt – Wheel bearing housing to control arm 2.00 N 10776501 Bolt – Stabilizer link to control arm 2.00 N 90183803 Nut - Stabilizer link to control arm
Continued on next page.

The repair information in this document is intended for use only by skilled technicians who have the proper tools, equipment and training to correctly and safely maintain your vehicle. These procedures are not intended to be attempted by “do-it-yourselfers,” and you should not assume this document applies to your vehicle, or that your vehicle has the condition described. To determine whether this information applies, contact an authorized Volkswagen dealer. 2019 Volkswagen Group of America, Inc. and Volkswagen Canada. All Rights Reserved. April 2019 42J5 Page 7 of 29
Criteria I.D. 12
Replace rear coil springs (Golf TDI) Labor operation: 4272 21 99 70 T.U.
Quantity Part Number Description 2.00 5QM511121D Coil spring* 2.00 N 10628601 Lower shock bolt
-OR-
Replace rear coil springs (Jetta) Labor operation: 4272 22 99 50 T.U.
Quantity Part Number Description 2.00 5QM511121D Coil spring*
Criteria I.D. 13
Replace rear coil springs (Golf TDI) Labor operation: 4272 21 99 70 T.U.
Quantity Part Number Description 2.00 5QM511121E Coil spring* 2.00 N 10628601 Lower shock bolt
-OR-
Replace rear coil springs (Jetta) Labor operation: 4272 22 99 50 T.U.
Quantity Part Number Description 2.00 5QM511121E Coil spring*

The repair information in this document is intended for use only by skilled technicians who have the proper tools, equipment and training to correctly and safely maintain your vehicle. These procedures are not intended to be attempted by “do-it-yourselfers,” and you should not assume this document applies to your vehicle, or that your vehicle has the condition described. To determine whether this information applies, contact an authorized Volkswagen dealer. 2019 Volkswagen Group of America, Inc. and Volkswagen Canada. All Rights Reserved. April 2019 42J5 Page 8 of 29
Customer Letter Example (USA)
<MONTH YEAR> <CUSTOMER NAME> <CUSTOMER ADDRESS> <CUSTOMER CITY STATE ZIPCODE>
This notice applies to your vehicle: <VIN>
NHTSA: 19V188
Subject: Safety Recall 42J5 – Rear Axle Coil Springs Certain 2015-2019 MY Volkswagen Golf, 2017-2019 MY Golf SportWagen, 2019 MY Jetta and 2018-2019 MY Tiguan
Dear Volkswagen Owner,
This notice is sent to you in accordance with the National Traffic and Motor Vehicle Safety Act. Volkswagen has decided that a defect, which relates to motor vehicle safety, exists in certain 2015-2019 model year Volkswagen vehicles. Our records show that you are the owner of a vehicle affected by this action.
What is the issue? The rear axle coil springs in affected vehicles may not have met factory specifications due to a defect in materials or because of problems in the spring production process. These issues can impact the long-term durability of the rear axle coil springs. Affected coil springs can break. A broken coil spring can damage a rear tire, become a hazard on the roadway and lead to a loss of vehicle control without warning, putting people at risk and possibly causing damage to other vehicles on the road.
What will we do? To correct this defect, your authorized Volkswagen dealer will replace the rear axle coil springs. This work will take about two hours to complete and will be performed for you free of charge.
What should you do? Please contact your authorized Volkswagen dealer without delay to schedule this recall repair. To set up an appointment online, please visit www.vw.com/find-a-dealer.
Lease vehicles and address changes
If you are the lessor and registered owner of the vehicle identified in this action, the law requires you to forward this letter immediately via first-class mail to the lessee within ten (10) days of receipt. If you have changed your address or sold the vehicle, please fill out the enclosed prepaid Owner Reply card and mail it to us so we can update our records.
Reimbursement of Expenses
If you have previously paid for repairs relating to the condition described in this letter, please refer to the enclosed form that explains how to request reimbursement.
Can we assist you further? If your authorized Volkswagen dealer fails or is unable to complete this work free of
charge within a reasonable time, or if you should have any questions about this communication, please reach out to us using your preferred method of communication at www.vw.com/contact or by calling us at 800-893-5298.
Checking your vehicle for open Recalls and Service Campaigns
To check your vehicle’s eligibility for repair under this or any other recall/service campaign, please visit www.vw.com/owners/recalls and enter your Vehicle Identification Number (VIN) into the Recall/Service Campaign Lookup tool.
If you still cannot obtain satisfaction, you may file a complaint with: The Administrator, National Highway Traffic Safety Administration, 1200 New Jersey Avenue, SE., Washington, DC 20590; or call the toll-free Vehicle Safety Hotline at 1-888-327-4236 (TTY: 1-800-424-9153); or go to http://www.safercar.gov.
We apologize for any inconvenience this matter may cause; however we are taking this action to help ensure your safety and continued satisfaction with your vehicle.
Sincerely,
Volkswagen Customer Protection

The repair information in this document is intended for use only by skilled technicians who have the proper tools, equipment and training to correctly and safely maintain your vehicle. These procedures are not intended to be attempted by “do-it-yourselfers,” and you should not assume this document applies to your vehicle, or that your vehicle has the condition described. To determine whether this information applies, contact an authorized Volkswagen dealer. 2019 Volkswagen Group of America, Inc. and Volkswagen Canada. All Rights Reserved. April 2019 42J5 Page 9 of 29
Customer Letter Example (CANADA )
<MONTH YEAR> <CUSTOMER NAME> <CUSTOMER ADDRESS> <CUSTOMER CITY STATE ZIPCODE>
This notice applies to your vehicle: <VIN>
Subject: Safety Recall 42J5 – Rear Axle Coil Springs Certain 2015-2019 MY Volkswagen Golf, 2017-2019 MY Golf SportWagen, 2019 MY Jetta and 2018-2019 MY Tiguan
Dear Volkswagen Owner,
This notice is sent to you in accordance with the requirements of the Motor Vehicle Safety Act. Volkswagen has decided that a defect, which relates to motor vehicle safety, exists in certain 2015-2019 model year Volkswagen vehicles. Our records show that you are the owner of a vehicle affected by this action.
What is the issue? The rear axle coil springs in affected vehicles may not have met factory specifications due to a defect in materials or because of problems in the spring production process. These issues can impact the long-term durability of the rear axle coil springs. Affected coil springs can break. A broken coil spring can damage a rear tire, become a hazard on the roadway and lead to a loss of vehicle control without warning, putting people at risk and possibly causing damage to other vehicles on the road.
What will we do? To correct this defect, your authorized Volkswagen dealer will replace the rear axle coil springs. This work will take about two hours to complete and will be performed for you free of charge.
What should you do? Please contact your authorized Volkswagen dealer without delay to schedule this recall repair.
Lease vehicles and address changes
If you are the lessor and registered owner of the vehicle identified in this action, the law requires you to forward this letter immediately via first-class mail to the lessee within ten (10) days of receipt. If you have changed your address or sold the vehicle, please fill out the enclosed prepaid Owner Reply card and mail it to us so we can update our records.
Reimbursement of Expenses
If you have previously paid for repairs relating to the condition described in this letter, please refer to the enclosed form that explains how to request reimbursement.
Can we assist you further?
If your authorized Volkswagen dealer fails or is unable to complete this work free of charge within a reasonable time, please contact Customer Relations, Monday through Friday from 8AM to 8PM EST by phone at 1-800-822-8987 or via our “Contact Us” page at www.vw.ca.
We apologize for any inconvenience this matter may cause; however we are taking this action to help ensure your safety and continued satisfaction with your vehicle.
Sincerely,
Volkswagen Customer Protection

The repair information in this document is intended for use only by skilled technicians who have the proper tools, equipment and training to correctly and safely maintain your vehicle. These procedures are not intended to be attempted by “do-it-yourselfers,” and you should not assume this document applies to your vehicle, or that your vehicle has the condition described. To determine whether this information applies, contact an authorized Volkswagen dealer. 2019 Volkswagen Group of America, Inc. and Volkswagen Canada. All Rights Reserved. April 2019 42J5 Page 10 of 29
Campaign Work Procedure 42J5 Safety Recall
Repair Overview NOTE
• These repair instructions may differ from the labor operations and labor times listed in ELSA.
• Damages resulting from improper repair or failure to follow these work instructions are the dealer’s responsibility and are not eligible for reimbursement under this action.
• This procedure must be read in its entirety prior to performing the repair.
• Due to variations in vehicle equipment and options, the steps/illustrations in this work procedure may not identically match all affected vehicles.
• Diagnosis and repair of pre-existing conditions in the vehicle are not covered under this action.
• When working during extreme temperatures, it is recommended that the vehicle be allowed to acclimate inside the shop to avoid temperature-related component damage/breakage.
• Replace rear coil springs <1>.

The repair information in this document is intended for use only by skilled technicians who have the proper tools, equipment and training to correctly and safely maintain your vehicle. These procedures are not intended to be attempted by “do-it-yourselfers,” and you should not assume this document applies to your vehicle, or that your vehicle has the condition described. To determine whether this information applies, contact an authorized Volkswagen dealer. 2019 Volkswagen Group of America, Inc. and Volkswagen Canada. All Rights Reserved. April 2019 42J5 Page 11 of 29
Required Parts
Tiguan Criteria Quantity Part Number Part Description
02 2 5QN.511.115.C
Rear coil spring 03 2 5QN.511.115.D
04 2 5QN.511.115.E
05 2 5QN.511.115.F
-AND-
02 or 03 or 04 or 05
4 N 101.064.02 Nut – Wheel bearing housing to control arm & shock to control arm
2 N 106.405.01 Bolt – Wheel bearing housing to control arm
2 N 106.283.01 Bolt - Shock to control arm
2 N 107.765.01 Bolt – Stabilizer link to control arm
2 N 901.838.04 Nut - Stabilizer link to control arm
Golf/Golf SportWagen Criteria Quantity Part Number Part Description
07 2 5QM.511.115.AJ
Rear coil spring 08 2 5QM.511.115.AK
09 2 5QM.511.115.C
10 2 5QM.511.115.D
-AND-
07 or 08 or 09 or 10
4 N 101.064.02 Nut – Wheel bearing housing to control arm & shock to control arm
2 N 106.405.01 Bolt – Wheel bearing housing to control arm
2 N 106.283.01 Bolt - Shock to control arm
2 N 107.765.01 Bolt – Stabilizer link to control arm
2 N 901.838.03 Nut - Stabilizer link to control arm
Jetta/Golf TDI Criteria Quantity Part Number Part Description
12 2 5QM.511.121.D Rear coil spring
13 2 5QM.511.121.E
-AND-
12 or 13 2 N 106.286.01 Shock bolt (GOLF TDI ONLY)
NOTE
The specified part numbers reflect the status at the start of this recall. Interim updates made in ETKA can cause a listed part number to become unavailable. In this case, the new part number specified in ETKA should be used.

The repair information in this document is intended for use only by skilled technicians who have the proper tools, equipment and training to correctly and safely maintain your vehicle. These procedures are not intended to be attempted by “do-it-yourselfers,” and you should not assume this document applies to your vehicle, or that your vehicle has the condition described. To determine whether this information applies, contact an authorized Volkswagen dealer. 2019 Volkswagen Group of America, Inc. and Volkswagen Canada. All Rights Reserved. April 2019 42J5 Page 12 of 29
IMPORTANT PARTS INFORMATION
42J5 Coil Spring Part Tag Guide
Several part numbers used in Safety Recall 42J5 were consolidated under one (1) part number.
Before filing a factory mis-box claim, and to help avoid repair delays, please refer to the table below to identify an acceptable coil spring part tag.
Coil spring tag (1) does not match the packaging label (2). This is OK if your parts align with the chart below.
Crit. Ordering Part Number OK (Acceptable) Tag Part Number
02 5QN-511-115-C 5QN-511-115-C 5QF-511-115-BE
03 5QN-511-115-D 5QN-511-115-D 5QF-511-115-BF
04 5QN-511-115-E 5QN-511-115-E 5QF-511-115-BG
05 5QN-511-115-F 5QN-511-115-F 5QF-511-115-BH
07 5QM-511-115-AJ 5QM-511-115-AJ 5Q0-511-115-BG
08 5QM-511-115-AK 5QM-511-115-AK 5Q0-511-115-BH
09 5QM-511-115-C 5QM-511-115-C 5Q0-511-115-JT
10 5QM-511-115-D 5QM-511-115-D 5Q0-511-115-BE
12 5QM-511-121-D 5QM-511-121-D 5Q0-511-121-AE 5QD-511-121-D
13 5QM-511-121-E 5QM-511-121-E 5Q0-511-121-AF
1 2

The repair information in this document is intended for use only by skilled technicians who have the proper tools, equipment and training to correctly and safely maintain your vehicle. These procedures are not intended to be attempted by “do-it-yourselfers,” and you should not assume this document applies to your vehicle, or that your vehicle has the condition described. To determine whether this information applies, contact an authorized Volkswagen dealer. 2019 Volkswagen Group of America, Inc. and Volkswagen Canada. All Rights Reserved. April 2019 42J5 Page 13 of 29
Required Tools
Engine and Gearbox Jack
-VAS6931-
(or equivalent)
Engine/Gearbox Jack - Gearbox Support
-T10337-
(or equivalent)
Engine/Gearbox Jack Adapter - Wheel Hub
Support
-T10149-
Torque Wrench 1332 40-200Nm
-VAG1332-
(or equivalent)
Torque Wrench 5-50Nm
-VAG1331-
(or equivalent)
Tensioning Strap
-T10038-
-OR-
Heavy Duty Ratchet Strap
(locally sourced)
Spring Compressor Kit - Spring Retainer w/Inserts
-VAG1752/3A-
(Jetta only)
Spring Compressor Kit - Spring Tensioner
-VAG1752/1-
(Jetta only)
The repair information in this document is intended for use only by skilled technicians who have the proper tools, equipment and training to correctly and safely maintain your vehicle. These procedures are not intended to be attempted by “do-it-yourselfers,” and you should not assume this document applies to your vehicle, or that your vehicle has the condition described. To determine whether this information applies, contact an authorized Volkswagen dealer. 2019 Volkswagen Group of America, Inc. and Volkswagen Canada. All Rights Reserved. April 2019 42J5 Page 14 of 29
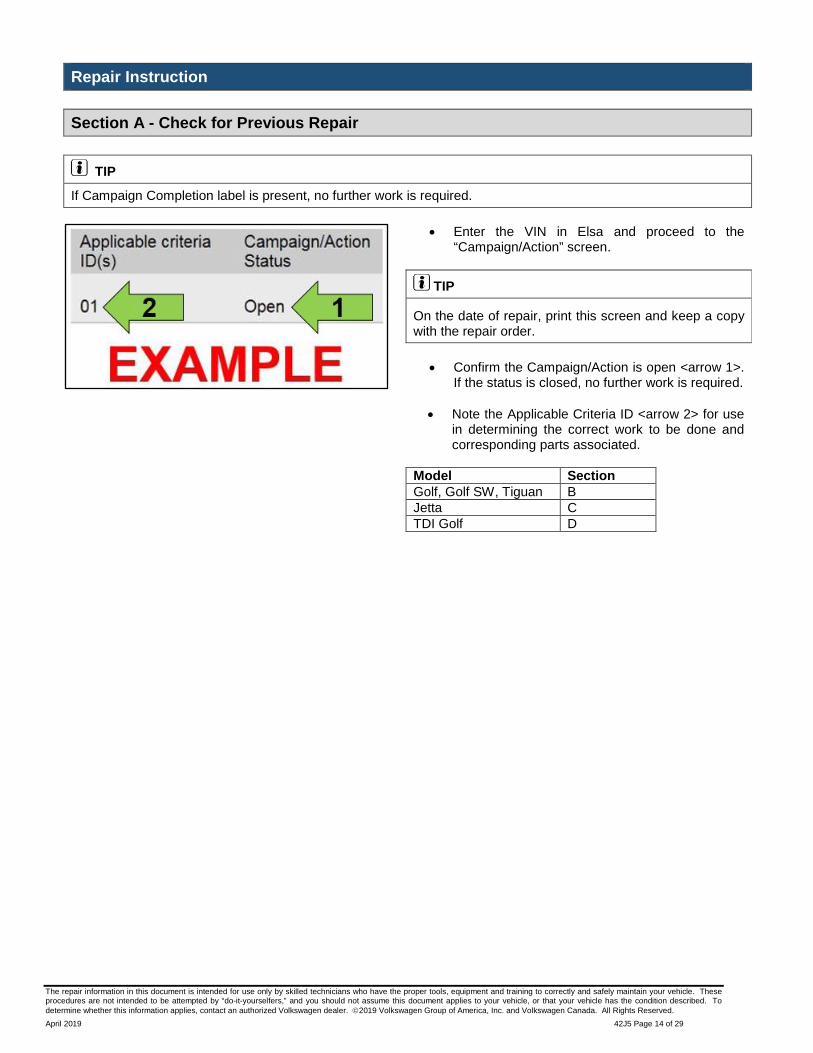
Repair Instruction Section A - Check for Previous Repair
TIP If Campaign Completion label is present, no further work is required.
• Enter the VIN in Elsa and proceed to the
“Campaign/Action” screen.
TIP
On the date of repair, print this screen and keep a copy with the repair order.
• Confirm the Campaign/Action is open <arrow 1>.
If the status is closed, no further work is required.
• Note the Applicable Criteria ID <arrow 2> for use in determining the correct work to be done and corresponding parts associated.
Model Section Golf, Golf SW, Tiguan B Jetta C TDI Golf D

The repair information in this document is intended for use only by skilled technicians who have the proper tools, equipment and training to correctly and safely maintain your vehicle. These procedures are not intended to be attempted by “do-it-yourselfers,” and you should not assume this document applies to your vehicle, or that your vehicle has the condition described. To determine whether this information applies, contact an authorized Volkswagen dealer. 2019 Volkswagen Group of America, Inc. and Volkswagen Canada. All Rights Reserved. April 2019 42J5 Page 15 of 29
Section B – Repair Procedure – Golf/Golf Sportwagen, Tiguan NOTE
The vehicles included in this repair section have a multi-link rear axle.
Secure vehicle on the hoist:
WARNING
When suspension is lifted in curb weight position, the vehicle must be secured on the hoist to prevent it from tipping off the hoist.
• Secure vehicle so it does not tip off the hoist using -T10038- or equivalent.
Disconnect level control system sensor (if equipped):
• Remove the bolts <1>.
• Remove the Left Rear Level Control System Sensor -G76- <2> bracket from the lower control arm.

The repair information in this document is intended for use only by skilled technicians who have the proper tools, equipment and training to correctly and safely maintain your vehicle. These procedures are not intended to be attempted by “do-it-yourselfers,” and you should not assume this document applies to your vehicle, or that your vehicle has the condition described. To determine whether this information applies, contact an authorized Volkswagen dealer. 2019 Volkswagen Group of America, Inc. and Volkswagen Canada. All Rights Reserved. April 2019 42J5 Page 16 of 29
Remove assembly aid:
• Press the tabs <arrows> on the assembly aid <1> inward.
• Remove the assembly aid <1> upward.
NOTE
The assembly aid is destroyed during removal. It does not have to be reinstalled.

The repair information in this document is intended for use only by skilled technicians who have the proper tools, equipment and training to correctly and safely maintain your vehicle. These procedures are not intended to be attempted by “do-it-yourselfers,” and you should not assume this document applies to your vehicle, or that your vehicle has the condition described. To determine whether this information applies, contact an authorized Volkswagen dealer. 2019 Volkswagen Group of America, Inc. and Volkswagen Canada. All Rights Reserved. April 2019 42J5 Page 17 of 29
NOTE
The following steps should be followed in the sequence shown in order to complete the repair effectively and efficiently. Doing so will also prevent damage to suspension components. The operation details, warnings, cautions and notes for this sequence are outlined in Sub-section 1 – Operation Details.
1. Left side:
a. Remove sway bar link nut and bolt.
2. Right side:
a. Support lower control arm with engine/gearbox jack and raise vehicle to curb weight position.
b. Remove the following:
i. Sway bar link nut and bolt.
ii. Lower shock nut and bolt.
iii. Wheel bearing housing nut and bolt.
c. Slowly lower engine/gearbox jack until spring can be removed.
d. Transfer upper and lower spring supports to the new spring.
e. Install new spring onto spring mounts on the control arm first, then the body.
f. Raise lower control arm with engine/gearbox jack until lower shock bolt and wheel bearing housing bolts can be installed by hand.
g. Install the following, but do not torque:
i. Lower shock bolt.
ii. Wheel bearing housing bolt
iii. DO NOT install sway bar link bolt yet.
h. Lower engine/gearbox jack.
3. Left side:
a. Support lower control arm with engine/gearbox jack and raise vehicle to curb weight position.
b. Remove the following:
i. Lower shock nut and bolt.
ii. Wheel bearing housing bolt.
iii. The sway bar link bolt should have been removed in step 1.
c. Slowly lower engine/gearbox jack until spring can be removed.
d. Transfer upper and lower spring supports to the new spring.
e. Install new spring onto spring mounts on the control arm first, then the body.
f. Raise lower control arm with engine/gearbox jack until lower shock bolt, wheel bearing housing bolts and sway bar link bolt can be installed by hand.
g. Install and torque the following in curb weight position:
i. Lower shock nut and bolt.
ii. Wheel bearing housing nut and bolt.
iii. Sway bar link nut and bolt.
h. Lower engine/gearbox jack.
Continued on next page:

The repair information in this document is intended for use only by skilled technicians who have the proper tools, equipment and training to correctly and safely maintain your vehicle. These procedures are not intended to be attempted by “do-it-yourselfers,” and you should not assume this document applies to your vehicle, or that your vehicle has the condition described. To determine whether this information applies, contact an authorized Volkswagen dealer. 2019 Volkswagen Group of America, Inc. and Volkswagen Canada. All Rights Reserved. April 2019 42J5 Page 18 of 29
4. Right side:
a. Install sway bar link bolt and nut but do not torque.
b. Support lower control arm with engine/gearbox jack and raise vehicle to curb weight position.
c. Torque the following on the right side of the vehicle in curb weight position:
i. Lower shock connection.
ii. Wheel bearing housing connection.
iii. Sway bar link connection.
5. Proceed to Section E – Vehicle Reassembly.
Sub-section 1 – Operation Details
Raising/supporting suspension in curb weight position:
WARNING
When suspension is lifted in curb weight position, the vehicle must be secured on the hoist to prevent it from tipping off the hoist.
• Position the -VAS6931- <1> with Engine/Gearbox Jack - Gearbox Support -T10337- <2> under the lower control arm.
• Raise the suspension with the -VAS6931- until dimension <a> is achieved.
Model Suspension Type Dimension <a>
Tiguan FWD 445 ± 10 mm
AWD 455 ± 10 mm
Golf ALL 385 ± 10 mm
CAUTION
• All bolts on suspension components with bonded rubber bushings must always be tightened in curb weight position (unloaded condition).
• Bonded rubber bushings have a limited range of rotation.
• Axle components with bonded rubber bushings must be brought into the position they will be in when driving before they are tightened (curb weight position). Otherwise, the bonded rubber bushing will have tension, which will reduce the service life.

The repair information in this document is intended for use only by skilled technicians who have the proper tools, equipment and training to correctly and safely maintain your vehicle. These procedures are not intended to be attempted by “do-it-yourselfers,” and you should not assume this document applies to your vehicle, or that your vehicle has the condition described. To determine whether this information applies, contact an authorized Volkswagen dealer. 2019 Volkswagen Group of America, Inc. and Volkswagen Canada. All Rights Reserved. April 2019 42J5 Page 19 of 29
Disconnecting stabilizer link from lower control arm:
• Remove nut <1> and bolt <2> from the stabilizer link <3>.
NOTE
Both stabilizer links must be disconnected from the lower control arms before any other suspension fasteners can be removed.
Disconnecting wheel bearing housing and lower shock bolts from lower control arm:
• Remove wheel bearing housing nut <3> and bolt <4>.
• Remove lower shock nut <1> and bolt <2>.

The repair information in this document is intended for use only by skilled technicians who have the proper tools, equipment and training to correctly and safely maintain your vehicle. These procedures are not intended to be attempted by “do-it-yourselfers,” and you should not assume this document applies to your vehicle, or that your vehicle has the condition described. To determine whether this information applies, contact an authorized Volkswagen dealer. 2019 Volkswagen Group of America, Inc. and Volkswagen Canada. All Rights Reserved. April 2019 42J5 Page 20 of 29
Replacing spring:
• Slowly lower -VAS6931- until the spring can be removed.
NOTE
The springs can be removed safely without tensioning the spring with a spring compressor.
• Install new spring.
• Transfer the upper spring support to the new spring.
NOTE
The lower spring support may stay attached to the lower control arm. If it does, ensure the lower spring support is transferred to the new spring.
• Note the following when installing the new spring:
1. The end of the spring coil <arrow> must rest against the stop on the lower spring support.
2. The lower spring support pin <arrow> must go through the hole in the lower control arm.
3. The upper spring support must be fully seated on the upper spring coil <arrow>.

The repair information in this document is intended for use only by skilled technicians who have the proper tools, equipment and training to correctly and safely maintain your vehicle. These procedures are not intended to be attempted by “do-it-yourselfers,” and you should not assume this document applies to your vehicle, or that your vehicle has the condition described. To determine whether this information applies, contact an authorized Volkswagen dealer. 2019 Volkswagen Group of America, Inc. and Volkswagen Canada. All Rights Reserved. April 2019 42J5 Page 21 of 29
Connecting stabilizer link fasteners to lower control arm:
• Start new nut <1> and bolt <2> by hand, but do not tighten.
Part Number Part Description
N 107.765.01 Bolt - Stabilizer link to control arm
N 901.838.04 Nut - Stabilizer link to control arm (TIGUAN ONLY)
N 901.838.03 Nut - Stabilizer link to control arm (GOLF/GOLF SW ONLY)
Installing wheel bearing housing and shock fasteners to lower control arm:
• Start new lower shock bolt <2> and nut <1> by hand, but do not tighten.
Part Number Part Description
N 106.283.01 Bolt - Shock to control arm
N 101.064.02 Nut - Shock to control arm
• Start new wheel bearing housing bolt <4> and nut <1> by hand, but do not tighten.
Part Number Part Description
N 106.405.01 Bolt - Wheel bearing housing to control arm
N 101.064.02 Nut - Wheel bearing housing to control arm
Torqueing suspension fasteners:
WARNING
When suspension is lifted in curb weight position, the vehicle must be secured on the hoist to prevent it from tipping off the hoist.
• Counter-hold bolts and torque fasteners as follows:
Connection Position Torque value
Stabilizer link <1 and 2> 20 Nm +180°
Wheel bearing housing <3 and 4> 70 Nm +180°
Shock <5 and 6> 70 Nm +180°

The repair information in this document is intended for use only by skilled technicians who have the proper tools, equipment and training to correctly and safely maintain your vehicle. These procedures are not intended to be attempted by “do-it-yourselfers,” and you should not assume this document applies to your vehicle, or that your vehicle has the condition described. To determine whether this information applies, contact an authorized Volkswagen dealer. 2019 Volkswagen Group of America, Inc. and Volkswagen Canada. All Rights Reserved. April 2019 42J5 Page 22 of 29
Sub-section 2 – Vehicle Reassembly
• Connect level control system sensor (if equipped):
o Ensure the sensor arm <2> does not bind.
o The level control system sensor lever must point toward vehicle exterior.
o Install the bolts <1> and torque to 5 Nm.
• Install rear wheels and torque to 120 Nm.
• Remove any tools that were used to secure the vehicle on the hoist.
• Install sealing plugs.
Work is complete - Proceed to Section E.

The repair information in this document is intended for use only by skilled technicians who have the proper tools, equipment and training to correctly and safely maintain your vehicle. These procedures are not intended to be attempted by “do-it-yourselfers,” and you should not assume this document applies to your vehicle, or that your vehicle has the condition described. To determine whether this information applies, contact an authorized Volkswagen dealer. 2019 Volkswagen Group of America, Inc. and Volkswagen Canada. All Rights Reserved. April 2019 42J5 Page 23 of 29
Section C – Repair Procedure – Jetta NOTE
The vehicles included in this repair section have a solid rear axle.
Remove clip (if present):
• Raise vehicle on hoist.
• Remove the clip <1> in the direction of <arrow> until stop.
Replacing rear springs:
• Install Spring Tensioner -VAG1752/1- with Spring Retainer -VAG1752/3A- onto rear spring.
WARNING
Make sure the coil spring is seated correctly in the -VAG1752/3A- <2>.
• Tension the coil spring and remove it.
NOTE
Use a wrench or a reversible ratchet to tighten the spring compressor. DO NOT use power tools to tighten the spring compressor or damage to the tool will occur.
• Transfer Spring Tensioner -VAG1752/1- with Spring Retainer -VAG1752/3A- onto new spring.

The repair information in this document is intended for use only by skilled technicians who have the proper tools, equipment and training to correctly and safely maintain your vehicle. These procedures are not intended to be attempted by “do-it-yourselfers,” and you should not assume this document applies to your vehicle, or that your vehicle has the condition described. To determine whether this information applies, contact an authorized Volkswagen dealer. 2019 Volkswagen Group of America, Inc. and Volkswagen Canada. All Rights Reserved. April 2019 42J5 Page 24 of 29
• Transfer the upper and lower spring supports to the new spring.
• Note the following when installing the new spring:
1. The end of the spring coil <arrow> must rest against the stop on the lower spring support.
2. The upper spring support must be fully seated on the upper spring coil <arrow>.
3. The lower spring support pin must go through the hole in the lower control arm.
• Tension new spring with Spring Tensioner -VAG1752/1- with Spring Retainer -VAG1752/3A-, install into vehicle and slowly release tension.
NOTE
Use a wrench or a reversible ratchet to tighten the spring compressor. DO NOT use power tools to tighten the spring compressor or damage to the tool will occur.
Install clip (if present):
• Install the clip <1> in the opposite direction of <arrow> until stop.
Work is complete - Proceed to Section E.

The repair information in this document is intended for use only by skilled technicians who have the proper tools, equipment and training to correctly and safely maintain your vehicle. These procedures are not intended to be attempted by “do-it-yourselfers,” and you should not assume this document applies to your vehicle, or that your vehicle has the condition described. To determine whether this information applies, contact an authorized Volkswagen dealer. 2019 Volkswagen Group of America, Inc. and Volkswagen Canada. All Rights Reserved. April 2019 42J5 Page 25 of 29
Section D – Repair Procedure – Golf TDI NOTE
The vehicles included in this repair section have a solid rear axle and a reductant agent tank.
Secure vehicle on the hoist:
WARNING
When suspension is lifted in curb weight position, the vehicle must be secured on the hoist to prevent it from tipping off the hoist.
• Secure vehicle so it does not tip off the hoist using -T10038- or equivalent.
Remove clip (if present):
• Raise vehicle on hoist and remove rear wheels.
• Remove the clip <1> in the direction of <arrow> until stop.

The repair information in this document is intended for use only by skilled technicians who have the proper tools, equipment and training to correctly and safely maintain your vehicle. These procedures are not intended to be attempted by “do-it-yourselfers,” and you should not assume this document applies to your vehicle, or that your vehicle has the condition described. To determine whether this information applies, contact an authorized Volkswagen dealer. 2019 Volkswagen Group of America, Inc. and Volkswagen Canada. All Rights Reserved. April 2019 42J5 Page 26 of 29
Remove lower shock bolts:
• Position the -VAS6931- with Engine/Gearbox Jack - Gearbox Support -T10337- under the spring pocket on the left side of the torsion beam axle and apply slight upward pressure.
• Remove left side lower shock bolt <1>.
• Lower the Engine and Gearbox Jack -VAS6931- and free up the shock.
• Repeat the same procedure to remove the right side lower shock bolt.
Replacing coil springs:
• Remove the engine and gearbox jack from under the vehicle.
• Pull down gently on the torsion beam axle and unseat the shock from the axle <image 1>.
• Unseat the coil spring from the upper pocket first, then the lower pocket <image 2>.
TIP
Use a small pry bar or large flat blade screwdriver to assist in unseating the coil spring from the lower spring pocket.
• Remove the coil spring from the vehicle.
• Install new spring.

The repair information in this document is intended for use only by skilled technicians who have the proper tools, equipment and training to correctly and safely maintain your vehicle. These procedures are not intended to be attempted by “do-it-yourselfers,” and you should not assume this document applies to your vehicle, or that your vehicle has the condition described. To determine whether this information applies, contact an authorized Volkswagen dealer. 2019 Volkswagen Group of America, Inc. and Volkswagen Canada. All Rights Reserved. April 2019 42J5 Page 27 of 29
• Transfer the upper and lower spring supports to the new spring.
• Slowly raise the suspension with the -VAS6931- and guide the spring so it is seated on the upper and lower spring mounts.
• Note the following when installing the new spring:
1. The end of the spring coil <arrow> must rest against the stop on the lower spring support.
2. The upper spring support must be fully seated on the upper spring coil <arrow>.
3. The lower spring support pin must go through the hole in the lower control arm.
Connect shocks to axle:
• Lift torsion beam axle on one side.
• Position shock <2> so the bolt holes on the shock and the axle line up.
• Start new lower shock bolt <1> by hand, but do not tighten.
Part Number Part Description
N 106.286.01 Lower shock bolt

The repair information in this document is intended for use only by skilled technicians who have the proper tools, equipment and training to correctly and safely maintain your vehicle. These procedures are not intended to be attempted by “do-it-yourselfers,” and you should not assume this document applies to your vehicle, or that your vehicle has the condition described. To determine whether this information applies, contact an authorized Volkswagen dealer. 2019 Volkswagen Group of America, Inc. and Volkswagen Canada. All Rights Reserved. April 2019 42J5 Page 28 of 29
Raise suspension to curb weight position:
WARNING
When suspension is lifted in curb weight position, the vehicle must be secured on the hoist to prevent it from tipping off the hoist.
• Turn the wheel hub until one of the holes for the wheel bolts is on top.
• Install the -T10149- with a wheel bolt.
• Raise the suspension with the -VAS6931- until dimension <a> is achieved.
o Dimension <a> = 385 ± 10 mm.
CAUTION
• All bolts on suspension components with bonded rubber bushings must always be tightened in curb weight position (unloaded condition).
• Bonded rubber bushings have a limited range of rotation.
• Axle components with bonded rubber bushings must be brought into the position they will be in when driving before they are tightened (curb weight position). Otherwise, the bonded rubber bushing will have tension, which will reduce the service life.
Torque lower shock bolt and install rear wheels:
• Torque lower shock bolt <1> to 70 Nm + 180°.
• Install rear wheels and torque to 120 Nm.
• Remove any tools that were used to secure the vehicle on the hoist.
• Remove tools from under the vehicle.
Work is complete - Proceed to Section E.

The repair information in this document is intended for use only by skilled technicians who have the proper tools, equipment and training to correctly and safely maintain your vehicle. These procedures are not intended to be attempted by “do-it-yourselfers,” and you should not assume this document applies to your vehicle, or that your vehicle has the condition described. To determine whether this information applies, contact an authorized Volkswagen dealer. 2019 Volkswagen Group of America, Inc. and Volkswagen Canada. All Rights Reserved. April 2019 42J5 Page 29 of 29
Section E – Campaign Completion Label
Install Campaign Completion Label
• Fill out and affix Campaign Completion Label, part number CAMP 010 000, next to the vehicle emission control information label.
TIP
Ensure Campaign Completion Label does not cover any existing label(s).
Proceed to Section F
Section F - Parts Return/Disposal
Properly store (retain), destroy or dispose of removed parts in accordance with all state/province and local requirements, unless otherwise indicated and/or requested through the Warranty Parts Portal (WPP) for U.S. and the Part Destruction and Core Disposition Report for Canada.