sace emax 2 - abb group · sace emax 2 e1.2 doc. n.° 1sdh000999r0720 - b0129 ... taladrado de la...
TRANSCRIPT

SACE Emax 2
E1.2
Doc. N.° 1SDH000999R0720 - B0129
Interblocco meccanico MI tipo A - E1.2Mechanical interlock MI type A - E1.2
MI typ A - E1.2Mechanische Verriegelung
Verrouillage mécanique MI type A - E1.2Enclavamiento mecánico MI tipo A - E1.2
OK
OK
1
2
2 1
CONTENUTO - CONTENTS - INHALT - CONTENU - CONTENIDO -
1-3
4-13
14-17
18
20
22-26
INDICE - INDEX - INDEX - INDEX - INDICE
GEOMETRIA - GEOMETRY - GEOMETRIE - GÉOMETRIÉ - GEOMETRÍA
MONTAGGI PRELIMINARI - PRELIMINARY ASSEMBLING - ASSEMBLIEREND EINLEITEND ASSEMBLEMENT PRÉLIMINAIRE - ASAMBLEA PRELIMINAR MONTAGGIO CAVI 1-2 - CABLES 1-2 ASSEMBLING - ASSEMBLIEREND KABELN 1-2ASSEMBLEMENT CÂBLES 1-2 - ASAMBLEA CABLES 1-2
MONTAGGIO SECONDA ETICHETTA - SECOND LABEL LABELLING - ZWEITE SCHILDCHENAPPLICATION SECONDE ÉTIQUETTE - APLICACIÓN SEGUNDA ETIQUETAMONTAGGIO BUSSOLE - BUSHES ASSEMBLING - ASSEMBLIEREND HÜLSEASSEMBLEMENT FINAL ET RÉGULATIONS - ASAMBLEA FINAL Y AJUSTES
MONTAGGI FINALI E REGOLAZIONI - FINAL ASSEMBLING AND SETTING ASSEMBLIEREND ENDE UND REGELUNGEN - ASSEMBLEMENT BOUSSOLES - ASAMBLEA DEDALES
FIGURA - FIGURE - FIGUR - FIGURE - FIGURA

SACE Emax 2 | ABB
AA X6
PP
BB
CC
DD
EE
FF
GG
HH
II
JJ
KK
LL
MM
NN
RR
SS
TT
UU
VV
V1V1
V2V2
V3V3
WW
EstraibileWithdrawable
Ausfahrbardébrochable
Extraíble
Montaggio a paretewall mountingWandanbau
montage sur paroimontaje en la pared
Montaggio a pavimentofloor mounting
Fußbodenanbaumontage sur sol
montaje en el suelo
EstraibileWithdrawable
Ausfahrbardébrochable
Extraíble
Montaggio a paretewall mountingWandanbau
montage sur paroimontaje en la pared
Montaggio a pavimentofloor mounting
Fußbodenanbaumontage sur sol
montaje en el suelo
X8
X2 X4
X2 X4
X2 X2
X1 X1
X1 X1
X1 X1
X1 X1
X1 X1
X2 X2
X2 X4
X1 X1
X1 X1
X1 X1
X1
X1
X1
X1
X2
X2 X2 X2X2 X2
X1X1 X1
X1X1 X1
X1X1 X1
X1X1 X1
X1
x
XX
OO
ø5
M5 X3
X1
V5V5
V4V4
YY
X2X2X2
X2X2X2
X3X3X3
X1 X1
X1 X1
ZZ X1
Z1Z1 X1M4x16
Ø4 Z2Z2 X1

1 2
3
F W
SACE Emax 2 | ABB
4 W
max
100
0
max 2750
Foratura piano di appoggio per passaggio caviMounting surface drilling for cableBohrung Auflagefläche für KabelPerçage plan d'appui pour le câbleTaladrado de la superficie de apoyo para el cable
Foratura piano di appoggio per passaggio caviMounting surface drilling for cableBohrung Auflagefläche für KabelPerçage plan d'appui pour le câbleTaladrado de la superficie de apoyo para el cable
3 Nm
RR
SS
TT
TT
ZZ
Z1Z12 NmZ2Z2
127
30
70 50
(5")
(1.1
8")
(2.76") (1.97")
80 152
155.
530
(6.1
2")
(1.1
8")
(3.15") (5.98")
(max
39.
37")
(max 108.27")
17.7 lb in
26.55 lb in

5
8
6
SACE Emax 2 | ABB
W
F
F
7
II
GG
HH
UU
UU
UU
2
3
1
4
1
1
2
4
3
3
6
5
9
12
10
SACE Emax 2 | ABB
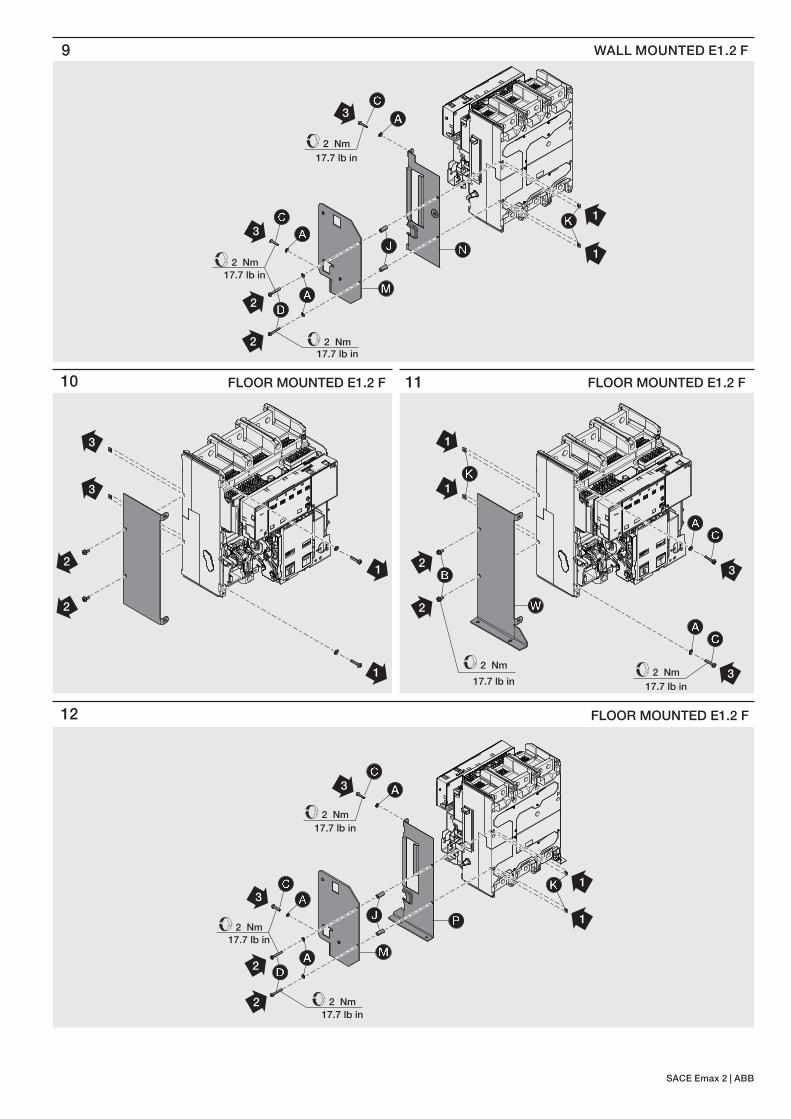
FLOOR MOUNTED E1.2 FFLOOR MOUNTED E1.2 F 11
WALL MOUNTED E1.2 F
FLOOR MOUNTED E1.2 F
1
1KK
3CC
AA
2 Nm
3CC
AA
2 Nm
AADD
2
2
2 Nm
MM
PPJJ
BB
KK
WW
AACC
AACC
2 Nm
2
2
1
3
3
2 Nm
1
2
2
3
1
1
3
1
1KK
3CC
AA
2 Nm
3CC
AA
2 Nm
AADD
2
2
2 Nm
MM
NNJJ
17.7 lb in
17.7 lb in
17.7 lb in
17.7 lb in 17.7 lb in
17.7 lb in
17.7 lb in
17.7 lb in
13
14
SACE Emax 2 | ABB
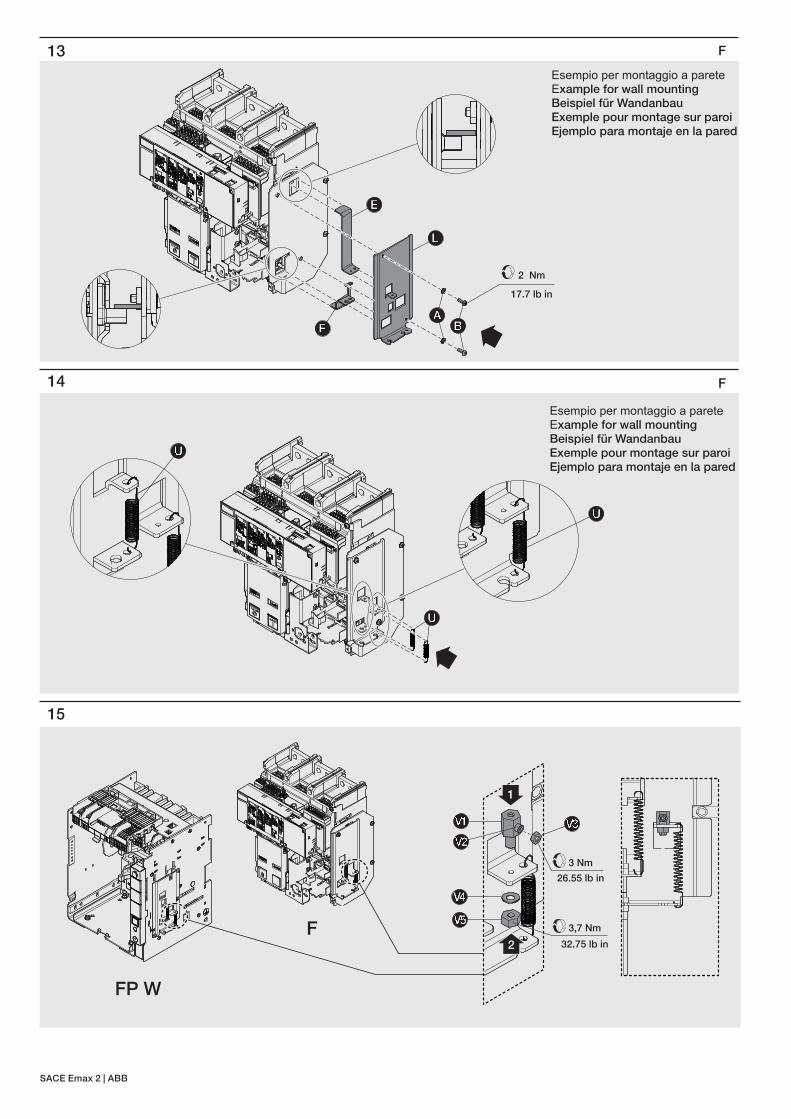
15
F
F
Esempio per montaggio a pareteExample for wall mountingBeispiel für WandanbauExemple pour montage sur paroiEjemplo para montaje en la pared
Esempio per montaggio a pareteExample for wall mountingBeispiel für WandanbauExemple pour montage sur paroiEjemplo para montaje en la pared
UU
UU
UU
FFAA
BB
LL
EE
2 Nm
3,7 Nm
1
2
V5V5
V4V4
V1V1
V2V2
V3V3
3 Nm
FP W
F
17.7 lb in
26.55 lb in
32.75 lb in
16
SACE Emax 2 | ABB
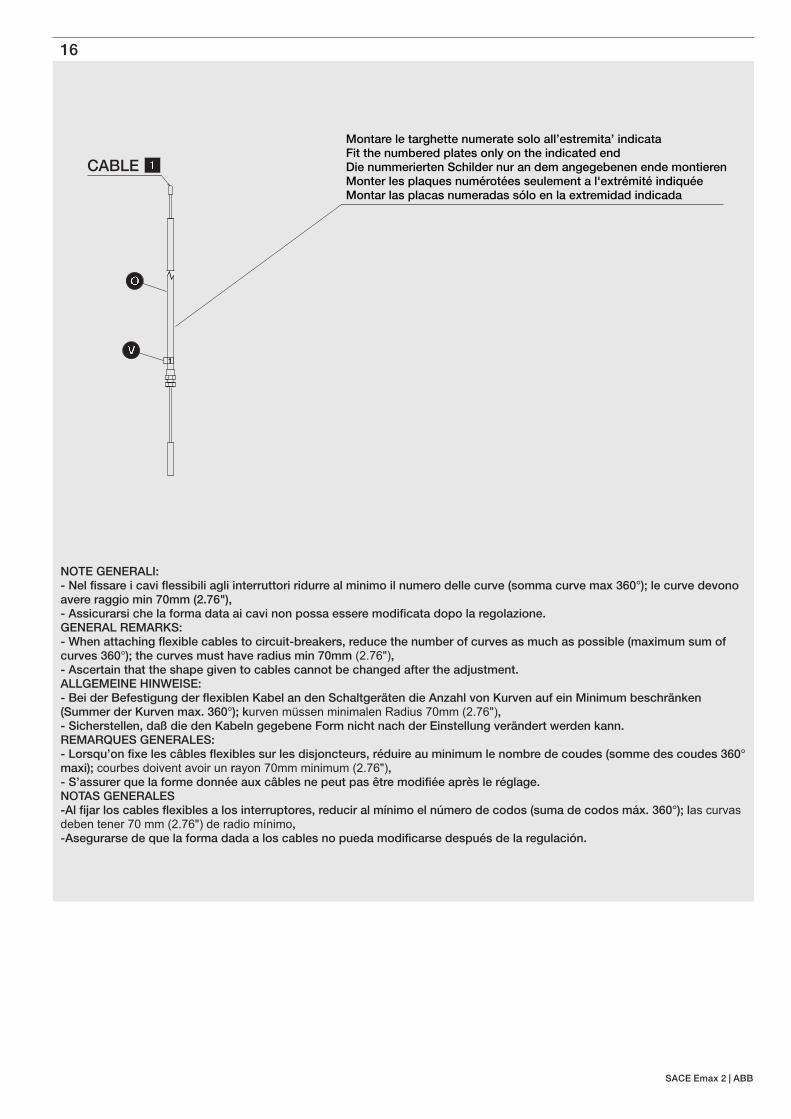
NOTE GENERALI:- Nel fissare i cavi flessibili agli interruttori ridurre al minimo il numero delle curve (somma curve max 360°); le curve devono avere raggio min 70mm (2.76"),- Assicurarsi che la forma data ai cavi non possa essere modificata dopo la regolazione.GENERAL REMARKS:- When attaching flexible cables to circuit-breakers, reduce the number of curves as much as possible (maximum sum of curves 360°); the curves must have radius min 70mm (2.76"),- Ascertain that the shape given to cables cannot be changed after the adjustment. ALLGEMEINE HINWEISE:- Bei der Befestigung der flexiblen Kabel an den Schaltgeräten die Anzahl von Kurven auf ein Minimum beschränken (Summer der Kurven max. 360°); kurven müssen minimalen Radius 70mm (2.76"),- Sicherstellen, daß die den Kabeln gegebene Form nicht nach der Einstellung verändert werden kann.REMARQUES GENERALES:- Lorsqu’on fixe les câbles flexibles sur les disjoncteurs, réduire au minimum le nombre de coudes (somme des coudes 360° maxi); courbes doivent avoir un rayon 70mm minimum (2.76"),- S’assurer que la forme donnée aux câbles ne peut pas être modifiée après le réglage.NOTAS GENERALES-Al fijar los cables flexibles a los interruptores, reducir al mínimo el número de codos (suma de codos máx. 360°); las curvas deben tener 70 mm (2.76") de radio mínimo,-Asegurarse de que la forma dada a los cables no pueda modificarse después de la regulación.
Montare le targhette numerate solo all’estremita’ indicataFit the numbered plates only on the indicated endDie nummerierten Schilder nur an dem angegebenen ende montierenMonter les plaques numérotées seulement a l'extrémité indiquéeMontar las placas numeradas sólo en la extremidad indicada
OO
VV1
11CABLE
SACE Emax 2 | ABB
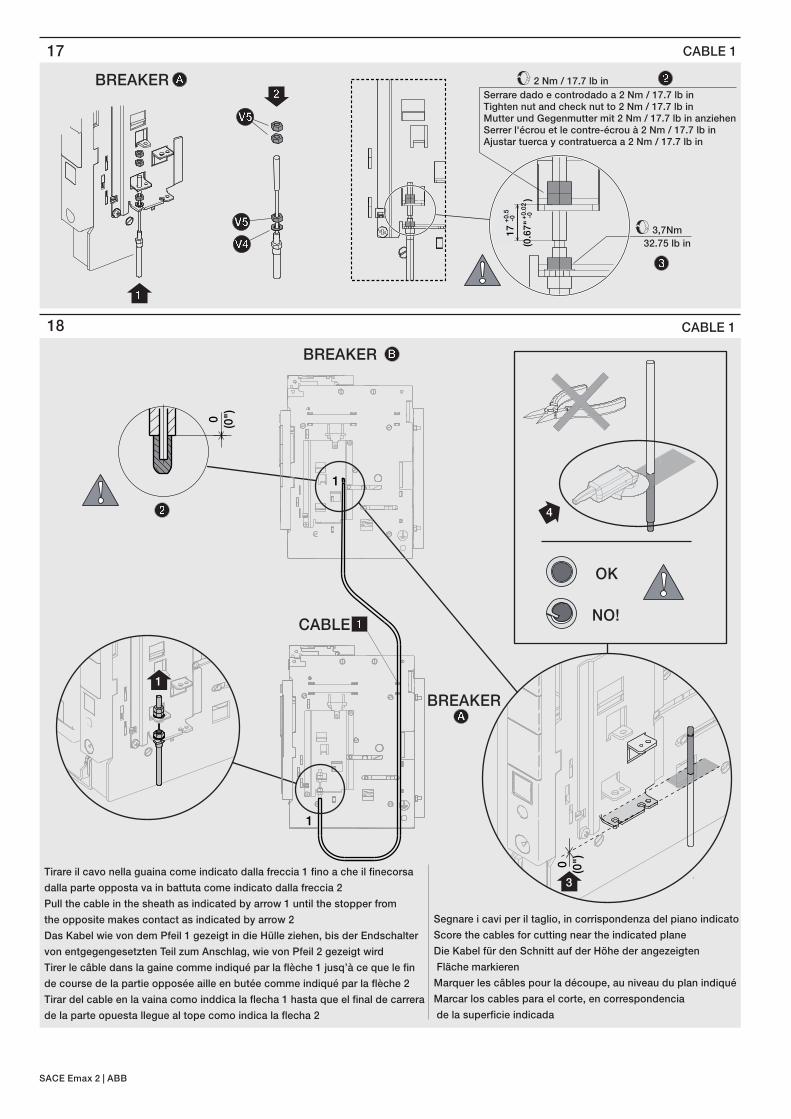
17
18
CABLE 1
CABLE 1
BREAKER AA22
2 Nm / 17.7 lb in
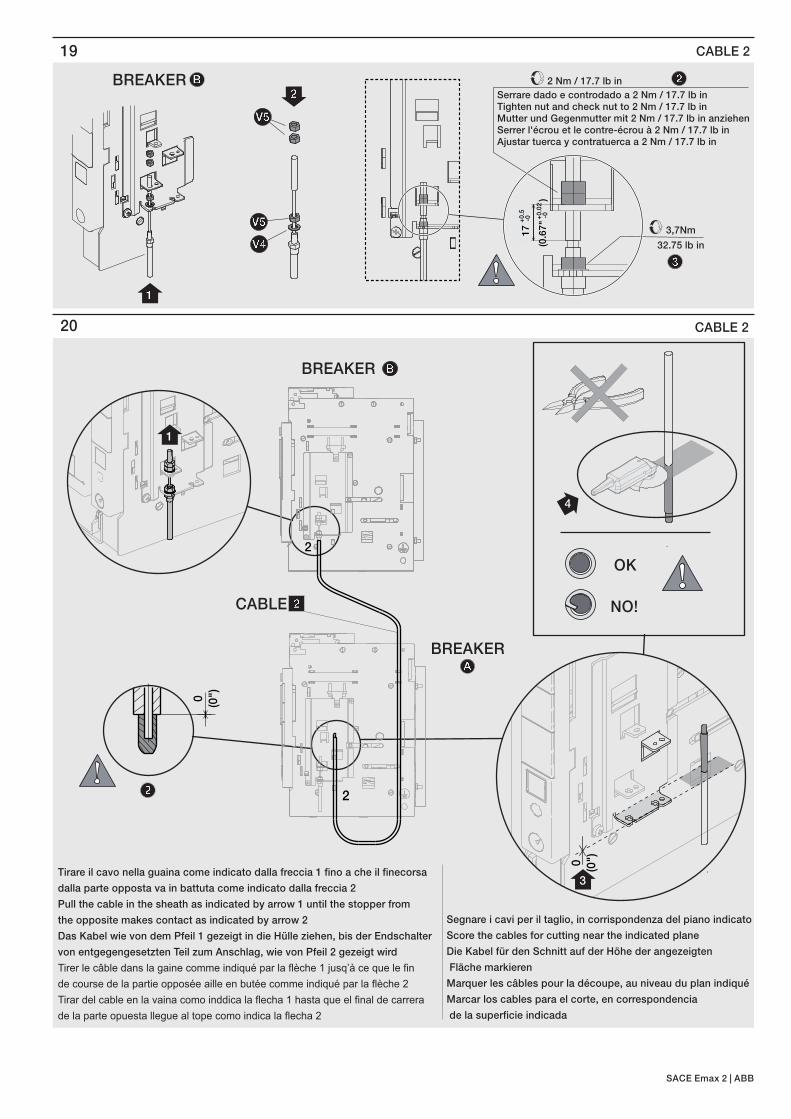
Serrare dado e controdado a 2 Nm / 17.7 lb inTighten nut and check nut to 2 Nm / 17.7 lb inMutter und Gegenmutter mit 2 Nm / 17.7 lb in anziehenSerrer l'écrou et le contre-écrou à 2 Nm / 17.7 lb inAjustar tuerca y contratuerca a 2 Nm / 17.7 lb in
3,7Nm
22
33
17
-0+0.5
V4V4
V5V5
V5V5
BREAKER
1
Segnare i cavi per il taglio, in corrispondenza del piano indicato
Score the cables for cutting near the indicated plane
Die Kabel für den Schnitt auf der Höhe der angezeigten
Fläche markieren
Marquer les câbles pour la découpe, au niveau du plan indiqué
Marcar los cables para el corte, en correspondencia
de la superficie indicada
Tirare il cavo nella guaina come indicato dalla freccia 1 fino a che il finecorsa
dalla parte opposta va in battuta come indicato dalla freccia 2
Pull the cable in the sheath as indicated by arrow 1 until the stopper from
the opposite makes contact as indicated by arrow 2
Das Kabel wie von dem Pfeil 1 gezeigt in die Hülle ziehen, bis der Endschalter
von entgegengesetzten Teil zum Anschlag, wie von Pfeil 2 gezeigt wird
Tirer le câble dans la gaine comme indiqué par la flèche 1 jusq’à ce que le fin
de course de la partie opposée aille en butée comme indiqué par la flèche 2
Tirar del cable en la vaina como inddica la flecha 1 hasta que el final de carrera
de la parte opuesta llegue al tope como indica la flecha 2
4
OK
NO!
0
BREAKER BB
CABLE 11
1
1
11
AA
3
22
32.75 lb in(0.6
7"
)
+0.0
2-0
(0")
0 (0")
SACE Emax 2 | ABB
19
20
CABLE 2
CABLE 2
0
BREAKERAA
Segnare i cavi per il taglio, in corrispondenza del piano indicato
Score the cables for cutting near the indicated plane
Die Kabel für den Schnitt auf der Höhe der angezeigten
Fläche markieren
Marquer les câbles pour la découpe, au niveau du plan indiqué
Marcar los cables para el corte, en correspondencia
de la superficie indicada
Tirare il cavo nella guaina come indicato dalla freccia 1 fino a che il finecorsa
dalla parte opposta va in battuta come indicato dalla freccia 2
Pull the cable in the sheath as indicated by arrow 1 until the stopper from
the opposite makes contact as indicated by arrow 2
Das Kabel wie von dem Pfeil 1 gezeigt in die Hülle ziehen, bis der Endschalter
von entgegengesetzten Teil zum Anschlag, wie von Pfeil 2 gezeigt wird
Tirer le câble dans la gaine comme indiqué par la flèche 1 jusq’à ce que le fin
de course de la partie opposée aille en butée comme indiqué par la flèche 2
Tirar del cable en la vaina como inddica la flecha 1 hasta que el final de carrera
de la parte opuesta llegue al tope como indica la flecha 2
4
OK
NO!
1
BREAKER BB22
2 Nm / 17.7 lb in
Serrare dado e controdado a 2 Nm / 17.7 lb inTighten nut and check nut to 2 Nm / 17.7 lb inMutter und Gegenmutter mit 2 Nm / 17.7 lb in anziehenSerrer l'écrou et le contre-écrou à 2 Nm / 17.7 lb inAjustar tuerca y contratuerca a 2 Nm / 17.7 lb in
3,7Nm
22
33
V4V4
V5V5
V5V5
CABLE
2
BREAKER BB
2
22
3
11
22
32.75 lb in
(0")
0 (0")
17
-0+0.5
(0.6
7"
)
+0.0
2-0

23
24
SACE Emax 2 | ABB
21
22
1
OO
YY
YY
Applicare la targhetta numerata all’estremità del cavoApply the numbered plate at the end of the cableDie nummerierten Schilder am Ende des Kabels anbringenAppliquer la plaque numérotée à l'extrémité du câbleAplicar la placa numerada en la extremidad del cable
Tenere ferma con una pinza la guaina e avvitare con una chiave inglese Ch8 il dado alla quota indicataHold the sheath with a pair of pliers and tighten the nut with an adjustable wrench Ch8 to the indicated positionMit einer Zange die Hülle festhalten und mit einem englischen Schlüssel Ch8 die Mutter mit dem angegebenen Wert anziehenTenir la gaine avec une pince et visser à l'aide d'une clé anglaise Ch8 l'écrou à la cote indiquéeMantener fija con una pinza la vaina y enroscar con una llave inglesa Ch8 la tuerca a la cota indicada
L =
6 m
m
ATTENZIONE:- Assicurarsi che la forma data ai cavi non possa essere modificata dopo la regolazione.
WARNING:- Ascertain that the shape given to cables cannot be changed after the adjustment.
HINWEISE:- Sicherstellen, daß die den Kabeln gegebene Form nicht nach der Einstellung verändert werden kann.
REMARQUES:- S’assurer que la forme donnée aux câbles ne peut pas être modifiée après le réglage.
NOTAS:- Asegurarse de que la forma dada a los cables no pueda modificarse después de la regulación.
2
33
3,7 Nm
YY
BB
AA
OK!
BREAKER
BREAKER
XX
21
12
1
3 Nm
(L =
0.2
4")
26.55 lb in
32.75 lb in
SACE Emax 2 | ABB
27 SIDE BY SIDE
25 26F
AA
BB
BREAKER
BREAKER
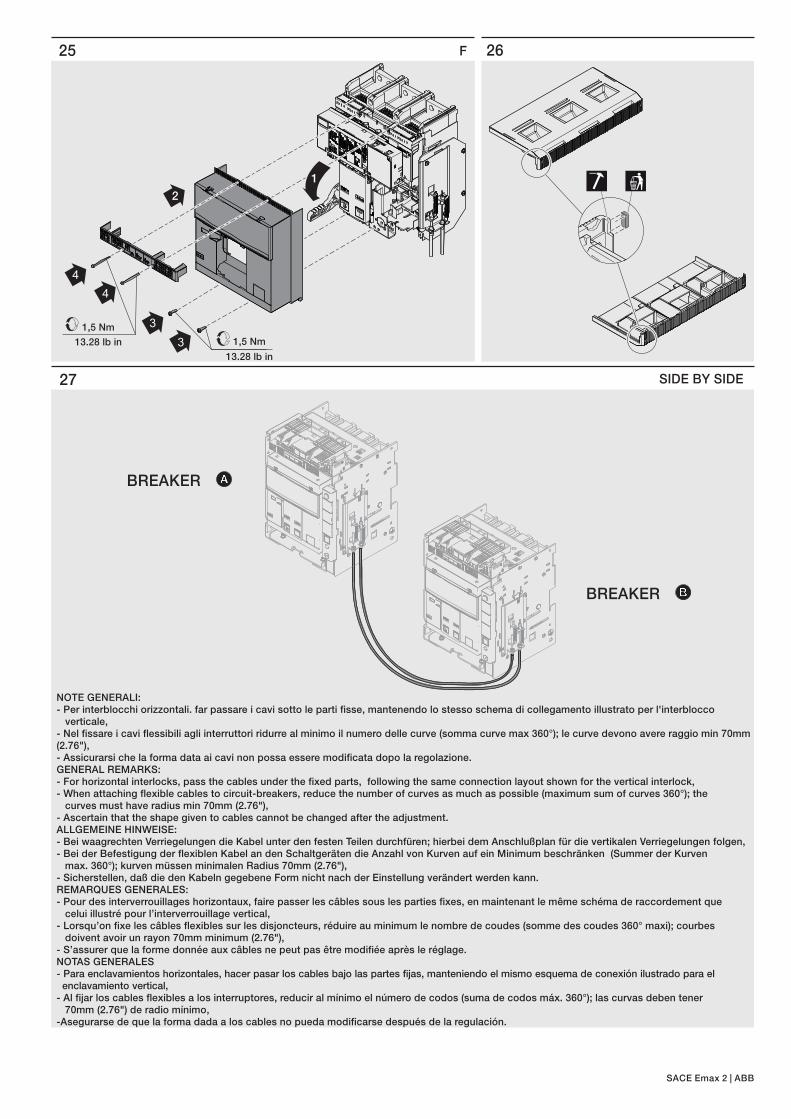
NOTE GENERALI:- Per interblocchi orizzontali. far passare i cavi sotto le parti fisse, mantenendo lo stesso schema di collegamento illustrato per l'interblocco verticale,- Nel fissare i cavi flessibili agli interruttori ridurre al minimo il numero delle curve (somma curve max 360°); le curve devono avere raggio min 70mm (2.76"),- Assicurarsi che la forma data ai cavi non possa essere modificata dopo la regolazione.GENERAL REMARKS:- For horizontal interlocks, pass the cables under the fixed parts, following the same connection layout shown for the vertical interlock,- When attaching flexible cables to circuit-breakers, reduce the number of curves as much as possible (maximum sum of curves 360°); the curves must have radius min 70mm (2.76"),- Ascertain that the shape given to cables cannot be changed after the adjustment. ALLGEMEINE HINWEISE:- Bei waagrechten Verriegelungen die Kabel unter den festen Teilen durchfüren; hierbei dem Anschlußplan für die vertikalen Verriegelungen folgen,- Bei der Befestigung der flexiblen Kabel an den Schaltgeräten die Anzahl von Kurven auf ein Minimum beschränken (Summer der Kurven max. 360°); kurven müssen minimalen Radius 70mm (2.76"),- Sicherstellen, daß die den Kabeln gegebene Form nicht nach der Einstellung verändert werden kann.REMARQUES GENERALES:- Pour des interverrouillages horizontaux, faire passer les câbles sous les parties fixes, en maintenant le même schéma de raccordement que celui illustré pour l’interverrouillage vertical,- Lorsqu’on fixe les câbles flexibles sur les disjoncteurs, réduire au minimum le nombre de coudes (somme des coudes 360° maxi); courbes doivent avoir un rayon 70mm minimum (2.76"),- S’assurer que la forme donnée aux câbles ne peut pas être modifiée après le réglage.NOTAS GENERALES- Para enclavamientos horizontales, hacer pasar los cables bajo las partes fijas, manteniendo el mismo esquema de conexión ilustrado para el enclavamiento vertical,- Al fijar los cables flexibles a los interruptores, reducir al mínimo el número de codos (suma de codos máx. 360°); las curvas deben tener 70mm (2.76") de radio mínimo,-Asegurarse de que la forma dada a los cables no pueda modificarse después de la regulación.
1,5 Nm
1,5 Nm
2
3
3
4
4
1
13.28 lb in
13.28 lb in

28
SACE Emax 2 | ABB
REGOLAZIONE:N.B. Nelle regolazioni quando si agisce sui dadi non far ruotare su sé stessi i puntali dei cavi1 Inserire le parti mobili nelle parti fisse (se estraibili)2 Chiudere l’interruttore ‘‘A’’3.1 Tirare il cavo ‘‘Y2’’ dell’interruttore chiuso verso l’alto fino a portare il tirante ‘‘Y4’’ dell’interruttore aperto in leggera battuta sul piano ‘‘Y3’’3.2 Bloccare con chiave CH2 il grano M4 ‘‘Y1’’ (1,5 Nm / 13.28 lb in) e chiudere il relativo controdado ‘‘Y5’’ con chiave Ch7 (1.5 Nm / 13.28 lb in)4 Aprire l’interruttore ‘‘A’’5 Chiudere l’interruttore ‘‘B’’ e ripetere i punti 3.1 e 3.26 Aprire l’interruttore ‘‘B’’7 Eseguire alcune manovre di chiusura e apertura, quindi verificare la battuta dei tiranti ‘‘Y4’’ sul piano ‘‘Y3’’8 Aprire i due interruttori
ADJUSTMENT:NOTE: During adjustments, do not allow the cable terminals to rotate when working on the nuts1 Insert the moving parts into the fixed parts (if withdrawable)2 Close the circuit-breaker ‘‘A’’3.1 Pull the cables ‘‘Y2’’ of the closed circuit-breakers wards up and bring the tie-rods ‘‘Y4’’ of the open circuit-breakers to touch lightly the surface ‘‘Y3’’3.2 Lock the grub screw M4 ‘‘Y1’’ with wrench CH2 (1.5 Nm / 13.28 lb in) and close the corresponding lock nut ‘‘Y5’’ with wrench Ch7 (1.5 Nm ) / 13.28 lb in4 Open circuit breaker ‘‘A’’5 Close circuit-breaker ‘‘B’’ and repeat steps 3.1 and 3.26 Open circuit breaker ‘‘B’7 Open and close a few times, then make sure that the tie-rods "Y4" touch lightly against the surface "Y3.8 Open the two circuit-breakers.
EINSTELLUNG:HINWEIS: Bei der betätigung der muttern während der einstellungdie kabelschuhe nicht um sich selbst drehen1 Die beweglichen Teile in die festen Teile stecken (sofer ausfahrbar)2 Den Leistungsschalter ‘‘A’’ einschalten3.1 Die Kabel ‘‘Y2’’ der eingeschalteten Leistungsschalter nach oben ziehen, bis die Zuganker ‘‘Y4’’ der ausgeschalteten Leistungsschalter in leichten Anschlag auf der Fläche ‘‘Y3’’ gebracht werden3.2 Die Madenschraube M4 ‘‘Y1’’ (1,5 Nm / 13.28 lb in) mit den Schlüssel Ch2 blockieren und die entsprechende Gegenmutter / 13.28 lb in ‘Y5’’ mit dem Schlüssel Ch7 (1.5Nm ) schließen4 Den Leistungsschalter ‘‘A’’ ausschalten5 Den Leistungsschalter ‘‘B’’ einschalten und die Punkte 3.1 und 3.2 wiederholen6 Den Leistungsschalter ‘‘B’’ ausschalten7 Ein paar Ein- und Ausschaltungen ausführen, dann den Anschlag der Zuganker ‘‘Y4’’ auf der Fläche ‘‘Y3’’ prüfen8 Den zwei Leistungsschalter ausschalten
REGLAGE:N.B. Lors des reglages, quand on agit sur les ecrous, ne pas faire tourner les cosses des cables sur elles-memes.1 Introduire les parties mobiles dans les parties fixes (si débrochables)2 Fermer le disjoncteur ‘‘A’’3.1 Tirer le câble ‘‘Y2’’ des disjoncteurs fermés vers le haunt jusqu'à mettre le tirant ‘‘Y4’’ des disjoncteurs ouverts légèrement en butée contre le plan ‘‘Y3’’3.2 Avec une clé CH2 bloquer la vis sans tête M4 ‘‘Y1’’ (1,5 Nm / 13.28 lb in) et serrer le contre-écrou ‘‘Y5’’ avec une clé Ch7 / 13.28 lb in (1.5 Nm )4 Ouvrir le disjoncteur ‘‘A’’5 Fermer le disjoncteur ‘‘B’’ et répéter les points 3.1 et 3.26 Ouvrir le disjoncteur ‘‘B’’7 Effectuer quelques manoeuvres de fermeture et d'ouverture, puis vérifier la butée des tirants ‘‘Y4’’ sur le plan ‘‘Y3’’8 Ouvrir les deux disjoncteurs
REGULACIÓNN.B. Durante las regulaciones, cuando se hacen girar las tuercas, impedir que los terminales de los cables giren sobre sí mismos.1 Introducir las partes móviles en las partes fijas (si son extraíbles)2 Cerrar el interruptor ‘‘A’’3.1 Tirar de los cables ‘‘Y2’’ de los interruptores cerrados hacia arriba hasta llevar los tirantes ‘‘Y4’’ de los interruptores abiertos apenas tocando la superficie ‘‘Y3’’3.2 Bloquear con llave CH2 el pasador M4 ‘‘Y1’’ (1,5 Nm / 13.28 lb in) y ajustar la correspondiente contratuerca ‘‘Y5’’ con / 13.28 lb in llave Ch7 (1.5 Nm )4 Abrir el interruptor ‘‘A’’5 Cerrar el interruptor ‘‘B’’ y repetir los puntos 3.1 y 3.26 Abrir el interruptor ‘‘B’’7 Efectuar algunas maniobras de cierre y apertura, luego verificar que los tirantes ‘‘Y4’’ hagan tope sobre la superficie ‘‘Y3’’8 Abrir los dos interruptores
Y1Y1
Y2Y2
Y5Y5
Y3Y3
Y4Y4

29
© Copyright 2014 ABB. All rights reserved. www.abb.com
For more information please contact:
ABB S.p.A.
ABB SACE Division
Via Baioni, 35
24123 Bergamo - Italy
Phone: +39 035 395 111
Fax: +39 035 395 306 - 433
CONTROLLO MECCANICO:Riarmare le molle dei comandi degli interruttori ed eseguire le seguenti operazioni:1- Chiudere l’interruttore ‘‘A’’ e controllare che l’interruttore ‘‘B’’ non possa essere chiuso. Riarmare le molle del comando dell’ interruttore ‘‘A’’ verificando che lo stesso resti in chiuso, quindi aprire l’interruttore ‘‘A’’.2- Chiudere l’interruttore ‘‘B’’ e controllare che l’interruttore ‘‘A’’ non possa essere chiuso. Riarmare le molle del comando dell’interruttore ‘‘B’’ verificando che lo stesso resti in chiuso, quindi aprire l’interruttore ‘‘B’’.3- Ripetere il test per tre volte. Al termine dei test verificare le regolazioni e il bloccaggio dei tiranti.
MECHANICAL CHECK:Reset the springs of the operating mechanisms of the circuit-breakers and perform the following operations:1- Close circuit-breakers ‘‘A’’ and make sure that circuit-breaker ‘‘B’’ cannot be closed. Reset the springs of the operating mechanisms of circuit-breaker ‘‘A’’ checking that it remain in closed position, then open circuit-breaker ‘‘A’’.2- Close circuit-breakers ‘‘B’’ and make sure that circuit-breaker ‘‘A’’ cannot be closed. Reset the springs of the operating mechanisms of circuit-breaker ‘‘B’’ checking that it remain in closed position, then open circuit-breaker ‘‘B’’.3- Repeat the test three times. When the tests are completed check the adjustments and the locking of the tie rods.
MECHANISCHE KONTROLLE:Die Federn der Antriebe der Leistungsschalter rückstellen und die folgenden Vorgänge ausführen:1- Die Leistungsschalter ‘‘A’’ einschalten und sicherstellen, dass der Leistungsschalter ‘‘B’’ nicht eingeschaltet werden kann. Die Federn der Antriebe der Leistungsschalter ‘‘A’’rückstellen und sicherstellen, dass sie eingeschaltet bleiben, dann die Leistungsschalter ‘‘A’’ ausschalten.2- Die Leistungsschalter ‘‘B’’ einschalten und sicherstellen, dass der Leistungsschalter ‘‘A’’ nicht eingeschaltet werden kann. Die Federn der Antriebe der Leistungsschalter ‘‘B’’ rückstellen und sicherstellen, dass sie eingeschaltet bleiben, dann die Leistungsschalter ‘‘B’’ ausschalten.3 Den Test drei Mal wiederholen. Am Ende des Tests die Einstellungen und den festen Sitz der Zuganker sicherstellen.
CONTROLE MÉCANIQUE:Réarmer les ressorts des commandes des disjoncteurs et effectuer les opérations suivantes:1- Fermer le disjoncteur ‘‘A’’ et contrôler que le disjoncteur ‘‘B’’ ne puisse pas être fermé. Réarmer les ressorts des commandes des disjoncteur ‘‘A’’ en vérifiant que ceux-ci restent en fermé, puis ouvrir les disjoncteur ‘‘A’’.2- Fermer les disjoncteurs ‘‘B’’ et contrôler que le disjoncteur ‘‘A’’ ne puisse pas être fermé. Réarmer les ressorts des commandes des disjoncteurs ‘‘B’’en vérifiant que ceux-ci restent en fermé, puis ouvrir les disjoncteurs ‘‘B’’.3- Répéter le test trois fois. A la fin des tests vérifier les réglages et le blocage des tirants.
CONTROL MECÁNICO:Rearmar los resortes de los mandos de los interruptores y efectuar las siguientes operaciones:1- Cerrar el interruptor ‘‘A’’ y controlar que el interruptor ‘‘B’’ no pueda cerrarse. Rearmar los resortes del mando del interruptor ‘‘A’’ verificando que lo mismo quede cerrado, luego abrir el interruptor ‘‘A’’.2- Cerrar el interruptor ‘‘B’’ y controlar que el interruptor ‘‘A’’ no pueda cerrarse. Rearmar los resortes del mando dl interruptor ‘‘A’’ verificando que lo mismo quede cerrado, luego abrir el interruptor ‘‘B’’.3- Repetir el test tres veces. Al finalizar las pruebas verificar las regulaciones y el bloqueo de los tirantes.