retail message quick guide...retail message quick guide chapter 2 - installation and setup 5 retail...
TRANSCRIPT

© Copyright 2015, LS Retail ehf. All rights reserved. All trademarks belong to their respective holders
Retail Message
Quick Guide
LS Nav 2015 (8.0)

LS Retail ehf. Katrinartun 2, 105 Reykjavik, Iceland
Tel: +354 414 5700 Fax: +354 571 2728
Contents
1 Introduction ................................................................................................................................ 3
2 Installation and Setup ............................................................................................................. 3
2.1 Retail Message Setup .................................................................................................................. 3
2.2 Retail Message Recipient Groups .......................................................................................... 3
2.3 Retail Message Action Codes ................................................................................................... 5
2.4 Retail Message POS Commands ............................................................................................. 5
2.5 Retail Message Web Requests ................................................................................................ 6
3 Retail Messages .......................................................................................................................... 6
3.1 Create Retail Message ................................................................................................................ 7
3.2 Recipients........................................................................................................................................ 8
3.3 Actions ........................................................................................................................................... 11
4 Active Retail Messages on POS .......................................................................................... 12

Retail Message Quick Guide
Chapter 1 - Introduction 3
1 Introduction
The purpose of the Retail Messages functionality is to enable a simple message exchange between Retail people. Retail Messages can contain a request for an Action and when such a message is processed the Action is initiated. Retail Messages are for example used for Click and Collect orders to initiate picking and put back.
Message can be sent to different types of recipients like Username or Store. When a message is sent to a store all member of that store will receive the message.
Retail Messages are created and activated at head office. POS’s work on HO data by sending and receiving web requests and responses. No data is stored on a POS database.
2 Installation and Setup
Retail Messages is included with the base system and no extra installation is needed.
2.1 Retail Message Setup
Retail Messages are identified by a number series. Select LS Retail > BackOffice > Store Management > Administration > Retail Message Setup:
A number series must be created and selected in the Message Nos. field. This Nos. will be used as a unique key for Retail Message Header.
2.2 Retail Message Recipient Groups
Recipients Groups can be created. These groups can then be selected in the recipients section in the Retail Message card for quicker selection of multiple recipients. Select LS Retail > BackOffice > Store Management > Administration > Retail Message Recipient Groups:

Retail Message Quick Guide
Chapter 2 - Installation and Setup 4
New group can be added directly at the bottom of the list or by pressing the New button:
We have four different recipient types in the recipients, Username, Store, Terminal and Staff. When the above group is placed on a message all the recipients will receive the message.

Retail Message Quick Guide
Chapter 2 - Installation and Setup 5
Retail recipients can have status Active or Inactive. If the status is Inactive when a group is exploded (when a Retail Message is activated) then the recipient is not made active for the message.
2.3 Retail Message Action Codes
The Action Code facility enables the users to create custom actions that can be linked to a Retail Message. Select LS Retail > BackOffice > Store Management > Administration > Retail Message Action Codes:
Action Codes are linked to a Codeunit. When a message is processed containing an Action Code this codeunit is run and the Retail Message Header record should be passed to the codeunit. The general fields in the Retail Message Header record can be used to pass parameters to the codeunit.
In the CRONUS LS company there is a sample codeunit that uses information in the Retail Message header and runs a specific report. The sample codeunit is here to demonstrate how a custom codeunit, that uses data from the Retail Message header, can be written. This codeunit calls a function that prints report 705 Inventory Availability for items with a number that starts with 10 (filter on Item No. is ‘10*’) and then sets the field Action Processed (Internal) to TRUE. That will tell the system that the message has been processed and the status of the Recipient running it is changed to Processed by Recipient and the Retail Message will be marked as Processed.
2.4 Retail Message POS Commands
Retail Messages uses two panels on the POS (#RETAIL-MSG-LIST and #RETAIL-MSG-DETAILS). To activate the first panel with the Retail Message Headers a button’s properties must be set as shown below:

Retail Message Quick Guide
Chapter 3 - Retail Messages 6
The panel definitions are available in the LS Cronus demo company.
2.5 Retail Message Web Requests
The Retail Message system uses three Web requests:
The definitions can be viewed and copied from the LS Cronus demo company.
3 Retail Messages
All Retail Messages are stored in the Head Office Database. Users can retrieve their active messages by opening a Retail Message List on the POS. When the user opens a message the system marks the message as read for that user.
Retail Message Quick Guide
Chapter 3 - Retail Messages 7
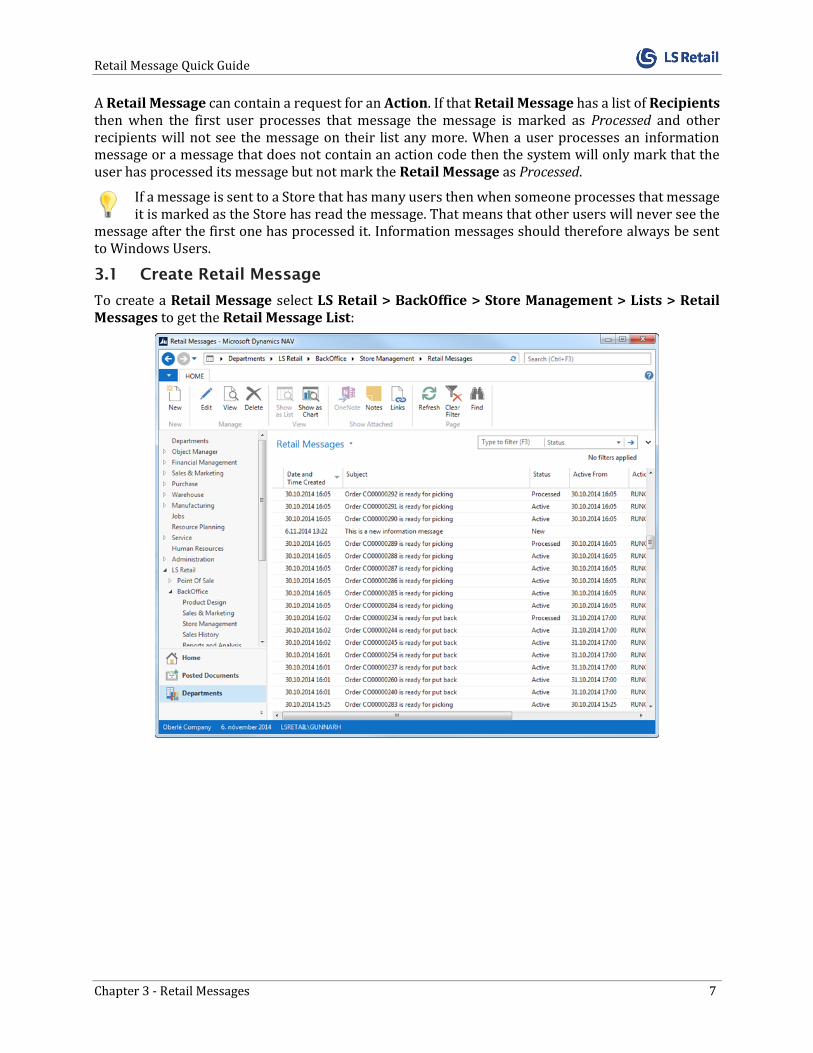
A Retail Message can contain a request for an Action. If that Retail Message has a list of Recipients then when the first user processes that message the message is marked as Processed and other recipients will not see the message on their list any more. When a user processes an information message or a message that does not contain an action code then the system will only mark that the user has processed its message but not mark the Retail Message as Processed.
If a message is sent to a Store that has many users then when someone processes that message it is marked as the Store has read the message. That means that other users will never see the
message after the first one has processed it. Information messages should therefore always be sent to Windows Users.
3.1 Create Retail Message
To create a Retail Message select LS Retail > BackOffice > Store Management > Lists > Retail Messages to get the Retail Message List:
Retail Message Quick Guide
Chapter 3 - Retail Messages 8
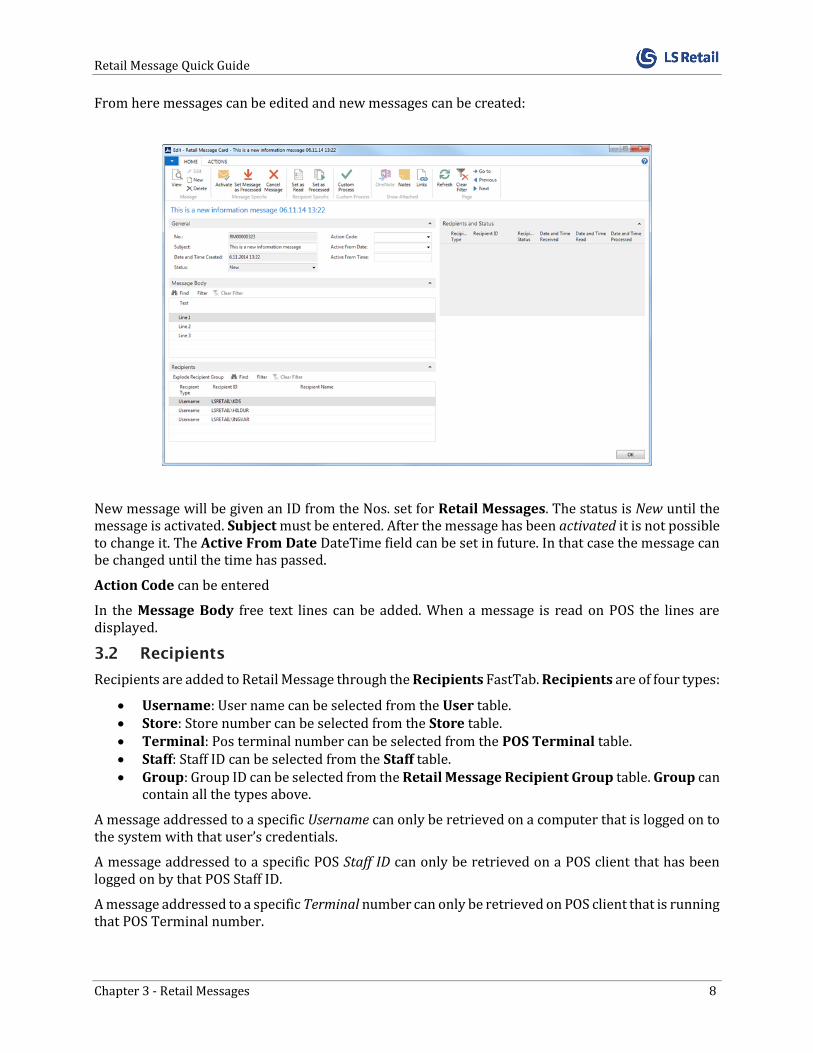
From here messages can be edited and new messages can be created:
New message will be given an ID from the Nos. set for Retail Messages. The status is New until the message is activated. Subject must be entered. After the message has been activated it is not possible to change it. The Active From Date DateTime field can be set in future. In that case the message can be changed until the time has passed.
Action Code can be entered
In the Message Body free text lines can be added. When a message is read on POS the lines are displayed.
3.2 Recipients
Recipients are added to Retail Message through the Recipients FastTab. Recipients are of four types:
Username: User name can be selected from the User table. Store: Store number can be selected from the Store table. Terminal: Pos terminal number can be selected from the POS Terminal table. Staff: Staff ID can be selected from the Staff table. Group: Group ID can be selected from the Retail Message Recipient Group table. Group can
contain all the types above.
A message addressed to a specific Username can only be retrieved on a computer that is logged on to the system with that user’s credentials.
A message addressed to a specific POS Staff ID can only be retrieved on a POS client that has been logged on by that POS Staff ID.
A message addressed to a specific Terminal number can only be retrieved on POS client that is running that POS Terminal number.
Retail Message Quick Guide
Chapter 3 - Retail Messages 9
A message addressed to a specific Store Number can only be retrieved on a POS client that is running in that Store.
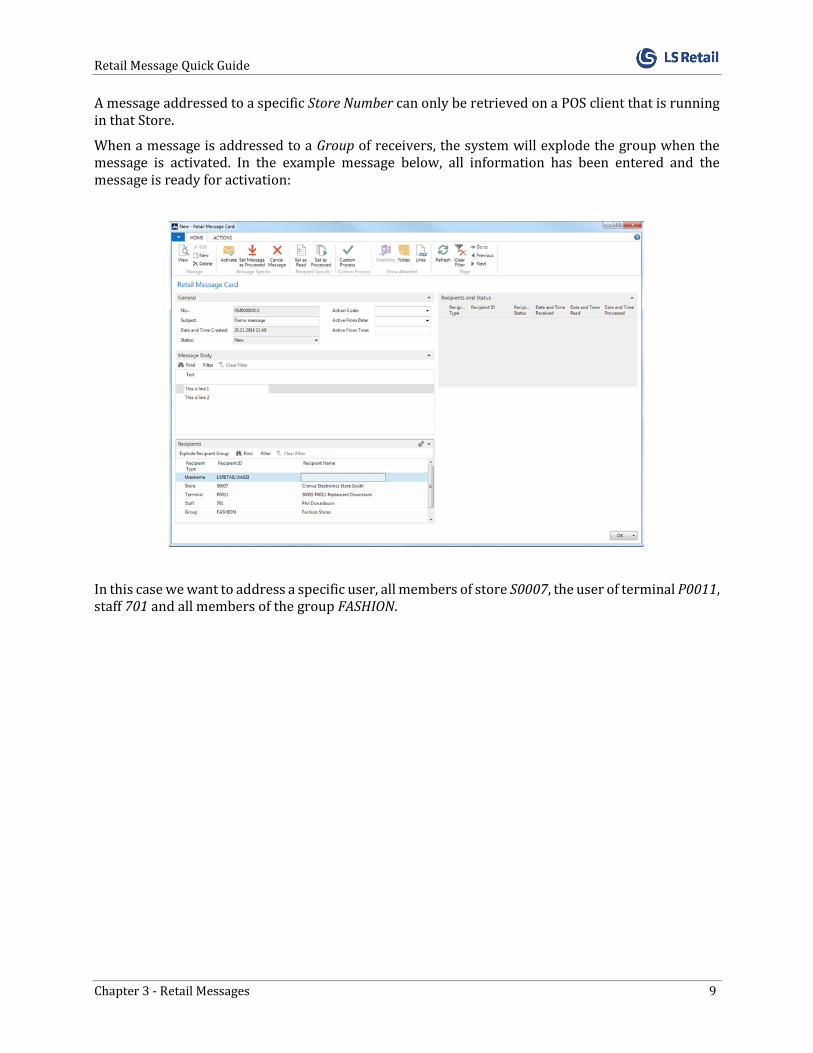
When a message is addressed to a Group of receivers, the system will explode the group when the message is activated. In the example message below, all information has been entered and the message is ready for activation:
In this case we want to address a specific user, all members of store S0007, the user of terminal P0011, staff 701 and all members of the group FASHION.
Retail Message Quick Guide
Chapter 3 - Retail Messages 10
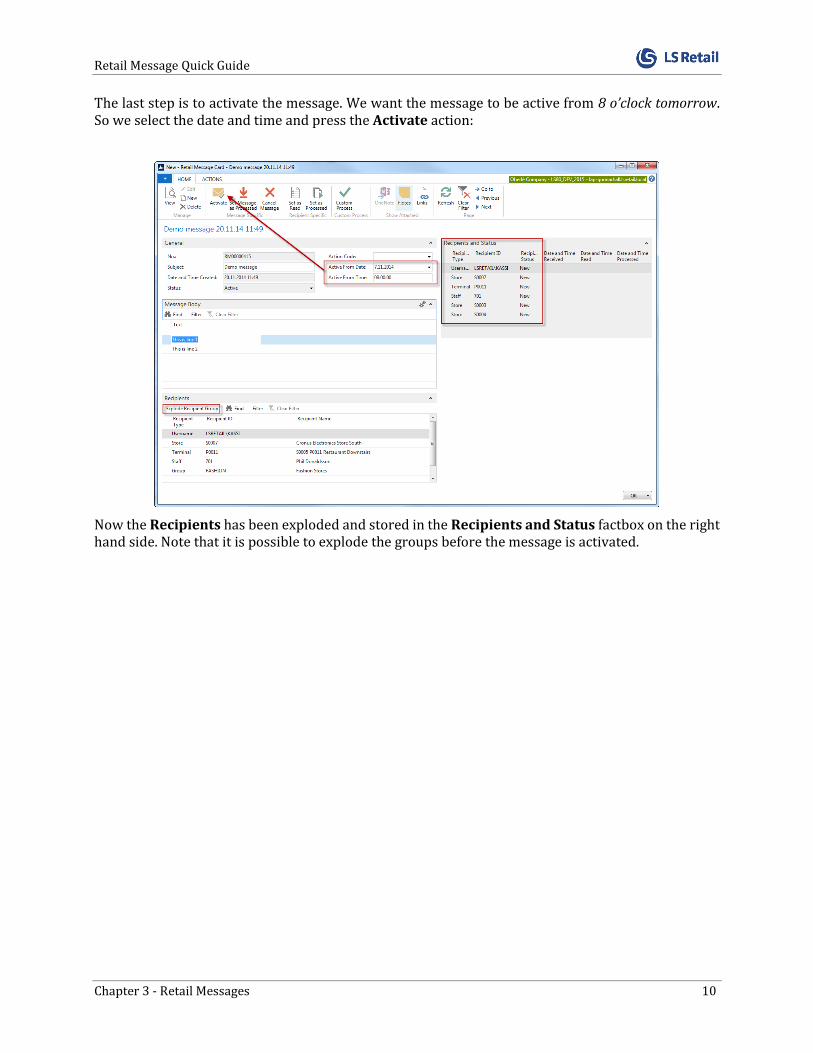
The last step is to activate the message. We want the message to be active from 8 o’clock tomorrow. So we select the date and time and press the Activate action:
Now the Recipients has been exploded and stored in the Recipients and Status factbox on the right hand side. Note that it is possible to explode the groups before the message is activated.

Retail Message Quick Guide
Chapter 3 - Retail Messages 11
Now the system can update the statuses for each recipient when a message is received, read and processed. In the next example, Staff 701 has read the above message on a POS in store S0007:
3.3 Actions
The following actions can be run directly from the Retail Message card:
The Activate action is used to activate a message. The message gets the status Active and if the Active From field is empty the current date and time is assigned to the field when the action is pressed. Recipients and Status lines are created from the Recipients lines with the Recipient Status New.
This action is used to set the status of the current message to Processed.
This action is used to set the status of the current message to Canceled.
This action can be used to set the recipient status to Read by Recipient. This will only mark the Recipient and Status line for the current logged in user. This action will not change the recipient status for other recipients.
This action can be used to set the recipient status to Processed by Recipient. This will only mark the Recipient and Status line for the current logged in user. This action will not change the recipient status for other recipients.
Retail Message Quick Guide
Chapter 4 - Active Retail Messages on POS 12
If a message contains an Action Code the action can be run directly from the Retail Message card by pressing the Custom Process Action.
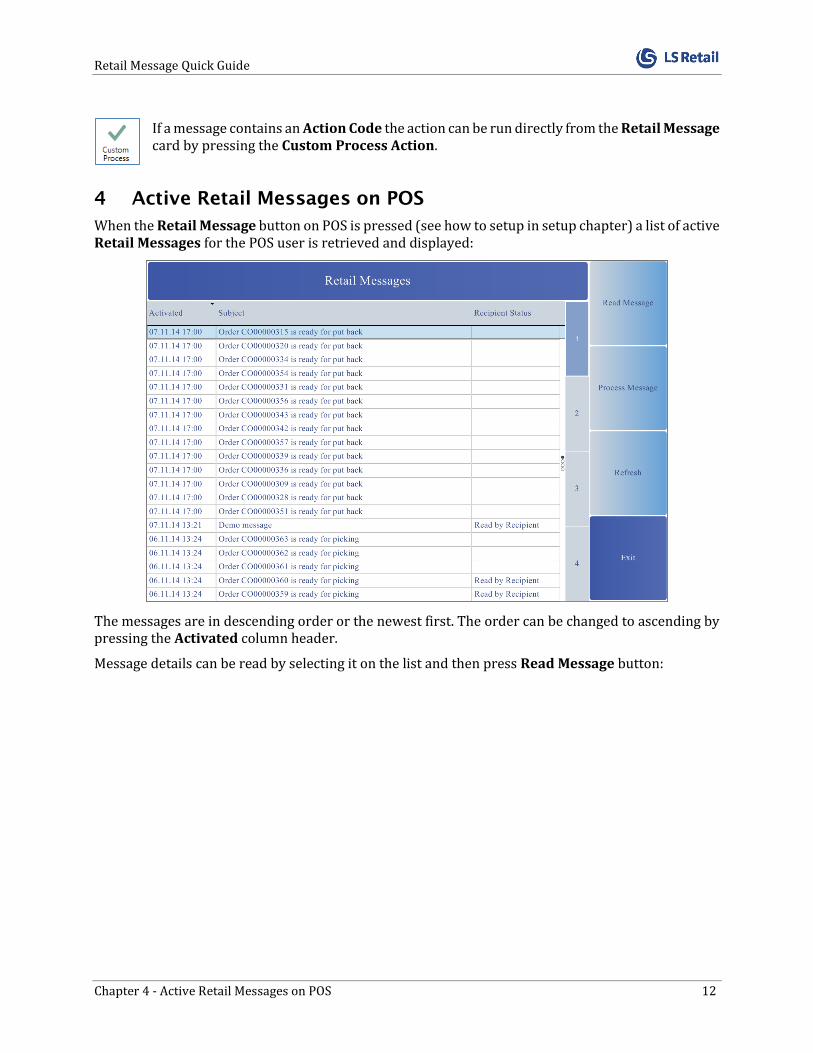
4 Active Retail Messages on POS
When the Retail Message button on POS is pressed (see how to setup in setup chapter) a list of active Retail Messages for the POS user is retrieved and displayed:
The messages are in descending order or the newest first. The order can be changed to ascending by pressing the Activated column header.
Message details can be read by selecting it on the list and then press Read Message button:

Retail Message Quick Guide
Chapter 4 - Active Retail Messages on POS 13
Here it is possible to continue and press the Process Message button. If the message contains an Action Code the corresponding codeunit is called. If the codeunit returns successfully the Recipients Status is set to Processed by Recipient and the Retail Message is marked as Processed. On the other hand if the message does not contain an Action Code then only the Recipient is marked as Processed by Recipient but the status of the Retail Message is not changed.
The message can be processed directly from the first panel. Then the Recipient lines will be marked as read and processed.
When a message is processed successfully it is removed from the list but the list is not refreshed. That means that if new messages exist (since the window was loaded) they will not be added to the list unless the Refresh button is pressed.