remote deposit service online - training.works.comtraining.works.com/direct/media/remote deposit...
TRANSCRIPT

Remote Deposit Service Online (Customer Administrator) Bank of America Direct®
User Guide
00-35-3892NSB
2
This manual contains proprietary and confidential information of Bank of America and was prepared by the staff of Bank of America. This user guide may not be reproduced or disclosed to others in whole or in part without the written permission of Bank of America. Permitted reproductions shall bear this notice and the Bank of America copyright notice. The user of this user guide acknowledges the rights of Bank of America in the contents and agrees to maintain this user guide and its contents in confidence.
Bank of America, N.A. – Member FDIC
©2009 Bank of America Corporation
All rights reserved. None of the enclosed material may be reproduced or published without permission of Bank of America.
00-35-3892NSB 03-2009 – digital library number and publication date
CashPro and Direct are registered trademarks of Bank of America Corporation. All other trademarks are the property of their respective owners.

1
Contents Introduction ......................................................................................... 3
Overview................................................................................................................................ 5
Before You Begin................................................................................ 7
User Roles and Functions ..................................................................................................... 7
Customer User Roles and Functions................................................................................... 10
Confirm Workstation Requirements..................................................................................... 12 Hardware Requirements ................................................................................................ 12 Software Requirements.................................................................................................. 13
Download and Install Digital Certificates (for Bank of America Direct) ............................... 14
Login to Bank of America Direct .......................................................................................... 15
Login to Remote Deposit Service Online............................................................................. 15 To login to Remote Deposit Service Online: .................................................................. 15
Getting Started.................................................................................. 18
Login to Bank of America Direct .......................................................................................... 18
Login to Remote Deposit Service Online............................................................................. 20
Performing Administrative Functions ................................................ 22
Account Groups ................................................................................ 24
Creating new account groups.............................................................................................. 24
Modifying an account group ................................................................................................ 28
Deleting an account group................................................................................................... 30
Users ................................................................................................ 33
Adding a new user ............................................................................................................... 33
Modifying an existing user ................................................................................................... 37
Deleting an existing user ..................................................................................................... 40
Rules................................................................................................. 42
To Create a New Rule Account ........................................................................................... 44
To Edit a Rule Account ........................................................................................................ 46

ii
To Delete a Rule Account.................................................................................................... 47
Custom Fields................................................................................... 50
Creating a custom field ........................................................................................................ 51
Assigning the custom field to a depository account ............................................................ 56
Editing Custom Fields.......................................................................................................... 58
Deleting Custom Fields........................................................................................................ 60
Customer Preferences...................................................................... 62
Lists...................................................................................................................................... 62
Optional Fields..................................................................................................................... 65
Reports ................................................................................................................................ 67
Set up payment Coupons- for remitters............................................................................... 69 Download the Scanner Driver ........................................................................................ 70
Virtual Endorsements .......................................................................................................... 81
Exiting the Remote Deposit Service Online Application ................... 85
Exit Remote Deposit Service Online ................................................................................... 85
Support ............................................................................................. 86
Help Menu Support.............................................................................................................. 86
Technical Support................................................................................................................ 86
Bank of America Direct Technical Support.......................................................................... 86
Acronyms.......................................................................................... 88
Icons .................................................................................................................................... 89
Get Online Help ................................................................................................................... 89
Understand Help Tips .......................................................................................................... 90
Troubleshooting, Login, Authentication and Scanner Errors............................................... 91
Sample Check ..................................................................................................................... 94

Remote Deposit Service Online Customer Administrator User Guide
3
Remote Deposit Service Online is a Web-based application that enables companies to make electronic deposits from their desktops using a bank approved scanner. Remote Deposit Service Online users can scan and capture images and MICR data of U.S. dollar items drawn on U.S. banks and transmit that data to Bank of America using a secure Internet connection.
Remote Deposit Service Online is available for scanning items and transmitting deposits 24 hours a day, excluding normally scheduled weekly system maintenance. By capturing and electronically submitting item images and MICR data to your account for deposit, daily runs to the banking centers are eliminated.
Advanced notice of scheduled outages are placed in the messaging area of the Welcome Screen.
The cutoff times for current day processing are noted below. The time zone and ledger cut off for your deposits are associated with the location and time zone of the user who submits the deposit to the bank. Deposits submitted after the published deadline will be processed on the next banking day.
Chapter 1Introduction

Remote Deposit Service Online Customer Administrator User Guide
4
REGION CUTOFF FOR CURRENT DAY PROCESSING
U.S. (Domestic) 9:00 p.m. PT
9:00 p.m. MT
10:00 p.m. CT
10:00 p.m. ET
Outside of the U.S. (International)
The 1st four digits of a WBS account determines ET or PT:
• # 1901 Miami (ET)
• # 6290 California (PT)
• # 6550 New York (ET)
10:00 p.m. ET
9:00 p.m. PT
Note: Deposits submitted after the current day cut-off times or during non-banking days1 will be processed the next banking day.
1 Non-banking days include U.S. bank holidays and Saturday and Sunday. Bank of America observes U.S. bank holidays as set forth by the Federal Reserve Bank. To see the schedule, refer to http://www.federalreserve.gov/aboutthefed/k8.htm.

Remote Deposit Service Online Customer Administrator User Guide
5
Overview The purpose of this user guide is to serve as a reference for Bank of America’s Remote Deposit Service Online application. The target audiences for this user guide are: Client Administrators.
Note: HELP is another reference source for Remote Deposit Service Online. It provides information specific to the screen the user is viewing and can be accessed by clicking the link in the upper right hand corner of the screen.
Bank of America offers remote depositing in accordance with the Check Clearing for the 21st Century Act (Check 21), which was signed into law by the Federal Reserve Board effective October 28, 2004. This law permits banks to truncate original checks, process check information electronically, and deliver substitute checks to banks that want to continue receiving paper checks. Bank of America’s Remote Deposit Service Online solution is a Web-based software application that allows businesses and retailers to:
• Capture images and data from debit items (such as checks) at their business and remote locations
• Balance deposit transactions and view images online
• Transfer check images and data to the bank for deposit
Clients using Bank of America’s Remote Deposit Service Online application can:
• Scan and capture images and MICR data of U.S. dollar items, drawn on U.S. domiciled accounts; these include personal, business, cashier checks, traveler’s checks, and money orders. Items that are drawn on a US domiciled account and MICR encoded with a valid eight or nine-digit routing and transit number can be deposited using the service.
• Clear items as through ACH or Image clearing networks
• Configure settings based on the business’ needs (for example, deposit limits, endorsements, column headings, custom fields, hot files, and dual depsoit approval.
• Deposit up to 500 items in a single deposit (including a deposit ticket), with no limit on the number of deposits that can be submitted during a business day2.
• Transmit images and data to the bank via a secure Internet connection.
• Prevent duplicates with electronic duplicate detection. 2 The declared amount (and the total amount of the deposit) cannot exceed $99,999,999.99.

Remote Deposit Service Online Customer Administrator User Guide
6
• View the status of deposit transmission to the bank and receive confirmation that the bank has received the deposit.
• Receive credit to a bank account and allow the item to clear electronically.
• Eliminate trips to the bank and the need for the original paper to be presented. Note: After depositing items using Remote Deposit Service Online, the deposited items must be safeguarded.
• Export information containing item data and images. This can be used in accounting processes and some accounts receivable systems.
• Modify item information and add comments before submitting deposits to the bank through 35 custom and remittance data fields.

Remote Deposit Service Online Customer Administrator User Guide
7
Chapter 2 Before You Begin
Make sure you have done the following:
• Enroll in Web-based training by going to http://training.works.com/direct/#rdsheader2
• Review your user roles and functions
• Confirm your workstation meets the minimum application requirements
• Download and install your Bank of America Direct digital certificate
• Confirm that the Remote Deposit Service Online application has been entitled to you by confirming with your implemantation specialist or by accessing the application via the Bank of America Direct Receipts page
If your role will include scanning and transmitting deposits, please see the User guide for non adminitrator functions.
User Roles and Functions For the Remote Deposit Service Online application, you are assigned a user role. The application and function of each user role has been established by Bank of America.
When the user successfully logs in to Remote Deposit Service Online, the Welcome Screen displays the assigned user roles.
When the user successfully logs in to Remote Deposit Service Online, the Welcome Screen displays the assigned user roles.
It is important to understand what tasks and or functions you can perform or information you can view within Remote Deposit Service Online. Except for the Customer Administrator role, users can request a role change by contacting the company’s
Remote Deposit Service Online Customer Administrator User Guide
8
designated Remote Deposit Service Online Customer Administrator. Bank of America associates maintain the assignment and set up of the primary Customer Administrator.
The tabs within the Remote Deposit Service Online application represent functions granted to certain user roles.
The tabs within the Remote Deposit Service Online application represent functions granted to certain user roles. Users will see all or some of the following tabs based on their entitlements:
• Home: Make deposits, run reports, view the deposit list screen, view important and informative messages from the bank
• Deposits: View deposit lists
• Reports: Run, download, print and save reports in PDF, RTF, CSV and XLS formats
• Research: Search for checks, download images
• Administration: Will vary based on Role, Customer Administrators will see all options, other roles may just the rules tab
Remote Deposit Service Online Customer Administrator User Guide
9
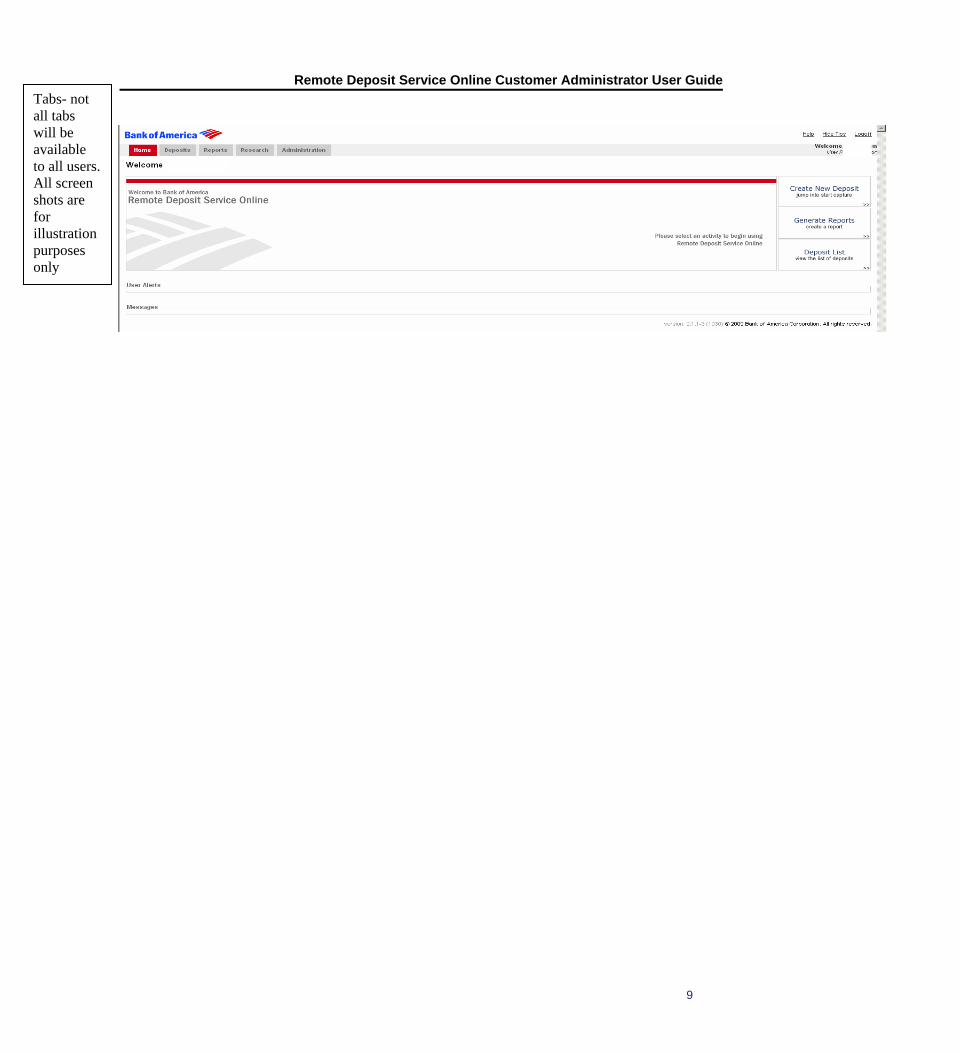
Tabs- not all tabs will be available to all users. All screen shots are for illustration purposes only

Remote Deposit Service Online Customer Administrator User Guide
10
Customer User Roles and Functions
ROLE FUNCTION THE WELCOME PAGE FOR THIS ROLE DISPLAYS THE:
Assign Deposit to Another User
Balance Deposits
Create/Read/Update/Delete ACH Opt Out Rules
Create/Read/Update/Delete Deposits
Create/Read/Update/Delete Hotlist Rules
Opt Item Out Of ACH
Override ACH Opt Out for Item
Override Hot List Reject for Item
Report On Client’s Users
Requests Item Research
Requests Reports
Transmit Deposits To Bank, including approve deposit
Operator
View Deposits
Home, Deposits, Reports, Research and Administration
Balance Deposits
Create/Read/Update/Delete ACH Opt Out Rules
Create/Read/Update/Delete Deposits
Limited Operator
Create/Read/Update/Delete Hotlist Rules
Home, Deposits, Reports, Research and Administration
Opt Item Out Of ACH
Override ACH Opt Out for Item
Override Hot List Reject for Item
Requests Item Research
Requests Reports
View Deposits
Read account data
Read user data
Customer Service Representative
Request Reports
Home, Deposits, Reports, Research and Administration

Remote Deposit Service Online Customer Administrator User Guide
11
Requests Item Research
View Account Groups
View Customer Details, including account data
View Deposits
Assign Account to account group
Create/Read/Update/Delete Account Groups
Read account data
Request Reports
Requests Item Research
Transmit Deposits To Bank, including approve deposit
View Account Groups
View Customer Details, including account data
Financial Officer
View Deposits
Home, Deposits, Reports, Research and Administration
Read user data
Report On Client’s Users
Requests Item Research
Report Viewer
Requests Reports
Home, Reports, Research and Administration

Remote Deposit Service Online Customer Administrator User Guide
12
Confirm Workstation Requirements
Hardware Requirements
Note: Remote Deposit Service Online does not support MAC computers or computers that run on a server environment.
HARDWARE REQUIREMENT DESCRIPTION
Processor: (min/recommended)
Windows XP : Pentium 512MHz/Pentium 1 GHz; Windows Vista: Pentium 800MHz/Pentium 1GHz
Note: If the minimum requirement is for a 1GHz processor, on a
dual-processor system the requirement is for each dual processor to ne 1GHZs.
Not all the operating systems that are certified for a client workstation will support dual core processors. Typically, the "Home" editions are single processor only.
Memory : (min/recommended) Windows XP : 256MB RAM/512MB RAM Windows Vista: 512MB RAM/1GB RAM
Hard Drive 1GByte free space on hard drive is required for installation and operation
Display Adapter and monitor capable of 1024 x 768 display with at least 256 colors
Network Ethernet 10Mbit connectivity to LAN, preferably with adapter teaming to enable failure protection.
Local port 80 will need to be open to allow communication with the scanner. This port is normally open, unless you are running a web server on the same device.
Internet Connectivity Internet connectivity with TCP/IP enabled
Broadband connectivity capable of at least 512Kbit upload speed is strongly recommended.
Peripherals • Standard 101-keyboard
• 2-button mouse

Remote Deposit Service Online Customer Administrator User Guide
13
Software Requirements
SOFTWARE REQUIREMENTS DESCRIPTION
Operating System • Microsoft Windows XP (any edition)
• Microsoft Windows Vista (any 32-bit edition)
Browser Microsoft Internet Explorer version 6.0 or 7.0, as supported by the operating system
Scanner/Printer Connectivity
1 x USB port - Minimum requirement is USB 1.1, but USB 2.0 is recommended. A USB port is a mandatory requirement for scanner operation.
If Remote Deposit Software based users have scanning capabilities and want to scan in both the Web-based and software-based environments, they must use separate PCs.
A USB port is a mandatory requirement for scanner operation
Port 80 must be open
Scanners Sold for Use with Remote Deposit Service Online
The following scanners are offered for purchase, rent, or lease by Bank of America and are supported in the Remote Deposit Service Online product.
Digital Check TS230-65, TS4120 - Scanners run on both the Vista and XP operating systems.
The following scanner is offered for purchase for use with Remote Deposit Service Online.
Digital CheXpress CX30- Runs on both Vista and XP operating systems.
Additional Scanners Supported by Remote Deposit Service Online
The following scanners are not currently offered for purchase, rent, or lease by Bank of America, but are supported for use with the Remote Deposit Service Online application:
Digital Check TS215, TS220, TS220E – Scanners run on both the Vista and XP operating systems.
Panini MyVision X30/60/90, MyVision XAGP 30/60/90 – Scanners run on XP operating system only.
• Panini scanners must be purchased with printing capability. If your model does not support printing, a firmware upgrade will be required.

Remote Deposit Service Online Customer Administrator User Guide
14
Download and Install Digital Certificates (for Bank of America Direct)
Before accessing Remote Deposit Service Online, each user must install a digital certificate for Bank of America Direct® and verify that the bank approved scanner components function properly.
1. Login to Bank of America Direct by typing:
https://direct.bankofamerica.com
If you do not have your digital certificate installed, you will be redirected to the Bank of America Direct Digital Certificate Pick-up site where you can download the digital certificate.
2. From the Bank of America Direct Digital Certificate Pick-up site, click Continue.
3. Go to the section which applies to you (Existing or New) and follow the instructions on the screen. .
Note: For more information on logging into Bank of America Direct, go to http://training.works.com/direct/ and select Accessing Bank of America Direct Quick Start Guide.
.
4. Click Continue.
5. Go to the section which applies to you (Existing or New) and follow the instructions on the screen.

Remote Deposit Service Online Customer Administrator User Guide
15
Login to Bank of America Direct After installing a digital certificate, the user will be able to login to Bank of America Direct. When users login for the first time, they are prompted to change their password, answer security questions, and accept the privacy policy.
For more information on logging into Bank of America Direct, go to http://training.works.com/direct/, and select Accessing BA Direct Quick Start Guide.
Login to Remote Deposit Service Online
To login to Remote Deposit Service Online: 1. Login to Bank of America Direct by typing:
https://direct.bankofamerica.com
2. Enter the following information:
• Bank of America Company ID
• Bank of America Direct User ID
• Bank of America Direct Password
Note: Contact the Bank of America Direct Technical Care Center (TCC) with Bank of America Direct login questions: Clients based in the US: 888.589.3473, International Clients: 1.704.387.3020.
Result: Authentication of user name and password through Bank of

Remote Deposit Service Online Customer Administrator User Guide
16
America Direct. After authentication is complete, the Bank of America Direct home page displays.
3. On the Bank of America Direct home page, click Services under the Receipts heading of the Bank of America Direct home page, or click Receipts tab in the header.
Result: The Receipts Services page displays.
4. Click Remote Deposit Service Online.
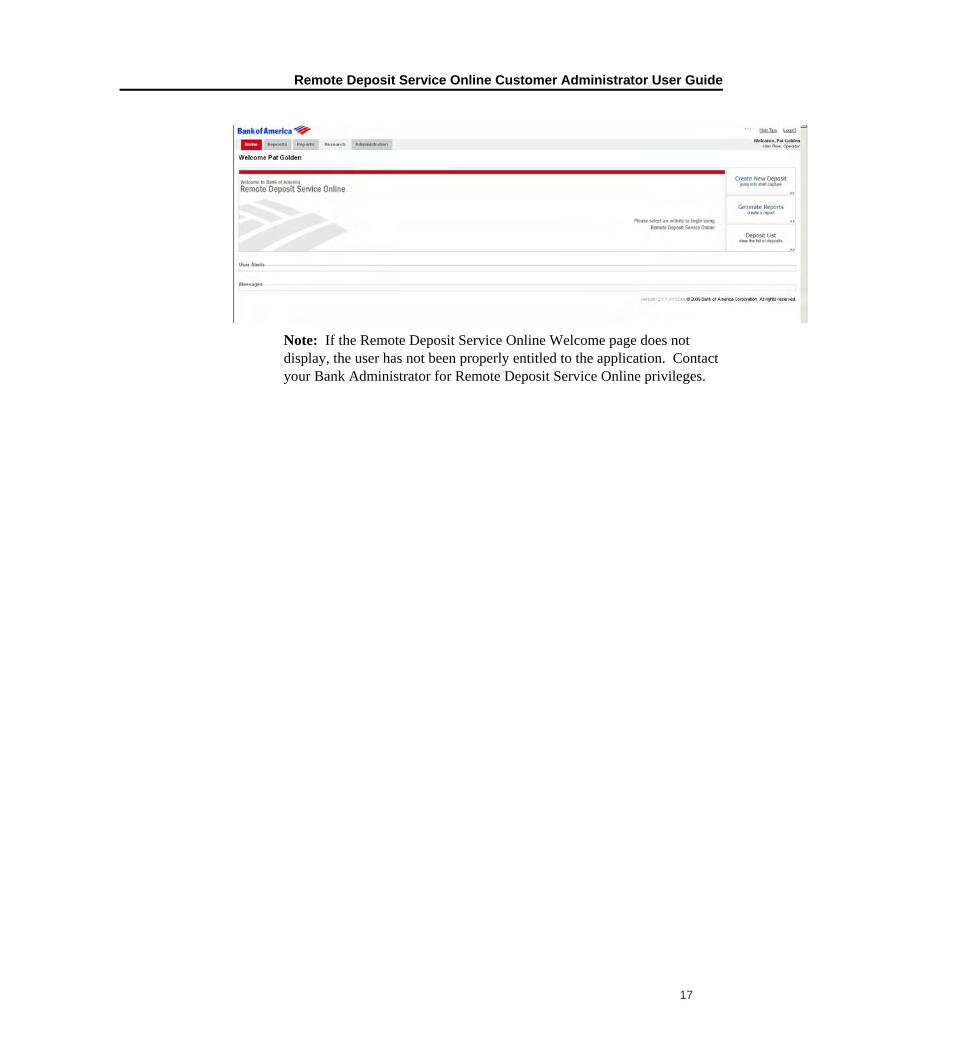
Result: The Remote Deposit Service Online Welcome screen displays in a separate window.
Remote Deposit Service Online Customer Administrator User Guide
17
Note: If the Remote Deposit Service Online Welcome page does not display, the user has not been properly entitled to the application. Contact your Bank Administrator for Remote Deposit Service Online privileges.
Remote Deposit Service Online Customer Administrator User Guide
18
This chapter describes how to login to the Remote Deposit Service Online application, and provides an introduction to some basic navigation tasks that you will find useful when working with Remote Deposit Service Online. Remote Deposit Service Online is a service that is accessed from within Bank of America Direct. You must always first log into Bank of America Direct in order to access Remote Deposit Service Online.
Login to Bank of America Direct After installing a digital certificate, the user will be able to login to Bank of America Direct. When users login for the first time, they are prompted to change their password, answer security questions, and accept the privacy policy.
For more information on logging into Bank of America Direct, go to http://training.works.com/direct/, and select Accessing BA Direct Quick Start Guide.
1. Login to Bank of America Direct by typing: https://direct.bankofamerica.com
Chapter 3Getting Started

Remote Deposit Service Online Customer Administrator User Guide
19
2. Enter the following information:
• Bank of America Company ID
• Bank of America Direct User ID
• Bank of America Direct Password
Note: Contact the Bank of America Direct Technical Care Center (TCC) with Bank of America Direct login questions: Clients based in the US: 888.589.3473, International Clients: 1.704.387.3020.
Result: Authentication of user name and password through Bank of America Direct. After authentication is complete, the Bank of America Direct home page displays.
3. On the Bank of America Direct home page, click Services under the
Receipts heading of the Bank of America Direct home page, or click Receipts tab in the header.
Result: The Receipts Services page displays.

Remote Deposit Service Online Customer Administrator User Guide
20
Login to Remote Deposit Service Online 4. Click Remote Deposit Service Online.
Result: The Remote Deposit Service Online Welcome screen displays in a separate window.
Note: If the Remote Deposit Service Online Welcome page does not display, the user has not been properly entitled to the application. Contact your Bank Administrator for Remote Deposit Service Online privileges
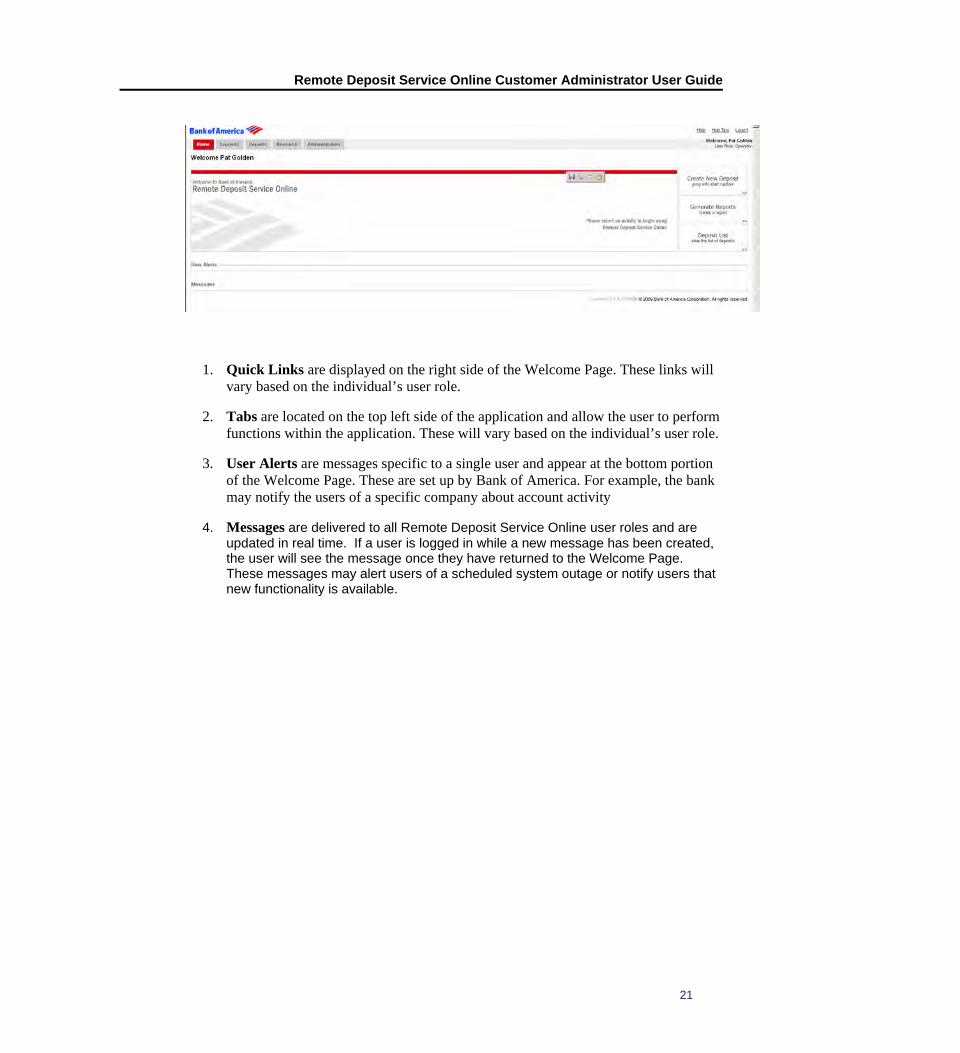
The Welcome Page provides a landing point for Remote Deposit Service Online and also acts as a home page after authentication. From the Welcome Page, users can create deposits, manage information within the application, view messages, and perform a variety of other tasks.
Remote Deposit Service Online Customer Administrator User Guide
21
1. Quick Links are displayed on the right side of the Welcome Page. These links will vary based on the individual’s user role.
2. Tabs are located on the top left side of the application and allow the user to perform functions within the application. These will vary based on the individual’s user role.
3. User Alerts are messages specific to a single user and appear at the bottom portion of the Welcome Page. These are set up by Bank of America. For example, the bank may notify the users of a specific company about account activity
4. Messages are delivered to all Remote Deposit Service Online user roles and are updated in real time. If a user is logged in while a new message has been created, the user will see the message once they have returned to the Welcome Page. These messages may alert users of a scheduled system outage or notify users that new functionality is available.
Remote Deposit Service Online Customer Administrator User Guide
22
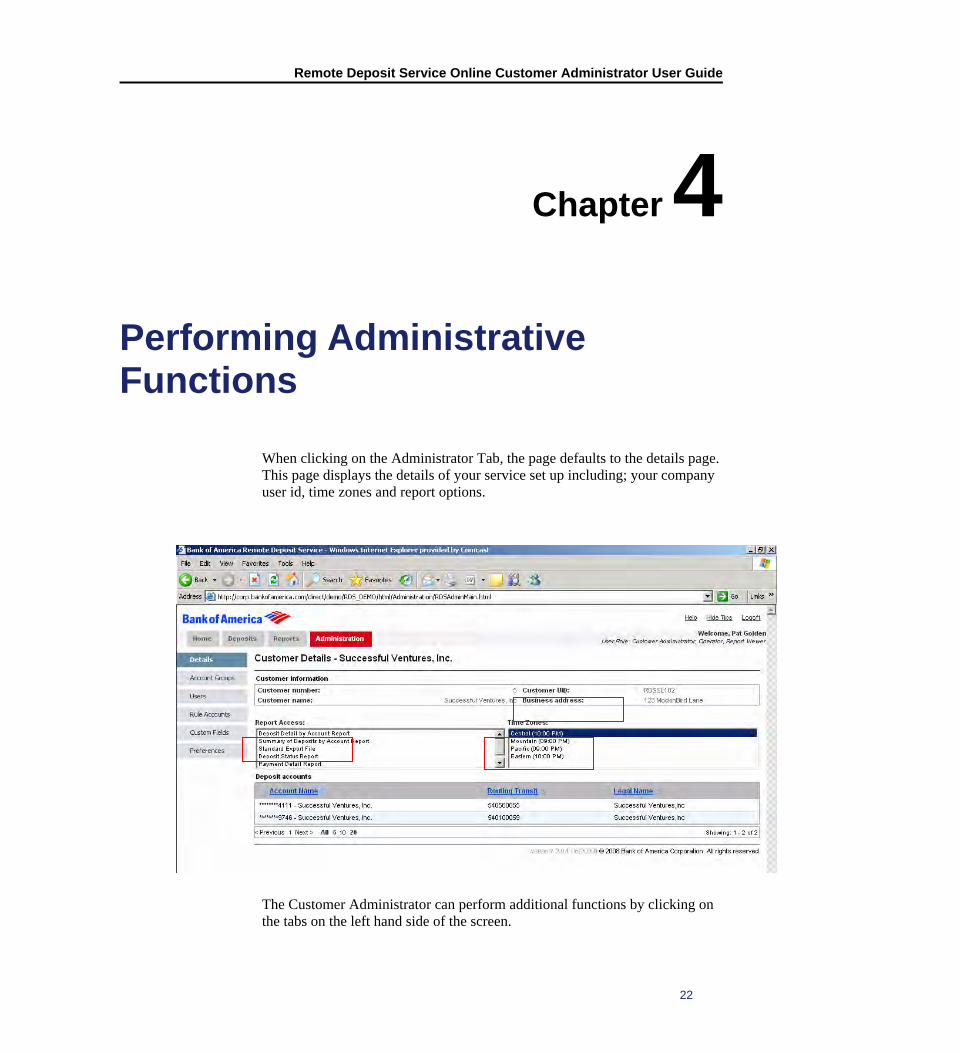
When clicking on the Administrator Tab, the page defaults to the details page. This page displays the details of your service set up including; your company user id, time zones and report options.
The Customer Administrator can perform additional functions by clicking on the tabs on the left hand side of the screen.
Chapter 4Performing Administrative Functions

Remote Deposit Service Online Customer Administrator User Guide
23
1. Account Groups: Add, delete and modify account groups
2. Users: Add, delete and modify users
3. Rule Accounts: Add delete and modify rules and associated accounts
4. Custom Fields: Add delete and modify custom fields
5. Preferences: Format lists for viewing information on screen, Set optional fields, Format reports for viewing, saving and exporting, Set up payment coupons if using remittances, Create and Edit Virtual endorsements

Remote Deposit Service Online Customer Administrator User Guide
24
Remote Deposit Service Online allows users the flexibility to designate deposits by Account groups. The account groups are defined by the company and are created by the Customer Administrator or Financial Officer. Account groups are used to organize accounts or can be used to represent locations. For example, an account group can be defined for each location or a group of locations by region. One or multiple accounts can be assigned to an account group.
• The company’s DDA account numbers are assigned to Account groups
• There can be multiple account numbers assigned an Account group
• Multiple Accounting groups can have the same DDA account numbers
• Each DDA account number must be assigned to an Account group in order to make deposits
Creating new account groups 1. Login to Remote Deposit Service Online.
2. Click the Administration tab.
Chapter 5Account Groups

Remote Deposit Service Online Customer Administrator User Guide
25
3. Click the Account Groups link.

Remote Deposit Service Online Customer Administrator User Guide
26
4. Click Create New Account group.
Result: The New Account Group page displays.
5. Enter a new Account Group name.
The Account Group Name is required and has a limit of 250 characters. Choose a meaningful account group name, for example a region or a store number
6. Choose an account group number. The account group number is an optional field and is limited to 10 numeric characters. The account group

Remote Deposit Service Online Customer Administrator User Guide
27
number is passed downstream to other applications like Bank of America Direct. This field is static and replaces the need for a location number on a deposit ticket. It does NOT support serialized deposits currently (a number in the serial field that is not static or contains a sequential number; example Location + sequential number. 1001, 1002, 1003 etc).
7. From the available accounts list, highlight the accounts that you want to map to the new account group. To select more than one account, click on the account and hold the shift key and press the down/up arrow. Accounts can be assigned to multiple account groups.
8. Click Add >> to add the accounts to the Account group.
9. Click Save to complete the new Account group creation process or click Cancel.

Remote Deposit Service Online Customer Administrator User Guide
28
Note: New accounts can only be added by Bank of America.
Result: A message displays to confirm that the new Account group has been created.
Modifying an account group 1. Login to Remote Deposit Service Online.
2. Click the Administration tab.

Remote Deposit Service Online Customer Administrator User Guide
29
3. Click the Account Groups link.
4. Click on the edit icon next to the account group you want to modify.

Remote Deposit Service Online Customer Administrator User Guide
30
5. Modify the information and select save or cancel.
Result: A message displays to confirm that the new Account group has been modified.
Deleting an account group 1. Login to Remote Deposit Service Online.
2. Click the Administration tab.

Remote Deposit Service Online Customer Administrator User Guide
31
3. Click the Account Groups link.
4. Click on the delete icon next to the account group you want to modify.

Remote Deposit Service Online Customer Administrator User Guide
32
5. The Account Group page refreshes and a message displays to confirm that the new Account group has been deleted.

Remote Deposit Service Online Customer Administrator User Guide
33
This section will show you how to add, modify and delete a User profile. Changes are done real time. If a user is deleted in error, they can not be added back until the next day.
Adding a new user 1. Login to Remote Deposit Service Online.
2. Click the Administration tab.
3. Click the Users link.
Chapter 6Users
Remote Deposit Service Online Customer Administrator User Guide
34
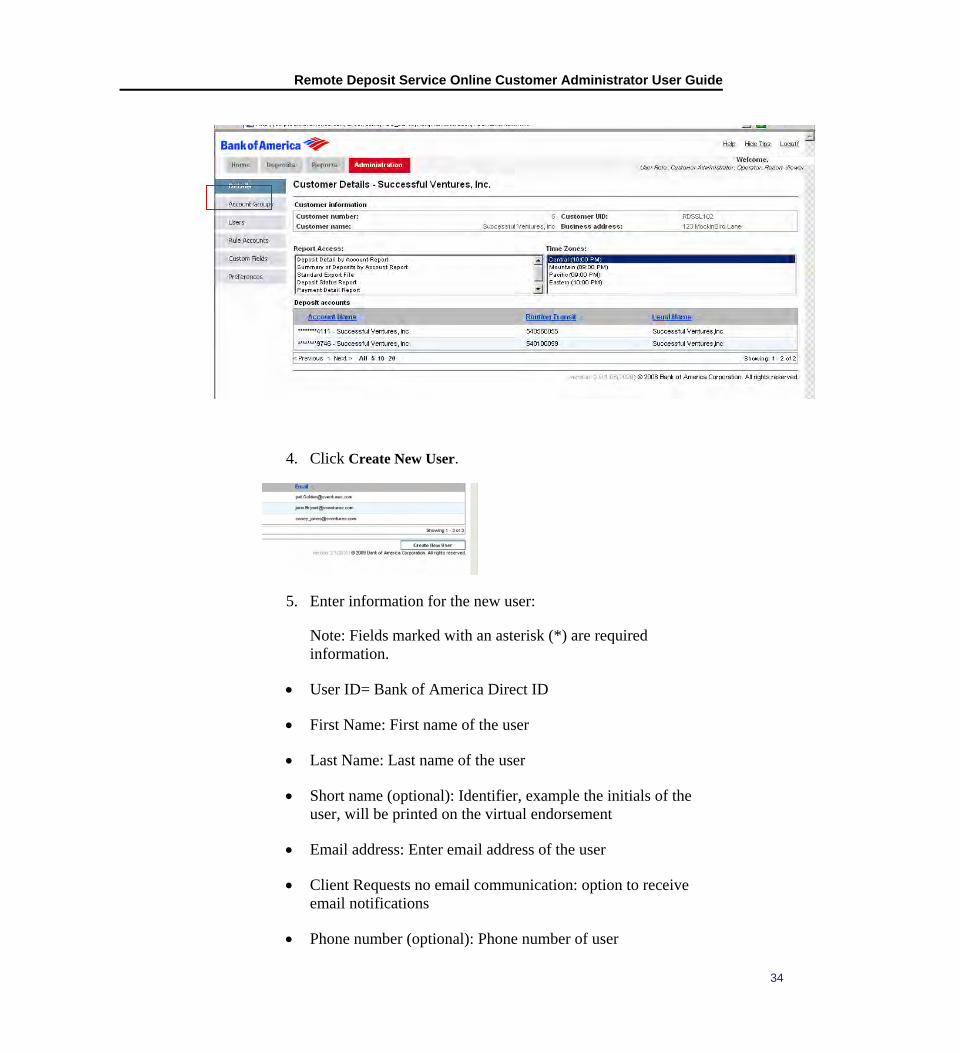
4. Click Create New User.
5. Enter information for the new user:
Note: Fields marked with an asterisk (*) are required information.
• User ID= Bank of America Direct ID
• First Name: First name of the user
• Last Name: Last name of the user
• Short name (optional): Identifier, example the initials of the user, will be printed on the virtual endorsement
• Email address: Enter email address of the user
• Client Requests no email communication: option to receive email notifications
• Phone number (optional): Phone number of user

Remote Deposit Service Online Customer Administrator User Guide
35
• Time Zone: Time zone of the user making the deposits; this determines the deposit deadline
• State: State of depositor
• Other information:
6. Click Next to move to step 2, User roles.
7. From the Available Roles list, select the role that you want the new user to have. See user role descriptions for details.
8. Click Add >> to assign the selected roles.
Remote Deposit Service Online Customer Administrator User Guide
36
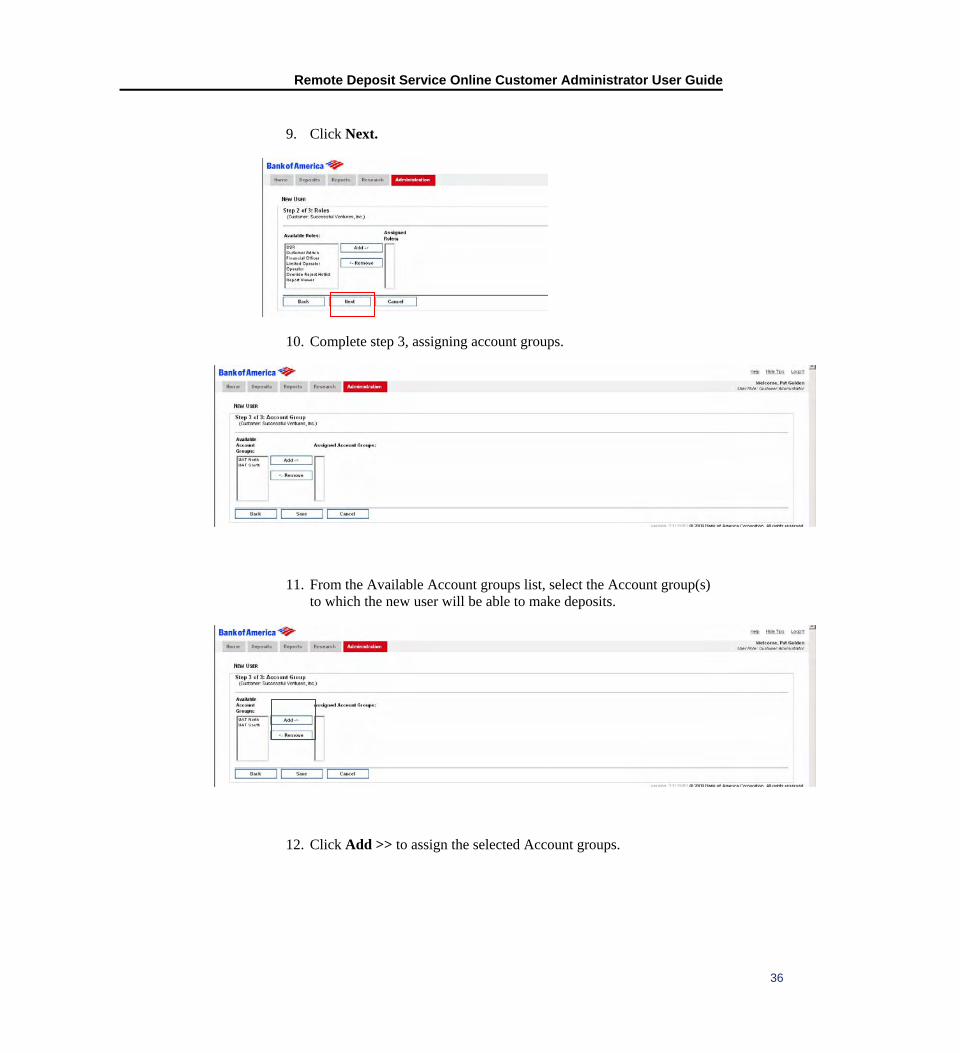
9. Click Next.
10. Complete step 3, assigning account groups.
11. From the Available Account groups list, select the Account group(s) to which the new user will be able to make deposits.
12. Click Add >> to assign the selected Account groups.

Remote Deposit Service Online Customer Administrator User Guide
37
13. Click Save to complete the process.
Result: A message displays notifying the administrator that the new user has been added.
Modifying an existing user 1. Login to Remote Deposit Service Online.
2. Click the Administration tab.

Remote Deposit Service Online Customer Administrator User Guide
38
3. Click the Users link.
Result: The User Search page displays. If all users are not displayed, you can click show all or search for a user by entering their last name or user id, and clicking the search key.

Remote Deposit Service Online Customer Administrator User Guide
39
4. Click the Edit this Users Details icon next to the user.
Result: The Users Details page displays.
5. From the Users Details Page, you can edit roles, edit account groups, change report access (default is access to all report types), and exclude accounts.
• To edit user roles, click on the edit roles tab, make the required changes and click save.

Remote Deposit Service Online Customer Administrator User Guide
40
• To edit Account groups, click on the Edit Account Groups button, make the required changes and click save
• To edit report access, click on the Edit Report Access button, make the required changes and click save.
• To edit account exclusions, click on the Edit Account Exclusions button, make the required changes and click save.
Result: A message displays notifying the administrator that the user has been modified
Deleting an existing user 1. Login to Remote Deposit Service Online.
2. Click the Administration tab.
Remote Deposit Service Online Customer Administrator User Guide
41
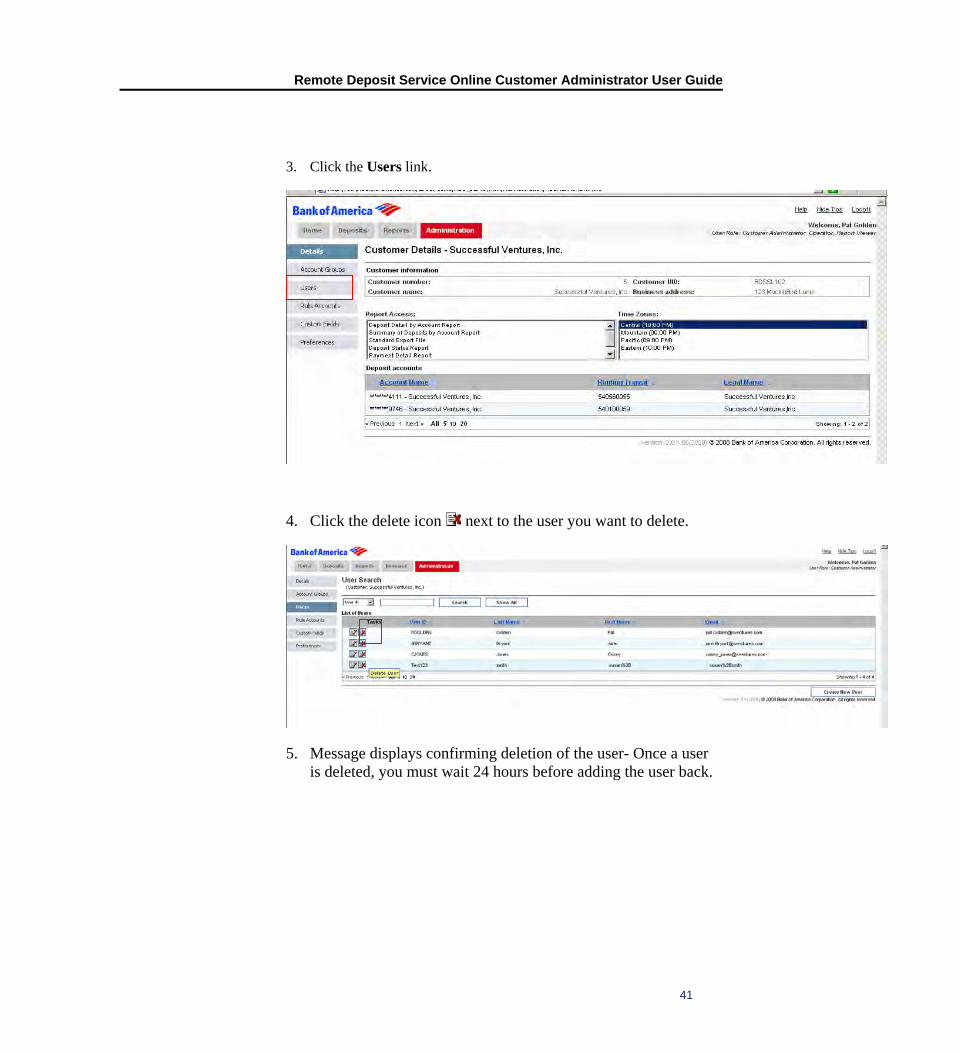
3. Click the Users link.
4. Click the delete icon next to the user you want to delete.
5. Message displays confirming deletion of the user- Once a user is deleted, you must wait 24 hours before adding the user back.

Remote Deposit Service Online Customer Administrator User Guide
42
A Customer Administrator and Operators are able to create several rules within Remote Deposit Service Online. A combination of the account number and Routing and Transit number on a scanned item will prompt the rule. There are three rule types available.
Hot list: This rule flags items for operator review that your company has determined as non acceptable, for example a check from an individual that is required to pay by money order or a check from a client that has contributed the maximum amount to a retirement fund.
Auto populate: This rule is used to populate predefined custom fields when an item is scanned, for example an apartment number or policy number or contact information. The data is carried to the custom field columns that can be exported into other applications
ACH opt out (if using ACH): The opt out rule allow companies to flag items that should not be cleared as ACH.
Creating a Rule:
1. Login to Remote Deposit Service Online.
2. Click the Administration tab.
Chapter 7Rules

Remote Deposit Service Online Customer Administrator User Guide
43
3. Click Rule Accounts.
4. Click Create New Rule.
5. Name the rule.
6. Choose the rule type.

Remote Deposit Service Online Customer Administrator User Guide
44
7. For Hot List and ACH Opt Out, click Save For Auto populating field, perform steps 8 and 9
8. Choose the custom field to auto populate
9. Choose a value to populate in the custom field
10. Click Save. The screen displays the message, “Rule was successfully created”
To Create a New Rule Account Add your customer check details to the rules you have created
1. Login to Remote Deposit Service Online.
2. Click the Administration tab.

Remote Deposit Service Online Customer Administrator User Guide
45
3. Click Rule Accounts
4. Click Create New Rule Account.
5. Enter the account number of the customer you wish to add to the rule.
6. Enter the routing transit (R/T) number of the account number for the customer you wish to add to the list.
7. Enter the description.

Remote Deposit Service Online Customer Administrator User Guide
46
8. Add the rules that you want applied to the account information entered and click save. If no rules have been created, click the Create New Rule button and follow To Create New Rule Account instructions.
To Edit a Rule Account 1. Click on the Administration tab.
2. Click Rule Accounts.
Remote Deposit Service Online Customer Administrator User Guide
47
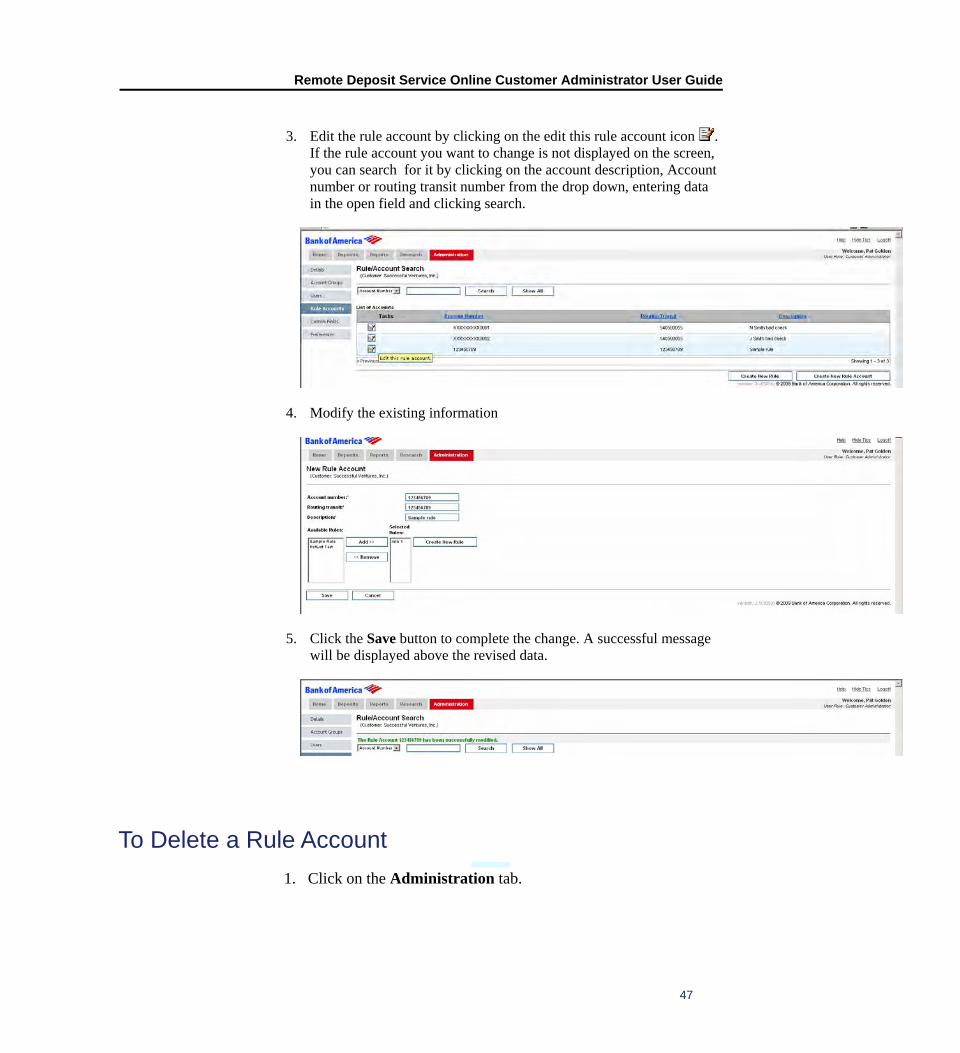
3. Edit the rule account by clicking on the edit this rule account icon . If the rule account you want to change is not displayed on the screen, you can search for it by clicking on the account description, Account number or routing transit number from the drop down, entering data in the open field and clicking search.
4. Modify the existing information
5. Click the Save button to complete the change. A successful message will be displayed above the revised data.
To Delete a Rule Account 1. Click on the Administration tab.

Remote Deposit Service Online Customer Administrator User Guide
48
2. Click Rule Accounts.
3. Delete the rule account by clicking on the Delete button next to the rule account you want to delete. If the rule account you want to change is not displayed on the screen, you can search for it by clicking on the account description, account number or routing transit number from the drop down, entering data in the open field and clicking search.
Remote Deposit Service Online Customer Administrator User Guide
49
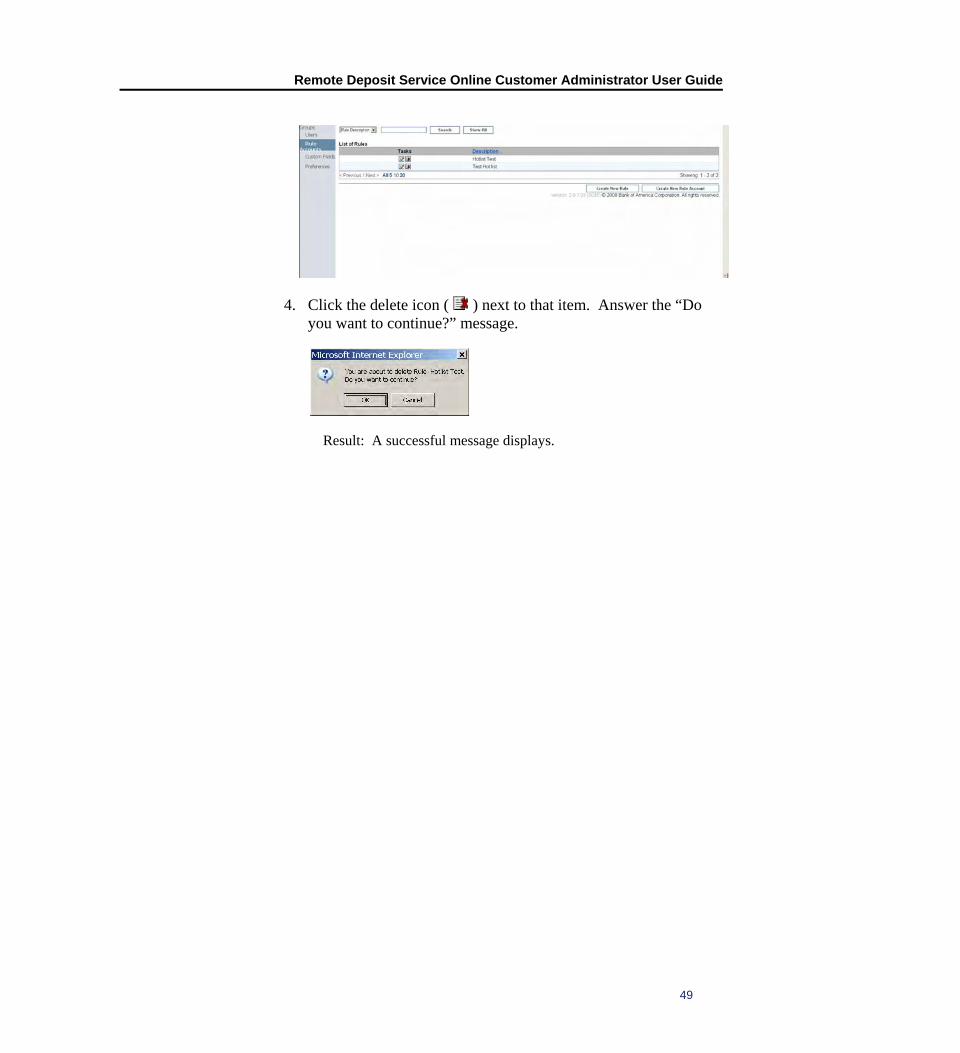
4. Click the delete icon ( ) next to that item. Answer the “Do you want to continue?” message.
Result: A successful message displays.

Remote Deposit Service Online Customer Administrator User Guide
50
Custom Fields are defined by your company and appear on the Item Edit page for data input and can be exported and used to reconcile. These fields are used to manually add non-standard information to items (for example, an invoice number) or can be auto populated with static information (apartment or policy number)
Thirty five (35) custom fields can be assigned to each remittance payment items and an additional 35 can be assigned to deposits.
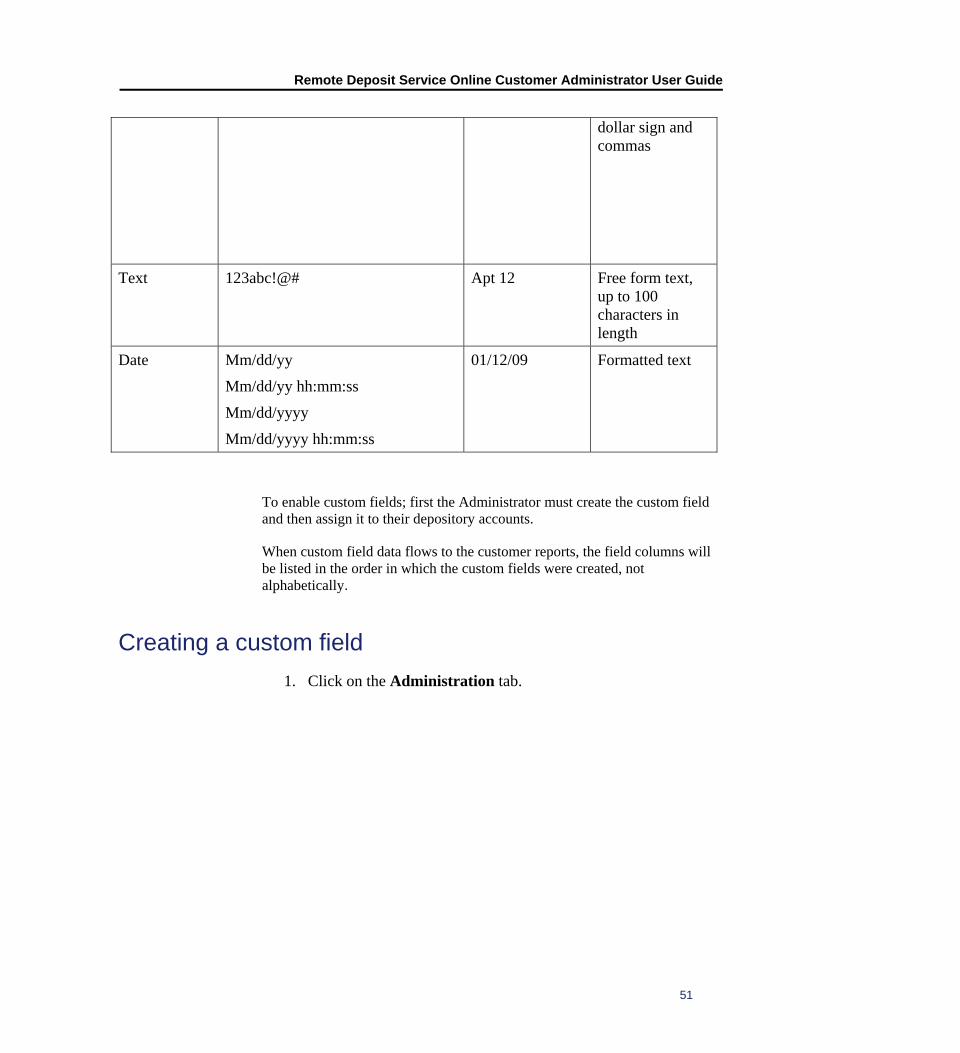
There are 4 types of custom fields:
DATA TYPE FORMAT EXAMPLE DESCRIPTION
Numeric ############################0 1234567 Any combination of numbers, up to 250 characters in length
Currency $##,###,###.00
########.00
$99,999,999.99
9999999.99
Dollar amount up to the maximum of $99,999,999.99 includes dollar sign and commas
Dollar amount up to the maximum of $99,999,999.99 does not include
Chapter 8Custom Fields
Remote Deposit Service Online Customer Administrator User Guide
51
dollar sign and commas
Text 123abc!@# Apt 12 Free form text, up to 100 characters in length
Date Mm/dd/yy
Mm/dd/yy hh:mm:ss
Mm/dd/yyyy
Mm/dd/yyyy hh:mm:ss
01/12/09
Formatted text
To enable custom fields; first the Administrator must create the custom field and then assign it to their depository accounts.
When custom field data flows to the customer reports, the field columns will be listed in the order in which the custom fields were created, not alphabetically.
Creating a custom field 1. Click on the Administration tab.

Remote Deposit Service Online Customer Administrator User Guide
52
2. Select Custom Fields
3. Click on Create new custom Field
4. Enter the Custom Field name: This name will be used to search for the custom field on the Custom Field/Account Search page.

Remote Deposit Service Online Customer Administrator User Guide
53
5. Choose the data type from the drop down
6. Choose the appropriate Input Validation Pattern for the custom field; applies to currency and date fields only.

Remote Deposit Service Online Customer Administrator User Guide
54
6. To make the custom field visible to a user, place a check-mark in the Show Custom Field box.
Custom fields can be either Editable (the user decides at the point in capture whether to input custom data) or Required; (the user must input data in order to process the item before transmitting the deposit). Choose editable or required
7. Enter the name you want displayed for each custom field in the Add Locale Label frame. It is suggested that this name be the same as the Name (1st field of input) and be as descriptive as possible. This is the custom field name that will display to users during deposit and remittance transactions. It will also display on certain reports.
8. Click Add a locale label, this is the header that will appear on reports.

Remote Deposit Service Online Customer Administrator User Guide
55
9. Click Save.
Result: A message returns confirming the new custom field has been created.
Result: The custom field is displayed in the list.

Remote Deposit Service Online Customer Administrator User Guide
56
Assigning the custom field to a depository account 1. From the Custom Field/account search screen, choose Account
Number from the drop down and enter the account number and click search. If you want a list of all accounts, click select all.
2. Choose the account by clicking on the edit icon next to the account number.
3. You can view the account set up by either item type or custom field. Choose Item Type or Custom Field from the drop down menu. Both options perform the same functions; however, the screens will vary slightly. The next example shows item type.

Remote Deposit Service Online Customer Administrator User Guide
57
4. Select the types of items that will prompt the custom field. Items types include Bank of America credit item (virtual and paper deposit ticket), business check, personal check and remittance coupons. Select multiple types by holding down the shift/arrow keys.
5. Select the custom field from the available custom fields. If there are other custom fields assigned to this account, those will be reflected in the selected custom field area.
6. Click add to move the selected item from the available column to the selected custom fields box.

Remote Deposit Service Online Customer Administrator User Guide
58
7. Arrange the custom field order by clicking on the field you want to reorder and then the move up/move down button.
8. If the custom field is a (currency) amount, and you want the total of the custom fields to add to the total of the amount of the item, click on the box beside “Ensure that all Currency Custom Fields, for this item Type, add up to the total amount of the item”.
9. Click save, updated screen confirms the changes.
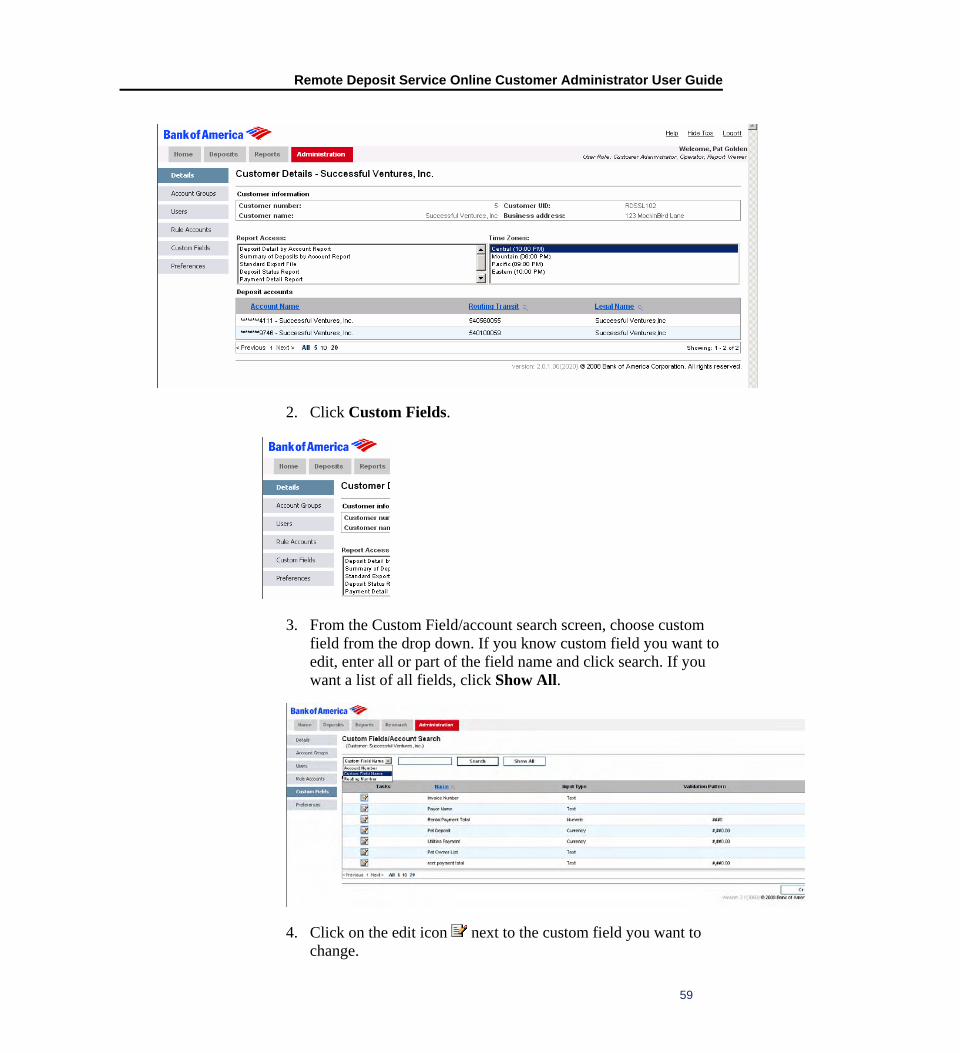
Editing Custom Fields 1. Click on the Administration tab.
Remote Deposit Service Online Customer Administrator User Guide
59
2. Click Custom Fields.
3. From the Custom Field/account search screen, choose custom field from the drop down. If you know custom field you want to edit, enter all or part of the field name and click search. If you want a list of all fields, click Show All.
4. Click on the edit icon next to the custom field you want to change.

Remote Deposit Service Online Customer Administrator User Guide
60
5. Edit the information on the Edit Custom Field screen.
6. Click Save.
Result: Message displays confirming the custom field has been changed.
Deleting Custom Fields 1. Click on the Administration tab.

Remote Deposit Service Online Customer Administrator User Guide
61
2. Click Custom Fields.
3. From the Custom Field/account search screen, choose custom field from the drop down. Or, if you know the custom field you want to edit, enter all or part of the field name and click search. If you want a list of all custom fields, click Show All.
4. Click the delete icon ( ) next to that item. Answer the “Do you want to continue?” message.
Result: A successful message displays

Remote Deposit Service Online Customer Administrator User Guide
62
A client administrator can manage their company preferences. Preferences include:
Lists: This preference allows the customer administrator to format how information appears on the screen.
Optional Fields: Optional Fields add additional information to deposits. These Optional Fields can hold any required information; for example a batch number for the deposit. The information a user submits in Optional Fields is saved within the Deposit Details screen. This information resides within the application and will not be provided in reports or any other external reporting. When Optional Fields are set up as required fields, those fields display on the New Deposit page.
Reports: This section enables you to create standard reports that may be used for printing, saving or exporting
Set up Payment coupons: For clients processing remittances, this page will enable set up of standard check size remittance coupons
Virtual Endorsements: The endorsement section allows you to customize endorsements by account. Some data elements within an endorsement are required and some cannot be modified (e.g. Bank of First Deposit). The required data elements appear in the list without the edit icon.
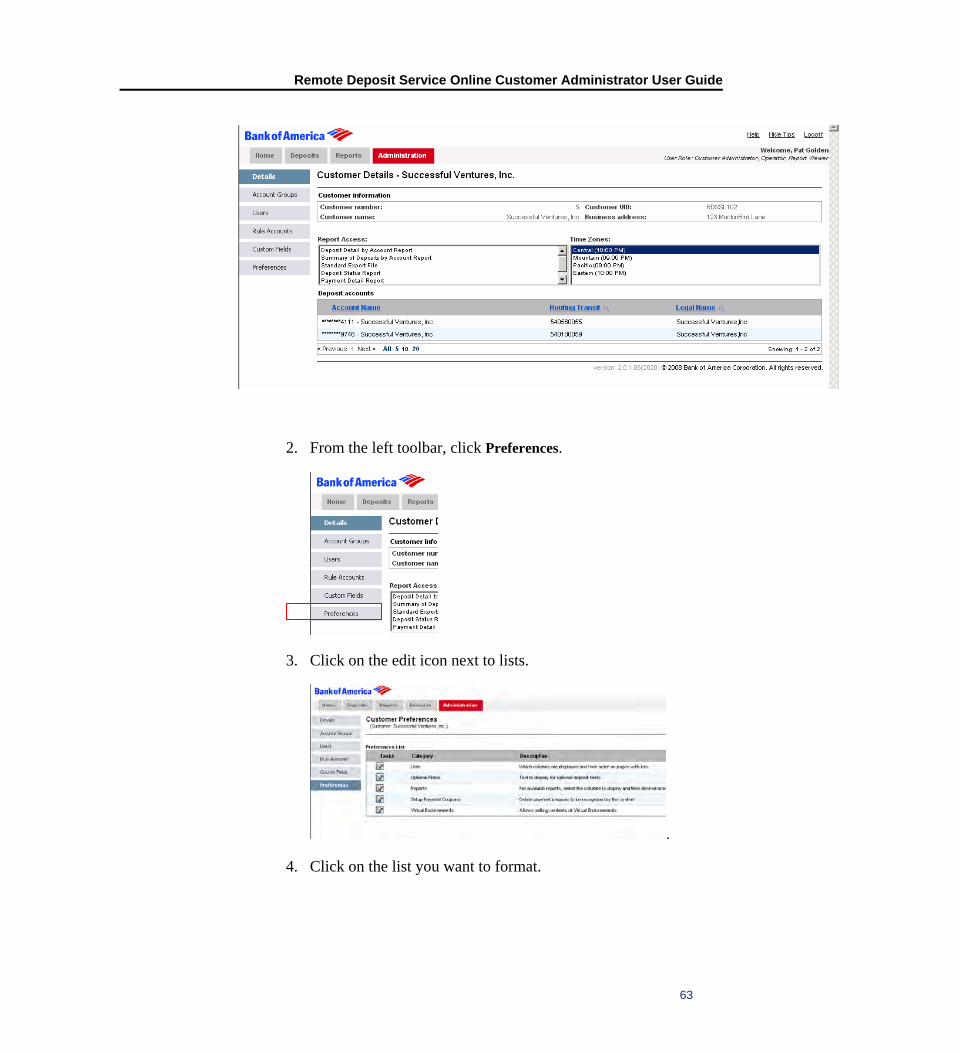
Lists
1. Click the Administration tab.
Chapter 9Customer Preferences
Remote Deposit Service Online Customer Administrator User Guide
63
2. From the left toolbar, click Preferences.
3. Click on the edit icon next to lists.
.
4. Click on the list you want to format.
Remote Deposit Service Online Customer Administrator User Guide
64
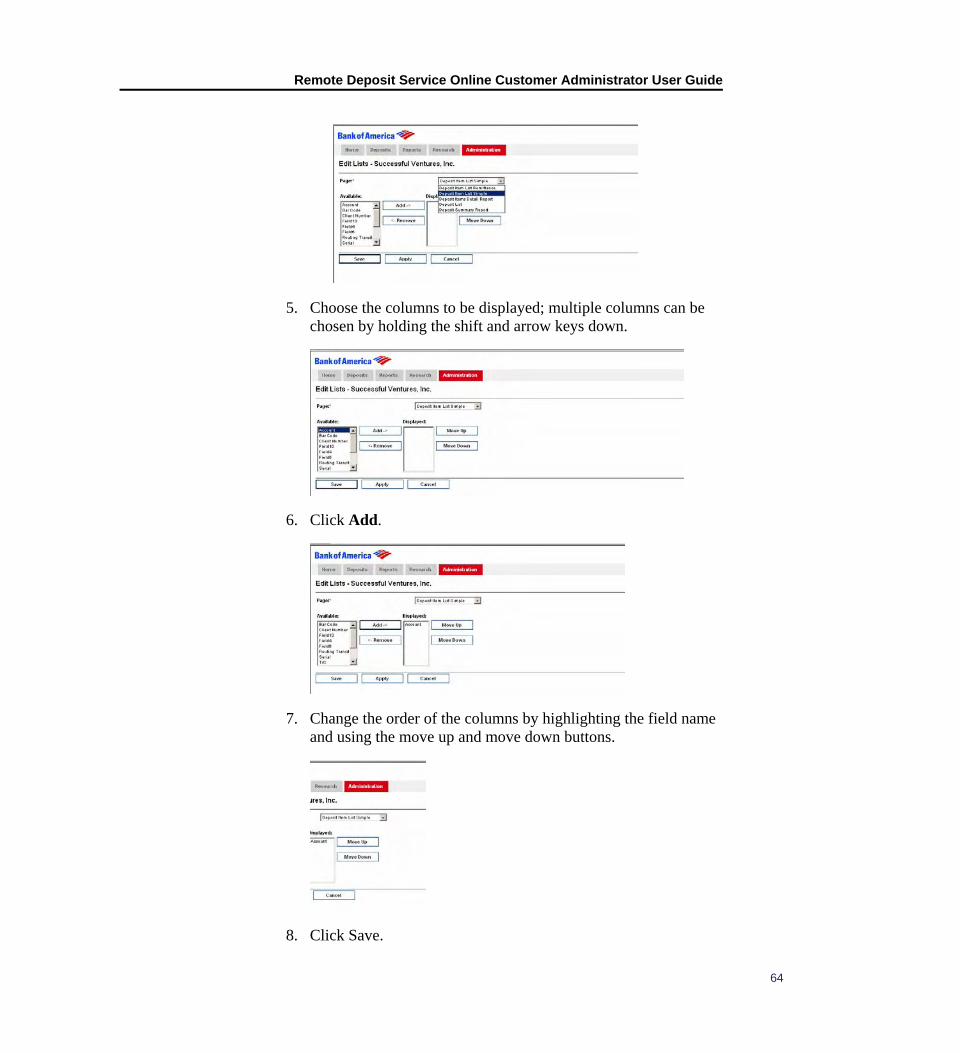
5. Choose the columns to be displayed; multiple columns can be chosen by holding the shift and arrow keys down.
6. Click Add.
7. Change the order of the columns by highlighting the field name and using the move up and move down buttons.
8. Click Save.

Remote Deposit Service Online Customer Administrator User Guide
65
Result: A message displays that the list has been updated.
Optional Fields The data captured and entered as Optional Fields on the Create New Deposit page will be displayed in Remote Deposit Service Online on the Deposit Details page. Users creating deposits will not see the optional fields on the New Deposit screen unless optional fields have been enabled.
1. Click the Administration tab.

Remote Deposit Service Online Customer Administrator User Guide
66
2. From the left toolbar, click Preferences.
3. Click on the edit icon next to optional fields.
.

Remote Deposit Service Online Customer Administrator User Guide
67
4. Choose whether the optional fields will be required or optional.
5. Name the optional fields.
6. Click Save to complete your changes.
Result: The page displays with the message that the change was successful.
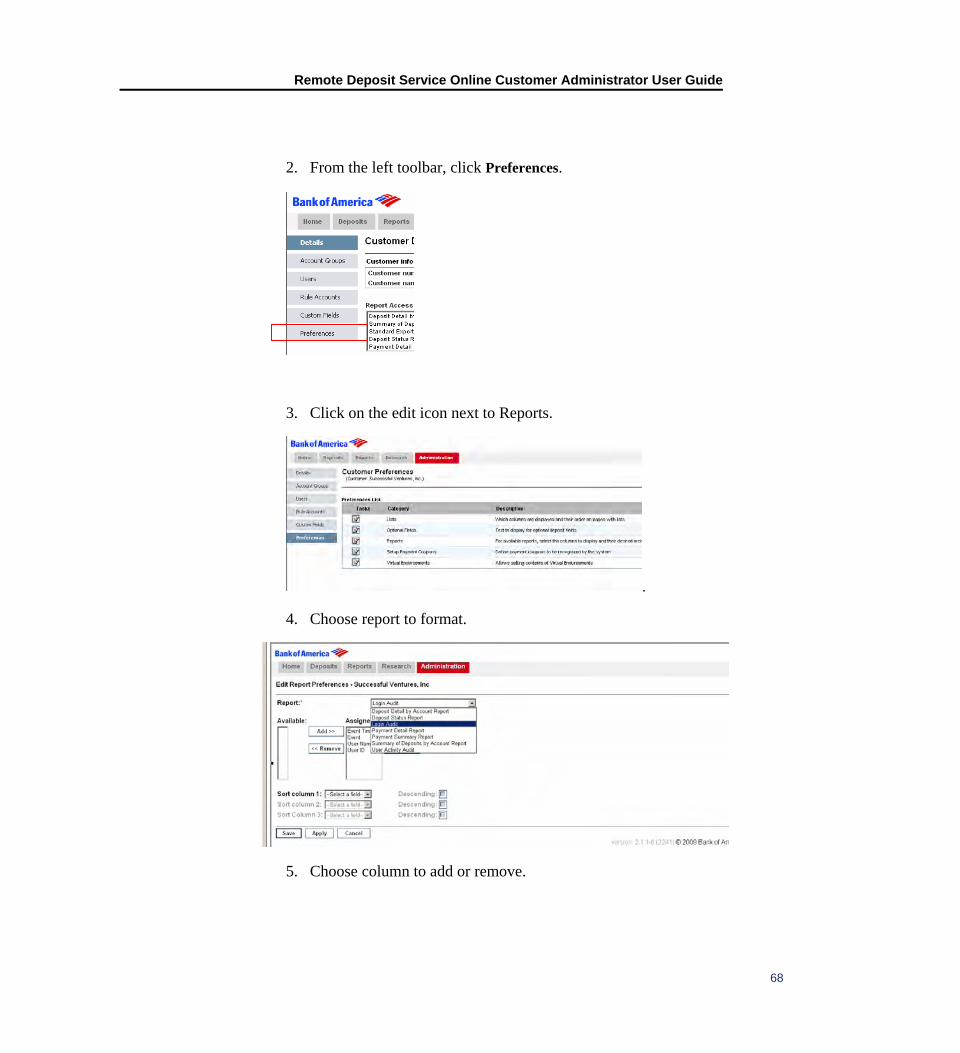
Reports 1. Click the Administration tab.
Remote Deposit Service Online Customer Administrator User Guide
68
2. From the left toolbar, click Preferences.
3. Click on the edit icon next to Reports.
.
4. Choose report to format.
5. Choose column to add or remove.

Remote Deposit Service Online Customer Administrator User Guide
69
6. Choose sort options.
7. Click Apply to format additional reports. Click Save if done. A message displays confirming the changes.
Set up payment Coupons- for remitters Note: A scanner is needed to perform this function. If the user has not downloaded the scanner driver from the application, you will be prompt you to do so Install the Scanner Driver
Before performing the installation:
• Disconnect the scanner and USB cable from the computer.
• Ensure you are logged into the workstation and that you have administrator privileges.
• Close all open applications, including any applications that use the check scanner.

Remote Deposit Service Online Customer Administrator User Guide
70
Download the Scanner Driver
1. Login to Bank of America Direct by typing: https://direct.bankofamerica.com
2. Click on Remote Deposit Service Online.
Result: The Remote Deposit Service Online Welcome Page displays.
3. Click Create New Deposit.
Result: The Driver Download page displays.
Remote Deposit Service Online Customer Administrator User Guide
71
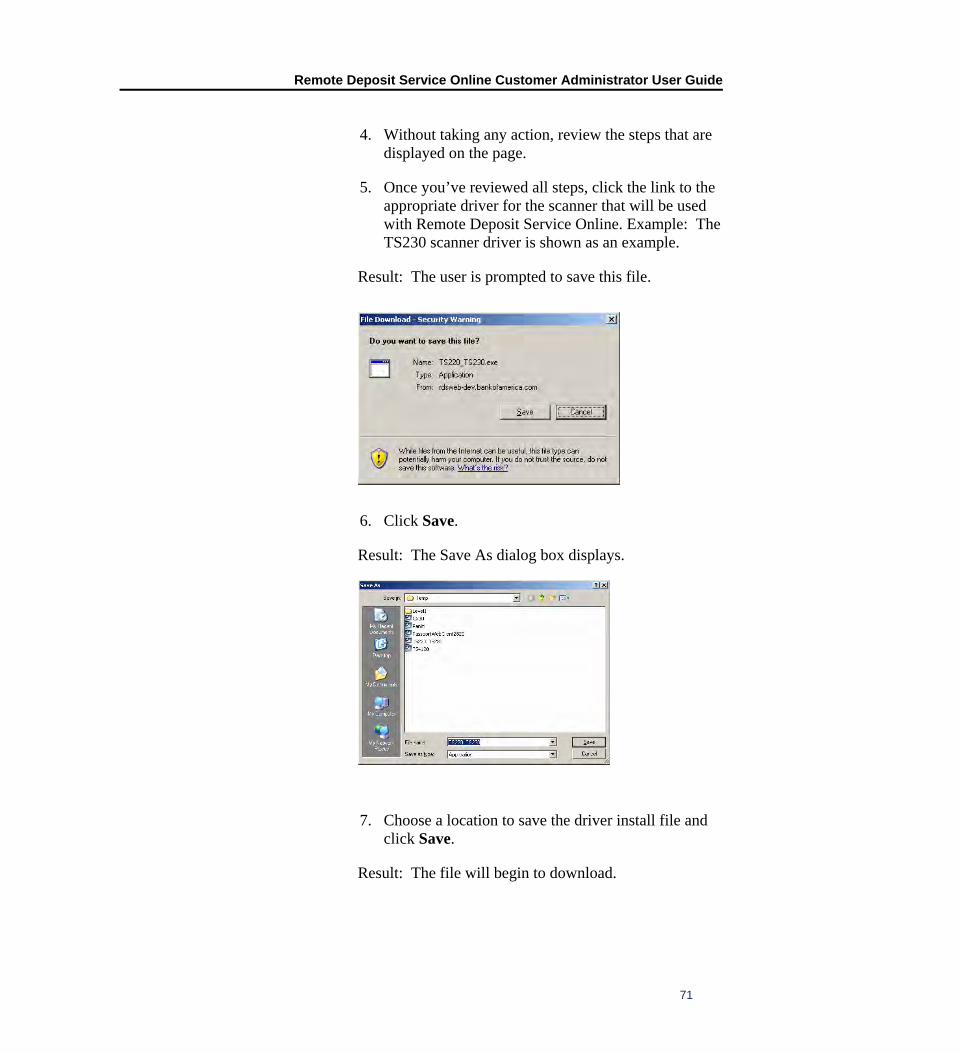
4. Without taking any action, review the steps that are displayed on the page.
5. Once you’ve reviewed all steps, click the link to the appropriate driver for the scanner that will be used with Remote Deposit Service Online. Example: The TS230 scanner driver is shown as an example.
Result: The user is prompted to save this file.
6. Click Save.
Result: The Save As dialog box displays.
7. Choose a location to save the driver install file and click Save.
Result: The file will begin to download.

Remote Deposit Service Online Customer Administrator User Guide
72
8. When the file download completes, click Run. This will launch the driver install application.
Result: A security warning message will appear.
9. Select Run to launch the software application.
Result: The Install Wizard launches.
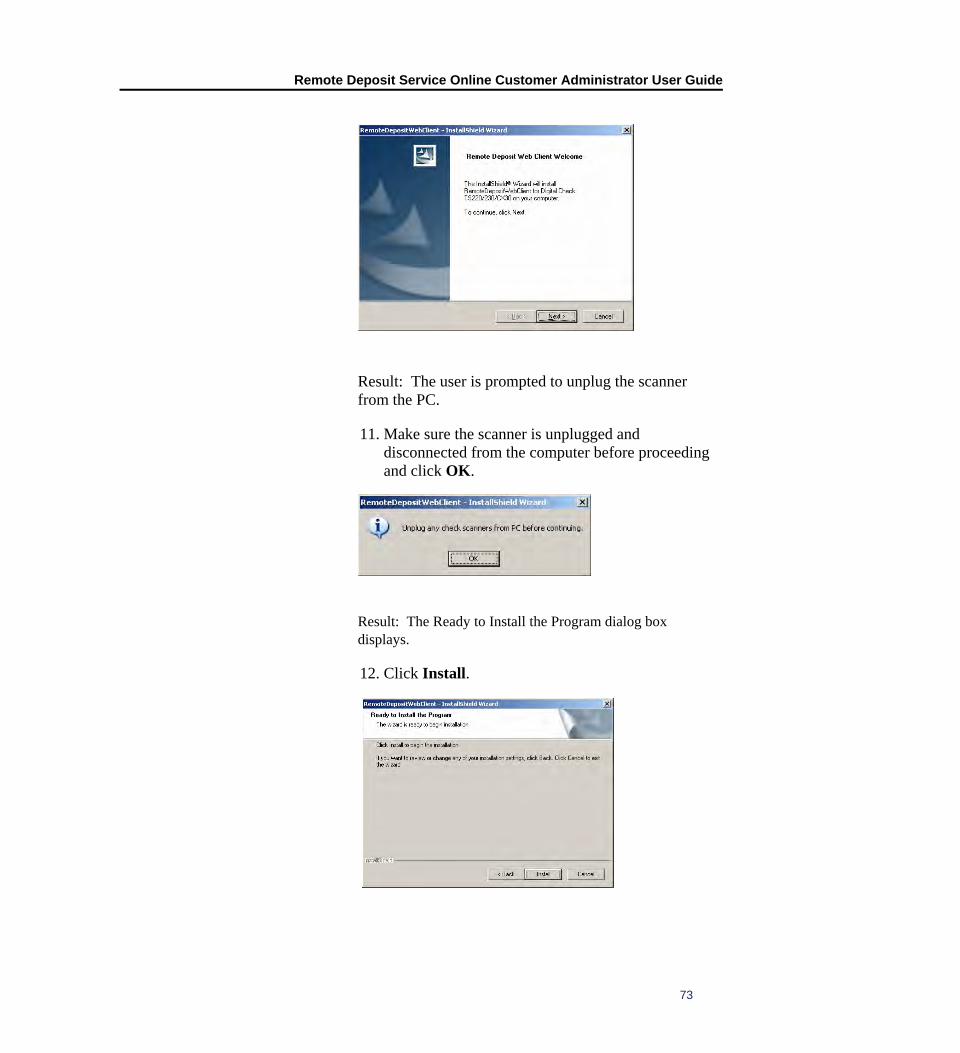
10. Click Next to begin the Wizard.
Remote Deposit Service Online Customer Administrator User Guide
73
Result: The user is prompted to unplug the scanner from the PC.
11. Make sure the scanner is unplugged and disconnected from the computer before proceeding and click OK.
Result: The Ready to Install the Program dialog box displays.
12. Click Install.

Remote Deposit Service Online Customer Administrator User Guide
74
Result: A series of status updates will appear. An example is shown here.
13. When the installation is complete, click Finish to complete the scanner driver installation process.
Result: The Install Shield Wizard Complete page displays.
14. Plug the scanner into your computer, click return
15. Collect the coupons for which you want your users to scan. It is suggested to have multiple versions of each coupon version.
16. Click the Administration tab.

Remote Deposit Service Online Customer Administrator User Guide
75
17. From the left toolbar, click Preferences.
18. Click on the edit icon next to Setup Payment Coupons.
.
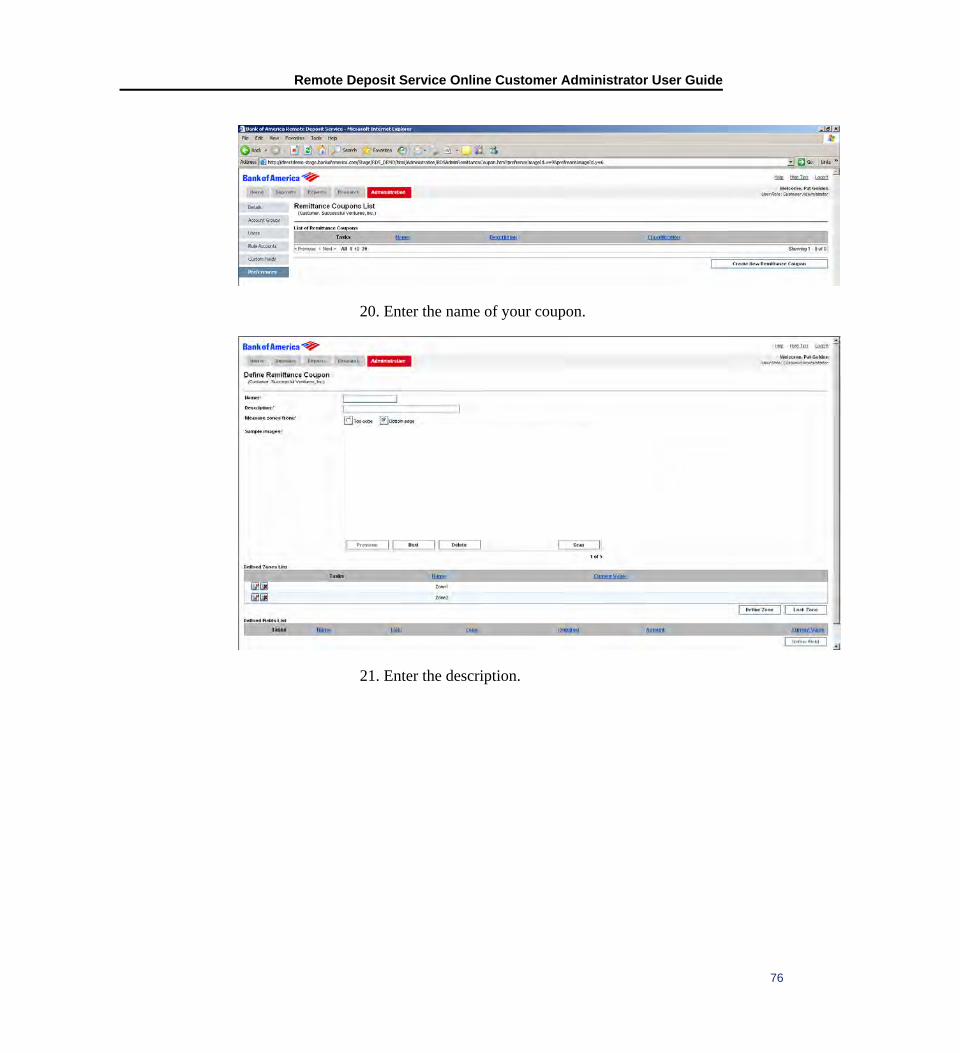
19. Click on Create New Remittance Coupon.
Remote Deposit Service Online Customer Administrator User Guide
76
20. Enter the name of your coupon.
21. Enter the description.

Remote Deposit Service Online Customer Administrator User Guide
77
22. Choose the measure zone: Select Top or Bottom edge, the opposites site of the perforation on the coupon sample(s)
23. Place first coupon version into the scanner and click scan. If you have multiple samples of the same version, you may scan all at once. Assure the number of coupons scan appear on screen. You can

Remote Deposit Service Online Customer Administrator User Guide
78
select Previous /Next to preview all coupons scanned.
24. Choose Define Zone, a pop up box appears.
25. Drag the pop up box around the Amount Paid zone. It is required to define this zone first as when your users scan this coupon for depositing with a debit item, the application will read the Amount Paid first and balance the coupon amount with the scanned debit item of that deposit.

Remote Deposit Service Online Customer Administrator User Guide
79
26. Click lock zone after the zone has been defined. Review the Current Value of the Locked Zone by reading by coupon.
27. Click on define field.
28. Enter the name of the field. The first field of zone 1 must be Amount Paid.

Remote Deposit Service Online Customer Administrator User Guide
80
29. Choose zone to define (amount paid should always be Zone 1).
30. For fields defined in the OCR line, count from the left hand side of the OCR string. for all define fields not located in the OCR field, enter the highest value possible for data populating in this field. Example – 1-9 will represent an amount of x,xxx,xxx.xx.
31. Select Set.

Remote Deposit Service Online Customer Administrator User Guide
81
32. Enter selection next to box “Is field required?”
33. Enter selection next to “Is field an amount?”
34. Click Save.
35. Continue with above steps until all fields you want to capture on the coupon have been entered.
36. Repeat for all additional unique coupons.
Virtual Endorsements 1. Click the Administration tab.

Remote Deposit Service Online Customer Administrator User Guide
82
2. From the left toolbar, click Preferences.
3. Click on the edit icon next to Virtual Endorsements.
.
4. Under the Tasks column, click the Edit icon , next to the item within the Virtual Endorsement that should be changed. The fields that may be edited are

Remote Deposit Service Online Customer Administrator User Guide
83
noted by the edit icon. The placement or order of the endorsement string cannot be changed, as system definitions determine both. Items surrounded by brackets {} are fields from the capture database that vary (i.e. by customer or deposit date). The user will not see these database fields in the Sample Endorsement area.
• Cust: Editable; 30 characters, customer account name. It is important to note,
CUST is the pre field endorsement, the customer name is the post field endorsement. Enter the legal name of your company
• Date: Deposit Date; Not editable, date of deposit • Dep: Deposit number; Not editable, the sequential number of the deposit,
cumulative number • Deposited by: Not editable, the short name of the individual making the
deposit • For deposit only to: This text may be replaced or amended, however language
can not be a qualified endorsement • Account group: (shown in graphic as location) Not Editable, the account group
of the client, can also reflect the location number if used in place of the account group
• R/T: Editable, Routing transit number of the depository account; used in processing the deposit, adjustments and returns
• SEQ: Sequence number of the deposit, assigned by the application • Account: Editable, Bank account number of the depository account
Printed endorsement Virtual endorsement

Remote Deposit Service Online Customer Administrator User Guide
84
5. When the changes are complete, click Save. Changes are applied to all of the customer accounts, not individual accounts.

Remote Deposit Service Online Customer Administrator User Guide
85
Chapter 10 Exiting the Remote Deposit Service Online Application
Exit Remote Deposit Service Online 1. Click on the Logoff link in the upper right corner of the application.
Result: The Bank of America Direct home page displays.

Remote Deposit Service Online Customer Administrator User Guide
86
Chapter 11 Support Help Menu Support
To access the Help menu, click the Help link in the top right corner of the home page. The Help menu changes depending on the page the user is viewing. Within each page, there is topic specific help. Note: The Help Menu is not an interactive support tool (for example, chat is not available).
Technical Support Contact the Check21 Help Desk with questions about the following:
• Remote Deposit Service Online
• Scanners
• To order scanner cleaning supplies
The Check21 Help Desk is available to take your calls 24 hours a day, seven days a week.
• 1.888.367.2521 toll-free (Domestic) or
• 1.804.553.6252 outside of the United States
Bank of America Direct Technical Support Contact the Bank of America Direct Technical Care Center (TCC) with questions about the following:
• Bank of America Direct User IDs
• Bank of America Direct Passwords
• Remote Deposit Service Online Digital Certificates

Remote Deposit Service Online Customer Administrator User Guide
87
The Bank of America Direct Technical Care Center is available
• 1.888.589.3473 toll free (domestic) (Mon – Sun between 7 a.m. and 9 p.m. Eastern Time).
• 1.704.387.3020 (outside of the United States) (Mon – Sun between 7 a.m. – 6 p.m. Eastern Time)
• Email at [email protected]
If located in Europe, the Middle East, and Africa, please contact Bank of America Direct Customer Support by:
• Email at [email protected]
• Telephone at +44 (0) 208.313.2154 (Mon – Sun between 8:00 and 18:00 GMT)
If located in Latin America, please contact your Global Treasury Management Product Specialist.
If located in Asia, please contact your Technical Specialist.

Appendix A Acronyms MICR
Magnetic Ink Character Recognition is a term that defines machine readable characters printed in magnetic ink in one of two fonts:
• E13B (used mostly in the Americas)
• CMC7 (used mostly in Europe)
OCR Optical Character Recognition refers to recognizing information from image (pictures). The technology is evolving rapidly, with more fonts being recognized and better recognition rates being achieved.
OCR is normally used to recognize pre-printed customer and account data on payment coupons.
PDF Portable Document Format
An imaging file format technically developed by Adobe systems. PDF captures formatting information from a variety of applications in such a way that they can be viewed and printed as they were intended in their original application by practically any computer, on multiple platforms, regardless of the specific application in which the original was created. PDF files may be text-searchable or image-only. Adobe® Acrobat, an application marketed by Adobe Systems, is required to edit, capture text, or otherwise manipulate a file in PDF format.
RTF Rich Text Format
A document file format that has been continually developed by Microsoft® for cross-platform document interchange. Most word processors are able to read and write these documents. Documents originated with Rich Text Format have .rtf file extension.

Appendix B Icons
Remote Deposit Service Online uses icons to communicate messages and information to users.
ICON ACTION PURPOSE
Delete Deletes the associated item.
View Lets you view an item's details.
Edit Lets you edit an item's details.
Selection Alerts you to selectable items.
Filter Lets you create filters.
Alert Draws attention to specified areas or items that required user action.
Get Online Help To access the Help menu, click the Help link in the top right corner of the Home page. The Help menu displays the data specific to the page being viewed.
Note: Online Help is not an Interactive tool (for example, Chat is not available). It displays static help information.
Online Help
Remote Deposit Service Online User Guide
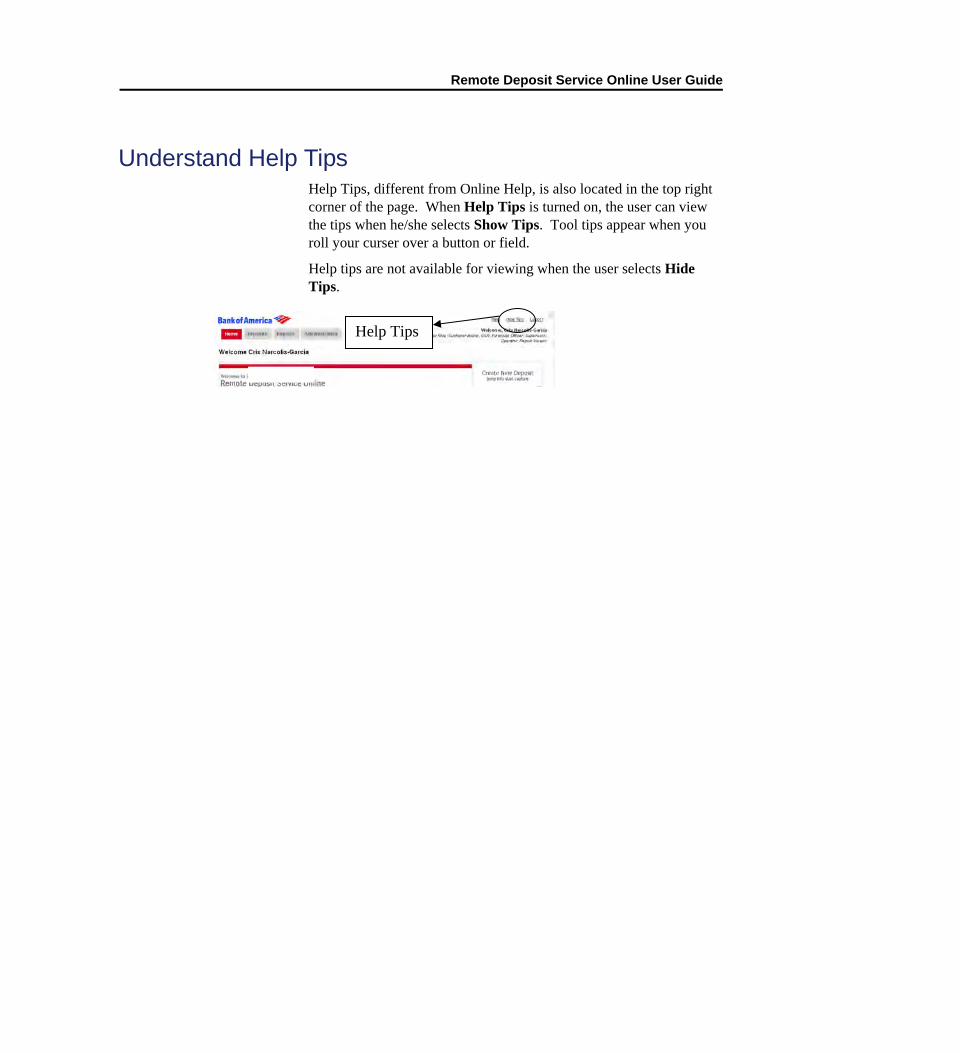
Understand Help Tips Help Tips, different from Online Help, is also located in the top right corner of the page. When Help Tips is turned on, the user can view the tips when he/she selects Show Tips. Tool tips appear when you roll your curser over a button or field.
Help tips are not available for viewing when the user selects Hide Tips.
Help Tips
Appendix C Troubleshooting, Login, Authentication and Scanner Errors
The table below provides information about login, authentication and scanner errors and potential resolutions.

Remote Deposit Service Online User Guide
ERROR PROBABLE CAUSE OF ERROR
POTENTIAL RESOLUTION
You are unable to login to Remote Deposit Service Online
User names and passwords are case sensitive, and passwords must comply with Bank of America’s digital certificate guidelines.
Ensure you enter the correct user name and password as was provided with your digital certification instructions in the e-mail from [email protected].
Contact the Bank of America Direct Technical Support for details about your specific password requirements or continue to be denied access to the application.
You entered an invalid user name or password within Bank of America Direct
User names and passwords are case sensitive, and passwords must comply with Bank of America’s
digital certificate guidelines.
Ensure you enter both your correct user name and password as provided to you by Bank of America when your digital certificate was issued. Contact Bank of America Direct Technical Support for details about your specific password requirements.
You entered invalid password information within Bank of America Direct
Re-enter the password information.
There is a password reset option within Bank of America Direct. For more information on logging onto Bank of America Direct, go to http://training.works.com/direct/#rdsheader2, and select Accessing Bank of America Direct Quick Start Guide.
Contact the Bank of America Direct Technical Support if you are still having problems.
The application cannot be accessed
Ensure the correct URL for Bank of America Direct is used.
If the problem persists, contact the Bank of America Check 21 Help Desk.
The computer does not detect the scanner or appropriate driver.
Scanner connections may be loose, scanner is powered off, or driver may not be correctly
• Check all USB and power connections.
• Check that scanner is powered on.
• Contact Check21 Help Desk for assistance with re-installing drivers.

Remote Deposit Service Online User Guide
ERROR PROBABLE CAUSE OF ERROR
POTENTIAL RESOLUTION
installed.
The scanner is not functioning properly
Check to see if any items are stuck in the scanner, clear the path and try again.
If the problem persists, close the application, restart the scanner manually by turning the power off and then on, and then restart the application.
If the problem persists, contact the Bank of America Check 21 Help Desk.
Laptop computer fails to detect the scanner.
This error occasionally appears if the scanner is plugged into the USB port on a laptop computer’s docking station.
Be sure that the scanner is plugged into the USB port on the computer, and not into the USB port on the laptop docking station. Docking stations can cause irregular behavior with the scanner operation and should be avoided.
It takes a long time to initialize the scanner each time I want to begin scanning
The scanner takes several seconds (10-15) to initialize when it is powered up and the initial items are scanned.
If you anticipate multiple scanning sessions, you may close the Remote Deposit Service application after you have completed the first session, but you may wish to leave the scanner powered on (the status LED should remain green).
Subsequent scanning session will initialize much more quickly
Two items have been scanned simultaneously
Items have inadvertently stuck together.
Delete the ‘piggyback’ items, remove any substance that may cause them to stick together and rescan
Item appears to be stuck in the scanner
Remove center cover from scanner, clear any stuck items, replace the center cover and then follow scanner jam recovery process.
If problem persists, clean the scanner’s document track.
If unable to re-process item, call Check21 Help Desk.

Remote Deposit Service Online User Guide
Appendix D Sample Check
At the bottom of every item is a line of characters encoded in magnetic ink. This line is called the MICR line. (Magnetic Ink Character Recognition). The pieces of information included in the MICR line may vary from item to item. The following image depicts a typical check, with the MICR line fields labeled.
The table below describes the fields that can appear in the MICR line of a check.
SYMBOL DESCRIPTION
Aux on-us number. This number is usually the check serial number. This is often included on commercial checks, but never on personal checks.
None EPC number. This is a single-character code that indicates that the item has previously been processed electronically. Most checks do not have an EPC number.
Transit Routing number. This is the eight- or nine-digit routing and transit number, which indicates the Account group of the paying bank.
Bank on-us number. This field includes the account number and sometimes the check number.

Remote Deposit Service Online User Guide
Encoded amount. This is the amount of the check and does not appear on most checks.