recommended work practices for removal of resilient floor
TRANSCRIPT

1
Recommended Work Practices
for Removal of
Resilient Floor Coverings
Warning
Do not sand, dry sweep, dry scrape, drill, saw, beadblast, or mechanically chip or
pulverize existing resilient flooring, backing, lining felt, asphaltic "cutback" adhesive,
or other adhesive.
These products may contain asbestos fibers and/or crystalline silica.
Avoid creating dust. Inhalation of such dust is a cancer and respiratory tract hazard.
Smoking by individuals exposed to asbestos fibers greatly increases the risk of serious
bodily harm.
Unless positively certain that the product is a non-asbestos-containing material, you
must presume it contains asbestos. Regulations may require that the material be tested
to determine asbestos content.
RFCI’s Recommended Work Practices for Removal of Resilient Floor Coverings are a
defined set of instructions addressed to the task of removing all resilient floor covering
structures.

2
NOTICE Various Federal, State and local government agencies have regulations governing the
removal of in-place asbestos-containing material. If you contemplate the removal of a
resilient floor covering structure that contains (or is presumed to contain) Asbestos, you
must review and comply with all applicable regulations.
This booklet replaces all prior editions of the RFCI and Armstrong Recommended Work
Practices Publications. Please note that these recommended work practices are subject to
change as new practices are incorporated. It is your responsibility to determine that the
recommended work practices you use are those in effect.
Important Information for Installers of Resilient Floor Coverings
Concerning Existing Resilient Floor Covering Structures
• Vinyl-asbestos tile and asphalt tile contain asbestos fibers, as did some asphaltic
"cutback" adhesives and the backings of many sheet vinyl floorings and lining felts. The
presence of the asbestos in these products is not readily identifiable.
• While resilient floor covering products manufactured today do not contain asbestos, the
asbestos used in the older products was encapsulated in the matrix of the product. The
Environmental Protection Agency (EPA) recognizes that those products are non-friable
(i.e. when dry cannot be crumbled, pulverized or reduced to powder by hand pressure)
unless certain activities prohibited by the removal practices in this booklet occur.
• Unless positively certain that the product you intend to remove is a non-asbestos-
containing material, you must presume it contains asbestos. Regulations may require that
the material be tested to determine asbestos content.
• RFCI's Recommended Work Practices are a defined set of instructions addressed to the
task of removing all resilient floor covering structures whether or not they contain
asbestos. When RFCI's Recommended Work Practices are followed, resilient floor
covering structures that contain (or are presumed to contain) asbestos can be removed in
a manner that will comply with the current Occupational Exposure to Asbestos Standard's
Permissible Exposure Limits (PEL) issued by the Occupational Safety and Health
Administration (OSHA).
• Numerous products, devices and techniques have been recently introduced and/or
recommended for the removal of resilient floor covering structures. Before you use any
practices other than those identified in this booklet for the removal of an in-place resilient
floor-covering product that contains (or is presumed to contain) asbestos, you must
determine that the practice meets all applicable regulations or standards including the
OSHA standards for occupational exposure to asbestos and the EPA asbestos regulations.

3
You must also determine that any materials used during the removal practice will be
compatible with the new floor covering to be installed.
Mold and Mildew
Prior to removing an existing resilient floor following the RFCI Recommended Work
Practices for Removal of Resilient Floor Coverings (unless state or local law requires
other measures) or installing a new floor, if there are visible indications of mold or mildew
or the presence of a strong musty odor in the area where resilient flooring is to be
removed or installed, the source of the problem should be identified and corrected before
proceeding with the flooring work. In virtually all situations, if there is a mold issue,
there is or has been an excessive moisture issue. Visible signs of mold or mildew (such as
discoloration) can indicate the presence of mold or mildew on the subfloor, on the
underlayment, on the back of the flooring, and sometimes even on the floor surface. If
mold or mildew is discovered during the removal or installation of resilient flooring, all
flooring work should stop until the mold/mildew problem (and any related moisture
problem) has been addressed. Before installing the new resilient flooring, make sure the
underlayment and/or subfloor is allowed to thoroughly dry and that any residual effect of
excessive moisture, mold, or structural damage has been corrected.
To deal with mold and mildew issues, you should refer to the U.S. Environmental
Protection Agency (EPA) guidelines that address mold and mildew. Depending on the
mold or mildew condition present, those remediation options range from cleanup
measures using gloves and biocide to hiring a professional mold and mildew remediation
contractor to address the condition. Remediation measures may require structural repairs
such as replacing the underlayment and/or subfloor contaminated with mold and mildew
as a result of prolonged exposure to moisture.
The EPA mold guidelines are contained in two publications "A Brief Guide to Mold,
Moisture and Your Home" (EPA 402-K-02-003) and "Mold Remediation in Schools and
Commercial Buildings" (EPA 402-K-01-001). Appendix B of the "Mold Remediation in
Schools and Commercial Buildings" publication describes potential health effects from
exposure to mold, such as allergic and asthma reactions and irritation to eyes, skin, nose
and throat. These publications can be located on EPA's website at
www.epa.gov/iaq/molds

4
IN CANADA
The Recommended Work Practices for the Removal of Resilient Floor Covering Materials
are intended for use in the United States. The work practices for the removal of in-place
resilient floor coverings and associated adhesives described in this publication have not
been reviewed with either National or Provincial officials in Canada to determine their
applicability when asbestos-containing or assumed to be asbestos- containing resilient
floor covering materials are encountered.
These work practices are recommended when removing resilient floor covering and its
associated adhesives that have been determined not to be asbestos-containing.
To determine what are acceptable work practices and the associated requirements for the
removal of resilient floor covering that is assumed to contain asbestos or has been
determined to contain asbestos, you should contact your local or provincial officials. As an alternative to the removal of any in-place resilient floor covering materials, refer to
page 7 (Alternative to Removal of Existing Resilient Floor Coverings).

5
OSHA REQUIREMENTS
In August 1994, OSHA published revised asbestos standards which affect some of the
operations described in this booklet. OSHA has determined that intact resilient floor
covering materials can be removed under a "negative exposure assessment" in
compliance with the revised standards by appropriately trained workers using the
Recommended Work Practices.
• "Intact" is defined to mean that the asbestos-containing material has not
crumbled, been pulverized, or otherwise deteriorated so that it is no longer likely
to be bound with its matrix. The incidental breakage of flooring materials, or
slicing of sheet vinyl floor covering with a sharp-edged instrument, during
removal operations conducted in accordance with the Recommended Work
Practices does not mean that the materials are not removed in an "intact"
condition. OSHA has recognized that resilient floor covering materials are
considered nonfriable if intact and generally do not emit airborne fibers unless
subjected to sanding, sawing or other aggressive operations.
• Installers of resilient floor covering materials that plan to use the Recommended
Work Practices outlined in this book to remove intact and nonfriable asbestos-
containing flooring materials are required to complete an 8-hour training program.
• Employers must designate a "competent person" with 4 hours of additional
training to be responsible for the health and safety of the workers at the floor
removal job site.
• OSHA has determined that the competent person can make a "negative exposure
assessment" based upon data in the OSHA asbestos rulemaking record (including
data from the Environ Reports) showing that use of the Recommended Work
Practices during removal of intact flooring material consistently results in worker
exposures below the levels permitted in the OSHA standards.
• Where other workers or persons may have access to the flooring removal
worksite, the employer must establish a demarcated "regulated area" (e.g. using
barrier tape or closing door to enclose a work area) and post warning signs.
• Workers who engage in the removal of asbestos-containing flooring materials
for more than 30 days per year (one hour or more per day) must receive medical
surveillance.
• Employers are required to maintain certain training, workplace and medical
records.

6
TABLE OF CONTENTS
GENERAL RULES FOR REMOVAL 0F RESILIENT FLOOR COVERING ALTERNATIVES TO REMOVAL OF EXISTING RESILIENT FLOOR
COVERINGS
Installing resilient floor covering over existing resilient floor covering…..….......7
Use of embossing leveler ........…………………………………………….…......7
Installing resilient floor covering over new underlayment.....………….….…......7
REMOVAL OF RESILIENT SHEET FLOORING
Supplies and tools…………………………………………..………….………….8
Fully-adhered resilient sheet flooring………………………..…………….……...9
Unadhered (loose-lay) or peripherally-adhered resilient sheet flooring ……..….12
REMOVAL OF RESILIENT TILE
Supplies and tools………………………………………………………….…….14
Removal procedure………………………………………………………………15 REMOVAL OF RESIDUAL ADHESIVE
Supplies and tools…………………………………………….…….……………..20
Wet-scraping residual adhesive .....…………………………….………….……...23
Removal of residual adhesive …………..l……………………….….……………24 COMPLETE REMOVAL OF WOOD UNDERLAYMENT
Supplies and tools ...............……………………………………………..….…….27
Wood underlayment with sheet flooring …………………………….….………..28
Wood underlayment with tile flooring . ………………………………….………30
Removal of wood underlayment boards…………………………………..………32

7
GENERAL RULES FOR REMOVAL OF RESILIENT FLOOR
COVERING When following the Recommended Work Practices there are several general rules to
follow:
Never sand, dry scrape, drill, saw, beadblast, or mechanically chip or
pulverize any resilient flooring, backing, lining felt asphaltic "cutback"
adhesive, or other adhesive to remove them from the floor. See "Warning
Statement" on page one.
Unless positively certain the product you intend to remove is a non-asbestos-
containing material, you must presume it contains asbestos. Regulations may
require that the material be tested to determine asbestos content.
Removal of existing floor covering should be considered the last alternative.
Use a vacuum equipped with HEPA filter, disposable dust bag, and metal
floor attachment (no brush).
All sheet floor removals must be done using detergent solution.
All felt scraping must be done wet.
Prior to removal, all tile must be wetted (except in cases where heat will be
applied).
Do not dry sweep.
Material removed must be placed in heavy-duty impermeable bags at least 6
mils thick or in a leak-tight container, properly labeled and disposed of in an
authorized landfill.

8
ALTERNATIVES TO REMOVAL OF EXISTING RESILENT
FLOOR COVERINGS
Removal of the in-place resilient floor should be considered the final alternative.
It is preferred you leave the existing resilient floor covering in place and go over
the top (single flooring layer only) with the new floor.
Alternatives to the removal of an existing resilient floor over approved subfloors
are:
1. Installing directly over a single layer of approved existing resilient
flooring.
2. Filling the embossing of the in-place resilient flooring with embossing
leveler before installation (residential use only).
3. Covering existing resilient flooring on an approved suspended wood
subfloor with a recommended wood underlayment.
When you plan to install a new resilient sheet or tile floor covering over an
existing resilient floor covering, follow the installation instructions published by
the manufacturer. Those instructions will tell you what must be done to the
existing surface before the new resilient floor covering can be installed. Remove
wax and other finishes by wet stripping only.
Contact your local floorcovering dealer for additional information.

9
REMOVAL OF RESILIENT SHEET FLOORING
Supplies and Tools
1. Safety glasses and gloves
2. Stiff-bladed wall or floor scraper
3. Utility or hook knife
4. Tank-type High Efficiency Particulate Air (HEPA) wet/dry vacuum cleaner
with disposable dust bag and metal floor attachment (no brush)
5. Hand-held tank sprayer
6. Large-size heavy-duty impermeable trash bags (at least 6 mils thick) or closed
leak-tight containers with ties, tape, or string to tie the bags shut, and
appropriate labels stating, for example "Caution— Contains Asbestos. Avoid
Opening or Breaking Bag or Container. Breathing Asbestos is Hazardous to
Your Health"
7. A liquid dishwashing detergent which is stated to contain anionic, nonionic
and amphoteric surfactants. Mix this specified liquid dishwashing detergent
with water to make a dilute solution (16 oz. specified liquid dishwashing
detergent in one gallon of water)
8. Ground fault circuit interrupter for electrical connection of the HEPA vacuum
and any other electrical connections required

10
Removal of Fully-Adhered Resilient Sheet Flooring
Warning Do not sand, dry sweep, dry scrape, drill, saw, beadblast or mechanically
chip or pulverize existing resilient flooring, backing, lining felt, asphaltic
"cutback" adhesive, or other adhesive. See "Warning Statement" on page
one.
a. Remove all furniture and appliances from the work area.
b. Remove any binding strips or other restrictive moldings from
doorways, walls, etc.
c. Prepare the specified liquid dishwashing detergent solution (16 oz. of
specified liquid dishwashing detergent to one gallon of water) and
pour into a hand sprayer.
d. Before removal begins, vacuum the entire floor using a HEPA vacuum
with a metal floor attachment.
Warning Electrical shock hazard exists. Use a ground fault interrupter for any
electrical connections of equipment used in a wet environment
e. Make a series of parallel slices 4" to 8" apart through the top layer of
the flooring and about halfway through the backing, parallel to the
wall, for the entire floor.
Caution Resilient flooring becomes slippery when wet with the specified liquid
dishwashing detergent solution. Use caution to contain the solution in the
immediate work area.
f. Wear layer removal:
One worker starts at the end of the room farthest from the entrance
door and pries up the corner of the strip, separating the backing from
the wear layer. As the strip is being removed, another worker sprays a

11
constant mist of the specified liquid dishwashing detergent solution
into the delamination nip point to minimize any airborne dust particles.
When done properly, the felt remaining on the floor and on the back of
the strip will be thoroughly wet. Do only one three-strip area at a time.
Stand on the remaining floor covering or clean floor (to the extent
feasible, minimize standing on the felt). The sliced strips should be
peeled from the backing by pulling or rolling around a core which will
control the stripping angle to create a uniform tension (some resilient
flooring wear layers may not be readily strippable and may require
wet-scraping). Tie or tape the removed material securely and place in
the heavy-duty impermeable trash bag or closed leak-tight container
for disposal.
g. Remove and dispose of each succeeding strip in the above manner.
Minimize walking on the exposed felt to the extent feasible. Worker
footwear must be cleaned or removed before leaving work area. Close
full bags tightly, and seal securely for disposal. Identify with an
appropriate label stating, for example "Caution—Contains Asbestos.
Avoid Opening or Breaking Container. Breathing Asbestos is
Hazardous to Your Health." Dispose in an approved landfill only.
h. Occasionally, parts of the top or inner layer will stick to the backing.
This can often be eliminated by peeling in the opposite direction. The
stiff-bladed scraper may aid in the removal or peeling of these layers.
i. Wet-scraping residual felt:
(1) After three strips of flooring material are removed, any residual
felt must be wet scraped. Thoroughly wet the residual felt with
the specified liquid dishwashing detergent solution. Wait a few
minutes to allow the specified liquid dishwashing detergent
solution to soak into the felt.
(2) Stand on the remaining floor covering to the extent feasible
(not the felt) and use the stiff bladed scraper to scrape up the
wet felt.

12
(3) Rewet the felt if the specified liquid dishwashing detergent
solution has not completely penetrated, if drying occurs, or if
dry felt is exposed during scraping. Pick up the scrapings while
still wet as they are removed from the floor and place in a
heavy-duty impermeable trash bag or leak-tight container. Wet-
scrape all felt from this floor area before proceeding further.
PRECAUTION: Excessive moisture can cause permanent damage to wood underlayments. It is the
installer's responsibility to use the correct amount of specified liquid dishwashing
detergent solution to prevent underlayment damage. A floor that has been wet-
scraped must be allowed to dry before installing any new resilient flooring.
(4) When this floor area has been cleaned free of felt, vacuum with
HEPA vacuum cleaner with the metal floor attachment.
Position the vacuum cleaner so that the discharge air does not
blow on the area being cleaned.
(5) Repeat the above on the next series of strips.
(6) Repeat this operation until the felt has been removed from the
whole floor. Close full bags tightly and seal securely for
disposal. Identify with an appropriate label stating, for example
"Caution—Contains Asbestos. Avoid Opening or Breaking
Bag or Container. Breathing Asbestos is Hazardous to Your
Health." Dispose in an approved landfill only.
(7) When the entire floor has been removed, let it dry and vacuum
with HEPA vacuum cleaner with the metal floor attachment.
Position the vacuum cleaner so that the discharge air does not
blow on the area being cleaned.
(8) After vacuuming, used HEPA filters and cleaner bags should
be removed according to the manufacturer's instructions and
placed in a heavy-duty impermeable trash bag or leaktight
container with an appropriate label stating, for example
"Caution—Contains Asbestos. Avoid Opening or Breaking
Bag or Container. Breathing Asbestos is Hazardous to Your
Health." Close and seal the trash bag securely for disposal.
Dispose in an approved landfill only.
(9) The floor is now ready to have a new resilient floor covering
installed. Follow the manufacturer's installation instructions.

13
Removal of Unadhered (Loose-Lay) or Peripherally-Adhered
Resilient Sheet Flooring
Warning Do not sand, dry sweep, dry scrape, drill, saw, beadblast, or mechanically chip or
pulverize existing resilient flooring, backing, lining felt, asphaltic "cutback"
adhesive, or other adhesive. See "Warning Statement" on page one.
a. Remove all furniture and appliances from the work area.
b. Remove any binding strips or other restrictive moldings from doorways, walls,
etc.
c. Prepare the specified liquid dishwashing detergent solution (16 oz. of the
specified liquid dishwashing detergent to one gallon of water) and pour into a
hand sprayer.
d. Before removal begins, vacuum the entire floor using a HEPA vacuum with a
metal floor attachment.
Warning Electrical shock hazard exists. Use a ground fault interrupter for any electrical
connections of equipment used in a wet environment.
e. If flooring is unadhered, start at the end of the room farthest from the entrance
doorway and slice a strip 18" wide in the unadhered flooring. One worker
removes the sliced strip while another worker sprays the specified liquid
dishwashing detergent solution directly into the separation nip point. Minimize
standing on the exposed subfloor during the removal process to the extent
feasible.
CAUTION Resilient flooring becomes slippery when wet with specified liquid dishwashing
detergent solution. Use caution to contain the solution in the immediate work area.
Standing on a new sheet of plywood or nonslip surface while working is
recommended.

14
f. Roll the wet strip tightly and tie or tape securely so it will not unroll. Place it in a
heavy-duty impermeable trash bag or closed leak-tight container big enough to
accommodate several rolls for disposal.
Use this method for nonbonded areas of peripherally-adhered floors. To remove
bonded areas, follow instructions under "Removal of Fully-Adhered Resilient
Sheet Flooring."
g. Clean the exposed floor with a HEPA vacuum cleaner with the metal floor
attachment. Position the vacuum cleaner so that the discharge air does not blow
on the area being cleaned.
h. Repeat the above, slicing, rolling and disposing of one strip at a time and cleaning
the newly exposed area immediately until the entire floor covering has been
removed. Let the floor dry, then vacuum with a HEPA vacuum cleaner using
metal floor attachment.
i. After vacuuming, used HEPA filters and cleaner bags should be removed
according to manufacturer's instructions and placed in a heavy-duty impermeable
trash bag or leak-tight container with an appropriate label stating, for example
"Caution—Contains Asbestos. Avoid Opening or Breaking Container. Breathing
Asbestos is Hazardous to Your Health." Close and seal the trash bags or leak-tight
container securely for disposal. Dispose in an approved landfill only.
j. The floor is now ready for installation of new floor covering using the
manufacturer's installation instructions.

15
REMOVAL OF RESILIENT TILE
Supplies and Tools
1. Safety glasses and gloves
2. Short- or long-handled scraper (DO NOT USE SPUD BAR OR
MECHANICAL CHIPPER)
3. Hammer
4. Commercial-type hand-held hot-air gun or a radiant heat source such as an
infrared machine
5. Large size heavy-duty labeled impermeable trash bags with minimum 6
mil thickness (or closed leak-tight containers), with ties, tape or string to
tie shut, and tags for labeling
6. Tank-type High Efficiency Particulate Air (HEPA) wet/dry vacuum
cleaner with disposable dust bag and metal floor attachment (no brush)
7. Hand-held tank sprayer
8. Ground fault circuit interrupter for electrical connection of the HEPA
vacuum and any other electrical connections required

16
Removal Procedure
Warning Do not sand, dry sweep, dry scrape, drill, saw, beadblast, or mechanically chip or
pulverize existing resilient flooring, backing lining felt, asphaltic "cutback" adhesive,
or other adhesive. See "Warning Statement" on page one.
a. Remove all furniture and appliances from the work area. Remove any binding
strips or other restrictive moldings from doorways, walls, etc.
b. Before removal begins, vacuum the entire floor using a HEPA vacuum with a
metal floor attachment
c. Floor tiles must be wetted (misted with hand sprayer) before actual removal
begins (unless heat will be used to remove tiles).
Warning Electrical shock hazard exists. Use a ground fault interrupter for any electrical
connections of equipment used in a wet environment.
d. Those areas normally exposed to heavy foot traffic patterns usually have tiles
adhered the tightest. In starting the tile removal process, select those areas
which receive the least traffic. Try to remove individual tiles in one piece
although some breakage of tiles is unavoidable.
e. Start the removal by carefully wedging a short or long handled scraper in the
seam of two adjoining tiles and gradually forcing the edge of one of the tiles
up and away from the floor. Continue to force the balance of the tile up by
working the scraper beneath the tile and exerting both a forward pressure and
a twisting action on the blade to promote release of the tile from the adhesive
and the floor.

17
f. After the tiles are removed place them, without further breakage into smaller
pieces, in a heavy-duty impermeable trash bag or closed leak-tight container
which will be used for disposal. Removed tiles can be placed in empty tile
cartons first and then placed in the heavy-duty impermeable trash bag. To
prevent tearing of the heavy-duty impermeable trash bag, place only one full
carton of removed tile in a bag.
g. With the removal of the first tile, accessibility of other tiles is improved. Force
the scraper under the exposed edge of another tile, and continue to exert a
prying, twisting force to the scraper as it is moved under the tile until the tile
releases from the floor. Remove and dispose of each tile in the manner
described in steps e. and f. above.
h. Minimize walking on the exposed adhesive to the extent feasible. Worker
footwear must be cleaned or removed before leaving work area. Close full
bags tightly and seal securely for disposal. Identify with an appropriate label
stating, for example "Caution—Contains Asbestos. Avoid Opening or
Breaking Container Breathing Asbestos is Hazardous to Your Health."
Dispose in an approved landfill only.
i. Some tiles will release quite easily while others require varying degrees of
force. Where the adhesive is spread heavily or the tile is bonded tightly, it may
prove easier to force the scraper under the tightly adhered areas by striking the
scraper handle with a hammer, using blows of moderate force while
maintaining the scraper at a 25° to 30° angle to the floor.
CAUTION
Wear safety glasses when using this procedure.
j. If you encounter areas where even the above methods will not remove the
tiles, the removal procedure can be simplified by thoroughly heating the tiles

18
with a hot air gun or a radiant heat source until the heat penetrates through the
tile and softens the adhesive.
k. Alternatively, without first prying up floor tiles using a scraper, a heat source
like a hot air gun or infrared heat machine can be used to apply heat to the
floor tile and then the tiles may be removed by hand or by using a scraper.
(Wetting the tiles is not required for this alternative removal method). When
using this procedure, walking on exposed adhesive may be unavoidable.
Worker footwear must be cleaned or removed before leaving the work area.
Warning
Handle the hot-air gun or radiant heat source carefully to avoid burn injury.
Do not handle the heated tiles or adhesive without suitable glove protection.
Do not use a blowtorch or open flame. Use caution not to burn or char tiles.
Work area must be adequately ventilated.

19
l. When using an infrared heat machine, follow manufacturer's instructions.
m. After tiles are removed, place them in a heavy-duty impermeable trash bag or
other closed leak-tight container without further breakage. Removed tiles can
be placed in empty tile cartons first and then placed in the heavy duty
impermeable trash bags. To prevent tearing of the heavy-duty impermeable
trash bag, place only one full carton of removed tile in a bag.
n. Close the full bags of removed tile tightly and seal securely for disposal.
Identify with an appropriate label stating, for example "Caution— Contains
Asbestos. Avoid Opening or Breaking Container. Breathing Asbestos is
Hazardous to Your Health." Dispose in an approved landfill only.
Warning Do not sand, dry sweep, dry scrape, drill, saw, beadblast, or mechanically
chip or pulverize existing resilient flooring, backing, lining felt, asphaltic
"cutback" adhesive, or other adhesive. See "Warning Statement" on page
one.
o. See Section 5, "Removal of Residual Adhesives” for proper treatment of
remaining adhesive.

20
REMOVAL OF RESIDUAL ADHESIVE
The removal of latex based adhesives commonly used with vinyl sheet floors and
some tiles can be accomplished by wetting the adhesive residue (which will soften
the adhesive) and scraping. Do not use an excessive amount of water which can
damage wood subfloors.
The treatment of residual asphaltic "cutback" adhesive, which is covered in this
section, is dependent upon the type of new resilient floor covering material to be
installed and the type of subfloor. Recommendations for the treatment of residual
asphaltic "cutback" adhesive are shown at pages 21 and 22.
NOTE
There are commercial adhesive removal products containing solvents that
are effective in removing cutback or emulsion adhesives and comply with
OSHA requirements (e.g. flashpoint greater than 140° F). These products
may be used for adhesive removals; however, they may leave a solvent
residue within the subfloor that can adversely affect the new adhesive or
floor covering. Thus, the warranties provided by the manufacturers of new
floor covering materials will not cover instances where subfloor conditions
damage their products or affect their installation.
The use of asbestos encapsulants or bridging materials over asphaltic
adhesive is not recommended as those products may affect the bonding
properties of the new adhesive. The application of asphaltic "cutback"
adhesives, if recommended by the replacement flooring manufacture), has
been demonstrated to be a suitable adhesive when applied over existing
cutback adhesive. The use of any new adhesive must be consistent with the
installation recommendations of the replacement-flooring manufacturer.
Supplies and Tools
1. Safety glasses and gloves
2. Stiff-bladed wall or floor scraper
3. Tank-type High Efficiency Particulate Air (HEPA) wet/dry vacuum cleaner
with disposable dust bag and metal floor attachment (no brush)
4. Large-size heavy-duty impermeable trash bags (or closed leak-tight
containers) with ties, tape, or string to tie the bags shut, and tags for labeling.
5. Slip-resistant shoes or rubber boots
6. Ground fault circuit interrupter for electrical connection of the HEPA vacuum
and any other electrical connections required
7. Hand-held sprayer

21
8. A liquid dishwashing detergent which is stated to contain anionic, nonionic
and amphoteric surfactants. Mix this specified liquid dishwashing detergent
with water to make a dilute solution (1 oz. of the specified liquid dishwashing
detergent to one gallon of water)
9. Additional supplies for removal method #l:
a. Floor machine fitted with 3M black floor pad (or equivalent)
b. Removal solution—e.g. “mop on, mop off, no machine scrub,"
stripping solution See note on page 19 regarding use of other solutions
c. Water-absorbent material
10. Additional supplies for removal method #2:
a. No. I sandblasting sand (clean, sharp, coarse, cutting sand)
b. Low-speed floor machine fitted with a floor plate (Clark Assembly
No. 500212-6)
c. Hand-held rubbing stones
22
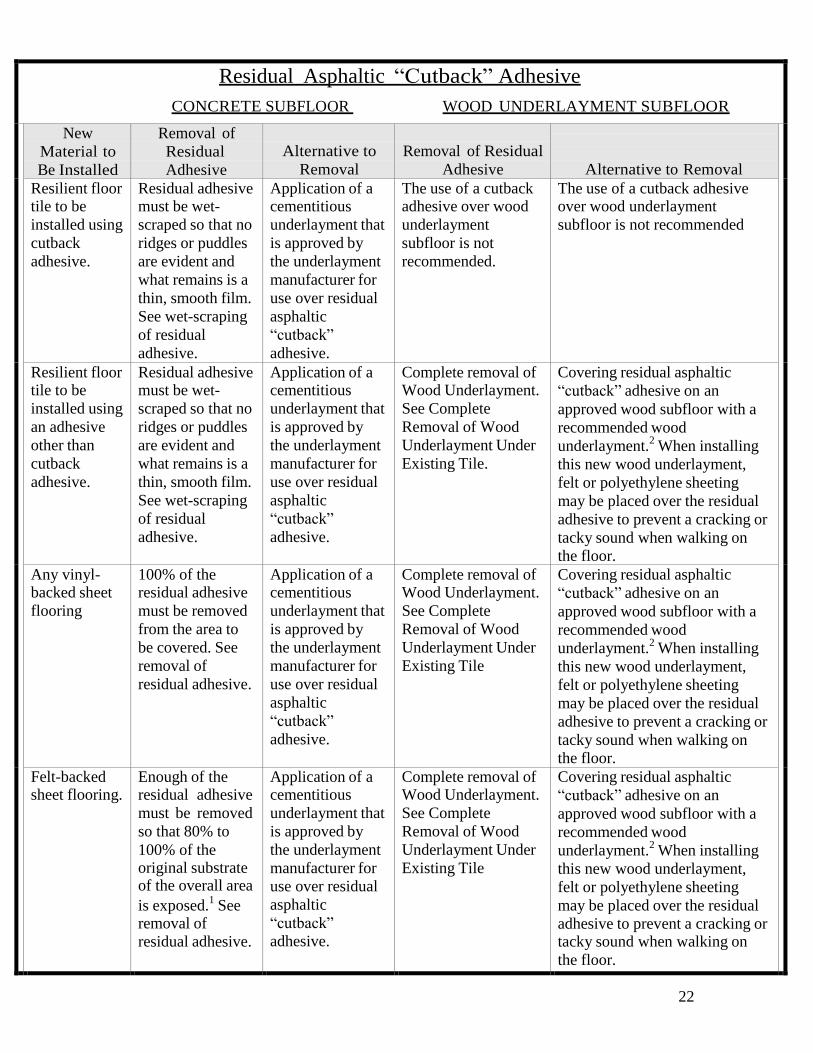
Residual Asphaltic “Cutback” Adhesive
CONCRETE SUBFLOOR WOOD UNDERLAYMENT SUBFLOOR
New
Material to
Be Installed
Removal of
Residual
Adhesive
Alternative to
Removal
Removal of Residual
Adhesive
Alternative to Removal
Resilient floor tile to be
installed using
cutback
adhesive.
Residual adhesive must be wet-
scraped so that no
ridges or puddles
are evident and
what remains is a
thin, smooth film.
See wet-scraping
of residual
adhesive.
Application of a cementitious
underlayment that
is approved by
the underlayment
manufacturer for
use over residual
asphaltic
“cutback”
adhesive.
The use of a cutback adhesive over wood
underlayment
subfloor is not
recommended.
The use of a cutback adhesive over wood underlayment
subfloor is not recommended
Resilient floor tile to be
installed using
an adhesive
other than
cutback
adhesive.
Residual adhesive must be wet-
scraped so that no
ridges or puddles
are evident and
what remains is a
thin, smooth film.
See wet-scraping
of residual
adhesive.
Application of a cementitious
underlayment that
is approved by
the underlayment
manufacturer for
use over residual
asphaltic
“cutback”
adhesive.
Complete removal of Wood Underlayment.
See Complete
Removal of Wood
Underlayment Under
Existing Tile.
Covering residual asphaltic
“cutback” adhesive on an
approved wood subfloor with a
recommended wood
underlayment.2
When installing
this new wood underlayment,
felt or polyethylene sheeting
may be placed over the residual
adhesive to prevent a cracking or
tacky sound when walking on
the floor.
Any vinyl- backed sheet
flooring
100% of the residual adhesive
must be removed
from the area to
be covered. See
removal of
residual adhesive.
Application of a cementitious
underlayment that
is approved by
the underlayment
manufacturer for
use over residual
asphaltic
“cutback”
adhesive.
Complete removal of Wood Underlayment.
See Complete
Removal of Wood
Underlayment Under
Existing Tile
Covering residual asphaltic
“cutback” adhesive on an
approved wood subfloor with a
recommended wood
underlayment.2
When installing
this new wood underlayment,
felt or polyethylene sheeting
may be placed over the residual
adhesive to prevent a cracking or
tacky sound when walking on
the floor.
Felt-backed sheet flooring.
Enough of the residual adhesive
must be removed
so that 80% to
100% of the original substrate of the overall area
is exposed.1
See removal of
residual adhesive.
Application of a cementitious
underlayment that
is approved by
the underlayment
manufacturer for
use over residual
asphaltic
“cutback”
adhesive.
Complete removal of Wood Underlayment.
See Complete
Removal of Wood
Underlayment Under
Existing Tile
Covering residual asphaltic
“cutback” adhesive on an
approved wood subfloor with a
recommended wood
underlayment.2
When installing
this new wood underlayment,
felt or polyethylene sheeting
may be placed over the residual
adhesive to prevent a cracking or tacky sound when walking on
the floor.

23
'Amount of adhesive which must be removed varies. Check with manufacturer of replacement felt-backed
sheet flooring for requirements.
2 All warranties and/or guarantees concerning underlayment's performance rest with the underlayment
manufacturer and not with the resilient floor covering’s manufacturer.

24
Wet-Scraping Residual Adhesive
Warning Do not sand, dry sweep, dry scrape, drill, saw, beadblast, or mechanically chip or
pulverize existing resilient flooring, backing, lining felt, asphalic "cutback"
adhesive, or other adhesive. See "Warning Statement" on page one.
If new resilient floor tile is to be installed over a concrete subfloor using an asphaltic
adhesive, the residual asphaltic "cutback" adhesive must be left so that no ridges or
puddles are evident and what remains is a thin, smooth film. This can be accomplished by
wet-scraping the residual adhesive.
Wet-Scraping residual asphaltic "cutback" adhesive:
1) Moisten an area with water mixed with the specified liquid dishwashing detergent (1 oz. specified liquid dishwashing detergent to one gallon of water) to aid in
wetting the adhesive. Make sure that the area stays moist. Wet-scrape with a stiff-
bladed wall or floor scraper removing ridges and any loose adhesive. Make sure
the adhesive is kept wet.
2) Place loosened adhesive residues into a heavy-duty impermeable trash bag or
leak-tight container with an appropriate label stating, for example "Caution—
Contains Asbestos. Avoid Opening or Breaking Container. Breathing Asbestos is
Hazardous to Your Health." Close and seal the trash bag securely for disposal.
Dispose in an approved landfill only.
3) Wet vacuum standing water with the HEPA vacuum cleaner.
4) Continue steps (1) through (3) until what remains of the residual asphaltic
"cutback" adhesive is a thin, smooth film.
5) Clean the entire floor with the HEPA vacuum cleaner using the metal floor
attachment.
6) After vacuuming, used HEPA filters and cleaner bags should be removed
according to manufacturer's instructions and placed in a heavy-duty impermeable
trash bag or leak tight container with an appropriate label stating, for example
"Caution—Contains Asbestos. Avoid Opening or Breaking Container. Breathing
Asbestos is Hazardous to Your Health." Close and seal the trash bags or
containers securely for disposal. Dispose in an approved landfill only.

25
Complete Removal of Asphaltic "Cutback" Adhesive
Warning Do not sand, dry sweep, dry scrape, drill, saw, beadblast or mechanically chip or
pulverize existing resilient flooring, backing, lining fell, asphaltic "cutback"
adhesive, or other adhesive. See "Warning Statement" on page one.
REMOVAL METHOD
a. Start in corner of the room farthest from the entrance door. Apply the removal
solution (e.g. "mop on, mop off, no machine scrub," stripping solution) by using a
hand sprayer or mop over an area of residual adhesive so that the adhesive in this
area always remains wet during its removal. Allow the area to soak for 5-10
minutes. Remove the adhesive using a floor machine equipped with a 3M black
floor pad (or equivalent), ensuring that the floor is kept wet in the area where the
machine is operating.
Warning Electrical shock hazard exists. Use a ground fault circuit interrupter for any
electrical connections of equipment used in a wet environment.
b. Occasionally push away the adhesive slurry from the subfloor with a wall or floor
scraper or squeegee to check for complete removal. Continue to use the floor
machine, equipped with black pad, in the same area until the concrete subfloor is
cleaned to the degree necessary for the new floor installation.
c. Adhesive around the edge of the room and in areas that were missed or difficult to
reach with the machine can be removed with a hand-held piece of the black floor
pad using the above procedures.
Warning Electrical shock hazard exists. Use a ground fault interrupter for any electrical
connections of equipment used in a wet environment.

26
d. Wet HEPA vacuum the adhesive slurry. When the HEPA vacuum is full, place
commercially suitable water absorbent into the HEPA container until the adhesive
slurry is absorbed. An absorbent material may be used on the slurry to absorb the
adhesive residue. Place the adhesive waste from the HEPA vacuum or floor into
heavy-duty impermeable bags or leak-tight containers with an appropriate label
stating, for example "Caution—Contains Asbestos”. Avoid Creating Dust.
Breathing Asbestos May Cause Bodily Harm." Close and seal the trash bag
securely for disposal. Dispose in an approved landfill only.
e. Rinse floor area with clean water using a hand sprayer or mop. Worker footwear
should also be cleaned and rinsed.
f. Wet-vacuum standing water with HEPA vacuum cleaner.
g. Continue steps a. through f. until the entire room is complete.
h. Allow subfloor to dry and vacuum with a HEPA vacuum with metal floor
attachment.
i. Minimize walking on the wet adhesive to the extent feasible. Worker footwear
must be cleaned or removed before leaving the work area.
27
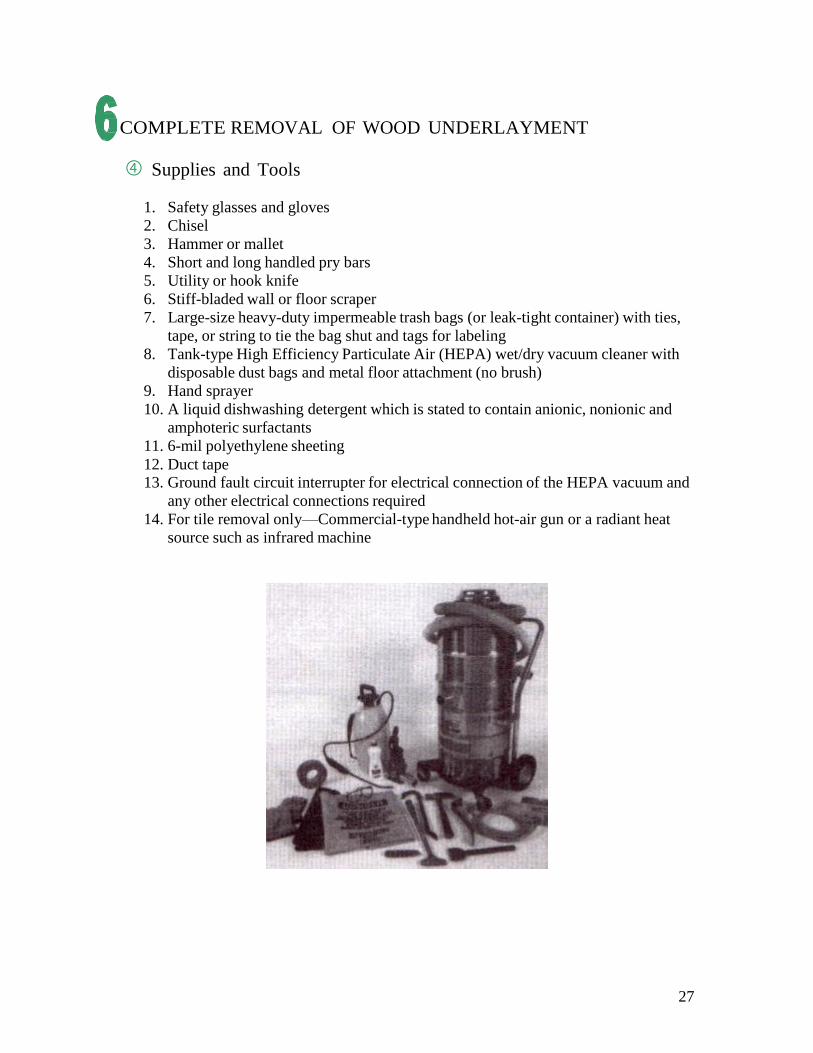
COMPLETE REMOVAL OF WOOD UNDERLAYMENT
Supplies and Tools
1. Safety glasses and gloves
2. Chisel
3. Hammer or mallet
4. Short and long handled pry bars
5. Utility or hook knife
6. Stiff-bladed wall or floor scraper
7. Large-size heavy-duty impermeable trash bags (or leak-tight container) with ties,
tape, or string to tie the bag shut and tags for labeling
8. Tank-type High Efficiency Particulate Air (HEPA) wet/dry vacuum cleaner with
disposable dust bags and metal floor attachment (no brush)
9. Hand sprayer
10. A liquid dishwashing detergent which is stated to contain anionic, nonionic and
amphoteric surfactants
11. 6-mil polyethylene sheeting
12. Duct tape 13. Ground fault circuit interrupter for electrical connection of the HEPA vacuum and
any other electrical connections required
14. For tile removal only—Commercial-type handheld hot-air gun or a radiant heat
source such as infrared machine

28
Complete Removal of Wood Underlayment (Subfloor) Under
Existing Sheet Flooring
Warning Do not sand, dry sweep, dry scrape, drill, saw, beadblast, or mechanically chip or
pulverize existing resilient flooring, backing, lining felt, asphaltic "cutback"
adhesive, or other adhesive. See "Warning Statement" on page one.
a. Remove all furniture and appliances from the work area.
b. Remove any binding strips or other restrictive moldings from doorways, walls,
etc.
c. Prepare the specified liquid dishwashing detergent solution (16 oz. of specified
liquid dishwashing detergent to one gallon of water) and pour into a hand sprayer.
d. Before removal begins, vacuum the entire floor using a HEPA vacuum with a
metal floor attachment
Warning Electrical shock hazard exists. Use a ground fault interrupter for any electrical
connections of equipment used in a wet environment.
e. Starting at the doorway or a floor ventilation vent, locate a joint in an
underlayment board.
f. Slice a strip of flooring 4 to 8 inches wide centered over the underlayment joint in
the panel to be removed. Slice through the top and inner layers of flooring and
about halfway through the backing. Continue this procedure for all underlayment
joints over the entire floor.
CAUTION Resilient flooring becomes slippery when wet with specified liquid dishwashing
detergent solution. Use caution to contain the solution in the immediate work area.
g. One worker pries up the corner of a strip, separating the backing from the wear
layer. As the strip is being removed, another worker sprays a constant mist of the
specified liquid dishwashing detergent solution into the delamination nip point to
minimize any airborne dust particles. When done properly, the felt remaining on
the floor and on the back of the strip will be thoroughly wet. Stand on the

29
remaining floor covering or clean floor (do not stand on the felt). The sliced strips
should be peeled from the backing by pulling or rolling around a core which will
control the stripping angle to create a uniform tension (some resilient flooring wear
layers may not be readily strippable and may require wet-scraping). Tie or tape the
removed material securely and place in a heavy-duty impermeable trash bag or
closed leak tight container for disposal.
h. Remove and dispose of each succeeding strip in the above manner. Minimize
walking on the exposed felt to the extent feasible. Worker footwear must be
cleaned or removed before leaving work area. Close full bags tightly, and seal
securely for disposal. Identify with an appropriate label stating, for example
"Caution—Contains Asbestos. Avoid Opening or Breaking Container. Breathing
Asbestos is Hazardous to Your Health." Dispose in an approved landfill only.
i. Occasionally, parts of the top or inner layer will stick to the backing. This can
often be eliminated by peeling in the opposite direction. The stiff bladed scraper
may aid in the removal or peeling of these layers.
WARNING Do not sand, dry sweep, dry scrape, drill, saw, beadblast, or mechanically chip or
pulverize existing resilient flooring, backing, lining felt, asphaltic "cutback"
adhesive, or other adhesive. See "Warning Statement" on page one.
j. Wet-scraping residual felt—follow instructions for wet-scraping residual felt on
Page 10, paragraph i.
k. For procedures for removing wood underlayment boards see Page 32.

30
Complete Removal of Wood Underlayment (Subfloor) Under
Existing Tile Flooring
a. Before removal begins, the entire floor is vacuumed using a HEPA vacuum with a
metal floor attachment.
WARNING Electrical shock hazard exists. Use a ground fault interrupter for any electrical
connections of equipment used in a wet environment.
b. Floor tiles must be wetted (misted with hand sprayer) before actual removal begins
(unless heat will be used to remove tiles).
CAUTION Resilient flooring becomes slippery when wet with the specified liquid dishwashing
detergent solution. Use caution to contain the solution in the immediate work area.
c. Starting at the doorway or a floor ventilation vent, locate a joint in an underlayment
board.
d. Start the removal of the tile at the underlayment joint by carefully wedging the
scraper in the seam of two adjoining tiles and gradually forcing the edge of one of the
tiles up and away from the floor. Do not intentionally break off pieces of the tile, but
continue to force the balance of the tile up by working the scraper beneath the
tile and exerting both a forward pressure and a twisting action of the blade to
promote release of the tile from the adhesive and the floor. Continue to remove tiles
in this manner at all underlayment joints until all board joints are exposed.
e. After the tiles are removed place them, without further breakage into smaller pieces,
in a heavy-duty impermeable trash bag or closed leak-tight container which will be
used for disposal. Removed tiles can be placed in empty tile cartons first and then
placed in heavy-duty impermeable trash bags. To prevent tearing of the heavy-duty
impermeable trash bag, place only one full carton of removed tile in a bag.
f. With the removal of the first tile, accessibility of the other tiles is improved. Force
the scraper under the exposed edge of another tile, and continue to exert a prying,
twisting force to the scraper as it is moved under the tile until the tile releases from
the underlayment. Remove and dispose of each tile in the manner above. Minimize
walking on the exposed adhesive to the extent feasible. Worker footwear must be
cleaned or removed before leaving area. Close full bags or leak-tight container
tightly and seal securely for disposal. Identify with an appropriate label stating, for
example "Caution—Contains Asbestos. Avoid Opening or Breaking Container.

31
Breathing Asbestos is Hazardous to Your Health." Dispose in an approved landfill
only.
g. Some tiles will release quite easily while others require varying degrees of force.
Where the adhesive is spread heavily or the tile is bonded tightly, it may prove easier
to force the scraper through the tightly adhered areas by striking the scraper handle
with a hammer, using blows of moderate force while maintaining the scraper at a 25°
to 30° angle to the floor.
h. If you encounter areas where even the above methods will not remove the tiles, the
removal procedure can be simplified by thoroughly heating the tiles with a hot-air
gun or a radiant heat source until the heat penetrates through the tile and softens the
adhesive.
i. When using automated infrared heating machines, follow the manufacturer's
instructions.
CAUTION Handle the hot-air gun or radiant heat source carefully to avoid burn injury. Do not
handle the heated tiles or adhesive without suitable glove protection. Do not use a
blowtorch or open flame. Use caution not to burn or char tiles. Work area must be
adequately ventilated.

32
Removal of Wood Underlayment Boards
WARNING Do not sand, dry sweep, dry scrape, drill, saw, beadblast or mechanically chip or
pulverize existing resilient flooring, backing, lining felt, asphaltic "cutback"
adhesive, or other adhesive. See "Warning Statement" on page one.
a. After all felt from sheet flooring has been wetscraped or tiles removed from the
underlayment joints, drive a chisel, using a hammer or mallet, between the
underlayment board and the subfloor. Use the chisel to pry up the underlayment
enough to insert a pry bar and remove the chisel. Slowly and carefully use pry bars to
pry up the underlayment board a little at a time until the board is completely loose
and can be removed.
b. Caution must be used to avoid breaking the underlayment board. The underlayment
board should be removed in one piece. If the underlayment board breaks, slice
through the sheet resilient flooring at the break and spray any exposed felt with the
specified liquid dishwashing detergent solution. Allow the specified liquid
dishwashing detergent solution to penetrate for a few minutes, then continue lifting
the broken underlayment. In the case of a broken underlayment board with tile
adhered, wet (mist) the broken tile and carefully remove any loose pieces.
c. Wear heavy gloves and be careful of wood splinters and fasteners sticking out of the
back of the underlayment. Each underlayment board (or piece of board) should be
removed from the work area as soon as it has been pried up to avoid injuries (such as
stepping on a nail). Fasteners protruding from removed board should be flattened with
a hammer. Place removed underlayment boards on skids with the nails pointing
downward. Wrap skid with 6-mil polyethylene plastic sheeting and secure with duct
tape. Identify with an appropriate label stating, for example "Caution—Contains
Asbestos. Avoid Opening or Breaking Container. Breathing Asbestos is Hazardous to
Your Health." Dispose in an approved landfill only.

33
d. If the underlayment panel extends under cabinets or wall partitions, it will be
necessary to slice through the flooring with a knife as close to the vertical surface as
possible. Deeply score the panel. This should allow for removal.
e. After each panel has been removed, pull out any nails or fasteners still in the subfloor.
f. A chisel is not needed to start the removal of boards after the first board has been
removed. Simply work the pry bar under the exposed edge of the next board.
g. When removal of the underlayment: under the existing floor is complete, thoroughly
check the exposed subfloor. Renail loose areas and reset any "popped" nails or
fasteners.
h. Vacuum up any residue using the HEPA vacuum cleaner with the metal floor
attachment.
i. After vacuuming, used HEPA filters and cleaner bags should be removed according
to the manufacturer's instructions and placed in a heavy-duty impermeable trash bag
or leak-tight container with an appropriate label stating, for example "Caution—
Contains Asbestos. Avoid Opening or Breaking Container. Breathing Asbestos is
Hazardous to Your Health." Close and seal the trash bag or container securely for
disposal. Dispose in an approved landfill only.
j. Prepare the subfloor by installing new underlayment and or floor covering according
to the manufacturer’s installation instructions.
Issued by
Resilient Floor Covering Institute
401 East Jefferson Street, Suite 102
Rockville, MD 20850
(301) 340-8580
January 1998
This book replaces all prior editions of the RFCI and Armstrong Recommended Work
Practices publications. Future editions of these work practices may be issued to replace
this publication.