r1200gs oil-cooled solo passenger - mustang seats
TRANSCRIPT
14 800‐243‐1392 mustangseats.com
BMW R1200GS ’04-12 (Oil-cooled models only)
Solo and Passenger Seat
Hardware included: Mustang Front Mounting Bracket
Tools needed: 8mm nut driver
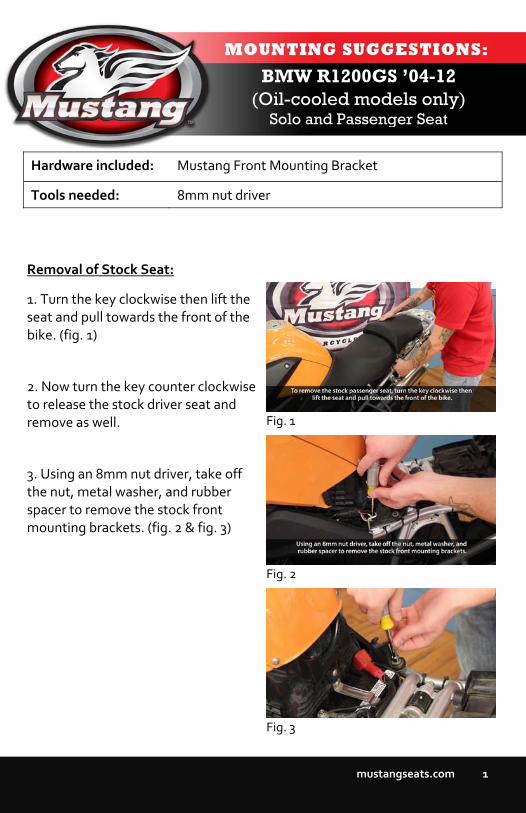
Removal of Stock Seat:
1. Turn the key clockwise then lift the seat and pull towards the front of the bike. (fig. 1)
2. Now turn the key counter clockwise to release the stock driver seat and remove as well.
3. Using an 8mm nut driver, take off the nut, metal washer, and rubber spacer to remove the stock front mounting brackets. (fig. 2 & fig. 3)
Fig. 1
Fig. 2
Fig. 3
Enjoy the comfort and custom look of your new Mustang seat!
These steps are guidelines to help you install your new Mustang product. If you need further assistance, please call us at 800‐243‐1392 or 413‐668‐1100, Monday through Friday 9:00 ‐ 5:30 Eastern or send an e‐mail to [email protected] or visit our website at www.mustangseats.com. For care and maintenance of our seats, please go to our website under "Support". Refers to part numbers: 79835, 76846, 76845

32 800‐243‐1392 mustangseats.com
Installation of Mustang Seat:
1. Now remove the rubber pads and press them into the holes from the bottom of Mustang’s supplied mounting bracket. (fig. 4)
2. Set the bracket in place over the studs on the frame. (fig. 5)
3. Reinstall the hardware you removed earlier, and tighten down with an 8mm driver.
4. Engage the front bracket on the driver seat with the lower slot on the mounting bracket. (fig. 6)
5. Push the driver seat forwar. Press rear of driver seat down until it clicks in place, engaging the rear bracket on the seat.
6. Next, place Mustang’s passenger seat in position and slide back until the rear brackets hook to the bike. Finally, puck down on the front of the passenger seat to engage the pin. (fig. 7)
Fig. 4
Fig. 5
Fig. 6
Fig. 7
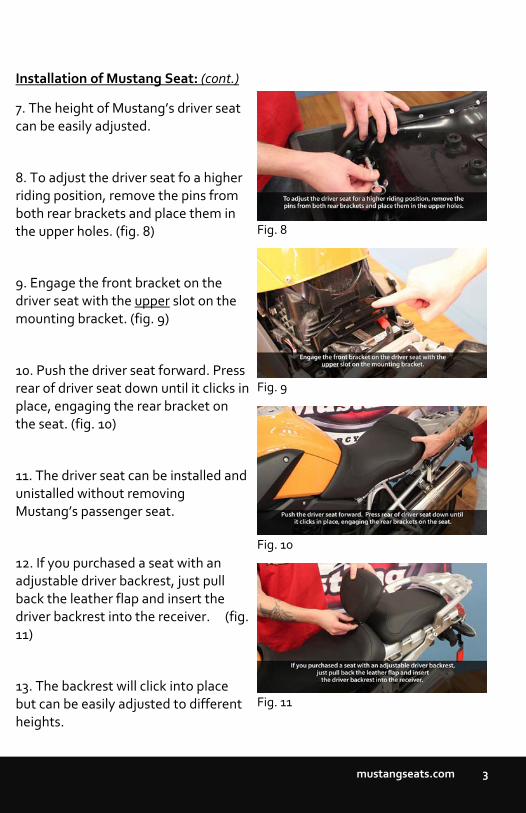
Installation of Mustang Seat: (cont.)
7. The height of Mustang’s driver seat can be easily adjusted.
8. To adjust the driver seat fo a higher riding position, remove the pins from both rear brackets and place them in the upper holes. (fig. 8)
9. Engage the front bracket on the driver seat with the upper slot on the mounting bracket. (fig. 9)
10. Push the driver seat forward. Press rear of driver seat down until it clicks in place, engaging the rear bracket on the seat. (fig. 10)
11. The driver seat can be installed and unistalled without removing Mustang’s passenger seat.
12. If you purchased a seat with an adjustable driver backrest, just pull back the leather flap and insert the driver backrest into the receiver. (fig. 11)
13. The backrest will click into place but can be easily adjusted to different heights.
Fig. 8
Fig. 9
Fig. 10
Fig. 11
32 800‐243‐1392 mustangseats.com
Installation of Mustang Seat:
1. Now remove the rubber pads and press them into the holes from the bottom of Mustang’s supplied mounting bracket. (fig. 4)
2. Set the bracket in place over the studs on the frame. (fig. 5)
3. Reinstall the hardware you removed earlier, and tighten down with an 8mm driver.
4. Engage the front bracket on the driver seat with the lower slot on the mounting bracket. (fig. 6)
5. Push the driver seat forwar. Press rear of driver seat down until it clicks in place, engaging the rear bracket on the seat.
6. Next, place Mustang’s passenger seat in position and slide back until the rear brackets hook to the bike. Finally, puck down on the front of the passenger seat to engage the pin. (fig. 7)
Fig. 4
Fig. 5
Fig. 6
Fig. 7
Installation of Mustang Seat: (cont.)
7. The height of Mustang’s driver seat can be easily adjusted.
8. To adjust the driver seat fo a higher riding position, remove the pins from both rear brackets and place them in the upper holes. (fig. 8)
9. Engage the front bracket on the driver seat with the upper slot on the mounting bracket. (fig. 9)
10. Push the driver seat forward. Press rear of driver seat down until it clicks in place, engaging the rear bracket on the seat. (fig. 10)
11. The driver seat can be installed and unistalled without removing Mustang’s passenger seat.
12. If you purchased a seat with an adjustable driver backrest, just pull back the leather flap and insert the driver backrest into the receiver. (fig. 11)
13. The backrest will click into place but can be easily adjusted to different heights.
Fig. 8
Fig. 9
Fig. 10
Fig. 11

14 800‐243‐1392 mustangseats.com
BMW R1200GS ’04-12 (Oil-cooled models only)
Solo and Passenger Seat
Hardware included: Mustang Front Mounting Bracket
Tools needed: 8mm nut driver
Removal of Stock Seat:
1. Turn the key clockwise then lift the seat and pull towards the front of the bike. (fig. 1)
2. Now turn the key counter clockwise to release the stock driver seat and remove as well.
3. Using an 8mm nut driver, take off the nut, metal washer, and rubber spacer to remove the stock front mounting brackets. (fig. 2 & fig. 3)
Fig. 1
Fig. 2
Fig. 3
Enjoy the comfort and custom look of your new Mustang seat!
These steps are guidelines to help you install your new Mustang product. If you need further assistance, please call us at 800‐243‐1392 or 413‐668‐1100, Monday through Friday 9:00 ‐ 5:30 Eastern or send an e‐mail to [email protected] or visit our website at www.mustangseats.com. For care and maintenance of our seats, please go to our website under "Support". Refers to part numbers: 79835, 76846, 76845