project 2 - logos - tafe nswlmsresources.newengland.tafensw.edu.au/nei/edu/adobesuite/assets/... ·...
TRANSCRIPT

© 2008 Adobe Systems Incorporated Logos 1
Project 2 Logos Timing: 4 to 7 hours
Project overview Logos can evoke immediate associations with companies or specific products. Organisations and corporations use logos to identify themselves and set up brands. A logo should be unique, functional, and versatile. In this project, students view sample logos and discuss colour theory and design principles used in the logos. Students plan, create, and build a logo for use in other publications, such as business cards, menus, or advertisements. Students learn about file formats, resolution, and image size and select appropriate settings for a variety of final product scenarios.
Student product: Digital logos optimised for web, print, and video.
Project objectives At the completion of the project, students will have developed the following skills:
Project management skills • Planning and creating a logo • Managing and organising graphics elements
and illustrations
Design skills • Understanding and employing design principles • Understanding and employing colour theory • Identifying the difference in colour modes • Understanding colour management • Sketching • Creating and editing graphical elements and
illustrations • Designing for a specific audience and purpose
Research and communication skills • Investigating logos • Critiquing designs • Communicating purpose and goal • Communicating and presenting design
decisions • Giving feedback on a project
Technical skills
Photoshop • Using guides and rulers • Understanding vector and bitmap graphics • Using swatches • Drawing lines • Drawing and modifying shapes • Creating vector masks • Adding text to images • Outputting for web • Outputting for print • Outputting for video

2 Logos © 2008 Adobe Systems Incorporated
Project materials • Adobe Photoshop CS4 Extended installed on
all machines • Presentation: Introduction to graphic design • Worksheet: Design principles • Guide: How to understand color management • Worksheet: Review and redesign of logos • Photoshop guide: How to create a new
document
• Photoshop guide: How to use drawing tools • Photoshop guide: How to draw shapes • Guide: Bitmap and vector images • Photoshop guide: How to use selection tools
(from Project 1) • Photoshop guide: How to add text to images • Photoshop guide: How to generate different file
formats (from Project 1)
Background preparation resources • Technical and content information • Key terms • ISTE NETS*S Standards for Students • Adobe Certified Associate, Visual Communication objectives
Project steps Colour theory and design (Suggested time: 50–75 minutes)
1. Tell students they will be creating a logo they can use as an identifying element for themselves, for a fictional organisation, or for a school group. Explain the goals of this project: • Explore colour theory and design principles • Investigate selection, drawing, and painting tools in Adobe Photoshop CS4 Extended • Understand and incorporate image-optimisation strategies and file formats • Identify aspects of redesign and its importance in the design process
2. Show students examples of print-, web-, and video-based logos and discuss with students the types of design principles used in these logos. Ask students to use the design principles worksheet to define design principles. As you introduce each principle, allow students time to fill in their worksheets. At the conclusion of the discussion, select a few students to share their documents and explain why the logo they chose represents a particular design principle. Some principles to cover include: • Emphasis/contrast (focal point) • Proximity/groupings • Balance • Alignment
• Harmony/proportion • White space • Repetition • Colour
Presentation: Introduction to graphic design
Worksheet: Design principles
Note: You could gather logos in a presentation to lead students through this exercise.
© 2008 Adobe Systems Incorporated Logos 3
3. Show students examples of print-, web-, and video-based logos and ask them to identify visual cues and design principles that help the logos stick in their minds. Discuss how these logos are appropriate for the organisations they represent. Discuss how the designs reach the organisation’s target audience and meet the goals of the company or individual.
4. As students begin to think about their logos, explain that they will select the colours, layout, and elements that will bring their logos to life. Some principles to cover include: • Brightness: The quantity of light reaching the viewer’s eye • Contrast and the colour wheel • Using colour in design • The differences between RGB and CMYK • Colour management: Ensuring that viewers see the same colour across different devices
5. To help students understand the importance of colour management, explain why colour variations occur between devices. Describe solutions to help them create consistency across devices. Some things to discuss include: • Causes of colour variation • Monitor profiles • Input device profiles • Output device profiles • Manage colour by using colour settings • Soft-proof to prevent colour variation from screen to print • Manage colour when printing
Guide: How to understand color management
6. Instruct students to select the person, group, or organisation they will create their logo for and brainstorm a set of words and goals that best describe that person, group, or organisation. Ask students to determine design principles they can use to evoke descriptive words as they sketch concepts for this logo on paper. Explain that they can incorporate any images from Project 1. Ask students to record their initial goals in the review and redesign worksheet.
Worksheet: Review and redesign of logos
Constructing the logo (Suggested time: 100–150 minutes)
7. Discuss possible canvas sizes for logos. Typical sizes are 79 x 51 pixels (very small), 150 x 25 pixels, 125 x 144 pixels, and 243 x 103 pixels. Introduce how to create a new document in Photoshop and explain the options they can alter, including: • Document size • Resolution • Colour mode (CMYK, RGB, greyscale, and so on) • Background colour
Photoshop guide: How to create a new document
8. Introduce how to use guides and rulers in Photoshop.

4 Logos © 2008 Adobe Systems Incorporated
9. Introduce drawing and image-editing tools such as the Line, Shape, Eraser, and Paint tools. Discuss the differences between vector and bitmap graphics.
Photoshop guide: How to use drawing tools
Photoshop guide: How to draw shapes
Guide: Bitmap and vector images
10. Introduce using vector masks as a useful tool for hiding selected parts of an image.
Photoshop guide: How to use selection tools (from Project 1)
11. Introduce text-effect tools such as Bevel and Emboss.
Photoshop guide: How to add text to images
12. Allow students time to build their logos.
Review and redesign (Suggested time: 20–30 minutes)
13. Through a class discussion, define review and redesign. Explore what redesign means for student work and why it could be a useful step in the overall design process. Develop class definitions and discuss possible steps or questions that will help in redesigning a product. Some possible categories for review include: • Meeting initial focus, purpose, and audience • Changing focus, purpose, or audience • Applying good design principles
14. Ask students individually to review their own logos against their initial goals and intended design principles.
Worksheet: Review and redesign of logos
15. After the review, allow students time to redesign their logos if needed.

© 2008 Adobe Systems Incorporated Logos 5
Optimising and finalising images (Suggested time: 50–100 minutes)
16. Explain to students that they need to prepare multiple versions of their logos for use in colour and in black-and-white printed documents, as well as for use on the web and in videos. Discuss image optimisation and the importance of file formats. Discussion topics could include: • The difference between printed and on-screen images (inches versus pixels, size variation, scaling
versus re-sampling, and ink dots versus RGB values) • File formats (such as GIF, JPEG, TIFF, EPS, and PDF) • Image resolution (such as pixels versus inches; ppi and dpi for printing, pixels for the web, and
line screen frequency for commercial printing) • Preserving image quality when manipulating images • Broadcast standards for video (such as NTSC and HDTV) to help select the appropriate TV
image preset • Avoiding thin lines (thinner than 2 pixels) because interlacing can create flicker when the image
is displayed in video • Using the NTSC Colors filter when working with colour for video use because saturated or bright
colours can cause bleeding when displayed in video
Note: In discussing file formats, it can be helpful to identify the best file formats for the web (JPG, GIF, PNG), for photos (PSD, TIFF, JPG, PDF, DICOM, large document format), for commercial printing (TIFF, EPS, PDF, PSD, DCS), for video (PSD, TGA, PICT), and for PowerPoint/Word (PNG).
Photoshop guide: How to generate different file formats (from Project 1).
17. Allow students time to prepare their logos for web, print, and video then save their settings as presets for future use.
Presenting their work (Suggested time: 50–100 minutes)
18. Explain that each student will present three logos to the class and include the following in their presentation: • Their design decisions in creating each logo and their rationale for preparing the images for each
medium (web, print, video), including the file type, size, and resolution for each version and situation.
• Explanations of any changes they made during the review and redesign stage. • What they learned in the project and what they want to learn next.

6 Logos © 2008 Adobe Systems Incorporated
Extension activities You can extend the project in the following ways:
• Design project: Ask students to explore the colour schemes posted on Kuler in Adobe labs: http://kuler.adobe.com. Ask students, in small groups, to select their favourite colour scheme and articulate where they could use such a colour scheme and why it is useful for that purpose.
• Design challenge: Select a student logo that incorporates complex colours and effects. Ask students to optimise this logo, trying to achieve a smaller file size than the creator’s original web version while maintaining the look and quality of the logo. Ask students to vote on the versions to select the one with the best quality and the smallest file size.
Assessment • Project rubric
Background preparation resources • Review the student step-by-step guides referenced in this project. • For an overview of the user interface and for more information on the technical aspects of
Photoshop, see Photoshop Help. • You could supplement this project with the following design book:
• Lawler, B. (2006). The Official Adobe Print Publishing Guide, Second Edition. Berkeley: Adobe Press.
Logos • You could download and prepare sample logos from the following kinds of organisations:
• Non-profit organisations • Large businesses • Small local businesses • Sports teams • Media organisations • Web-based companies
• A short article on making logo designs: www.webdesignfromscratch.com/logos.cfm. • Types of logos and their construction: www.grantasticdesigns.com/logos1.html.
Graphic design • Review the Introduction to Graphic Design presentation. • An article on design principles:
www.digital-web.com/articles/principles_of_design. • Before-and-after formats illustrating design principles:
http://desktoppub.about.com/od/designprinciples/l/aa_pod2.htm. • A short introduction to graphic design theory, explaining the aspects of design to consider when
composing a piece of fine art or producing a graphic layout: www.usask.ca/education/coursework/skaalid/theory/cgdt/designtheory.htm.

© 2008 Adobe Systems Incorporated Logos 7
• A brief discussion of the main principles of design: http://char.txa.cornell.edu/language/principl/principl.htm.
• Definitions and examples of elements and principles of design: www.johnlovett.com/test.htm.
• Definitions for graphic design principles: www.msu.edu/~glazered/tc801/graphic.html.
Colour theory • An overview of colour theory and the colour wheel:
www.colormatters.com/colortheory.html. • A colour theory tutorial: www.worqx.com/color/. • A site to spur discussion and terminology of colour selection:
http://kuler.adobe.com.
Design process • This article from design-lib.com design libraries discusses the design process:
www.design-lib.com/guidelines-to-graphic-design-process-gd.php.
Key terms • Logo • colour wheel • hue • saturation • chroma • tint • tone • shade • brightness • RGB • CMYK • colour gamut • colour profiles • colour management
• file format • resolution • optimise • review • redesign • vector • bitmap • proximity/groupings • balance • alignment • harmony/proportion • white space • repetition • pixels

8 Logos © 2008 Adobe Systems Incorporated
ISTE NETS*S Standards for Students This project is aligned to the ISTE NETS*S Technology Standards. Depending on the subject and content area the student selects, you can research your education authority’s content standards to see how this project aligns to your requirements.
1. Creativity and Innovation Students demonstrate creative thinking, construct knowledge, and develop innovative products using technology. Students:
a. apply existing knowledge to generate new ideas, products, or processes.
b. create original works as a means of personal or group expression.
2. Communication and Collaboration Students use digital media and environments to communicate and work collaboratively, including at a distance, to support individual learning and contribute to the learning of others. Students:
b. communicate information and ideas effectively to multiple audiences using a variety of media and formats.
3. Research and Information Retrieval Students apply digital tools to gather, evaluate, and use information. Students:
c. evaluate and select information sources and digital tools based on the appropriateness to specific tasks.
4. Critical Thinking and Problem Solving Students use critical thinking skills to plan and conduct research, manage projects, solve problems and make informed decisions using appropriate digital tools and resources. Students:
b. plan and manage activities to develop a solution or complete a project.
5. Digital Citizenship Students understand human, cultural, and societal issues related to technology and practice legal and ethical behavior. Students:
c. demonstrate personal responsibility for lifelong learning.
6. Technology Operations and Concepts Students demonstrate a sound understanding of technology concepts, systems and operations. Students:
a. understand and use technology systems.
b. select and use applications effectively and productively.

© 2008 Adobe Systems Incorporated Logos 9
Adobe Certified Associate, Visual Communication objectives
1.1 Identify the purpose, audience, and audience needs for preparing image(s).
2.1 Demonstrate knowledge of image resolution, image size, and image file format for web, video, and print.
2.2 Demonstrate knowledge of design principles, elements, and image composition.
2.5 Demonstrate knowledge of image-generating devices, their resulting image types, and how to access resulting images in Photoshop.
2.6 Understanding key terminology of digital images.
3.3 Demonstrate knowledge of importing, exporting, organizing, and saving.
3.5 Demonstrate an understanding of and select the appropriate features and options required to implement a color management workflow.
4.1 Demonstrate knowledge of working with selections and measurement.
4.2 Use Photoshop guides and rulers.
4.6 Demonstrate knowledge of drawing and painting.
4.7 Demonstrate knowledge of type.
5.1 Demonstrate knowledge of preparing images for web, print, and video.
Assessment 0 - Does not meet
expectations 3 - Meets expectations 5 - Exceeds expectations
Brainstorm Absent or incomplete. Identifies person, group, or organisation for which to design logo. Provides descriptive words and sketch of logo with a purpose and goal.
Identifies person, group, or organisation for which to design logo. Provides descriptive words and sketch of logo with clear purpose and goal.
Logo – content
Absent or incomplete. Logo communicates a purpose and goal for person, group, or organisation it is designed for.
Logo clearly and effectively communicates a purpose and goal for person, group, or organisation it is designed for.

10 Logos © 2008 Adobe Systems Incorporated
0 - Does not meet expectations
3 - Meets expectations 5 - Exceeds expectations
Logo for print – colour
Absent or incomplete. Creates logo in appropriate file format and size for printing in colour. Employs appropriate colour theory and design principles.
Creates logo with a clear purpose and goal. The logo is in appropriate file format and size for print in colour. Clearly and efficiently employs appropriate colour theory and design principles.
Logo for print – black & white
Absent or incomplete. Creates logo in appropriate file format and size for printing in black & white. Employs appropriate colour theory and design principles.
Creates logo with a clear purpose and goal. The logo is in appropriate file format and size for print in black & white. Clearly and efficiently employs appropriate colour theory and design principles.
Logo for web Absent or incomplete. Creates logo in appropriate file format and size for the web. Employs appropriate colour theory and design principles.
Creates logo with a clear purpose and goal. The logo is in appropriate file format and size for the web. Clearly and efficiently employs appropriate colour theory and design principles.
Logos for video
Absent or incomplete. Creates logo in appropriate file format and size for video. Employs appropriate colour theory and design principles.
Creates logo with a clear purpose and goal. The logo is in appropriate file format and size for video. Clearly and efficiently employs appropriate colour theory and design principles.

© 2008 Adobe Systems Incorporated Logos 11
0 - Does not meet expectations
3 - Meets expectations 5 - Exceeds expectations
Presentation Absent, incomplete, or unfocused.
Presentation includes rationale for the selected file format, size, and resolution for each final product scenario. Presentation explains how the logos communicate a purpose and details changes made in the review and redesign cycle. Presentation reflects on what they learned and what they would like to learn next.
Presentation is clear and compelling. Rationale for the selected file format, size, and resolution for each final product scenario is succinct and logical. Presentation clearly explains how the logos communicate a purpose and details changes made in the review and redesign cycle. Presentation reflects on what students learned and identifies what they want to learn next and why.

®
Copyright 2008 Adobe Systems Incorporated. All rights reserved. Copyright 2008 Adobe Systems Incorporated. All rights reserved.
®
1
INTRODUCTION TO GRAPHIC DESIGNMOVEMENT, BALANCE, UNITY, CONTRAST, EMPHASIS, LINE, AND COLOUR
®
Copyright 2008 Adobe Systems Incorporated. All rights reserved. 2
Graphic design elements
Graphic design elements are the building blocks of graphics. Line
Colour
Shape
Texture

®
Copyright 2008 Adobe Systems Incorporated. All rights reserved. 3
Lines
Lines can be straight or curved.
How are lines used in the composition on this slide?

®
Copyright 2008 Adobe Systems Incorporated. All rights reserved. 4
Colour definitions
Hue is another word for colour.
Chroma is the intensity or purity of colour.
Tint is a colour mixed with white.
Tone is a colour mixed with gray.
Shade is a colour mixed with black.

®
Copyright 2008 Adobe Systems Incorporated. All rights reserved. 5
Colour and contrast
Using colour can enhance or detract from a composition.www.lighthouse.org/color_contrast.htm
Colour wheels help determine which colours are in greatest contrast.
Use Kuler from Adobe Labs to try out new colour schemes:
http://kuler.adobe.com/

®
Copyright 2008 Adobe Systems Incorporated. All rights reserved. 6
Colour wheels
Analogous colours are adjacent to each other on the colour wheel.
Complementary colours are opposite each other on the colour wheel.
®
Copyright 2008 Adobe Systems Incorporated. All rights reserved. 7
Colour in design
Use colour to label or show hierarchy.
Use colour to represent or imitate reality.
Use colour to unify, separate, or emphasise.
Use colour to decorate.
Use colour consistently.

®
Copyright 2008 Adobe Systems Incorporated. All rights reserved. 8
Shapes
Shapes are enclosed objects that can be created by line or created by colour and value changes that define their edges.

®
Copyright 2008 Adobe Systems Incorporated. All rights reserved. 9
Texture
Texture is the surface look of an object created by varying dark and light areas.
Roughness
Smoothness
Depth

®
Copyright 2008 Adobe Systems Incorporated. All rights reserved. 10
Graphic design principles
Graphic design principles are ways in which elements are used together. Movement
Balance
Emphasis
Unity

®
Copyright 2008 Adobe Systems Incorporated. All rights reserved. 11
Movement
Movement is the use of lines, colour, and repetition to create the illusion of motion. Curved forms or lines
Repetition of geometric forms
Fuzzy lines or outlines

®
Copyright 2008 Adobe Systems Incorporated. All rights reserved. 12
Lines
Lines can indicate motion or direction.
How are lines used in the composition on this slide?
®
Copyright 2008 Adobe Systems Incorporated. All rights reserved. 13
Balance
Balance is the act of comparing or estimating two things, one against the other, and the contrast between: Empty space (white space) and filled space
Text and images
Colour and no colorus and different colours
Textures against flat colours

®
Copyright 2008 Adobe Systems Incorporated. All rights reserved. 14
Balance in composition
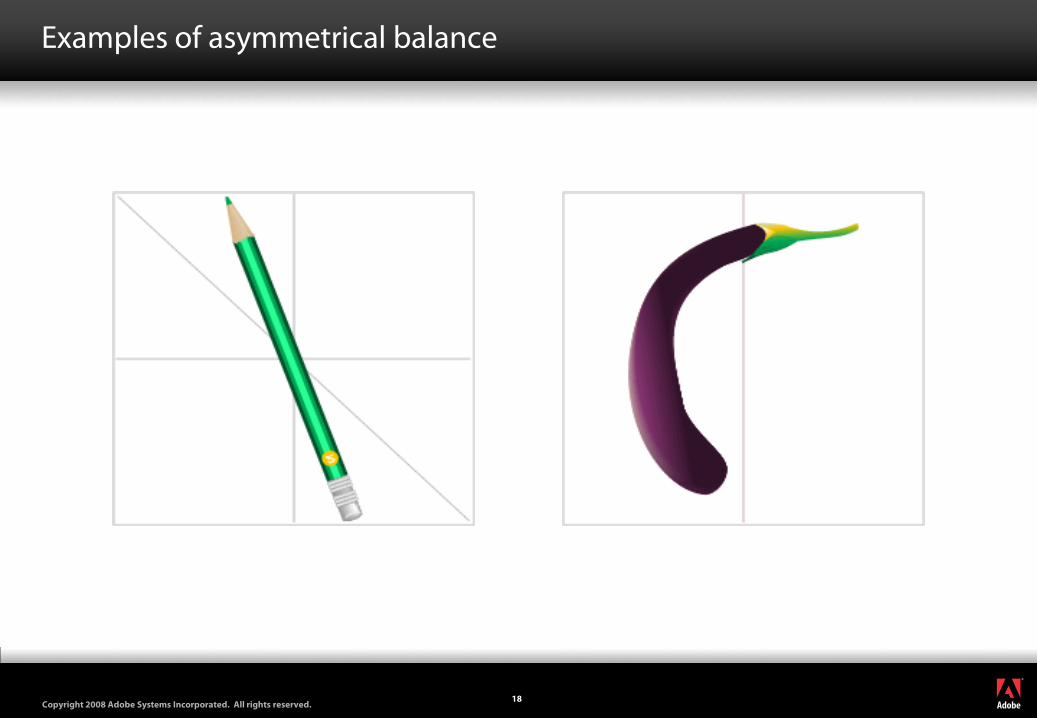
There are three different types of balance when using colour, shape, and position: Symmetry
Asymmetry
Radial symmetry

®
Copyright 2008 Adobe Systems Incorporated. All rights reserved. 15
Symmetrical or formal balance
You can usually identify at least one of three lines of symmetry. Horizontal
Vertical
Diagonal

®
Copyright 2008 Adobe Systems Incorporated. All rights reserved. 16
Symmetrical balance

®
Copyright 2008 Adobe Systems Incorporated. All rights reserved. 17
Examples of symmetrical balance
®
Copyright 2008 Adobe Systems Incorporated. All rights reserved. 18
Examples of asymmetrical balance

®
Copyright 2008 Adobe Systems Incorporated. All rights reserved. 19
Examples of radial balance

®
Copyright 2008 Adobe Systems Incorporated. All rights reserved. 20
Unity
Unity: The correct balance of composition or colour that produces a harmonious effect.
What is the focus of the message?

®
Copyright 2008 Adobe Systems Incorporated. All rights reserved. 21
Emphasis
Emphasis: To express with particular stress or force.
What message is stressed here?
®
Copyright 2008 Adobe Systems Incorporated. All rights reserved. 22
Summary
The basis of good graphic design is use of design elements and their thoughtful application in the form of design principles.
Clearly identify what you are trying to accomplish — use design to convey your message.
Brainstorm alternatives.