profile management 7 - citrix virtual apps
TRANSCRIPT

Profile Management 7.18
Citrix Product Documentation | docs.citrix.com August 17, 2018

Profile Management 7.18
Contents
What’s new 3Native Outlook search experience . . . . . . . . . . . . . . . . . . . . . . . . . . . . . . . . 3
Fixed issues 3
Known issues 4
System requirements 4Software requirements . . . . . . . . . . . . . . . . . . . . . . . . . . . . . . . . . . . . . . 5Citrix product compatibility . . . . . . . . . . . . . . . . . . . . . . . . . . . . . . . . . . . 5Downloads . . . . . . . . . . . . . . . . . . . . . . . . . . . . . . . . . . . . . . . . . . . . 6Diagnostics Feature . . . . . . . . . . . . . . . . . . . . . . . . . . . . . . . . . . . . . . . . 6Application Streaming . . . . . . . . . . . . . . . . . . . . . . . . . . . . . . . . . . . . . . 6Cross-Platform Settings . . . . . . . . . . . . . . . . . . . . . . . . . . . . . . . . . . . . . 6Migrating Existing Profiles to Citrix User Profiles . . . . . . . . . . . . . . . . . . . . . . . . 7
How Profile Management works 7
About profiles 8Types of profiles . . . . . . . . . . . . . . . . . . . . . . . . . . . . . . . . . . . . . . . . . 9Profile versions . . . . . . . . . . . . . . . . . . . . . . . . . . . . . . . . . . . . . . . . . . 9
Assign profiles 10What methods can I use in Windows to assign profiles to users? . . . . . . . . . . . . . . . . 10What is the priority order for delivering profiles to domain users if more than onemethod is
used? . . . . . . . . . . . . . . . . . . . . . . . . . . . . . . . . . . . . . . . . . . . . 11
Profile Management architecture 11Important information about Profile Management stores . . . . . . . . . . . . . . . . . . . 11Folder structure of the user store . . . . . . . . . . . . . . . . . . . . . . . . . . . . . . . . 12Pending area . . . . . . . . . . . . . . . . . . . . . . . . . . . . . . . . . . . . . . . . . . . 13Folder structure of the user store with multiple platforms . . . . . . . . . . . . . . . . . . . 13The user store and AD forests . . . . . . . . . . . . . . . . . . . . . . . . . . . . . . . . . . 14Localizing the user store . . . . . . . . . . . . . . . . . . . . . . . . . . . . . . . . . . . . . 14
Profile Management use cases 16Multiple sessions . . . . . . . . . . . . . . . . . . . . . . . . . . . . . . . . . . . . . . . . . 16“Last write wins” and roaming profile consistency issues . . . . . . . . . . . . . . . . . . . 18
Access multiple resources 18
© 1999-2018 Citrix Systems, Inc. All rights reserved. 2

Profile Management 7.18
Logon diagram 19
Logoff diagram 21
Plan your deployment 23Plan a pilot study with the .ini file . . . . . . . . . . . . . . . . . . . . . . . . . . . . . . . . 23
Decide on a configuration 23UPMConfigCheck . . . . . . . . . . . . . . . . . . . . . . . . . . . . . . . . . . . . . . . . . 24Group computers into OUs . . . . . . . . . . . . . . . . . . . . . . . . . . . . . . . . . . . . 24
Pilot? Production? 24Policy: Path to user store . . . . . . . . . . . . . . . . . . . . . . . . . . . . . . . . . . . . . 25Policies: Processed groups, Excluded groups . . . . . . . . . . . . . . . . . . . . . . . . . . 25
Migrate profiles? New profiles? 26Policy: Template profile . . . . . . . . . . . . . . . . . . . . . . . . . . . . . . . . . . . . . 26
Persistent? Provisioned? Dedicated? Shared? 27Notes . . . . . . . . . . . . . . . . . . . . . . . . . . . . . . . . . . . . . . . . . . . . . . . 28
Mobile? Static? 29Themobile case . . . . . . . . . . . . . . . . . . . . . . . . . . . . . . . . . . . . . . . . . 29The static case . . . . . . . . . . . . . . . . . . . . . . . . . . . . . . . . . . . . . . . . . . 30
Which applications? 30Simple applications . . . . . . . . . . . . . . . . . . . . . . . . . . . . . . . . . . . . . . . 31Legacy applications . . . . . . . . . . . . . . . . . . . . . . . . . . . . . . . . . . . . . . . . 31Complex applications . . . . . . . . . . . . . . . . . . . . . . . . . . . . . . . . . . . . . . 31Cross-platform applications . . . . . . . . . . . . . . . . . . . . . . . . . . . . . . . . . . . 32Java and Web Applications . . . . . . . . . . . . . . . . . . . . . . . . . . . . . . . . . . . . 32Summary of policies . . . . . . . . . . . . . . . . . . . . . . . . . . . . . . . . . . . . . . . 32Wildcard processing in file names . . . . . . . . . . . . . . . . . . . . . . . . . . . . . . . . 33Inclusion and exclusion rules . . . . . . . . . . . . . . . . . . . . . . . . . . . . . . . . . . 33Non-English folder names in profiles . . . . . . . . . . . . . . . . . . . . . . . . . . . . . . 34Next steps . . . . . . . . . . . . . . . . . . . . . . . . . . . . . . . . . . . . . . . . . . . . . 34
Review, test, and activate Profile Management 34Policy: Enable Profile Management . . . . . . . . . . . . . . . . . . . . . . . . . . . . . . . 34
Plan for multiple platforms 34Why are user profiles onmultiple platforms such a challenge? . . . . . . . . . . . . . . . . 34How does changing the way an application is installed cause issues? . . . . . . . . . . . . . 35
© 1999-2018 Citrix Systems, Inc. All rights reserved. 3

Profile Management 7.18
The Start menu . . . . . . . . . . . . . . . . . . . . . . . . . . . . . . . . . . . . . . . . . . 35The Quick Launch toolbar . . . . . . . . . . . . . . . . . . . . . . . . . . . . . . . . . . . . 36What types of profiles should I create? . . . . . . . . . . . . . . . . . . . . . . . . . . . . . 36
Share Citrix user profiles onmultiple file servers 36
Administer profiles within and across OUs 38Within OUs . . . . . . . . . . . . . . . . . . . . . . . . . . . . . . . . . . . . . . . . . . . . 38Across OUs . . . . . . . . . . . . . . . . . . . . . . . . . . . . . . . . . . . . . . . . . . . . 39
Domain and forest support in Profile Management 39
High availability and disaster recovery with Profile Management 40Comparison with roaming profiles . . . . . . . . . . . . . . . . . . . . . . . . . . . . . . . . 40
Scenario 1 - Basic setup of geographically adjacent user stores and failover clusters 41Option 1 – DFS Namespaces . . . . . . . . . . . . . . . . . . . . . . . . . . . . . . . . . . . 41Option 2 - DFS Namespaces with failover clustering . . . . . . . . . . . . . . . . . . . . . . 44
Scenario 2 - Multiple folder targets and replication 45Option 1 - Referrals to multiple folder targets . . . . . . . . . . . . . . . . . . . . . . . . . . 45Option 2 - Distributed file system replication . . . . . . . . . . . . . . . . . . . . . . . . . . 46
Scenario 3 - Disaster recovery 47
Scenario 4 - The traveling user 49
Scenario 5 - Load-balancing user stores 49Background reading . . . . . . . . . . . . . . . . . . . . . . . . . . . . . . . . . . . . . . . 49
Plan folder redirection with Profile Management 51Important information about folder redirection . . . . . . . . . . . . . . . . . . . . . . . . 52
Third-party directory, authentication, and file services 52Directory services . . . . . . . . . . . . . . . . . . . . . . . . . . . . . . . . . . . . . . . . . 52Authentication services . . . . . . . . . . . . . . . . . . . . . . . . . . . . . . . . . . . . . 53File services . . . . . . . . . . . . . . . . . . . . . . . . . . . . . . . . . . . . . . . . . . . . 53
Frequently asked questions about profiles onmultiple platforms andProfileManagementmigration 53How can I be certain of avoiding compatibility issues with my profiles? . . . . . . . . . . . . 53Can I share profiles across different systems? . . . . . . . . . . . . . . . . . . . . . . . . . . 54How does Profile management enable settings across multiple versions or platforms? . . . 54
© 1999-2018 Citrix Systems, Inc. All rights reserved. 4

Profile Management 7.18
How does Microsoft support roaming profiles across platforms and versions? . . . . . . . . 54Is sharing a profile between x86 and x64 platforms possible? . . . . . . . . . . . . . . . . . 54I want to test how one profile behaves across multiple platforms. Where do I start? . . . . . 55Can I assign profiles based on the computer a user logs on to? . . . . . . . . . . . . . . . . 55Why are profile assignments based on computer desirable? . . . . . . . . . . . . . . . . . . 56Does Profile Management migrate Windows user profiles to Citrix user profiles? . . . . . . . 56Which profiles can bemigrated to Citrix user profiles? . . . . . . . . . . . . . . . . . . . . . 56How do I use a template profile? . . . . . . . . . . . . . . . . . . . . . . . . . . . . . . . . . 56
Install and set up 57About Profile Management installations . . . . . . . . . . . . . . . . . . . . . . . . . . . . . 57To install the .msi file . . . . . . . . . . . . . . . . . . . . . . . . . . . . . . . . . . . . . . . 57To install the .msi file from the command line . . . . . . . . . . . . . . . . . . . . . . . . . . 57To add the .adm or .admx file . . . . . . . . . . . . . . . . . . . . . . . . . . . . . . . . . . 59To remove Profile Management . . . . . . . . . . . . . . . . . . . . . . . . . . . . . . . . . 60
Files included in the download 60
Create the user store 61
Test Profile Management with a local GPO 62Test the user experience . . . . . . . . . . . . . . . . . . . . . . . . . . . . . . . . . . . . . 63Test operating system variations . . . . . . . . . . . . . . . . . . . . . . . . . . . . . . . . . 63
Upgrade andmigrate 64Mixed Deployments . . . . . . . . . . . . . . . . . . . . . . . . . . . . . . . . . . . . . . . . 64Mixed Deployments Involving Profile Management 2.1.1 or Earlier . . . . . . . . . . . . . . . 64Strategy 1: One-off Migration . . . . . . . . . . . . . . . . . . . . . . . . . . . . . . . . . . . 65Strategy 2: Phased Migration . . . . . . . . . . . . . . . . . . . . . . . . . . . . . . . . . . . 66
Upgrade Profile Management 67To upgrade an existing .adm file . . . . . . . . . . . . . . . . . . . . . . . . . . . . . . . . . 67To upgrade the .msi file . . . . . . . . . . . . . . . . . . . . . . . . . . . . . . . . . . . . . . 68To upgrade the .ini file . . . . . . . . . . . . . . . . . . . . . . . . . . . . . . . . . . . . . . 68
Frequently asked questions about upgrading Profile Management 69What are the recommendations for testing Profile Management? . . . . . . . . . . . . . . . 69A new .adm or .admx file is released with a new version of the software. What do I do? . . . 69How do I roll back Profile Management if I upgraded incorrectly? . . . . . . . . . . . . . . . 70
Migrate user profiles 70Tomigrate to roaming profiles . . . . . . . . . . . . . . . . . . . . . . . . . . . . . . . . . . 70
© 1999-2018 Citrix Systems, Inc. All rights reserved. 5

Profile Management 7.18
Tomigrate from personal vDisks . . . . . . . . . . . . . . . . . . . . . . . . . . . . . . . . . 71
Configure 72
Manage 72Policy: Number of retries when accessing locked files . . . . . . . . . . . . . . . . . . . . . 72
Resolve conflicting profiles 73
Specify a template or mandatory profile 73
Choose amigration policy 74
Enable Profile Management 75
Configuration precedence 75
About the Profile Management .ini file 76Default configuration . . . . . . . . . . . . . . . . . . . . . . . . . . . . . . . . . . . . . . . 76Modify the .ini file . . . . . . . . . . . . . . . . . . . . . . . . . . . . . . . . . . . . . . . . . 77
Include and exclude items 77Before including and excluding items . . . . . . . . . . . . . . . . . . . . . . . . . . . . . . 78Files and folders . . . . . . . . . . . . . . . . . . . . . . . . . . . . . . . . . . . . . . . . . 78The registry . . . . . . . . . . . . . . . . . . . . . . . . . . . . . . . . . . . . . . . . . . . . 79About exclusions . . . . . . . . . . . . . . . . . . . . . . . . . . . . . . . . . . . . . . . . . 79Inclusion and exclusion rules . . . . . . . . . . . . . . . . . . . . . . . . . . . . . . . . . . 79
Default inclusions and exclusions 80Registry inclusion list . . . . . . . . . . . . . . . . . . . . . . . . . . . . . . . . . . . . . . . 80Registry exclusion list . . . . . . . . . . . . . . . . . . . . . . . . . . . . . . . . . . . . . . . 80Folder inclusion list . . . . . . . . . . . . . . . . . . . . . . . . . . . . . . . . . . . . . . . . 81Folder exclusion list . . . . . . . . . . . . . . . . . . . . . . . . . . . . . . . . . . . . . . . 81File inclusion list . . . . . . . . . . . . . . . . . . . . . . . . . . . . . . . . . . . . . . . . . 82File exclusion list . . . . . . . . . . . . . . . . . . . . . . . . . . . . . . . . . . . . . . . . . 82
Include and exclude items 82To include items . . . . . . . . . . . . . . . . . . . . . . . . . . . . . . . . . . . . . . . . . 83To exclude items . . . . . . . . . . . . . . . . . . . . . . . . . . . . . . . . . . . . . . . . . 84
Use wildcards 85Examples . . . . . . . . . . . . . . . . . . . . . . . . . . . . . . . . . . . . . . . . . . . . . 85
Enable logon exclusion check 86
© 1999-2018 Citrix Systems, Inc. All rights reserved. 6

Profile Management 7.18
Define which groups’ profiles are processed 87
Specify the path to the user store 88
Store certificates 90Example . . . . . . . . . . . . . . . . . . . . . . . . . . . . . . . . . . . . . . . . . . . . . . 91
Stream user profiles 91To enable profile streaming exclusion . . . . . . . . . . . . . . . . . . . . . . . . . . . . . . 92
Configure folder redirection 93
Manage cookie folders and other transactional folders 94Settings required for Internet Explorer 10 and later versions for browser compatibility . . . . 94Tomirror folders . . . . . . . . . . . . . . . . . . . . . . . . . . . . . . . . . . . . . . . . . 95To delete stale cookies . . . . . . . . . . . . . . . . . . . . . . . . . . . . . . . . . . . . . . 95To process cookie folders . . . . . . . . . . . . . . . . . . . . . . . . . . . . . . . . . . . . . 96
Configure offline profiles 96Using Group Policy . . . . . . . . . . . . . . . . . . . . . . . . . . . . . . . . . . . . . . . . 97Using the .ini file . . . . . . . . . . . . . . . . . . . . . . . . . . . . . . . . . . . . . . . . . 97
Configure the Customer Experience Improvement Program (CEIP) 98
Configure active write back 98
Configure cross-platform settings 99Example: Roaming Microsoft Office settings between Windows Server 2008 and Windows 7 101
Operating systems and applications supported by cross-platform settings 102About definition files . . . . . . . . . . . . . . . . . . . . . . . . . . . . . . . . . . . . . . . 102Supported operating systems . . . . . . . . . . . . . . . . . . . . . . . . . . . . . . . . . . 102Supported Citrix products . . . . . . . . . . . . . . . . . . . . . . . . . . . . . . . . . . . . 102Supported applications . . . . . . . . . . . . . . . . . . . . . . . . . . . . . . . . . . . . . 103
Create a definition file 103
Application definition file structure 107Architecture Chart . . . . . . . . . . . . . . . . . . . . . . . . . . . . . . . . . . . . . . . . 107Sample . . . . . . . . . . . . . . . . . . . . . . . . . . . . . . . . . . . . . . . . . . . . . . 109
Cross-platform settings - Case study 113
Initial configuration 113
© 1999-2018 Citrix Systems, Inc. All rights reserved. 7

Profile Management 7.18
Plan the new site 115
Execute the plan 116Phase 1: Configure the new file servers . . . . . . . . . . . . . . . . . . . . . . . . . . . . . 116Phase 2: Upgrade the machines in 2k8_Farm to Profile Management 5.0 . . . . . . . . . . . 117Phase 3: Choose which definition files to deploy . . . . . . . . . . . . . . . . . . . . . . . . 117Phase 4: Configure the machines in 2k8_Farm for Profile Management 5.0 . . . . . . . . . . 117Phase 5: Prepare the machines in 2k12_Farm . . . . . . . . . . . . . . . . . . . . . . . . . . 118Phase 6: Live testing . . . . . . . . . . . . . . . . . . . . . . . . . . . . . . . . . . . . . . . 120
Other considerations 121
Force user logoffs 122
Synchronize file security attributes 122
Enable large file handling 122
Enable application profiler 123
Enable native Outlook search experience 123Note . . . . . . . . . . . . . . . . . . . . . . . . . . . . . . . . . . . . . . . . . . . . . . . . 124
Policies 124
Profile Management policies 125Modifying policies . . . . . . . . . . . . . . . . . . . . . . . . . . . . . . . . . . . . . . . . 125Profile Management variables . . . . . . . . . . . . . . . . . . . . . . . . . . . . . . . . . . 125Policies and versions . . . . . . . . . . . . . . . . . . . . . . . . . . . . . . . . . . . . . . . 126Policies available from Version 5.5 . . . . . . . . . . . . . . . . . . . . . . . . . . . . . . . . 127Feature . . . . . . . . . . . . . . . . . . . . . . . . . . . . . . . . . . . . . . . . . . . . . . 127Policies available from Version 5.0 to 5.4 . . . . . . . . . . . . . . . . . . . . . . . . . . . . 127Policies available from Version 4.x . . . . . . . . . . . . . . . . . . . . . . . . . . . . . . . . 128Policies available from Version 3.x . . . . . . . . . . . . . . . . . . . . . . . . . . . . . . . . 129Policies available from Version 2.x . . . . . . . . . . . . . . . . . . . . . . . . . . . . . . . . 131
Profile Management policy descriptions and defaults 134Sections in the .adm and .admx files . . . . . . . . . . . . . . . . . . . . . . . . . . . . . . . 134Profile Management . . . . . . . . . . . . . . . . . . . . . . . . . . . . . . . . . . . . . . . 135Profile Management\Folder Redirection (User Configuration) . . . . . . . . . . . . . . . . . 137Profile Management\Profile handling . . . . . . . . . . . . . . . . . . . . . . . . . . . . . . 138Profile Management\Advanced settings . . . . . . . . . . . . . . . . . . . . . . . . . . . . . 140Profile Management\Log settings . . . . . . . . . . . . . . . . . . . . . . . . . . . . . . . . 141
© 1999-2018 Citrix Systems, Inc. All rights reserved. 8

Profile Management 7.18
Profile Management\Registry . . . . . . . . . . . . . . . . . . . . . . . . . . . . . . . . . . 142Profile Management\File system . . . . . . . . . . . . . . . . . . . . . . . . . . . . . . . . . 143Profile Management\File system\Synchronization . . . . . . . . . . . . . . . . . . . . . . . 144Profile Management\Streamed user profiles . . . . . . . . . . . . . . . . . . . . . . . . . . 145Profile Management\Cross-platform settings . . . . . . . . . . . . . . . . . . . . . . . . . . 146
Integrate 148
Profile Management and XenApp 148Streamed applications . . . . . . . . . . . . . . . . . . . . . . . . . . . . . . . . . . . . . . 148
Profile Management and XenDesktop 149Install and upgrade Profile Management in XenDesktop deployments . . . . . . . . . . . . 149Configure Profile Management in XenDesktop deployments . . . . . . . . . . . . . . . . . . 149Configure Profile Management in personal vDisk deployments . . . . . . . . . . . . . . . . 150Metro apps . . . . . . . . . . . . . . . . . . . . . . . . . . . . . . . . . . . . . . . . . . . . 150Example Settings for XenDesktop . . . . . . . . . . . . . . . . . . . . . . . . . . . . . . . . 150Citrix/Profile Management . . . . . . . . . . . . . . . . . . . . . . . . . . . . . . . . . . . . 152Citrix/Profile Management/Profile handling . . . . . . . . . . . . . . . . . . . . . . . . . . . 152Citrix/Profile Management/Advanced settings . . . . . . . . . . . . . . . . . . . . . . . . . 152Citrix/Profile Management/File system . . . . . . . . . . . . . . . . . . . . . . . . . . . . . 152Citrix/Profile Management/File system/Synchronization . . . . . . . . . . . . . . . . . . . . 153Citrix/Profile Management/Streamed user profiles . . . . . . . . . . . . . . . . . . . . . . . 153
Profile Management and VDI-in-a-Box 153
Profile Management and UE-V 153
Profile Management and ShareFile 154Installation . . . . . . . . . . . . . . . . . . . . . . . . . . . . . . . . . . . . . . . . . . . . 154Exclusions . . . . . . . . . . . . . . . . . . . . . . . . . . . . . . . . . . . . . . . . . . . . . 154Personal vDisks . . . . . . . . . . . . . . . . . . . . . . . . . . . . . . . . . . . . . . . . . . 155
Profile Management and App-V 155
Profile Management and Provisioning Servicess 156Supportedmodes . . . . . . . . . . . . . . . . . . . . . . . . . . . . . . . . . . . . . . . . 156To remove non-essential, locally cached profiles from the Master Target Device . . . . . . . 156Retrieve log files from vDisk images . . . . . . . . . . . . . . . . . . . . . . . . . . . . . . . 156To retrieve a log file that is deleted at logoff . . . . . . . . . . . . . . . . . . . . . . . . . . . 157To retrieve a log file that is deleted at logon . . . . . . . . . . . . . . . . . . . . . . . . . . . 157To relocate Provisioning Services log files . . . . . . . . . . . . . . . . . . . . . . . . . . . . 158
© 1999-2018 Citrix Systems, Inc. All rights reserved. 9

Profile Management 7.18
Preconfigure Profile Management on provisioned images 158
Profile Management and Self-service Plug-in 159
Profile Management and VMware 159
Profile Management and Outlook 160
Using Windows profiles with Password Manager and Single Sign-on 161Local profiles . . . . . . . . . . . . . . . . . . . . . . . . . . . . . . . . . . . . . . . . . . . 161Roaming profiles . . . . . . . . . . . . . . . . . . . . . . . . . . . . . . . . . . . . . . . . . 162Mandatory or hybrid profiles . . . . . . . . . . . . . . . . . . . . . . . . . . . . . . . . . . . 162Folder redirection . . . . . . . . . . . . . . . . . . . . . . . . . . . . . . . . . . . . . . . . . 163Best practices . . . . . . . . . . . . . . . . . . . . . . . . . . . . . . . . . . . . . . . . . . . 164
Google Chrome browser 164
Firefox browser 164
Secure 165Permissions . . . . . . . . . . . . . . . . . . . . . . . . . . . . . . . . . . . . . . . . . . . . 165Access control list (ACL) . . . . . . . . . . . . . . . . . . . . . . . . . . . . . . . . . . . . . 166Profile streaming and enterprise antivirus products . . . . . . . . . . . . . . . . . . . . . . 166Troubleshoot Profile Management in streaming and antivirus deployments . . . . . . . . . 167
Troubleshoot 168
Enable logging for troubleshooting 168Policy: Enable logging . . . . . . . . . . . . . . . . . . . . . . . . . . . . . . . . . . . . . . 168Policy: Log settings . . . . . . . . . . . . . . . . . . . . . . . . . . . . . . . . . . . . . . . . 169Policy: Maximum size of the log file . . . . . . . . . . . . . . . . . . . . . . . . . . . . . . . 169Policy: Path to log file . . . . . . . . . . . . . . . . . . . . . . . . . . . . . . . . . . . . . . . 169
Profile Management log files 170Profile management log file - entry types . . . . . . . . . . . . . . . . . . . . . . . . . . . . 171Profile management log file - format . . . . . . . . . . . . . . . . . . . . . . . . . . . . . . 172
Events logged by Profile Management 172
Log file checklist 188
Troubleshoot without logging 189
Advanced troubleshooting checklist 191
© 1999-2018 Citrix Systems, Inc. All rights reserved. 10

Profile Management 7.18
Troubleshooting common issues 191Slow Logons . . . . . . . . . . . . . . . . . . . . . . . . . . . . . . . . . . . . . . . . . . . 191Checking That Profiles Are Being Streamed . . . . . . . . . . . . . . . . . . . . . . . . . . . 191Determining Which Policies Are In Force . . . . . . . . . . . . . . . . . . . . . . . . . . . . . 192Excluding Corrupt Profile Data . . . . . . . . . . . . . . . . . . . . . . . . . . . . . . . . . . 192Cleaning Connections to Registry Entries . . . . . . . . . . . . . . . . . . . . . . . . . . . . 192Deleting Local Profiles . . . . . . . . . . . . . . . . . . . . . . . . . . . . . . . . . . . . . . 192Deleting Locked, Cached Profiles . . . . . . . . . . . . . . . . . . . . . . . . . . . . . . . . 192Identifying Where Profiles Are Stored . . . . . . . . . . . . . . . . . . . . . . . . . . . . . . 193Checking Servers . . . . . . . . . . . . . . . . . . . . . . . . . . . . . . . . . . . . . . . . . 193Roll back . . . . . . . . . . . . . . . . . . . . . . . . . . . . . . . . . . . . . . . . . . . . . 193Profile Management Running on VMware Creates Multiple Profiles . . . . . . . . . . . . . . 193Long Logon Times With Novell eDirectory . . . . . . . . . . . . . . . . . . . . . . . . . . . . 194Excluded Folders in User Store . . . . . . . . . . . . . . . . . . . . . . . . . . . . . . . . . . 194Missing Information In Log File . . . . . . . . . . . . . . . . . . . . . . . . . . . . . . . . . . 194GPO Settings Inoperative . . . . . . . . . . . . . . . . . . . . . . . . . . . . . . . . . . . . . 194Users Receive New or Temporary Profiles . . . . . . . . . . . . . . . . . . . . . . . . . . . . 194Profile Data Lost When XenDesktop Sessions Become Unresponsive . . . . . . . . . . . . . 195Users Cannot Log On (Event ID 1000, Source Userenv) . . . . . . . . . . . . . . . . . . . . . 195Printing . . . . . . . . . . . . . . . . . . . . . . . . . . . . . . . . . . . . . . . . . . . . . . 195Problems With Application Settings on Multiple Platforms . . . . . . . . . . . . . . . . . . . 195Profiles Owned by Unknown Accounts . . . . . . . . . . . . . . . . . . . . . . . . . . . . 196
Collect diagnostic information 196To create a diagnostic trace log . . . . . . . . . . . . . . . . . . . . . . . . . . . . . . . . . 197To produce a session dump file . . . . . . . . . . . . . . . . . . . . . . . . . . . . . . . . . 198To set Microsoft NT Symbolic Debugger as your default Windows postmortem debugging tool 198
Contact Citrix Technical Support 198
Glossary 199
© 1999-2018 Citrix Systems, Inc. All rights reserved. 11
Profile Management 7.18
What’s new
July 16, 2018
This version includes the following new feature and addresses several issues to improve the user ex-perience.
Native Outlook search experience
This new feature allows for a native Outlook search experience by automatically roaming Outlooksearch data along with the user profile. If the Outlook cached data file .OST is used, Outlook searchdata can roam automatically as part of the user profile. For details, see Enable native Outlook searchexperience.
Fixed issues
July 11, 2018
Compared to: Citrix Profile Management 7.17
Profile Management 7.18 contains the following fix compared to Profile Management 7.17:
• When you configure folder redirection using Microsoft Active Directory policy by clicking ResetProfile in Citrix Director, the redirected folders are also reset. As a result, certain folders suchasDocuments,Pictures,Music, Videos, and Favorites are renamed. But, folders such as StartMenu, Contacts, Downloads, Links, Searches, and Saved Games are not renamed.[#LC9237]
• The Profile Management Service might exit unexpectedly with exception code 0xc0000374.[#LC9355]
• WithActivewritebackRegistrypolicyenabled, the twopoliciesSoftware\Microsoft\AppV\Client\Integrationand Software\Microsoft\AppV\Client\Publishing related to App-V for the exclusion of registrymight not work. [#LC9550]
• 7.15 LTSR CU2 sessions might launch as a black screen. The issue occurs with sessions runningon XenApp and XenDesktop 7.15 LTSR CU2 and 7.17 VDAs when Profile Management is enabled.For more information and a workaround, see Knowledge Center article CTX235100. [#LC9648]
• The Folders tomirror policy in Profile Management might fail to work. [#LC9691]
• With ProfileManagement enabled, blank iconsmight appear in theStartmenu in the publisheddesktops. The issue occurs during second or subsequent logons.
© 1999-2018 Citrix Systems, Inc. All rights reserved. 12

Profile Management 7.18
Note: This fix is effective only on fresh installations. For upgrade scenarios, you must config-ure the Folder to Mirror policy manually either in the HDX Group Policy Editor or in the ActiveDirectory Policy Editor. [#LC9692]
Known issues
July 11, 2018
The following known issues exist in this release:
• The Profile Management driver might not start after you install Profile Management. You mustreinstall the driver by using the driver’s INF file in the installation directory.
[#UPM1110]
• When youenable theuser-basedOutlook search roaming, for users configuredasnot processedby Profile Management, Outlook search does not work.
[#UPM1150]
• With Profile Management 7.16 and later, the WMIprvse.exe experiences high CPU consumptionwhen the number of users increases.A private fix is available. Go to https://www.citrix.com/support/open-a-support-case/, andopen a support case for technical support.
[#9257]
• With Windows 10 version 1709, Profile Management cannot synchronize Outlook signatures. Aprivate fix is available. Go to https://www.citrix.com/support/open-a-support-case/, and opena support case for technical support.
[#9503]
• When the logon exclusion check is set toDelete excluded files or folders, and amember of thelocal administrators group logs on for the first time, Profile Management deletes the excludedfolders from the default user profile. A private fix is available. Go to https://www.citrix.com/support/open-a-support-case/, and open a support case for technical support.
[#9575]
System requirements
July 11, 2018
© 1999-2018 Citrix Systems, Inc. All rights reserved. 13

Profile Management 7.18
Software requirements
Systems running Profile Management 7.x must be based on one of the following operating systems:
• Desktops - MicrosoftWindows 7, Windows 8, Windows 8.1, and Windows 10.
In XenDesktop environments, Windows Store applications (also known as Metro apps) are sup-ported on dedicated desktops and on desktops with personal vDisks, but not on other desktoptypes.
• Servers - Standard, Enterprise, and Datacenter Editions of Windows Server 2016, WindowsServer 2008 (includingWindows Server 2008 R2) andWindows Server 2012 (includingWindowsServer 2012 R2).
With Enhanced Protected Mode (EPM), cookies in Microsoft Internet Explorer 10 or later are not sup-ported on Windows 7 or later. When EPM is enabled, Profile Management does not process or handlecookies.
Every user should have access to the user store, a network folder where profiles are stored centrally.Alternatively, profiles can be stored in users’ home drives if preferred. For more information, see Pro-file Management architecture.
Unless you use XenDesktop 7, where Profile Management is integrated into Desktop Studio, Active Di-rectory (AD) Group Policy Objects (GPOs) are required for configuration. AD forest functional and do-main functional levels ofWindows Server 2008 andWindows Server 2012 nativemode are supported.For more information, see Domain and forest support in Profile Management. Alternatively, you canuse a local .ini file for configuration settings, but in general the .ini file should be used for testing pur-poses only. Note that settings in the .ini file are applied for any setting not configured in the GPO, thatis any Group Policy setting that is left in the Not Configured state.
If short file names (also known as 8.3 file names) are mandated in a Citrix product or component youare using with Profile Management, do not turn off support for short file names in your Profile Man-agement deployment. Doing so may cause issues when files are copied to and from the user store.
On computers running the Profile Management Service, store profiles on a single disk mounted bydrive letter. If a disk is mounted into a folder that is used to store a user’s profile (a typical example isC:\Users), it might be masked from the Service and not processed.
Citrix product compatibility
Profile Management 7.x can be used with these Citrix products:
• XenDesktop• XenApp• VDI-in-a-Box
© 1999-2018 Citrix Systems, Inc. All rights reserved. 14

Profile Management 7.18
For the compatibility matrix of Profile Management and XenApp and XenDesktop, see Additional Life-cycle Information for Citrix Profile Management.
Downloads
To download Profile Management
1. Navigate to the Citrix download page.2. Log on to My Account. Your account must be associated with the licensing entitlement for the
Citrix product that you have deployed. If your account is not associated with your license enti-tlement, contact Citrix Customer Service.
3. In Find Downloads, select your product and select Components as the download type.4. Download the latest version of Profile Management.
Diagnostics Feature
Before you can use Citrix Diagnostic Facility to capture trace logs, ensure it is available with the Citrixproduct or component that is used on the device, virtual desktop, or Citrix server whose profiles youwant to monitor.
Application Streaming
If you use Citrix XenApp to stream applications to user devices, install the Citrix offline plug-in (for-merly calledXenAppPlug-in for StreamedApps) 1.3.1 or later onuser devices. Version 1.2 of this plug-inchanged the location of per-user disk storage for streamed application settings, resulting in user pref-erences being lost at logoff. With Version 1.3.1 or later, these settings are stored in%LOCALAPPDATA%,and follow the user from device to device without data loss. No configuration of Profile Managementis required with this later version of the plug-in.
Although it is unsupported, if youmust use XenApp Plugin for Streamed Apps 1.2 see Knowledge Cen-ter article CTX120006 for a workaround to the data-loss issue.
Cross-Platform Settings
To use the cross-platform settings feature in this release, Microsoft Core XML Services (MSXML)6.0 Service Pack 1 or later must be installed on all computers running the Profile ManagementService. This component is part of Microsoft .NET Framework 3.5 and is required to process defini-tion files. For more information on MSXML 6.0 Service Pack 1, including its system requirements,see http://www.microsoft.com/downloads/en/details.aspx?FamilyID=d21c292c-368b-4ce1-9dab-3e9827b70604&displaylang=en.
© 1999-2018 Citrix Systems, Inc. All rights reserved. 15
Profile Management 7.18
Use this feature only with the supported set of operating systems and applications. For more infor-mation, see Operating systems and applications supported By cross-platform settings.
Migrating Existing Profiles to Citrix User Profiles
Migration from the following profile types to Citrix user profiles is supported:
• Windows roaming profiles• Local profiles based on any of the following operating systems:
– Windows 10– Windows 8– Windows 7– Windows Vista– Windows XP– Windows Server 2016– Windows Server 2012 R2– Windows Server 2012– Windows Server 2008 R2– Windows Server 2008– Windows Server 2003
• Citrix user profiles created with User Profile Manager 2.0
Migration from the following profile types to Citrix user profiles is unsupported:
• Microsoftmandatory profiles.Tip: You can use the template profile feature of Profile Management to configure a Microsoftmandatory profile as aCitrixmandatory profile. Citrixmandatory profiles are used for all logonsand function exactly like regular Citrix user profiles except that no user changes are saved. Forinformation, seeSpecify a template or mandatory profile.
• Citrix mandatory profiles.• Citrixuserprofiles createdwithaUserProfileManagerTechnicalPreviewreleaseorbeta release.• Third-party profiles (including sepagoPROFILEs).
You cannot upgrade from a 32-bit Citrix user profile to a 64-bit one.
How Profile Management works
July 11, 2018
ProfileManagement addresses user profile deficiencies in environmentswhere simultaneous domainlogons by the same user introduce complexities and consistency issues to the profile. For example,
© 1999-2018 Citrix Systems, Inc. All rights reserved. 16

Profile Management 7.18
if a user starts sessions to two different virtual resources based on a roaming profile, the profile ofthe session that terminates last overrides the profile of the first session. This problem, known as “lastwrite wins,” discards any personalization settings that the user makes in the first session.
You can tackle the problem by using separate profiles for each resource silo. However, this resultsin increased administration overhead and storage capacity requirements. Another drawback is thatusers will experience different settings depending on the resource silo they access.
Profile Management optimizes profiles in an easy and reliable way. At interim stages and at logoff,registry changes, as well as files and folders in the profile, are saved to the user store for each user. If,as is common, a file exists, it is overwritten if it has an earlier time stamp.
At logon, users’ registry entries and files are copied from the user store. If a locally cached profileexists, the two sets are synchronized. This makes all settings for all applications and silos availableduring the session. And it is no longer necessary tomaintain a separate user profile for each silo. Citrixstreamed user profiles can further enhance logon times.
ProfileManagement helps to safeguard application settings formobile userswho experience networkdisruption (if the offline profiles features are configured) and users who access resources from differ-ent operating systems (if the cross-platform settings feature is configured).
Note: Profile Management processes domain user logons not local accounts.
For amoredetailedoverviewofProfileManagement, search theProfileManagementblogon theCitrixBlogs homepage.
Where network-based profiles are employed, consider adopting Profile Management in your organi-zation. You may be able to implement other solutions such as mandatory or roaming profiles, andmaintain them with standard knowledge of Microsoft Windows. However, unless your deploymentis very restricted (for example, a call center where user customization is very limited so mandatoryprofiles are appropriate), Profile Management might be preferred.
Citrix recommends using folder redirection so that user-specific data is saved separately from the pro-file.
The home-folder and template paths must be configured only with the network location.
About profiles
July 12, 2018
AWindows user profile is a collection of folders, files, registry settings, and configuration settings thatdefine the environment for a user who logs on with a particular user account. These settings may becustomizable by the user, depending on the administrative configuration. Examples of settings thatcan be customized are:
© 1999-2018 Citrix Systems, Inc. All rights reserved. 17

Profile Management 7.18
• Desktop settings such as wallpaper and screen saver• Shortcuts and Start menu setting• Internet Explorer Favorites and Home Page• Microsoft Outlook signature• Printers
Some user settings and data can be redirected by folder redirection. However, if folder redirection isnot used these settings are stored within the user profile.
Types of profiles
Windows includes several types of profiles:
Profile Type Storage LocationConfigurationLocation Application Save Changes?
Local Local device Local device Local deviceonly
Yes
Roaming Network Active Directory Any deviceaccessed
Yes
Mandatory(MandatoryRoaming)
Network Active Directory Any deviceaccessed
No
Temporary Not Applicable Not Applicable Local deviceonly
No
A temporary profile is only assigned when a specific profile type cannot be assigned. Except manda-tory profiles, a distinct profile typically exists for each user. In addition, mandatory profiles do notallow users to save any customizations.
For Remote Desktop Services users, a specific roaming ormandatory profile can be assigned to avoidissues thatmayoccur if the sameprofile is assigned toauserwithinaRemoteDesktopServices sessionand a local session.
Profile versions
Versions of MicrosoftWindows user profiles are as follows:
• Version 5 – Windows 10• Version 4 – Windows 8.1 and Windows Server 2012 R2
© 1999-2018 Citrix Systems, Inc. All rights reserved. 18

Profile Management 7.18
• Version 3 - Windows 8 and Windows Server 2012• Version 2 - Windows Vista, Windows 7, Windows Server 2008, and Windows Server R2• Version 1 – Operating systems earlier than Windows Vista and Windows Server 2008
The folder structure (or namespace) of Microsoft’s Version 1 profiles is mostly interchangeable. Forexample, the folders on Windows XP and Windows Server 2003 are almost identical. Likewise, thestructure of Version 2 profiles is mostly interchangeable.
However, the namespace is different between Version 1 and later profiles. This folder structurewas changed in the later operating systems to provide user-specific folders isolated for userand application data. Version 1 profiles store data in the root folder, Documents and Settings.Version 2 profiles store data in a more intuitively named folder called Users. For example, thefolder contents of AppData\Local in Windows Vista is the same as the contents of Documents andSettings\<username>\Local Settings\Application Data in Windows XP.
Formore information about the differences between Version 1 and later profiles, see Managing Roam-ing User Data Deployment Guide.
Assign profiles
July 11, 2018
Whatmethods can I use in Windows to assign profiles to users?
This topic refers to the assignment of profiles in MicrosoftWindows not Citrix Profile Management.
You can assign profiles to users in several ways:
• Using their user account properties in Active Directory (AD)• Using Group Policy (GP)• Using the above methods to assign profiles specific to Remote Desktop Services (formerlyknown as Terminal Services) sessions
Some of these methods are only available in specific operating systems:
• Remote Desktop Services. To assign Remote Desktop Services profiles on Windows Server2008 R2, use the GPO setting Set path for Remote Desktop Services Roaming User Profile. It islocated in Computer Configuration\Administrative Templates\Windows Component\RemoteDesktop Services\Remote Desktop Session Host\Profiles. On earlier server operating systems,use the setting Set path for TS Roaming Profiles, which is located in Computer Configura-tion\Administrative Templates\Windows Components\Terminal Services.
© 1999-2018 Citrix Systems, Inc. All rights reserved. 19

Profile Management 7.18
To configure profiles for individual users, you can also set Set path for TS Roaming Profiles onthe individual accounts in theUser AccountProperties pages in AD.However, typically it ismuchbetter to make this assignment in GP.
You canuse the settingUsemandatory profiles on the terminal server to force the use ofmanda-tory profiles.
• Windows 7, Windows 8, and Windows Server: Set roaming profiles on individual accountsusing the User Account Properties pages. Additionally, for Windows Server 2008 AD and Win-dows 7 devices, you can use the GPO setting Set roaming profile path for all users logging onto this computer. This is located in Computer\Administrative Templates\System\User Profiles.For users logging on to Windows 8 or Windows Server 2012 computers, you can also set users’home folders using Active Directory in Windows Server 2012.
What is the priority order for delivering profiles to domain users if more than onemethod is used?
When Profile Management is used to manage a user’s profile, it takes precedence over any other pro-file assignment method. A user whose profile data is not managed by Profile Management might beassigned a profile using multiple methods. The actual profile used is based on the following prece-dence:
1. Citrix user profile (that is, a profile created by Profile Management)2. Remote Desktop Services profile assigned by a GPO3. Remote Desktop Services profile assigned by a User Property4. Roaming profile assigned by a GPO (Windows Server 2008 AD andWindows 7 only)5. Roaming profile assigned by a User Property
Profile Management architecture
July 12, 2018
This topic describes the folder structure of the user store and of the cross-platform settings store. Theuser store is the central location for Citrix user profiles. The cross-platform settings store is a separatelocation.
Important information about Profile Management stores
The structures of the user store and cross-platform settings store are described here for informationpurposes and to assist with localizing and troubleshooting. Follow these important recommenda-tions, which are designed to minimize problems with profile data andmaintain security:
© 1999-2018 Citrix Systems, Inc. All rights reserved. 20

Profile Management 7.18
• Do not change the structure of either store.• Do not write files and folders directly to any part of a store. The user store is different in thisrespect from any redirected folders.
• Keep the user store separate from any redirected folders. You can keep them on disjoint sharesof the same file server or DFS namespace, for example \\server1\profiles\%username% and\\server1\folders\%username%. This technique also makes it much easier to support Version 1and Version 2 profiles together, and to support a single set of redirected folders shared by bothprofile versions.
• Users do not need to see the user store, so do not map a drive letter to it.• Do not impose quotas on the user store. If you restrict profile size, consider excluding itemsrather than using a quota.
Folder structure of the user store
The user store defaults to the WINDOWS folder in the user’s home directory. This simplifies pilot in-stallations, but for production systems, you should configure the user store to be a network share or(for best scalability) a DFS namespace. Supported configurations for enterprise-ready user stores aredescribed in High availability and disaster recovery with Profile Management.
Recommendations on creating secure user stores are available in the article called Create a file sharefor roaming user profiles on the Microsoft TechNet Web site. These minimum recommendations en-sure a high level of security for basic operation. Additionally, when configuring access to the userstore, include the Administrators group, which is required to modify or remove a Citrix user profile.
Note: OnWindows 7 andWindows 2008R2 client devices, donot select the Encrypt data access check-box while creating the share on Windows 2012 R2 File Server.
The folder structure of the user store at the root level is shown in this table.
Folder Notes
\ The root of a profile in the user store.
\UPM_Profile This folder contains files and folders from theprofile.
\UPM_Drive_C This folder contains any included items fromoutside the profile (in this case from drive C).This folder is present during upgrades fromProfile Management 4.x or earlier. Managingitems outside the profile is not supported inProfile Management 5.0.
© 1999-2018 Citrix Systems, Inc. All rights reserved. 21

Profile Management 7.18
Folder Notes
\Pending This folder contains the lock file, any pendingfiles, and the stamp file if the streaming featureis in use.
Some examples are shown in this table.
Example Folder Name Notes
\UPM_Profile\Data The synchronized content of the Data folder inthe user profile.
\UPM_Profile\AppData_upm_var The synchronized content of the de-localizedApplication Data folder in the user profile. Thisfolder is present during upgrades from ProfileManagement 4.x or earlier. Managing Version 1profiles (of which Application Data is anexample folder) is not supported in ProfileManagement 5.0.
Pending area
Theuser store includes thependingarea. This area is aholdingareausedby the streameduserprofilesand active write back features. All files are synchronized from the pending area to the user store aftera user logs off from their last session. New sessions download files from both the user store and thepending area, so the user always experiences an up-to-date profile.
If a server becomes unresponsive, a timeout can be set that releases files in the pending area back tothe user store (if configured as part of the streamed user profiles feature).
Folder structure of the user store withmultiple platforms
When using the cross-platform settings feature, multiple platforms are involved. You must de-fine platform-specific folders to separate the profiles for each platform. Typically, you do thisusing Profile Management variables in the Path to user store policy (for example, using %USER-NAME%\!CTX_OSNAME!!CTX_OSBITNESS! in the path).
The cross-platform settings store holds the settings for supported applications after the cross-platform settings feature is configured. You specify the name and location of the store during
© 1999-2018 Citrix Systems, Inc. All rights reserved. 22

Profile Management 7.18
configuration (using the Path to cross-platform settings store policy). The store holds the subset ofthe user’s settings that roam between operating systems.
For example, you might want to roam settings between Windows XP and Windows 7. The platform-specific folders contain the user settings that are unique to Windows XP and Windows 7. The cross-platformsettings storecontains the subsetof the settings that roambetween theseoperating systems.At logon, this subset is copied into, and remains part of, the platform-specific folders. At logoff, anychanges to the subset are extracted and placed back into the cross-platform settings store.
Each platform-specific folder contains standard subfolders (for example, UPM_Profile). For more in-formation, see Folder structure of the user store. In addition, the UPM_CPS_Metadata subfolder ispresent. This system-created folder contains temporary settings that are shared across operating sys-tems.
The user store and AD forests
Citrix user profiles cannot be managed across forests. They can be managed across domains in thesame forest allowing multiple users with the same logon name to access the same resources in theforest. This involves uniquely identifying profiles with the%USERDOMAIN% and%USERNAME% vari-ables in the path to the user store.
However, in this case youmust use variables to disambiguate identical logon nameswhen setting thepath to the user store. To do this, append the domain name variable to the path. You must also setpermissionson theuser store andenableProfileManagement’s ProcessedGroups settingusingActiveDirectory’s Universal Groups.
You can use a manually defined system variable such as %ProfVer% to set the operating system ver-sion. Or you can use a Profile Management variable to set the operating system name, bitness, or theprofile version. For examples of user store paths in AD forests, see Specify the path to the user store.
Localizing the user store
The following table provides an overview of how Profile Management localizes and de-localizes fold-ers when profile data is moved to and from the user store. Only folder names are localized and de-localized. For example, Start menu entries and registry settings are not translated into the correctlanguage by Profile Management.
This information is relevant only when upgrading from Profile Management 4.x or earlier, when Ver-sion 1 profiles may be present. Managing Version 1 profiles is not supported in Profile Management5.0.
© 1999-2018 Citrix Systems, Inc. All rights reserved. 23

Profile Management 7.18
Version 1 English Folder User Store FolderFull Path Relative to the UserProfile
Accessibility Accessibility_upm_var \StartMenu\Programs\Accessories\
Accessories Accessories_upm_var \Start Menu\Programs\
Administrative Tools AdminTools_upm_var \Start Menu\Programs\
Application Data AppData_upm_var \Local Settings\
Cookies Cookies_upm_var \
Desktop Desktop_upm_var \
Entertainment Entertainment_upm_var \StartMenu\Programs\Accessories\
Favorites Favorites_upm_var \
History History_upm_var \Local Settings\
Links Links_upm_var \Favorites\
Local Settings LocalSettings_upm_var \
My Documents MyDocuments_upm_var \
My Music MyMusic_upm_var \My Documents\
My Pictures MyPictures_upm_var \My Documents\
My Videos MyVideos_upm_var \My Documents\
NetHood NetHood_upm_var \
PrintHood PrintHood_upm_var \
Programs Programs_upm_var \Start Menu\
Recent Recent_upm_vars \
Start Menu StartMenu_upm_var \
Templates Templates_upm_var \
Temporary Internet Files TemporaryInternetFiles_upm_var\Local Settings\
SendTo SendTo_upm_var \
Startup Startup_upm_var \Start Menu\Programs\
System Tools SystemTools_upm_var \StartMenu\Programs\Accessories\
© 1999-2018 Citrix Systems, Inc. All rights reserved. 24

Profile Management 7.18
Profile Management use cases
July 11, 2018
Citrix ProfileManagement canbe implemented tomanageusers’ profiles in different scenarios regard-less of how applications are delivered to users or where they are housed. The following are examplesof these scenarios:
• Citrix XenApp with published applications
• Citrix XenApp with published desktops
• Citrix XenApp with applications streamed into an isolation environment
• Applications streamed to XenDesktop virtual desktops
• Applications installed on XenDesktop virtual desktops
• Applications streamed to physical desktops
• Applications installed locally on physical desktops
Of these scenarios, Citrix sees the following as the most common use cases:
• Multiple sessions - The user accesses multiple XenApp server silos and therefore has multiplesessions open. Note however that application isolation and streaming on the server are alter-natives to server silos. This scenario is described in more detail in this topic.
• “Last write wins” and roaming profile consistency issues - The last write to the roaming pro-file causes all settings to be saved. Therefore, roaming profiles might not retain the right dataif multiple sessions are open and interim changes are made. In addition, settings may not bewritten correctly to the profile as a result of network, storage issues, or other problems. Thisscenario is described in more detail in this topic.
• Largeprofiles and logon speed - Profile bloat canmake user profiles unwieldy resulting in stor-age and management issues. Typically, during logon Windows copies the user’s entire profileover the network to the local user device. For bloated profiles, this can prolong the user’s logontime.
Multiple sessions
Especially in large environments, it may be necessary for users to open multiple sessions to accessdifferent applications that are housed on different XenApp servers, whether in the same farm or mul-tiple farms. Where possible, Citrix administrators should consider application isolation or streamingto house applications on the same XenApp server to allow users to access all applications from a sin-gle server and thus a single session. However, this may not be possible if a business unit controlsspecific servers or applications cannot be streamed.
© 1999-2018 Citrix Systems, Inc. All rights reserved. 25

Profile Management 7.18
Once it has been determined that it is indeed necessary for users to access applications from variousXenApp servers, the impact on profiles should be ascertained.
This diagram illustrates the example below, where application settings may be lost when multiplesessions exist.
For example, Mary wants to access App A, App B, and App C and she is routed to Server 1, Server 8,and Server 12 respectively. Upon logon to each application, her Terminal Services roaming profile isloaded onto each server and folders are redirected for each session. When she is logged on to App Aon Server1, Mary changes Setting1 and logs off that session. She then completes her work in the othertwo applications and logs off.
At logoff, the change thatMarymadewithin her sessiononServer 1 is overwrittenbecause the settingswithin the last closed session are retained, not the interim change. When Mary logs on to App A thenext day, she is frustrated because the change she made is not visible.
Profile Management can generally prevent this situation from occurring. Profile Management onlywrites back the specific settings that were changed during a session; all other unchanged settingsremain untouched. So the only potential conflict that would arise is if Mary changed Setting1 withinanother session. However, the user would likely expect that the most recent change was retained,which is the case, if Profile Management is used in this scenario.
© 1999-2018 Citrix Systems, Inc. All rights reserved. 26

Profile Management 7.18
“Last write wins” and roaming profile consistency issues
This scenario is similar to the first one in this topic. “Last write wins” issues can present themselvesin various ways, and user frustration canmount as the number of devices accessed increases.
Because the roaming profile retains all profile data, except folders that have been redirected, the userprofile can grow large. Not only does this add to the logon time because the profile must be down-loaded, the potential for inconsistency grows during the write phase of the logoff, especially wherenetwork issues exist.
Profile Management enables specific data to be excluded from the user profile, enabling the user pro-file to be kept to aminimal size. Because only differences are written to the profile, the write phase ofthe logoff involves less data and is faster. Profile Management can be beneficial for applications thatuse profiles for temporary data but do not clean them up when the applications terminate.
Access multiple resources
July 11, 2018
Profiles becomemore complex as users accessmultiple resources. With profiles stored on a network,Microsoft Windows uses the registry to store user settings. Profiles are copied from the network tothe local device at logon, and copied back to the network at logoff. On a daily basis, users accessmultiple computers, switch between desktops and laptops, and access virtual resources createdwithCitrix XenDesktop and Citrix XenApp.
This diagram illustrates how a single Citrix user profile follows a user who logs on to multiple re-sources.
© 1999-2018 Citrix Systems, Inc. All rights reserved. 27

Profile Management 7.18
For example, a user has a local, physical desktop and from it accesses applications publishedwith Xe-nApp. They also access a virtual desktop createdwith XenDesktop. Theuser’s settings are not uniformacross all of these resources unless the settings are appropriately configured.
In addition, when they access a shared resource, the behavior of roaming profiles means that the“last write wins.” For example, an administrator enables a roaming profile and a user changes thebackground color of the local desktop. The user then logs on to a XenDesktop virtual desktop, logs offthe local desktop, and logs off the virtual desktop. Both the local and virtual desktops were open atthe same time and the last logoffwas from the virtual desktop. Therefore, the settings from the virtualdesktop session were the last written to the profile, and the change to the background color is lost.
Logon diagram
July 11, 2018
This diagram helps you work out the details of your user profile migration strategy. It also explainsthese aspects of performance:
• When you migrate a profile, two network copies can take place, which slows down the logonprocess. For example, the operation “Copy default profile to local Pm profile and to user store”first involves a full profile copy from the roaming profile store to the local computer. And thena second full profile copy from the local computer to the user store.
• When a cached profile is used, no copying of profile data across the network takes place.
Read thediagram from thebottom to the top. Check thedesiredoperations in theboxes at thebottom(for example, “Copy default profile to local Pm profile and to user store”). And then track a path backto identify the required migration settings.
© 1999-2018 Citrix Systems, Inc. All rights reserved. 28

Profile Management 7.18
© 1999-2018 Citrix Systems, Inc. All rights reserved. 29

Profile Management 7.18
Logoff diagram
July 11, 2018
This diagram describes the logic used to copy or merge profile data at logoff.
© 1999-2018 Citrix Systems, Inc. All rights reserved. 30

Profile Management 7.18
© 1999-2018 Citrix Systems, Inc. All rights reserved. 31

Profile Management 7.18
Plan your deployment
July 11, 2018
To plan a Profile Management deployment, you decide on a set of policy settings that together forma configuration that is suitable for your environment and users. The automatic configuration featuresimplifies some of this decision-making for XenDesktop deployments. As a guide to carrying out thisimportant task on any deployment, see Decide on a configuration.
Having decided on a configuration, and reviewed and tested it, a typical deployment then consists of:
1. Creating the user store2. Installing Profile Management3. Enabling Profile Management
Plan a pilot study with the .ini file
The following information is intended to assist youusing theProfileManagement .ini file during apilotstudy or evaluation.
Important: If you intend to use the .ini file (UPMPolicyDefaults_all.ini) for evaluation purposes, re-name the file before you switch to using Group Policy (GP) in a production environment. For example,rename the file to UPMPolicyDefaults_all_old.ini. Renaming the file allows you to be certain that onlyproduction settings are applied, and that no settings you specified during your evaluation are used.
If the file is not renamed, Profile Management examines it for any settings not configured in GroupPolicy and adopts any non-default settings it finds. So, to eliminate the risk of unwanted settingsbeing introduced, configure all settings youwant to use in your production environment using GroupPolicy, not the .ini file.
The .ini file contains the same policies as the .adm and .admx files, but the policies have differentnames. If you are familiar with the names in GP and are planning a pilot study with the .ini file, com-pare the names using the tables in Profile Management policies.
Formore information on .ini file deployments, see Upgrade Profile Management and Test Profile Man-agement with a local GPO.
Decide on a configuration
July 11, 2018
To configure Profile Management, the recommended approach is to answer these basic questionsabout your environment:
© 1999-2018 Citrix Systems, Inc. All rights reserved. 32
Profile Management 7.18
1. Pilot? Production?2. Migrate profiles? New profiles?3. Persistent? Provisioned? Dedicated? Shared?4. Mobile? Static?5. Which applications?
Depending on the answer to each question, you configure Profile Management differently as ex-plained in the remaining topics in this section. You configure only the policies that fit the answers tothese questions; you can leave other policies in their default setting. For a list of policies that you donot configure, see Manage.
After youhaveansweredeachquestionandconfiguredProfileManagement appropriately, you shouldanticipate:
• Review, test, and activate Profile Management• Troubleshoot
UPMConfigCheck
UPMConfigCheck is a PowerShell script that examines a live Profile Management deployment and de-termines whether it is optimally configured. For more information on this tool, see CTX132805.
Group computers into OUs
If your answers to the questions are the same for different sets of computers, consider grouping theminto an Active Directory Organizational Unit (OU). And consider configuring Profile Management byusing a single Group Policy Object (GPO) attached to that OU. If your answers to these questions aredifferent, consider grouping the computers into separate OUs.
Alternatively, where a domain supports WMI filtering, you can group all computers into the same OUand use WMI filtering to select between appropriately configured GPOs.
Pilot? Production?
July 11, 2018
The aim of a pilot deployment is to be able to demonstrate a solution quickly and reliably. An impor-tant goal might be to reduce the number of components in the pilot. For Profile Management, twocomponents are the user store and the selection of users whose profiles are processed.
© 1999-2018 Citrix Systems, Inc. All rights reserved. 33

Profile Management 7.18
Policy: Path to user store
Setting up a user store for Citrix user profiles is exactly like setting up a profile store forWindows roam-ing profiles.
For a pilot deployment, you can often ignore these considerations. The default value for the Pathto user store policy is the Windows folder in the user’s home directory. This works well for a single-platform pilot so long as only one operating system (and therefore only one profile version) is de-ployed. For information on profile versions, see About profiles. This option assumes that enoughstorage is available in users’ home directories and that no file-server quotas are applied. Citrix doesnot recommend the use of file-server quotas with profiles. The reasons for this are given in ShareCitrix user profiles onmultiple file servers.
For a production deployment, you must carefully consider security, load balancing, high availability,and disaster recovery. Follow the recommendations in these topics for creating and configuring theuser store:
• Profile Management architecture• Create the user store• Specify the path to the user store• High availability and disaster recovery with Profile Management
Policies: Processed groups, Excluded groups
The complexity of production deploymentsmeans that youmight need to phase the rollout of ProfileManagement, rather than release it to all users at the same time. Youmight tell users that they receivedifferent profile experiences when connecting to different resources while the deployment is in theprocess of being rolled out.
For performance reasons, Profile Management is licensed by an End-User License Agreement (EULA)not built-in license checking. Youmight choose tomanage license allocation by assigning users to anActive Directory (AD) user group or using an existing AD group if a suitable one exists.
In pilot deployments, use of Profile Management is restricted by invitation to a small group of users,possibly from several departments, where no single, representative AD group can be used. In thiscase, leave the Processed groups and Excluded groups policies unconfigured. Profile Managementperforms no checking on groupmembership and all users are processed.
For more information on these policies, see Define which groups’ profiles are processed.
Important: In all cases, you must ensure that the number of users processed by Profile Managementdoes not exceed the limits set by the relevant EULA.
© 1999-2018 Citrix Systems, Inc. All rights reserved. 34

Profile Management 7.18
Migrate profiles? New profiles?
July 11, 2018
You can take advantage of a Profile Management deployment to refresh your organization’s profiles,initially using a small, customized profile, and rigidly controlling additions to it. Alternatively, youmay need tomigrate existing profiles into the Profile Management environment and preserve the per-sonalizations that have built up over many years. With Citrix VDI-in-a-Box deployments, you mightmigrate existing local profiles rather than starting from scratch.
If you decide to migrate existing profiles, configure the Migration of existing profiles and Local profileconflict handling policies.
The following diagram illustrates how to configure these policies based on your answer to this ques-tion.
Policy: Template profile
If you decide to create an entirely new set of profiles, consider creating a template for this purposeusing the Template profile policy. For information, see Specify a template ormandatory profile. If youdo not create a template, Profile Management gives users the default Windows profile, for example,from a VDI-in-a-Box master image. If no template is required, leave this policy disabled.
The Template profile policy is similar to the Path to user store policy. This policy specifies the loca-tion of a profile that can be used as the basis for creating a user’s profile when the user first logs on to
© 1999-2018 Citrix Systems, Inc. All rights reserved. 35

Profile Management 7.18
a computer managed by Profile Management.
You can optionally use the template as a Citrix mandatory profile for all logons. As part of your plan-ning, you must perform tasks such as identifying the applications that users access. You must config-ure the registry states, shortcuts, and desktop settings in the profile accordingly. Youmust set permis-sions on profile folders andmodify users’ logon scripts.
Note: When selectingmandatory profiles in XenDesktopdeployments, Citrix recommends usingDesk-top Studio rather than the Profile Management .adm or .admx file.
Persistent? Provisioned? Dedicated? Shared?
July 11, 2018
The types of machines that create profiles affect your configuration decisions. The primary factorsare whether machines are persistent or provisioned, and whether they are shared by multiple usersor dedicated to just one user.
Persistent systems have some type of local storage, the contents of which can be expected to persistwhen the system turns off. Persistent systems may employ storage technology such as storage areanetworks (SANs) to provide local diskmimicking. In contrast, provisioned systems are created “on thefly” fromabasedisk and some typeof identity disk. Local storage is usuallymimickedbyaRAMdisk ornetworkdisk, the latter oftenprovidedbyaSANwithahigh-speed link. Theprovisioning technology isgenerally ProvisioningServicesorMachineCreationServices (or a third-party equivalent). Sometimesprovisioned systems have persistent local storage, whichmight be provided by Personal vDisks. Theyare classed as persistent.
Together, these two factors define the following machine types:
• Both persistent and dedicated - Examples are Desktop OS machines with a static assignmentand aPersonal vDisk that are createdwithMachine Creation Services (in XenDesktop), desktopswith Personal vDisks that are created with VDI-in-a-Box, physical workstations, and laptops
• Both persistent and shared - Examples are Server OSmachines that are created with MachineCreation Services (in XenDesktop), and XenApp servers
• Bothprovisionedanddedicated - Examples areDesktopOSmachineswith a static assignmentbut without a Personal vDisk that are created with Provisioning Services (in XenDesktop)
• Both provisioned and shared - Examples are DesktopOSmachineswith a randomassignmentthat are created with Provisioning Services (in XenDesktop), desktops without Personal vDisksthat are created with VDI-in-a-Box, and XenApp servers
The following Profile Management policy settings are suggested guidelines for the different machinetypes. They usuallyworkwell, but youmightwant to deviate from themas your deployment requires.
© 1999-2018 Citrix Systems, Inc. All rights reserved. 36

Profile Management 7.18
Note: In XenDesktop deployments,Delete locally cached profiles on logoff,Profile streaming, andAlways cache are enforced by the auto-configuration feature.
PolicyBoth persistentand dedicated
Both persistentand shared
Bothprovisioned anddedicated
Bothprovisioned andshared
Delete locallycached profileson logoff
Disabled Enabled Disabled (note 5) Enabled
Profilestreaming
Disabled Enabled Enabled Enabled
Always cache Enabled (note 1) Disabled (note 2) Disabled (note 6) Disabled
Active write back Disabled Disabled (note 3) Enabled Enabled
Process logonsof localadministrators
Enabled Disabled (note 4) Enabled Enabled (note 7)
Notes
1. Because Profile streaming is disabled for this machine type, the Always cache setting is alwaysignored.
2. Disable Always cache. However, you can ensure that large files are loaded into profiles as soonas possible after logon by enabling this policy and using it to define a file size limit (in MB). Anyfile this size or larger is cached locally as soon as possible.
3. Disable Activewrite back except to save changes in profiles of users who roambetween XenAppservers. In this case, enable this policy.
4. Disable Process logons of local administrators except for Hosted Shared Desktops. In this case,enable this policy.
5. Disable Delete locally cached profiles on logoff. This retains locally cached profiles. Becausethe machines are assigned to individual users, logons are faster if their profiles are cached.
6. Enable Process logons of local administrators except for profiles of users who roam betweenXenApp servers. In this case, disable this policy.
© 1999-2018 Citrix Systems, Inc. All rights reserved. 37

Profile Management 7.18
Mobile? Static?
July 11, 2018
Are your machines permanently connected to the Active Directory domain? Laptops and similar mo-biledevicesprobablyarenot. Similarly, somedeploymentsmighthave fixedmachineswithpersistentlocal storage but the machines are separated from the data center for significant periods of time. Forexample, a remote branch office is linked to the corporate headquarters by satellite communications.Another example is disaster recovery, where infrastructure is being restored and power or communi-cations are intermittent.
Typically, Profile Management is resilient to short network outages (less than 24 hours) so long asthe user does not log off while the network is unavailable. In these circumstances, you can optimizeProfile Management in several ways that significantly speed up the logon process. This is the staticcase.
Where extended periods of disconnection are expected or users must be able to log off or shut downtheir computerswhile disconnected from the corporate network, you cannot optimizeProfileManage-ment. When users reconnect, logons are slow while the entire profile is fetched from the user store.This is the mobile case.
Themobile case
For extended periods of disconnection (and only intermittent periods of connection to the Active Di-rectorydomain), enable theOfflineprofile support policy. This automatically disables the effect of thefollowing policies, controlling optimizations that are not supported. The policiesmight not appear tobe disabled in Group Policy but they have no effect:
• Profile streaming• Always cache
Note: IfOffline profile support is enabled,Active write back is honored but can only work when the computer is connected to the network.
Important: Do not enableOffline profile support with Citrix VDI-in-a-Box. This policy is not suitable for this product becausedesktops created with it do not have persistent local storage.
© 1999-2018 Citrix Systems, Inc. All rights reserved. 38

Profile Management 7.18
The static case
Policy: Offline profile support
For short periods of disconnection, disable the Offline profile support policy. This allows the configu-ration of any of the following policies.
Policy: Streamed user profile groups
Set the Streamed user profile groups policy to Unconfigured. Enabling this policy is effective only ifProfile streaming is also enabled. Streamed user profile groups is used to limit the use of streamedprofiles to specific Active Directory user groups. It is useful in some scenarios when migrating fromolder versions of ProfileManagement. For instructions on setting this policy, see Streamuser profiles.
For information on high availability and disaster recovery as it applies to this policy, see Scenario 4 -The traveling user.
Policy: Timeout for pending area lock files
Set the Timeout for pending area lock files policy to Unconfigured to apply the default operation,which is aone-day timeout for thependingarea lock. This is theonly supportedvalue, sodonot adjustthis policy.
Policy: Active write back
For information on this policy, see Persistent? Provisioned? Dedicated? Shared?
Which applications?
July 12, 2018
The applications in use in your deployment affect how you configure Profile Management. However,in contrast to the other configuration decisions you make, there are no simple yes-or-no recommen-dations. The decisions you take depend on where the applications store persistent customizations,which can either be in the registry or in the file system.
Analyze and understand your users’ applications thoroughly to establishwhere the applications storetheir settings and users’ customizations. Use a tool such as ProcessMonitor tomonitor application bi-naries. Google is another resource. For information on Process Monitor, see http://technet.microsoft.com/en-gb/sysinternals/bb896645.
© 1999-2018 Citrix Systems, Inc. All rights reserved. 39

Profile Management 7.18
Once you understand how the applications behave, use inclusions to define which files and settingsare processed by Profile Management. Use exclusions to define which aren’t. By default, everythingin a profile is processed except for files in AppData\Local. If your deployment includes DropBox orGoogle Chrome, or applications created with the one-click publish in Visual Studio, you might needto include the subfolders of AppData\Local explicitly.
Simple applications
Simple applications are those applications that arewell behaved. They store personalization settingsin theHKCUregistryhiveandpersonalization fileswithin theprofile. Simpleapplications requirebasicsynchronization and this in turn requires you to include and exclude items using:
• Relative paths (relative to %USERPROFILE%) in any of the following policies:– Directories to synchronize– Files to synchronize– Exclusion list - directories– Exclusion list - files– Folders to mirrorNote: %USERPROFILE% is impliedbyProfileManagement. Donot add it explicitly to thesepolicies.
• Registry-relative paths (that is, relative to the HKCU root) in either of these policies:– Exclusion list– Inclusion list
For instructions on including and excluding items, see Include and exclude items.
Legacy applications
Legacy applications are badly behaved; they store their personalization files in custom folders outsidethe profile. The recommended solution is not to use ProfileManagementwith legacy applications butinstead to use the Personal vDisk feature of XenDesktop.
Complex applications
Complex applications require special treatment. The application’s files can cross-reference eachother and must be treated as an inter-related group. Profile Management supports two behaviorsassociated with complex applications: cookie management and folder mirroring.
Cookie management in Internet Explorer is a special case of basic synchronization in which both ofthe following policies are always specified:
© 1999-2018 Citrix Systems, Inc. All rights reserved. 40

Profile Management 7.18
• Process Internet cookie files on logoff• Folders to mirror
For information on folder mirroring, more information on cookie management, and instructions onsetting these policies, see Manage cookie folders and other transactional folders.
Cross-platform applications
Cross-platform applications are those applicationns that might be hosted onmultiple platforms. Forspecific versions of Internet Explorer and Microsoft Office, Profile Management supports the sharingof personalization settings across platforms, whether the settings are stored in the registry or as filesin theprofile. Recommendedpolicy settings for cross-platformapplications aredocumentedatCross-platform settings - Case study.
If you want to share other applications’ settings across platforms, Citrix recommends using ProfileMigrator from Sepago.
Java andWeb Applications
Java applications can leave many small files in a profile, which can dramatically reduce profile loadtimes. To prevent this, consider excluding AppData\Roaming\Sun\Java.
Summary of policies
The following table summarizes the policies you use to configure Profile Management for differenttypes of applications. The following terms are used in the table:
• Relative. A relative path on a local volume, relative to %USERPROFILE% (which must not bespecified). Examples: AppData\Local\Microsoft\Office\Access.qat, AppData\Roaming\Adobe\.
• Absolute. Anabsolutepathona local volume. Examples: C:\BadApp\*.txt, C:\BadApp\Database\info.db.• Registry Relative. Refers to a path within the HKCU hive. Examples: Software\Policies, Soft-ware\Adobe.
• Flag. Uses flags to enable or disable processing where no path information is required. Exam-ples: Enabled, Disabled.
Policy
Policy Type(Registry,Folder, orFile)
WildcardSupport?
ApplicationType - Simple
ApplicationType - Legacy
ApplicationType -Complex
Directories tosynchronize
Folder Relative Absolute
© 1999-2018 Citrix Systems, Inc. All rights reserved. 41

Profile Management 7.18
Policy
Policy Type(Registry,Folder, orFile)
WildcardSupport?
ApplicationType - Simple
ApplicationType - Legacy
ApplicationType -Complex
Files tosynchronize
File Yes Relative Absolute
Exclusion list- directories
Folder Relative Absolute
Exclusion list- files
File Yes Relative Absolute
Inclusion list Registry Registryrelative
Exclusion list Registry Registryrelative
Folders toMirror
Folder Absolute Relative
ProcessInternetcookie fileson logoff
Flag
Wildcard processing in file names
Policies that refer to files (rather than folders or registry entries) support wildcards. Formore informa-tion, see Use wildcards.
Inclusion and exclusion rules
Profile Management uses rules to include and exclude files, folders, and registry keys from user pro-files in the user store. These rules result in sensible and intuitive behavior. All items are included bydefault. From that starting point, you can configure top-level exceptions as exclusions, then configuredeeper exceptions to the top-level exceptions as inclusions, and so on. For more information on therules, including instructions on including and excluding items, see Include and exclude items.
© 1999-2018 Citrix Systems, Inc. All rights reserved. 42

Profile Management 7.18
Non-English folder names in profiles
For non-English systems that use Version 1 profiles, specify relative paths in inclusion and exclusionlists in the local language. For example, on a German system, use Dokumenten not Documents. If yousupport multiple locales, add each included or excluded item in each language.
Next steps
Important: This topic describes the last of the questions that you must answer to configure your Pro-file Management deployment. The questions are listed inDecide on a configuration. Once you have answered all of the questions and have configured the set-tings accordingly, you are ready to review the configuration and go live as described inReview, test, and activate Profile Management. You can leave all other policies in their default setting.For a list of policies that youmust not configure, see Policies not requiring configuration inManage.
Review, test, and activate Profile Management
July 11, 2018
This topic assumes that you have answered all of the questions about your deployment listed in De-cide on a configuration. And you have configured Profile Management policies accordingly. You arenow ready to review the configuration and go live.
Ask a colleague to review your policy settings. Then, test the configuration. You can use the .ini file totest. Once testing is complete, manually transfer the settings to a Group Policy Object.
Policy: Enable Profile Management
Until you enable this policy, Profile Management is inactive.
Plan for multiple platforms
July 11, 2018
Why are user profiles onmultiple platforms such a challenge?
It is common for users to accessmultiple computing devices. The challenge with any type of roamingprofile results from the differences between systems on these devices. For example, if I create a short-
© 1999-2018 Citrix Systems, Inc. All rights reserved. 43
Profile Management 7.18
cut onmy desktop to a local file that does not exist when I move to a different device, I have a brokenshortcut onmy desktop.
A similar issue exists when roaming between a desktop operating system (OS) and a server OS. Somesettingsmay not be applicable on the server (such as power settings or video settings). Furthermore,if applications are not installed similarly on each device, when I roam other issues may emerge.
Some personalization settings (such as My Documents, Favorites, and other files that function inde-pendently of OS or application version) are much easier to manage than others. But even these set-tings may be difficult to roamwhen a document type is only supported on one system. For example,a user has Microsoft Project installed on one system, but on another device that file type is not rec-ognized. This situation is exacerbated if the same application is present on two systems but on onedifferent add-ons are installed and expected by a document.
How does changing the way an application is installed cause issues?
Even though platforms are identically installed, if an application is configured differently on each,errors may occur when the application starts. For example, amacro or add-onmight activate in Excelon one platform but not another.
The Start menu
The Startmenu contains links (LNK and LNK2 files). The user-specific part of themenu is stored in theprofile and can bemodified by users. Adding custom links (to executables or documents) is common.In addition, links that are language-specific result inmultiple Startmenu entries for the same applica-tion. Furthermore, links pointing to documents might be invalid on other computers. The reason isthat the path to the document is relative to another system, or it is a network path that is inaccessible.
By default, the content of the Start menu folder is not saved by Profile Management because linkspointing to executables are often computer-dependent. However, in situations where the systemsare very similar, including the Start menu in your Profile Management configuration improves theconsistency when users roam fromdesktop to desktop. Alternatively, you can process the Startmenuwith folder redirection.
Note: Unpredictable side effects can often result from what appears to be the most innocuous ofchanges. For example, see the article Citrix User Profile Manager (UPM) and the Broken Rootdriveon the Sepago blog.
Always test and verify the behavior of the Start menu across platforms.
© 1999-2018 Citrix Systems, Inc. All rights reserved. 44
Profile Management 7.18
The Quick Launch toolbar
The Quick Launch toolbar contains links and is configurable by users. By default, the Quick Launchtoolbar is saved by Profile Management. In some environments, this might not be desirable becausethe links may be computer-dependent.
To exclude the toolbar from profiles, add the following entry to the folder exclusion list: App-Data\Roaming\Microsoft\Internet Explorer\Quick Launch.
What types of profiles should I create?
Important: Because of the difference in their structure, Citrix recommends creating separate Version 1and Version 2 profiles for each user in any environment that contains multiple platforms. Differencesbetween theWindowsVista andWindows7profile namespacemake it difficult to shareprofiles acrossthese platforms. And failures can also occur between Windows XP and Windows Server 2003. Formore information on Version 1 and Version 2 profiles, seeAbout profiles.
The definition ofmultiple platforms here includes not justmultiple operating systems (including onesof different bitness) but alsomultiple application versions runningon the sameoperating system. Thefollowing examples illustrate the reasons for this recommendation:
• 32-bit systemsmay contain registry keys that instruct the operating system to start applicationsin locations specific to 32-bit operating systems. If the keys are used by a Citrix user profile ona 64-bit system, the location might not exist on that system and the application fails to start.
• MicrosoftOffice 2003, Office 2007, andOffice 2010 store someWord settings in different registrykeys. Even if these applications run on the same operating system, you must create separateprofiles for the three different versions of the Word application.
Citrix recommends using Microsoft folder redirection with Citrix user profiles to help ensure profileinteroperability. Within an environment where Windows Vista or Windows 7 must co-exist with Win-dows XP, it is evenmore important.
Tip: Depending on your organization’s data management policy, it is good practice to delete profilesfrom the user store and the cross-platform settings store for user accounts that have been removedfrom Active Directory.
Share Citrix user profiles onmultiple file servers
July 11, 2018
© 1999-2018 Citrix Systems, Inc. All rights reserved. 45

Profile Management 7.18
The simplest implementation of ProfileManagement is one inwhich the user store is onone file serverthat covers all users in one geographical location. This topic describes a more distributed environ-ment involving multiple file servers. For information on highly distributed environments, see Highavailability and disaster recovery with Profile Management.
Note: Disable server-side file quotas for the user store because filling the quota causes data loss andrequires the profile to be reset. It is better to limit the amount of personal data held in profiles (forexample, Documents, Music and Pictures) by using folder redirection to a separate volume that doeshave server-side file quotas enabled.
The user store can be located across multiple file servers, which has benefits in large deploymentswhere many profiles must be shared across the network. Profile management defines the user storewith a single setting,Path to user store, so youdefinemultiple file servers by adding attributes to thissetting. You can use any LDAP attributes that are defined in the user schema in Active Directory. Fordetails, see http://msdn.microsoft.com/en-us/library/ms675090(VS.85).aspx.
Suppose that your users are in schools located in different cities and the #l# attribute (lower case L,for location) is configured to represent this. You have locations in London, Paris, and Madrid. Youconfigure the path to the user store as:
\\#l#.userstore.myschools.net\profile\#sAMAccountName#\%ProfileVer%\
For Paris, this is expanded to:
\\Paris.userstore.myschools.net\profile\JohnSmith\v1\
You thendivideupyourcitiesacross theavailable servers, for examplesettingupParis.userstore.myschools.netin your DNS to point to Server1.
Before using any attribute in this way, check all of its values. They must only contain characters thatcan be used as part of a server name. For example, values for #l#might contain spaces or be too long.
If you can’t use the#l# attribute, examine yourADuser schema for other attributes suchas #company#or #department# that achieve a similar partitioning.
You can also create custom attributes. Use Active Directory Explorer, which is a sysinternals tool, tofind which attributes have been defined for any particular domain. Active Directory Explorer is avail-able at http://technet.microsoft.com/en-us/sysinternals/bb963907.aspx.
Note: Do not use user environment variables such as%homeshare% to distinguish profiles or servers.Profile management recognizes system environment variables but not user environment variables.You can, however, use the related Active Directory property, #homeDirectory#. So, if youwant to storeprofiles on the same share as the users’ HOME directories, set the path to the user store as #homeDi-rectory#\profiles .
The use of variables in the path to the user store is described in the following topics:
• Specify the path to the user store
© 1999-2018 Citrix Systems, Inc. All rights reserved. 46
Profile Management 7.18
• Administer profiles within and across OUs• High availability and disaster recovery with Profile Management
Administer profiles within and across OUs
July 16, 2018
Within OUs
You can control how Profile Management administers profiles within an Organizational Unit (OU).In Windows Server 2008 environments, use Windows Management Instrumentation (WMI) filteringto restrict the .adm or .admx file to a subset of computers in the OU. WMI filtering is a capabilityof Group Policy Management Console with Service Pack 1 (GPMC with SP1). For more informa-tion on WMI filtering, see http://technet.microsoft.com/en-us/library/cc779036(WS.10).aspx andhttp://technet.microsoft.com/en-us/library/cc758471(WS.10).aspx. For more information on GPMCwith SP1, see http://www.microsoft.com/DOWNLOADS/details.aspx?FamilyID=0a6d4c24-8cbd-4b35-9272-dd3cbfc81887&displaylang=en.
The following methods let you manage computers with different OSs using a single Group Policy Ob-ject (GPO) in a single OU. Eachmethod is a different approach to defining the path to the user store:
• Hard-coded strings• Profile Management variables• System environment variables
Hard-coded strings specify a location that contains computers of just one type. This allows profilesfrom those computers to be identified by Profile Management uniquely. For example, if you have anOUcontainingonlyWindows7computers, youmight specify \server\profiles$\%USERNAME%.%USERDOMAIN%\Windows7in Path to user store. In this example, the Windows7 folder is hard-coded. Hard-coded strings do notrequire any setup on the computers that run the Profile Management Service.
Profile Management variables are the preferred method because they can be combined flexibly toidentify computers uniquely and do not require any setup. For example, if you have an OU containingWindows 7 and Windows 8 profiles running on operating systems of different bitness, you mightspecify \\server\profiles$\%USERNAME%.%USERDOMAIN%\!CTX_OSNAME!!CTX_OSBITNESS! inPath to user store. In this example, the two Profile Management variablesmight resolve to the foldersWin7x86 (containing the profiles running on the Windows 7 32-bit operating system) and Win8x64(containing the profiles running on the Windows 8 64-bit operating system). For more informationon Profile Management variables, see Profile Management policies.
System environment variables require some configuration. They must be set up on each computer
© 1999-2018 Citrix Systems, Inc. All rights reserved. 47

Profile Management 7.18
that runs the Profile Management Service. Where Profile Management variables are not suitable, con-sider incorporating system environment variables into the path to the user store as follows.
On each computer, set up a system environment variable called %ProfVer%. (User environment vari-ables are not supported.) Then, set the path to the user store as:
pre codeblock \\upmserver\upmshare\\%username%.%userdomain%\\%ProfVer%
For example, set the value for %ProfVer% to Win7 for your Windows 7 32-bit computers and Win7x64for yourWindows 7 64-bit computers. ForWindows Server 2008 32-bit and 64-bit computers, use 2k8and 2k8x64 respectively. Setting these values manually on many computers is time-consuming, butif you use Provisioning Services, you only have to add the variable to your base image.
Tip: In Windows Server 2008 R2 and Windows Server 2012, you can speed up the creation and appli-cation of environment variables using Group Policy; in Group Policy Management Editor, clickComputer Configuration >Preferences >Windows Settings >Environment, and thenAction >New >Environment Variable.
Across OUs
You can control how Profile Management administers profiles across OUs. Depending on your OUhierarchy and GPO inheritance, you can separate into one GPO a common set of Profile Managementpolicies that apply to multiple OUs. For example, Path to user store and Enable Profile Managementmust be applied to all OUs. So you might store them separately in a dedicated GPO, enabling onlythese policies there (and leaving them unconfigured in all other GPOs).
You can also use a dedicated GPO to override inherited policies. For information on GPO inheritance,see the MicrosoftWeb site.
Domain and forest support in Profile Management
July 11, 2018
Domain and forest functional levels of Windows Server 2008 andWindows Server 2012 are supportedby Profile Management. Older operating systems are unsupported.
The use of system environment variables can help to disambiguate user names in multiple domains.For more information, see Administer profiles within and across OUs.
© 1999-2018 Citrix Systems, Inc. All rights reserved. 48

Profile Management 7.18
High availability and disaster recovery with Profile Management
July 11, 2018
As a prerequisite, familiarize yourself with the structure of the user store and how to create it by read-ing Profile Management architecture and Create the user store.
These topics describe the supported scenarios for high availability anddisaster recovery as they applyto Citrix Profile Management. It relates the scenarios to the relevant, underlying Microsoft technolo-gies and identifies what is supported:
• Scenario 1: Basic setup of geographically adjacent user stores and failover clusters• Scenario 2: Multiple folder targets and replication• Scenario 3: Disaster recovery• Scenario 4: The traveling user• Scenario 5: Load-balancing user stores
Profile Management assumes that it operates in an environment that is reliable. Principally, this relia-bility applies to the availability of Active Directory (AD) and a networked user store (NUS).When eitherof these is not available, Profile Management cannot provide a profile, and hands over responsibilityto Windows, which generally provides a default profile.
Comparison with roaming profiles
Indisaster recoveryandhighavailability scenarios, CitrixProfileManagementmightbeaffectedby thesame issues as affect Microsoft roaming profiles. Unless stated to the contrary, Profile Managementdoes not resolve such issues.
In particular, note the following:
• Profile Management support is limited to the scenarios where roaming profiles are also sup-ported. For more information, see “Can I use DFS with Offline Files and redirected My Docu-ments folders?” at http://technet.microsoft.com/en-us/library/hh341474(WS.10).aspx.
• The cache option for offline files must be disabled on roaming user profile shares. The samerestriction applies to Profile Management shares. For more information, see http://support.microsoft.com/kb/287566.
• A roaming profile is not loaded from a DFS share. The same restriction applies to Profile Man-agement shares. For more information, see http://support.microsoft.com/kb/830856.
© 1999-2018 Citrix Systems, Inc. All rights reserved. 49

Profile Management 7.18
Scenario 1 - Basic setup of geographically adjacent user stores andfailover clusters
July 11, 2018
“I want my users to always use a geographically adjacent, preferred networked user store (NUS) fortheir profiles.” Options 1 and 2 apply in this case.
“I want my NUS to be on a failover cluster, to give me high availability.” Option 2 applies in this case.
The following graphic illustrates this scenario. Users in North America (NA) want to use the NUS inNew York rather than the NUS in Brisbane. The aim is to reduce latency and to minimize the trafficsent over the intercontinental link to Australia or New Zealand (ANZ).
Option 1 – DFS Namespaces
Background reading
• For an overview of the Microsoft DFS Namespaces technology, see http://technet.microsoft.com/en-us/library/cc730736(WS.10).aspx.
© 1999-2018 Citrix Systems, Inc. All rights reserved. 50

Profile Management 7.18
• For advice on load balancing user stores, see the Citrix blog at http://community.citrix.com/display/ocb/2009/07/21/Profile+Management+-+Load+Balancing+User+Stores.
Implementing this option
DFS Namespaces can resolve some of the issues presented in the blog article.
Let us set up a namespace for the NUS called \\MyCorp\Profiles. It is the namespace root. We set upnamespace servers in New York and Brisbane (and any of the other sites). Each namespace server hasfolders corresponding to each Active Directory location, which in turn have targets on a server in NewYork or Brisbane.
Wemight have the following locations configured in Active Directory (part of the user records).
AD Location Attribute (#l#) Geographic Location
Wagga Wagga ANZ
Darwin ANZ
Brisbane ANZ
Auckland ANZ
Seattle NA
San Diego NA
West Palm Beach NA
Poughkeepsie, New York NA
The following graphic shows one way of setting this up using DFS Namespaces.
© 1999-2018 Citrix Systems, Inc. All rights reserved. 51

Profile Management 7.18
Once it is set up, we configure the Path to user store setting as:
\\MyCorp\Profiles\#l#
The profiles of users belonging to the eight sites are distributed to just two servers, meeting the geo-graphical constraints required of the scenario.
© 1999-2018 Citrix Systems, Inc. All rights reserved. 52

Profile Management 7.18
Alternatives
You can order namespace targets and use the ordering rules as follows. When DFS Namespaces re-solves which target to use, it is possible to specify that only targets in the local site are chosen. Itworks so long as you are sure that, for any given user, every desktop and server is guaranteed to be-long to the same site.
This technique fails if, say, a user normally based at Poughkeepsie visits Wagga Wagga. Their laptopprofile may come from Brisbane, but the profile used by their published applicationsmay come fromNew York.
The recommended technique, using AD attributes, ensures that the same DFS Namespace choicesaremade for every session that the user initiates. The reason is that the #l# derives from the user’s ADconfiguration rather than frommachine configurations.
Option 2 - DFS Namespaces with failover clustering
Background reading
• For a step-by-step guide to configuring a two-node file server failover cluster, see http://technet.microsoft.com/en-us/library/cc731844(WS.10).aspx.
• For information about choosing a namespace type, see http://technet.microsoft.com/en-us/library/cc770287(WS.10).aspx.
Implementing this option
Adding failover clustering allows you to provide basic high availability.
The key point in this option is to turn the file servers into failover clusters, so that folder targets arehosted on a failover cluster rather than a single server.
If you require the namespace server itself to have high availability, you must choose a standalonenamespace. Domain-based namespaces do not support the use of failover clusters as namespaceservers. Folder targets might be hosted on failover clusters, regardless of the type of namespaceserver.
Important: The state of file locks may not be preserved if a server in a failover cluster fails. ProfileManagement takes out file locks on the NUS at certain points during profile processing. It is possiblethat a failover at a critical point might result in profile corruption.
© 1999-2018 Citrix Systems, Inc. All rights reserved. 53

Profile Management 7.18
Scenario 2 - Multiple folder targets and replication
July 11, 2018
“If my local NUS is not available, I want my users to be able to get their profile data from a backuplocation somewhere else on the corporate network. If theymake changes, those changes need to getback to their preferred NUS when it is available again.”
The basic requirement in this scenario is to provide alternative locations for profiles on the network.The use case includes the partial failure of the network infrastructure or the complete unavailabilityof a folder target such as a failover cluster.
Options you should consider are the use of multiple folder targets and the use of DFS replication.
Option 1 - Referrals tomultiple folder targets
Background reading
For information about tuning DFS namespaces, see http://technet.microsoft.com/en-us/library/cc771083(WS.10).aspx.
About this option
A referral is an ordered list of targets that are tried in turn by a user device. It is designed for scenarioswhere the targets are read-only, such as software libraries. There is no linkage between targets, sousing this technique with profiles may create multiple profiles that cannot be synchronized.
However, it is possible to define both an orderingmethod and a target priority for targets in referrals.Choosing a suitable ordering method appears to result in a consistent choice of target by all user ses-sions. But in practice, even when all of a user’s devices are within the same site, intra-site routingproblems can still result in different targets being chosen by different sessions. This problem can becompounded when devices cache referrals.
Important: This option is not suitable for Profile management deployments and is not supported.However, file replication has been used in some specialized deployments in which only a single ses-sion can be guaranteed andActive write back is disabled. For information on these special cases, contact Citrix Consulting.
© 1999-2018 Citrix Systems, Inc. All rights reserved. 54

Profile Management 7.18
Option 2 - Distributed file system replication
Background reading
• For an overview of Distributed File System Replication (DFSR), see http://technet.microsoft.com/en-us/library/cc771058(WS.10).aspx.
• For a statement of support about replicated user profile data, see http://blogs.technet.com/b/askds/archive/2010/09/01/microsoft-s-support-statement-around-replicated-user-profile-data.aspx.
• To understand why DFSR does not support distributed file locking, see http://blogs.technet.com/b/askds/archive/2009/02/20/understanding-the-lack-of-distributed-file-locking-in-dfsr.aspx.
Implementing this option
DFSReplication provides folder synchronization across limited bandwidth network connections. Thisoption appears to solve the problems in Option 1 because it synchronizes multiple folder targets thata single namespace folder definition refers to. Indeed, when folders are added as targets to a folderdefinition, they can be specified as belonging to a replication group.
There are two forms of replication to consider:
• One-way replication (also known as active-passive replication) is designed for backing up criti-cal data to a safe repository. This replication makes it suitable for maintaining a disaster recov-ery site, for example. It can be made to work with Profile Management so long as the passivetargets are disabled for referrals, and are only invoked when the disaster recovery plan is acti-vated.
• Two-way replication (also known as active-active replication) is intended to provide local read-write access to global shared data. Instantaneous replication is not necessarily a requirementhere. The shared data may bemodified infrequently.Important: Active-active DFSR is not supported.
A schedule defines the frequencywith which data is replicated. A frequent schedule ismore intensiveon both CPU and bandwidth, but does not guarantee instantaneous updates.
At various points in its operation, Profile Management requires certain files to be locked in the NUS tocoordinateupdates to the (shared)user store. Typically theseupdates takeplacewhenasession startsand ends, and in the middle of a session if active write-back is enabled. Since distributed file lockingis not supported by DFS Replication, Profile Management can only select one target as an NUS. Thisset effectively eliminates any value of two-way replication (active-active replication), which is there-fore not suitable for Profile Management and is not supported. One-way replication (active-passivereplication) is suitable for Profile Management only as part of a disaster recovery system. Other usesare not supported.
© 1999-2018 Citrix Systems, Inc. All rights reserved. 55

Profile Management 7.18
Scenario 3 - Disaster recovery
July 11, 2018
“How do I set up a full disaster recovery site to handle Citrix user profiles?”
The key features required for disaster recovery (DR) are supported by Profile Management:
• DFS namespaces. Domain-based namespace servers are preferred in this scenario becausethey allow the DR site to have its own namespace server. (A standalone namespace server can-not be replicated, but it can be hosted on a failover cluster.)
• Multiple folder targets and DFS Replication. For each NUS, you provide at least two targets,but only enable one in normal operation. You set up one-way DFS Replication to ensure thatthe disabled targets (at the DR sites) are kept up-to-date.
• Failover clusters for hosting individual folder targets. Optional. It might be wasteful of re-sources on the DR site.
In this diagram, a domain-based namespace manages the NUS. (The diagram in Scenario 1 deliber-ately did not include namespaces.) You can include a namespace server in each site, including the DRsite. The servers all support the same view of the namespace.
© 1999-2018 Citrix Systems, Inc. All rights reserved. 56
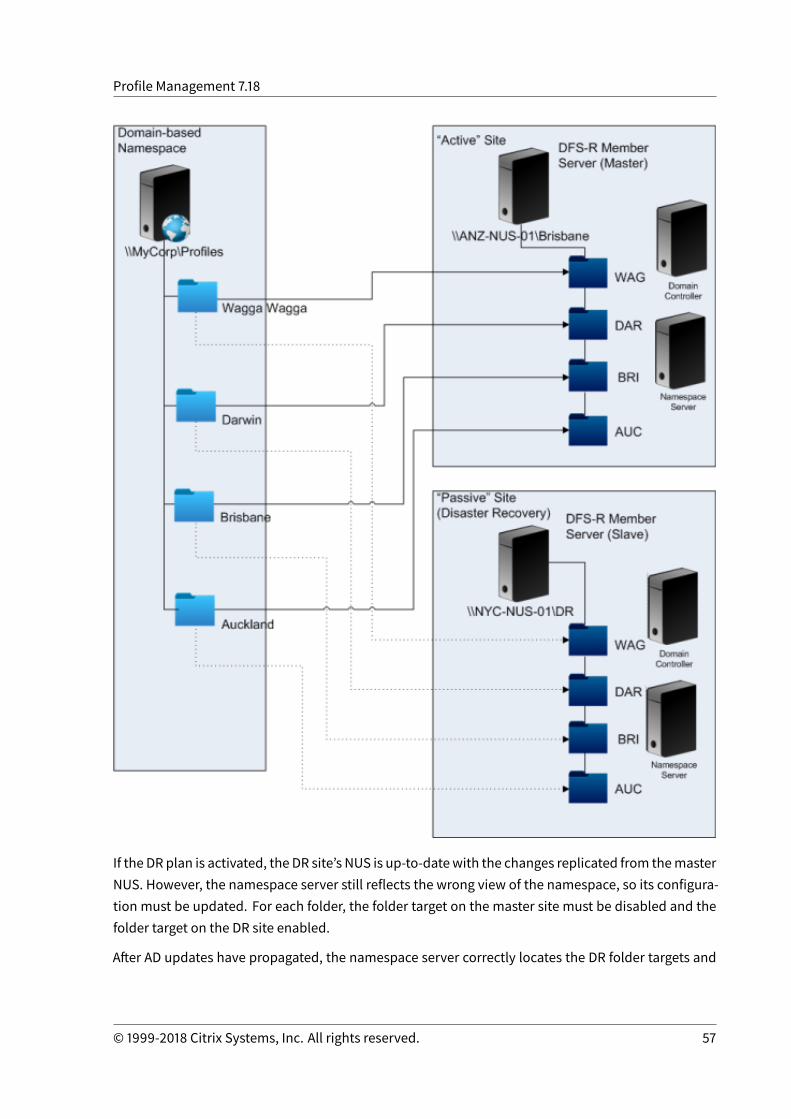
Profile Management 7.18
If the DR plan is activated, the DR site’s NUS is up-to-datewith the changes replicated from themasterNUS. However, the namespace server still reflects the wrong view of the namespace, so its configura-tion must be updated. For each folder, the folder target on the master site must be disabled and thefolder target on the DR site enabled.
After AD updates have propagated, the namespace server correctly locates the DR folder targets and
© 1999-2018 Citrix Systems, Inc. All rights reserved. 57

Profile Management 7.18
the DR site is ready to use by Profile Management.
Note: ThePath to user store setting refers to namespace folders, not real servers, so there is no need to updatethe Profile Management configuration.
Inpractice, one-wayor two-way replication ispossiblebecause theDRsite isnotnormallyused forpro-files. Once the disaster is over, a connection from the DR site to the master site ensures that changesmade to the NUS during the disaster are replicated on the master site.
Scenario 4 - The traveling user
July 11, 2018
“When my staff roam between different offices, I want their preferred NUS to change, so that they’restill using a geographically adjacent NUS.”
The difficulty with this scenario is that a user’s logon session may be aggregated from multiple loca-tions. They typically roam their desktop session from one site to another. But many of their appli-cations are hosted on backend servers that have no awareness of the current location of the user’sdesktop.
Furthermore, the usermight reconnect to disconnected sessions, probably hosted at their home loca-tion. If the sessions were for some reason forced to switch to an NUS in the user’s new location, theirperformance degrades.
For travelers who hot-desk, using the Profile streaming and Always cache settings is the best option.With a fixed machine, they still log on quickly, using Citrix streamed user profiles. Enabling Alwayscache loads the remainder of the profile in the background.
Scenario 5 - Load-balancing user stores
July 11, 2018
“I want to load-balance my users across several geographically adjacent networked user stores(NUSs).”
Background reading
• For an overview of the Microsoft DFS Namespaces technology, http://technet.microsoft.com/en-us/library/cc730736(WS.10).aspx.
© 1999-2018 Citrix Systems, Inc. All rights reserved. 58

Profile Management 7.18
• For advice on load balancing user stores, see the Citrix blog at http://blogs.citrix.com/2009/07/21/profile-management-load-balancing-user-stores/.
Unlike Scenario 1, this scenario has a single site that is large enough to require multiple NUSs. UsingDFS namespaces, we can improve on the solution in Scenario 1.
Scenario 1 (Option 1) used DFS Namespaces to map multiple sites to different folders on the sameserver. You can use a similar technique to map subfolders of a namespace to folders on differentservers.
Ideally, you need an AD attribute that partitions user accounts into similarly sized chunks, such as#department#. As in Scenario 1, #department# must always be defined and must be guaranteed tocontain a correct folder name.
As in Scenario 1, we set up a namespace for the NUS called \\MyCorp\Profiles.
This diagram shows how to set up the namespace.
© 1999-2018 Citrix Systems, Inc. All rights reserved. 59
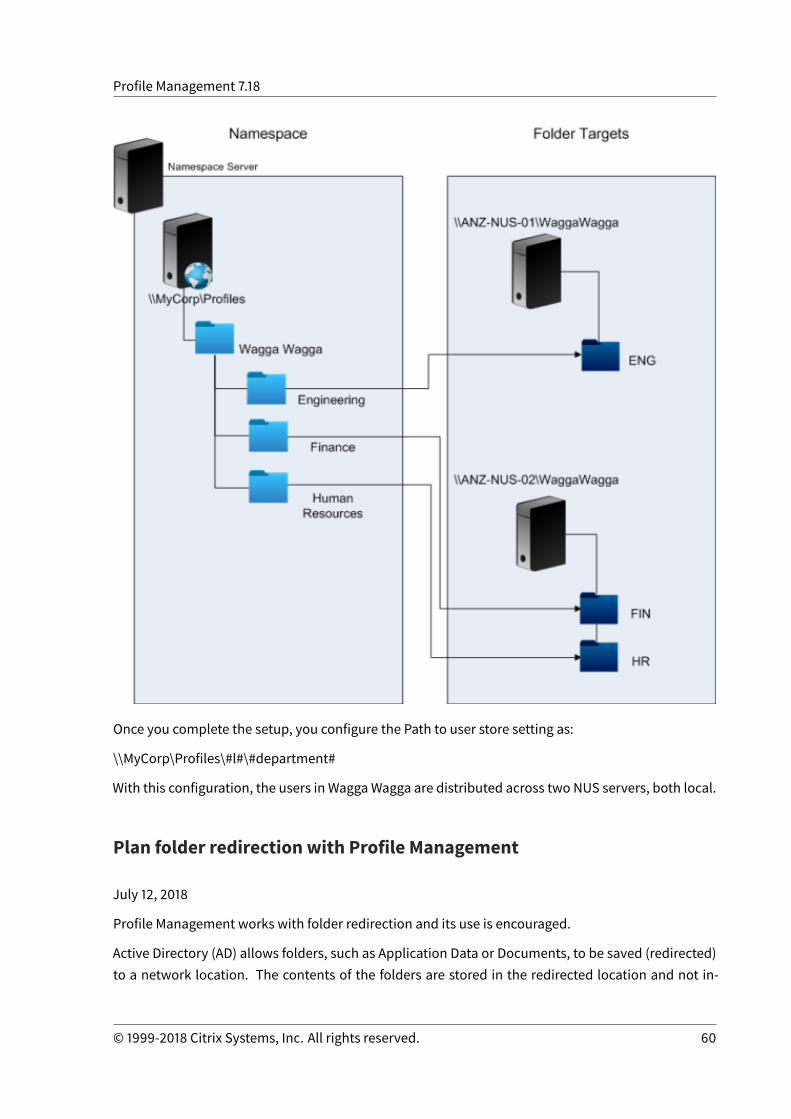
Profile Management 7.18
Once you complete the setup, you configure the Path to user store setting as:
\\MyCorp\Profiles\#l#\#department#
With this configuration, the users in WaggaWagga are distributed across two NUS servers, both local.
Plan folder redirection with Profile Management
July 12, 2018
Profile Management works with folder redirection and its use is encouraged.
Active Directory (AD) allows folders, such as Application Data or Documents, to be saved (redirected)to a network location. The contents of the folders are stored in the redirected location and not in-
© 1999-2018 Citrix Systems, Inc. All rights reserved. 60

Profile Management 7.18
cludedwithin the user profile, which therefore reduces in size. Depending on the version of AD, somefolders can be redirected but not others. In addition, configuring folder redirection allows users withmandatory profiles to save some settings, files, and other data while still restricting profile usage.
As a general guideline, Citrix recommends enabling folder redirection for all user data that is not ac-cessed regularly within a session if network bandwidth permits.
Not all folders which can be redirected are accessible with AD. The folders that can be redirected on aspecificoperatingsystemare in the registryunderHKCU\Software\Microsoft\Windows\CurrentVersion\Explorer\UserShell Folders.
Important information about folder redirection
Note the following important points about using folder redirection with Profile management:
• In XenDesktop 7, you specify the folders to redirect in Studio using XenDesktop policies. Formore information, see the XenDesktop documentation.
• To configure folder direction successfully, be aware of the differences in folder structure be-tween Version 1 and Version 2 profiles.
• For more security considerations when using folder redirection, see Secure and the articleFolder Redirection Overview on the Microsoft TechNet Web site.
• Treat the user store differently to the share used for redirected folders.• Do not add redirected folders to exclusion lists.
Third-party directory, authentication, and file services
July 11, 2018
This topic describes support for directory, authentication, and file services other than those providedby Microsoft.
Directory services
Important: Active Directory (AD) is critical to the operation of Profile Management. Other directoryservices are not supported. These services include:
• Novell eDirectory.• Windows 2000 server or earlier operating systems (OSs). Windows 2000 server supports ADbut not at the required level; for more information, see Domain and forest support in Profilemanagement. MicrosoftWindows NT 4.0 pre-dates AD.
• Samba 4 or earlier.
© 1999-2018 Citrix Systems, Inc. All rights reserved. 61

Profile Management 7.18
Authentication services
Other authentication services can co-exist with AD within a domain but are not supported by ProfileManagement. The reason is that, like the Profile Management Service, they can interact with winl-ogon.exe and cause problems with the user logon process. For example, the authentication servicefrom Novell allows users to access Novell resources, such as printers and file shares, but is not sup-ported.
File services
Third-party file services can be used for the user store and folder redirection (if supported by theWin-dows operating system being used). File servers must be of the type Server Message Block (SMB) orCommon Internet File System (CIFS) and must support the NTFS file system. For these reasons, thefollowing are supported:
• Windows Server 2003 or later• Samba 3
Important: Because it requires authentication against the Novell directory, the Novell file service isnot supported.
Frequently asked questions about profiles onmultiple platforms andProfile Managementmigration
July 16, 2018
This section contains questions and answers about using profiles in environments with multiple Win-dows operating systems, or multiple versions or bitnesses of a single operating system.
For answers to frequently asked questions about upgrades, see Frequently asked questions aboutupgrading Profile Management.
How can I be certain of avoiding compatibility issues withmy profiles?
Balance the need to support heterogeneous environments with the need for personalization settingsto track users and their devices. Typically, the balance between these two needs can only be deter-mined by administrators and IT departments. Youmanage the different systems by adjusting the userprofiles as follows. When profiles roam, any issues must be handled properly or, if really necessary,settings must be ignored completely and not tracked at all. This is the basis of many third-party soft-ware solutions.
© 1999-2018 Citrix Systems, Inc. All rights reserved. 62

Profile Management 7.18
To minimize troubleshooting, try and roam profiles across the same device setup (installed applica-tions, OS version, and so on). In many scenarios in the modern world however, that is not easilyachieved, which makes for an imperfect user experience. For example, a user should not need toreplicate their Favorites or My Documents just because they use multiple operating systems. Admin-istrators can enhance the user experience in this case by using Folder Redirection. The use of thisMicrosoft feature is also encouraged in other scenarios.
Can I share profiles across different systems?
Citrix recommends having one base profile for each platform. This is not necessarily the same as oneprofile per operating system. For more information on this recommendation, see Plan for multipleplatforms. This minimizes the number of settings that might not work together or that do not applyto any given OS. For example, desktop power settings are not applicable in a server scenario or oneinvolving Remote Desktop Services (formerly Terminal Services).
As you try to simplify and reduce the number of profiles and they are used onmore than oneOS, thereis greater risk of conflicting settings. This is further compoundedwhen the systems are not the same.For example, MicrosoftOffice add-insmay not exist on every device. Fortunately, settings such as thisone that are not applicable on a given device are often ignored. Support issues arise when they arenot ignored. Microsoft Excel fails to start if an add-in is not present.
How does Profile management enable settings across multiple versions or platforms?
Citrix provides the ability to roamcommon settings acrossmultiple base profiles. Citrix enables roam-ing of settings such as Microsoft Office, Internet Explorer, and wallpaper. The ability to support thesetypes of scenarios is limited by the degree to which applications support the roaming of settings be-tween platforms. The links in the next question cover Microsoft’s position and best practices.
How does Microsoft support roaming profiles across platforms and versions?
For best practices for roaming profiles, see http://technet.microsoft.com/en-us/library/cc784484.aspx.
For Office 2007 toolbar settings, see http://support.microsoft.com/kb/926805/en-us.
Where the standard Microsoft Windows profile solutions do not fully address technical, custom, orbusiness requirements, Profile management represents a viable solution.
Is sharing a profile between x86 and x64 platforms possible?
SharingoneprofilebetweenWindowsx86andx64mightgenerallywork, but some issuesarepossible.
© 1999-2018 Citrix Systems, Inc. All rights reserved. 63
Profile Management 7.18
There are several reasons. For example, one reason is that per-use file associations are stored inHKCU\Software\Classes. If a non-administrator sets Firefox as their default browser, the followingis stored on a 32-bit system:
HKEY_CURRENT_USER\Software\Classes\FirefoxHTML\shell\open\command -> “C:\ProgramFiles\Mozilla Firefox\firefox.exe” -requestPending -osint -url “%1”
If a profile containing this path is used on Windows x64, the OS looks for a 64-bit version of Firefox,but this does not exist. Instead, a 32-bit version is probably installed at C:\Program Files (x86)\MozillaFirefox. This results in the browser not starting.
The reverse is also true. A path is set on an x64 platform but is used on an x86 one.
I want to test how one profile behaves across multiple platforms. Where do I start?
Testing and validating are key to experimentingwith theuseof oneprofile onmore thanoneplatform.The recommended approach is to have one profile per platform. If you want to explore how a singleprofile behaves across multiple platforms, the following information might be helpful.
Start by identifying whatmight cause issues by answering the next question. Use the remaining ques-tions in this topic for ideas for tackling and tracking the issues.
Items that work across platforms:
• My Documents and Favorites• Applications that store their configuration information (with defaults) completely within theprofile
Items that might not work:
• Applications that store hard-coded data, path data, and so on• Settings specific to x64 or x86 platforms• Installations of applications that are not identical, such as Excel Add-ins that are not present onall systems. These installationsmight causeall typesof error conditions that varybyapplication
Can I assign profiles based on the computer a user logs on to?
Yes. Profile Management can apply a profile based on the local desktop, XenApp, or XenDesktop, orany combination of these.
With the correct Profile Management setting enabled, a Remote Desktop Services (formerly TerminalServices) profile is used only when a user has a Terminal Server or XenApp session. This setting over-rides any existing profile (except for a Citrix user profile) when the user logs on through a RemoteDesktop Services session.
© 1999-2018 Citrix Systems, Inc. All rights reserved. 64

Profile Management 7.18
On Windows 7, you can use a GPO computer setting to assign a profile based on the computer a userlogs on to. Again, because this is based onGP, the profile assignment depends on theOU towhich theGPO is applied.
Why are profile assignments based on computer desirable?
It is very useful to assign a profile to the computer a user logs on to if a distinct user experience isdesired. For example, administrators may decide that profiles used with Remote Desktop Services(formerly Terminal Server) sessions are kept separate from profiles used with desktops.
Does Profile Managementmigrate Windows user profiles to Citrix user profiles?
You can configure Profile Management to automatically migrate existing roaming and local profileswhen users log on. You can also use a template profile or the default Windows profile as the basis fornew Citrix user profiles.
For information about planning and setting up your Profile Management migration, see Migrate pro-files? New profiles?. For details of how the software migrates Windows user profiles to Citrix userprofiles, see Logon diagram.
Which profiles can bemigrated to Citrix user profiles?
Profile Management can migrate Windows local profiles and Windows roaming profiles. Mandatoryprofiles (.man files) are ignored by Profile Management but they can be used as templates for Citrixuser profiles. To ensureProfileManagementworks correctly, deactivate the assignment ofmandatoryprofiles to all users.
To use your existing Windows mandatory profile as a template, see Specify a template or mandatoryprofile.
How do I use a template profile?
Profile Management allows you to specify a template profile that is used as the basis for the creationof new Citrix user profiles. Typically, a user who is assigned a profile for the first time receives thedefault user profile of the Windows device they log on to. This may be acceptable, but it means anyvariation in different devices’ default user profiles results in differences in the base profile created forthe user. Therefore, you can regard the template profile feature as a global default user profile.
If you want to prevent users making any change to their profile data, you can also identify a templateprofile as a Citrix mandatory profile.
For more information, see Specify a template or mandatory profile.
© 1999-2018 Citrix Systems, Inc. All rights reserved. 65

Profile Management 7.18
Install and set up
July 12, 2018
About Profile Management installations
Deploying Profile Management consists of installing a .msi file and either an .adm or .admx file. Forinformation on upgrades rather than installations, see Upgrade andmigrate.
Install the Profile Management .msi file on each computer whose user profiles you want to manage.Typically, you install the .msi file on computers using a distribution tool, an imaging solution, orstreaming technology. You can also install it directly on any computer using one of the installers inthe download package. Unattended installations are supported.
Install the .adm or .admx file by adding it to Group Policy (GP).
Installing the .msi file and the .admor .admx file alonedoes not enable ProfileManagement. Youmustenable it separately (using theprocedure EnableProfileManagement) after performingall other setuptasks.
Citrix recommends that the same version of Profile Management is installed on all user devices andthe same version’s .adm or .admx file is added to each Group Policy Object on all domain controllers.This prevents corruption of profile data, whichmight result when different user store structures (fromdifferent versions) exist.
Note
In Profile Management 5.x releases, Citrix maintains the same user store structure, except thatCitrix updates profile versions by following Microsoft operating system updates.
To install the .msi file
This procedure installs Profile Management on a single computer.
1. Log on to the computer with administrator privileges.2. Locate and run the appropriate installer from the download package. The installation wizard
appears.3. Follow the on-screen instructions in the wizard.4. Restart the computer.
To install the .msi file from the command line
Important: In an earlier version of Profile Management, the following keys were removed from theregistry exclusion list in the supplied .ini file:
© 1999-2018 Citrix Systems, Inc. All rights reserved. 66

Profile Management 7.18
• HKEY_CURRENT_USER\Software\Microsoft\Windows\CurrentVersion\Group Policy• HKEY_CURRENT_USER\Software\Policies• HKEY_CURRENT_USER\Software\Microsoft\Windows\CurrentVersion\Policies
If you use these exclusions in Group Policy and setOVERWRITEINIFILES=yes in this procedure, ensure that you add all three of the keys or none of them(but not a subset) to the registry exclusion list. (TheOVERWRITEINIFILES option is primarily intended for deployments using Group Policy rather than an.ini file. Or this option is for either deployment type in which configuration settings can be discardedand the default .ini file reinstalled.) The option overwrites all of the changes you made throughoutthe .ini file including the keys. Citrix recommends running the installer without this option and thenmanually removing the key settings in the .ini file. Alternatively, if you use this option, ensure that youadd the exclusions as described. For more information on preserving exclusions during installation,see the Sepago blog athttps://www.sepago.de/blog/.
1. At a command line, run the following command:
pre codeblock msiexec /i <path to the MSI file> /quiet [/norestart] [INSTALLDIR=<installation directory>] [OVERWRITEINIFILES=yes] [INSTALLPOLICYINIFILES=no]
This command performs the installation without displaying a user interface and then performsa restart.
If UAC is enabled, run themsiexec commandwith elevated rights, for example from an elevatedcommand prompt.
You can suppress the restart using the /norestart option, but, depending on the operating sys-tem, Profile Management might not function until the computer has restarted. For example,you do not need to restart Windows 7 workstations.
INSTALLDIR can be user specified.
For information on the OVERWRITEINIFILES=yes option, see Upgrade Profile Management.
Setting INSTALLPOLICYINIFILES to no prevents the installation of the Profile Management .inifile. If you have used the .ini file with a previous version of the software andwant to continue touse the settings contained in itwith this version, after installation transfer each settingmanuallyto the equivalent Profile Management policy in Group Policy Editor.
If UAC is enabled, run themsiexec commandwith elevated rights, for example from an elevatedcommand prompt.
2. If you are upgrading, a dialog box may advise you that some files are in use. You are given theoption to close the application or continuewithout closing. Select the option to close the appli-cation.
© 1999-2018 Citrix Systems, Inc. All rights reserved. 67

Profile Management 7.18
To add the .adm or .admx file
Use this procedure if no earlier version of the Profile Management .adm file is present in Group Policy.If you are upgrading an .adm file, see Upgrade Profile Management.
In production environments, configure Profile Management with Group Policy. For each OU contain-ing the computers you want to manage, create and link a Group Policy Object (GPO), and then addthe Profile Management .adm or .admx file to the GPO.
To configure Citrix user profiles, you can use any computer that runs Windows Group Policy Manage-ment Console. The computer does not have to be a domain controller. Domain controllers only storethe .adm or .admx file.
Note: For small pilot projects and evaluations where no separate test deployment of Active Directory(AD) is available, you can also use the installed .ini file instead of the .adm or .admx file. If, after suc-cessful testing, you move from the .ini file to an AD deployment, be sure to add to the .adm or .admxfile any required inclusions and exclusions in addition to theminimumdefaults that are documentedinDefault inclusions and exclusions.
1. On the domain controller, do one of the following:• Import the .adm file. The file is located in the GPO folder in the download package.• Copy the .admx file fromtheGPOfolder in thedownloadpackage to theC:\Windows\PolicyDefinitionsfolder and copy the .adml file to the C:\Windows\PolicyDefinitions\<localized folder>. Forexample, on English language operating systems, <localized folder> is en-US. Proceed toStep 5.
2. On the computer youwant to use to configure ProfileManagement, open Active Directory Usersand Computers.
3. Identify the OUs containing the computers that Profile Management is installed on. For infor-mation on how to configure Profile Management to work in your existing OU structure, see Ad-minister profiles within and across OUs.
4. In Group Policy Management, create a GPO and link it to each OU.Note: If you apply security filtering to theGPO, do so using either the AuthenticatedUsers groupor a computer group. Do not use a security group that only contains individual users.
5. Edit the GPO in Group Policy Editor:a) Expand Computer Configuration and right-click Administrative Templates under the GPO.b) Click Add/Remove Templates and click Add.c) Browse to the .adm or .admx file that you imported or copied earlier and click Open.d) Click Close. Creates a Citrix folder and a Profile Management subfolder that stores the
settings from the .adm or .admx file.
© 1999-2018 Citrix Systems, Inc. All rights reserved. 68

Profile Management 7.18
Note
Profile Management 5.5 places the ADMX policies node under Citrix Components. To configureProfile Management 5.5:
• Remove the existing .admx files in the [WindowsFolder]\PolicyDefinitions folder, and thencopy the ctxprofile5.5.0.admx file and the CitrixBase.admx file to the folder.
• Remove theexisting .adml file in the [WindowsFolder]\PolicyDefinitions\<localized folder>,and then copy the ctxprofile5.5.0.adml file and the CitrixBase.adml file to the folder.
To remove Profile Management
This procedure removes Profile Management from a single computer. You must be an administratorof the computer.
1. To avoid data loss, ensure that all users are logged off.2. From the list of installed programs in Programs and Features, select Profile Management and
click Uninstall.3. Click Yes.4. Restart the computer.
You can also remove Profile Management in unattendedmode.
Files included in the download
July 11, 2018
The following files are included in this release.
File Name Description
profilemgt_x86.msi Installer for 32-bit systems
profilemgt_x64.msi Installer for 64-bit systems
GPO\ctxprofile5.1.0.adm .Adm file used in Group Policy
GPO\ctxprofile5.1.0.admx .Admx file used in Group Policy
GPO\ctxprofile5.1.0.adml .Adml file used with .admx file in Group Policy
welcome.html List of documentation resources
CrossPlatform\*.xml Definition files for supported applications
© 1999-2018 Citrix Systems, Inc. All rights reserved. 69
Profile Management 7.18
In addition to DLLs and other files, you might need to be aware of the following files. The installer inthe install location (by default, C:\Program Files\Citrix\User Profile Manager) creates these files.
File Name Description
UPMPolicyDefaults_all.ini Profile Management .ini file
UserProfileManager.exe Windows service carrying out functions oncomputers managed by Profile Management
Create the user store
July 11, 2018
This topic helps you create the user store in a way that best suits your organization. In addition to re-viewing the information here, be sure to configure the path to the user store as efficiently as possible.For example, configure the path by the sensible use of variables. For advice and examples on thatsubject, see Specify the path to the user store.
The user store is the central, network location for storing Citrix user profiles.
Any Server Message Block (SMB) or Common Internet File System (CIFS) file share can be used for theuser store. The best practice is to ensure that the share:
• Can be accessed by the accounts used with Citrix user profiles• Is large enough to store profile data• Is robust in case of disk or network failure
This diagram illustrates an example user store in relation to storage for redirected folder items, thecross-platform settings store (on a separate file server), and Windows 7 virtual desktops publishedwith XenDesktop and running Microsoft Office. User devices that access the virtual desktops are alsoshown for reference.
© 1999-2018 Citrix Systems, Inc. All rights reserved. 70

Profile Management 7.18
Recommendations on creating secure user stores are available in the article called Create a file sharefor roaming user profiles on the Microsoft TechNet Web site. These minimum recommendations en-sure a high level of security for basic operation. Additionally, when configuring access to the userstore, include the Administrators group, which is required to modify or remove a Citrix user profile.
If your deployment includesmultiple platforms, review the informationonVersion 1 andVersion2pro-file types in Plan formultiple platforms. As for the structure of the user store, see Profile Managementarchitecture.
Note: If an application modifies the access control list (ACL) of a file in the user’s profile, Profile Man-agement does not replicate those changes in the user store. This is consistent with the behavior ofWindows roaming profiles.
Test Profile Management with a local GPO
July 11, 2018
© 1999-2018 Citrix Systems, Inc. All rights reserved. 71
Profile Management 7.18
Before deploying Profile Management in a production environment, Citrix recommends using a testenvironment. You can create this setupon a localmachinewith the supplied .ini file. A fully supportedand easier means of transferring settings to the domain GPO is based on a local installation and con-figuration of the ADM file on a device. Test logon and logoff behaviors and adjust the local GPO untilsatisfactory results are obtained. You can perform tests safely this way if the device is a member ofa production OU. The reason is that local policies are invoked where OU and domain policies do notexist or are not configured. When using local policies, ensure no Profile Management GPOs are usedanywhere else (for example, in the domain or sites).
In addition, where an administrator does not have access to or control of domain GPOs for the config-uration of the ProfileManagement ADM file, local GPOs can be used as a long-term solution. However,this way introduces complexities into the environment. For example, you must ensure that the Pro-file Management ADM file is installed and configured on each device. And there might be inability ofdomain users to maintain settings when accessing multiple devices.
Important: For these reasons Citrix does not recommend the use of local GPOs as a long-term, enter-prise solution.
If you are testing on Windows 2008 domain controllers, consider using a Windows Management In-strumentation (WMI) filter to restrict your configuration to just one machine in an OU temporarily.
Test the user experience
Minimizing differences in the end user experience when accessing resources from various devices isthe goal when implementing a profile solution. Before Profile Management, the contents of users’registry and files might vary depending on the physical device, profile configuration, and operatingsystem. For this reason, Profile Management must be configured to address the differences betweensystem installations on computers the users roam between.
You must therefore check user access to resources in ways that mimic your production environment.These resources might include:
• A client device with locally installed applications• A virtual desktop created with Citrix XenDesktop and including streamed or locally installed ap-plications
• A Citrix XenApp application, either published on or streamed from a XenApp server• A Terminal Services client
Test operating system variations
Usersmight access applications fromdifferent operating systems. The variation between themmightcreate conflicting settings within a single user profile. You must understand the differences between
© 1999-2018 Citrix Systems, Inc. All rights reserved. 72
Profile Management 7.18
Version 1 and Version 2 profiles and how they affect your deployment. The variations are key to anyprofile solution. For more information on Version 1 and Version 2 profiles, see About profiles.
Upgrade andmigrate
July 11, 2018
This section contains procedures for upgrading Profile Management software and information abouttransitioning your existing Windows user profiles to Citrix user profiles. For example, you can easilyupgrade from Version 3.x to Version 5.x using those procedures.
Before upgrading, understand which Profile Management features and settings are available in therelease you are upgrading from and to. To review this information, see Profile Management policies.To facilitate upgrades from .ini files to Group Policy, that topic also maps the setting names in the .inifile to those in the .adm and .admx files.
Do not configure ProfileManagement (either in GroupPolicy orwith the .ini file) while upgrading. Sep-arate these two tasks by upgrading your deployment first and then configuring settings as required,ideally by answering the questions in Decide on a configuration.
Tip: You can hotfix your deployment of Profile Management 2.1.1 or later by upgrading to the latestversion. After upgrading, you can, if desired, enable any later feature.
Mixed Deployments
For deployments in which different versions of Profile Management coexist, you should:
• Minimize the time that a mixed deployment exists• Add the latest version’s .admor .admx file to eachGroupPolicyObject onall domain controllers,ensuring all new features are disabled and allowing time for the new policies to propagate
• Upgrade all computers to the latest version of Profile Management before enabling any policy
Mixeddeployments that containVersions5.x and3.2 are supported. However, treat suchdeploymentsas a temporary state that exists during migration from the earlier version to the later one.
Important: Deployments that contain Version 5.x with Version 2.1.1 or any earlier version, includingCitrix TechnicalPrevieworbeta releases, areunsupported. However, if youcannotupgrade, and thoseversions must coexist in your deployment, youmay find the rest of this topic helpful.
Mixed Deployments Involving Profile Management 2.1.1 or Earlier
The rest of this topic contains information on the coexistence of Profile Management 2.1.1 or earlier,and Profile Management 3.x, or 5.x. It tells you how to migrate from one version to the other. In this
© 1999-2018 Citrix Systems, Inc. All rights reserved. 73
Profile Management 7.18
topic, the terms Version 2 and Version 5 are used as shorthand for these versions.
Isolate each version in a separate OU and maintain separate user stores for the computers runningeach version. Alternatively, if a single user store serves computers running both versions, ensure thatall Version 5 settings are disabled until all the computers have been upgraded to Version 5. After youenable any Version 4 setting in a “mixed” user store, users can still log on to a computer that runsVersion 2. But they receive a temporary Windows user profile (not their network, Citrix user profile)and changes they make to that profile are not saved. You must consider mixed deployments to betemporary, andminimize the time they exist before completing the upgrade.
Using separate OUs and user stores can be inconvenient. To avoid these constraints, you can use oneof the following two strategies. You configure each group in the appropriate version of ProfileManage-ment using the Processed groups setting. Strategy 2 is more work than Strategy 1. With the former,you keep updating the Version 5 processed user groups. And you maintain two sets of applicationsand desktops (but you can automate by exporting application definitions from XenApp). The advan-tage is that you can take your time over the migration.
Note: As an alternative to the following strategies, withWindows Server 2008 Active Directory you canuse WMI filtering to apply a GPO to a subset of computers in an OU, and determine which version ofProfile Management is installed. Thus, you can automatically adjust which policy is applied, tomatchthe version.
Strategy 1: One-offMigration
This scenario assumes that some downtime is acceptable. All computers are migrated at the sametime.
Themigration strategy is:
1. Replace the Version 2 ADM file with the Version 5 file. The latter is compatible with the earlierversion, so Version 2 computers continue to operate normally.
2. Ensure all of the Version 5 settings are disabled. Do not rely on the default Not enabled.3. Start upgrading all the computers from Version 2 to Version 5. Fit this in with your normalmain-
tenance and update schedules. With one exception, Version 5 acts as Version 2 until you enableany Version 5 setting. The exception is as follows. It is rare but more likely to occur if this up-grade step is staggered over a long time. If a user accesses their Citrix user profile frommultipleservers, multiple Version 4 sessions are created. For example, they first use a workstation toaccess a virtual desktop on one server and then a laptop to access a published application onanother. Profile Management must use the pending area for the second, laptop session. At thispoint, the entire OU is treated as a Version 5 deployment (albeit one without any configuredVersion 5 features). And PmCompatibility.ini is updated to reflect this change.
4. Optionally, set your Version 5 processed users group to include only the members of a smallpilot group. Wait for the AD Group Policy changes to propagate throughout the network (for
© 1999-2018 Citrix Systems, Inc. All rights reserved. 74

Profile Management 7.18
example, over a weekend). You do not need to prevent access for any other users while thischange is happening. Back up theprofiles of the pilot group. Then let the pilot group test ProfileManagement.
5. When you are happy with the pilot group results, ensure that you have backed up the otherusers’ profiles.
6. Use the next scheduled maintenance period to add the remaining users to the Version 5 pro-cessed users group. Allow sufficient time for the AD Group Policy changes to propagate, and letthe remaining users log on.
Strategy 2: Phased Migration
This scenario assumes that you cannot move all your machines or your users to the new version inone go, so you select subsets of users that you migrate in batches. It suits deployments with severaldatacenters or geographically distributed users.
The migration strategy is:
1. Replace the Version 2 ADM file with the Version 5 file. The latter is compatible with the earlierversion, so Version 2 computers continue to operate normally.
2. Ensure all of the Version 5 settings are disabled. Do not rely on the default Not enabled.3. Upgrade a few computers (the first batch) to Version 5. Alternatively, install Version 5 on new
computers. By default, your Version 5-processed users group contains an empty group, so nouser is processed as a Version 5 user. Be aware of the exception described in Strategy 1, whichmay also apply when you upgrade computers in a phasedmigration.
4. Publishnewapplications (usingXenApp)or virtual desktops (usingXenApporXenDesktop) fromyour Version 5 computers. These applications and desktops are identical to the ones previouslypublished from your Version 2 computers, except for their names. These names identify themas for use by Version 5 users.
5. The selected users in this batch log on to the applications or desktops (for example, using WebInterface). They choose the new applications. (UseWeb Interface to enforce this step, based onuser name or group membership). As a result, their sessions run on the Version 4 computersbut they are processed with Version 2 settings.
6. Ensure that you have backed up all users’ profiles.7. Move the users out of the Version 2 processed users group and into the Version 4 group. Wait
for the AD Group Policy changes to propagate to the Version 5 computers. Next time they logon, the users’ sessions are processed with Version 5 settings.
8. Upgrade the next batch of computers andmigrate the next batch of users, as above.
© 1999-2018 Citrix Systems, Inc. All rights reserved. 75
Profile Management 7.18
Upgrade Profile Management
July 13, 2018
This topic provides guidance on upgrading your Profile Management deployment by using Active Di-rectory.
Important: It is important that you follow the order of the steps in this upgrade process. Upgrade thesoftware on all computers only after adding the new .admor .admx file toGroupPolicy. If youupgradebeforehand, log files might be stored in two locations. One contains log files for the old version andthe other contains the files for the new version. This consideration particularly affects XenDesktopdeployments.
It is also important to upgrade during a scheduled maintenance period. Or upgrade at a time whenActive Directory replication allows the changes to propagate through your deployment. Typically,upgrade can take up to 24 hours.
The upgrade process involves:
1. Creating a Group Policy Object (GPO) and adding the new .adm or .admx file to the new GPO
- or -
Upgrading an existing .adm or .admx file as described in Step 1 below
2. Upgrading the .msi file on all computers as described in Step 2 below
3. Applying the GPO.
To upgrade an existing .adm file
If any earlier version of the Profile Management .adm file exists in Group Policy, you can upgrade it byusing this procedure. All policy settings in the earlier version are preserved when you upgrade. Formore information, see A new .adm or .admx file is released with a new version of the software. Whatdo I do?.
1. On the domain controller, do one of the following:• Import the existing .adm file. The file is located in the GPO_Templates folder in the down-load package.
• Copy the .admx file from the GPO_Templates folder in the download package to theC:\Windows\PolicyDefinitions folderandcopy the .adml file to theC:\Windows\PolicyDefinitions\<localizedfolder>. For example, on English operating systems, <localized folder> is en-US.
2. On the computer you use to configure Profile Management, open Active Directory Users andComputers.
3. In the Group Policy Object Editor, right-click Administrative Templates and select Add/RemoveTemplates.
© 1999-2018 Citrix Systems, Inc. All rights reserved. 76
Profile Management 7.18
4. Select the existing version of the Profile Management .adm file (for example, ctxprofile5.4.1),click Remove and then Close. The Administrative Templates\Citrix folder is deleted.
5. Right-click Administrative Templates and select Add/Remove Templates again.6. Click Add, browse to the location of the new version of the .adm or .admx file (for example, ctx-
profile5.5.0), select it, and click Close. The new file is imported but the old settings are retained.
To upgrade the .msi file
Citrix recommends that you install the same version of Profile Management on all user devices andthat you add the .adm or .admx file of that same version to each Group Policy Object on all domaincontrollers. Doing so prevents corruption of profile data, whichmight result when different user storestructures (from different versions) exist.
Citrix recommends that you upgrade all computers to the latest version of ProfileManagement beforeenabling any new setting. To check whether a setting is new in the version you are using, see ProfileManagement policies.
1. Ensure that all users are logged off from the computers you want to upgrade.2. Install the new version of Profile Management over the existing version by running the .msi file
on each computer. For more information, see Install and set up.
To upgrade the .ini file
You edite the .ini file in an earlier version of Profile Management and upgrade to a newer version. Thesoftware can detect that the file was edited and, by default, does not overwrite it. To preserve your.ini file settings, and use the new settings in the newer version, youmust do one of the following:
• Manually add the new settings from the .ini file of the newer version to your existing, edited .inifile.
• Save a copyof the existing, edited version’s .ini file. Use theOVERWRITEINIFILES=yes command-line option to force an overwrite of the file during the upgrade. Add your saved settings to theupgraded .ini file. For example:
msiexec /i <path to theMSI file> /quiet [INSTALLDIR=<installationdirectory>] [OVERWRITEINIFILES=yes][INSTALLPOLICYINIFILES=no]
Note
To configure Profile Management policy through HDX, youmust:
• upgrade your Delivery Controllers. The reason is that HDX reads the Profile Managementpolicy settings from the UserProfileManager_PowerShellSnapIn.msi file present in the Xe-nApp and XenDesktop layout image-full\x64\Citrix Desktop Delivery Controller.
© 1999-2018 Citrix Systems, Inc. All rights reserved. 77

Profile Management 7.18
• upgrade your VDAs to get the latest version of Profile Management.
More Resources
• Frequently asked questions about upgrading Profile Management.• Profile Management policies.• Install and set up.
Frequently asked questions about upgrading Profile Management
July 11, 2018
This topic contains questions and answers about upgrading to Citrix Profile Management 5.0.
For more information on upgrading Profile Management and how different versions coexist, see theCitrix Profile Management blog.
Important: Do not upgrade from versions earlier than Version 3.0.
What are the recommendations for testing Profile Management?
Test Profile Management before rolling out the software in a production environment. Your pilotmust use a separate Organizational Unit (OU), and must not use the same accounts as users in theproduction environment. It must at least use a different user store.
For upgrades from Version 2.x, note that Version 5.0 marks profiles in the user store with Version 5.0tags. Version 5.0 uses a schema newer than the one used in Version 2.0. Version 2.1.1 can detect thenew schema but cannot process it. So it tries to load a temporary profile to avoid overwriting datamanaged by Version 5.0. This is undesirable in a production environment. Citrix recommends usinga different user store for testing Version 5.0.
A new .adm or .admx file is released with a new version of the software. What do I do?
The .admand .admx files are designed so you can replace .adm files fromearlier releases. The existingsettings are preserved. You can replace the files in the same Group Policy Object (GPO). You do nothave to create a GPO, but if you prefer to do so, see the instructions in Upgrade Profile Management.
For upgrades from Version 2.x, you must not enable any of the new features in Profile Management5.0 while the upgrade is in progress. Version 5.0 has a different schema, which would be corrupted ifVersion 2.x wrote to it. A compatibility check was introduced in Profile Management 2.1.1. The checkhelps avoid the resulting corruption if this version runs in an environment that also includes a laterversion.
© 1999-2018 Citrix Systems, Inc. All rights reserved. 78

Profile Management 7.18
During the upgrade process, ensure that Profile Management is not running. Some machines havethe old configuration and others have the new one, which can lead to inconsistencies or temporaryprofiles being assigned.
When all upgrades are completed and no Profile Management 2.x systems are present, it is safe toenable the desired version 5.0 features in the GPO. Do this during a scheduled maintenance period.Allow time (typically 24 hours) for the Active Directory (AD) changes to propagate.
How do I roll back Profile Management if I upgraded incorrectly?
This topic describes rolling back from Version 5.0 to any earlier version.
Important: Rolling back to an earlier version has not been officially tested and can be difficult.
Themost important step is to revert the schema. This stepmust be done for every user’s profile whileall users are logged off (during a scheduled downtime).
Each user’s profile in the user store contains a file in the root directory called PmCompatibility.ini,whichmust be deleted. After all these files are deleted, you can revert to the earlier version and restartthe deployment with that version’s .adm file.
If the PmCompatibility.ini files are not deleted, the earlier version checks, finds that Version 5.0 sys-tems also use the user store, gives the user a temporary profile, and asks them to alert their supportdesk. They can tell the user to log off and thenmanually delete the .ini file from the user store.
Migrate user profiles
July 11, 2018
This topic contains instructions on turning Citrix user profiles into Windows roaming profiles. It alsodescribes how to remove Citrix user profiles from personal vDisks (a Citrix XenDesktop feature) soProfile Management can process them.
For more information onmigration strategies, see Upgrade andmigrate.
Tomigrate to roaming profiles
You can migrate Citrix user profiles to Windows roaming profiles at any time. Move profile data to anetwork location where the roaming profiles are stored. After migration, Profile Management takesno part in processing user logons or application settings.
1. Ensure that all users are logged off.
© 1999-2018 Citrix Systems, Inc. All rights reserved. 79

Profile Management 7.18
2. Remove the Profile Management Service from all of the computers that are managed by thesoftware.
3. In the user store, move the contents of \UPM_Profile to your roaming profile location. You donot have to move the contents of the cross-platform settings store.
4. In addition, for Version 1 profiles only, remove the _upm_var suffix from all subfolders of\UPM_Profile.Note: Youmight find that scripting simplifies this step.
Tomigrate from personal vDisks
If you use the Personal vDisk feature in XenDesktop, by default user profiles are stored on the PersonalvDisk’s P: drive not the virtual desktop’s C: drive. If instead you want Citrix Profile Management (notthe Personal vDisk) to process the profiles, you adjust this default when installing the Virtual DesktopAgent bymodifying the Registry on themaster image used for a new catalog. In this scenario, becausethe catalog is new, no users have logged on, so no profiles are stored on the P: drive.
Important: An alternative scenario occurs if you enable Profile management on machines in existingcatalogs with Personal vDisks. Because the catalog is already in use, logons have taken place andprofiles are present on the P: drive. The profiles remain there after youmodify the Registry. Thereforeadjust the default differently.
Issues that indicate the presence of profiles on P: drives while Profilemanagement is enabled includeusers having to reset their wallpaper, having to reconfigure their applications, or receiving temporaryprofiles.
Follow these instructions to adjust the default in this alternative scenario.
1. Scheduleamaintenancedowntime for thevirtualmachineswhoseprofiles youwant tomigrate.
2. Create a startup script (or edit your existing script). Include a command to run Delprof.exe, aprofile deletion tool for Windows XP from Microsoft, or Delprof2.exe. a similar tool for later op-erating systems from Sepago. Follow the run command by a shutdown command:
pre codeblock \\<share name>\delprof.exe /q /i shutdown /s /t 0
You can download Delprof.exe from the Microsoft Web site. For information on this tool, seehttp://support.microsoft.com/kb/315411.
3. On the master image, change the following Registry setting from 1 to 0:
Caution: Editing the registry incorrectly can cause serious problems that may require you toreinstall your operating system. Citrix cannot guarantee that problems resulting from the incor-rect use of Registry Editor can be solved. Use Registry Editor at your own risk. Be sure to backup the registry before you edit it.
HKLM\Software\Citrix\personal vDisk\Config\EnableUserProfileRedirection
© 1999-2018 Citrix Systems, Inc. All rights reserved. 80

Profile Management 7.18
4. Update the master image’s inventory.
5. During the scheduled downtime, distribute the master image to the virtual machines. Ensurethat they restart. At that point, the script runs, deletes the profiles from the P: drives, and shutsdown the machines.
6. When all of themachines are shut down, delete the startup script (or the line you added to yourexisting script).
7. Start all of the machines or let users log on. From this point, profiles are stored on the virtualdesktops’ C: drives.
Note: To migrate profiles in the reverse direction so they are managed by the personal vDisk (notProfile Management), follow these instructions. But change the Registry setting of EnableUserProfil-eRedirection from 0 to 1. This change loads the profiles on to the personal vDisk’s P: drive.
Configure
July 11, 2018
This topic introduces how to configure ProfileManagement policies tomeet your deployment require-ments. For instructions on setting a policy, see Manage.
Manage
July 11, 2018
Important: The following policy generally does not require configuration. Unless instructed to by Cit-rix personnel, leave it in its default settings.
Policy: Number of retries when accessing locked files
It is most unlikely that you need to enable this policy.
During logoff, if there are any locked files, the Profile Management Service tries the specified numberof times to access the files and copy them back to the user store. But typically the Service only reads(not writes to) the files for the copy operation to succeed. If any locked files exist, the Service does notdelete the local profile and instead leaves it “stale” (as long as the appropriate policy was enabled).
Citrix recommends that you do not enable this policy.
© 1999-2018 Citrix Systems, Inc. All rights reserved. 81
Profile Management 7.18
Resolve conflicting profiles
July 11, 2018
Conflicts between local Windows user profiles and Citrix user profiles (in the user store) can occurwhen you add Profile Management to an existing deployment. In this scenario, you must determinehow the data in the local Windows profile is managed.
1. Under Profile Management, open the Profile handling folder.2. Double-click the Local profile conflict handling policy.3. Select Enabled.4. Select one of the following options from the drop-down list:
• Use local profile. Profile Management processes the local Windows user profile but doesnot change it in any way.
• Delete local profile. Profile Management deletes the local Windows user profile and thenimports the Citrix user profile from the user store.
• Rename local profile. Profile Management renames the local Windows user profile (forbackup purposes) and then imports the Citrix user profile from the user store.
If Local profile conflict handling is not configuredhere, the value from the .ini file is used. If this settingis not configured here or in the .ini file, existing local profiles are used.
For your changes to take effect, run the gpupdate /force command from the command prompt asdocumented at http://technet.microsoft.com/en-us/library/bb490983.aspx.
Specify a template or mandatory profile
July 11, 2018
By default, new Citrix user profiles are created from the default user profile on the computer where auser first logs on. ProfileManagement can alternatively use a centrally stored templatewhen creatingprofiles. The template can be a standard roaming, local, or mandatory profile that resides on anynetwork file share.
Any variation in different devices’ default user profiles results in differences in the base profile createdfor the user. You can regard your selection of a template profile as a Global Default User profile.
As prerequisites:
• Ensure that the template profile does not contain any user-specific data• Ensure that users have read access to the template profile• Convert a mandatory profile to a template profile by renaming the file NTUSER.MAN toNTUSER.DAT
• Remove SACLs from NTUSER.DAT in the template profile
© 1999-2018 Citrix Systems, Inc. All rights reserved. 82
Profile Management 7.18
For information on creating template profiles by customizing existing Microsoft profiles, see http://support.microsoft.com/kb/959753and http://support.microsoft.com/kb/973289.
1. Under Profile Management, open the Profile handling folder.
2. Double-click the Template profile policy.
3. Select Enabled.
4. In Path to the template profile, enter the location of the profile youwant to use as a template ormandatory profile. This path is the full path to the folder containing the NTUSER.DAT registryfile and any other folders and files required for the template.
Important: If thepath consists only ofNTUSER.DAT, ensure that youdonot include the file namein the path. For example, with the file \\myservername\myprofiles\template\ntuser.dat, set thelocation as \\myservername\myprofiles\template.
Use absolute paths, which can be UNC paths or paths on the local machine. You can use thelatter, for example, to specify a template profile permanently on a Citrix Provisioning Servicesimage. Relative paths are not supported.
This policy does not support expansion of Active Directory attributes, system environment vari-ables, or the %USERNAME% and%USERDOMAIN% variables.
5. Optionally, select a check box to override any existing Windows user profiles. If a user has noCitrix user profile, but a local or roamingWindows user profile exists, by default the local profileis used. And this file is migrated to the user store, if this is not disabled. You can change thesetting by enabling the checkbox Template profile overrides local profile or Template profileoverrides roaming profile. Additionally, identify the template as a Citrixmandatory profile. LikeWindowsmandatory profiles, changes cannot be saved to Citrix mandatory profiles.
If Template profile is not configured here, the value from the .ini file is used. If this setting is not con-figured here or in the .ini file, no template or mandatory profile is used.
For your changes to take effect, run the gpupdate /force command from the command prompt asdocumented at http://technet.microsoft.com/en-us/library/bb490983.aspx.
Choose amigration policy
July 11, 2018
Whenauser first logs onafterProfileManagement is enabled, noCitrix user profile for themexists. Butyou can migrate their existing Windows user profile “on the fly” during logon. Decide which existingprofile (roaming, local, or both) is copied and used in all further processing.
For more information on planning a migration strategy, see Migrate profiles? New profiles?. In addi-tion, review the system requirements for migrating existing profiles in System requirements.
© 1999-2018 Citrix Systems, Inc. All rights reserved. 83

Profile Management 7.18
1. Under Profile Management, open the Profile handling folder.2. Double-click the Migration of existing profiles policy.3. Select Enabled.4. Select one of the following options from the drop-down list:
• Local. Use this setting if you are migrating local profiles.• Local andRoaming. Use this setting if you aremigrating local and roaming profiles (includ-ing Remote Desktop Services profiles, formerly known as Terminal Services profiles).
• Roaming. Use this setting if youaremigrating roamingprofilesorRemoteDesktopServicesprofiles.
IfMigration of existing profiles is not configured here, the value from the .ini file is used. If this settingis not configured here or in the .ini file, existing local and roaming profiles aremigrated. If this settingis disabled, no profile is migrated. If this setting is disabled and no Citrix user profile exists in theuser store, the existing Windowsmechanism for creating profiles is used as in a setup without ProfileManagement.
For your changes to take effect, run the gpupdate /force command from the command prompt asdocumented at http://technet.microsoft.com/en-us/library/bb490983.aspx.
Enable Profile Management
July 11, 2018
By default, to facilitate deployment, Profile Management does not process logons or logoffs. EnableProfile Management only after carrying out all other setup tasks and testing how Citrix user profilesperform in your environment.
1. Under Profile Management, double-click the Enable Profile management policy.2. Select Enabled.
If this setting is not configured here, the value from the .ini file is used. If this setting is not configuredhere or in the .ini file, Profile Management does not process Windows user profiles in any way.
For your changes to take effect, run the gpupdate /force command from the command prompt asdocumented at http://technet.microsoft.com/en-us/library/bb490983.aspx.
Configuration precedence
July 11, 2018
You can configure Profile Management using Group Policies and the .ini file. Configuration settingsare applied as follows:
© 1999-2018 Citrix Systems, Inc. All rights reserved. 84

Profile Management 7.18
1. SettingsdefinedbyGroupPolicies takeprecedence. The .ini file is queriedonly if a policy settingis set toNot Configured.
Note: If you apply a Group Policy Object selectively to sites and domains within an Organiza-tional Unit, a further precedence applies. See Defining the scope of application of Group Pol-icy documentedathttps://technet.microsoft.com/en-us/library/cc754948(v=ws.10).aspx. Notethat domain and OU Group Policies take precedence over local policies.
2. Where a setting is not defined by a policy, Profile Management tries to read the setting from the.ini file.
3. If a setting is not configured by a group policy or in the .ini file, the default setting is used.
In XenDesktop 7 deployments, be aware of the additional precedence introduced by XenDesktop poli-cies. For more information, see the topic User profiles in the XenDesktop documentation.
There might be situations where you want to configure the same setting differently in Group Policyand the .ini file. For example when you want to activate default logging with a Group Policy settingbut activate verbose logging using the .ini file on a computer that you use for troubleshooting.
About the Profile Management .ini file
July 11, 2018
Default configuration
Profile Management comes with a default configuration stored in an .ini file. This file must be locatedin the installation folder so that the Profile Management Service can recognize it. The default config-uration is suitable for most environments. It processes the profiles of all users in all groups.
If you have a non-English deployment of Profile Management running on Windows XP or WindowsServer 2003, you must create an appropriate language version of the .ini file using UPMPolicy-Defaults_all.ini. Rename a copy of this file to reflect your language (for example, UPMPolicyDe-faults_all_es.ini for Spanish) and localize the folder names. Use these file names:
• For French operating systems, UPMPolicyDefaults_all_fr.ini• For German operating systems, UPMPolicyDefaults_all_de.ini• For Spanish operating systems, UPMPolicyDefaults_all_es.ini• For Japanese operating systems, UPMPolicyDefaults_all_ja.ini• For Simplified Chinese operating systems, UPMPolicyDefaults_all_zh-CN.ini
© 1999-2018 Citrix Systems, Inc. All rights reserved. 85

Profile Management 7.18
Modify the .ini file
If you add entries to the .ini file, ensure that the variables and values have the correct format.
Flags (on/off indicators) must be of this form:
“‘ pre codeblock
=“‘A value of 1 enables a setting and any other value or no value disables it. For example, the followingentry enables the ServiceActive setting:“‘ pre codeblockServiceActive=1“‘Any of the following entries disable the setting:“‘ pre codeblockServiceActive=ONServiceActive=OFFServiceActive=TRUEServiceActive=FALSEServiceActive=“‘List entries must be of this form:“‘ pre codeblock=“‘Do not append 1 after the equals sign. For example, the following entry specifies Microsoft Office filesto be synchronized:“‘ pre codeblock[SyncFileList]AppData\Local\Microsoft\Office\*.OfficeUI“‘Changes to Group Policy settings take effect when amanual or automatic policy refresh occurs on thetarget computers. Changes to the .ini file take effect when you issue the command gpupdate /force,which is recommended. Or the changes take effect when you restart the Profile Management Serviceon the target computers.
Include and exclude items
July 11, 2018
© 1999-2018 Citrix Systems, Inc. All rights reserved. 86

Profile Management 7.18
This topic describes the process that Profile Management uses to include and exclude items fromusers’ profiles. Ensure that you understand this process if you decide to modify the default inclusionor exclusion lists to improve the logon and logoff experience of your users. To help you determinewhether this modification is required, see Which applications?
For example, you might include Microsoft Word because it is a highly customizable and frequentlyused application that should present the same experience to roaming users however it is accessed.Conversely, you might exclude an enterprise application because it is infrequently used by somegroups so its profile data does not need to be downloaded at each logon and logoff.
By default, all files and folders in local profiles are synchronized with the user store. You can specifyfiles and folders that you do not want to synchronize by adding them to an exclusion list. If you ex-clude a folder, you can specify subfolders of it that you do want to synchronize by adding them to aninclusion list.
You can include and exclude:
• Files and folders contained inside profiles.• Files and folders that store personalization settings outside profiles.• Registry entries in the HKCU hive that store personalization settings. Entries in the HKLM hiveare not processed by default and cannot be configured to do so.
Before including and excluding items
Before tuning the contents of your users’ profiles, consider using the set of built-in Windows Perfor-manceMonitoring (Perfmon) counters. Theseprovide insights into thebehavior of your profiles. Avail-able counters includemeasurementsof theprofile sizeand the time taken tocreateaCitrix userprofileon the local computer.
Youmight need to decidewhether to cache profiles locally (on the computers that run ProfileManage-ment). Factors that affect the decision include the Citrix products in your deployment, the availablespace on the local computers, and the number of users in the deployment.
Files and folders
All includedandexcluded folder names are language specific. However, folder names in theuser storeare in a format independent of the operating system language.
You can synchronize files or folders on disks that are treated as local by the operating system. Youcannot synchronize files or folders on network mapped drives.
© 1999-2018 Citrix Systems, Inc. All rights reserved. 87

Profile Management 7.18
The registry
For existing users, the entire HKCU hive is copied to the user store. For new users, the hive of theirMicrosoft local, roaming, default, or template profile is copied. Inclusions are added and exclusionsare removed from the hive when changes are made to the user store.
Changes to registry key values are not preserved. This is by design and supports the typical use case inwhich an administrator provides users with a template profile containing a registry value that shouldnot be changed (for example, to standardize the functioning of a particular application). If you havea template profile that contains unwanted keys, use a tool such as Profile Nurse from Sepago to elim-inate them from the user store.
About exclusions
Exclusions are processed at logoff not logon. They do not delete data from the user store but preventnew data from being written to it.
Other than the default exclusions, typically you do not need to exclude any items when you first rollout ProfileManagement. Later, as you track applicationperformanceandgather feedback fromusers,youmight need to exclude items if settings frommultiple applications clash or if a user’s NTUSER.DATfile grows very large as a result of collecting unneeded settings.
Do not add redirected folders as exclusions.
Important: Citrix recommends that you exclude the folder AppData\Local and AppData\LocalLowfrom synchronization. If you do not, a very large amount of datamay be transferred over the networkand users may experience logon delays. These folders are not synchronized by standard Windowsroaming profiles. In the default configuration, the exclusion lists contain these folders.
Inclusion and exclusion rules
The following rules are used when Profile Management includes and excludes files, folders, and reg-istry keys:
1. All items are included by default2. If the same path is configured as both an inclusion and an exclusion, the inclusion takes prece-
dence3. An inclusion takes precedence over an exclusion in the same folder4. An inclusion takes precedence over an exclusion higher up in the folder hierarchy5. An exclusion takes precedence over an inclusion higher up in the folder hierarchy
These rules result in sensible and intuitive behavior. All items are included by default. From thatstarting point, you can configure top-level exceptions as exclusions, then configure deeper exceptionsto the top-level exceptions as inclusions, and so on.
© 1999-2018 Citrix Systems, Inc. All rights reserved. 88
Profile Management 7.18
Default inclusions and exclusions
July 11, 2018
This topic describes the default items that Profile Management includes in and excludes from its pro-cessing. Depending on the applications in your deployment, extra (non-default) items might be re-quired. To help you determine which extra items you include or exclude, see Which applications?
Important: If you use Group Policy rather than the .ini file (or you are rolling out a Group Policy de-ployment after a successful test with the .ini file), unlike the installed .ini file, no items are includedor excluded by default in the .adm or .admx file. You must add the default items manually to the file.These items are shown in the tables in this topic. Note the following:
• Use ProfileManagement policies tomap setting names in the .ini file and the .admor .admx file,and to understand how the Profile Management variables (for example, !ctx_internetcache!)expand
• Whenpasting inclusionsandexclusions fromthe .ini file, remove the trailing= (equals sign) fromeach item
• Do not add an initial backslash to inclusions and exclusions
Registry inclusion list
Default Value
<empty>
Registry exclusion list
Default Value
Software\Microsoft\AppV\Client\Integration=
Software\Microsoft\AppV\Client\Publishing=
Software\Microsoft\Speech_OneCore=
Note: If you are using Microsoft App-V, this exclusion is not correct and different exclusions are re-quired as documented atProfile Management and App-V.
© 1999-2018 Citrix Systems, Inc. All rights reserved. 89

Profile Management 7.18
Folder inclusion list
Default Value
<empty>
All folders in the profile are included by default.
Folder exclusion list
Folders in this table are excluded from synchronization.
Default Value
!ctx_internetcache!=
!ctx_localappdata!\Google\Chrome\User Data\Default\Cache=
!ctx_localappdata!\Google\Chrome\User Data\Default\Cached Theme Images=
!ctx_localappdata!\Google\Chrome\User Data\Default\JumpListIcons=
!ctx_localappdata!\Google\Chrome\User Data\Default\JumpListIconsOld=
!ctx_localappdata!\GroupPolicy=
!ctx_localappdata!\Microsoft\AppV=
!ctx_localappdata!\Microsoft\Messenger=
!ctx_localappdata!\Microsoft\Office\15.0\Lync\Tracing=
!ctx_localappdata!\Microsoft\OneNote=
!ctx_localappdata!\Microsoft\Outlook=
!ctx_localappdata!\Microsoft\Terminal Server Client=
!ctx_localappdata!\Microsoft\UEV=
!ctx_localappdata!\Microsoft\Windows Live=
!ctx_localappdata!\Microsoft\Windows Live Contacts=
!ctx_localappdata!\Microsoft\Windows\Application Shortcuts=
!ctx_localappdata!\Microsoft\Windows\Burn=
!ctx_localappdata!\Microsoft\Windows\CD Burning=
!ctx_localappdata!\Microsoft\Windows\Notifications=
© 1999-2018 Citrix Systems, Inc. All rights reserved. 90

Profile Management 7.18
Default Value
!ctx_localappdata!\Packages=
!ctx_localappdata!\Sun=
!ctx_localappdata!\Windows Live=
!ctx_localsettings!\Temp=
!ctx_roamingappdata!\Microsoft\AppV\Client\Catalog=
!ctx_roamingappdata!\Sun\Java\Deployment\cache=
!ctx_roamingappdata!\Sun\Java\Deployment\log=
!ctx_roamingappdata!\Sun\Java\Deployment\tmp=
$Recycle.Bin=
AppData\LocalLow=
Tracing=
File inclusion list
Default Value
<empty>
All files in the profile are included by default.
File exclusion list
Default Value
<empty>
No files in the profile are excluded by default.
Include and exclude items
July 11, 2018
© 1999-2018 Citrix Systems, Inc. All rights reserved. 91

Profile Management 7.18
As a prerequisite, ensure that you understand how inclusions and exclusionswork. Formore informa-tion, see Include and exclude items. For information on the default included and excluded items, seeDefault inclusions and exclusions.
Use Enter to separate multiple entries when you include and exclude items.
To include items
Tips: If desired, you can include specific top-level folders. In a collaborative environment, this stephas the advantage of signaling critical folders to other administrators.
1. Under Profile Management > Registry, double-click the Inclusion list policy.
2. Select Enabled.
3. Add any profile-related registry keys in the HKCU hive that you want to be processed duringlogoff. Example: Software\Adobe.
4. Under Profile Management > File system > Synchronization, double-click the Directories to syn-chronize policy.
5. Select Enabled.
6. Add any folders that you want Profile Management to process but that are located in excludedfolders.
ProfileManagement synchronizes eachuser’s entire profile between the system it is installedonand the user store. It is not necessary to include subfolders of the user profile by adding themto this list. Paths on this list can be absolute or relative. Relative paths are interpreted as beingrelative to the user profile. Example:
• Desktop\exclude\include. Ensures that the subfolder called include is synchronized evenif the folder called Desktop\exclude is not.
7. Under Profile Management > File system > Synchronization, double-click the Files to synchro-nize policy.
8. Select Enabled.
9. Profile Management synchronizes each user’s entire profile between the system it is installedon and the user store. It is not necessary to include files in the user profile by adding them tothis list.
This setting allows for the inclusion of files below excluded folders. Paths on this list can be ab-solute or relative. Relative paths are interpreted as being relative to the user profile. Wildcardscan be used but are only allowed for file names. Wildcards cannot be nested and are appliedrecursively. Examples:
© 1999-2018 Citrix Systems, Inc. All rights reserved. 92

Profile Management 7.18
• AppData\Local\Microsoft\Office\Access.qat. Specifies a file belowa folder that is excludedin the default configuration.
• AppData\Local\MyApp\*.cfg. Specifies all files with the extension .cfg in the profile folderAppData\Local\MyApp and its subfolders.
If Inclusion list is not configuredhere, the value from the .ini file is used. If this setting is not configuredhere or in the .ini file, all of the HKCU hive is processed.
If Directories to synchronize are not configured here, the value from the .ini file is used. If this settingis not configured here or in the .ini file, only non-excluded folders in the user profile are synchronized.Disabling this setting has the same effect as enabling it and configuring an empty list.
If Files to synchronize is not configured here, the value from the .ini file is used. If this setting is notconfiguredhereor in the .ini file, onlynon-excluded files in theuserprofile are synchronized. Disablingthis setting has the same effect as enabling it and configuring an empty list.
For your changes to take effect, run the gpupdate /force command from the command prompt asdocumented at http://technet.microsoft.com/en-us/library/bb490983.aspx.
To exclude items
1. Under Profile Management > Registry, click the Exclusion list policy.
2. Select Enabled.
3. Click Show and add any registry keys in the HKCU hive that you do not want to be processedduring logoff. Example: Software\Policies.
4. Under Profile Management > File system, double-click the Exclusion list - directories policy.
5. Select Enabled.
6. Add any folders that you do not want Profile Management to process. Folder names can bespecified as absolute paths or as paths relative to the user profile (%USERPROFILE%). Use thatvariable to locate the profile but do not enter the variable itself in this policy. Omit initial back-slashes from paths.
Examples:
• Desktop. Does not process the Desktop folder in the user profile.• MyApp\tmp. Does not process the folder %USERPROFILE%\MyApp\tmp.
7. Under Profile Management > File system, double-click the Exclusion list - files policy.
8. Select Enabled.
9. Add any files that you do not want Profile Management to process. File names can be specifiedas absolute paths or as paths relative to the user profile (%USERPROFILE%). Use that variable
© 1999-2018 Citrix Systems, Inc. All rights reserved. 93

Profile Management 7.18
to locate the profile but do not enter the variable itself in this policy. Wildcards are allowed andare applied recursively.
Examples:
• *.tmp ignores all temp files in %USERPROFILE%.• appData\roaming\MyUnwantedApp*.tmp ignores all files with the extension .tmp in%USERPROFILE% for the specified application.
If Exclusion list is disabled, no registry keys are excluded. If this setting is not configured here, thevalue from the .ini file is used. If this setting is not configured here or in the .ini file, no registry keysare excluded.
If Exclusion list - directories is disabled, no folders are excluded. If this setting is not configured here,the value from the .ini file is used. If this setting is not configured here or in the .ini file, no folders areexcluded.
If Exclusion list - files is disabled, no files are excluded. If this setting is not configured here, the valuefrom the .ini file is used. If this setting is not configured here or in the .ini file, no files are excluded.
For your changes to take effect, run the gpupdate /force command from the command prompt asdocumented at http://technet.microsoft.com/en-us/library/bb490983.aspx.
Use wildcards
July 11, 2018
You can use DOS-style wildcard characters, such as ? (questionmark) and * (asterisk), in policies thatrefer to files (for example, file inclusion and exclusion lists). The ? (question mark) matches a singlecharacter. The * (asterisk) matches zero or more characters.
As of Profile Management 7.15, you can use the vertical bar ‘|’ for applying a policy to only the cur-rent folder without propagating it to the subfolders.
Wildcards work recursively. Ensure that you specify a valid path when using wildcards.
Policies that support wildcards do not support any other type of processing, such as the use of en-vironment variables or Active Directory attributes. You cannot use wildcards in policies that refer tofolders or registry entries.
Examples
The wildcard <path name>\h*.txtmatches house.txt, h.txt, and house.txt.txt, but does not matchah.txt.
The wildcard <path name>\a?c.txtmatches abc.txt, but does not match ac.txt.
© 1999-2018 Citrix Systems, Inc. All rights reserved. 94

Profile Management 7.18
Thewildcard <path name>\a?c*d.txtmatches abcd.txt and abccd.txt, but does notmatch acd.txt.
Configuring policies in profile root folder:*.txt specifies all files with the extension .txt in the root folder and subfolders.
*h.txt specifies all files that match this wildcard in the root folder and subfolders.
h*.txt specifies all files that match this wildcard in the root folder and its subfolders.
a?c.txt specifies all files that match this wildcard in the root folder and its subfolders.
*.txt| specifies all files with the extension .txt in the root folder without propagating it to the sub-folders.
Configuring policies in profile non-root folders:
• Examples for a file name part starts with * or ?
AppData\*.txt specifies all files thatmatch thiswildcard in the directory AppData and its sub-folders.
AppData\*h.txt specifies all files that match this wildcard in the directory AppData and itssubfolders.
• Examples for a file name part not starting with * or ?
AppData\h*.txt specifies all files that match this wildcard in the directory AppData withoutpropagating it to the subfolders.
AppData\a?c.txt specifies all files thatmatch this wildcard in the directory AppData withoutpropagating it to the subfolders.
Note: As of ProfileManagement 7.15, such configuration is applied to not only the current folderbut also the subfolders. For example, AppData\h*.txt specifies all files that match this wild-card in the directory AppData and its subfolders.
Enable logon exclusion check
July 11, 2018
When logon exclusion check is set to “1,” Profile Management does not synchronize the files and fold-ers specified in the logon exclusion list from the user store to the local profile when a user logs on.When logon exclusion check is set to “2,” Profile Management deletes the files and folders specifiedin the exclusion list from the user store when a user logs on. By default, logon exclusion check is dis-abled.
Warning: Setting logon exclusion check to “2” deletes your excluded files and folders from the userstore permanently. When you include the excluded files and folders again, these files and folders aredeleted from the cached local profile when you log on.
© 1999-2018 Citrix Systems, Inc. All rights reserved. 95
Profile Management 7.18
To enable logon exclusion check, follow the steps below:
1. Open the Profile Management .ini file. For more information about the .ini file, see About theProfile Management .ini file.
2. Add the EnableLogonExclusionCheck item in the [General Settings] section.3. To ignore files and folders specified in the exclusion list from the user store, set the value to 1.
To delete files and folders specified in the exclusion list from the user store, set the value to 2.To disable the check, set the value to 0.EnableLogonExclusionCheck=1EnableLogonExclusionCheck=2EnableLogonExclusionCheck=0
4. Save and close the Profile Management .ini file.
For your changes to take effect, run the gpupdate /force command. For more information, see http://technet.microsoft.com/en-us/library/bb490983.aspx.
Define which groups’ profiles are processed
July 11, 2018
You can define the users whose profiles are processed and profiles that are not. You can use bothcomputer local groups and domain groups (local, global, and universal). Specify domain groups inthe format <DOMAIN NAME>\<GROUP NAME>. Specify local groups in the format GROUP NAME.
Note: Computer local groups must be newly created local groups and the members must be domainusers.
1. Under Profile Management, double-click the Processed groups policy.
2. Select Enabled.
3. Click Show.
4. Add the groups containing the users whose profiles you want Profile Management to process.Use Enter to separate multiple entries.
If this setting is not configured here, the value from the .ini file is used. If this setting is notconfigured here or in the .ini file, members of all user groups are processed unless you excludethem using the Excluded groups policy.
5. Under Profile Management, double-click the Excluded groups policy.
6. Select Enabled.
7. Click Show.
© 1999-2018 Citrix Systems, Inc. All rights reserved. 96

Profile Management 7.18
8. Add the groups containing the users you do not want Profile Management to process. Use Enterto separate multiple entries.
If this setting is not configured here, the value from the .ini file is used. If this setting is notconfigured here or in the .ini file, no members of any groups are excluded.
9. Tomanage theprofiles of local administrators, under ProfileManagement, double-click thePro-cess logons of local administrators policy and click Enabled.
Important: By default, Profile Management recognizes which operating system is in use, andprocesses the accounts of local administrators on desktop, not server, operating systems. Thereason is that users are typically members of the Local Administrators group only on desktops,and excluding local administrators from processing in server environments assists with trou-bleshooting. Therefore only enable this policy if you want to modify the default behavior.
The Excluded groups policy takes precedence over the Process logons of local administratorspolicy. If an account appears in both policies, it is not processed by Profile Management.
If this setting is not configured here, the value from the .ini file is used. If this setting is notconfigured here or in the .ini file, the profiles of local administrators are not processed.
For your changes to take effect, run the gpupdate /force command from the command prompt asdocumented at http://technet.microsoft.com/en-us/library/bb490983.aspx.
Specify the path to the user store
July 11, 2018
Before specifying the path to the user store, refer toProfile Management architecture and, if relevant to your deployment, understand the effect of:
• Storing multilingual profiles• Combining inclusions and exclusions
1. Under Profile Management, double-click the Path to user store policy.2. Select Enabled and enter the path to the directory (the user store) in which the user settings
(registry changes and synchronized files) are saved.
The path can be:
• A relative path. This pathmust be relative to the home directory, which is typically configuredas the #homeDirectory# attribute for a user in Active Directory (AD).
• A UNC path. This path typically specifies a server share or a DFS namespace.
• Disabled or unconfigured. In this case, a value of #homeDirectory#\Windows is assumed.
The following types of variables can be used for this setting:
© 1999-2018 Citrix Systems, Inc. All rights reserved. 97

Profile Management 7.18
• System environment variables enclosed in percent signs (for example, %ProfVer%). Systemenvironment variables generally require extra setup. Formore information, see Administer pro-files within and across OUs.
• Attributes of the AD user object enclosed in hashes (for example, #sAMAccountName#).• Profile Management variables. For more information, see Profile Management policies.
User environment variables cannot be used, except for %username% and %userdomain%. Youcan also create custom AD attributes to define organizational variables such as location or users.Attributes are case-sensitive.
Examples:
• \\server\share\#sAMAccountName#stores theuser settings to theUNCpath \\server\share\JohnSmith(if #sAMAccountName# resolves to JohnSmith for the current user)
• \\server\profiles$\%USERNAME%.%USERDOMAIN%\!CTX_OSNAME!!CTX_OSBITNESS! mightexpand to \\server\profiles$\JohnSmith.Finance\Win8x64
Important: Whichever attributes or variables you use, check that this setting expands to the folderone level higher than the folder containing NTUSER.DAT. For example, if this file is contained in\\server\profiles$\JohnSmith.Finance\Win8x64\UPM_Profile, set the path to the user store as\\server\profiles$\JohnSmith.Finance\Win8x64 (not the \UPM_Profile subfolder).
This diagram illustrates the components of a typical path to the user store that incorporates AD at-tributes, environment variables, and Profile Management variables.
© 1999-2018 Citrix Systems, Inc. All rights reserved. 98

Profile Management 7.18
Formore information on using variables when specifying the path to the user store, see the followingtopics:
• Share Citrix user profiles onmultiple file servers• Administer profiles within and across OUs• High availability and disaster recovery with Profile Management
If Path to user store is disabled, the user settings are saved in the Windows subdirectory of the homedirectory.
If this setting is not configuredhere, the setting from the .ini file is used. If this setting is not configuredhere or in the .ini file, the Windows directory on the home drive is used.
For your changes to take effect, run the gpupdate /force command from the command prompt asdocumented at http://technet.microsoft.com/en-us/library/bb490983.aspx.
Store certificates
July 11, 2018
© 1999-2018 Citrix Systems, Inc. All rights reserved. 99

Profile Management 7.18
Follow this procedure to save personal certificates that have been imported into the certificate storeduring a session. By default, certificates are automatically synchronized.
1. Add the path Application Data\Microsoft\SystemCertificates\My to the Directories to synchro-nize setting. The operating system language determines the Application Data folder in this lo-cation. If a policy is used to configure multi-language systems, add each language’s location tothe list.
Example
On an English system, the path is Application Data\Microsoft\SystemCertificates\My. On a Germansystem, it is Anwendungsdaten\Microsoft\SystemCertificates\My.
For your changes to take effect, run the gpupdate /force command from the command prompt asdocumented at http://technet.microsoft.com/en-us/library/bb490983.aspx.
Stream user profiles
July 11, 2018
With the Citrix streamed user profiles feature, files and folders contained in a profile are fetched fromthe user store to the local computer only when they are accessed by users after they have logged on.Registry entries and any files in the pending area are exceptions. They are fetched immediately. Formore information on the pending area, see Pending area inProfile Management architecture.
Streaming is not required and does not work with the personal vDisk feature of Citrix XenDesktop.
1. Under Profile Management, double-click Streamed user profiles.2. Double-click Profile streaming.3. Select Enabled and click OK.4. Optionally, to enhance the streaming experience for users, double-click Always cache, select
Enabled, and do one of the following:• To save network bandwidth by imposing a lower limit on the size of files or folders that arestreamed, set a limit in megabytes. Any files and folders that exceed the limit are fetchedas soon as possible after logon.
• To turn on the cache entire profile feature, set the limit to zero. After logon, this fetches allfiles in the user store as a background system task, without any feedback to users.If large files are present, the Always cache policy can improve performance by reducinglogon times.
5. Click OK.
© 1999-2018 Citrix Systems, Inc. All rights reserved. 100

Profile Management 7.18
6. Optionally, double-clickTimeout forpendingarea lock files, select Enabled, andenter a timeoutperiod (days) that freesup files so theyarewrittenback to theuser store fromthependingarea ifthe user store remains lockedwhen a server becomes unresponsive. Use this setting to preventbloat in the pending area and to ensure that the user store always contains themost up-to-datefiles.
7. Click OK.8. Optionally, if you want only a subset of user profiles in the OU to be streamed, double-click
Streamed user profile groups, select Enabled, and enter a list of groups. Use Enter to separatemultiple entries. The profiles of users in all other groups are not streamed.
9. Click OK.
If Profile streaming is not configured in Policy or INI file, Profile Streaming is enabled.
If Always cache isnot configuredhere, the value fromthe .ini file is used. If this setting is not configuredhere or in the .ini file, it is disabled.
If Timeout for pending area lock files is not configured here, the value from the .ini file is used. If thissetting is not configured here or in the .ini file, the default value of one day is used.
If Streamed user profile groups is disabled, all user groups are processed. If this setting is not config-ured here, the value from the .ini file is used. If this setting is not configured here or in the .ini file, allusers are processed.
For your changes to take effect, run the gpupdate /force command from the command prompt asdocumented at http://technet.microsoft.com/en-us/library/bb490983.aspx.
To enable profile streaming exclusion
When profile streaming exclusion is enabled, Profile Management does not stream folders in the ex-clusion list, and all the folder as are fetched immediately from the user store to the local computerwhen a user logs on.
To enable profile streaming exclusion, follow the steps below:
1. Under Profile Management, double-click Streamed user profiles.2. Double-click the Profile Streaming Exclusion list - directories policy.3. Select Enabled.4. Click Show.5. Add folders that you do not want Profile Management to stream. The folder names can be spec-
ified as absolute paths or as paths relative to the user profile (%USERPROFILE%). Use that vari-able to locate the profile but do not enter the variable itself in this policy. Omit initial back-slashes from paths.
For example:
© 1999-2018 Citrix Systems, Inc. All rights reserved. 101

Profile Management 7.18
• Desktop. The Desktop folder is not processed in the user profile.• MyApp\tmp. The %USERPROFILE%\MyApp\tmp folder is not processed.
If this setting is not configured here, the following folders in the .ini file are excluded by default:
• AppData\Local\Microsoft\Credentials• Appdata\Roaming\Microsoft\Credentials• Appdata\Roaming\Microsoft\Crypto• Appdata\Roaming\Microsoft\Protect• Appdata\Roaming\Microsoft\SystemCertificates
If this setting is not configured here or in the .ini file, all folders are streamed.
For your changes to take effect, run the gpupdate /force command. For more information, see http://technet.microsoft.com/en-us/library/bb490983.aspx.
Note:
• This policy only takes effect when Profile Streaming is enabled.• The wildcard * and ? are not supported by this policy.• Use Enter to separate multiple entries.• When manually editing the profile streaming exclusion list, you must add the default excludedfolders as shown above to avoid logons hanging.
Configure folder redirection
July 11, 2018
Folder redirection is a feature of MicrosoftWindows and can be used with Profile Management.
Important: Configure folder redirection using only one of these methods: Microsoft Active Directory(AD) GPOs or Citrix policies. Usingmultiple methods to configure folder redirectionmay cause unpre-dictable results. Using Microsoft AD GPOs provides the most comprehensive configuration options,so it is recommended.
1. Move the required users to the OU that is managed by Profile Management.2. Create a GPO and open it for edit.3. In User Configuration > Policies > Administrative Templates > Citrix > Profile Management >
Folder Redirection, select the folder you want to redirect.4. Enable the Redirect the <folder name> folder policy and provide the path to this shared folder.
Do not add exclusions for redirected folders. Do not add usernames or folder names to thispath. For example, if you set this path to the Desktop folder as \\server\share\, to the user thisis redirected as \\server\share\<user name>\Desktop.
5. For your changes to take effect, run the gpupdate /force command from the command promptas documented at http://technet.microsoft.com/en-us/library/bb490983.aspx.
© 1999-2018 Citrix Systems, Inc. All rights reserved. 102

Profile Management 7.18
All folders can be redirected, including:
• The Documents folder, which you can redirect to the user’s home directory• TheMusic, Pictures, and Videos folders, which you can redirect relative to theDocuments folder
Manage cookie folders and other transactional folders
July 11, 2018
This topic applies to Profile Management 3.1 and later.
The two procedures, mirroring folders and deleting stale cookies, are related. If youmanage the Inter-net Explorer Cookies folder, use both procedures. This step ensures transactional integrity while alsoreducing profile bloat involving Index.dat and browser cookies.
Mirroring can also be appliedmorewidely because it can help solve similar issues involving any trans-actional folder (also known as a referential folder). These folders contain interdependent files, whereone file references others. Mirroring folders allows Profile Management to process a transactionalfolder and its contents as a single entity, thereby avoiding profile bloat.
For example, consider how Index.dat references cookies while a user browses the Internet. A user hastwo Internet Explorer sessions, each on a different server, and they visit different sites in each session.Cookies from each site are added to the appropriate server. The user logs off from the first session(or in the middle of a session, if the active write back feature is configured). Then the cookies fromthe second session should replace those from the first session. However, instead they are merged,and the references to the cookies in Index.dat become out of date. Further browsing in new sessionsresults in repeatedmerging and a bloated cookie folder.
Mirroring the cookie folder solves the issue by overwriting the cookies with those cookies from thelast session each time the user logs off so Index.dat stays up-to-date.
The cookie folder can become bloated not only when multiple sessions are involved but also whenWeb sites are revisited and stale cookies build up. The second procedure in this topic solves the latterissue by removing the stale cookies from all profiles.
Settings required for Internet Explorer 10 and later versions for browser compatibility
CONFIGURE: Add the following folders under Mirroring:
• AppData\Local\Microsoft\Windows\INetCookies (Cookies location for Windows 8.1 platform)• AppData\Roaming\Microsoft\Windows\Cookies (Cookies location for Windows 7 and Windows8 platforms)
• AppData\Local\Microsoft\Windows\WebCache (Cookies database is maintained at Web-cache01.dat)
© 1999-2018 Citrix Systems, Inc. All rights reserved. 103

Profile Management 7.18
Note:
• History: Browsing history from Version 5.1 of UPM or older profiles is not persisted.• Cookies: Cookies created using Version 5.1 of UPM or older profiles are persisted.• Stale cookies: In Version 5.1 & older of UPM, these cookies are not handled and remain as a partof the profile until deletedmanually. In Version 5.2 of UPM,when using Internet Explorer 10 andlater, these cookies are handled in Protected and Normal modes.
The cookies and browsing history information in versions of Internet Explorer 9 and earlier are notcompatible with the cookies and browsing history information in Internet Explorer 10 and later. Usersare advised not to move across multiple systems that have different versions of Internet Explorer in-stalled. [#474200]
Tomirror folders
Use this procedure for any transactional folders not just those folders that store cookies.
Caution: Mirroring transactional folders canmean that the “last write wins”. Files that aremodified inmore than one session are overwritten by the last update. Thismight result in the loss of users’ profilechanges.
1. Under Profile Management > File system > Synchronization, double-click the Folders to mir-ror policy.
2. Select Enabled.3. Add the list of folders, relative to the root folder in the user store, that you want to mirror.
Use Enter to separate multiple entries. This policy works recursively, so do not add subfold-ers to the list. For example, add AppData\Roaming\Microsoft\Windows\Cookies but not App-Data\Roaming\Microsoft\Windows\Cookies\Low as well.
If Folders to mirror is not configured here, the value from the .ini file is used. If this setting is notconfigured here or in the .ini file, no folders are mirrored.
For your changes to take effect, run the gpupdate /force command from the command prompt asdocumented at http://technet.microsoft.com/en-us/library/bb490983.aspx.
To delete stale cookies
If you are using Internet Explorer 10 or later, this procedure is not required.
1. Under Profile Management > Advanced Settings, double-click the Process Internet cookie fileson logoff policy.
2. Select Enabled.3. Click OK.
© 1999-2018 Citrix Systems, Inc. All rights reserved. 104
Profile Management 7.18
IfProcess Internet cookie files on logoff is not configured here, the value from the .ini file is used. If thissetting is not configured here or in the .ini file, no processing of Index.dat takes place.
For your changes to take effect, run the gpupdate /force command from the command prompt asdocumented at http://technet.microsoft.com/en-us/library/bb490983.aspx.
Enabling Process Internet cookie files on logoff increases logoff times. Nevertheless, to maintain theintegrity of the cookie folder, the supported configuration is to set both Folders tomirror and ProcessInternet cookie files on logoff, as the following best practice demonstrates:
To process cookie folders
1. Under Profile Management > File system > Synchronization, double-click the Folders to mir-ror policy.
2. Select Enabled.3. Add the list of folders, relative to the root folder in the user store, that you want to mirror. Add
the folder Cookies for Version 1 profiles and AppData\Roaming\Microsoft\Windows\Cookies forVersion 2 profiles.
4. Under Profile Management > Advanced Settings, double-click the Process Internet cookie fileson logoff policy. This step deletes the stale cookies referenced by Index.dat.
5. Select Enabled.6. Click OK.
For your changes to take effect, run the gpupdate /force command from the command prompt asdocumented at http://technet.microsoft.com/en-us/library/bb490983.aspx.
Configure offline profiles
July 11, 2018
Citrix offline profiles are intended for laptop users ormobile-device users who roamwith intermittentaccess to a network. This feature allows profiles to synchronize with the user store at the earliestpossible opportunity. When a network disconnection occurs, profiles remain intact on the laptop ordevice even after restarting or hibernating. As mobile users work, their profiles are updated locallyand are eventually synchronized with the user store when the network connection is re-established.
This feature works only with domain-joined computers (including ones running Citrix XenClient). Itis not intended for use with servers or desktop computers, whose network connections tend to bepermanent.
Typically, you don’t enable both offline profiles and streamed user profiles. For this reason, offlineprofiles takeoverprecedenceanddisable streameduserprofilesand theDelete locally cachedprofiles
© 1999-2018 Citrix Systems, Inc. All rights reserved. 105

Profile Management 7.18
on logoff setting. Ensure that users always have a complete profile on their laptop or mobile devicewhen they first log on.
You can configure offline profiles in these ways:
• Using Group Policy. This policy gives you centralized administrative control of the feature butyoumust createa separateOUcontaining the laptopsordevices thatuseofflineprofiles.</span>
• Using the .ini file. It is an easier option if you prefer not to create a special OU just for laptopsandmobile devices. But it effectively hands control of this feature to individual device owners.This option requires a once-only configuration of each laptop or mobile device.</span>
If Offline profile support is not configured using Group Policy, the value from the .ini file is used. If thissetting is not configured in Group Policy or in the .ini file, offline profiles are disabled.
Using Group Policy
1. Create an OU containing all computers managed by Profile Management. Include the laptopsandmobile devices that use offline profiles, your XenApp servers, and your virtual desktops.
2. Create a child OU containing only the laptops andmobile devices.3. In Group Policy Management, create a baseline Group Policy Object (GPO) that enforces your
site-wide policies, and link it to both OUs.4. Configure the baseline GPO with the Profile Management settings common to all computers.5. Create a second, offline GPO and link it to the child OU.6. Configure the offline GPO as follows:
a) Under Profile Management, double-click Offline profile support.b) Select Enabled and click OK.c) Configure any other settings that you want to apply only to laptops andmobile devices.
For your changes to take effect, run the gpupdate /force command from the command prompt asdocumented at http://technet.microsoft.com/en-us/library/bb490983.aspx.
Using the .ini file
As a prerequisite, ensure that Offline profile support is unconfigured (the default) in both the baselineand offline GPO. If these settings are configured, the .ini file setting is overridden.
1. On each laptop ormobile device, locate the .ini file created by the Profile Management installer.To locate the .ini file, see Files included in the download.
2. Uncomment this line (by removing the semi-colon from it):
pre codeblock ;OfflineSupport=
3. Save the .ini file.
© 1999-2018 Citrix Systems, Inc. All rights reserved. 106

Profile Management 7.18
For your changes to take effect, run the gpupdate /force command from the command promptas documented at http://technet.microsoft.com/en-us/library/bb490983.aspx.
Configure the Customer Experience Improvement Program (CEIP)
July 11, 2018
To configure the Customer Experience Improvement Program (CEIP), follow these steps:
1. Open the Group Policy Management Editor.2. Under Policies > Administrative Templates: Policy definitions (ADM) > Classic Administra-
tive Templates (ADM) > Citrix > Profile Management > Advanced settings, double-click Cus-tomer Experience Improvement Program.
3. Select Enabled or Disabled, then clickOK.4. For your changes to take effect, run the gpupdate /force command from the command prompt
as documented at Gpupdate.
Note: If Customer Experience Improvement Program is not configured in Group Policy objects andHDX, the value from the .ini file is used. If this setting is not configured anywhere, it is enabled bydefault.
For more information about CEIP, see About the Citrix Customer Experience Improvement Program(CEIP).
Configure active write back
July 11, 2018
To ensure profile integrity, files and folders that aremodified on the local computer can be backed upto the user store during a session, before logoff.
If a user starts a second session (started at a second computer, for example), modificationsmade to afile in the first session are available in the second if it was started before logging off the first.
1. Under Profile Management, double-click Active write back.2. Select Enabled and click OK.
If Activewriteback isnot configured inGroupPolicyobjectsandHDX, thevalue fromthe .ini file isused.If this setting isnot configuredanywhere, itwill be configuredbyProfileManagementdynamically. Formore information, see Advanced troubleshooting checklist.
For your changes to take effect, run the gpupdate /force command from the command prompt asdocumented at http://technet.microsoft.com/en-us/library/bb490983.aspx.
© 1999-2018 Citrix Systems, Inc. All rights reserved. 107

Profile Management 7.18
Note
Active write back for registry entries is disabled by default. You can enable this feature underProfile Management > Active write back Registrywhen active write back has been enabled. Ifit is not configured in Group Policy objects and HDX, the value from the .ini file is used.
Configure cross-platform settings
July 11, 2018
Important: Note the following important information for this feature:
• Cross-platform settings in Profile Management work with a set of supported operating systems(OSs) and applications. Configure this feature only in a production environment.
• Microsoft Office settings do not roam between versions of that application. For more informa-tion, see Operating systems and applications supported By cross-platform settings.
• This feature is suitable for registry andapplication settings. It is not for files or folders, or objectstypically used with folder redirection (for example, browser favorites, and desktop and Startmenu settings).
• If you use this feature to migrate user profiles between systems with different profile versions,disable it after the migration has been completed for all users. There is some performance im-pact, primarily to logoffs, when using this feature. So it is best to leave it disabled unless yousupport roaming between profile versions.
This topic contains an example of the steps you can take to configure cross-platform settings. For amore detailed case study, see Cross-platform settings - Case study.
Tip: Citrix recommends restricting this feature to a small, test set of users before putting it intoproduction. Use theCross-platform settings user groups option to achieve it. If this setting is configured, the cross-platform settings feature of Profile Management processes only members of these user groups. Ifthis setting is disabled, the feature processes all of the users specified by theProcessed groups setting. IfCross-platform settings user groups is not configured in Group Policy or the .ini file, all user groupsare processed.
1. For the settings that are common to all platforms, create a common Group Policy Object (com-mon GPO), link it to the Profile Management .adm or .admx file, and configure the settings asrequired. This setup is best practice because it minimizes duplicate settings that canmake anylater troubleshooting awkward. Depending on your requirements, all Profile Management set-tings work on multiple platforms except Path to user store. Configure Path to user store sep-arately for each platform due to the different user store structures of Version 1 and Version 2
© 1999-2018 Citrix Systems, Inc. All rights reserved. 108

Profile Management 7.18
profiles. In the common GPO, leave this setting unconfigured.2. Create separate OUs for your different platforms. For example, if you are migrating from Win-
dows 7 to Windows 8, create separate OUs for these operating systems), and set Path to userstore appropriately in each OU.
3. Locate the definition (.xml) files for the supported applications whose personalizations youwant to work across the platforms. These files are located in the CrossPlatform folder in thedownload package. You can create your own application definition files. For details, see Createa definition file.
4. Copy the .xml files to a suitable location on your network.5. Edit the common GPO in Group Policy Management Editor. Under Profile Management open
the Cross-platform settings folder and configure these settings:• Cross-platform settings user groups. Restricts the users who experience cross-platformsettings. This setting is optional. It is useful when testing this feature or rolling it out instages.
• Path to cross-platform definitions. Identifies the network location of the definition filesthat you copied from the download package. This must be a UNC path. Users must haveread access to this location, and administrators must have write access to it. The locationmust be a Server Message Block (SMB) or Common Internet File System (CIFS) file share.
• Path to cross-platform settings store. It is the common area of the user store where profiledata shared by multiple platforms is located. Users must have write access to this area.The path can be an absolute UNC path or a path relative to the home directory. You canuse the same variables as for Path to user store.
6. Specify a baseplatformby ensuring Source for creating cross-platform settings is set to Enabledin that platform’s OU. This setting migrates data from the base platform’s profiles to the cross-platform settings store. In the other platforms’ OUs, set this policy to Disabled or Unconfigured.Each platform’s own set of profiles are stored in a separate OU. You must decide which plat-form’s profile data to use to seed the cross-platform settings store. This is referred to as thebase platform. If the cross-platform settings store contains a definition file with no data, or thecached data in a single-platform profile is newer than the definition’s data in the store, ProfileManagement migrates the data from the single-platform profile to the store unless you disablethis setting.Important: IfSource for creating cross-platformsettings is enabled inmultipleOUs, theplatform that the firstuser logs on to becomes the base profile.
7. Set Enable cross-platform settings to Enabled. By default, to facilitate deployment, cross-platform settings is disabled until you turn on this setting.
8. Run a Group Policy update.9. If you are migrating profiles across platforms but not supporting roaming of them, when the
migration is complete, set Enable cross-platform settings to Disabled.
© 1999-2018 Citrix Systems, Inc. All rights reserved. 109

Profile Management 7.18
If Path to cross-platform definitions is not configured here, the value from the .ini file is used. If thissetting is not configured here or in the .ini file, no cross-platform settings are applied.
If Path to cross-platform settings store is disabled, the default path Windows\PM_CP is used. If thissetting is not configured here, the value from the .ini file is used. If this setting is not configured hereor in the .ini file, the default path is used.
If Enable cross-platformsettings isnot configuredhere, thevalue fromthe .ini file isused. If this settingis not configured here or in the .ini file, no cross-platform settings are applied.
Example: Roaming Microsoft Office settings betweenWindows Server 2008 andWindows 7
This example describes the major steps involved in allowing users’ application settings to roam be-tween two operating systems that create Version 2 profiles. Microsoft Office 2010 is the example ap-plication, and roaming takes places betweenCitrix XenApp 6.5 onWindows Server 2008 andWindows7. Both OSs are 64-bit.
1. Users are accustomed toaccessingOffice 2010and Internet Explorer 9 aspublishedapplicationson XenApp servers, and change several settings in these applications. For example, theymodifytheir email signature in Office and choose a new home page in Internet Explorer.
2. At a future date, virtual desktops (created with Citrix XenDesktop) are created but not yet re-leased to users. The desktops run Windows 7 and are preconfigured with Office 2010 and Inter-net Explorer 9.
3. The users expect their settings to be the same on their new desktops. You configure the cross-platform settings feature according to the procedure in this topic. It includes enabling Sourcefor creating cross-platform settings in the OU for Windows Server 2008.
4. When users next run the published versions of the applications (not the new, virtual desktops),their settings are copied to the cross-platform settings store.
5. The new desktops are then released to users. When they log on and run the local versions of Of-fice and Internet Explorer, the settings from the earlier Windows Server 2008 sessions are used.Users’ modified email signatures and home pages are available on their Windows 7machines.
6. Users browse in Internet Explorer from their virtual desktop, and decide to change their homepage again.
7. Users log off and leave work. They don’t have access to their virtual desktop at home, but theycan run the published version of Internet Explorer 9 remotely. They find theirmost recent homepage, created on Windows 7 in the previous step, has been preserved.
© 1999-2018 Citrix Systems, Inc. All rights reserved. 110
Profile Management 7.18
Operating systems and applications supported by cross-platformsettings
July 11, 2018
This topic describes the applications and operating systems (OSs) supported by the cross-platformsettings feature in this release of Profile management.
About definition files
Definition files contain commonpersonalizations for selectedWindowsapplications. Each file and thedefinitionswithin it allowusers to connect to the same application onmultiple OSs, presenting essen-tially identical profiles on each platform. For example, users might access two instances of MicrosoftOffice. One is installed on a Windows 7 virtual desktop and the other is published with Citrix XenAppon Windows Server 2003. Whichever instance is accessed, users’ experience of Office is consistent.
Preconfigured definition files are a key aspect of the cross-platform settings feature. There is a defini-tion file for each supported application. Definition files are in an XML format.
Important: Without a thorough analysis of an application’s behavior across all OSs and a full under-standing of this feature’s operation, editing of definition files can result in unexpected changes tousers’ profiles that can be difficult to troubleshoot. For this reason, Citrix does not support the edit-ing of the supplied definition files or the creation of new ones. In addition, some application settingscannot be duplicated across OSs due to the nature of Windows user profiles.
In addition note that, although this feature is suitable for registry and application settings, it is notsuitable for files or folders, or objects typically used with folder redirection (for example, browser fa-vorites, and desktop and Start menu settings).
Supported operating systems
You can roam profiles between any of the supported client OSs, and between any of the supportedserver OSs.
The following are supported (x86 and x64 versions as applicable):
• Client OSs. Windows XP, Windows 7, and Windows Vista.• Server OSs. Windows Server 2003, Windows Server 2008, and Windows Server 2008 R2.
Supported Citrix products
The following Citrix products are supported by the cross-platform settings feature:
© 1999-2018 Citrix Systems, Inc. All rights reserved. 111

Profile Management 7.18
• XenApp 5 Feature Pack for Windows Server 2003 or later• XenDesktop 4 or later
Supported applications
The following definition files are available in this release. The XML file name indicates the supportedapplication and versions.
• Internet Explorer 7 Plus.xml. This file supports the roaming of Versions 7, 8, and 9 of Inter-net Explorer (except favorites) across platforms. The roaming of favorites and feeds is not sup-ported.
• Office 2007.xml.• Office 2010.xml.• Wallpaper.xml. This file supports the roaming of desktop wallpaper across platforms. Theroaming of themes across platforms is not supported.
Important: Use the definition files for each application only in the above supported scenarios. Forexample, Internet Explorer 7 Plus.xml roams settings between multiple versions of that browser. Butyou cannot use Office 2007.xml or Office 2010.xml to roam settings between versions of Office.
Create a definition file
July 16, 2018
Definition files define the folders, files, or registries to be synchronized. You can create your own ap-plication definition files.
Use the Microsoft UE-V template generator to create a UE-V template file.
1. Download theWindowsAssessment andDeploymentKit (WindowsADK) forWindows 10 fromMicrosoft website.
2. Install Windows ADK. SelectMicrosoft User Experience Virtualization (UE-V) Template Gen-erator. Click Install. Click Finish to close the wizard after the installation completes.
3. Click Start, clickMicrosoft User Experience Virtualization, and then clickMicrosoft User Ex-perience Virtualization Generator.
4. Click Create a settings location template.5. Follow the wizard to specify application related parameters. Click Next to continue.
Take Notepad as an example. Specify the file path as C:\Windows\System32\notepad.exe.6. After the specified application starts, close it.7. After the process completes, click Next to continue.8. Choose Review Locations in the left pane. Select all the checkboxes in the lists for standard
and nonstandard registry/files.
© 1999-2018 Citrix Systems, Inc. All rights reserved. 112

Profile Management 7.18
9. Click Create to save the template XML file.Take Notepad as the example. Save the template XML file as Notepad.xml.
Note
Youmight have multiple applications defined in a single UE-V template file.
To convert the UE-V template file to a cross-platform definition file, follow the steps below:
1. Download the conversion tool here.
2. From a command prompt, run the command convert show filename to display all applicationnames in the definition file.
3. Run the following command to convert the UE-V template file to a definition file.convert source destination [/Index] [/V]
[/Index]:Convert only the application specified by index number.
By default, this tool converts all applications in the UE-V template.
[/V]: Display verbose information for the conversion.
For cross-platform settings, you must repeat the steps above for other operating systems and mergethe definition files into one. You can use the Platform element with theOSVersionNumber attributeto merge the files. On Windows 7, a setting folder is at AppData\Application\Win7\folder. On Win-dows 10, at AppData\Application\Win10\folder.
On Windows 7, the definition file you created looks as follows:
1 <?xml version=”1.0” encoding=”utf-8”?>23 <GroupDefinitions Version=”4.0.0.0” GUID=”93E41C6E-2091-1B9B-36BC-7
CE94EDC677E”>45 <Group Name=”Common Settings” GUID=”32D83BB6-F3AD-985F-D4BC-655
B3D9ACBE2”>67 <Object Name=”!CTX_ROAMINGAPPDATA!\Application\Win7\folder”
GUID=”1B43DE3F-EC9C-463c-AC19-CD01D00219B6”>89 <Platform>1011 <Folder>1213 <Path>!CTX_ROAMINGAPPDATA!\Application\Win7\folder
</Path>1415 <Recurse/>
© 1999-2018 Citrix Systems, Inc. All rights reserved. 113

Profile Management 7.18
1617 </Folder>1819 </Platform>2021 </Object>2223 </Group>2425 </GroupDefinitions>
OnWindows 10, the definition file you created looks as follows:
1 <?xml version=”1.0” encoding=”utf-8”?>23 <GroupDefinitions Version=”4.0.0.0” GUID=”93E41C6E-2091-1B9B-36BC-7
CE94EDC677E”>45 <Group Name=”Common Settings” GUID=”32D83BB6-F3AD-985F-D4BC-655
B3D9ACBE2”>67 <Object Name=”!CTX_ROAMINGAPPDATA!\Application\Win10\folder”
GUID=”1B43DE3F-EC9C-463c-AC19-CD01D00219B6”>89 <Platform>1011 <Folder>1213 <Path>!CTX_ROAMINGAPPDATA!\Application\Win10\folder
</Path>1415 <Recurse/>1617 </Folder>1819 </Platform>2021 </Object>2223 </Group>2425 </GroupDefinitions>
After merging, the contents of the definition file look as follows:
© 1999-2018 Citrix Systems, Inc. All rights reserved. 114
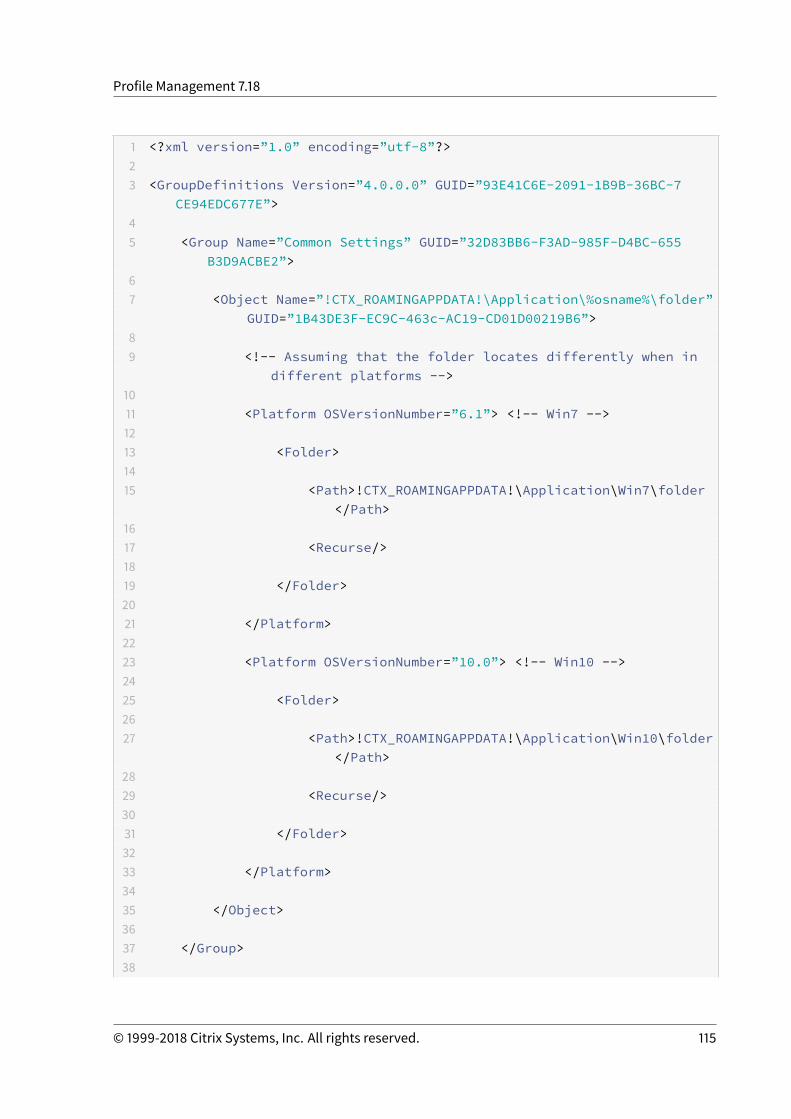
Profile Management 7.18
1 <?xml version=”1.0” encoding=”utf-8”?>23 <GroupDefinitions Version=”4.0.0.0” GUID=”93E41C6E-2091-1B9B-36BC-7
CE94EDC677E”>45 <Group Name=”Common Settings” GUID=”32D83BB6-F3AD-985F-D4BC-655
B3D9ACBE2”>67 <Object Name=”!CTX_ROAMINGAPPDATA!\Application\%osname%\folder”
GUID=”1B43DE3F-EC9C-463c-AC19-CD01D00219B6”>89 <!-- Assuming that the folder locates differently when in
different platforms -->1011 <Platform OSVersionNumber=”6.1”> <!-- Win7 -->1213 <Folder>1415 <Path>!CTX_ROAMINGAPPDATA!\Application\Win7\folder
</Path>1617 <Recurse/>1819 </Folder>2021 </Platform>2223 <Platform OSVersionNumber=”10.0”> <!-- Win10 -->2425 <Folder>2627 <Path>!CTX_ROAMINGAPPDATA!\Application\Win10\folder
</Path>2829 <Recurse/>3031 </Folder>3233 </Platform>3435 </Object>3637 </Group>38
© 1999-2018 Citrix Systems, Inc. All rights reserved. 115

Profile Management 7.18
39 </GroupDefinitions>
For information about configuring cross-platform settings, see Configure cross-platform settings.
For information about the architecture of definition files, see Application definition file structure.
For information about enabling application profiler, see Enable application profiler.
Application definition file structure
July 12, 2018
This document describes the XML structure of Profile Management application definition files. Thisstructure applies to both application profiler and cross-platform settings.
Architecture Chart
• XML Declaration and Encoding Attribute
The XML declaration must specify the attribute, <?xml version=”1.0”>.
Encoding=”UTF-8” is a recommended attribute.
• GroupDefinitions
A container of collections of groups. It acts as the root element of the XML document. Its at-tributes include version and GUID. They are mandatory attributes.
• Group
Defines settings of a subapplication. Its attributes are name and GUID. They are mandatoryattributes.
© 1999-2018 Citrix Systems, Inc. All rights reserved. 116

Profile Management 7.18
• Object
Defines one setting of a subapplication. Its attributes are name and GUID. They are mandatoryattributes.
• Platform
Platform provides different definitions in different operating systems. It can use an optional at-tribute OSVersionNumber to specify the operating system. When there is no attribute, all plat-forms accept the inner definition of the setting. Platform must contain one of the followingelements: RegKey, RegValue, File, Folder, and Wallpaper.
• RegKey
Defines a setting as a key in the registry. It must contain the Key element. It includes two op-tional subelements, Recurse and Merge. Recurse and Merge define the performance when Pro-file Management roams the key. Another optional subelement is ExcludeValues which definesthe registry values that can be excluded.
• RegValue
Defines a setting as a value in the registry. It must contain Key to specify the path of its parentkey.
• Folder
Defines a setting as a folder. Itmust contain Path to specify the path of the folder. It has optionalsub-elements, Recurse and Merge. Recurse and Merge define the performance when ProfileManagement roams the folder. Another optional subelement is ExcludeFiles, which defines thefiles that can be excluded.
• File
Defines a setting as a file. It must contain Path to specify the path of its parent folder, and File-Name to specify the name of a file.
• Wallpaper
Defines all wallpaper settings. No attributes or subelements are required. Profile Managementroams these settings automatically.
• Key
Specifies thepathof the registry keyor thepathof theparent registry key. Key is the subelementof RegKey and RegValue.
• ValueName
Specifies the name of the registry value. It is a subelement of RegValue.
• Path
© 1999-2018 Citrix Systems, Inc. All rights reserved. 117

Profile Management 7.18
Specifies the path of the folder or the path of the parent folder. It is a subelement of Folder andFile. Profile Management variables can be adopted.
• FileName
Specifies the name of a file. It is s subelement of File.
• Recurse
Optional subelement of RegKey and Folder. If this element exists, Profile Management roamsthe key and the folder recursively.
• Merge
Optional subelement of RegKey and Folder. If this element exists, Profile Management merges(but does not substitute) the key and the folder.
• ExcludeValues
Optional subelement of RegKey. Specifies the values that can be excluded when roaming thekey.
• ExcludeFiles
Optional subelementof Folder. Specifies the files that canbeexcludedwhen roaming the folder.
• Exclude
Subelement of ExcludeValues and ExcludeFiles. Specifies the excluded items of files or registryvalues.
Note
Make sure that your document contains a correct syntax format. Profile Management checksthese files by using the CPSValidationSchema.xsd validation file when these files load. You canfind the validation file under the installation path of Profile Management. Profile Managementignores incorrect files and record error messages in the log.
Sample
1 <?xml version=”1.0” encoding=”UTF-8”?>23 <!-- Copyright 2011 Citrix Systems, Inc. All Rights Reserved. -->45 <GroupDefinitions GUID=”748E63D3-426E-4796-9C32-420B25DB2D9F” Version=”
4.0.0.0”>67 <!-- Application Settings -->8
© 1999-2018 Citrix Systems, Inc. All rights reserved. 118

Profile Management 7.18
9 <Group GUID=”0FCCCF29-0A0E-482d-A77E-3F39A8A854A6” Name=”ApplicationSettings”>
1011 <!-- Registry Key Setting Example -->1213 <Object GUID=”637EC13C-2D47-4142-A8EB-3CEA6D53522A” Name=”Software\
Application\certain key”>1415 <Platform>1617 <RegKey>1819 <Key>Software\Microsoft\Office\certain key</Key>2021 <Merge/>2223 <Recurse/>2425 <ExcludeValues>2627 <Exclude>excluded value 1</Exclude>2829 <Exclude>excluded value 2</Exclude>3031 <Exclude>excluded value 3</Exclude>3233 </ExcludeValues>3435 </RegKey>3637 </Platform>3839 </Object>4041 <!-- Registry Value Setting Example -->4243 <Object GUID=”3C896310-10C4-4e5f-90C7-A79F4E653F81” Name=”Software\
Application\certain value”>4445 <!-- Folder Setting Example -->4647 <Object GUID=”7F8615D0-5E63-4bd0-982D-B7740559C6F9” Name=”!
CTX_ROAMINGAPPDATA!\Application\setting folder”>4849 <Platform>
© 1999-2018 Citrix Systems, Inc. All rights reserved. 119

Profile Management 7.18
5051 <Folder>5253 <!-- We can use Citrix variable if necessary -->5455 <Path>!CTX_ROAMINGAPPDATA!\Application\setting folder</Path>5657 <Merge/>5859 <Recurse/>6061 <ExcludeFiles>6263 <Exclude>excluded file 1</Exclude>6465 <Exclude>excluded file 2</Exclude>6667 <Exclude>excluded file 3</Exclude>6869 </ExcludeFiles>7071 </Folder>7273 </Platform>7475 </Object>7677 <!-- File Setting Example -->7879 <Object GUID=”7F8615D0-5E63-4bd0-982D-B7740559C6F9” Name=”!
CTX_ROAMINGAPPDATA!\Application\file.txt”>8081 <Platform>8283 <File>8485 <!-- We can use Citrix variable if necessary -->8687 <Path>!CTX_ROAMINGAPPDATA!\Application</Path>8889 <FileName>file.txt</FileName>9091 </File>9293 </Platform>
© 1999-2018 Citrix Systems, Inc. All rights reserved. 120

Profile Management 7.18
9495 </Object>9697 <!-- Setting based on different OS -->9899 <Object GUID=”1B43DE3F-EC9C-463c-AC19-CD01D00219B6” Name=”!
CTX_ROAMINGAPPDATA!\Application\%osname%\folder”>100101 <!-- Assuming that the folder locates differently when in different
platforms -->102103 <Platform OSVersionNumber=”6.1”>104105 <!-- Win7 -->106107 <Folder>108109 <Path>!CTX_ROAMINGAPPDATA!\Application\Win7\folder</Path>110111 <Recurse/>112113 </Folder>114115 </Platform>116117 <Platform OSVersionNumber=”10.0”>118119 <!-- Win10 -->120121 <Folder>122123 <Path>!CTX_ROAMINGAPPDATA!\Application\Win10\folder</Path>124125 <Recurse/>126127 </Folder>128129 </Platform>130131 </Object>132133 </Group>134135 </GroupDefinitions>
© 1999-2018 Citrix Systems, Inc. All rights reserved. 121

Profile Management 7.18
Cross-platform settings - Case study
July 11, 2018
The primary use case for the cross-platform settings feature is themigration fromWindows 7 andWin-dows Server 2008 to Windows 8 and Windows Server 2012. It is likely that this migration is accompa-nied by a move fromMicrosoft Office 2003 or Office 2007 to Office 2010. Given the typical investmentin Windows 2003 systems, a significant coexistence phase is expected, so the feature is expected tosupport both migration and sustained coexistence.
This case study startswith an existingWindows 7 andWindows 2008 environment runningOffice 2007and adds Windows 8 shared, provisioned virtual desktops.
The case study consists of:
• Initial configuration• Plan the new site• Execute the plan• Other considerations
Initial configuration
July 11, 2018
The following graphic illustrates the environment configuration in this case study.
© 1999-2018 Citrix Systems, Inc. All rights reserved. 122
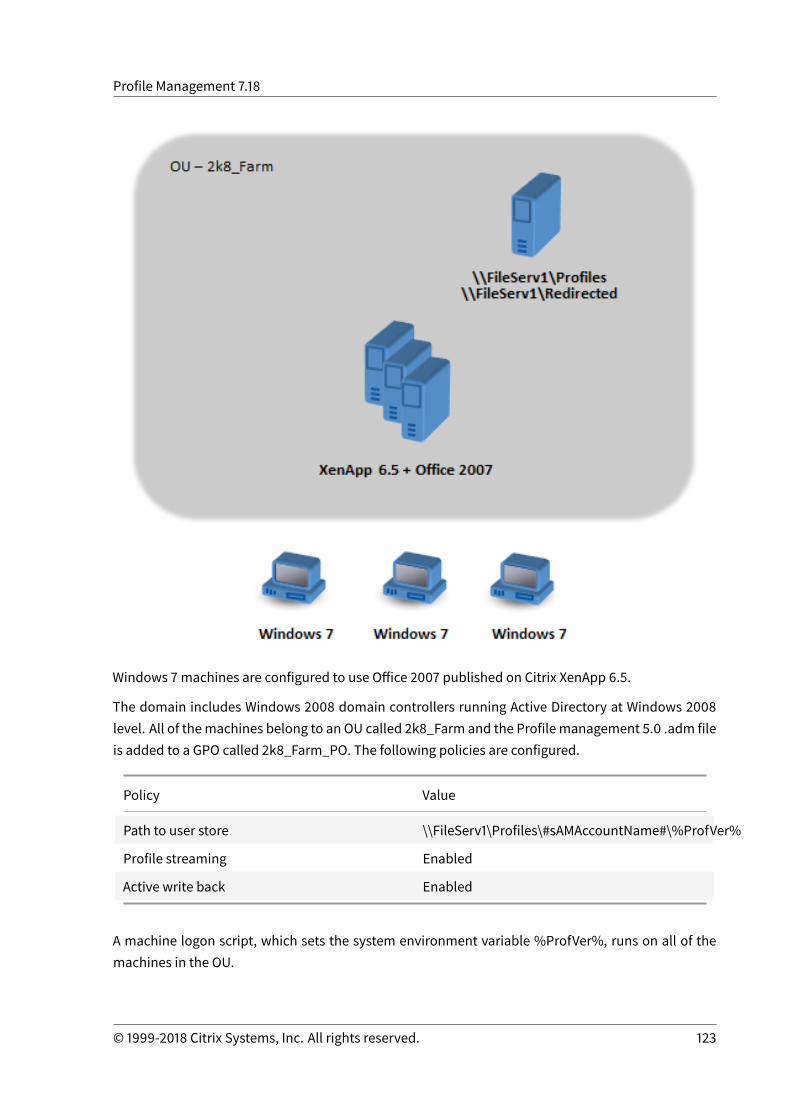
Profile Management 7.18
Windows 7machines are configured to use Office 2007 published on Citrix XenApp 6.5.
The domain includes Windows 2008 domain controllers running Active Directory at Windows 2008level. All of themachines belong to an OU called 2k8_Farm and the Profile management 5.0 .adm fileis added to a GPO called 2k8_Farm_PO. The following policies are configured.
Policy Value
Path to user store \\FileServ1\Profiles\#sAMAccountName#\%ProfVer%
Profile streaming Enabled
Active write back Enabled
A machine logon script, which sets the system environment variable %ProfVer%, runs on all of themachines in the OU.
© 1999-2018 Citrix Systems, Inc. All rights reserved. 123

Profile Management 7.18
Machine Type %ProfVer%
XenApp server on Windows 2008 Win2008
Windows 7 desktops Win7
So, for example, user john.smith has his profile at \\FileServ1\Profiles\john.smith\Win7 for the Win-dows 7 desktop and at \\FileServ1\Profiles\john.smith\Win2008 for the XenApp servers. Separate pro-files are maintained for desktops and servers. The administrator is aware that issues exist when pro-files roam between workstation and server operating systems and is being cautious.
Folder redirection is set up using Group Policy in User Configuration > Policies > Windows Settings >Folder Redirection.
Plan the new site
July 11, 2018
The network administrators have decided to set up a new domain for the new environment, based onWindows Server 2012 domain controllers and Active Directory 2012. Ultimately, a new XenApp farm isplanned, based on Windows Server 2012 running XenApp. But for now, the new domain is used onlyfor the Windows 7 XenDesktop site.
The site is based on a sharedWindows 7 base image hosted in a XenServer environment and accessedby Windows terminals. Office 2007 is included in the base image.
Because users from both domains are expected to use the new domain, a two-way trust is set upbetween OldDomain and NewDomain. Both domains must belong to the same AD forest.
The following graphic illustrates the configuration of the new XenDesktop site.
© 1999-2018 Citrix Systems, Inc. All rights reserved. 124
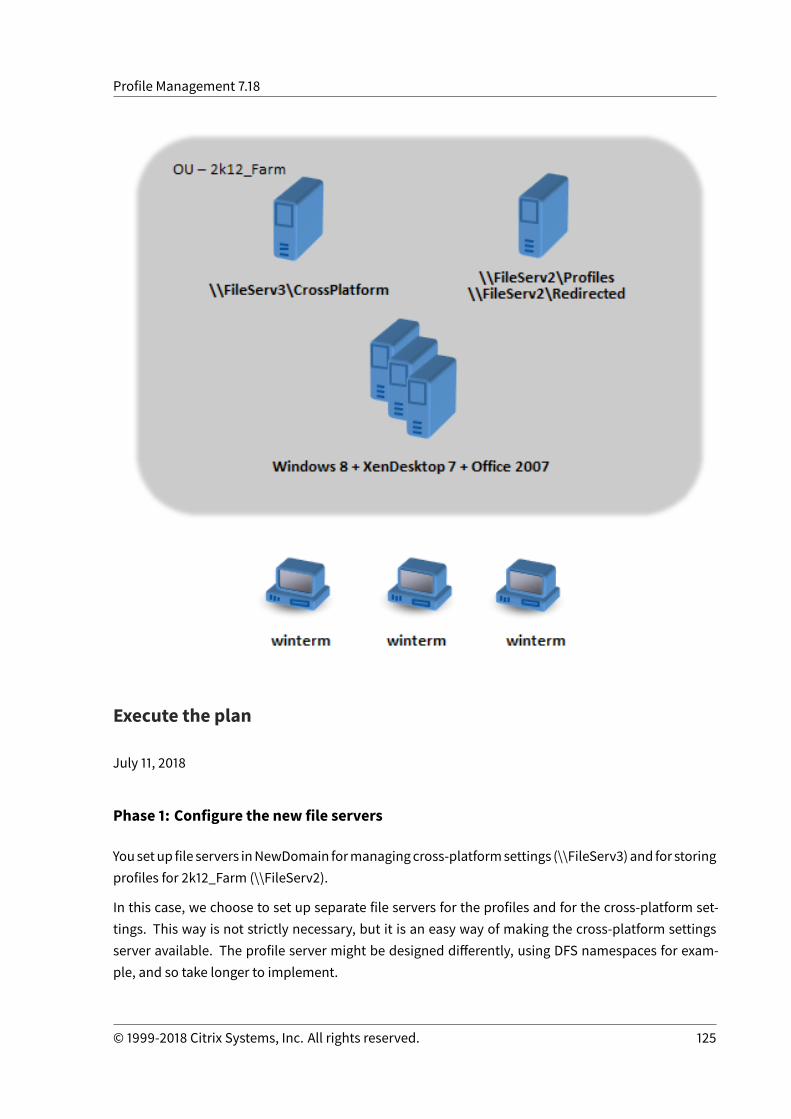
Profile Management 7.18
Execute the plan
July 11, 2018
Phase 1: Configure the new file servers
Yousetup file servers inNewDomain formanagingcross-platformsettings (\\FileServ3) and for storingprofiles for 2k12_Farm (\\FileServ2).
In this case, we choose to set up separate file servers for the profiles and for the cross-platform set-tings. This way is not strictly necessary, but it is an easy way of making the cross-platform settingsserver available. The profile server might be designed differently, using DFS namespaces for exam-ple, and so take longer to implement.
© 1999-2018 Citrix Systems, Inc. All rights reserved. 125

Profile Management 7.18
In both cases, the server shares should be set up according to the security recommendations forroaming user profiles on shared folders. For more information, see http://technet.microsoft.com/en-us/library/cc757013(WS.10).aspx.
Phase 2: Upgrade themachines in 2k8_Farm to Profile Management 5.0
For instructions, see Upgrade Profile Management.
Phase 3: Choose which definition files to deploy
Some configuration files (called definition files) are supplied for Microsoft Office, Internet Explorer,and Windows wallpaper.
Important: Do not update these files unless instructed to by Citrix personnel.
Choose the configuration files that are relevant to your deployment, and copy only these files to\\FileServ3\CrossPlatform\Definitions. In this example, copy just Office 2007.xml.
Phase 4: Configure themachines in 2k8_Farm for Profile Management 5.0
Once the upgrade is complete, make the following configuration changes to (partially) enable thecross-platform settings feature. At this stage, only \\FileServ3\CrossPlatform needs to be available.
Policy Value Notes
Path to user store \\FileServ1\Profiles\#sAMAccountName#\%ProfVer%No change. This path is onlyused by OldDomain users, sothere is no need to change itto support NewDomain users.
Enable cross-platformsettings
Enabled
Cross-platform settings usergroups
Disabled All user groups are processed.
Path to cross-platformdefinitions
\\FileServ3\CrossPlatform\DefinitionsThis path is where thedefinition files are located.
© 1999-2018 Citrix Systems, Inc. All rights reserved. 126

Profile Management 7.18
Policy Value Notes
Path to cross-platformsettings store
\\FileServ3\CrossPlatform\Store\%USERNAME%.%USERDOMAIN%The cross-platform settingsstore is shared by users ofboth domains, so both%USERNAME% and%USERDOMAIN%must bespecified in the path.
Source for creatingcross-platform settings
Enabled Ensures that cross-platformsettings from OldDomain areused to initialize thecross-platform settings store,before giving users access toNewDomain resources.
No changes are required to the machine logon script.
No changes are required to the folder redirection policy.
The OU 2k8_Farm can now be left to run. As users log on, Profile Management copies the settingsidentified in the definition file Office 2007.xml to the cross-platform settings store.
Phase 5: Prepare themachines in 2k12_Farm
Now that the file servers are set up in 2k8_Farm, it is time to build the XenDesktop site. Install ProfileManagement 5.0 when the Windows 7 XenDesktop virtual desktops are running. Here is a suitableconfiguration.
Policy Value Notes
Path to user store \\FileServ2\Profiles\%USERNAME%.%USERDOMAIN%\%ProfVer%As this file share is used byusers from both domains, it isimportant also to includedomain information.
Active write back Disabled
Enable cross-platformsettings
Enabled
Cross-platform settings usergroups
Disabled All user groups are processed.
© 1999-2018 Citrix Systems, Inc. All rights reserved. 127
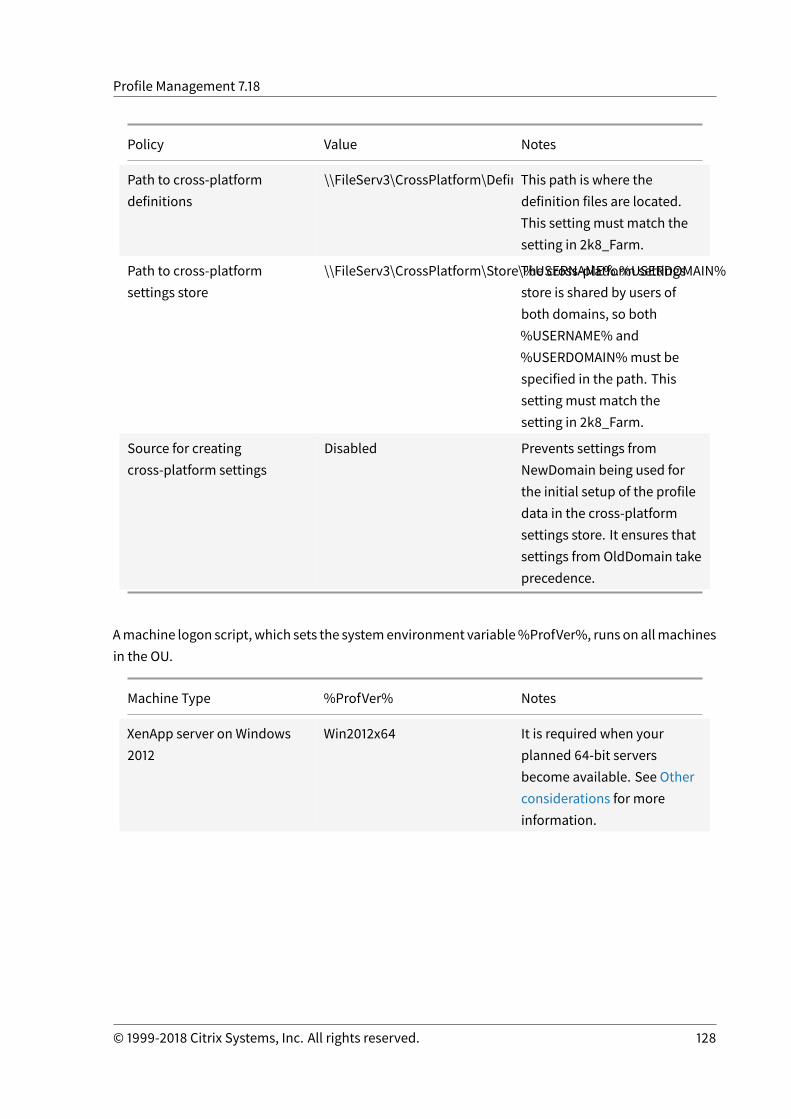
Profile Management 7.18
Policy Value Notes
Path to cross-platformdefinitions
\\FileServ3\CrossPlatform\DefinitionsThis path is where thedefinition files are located.This setting must match thesetting in 2k8_Farm.
Path to cross-platformsettings store
\\FileServ3\CrossPlatform\Store\%USERNAME%.%USERDOMAIN%The cross-platform settingsstore is shared by users ofboth domains, so both%USERNAME% and%USERDOMAIN%must bespecified in the path. Thissetting must match thesetting in 2k8_Farm.
Source for creatingcross-platform settings
Disabled Prevents settings fromNewDomain being used forthe initial setup of the profiledata in the cross-platformsettings store. It ensures thatsettings from OldDomain takeprecedence.
Amachine logon script, which sets the systemenvironment variable%ProfVer%, runs on allmachinesin the OU.
Machine Type %ProfVer% Notes
XenApp server on Windows2012
Win2012x64 It is required when yourplanned 64-bit serversbecome available. See Otherconsiderations for moreinformation.
© 1999-2018 Citrix Systems, Inc. All rights reserved. 128

Profile Management 7.18
Machine Type %ProfVer% Notes
Windows 7 desktops Win7 If both 32-bit and 64-bitversions of Windows 7 aredeployed, it is recommendedthat they have separateprofiles. So %ProfVer%mustbe configured differently oneach platform.
So theOldDomainuser john.smithhashis profile at \\FileServ2\Profiles\ john.smith.OldDomain\Win7for theWindows 7 desktop and at \\FileServ2\Profiles\ john.smith.OldDomain\Win2012x64 for the Xe-nApp servers.
AndaNewDomainuserwilliam.brownhashisprofileat \\FileServ2\Profiles\william.brown.NewDomain\Win7for the Windows 7 desktop and at \\FileServ2\Profiles\william.brown.NewDomain\Win2012x64 forthe XenApp servers.
Again, you set up folder redirection using Group Policy. Because the domain is based on WindowsServer 2012, set folder redirection from<Group Policy Object Name> > User Configuration > Policies >Windows Settings > Folder Redirection.
Policy Value
Favorites \\FileServ2\Redirected\%USERNAME%.%USERDOMAIN%\Favorites
My Documents \\FileServ2\Redirected\%USERNAME%.%USERDOMAIN%\Documents
%USERDOMAIN% has been added to the folder redirection path. This setup is not necessary becausethis policy only applies to NewDomain users. But it might be useful if in the future, you decide tomigrate OldDomain users to the same server. For now, OldDomain users continue to use the FolderRedirection policy from OldDomain which redirects their folders to \\FileServ1.
Phase 6: Live testing
You perform testing in two stages:
1. You test that the profile data for users fromNewDomain operates correctly. These users have nodata set up in the cross-platform settings store. As the policy Source for creating cross-platformsettings is set to disabled, their profile changes do not propagate to OldDomain.
© 1999-2018 Citrix Systems, Inc. All rights reserved. 129

Profile Management 7.18
2. You test with a few users from OldDomain. When they first log on, the cross-platform settingsdata is copied to their profile. For later logons, changes from either domain are copied to theother. If a user from OldDomain logs on to NewDomain and no profile data is present (becausethe user has not used their profile in OldDomain since OldDomainwas upgraded to Profile Man-agement5.0), the cross-platformsettings store is notupdated. With theconfigurationdescribedin this topic, a usermust log on to OldDomain before their settings roambetween the domains.This way ensures that user settings (possibly created over many years) are not overwritten bydefault settings from NewDomain.
Other considerations
July 11, 2018
As configured in this case study, Profile Management does not use the settings from NewDomain toinitialize the cross-platform settings store. Only settings fromOldDomain can be used to initialize thestore. It is acceptable until NewDomain contains more than one type of profile (such as Windows 732-bit and Windows 7 64-bit). Alternatively, users from NewDomain may need to access resources inOldDomain. In these cases, youmust enable the policy Source for creating cross-platform settings onfurther types of machine appropriately.
Caution: IfSource for creating cross-platformsettings is set incorrectly, it is possible that anewprofile obliteratesan existing profile with many accumulated and treasured settings. So Citrix recommends that thispolicy is set on only one platform type at a time. This platform is generally the older (more mature)platform, where settings that users most likely want to keep have accumulated.
In this case study, separate domains are used to illustrate some points. Additionally, the cross-platform settings feature can manage the roaming of settings between two OUs, or even betweenmachines of different types in a single OU. In this case, you might have to set the policy Sourcefor creating cross-platform settings differently for the different machine types. This setup can beachieved in a number of ways:
• Use the setting CPMigrationsFromBaseProfileToCPStore in the .ini file to set the policy differ-ently on eachmachine type. Do not set the policy Source for creating cross-platform settings.
• Use Windows Management Instrumentation (WMI) filtering to manage different GPOs on thesame OU. You can configure the common settings in a GPO that applies to all machines in theOU. But you add only the policy Source for creating cross-platform settings to additional GPOsand filter using a WMI query.
© 1999-2018 Citrix Systems, Inc. All rights reserved. 130

Profile Management 7.18
Force user logoffs
July 11, 2018
Bydefault, users are given a temporary profile if a problem is encountered (for example, the user storeis unavailable). However, you can instead configure Profile Management to display an error messageand then log users off. This can help with troubleshooting.
1. Under Profile Management, open the Advanced settings folder.2. Double-click the Log off user if a problem is encountered policy.3. Select Enabled.
Synchronize file security attributes
July 11, 2018
Security attributes can be synchronized when Profile Management copies files and folders in a userprofile between the system on which the profile is installed and the user store. This feature aims toprevent inconsistencies among security attributes. It requires Windows 10 and later, and in WindowsServer 2016.
This feature is enabled by default. To disable it, follow the steps below:
1. In the UPMPolicyDefaults_all.ini file, add SecurityPreserveEnabled=0 in the General Set-tings section.
2. From a command line, run the command gpupdate /force.
Note that Profile Management synchronizes profile changes based on the latest modification time ofthe profile. Profile Management does not synchronize a file if the changes are made only to the file’ssecurity attributes.
Enable large file handling
July 11, 2018
Large files existing in aprofile area common reason for a slow logonor logoff. Citrix provides anoptionto redirect large files to the user store. This option eliminates the need to synchronize those files overthe network.
To enable large file handling in group policy, follow the steps below:
1. Under Profile Management, open the File system folder.2. Double-click the Large File Handling - Files to be created as symbolic links policy.
© 1999-2018 Citrix Systems, Inc. All rights reserved. 131

Profile Management 7.18
3. Specify files to be handled.
To enable large file handling in the UPMPolicyDefaults_all.ini file, follow the steps below:
1. Add the [LargeFileHandlingList] section in the .ini file.2. Specify files to be handled under that section.
You can use wildcards in policies that refer to files. For example,!ctx_localappdata!\Microsoft\Outlook\*.ost
Make sure that these files are not added to the exclusion list from Citrix Profile Management.
Note
Some applications do not allow concurrent file access. Citrix recommends that you take appli-cation behavior into consideration when you define your large file handling policy.
Citrix recommends that youapplyMicrosoftsecurity updateMS15-090. As ageneral security prac-tice, make sure that you keep your MicrosoftWindows systems updated.
Enable application profiler
July 11, 2018
This feature defines application based profile handling. When you enable this feature, only the set-tings defined in the definition file are synchronized.
To enable application profiler, follow the steps below:
1. Under Profile Management, open the XenApp Optimization settings folder.2. Enable the XenApp Optimization policy.3. Enable the Path to XenApp optimization definitions policy.4. Specify a folder where the XenApp optimization definition files are located.5. Run the command gpupdate /force to enforce policy deployment.
Note
For information about creating definition files, see Create a definition file.
During logoff, only settings in thedefinition file are synchronized, all other settings arediscarded.Use folder redirection in case you want to view or update user documents in the session. Forconfiguring folder redirection, see Configure folder redirection.
Enable native Outlook search experience
July 11, 2018
© 1999-2018 Citrix Systems, Inc. All rights reserved. 132

Profile Management 7.18
With this feature, the Outlook cache file (*.ost) and the Microsoft search database specific to the userare roamed along with the user profile.
First, enable Microsoft Windows Search Service, and set its startup type to “Automatic.” Then followthe steps below to enable search index roaming for Outlook.
1. Open the Group Policy Management Editor.2. Under Policies > Administrative Templates: Policy definitions (ADM) > Classic Administra-
tive Templates (ADM) > Citrix > Profile Management > Advanced settings, double-click theEnable search index roaming for Outlook policy.
3. Select Enabled. ClickOK.
If search index roaming is not configured in Group Policy objects, the value from the .ini file is used. Ifthis setting is not configured anywhere, it is enabled by default.
For your changes to take effect, run the gpupdate /force command from the command prompt. Youmust log off all sessions and then log on again. For details, see http://technet.microsoft.com/en-us/library/bb490983.aspx.
Note
• Software requirements:MicrosoftWindows 10 1709 (64-bit edition) or Windows Server 2016Microsoft Outlook 2016 32-bit edition
• Supported MicrosoftWindows Search Service (SearchIndexer.exe) versions:7.0.1393.21257.0.1393.18847.0.1393.17707.0.9600.187227.0.14393.18847.0.10240.174437.0.15063.4137.0.16299.157.0.16299.248
• Concurrent sessions onmultiple machines are not supported.
Policies
July 11, 2018
This topic provides:Profile Management policies - describing some important aspects of the policies in the .adm and
© 1999-2018 Citrix Systems, Inc. All rights reserved. 133

Profile Management 7.18
.admx files, and the templates used to configure Profile Management.Profile Management policy descriptions and defaults - providing reference information on each pol-icy, including policy default settings.
Profile Management policies
July 11, 2018
This topic describes some important aspects of the policies in the .admand .admx files, the templatesused to configure Profile Management.
For reference information on each policy, including its default setting, see Profile Management policydescriptions and defaults. For instructions on setting a policy, see Manage.
Modifying policies
To deactivate any Profile Management policy that you enter as lists (for example, exclusion lists andinclusion lists), set the policy to Disabled. Do not set the policy to Not Configured.
For your changes to take effect, run the gpupdate /force command from the command prompt asdocumented at http://technet.microsoft.com/en-us/library/bb490983.aspx.
Profile Management variables
In this versionofProfileManagement, the followingvariablesareavailable foruse inbothGroupPolicyand the .ini file.
For policies that define files and registry entries, the following variables expand as follows.
VariableExpansion for Version 1profiles
Expansion for Version 2profiles
!ctx_localsettings! Local Settings\ApplicationData
AppData\Local
!ctx_roamingappdata! Application Data AppData\Roaming
!ctx_startmenu! Start Menu AppData\Roaming\Microsoft\Windows\StartMenu
!ctx_internetcache! Local Settings\TemporaryInternet Files
AppData\Local\Microsoft\Windows\TemporaryInternet Files
!ctx_localappdata! Local Settings\ApplicationData
AppData\Local
© 1999-2018 Citrix Systems, Inc. All rights reserved. 134
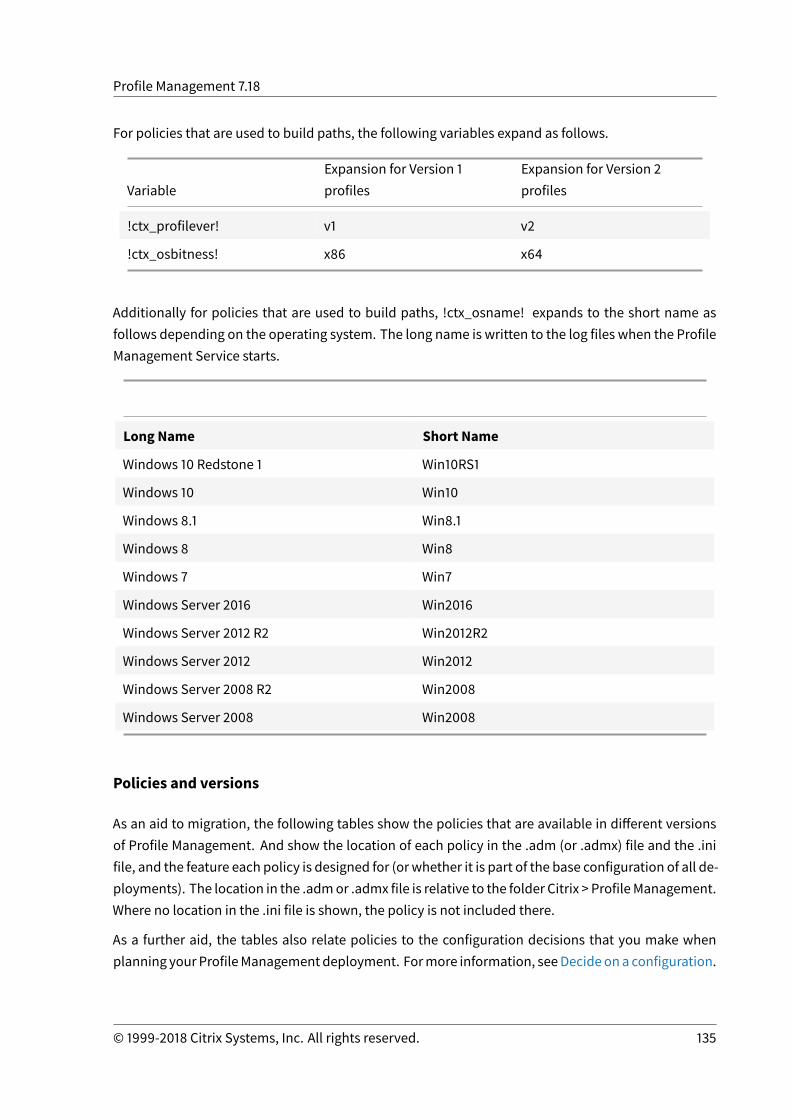
Profile Management 7.18
For policies that are used to build paths, the following variables expand as follows.
VariableExpansion for Version 1profiles
Expansion for Version 2profiles
!ctx_profilever! v1 v2
!ctx_osbitness! x86 x64
Additionally for policies that are used to build paths, !ctx_osname! expands to the short name asfollows depending on the operating system. The long name is written to the log files when the ProfileManagement Service starts.
Long Name Short Name
Windows 10 Redstone 1 Win10RS1
Windows 10 Win10
Windows 8.1 Win8.1
Windows 8 Win8
Windows 7 Win7
Windows Server 2016 Win2016
Windows Server 2012 R2 Win2012R2
Windows Server 2012 Win2012
Windows Server 2008 R2 Win2008
Windows Server 2008 Win2008
Policies and versions
As an aid to migration, the following tables show the policies that are available in different versionsof Profile Management. And show the location of each policy in the .adm (or .admx) file and the .inifile, and the feature each policy is designed for (or whether it is part of the base configuration of all de-ployments). The location in the .admor .admx file is relative to the folder Citrix > ProfileManagement.Where no location in the .ini file is shown, the policy is not included there.
As a further aid, the tables also relate policies to the configuration decisions that you make whenplanning your ProfileManagement deployment. Formore information, seeDecideona configuration.
© 1999-2018 Citrix Systems, Inc. All rights reserved. 135

Profile Management 7.18
Where no decision is shown, do not set the policy unless asked to by Citrix Technical Support.
To simplify upgrades, in ProfileManagement 5.x, all policies in the .adm file or .admx file are set toNotConfigured by default.
Policies available from Version 5.5
Policy in .adm or .admx file
Location in .adm or .admx file
Location in .ini file
Feature
Default Exclusion list
\Registry
DefaultExclusionListRegistry
NTUSER.DAT
\Registry
LastKnownGoodRegistry
Default Exclusion list - directories
\File system
DefaultSyncExclusionListDir
Policy in .adm or .admx file
Configuration decision
Default Exclusion list
Default Exclusion list - directories
NTUSER.DAT
Policies available from Version 5.0 to 5.4
Policy in .adm or.admx file
Location in .adm or.admx file Location in .ini file Feature
Excluded groups ExcludedGroups Excluded Groups
© 1999-2018 Citrix Systems, Inc. All rights reserved. 136
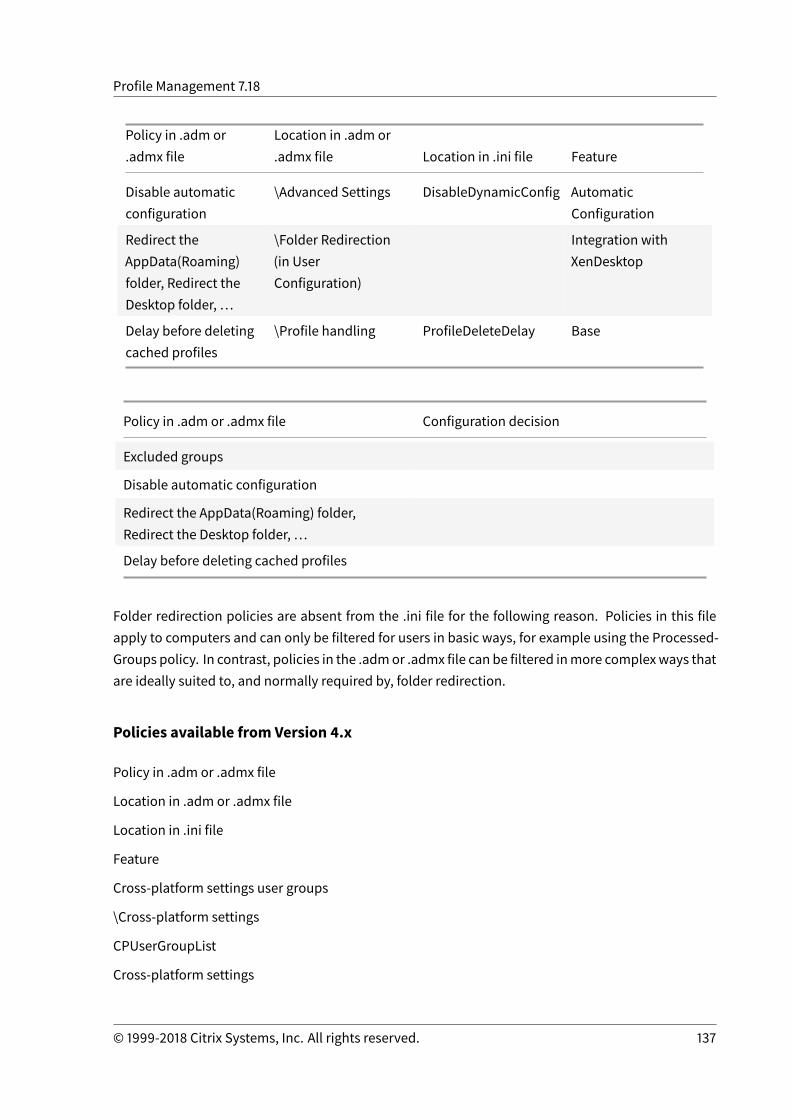
Profile Management 7.18
Policy in .adm or.admx file
Location in .adm or.admx file Location in .ini file Feature
Disable automaticconfiguration
\Advanced Settings DisableDynamicConfig AutomaticConfiguration
Redirect theAppData(Roaming)folder, Redirect theDesktop folder, …
\Folder Redirection(in UserConfiguration)
Integration withXenDesktop
Delay before deletingcached profiles
\Profile handling ProfileDeleteDelay Base
Policy in .adm or .admx file Configuration decision
Excluded groups
Disable automatic configuration
Redirect the AppData(Roaming) folder,Redirect the Desktop folder, …
Delay before deleting cached profiles
Folder redirection policies are absent from the .ini file for the following reason. Policies in this fileapply to computers and can only be filtered for users in basic ways, for example using the Processed-Groups policy. In contrast, policies in the .admor .admx file can be filtered inmore complexways thatare ideally suited to, and normally required by, folder redirection.
Policies available from Version 4.x
Policy in .adm or .admx file
Location in .adm or .admx file
Location in .ini file
Feature
Cross-platform settings user groups
\Cross-platform settings
CPUserGroupList
Cross-platform settings
© 1999-2018 Citrix Systems, Inc. All rights reserved. 137
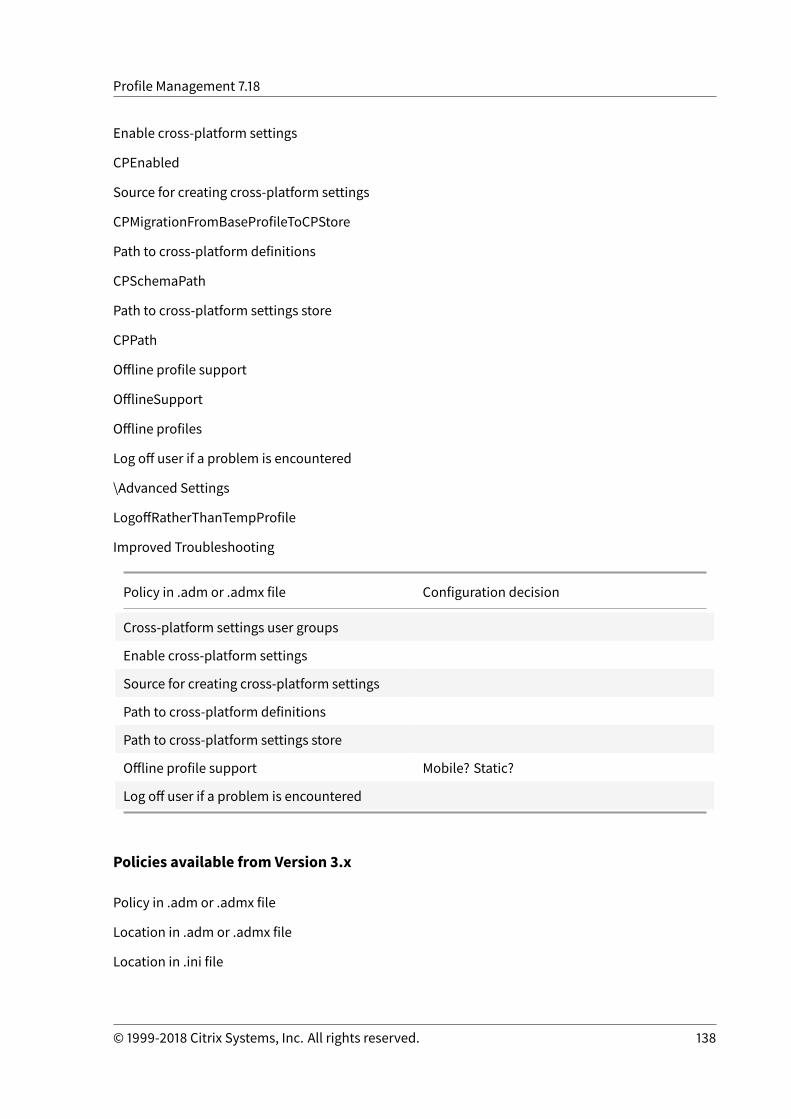
Profile Management 7.18
Enable cross-platform settings
CPEnabled
Source for creating cross-platform settings
CPMigrationFromBaseProfileToCPStore
Path to cross-platform definitions
CPSchemaPath
Path to cross-platform settings store
CPPath
Offline profile support
OfflineSupport
Offline profiles
Log off user if a problem is encountered
\Advanced Settings
LogoffRatherThanTempProfile
Improved Troubleshooting
Policy in .adm or .admx file Configuration decision
Cross-platform settings user groups
Enable cross-platform settings
Source for creating cross-platform settings
Path to cross-platform definitions
Path to cross-platform settings store
Offline profile support Mobile? Static?
Log off user if a problem is encountered
Policies available from Version 3.x
Policy in .adm or .admx file
Location in .adm or .admx file
Location in .ini file
© 1999-2018 Citrix Systems, Inc. All rights reserved. 138

Profile Management 7.18
Feature
Active write back
PSMidSessionWriteBack
Active profile write back (in Version 4.0, renamed Active write back)
Folders to mirror (available from Version 3.1)
\File system\Synchronization
MirrorFoldersList
Folder mirroring
Process Internet cookie files on logoff (available from Version 3.1)
\Advanced settings
ProcessCookieFiles
Delete Redirected Folders (available in Versions 3.2, 3.2.2, and 4.0)
DeleteRedirectedFolders
Support for folder redirection
Always cache
\Streamed user profiles
PSAlwaysCache
Streamed user profiles
Profile streaming
PSEnabled
Timeout for pending area lock files
PSPendingLockTimeout
Streamed user profile groups
PSUserGroupsList
Policy in .adm or .admx file
Configuration decision
Active write back
Persistent? Provisioned? Dedicated? Shared?
Folders to mirror (available from Version 3.1)
© 1999-2018 Citrix Systems, Inc. All rights reserved. 139
Profile Management 7.18
Which applications?
Process Internet cookie files on logoff (available from Version 3.1)
Delete Redirected Folders (available in Versions 3.2, 3.2.2, and 4.0)
Mobile? Static?
Always cache
Profile streaming
Timeout for pending area lock files
Streamed user profile groups
Policies available from Version 2.x
Policy in .adm or .admx file
Location in .adm or .admx file
Location in .ini file
Feature
Path to user store
PathToUserStore
Base
Processed groups
ProcessedGroups
Local profile conflict handling
\Profile handling
LocalProfileConflictHandling
Migration of existing profiles
MigrateWindowsProfilesToUserStore
Template profile
TemplateProfilePath,
TemplateProfileOverridesRoamingProfile,
TemplateProfileOverridesLocalProfile,
Delete locally cached profiles on logoff
© 1999-2018 Citrix Systems, Inc. All rights reserved. 140

Profile Management 7.18
DeleteCachedProfilesOnLogoff
Directory of the MFT cache file
(removed in Version 5.0)
\Advanced settings
USNDBPath
Directories to synchronize
\File system\Synchronization
SyncDirList
Exclusion list
\Registry
ExclusionListRegistry
Files to synchronize
\File system\Synchronization
SyncFileList
Inclusion list
\Registry
InclusionListRegistry
Exclusion list - directories
\File system
SyncExclusionListDir
Exclusion list - files
SyncExclusionListFiles
Number of retries when accessing locked files
\Advanced settings
LoadRetries
Process logons of local administrators
ProcessAdmins
Enable Profile Management
ServiceActive
© 1999-2018 Citrix Systems, Inc. All rights reserved. 141

Profile Management 7.18
Enable logging
\Log settings
LoggingEnabled
Logging
Log settings
LogLevel…
Maximum size of the log file
MaxLogSize
Path to log file(available from Version 2.1)
PathToLogFile
Policy in .adm or .admx file
Configuration decision
Path to user store
Pilot? Production?
Processed groups
Local profile conflict handling
Migrate Profiles? New Profiles?
Migration of existing profiles
Template profile
Delete locally cached profiles on logoff
Persistent? Provisioned? Dedicated? Shared?
Directory of the MFT cache file
(removed in Version 5.0)
Directories to synchronize
Which applications?
Exclusion list
Files to synchronize
Inclusion list
Exclusion list - directories
© 1999-2018 Citrix Systems, Inc. All rights reserved. 142

Profile Management 7.18
Exclusion list - files
Number of retries when accessing locked files
Process logons of local administrators
Enable Profile Management
Enable logging
Log settings
Maximum size of the log file
Path to log file(available from Version 2.1)
Profile Management policy descriptions and defaults
July 11, 2018
This topic describes the policies in the Profile Management .adm and .admx files, and the structure ofthe files. In addition, it lists the default setting of each policy.
Other information, such as the names of the equivalent .ini file settings and which version of ProfileManagement is required for any particular policy, is available in Profile Management policies.
In the Group Policy Object Editor, most of the policies appear under Computer Configuration > Ad-ministrative Templates > Classic Administrative Templates > Citrix. Redirected folder policies appearunder User Configuration > Administrative Templates > Classic Administrative Templates > Citrix.
Sections in the .adm and .admx files
All Profile Management policies are contained in the following sections, located in the Citrix folder.The policies are located under Computer Configuration in Group Policy Editor unless a section is la-beled User Configuration:
Profile Management
Profile Management\Folder Redirection (User Configuration)
Profile Management\Profile handling
Profile Management\Advanced settings
Profile Management\Log settings
Profile Management\Registry
Profile Management\File system
© 1999-2018 Citrix Systems, Inc. All rights reserved. 143

Profile Management 7.18
Profile Management\File system\Synchronization
Profile Management\Streamed user profiles
Profile Management\Cross-platform settings
Profile Management
Enable Profile Management
By default, to facilitate deployment, Profile Management does not process logons or logoffs. EnableProfile Management only after carrying out all other setup tasks and testing how Citrix user profilesperform in your environment.
If this policy is not configured here, the value from the .ini file is used. If this policy is not configuredhere or in the .ini file, Profile Management does not process Windows user profiles in any way.
Processed groups
Both computer local groups and domain groups (local, global, and universal) can be used. Domaingroups should be specified in the format: DOMAIN NAME\GROUP NAME.
If this policy is configured here, Profile Management processes only members of these user groups. Ifthis policy is disabled, Profile Management processes all users. If this policy is not configured here,the value from the .ini file is used. If this policy is not configured here or in the .ini file, members of alluser groups are processed.
Excluded groups
You can use computer local groups and domain groups (local, global, and universal) to prevent partic-ular user profiles from being processed. Specify domain groups in the form DOMAIN NAME\ GROUPNAME.
If this setting is configured here, Profile Management excludes members of these user groups. If thissetting is disabled, Profile Management does not exclude any users. If this setting is not configuredhere, the value from the .ini file is used. If this setting is not configured here or in the .ini file, nomembers of any groups are excluded.
Process logons of local administrators
Specifies whether logons of members of the BUILTIN\Administrators group are processed. If this pol-icy is disabled or not configured on server operating systems (such as XenApp environments), Profile
© 1999-2018 Citrix Systems, Inc. All rights reserved. 144

Profile Management 7.18
Management assumes that logons by domain users, but not local administrators, must be processed.On desktop operating systems (such as XenDesktop environments), local administrator logons areprocessed. This policy allows domain users with local administrator rights, typically XenDesktopusers with assigned virtual desktops, to bypass any processing, log on, and troubleshoot the desk-top experiencing problems with Profile Management.
Note: Domain users’ logons may be subject to restrictions imposed by group membership, typicallyto ensure compliance with product licensing.If this policy is disabled, Profile Management does not process logons by local administrators. If thispolicy is not configured here, the value from the .ini file is used. If this policy is not configured here orin the .ini file, administrators are not processed.
Path to user store
Sets the path to the directory (the user store) inwhich the user settings (registry changes and synchro-nized files) are saved.
The path can be:
• A relative path. It must be relative to the home directory (which is typically configured as the#homeDirectory# attribute for a user in Active Directory).
• A UNC path. It typically specifies a server share or a DFS namespace.• Disabled or unconfigured. In this case, a value of #homeDirectory#\Windows is assumed.
The following types of variables can be used for this policy:
• System environment variables enclosed in percent signs (for example, %ProfVer%). Systemenvironment variables generally require extra setup.
• Attributes of the Active Directory user object enclosed in hashes (for example, #sAMAccount-Name#).
• Profile Management variables. For more information, see the Profile Management variablesproduct document.
User environment variables cannot be used, except for %username% and %userdomain%. You canalso create custom attributes to define organizational variables such as location or users fully. At-tributes are case-sensitive.
Examples:
• \server\share#sAMAccountName#stores theuser settings to theUNCpath \server\share\JohnSmith(if #sAMAccountName# resolves to JohnSmith for the current user)
• \server\profiles$\%USERNAME%.%USERDOMAIN%!CTX_OSNAME!!CTX_OSBITNESS! might ex-pand to \server\profiles$\JohnSmith.DOMAINCONTROLLER1\Win8x64
© 1999-2018 Citrix Systems, Inc. All rights reserved. 145

Profile Management 7.18
Important: Whichever attributes or variables you use, check that this policy expands to the folderone level higher than the folder containing NTUSER.DAT. For example, if this file is containedin \server\profiles$\JohnSmith.Finance\Win8x64\UPM_Profile, set the path to the user store as\server\profiles$\JohnSmith.Finance\Win8x64 (not the \UPM_Profile subfolder).
For more information on using variables when specifying the path to the user store, see the followingtopics:
• Share Citrix user profiles onmultiple file servers• Administer profiles within and across OUs• High availability and disaster recovery with Profile Management
If Path to user store is disabled, the user settings are saved in the Windows subdirectory of the homedirectory.
If thispolicy isdisabled, theuser settingsare saved in theWindowssubdirectoryof thehomedirectory.If this policy is not configured here, the value from the .ini file is used. If this policy is not configuredhere or in the .ini file, the Windows directory on the home drive is used.
Active write back
Files and folders (but not registry entries) that are modified can be synchronized to the user store inthe middle of a session, before logoff.
If this policy is not configured here, the value from the .ini file is used. If this policy is not configuredhere or in the .ini file, it is enabled.
Offline profile support
This policy allows profiles to synchronize with the user store at the earliest possible opportunity. Itis aimed at laptop or mobile device users who roam. When a network disconnection occurs, profilesremain intact on the laptop or device even after rebooting or hibernating. Asmobile users work, theirprofiles are updated locally and are eventually synchronized with the user store when the networkconnection is re-established.
If this policy is not configured here, the value from the .ini file is used. If this policy is not configuredhere or in the .ini file, offline profiles are disabled.
Profile Management\Folder Redirection (User Configuration)
The policies in this section (for example, Redirect the AppData(Roaming) folder) specify whether toredirect folders that commonly appear in profiles, and the redirection target. Specify targets as UNCpaths (for server shares or DFS namespaces) or as paths relative to users’ home directory. This istypically configured with the #homeDirectory# attribute in Active Directory.
© 1999-2018 Citrix Systems, Inc. All rights reserved. 146

Profile Management 7.18
If a policy is not configured here, Profile Management does not redirect the specified folder.
Note: When you use UNC paths for folder redirection, the #homedirectory# variable is not supported.After you choose the Redirect to the user’s home directory policy, you do not need to specify the path.
Profile Management\Profile handling
Delay before deleting cached profiles
Sets an optional extension to the delay before locally cached profiles are deleted at logoff. A value of0 deletes the profiles immediately, at the end of the logoff process. Profile Management checks forlogoffs everyminute. So a value of 60 ensures that profiles are deleted between one and twominutesafter users have logged off (depending on when the last check took place). Extending the delay isuseful if you know that a process keeps files or the user registry hive open during logoff. With largeprofiles, this setup can also speed up logoff.
Important: This policy works only if Delete locally cached profiles on logoff is enabled.If this policy is not configured here, the value from the .ini file is used. If this policy is not configuredhere or in the .ini file, profiles are deleted immediately.
Delete locally cached profiles on logoff
Specifies whether locally cached profiles are deleted after logoff.
If this policy is enabled, a user’s local profile cache is deleted after they have logged off. This settingis recommended for terminal servers. If this policy is disabled, cached profiles are not deleted.
Note: You can control when profiles are deleted at logoff using Delay before deleting cached profiles.If Delete locally cached profiles on logoff is not configured here, the value from the .ini file is used. Ifthis policy is not configured here or in the .ini file, cached profiles are not deleted.
Local profile conflict handling
This policy configures how Profile Management behaves if both a profile in the user store and a localWindows user profile (not a Citrix user profile) exist.
If this policy is disabled or set to the default value of Use local profile, Profile Management uses thelocal profile, but does not change it in any way. If this policy is set to Delete local profile, Profile Man-agement deletes the localWindows user profile. And then imports the Citrix user profile from the userstore. If this policy is set to Rename local profile, ProfileManagement renames the localWindowsuserprofile (for backup purposes). And then imports the Citrix user profile from the user store.
© 1999-2018 Citrix Systems, Inc. All rights reserved. 147

Profile Management 7.18
If this policy is not configured here, the value from the .ini file is used. If this policy is not configuredhere or in the .ini file, existing local profiles are used.
Migration of existing profiles
Profile Management can migrate existing profiles “on the fly” during logon if the user has no profilein the user store. Select Roaming if you are migrating roaming profiles or Remote Desktop Servicesprofiles.
The following event takesplaceduring logon. If an existingWindowsprofile is foundand theuser doesnot yet have a Citrix user profile in the user store, theWindows profile is migrated (copied) to the userstore on the fly. After this process, the user store profile is used by Profile Management in the currentand any other session configured with the path to the same user store.
If this setting is enabled, profilemigration canbe activated for roaming and local profiles (the default),roaming profiles only, local profiles only. Or profilemigration can be disabled altogether. If profilemi-gration is disabled and no Citrix user profile exists in the user store, the existingWindowsmechanismfor creating profiles is used as in a setup without Profile Management.
If this policy is not configured here, the value from the .ini file is used. If this policy is not configuredhere or in the .ini file, existing local and roaming profiles aremigrated. If this policy is disabled, no pro-file is migrated. If this policy is disabled and no Citrix user profile exists in the user store, the existingWindowsmechanism for creating profiles is used as in a setup without Profile Management.
Template profile
Specifies the path to any profile you want to use as a template. This path is the full path to the foldercontaining the NTUSER.DAT registry file and any other folders and files required for the template pro-file.
Important: Ensure that you do not include NTUSER.DAT in the path. For example, with the file\myservername\myprofiles\template\ntuser.dat, set the locationas \myservername\myprofiles\template.Use absolute paths, which can be UNC ones or paths on the local machine. You can use the latter, forexample, to specify a template profile permanently on a Citrix Provisioning Services image). Relativepaths are not supported.
This policy does not support expansion of Active Directory attributes, system environment variables,or the %USERNAME% and%USERDOMAIN% variables.
If this policy is disabled, templates are not used. If this policy is enabled, Profile Management usesthe template instead of the local default profile when creating user profiles. If a user has no Citrix userprofile, but a local or roamingWindows user profile exists, by default the local profile is used. And thelocal profile is migrated to the user store, if this policy is not disabled. This setup can be changed by
© 1999-2018 Citrix Systems, Inc. All rights reserved. 148
Profile Management 7.18
enabling the checkbox Template profile overrides local profile or Template profile overrides roamingprofile. Additionally, identifying the template as a Citrix mandatory profile means that, like Windowsmandatory profiles, changes are not saved.
If this policy is not configured here, the value from the .ini file is used. If this policy is not configuredhere or in the .ini file, no template is used.
Profile Management\Advanced settings
Number of retries when accessing locked files
Sets the number of retries when accessing locked files.
If this policy is disabled, the default value of five retries is used. If this policy is not configured here,the value from the .ini file is used. If this policy is not configured here or in the .ini file, the defaultvalue is used.
Process Internet cookie files on logoff
Somedeployments leave extra Internet cookies that are not referencedby the file Index.dat. The extracookies left in the file system after sustained browsing can lead to profile bloat. Enable this policy toforce processing of Index.dat and remove the extra cookies. The policy increases logoff times, so onlyenable it if you experience this issue.
If this policy is not configured here, the value from the .ini file is used. If this policy is not configuredhere or in the .ini file, no processing of Index.dat takes place.
Disable automatic configuration
ProfileManagementexaminesanyXenDesktopenvironment, for example for thepresenceofpersonalvDisks, and configures Group Policy accordingly. Only Profile Management policies in the Not Config-ured state are adjusted, so any customizations you have made are preserved. This feature speeds updeployment and simplifies optimization. No configuration of the feature is necessary, but you candisable automatic configuration when upgrading (to retain settings from earlier versions) or whentroubleshooting. Automatic configuration does not work in XenApp or other environments.
If this setting is not configured here, the value from the .ini file is used.
If this setting is not configured here or in the .ini file, automatic configuration is turned on so ProfileManagement settings might change if the environment changes.
© 1999-2018 Citrix Systems, Inc. All rights reserved. 149

Profile Management 7.18
Log off user if a problem is encountered
If this policy is disabled or not configured, users are given a temporary profile if a problem is encoun-tered (for example, the user store is unavailable). If it is enabled, an error message is displayed andusers are logged off. This setup can simplify troubleshooting of the problem.
If this setting is not configured here, the value from the .ini file is used.
If this setting is not configured here or in the .ini file, a temporary profile is provided.
Profile Management\Log settings
Enable logging
This policy enables or disables logging. Only enable this policy if you are troubleshooting Profile Man-agement.
If this policy is disabled, only errors are logged. If this policy is not configured here, the value from the.ini file is used. If this policy is not configured here or in the .ini file, only errors are logged.
Log settings
It is a set of policies that you can use to focus on specific activities. Only set these policies if you aretroubleshooting, and set them all unless you are requested to do otherwise by Citrix personnel.
If these policies are not configured here, Profile Management uses the values from the .ini file. If thesepolicies are not configured here or in the .ini file, errors and general information are logged.
The check boxes for these policies correspond to the following settings in the .ini file: LogLevel-Warnings, LogLevelInformation, LogLevelFileSystemNotification, LogLevelFileSystemActions,LogLevelRegistryActions, LogLevelRegistryDifference, LogLevelActiveDirectoryActions, LogLevelPoli-cyUserLogon, LogLevelLogon, LogLevelLogoff, and LogLevelUserName.
Maximum size of the log file
The default value for the maximum size of the Profile Management log file is small. If you have suf-ficient disk space, increase it to 5 MB or 10 MB, or more. If the log file grows beyond the maximumsize, an existing backup of the file (.bak) is deleted. The log file is renamed to .bak and a new log fileis created. The log file is created in %SystemRoot%\System32\Logfiles\UserProfileManager.
If this policy is disabled, the default value of 1MB is used. If this policy is not configured here, the valuefrom the .ini file is used. If this policy is not configured here or in the .ini file, the default value is used.
© 1999-2018 Citrix Systems, Inc. All rights reserved. 150

Profile Management 7.18
Path to log file
Sets an alternative path to which the log files are saved.
The path can point to a local drive or a remote, network-based one (aUNCpath). Remote paths can beuseful in large, distributed environments but they can create significant network traffic, whichmaybeinappropriate for log files. For provisioned, virtual machines with a persistent hard drive, set a localpath to that drive. This setup ensures log files are preserved when the machine restarts. For virtualmachineswithout a persistent hard drive, setting aUNCpath allows you to retain the log files. But thesystem account for the machines must have write access to the UNC share. Use a local path for anylaptops managed by the offline profiles feature.
If a UNC path is used for log files, Citrix recommends that an appropriate access control list is appliedto the log file folder. This setup ensures that only authorized user or computer accounts can accessthe stored files.
Examples:
• D:\LogFiles\ProfileManagement.• \server\LogFiles\ProfileManagement
If this policy is not configured here, the value from the .ini file is used. If this policy is not configuredhere or in the .ini file, the default location %SystemRoot%\System32\Logfiles\UserProfileManager isused.
Profile Management\Registry
Exclusion list
List of registry keys in the HKCU hive which are ignored during logoff.
Example: Software\Policies
If this policy is disabled, no registry keys are excluded. If this policy is not configured here, the valuefrom the .ini file is used. If this policy is not configured here or in the .ini file, no registry keys areexcluded.
Inclusion list
List of registry keys in the HKCU hive that are processed during logoff.
Example: Software\Adobe.
If this policy is enabled, only keys on this list are processed. If this policy is disabled, the completeHKCU hive is processed. If this policy is not configured here, the value from the .ini file is used. If thispolicy is not configured here or in the .ini file, all of HKCU is processed.
© 1999-2018 Citrix Systems, Inc. All rights reserved. 151

Profile Management 7.18
Enable Default Exclusion List - Profile Management 5.5
Default list of registry keys in the HKCU hive that are not synchronized to the user’s profile. Use thispolicy to specify GPO exclusion files without having to fill them in manually.
If you disable this policy, Profile Management does not exclude any registry keys by default. If youdo not configure this policy here, Profile Management uses the value from the .ini file. If you do notconfigure this policy here or in the .ini file, Profile Management does not exclude any registry keys bydefault.
NTUSER.DAT backup
Enables a backup of the last known good copy of NTUSER.DAT and rollback in case of corruption.
If you do not configure this policy here, Profile Management uses the value from the .ini file. If you donot configure this policy here or in the .ini file, Profile Management does not back up NTUSER.DAT.
Profile Management\File system
Exclusion list - files
List of files that are ignored during synchronization. File names must be paths relative to the userprofile (%USERPROFILE%). Wildcards are allowed and are applied recursively.
Examples:
• Desktop\Desktop.ini ignores the file Desktop.ini in the Desktop folder• %USERPROFILE%*.tmp ignores all files with the extension .tmp in the entire profile• AppData\Roaming\MyApp*.tmp ignores all fileswith theextension .tmp inonepart of theprofile
If this policy is disabled, no files are excluded. If this policy is not configured here, the value from the.ini file is used. If this policy is not configured here or in the .ini file, no files are excluded.
Exclusion list - directories
List of folders that are ignored during synchronization. Folder namesmust be specified as paths rela-tive to the user profile (%USERPROFILE%).
Example:
• Desktop ignores the Desktop folder in the user profile
If this policy is disabled, no folders are excluded. If this policy is not configured here, the value fromthe .ini file is used. If this policy is not configured here or in the .ini file, no folders are excluded.
© 1999-2018 Citrix Systems, Inc. All rights reserved. 152

Profile Management 7.18
Enable Default Exclusion List - directories - Profile Management 5.5
Default list of directories ignored during synchronization. Use this policy to specify GPO exclusiondirectories without having to fill them in manually.
If youdisable thispolicy, ProfileManagementdoesnotexcludeanydirectoriesbydefault. If youdonotconfigure this policy here, Profile Management uses the value from the .ini file. If you do not configurethis policy here or in the .ini file, Profile Management does not exclude any directories by default.
Profile Management\File system\Synchronization
Directories to synchronize
Profile Management synchronizes each user’s entire profile between the system it is installed on andthe user store. It is not necessary to include subfolders of the user profile by adding them to this list.
Paths on this list must be relative to the user profile.
Example:
• Desktop\exclude\include ensures that the subfolder called include is synchronized even if thefolder called Desktop\exclude is not
Disabling this policy has the same effect as enabling it and configuring an empty list.
If this policy is not configured here, the value from the .ini file is used. If this policy is not configuredhere or in the .ini file, only non-excluded folders in the user profile are synchronized.
Files to synchronize
Profile Management synchronizes each user’s entire profile between the system it is installed on andthe user store. It is not necessary to include files in the user profile by adding them to this list.
This policy canbeused to include files belowexcluded folders. Pathson this listmust be relative to theuser profile. Wildcards can be used but are only allowed for file names. Wildcards cannot be nestedand are applied recursively.
Examples:
• AppData\Local\Microsoft\Office\Access.qat specifies a file below a folder that is excluded in thedefault configuration
• AppData\Local\MyApp*.cfg specifies all files with the extension .cfg in the profile folder App-Data\Local\MyApp and its subfolders
Disabling this policy has the same effect as enabling it and configuring an empty list.
© 1999-2018 Citrix Systems, Inc. All rights reserved. 153

Profile Management 7.18
If this policy is not configured here, the value from the .ini file is used. If this policy is not configuredhere or in the .ini file, only non-excluded files in the user profile are synchronized.
Folders tomirror
This policy canhelp solve issues involving any transactional folder (also knownas a referential folder).That folder contains interdependent files, where one file references others. Mirroring folders allowsProfile Management to process a transactional folder and its contents as a single entity, avoiding pro-file bloat. For example, you can mirror the Internet Explorer cookies folder so that Index.dat is syn-chronizedwith the cookies that it indexes. In these situations the “lastwritewins.” So files inmirroredfolders that havebeenmodified inmore thanone session are overwritten by the last update, resultingin loss of profile changes.
For example, consider how Index.dat references cookies while a user browses the Internet. If a userhas two Internet Explorer sessions, each on a different server, and they visit different sites in eachsession, cookies from each site are added to the appropriate server. When the user logs off from thefirst session (or in the middle of a session, if the active write back feature is configured), the cookiesfrom the second sessionmust replace those cookies from the first session. However, instead they aremerged, and the references to the cookies in Index.dat become out of date. Further browsing in newsessions results in repeatedmerging and a bloated cookie folder.
Mirroring the cookie folder solves the issue by overwriting the cookies with those cookies from thelast session each time the user logs off. So Index.dat stays up-to-date.
If this policy is not configured here, the value from the .ini file is used. If this policy is not configuredhere or in the .ini file, no folders are mirrored.
Profile Management\Streamed user profiles
Profile streaming
Files and folders contained in aprofile are fetched from theuser store to the local computer onlywhenthey are accessedbyusers after they have loggedon. Registry entries and any files in thepending areaare exceptions. They are fetched immediately.
If this policy is not configured here, the value from the .ini file is used. If this policy is not configuredhere or in the .ini file, it is disabled.
Always cache
Optionally, to enhance the user experience, use this policy with the Profile streaming policy.
© 1999-2018 Citrix Systems, Inc. All rights reserved. 154

Profile Management 7.18
This setting imposes a lower limit on the size of files that are streamed. Any file this size or larger iscached locally as soon as possible after logon. To use the cache entire profile feature, set this limit tozero (which fetches all of the profile contents as a background task).
If this policy is not configured here, the value from the .ini file is used. If this policy is not configuredhere or in the .ini file, it is disabled.
Timeout for pending area lock files
You can set a timeout period (days) that frees up users’ files. So the files are written back to the userstore from the pending area if the user store remains locked when a server becomes unresponsive.Use this policy to prevent bloat in the pending area and to ensure that the user store always containsthe most up-to-date files.
If this policy is not configured here, the value from the .ini file is used. If this policy is not configuredhere or in the .ini file, the default value of one day is used.
Streamed user profile groups
This policy streams the profiles of a subset of Windows user groups in the OU. The profiles of users inall other groups are not streamed.
If this policy is disabled, all user groups are processed. If this policy is not configured here, the valuefrom the .ini file is used. If this policy is not configured here or in the .ini file, all users are processed.
Profile Management\Cross-platform settings
Enable cross-platform settings
By default, to facilitate deployment, cross-platform settings are disabled. Turn on processing by en-abling this policy but only after thorough planning and testing of this feature.
If this policy is not configured here, the value from the .ini file is used. If this policy is not configuredhere or in the .ini file, no cross-platform settings are applied.
Cross-platform settings user groups
Enter one or more Windows user groups. For example, you might use this policy to process only theprofiles from a test user group. If this policy is configured, the cross-platform settings feature of Pro-file Management processes only members of these user groups. If this policy is disabled, the featureprocesses all of the users specified by the Processed groups policy.
© 1999-2018 Citrix Systems, Inc. All rights reserved. 155

Profile Management 7.18
If this policy is not configured here, the value from the .ini file is used. If this policy is not configuredhere or in the .ini file, all user groups are processed.
Path to cross-platform definitions
Identifies thenetwork locationof thedefinition files that you copied fromthedownloadpackage. Thispathmust be a UNC path. Usersmust have read access to this location, and administratorsmust havewrite access to it. The locationmust be a ServerMessageBlock (SMB) or Common Internet File System(CIFS) file share.
If this policy is not configured here, the value from the .ini file is used. If this policy is not configuredhere or in the .ini file, no cross-platform settings are applied.
Path to cross-platform settings store
Sets the path to the cross-platform settings store, the folder in which users’ cross-platform settingsare saved. Users must have write access to this area. The path can be an absolute UNC path or a pathrelative to the home directory.
This area is the common area of the user store where profile data shared by multiple platforms islocated. Users must have write access to this area. The path can be an absolute UNC path or a pathrelative to the home directory. You can use the same variables as for Path to user store.
If this policy is disabled, the path Windows\PM_CP is used. If this policy is not configured here, thevalue from the .ini file is used. If this policy is not configured here or in the .ini file, the default value isused.
Source for creating cross-platform settings
Specifies a platform as the base platform if this policy is enabled in that platform’s OU. This policymigrates data from the base platform’s profiles to the cross-platform settings store.
Each platform’s own set of profiles are stored in a separate OU. You must decide which platform’sprofile data to use to seed the cross-platform settings store. It is referred to as the base platform. Ifthe cross-platform settings store contains a definition file with no data, or the cached data in a single-platformprofile is newer than the definition’s data in the store, ProfileManagementmigrates the datafrom the single-platform profile to the store unless you disable this policy.
Important: If this policy is enabled inmultiple OUs, or multiple user or machine objects, the platformthat the first user logs on to becomes the base profile.By default this policy is Enabled.
© 1999-2018 Citrix Systems, Inc. All rights reserved. 156

Profile Management 7.18
Integrate
July 11, 2018
This section contains information for Citrix administrators deploying Profile Management with otherCitrix products or components. Use this information in addition to, not instead of, the other topicsin the Profile Management documentation. For example, for solutions to common issues with ProfileManagement in such deployments, see Troubleshoot.
This section also contains information about how some third-party products interactwith ProfileMan-agement or profiles in general.
Profile Management and XenApp
July 11, 2018
Useof this versionofProfilemanagementonXenAppservers is subject to theProfileManagementend-user license agreement (EULA). You can also install Profile Management on local desktops, allowingusers to share their local profile with published resources.
Note: Profile Management automatically configures itself in XenDesktop but not XenApp environ-ments. Use Group Policy or the .ini file to adjust Profile Management settings for your XenAppdeployment.
Profile Management works in XenApp environments that employ Remote Desktop Services (formerlyknown as Terminal Services). In these environments, youmust set up an OU for each supported oper-ating system. For more information, see your Microsoft documentation.
In farms that contain different versions of XenApp or that run different operating systems, Citrix rec-ommends using a separate OU for each server that runs each version or operating system.
Important: Including and excluding folders that are shared by multiple users (for example, folderscontaining shared application data published with XenApp) is not supported.
Streamed applications
Profile Management can be used in environments where applications are streamed to either user de-vices directly or streamed to XenApp servers and, from there, published to users.
Client-side application virtualization technology in XenApp is based on application streaming whichautomatically isolates the application. The application streaming feature enables applications to bedelivered to XenApp servers and client devices, and run in a protected virtual environment. There aremany reasons to isolate theapplications that arebeing streamed tousers, suchas theability to control
© 1999-2018 Citrix Systems, Inc. All rights reserved. 157
Profile Management 7.18
how applications interact on the user device to prevent application conflicts. For example, isolationof user settings is required if different versions of the same application are present. Microsoft Office2003might be installed locally and Office 2007might be streamed to users’ devices. Failure to isolateuser settings creates conflicts, and might severely affect the functionality of both applications (localand streamed).
For requirements relating to the use of Profile Management with streamed applications, see Systemrequirements.
Profile Management and XenDesktop
July 11, 2018
Important: Citrix recommendsusing theprofileManagement capabilities integrated into XenDesktop.For more information, see theXenDesktop documentation. The information in this topic applies to a different deployment - theuse of XenDesktop with the Profile Management component that has been separately installed andconfigured.
Install and upgrade Profile Management in XenDesktop deployments
Use of this version of Profile Management with XenDesktop is subject to the Profile Management end-user license agreement (EULA). Subject to the terms in theEULA, you canalsouseProfileManagementwith XenApp in a XenDesktop environment.
If you upgrade Profile Management in a XenDesktop deployment, consider the effect on the log filelocations as described in Upgrade Profile Management.
For XenDesktop in Quick Deploy setups, see the recommendations in Decide on a configuration.
Configure Profile Management in XenDesktop deployments
If Profile Management has not been configured correctly on the images before they are rolled out, theProfile Management Service starts before Group Policy is applied. To avoid this, perform the configu-ration using the documented procedures before you put the images into a production environment.
Important: Including and excluding folders that are shared by multiple users (for example, folderscontaining data that can be shared bymultiple virtual desktops) is not supported.
© 1999-2018 Citrix Systems, Inc. All rights reserved. 158
Profile Management 7.18
Configure Profile Management in personal vDisk deployments
If you use the personal vDisk feature of XenDesktop, Citrix user profiles are stored on virtual desktops’personal vDisks by default, typically the P: drives. The profiles are not stored on users’ C: drives. How-ever, this is where Profile Management expects to find the profiles. So you must modify the Registryon the master image while installing or upgrading the Virtual Desktop Agent. In addition, becauseyou have freed up space on the personal vDisk, it is also good practice to increase the default alloca-tion of disk space for applications on the master image. For instructions on these modifications, seeManaging XenDesktop documentation.
Do not delete the copy of a profile in the user store while a copy remains on the personal vDisk. Doingso creates a Profile Management error, and causes a temporary profile to be used for logons to the vir-tual desktop. Formore information, see Users Receive New or Temporary Profiles in Troubleshootingcommon issues.
Metro apps
In XenDesktop environments, Windows Store applications (also known as Metro apps) are supportedon dedicated desktops and on desktops with personal vDisks, but not on other desktop types.
Metro apps are intended for use by single users on dedicated devices. They are not designed to workwith any type of roaming profile, including Citrix user profiles. If a user requires Metro apps on theirdesktops, Citrix recommends creating their profile on a dedicated desktop, and preserving the profileat logoff. The user should access the apps on this desktop only. Metro apps on any other desktopsthat create profiles in the user store are unusable.
Metro apps do not work if:
1. A user accesses a pooledmachine (pooled-random, static, or RDS) containing any type of roam-ing profile (including a Citrix user profile)
2. A user accesses a dedicated desktop with a personal vDisk (the recommended solution) buttheir profile was already created on another desktop
In these cases, there is a temporary fix that allows the user to install the apps in their current session.This is to follow the Microsoft recommendation of enabling the Allow deployment operations in spe-cial profiles policy. In Group Policy Management Editor, this is located in Computer Configuration >Policies > Administrative Templates > Windows Components > App Package Deployment. However,this fix requires users to install the apps each time they log on.
Example Settings for XenDesktop
This topic lists Profile Management policy settings used in a typical XenDesktop deployment. Win-dows 7 virtual desktops are createdwith Citrix Provisioning Services and are sharedbymultiple users.
© 1999-2018 Citrix Systems, Inc. All rights reserved. 159

Profile Management 7.18
In this example, the desktops, which are created from a pooled-random catalog and are deleted atlogoff, are intended for use on static workstations (not mobile laptops) and personal vDisks are notused.
Where no policy is listed, no selection or entry was made in Group Policy, and the default setting ap-plies.
Note the following:
• Path to user store - You can incorporate Profile Management variables into the path to the userstore. This example uses !CTX_OSNAME! and !CTX_OSBITNESS!, which expand toWin7 and x86respectively when the path is interpreted. The AD attribute #sAMAccountName# is also used tospecify user names.
• Delete locally cached profiles on logoff - Disabling this policy is safe because the desktops donot include personal vDisks and get deleted when users log off. Preserving locally cached pro-files is therefore unnecessary. (If the desktops were not discarded at logoff, this policy shouldbe enabled.)
• Profile streaming - Enabling this setting improves logon times in this deployment.• Active write back - This policy is enabled because the pooled desktops in this deployment areonly temporarily allocated to users. The users might therefore change their profile but mightforget (or not bother) to close their desktop session. With this setting enabled, local file changesin the profile are mirrored in the user store before logoff.
Note: If you enable the Active write back policy, performing a significant number of file operations ina session - such as file creation, file copy, and file deletion – can cause high system I/O activity andresult in temporary performance issues while Profile Management synchronizes the file changes tothe user store.
• Process logons of local administrators - Enabling this setting is recommended for XenDesktopdeployments, in which most users are local administrators.
• Processed groups - All domain users’ profiles are managed by Profile Management.• Exclusion list - directories (file system) and Exclusion list (registry) - These settings preventthe listed temporary or cached files, and the listed registry entries, frombeingprocessed. Thesefiles and entries are commonly stored in user profiles.
• Directories to synchronize and Files to synchronize - Knowledge of where users’ applicationdata is stored helped define these settings.
Important: XenDesktop deployments vary, so the Profile Management policy settings you decide onare probably different to those in this example. To plan your settings, follow the advice inDecide on a configuration.
© 1999-2018 Citrix Systems, Inc. All rights reserved. 160

Profile Management 7.18
Citrix/Profile Management
• Enable Profile management
Enabled
• Processed groups
MyDomainName\Domain Users
• Path to user store
\\MyServer.MyDomain\MyUserStore\#sAMAccountName#\!CTX_OSNAME!_!CTX_OSBITNESS!
• Active write back
Enabled
• Process logons of local administrators
Enabled
Citrix/Profile Management/Profile handling
• Delete locally cached profiles on logoff
Disabled
Citrix/Profile Management/Advanced settings
• Process Internet cookie files on logoff
Enabled
Citrix/Profile Management/File system
• Exclusion list - directories
$Recycle.Bin
AppData\Local\Microsoft\Windows\Temporary Internet Files
AppData\Local\Microsoft\Outlook
AppData\Local\Temp
AppData\LocalLow
AppData\Roaming\Microsoft\Windows\Start Menu
© 1999-2018 Citrix Systems, Inc. All rights reserved. 161

Profile Management 7.18
AppData\Roaming\Sun\Java\Deployment\cache
AppData\Roaming\Sun\Java\Deployment\log
AppData\Roaming\Sun\Java\Deployment\tmp
Citrix/Profile Management/File system/Synchronization
• Directories to synchronize
AppData\Microsoft\Windows\Start Menu\Programs\Dazzle Apps
• Folders to mirror
AppData\Roaming\Microsoft\Windows\Cookies
Citrix/Profile Management/Streamed user profiles
• Profile streaming
Enabled
Profile Management and VDI-in-a-Box
July 11, 2018
You can use Profile Management on desktops created with Citrix VDI-in-a-Box. For more information,see Configuring User Profile Management with VDI-in-a-Box in VDI-in-a-Box documentation.
Use of this version of Profile Managementwith VDI-in-a-Box is subject to the Profile Management end-user license agreement (EULA). Subject to the terms in theEULA, you canalsouseProfileManagementwith XenApp in a VDI-in-a-Box environment. For more information, see Profile Management and Xe-nApp.
Profile Management and UE-V
July 11, 2018
Profile Management 5.x and Microsoft User Experience Virtualization (UE-V) 2.0 can co-exist in thesame environment. UE-V is useful when multiple profile versions are present (for example, Version 1and Version 2 profiles). For this reason, do not use the cross-platform settings feature of Citrix Profile
© 1999-2018 Citrix Systems, Inc. All rights reserved. 162

Profile Management 7.18
Management when UE-V is present. In fact, UE-V may be preferred over that feature because it sup-portsmore applications, synchronization during user sessions, and XML configuration and generationfor applications.
When Profile Management co-exists with UE-V, whether or not the cross-platform settings feature isenabled:
• Exclude the AppData\Local\Microsoft\UEV folder. Profile settings captured by UE-V then over-write those captured by Profile Management.
• Do not share profiles controlled by UE-V with those controlled by Profile Management alone.If you do, the “last write wins.” In other words, the last component to synchronize the profile(UE-V or Profile Management) determines which data is saved, which can lead to data loss.
Note: UE-V requires the Microsoft Desktop Optimization Pack (MDOP).
Profile Management and ShareFile
July 11, 2018
The information in this topic applies to theuseof ProfileManagement inCitrix ShareFile deployments.Some of it may also be useful for other internet-based file-sharing systems.
You can use ShareFile with Profile Management 4.1.2 and later. ShareFile is only supported in On-Demandmode.
Installation
If you use ShareFile 2.7, to avoid a compatibility issue install this version first before installing ProfileManagement. This installation dependency does not exist with ShareFile 2.6.
Exclusions
ShareFile stores configuration data locally in the \AppData\Roaming\ShareFile folder. For users withCitrix user profiles, this data must roam with the user profile so that the user-specific ShareFile con-figuration is persisted. Since this ShareFile folder is part of the profile, no Profile Management config-uration is required. The configuration data roams by default.
However, user data that is managed by ShareFile is contained in the ShareFile folder that is in theroot of the profile (%USERPROFILE%\ShareFile). This data must not roamwith the profile because itis managed by, and synchronizes with, the ShareFile server. You must therefore add this folder as aProfile Management exclusion. For instructions on setting exclusions, see Include and exclude items.
© 1999-2018 Citrix Systems, Inc. All rights reserved. 163

Profile Management 7.18
Personal vDisks
If you create virtual desktopswith Personal vDisks (using Citrix XenDesktop), configure ShareFile withthe location of the user data on the vDisks. This ensures that file synchronization can take place be-tween the desktops and the ShareFile server. By default, Personal vDisks are mapped as P: drives onthe desktops so the data might be located in P:\Users\<user name>. In this case, you would set thelocation using the LocalSyncFolder policy in ShareFile.
Important: To prevent unnecessary synchronizations, which can adversely affect the performance ofProfile Management and Personal vDisks, Citrix recommends using the Folder-ID setting on foldersthat contain large files unless they need to be synchronized on the virtual desktop. This is a ShareFilesetting.
Profile Management and App-V
July 11, 2018
You can use Profile Management 5.x in the same environment as Microsoft Application Virtualization5.0 (App-V 5.0).
Note
Profile Management supports only globally published App-V.
Exclude the following item using Profile management exclusions:
• Profile Management\File system\Exclusion list\directories:– AppData\Local\Microsoft\AppV
Add the following Profile Management policies:
• Profile Management\File system\Exclusion list\directories:– AppData\Local\Microsoft\AppV– AppData\Roaming\Microsoft\AppV\Client\Catalog
• Profile Management\registry\Exclusion list:Software\Microsoft\AppV\Client\IntegrationSoftware\Microsoft\AppV\Client\Publishing
For instructions on setting exclusions, see Include and exclude items.
If theUserLogonRefresh setting is enabled in App-V, disable theProfile streamingpolicy in ProfileMan-agement.
For an example of how to sequence an App-V application, see http://support.microsoft.com/kb/2830069.
© 1999-2018 Citrix Systems, Inc. All rights reserved. 164

Profile Management 7.18
For information on configuring third-party Profile Management solutions with App-V enabled, seehttps://technet.microsoft.com/en-us/library/dn659478.aspx. Do not include Software\Classes onMi-crosoftWindows 10 systems.
Profile Management and Provisioning Servicess
July 11, 2018
This topic contains advice on maintaining Citrix user profiles on virtual disks (vDisks) created withCitrix Provisioning Services. Before following this advice, you should understand how your vDisk con-figuration affects your Profile Management configuration as described in Persistent? Provisioned?Dedicated? Shared?
Supportedmodes
You can use Profile Management on vDisks running in Standard Image and Private Image modes butnot Difference Disk Imagemode.
To remove non-essential, locally cached profiles from the Master Target Device
To prevent any non-essential, locally cached profiles being stored, ensure that these profiles are re-moved from vDisks running in Standard Image mode before taking the Master Target Device image.But do not remove the currently logged-on local administrator’s profile. A good way of achieving thisis as follows. During this procedure, error messages may be displayed.
1. Right-click Computer.2. Select Properties.3. Click Advanced system settings.4. On the Advanced tab, click Settings in User Profiles.5. Highlight each profile you want to remove and click Delete.
Retrieve log files from vDisk images
This topic provides guidance on using log files that reside on shared (vDisk) images createdwith CitrixProvisioning Services. Profile Management saves the files at logoff. But, if you use vDisk images, takeaccountof the fact thatbase images canbe reset,which results in log filesbeingdeleted. You thereforemust take some action to retrieve the files. The action you take depends on whether the log files arebeing deleted at logon or logoff.
© 1999-2018 Citrix Systems, Inc. All rights reserved. 165

Profile Management 7.18
Use of vDisk images is common in XenDesktop deployments, so the guidance in this topic uses thatproduct as an example.
To retrieve a log file that is deleted at logoff
If entire profiles or parts of them are not saved back to the user store on the network, the log file isalso not saved there.
If the Provisioning Services write-cache is stored on the computer running Provisioning Services, thisissue should not arise. And the log file should be saved back to the user store.
If the write-cache is stored locally, in this procedure you may have to log on from the same device asthe user. However, even this may fail if the write-cache is stored locally in RAM.
If thewrite cache is not on the computer running Provisioning Services, youmay have to create a copyof the vDisk image. You assign it to the new virtualmachine, and change thewrite-cache on the imageso it is stored on that computer.
1. In XenDesktop, create a desktop group, add one virtual machine to it, and point it to your vDiskimage.
2. Grant access to the virtual machine to one test user and the administrator.3. Modify the desktop group’s idle pool count to 1 for all times of the day (to stop power manage-
ment turning the machine off). Set its logoff behavior to Do nothing (to prevent the machinerestarting and resetting the image).
4. Log on as the test user to the virtual desktop and then log off from it.5. Log on as administrator from the XenCenter or VMware console, and retrieve the log file.
Consult the XenDesktop documentation for more information on creating desktop groups and modi-fying their properties.
To retrieve a log file that is deleted at logon
If a profile is current in the user store on the network but does not load correctly when the user logson, log file entries are lost.
1. Map a drive to \\<vmhostname>\C$ and, before the user logs off the session, locate the logfile. The log file is not complete (some entries will be missing) but if the problem you are trou-bleshooting is at logon, it may provide enough information for you to isolate the cause of theissue.
© 1999-2018 Citrix Systems, Inc. All rights reserved. 166
Profile Management 7.18
To relocate Provisioning Services log files
Using Standard Imagemode, the Provisioning Services event log files are lost when the system shutsdown. For instructions on changing the default location of the files to prevent this, see CTX115601.
Preconfigure Profile Management on provisioned images
July 11, 2018
Using provisioning software such as Citrix Provisioning Services, Citrix XenServer, or VMware ESX youcanbuild images that haveProfileManagement pre-installed. Whendoing so, you likely capture someGroup Policy settings in the registry while you set up the image. For example, it happens while itis in Private Image mode with Provisioning Services. The settings are still present when you deploythe image. For example, when you switch back to Standard Image mode with Provisioning Services.Ideally, you should choosedefaults that suit the stateof the virtualmachinewhen it starts runningandyour users requirements when they log on. At a minimum, you should ensure that you have suitabledefaults for those policies described in Persistent? Provisioned? Dedicated? Shared?
The defaults are used if gpupdate is not run before the Citrix Profile Management Service starts. Soit is best to ensure that they are sensible defaults for most cases. Use this procedure to preconfigurethese and other settings you want to preserve in the image.
Note: If you use Provisioning Services, Citrix recommends that you preconfigure images with the Pro-file Management .ini file first. And you transfer the settings to the .adm or .admx file only once yourtesting proves successful.
1. If you use the .adm or .admx file, change the desired settings using the file in the appropriateGPO. If you use the .ini file, omit this step; youmake the changes in a later step.
2. Make the same changes to the log level.3. Do one of the following:
• Switch the image to Private Image mode (Citrix Provisioning Services) and start the oper-ating system on it.
• Start the operating system (Citrix XenServer or VMware ESX).4. Log on using an Administrator account (not any test user account youmay have set up), and run
gpupdate /force. This step ensures that the registry is correctly configured.5. If you use the .ini file, change the desired settings in the file.6. Stop the Profile Management Service.7. To avoid confusion with the new log files that are created, delete the old Profile Management
log file and the configuration log file. These have file names that use the name of the old image.They are redundant because theupdated imagehasnew files (with thenameof thenew image).
8. Do one of the following:
© 1999-2018 Citrix Systems, Inc. All rights reserved. 167

Profile Management 7.18
• Switch the image back to Standard Imagemode (Citrix Provisioning Services).• Save the updated image (Citrix XenServer or VMware ESX).
9. Start the operating system on the image.
Profile Management and Self-service Plug-in
July 11, 2018
By default, Profile Management excludes the Windows Start menu folder. Citrix Self-service Plug-inusers cannot see their subscribed applications in the Start menu. Adjust this default behavior by re-moving the folder %APPDATA%\Microsoft\Windows\Start Menu from the Exclusion list - directoriespolicy. In addition, when using GPOs for configuration, it is best practice to delete the Profile man-agement .ini file. These actions ensure that the Start menu folder containing subscribed applications(and any user-created subfolders) are processed by Profile Management.
Note: If you are using theProfileManagement .ini file rather thanGroupPolicy, remove this entry fromthe default exclusion list in that file.
Profile Management and VMware
July 11, 2018
This topic applies to Citrix user profiles on virtual machines created with VMware software such asVMware ESX. It addresses an issue where local profile caches become locked.
If you have set up Profile Management to delete cached local profiles when users log off from their vir-tual machines createdwith VMware (in your XenDesktop or XenApp deployment, say) but the profilesare not deleted, you can use this workaround to overcome the issue.
This issue has been shown to occur when roaming profiles are used on virtual machines created withVMware ESX 3.5, and the Profile Management setting Delete locally cached profiles on logoff is en-abled.
The issue occurs because the Shared Folders option in VMware Tools adds a file to the profiles. Andthe file is locked by a running process thereby preventing profiles being deleted at logoff. The file isC:\Documents and Settings\userid\Application Data\VMware\hgfs.dat.
If you have verbose logging enabled in Profile Management, the log file may detect this problemwithan entry such as:
2009-06-03;11:44:31.456;ERROR;PCNAME;JohnSmith4;3;3640;DeleteDirectory: Deleting thedirectory<C:\Documents and Settings\<user name>\Local Settings\Application Data\VMware> failedwith: Thedirectory is not empty.
© 1999-2018 Citrix Systems, Inc. All rights reserved. 168

Profile Management 7.18
To work around this issue in a XenApp deployment on Windows Server 2008:
1. Log on as Administrator to the XenApp server.2. In XenApp deployments, log off all users from the server.3. In Control Panel, go to Add/Remove Programs.4. Locate VMware Tools and choose the Change option.5. Change Shared Folders to This feature will not be available.6. Click Next > Modify > Finish.7. Restart the server.8. Clean up the half-deleted profiles. Use My Computer > Properties > Advanced > User Profiles,
select the profiles and delete them. Windows informs you of any errors trying to delete theprofiles.
Note: A separate issue in environments running Profile Management on VMware can result in the cre-ation of multiple sequential profiles. For information about this issue and how to resolve it, seeCTX122501.
Profile Management and Outlook
July 11, 2018
This topic describes best practice for integrating Microsoft Outlook with roaming profiles.
It is good practice to ensure that users store Outlook data on a server rather than on a network shareor locally.
With roaming profiles, files and folders in the location defined by the environment variable%UserPro-file% (on the local computer) roam with users, except for one folder, %UserProfile%\Local Settings.This exception affects Outlook users because a Microsoft recommendation means that, by default,some Outlook data (for example, .ost, .pst, and .pab files) is created in this non-roaming folder.
Important: Files in this location are typically large and hinder the performance of roaming profiles.
The following practices can reduce troubleshooting of roaming profiles with Outlook and encouragegood email management by users and administrators:
• If possible, use an ADM template for Microsoft Office that prohibits the use of .pst files.• If users need more space, increase storage on your Microsoft Exchange servers rather than anetwork share.
• Define and enforce an email retention policy for the entire company (one that involves acompany-wide email storage server) rather than granting exceptions for .pst files to individualusers or increasing their personal storage capacity. The policy should also discourage relianceon .pst files by allowing users easily to request email restores to their inbox.
© 1999-2018 Citrix Systems, Inc. All rights reserved. 169

Profile Management 7.18
• If .pst files cannot be prohibited, do not configure Profile Management or roaming profiles onyour Exchange servers.
UsingWindows profiles with Password Manager and Single Sign-on
July 11, 2018
This topic does not contain any information specific to Profile Management. It tells you how to con-figure certain Windows options so that Citrix Single Sign-on operates optimally with local profiles,roaming profiles, mandatory profiles, or hybrid profiles. This topic applies to Citrix Single Sign-on 4.8or 5.0.
Local profiles
Local profiles are stored on the local server to which the user has logged on. Password Manager andSingle Sign-on save registry information in the HKCU\Software\Citrix\MetaFrame Password Managerhive of the User Registry located at:
%SystemDrive%\Documents and Settings\%username%\NTUSER.DAT.
Files are also saved in:
%SystemDrive%\Documents and Settings\%username%\Application Data\Citrix\MetaFrame Pass-word Manager.
On Windows 7, Single Sign-on uses:
%APPDATA%\Roaming\Citrix\MetaFrame Password Manager
Important: It is critical that Single Sign-on has Full Control Access to the following files:
File Name Description
%username%.mmf User’s credential information file with pointersto aelist.ini.
entlist.ini Application definition file created at enterpriselevel in the synchronization point or ActiveDirectory.
aelist.ini Application definition file created by merginguser’s local application definition file(applist.ini) and the enterprise applicationdefinitions (entlist.ini).
© 1999-2018 Citrix Systems, Inc. All rights reserved. 170
Profile Management 7.18
Roaming profiles
Roaming profiles are saved on a network share and synchronized to a local server copy each time theuser logs on. Characteristics of a successful roaming profile deployment include high-speed networkconnectivity such as a SAN (System Area Network) or NAS (Network Area Storage). Other commondeployments include clustering solutions where the profiles are stored on high-availability servers.
Two issues affect roaming andmandatory profile deployments:
• A single roamingprofile canonlybeusedwithone file synchronizationpoint. Whenmultiple syn-chronization points are used, data in the Memory Mapped File (MMF) may become corrupted.
• When roamingprofilesareusedwithmultiple concurrent sessions, they share thebackendMMF.All active sessions share some common session data such as retry lock counters, last used datacounters, and event log entries.
Mandatory or hybrid profiles
Mandatory profiles are by definition user read-only profiles. Single Sign-on needswrite permission tothe profile folder under Application Data. Withmandatory profiles, a user maymake changes but thechanges are not saved back to the profile at logoff. For Single Sign-on to work correctly with manda-tory profiles, the Application Data Folder must be redirected.
The registry changes are written each time the user logs on. Credential information is synchronizedwith the synchronization point but the changes are not saved back to the profile.
Beginning with Windows 2000, Microsoft provides a mechanism for redirecting the Application Datafolder. However, usingWindowsNT4domains requires logonscripts capableofmodifying the locationof the Application Data folder. You can achieve this using tools such as Kix or VBScript to define awriteable location for the Application Data folder.
The following example uses Kix to redirect the Application Data folder during user logon:
Important: This sample script is for informational purposes only and should not be used in your envi-ronment without first testing it.
“‘ pre codeblock
$LogonServer = “%LOGONSERVER%”$HKCU = “HKEY_CURRENT_USER”$ShellFolders_Key =“$HKCU\Software\Microsoft\Windows\CurrentVersion\Explorer\ShellFolders”$UserShellFolders_Key =“$HKCU\Software\Microsoft\Windows\CurrentVersion\Explorer\User
© 1999-2018 Citrix Systems, Inc. All rights reserved. 171

Profile Management 7.18
Shell Folders”$UserProfFolder =“$LogonServer\profiles\@userID”$UserAppData =“$LogonServer\profiles\@userID\Application Data”$UserDesktop =“$LogonServer\profiles\@userID\Desktop”$UserFavorites =“$LogonServer\profiles\@userID\Favorites”$UserPersonal = “X:\My Documents”$UserRecent =“$LogonServer\profiles\@userID\Recent”if (exist(“$UserAppData”) = 0)shell ‘%ComSpec% /c md “$UserAppData”’endifif (exist(“$UserDesktop”) = 0)shell ‘%ComSpec% /c md “$UserDesktop”’endifif (exist(“$UserRecent”) = 0)shell ‘%ComSpec% /c md “$UserRecent”’endifif (exist(“$UserFavorites”) = 0)shell ‘%ComSpec% /c md “$UserFavorites”’endif“‘
The hybrid profile is another solution for the mandatory profile issue. When the user logs on, themandatory profile loads and a custom application loads and unloads user registry hives based onapplications available to the user. As with mandatory profiles, the user canmodify those parts of theregistry during a session. The difference comparedwithmandatory profiles is that changes are savedwhen the user logs off and are reloaded when they log on again.
If a hybrid profile is used, the HKEY_CURRENT_USER\Software\Citrix\MetaFrame Password registrykeys must be imported and exported as part of the logon and logoff process.
Folder redirection
Folder redirection is implemented using Group Policy Objects and Active Directory. It uses Group Poli-cies to define a location for folders that are part of the user profile.
Four folders can be redirected:
© 1999-2018 Citrix Systems, Inc. All rights reserved. 172

Profile Management 7.18
• My Documents• Application Data• Desktop• Start Menu
Two modes of redirection can be configured using Group Policies: basic redirection andadvanced redirection. Both are supported by Single Sign-on. In Windows 2000, you mustreference the share that stores application data using the username variable (for example\\servername\sharename\%username%).
Folder redirection is global for the user and it affects all of their applications. All applications that usethe Application Data folder must support it.
Read the following Microsoft articles to learn more about folder redirection:
HOW TO: Dynamically Create Secure Redirected Folders By Using Folder Redirections
Folder Redirection Feature in Windows
Enabling the Administrator to Have Access to Redirected Folders
Best practices
• Redirect theApplicationData folderswherepossible. This improvesnetworkperformance, elim-inating the need to copy the data in those folders each time users log on.
• When troubleshooting Password Manager Agent, always verify that the logged-on user has FullControl permission on their Application Data folder.
Google Chrome browser
July 11, 2018
Google Chrome users are advised to exclude the following folders from synchronizing:
• Appdata\Local\Google\Chrome\User Data\Default\JumpListIcons• Appdata\Local\Google\Chrome\User Data\Default\JumpListIconsOld• Appdata\Local\Google\Chrome\User Data\Default\Cache=• Appdata\Local\Google\Chrome\User Data\Default\Cached Theme Images=
Firefox browser
July 11, 2018
© 1999-2018 Citrix Systems, Inc. All rights reserved. 173
Profile Management 7.18
Firefox users are advised to exclude the following file from synchronizing:
Appdata\roaming\mozilla\Firefox\profiles\*\sessionstore.bak
Secure
July 12, 2018
This topic contains recommended best practice for securing Profile Management. In general, securethe servers on which the user store is located to prevent unwanted access to Citrix user profile data.
Recommendations on creating secure user stores are available in the article called Create a file sharefor roaming user profiles on the Microsoft TechNet Web site. These minimum recommendations en-sure a high level of security for basic operation. Additionally, when configuring access to the userstore, include the Administrators group, which is required to modify or remove a Citrix user profile.
Permissions
Citrix tests and recommends the following permissions for the user store and the cross-platform set-tings store:
• Share Permissions: Full control of the user store root folder
• The following NTFS permissions, as currently recommended by Microsoft:
Group or User Name Permission Apply To
Creator Owner Full Control Subfolders and files only
<The group of accounts underProfile management control>
List Folder / Read Data andCreate Folders / Append Data
This folder only
Local System Full Control This folder, subfolders, andfiles
Assuming inheritance is not disabled, these permissions allow the accounts to access the stores. Andallow the accounts to create subfolders for users’ profiles and perform the necessary read and writeoperations.
Beyond this minimum, you can also simplify administration by creating a group of administratorswith full control of subfolders and files only. Then deleting profiles (a common troubleshooting task)becomes easier for members of that group.
If you use a template profile, users need read access to it.
© 1999-2018 Citrix Systems, Inc. All rights reserved. 174
Profile Management 7.18
Access control list (ACL)
If you use the cross-platform settings feature, set ACLs on the folder that stores the definition files asfollows: read access for authenticated users, and read-write access for administrators.
Windows roamingprofiles automatically removesadministratorprivileges fromthe folders containingprofiledataon thenetwork. ProfileManagementdoesnot automatically remove theseprivileges fromfolders in the user store. Depending on your organization’s security policies, you can do somanually.
Note: If an application modifies the ACL of a file in the user’s profile, Profile Management does notreplicate those changes in the user store. It is consistent with the behavior of Windows roaming pro-files.
Profile streaming and enterprise antivirus products
The streamed user profiles feature of Citrix Profile Management uses advanced NTFS features to sim-ulate the presence of files missing from users’ profiles. In that respect, the feature is very similar to aclass of products known as Hierarchical Storage Managers (HSMs). HSMs are typically used to archiveinfrequently used files on to slow mass-storage devices such as magnetic tape or rewritable opticalstorage. When such files are required, HSMdrivers intercept the first file request, suspend the processmaking the request, fetch the file from thearchive storage. And thenallow the file request to continue.Given this similarity, the streamed user profiles driver, upmjit.sys, is in fact defined as an HSM driver.
In such an environment, configure antivirus products to be aware of HSM drivers, and the streameduser profiles driver is no different. To defend against the most sophisticated threats, antivirus prod-ucts must perform some of their functions at the device driver level. And, like HSM drivers, they workby intercepting file requests, suspending the originating process, scanning the file, and resuming.
It is relatively easy tomisconfigureanantivirusprogramto interrupt anHSMsuchas the streameduserprofiles driver, preventing it from fetching files from the user store, and causing the logon to hang.
Fortunately, enterprise antivirus products are written with the possibility of sophisticated storageproducts, such as HSMs, in mind. And they can be configured to delay their scanning until the HSMhas done its work. Home antivirus products are less sophisticated in this respect. So the use of homeand SoHo (small office/home office) antivirus products is not supported with streamed user profiles.
To configure your antivirus product for use with streamed user profiles, look for one of the followingproduct features. Feature names are indicative only:
• Trusted process list. Identifies HSMs to the antivirus product, which allows the HSM to com-plete the file retrieval process. The antivirus product scans the file when it is first accessed by anon-trusted process.
• Donot scanonopenor status-checkoperations. Configures theantivirusproduct to scanonlya file when data is accessed (for example, when a file is executed or created). Other types of file
© 1999-2018 Citrix Systems, Inc. All rights reserved. 175

Profile Management 7.18
access (for example, when a file is opened or its status checked) are ignored by the antivirusproduct. HSMs generally activate in response to file-open and file-status-check operations, sodisabling virus scans on these operations eliminates potential conflicts.
Citrix tests streamed user profiles with versions of the leading enterprise antivirus products to ensurethat they are compatible with Profile Management. These versions include:
• McAfee Virus Scan Enterprise 8.7• Symantec Endpoint Protection 11.0• Trend Micro OfficeScan 10
Earlier versions of these products are not tested.
If you are using an enterprise antivirus product from other vendors, ensure that it is HSM-aware. Itcan be configured to allow HSM operations to complete before performing scans.
Someantivirusproducts allowadministrators to choose to scan-on-reador scan-on-write. This choicebalancesperformanceagainst security. The streameduserprofiles feature is unaffectedby the choice.
Troubleshoot Profile Management in streaming and antivirus deployments
If you encounter issues, such as logons hanging or taking a very long time, there might be a miscon-figuration between Profile Management and your enterprise antivirus product. Try the following pro-cedures, in this order:
1. Check that youhave the latest versionofProfileManagement. Your issuemayalreadyhavebeenfound and fixed.
2. Add theProfileManagement service (UserProfileManager.exe) to the list of trustedprocesses foryour enterprise antivirus product.
3. Turn off virus checking on HSM operations such as open, create, restore, or status check. Onlyperform virus checks on read or write operations.
4. Turn off other sophisticated virus checking features. For example, antivirus products may per-form a quick scan of the first few blocks of a file to determine the actual file type. These checksmatch the file contents with the declared file type but can interfere with HSM operations.
5. Turn off the Windows search-indexing service, at least for the folders where profiles are storedon local drives. This service causes unnecessary HSM retrievals, and has been observed to pro-voke contention between streamed user profiles and enterprise antivirus products.
If none of these stepswork, turn off streameduser profiles (by disabling the Profile streaming setting).If it works, re-enable the feature and disable your enterprise antivirus product. If it also works, gatherProfile Management diagnostics for the non-working case and contact Citrix Technical Support. Theyneed to know the exact version of enterprise antivirus product.
To continue using ProfileManagement, do not forget to re-enable the enterprise antivirus and turn off
© 1999-2018 Citrix Systems, Inc. All rights reserved. 176
Profile Management 7.18
streamed user profiles. Other features of Profile Management continue to function in this configura-tion. Only the streaming of profiles is disabled.
Troubleshoot
July 11, 2018
As a first step in troubleshooting any issue that you or your users experience, follow these basic steps:
1. If you are using XenDesktop 7, start troubleshooting in Desktop Director. This console displaysproperties of profiles that can help you diagnose and correct problems.
2. Use UPMConfigCheck. It is a PowerShell script that examines a live Profile Management deploy-ment and determines whether it is optimally configured. Formore information on this tool, seeCTX132805.
3. If a Profile Management .ini file is in use, check its configuration on the affected computer.4. Check the settings in Group Policy (GP) against the recommended configurations that are de-
scribed in Decide on a configuration. To deactivate any Profile Management policy that youenter as lists (for example, exclusion lists and inclusion lists), set the policy to Disabled. Do notset the policy to Not Configured.
5. Check the HKLM\Software\Policies registry entry on the affected computer to see if there areany stale policies due to GP tattooing issues, and delete them. Tattooing occurs when policiesare deleted from GP but remain in the registry.
6. Check the file UPMSettings.ini, which contains all of the Profile Management settings that havebeen applied for each user. This file is located in the root folder of each Citrix user profile in theuser store.
If these steps do not correct the issue, consult the remaining topics in this section of eDocs.
Enable logging for troubleshooting
July 11, 2018
Only enable logging if you experience an issue in your Profile Management deployment and want totroubleshoot it. In addition, disable logging when the issue is resolved and delete the log files, whichmay contain sensitive information.
Policy: Enable logging
This policy enables or disables logging. Only enable this policy if you are troubleshooting Profile Man-agement.
© 1999-2018 Citrix Systems, Inc. All rights reserved. 177
Profile Management 7.18
If Enable logging is disabled, only errors are logged. If this policy is not configured in GP, the valuefrom the .ini file is used. If this policy is not configured in GP or the .ini file, only errors are logged.
Policy: Log settings
This policy is a set of options that you can use to focus on specific actions and events. Only set theseoptions if you are troubleshooting, and set themall unless you are requested to do otherwise by Citrixpersonnel.
If Log settings are not configured in GP, Profile Management uses the settings from the .ini file. If thispolicy is not configured in GP or the .ini file, errors and general information are logged.
Policy: Maximum size of the log file
The default value for the maximum size of the Profile Management log file is 10 MB (10,485,760bytes). If you have sufficient disk space, increase it to 20 MB (20,971,520 bytes), or more. If thelog file grows beyond the maximum size, an existing backup of the file (.bak) is deleted. Andthe log file is renamed to .bak and a new log file is created. The log file is created in %System-Root%\System32\Logfiles\UserProfileManager.
In XenDesktop deployments that use Machine Creation Services a persistent folder imposes a 15 MB(15,728,640 bytes) limit on log files (not just Profile Management ones). You can store your log files ona system disk, where this limitation does not apply. Or use this policy to restrict the log file size to amaximum of 7 MB (7864320 bytes). Profile Management can then store, on the persistent folder, thecurrent log file, and the previous one as a .bak file.
If this policy is disabled, the default value of 10 MB (10,485,760 bytes) is used. If this setting is notconfigured in GP, the value from the .ini file is used. If this setting is not configured in GP or the .ini file,the default value is used.
Policy: Path to log file
You can set an alternative path to which the log files are saved. The path can be to a local drive or aremote, network-based one (a UNC path). Remote paths can be useful in large, distributed environ-ments, but they can create significant network traffic, which may be inappropriate for log files.
For profiles on virtual machines, consider whether drives on the desktops are persistent because thisaffects logging. If a desktop has a persistent drive (for example, if it was createdwith a personal vDiskusingCitrix XenDesktop), set a local path to it. The log files arepreservedwhen themachine restarts. Ifa desktop does not have a persistent drive (for example, it was createdwithout a personal vDisk usingXenDesktop), set a UNC path. This setup allows you to retain the log files but the system account for
© 1999-2018 Citrix Systems, Inc. All rights reserved. 178

Profile Management 7.18
the machines must have write access to the UNC share. Use a local path for any laptops managed bythe offline profiles feature.
If a UNC path is used for log files:
• Citrix recommends that an access control list is applied to the log file folder. It is to ensure thatonly authorized user or computer accounts can access the stored files.
• Duplicate log files remain locally. These files can be left on the computer. But if you want to re-move them, first stop the Profile Management Service. Delete the log file and the configurationlog file. Then restart the computer.
• Set NTFS and SMB share level permissions to Domain computers Read/Write.
Examples:
• D:\LogFiles\ProfileManagement• \\servername\LogFiles\ProfileManagement
If Path to log file isnot configured inGP, thevalue fromthe .ini file is used. If thispolicy isnot configuredin GP or the .ini file, the default location %SystemRoot%\System32\Logfiles\UserProfileManager isused.
For the special case of XenDesktop Machine Creation Services, a local, persistent folder is mapped tothe C drive at C:\ProgramFiles\Citrix\PvsVM\Service\PersistedData. It is a good location to store up to15 MB of log data. If you use it, note the limit on Maximum size of the log file.
Profile Management log files
July 11, 2018
The following logs can be useful when troubleshooting Profile management.
Informal Name Log Name LocationType of LogInformation
Windows event log %SystemRoot%\system32\LogFilesThe Windows eventlog, which you viewwith Microsoft EventViewer, is usedprimarily for errorreporting. Only errorsare written to it.
© 1999-2018 Citrix Systems, Inc. All rights reserved. 179

Profile Management 7.18
Informal Name Log Name LocationType of LogInformation
Profile managementlog file
#_pm.log %SystemRoot%\system32\LogFiles\UserProfileManagerInformationalmessages andwarnings, includingerrors, are written tothe ProfileManagement logfile.The domainnameis the computer’sdomain and thecomputername is itsname. If the domaincannot bedetermined, this logfile is called UserPro-fileManager.log.
Profile managementconfiguration log file
#_pm_config.log %SystemRoot%\system32\LogFiles\UserProfileManagerThe configuration logfile captures the GPOand .ini file settingseven if logging isturned off. If thedomain cannot bedetermined it iscalled UserProfileM-anager_pm_config.
If requested by Citrix Technical Support, youmay also need to examine the log files createdwith CitrixDiagnostic Facility.
The rest of this topic describes the contents of the Profile management log file.
Profile management log file - entry types
• Commonwarnings. All common warnings.• Common information. All common information.• File system notifications. One log entry is created each time a processed file or folder ischanged.
• File system actions. File system operations performed by Profile management.
© 1999-2018 Citrix Systems, Inc. All rights reserved. 180

Profile Management 7.18
• Registry actions. Registry actions performed by Profile management.• Registry differences at logoff. All registry keys in the hive HKCU that have been changed in asession.Important: This setting produces large amounts of output in the log file.
• Active Directory actions. Each time Profilemanagement queries the Active Directory, an entryis written to the log file.
• Policy values. When the Profile management service starts or a policy refresh occurs, policyvalues are written to the log file.
• Logon. The series of actions during logon are written to the log file.• Logoff. The series of actions during logoff are written to the log file.• Personalized user information. Where applicable, user and domain names are logged to ded-icated columns of the log file.
When the Citrix policy setting for each entry type is enabled, that entry type is logged.
Profile management log file - format
Each line in the log file has several fields, separated by semicolons.
Field Description
Date Date of the log entry
Time Time of the log entry (including milliseconds)
Severity Either INFORMATION, WARNING, or ERROR
Domain The domain of the user (where applicable)
User name The name of the user (where applicable)
Session ID The session ID (where applicable)
Thread ID The ID of the thread that created this line
Function and description The name of the Profile management functionexecuting at the time, and the log message
Events logged by Profile Management
July 11, 2018
Events logged by Profile Management can be used by Citrix EdgeSight or third-party monitoring andreporting tools. View the events in Windows Event Viewer. Select the Applications node in the left
© 1999-2018 Citrix Systems, Inc. All rights reserved. 181

Profile Management 7.18
pane. The Source of the events in the right pane is Citrix Profile Management.
Events are not all sequentially numbered and not all are used in this version of Profile Management.However, they might be logged if you upgrade from an earlier version.
Event ID Description Cause Action
6 The Citrix ProfileManagement servicehas started.
The Citrix ProfileManagement servicehas started. It mightbe the result of anautomatic start, amanual start, or arestart.
If the start or restartwas not planned,check the event logfor errors and takeany corrective actionindicated, includingProfile Managementtroubleshootingprocedures.
7 The Citrix ProfileManagement servicehas stopped.
The Citrix ProfileManagement servicehas stopped. Thismight be the result ofa manual stop or aspart of shutdownprocessing.
If the service stop wasnot planned, checkthe event log forerrors and take anycorrective actionindicated, includingProfile Managementtroubleshootingprocedures.
8 The profile for userhas beenmodified bya later version ofCitrix ProfileManagement and canno longer be used bythis version…
The Citrix ProfileManagement serviceon this machine hasdetected that a laterversion of Profilemanagement hasmodified the user’sprofile in the userstore. To preventpossible data loss,earlier versions ofProfile Managementrevert to using atemporary profile.
Upgrade thiscomputer (and allother computerssharing the user storeand using earlierversions of ProfileManagement) to usethe latest version.
© 1999-2018 Citrix Systems, Inc. All rights reserved. 182

Profile Management 7.18
Event ID Description Cause Action
9 The logon hookdetectionencountered aproblem…
The Citrix ProfileManagement servicedetected a problemwhile setting up logonnotification. TheCitrix ProfileManagement servicerequires that theinstallation pathcontains no spaces,or the 8.3 filenamesupport is enabled onthe volume where theservice is installed.
Reinstall Citrix ProfileManagement to apath with no spacesor enable 8.3filename support onthe volume whereProfile managementis installed.
10 User path to the userstore is…
A valid Citrix userprofile has beenfound at the locationindicated.
None. This messageis for informationonly.
11 spsMain:CreateNamedPipefailed with…
(This event is nolonger used.)
None.
© 1999-2018 Citrix Systems, Inc. All rights reserved. 183

Profile Management 7.18
Event ID Description Cause Action
12 StartMonitoringProfile:A problemwasdetected in theWindows changejournal managementduring logon…
The Citrix ProfileManagement Servicewas unable tomonitor the profile ora folder configuredfor extendedsynchronization. Aproblemwasdetected in theWindows changejournal eventmanagement,preventing theService frommonitoring changes.Citrix ProfileManagement doesnot process thisfolder. A Windowsuser profile is usedinstead.
Ensure that changejournal processing isconfigured andoperational for allvolumes managed byProfile Management.Ensure that thecomputer hasadequate systemresources. Check theevent log for errorsand take anycorrective actionindicated, includingProfile Managementtroubleshootingprocedures.
© 1999-2018 Citrix Systems, Inc. All rights reserved. 184
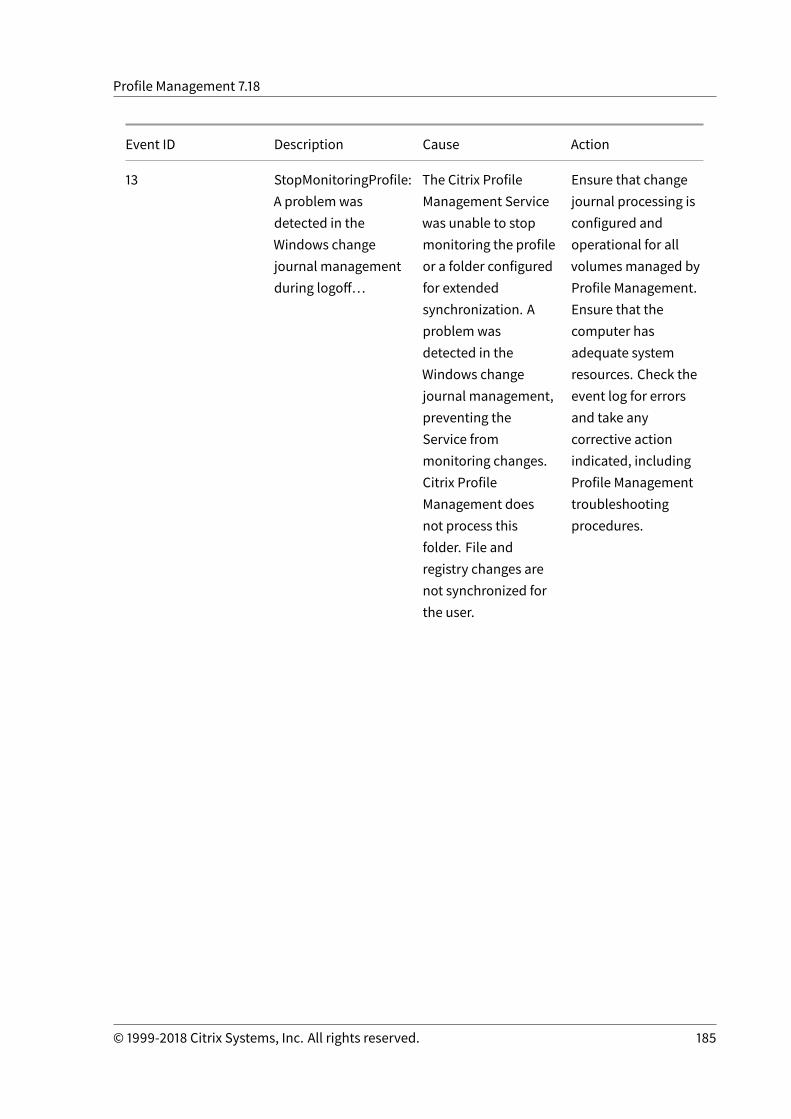
Profile Management 7.18
Event ID Description Cause Action
13 StopMonitoringProfile:A problemwasdetected in theWindows changejournal managementduring logoff…
The Citrix ProfileManagement Servicewas unable to stopmonitoring the profileor a folder configuredfor extendedsynchronization. Aproblemwasdetected in theWindows changejournal management,preventing theService frommonitoring changes.Citrix ProfileManagement doesnot process thisfolder. File andregistry changes arenot synchronized forthe user.
Ensure that changejournal processing isconfigured andoperational for allvolumes managed byProfile Management.Ensure that thecomputer hasadequate systemresources. Check theevent log for errorsand take anycorrective actionindicated, includingProfile Managementtroubleshootingprocedures.
© 1999-2018 Citrix Systems, Inc. All rights reserved. 185
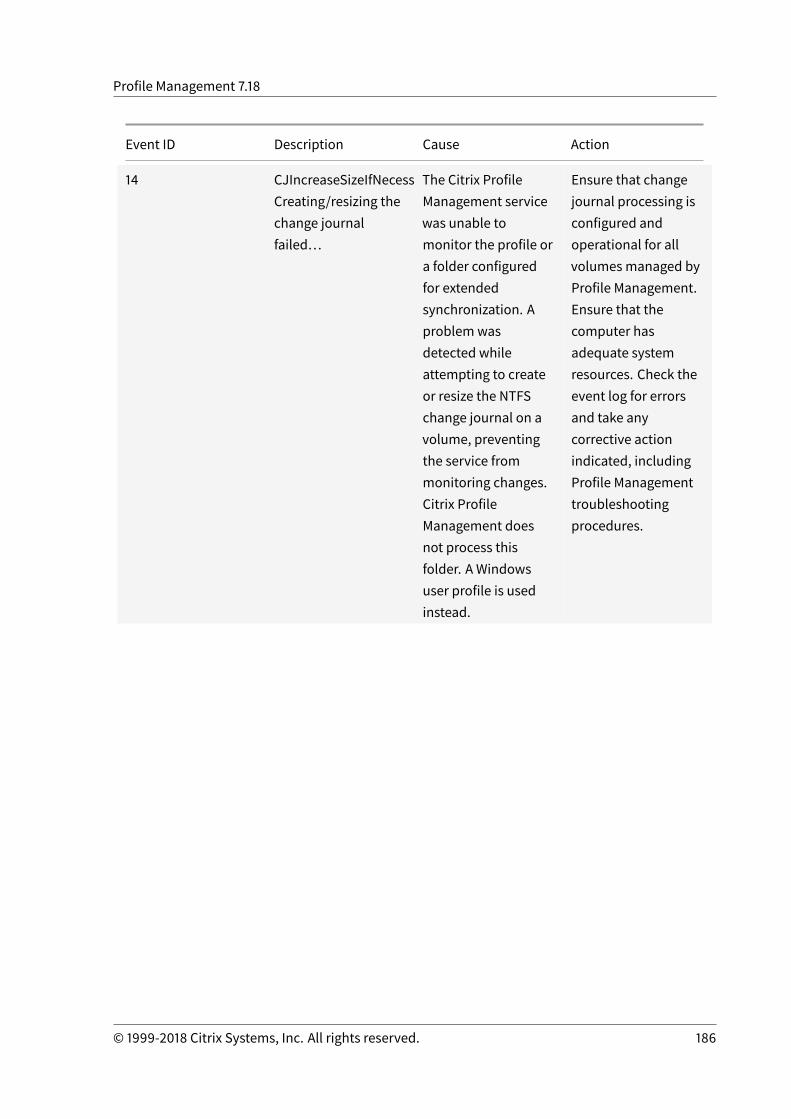
Profile Management 7.18
Event ID Description Cause Action
14 CJIncreaseSizeIfNecessary:Creating/resizing thechange journalfailed…
The Citrix ProfileManagement servicewas unable tomonitor the profile ora folder configuredfor extendedsynchronization. Aproblemwasdetected whileattempting to createor resize the NTFSchange journal on avolume, preventingthe service frommonitoring changes.Citrix ProfileManagement doesnot process thisfolder. A Windowsuser profile is usedinstead.
Ensure that changejournal processing isconfigured andoperational for allvolumes managed byProfile Management.Ensure that thecomputer hasadequate systemresources. Check theevent log for errorsand take anycorrective actionindicated, includingProfile Managementtroubleshootingprocedures.
© 1999-2018 Citrix Systems, Inc. All rights reserved. 186
Profile Management 7.18
Event ID Description Cause Action
15 CJInitializeForMonitoring:Unable to query thejournal…
The Citrix ProfileManagement servicewas unable tomonitor the profile ora folder configuredfor extendedsynchronization. Aproblemwasdetected whilequerying the NTFSchange journal on avolume, preventingthe service frommonitoring changes.Citrix ProfileManagement doesnot process thisfolder. A Windowsuser profile is usedinstead.
Ensure that changejournal processing isconfigured andoperational for allvolumes managed byProfile management.Ensure that thecomputer hasadequate systemresources. Check theevent log for errorsand take anycorrective actionindicated, includingProfile Managementtroubleshootingprocedures.
© 1999-2018 Citrix Systems, Inc. All rights reserved. 187

Profile Management 7.18
Event ID Description Cause Action
16 CJInitializeForMonitoring:Initial MFT scanfinished with errors.
The Citrix ProfileManagement servicewas unable tomonitor the profile ora folder configuredfor extendedsynchronization. Aproblemwasdetected whileperforming an initialscan of the NTFSchange journal on avolume, preventingthe service frommonitoring changes.Citrix ProfileManagement doesnot process thisfolder. A Windowsuser profile is usedinstead.
Ensure that changejournal processing isconfigured andoperational for allvolumes managed byProfile Management.Ensure that thecomputer hasadequate systemresources. Check theevent log for errorsand take anycorrective actionindicated, includingProfile Managementtroubleshootingprocedures.
© 1999-2018 Citrix Systems, Inc. All rights reserved. 188

Profile Management 7.18
Event ID Description Cause Action
17 CJInitializeForMonitoring:Processing FSchanges since servicestart failed.
The Citrix ProfileManagement servicewas unable tomonitor the profile ora folder configuredfor extendedsynchronization. Aproblemwasdetected whileperforming an updatescan of the NTFSchange journal on avolume. This errordoes not prevent theservice frommonitoring changes.Citrix ProfileManagementprocesses thisdirectory as normal.
Although this errordoes not prevent theoperation of Profilemanagement, checkfor errors anyway.Ensure that changejournal processing isconfigured andoperational for allvolumes managed byProfile Management.Ensure that thecomputer hasadequate systemresources. Check theevent log for errorsand take anycorrective actionindicated, includingProfile Managementtroubleshootingprocedures.
© 1999-2018 Citrix Systems, Inc. All rights reserved. 189

Profile Management 7.18
Event ID Description Cause Action
18 CJProcessAvailableRecords:Internal Error…
A failure occurred inthe Citrix ProfileManagement servicewhile monitoring theprofile or a folderconfigured forextendedsynchronization. Aproblemwasdetected whileperforming an updatescan of the NTFSchange journal on avolume, preventingthe service frommonitoring recentchanges. Citrix ProfileManagement doesnot completeprocessing on thisfolder. Back upcritical datamanually.
The Citrix ProfileManagement Servicewas unable tomonitor the profile ora folder configuredfor extendedsynchronization. Aproblemwasdetected in theWindows changejournal eventmanagement,preventing theService frommonitoring changes.Citrix ProfileManagement will notprocess this folder. AWindows user profileis used instead.
© 1999-2018 Citrix Systems, Inc. All rights reserved. 190

Profile Management 7.18
Event ID Description Cause Action
19 USNChangeMonitor:Initialization ofchange journalfailed…
A failure occurred inthe Citrix ProfileManagement servicewhile monitoring theprofile or a folderconfigured forextendedsynchronization. Aproblemwasdetected whilepreparing the initialscan of the NTFSchange journal on avolume, preventingthe service frommonitoring changes.Citrix ProfileManagement doesnot completeprocessing on thisdirectory. Back upcritical datamanually.
The Citrix ProfileManagement Servicewas unable tomonitor the profile ora folder configuredfor extendedsynchronization. Aproblemwasdetected in theWindows changejournal eventmanagement,preventing theService frommonitoring changes.Citrix ProfileManagement doesnot process thisfolder. A Windowsuser profile is usedinstead.
© 1999-2018 Citrix Systems, Inc. All rights reserved. 191
Profile Management 7.18
Event ID Description Cause Action
20 CADUser::Init:Determining the DNSdomain and ADsPathfailed…
A problem occurredwhile querying ActiveDirectory forinformation aboutthe logged-on user.Citrix ProfileManagement doesnot process thisfolder. A Windowsuser profile is usedinstead.
Ensure that thecomputer has afunctioning networkpath to a domaincontroller. Ensurethat the computerhas adequate systemresources. Check theevent log for errorsand take anycorrective actionindicated, includingProfile Managementtroubleshootingprocedures.
21 Determining the DNSdomain and ADsPathfailed…
This issue can becaused by a limit onmemory allocation,as described in theMicrosoft TechNetarticle 263693.
The resolution for thisissue is described inthe Citrix KnowledgeCenter articleCTX124953.
22 File access was slow.User experienced adelay while file wasfetched from the userstore.
The user tried toaccess the file butProfile Managementdetected a delay inthis operation. Theuser received awarning message.This might be due toantivirus softwarepreventing access tothe file in the userstore.
Consult the ProfileManagementdocumentation fortroubleshooting andconfiguration adviceon enterpriseantivirus products.
© 1999-2018 Citrix Systems, Inc. All rights reserved. 192
Profile Management 7.18
Event ID Description Cause Action
23 File access may bedenied. Userexperienced a longdelay while file wasfetched from the userstore.
The user tried toaccess the file butProfile Managementdetected such asignificant delay inthis operation thataccess may bedenied. The userreceived an errormessage. This mightbe due to antivirussoftware preventingaccess to the file inthe user store.
Consult the ProfileManagementdocumentation fortroubleshooting andconfiguration adviceon enterpriseantivirus products.
24 RevertToSelf failedwith error code andProfile managementwas shut down.
Some logon andlogoff processing isperformed usingimpersonation. TheRevertToSelf functionis normally invokedwhen impersonationis complete. On thisoccasion, thefunction could not becalled so, for securityreasons, ProfileManagementsoftware was shutdown. The userreceived an errormessage.
If you suspect asecurity breach,follow yourorganization’sprocedures toaddress it, and thenrestart ProfileManagement.
© 1999-2018 Citrix Systems, Inc. All rights reserved. 193

Profile Management 7.18
Event ID Description Cause Action
25 The profile for user ismanaged by CitrixProfile Management,but the user storecould not bereached…
The Citrix ProfileManagement Serviceon this computercannot reach thespecified user store.This is normallybecause of a networkissue or because theserver hosting theuser store isunavailable.
Ensure the serverhosting the user storeis available and thenetwork between thiscomputer and theserver is operational.
26 The default profilelocation is invalid.Profiles in thislocation cannot bemonitoredcorrectly…
Profiles on thiscomputer must be ona disk mounted on adrive letter (forexample, C:).
Move the profiles onthis computer to adisk mounted on adrive letter, andrestart ProfileManagement.
27 The profile folder foruser is not presentunder the defaultprofile location…
In the registry, thelocation of this user’sprofile and of thedefault profile do notmatch. This canoccur, for example, ifprofiles are movedbetween differentvolumes on themachine running theProfile ManagementService.
Ensure that this user’sprofile is locatedunder the defaultfolder location. Useappropriate tools ifnecessary so that theprofile data in the filesystemmatches theprofile’s registrysettings.
© 1999-2018 Citrix Systems, Inc. All rights reserved. 194

Profile Management 7.18
Event ID Description Cause Action
28 An error occurredwhile trying to resetsecurity permissionson the registry hivefor user .
It is likely that thereare permission issueswith the registry inthe default ortemplate profile usedto create this Citrixuser profile.
If appropriate, resetthe securitypermissions on theuser’s registry hive inthe ProfileManagement userstore using athird-party utilitysuch as SetAcl.
29 A template profilepath is configured butno profile wasfound…
The specified foldercannot be used in theTemplate profilesetting because itdoes not contain thefile NTUSER.DAT. Thisissue commonlyoccurs when the fullpath of theNTUSER.DAT file isconfigured instead ofthe folder containingNTUSER.DAT. TheTemplate profilesetting does notsupport expansion ofActive Directoryattributes, systemenvironmentvariables, or the%USERNAME% and%USERDOMAIN%variables.
Check that you haveconfigured a validpath to the foldercontaining thetemplate profile.Check that the pathcontainsNTUSER.DAT. Ensurethat this file is a validfile, and that accessrights are setcorrectly on thefolder to allow readaccess to all files.
33 Citrix ProfileManagement createda profile in the userstore from a localprofile at LOCATION
A profile was createdin the user store fromthe locationindicated.
None. This messageis for informationonly.
© 1999-2018 Citrix Systems, Inc. All rights reserved. 195

Profile Management 7.18
Event ID Description Cause Action
34 Citrix ProfileManagement createda profile in the userstore from a roamingprofile at LOCATION
A profile was createdin the user store fromthe locationindicated.
None. This messageis for informationonly.
35 Citrix ProfileManagement createda profile in the userstore from a templateprofile at LOCATION
A profile was createdin the user store fromthe locationindicated.
None. This messageis for information only
36 The existing profilefolder for USER couldnot be prepared forthis user’s new Citrixmandatory profile.The user is given atemporary profile ifpossible.
Citrix mandatoryprofiles use copies ofa template profile foreach logon. Anyexisting profiles aredeleted and the Citrixmandatory profilesare copied from thespecified templatelocation. This processfailed.
Delete any existingprofile foldermanually. Youmayhave to restart thecomputer if files arelocked by anotherprocess that causesthe deletion to fail.Ensure that thetemplate folder existsand the user haspermissions to readits contents.
37 The user store pathfor user could not bereached. A temporaryprofile is created forthis user and nochanges are saved totheir profile in thisuser store.
The Citrix ProfileManagement Serviceon this computercannot reach thespecified user store.This is normallybecause of a networkissue or because theserver hosting theuser store isunavailable.
Ensure the serverhosting the user storeis available and thenetwork between thiscomputer and theserver is operational.
© 1999-2018 Citrix Systems, Inc. All rights reserved. 196

Profile Management 7.18
Event ID Description Cause Action
38 The profile for user ismanaged by CitrixProfile Management,but the user storepath could not befound. A temporaryprofile is created forthis user and nochanges are saved totheir profile in thisuser store.
The Citrix ProfileManagement Serviceon this computercannot find theprofile in thespecified user store.This might bebecause of a networkissue or because theserver hosting theuser store isunavailable. But itmight also bebecause the profile inthe user store hasbeen deleted ormoved. Or the path tothe user store haschanged and nolonger correctlypoints to an existingprofile in the userstore.
Ensure that the serverhosting the user storeis available. And thenetwork between thiscomputer and theserver is operationaland the path to theuser store points toan existing profile. Ifthe profile in the userstore has beendeleted, delete theprofile on the localmachine.
Log file checklist
July 11, 2018
After working through the basic troubleshooting checklist, examine the Profile Management log fileas follows.
1. Make sure that logging is enabled.2. Check the log file for errors. Locate these errors by searching for the word ERROR.3. Check the log file for warnings. Locate these warnings by searching for the word WARNING.4. Run the command gpupdate /force on the computer on which the error occurs, and check the
log file again. Reviewwhich settings are active and fromwhere the configuration has been read(either Group Policy or an .ini file).
© 1999-2018 Citrix Systems, Inc. All rights reserved. 197

Profile Management 7.18
5. Check that the path to the user store is correct.6. Check that all information from Active Directory was read correctly.7. Check the time stamps. Is there an action that took too long?
If the log file does not help you identify the issue, see Advanced troubleshooting checklist.
Troubleshoot without logging
July 11, 2018
If no logging at all is taking place, try the troubleshooting approach used in the following example.It is designed to help you work out which configuration settings are being read, establish where theyare being read from (whenmultiple ADM files are present), and check that the log file correctly trackschanges made to profiles. The strategy creates a small test OU to which a test user logs on, allowingyou to create profile modifications that you then track in the log file and Resultant Set of Policies(RSoP) report.
The deployment in this example has XenApp servers running onWindows Server 2003with users con-necting to their published resources using the Plug-in for Hosted Apps for Windows. The deploymentuses OU-based GPOs. INI file-based configuration is not used.
Caution: Editing the registry incorrectly can cause serious problems that may require you to reinstallyour operating system. Citrix cannot guarantee that problems resulting from the incorrect use of Reg-istry Editor can be solved. Use Registry Editor at your own risk. Be sure to back up the registry beforeyou edit it.
1. Remove from the production environment one of the XenApp servers that hosts the Citrix userprofiles. And add it to a new OU containing just this server.
2. Remove and reinstall Profilemanagement on the server. When reinstalling, check that short filenames (also known as 8.3 file names) are activated. As this example usesWindows Server 2003,you do this as follows:
• If the following registry entry is set to 1 (DWORD value), set it to 0 and reinstall Profileman-agement: HKLM\System\CurrentControlSet\Control\FileSystem\NtfsDisable8Dot3NameCreation.This enables support for short file names.
• If the entry is not set to 1, reinstall Profilemanagement to a locationwhere each subfoldername is eight characters or less, for example c:\prof-manFor later operating systems, you do not need to adjust this registry entry.
3. Log on as a domain administrator to the server.4. Examine the local policy and remove the ADM file at this level.5. Delete any links to GPOs assigned to your new OU.6. On theserver, delete thekeyandall subkeys fromRegistryEditor: HKLM\Software\Policies\Citrix\UserProfileManager\7. Remove any Profile management .ini file.
© 1999-2018 Citrix Systems, Inc. All rights reserved. 198

Profile Management 7.18
8. Using My Computer > Properties > Advanced, delete all profiles except those profiles that youwant to test. Research any errors that appear.
9. So that you can check the Profile management log file when logging on as a user, give the Au-thenticatedUsersgroup full controlof the file. This isC:\Windows\System32\LogFiles\UserProfileManager\<domainname>#<computername>_pm.log(where <domainname> is the computer’s domain and<computername> is its name). If thedomain cannot be determined, the log file is UserProfileManager.log.
10. Create a GPO that contains only the following settings, and link it to your new OU. Ensure thatthe GPO is assigned to the Authenticated Users group. Enable these settings:a) Enable Profile management.b) Path to user store.c) Enable logging.d) Log settings. Scroll to select all settings in this section of the ADM file.e) Migration of existing profiles. Select Roaming and local profiles.f) Local profile conflict handling. Select Rename local profile.g) Delete locally cached profiles on logoff.
Disable the setting Process logons of local administrators. It helps when troubleshootingbecause, if Profile management is misconfigured and prevents user logons, you are stillable to log on as an administrator.
11. Control how the GPO link is applied to the OU by right-clicking the OU and selecting Block In-heritance.
12. Create a domain test user who has never logged on and who is not amember of any group thatis a local administrator on the server.
13. Publish a full desktop to this user andmake sure the user is in the Remote DesktopUsers group.14. If the domain has multiple domain controllers (DCs), force AD replication between all the DCs
in the same site as the server.15. Log on to the server as domain Administrator, delete the log file, restart the Citrix Profile Man-
agement service, and run gpupdate /force.16. Check the registryandmakesure theonlyvalues inHKLM\Software\Policies\Citrix\UserProfileManager\
are the ones for your new GPO.17. Log out as Administrator.18. Using the Plug-in for Hosted Apps, log on to the published full desktop as the new domain test
user.19. Make some setting changes to Internet Explorer, and create a blank test file in your My Docs
folder.20. Create a shortcut to the Profilemanagement log file. Open it and examine the entries. Research
any items that may require attention.21. Log out and then back in as domain Administrator.22. Generate an RSoP report for the test user and the server.
If the report does not contain what you expect, research any items that require attention.
© 1999-2018 Citrix Systems, Inc. All rights reserved. 199

Profile Management 7.18
Advanced troubleshooting checklist
July 11, 2018
Once you have followed the steps in the basic troubleshooting checklist to try and correct an issue,and eliminated the Profile Management log file as a source of useful information, use this checklist totroubleshoot further.
• Check the Resultant Set of Policies (RSoP) from the computer you are analyzing and ensure allGPOs are applied as expected.
• Check that you have the latest version of Profilemanagement installed. Examine the version in-formation of UserProfileManager.exe by right-clicking the file in Windows Explorer and clickingProperties > Version. The latest version is available from the My Account site; select your Citrixproduct and download Profile Management from the Downloads section.Tip: You can hotfix your deployment of Profile Management 2.1.1 or later by upgrading to thelatest version. After upgrading, you can, if desired, enable any later feature.
• Check the Profile Management support forum. Someone else may already have encounteredthe problem and solved it.
• Try to reproduce the issue you are observing on a clean computer with the same operating sys-tem as the affected computer. If possible, install the software products that are present on theaffected computer one by one, and see if the issue is reproduced after each installation.
Troubleshooting common issues
July 11, 2018
Slow Logons
For information about known issues with slow logons and workarounds, see CTX101705.
Checking That Profiles Are Being Streamed
If you have enabled streamed user profiles and want to verify that this feature is being applied to auser’s profile:
1. Check the following type of entry in the Profile Management log file:</span>
pre codeblock 2010-03-16;16:16:35.369;INFORMATION;;;;1140;ReadPolicy:Configuration value read from policy: PSEnabled=<1>
The last item should be set to PSEnabled=<1> if the feature is enabled.
© 1999-2018 Citrix Systems, Inc. All rights reserved. 200

Profile Management 7.18
2. Check the following entry for the user in the Profile Management log file:</span>
pre codeblock 2010-03-16;20:17:30.401;INFORMATION;<domain name>;<username>;2;2364;ProcessLogon: User logging on with Streamed Profile
support enabled.
If streamed user profiles are not being applied, the item reads ProcessLogon: User logging onwith Streamed Profile support disabled.
Determining Which Policies Are In Force
UseUPMSettings.ini (located in the root folder of eachCitrix user profile in theuser store) todeterminethe ProfileManagement policies that are being applied. Examining this filemight bemore convenientthanusing theResultantSetofPolicy (RSoP)especially if youuseamixtureofGPOsand .ini file settingsto determine policies.
Use UPMFRSettings.ini (also located in the root folder) to determine which profile folders are not pro-cessed because they are on an exclusion list.
Excluding Corrupt Profile Data
If a user profile is corrupt and youare confident theproblem lieswith aparticular file or folder, excludeit from the synchronization process by adding it to the exclusion list.
Cleaning Connections to Registry Entries
In some scenarios (not just those involving Profile Management), connections to registry profile dataare preserved after users log off. Thismay result in slow logoffs or incomplete termination of user ses-sions. TheUser Profile Hive Cleanup (UPHClean) tool fromMicrosoft can help resolve these scenarios.
Deleting Local Profiles
Microsoft Delprof.exe and Sepago Delprof2 are tools that help you delete user profiles.
Deleting Locked, Cached Profiles
If youuseVMware software to create virtual desktops, butusers’ cachedprofiles are lockedandcannotbe deleted, see Profile Management and VMware for troubleshooting information.
© 1999-2018 Citrix Systems, Inc. All rights reserved. 201
Profile Management 7.18
Identifying Where Profiles Are Stored
Diagnosing profile issues can involve locating where the files in a user’s profiles are stored. This pro-cedure provides a quick way to check this.
1. In Event Viewer, click Application in the left pane.</span>2. Under Source in the right pane, locate the Citrix Profile Management event of interest and
double-click it.</span>3. The path to the user store associated with the event is displayed as a link on the General
tab.</span>4. Follow the link to browse the user store if you want to explore the files.</span>
Checking Servers
To determinewhether a server is processing a user’s logons and logoffs correctly, check the file calledPmCompatibility.ini in the user’s profile in the user store. The file is located in the profile’s root folder.The last entry in the file is the name of the server from which the user last logged off. For example, ifthe server runs Profile Management 5.0, the entry would be:
1 [LastUpdateServerName]2 5.0=<computer name>
Roll back
You can roll back to earlier versions of Profile Management. To do this, run del /s from the commandline on the file server that hosts the user store. This deletes the file PmCompatibility.ini from eachprofile. For example, if the local path to the user store is D:\UpmProfiles, run:
1 del /s D:\UpmProfiles\pmcompatibility.ini
After the command has completed, users can log on to computers running the earlier version andreceive their profile from the user store.
Profile Management Running on VMware Creates Multiple Profiles
Replicated VMware folders are created in user profiles. The replicates have incremented folder names(000, 001, 002, and soon). Formore information about this issue andhow to resolve it, see CTX122501.
© 1999-2018 Citrix Systems, Inc. All rights reserved. 202
Profile Management 7.18
Long Logon Times With Novell eDirectory
Whenusers log on to an environment involving Citrix products andNovell eDirectory (formerly knownas Novell Directory Services), long logon times might be experienced and errors written to the eventlog. Sessions might hang or freeze for up to 30 seconds at the Applying your personal settings stage.For more information about this issue and how to resolve it, see CTX118595.
Excluded Folders in User Store
Excluded foldersappear in theuser store. This is expectedandnocorrectiveaction is required. Folderson an exclusion list are created in the user store but their contents are not synchronized.
Missing Information In Log File
Activating debug mode does not automatically enable full logging. In Log settings, verify that youhave selected all of the checkboxes for the events you want to log.
Tip: Youmay have to scroll down to enable the last checkboxes on the list.
GPO Settings Inoperative
You change a GPO setting but it is not operative on the computer running the Citrix Profile Manage-ment Service. This might be because GP does not refresh immediately but instead is based on eventsor intervals specified in your deployment. If youwant to refresh GP immediately, run gpupdate /forceon the computer.
For your changes to take effect, run the gpupdate /force command from the command prompt asdocumented at http://technet.microsoft.com/en-us/library/bb490983.aspx.
Users Receive New or Temporary Profiles
Bydefault, users are given a temporary profile if a problem is encountered (for example, the user storeis unavailable). However, you can instead configure Profile Management to display an error messageand then log users off. This can help with troubleshooting.
For instructions on configuring this feature, see Force user logoffs.
In some circumstances, when they log on, users receive a new profile instead of their cached profile.For more information about this issue and a workaround for it, see CTX118226.
Usersmight also receivea temporaryprofile if a local profile is present after thecopy in theuser store isremoved. This situation can arise if the user store is cleared but local profiles are not deleted at logoff.
© 1999-2018 Citrix Systems, Inc. All rights reserved. 203

Profile Management 7.18
Profile Management treats such partial removal of profiles as a network, share, or permissions error,and provides the user with a temporary profile. For this reason, partial removal is not recommended.To work around this issue, log on to the affected computer and delete the profile manually.
If your deployment includes personal vDisks (a XenDesktop feature), users may receive temporaryprofiles if the default processing of these disks has not been correctly adjusted. Formore information,see Migrate user profiles.
Profile Data Lost When XenDesktop Sessions Become Unresponsive
In a XenDesktopdeployment, disconnecting fromaRemoteDesktopProtocol (RDP) session can causea virtual desktop to become unresponsive or to restart. This impacts Profile Management because itcauses profile data to be lost when the session ends. The issue is fixed in Citrix Virtual Desktop AgentVersion 3.1.3242 and later.
Users Cannot Log On (Event ID 1000, Source Userenv)
Users are unable to log on to a Citrix environment and receive the following errormessage: “Windowsdidnot loadyour roamingprofile and is attempting to log youonwith your local profile…Contact yournetwork administrator.” This appears in the Application event. Log onWindows as Event ID 1000, withsource Userenv.
For more information about this issue and other workarounds for it, see CTX105618.
Printing
In Citrix XenDesktop environments, a user can select a default printer but sometimes the selectionis not retained between logons. This has been observed when a XenDesktop policy is used to setprinters on pooled virtual desktops based on a Citrix Provisioning Services vDisk in Standard Imagemode. This issue does not originate with Profile Management. Though the Profile Management logfile shows that the registry entry for the printer is copied at logoff (which is expected) but NTUSER.datfor the user does not contain the entry (which is not expected). The issue in fact originates with theway XenDesktop uses the DefaultPmFlags registry setting. For more information, see CTX119066.
Sometimes, unexpectedprinters are added toprofiles and, after users remove them, theprinters reap-pear at the next logon. For more information, see the Profile Management support forum.
ProblemsWith Application Settings on Multiple Platforms
You may experience problems where application settings do not roam correctly across multiple plat-foms. Typically these problems result from:
© 1999-2018 Citrix Systems, Inc. All rights reserved. 204

Profile Management 7.18
• Settings that are not applicable from one system to another. For example, hardware specificsettings that are not on every system.
• Applications that are installed differently on different systems. For example, an application thatis installed on a C: drive on one system but on D: on another, an application that is installed inC:\Program Files on one system but in C:\Program Files (x86) on another, or an Excel add-ininstalled on one system but not another.
• Applications that store setting information outside of the profile. Ffor example, informationstored in the local machine’s settings or outside the user profile.
• Language-specific configuration settings stored in the registry. Profile Management automati-cally translates language-specific folder names in Version 1 profiles but not in the registry.
In most instances, these issues can beminimized by better standardization of the systems that causethe issues. However, often the issues result from inherent incompatibilities (with multiple platforms)of the OS or the respective application. If the problematic settings are not critical, excluding themfrom the profile might resolve the issue.
Profiles Owned by Unknown Accounts
On rare occasions, a profile can appear to belong to an unknown account. On the Advanced tab of theSystem Properties dialog box for a computer, Account Unknown is displayed when you click Settingsin User Profiles. This is accompanied by an event log entry, “Profile notification of event Create forcomponent <application ID> failed, error code is ???.” In the registry, the application ID points to theSHACCT Profile Notification Handler, a Microsoft component.
To confirm that this occurs in your environment, logonasauserwhosedata is notprocessedbyProfileManagement, and check for these symptoms.
It is not an issuewith Profile Management butmight be the result of Active Directory interacting badlywith virtual machine snapshots. The operation of Citrix user profiles is unaffected. Users can log onand off, and their profile changes are preserved.
Collect diagnostic information
July 11, 2018
Before attempting to collect information on a problem with Profile Management, make sure you canreproduce the problem.
If you are using XenDesktop 7, start troubleshooting in Desktop Director. This console displays prop-erties of profiles that can help you diagnose and correct problems.
© 1999-2018 Citrix Systems, Inc. All rights reserved. 205
Profile Management 7.18
1. Open the Profile Management Group Policy Object (GPO) in the Group Policy Management Edi-tor. Or open the .ini file in Notepad if you are not using GPO tomanage logging. For informationon the .ini file including its location, see Files included in the download.
2. Configure the following settings under the Profile Management\Log settings folder:• Set Enable logging to Enabled.• Select all of the events in Log settings.• In Maximum size of the log file, set themaximum size of the Profile Management log file inbytes.
3. Run gpupdate /force on the server or desktop.4. If requested by Citrix Technical Support, collect a diagnostic trace log (available in Profile man-
agement 3.x or later) using the instructions in Advanced troubleshooting checklist.5. Reproduce the problem and collect the log files, including the .log.bak file.6. Optionally, or if requested, collect the Resultant Set of Policy (RSoP) report, application event
logs, USERENV log, UPMSettings.ini, UPMFRSettings.ini, and PmCompatibility.ini. The .ini filesare located in the root folder of each Citrix user profile in the user store.
Data collection can become complex if Citrix Provisioning Services is part of your deployment andthe problem occurs when profiles are being initialized. In this scenario, you must make the aboveconfiguration updates in the .ini file (and unconfigure the aboveGPO log settings) or preferably followthe instructions in To preconfigure Profile management on provisioned images.
To create a diagnostic trace log
The diagnostic enhancements feature allows you to create and package trace logs for Citrix Techni-cal Support. These capture events about servers (but not user devices or virtual desktops) relatingto many aspects of Profile Management’s performance particularly the operation of streamed userprofiles.
For information on creating trace logs about user devices or virtual desktops, see CTX124455.
Only package and send a trace log if you are asked to do so by Technical Support.
Before you can use Citrix Diagnostic Facility to capture trace logs, ensure that it is available with theCitrix product or component that is used on the device, virtual desktop, or Citrix serverwhose profilesyou want to monitor.
The Access Management Console and Delivery Services Console contain a powerful tool, Citrix Diag-nostic Facility, which gathers and packages trace logs. These can be valuable when Citrix Supportdiagnose problems in your deployment.
1. In the Access Management Console or Delivery Services Console, start generating a trace logusing the procedure in CTX104578.
© 1999-2018 Citrix Systems, Inc. All rights reserved. 206

Profile Management 7.18
2. When selecting which modules to trace, choose one or all of the following Profile Managementmodules:
• UPM_Service. Records each time the Profile Management Service was invoked (for ex-ample, at logon, at logoff, or when mid-session synchronization operations or periodicmaintenance takes place).
• UPM_DLL_Perfmon. Allows you to trace Windows Performance Monitor counters associ-ated with and errors generated by Profile Management.
• UPM_Driver. Records file-system changes and each time the Citrix streamed user profilesdriver is used.
3. Complete the remaining steps in article CTX104578.
To produce a session dump file
You can save Profile Management’s internal data state to a dump file. This is helpful when you canisolate an issue to a specific point in a session but there is no associated entry in the log file.
1. Create a file called.txt in the root of the drive on which the affected user profile is located (typically C:). ProfileManagement dumps its internal data state to the file UserProfileManagerInternalData.log in thelog file folder and deletes the file.txt.
To set Microsoft NT Symbolic Debugger as your default Windows postmortemdebugging tool
For information about setting NT Symbolic Debugger (NTSD) as your default Windows postmortemdebugging tool, see CTX105888.
Contact Citrix Technical Support
July 11, 2018
If you have checked the log file and the other troubleshooting advice in this section, and believe theproblem you experience is due to Profile Management, contact Citrix Technical Support. Always in-clude the following files and as much other information as possible:
• All Profile Management log files (in %SystemRoot%\System32\Logfiles\UserProfileManager).Ensure that you have all of the log settings activated.
Log files from the affectedmachine should contain at least the following information:
© 1999-2018 Citrix Systems, Inc. All rights reserved. 207

Profile Management 7.18
– Start of the service (including the version and build number of Profile Management)– Reading of the configuration by the service– One full logon process of the affected user– The activity the user performed when the issue occurred– One full logoff process for the affected user
Tip: Ensure that you have increased the maximum size of the log file.
• The Resultant Set of Policy (RSoP) for the machine and affected user.
• Details of the operating system, language, and version installed on the affected system.
• Details of Citrix products and versions installed on the system.
• PmCompatibility.ini andUPMSettings.ini. These files are located in the root folder of each Citrixuser profile in the user store.
• If available, the Userenv debug file. Consult your Microsoft documentation for information onthis tool.
• If available, the session dump file. For more information on this Citrix tool, see To produce asession dump file.
Glossary
July 11, 2018
This topic contains terms and definitions used in the Profile Management software and documenta-tion. Profile-related terms used in other Citrix software are also included. To understand other con-cepts relating to Windows user profiles, visit the MicrosoftWeb site.
Term Definition
Base platform See cross-platform settings store.
© 1999-2018 Citrix Systems, Inc. All rights reserved. 208

Profile Management 7.18
Term Definition
Base profile The base profile is defined by a UNC path to aprofile in the user store. If the cross-platformsettings feature is used, registry settings andfiles that can be shared across platforms forma subset of the base profile. This subset iscopied to the cross-platform settings store,and, from there, they are added to the profileused as the target for migration or roaming.Although the cross-platform settings storecontains a subset of the base profile, this (andthe target profile) is always stored as completeprofiles. And it can, if necessary, be used asstandard Windows roaming or local profiles.Note however that if the streamed user profilesfeature is used, the base profile mighttemporarily be incomplete. Some files mightexist in the pending area until the user logs off.See roam for considerations when definingbase profiles in roaming scenarios.
Cache The terms cache and synchronize refer to theact of downloading files from the user store, oruploading to it. The term fetch is more specificand refers to how the streamed user profilesfeature downloads, any time after logon whenthe user needs them, a subset of files from theuser store.
© 1999-2018 Citrix Systems, Inc. All rights reserved. 209

Profile Management 7.18
Term Definition
Citrix mandatory profile, Citrix roaming profile,Citrix user profile
Citrix user profile is the general term for theprofile that a user receives when ProfileManagement is installed and enabled. Thereare two types of Citrix user profiles: Citrixroaming profiles and Citrix mandatory profiles.A Citrix roaming profile is the standardcollection of files, folders, and registry settingsthat are customized by users in theirday-to-day work, that are saved in the userstore at logoff, and that are treated by ProfileManagement policies. A Citrix mandatoryprofile is similar to a Citrix roaming profile inhow it is treated by Profile Management. Butno changes are saved in the user store at logoff.At logon, a fresh copy of the mandatory profileis loaded. Citrix user profiles are different fromMicrosoft local, Microsoft roaming, or Microsoftmandatory profiles.
Computer As used in these Profile Management topics,the general term computer can refer to anymachine on which the Citrix ProfileManagement Service is installed. This can be auser device, virtual desktop (possiblyprovisioned from a XenDesktop virtualmachine), or a XenApp server that hostspublished applications.
Cross-platform definition file This file is an .xml file supplied with ProfileManagement that contains the informationneeded to make the cross-platform settingsfeature work. There is one file per supportedapplication.
Cross-platform settings store This location, which is separate from the userstore, holds the settings for supportedapplications once the cross-platform settingsfeature is configured. Choose which platform’sprofile data is used to seed the cross-platformsettings store. It is the base platform.
© 1999-2018 Citrix Systems, Inc. All rights reserved. 210

Profile Management 7.18
Term Definition
Fetch See cache.
Legacy application A legacy application is a badly behaved onebecause it stores settings in a non-standardlocation. It includes systems that storetemporary application data in user profilesand, by doing so, create profile bloat.
Migrate Migration is the planned, one-waymovementof profiles from one platform to another (forexample, fromWindows XP to Windows 7).
Profile bloat Windows user profiles can increase in sizewhen temporary files are not deleted. Thiscauses slow logons and is referred to as profilebloat.
Roam Roaming is the use of different base profilesfrommultiple computers or sessions (forexample, one base profile for a computerrunning Windows 2008 R2 and a second onefor Windows 7). Users roamwhen they connectback and forth between computers or sessionsthat have different base profiles. Depending onhow you configure your Organizational Units(OUs), a base profile can be shared acrossplatforms. For example, the same profile canbe used by both Windows 2008 R2 andWindows 7 OUs. In this case, users do not roambecause the same base profile is shared. Baseprofiles can only be shared by operatingsystems with the same profile version (Version1 or Version 2 profiles). Users always roamwhen both Version 1 and Version 2 profiles areactive.
Synchronize See cache.
User store The user store is the central, network locationfor storing Citrix user profiles. See alsocross-platform settings store.
© 1999-2018 Citrix Systems, Inc. All rights reserved. 211

Profile Management 7.18
Term Definition
vDisk, personal vDisk A vDisk is a virtual disk created from amasterimage by Citrix Provisioning Services. Apersonal vDisk is a disk used by CitrixXenDesktop to store profiles, user-installed anddepartmental applications, and user data.Personal vDisks are separate from the disksused for the operating system, registry, andbase applications.
Version 1 profile, Version 2 profile Profiles in MicrosoftWindows XP and WindowsServer 2003 are known as Version 1 profiles.Those profiles in Windows Vista, Windows 7,Windows Server 2008, and Windows Server2008 R2 are known as Version 2 profiles.Version 1 and Version 2 profiles have differentnamespaces, which affects some aspects oftheir configuration.
© 1999-2018 Citrix Systems, Inc. All rights reserved. 212

Profile Management 7.18
© 1999-2018 Citrix Systems, Inc. All rights reserved. 213

LocationsCorporate Headquarters | 851 Cypress Creek Road Fort Lauderdale, FL 33309, United StatesSilicon Valley | 4988 Great America Parkway Santa Clara, CA 95054, United States
© 2018 Citrix Systems, Inc. All rights reserved. Citrix, the Citrix logo, and other marks appearing herein are property of
Citrix Systems, Inc. and/or one or more of its subsidiaries, andmay be registered with the U.S. Patent and Trademark Office
and in other countries. All other marks are the property of their respective owner(s).
Citrix Product Documentation | docs.citrix.com August 17, 2018