deploying virtualized desktops and apps with citrix...
TRANSCRIPT

Deploying virtualized desktops and apps with Citrix XenDesktop
Self-paced exercise guide

Page 2
Table of Contents
LAB ENVIRONMENT DETAILS .................................................................................................................................. 3
LAB: IMPLEMENTING XENDESKTOP AS A FULL DESKTOP DEPLOYMENT ................................................................ 4
OVERVIEW ...................................................................................................... ERROR! BOOKMARK NOT DEFINED.
EXERCISE 1: INSTALLING THE VDA ON THE MASTER IMAGE .................................................................................. 4
EXERCISE 2: INSTALLING VDA AND PREPARING THE MASTER IMAGE WITH PVD .................................................. 8
EXERCISE 3: INSTALLING XENDESKTOP AS A FULL DESKTOP DEPLOYMENT ......................................................... 14
EXERCISE 4: XENDESKTOP DEPLOYMENT ADMINISTRATION ............................................................................... 32
EXERCISE 5: USING DESKTOP DIRECTOR ............................................................................................................... 36
EXERCISE 6: CREATING HDX POLICIES USING DESKTOP STUDIO AND GROUP POLICY MANAGEMENT CONSOLE41

Page 3
Lab Environment Details
This section is used to describe the lab environment and the virtual machines that are used.
VM Name IP Address Description
AD 192.168.10.11 Win Server 2008 R2. Domain controller for training.lab, DNS, DHCP services, and license server.
SQLServer 192.168.10.12 Win Server 2008 R2. SQL Server 2008 R2 hosting XenDesktop and Provisioning Services databases.
XD56 192.168.10.14 Win Server 2008 R2. XenDesktop 5.6 DDC
Win7VDA DHCP Windows 7 Professional – VDA 5.6 to be installed (PvD enabled)
Client DHCP Windows 7 Professional – VDA 5.6 to be installed
Required Lab Credentials Below you can find the login credentials required to connect to the environment and complete
the lab exercises.
Domain/Machine Username Password Description
Training.lab Administrator Citrix123 Domain Administrator
Training.lab User1 Citrix123 Domain User
Training.lab User2 Citrix123 Domain User
Local Administrator citrix Local Administrator
Page 4
Overview: Implementing XenDesktop as a Full Desktop Deployment In this lab you will configure a complete XenDesktop Site using Desktop Deployment and creating catalogs that use Personal vDisks and catalogs that do not use Personal vDisks.
First you will install the Virtual Desktop Agent (VDA) on a two different master images of Windows 7 in preparation for using it to deploy desktops with Machine Creation Services. You will install the VDA without Personal vDisk (PvD), and the second one with PvD enabled.
Second we will install and configure XenDesktop as a full desktop deployment showing you the steps needed to fully configure this solution.
Once everything is installed we’ll go through how to effectively administer the deployment as well as looking at tools such as Desktop Director and HDX Policies.
Exercise 1: Installing the VDA on the Master Image The Virtual Desktop Agent (VDA) has to be present on the virtual machines (VMs) to which your users will be connecting. It enables the machines to register with controllers and manages the HDX connection between the machines and the user devices.
If you are using XenDesktop or Provisioning services to provision VMs, you need to install and configure the Virtual Desktop Agent only once, but if you are using separate stand-alone virtual or physical machines you must install it on each of the machines so they can register with the controller to allow user connections. In this exercise we will install the VDA on the master image.
Step-by-step guidance Estimated time to complete this lab: 10 minutes.
Step Action
1. Click on the Client VM, click the Console tab and login as Training\Administrator with the password of Citrix123.
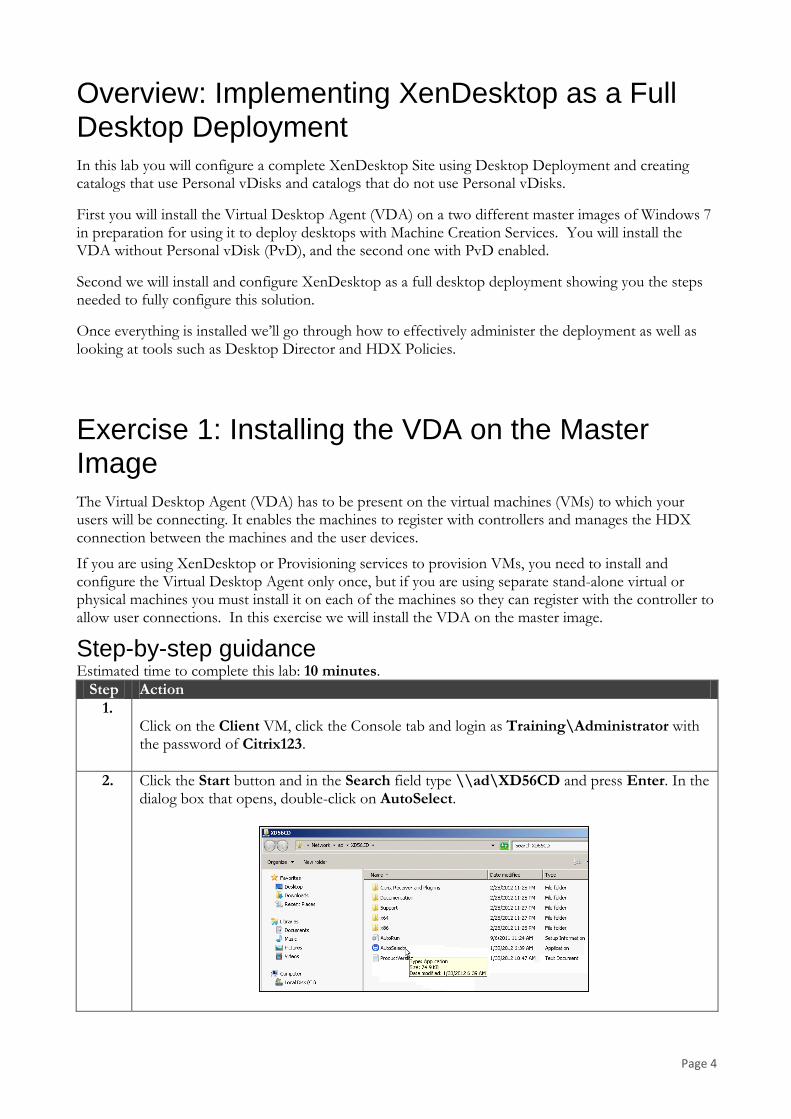
2. Click the Start button and in the Search field type \\ad\XD56CD and press Enter. In the dialog box that opens, double-click on AutoSelect.
Page 5
Step Action
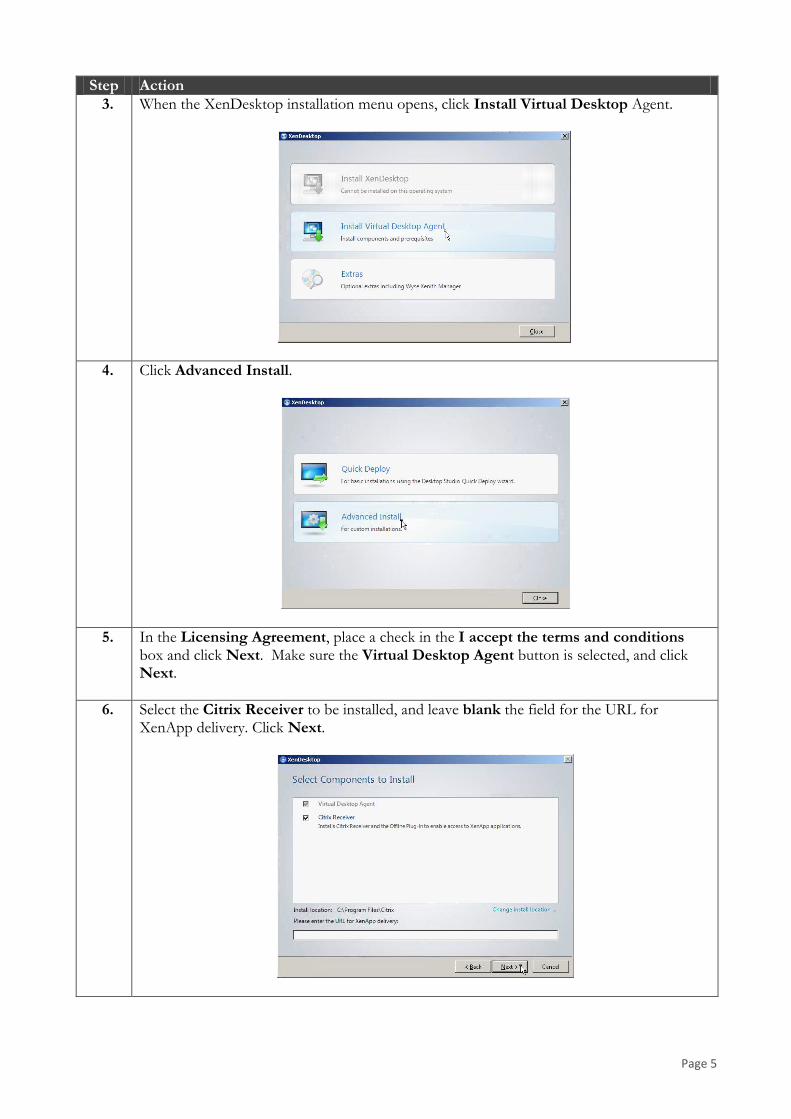
3. When the XenDesktop installation menu opens, click Install Virtual Desktop Agent.
4. Click Advanced Install.
5. In the Licensing Agreement, place a check in the I accept the terms and conditions box and click Next. Make sure the Virtual Desktop Agent button is selected, and click Next.
6. Select the Citrix Receiver to be installed, and leave blank the field for the URL for XenApp delivery. Click Next.

Page 6
Step Action
7. Ensure that the No, don’t enable personal vDisk right now button is selected and click Next.
Note: If you plan to use Quick Deploy you cannot use Personal vDisks.
8. In the controller location screen, enter xd56.training.lab in the first field and click the Check button to verify it can contact the controller. Close the message by clicking OK, and click Next.
Note: XenDesktop has not been installed on this controller, the check only verifies that the machine exists. We’ll setup and configure the controller later.
9. In the Virtual Desktop Configuration dialog, accept the default choices. Click Next.

Page 7
Step Action
10. Click Install to install the VDA. This install will take 2-3 minutes.
11. When the installation is done, click Close to restart the VM.
END OF EXERCISE

Page 8
Exercise 2: Installing VDA and Preparing the Master Image with PvD With Citrix personal vDisk, each user gets a personal workspace which they can use to personalize their desktop. The workspace contains any user or department installed apps and any data and settings the administrator chooses to store there. Since personal vDisk workspaces only contain user changes, this radically reduces storage requirements. In this exercise we are going to install the personal vDisk (PvD) on the master image when we install the VDA. We will then go through the nessicarry steps to configure the personal vDisk.
Step-by-step guidance Estimated time to complete this lab: 15 minutes.
Step Action
1. Select the Win7VDA VM, click the Console tab and login as Training\Administrator with the password of Citrix123.
2. Connect to \\ad\xd56cd and run AutoSelect. Select Install Virtual Desktop Agent.
3. Select Advanced Install.
4. Accept the licensing agreement and click Next.

Page 9
Step Action
5. Verify Virtual Desktop Agent is selected and click Next.
6. Uncheck Citrix Receiver and click Next.
Note: The Receiver isn’t being installed because in this lab we are not deploying XenApp servers. In a deployment that includes XenApp servers, you can either install the Receiver along with the VDA, or, install a newer version than the one included on the XenDesktop CD (recommended).
7. Select Yes, enable personal vDisk and click Next.

Page 10
Step Action
8. In the controller location screen, enter xd56.training.lab in the first field and click the Check button to verify it can contact the controller. Close the message by clicking OK, and click Next.
9. Leave the default choices and click Next.
10. Click Install at the summary screen and let the installer run through to completion. This should take 2-3 minutes.

Page 11
Step Action
11. Click Close and allow the machine to reboot.
Note The steps below would NOT be performed in this fashion in a real world deployment. They are used to provide insight into how PvD works. The machine that will become the base image for Personal vDisks now needs to be prepared. The first step is to create an inventory.
DO NOT RUN THE INVENTORY YET It can be done in two ways:
1) By initiating a machine shutdown. If you shutdown you will see a message warning you that an inventory needs to be taken. Cancel will abort the shutdown.
2) Via the applet Update Personal vDisk. However, before we create the inventory we will examine what is installed. As a reminder, some of these steps would not be preformed in a real world deployment as part of the daily operations.
12. Login to the Win7VDA virtual machine as Training\Administrator.
13. Open a command window. Change Directory to C:\ProgramData\Citrix\personal vDisk by running the following command.
cd “C:\ProgramData\Citrix\personal vDisk”
14. In the command window run the “dir” command to get a directory listing. This is an example of the “pristine”state. i.e. no inventory has been taken yet and as such there is no VHD file. Leave this command window open.

Page 12
Step Action
15. Now, let’s start the inventory process. Click Start All Programs Citrix Update Personal vDisk. IMPORTANT: In this lab we DO NOT want the system to shutdown automatically. Ensure that the Automatic System Shutdown is disabled by removing the check in the checkbox. Do this while the Updating inventory process is running.
Notes: It takes 2-3 minutes for the inventory to be updated. First inventory is done when the disk is in read/write mode and no PvD is attached. Subsequent inventories are done at every VM start when a PvD is attached.
16. While the Updating inventory process is running, run a Directory Listing once more in the command window. The file named UserData.VDESK.TEMPLATE. is used to collect the information that is used to create the Personal vDisk for each user. It will remain at 0 bytes until the inventory process completes.
17. When the Inventory process completes run a Directory Listing once more. The UserData.VDESK.TEMPLATE file should now be more than zero bytes.
Note The initial Inventory is now complete and the machine is ready for use as a base image for XenDesktops using Personal vDisks. The normal process would be to run the inventory and let the machines shutdown automatically.

Page 13
Step Action
18. Shutdown Win7VDA. If you get the following message, click Update inventory. Allow the update process to shut down the VM.
END OF EXERCISE

Page 14
Exercise 3: Installing XenDesktop as a Full Desktop Deployment Now we will install and configure XenDesktop as a full desktop deployment showing you the steps needed to fully configure this solution. These steps include, installation, desktop deployment, initial configuration, machine creation and user assignment. Once this is complete we’ll take a look at how to create different types of desktops as well as explore different features like PvD.
Step-by-step guidance Estimated time to complete this lab: 40 minutes.
Step Action
1. Select the XD56 VM, click the Console tab and login as Training\Administrator with the password of Citrix123.
2. From the Start menu, click in the Search field and type \\ad\xd56cd and press Enter. In the dialog box that opens, double-click on AutoSelect. (it may take 20-30seconds to open)
3. In the XenDesktop menu that opens, click Install XenDesktop.
4. Accept the terms and conditions of the Licensing Agreement and click Next.

Page 15
Step Action
5. Select all the components to install except the License Server, and click Next.
6. Click Install. The install takes approximately 3-5 minutes.When the installation is finished, click Close.

Page 16
Step Action
7. Desktop Studio opens and presents the initial configuration menu. Click Desktop Deployment.
8. For the site name, type XDProd. For the database configuration, click the button Use existing database and change the server location to SQLServer. Leave the database name as the default. Click the Test connection… button.

Page 17
Step Action
9. Click OK to tell XenDesktop to create the database automatically on the SQL Server.
10. Click OK on the message that the connection tests passed. Then click Next.
11. For the License server, enter licenses.citrixvirtualclassroom.com:27000, then click Connect to verify connectivity. Once the license server has been verified click Next.
Note: Our license server is located in a domain outside the training.lab domain. Because of this we won’t be able to select the product type in this screen. We will do that in a later step. If you license server is located in the same domain as you XD deployment you would be able to set your XenDesktop edition on this screen.

Page 18
Step Action
12. The Host type is Citrix XenServer.
To find the address and password plese refer to the information in the web portal for this training class.
Enter http://<assigned XenServer IP address> for the Address. Username is root and the password is the one you were assigned for the XenServer. Enter XS1 for the connection name. Click Next.
13. Type XD56 Host for the Host name and select Internal for the network. Click Next.

Page 19
Step Action
14. Verify Local Storage is selected and choose Use same storage for virtual machines and personal vDisk. Click Next.
15. Click Finish at the Summary screen. Wait a 30-60 seconds for the configuration to complete.
16. Initial configuration is now complete. As we mentioned in step 11, we need to configure the correct XenDesktop edition in Desktop Studio since our license server is not in the same domain.
On the right hand side of DesktopStudio expand Configuration then click Licensing.
17. In the upper right hand corner,
click Edit product edition
18.
In this window choose the following options:
Platinum Edition
User/Device Licensing
Then click OK

Page 20
Step Action
19. Click the Configure button for Machine creation.
20. Choose Pooled with personal vDisk for the Machine type. Click Next.
21. Select Win7VDA as the Master Image. Click Next.

Page 21
Step Action
22. Create 2 virtual machines and leave the defaults for the end-user personal vDisk size and drive letter and click Next.
23. Select the Desktops OU in AD and use Win7M## for the Account naming scheme.Click Next.
24. Specify a catalog description if desired and click Next.

Page 22
Step Action
25. On the Summary screen, enter the Catalog name of Win7 Desktops MCS with PvD. Click Finish.
It will take about 10 minutes for the master image to be copied and the machines created.
26. 2 Click on Configure for the User assignment.

Page 23
Step Action
27. Select the Win7 Desktops… catalog and add 2 machines. Click Next.
28. Click Add, type in Domain Users, click OK then click Next.
29. Click Next on the Delegation screen.
30. On the Summary Screen, add a Display name of Win7 Desktop MCS and a Desktop Group name of Windows 7 Desktops MCS – PvD and click Finish.

Page 24
Step Action
31. The initial configuration is now complete; click on the Go to site dashboard button to see the current status.
32. The Dashboard shows detailed information on the desktops.
Page 25
Step Action
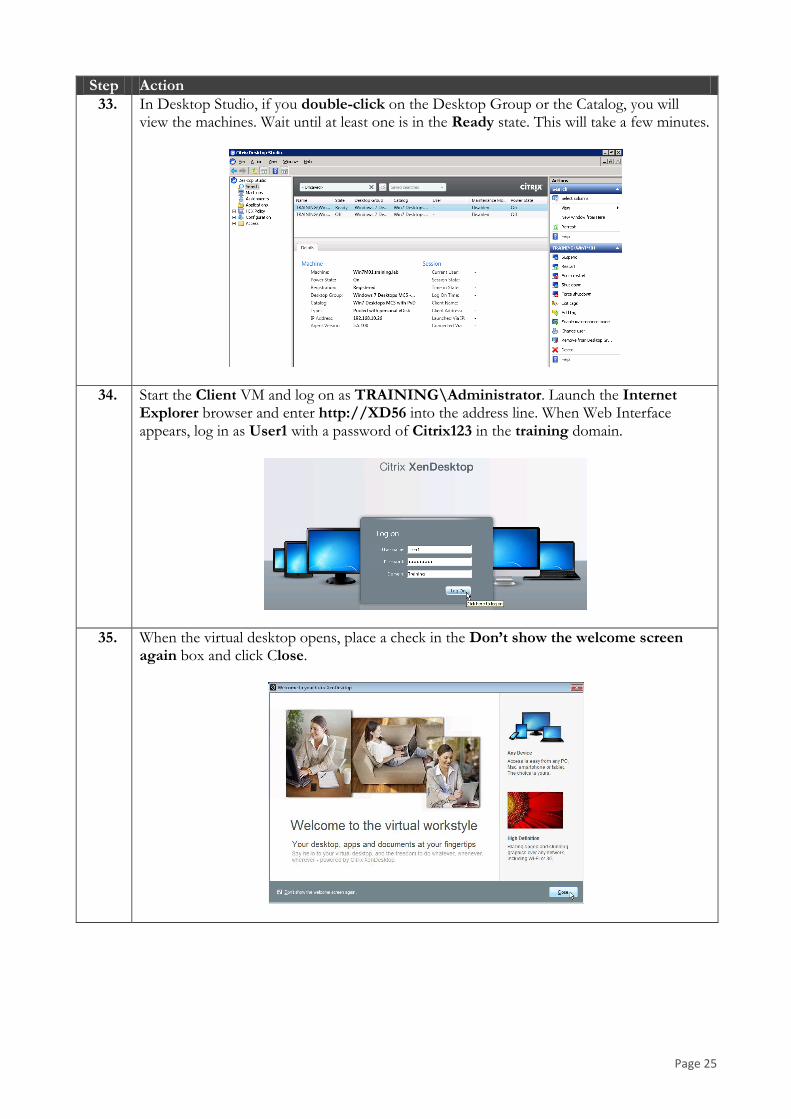
33. In Desktop Studio, if you double-click on the Desktop Group or the Catalog, you will view the machines. Wait until at least one is in the Ready state. This will take a few minutes.
34. Start the Client VM and log on as TRAINING\Administrator. Launch the Internet Explorer browser and enter http://XD56 into the address line. When Web Interface appears, log in as User1 with a password of Citrix123 in the training domain.
35. When the virtual desktop opens, place a check in the Don’t show the welcome screen again box and click Close.

Page 26
Step Action
36. If you see this message, click Read/write access and check Do not ask me again for this virtual desktop.
37. Using Windows Explorer, examine the contents of the Personal vDisk, drive P:.

Page 27
Step Action
38. From XenCenter, click on the Win7M01 VM and select the Storage tab. Verify the “Machine”_pvdisk of 10GB has been created.
39. On the XD56 VM, in Desktop Studio, right-click on Machines in the left pane and choose Create Catalog.
40. Choose Pooled for the machine type and Random for machine assignment and click Next.
41. Select Client for the Master Image and click Next.

Page 28
Step Action
42. Create 2 virtual machines. Leave all the other settings at their defaults, and click Next.
43. Select the Desktops OU in AD and enter XDPooled## for the naming scheme. Click Next.
44. Enter a catalog description if you wish and click Next.

Page 29
Step Action
45. At the Summary screen, enter XDPooled for the Catalog name, and click Finish.
46. The creation of the machines will take about 10 minutes.
47. When the catalog creation is finished, right-click on Assignments in the left pane and choose Create Desktop Group.

Page 30
Step Action
48. Select the XDPooled catalog and enter 2 in the Add machines field. Click Next.
49. Click the Add… button to enter TRAINING\Domain Users. Then click Next.
50. Click Next at the Delegate box. In the Summary screen, type Win7 Desktop for the Display name and XDPooled Desktops for the Desktop Group name. Then click Finish.

Page 31
Step Action
51. Double-click on the XDPooled Desktops desktop group and view the machines. Wait until at least one is in the Ready state. Click the Refresh button in the right pane occasionally to see the most up-to-date information in the console.
52. On the Client VM, using Internet Explorer go to http://xd56 and log in as User3 with the password of Citrix123, in the Training domain. Launch the Win7 Desktop. This desktop has no Personal vDisk and no changes to it persist.
END OF EXERCISE
Page 32
Exercise 4: XenDesktop Deployment Administration In this exercise you will examine a XenDesktop Site and learn how to administer it using Desktop Studio, Desktop Director, and policies.
Step-by-step guidance Estimated time to complete this lab: 10 minutes.
Step Action
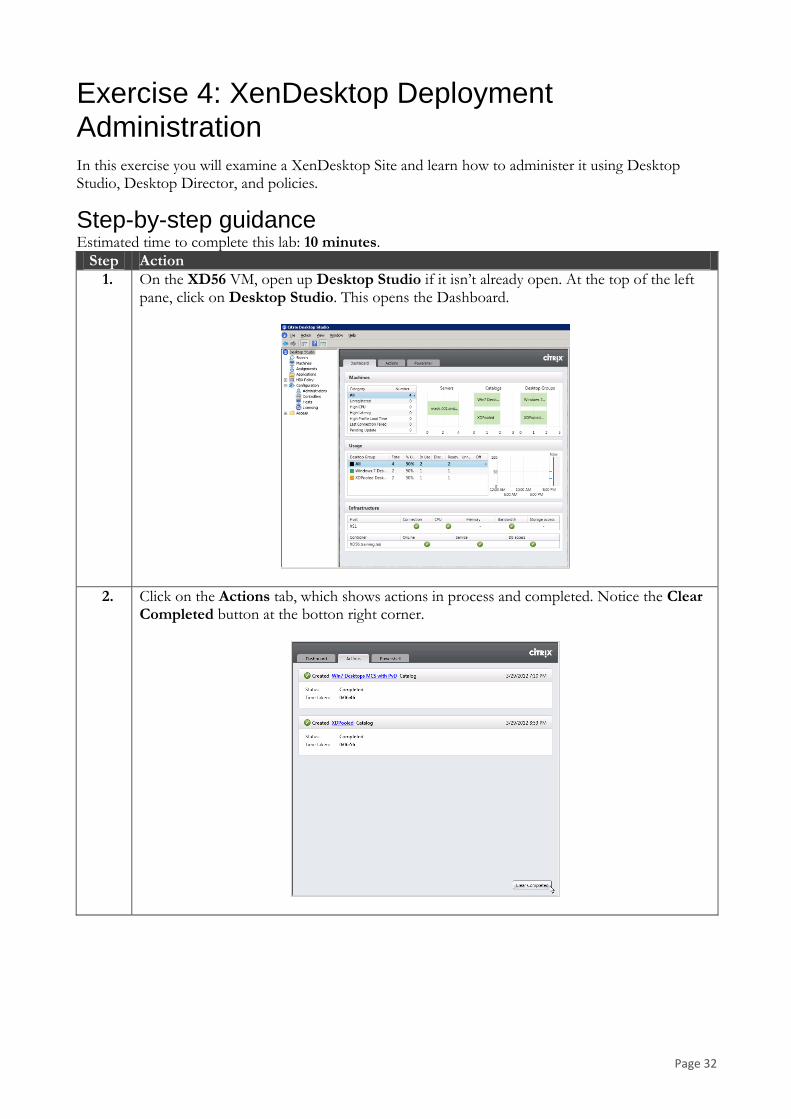
1. On the XD56 VM, open up Desktop Studio if it isn’t already open. At the top of the left pane, click on Desktop Studio. This opens the Dashboard.
2. Click on the Actions tab, which shows actions in process and completed. Notice the Clear Completed button at the botton right corner.

Page 33
Step Action
3. Click on the Powershell tab. This reveals the Powershell scripts that Desktop Studio has run to respond to your requests. Notice the Launch PowerShell button in the bottom right corner.
4. Click on the Launch PowerShell button. This opens a PowerShell console with all the Citrix SDK snap-ins loaded. Type Get-Brokersite to display information about the XenDesktop site. Type Get-BrokerDBconnection to get information about the SQL connection.
5. Type help Get-Broker to get a list of commands that can be used. Close the command window when you are done.
6. In the left pane, click on Search. Click on the chevron icon to reveal or hide the search criteria fields.

Page 34
Step Action
7. In XenCenter, click on Local Storage in XenCenter’s left pane. Then, click on the Storage tab. Here you can see the diff disks, identity disks, pvdisks, and base disks that have been created by MCS.
8. Select the XD56 VM. Run Server Manager. Expand the Configuration node in the left pane and click on Services. Notice all the Citrix services that are installed.
9. Browse to C:\Program Files\Citrix\Broker\Service. Each service has a corresponding .config file that is used to enable logging and other configuration choices.
10. Open the BrokerService.exe.config file using Notepad. The logging for each service is enabled in the corresponding .config file in the <appSettings> section. Close Notepad.

Page 35
Step Action
11. In Desktop Studio, expand Configuration in the left pane. Right-click on Administrators and choose Add Administrator.
12. Click the Browse... button to browse AD for User1. Check Machine Administrator, then click Next, then click Finish.
13. In the same way, make User2 an Assignment Administrator of the XDPooled catalog.
14. In the left pane, click on Machines. Then, right-click on XDPooled and choose Edit Catalog. Notice that User2 is now an Assignment Administrator that can create desktop groups from this catalog. Click OK.
END OF EXERCISE

Page 36
Exercise 5: Using Desktop Director Desktop Director provides a detailed and intuitive overview of XenDesktop environments. It enables support and helpdesk teams to quickly and seamlessly perform crucial support tasks for their end users while at the same time monitoring and troubleshooting system issues before they become system-critical. In this exercise we will take a look at Desktop Director and learn how to use it to gather information and monitor your desktop deployment.
Step-by-step guidance Estimated time to complete this lab: 15 minutes.
Step Action
1. On the XD56 VM, open the Internet Explorer browser and type http://xd56/desktopdirector in the adddress line. When the Desktop Director login screen appears, log in as Administrator in the Training domain.
2. In the Search field, type the first few characters of the Win7Mxx desktops that were created earlier.
3. Select one and observe the information that is displayed. (If one is not in use, go to the Client VM and launch one of the Win7M desktops for User1 or User2.)

Page 37
Step Action
4. Take note of the many sections of information: Machine Details, Session Details, HDX, Hypervisor, Broker, Activity (showing CPU, Memory, and Network activity). Notice the chevron arrows that are in the top right corner of each section. Click on these to hide/unhide any section.
5. In the Machine Details section, at the bottom, notice the Personal vDisk information.
6. At the top of the Machine Details section, notice the Reset Personal vDisk button. (DON’T USE IT)
7. At the top of the Session Details section, notice the Shadow button.
8. Before we can use the Shadow feature (Remote Assistance) we must enable it. It was already enabled on the XenDesktop when the VDA was installed, but a Group Policy must be set as well. In XenCenter, select the AD.training.lab VM, click the Console tab and login as Training\Administrator with the password of Citrix123.

Page 38
Step Action
9. Launch the Group Policy Management console (GPMC) from Administrative Tools. (Or just use the icon on the desktop.)
10. In the GPMC, expand the tree and right-click on Desktops OU under the Training.lab
domain. Choose Create a GPO in the this domain, and Link it here…
11. Name the new GPO Remote Assistance. Click OK.
12. Right-click on the new GPO and choose Edit… In the Editor, in the left pane, under Computer Configuration, expand Polices > Administrative Templates > System and click on Remote Assistance. In the right pane, double-click on Offer Remote Assistance.

Page 39
Step Action
13. Click the Enabled button. Under Permit remote control of this computer:, make sure it says Allow helpers to remotely control the computer. Click on the Show… button.
14. In the Value field, type training\domain admins and click OK. Then click OK again.
15. Go to the Client VM, and restart the virtual desktop that you are wanting to shadow, and log the user back on.
16. On XD56, in the Desktop Director, make sure you are in the Session Details of the desktop you wish to shadow and click the Shadow button.
17. At the File Download message, click Open.
18. You then see a black, empty Windows Remote Assistance screen. A message has been sent to the desktop asking permission to connect to it. Switch to the Client VM where the virtual desktop is running and click Yes on the message on the virtual desktop to allow the connection.

Page 40
Step Action
19. The Remote Assistance session is now functioning. When you are ready to end it, close the Windows Remote Assistance window on XD56, or click the red X on the Remote Assistance toolbar on the virtual desktop.
Note: If the shadowing looks skewed visually, this problem can be fixed by changing the resolution on the machines to make them match. This is a limitation of Microsoft’s Remote Assistance feature. For the lab, try maximizing the virtual desktop on Client. If that doesn’t work, set both the XenDesktop you wish to shadow and the XD56 machine to 1024x768 and attempt to shadow again.
20. Close Desktop Director on XD56 and log off of all virtual desktops running on Client.
END OF EXERCISE

Page 41
Exercise 6: Creating HDX Policies Using Desktop Studio and Group Policy Management Console Citrix HDX includes a broad set of technologies designed to provide a high-definition user experience. HDX builds on existing technologies in Citrix products, extending them with new innovations for today’s media-rich user environments. Here you will learn how to control the experience using HDX policies, created using Desktop Studio and Group Policy Management Console.
Step-by-step guidance Estimated time to complete this lab: 25 minutes.
Step Action
1. On the XD56 VM, in Desktop Studio, on the left side, expand HDX Policy and select Machines. On the left hand side of the screen click click the New… button to create a new machine policy. Name it CPU and click Next.
2. Select CPU Usage Monitoring in the left pane and then click Add to the right of Enable Monitoring.
3. Make sure that the Allowed button is selected and then click OK.
Page 42
Step Action
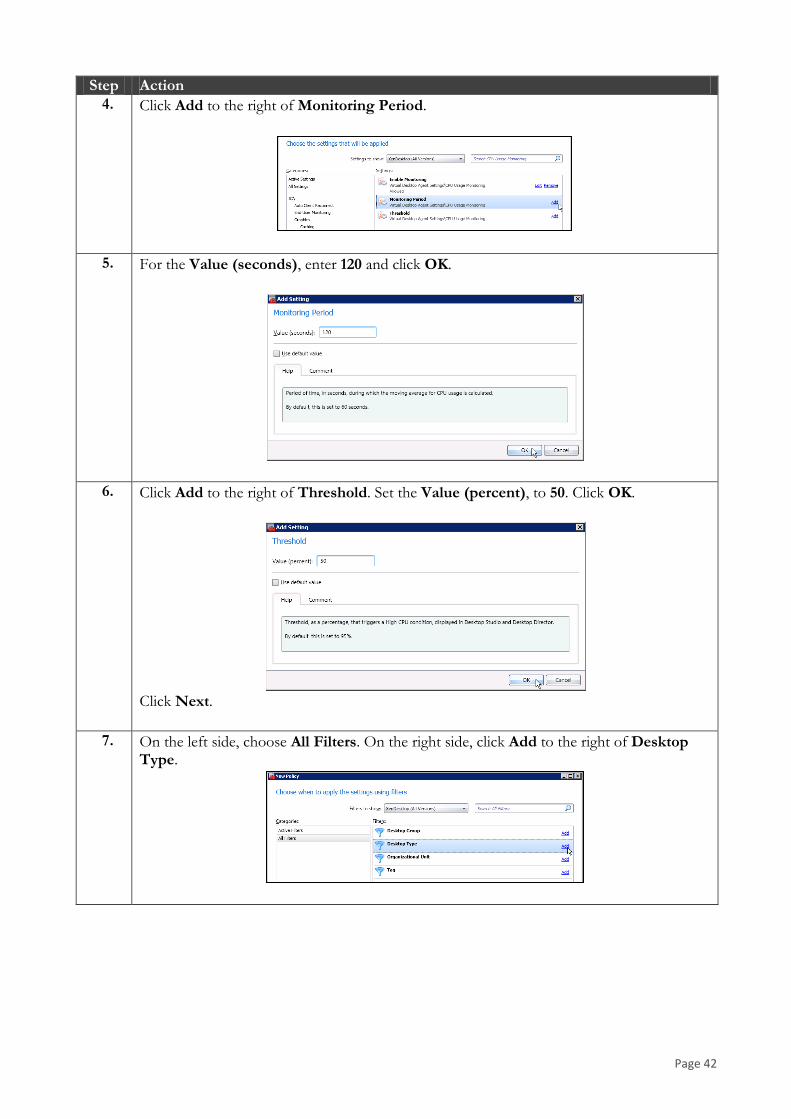
4. Click Add to the right of Monitoring Period.
5. For the Value (seconds), enter 120 and click OK.
6. Click Add to the right of Threshold. Set the Value (percent), to 50. Click OK.
Click Next.
7. On the left side, choose All Filters. On the right side, click Add to the right of Desktop Type.

Page 43
Step Action
8. Click Add… Choose Shared Desktop from the Desktop type drop down. Click OK.
Click OK again. Then click Next.
9. Click Create to complete the process.
10. In Desktop Studio, on the left side, under HDX Policy, select Users. Then click the New… button to create a new user policy. Name it Idle time and click Next.
11. Select Session Limits on the left, and click the Add button to the right of Session idle timer.
12. Make sure the Enable button is selected and click OK to enable the Session Idle Timer.
13. Click Add to the right of Session idle timer interval.
14. Change the Value (minutes) to 6. Click OK and then click Next.
15. On the left, select All Filters. On the right, click the Add button to the right of Desktop Type. Click the Add… button and select Shared Desktop. Click OK, then click OK again, then click Next.
16. Click Create to finish making the policy.

Page 44
Step Action
17. On the Client VM, open the Internet Explorer browser and connect to http://xd56. Log in as Administrator in the Training domain with the password of Citrix123. Launch the Win7 Desktop (not the Win7 Desktop MCS). The Win7 Desktop is the shared desktop (pooled). Close the Welcome screen and any Receiver message you may get.
18. In the virtual desktop, from the Start menu, choose All Programs > Hot CPU Tester Pro 4 LE > Hot CPU Tester Pro 4.to launch the CPU tester utility.
Click OK at the initial dialog box.
19. ad Click Run Test and let it run.
20. Go to the XD56 VM and open Internet Explorer. Enter http://xd56/desktopdirector to launch the Desktop Director.
Log in as Training\Administrator password Citrix123.

Page 45
Step Action
21. In the Machines section, watch for the High CPU alert.
22. Navigate to the information on the machine that is alerting by clicking on the blue number, and then choosing the machine from the list. Using the dashboard, you can monitor the machine.
23. On the Client VM, in the virtual desktop, click Stop Test and close Hot CPU Tester. To test our Idletime user policy, leave the virtual desktop open and running, but don’t touch it for 6 minutes. It should get disconnected after 6 minutes of idle time. You can continue with the lab steps during this time.
24. Run Group Policy Management from Administrative Tools. Expand the tree in the left pane. Right-click on the training.lab domain and choose Create a GPO in this domain…

Page 46
Step Action
25. Name the GPO HDX and click OK. Right-click the new HDX policy and select Edit…
26. In the editor, on the left side, go to User Configuration > Policies > Citrix Policies. On the right side, click New…
Name the new policy HDX Printer Policy, and click Next.
27. On the left, under Printing, select Client Printers. On the right, click Add to the right of Auto Create Client Printers.
28. Change the pull-down to Auto Create the client’s default printer only. Click OK, then click Next.
29. Click Add to the right of User or Group. Click Add… and browse or enter TRAINING\Domain Users. Click OK, then OK, then Next. Finally, click Create.

Page 47
Step Action
30. In either Desktop Studio or Desktop Director, check the status of the virtual desktop you left alone in Step 24. If 6 minutes have elapsed, the status should show Disconnected.
31. NOTE: The following steps need to be done to prepare for the labs that follow:
In the XD56 virtual machine, in Desktop Studio, in the left column, click Machines. Double-click on the catalog Win7 Desktops MCS with PvD. Select both of the machines listed. Right-click on them and choose Enable maintenance mode.
32. Confirm the action by clicking Yes.
33. Right-click on both machines again and choose Shut down. Confirm the action.

Page 48
Step Action
34. In the left column, click on Machines again. Double-click on the catalog XDPooled. Select both of the machines listed. Right-click on them and choose Enable maintenance mode and confirm by clicking Yes.
35. Right-click on the two machines again, and choose Shut down. Confirm the action.
36. In XenCenter, in the left pane, check that both Win7Mxx machines and both the XDPooledxx machines are shut down.
END OF EXERCISE
Please complete the survey
We value your feedback! Please take a moment to let us know about your self-paced lab experience by completing a brief survey on the web portal before you logout.

Page 49
Revision History
Revision Change Description Date
1.0 Worldwide Technical Readiness Feb 2013
About Citrix
Citrix Systems, Inc. designs, develops and markets technology solutions that enable information technology (IT)
services. The Enterprise division and the Online Services division constitute its two segments. Its revenues are
derived from sales of Enterprise division products, which include its Desktop Solutions, Datacenter and Cloud
Solutions, Cloud-based Data Solutions and related technical services and from its Online Services division's Web
collaboration, remote access and support services. It markets and licenses its products directly to enterprise
customers, over the Web, and through systems integrators (Sis) in addition to indirectly through value-added
resellers (VARs), value-added distributors (VADs) and original equipment manufacturers (OEMs). In July 2012,
the Company acquired Bytemobile, provider of data and video optimization solutions for mobile network
operators.
http://www.citrix.com
© 2013 Citrix Systems, Inc. All rights reserved.

Page 50