powerpoint presentation€¦ · hyperosmolar non-ketotic syndrome hypotension shock decompensated...
TRANSCRIPT

Point of Care Testing (POCT) May, 2017
Slide 1 of 29

All POCT policies and procedures are located on the FMH Intranet
In the “Search by Policy” section:
◦ Select “Within Title” (not “Within Document”)
◦ Type “POCT” in the keyword match box
You can also directly enter the POCT policy number
◦ The AccuChek Inform II policy is PC 209
Slide 2 of 29

Test Limitations
Code Keys
Quality Control
Patient Testing Procedure
Critical Values
Cleaning the Meter
Important Reminders
Troubleshooting
Completion of Training
Slide 3 of 29

“LO”- the blood glucose is lower than 10 mg/dl
“HI”- the blood glucose result is higher than 600 mg/dl
Note: The test should be repeated and if the comment “HI” or “LO” appears again, then a laboratory glucose must be performed; a physician order is not required
When the patient has decreased peripheral blood flow, glucose results may not be reliable.
Examples of patient diagnoses that cause decreased peripheral blood flow are:
◦ Severe Dehydration as a result of ketoacidosis or due to hyperglycemic hyperosmolar non-ketotic syndrome
◦ Hypotension
◦ Shock
◦ Decompensated heart failure NYHA Class IV, or
◦ Peripheral arterial occlusive disease
Glucose testing should be performed in the lab on these patients.
Please refer to the Policy & Procedure PC 209 on the FMH Intranet
Slide 4 of 29
The performance of this system has not been evaluated in the “critically ill”. For Point of Care glucose testing purposes Frederick Memorial Hospital defines a “critically ill” patient as:
◦ Unstable patients in the ICU unit, also referred to as Level 1 ICU patients. Other patients will be considered if they come through the ED or other locations, and are admitted into the ICU.
If there is question of the accuracy of the Accu-Chek glucose result, repeat the Accu-Chek glucose test, and/or draw a tube of blood and send the sample to the Main Lab for confirmation and verification.
All Accu-Chek glucose values should be used in correlation with the clinical history and clinical presentation. If clinically indicated, defer Accu-Chek results to the Main Lab glucose for correlation.
Slide 5 of 29

When opening a new bottle of test strips, throw away the code key
The lot # info will be entered by the Point of Care coordinator and the meters will be updated wirelessly
The outdate is printed on the bottle label and does not change once opened
Slide 6 of 29

Level 1 and Level 2 control testing must be performed at the following times:
◦ Every 24 hours that patient testing is performed
◦ When a vial of strips has been left open or when the test strips have been exposed to extreme heat, cold, or humidity
◦ When patient test results contradict clinical symptoms
◦ If the meter is dropped
Slide 7 of 29
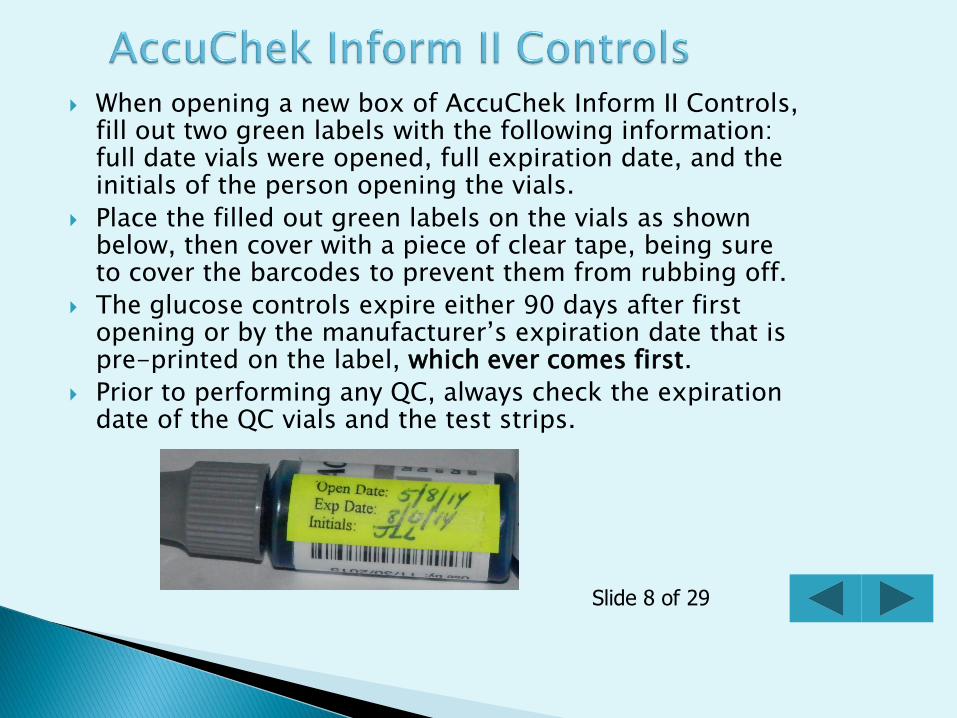
When opening a new box of AccuChek Inform II Controls, fill out two green labels with the following information: full date vials were opened, full expiration date, and the initials of the person opening the vials.
Place the filled out green labels on the vials as shown below, then cover with a piece of clear tape, being sure to cover the barcodes to prevent them from rubbing off.
The glucose controls expire either 90 days after first opening or by the manufacturer’s expiration date that is pre-printed on the label, which ever comes first.
Prior to performing any QC, always check the expiration date of the QC vials and the test strips.
Slide 8 of 29

The AccuChek test strip outdate is pre-printed on the bottle label. The outdate does not change once the bottle is opened. If the QC fails to pass with your current bottle of strips, it should be discarded.
Open a new bottle of strips and perform QC on the new strips prior to using them for patient testing.
Slide 9 of 29

Don gloves
Enter your operator ID and touch the checkmark to confirm and display the Main Menu
From the Main Menu, touch Control Testing
Barcode scan the level of control that you wish to test
Verify the test strip code by scanning the barcode label on the test strip vial
When prompted(see below), insert the end of the test strip with the gold bars facing up, into the test strip port with the AccuChek screen facing up
Slide 10 of 29

Always follow the prompts on the AccuChek screen and always insert test strip BEFORE dosing with QC solution
When the flashing “Drop” or “Bottle” icon appears (see below), gently mix the control then touch and hold a drop of the control solution to the front edge of the yellow target area
It is important to keep the strip and meter in a horizontal position or at an angle with the test strip sample application tip facing downward so that excess fluid does not slide down the test strip and into the strip port of the meter
Slide 11 of 29

The sample is drawn into the test strip by capillary action
When enough sample is applied, the meter beeps. When the test is completed and the result is ready, the meter will beep again. o “PASS” indicates the control is within range
If “FAIL” appears, repeat failed control and consider the following:
◦ The test strip vial has been left open and the strips in the vial are not any good and should be discarded
◦ The control levels were switched
◦ Procedural error
◦ The control solutions are expired and/or contaminated
Slide 12 of 29

If the QC result is “Fail”, enter a comment by touching the empty speech bubble icon.
There is no need to comment on a result of “Pass” Touch the checkmark to record the test and return to the
Main Menu screen in order to run the next test if needed. Once testing is complete, remove the used test strip and
your disposable gloves and discard per policy The meters are wireless, so the results will transfer after
you press the final checkmark. Once testing is complete, and you have cleaned the meter,
it MUST be returned to the base unit for charging
Please refer to Slide 20 for updated cleaning instructions
Slide 13 of 29

Wash hands and don gloves
Enter your operator ID and touch the checkmark to confirm and display the Main Menu
From the Main Menu, touch “Patient Test”
Verify ID of patient by asking the patient to tell you their first and last name and date of birth. Compare the stated information to the patient’s armband and, if all information matches, scan the patient’s armband.
Slide 14 of 29

Barcode scan the patient ID and touch the checkmark to confirm
NOTE: If the patient’s armband cannot be scanned, carefully enter the 9 digit patient account number manually. (You must include the “A” that precedes the patient account number for the result to be accurately recorded in the EHR)
NEVER use patient ID labels not attached to the patient, such as:
Found lying in the patient’s room
From a patient chart
Slide 15 of 29
Verify the test strip code by scanning the barcode label on the test strip vial
Remove a test strip from the vial and immediately recap the vial. The test strips are very sensitive to humidity.
When prompted, insert the end of the test strip with the gold bars into the test strip port of the AccuChek meter with screen facing up
The meter will beep when the test strip is inserted correctly
The AccuChek Inform II can read venous, capillary, arterial, or whole blood from line draw or neonatal heel stick samples (cord blood samples cannot be used)
Slide 16 of 29

When flashing drop icon appears, obtain blood sample as follows:
◦ Clean the finger with alcohol prep pad and allow to air dry
◦ Twist off blue protective cap of lancet
◦ Firmly press the lancet against the clean side of the fingertip and press the blue button to fire lancet
◦ Wipe away the first drop of blood to avoid potential contaminants
◦ Touch and hold the second drop of blood onto the front edge of the yellow target area on the test strip
◦ The sample is drawn into the test strip by a capillary action
◦ It is important to keep the strip and meter in a horizontal position or at an angle with the test strip sample application tip facing downward so that excess blood does not run down the test strip and into the strip port of the meter
◦ NICU performs heel-stick per policy
Slide 17 of 29

When the test is completed and the result is ready, the meter will beep
If the result is <50 or >500 in an adult, a comment code must be entered by pressing the comment icon
(consult physician order for physician values in pediatric and neonatal populations).
Please See Next Slide for additional instructions for follow up on Critical Results
Touch the checkmark to record the test and return to the “Main Menu” screen
Clean and disinfect the meter after each patient test. (Please refer to Slide 20 for updated cleaning instructions)
The results will transfer wirelessly after being recorded
To maintain a fully charged battery, always return the meter to the base unit when not in use.
Slide 18 of 29

For adult/geriatric patients:
◦ <50 mg/dL or >500 mg/dL requires physician notification or treatment per physician’s orders
◦ AccuChek Inform II requires an appropriate comment about the action taken
Note: The test should be repeated and if the repeat result confirms the first result, then a laboratory glucose must be performed; a physician order is not required.
Pediatric patients:
◦ 2 months-18 years: <50 mg/dL or >500 mg/dL
Neonate Patients:
◦ 0 days to 1 month: <40 mg/dL or >130 mg/dL
◦ 1 – 2 months: <50 mg/dL or >500 mg/dL
Slide 19 of 29

Disinfect the meter using the hospital approved cleaner, Clorox Germicidal Wipes
◦ Leave wet solution on meter for 1 minute of contact time for Clorox Germicidal wipes. Wipe the screen with a paper towel if a cloudy film remains
For patients on Enteric Isolation
◦ Cleanse the meters with Clorox Germicidal Bleach wipes
◦ Contact time for Bleach Wipes is 3 minutes
Keep the meter and base unit contacts and rubber “feet” free from contaminants like disinfectants and hand cream residue. To assure that the meter and base unit contacts and rubber “feet” are free from these substances you need to use a piece of gauze moistened with water to rinse them. Then dry with a paper towel prior to placing the meter back into the base unit for charging.
Slide 20 of 29

The only disinfectant wipe cleared for use by the AccuChek manufacturer is the Clorox Bleach Germicidal Wipe.(See picture)
Dispatch and the new Hydrogen Peroxide wipes cannot be used on the meters, due to the corrosive effect of the detergent contained in those products.
Slide 21 of 29

Do Not:
Clean or disinfect the meter while performing any type of test.
Allow pooling of liquid on the touchscreen.
Spray anything onto the meter or base unit.
Immerse the meter or base unit in liquid.
Get liquid into the test strip port! If liquid does get into the port, immediately dry the components with a dry cloth or gauze pad.
Use any cleaning and disinfecting product other than Clorox Bleach Germicidal wipes.
Wipe the feet and battery charging connections on the back of the AccuChek meter with Bleach, unless you are going to rinse and dry them afterwards.
Slide 22 of 29

Keep the meter and base unit contacts and rubber “feet” free from contaminants like disinfectants and hand cream residue. To ensure that the meter and base unit contacts and rubber “feet” are free from these substances you need to use a piece of gauze moistened with water to rinse them, and then dry with a paper towel prior to placing the meter back into the base unit to charge.
Slide 23 of 29

Do not perform AccuChek tests on anyone except patients.
It is against hospital policy to perform AccuChek tests on yourself or on co-workers.
The one exception is when there is a Rapid Response on a visitor or staff member.
If one of your co-workers or a student nurse is not feeling well please take them to the Employee Health Nurse for evaluation. If Employee Health is not open take them to the Emergency Department for treatment.
Slide 24 of 29

If the meter will not turn on or the screen is frozen:
◦ Place the meter in the base unit to make sure it is adequately charged
◦ If problem persists, call the Point of Care Coordinator in the Lab at x3894 or x2514. Leave a message after hours.
If you hear a humming or hissing sound, see a blank display, or do not see a lightning bolt across the battery icon when docked, undock the meter and perform the cleaning procedure given on slide # 23, then re-dock the meter by pushing it gently into the base unit to ensure proper contact.
Slide 25 of 29
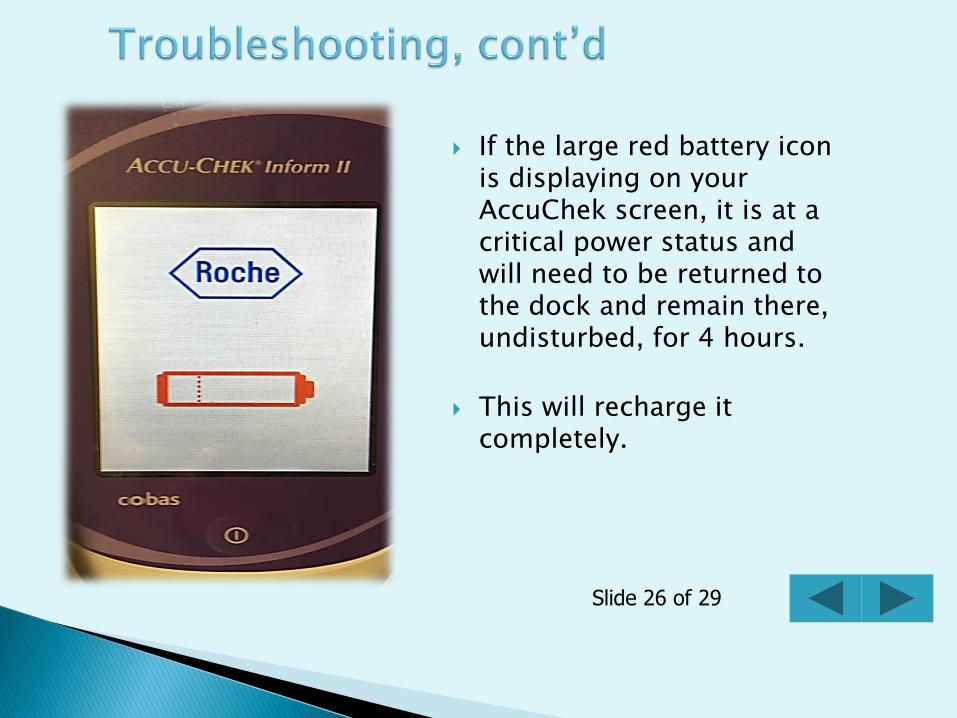
If the large red battery icon is displaying on your AccuChek screen, it is at a critical power status and will need to be returned to the dock and remain there, undisturbed, for 4 hours.
This will recharge it completely.
Slide 26 of 29

The AccuChek meter is charging successfully when you see the black lightning bold across the large red battery icon. The large icon will disappear as the battery’s power % increases so don’t be concerned. Just remember that it needs to stay on the dock for as close to 4 hours as possible to become fully charged.
Slide 27 of 29

Docking Station Information:
The bulbs in the docking stations are beginning to go bad. This does not mean that the docking station is not working. If you suspect that it is not charging, check the electrical power cord. If the green light located on the plug is lit, there is power going to your docking station. If the green light located on the plug is not lit, please contact POCT at X2514 or X3894.
Only one docking station per unit will be a wired location. This is for redundancy should the wireless system experience downtime. The wired dock on your unit will be labeled with a sticker that says: “This is the “Wired” docking stn for unit.”
Should the wireless system experience downtime and your wired docking station is not working, contact the POCT staff so he/she can conduct troubleshooting on that docking station. If no one is available in POC, leave a message and use the wired downloader on another unit until the one in question can be fixed.
Slide 28 of 29
When you are ready to take the test:
1. Return to the FMH internet page where you opened this course material
2. Click the link for the test (the test will appear on screen in Adobe Reader, in PDF format)
3. Print the test, then complete it and return it to your supervisor for grading
Slide 29 of 29