powerpoint 2010 tutorial - florida tech [email protected] jared campbell • • 321-674-7738...
TRANSCRIPT
Page 1
Jared Campbell • [email protected] • 321-674-7738
PowerPoint 2010 tutorial
Contents The fundamentals ......................................................................................................................................... 3
How to Create a New Presentation .......................................................................................................... 3
How to open a Presentation ..................................................................................................................... 3
How to save a presentation ...................................................................................................................... 3
Printing presentations................................................................................................................................... 3
Print Layout ............................................................................................................................................... 3
Printing Handouts ..................................................................................................................................... 4
Slides ............................................................................................................................................................. 4
Inserting new slides into a presentation ................................................................................................... 4
Changing the slide layout .......................................................................................................................... 4
Changing the slide background using the Background Styles button. ...................................................... 4
Changing the slide background using Format Background....................................................................... 5
Gradient types........................................................................................................................................... 6
Adjusting the Gradient stops .................................................................................................................... 6
Gradient Brightness and Transparency ..................................................................................................... 7
Views of Slides .............................................................................................................................................. 8
Normal View ............................................................................................................................................. 8
Slide Sorter View ....................................................................................................................................... 8
Reading View ............................................................................................................................................ 8
Slide Masters - Viewing the Slide Master ................................................................................................. 8
How to set up your Slide Master! ............................................................................................................. 9
Inserting headers and/or footers ............................................................................................................ 10
Adding a Section to a slideshow ............................................................................................................. 11
How to change Paragraph Alignment ..................................................................................................... 11
How to create a Bulleted or Numbered List (or How to remove a bulleted and numbered list.) .......... 11
Inserting Images and Multimedia ............................................................................................................... 11
Inserting Images ...................................................................................................................................... 11
Inserting Video file .................................................................................................................................. 12

Page 2
Jared Campbell • [email protected] • 321-674-7738
Inserting an Audio clip ............................................................................................................................ 12
Use a frame from your video as a poster frame ..................................................................................... 12
Use a picture as a poster frame for your video ...................................................................................... 12
Transitions and Animation Effects .............................................................................................................. 12
Add a slide transition .............................................................................................................................. 12
Add an animation effect to an object ..................................................................................................... 13
How to copy animation effects from one object to another: ................................................................. 13
Slide Show Delivery, The Laser Pointer, and how to access the Pen .......................................................... 14
Present a slide show ............................................................................................................................... 14
How to use the Laser Pointer .................................................................................................................. 14
How to use the Pen ................................................................................................................................. 14
How to automatically loop your presentation ............................................................................................ 14
How to record narration over your slide show ........................................................................................... 15
How to use KeepVid.com to download videos from Youtube for your PowerPoint .................................. 16
How to use the LiveWeb plugin to insert and view web pages in real-time .............................................. 17
Playing an audio file across an automatic slide show in PowerPoint 2010 ............................................ 23
Top Ten Slide Tips by Garr Reynolds ........................................................................................................... 25
1. Keep It Simple ................................................................................................................................. 25
2. Limit bullet points & Text ................................................................................................................ 25
3. Limit Transitions and Builds (animation) ........................................................................................ 26
4. Use High-quality graphics ............................................................................................................... 27
5. Have a visual theme, but avoid using PowerPoint templates ........................................................ 28
6. Use appropriate charts ................................................................................................................... 29
7. Use color well .................................................................................................................................. 31
8. Choose your fonts well ................................................................................................................... 31
9. Use video or audio .......................................................................................................................... 32
10. Spend time in the slide sorter ..................................................................................................... 32
Page 3
Jared Campbell • [email protected] • 321-674-7738
The fundamentals
How to Create a New Presentation 1. Click the File tab and then click New.
2. Click Create.
How to open a Presentation 1. Click File then Open.
How to save a presentation 1. Click the Save button on the Quick Access Toolbar.
2. Give the presentation a name and save it into a memorable location.
Printing presentations There are several options when printing PowerPoint presentations. You have the opportunity to print
full page slides, slides with notes, an outline or handouts.
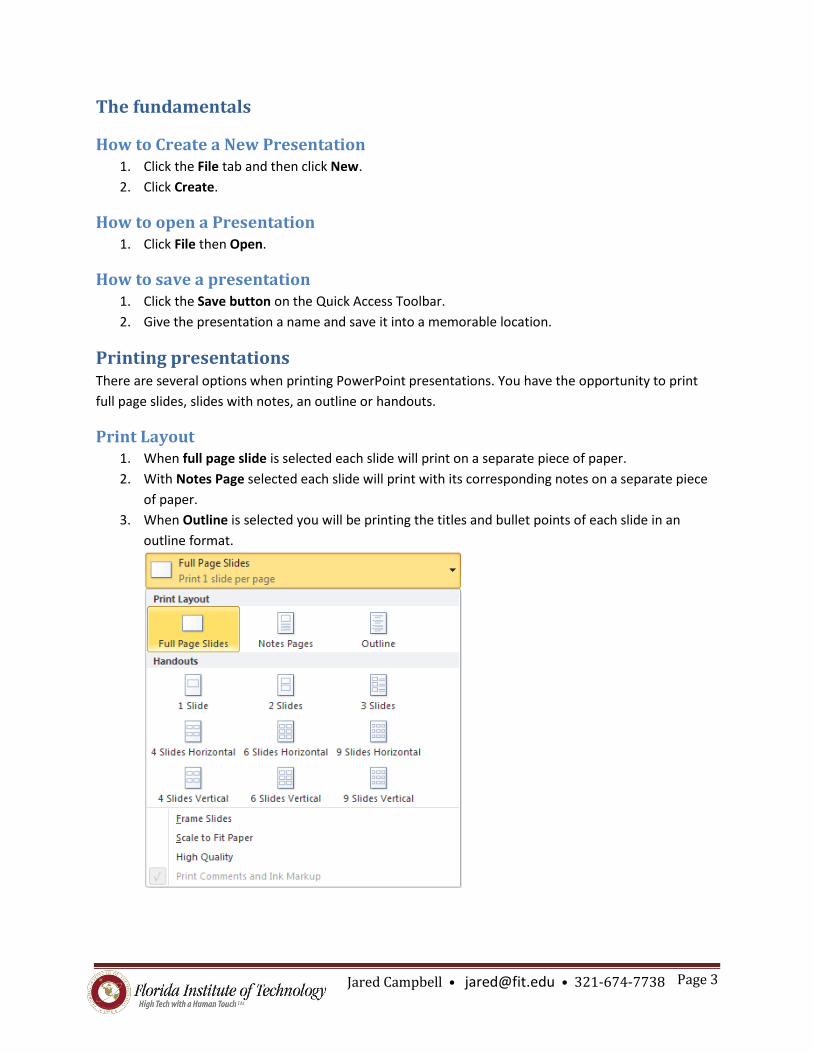
Print Layout 1. When full page slide is selected each slide will print on a separate piece of paper.
2. With Notes Page selected each slide will print with its corresponding notes on a separate piece
of paper.
3. When Outline is selected you will be printing the titles and bullet points of each slide in an
outline format.

Page 4
Jared Campbell • [email protected] • 321-674-7738
Printing Handouts Printing handouts will allow you to print anywhere from 1 to 9 small slides on each page. If you are
looking to print slides and have an area to the right of each slide to take notes on select 3 slides in the
handout section.
You will also have the ability when printing to frame the slides, scale the slides to fit the paper and
increase the printing quality by selecting these options. When any of these are selected a checkmark will
display to the left of each option.
Slides
Inserting new slides into a presentation 1. Click the Home tab then click New Slide
2. Or Press <Ctrl>+<M>
Changing the slide layout 1. Click the Home tab then select a new layout by clicking Layout.
Changing the slide background using the Background Styles button. 1. Click the Design tab, click the Background Styles button and select a background.
Page 5
Jared Campbell • [email protected] • 321-674-7738
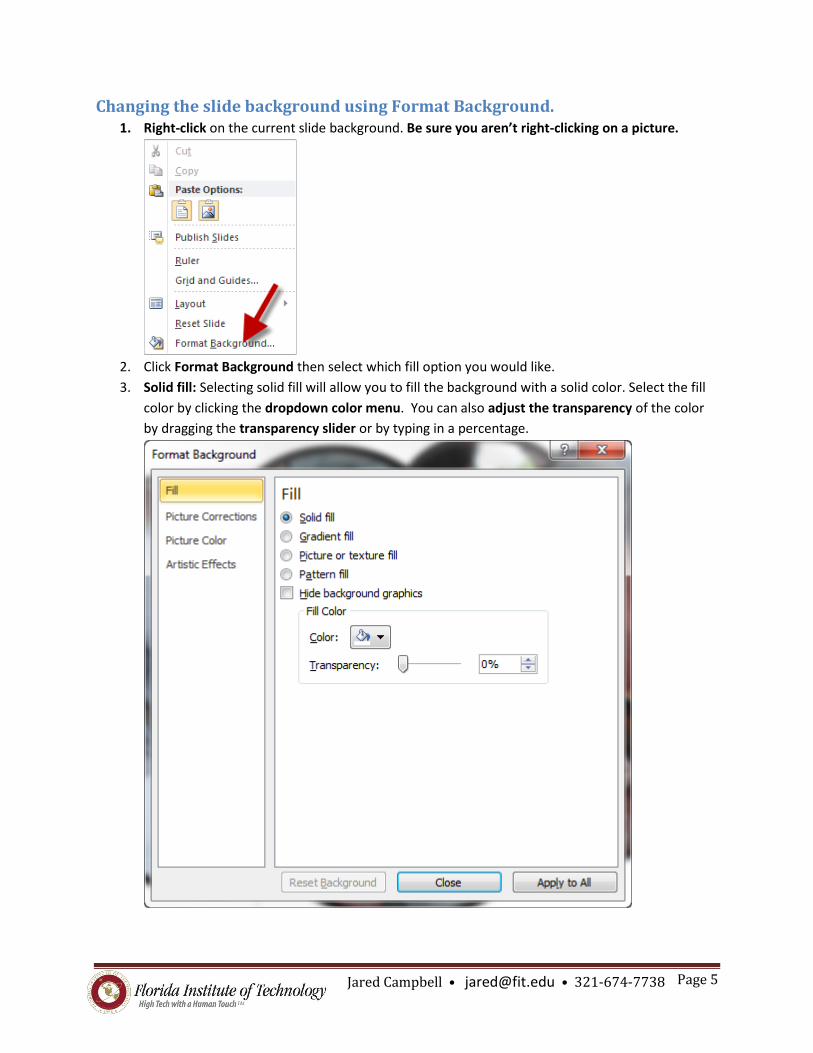
Changing the slide background using Format Background. 1. Right-click on the current slide background. Be sure you aren’t right-clicking on a picture.
2. Click Format Background then select which fill option you would like.
3. Solid fill: Selecting solid fill will allow you to fill the background with a solid color. Select the fill
color by clicking the dropdown color menu. You can also adjust the transparency of the color
by dragging the transparency slider or by typing in a percentage.
Page 6
Jared Campbell • [email protected] • 321-674-7738
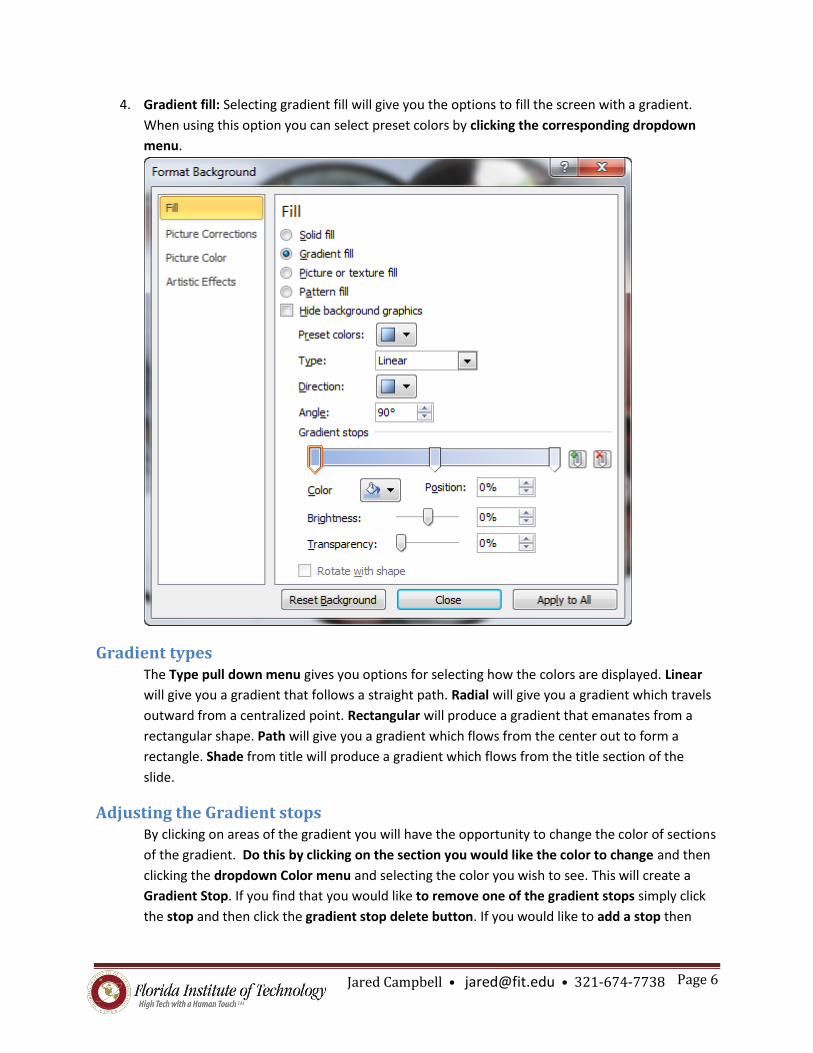
4. Gradient fill: Selecting gradient fill will give you the options to fill the screen with a gradient.
When using this option you can select preset colors by clicking the corresponding dropdown
menu.
Gradient types The Type pull down menu gives you options for selecting how the colors are displayed. Linear
will give you a gradient that follows a straight path. Radial will give you a gradient which travels
outward from a centralized point. Rectangular will produce a gradient that emanates from a
rectangular shape. Path will give you a gradient which flows from the center out to form a
rectangle. Shade from title will produce a gradient which flows from the title section of the
slide.
Adjusting the Gradient stops By clicking on areas of the gradient you will have the opportunity to change the color of sections
of the gradient. Do this by clicking on the section you would like the color to change and then
clicking the dropdown Color menu and selecting the color you wish to see. This will create a
Gradient Stop. If you find that you would like to remove one of the gradient stops simply click
the stop and then click the gradient stop delete button. If you would like to add a stop then

Page 7
Jared Campbell • [email protected] • 321-674-7738
select the gradient stop add button. Each stop will correspond to a different color. You may
slide them around to adjust the appearance of the gradient.
Gradient Brightness and Transparency To adjust the brightness and/or the transparency of the color in the gradient slide the
corresponding sliders left or right depending upon your needs.
Apply to All will apply the background to all of your slides. If you would like to change only the
one slide just click the Close button.
5. Picture or texture fill: You can insert pictures as a background using this selection.
Click the Insert from File button to select your picture. I tend to avoid clip art, but if you must
you can select the Clip Art button instead.
If you would like to tile the picture (this means repeat the picture over and over again on a slide)
you should select the Tile picture as texture checkbox.

Page 8
Jared Campbell • [email protected] • 321-674-7738
When you add a picture as a background you lose some of the ability of adjusting its placement.
Often times pictures will become stretched and distorted. You can adjust this by modifying the
Stretch Options. Click the up/down arrows next to any of the offsets to change how the picture
looks.
You may also adjust the transparency of a picture background by sliding the Transparency
slider.
Views of Slides Clicking on the View tab gives you access to the different Presentation Views.
In the bottom right of the PowerPoint screen you will also find buttons that you can also quickly access
the different views. You can also access these different views by clicking on the View tab and going to
the Presentation Views group.
Normal View is what is typically used to create and edit PowerPoint slides.
Slide Sorter View is what is typically used to edit entire PowerPoint slide shows. You have the
ability to move sections and slides around as needed.
Reading View gives you a quick screen of what the presentation will look like when you are
presenting. One of the nice things about this view is that you can see the presentation without it taking
up the entire screen.
Slide Masters - Viewing the Slide Master A slide master is a slide which stores information about the theme and layout of your presentation. This
includes information about backgrounds, color, fonts, effects, placeholder sizes, and positioning. Using a
slide master can save you a lot of time because you don’t have to type in the same information on more
than one slide. This can be very helpful if you have a long presentation with lots of slides.
Page 9
Jared Campbell • [email protected] • 321-674-7738
Slide masters allow you to create templates that you can use over and over within a presentation. You
can have more than one slide master in a presentation.
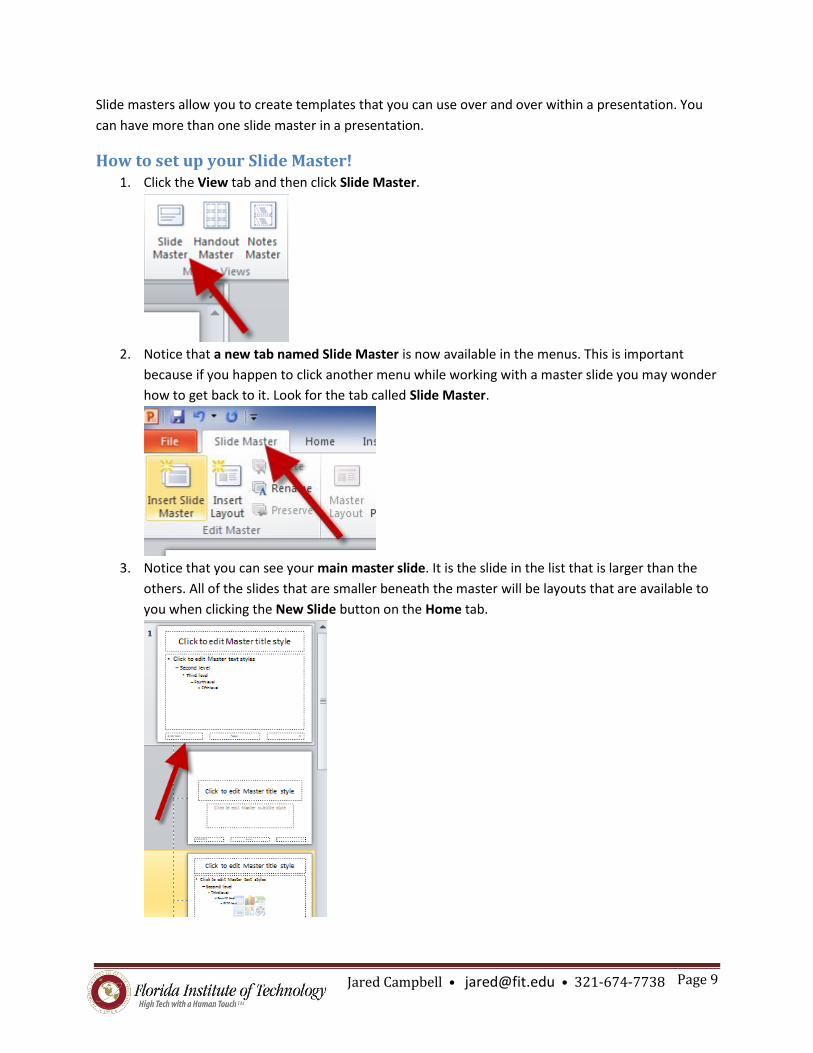
How to set up your Slide Master! 1. Click the View tab and then click Slide Master.
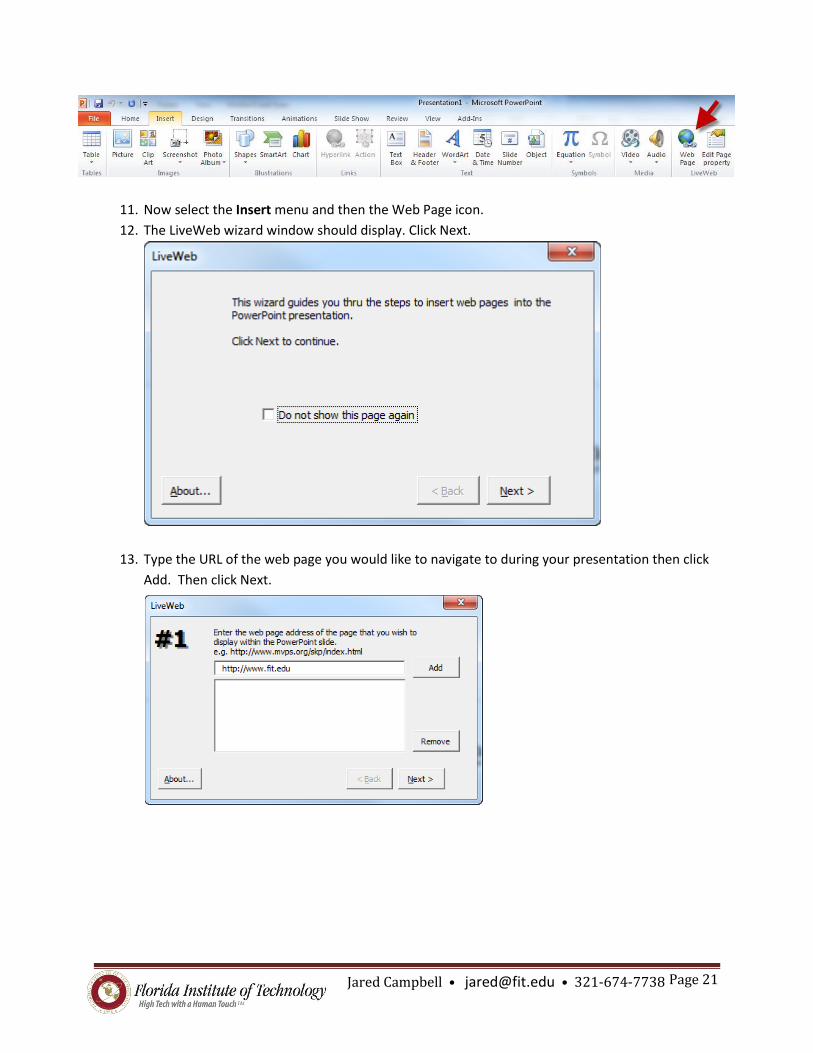
2. Notice that a new tab named Slide Master is now available in the menus. This is important
because if you happen to click another menu while working with a master slide you may wonder
how to get back to it. Look for the tab called Slide Master.
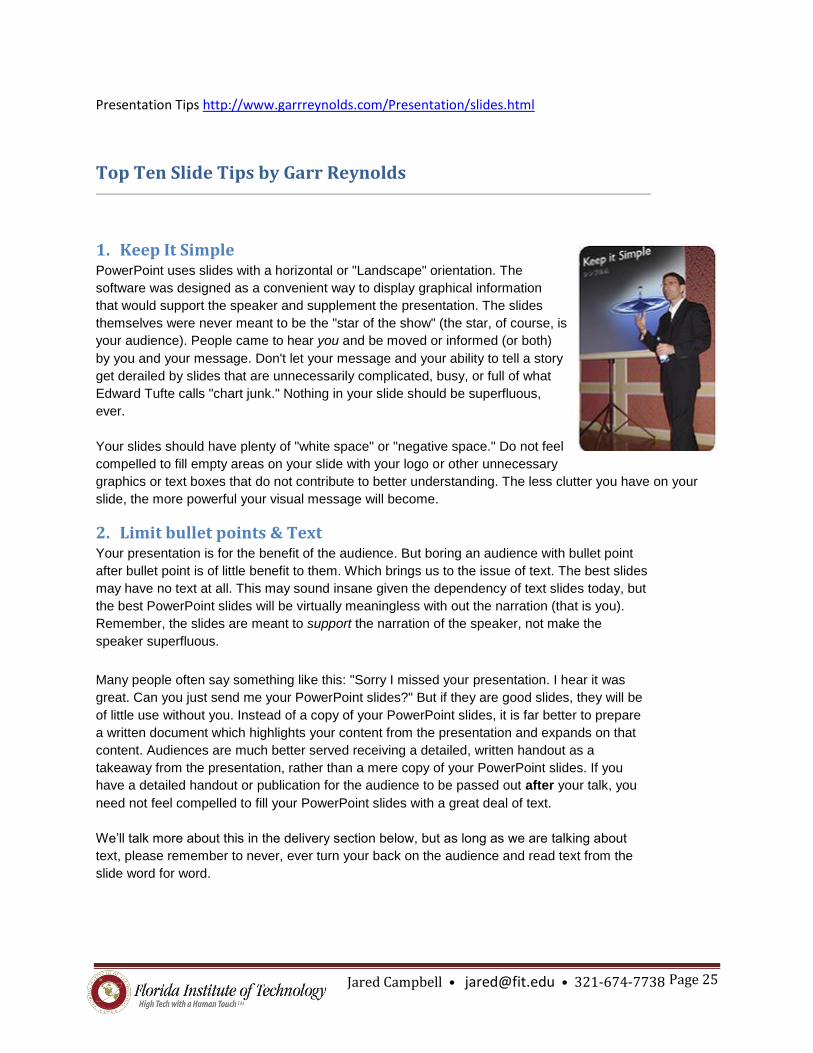
3. Notice that you can see your main master slide. It is the slide in the list that is larger than the
others. All of the slides that are smaller beneath the master will be layouts that are available to
you when clicking the New Slide button on the Home tab.

Page 10
Jared Campbell • [email protected] • 321-674-7738
4. If you modify the Master slide it will carry over to the rest of the slides. This includes
backgrounds, fonts, footers, etc.
5. You can add a layout slide or modify any of the layout slides.
6. You can also add a placeholder to any of the slides. Place holders are areas on the slide to put
items such as text, pictures, or a number of other items.
7. You can rename your modified Master slides and Layout slides by clicking the Rename button
on the Slide Master menu.
8. When you are finished modifying the Master slide or any of the layout slides click the Close
Master View button.
9. Now when you are in the Home tab you can select the drop down arrow next to New Slide and
see all of the layout options available to you.
Inserting headers and/or footers Steps to inserting headers and footers
1. Click the Insert tab.
2. Click the Header and Footer button.
3. Select the options that you want and click Apply or Apply to all.

Page 11
Jared Campbell • [email protected] • 321-674-7738
Adding a Section to a slideshow Adding sections to your presentation can help structure the content of your presentation. Think of
PowerPoint sections as chapters in books.
1. From the Home tab click the Section button.
2. Click Add section.
How to change Paragraph Alignment
1. Select the paragraph(s) and then click the appropriate alignment button. You can make them
left-justified, center-justified, right-justified, or align both right and left together. These
buttons are found on the home tab in the Paragraph section.
How to create a Bulleted or Numbered List (or How to remove a bulleted and
numbered list.) 1. Select the paragraph that you want to bullet or number. (Or, if you would like to remove the
bullets or numbers, select that text.)
2. Click the Bullets or Numbering button on the Home tab.
Inserting Images and Multimedia
1. Inserting Images: Click on the Insert tab and click the Picture button in the images group.
Navigate to the picture you want and click Insert.

Page 12
Jared Campbell • [email protected] • 321-674-7738
2. Inserting Video file: Click the Insert tab and then click the Video button in the Media
group. Navigate to the video you want and click Insert.
3. Inserting an Audio clip: Click the Insert tab and then click the Audio button in the Media
group. Select Audio from file and then navigate to the audio file that you want. Click Insert.
Use a frame from your video as a poster frame Typically videos will show as a black box instead of having an actual image indicating that there is a
video file that will play. In order to give it a picture that is static and visible follow these steps:
1. Click Play to begin playing the video. 2. Play the video until you see the frame that you want to use as your poster frame, and then click
Pause. 3. Under Video Tools, on the Format tab, in the Set Poster Frame group, and then click Current
Frame.
Use a picture as a poster frame for your video 1. Select the video on the slide. 2. Under Video Tools, on the Format tab, in the Adjust group, click Poster Frame, and then click
Image from file.
Transitions and Animation Effects
1. To add a slide transition: navigate to the slide you want to add a transition to. Click the
Transitions tab then click the downward pointing arrow to select a transition effect.

Page 13
Jared Campbell • [email protected] • 321-674-7738
2. To add an animation effect to an object: This could be a drawing object or text box.
Select the text box or the object and then click the Animations tab. Click the downward
pointing arrow to display the transition effects available. Pick the animation you like.
You may find that adding animations to objects is simpler by clicking the Animation Pane in the
Advanced Animation group. This will display the Animation Pane on the right side of the screen.
This will give you options of when you’d like the animation to start, effect options, timing, etc.
3. How to copy animation effects from one object to another: First select the
object that has the animation effect you would like to copy. Click the Animations tab and then
click the Animation Painter button in the Advanced Animation group. Then click the object that
you would like the copied animation effect to be copied to.

Page 14
Jared Campbell • [email protected] • 321-674-7738
4. If you would like to change the animation sequence then with the Animation Pane
opened you can click and drag items to change when the object’s animation happens. You can
also visit the Timing group on the Animations tab and select Reorder Animation
Slide Show Delivery, The Laser Pointer, and how to access the Pen
1. Present a slide show. Click the Slide Show button
or click the Slide Show tab and then click the
button that says either From Beginning or From Current Slide.
2. How to use the Laser Pointer: Simply hold down the <CTRL> key while clicking and
holding the left mouse button.
3. To use the Pen simply hold down the <CTRL> +<P> and then draw on the screen. Press
<CTRL> +<A> to switch back to the arrow pointer. Press <E> to erase your inkings.
How to automatically loop your presentation 1. Select your first slide and then click on the Transitions tab.
2. In the timing group make sure that On Mouse Click is unchecked and that the After checkbox is
checked. Give yourself a few seconds. (5 is usually good, but you may want more or less.)
3. Click Apply to All.
4. Click the Slide Show Tab and then click the Set Up Slide Show button.
5. In the Show type region, select the Browsed at a Kiosk.
6. Click the Ok button.
7. Start the show when you are ready.

Page 15
Jared Campbell • [email protected] • 321-674-7738
How to record narration over your slide show After preparing your slideshow you may wish to record you narrating it. For this you will need a
microphone.
1. To start click the Slide Show tab and then click the Record Slide Show button in the Set Up
group.
2. To record from the beginning click the Start Recording from Beginning option.
3. To record from anywhere else in the presentation click on the slide you wish to start recording
and then click Start Recording from Current Slide option.
4. A Record Slide Show box will display and it will ask you if you’d like to record the slide and
animation timings as well as the Narrations and laser pointer. If you aren’t sure just make sure
all are checked and then click the Start Recording button. Note: If you do not have a
microphone attached the option to record Narrations and laser pointer will be greyed out.
5. Run through your presentation and narrate it using your microphone.
6. Press the ESC key when you are finished.
7. Don’t forget to Save.
8. To test out your narration start your presentation. Be sure that your speakers are on and your
volume is turned up.
9. If you are satisfied with your recording just click Save and you are good.
10. If you are not satisfied with your recording click the words on the Record Slide Show button
and select Clear. Then click to either Clear the timings on the current slide or All slides or clear
Narration on current slide or on All slides.

Page 16
Jared Campbell • [email protected] • 321-674-7738
How to use KeepVid.com to download videos from Youtube for your
PowerPoint Note: Do respect the copyright of others. If it isn’t yours – get their permission in writing.
1. Make sure your links toolbar is showing. a. In Firefox this is done by going to View then to Toolbars and then making sure there is a
check mark next to Bookmarks toolbar. b. In Google Chrome this is done by clicking the wrench icon and then Bookmarks and
finally clicking Show bookmarks bar. c. In Internet Explorer 9 press the ALT button on your keyboard and then click View then
Toolbars. Finally click on Favorites Bar. d. If your favorite internet browser isn’t displayed here let me know.
2. Go to http://keepvid.com/ . Drag the KEEPVID Bookmarklet onto the bookmark (aka favorites) toolbar. This will create a button named Keep It! .
3. Visit the youtube video that you are interested in. 4. Click the Keep It! Button. 5. It will take you to the keepvid page. Find the section titled Download links. 6. Click on a link that says Download FLV or Download MP4. Pick the one that says Max and then a
number with a p after it.
7. That should download into the folder that downloaded items typically download to.

Page 17
Jared Campbell • [email protected] • 321-674-7738
8. Move the downloaded video into the folder that your PowerPoint file is in. You should put both the PowerPoint file and the downloaded video into a separate folder. This is very important because if you move the PowerPoint file to another location, it may have trouble finding the video file associated with it when you present.
9. Open your PowerPoint presentation and then place the video file into it by going to Insert then Video. You will have to navigate to the folder.
10. Save your progress in PowerPoint. 11. Check to see that it works!
How to use the LiveWeb plugin to insert and view web pages in real-time (Note: You have to follow these instructions on every computer you will present from.)
1. Using a browser, navigate to http://skp.mvps.org/liveweb.htm
2. Find your version of PowerPoint and download the zip file.
3. Navigate to the location of where the zip folder was downloaded, and right-click. A box may
open up that makes you aware of the potential for computer harm. Click OK.
4. Click Extract All. Once the Extract Compressed (Zipped) Folders box opens up. Select a
destination for the files, then click Extract.

Page 18
Jared Campbell • [email protected] • 321-674-7738
5. Once finished, the extracted files should display in a window. You should see 3 things:
Disclaimer, LiveWeb and Readme.
Installing LiveWeb Instructions for Office 2007 and 2010
1. Start PowerPoint.
2. If you have OFFICE 2007 Click the Office Orb and then near the bottom of the menu,
click PowerPoint Options, and then continue to step 3.

Page 19
Jared Campbell • [email protected] • 321-674-7738
If you have OFFICE 2010 Click File then Options and then click Add-Ins.
3. Click Add-Ins
4. Near the bottom of the screen you will find a pull down menu that says COM Add-ins. Click the
down arrow and select PowerPoint Add-Ins then click the Go button.
5. The Add-Ins window will open, you may have other Add-ins available in the window, we can
ignore those for now.

Page 20
Jared Campbell • [email protected] • 321-674-7738
Click Add New …
6. Navigate to the location of the file you extracted in step 5, click LiveWeb and then OK.
7. It may tell you that Microsoft Office has identified a potential security concern. If so, click Enable
Macros.
8. You should see a screen that looks like this:
9. You may now click Close.
10. To try out the LiveWeb add-in, create a new slide that you would like to insert a web page into.
Page 21
Jared Campbell • [email protected] • 321-674-7738
11. Now select the Insert menu and then the Web Page icon.
12. The LiveWeb wizard window should display. Click Next.
13. Type the URL of the web page you would like to navigate to during your presentation then click
Add. Then click Next.

Page 22
Jared Campbell • [email protected] • 321-674-7738
14. If you want the web page to refresh every time you visit the slide it will be on, keep the Yes,
refresh box checked. Otherwise, uncheck it. Click next.
15. The next window that opens, asks about how much of the screen you would like to use. The
default is 90% and centered. If you would like to change these settings, feel free. I find 90% to
be a great size. Click Next.
16. Click Finish when the next window opens.
17. You should see a screen that looks like this:

Page 23
Jared Campbell • [email protected] • 321-674-7738
18. Click OK.
19. Start your slide show as normal. When you reach the slide with the inserted web page, it will
display in the center of the presentation.
20. Don’t forget to save as you go! Enjoy!
Playing an audio file across an automatic slide show in PowerPoint 2010 1. Make sure your audio file is in one of these formats: mp3, aiff, au, wav, wma, mid or midi.
2. First add all of your pictures into PowerPoint slides.
3. Select the Transitions tab. Here are some recommended settings. Select Random Bars, Duration
00.50, Click Apply To All. Uncheck On Mouse Click. Check the checkbox to the left of After: and set it to 00:5.00. Click the Apply To All button again just for good measure.
4. Open up the first slide of your slide show.
5. Click the Insert Tab. Choose Audio in the Media section.

Page 24
Jared Campbell • [email protected] • 321-674-7738
6. Select Audio from File. Navigate to where the audio file you want to use is then click Insert.
7. A new menu will show up called “Audio Tools”. Click the Playback tab.
8. From the Start: pull down menu in the Audio Options section, set it to play across slides. Also check Hide During Show and Loop until Stopped.
If you start the slide show, just wait a couple of seconds and the song should start playing automatically
throughout the slide show. The song will start over when it reaches the end.
Page 25
Jared Campbell • [email protected] • 321-674-7738
Presentation Tips http://www.garrreynolds.com/Presentation/slides.html
Top Ten Slide Tips by Garr Reynolds
1. Keep It Simple PowerPoint uses slides with a horizontal or "Landscape" orientation. The
software was designed as a convenient way to display graphical information
that would support the speaker and supplement the presentation. The slides
themselves were never meant to be the "star of the show" (the star, of course, is
your audience). People came to hear you and be moved or informed (or both)
by you and your message. Don't let your message and your ability to tell a story
get derailed by slides that are unnecessarily complicated, busy, or full of what
Edward Tufte calls "chart junk." Nothing in your slide should be superfluous,
ever.
Your slides should have plenty of "white space" or "negative space." Do not feel
compelled to fill empty areas on your slide with your logo or other unnecessary
graphics or text boxes that do not contribute to better understanding. The less clutter you have on your
slide, the more powerful your visual message will become.
2. Limit bullet points & Text Your presentation is for the benefit of the audience. But boring an audience with bullet point
after bullet point is of little benefit to them. Which brings us to the issue of text. The best slides
may have no text at all. This may sound insane given the dependency of text slides today, but
the best PowerPoint slides will be virtually meaningless with out the narration (that is you).
Remember, the slides are meant to support the narration of the speaker, not make the
speaker superfluous.
Many people often say something like this: "Sorry I missed your presentation. I hear it was
great. Can you just send me your PowerPoint slides?" But if they are good slides, they will be
of little use without you. Instead of a copy of your PowerPoint slides, it is far better to prepare
a written document which highlights your content from the presentation and expands on that
content. Audiences are much better served receiving a detailed, written handout as a
takeaway from the presentation, rather than a mere copy of your PowerPoint slides. If you
have a detailed handout or publication for the audience to be passed out after your talk, you
need not feel compelled to fill your PowerPoint slides with a great deal of text.
We’ll talk more about this in the delivery section below, but as long as we are talking about
text, please remember to never, ever turn your back on the audience and read text from the
slide word for word.

Page 26
Jared Campbell • [email protected] • 321-674-7738
This slide is not unusual, but it is not a visual aid,
it is more like an "eye chart." Try to avoid text-heavy (and sleep inducing)
slides like this one.
Aim for something like this simple slide above. And this is even better...
3. Limit Transitions and Builds (animation)
Use object builds and slide transitions judiciously. Object builds (also called animations), such
as bullet points, should not be animated on every slide. Some animation is a good thing, but
stick to the most subtle and professional (similar to what you might see on the evening TV
news broadcast). A simple "Wipe Left-to-Right" (from the "Animations" menu) is good for a
bullet point, but a "Move" or "Fly" for example is too tedious and slow (and yet, is used in many
presentations today). Listeners will get bored very quickly if they are asked to endure slide
after slide of animation. For transitions between slides, use no more than two-three different
types of transition effects and do not place transition effects between all slides.

Page 27
Jared Campbell • [email protected] • 321-674-7738
4. Use High-quality graphics Free stock photos here: http://www.sxc.hu/
Use high-quality graphics including photographs. You can take your own high-quality
photographs with your digital camera, purchase professional stock photography, or use the
plethora of high-quality images available on line (be cautious of copyright issues, however).
Never simply stretch a small, low-resolution photo to make it fit your layout - doing so will
degrade the resolution even further.
Avoid using PowerPoint Clip Art or other cartoonish line art. Again, if it is included in the
software, your audience has seen it a million times before. It may have been interesting in
1993, but today the inclusion of such clip art often undermines the professionalism of the
presenter. There are exceptions, of course, and not all PowerPoint art is dreadful, but use
carefully and judiciously.
Try to avoid cheesy clip art like this. This edited stock photograph is more effective and
professional.
I often use images of people in my slides, as photography of people tends to help the audience
connect with the slide on a more emotional level. If the photographic image is secondary in
importance, then I decrease the opacity and add a Gaussian Blur or motion filter in Photoshop.
If the photographic image is the primary area I want the audience to notice (such as a picture
of a product), then the image can be more pronounced and little (or no) text is needed.
In this title slide, the image is primary. In this slide of the same presentation, the image is
secondary and "pushed" to the back by editing it
first in Photoshop.

Page 28
Jared Campbell • [email protected] • 321-674-7738
5. Have a visual theme, but avoid using PowerPoint templates You clearly need a consistent visual theme throughout your presentation, but most templates
included in PowerPoint have been seen by your audience countless times (and besides, the
templates are not all that great to begin with). Your audience expects a unique presentation
with new (at least to them) content, otherwise why would they be attending your talk? No
audience will be excited about a cookie-cutter presentation, and we must therefore shy away
from any supporting visuals, such as the ubiquitous PowerPoint Design Template, that
suggests your presentation is formulaic or prepackaged.
You can make your own background templates which will be more tailored to your needs. You
can then save the PowerPoint file as a Design Template (.pot) and the new template will
appear among your standard Microsoft templates for your future use. You can also purchase
professional templates on-line (for example: www.powerpointtemplatespro.com).
Page 29
Jared Campbell • [email protected] • 321-674-7738
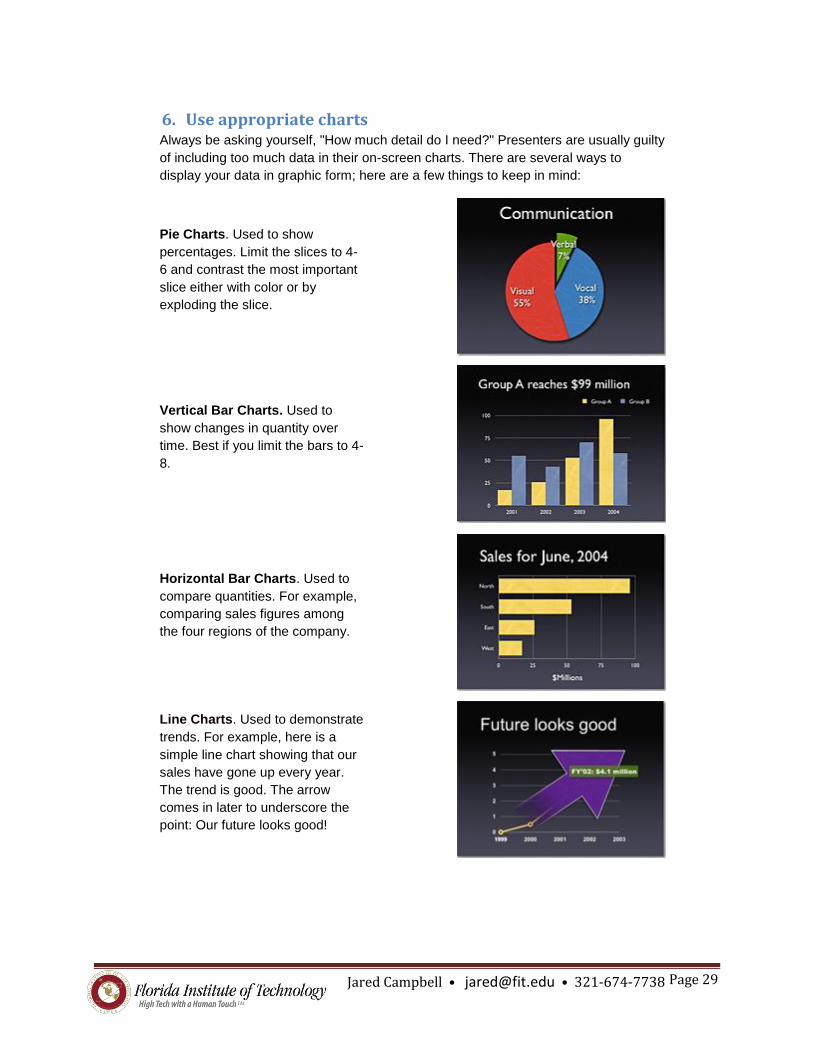
6. Use appropriate charts Always be asking yourself, "How much detail do I need?" Presenters are usually guilty
of including too much data in their on-screen charts. There are several ways to
display your data in graphic form; here are a few things to keep in mind:
Pie Charts. Used to show
percentages. Limit the slices to 4-
6 and contrast the most important
slice either with color or by
exploding the slice.
Vertical Bar Charts. Used to
show changes in quantity over
time. Best if you limit the bars to 4-
8.
Horizontal Bar Charts. Used to
compare quantities. For example,
comparing sales figures among
the four regions of the company.
Line Charts. Used to demonstrate
trends. For example, here is a
simple line chart showing that our
sales have gone up every year.
The trend is good. The arrow
comes in later to underscore the
point: Our future looks good!

Page 30
Jared Campbell • [email protected] • 321-674-7738
In general, tables are good for side-by-side comparisons of quantitative
data. However, tables can lack impact on a visceral level. If you want to show
how your contributions are significantly higher than two other parties, for
example, it would be best to show that in the form of a bar chart (below,
right). If you're trying to downplay the fact that your contributions are lower
than others, however, a table will display that information in a less dramatic
or emotional way.

Page 31
Jared Campbell • [email protected] • 321-674-7738
7. Use color well
Color evokes feelings. Color is emotional. The right color can help persuade and motivate.
Studies show that color usage can increase interest and improve learning comprehension and
retention.
You do not need to be an expert in color theory, but it's good for business
professionals to know at least a bit on the subject. Colors can be divided into
two general categories: Cool (such as blue and green) and Warm (such as
orange and red). Cool colors work best for backgrounds as they appear to
recede away from us into the background. Warm colors generally work best for
objects in the foreground (such as text) because they appear to be coming at
us. It is no surprise, then, that the most ubiquitous PowerPoint slide color
scheme includes a blue background with yellow text. You do not need to feel
compelled to use this color scheme, though you may choose to use a variation
of those colors.
If you will be presenting in a dark room (such as a large hall), then a dark background (dark
blue, grey, etc.) with white or light text will work fine. But if you plan to keep most of the lights
on (which is highly advisable) then a white background with black or dark text works much
better. In rooms with a good deal of ambient light, a screen image with a dark background and
light text tends to washout, but dark text on a light background will maintain its visual intensity
a bit better.
8. Choose your fonts well Fonts communicate subtle messages in and of themselves, which is why you should choose
fonts deliberately. Use the same font set throughout your entire slide presentation, and use no
more than two complementary fonts (e.g., Arial and Arial Bold). Make sure you know the
difference between a Serif font (e.g., Times New Roman) and a Sans-Serif font (Helvetica or
Arial). Serif fonts were designed to be used in documents filled with lots of text. Serif fonts are
said to be easier to read at small point sizes, but for on screen presentations the serifs tend to
get lost due to the relatively low resolution of projectors. San-serif fonts are generally best for
PowerPoint presentations, but try to avoid the ubiquitous Helvetica. I often choose to use Gill
Sans as it is somewhere in between a serif and a sans-serif font and is professional yet
friendly and "conversational." Regardless of what font you choose, make sure the text can be
read from the back of the room.
Times
Arial Black and Arial

Page 32
Jared Campbell • [email protected] • 321-674-7738
9. Use video or audio Use video and audio when appropriate. Using video clips to show
concrete examples promotes active cognitive processing, which is
the natural way people learn. You can use video clips within
PowerPoint without ever leaving the application or tuning on a VCR.
Using a video clip not only will illustrate your point better, it will also
serve as a change of pace thereby increasing the interest of your
audience. You can use audio clips (such as interviews) as well.
Something to avoid, however, is cheesy sound effects that are included in PowerPoint (such
as the sound of a horn or applause when transitioning slides). The use of superfluous sound
effects attached to animations is a sure way to lose credibility with your audience.
10. Spend time in the slide sorter According to the Segmentation Principle of multimedia learning theory, people comprehend
better when information is presented in small chunks or segments. By getting out of the Slide
View and into the Slide Sorter view, you can see how the logical flow of your presentation is
progressing. In this view you may decide to break up one slide into, say, two-three slides so
that your presentation has a more natural and logical flow or process. In this view you will be
able to capture more of the gestalt of your entire presentation from the point of view of your
audience. You will be able to notice more extraneous pieces of visual data that can be
removed to increase visual clarity and improve communication.
The Slide Sorter view in PowerPoint.