plumbing leadwork: joints and pipes technical advice no… · plumbing leadwork: joints and pipes....
TRANSCRIPT

The Society for the Protection of Ancient Buildings37 Spital SquareLondon E1 6DY 020 7377 1644 [email protected]
Plumbing Leadwork:Joints and PipesSPAB Technical Advice NotePeter T J Rumley MA, DPhil, MA, FSA, MCIfA

SPAB Plumbing Leadwork: Joints and Pipes2
ContentsThis Technical Advice Note explains the basic jointing techniques and methods of pipe fabrication used in plumbing leadwork, ie the making, fixing and maintenance of pipework for building services, which require a broader range of skills from those used in lead sheetwork for roofs and cladding. Historically, lead pipes were used for the supply of water and gas, as well as the disposal of rainwater and foul water.
Materials such as cast iron, copper and plastic having replaced lead, the construction industry no longer offers training in plumbing leadwork. the loss of such traditonal skills is of great concern to the SPAB. Much historic plumbing leadwork has been lost or harmed through poor quality repair work or inappropriate replacement, particularly in hidden areas, due to a lack of conservation understanding and traditional plumbing craft skills. The skills of the plumbing leadworker remain essential for the conservation of historic leadwork.
1 Introduction ....................... 3
2 Joints in leadwork ....................... 3
3 Pipe fabrication ....................... 7
4 References ....................... 10
5 Other advice ....................... 10
Cover image: Historic lead waste water pipe with associated collar and brackets.Photo: Douglas D Kent

SPAB Plumbing Leadwork: Joints and Pipes3
1 IntroductionWhen undertaking repairs to historic plumbing leadwork, it is important to copy the original jointing methods and not to ‘improve’ upon them, as to do so is to change the fundamental nature of the historic piece. It is equally important not to follow bad examples set by earlier repairs carried out with inappropriate techniques or poor workmanship.
Work on lead pipes entails the use of techniques different from those generally recommended for lead roofing. In particular, the tradtional skill of solder wiping is often the suitable method for forming joints in lead pipwork as opposed to leadburning (lead-welding), which tends to be advocated for patch repairing lead sheet roofs. Other traditional skills associated with plumbing leadwork include lead pipe bending and pipe construction.
2 Joints in leadwork2.1 Types of joint
Three hot processes have been used historically for jointing leadwork:
• Soldering.• Wiped soldering.• Leadburning.
2.2 Soldered joints
Soldering entails the use of an alloy, or ‘solder’, to join metal without heating it to its melting point. The melting point of lead (327.5˚C) is reduced by the addition of tin. The proportions of tin and lead can be varied to produce a range of alloys, each with a different melting point, which can be exploited by the plumber for different purposes. Table 1 gives the usual ratios and their respective applications.
Solder Lead:tin Melting point Application
Blowpipe 1:2 171.1˚C A fine solder used for delicate work
Tinman’s 1:1 187.7˚C A fine solder used for copper-bit jointing, tinning for pre-jointing, tinning for decoration and general applications
Plumber’s 2:1 227.2˚C A coarse solder used for wiping all kinds of joints; has a working plastic range between 182˚C and 262˚C
Table 1: Lead:tin ratios for soldering

SPAB Plumbing Leadwork: Joints and Pipes4
There is as much art in fixing the joints in place, ready to be soldered, as there is in the soldering itself. ‘Solder-tacking’ is the use of spots of solder to hold the edges of an item together before it is finally soldered. Before this is done, however, all surfaces to be joined are cleaned by scraping back to bright metal using a shave hook.1 They may be smeared with flux, which assists jointing by preventing oxidation (dulling of the bright surface of the lead, which can occur very quickly after cleaning). Only non-corrosive fluxes, such as rosin or tallow, should be used.
When plumbers had to rely on coal or charcoal for heat, two soldering irons were used to maintain soldering temperature, one being used to apply the solder while the other was being heated by the plumber’s mate. Today, an oxyacetylene torch is used.
Soldered joints can be susceptible to thermal movement. However, items fabricated from smaller sheets of heavier-gauge lead – rainwater heads, pipes and cisterns – are less likely than lead sheet roofing to suffer from thermal stress.
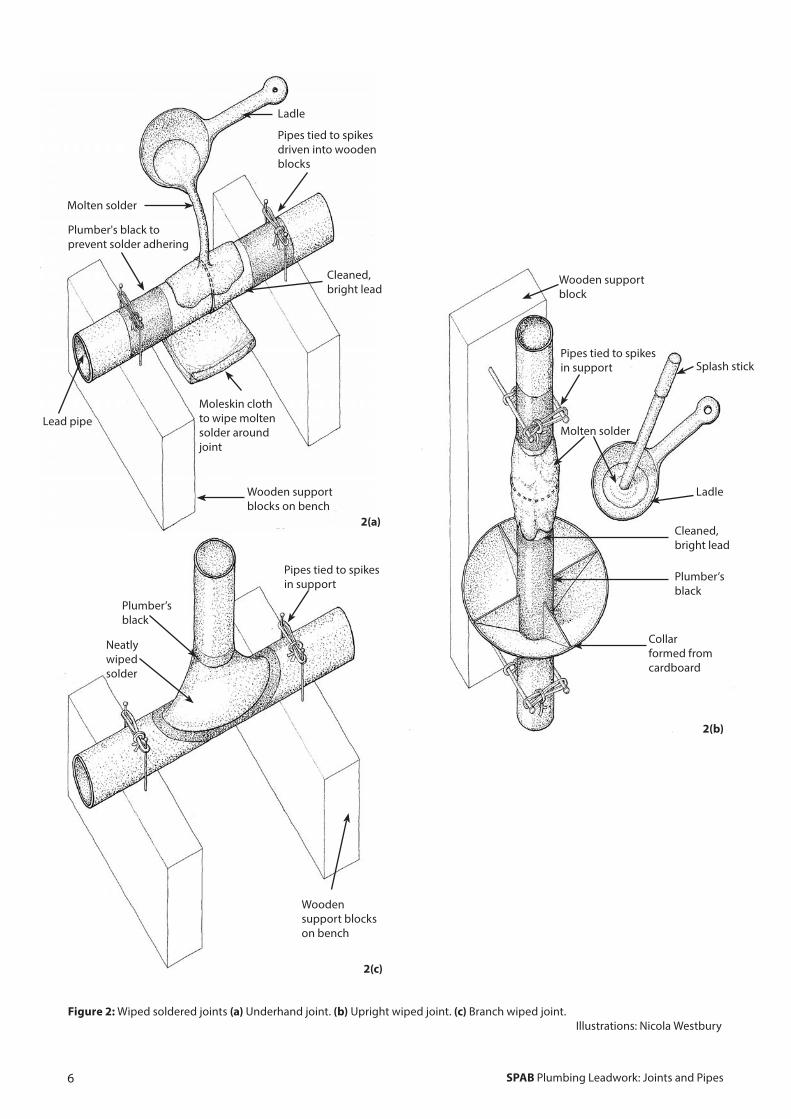
2.3 Wiped soldered joints
Wiped soldered joints were used extensively in lead pipework for water supply and rainwater drainage (see figure 1), and for making decorative rainwater heads. The wiped joint is made by manipulating a mass of molten solder into a neat shape over a joint and smoothing it with a moleskin cloth2 before the solder solidifies.
The tools required for wiped solder joints in making items from sheet lead are a: melting pot, ladle, hammer, shave hook, rasp, mallet and dresser. In addition, boxwood turnpins are used to open out the ends of the pipes; they come in various diameters and taper to suit different pipe sizes. The materials needed are: plumber’s solder (see table 1), flux and ‘plumber’s black’ – a masking fluid made of size (animal skin glue), whiting and lamp black mixed together to a creamy consistency.
For safety reasons, this work is nearly always completed on the bench and rarely in situ. Fixing rods are nailed into the bench and the item is tied to them to hold it in place. Lead sheet must be fixed firmly in position ready for soldering, either by solder tacking and/or spikes driven into the bench.
It is sometimes necessary to wipe joints in situ where access is restricted. However, there is often enough give in lead pipes to pull them away from the wall so that the solder can be wiped around appropriately.
To limit the spread of the solder and prevent it adhering where not required, the surface of the lead is masked (‘soiled’) using plumber’s black. The areas to be joined are cleaned with a shave hook, heated with a blow lamp and smeared with flux. The solder is then ladled over the joint
Figure 1: Lead water pipe for WC with wiped soldered joint below cistern. Photo: Douglas D Kent

SPAB Plumbing Leadwork: Joints and Pipes5
and wiped neatly with the moleskin cloth. It will splash everywhere but will fall away from the soiled areas. Solder that flows on the joint may be wiped neatly from the outside. In box-like items such as rainwater heads, this type of joint is particularly strong, as the solder will form a right-angled triangle along the corner seams, supporting the ‘walls’ of the box from within.
Wiped soldered joints on soil, waste and vent pipes are made with the same tools and materials as those used for sheet items. The three basic types of joint are:
• Underhand wiped.• Upright wiped.• Branch wiped.
(See figure 2.)
In underhand wiped joints, the ends of the pipe are cut square, and a turnpin and mallet are used to open out the female end. The male spigot end is tapered with a rasp. Each pipe is then soiled with plumber’s black. When dry, the soiled ends are cleaned, and flux is applied to the cleaned metal. The pipes are fixed in position and the solder is poured over the joint with a ladle while a moleskin catch cloth is held underneath the pipe. The solder is roughly and smartly wiped around the joint. The wiping must be timed so that the solder sticks to the surface where intended. A smaller moleskin wiping cloth is used to mould the joint to the correct shape. A thin strip of moleskin is worked around the pipe to finish off and shape the joint lengthways.
The same tools are used to make upright wiped joints, with the addition of a splash stick and a cardboard collar; the latter is fixed below the joint to catch the dripping solder. The pipe is prepared in the same way as for the other wiped joints. The solder is splashed up from the ladle onto the joint using the splash stick and wiped into position with moleskin. The soiled collar and excess solder are removed as soon as possible.
Branch wiped joints: A damaged pipe may be released from a joint by applying a gentle flame to the solder to melt it. The joint must be cleaned before a new section of pipe is inserted. Both pipes are prepared as described above. A pair of compasses is used in conjunction with a scribing plate (a thin, flat piece of brass that holds the compasses in the correct relationship to the curved surface of the pipe) to incise the line of the angled joint into the plumber’s black. This masking fluid is then scraped back to the scribed line, enabling the plumber to achieve an accurate joint between the pipes. The wiped solder is formed into a neat, slightly concave, shape. (See figure 3.)
2.4 Leadburning
The technique of using a hot welding iron to fuse the lead joint without the use of solder or flux was known in Roman times, and is also mentioned in medieval building accounts. It was further developed in the early 20th century with oxyacetylene equipment, and is now primarily used in sheet leadwork.
The small, precise oxyacetylene flame creates a pool of molten lead to close the gap between the two sections of lead being joined. The lead filler rod (a thin strip of scrap lead, scraped bright) provides added strength. Depending on the intended location and use of the pipe, two or three loadings may be needed to achieve a sufficiently strong seam. Suggested cylinder pressure gauges are 0.21 bar (3 psi) with nozzle sizes from 1-5.
Leadburning can be used in pipe fabrication, to join the two long edges of a sheet of lead that has been rolled into a cylinder.
SPAB Plumbing Leadwork: Joints and Pipes6
Figure 2: Wiped soldered joints (a) Underhand joint. (b) Upright wiped joint. (c) Branch wiped joint. Illustrations: Nicola Westbury
2(a)
2(b)
Pipes tied to spikes driven into wooden blocks
Ladle
Cleaned, bright lead
Moleskin cloth to wipe molten solder around joint
Wooden support blocks on bench
Plumber's black to prevent solder adhering
Lead pipe
Molten solder
Molten solder
Ladle
Cleaned, bright lead
Plumber’s black
Splash stickPipes tied to spikes in support
Wooden supportblock
Collar formed from cardboard
Pipes tied to spikes in support
Plumber’s black
Neatly wiped solder
Wooden support blocks on bench
2(c)

SPAB Plumbing Leadwork: Joints and Pipes7
3 Pipe fabrication3.1 Types of pipe
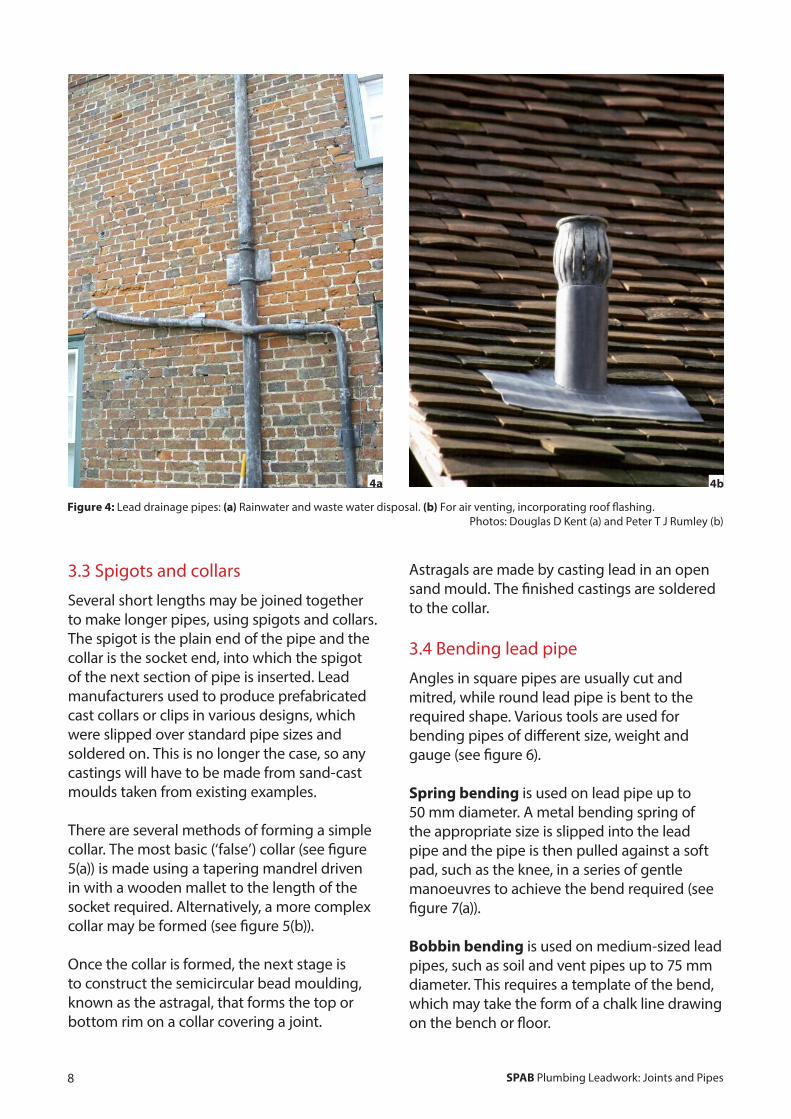
Essentially, three kinds of lead drainage pipe are found on old buildings (see figure 4). The first carries rainwater from the roof and normally has open joints where the spigot and collar meet. The second comprises waste and soil pipes, and the third, air vent pipes. The latter are normally round in profile, sealed with wiped joints and vented with a decorative cap or finial.
From Victorian times until the late 1940s, lead pipe was produced by hydraulic presses, which extruded it in massive coils. For the repair of existing drainage installations, however, it is assumed that replacement sections of lead pipe will be handmade.
3.2 Pipe sections
Round- or square-section pipe may be fabricated by wrapping sheet lead of the appropriate type and gauge around a steel tube or hardwood mandrel made to the size required for the job in hand and supported between two benches.
The lead is joined with a seam following the same technique employed for the original pipe, whether soldering, wiped soldering or leadburning. The existing joint position – normally at the back of the pipe – should be copied.
The metal to be joined is prepared as described above (see section 2.2). The soldering iron is supported on a small ‘chariot’, made up of discs (perhaps two old coins) with an axle, so that it can be run along the join with the solder. The plumber’s assistant may use a wet sponge or swab to cool the solder, which prevents the pipe seam from opening during the soldering process.
Figure 3: Formation of a branch wiped joint demonstrated on an SPAB course: (a) Opening up to receive the branch pipe. (b) Use of compasses and a scribing plate to incise the line of the joint. (c) Scraping back the masking fluid. (d) Applying the solder.
Photos: Douglas D Kent
3a 3b
3d3c
SPAB Plumbing Leadwork: Joints and Pipes8
3.3 Spigots and collars
Several short lengths may be joined together to make longer pipes, using spigots and collars. The spigot is the plain end of the pipe and the collar is the socket end, into which the spigot of the next section of pipe is inserted. Lead manufacturers used to produce prefabricated cast collars or clips in various designs, which were slipped over standard pipe sizes and soldered on. This is no longer the case, so any castings will have to be made from sand-cast moulds taken from existing examples.
There are several methods of forming a simple collar. The most basic (‘false’) collar (see figure 5(a)) is made using a tapering mandrel driven in with a wooden mallet to the length of the socket required. Alternatively, a more complex collar may be formed (see figure 5(b)).
Once the collar is formed, the next stage is to construct the semicircular bead moulding, known as the astragal, that forms the top or bottom rim on a collar covering a joint.
Astragals are made by casting lead in an open sand mould. The finished castings are soldered to the collar.
3.4 Bending lead pipe
Angles in square pipes are usually cut and mitred, while round lead pipe is bent to the required shape. Various tools are used for bending pipes of different size, weight and gauge (see figure 6).
Spring bending is used on lead pipe up to 50 mm diameter. A metal bending spring of the appropriate size is slipped into the lead pipe and the pipe is then pulled against a soft pad, such as the knee, in a series of gentle manoeuvres to achieve the bend required (see figure 7(a)).
Bobbin bending is used on medium-sized lead pipes, such as soil and vent pipes up to 75 mm diameter. This requires a template of the bend, which may take the form of a chalk line drawing on the bench or floor.
Figure 4: Lead drainage pipes: (a) Rainwater and waste water disposal. (b) For air venting, incorporating roof flashing. Photos: Douglas D Kent (a) and Peter T J Rumley (b)
4a 4b

SPAB Plumbing Leadwork: Joints and Pipes9
The pipe is slightly flattened with a bending stick to form an ellipse at the point at which the bend is to be made. The pipe is then gently pulled around into the shape of the bend in easy stages, care being taken to avoid buckling the throat, or the inside of the bend. At the first pull the pipe side will swell; to maintain the true diameter, a bobbin with followers (of slightly smaller size) is driven into the pipe bend with a drift and snatched through on the wire to which they are attached. This is repeated for each pulling until the desired radius of the bend is achieved (see figure 7(b)).
Bobbin, snatch weight and dummy bending is used on lead pipe of 75 mm to 150 mm diameter. The greater the diameter, the greater the risk of the back, or ‘heel’, of the bend stretching, while the throat kinks. The pipe is gently warmed at the point at which the bend is to be made: this can be done by soiling the pipe with plumber’s black and then pouring hot solder over the soiled area, or with a blowlamp, taking care to avoid meltdown.
Once heated, the pipe is pulled up to create the first stage of the bend, which kinks the pipe at the throat. This is known as the ‘throw’. A dummy is then used internally to knock out the kink (‘dummying-out’). The dummy can be used as a lever on the edge of the bench. Care must be taken to keep the thickness of the pipe even, so the throat, which is buckled with excess lead, is driven with a bending dresser up and around to the heel that has been stretched during the bending and is therefore thinner at this point.
To complete the process, a wooden bobbin and smaller diameter followers are inserted with a heavy metal snatch weight attached to a wire, and pulled back and forth several times through the bend to create an even diameter (see figure 7(c)). Two people usually complete the working and bending of larger soil pipes.
The specialised sand bending technique is employed on lead pipe of larger diameter than 150 mm. The sand in effect takes the place of the bobbins and during the bending process the sand prevents the lead pipe from creasing.
Figure 5: Collars: (a) Early ‘false’ collar and spigot joint formed simply by opening and closing the ends of the lower and upper pipes respectively, and applying cast astragals to the lower pipe, along with a band to create ears for fixing to the wall. (b) Typical plain collar fabricated separately as a wide cylinder, with cast astragals, and slipped over the lower pipe to form the collar to receive the spigot. Photos: Peter T J Rumley
5a 5b

SPAB Plumbing Leadwork: Joints and Pipes10
4 References1 The soldering process described is for forming lead-to-lead joints. When joining copper or brass to lead, the method varies. After the copper or brass is cleaned with wire wool, it is given a thin coating of solder (‘tinned’) to ensure good coverage and a strong joint. The pipe can go cold if need be. The lead is not tinned. The two pieces are located and heated with flux and solder2 Moleskin is a densely woven cotton fabric with a soft pile on one side that resembles the fur of moles (but is not actually animal skin)
5 Other advice5.1 Contacts
Where work to plumbing leadwork is being considered, the SPAB may be able to suggest suitable specialists, including contractors.
5.2 Further ReadingDavies, P (1898) Standard Practical Plumbing, London: E & F Spon Ltd
Lloyd, N (1929) Building Craftsmanship, Cambridge: Cambridge University Press
Martin, A (1929) The Modern Practical Plumber, London: Caxton Ltd
Molloy, E (1943) Lead Pipe Work, London: George Newnes Ltd
Rumley, P T J (2007) Conservation of Decorative Leadwork, SPAB Technical Pamphlet 17, London: SPAB
Slocombe, M (2017) The SPAB Approach to the Conservation and Repair of Old Buildings, London: Society for the Protection of Ancient Buildings
5.3 Other organisations
• Weald & Downland Living Museum www.wealddown.co.uk 01243 811363
The Worshipful Company of Plumbers has supported the creation of a Museum of Plumbing in Court Barn at the Weald & Downland Living Museum. There is an exhibition here that illustrates the traditional role of the plumber and plumbing skills. Nearby is a plumber’s workshop, c1925, that was moved from Newick, East Sussex and in which are displayed a wide variety of tools and equipment donated by many craftspeople
5.4 Health and safety
In most cases the use of lead in building does not create a significant hazard, although it is essential not to eat, drink or smoke in a place liable to be contaminated with lead and also to wash your hands, arms and face thoroughly at the end of each working session. When undertaking hot works in unventilated conditions, additional precautions must be followed.
Hot work is a serious fire hazard and a permit may be required to undertake this operation.
Figure 6: Bobbins used for truing bends in lead pipes. Photo: Douglas D Kent

SPAB Plumbing Leadwork: Joints and Pipes11
7(a)
7(b)
7(c)
Figure 7: Bending pipes: (a) Spring pipe bending. (b) Bobbin bending. (c) Bobbin, snatch weight and dummy bending. Illustrations: Nicola Westbury
Heel
Lead pipe
Bending spring
Throat
Wooden followers
Woodenbobbin
Drift to push or pull bobbin through
Throat
Heel
Heel
Throat
Dummy
Wooden bobbin to fit bore of pipe
Metal snatch weight moved back and forth

The Society for the Protection of Ancient Buildings (SPAB) believes old buildings have a future. From cottages to castles and from churches to cathedrals we are here to help buildings and the people who care for them.Through our unique training schemes, courses, advice and research we help people put our expertise into practice.
Founded by William Morris in 1877, the SPAB was established in response to the work of Victorian architects whose enthusiasm for harmful restoration caused irreparable damage. Today the SPAB encourages excellence in new design to enrich and complement the built historic environment. We train new generations of architectural professionals and building craftspeople to shape this landscape with sensitivity and skill, and we play a statutory role as adviser to local planning authorities. In our casework we campaign actively to protect old buildings at risk.
SPAB: hands on history. Join today to support our positive, practical approach to building conservation.
The Society for the Protection of Ancient Buildings37 Spital Square, London E1 6DY
Tel 020 7377 [email protected] www.spab.org.uk
A charitable company limited by guaranteeregistered in England and Wales
Company No 5743962 Charity No 111 3753 VAT No 577 4276 02
Published by the SPABin April 2019© SPAB 2019 Edn 2 Rev 0
SPAB ref T5301Rwww.spab.org.uk
ISBN 978-1-898856-43-6
The Society for the Protection of Ancient Buildings (SPAB) believes old buildings have a future. From cottages to castles and from churches to cathedrals we are here to help buildings and the people who care for them. Through our unique training schemes, courses, advice and research we help people put our expertise into practice.
Today the SPAB encourages excellence in new repair and good design to enrich and complement the built historic environment. We train new generations of architectural professionals and building craftspeople to conserve this landscape with sensitivity and skill, and we play a statutory role as adviser to local planning authorities. In our casework we campaign actively to protect old buildings at risk.
SPAB: hands on history. Join today to support our positive, practical approach to building conservation.
The content of this publication is offered in good faith, but neither the author nor the Society can accept responsibility arising from incorrect or incomplete information that may be included. The use of traditional materials may incur risks that are different from those associated with modern materials. Manufacturers’ and suppliers’ guidelines should always be observed. This document is intended as a contribution to a continuing debate and we welcome comments.
Written by Peter T J Rumley. The author is indebted to Douglas Kent (SPAB Technical and Research Director) and Tim Ratcliffe (Tim Ratcliffe Associates, architect and historic building and traditional material consultant) for their help with the preparation of this document. Edited by Kit Wedd. Grateful thanks to Judith Rodden for editorial advice. Produced by Catherine Peacock. The sources of illustrations are given adjacent to them together with any copyright where not belonging to the SPAB.