page: 1 version.8 july 2006 lesson 4: receiving process
Post on 21-Dec-2015
215 views
TRANSCRIPT

Page: 1
Version .8
July 2006
Lesson 4: Receiving Process

Page: 2
Version .8
July 2006
Lesson 4: Overview and Agenda
Lesson 4: Receiving ProcessOverview and Agenda
Lesson Overview
The Receiving Process involves entering all items that have been ordered through a PO and delivered to the university into the Banner system. When working with the Procurement module, in addition to adding the items you have received, you can add text messages, perform inquiries and adjust over-received items.
Lesson Agenda
Topic 1: PO Inquiry ProcessTopic 2: Entering a ReceiverTopic 3: Viewing Text Messages Topic 4: Adjusting an Over-Received PO
Lesson Agenda
Topic 1: PO Inquiry ProcessTopic 2: Entering a ReceiverTopic 3: Viewing Text Messages Topic 4: Adjusting an Over-Received PO
Page: 3
Version .8
July 2006
A query is the process of looking to see what information is already entered into the PO. The inquiry form allows you to inquire on items that have been received on a PO. You can inquire on vendor information, shipping information, number of items ordered, unit cost, description, FOAPAL, etc.
What you will learn in this topic:
• How to view an existing PO
Lesson 4: Receiving ProcessTopic 1: PO Inquiry Process
Discussion: PO Inquiry Process

Page: 4
Version .8
July 2006
1) Type FPIPURR into the Direct Access field on the Banner Main Menu and press Enter. The Purchase/Blanket Inquiry Form appears.
2) Type the PO number that you want to query.
3) Press Ctrl + Page Down to go to the next block.
1) Type FPIPURR into the Direct Access field on the Banner Main Menu and press Enter. The Purchase/Blanket Inquiry Form appears.
2) Type the PO number that you want to query.
3) Press Ctrl + Page Down to go to the next block.
Procedure: PO Inquiry Process
Lesson 4: Receiving ProcessTopic 1: PO Inquiry Process
2

Page: 5
Version .8
July 2006
4) Press Ctrl + Page Down to go to the next block.
Note: This screen will give you a look at all of the PO information.
4) Press Ctrl + Page Down to go to the next block.
Note: This screen will give you a look at all of the PO information.
Lesson 4: Receiving ProcessTopic 1: PO Inquiry Process
Procedure: PO Inquiry Process

Page: 6
Version .8
July 2006
5) Press Ctrl + Page Down to go to the next block.
Note: This screen will give you shipping or delivery information.
5) Press Ctrl + Page Down to go to the next block.
Note: This screen will give you shipping or delivery information.
Lesson 4: Receiving ProcessTopic 1: PO Inquiry Process
Procedure: PO Inquiry Process

Page: 7
Version .8
July 2006
6) Press Ctrl + Page Down to go to the next block.
Note: This screen will give you vendor information.
6) Press Ctrl + Page Down to go to the next block.
Note: This screen will give you vendor information.
Lesson 4: Receiving ProcessTopic 1: PO Inquiry Process
Procedure: PO Inquiry Process

Page: 8
Version .8
July 2006
6) Press Ctrl + Page Down to go to the next block.
7) Click on the Exit button.
Note: This screen will give you description, cost, quantity and FOAPAL information.
6) Press Ctrl + Page Down to go to the next block.
7) Click on the Exit button.
Note: This screen will give you description, cost, quantity and FOAPAL information.
Lesson 4: Receiving ProcessTopic 1: PO Inquiry Process
7
Procedure: PO Inquiry Process

Page: 9
Version .8
July 2006
Topic 1, On Your Own Activity: Perform an Inquiry
Steps Actions
1) Type “FPIPURR” in the Direct Access. Loads the Purchase/Blanket Order Inquiry form.
2) Type “P0000033” in the Purchase Order field. To enter the PO number you will be querying.
3) Click the Next Block button or press Ctrl + Page Down.
Next block moves you to the next screen giving you a look at the PO information.
4) Click the Next Block button or press Ctrl + Page Down.
Next block moves you to the next screen where you can see shipping or delivery information.
5) Click the Next Block button or press Ctrl + Page Down.
Next block moves you to the next screen where you can see vendor information.
6) Click the Next Block button or press Ctrl + Page Down.
Next block next moves you to the next screen where you can now see description, cost, quantity,etc.
7) Click the Next Block button or press Ctrl + Page Down. Next block moves you to the FOAPAL string.
8) Click on the red door button or Ctrl + Q.. Returns you to the Banner main menu screen.
Now it’s your turn!
Lesson 4: Receiving ProcessTopic 1: PO Inquiry Process

Page: 10
Version .8
July 2006
Topic 2: Entering a Receiver
Once an order has been received by the university, you will need to add the number of items received into Banner. You can also add a text message if a discrepancy or comment needs to be noted.
What you will learn in this topic:
• How to enter items that have been received• How to add a text message
Lesson 4: Receiving ProcessTopic 2: Entering a Receiver

Page: 11
Version .8
July 2006
Procedure: Entering a Receiver
1) Type FPARCVD into the Direct Access field on the Banner Main Menu and press Enter. The Receiving Goods Form appears.
2) Type NEXT in the Receiver Document Code.
3) Press Ctrl + Page Down to go to the next block.
1) Type FPARCVD into the Direct Access field on the Banner Main Menu and press Enter. The Receiving Goods Form appears.
2) Type NEXT in the Receiver Document Code.
3) Press Ctrl + Page Down to go to the next block.
Lesson 4: Receiving ProcessTopic 2: Entering a Receiver
2
Note: The Date Received and the Received By fields will populate.
Note: The Date Received and the Received By fields will populate.

Page: 12
Version .8
July 2006
4) Double click in the Receiving Method field. This is a mandatory field.
5) From the drop-down list of choices, select the appropriate delivery method.
6) Press Ctrl + Page Down to go to the next block.
Note: The Carrier field is not a mandatory field.
4) Double click in the Receiving Method field. This is a mandatory field.
5) From the drop-down list of choices, select the appropriate delivery method.
6) Press Ctrl + Page Down to go to the next block.
Note: The Carrier field is not a mandatory field.
Procedure: Entering a Receiver
Lesson 4: Receiving ProcessTopic 2: Entering a Receiver
4
5
Note: The Banner System will assign a Receiving Document Number.
Note: The Banner System will assign a Receiving Document Number.

Page: 13
Version .8
July 2006
7) In the Packing Slip field, enter the packing slip number. This is a mandatory field.
8) Press Ctrl + Page Down to go to the next block.
7) In the Packing Slip field, enter the packing slip number. This is a mandatory field.
8) Press Ctrl + Page Down to go to the next block.
Procedure: Entering a Receiver
Lesson 4: Receiving ProcessTopic 2: Entering a Receiver
Note: If no packing slip number can be found, you can use your initials and the date. The Bill of Lading field is not a required field.
Note: If no packing slip number can be found, you can use your initials and the date. The Bill of Lading field is not a required field.
7

Page: 14
Version .8
July 2006
9) In the Purchase Order field, enter in the PO number.
10) Tab to the next field.11) Click the Save button.12) From the Options menu, select
Select Purchase Order Items.
9) In the Purchase Order field, enter in the PO number.
10) Tab to the next field.11) Click the Save button.12) From the Options menu, select
Select Purchase Order Items.
Note: After you enter the PO number and tab to the next field, the Buyer and Vendor fields will populate.
Note: After you enter the PO number and tab to the next field, the Buyer and Vendor fields will populate.
Lesson 4: Receiving ProcessTopic 2: Entering a Receiver
Procedure: Entering a Receiver
9
1112
Page: 15
Version .8
July 2006
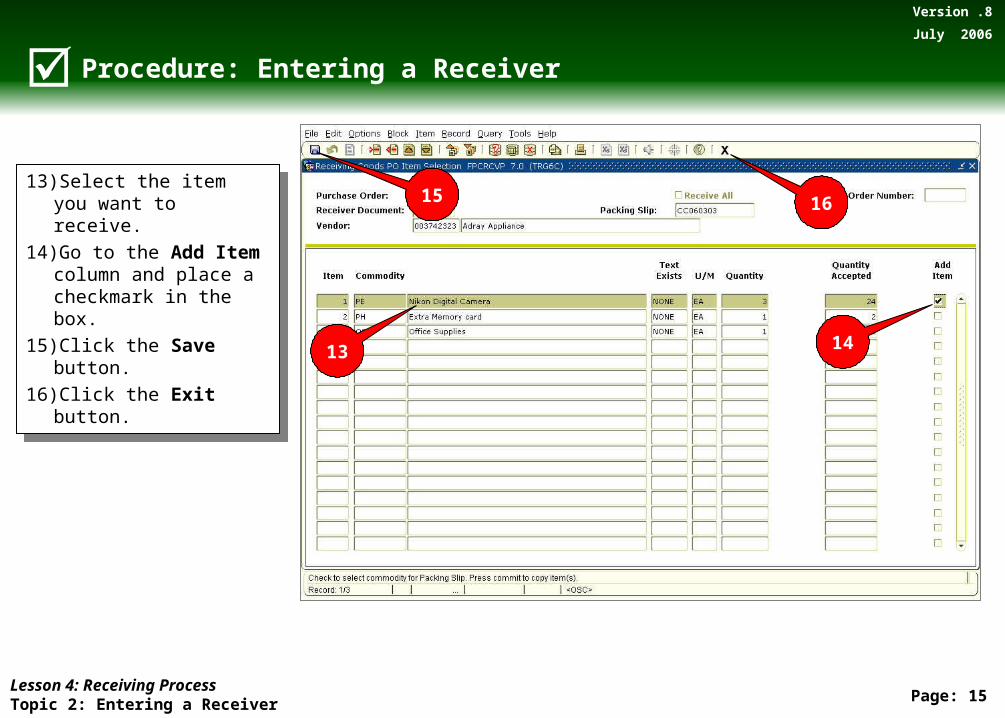
13) Select the item you want to receive.
14) Go to the Add Item column and place a checkmark in the box.
15) Click the Save button.16) Click the Exit button.
13) Select the item you want to receive.
14) Go to the Add Item column and place a checkmark in the box.
15) Click the Save button.16) Click the Exit button.
Lesson 4: Receiving ProcessTopic 2: Entering a Receiver
Procedure: Entering a Receiver
13 14
15 16

Page: 16
Version .8
July 2006
You return to the Receiving Goods Form.
18) Press Ctrl + Page Down to go to the next block.
Note: This will take you to the Commodity Form.
You return to the Receiving Goods Form.
18) Press Ctrl + Page Down to go to the next block.
Note: This will take you to the Commodity Form.
Procedure: Entering a Receiver
Lesson 4: Receiving ProcessTopic 2: Entering a Receiver

Page: 17
Version .8
July 2006
Lesson 4: Receiving ProcessTopic 2: Entering a Receiver
Procedure: Entering a Receiver
Note: On a standing PO, you will enter a dollar amount instead of the quantity. If there are more items to be received, use the scroll bar to move to the next commodity item.
Note: On a standing PO, you will enter a dollar amount instead of the quantity. If there are more items to be received, use the scroll bar to move to the next commodity item.
19) Click in the Current field and enter the quantity of items you are receiving.
Note: If you want to add a text message continue with the next step. Otherwise, go to step 27.
20) From the Options menu, select Header Information.
19) Click in the Current field and enter the quantity of items you are receiving.
Note: If you want to add a text message continue with the next step. Otherwise, go to step 27.
20) From the Options menu, select Header Information.
20
19
Page: 18
Version .8
July 2006
Procedure: Entering a Receiver
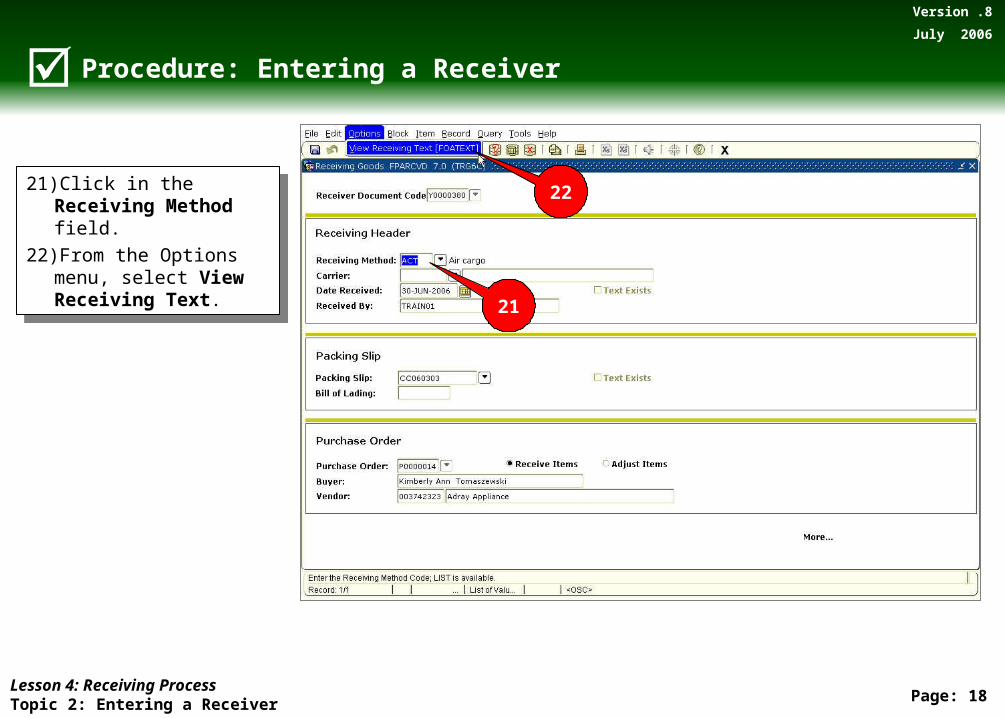
21) Click in the Receiving Method field.
22) From the Options menu, select View Receiving Text.
21) Click in the Receiving Method field.
22) From the Options menu, select View Receiving Text.
Lesson 4: Receiving ProcessTopic 2: Entering a Receiver
21
22

Page: 19
Version .8
July 2006
23) Type the text message.24) Click the Save button.25) Click the Exit button.26) Press Ctrl + Page Down three
times to go back to the Commodity form.
23) Type the text message.24) Click the Save button.25) Click the Exit button.26) Press Ctrl + Page Down three
times to go back to the Commodity form.
Lesson 4: Receiving ProcessTopic 2: Entering a Receiver
Procedure: Entering a Receiver
Note: When entering text, you need to click in the next line to advance forward or use the down arrow. The text does not wrap from line to line.
Note: When entering text, you need to click in the next line to advance forward or use the down arrow. The text does not wrap from line to line.
23
2425

Page: 20
Version .8
July 2006
27) Press Ctrl + Page Down to go to the next block.
27) Press Ctrl + Page Down to go to the next block.
Lesson 4: Receiving ProcessTopic 2: Entering a Receiver
Procedure: Entering a Receiver
Note: Before you exit, make note of the Document Code number for future reference.
Note: Before you exit, make note of the Document Code number for future reference.

Page: 21
Version .8
July 2006
28) Click the Complete button.29) Click the Exit button.
28) Click the Complete button.29) Click the Exit button.
Lesson 4: Receiving ProcessTopic 2: Entering a Receiver
Procedure: Entering a Receiver
28
29

Page: 22
Version .8
July 2006
Topic 2, On Your Own Activity: Enter a Receiver
Steps Actions
1) Type “FPARCVD” in the Direct Access. Loads the Receiving Goods form.
2) Type “NEXT” in the Receiver Document Code. Banner will assign a Receiving Document number.
3) Click the Next Block button or press Ctrl + Page Down.
Next block moves you to the Receiver Method field within the Receiver Header block.
4) Double click in the Receiving Method box and select the appropriate delivery method.
A pop up box appears that contains a list of delivery methods to choose from.
5) Click the Next Block button or press Ctrl + Page Down. Next block moves you to the Packing Slip field.
6) Type “CC063003” in the Packing Slip field. If no packing slip number can be found, use your initials and the date.
7) Click the Next Block button or press Ctrl + Page Down.
Next block moves you to the Purchase Order field.
8) Type “P0000017” in the Purchase Order field. This is the PO that you will be receiving items against.
9) Tab to the next field and click the Save button. The Buyer and Vendor field will populate and the information will be saved.
Now it’s your turn!
Lesson 4: Receiving ProcessTopic 2: Entering a Receiver

Page: 23
Version .8
July 2006
Topic 2, On Your Own Activity: Enter a Receiver (continued)
Steps Actions
10) From the Options menu, Select Purchase Order Items.
The Receiving Goods PO Selection form will appear.
11) Click the Next Block button or press Ctrl + Page Down.
Next block will move you to the first commodity line.
12) Place a checkmark in the Add Item column of the Nikon Digital Camera and click the Save button.
This is the commodity item that you are receiving.
13) Click the red door or Ctrl + Q, then select Yes when asked to close the form. This will return you to the Receiving Goods screen.
14) Click the Next Block button or press Ctrl + Page Down.
Next block will move you to the Commodity screen.
15) Enter “1” in the Current field. This is the quantity received for this commodity item.
16) From the Options menu, select Header Information.
This will take you to the Receiving Goods form.
17) Click in the Receiving Method field and from the Options menu, select View Receiving Text.
This will take you to the General Text Entry form.
Lesson 4: Receiving ProcessTopic 2: Entering a Receiver

Page: 24
Version .8
July 2006
Topic 2, On Your Own Activity: Enter a Receiver (continued)
Steps Actions
18) Type “this item included a camera case” and click the Save button. To add and save your text message.
19) Note the document code number for future reference and click the Exit button or Ctrl + Q.
This returns you to the Receiving Goods screen.
20) Click the Next Block button or press Ctrl + Page Down three times.
Next block will move you through the screen and take you to the Commodity screen.
21) Click the Next Block button or press Ctrl + Page Down.
This will bring up the Completion screen.
22) Click the Complete button. This will complete the Receiver and take you back to the Receiving Goods screen.
23) Click the Exit button or Ctrl + Q. Returns you to the Banner main menu.
Lesson 4: Receiving ProcessTopic 2: Entering a Receiver
Page: 25
Version .8
July 2006
Topic 3: Viewing Text Messages
If there is a message attached to a receiver in either the Receiver or Packing Slip block, you can view the contents of that message.
What you will learn in this topic:
• How to view a text message
Lesson 4: Receiving ProcessTopic 3: Viewing Text Messages

Page: 26
Version .8
July 2006
Procedure: Viewing Text Messages
Lesson 4: Receiving ProcessTopic 3: Viewing Text Messages
1) Type FOIDOCH in the Direct Access field on the Banner Main Menu and press Enter. The Document History Form will appear.
2) Type RCV in the Doc Type field.
3) Tab to the Doc Code field.4) Type the Doc Code number
that you want to query.
1) Type FOIDOCH in the Direct Access field on the Banner Main Menu and press Enter. The Document History Form will appear.
2) Type RCV in the Doc Type field.
3) Tab to the Doc Code field.4) Type the Doc Code number
that you want to query.
Note: You need to know the Doc Code number.
Note: You need to know the Doc Code number.
2 4

Page: 27
Version .8
July 2006
4) Click in the Receiver block and highlight the Doc Code number.
5) From the Options menu, select Receiver Information.
4) Click in the Receiver block and highlight the Doc Code number.
5) From the Options menu, select Receiver Information.
Lesson 4: Receiving ProcessTopic 3: Viewing Text Messages
Procedure: Viewing Text Messages
4
5

Page: 28
Version .8
July 2006
6) Press Ctrl + Page Down to go to the next block.
7) From the Options menu, select Receiver Text.
6) Press Ctrl + Page Down to go to the next block.
7) From the Options menu, select Receiver Text.
Note: If you have a text message in either the Receiver or Packing Slip block, you will see a “Y” in the Text Exists field.
Note: If you have a text message in either the Receiver or Packing Slip block, you will see a “Y” in the Text Exists field.
Procedure: Viewing Text Messages
Lesson 4: Receiving ProcessTopic 3: Viewing Text Messages
7

Page: 29
Version .8
July 2006
8) Click the Exit button three times.
8) Click the Exit button three times.
Procedure: Viewing Text Messages
Lesson 4: Receiving ProcessTopic 3: Viewing Text Messages
8

Page: 30
Version .8
July 2006
Topic 3, On Your Own Activity: View a Text Message
Steps Actions
1) Type “FOIDOCH” in the Direct Access field. Loads the Document History form
2) Type “RCV” in the Doc Type Code.
3) Type “Y0000046” in the Doc Code field. The Doc Code number you want to query
4) Click in the Receiver block and highlight the Doc Code number.
5) From the Options menu, select Receiver Information. Moves you to the Receiving Goods Query form
6) Click the Next Block button or press Ctrl + Page Down.
This populates the screen. If a “Y” appears in the Text Exists field, you have a message to view.
7) From the Options menu, select Receiver Text. This takes you to the General Text screen where you can read and view your message.
8) Click the red door button or Ctrl + Q three times. Returns you to the Banner main menu
Now it’s your turn!
Lesson 4: Receiving ProcessTopic 3: Viewing Text Messages

Page: 31
Version .8
July 2006
Topic 4: Adjusting an Over-Received PO
When an item has been entered into the system for more than was actually received, an adjustment is needed. The adjustment must be entered into the system as a reverse or negative transaction. The adjustment may not be used for an amount that is greater than the total received.
What you will learn in this topic:
• How to adjust items that have been over received
Lesson 4: Receiving ProcessTopic 4: Adjusting an Over-Received PO

Page: 32
Version .8
July 2006
1) Type FPARCVD in the Direct Access field on the Banner Main Menu and press Enter. The Receiving Goods Form will appear.
2) Type NEXT in the Receiver Document Code.
3) Press Ctrl + Page Down to go to the next block.
1) Type FPARCVD in the Direct Access field on the Banner Main Menu and press Enter. The Receiving Goods Form will appear.
2) Type NEXT in the Receiver Document Code.
3) Press Ctrl + Page Down to go to the next block.
Lesson 4: Receiving ProcessTopic 4: Adjusting an Over-Received PO
Procedure: Adjusting an Over-Received PO
2
Note: The Date Received and the Received By fields will populate.
Note: The Date Received and the Received By fields will populate.
Page: 33
Version .8
July 2006
Lesson 4: Receiving ProcessTopic 4: Adjusting an Over-Received PO
Procedure: Adjusting an Over-Received PO
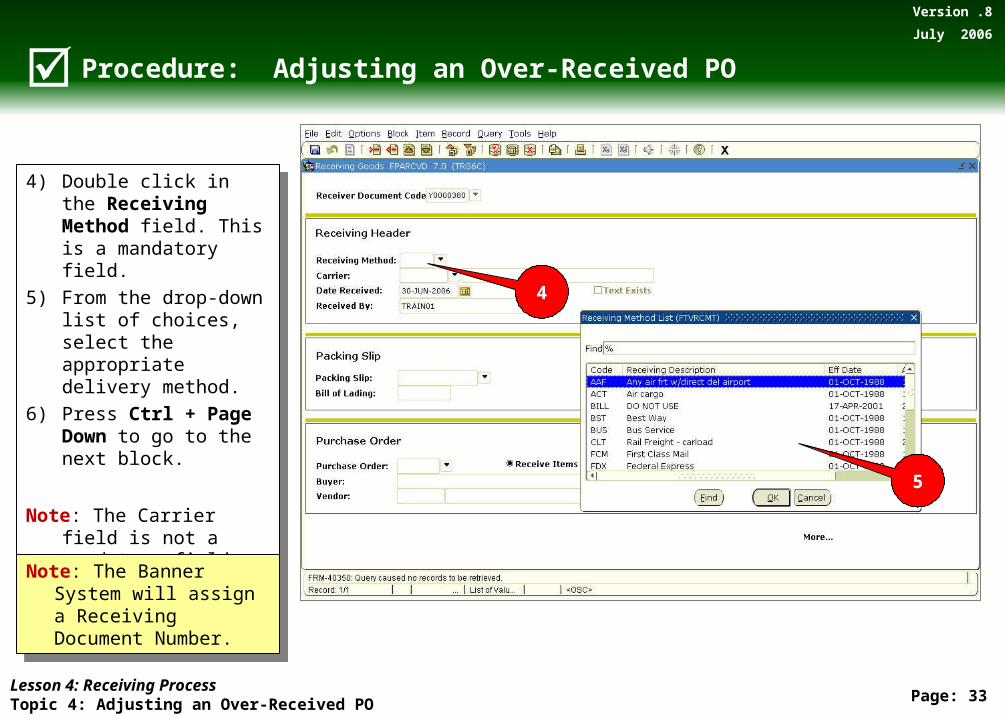
4) Double click in the Receiving Method field. This is a mandatory field.
5) From the drop-down list of choices, select the appropriate delivery method.
6) Press Ctrl + Page Down to go to the next block.
Note: The Carrier field is not a mandatory field.
4) Double click in the Receiving Method field. This is a mandatory field.
5) From the drop-down list of choices, select the appropriate delivery method.
6) Press Ctrl + Page Down to go to the next block.
Note: The Carrier field is not a mandatory field.
4
5
Note: The Banner System will assign a Receiving Document Number.
Note: The Banner System will assign a Receiving Document Number.

Page: 34
Version .8
July 2006
7) In the Packing Slip field, enter the packing slip number. This is a mandatory field.
8) Press Ctrl + Page Down to go to the next block.
7) In the Packing Slip field, enter the packing slip number. This is a mandatory field.
8) Press Ctrl + Page Down to go to the next block.
Lesson 4: Receiving ProcessTopic 4: Adjusting an Over-Received PO
Procedure: Adjusting an Over-Received PO
Note: If a packing slip number cannot be found, you can use your initials and the date. The Bill of Lading field is not a required field.
Note: If a packing slip number cannot be found, you can use your initials and the date. The Bill of Lading field is not a required field.
7

Page: 35
Version .8
July 2006
Note: This is the only time you can change the form from receive to adjust. If you move ahead, you cannot return and make a change.
Note: This is the only time you can change the form from receive to adjust. If you move ahead, you cannot return and make a change.
9) In the Purchase Order field, enter the PO number.
10) Click the radio button to change from Receive Items to Adjust Items.
11) Click the Save button.12) From the Options menu,
select Select Purchase Order Items.
9) In the Purchase Order field, enter the PO number.
10) Click the radio button to change from Receive Items to Adjust Items.
11) Click the Save button.12) From the Options menu,
select Select Purchase Order Items.
Lesson 4: Receiving ProcessTopic 4: Adjusting an Over-Received PO
Procedure: Adjusting an Over-Received PO
9
12
10
11
Page: 36
Version .8
July 2006
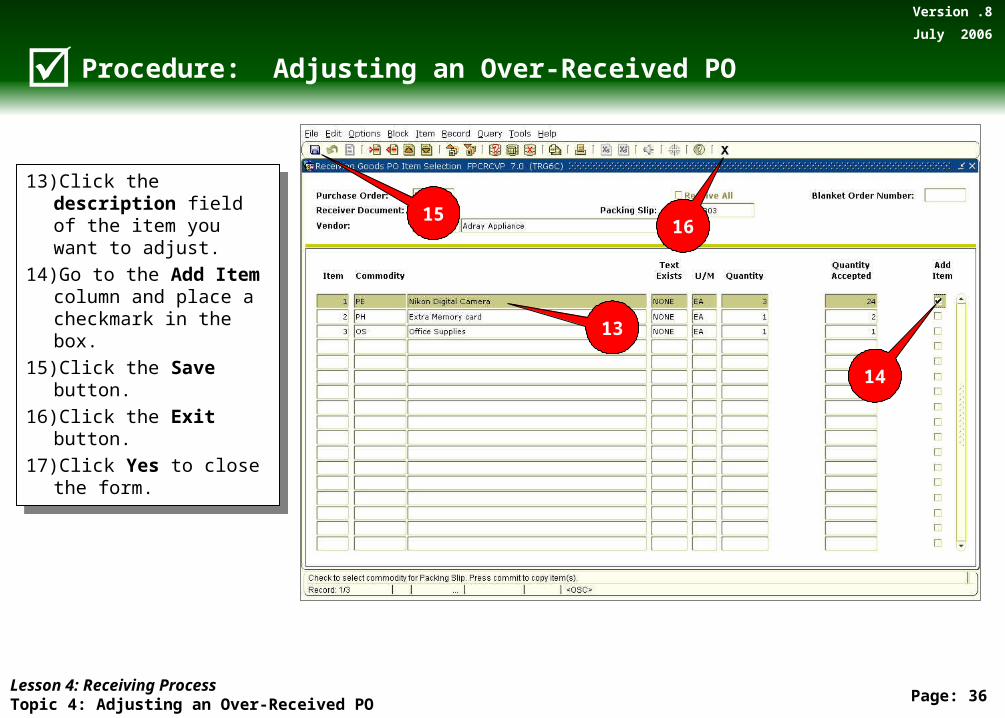
13) Click the description field of the item you want to adjust.
14) Go to the Add Item column and place a checkmark in the box.
15) Click the Save button.16) Click the Exit button.17) Click Yes to close the form.
13) Click the description field of the item you want to adjust.
14) Go to the Add Item column and place a checkmark in the box.
15) Click the Save button.16) Click the Exit button.17) Click Yes to close the form.
Procedure: Adjusting an Over-Received PO
Lesson 4: Receiving ProcessTopic 4: Adjusting an Over-Received PO
14
1615
13

Page: 37
Version .8
July 2006
You return to the Receiving Goods (FPARCVD) Form.
18) Press Ctrl + Page Down to go to the next block.
Note: This will take you to the Commodity Form on the next page.
You return to the Receiving Goods (FPARCVD) Form.
18) Press Ctrl + Page Down to go to the next block.
Note: This will take you to the Commodity Form on the next page.
Procedure: Adjusting an Over-Received PO
Lesson 4: Receiving ProcessTopic 4: Adjusting an Over-Received PO
Page: 38
Version .8
July 2006
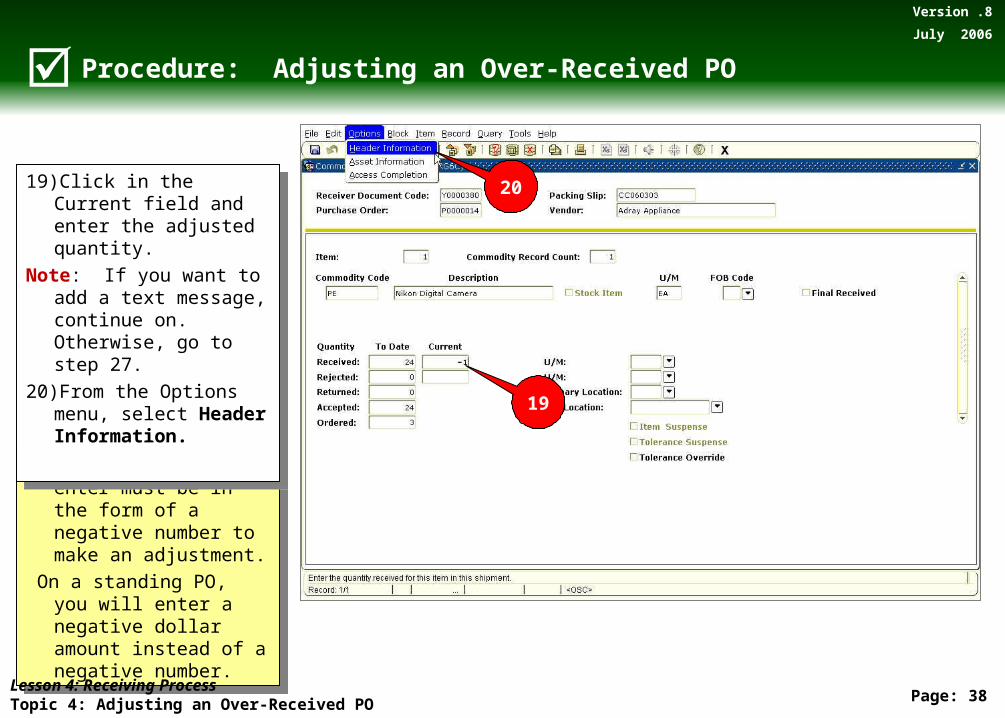
Note: The amount you enter must be in the form of a negative number to make an adjustment.
On a standing PO, you will enter a negative dollar amount instead of a negative number.
Note: The amount you enter must be in the form of a negative number to make an adjustment.
On a standing PO, you will enter a negative dollar amount instead of a negative number.
19) Click in the Current field and enter the adjusted quantity.
Note: If you want to add a text message, continue on. Otherwise, go to step 27.
20) From the Options menu, select Header Information.
19) Click in the Current field and enter the adjusted quantity.
Note: If you want to add a text message, continue on. Otherwise, go to step 27.
20) From the Options menu, select Header Information.
Procedure: Adjusting an Over-Received PO
Lesson 4: Receiving ProcessTopic 4: Adjusting an Over-Received PO
19
20

Page: 39
Version .8
July 2006
Lesson 4: Receiving ProcessTopic 4: Adjusting an Over-Received PO
Procedure: Adjusting an Over-Received PO
21) Click in the Receiving Method field.
22) From the Options menu, select View Receiving Text.
21) Click in the Receiving Method field.
22) From the Options menu, select View Receiving Text.
21
22

Page: 40
Version .8
July 2006
Lesson 4: Receiving ProcessTopic 4: Adjusting an Over-Received PO
Procedure: Adjusting an Over-Received PO
23) Type the text message.24) Click the Save button.25) Click the Exit button.26) Press Ctrl + Page Down three
times to go back to the Commodity form.
23) Type the text message.24) Click the Save button.25) Click the Exit button.26) Press Ctrl + Page Down three
times to go back to the Commodity form.
23
24 25

Page: 41
Version .8
July 2006
27) Press Ctrl + Page Down to go to the next block.
27) Press Ctrl + Page Down to go to the next block.
Lesson 4: Receiving ProcessTopic 4: Adjusting an Over-Received PO
Procedure: Adjusting an Over-Received PO
Note: Before you exit, make note of the Document Code number for future reference.
Note: Before you exit, make note of the Document Code number for future reference.
Page: 42
Version .8
July 2006
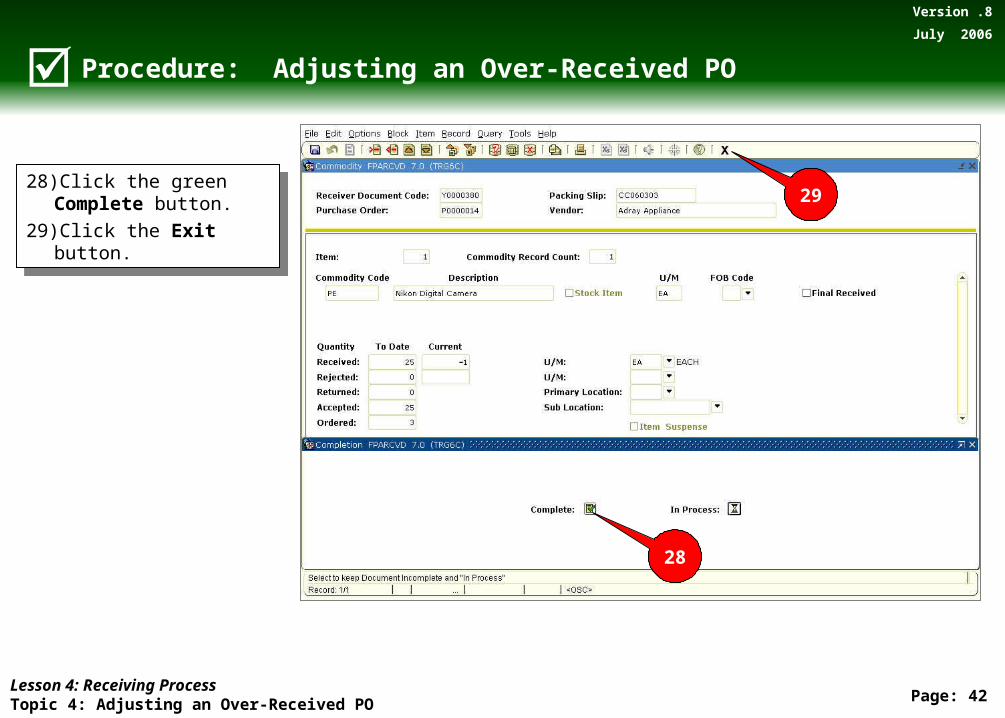
28) Click the green Complete button.
29) Click the Exit button.
28) Click the green Complete button.
29) Click the Exit button.
Lesson 4: Receiving ProcessTopic 4: Adjusting an Over-Received PO
Procedure: Adjusting an Over-Received PO
28
29

Page: 43
Version .8
July 2006
Topic 4, On Your Own Activity: Adjust an Over-Received PO
Steps Actions
1) Type “FPARCVD” in the Direct Access field. Loads the Receiving Goods form.
2) Type “NEXT” in the Receiver Document Code. Banner will assign a Receiving Document number.
3) Click the Next Block button or press Ctrl + Page Down.
Next block moves you to the Receiving Method field within the Receiving Header block.
4) Double click in the Receiving Method field and select the appropriate delivery method.
A pop up box appears that contains a list of delivery methods to choose from.
5) Click the Next Block button or press Ctrl + Page Down.
Next block moves you to the Packing Slip field.
6) Type “CC063003” in the Packing Slip field If no packing number can be found, use your initials and the date.
7) Click the Next Block button or press Ctrl + Page Down.
Next block moves you to the Purchase Order field.
8) Type “P0000017” in the Purchase Order field. This is the PO number that you will be adjusting.
9) Click on the “Adjust Items” radio button. This is the only time you can change the form from receive to adjust.
Now it’s your turn!
Lesson 4: Receiving ProcessTopic 4: Adjusting an Over-Received PO

Page: 44
Version .8
July 2006
Topic 4, On Your Own Activity: Adjust an Over-Received PO (continued)
Steps Actions
10) Tab down to the next field and click the Save button.
The Buyer and Vendor fields will populate and the information will be saved.
11) From the Options menu, Select Purchase Order Items.
The Receiving Goods PO Selection form will appear.
12) Click the Next Block button or press Ctrl + Page Down.
Next block will move you to the first commodity line.
13) Place a checkmark in the Add Item column of the Nikon Digital Camera and click the Save button.
This is the commodity that you are adjusting.
14) Click the red door or Ctrl + Q , then select “Yes” when asked to close the form. This will return you to the Receiving Goods screen.
15) Click the Next Block button or press Ctrl + Page Down.
Next block will move you to the Commodity screen.
16) Enter a “-1” in the Adjustment field. This is the adjusted quantity. Remember the amount must be in a negative number.
17) From the Options menu, select Header Information.
This will take you to the Receiving Goods screen.
Lesson 4: Receiving ProcessTopic 4: Adjusting an Over-Received PO
Page: 45
Version .8
July 2006
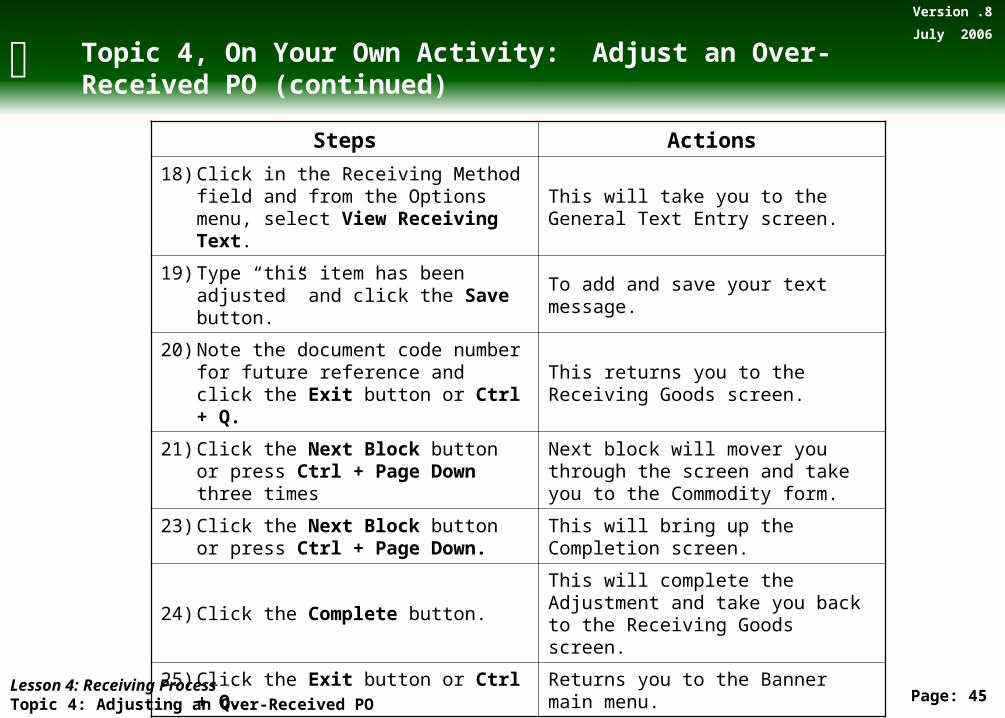
Topic 4, On Your Own Activity: Adjust an Over-Received PO (continued)
Steps Actions
18) Click in the Receiving Method field and from the Options menu, select View Receiving Text.
This will take you to the General Text Entry screen.
19) Type “this item has been adjusted” and click the Save button. To add and save your text message.
20) Note the document code number for future reference and click the Exit button or Ctrl + Q.
This returns you to the Receiving Goods screen.
21) Click the Next Block button or press Ctrl + Page Down three times
Next block will mover you through the screen and take you to the Commodity form.
23) Click the Next Block button or press Ctrl + Page Down.
This will bring up the Completion screen.
24) Click the Complete button. This will complete the Adjustment and take you back to the Receiving Goods screen.
25) Click the Exit button or Ctrl + Q. Returns you to the Banner main menu.
Lesson 4: Receiving ProcessTopic 4: Adjusting an Over-Received PO
Page: 46
Version .8
July 2006
Break time!