owner's manual - pc533
TRANSCRIPT
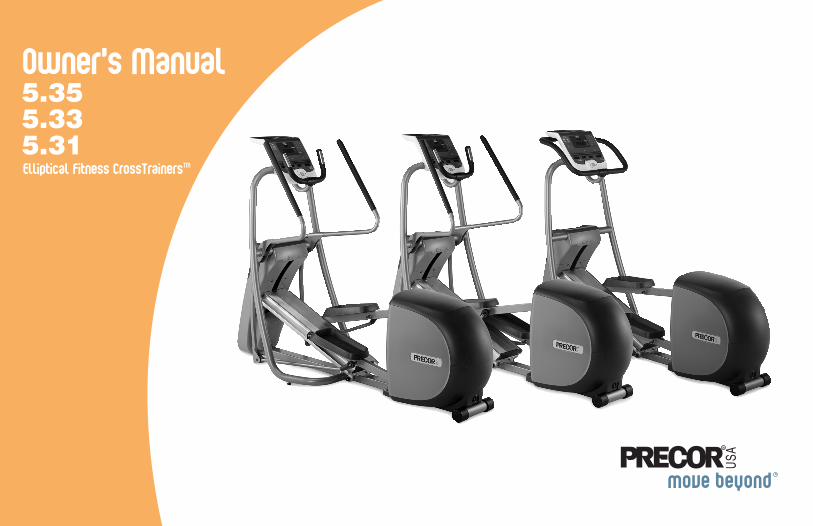
5.355.335.31
OM_5.3x-V_Cover.fm Page 1 Monday, July 30, 2007 3:08 PM

OM_5.3x-V_Cover.fm Page 2 Monday, July 30, 2007 3:08 PM

1
IMP
OR
TA
NT S
AF
ET
Y IN
ST
RU
CT
ION
S
ve the EFX unattended when it is plugged in. e EFX from the power source when it is not in e cleaning it, and before providing authorized
and operate the EFX on a solid, level surface. e EFX a few feet from walls or furniture. Keep round the EFX clear. he EFX in good working condition. Refer to enance section. Routinely check and make all fasteners are secure.FX only for its intended purpose as described nual. Do not use accessory attachments that commended by the manufacturer, as such ts may cause injuries.rate the unit if it is damaged, not working hen it has been dropped, or has been
in water. Return the EFX to a service center ation and repair. power cord and plug away from heated
erate the EFX where aerosol (spray) products used or where oxygen is being administered.
Owner’s Manual: Important Safety Instructions
Important Safety InstructionsWhen using the EFX, always take basic precautions, including the following:
• Read all instructions before using the EFX. These instructions are written for your safety and to protect the unit.
• Before beginning any fitness program, see your physician for a complete physical examination.Il est conseillé de subir un examen médical complet avant d’entreprendre tout programme d’exercise. Si vous avez des étourdissements ou des faiblesses, arrêtez les exercices immédiatement.
To reduce the risk of electrical shock always unplug the EFX from the electrical outlet immediately after using and before cleaning.
To reduce the risk of burns, fire, electric shock, or injury, take the following precautions:
• Do not allow children or those unfamiliar with its operation on or near the EFX. Do not leave children unsupervised around the unit.
• Never leaUnplug thuse, beforservice.
• AssembleLocate ththe area a
• Maintain tthe Maintsure that
• Use the Ein this maare not reattachmen
• Never opeproperly, wimmersedfor examin
• Keep the surfaces.
• Do not opare being
DANGER
WARNING

2
IMP
OR
TA
NT S
AF
ET
Y IN
ST
RU
CT
ION
S body and head facing forward. Never attempt und on the EFX.
ce your hands or feet in the path of the roller se injury may occur to you or damage may
he equipment.e the locking pin to secure the foot pedals EFX is not in use.ck the unit. Do not stand on the handrail(s), nsole, or covers.erexert yourself or work to exhaustion. If you ain or abnormal symptoms, stop your workout ly and consult your physician. EFX is not in use, disconnect the unit by e power switch to the Off position, and then e power plug from the wall outlet.
provaled with the ETL-c logo, the unit has nd conforms to the requirements of
-335-1/3-04, EN 60335-1: 2002 Safety of d Similar Electrical Appliances.
Owner’s Manual: Important Safety Instructions
• Do not use outdoors.• Do not attempt to service the EFX yourself except to
follow the maintenance instructions found in this manual. • Never drop or insert objects into any opening. Keep
hands away from moving parts.• Keep all electrical components, such as the power
cord and power switch, away from liquids to prevent shock.
• Do not hang anything on the handrails, moving handlebars, or covers. Place liquids, magazines, and books in the appropriate receptacles.
The EFX must be connected to a properly grounded outlet. See Grounding Instructions.
• Wear proper exercise clothing and shoes for your workout and avoid loose clothing. Do not wear shoes with heels or leather soles. Check the soles of your shoes and remove any dirt and embedded stones. Tie long hair back.
• Use care when getting on or off the EFX. Use the stationary handrail for stability.
• For safety, hold onto a stationary handrail while using the EFX.
• Keep yourto turn aro
• Never plaarm becauoccur to t
• Always uswhen the
• Do not rodisplay co
• Do not ovfeel any pimmediate
• When theturning thremove th
Safety ApWhen identifibeen tested aCAN/CSA-EHousehold an
DANGER

3
IMP
OR
TA
NT S
AF
ET
Y IN
ST
RU
CT
ION
S
Designated for U.S. Marketsg plug on the EFX looks like the plug shown in he power outlet must have the same as the plug. No adapter should be used with
0-volt power plug
Owner’s Manual: Important Safety Instructions
Grounding InstructionsThe EFX must be grounded. If the unit malfunctions or breaks down, grounding provides a path of least resistance for electric current, which reduces the risk of electrical shock. The unit is equipped with a power cord having an equipment-grounding conductor and a grounding plug. The plug must be inserted into an outlet that is properly installed and grounded in accordance with all local codes and ordinances. Failure to properly ground the EFX could void the Precor Limited Warranty.
Improper connection of the equipment-grounding conductor can result in a risk of electric shock. Check with a qualified electrician or service person if you are in doubt as to whether the unit is properly grounded. Do not modify the plug provided with the EFX. If it does not fit the outlet, get a proper outlet installed by a qualified electrician.
120 V UnitsThe groundinDiagram 1. Tconfigurationthis product.
Diagram 1: 12
DANGER

4
IMP
OR
TA
NT S
AF
ET
Y IN
ST
RU
CT
ION
S
epartment of Communicationsparatus does not exceed the Class B limits for
missions from digital apparatus set out in the rence Regulations of the Canadian f Communications.
pareil numérique n’émet pas de bruits ues dépassant les limites applicables aux ériques de la class B prescrites dans le r le brouillage radioélectrique édicté par le Communications du Canada.
: Haute Tension
z avant de réparer
Owner’s Manual: Important Safety Instructions
Radio Frequency Interference (RFI)
Federal Communications Commission, Part 15The EFX has been tested and found to comply with the limits for a Class B digital device, pursuant to Part 15 of the FCC Rules. These limits are designed to provide reasonable protection against harmful interference in a residential installation. The EFX generates, uses, and can radiate radio frequency energy and, if not installed and used in accordance with the owner’s manual instructions, may cause harmful interference to radio communications.
Per FCC rules, changes or modifications not expressly approved by Precor could void the user’s authority to operate the equipment.
Canadian DThis digital apradio noise eRadio InterfeDepartment o
Le présent apradioéélectriqappareils numRèglement suministére des
ATTENTION
DébrancheWARNING

5
IMP
OR
TA
NT S
AF
ET
Y IN
ST
RU
CT
ION
S
Serviceot attempt to service the EFX except for tasks as described in this manual. The EFX tain any user-serviceable parts that require or information about product operation or he Precor web site at www.precor.com.
eed more information regarding customer ers or a list of Precor authorized service
the Precor web site at www.precor.com/corp/
erence, write the model, serial number, and ase for your unit in the space provided. The is printed on a label located beneath the acle (Diagram 2).
cation of serial number
____ Serial #: _______________________
ed: _________________________
Serial number label
Owner’s Manual: Important Safety Instructions
European ApplicationsThis product conforms to the requirements of the European Council Directive 2004/108/EC, Electromagnetic Compatibility and has been tested to the following standards:
• EN55022, Limits & Methods of Measurement of Radio Interference, Information Technology Equipment.
• EN50024, Immunity of Information Technology Equipment
This product is compliant to 2002/95/EC, Restriction of Hazardous Substances Directive.
This product also conforms to the requirements of the European Council Directive 2006/95/EC, Low Voltage Directive and has been tested to the following standard:
• IEC 335-1, Safety of Household and similar Electrical Appliances.
ObtainingYou should nmaintenance does not conlubrication. Fservice, see t
Should you nsupport numbcenters, visit contact.
For future refdate of purchserial numberpower recept
Diagram 2: Lo
Model #: ___
Date purchas

6
y Console ..............................................................19e Information about the Upper Display .................. 20e Information about the Lower Display .................. 21pads ............................................................................... 23
dentification ..........................................................28ing a User ..................................................................... 29ating User Information on the EFX5.35 ................. 30ating User Information on EFX5.31 or EFX5.33 .................................................. 31nging the User Name and ring Workout Statistics ............................................ 32
ut Options ............................................................33osing QUICKSTART ................................................. 34cting a Program .......................................................... 35cting a User Key ......................................................... 36ling Down After a Workout ...................................... 37sing During a Workout or the l-Down Period ............................................................. 38ing a Workout .............................................................. 38
Owner’s Manual: Table of Contents
Table of Contents
Important Safety Instructions .............................1Safety Approval .....................................................................2Grounding Instructions ........................................................3Radio Frequency Interference (RFI) .................................4European Applications ........................................................5Obtaining Service .................................................................5
EFX Features .....................................................................9The Locking Pin .....................................................................9Converting Handlebar Positions .................................... 10Using the Stationary Handrail ......................................... 11Moving Handlebars Support the Total Body Workout .......................................................... 11Turning the Unit On and Off ............................................ 11Weight Limit ........................................................................ 11Location ............................................................................... 12
Heart Rate Features ...................................................... 13Important Use and Safety Information .......................... 13Using the Heart Rate Touch-Sensitive Handrail Grips ..................................... 16Using SmartRate ................................................................ 16Exercise to Your Target Heart Rate ............................... 18Heart Rate Analysis ........................................................... 18
DisplaMorMorKey
User IAddUpdUpdthe ChaClea
WorkoChoSeleSeleCooPauCooEnd
7
enance ....................................................................56ection ............................................................................ 56ning the Equipment ................................................... 56ing the Chest Strap ................................................... 57g-Term Storage ............................................................ 57
r Residential Equipment d Warranty.................................................. 58
Owner’s Manual: Table of Contents
Programs .......................................................................... 39Choosing a Program ......................................................... 39Changing Programs in Mid-session .............................. 39Program Tips ...................................................................... 40Manual Program ................................................................. 41Interval Program ................................................................. 41Aerobic Endurance Program ........................................... 42Hill Climb Program ............................................................ 42Heart Rate Programs ........................................................ 43Fitness Test Program ........................................................ 44Weight Loss Programs ..................................................... 46Gluteal Program ................................................................. 47CrossTrainer Program ...................................................... 47
Advanced Programming and Troubleshooting ..... 48Advanced Programming Tips .......................................... 48Changing EFX Settings .................................................... 49Informational Displays ....................................................... 51Troubleshooting Error Codes ......................................... 54Troubleshooting Heart Rate ............................................ 55
MaintInspCleaStorLon
PrecoLimite

8
Owner’s Manual: Table of ContentsNotes:

9
ing, use the locking pin to secure the foot
emove locking pin before exercising
tore the locking pin under the ramp
Roller arm
ion Ramp
Owner’s Manual: EFX Features
EFX Features
The EFX is equipped with certain items that, when used properly, help sustain a safe and enjoyable workout. These items include:
• Locking pin location• Convertible handlebars (EFX5.35. only)• Stationary handrails with heart rate feature (EFX5.35 and
EFX 5.33 only)• Moving handlebars (EFX5.35 and EFX5.33 only)• Power switch location
The Locking PinCAUTION: Always use the locking pin to secure the foot pedals when the EFX is not in use.
The locking pin secures the foot pedals to keep them from traveling up or down the ramp. Before beginning your workout, pull firmly on the pin to slide it out of the roller arm. Refer to Diagram 3. A lanyard attaches the locking pin to the ramp.
Store the locking pin underneath the ramp once it is removed from the roller arm. Refer to Diagram 4.
After exercispedals.
Diagram 3: R
Diagram 4: S
Locking pin
Lanyard
Storage locat
10
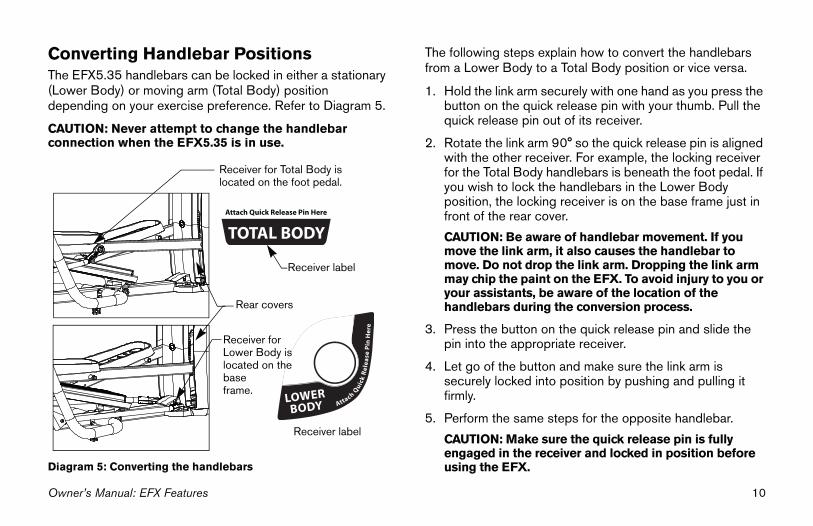
steps explain how to convert the handlebars Body to a Total Body position or vice versa.
nk arm securely with one hand as you press the the quick release pin with your thumb. Pull the se pin out of its receiver.
link arm 90° so the quick release pin is aligned ther receiver. For example, the locking receiver al Body handlebars is beneath the foot pedal. If o lock the handlebars in the Lower Body he locking receiver is on the base frame just in rear cover.
: Be aware of handlebar movement. If you link arm, it also causes the handlebar to not drop the link arm. Dropping the link arm he paint on the EFX. To avoid injury to you or tants, be aware of the location of the
rs during the conversion process.
button on the quick release pin and slide the e appropriate receiver.
he button and make sure the link arm is cked into position by pushing and pulling it
e same steps for the opposite handlebar.
: Make sure the quick release pin is fully n the receiver and locked in position before EFX.
Owner’s Manual: EFX Features
Converting Handlebar PositionsThe EFX5.35 handlebars can be locked in either a stationary (Lower Body) or moving arm (Total Body) position depending on your exercise preference. Refer to Diagram 5.
CAUTION: Never attempt to change the handlebar connection when the EFX5.35 is in use.
Diagram 5: Converting the handlebars
The followingfrom a Lower
1. Hold the libutton on quick relea
2. Rotate thewith the ofor the Totyou wish tposition, tfront of the
CAUTIONmove the move. Domay chip tyour assishandleba
3. Press the pin into th
4. Let go of tsecurely lofirmly.
5. Perform th
CAUTIONengaged iusing the
Attach Quic
k R
ele
ase
Pin
He
re
LOWERBODY
Receiver for Total Body is located on the foot pedal.
Receiver for Lower Body is located on the base frame.
Rear covers
Receiver label
Receiver label
11
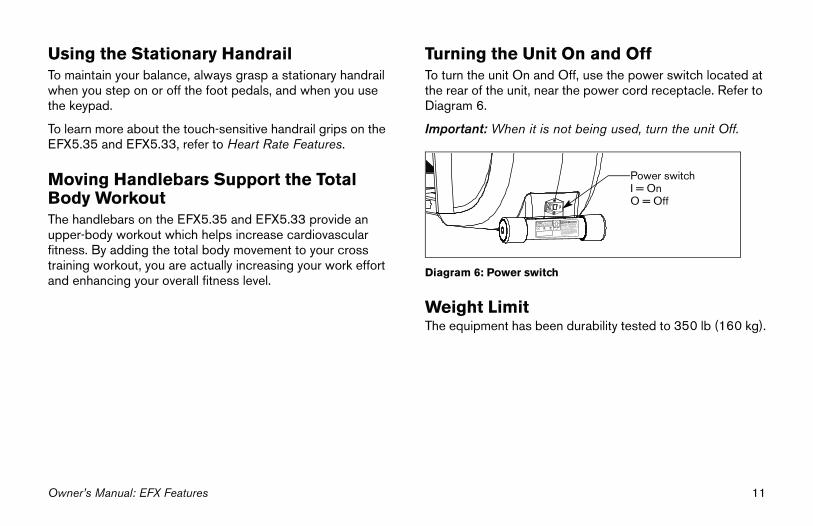
the Unit On and Offnit On and Off, use the power switch located at e unit, near the power cord receptacle. Refer to
When it is not being used, turn the unit Off.
ower switch
imitent has been durability tested to 350 lb (160 kg).
Power switchI = OnO = Off
Owner’s Manual: EFX Features
Using the Stationary HandrailTo maintain your balance, always grasp a stationary handrail when you step on or off the foot pedals, and when you use the keypad.
To learn more about the touch-sensitive handrail grips on the EFX5.35 and EFX5.33, refer to Heart Rate Features.
Moving Handlebars Support the Total Body WorkoutThe handlebars on the EFX5.35 and EFX5.33 provide an upper-body workout which helps increase cardiovascular fitness. By adding the total body movement to your cross training workout, you are actually increasing your work effort and enhancing your overall fitness level.
Turning To turn the uthe rear of thDiagram 6.
Important:
Diagram 6: P
Weight LThe equipm
12
d EFX5.35
handlebars in the Lower Body position. Refer to s on the base of the EFX and to the instructions Converting Handlebar Positions.
e a comfortable height for lifting and have your grasp one handlebar while you grasp the one.
FX and roll it on the rear rollers to the desired
Owner’s Manual: EFX Features
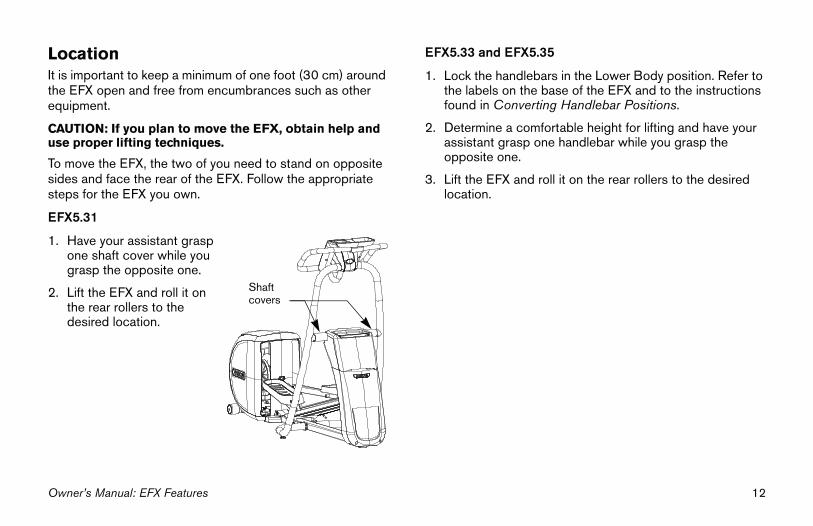
LocationIt is important to keep a minimum of one foot (30 cm) around the EFX open and free from encumbrances such as other equipment.
CAUTION: If you plan to move the EFX, obtain help and use proper lifting techniques.
To move the EFX, the two of you need to stand on opposite sides and face the rear of the EFX. Follow the appropriate steps for the EFX you own.
EFX5.31
1. Have your assistant grasp one shaft cover while you grasp the opposite one.
2. Lift the EFX and roll it on the rear rollers to the desired location.
EFX5.33 an
1. Lock thethe labelfound in
2. Determinassistantopposite
3. Lift the Elocation.
Shaft covers
13
t Use and Safety Informationlowing before using the heart rate or SmartRate
your physician before engaging in any vigorous Do not use the heart rate programs until d by your physician.ur heart rate and your physician-recommended e target zone. Individual heart rates vary g to several physiological factors and may not nd directly with Diagram 7.
Owner’s Manual: Heart Rate Features
Heart Rate Features
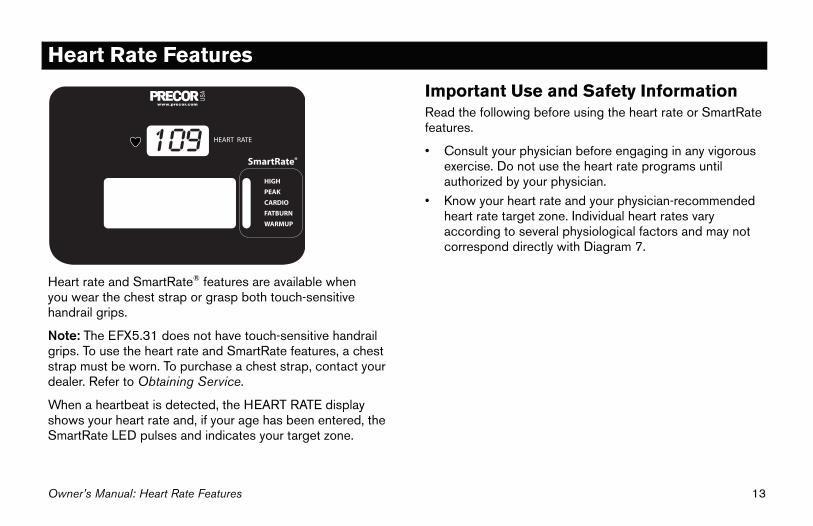
Heart rate and SmartRate® features are available when you wear the chest strap or grasp both touch-sensitive handrail grips.
Note: The EFX5.31 does not have touch-sensitive handrail grips. To use the heart rate and SmartRate features, a chest strap must be worn. To purchase a chest strap, contact your dealer. Refer to Obtaining Service.
When a heartbeat is detected, the HEART RATE display shows your heart rate and, if your age has been entered, the SmartRate LED pulses and indicates your target zone.
ImportanRead the folfeatures.
• Consult exercise.authorize
• Know yoheart rataccordincorrespo
SmartRate109
14
put on the chest strap, face the display console seconds. This allows the receiver in the console ize the signal from the chest strap.
ears in the display, the EFX is detecting a signal, ot yet determined your heart rate. Make sure the ap is positioned properly around your chest and our skin.fer to use the touch-sensitive handrail grips on .35 or EFX5.33, grasp both grips and wait five
conds. Make sure both hands are moist.
en a signal is detected, the heart rate icon d a number appears in the HEART RATE d indicates your heart rate.
ce forward on the EFX and use the stationary for balance. Keep upper body movement to a .
Owner’s Manual: Heart Rate Features
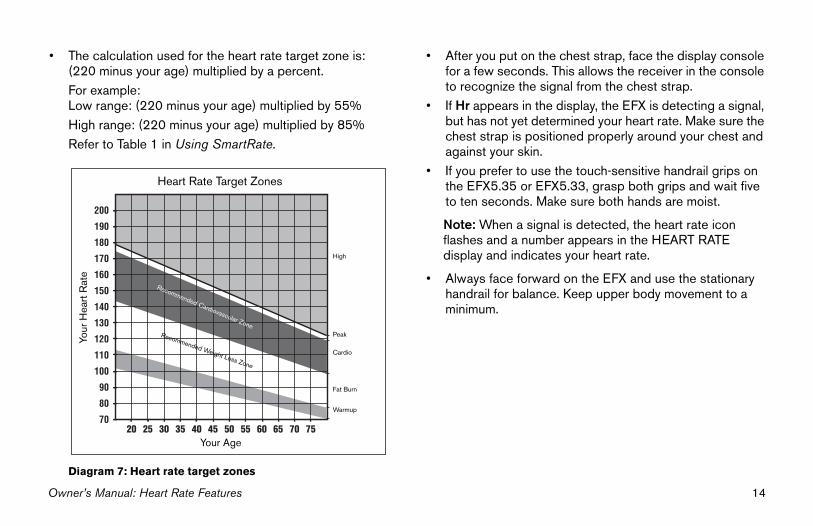
• The calculation used for the heart rate target zone is:(220 minus your age) multiplied by a percent.For example:Low range: (220 minus your age) multiplied by 55%High range: (220 minus your age) multiplied by 85%Refer to Table 1 in Using SmartRate.
Diagram 7: Heart rate target zones
• After youfor a fewto recogn
• If Hr appbut has nchest stragainst y
• If you prethe EFX5to ten se
Note: Whflashes andisplay an
• Always fahandrail minimum
20 25 30 35 40 45 50 55 60 65 70 7570
80
90
100
120
130
140
150
160
170
180
190
200
110
Heart Rate Target Zones
Your Age
Your
Hea
rt R
ate
High
Cardio
Warmup
Recommended Cardiovascular ZoneRecommended Weight Loss Zone
Peak
Fat Burn
15
strap and fasten it around your chest. The strap el snug, not restrictive. Refer to Diagram 9.
9: Adjust chest strap
re that the chest strap is right side up, lies lly across your chest, and is centered in the f your chest. Refer to Diagram 10.
10: Fasten chest strap
t on the chest strap, face the display console for ds. This allows the receiver in the console to e signal from the chest strap.
Owner’s Manual: Heart Rate Features
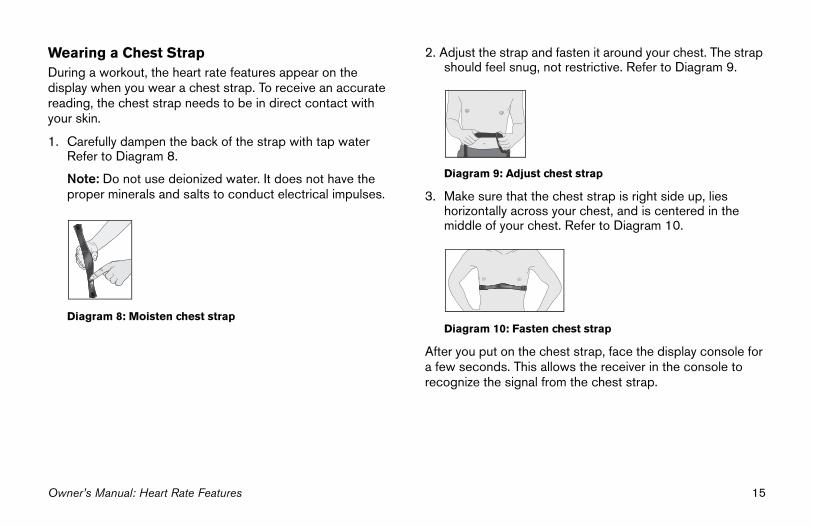
Wearing a Chest StrapDuring a workout, the heart rate features appear on the display when you wear a chest strap. To receive an accurate reading, the chest strap needs to be in direct contact with your skin.
1. Carefully dampen the back of the strap with tap water Refer to Diagram 8.
Note: Do not use deionized water. It does not have the proper minerals and salts to conduct electrical impulses.
Diagram 8: Moisten chest strap
2. Adjust theshould fe
Diagram
3. Make suhorizontamiddle o
Diagram
After you pua few seconrecognize th
16
concentration of salts in a person's perspiration ugh conductivity to transmit a signal to the
de the display console. However, some people, body chemistry or erratic heart beats cannot use nsitive heart rate feature on the EFX. A chest
rovide better results.
While exercising, do not grasp the touch-ndrail grips and wear the chest strap at the he touch-sensitive handrail grips override the the chest strap transmitter. If used together, readings may occur.
artRateate feature helps you monitor and maintain your the target zone best suited to your specific LEDs may light during a workout. When the EFX art rate, a single LED blinks and indicates the ur heart rate is in.
To use the SmartRate feature, you must choose nd enter your age during the setup phase of e session.
Owner’s Manual: Heart Rate Features
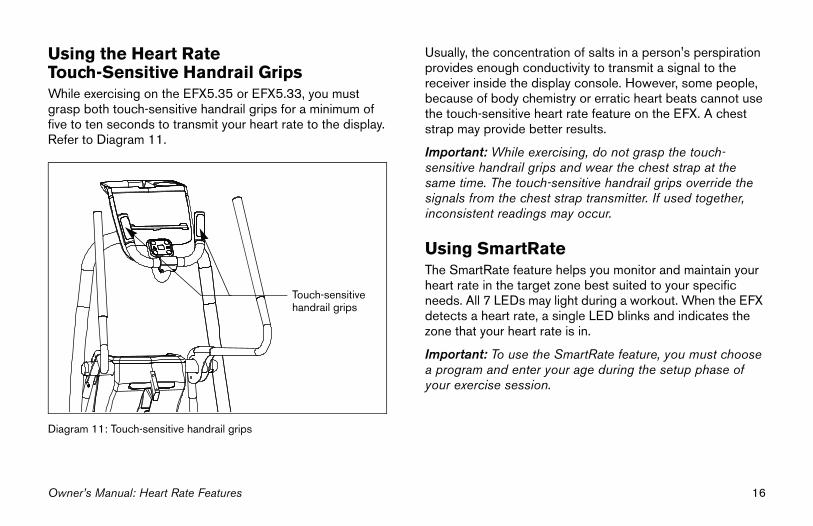
Using the Heart Rate Touch-Sensitive Handrail GripsWhile exercising on the EFX5.35 or EFX5.33, you must grasp both touch-sensitive handrail grips for a minimum of five to ten seconds to transmit your heart rate to the display. Refer to Diagram 11.
Diagram 11: Touch-sensitive handrail grips
Usually, the provides enoreceiver insibecause of the touch-sestrap may p
Important: sensitive hasame time. Tsignals frominconsistent
Using SmThe SmartRheart rate inneeds. All 7detects a hezone that yo
Important: a program ayour exercis
Touch-sensitive handrail grips
17
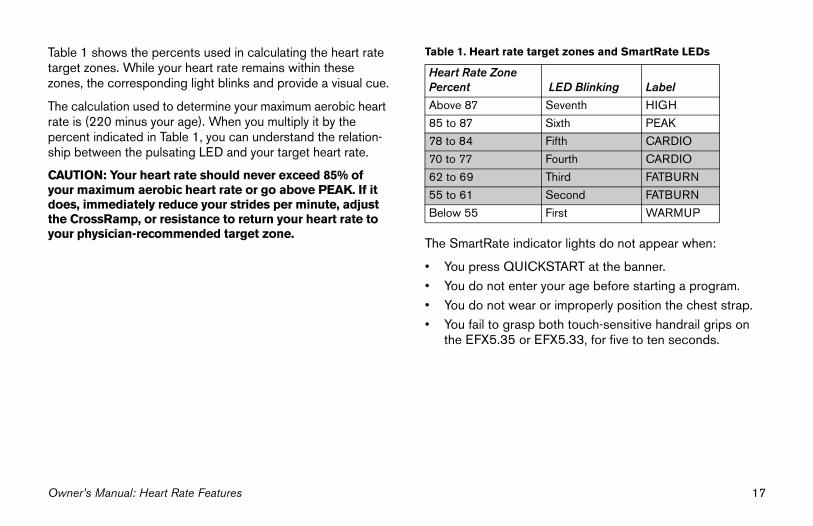
rt rate target zones and SmartRate LEDs
ate indicator lights do not appear when:
s QUICKSTART at the banner.ot enter your age before starting a program.ot wear or improperly position the chest strap.o grasp both touch-sensitive handrail grips on .35 or EFX5.33, for five to ten seconds.
one LED Blinking Label
Seventh HIGH
Sixth PEAK
Fifth CARDIO
Fourth CARDIO
Third FATBURN
Second FATBURN
First WARMUP
Owner’s Manual: Heart Rate Features
Table 1 shows the percents used in calculating the heart rate target zones. While your heart rate remains within these zones, the corresponding light blinks and provide a visual cue.
The calculation used to determine your maximum aerobic heart rate is (220 minus your age). When you multiply it by the percent indicated in Table 1, you can understand the relation-ship between the pulsating LED and your target heart rate.
CAUTION: Your heart rate should never exceed 85% of your maximum aerobic heart rate or go above PEAK. If it does, immediately reduce your strides per minute, adjust the CrossRamp, or resistance to return your heart rate to your physician-recommended target zone.
Table 1. Hea
The SmartR
• You pres• You do n• You do n• You fail t
the EFX5
Heart Rate ZPercent
Above 87
85 to 87
78 to 84
70 to 77
62 to 69
55 to 61
Below 55

18
te Analysisou complete a program using the chest strap or ive handrail grips, the EFX provides a heart rate r the workout summary.
e heart rate appears followed by the maximum hieved during your workout. A third display
ou entered your age, and indicates the amount of art rate remained between the target zones
te analysis is based on how often your heart rate eived while exercising. If you use the chest strap, heart rate will be more accurate than if you grasp the touch-sensitive handrail grips.
Owner’s Manual: Heart Rate Features
Exercise to Your Target Heart RateA dedicated window displays your heart rate while exercising. To view your heart rate (beats per minute) on the display, either wear a chest strap or grasp both touch-sensitive handrail grips.
Note: The EFX5.31 does not have the touch-sensitive handrail grips so you must purchase the optional chest strap transmitter to monitor your heart rate.
The Precor web site (www.precor.com) has several suggestions for workouts with varying levels of intensity. It provides many workout details that include the appropriate target heart rate.
The EFX includes a program that lets you exercise based on a specified target heart rate. As you exercise, the Basic HRC Program monitors your heart rate and automatically maintains it within a few beats per minute (bpm) of your selected target.
To use this program, press the PROGRAMS - HEART RATE key. For more information, refer to Programs.
Heart RaEvery time ytouch-sensitanalysis afte
Your averagheart rate acappears, if ytime your heshown.
The heart rasignal is recthe averageoccasionally
19
pyright 2007 Precor Incorporated en
DATA
TOTAL STRIDES
STRIDES/min
VERTICAL GAIN
SET
Before beginning any fitness , see your physician for a thorough physical
ation. Seek advice from your physician to learn the eart rate appropriate for your fitness level. Do not allow or those unfamiliar with its operation on or near this
ent. Read the product owner's manual or consult a d instructor before operating this equipment. Improper his equipment can result in serious injury. If you feel intness, or dizziness, stop exercising immediately.
SmartRate display: LEDs light in this column when the SmartRate feature is activated. Follow the LEDs to monitor your heart rate and maintain it in your target zone.
Number keys: During an exercise session, use the number keys to answer prompts and update information.
Lower display: While you exercise, six sets of numbers show information about your session. Refer to More Information about the Lower Display
SISTANCE arrow keys: Use the arrow keys djust the resistance.
OK and Navigational arrow keys: Use the OK key to confirm responses to specific prompts. The up and down arrow keys present the available selections and affect what appears on the display. Refer to the Navigational Keypad.
RESET key: Press this key to end your session and view your workout summary. Pressing the key a second time, causes the display to reset to the Precor banner.
Owner’
DispUpper dPrecor bprogramprogramblinkingindicate
PROGRexercisekey to veach cadescrip
Selectithroughyou canduring yappear You canright se
User 1—Precor exercisestored f
s Manual: Display Console
lay Console
SmartRate
Co
TIME ELAPSED
TIME REMAINING
CALORIES
MANUAL
HEARTRATE
INTERVAL WEIGHT LOSS
VARIETY PERFORMANCE
CROSSRAMP RESISTANCE
RE
programexamintarget hchildrenequipmqualifieuse of tpain, fa
QUICKSTART
isplay: Initially shows the anner. It changes to the profile when you select a or press QUICKSTART. A column in the profile s your position.
AMS keypad: To begin an session, press a PROGRAMS iew a menu of programs within tegory. For program tions, refer to Programs.
on key: Press the key to move the information in the column, so choose what you want to display our session. Indicator lights
next to the item that is displayed. perform the same function with the lection key.
2: Press a USER key at the banner to personalize your experience. The information is or future exercise sessions.
REto a
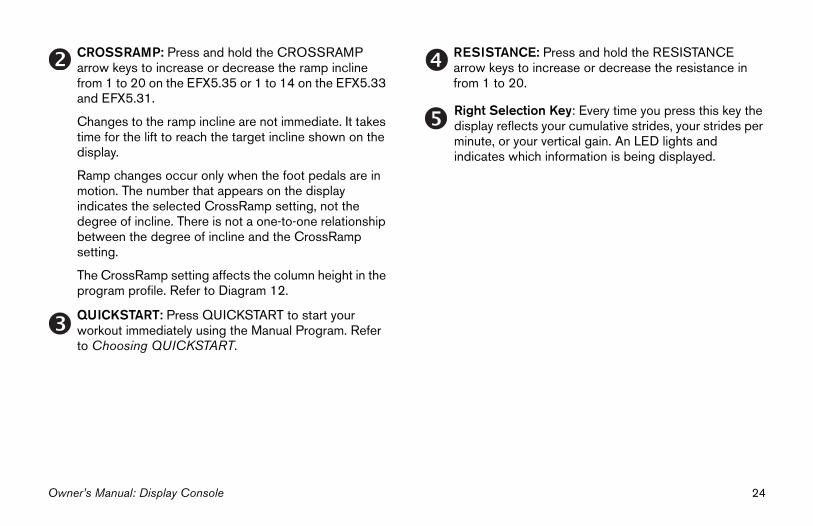
CROSSRAMP arrow keys: Use the arrow keys to adjust the ramp incline.
HEART RATE display: Use a chest strap or grasp both touch-sensitive grips (EFX5.35 or EFX5.33) to display and monitor your pulse.
20
EFX5.35 column height in the program profile
EFX5.33 and EFX5.31 column height in the file
1 — 3
4 — 6
7 — 9
10 — 12
13 — 15
16 — 18
19 — 20
lumn height CrossRamp settings
1 — 2
3 — 4
5 — 6
7 — 8
9 — 10
11 — 12
13 — 14
lumn height CrossRamp settings
Owner’s Manual: Display Console
More Information about the Upper Display
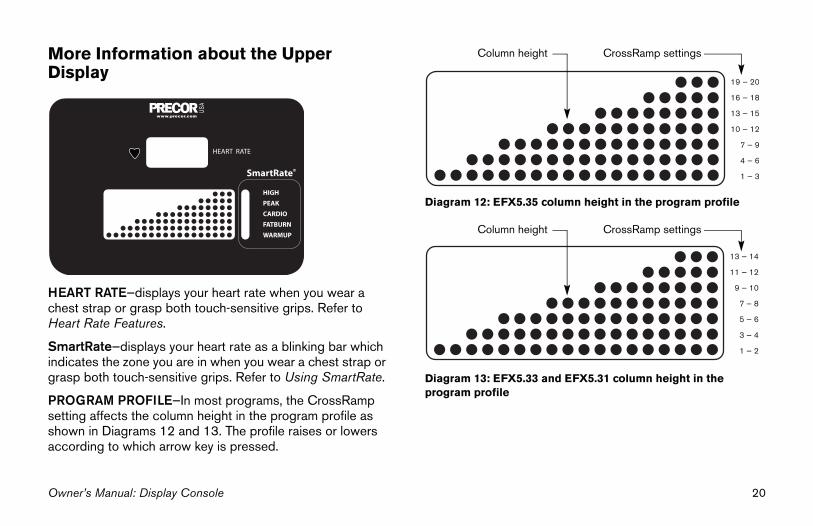
HEART RATE—displays your heart rate when you wear a chest strap or grasp both touch-sensitive grips. Refer to Heart Rate Features.
SmartRate—displays your heart rate as a blinking bar which indicates the zone you are in when you wear a chest strap or grasp both touch-sensitive grips. Refer to Using SmartRate.
PROGRAM PROFILE—In most programs, the CrossRamp setting affects the column height in the program profile as shown in Diagrams 12 and 13. The profile raises or lowers according to which arrow key is pressed.
Diagram 12:
Diagram 13: program pro
SmartRate
Co
Co

21
ELAPSED, TIME REMAINING and RIESLAPSED—displays workout time in minutes and s and indicates the amount of time you have xercising. When you exceed 60 minutes during a
orkout, the TIME ELAPSED display converts to nd minutes.
EMAINING—shows the amount of time ing in a workout. If the selected workout time is n 60 minutes, the display shows time in minutes
conds. If you select a workout time greater than utes, the display reflects hours and minutes until ntdown reaches 60 minutes, at which time the reverts to minutes and seconds.
IES—displays the estimated cumulative number ries burned. The calorie calculation is derived e pedaling speed, resistance, and your weight. urate weight entry results in a more accurate count. When using QUICKSTART and a weight t been specified, the default weight is 150 (68 kilograms).
Owner’s Manual: Display Console
More Information about the Lower Display
The lower display provides information about your exercise session. The two center windows automatically provide information about your CrossRamp and resistance settings. To choose the type of information displayed in the left and right windows, press the adjacent Selection key. The numbers that appear relate to your workout statistics and are described below.
Note: If you choose to rest a book or magazine on the display, you can still view these workout statistics.
TIMECALOTIME Esecondbeen esingle whours a
TIME Rremainless thaand se60 minthe coudisplay
CALORof calofrom thAn acccaloriehas nopounds
QUICKSTART
TIME ELAPSED
TIME REMAINING
CALORIES
TOTAL STRIDES
STRIDES/min
VERTICAL GAINCROSSRAMP RESISTANCE

22
ES/min—displays the number of strides you te in a minute up to a maximum value of 510
per minute. A stride is an exaggerated walking ent. If you start in a position with one foot plate , a stride is completed when you move the rear dal all the way forward while the other foot plate to the rear. Two strides create one complete ion of the flywheel. So, the value that appears on play is always an even number between 20 and e average, effective exercise pace is between
150 strides per minute.
AL GAIN—displays an estimate of your tive vertical gain in feet or meters based on your amp level, resistance level, weight, and caloric iture. You can use the VERTICAL GAIN display ique motivational unit of measurement and your fitness goals by varying the elliptical motion FX. Higher CrossRamp and resistance levels
ult in greater vertical gain.
Owner’s Manual: Display Console
CROSSRAMPCROSSRAMP—displays the incremental motion affected by the ramp position. The CROSSRAMP arrow keys affect the lift and let you set a ramp incline between 1 and 20 on the EFX5.35 and between 1 and 14 on the EFX5.33 and EFX5.31. The value displayed can change in whole number increments.
RESISTANCERESISTANCE—displays the resistance you feel against your stride. The RESISTANCE arrow keys let you set a resistance level between 1 and 20.
TOTAL STRIDES, STRIDES/min and VERTICAL GAINTOTAL STRIDES—shows the total number of strides completed, which is always an even number since two strides create one complete revolution of the flywheel. A stride is an exaggerated walking movement. On the EFX, if you start in a position with one foot pedal forward, a stride is completed when you move the rear foot pedal all the way forward while the other foot pedal moves to the rear.
STRIDcomplestridesmovemforwardfoot pemoves revolutthe dis510. Th100 to
VERTICcumulaCrossRexpendas a unrealize of the Ewill res

23
play Keypad and the Selection Keys
Lower Display keypad and the Selection keys
lection Key: Every time you press this key the reflects: the time elapsed since you began your e session, the time remaining, or your cumulative s. An LED lights and indicates which information displayed. The TIME REMAINING display is lit
ou begin a program.
QUICKSTART
LAPSED
EMAINING
IES
TOTAL STRIDES
STRIDES/min
VERTICAL GAINCROSSRAMP RESISTANCE
Owner’s Manual: Display Console
KeypadsUse the keypads to enter your workout session selections, to affect what appears on the display, and to establish your CrossRamp and resistance preferences.
Five distinct keypads exist on the display and are discussed in this section:
• Lower Display keypad and the Selection keys• User identification keys• Navigational keypad in the center of the display• PROGRAMS keypad• Number keypad with the ENTER and CLEAR keys
Lower Dis
Diagram 14:
Left Sedisplayexerciscalorieis beingwhen y
TIME E
TIME R
CALOR
24
TANCE: Press and hold the RESISTANCE eys to increase or decrease the resistance in to 20.
election Key: Every time you press this key the reflects your cumulative strides, your strides per , or your vertical gain. An LED lights and es which information is being displayed.
Owner’s Manual: Display Console
CROSSRAMP: Press and hold the CROSSRAMP arrow keys to increase or decrease the ramp incline from 1 to 20 on the EFX5.35 or 1 to 14 on the EFX5.33 and EFX5.31.
Changes to the ramp incline are not immediate. It takes time for the lift to reach the target incline shown on the display.
Ramp changes occur only when the foot pedals are in motion. The number that appears on the display indicates the selected CrossRamp setting, not the degree of incline. There is not a one-to-one relationship between the degree of incline and the CrossRamp setting.
The CrossRamp setting affects the column height in the program profile. Refer to Diagram 12.
QUICKSTART: Press QUICKSTART to start your workout immediately using the Manual Program. Refer to Choosing QUICKSTART.
RESISarrow kfrom 1
Right Sdisplayminuteindicat
25
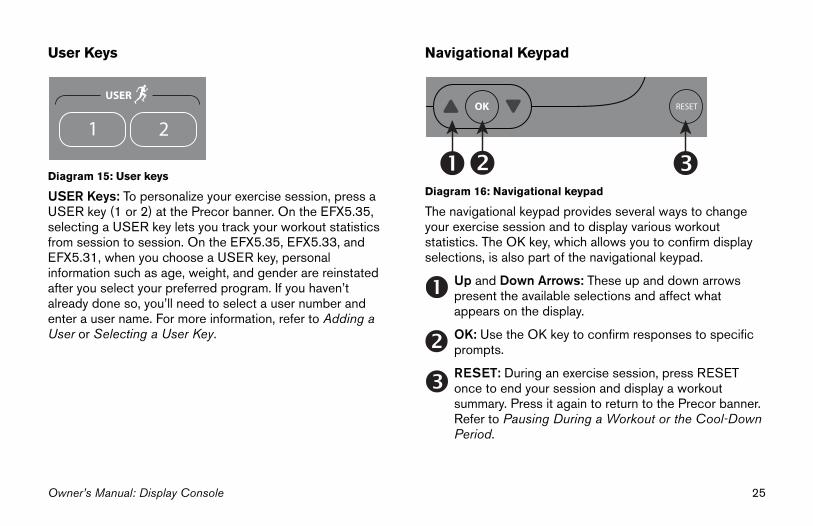
nal Keypad
Navigational keypad
onal keypad provides several ways to change e session and to display various workout e OK key, which allows you to confirm display
s also part of the navigational keypad.
Down Arrows: These up and down arrows t the available selections and affect what s on the display.
e the OK key to confirm responses to specific s.
: During an exercise session, press RESET end your session and display a workout ry. Press it again to return to the Precor banner. o Pausing During a Workout or the Cool-Down .
RESET
Owner’s Manual: Display Console
User Keys
Diagram 15: User keys
USER Keys: To personalize your exercise session, press a USER key (1 or 2) at the Precor banner. On the EFX5.35, selecting a USER key lets you track your workout statistics from session to session. On the EFX5.35, EFX5.33, and EFX5.31, when you choose a USER key, personal information such as age, weight, and gender are reinstated after you select your preferred program. If you haven’t already done so, you’ll need to select a user number and enter a user name. For more information, refer to Adding a User or Selecting a User Key.
Navigatio
Diagram 16:
The navigatiyour exercisstatistics. Thselections, i
Up andpresenappear
OK: Usprompt
RESETonce tosummaRefer tPeriod
26
ble programs
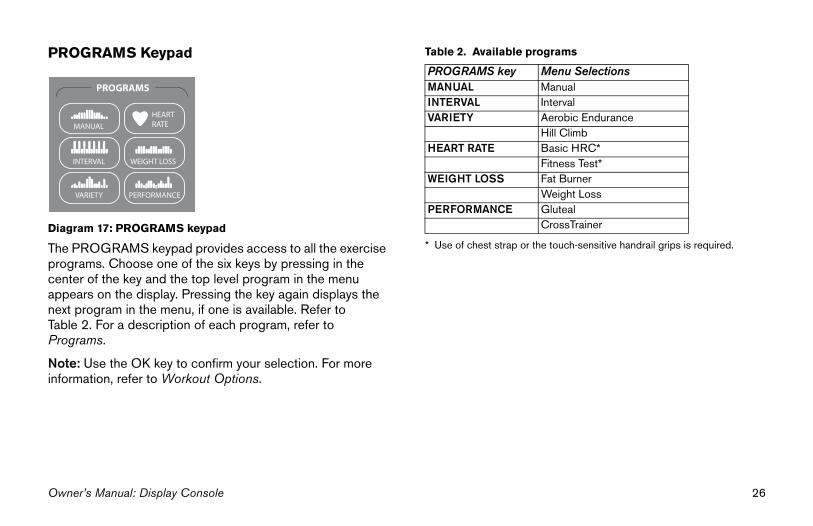
trap or the touch-sensitive handrail grips is required.
ey Menu SelectionsManualIntervalAerobic EnduranceHill ClimbBasic HRC*Fitness Test* Fat BurnerWeight Loss
E GlutealCrossTrainer
Owner’s Manual: Display Console
PROGRAMS Keypad
Diagram 17: PROGRAMS keypad
The PROGRAMS keypad provides access to all the exercise programs. Choose one of the six keys by pressing in the center of the key and the top level program in the menu appears on the display. Pressing the key again displays the next program in the menu, if one is available. Refer to Table 2. For a description of each program, refer to Programs.
Note: Use the OK key to confirm your selection. For more information, refer to Workout Options.
Table 2. Availa
* Use of chest s
MANUAL
HEARTRATE
INTERVAL WEIGHT LOSS
VARIETY PERFORMANCE
PROGRAMS kMANUALINTERVALVARIETY
HEART RATE
WEIGHT LOSS
PERFORMANC
27
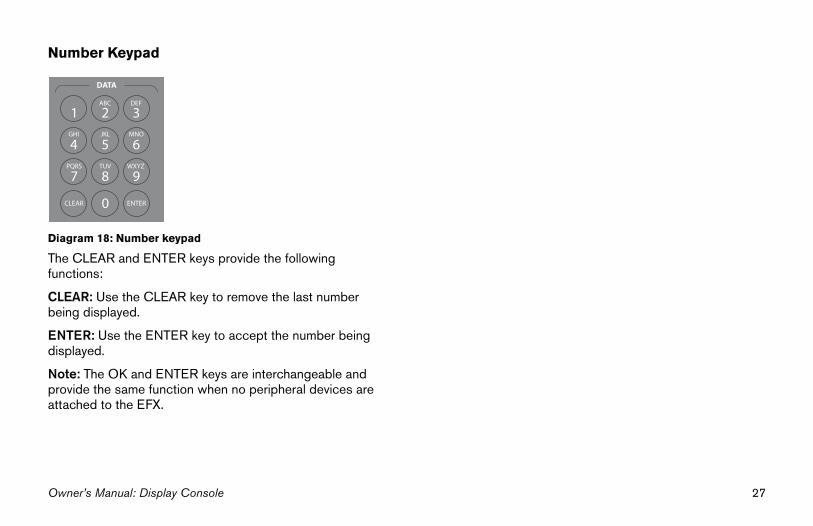
Owner’s Manual: Display ConsoleNumber Keypad
Diagram 18: Number keypad
The CLEAR and ENTER keys provide the following functions:
CLEAR: Use the CLEAR key to remove the last number being displayed.
ENTER: Use the ENTER key to accept the number being displayed.
Note: The OK and ENTER keys are interchangeable and provide the same function when no peripheral devices are attached to the EFX.
DATA

28
explains how to:
er.our personal information.the user name and clear your workout statistics.
Owner’s Manual: User Identification
User Identification
Choosing a user identification (USER) key enables the EFX to identify you. Once you configure your USER key, you can personalize your workout session and store information about your preferred program, workout time, weight, age, and gender.
The USER keys allow two people to customize, store, and retrieve workout selections. On the EFX5.35 you can also track your cumulative workout statistics.
Initially, you must “add a user” so the EFX can store exercise session information associated with the specific user key. Once you enter the requested information, it is stored until you opt to change it. You can select the same USER key time and time again, and your user preferences will automatically be re-instated. Refer to Adding a User.
This section
• Add a us• Update y• Change
29
u are satisfied with your name or user tion, press OK.
lay then prompts you to enter your weight, age, er.
avigational arrow keys or number keys to ach prompt, and then press OK. With each ul entry, you move onto the next prompt. After r the gender type, the display indicates that the p is complete and resets to the Precor banner.
an exercise session using your USER key, refer ing a User Key.
Owner’s Manual: User Identification
Adding a User
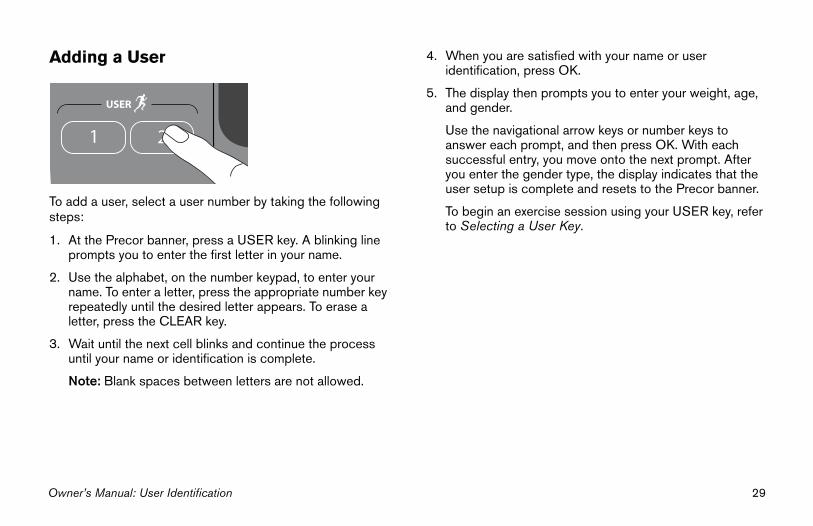
To add a user, select a user number by taking the following steps:
1. At the Precor banner, press a USER key. A blinking line prompts you to enter the first letter in your name.
2. Use the alphabet, on the number keypad, to enter your name. To enter a letter, press the appropriate number key repeatedly until the desired letter appears. To erase a letter, press the CLEAR key.
3. Wait until the next cell blinks and continue the process until your name or identification is complete.
Note: Blank spaces between letters are not allowed.
4. When yoidentifica
5. The dispand gend
Use the nanswer esuccessfyou enteuser setu
To beginto Select

30
he prompts for weight, age, and gender.
navigational arrow keys or number keys to ach prompt, and then press OK. With each
ful entry, you move onto the next prompt.
LEAR [user name] STATISTICS? prompt, ne of the following options:
Pressing number 1 updates user information only. The program preferences and cumulative workout statistics remain intact.
Pressing number 2 updates user information, but deletes program preferences and cumulative workout statistics. Refer to Updating User Information on the EFX5.31 or EFX5.33.
Owner’s Manual: User Identification
Updating User Information on the EFX5.35
To update user information on the EFX5.35 such as weight and age without clearing the workout statistics associated with a USER key, take the following steps:
1. At the Precor banner, press and hold the USER key. A welcome greeting scrolls across the display.
Continue holding the USER key until CHANGE USER [user number]? USER [x] SETUP scrolls across the display. Release the USER key, and then press OK.
2. When your user name appears, do not change it. Accept it as is by pressing OK.
Important: If you change your user name, you also delete all cumulative workout statistics associated with the user name.
3. Answer t
Use the answer esuccess
4. At the Cchoose o
1 = No
2 = Yes

31
he prompts for weight and age.
navigational arrow keys or number keys to ach prompt, and then press OK. With each
ful entry, you move onto the next prompt.
arrow keys to answer the gender prompt. When your selection, the display resets to the Precor
Owner’s Manual: User Identification
Updating User Information on the EFX5.31 or EFX5.33
To update user information on the EFX5.33 or EFX5.31, such as weight and age associated with a USER key, take the following steps:
1. At the Precor banner, press and hold the USER key. A welcome greeting scrolls across the display.
Continue holding the USER key until CHANGE USER [user number]? USER [x] SETUP scrolls across the display. Release the USER key, and then press OK.
2. When your user name appears, do not change it. Accept it as is by pressing OK.
3. Answer t
Use the answer esuccess
4. Use the you makebanner.

32
alphabet, on the number keypad, to enter a new enter a letter, press the appropriate number key ly until the desired letter appears. To erase a ss the CLEAR key.
g space or letter indicates it is ready to receive a r. Wait until the next cell blinks and continue the until your name or user identification is complete.
ank spaces between letters are not allowed.
u are satisfied with your name or user tion, press OK.
lay then prompts you to enter your weight, age, er.
navigational arrow keys or number keys to ach prompt, and then press OK. With each
ful entry, you move onto the next prompt. After r the gender type, the display indicates that the p is complete and resets to the Precor banner.
eferences and workout statistics are cleared and ms are restored to original default settings.
Owner’s Manual: User Identification
Changing the User Name and Clearing Workout Statistics
You can clear the stored workout statistics for any USER key by changing the name associated with a USER key. Changing the user name resets any stored preferences, such as weight and age, to the original factory defaults. On the EFX5.35, the cumulative statistics are reset to zero and the metrics displayed are reset to factory defaults.
1. At the Precor banner, press and hold the USER key while the welcome greeting scrolls across the display.
Continue holding the USER key until CHANGE USER [user number]? scrolls across the display. Release the USER key, and then press OK.
2. When your user name appears, a blinking line prompts you to change the first letter.
3. Use the name. Torepeatedletter, pre
4. A blinkinnew letteprocess
Note: Bl
5. When yoidentifica
6. The dispand gend
Use the answer esuccessyou enteuser setu
Note: Prall progra
33
ne of the following options:
.. Steps...
exercising tely
Use the QUICKSTART key.Refer to Choosing QUICKSTART.
a list of s
Press a PROGRAMS key.Refer to Selecting a Program.
exercising ersonal ces
Press your USER key.Refer to Selecting a User Key.
Owner’s Manual: Workout Options
Workout Options
CAUTION: Before beginning any fitness program, see your physician for a complete physical examination. Know your physician-recommended heart rate target zone.
Note: On the EFX5.35, determine whether you want Total Body or Lower Body handlebars and lock the link arms to the appropriate position. Refer to Converting Handlebar Positions.
1. Turn the unit On. The Precor banner scrolls across the display.
2. Hold on to a stationary handrail while stepping on the foot pedals.
3. Face the display. When you are comfortably situated, begin pedaling.
Important: Before exercising, review the Important Safety Instructions found at the beginning of this manual.
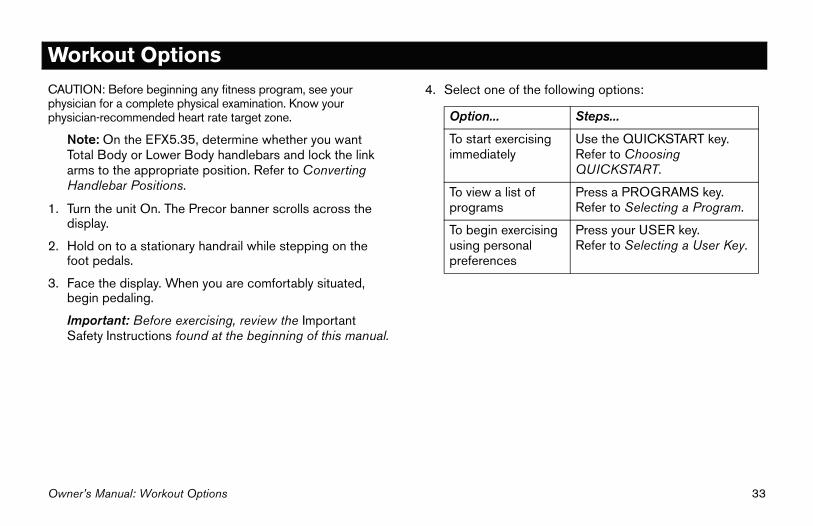
4. Select o
Option.
To startimmedia
To viewprogram
To beginusing ppreferen
34
ROSSRAMP and RESISTANCE arrow keys to he ramp incline and resistance.
mfortable stride rate between 100 and 150 er minute.
e SmartRate feature, you need to specify your is case, review the steps found in Adding a User ting a Program.
hen you use the QUICKSTART key, you enter UAL program as a guest user. Workout statistics preferences for weight, age, and gender are not memory. To save this type of information, refer to a User Key.
Owner’s Manual: Workout Options
Choosing QUICKSTART
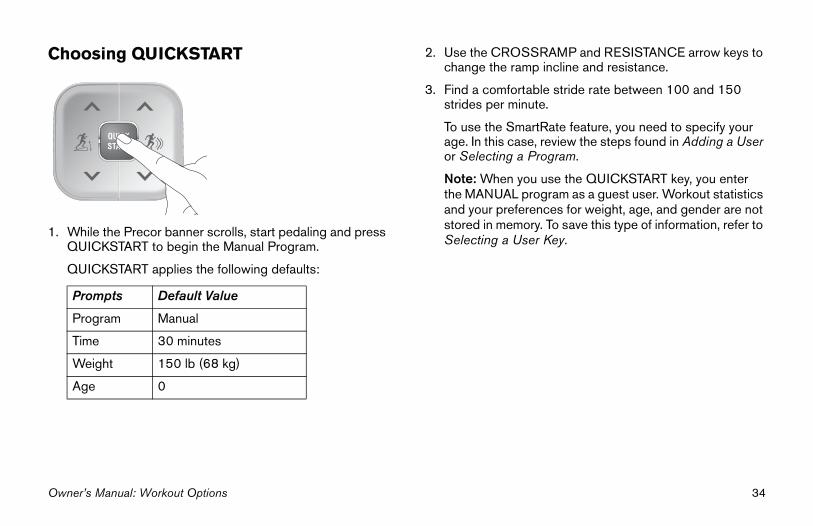
1. While the Precor banner scrolls, start pedaling and press QUICKSTART to begin the Manual Program.
QUICKSTART applies the following defaults:
2. Use the Cchange t
3. Find a costrides p
To use thage. In thor Selec
Note: Wthe MANand yourstored inSelecting
Prompts Default Value
Program Manual
Time 30 minutes
Weight 150 lb (68 kg)
Age 0
QUICKSTART

35
e NO LIMIT option lets you work out indefinitely. ere is no time limit, an automatic cool-down not appended to your program. Refer to Down After a Workout.
r weight (1—350) and then your age (1—99).
change a value (program, time, weight, or age) have already entered press RESET to return to or banner. Select a program and reenter the ate values.
o a handrail. The ramp automatically changes to sRamp set for your program.
hen you select a program without an identifying y, you enter the program as a guest user.
ive workout statistics and your preferences for ge, and gender are not stored in memory. To type of information, refer to Selecting a User
ROSSRAMP and RESISTANCE arrow keys to he ramp incline and resistance.
mfortable stride rate between 100 and 150 er minute.
Owner’s Manual: Workout Options
Selecting a Program
1. While the Precor banner scrolls, repeatedly press one of the PROGRAMS menu keys to review its list of programs. Choose the program you want, and then press OK. For a description of each program, refer to Programs or review Table 2 with the PROGRAMS Keypad.
Note: After pressing a program menu key, you can also scroll through the list of programs within that menu by pressing the navigational arrow keys.
2. A workout time blinks in the center display if you choose a time-based program. Enter a number between 1—240 minutes or zero (NO LIMIT) by using the navigational arrow keys or the number keys, and then press OK.
Note: ThSince thperiod isCooling
3. Enter you
Note: Tothat you the Precappropri
4. Hold ontthe Cros
Note: WUSER keCumulatweight, asave thisKey.
5. Use the Cchange t
6. Find a costrides p
MANUAL
HEARTRATE
INTERVAL WEIGHT LOSS
VARIETY PERFORMANCE
36
K to select the program being displayed or nother program using the PROGRAMS keypad. Selecting a Program for information about how e a program.
nt: If you make an entry error, press RESET to the Precor banner.
lay prompts you for a workout time. To adjust the the number keypad or the navigational arrow accept the number appearing on the display, .
daling.
ROSSRAMP and RESISTANCE arrow keys to he ramp incline and resistance.
mfortable stride rate between 100 and 150 er minute.
Owner’s Manual: Workout Options
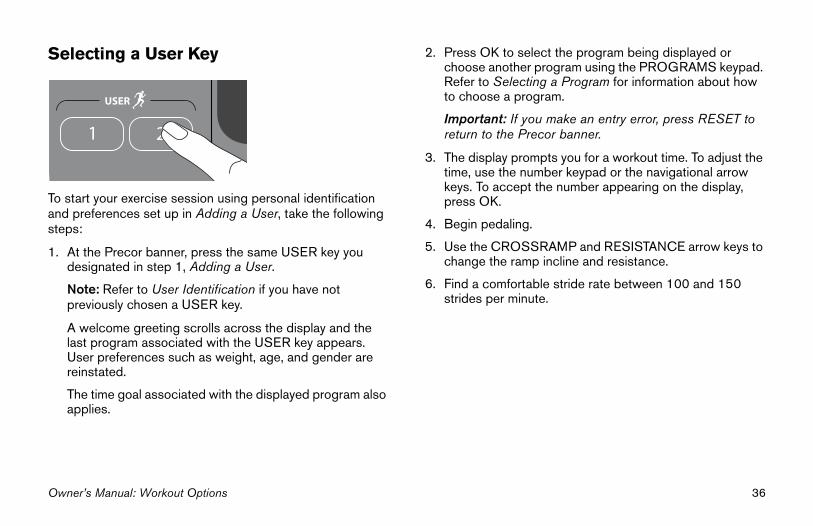
Selecting a User Key
To start your exercise session using personal identification and preferences set up in Adding a User, take the following steps:
1. At the Precor banner, press the same USER key you designated in step 1, Adding a User.
Note: Refer to User Identification if you have not previously chosen a USER key.
A welcome greeting scrolls across the display and the last program associated with the USER key appears. User preferences such as weight, age, and gender are reinstated.
The time goal associated with the displayed program also applies.
2. Press Ochoose aRefer to to choos
Importareturn to
3. The disptime, usekeys. To press OK
4. Begin pe
5. Use the Cchange t
6. Find a costrides p
37
ely end the cool-down period, do the following:
stationary handrail with one hand.
SET to view the workout summary.
SET again to return to the Precor banner.
Hold on to a stationary handrail. Step off the he lift has stopped moving.
Owner’s Manual: Workout Options
Cooling Down After a WorkoutIncorporate a cool-down period into your workout to help lower your heart rate and minimize muscle stiffness or soreness.
Note: You cannot switch to a different program or change display options during the cool-down period. To alter the cool-down period time limit, refer to Setting a Cool-Down Time Limit.
When you complete a program with a time limit, you automatically enter a cool-down period. The resistance is reduced by 20%. To readjust the CrossRamp or resistance, press the arrow keys. To lower your heart rate, reduce your strides per minute.
A workout summary appears at the end of the cool-down period. Refer to Ending a Workout.
Important: If you exit a program before completing it, the cool-down period is bypassed.
To prematur
1. Grasp a
2. Press RE
3. Press RE
Important: EFX when t
38
Workoutold on to a stationary handrail when you near the end ise session.
r pedaling when you complete the cool-down period.
Selection keys to display each workout statistic, TOTAL CALORIES or VERTICAL GAIN. The statistics include warm-up and cool-down After ten minutes, the display automatically the Precor banner.
score, associated with your fitness category, when you take the Fitness Test.
ate analysis also appears, if you held onto the nsitive handrail grips or wore a chest strap while g. Refer to Heart Rate Analysis.
the EFX5.35, the workout summary provides ulative workout statistics.
to the Precor banner before the 10 minutes ress the RESET key.
the EFX and lock the foot pedals in place with ng pin.
Never leave children unsupervised around the turn Off and unplug the EFX when it is not in e foot pedals in place with the locking pin.
Owner’s Manual: Workout Options
Pausing During a Workout or the Cool-Down PeriodStop pedaling to pause anytime during a workout or during a cool-down period. The pause mode has a default time limit of 10 minutes. If you do not resume exercising during that time, the display returns to the banner.
Note: You can change the pause time limit by following the instructions found in Changing EFX Settings.
1. To pause, stop pedaling.
The center display indicates the amount of time remaining in pause mode.
2. To resume exercising from pause mode, begin pedaling.
When you pause a program, you can change your program selection. Refer to Changing Programs in Mid-session.
Note: While paused during the cool-down period, you cannot change to another program.
Ending aCAUTION: Hof your exerc
1. Slow you
Use the such as workout periods. resets to
A fitnessappears
A heart rtouch-seexercisin
Note: Onyour cum
2. To returnelapse, p
3. Turn Off the locki
Important: EFX. Alwaysuse. Lock th
39
g Programs in Mid-sessionnge programs in the middle of a session by ew program from the PROGRAMS key menu. ted workout statistics are transferred to the new you continue exercising.
rams, such as the Fitness Test, Basic HRC, nd Aerobic Endurance, are not available for mid-
sfers due to set goals and program preferences. s, a message scrolls across the center display.
Owner’s Manual: Programs
Programs
This section describes the programs available on the EFX. Use this section as a reference tool to better understand each program’s purpose. For more information, refer to Selecting a Program.
The program descriptions are presented in menu selection order. To see a list of programs, refer to PROGRAMS Keypad and Table 2.
Choosing a ProgramChoosing a program depends on your goals. If you are a beginner or returning to regular exercise, you can start a cardio-conditioning program to slowly return your body to a comfortable level of exercise. If you have been exercising and feel that you have an intermediate or advanced fitness level, you probably have established goals. The Precor web site (www.precor.com) can give you many ideas about fitness workouts and advice from the experts.
Several exercise choices on the EFX are pre-programmed with recommendations for CrossRamp, resistance and alternating interval levels. You always have the option to override the suggested levels with the exception of the Basic HRC and Fitness Test.
ChanginYou can chaselecting a nAll accumulaprogram as
Certain progFat Burner, asession tranIf this occur

40
during a program, stop pedaling. Refer to During a Workout or the Cool-Down Period.u complete a program that contains a time or oal, the automatic cool-down period begins. Cooling Down After a Workout.ime limits exist for the cool-down period and ode. Refer to Changing EFX Settings if you wish the settings.ive workout statistics appear when you end your session. Refer to Ending a Workout.
Owner’s Manual: Programs
Program Tips• Begin at the Precor banner. Refer to Workout Options.• A blinking column indicates your position as you progress
through a program.• To use the SmartRate feature, you need to specify your
age and wear a chest strap or hold on to the touch-sensitive handrail grips. Refer to Using SmartRate.
• To exercise indefinitely in any program (except preset programs, such as the Fitness Test, Fat Burner, Weight Loss, and Aerobic Endurance), an unlimited exercise time setting may be an available option. Refer to Selecting a Program.
• If your level of exertion becomes too great, reduce your strides per minute and change the CrossRamp or resistance settings using the arrow keys to override each upcoming column in the program profile.
• To pausePausing
• When yocalorie gRefer to
• Default tpause mto adjust
• Cumulatexercise
41
Program
Program, available by pressing the INTERVAL f the best for conditioning your cardiovascular program raises and lowers your level of exertion or the specified period of time.
est interval is set to a CrossRamp of 4 and a f 1. The work interval is set at a CrossRamp of istance of 8. The display lets you know when the are about to change and it indicates the levels terval.
ising, you can vary your strides per minute and reset ramp incline and resistance settings using RAMP or RESISTANCE arrow keys. The
repeated throughout the remainder of the hen you complete the program the CrossRamp ce settings return to their standard defaults. No ablished during your exercise session, are
INTERVAL
Owner’s Manual: Programs
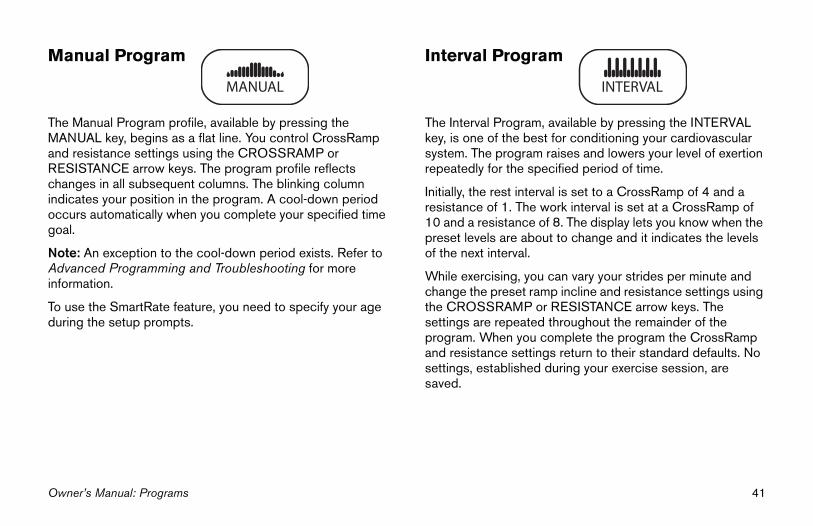
Manual Program
The Manual Program profile, available by pressing the MANUAL key, begins as a flat line. You control CrossRamp and resistance settings using the CROSSRAMP or RESISTANCE arrow keys. The program profile reflects changes in all subsequent columns. The blinking column indicates your position in the program. A cool-down period occurs automatically when you complete your specified time goal.
Note: An exception to the cool-down period exists. Refer to Advanced Programming and Troubleshooting for more information.
To use the SmartRate feature, you need to specify your age during the setup prompts.
Interval
The Interval key, is one osystem. Therepeatedly f
Initially, the rresistance o10 and a respreset levelsof the next in
While exercchange the pthe CROSSsettings areprogram. Wand resistansettings, estsaved.
MANUAL
42
b Program
b Program, available by pressing the VARIETY programmed CrossRamp settings in a fixed designed to increase muscle tone, cardio-, and endurance over several weeks.
consists of alternating forward and backward vements that focus on working the thigh and calf ps. Display prompts appear indicating when to al direction at select intervals: 25%, 50%, and ram completion.
exercise session, you can change your strides nd override the CrossRamp or resistance g the arrow keys.
VARIETY
Owner’s Manual: Programs
Aerobic Endurance Program
The Aerobic Endurance Program can be accessed by pressing the VARIETY key. The 30 to 60 minute program has been designed by Dr. Emily Cooper of Seattle Performance Medicine (www.spmedicine.com) to enhance muscular and aerobic endurance. It has a warmup period followed by gradually increasing CrossRamp inclines and resistance.
During the warmup period, the display prompts you to maintain a specific stride rate which increases muscle flexibility and raises your heart rate. When the program begins, maintain the recommended stride rate of 140 strides per minute to improve cardiopulmonary conditioning and muscular endurance. The ramp incline varies throughout the program every three minutes. When you complete the program, a 3-minute, cool-down period begins.
The CrossRamp and resistance are preset based on your body weight and the recommended strides per minute, but you have the option to adjust either one during the program using the arrow keys. If you make adjustments, you may change the effectiveness of the program.
Hill Clim
The Hill Climkey, has prepattern. It isconditioning
The programpedaling momuscle groureverse ped75% of prog
During your per minute asettings usin
VARIETY
43
gram provides a 3-minute warm-up period. is time, you may change the CrossRamp or e, but you cannot adjust the time or change to a or calorie goal. At the end of the warm-up e program automatically controls the resistance. the RESISTANCE arrow keys has no affect.
hen your target heart rate is achieved or the period elapses, the warm-up period ends and ram begins.
ram sets the target heart rate as a percentage of us your age. Changing the target heart rate your e or CrossRamp affects the unit’s ability to your target heart rate in the preferred zone. It e for the EFX to readjust the resistance so that rt rate remains on target. Check the SmartRate
EART RATE displays to see if you are ing your preferred zone and to determine your art rate. For information about understanding et heart rate, refer to Heart Rate Features. to the CrossRamp are reflected in the
’s profile. Automatic resistance changes appear SISTANCE display.e the program, select a different PROGRAMS
press OK.own period is incorporated into the program.
Owner’s Manual: Programs
Heart Rate Programs
The Basic HRC Program, available by pressing the HEART RATE key, adjusts the CrossRamp to maintain your heart rate within two beats per minute of the target heart rate while you exercise. To use this program, you must enter your age and wear a chest strap or grasp the touch-sensitive handrail grips so your heart rate can be monitored throughout the session.
Important: Consult your physician to determine the appropriate target heart rate for your age and fitness level. If your physician recommends a different target heart rate than the one that appears on the display adjust it accordingly. Do not exercise over the recommended range of 85% of your maximum aerobic heart rate.
Heart Rate Program TipsThe Basic HRC Program enhances your overall cardiovascular fitness level to help you achieve your weight loss and fitness goals. Read through the following tips before selecting a program. These tips provide general information regarding how the program functions. For more information and exercise suggestions, refer to the Precor web site at www.precor.com.
• Each proDuring thresistancdistanceperiod, thPressing
Note: W3-minutethe prog
• The prog220 minstride ratmaintaintakes timyour heaand the Hmaintainactual heyour targ
• Changesprogramin the RE
• To changkey and
• A cool-d
HEARTRATE
44
est, the EFX maintains the CrossRamp setting dually increases the resistance in specific display may request that you change your stride
are disabled. The test ends if,
s RESET.tes has elapsed since the last heart rate signal ived.
rm up, if you surpass your target heart rate (74% aximum aerobic heart rate). pedaling and the pause time limit elapses.mplete the test for it to determine your aerobic establish your V02 max. Once you complete the s score and fitness level appear as part of the mary. Use it to compare to Table 3 or Table 4.
Owner’s Manual: Programs
Fitness Test Program
The Fitness Test, available by pressing the HEART RATE key, is a test that consists of three 5-minute sessions. A warm-up and cool-down period is incorporated into the program. The actual duration of the test ranges between 5 and 23 minutes depending on your fitness level. You cannot adjust the CrossRamp or resistance settings.
The Fitness Test measures the maximum amount of oxygen (V02 max) the body can use for energy production during exercise. The higher the amount of oxygen that your body can use enhances your ability to exercise for prolonged periods of time. The test results can help you gauge the effectiveness of your current exercise routine and tailor it to meet your fitness goals.
Important: You must wear the chest strap or grasp both touch-sensitive handrail grips throughout the Fitness Test. If the heart rate reception is erratic, incorrect readings can occur and terminate the test.
During the tat 4 and grastages. The rate.
The keypads
• You pres• Two minu
was rece• After wa
of your m• You stopYou must cocapacity andtest, a fitnesworkout sum
HEARTRATE
45
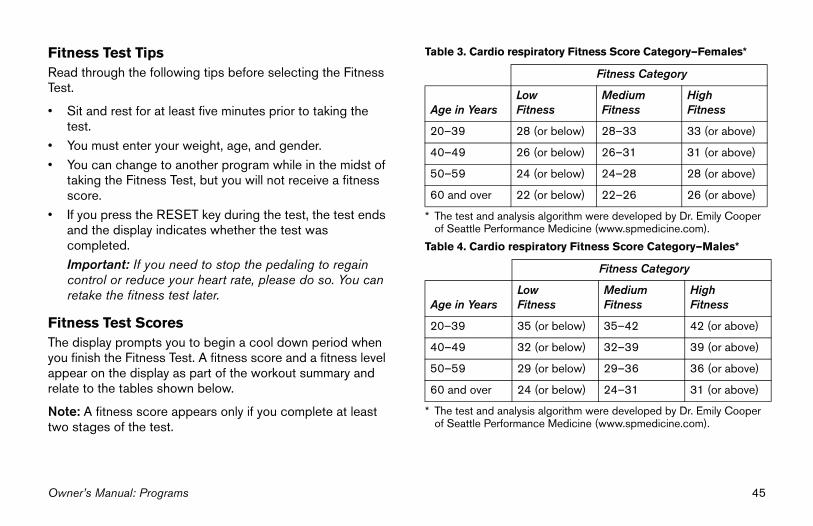
io respiratory Fitness Score Category—Females*
analysis algorithm were developed by Dr. Emily Cooper rformance Medicine (www.spmedicine.com).
io respiratory Fitness Score Category—Males*
analysis algorithm were developed by Dr. Emily Cooper rformance Medicine (www.spmedicine.com).
Fitness Category
sLowFitness
MediumFitness
HighFitness
28 (or below) 28–33 33 (or above)
26 (or below) 26–31 31 (or above)
24 (or below) 24–28 28 (or above)
22 (or below) 22–26 26 (or above)
Fitness Category
sLowFitness
MediumFitness
HighFitness
35 (or below) 35–42 42 (or above)
32 (or below) 32–39 39 (or above)
29 (or below) 29–36 36 (or above)
24 (or below) 24–31 31 (or above)
Owner’s Manual: Programs
Fitness Test TipsRead through the following tips before selecting the Fitness Test.
• Sit and rest for at least five minutes prior to taking the test.
• You must enter your weight, age, and gender.• You can change to another program while in the midst of
taking the Fitness Test, but you will not receive a fitness score.
• If you press the RESET key during the test, the test ends and the display indicates whether the test was completed.Important: If you need to stop the pedaling to regain control or reduce your heart rate, please do so. You can retake the fitness test later.
Fitness Test ScoresThe display prompts you to begin a cool down period when you finish the Fitness Test. A fitness score and a fitness level appear on the display as part of the workout summary and relate to the tables shown below.
Note: A fitness score appears only if you complete at least two stages of the test.
Table 3. Card
* The test andof Seattle Pe
Table 4. Card
* The test andof Seattle Pe
Age in Year
20–39
40–49
50–59
60 and over
Age in Year
20–39
40–49
50–59
60 and over

46
low briefly explains the purpose of each program.
Description
This program has been designed by Dr. Emily Cooper of Seattle Performance Medicine (www.spmedicine.com) to improve fat-burning results and increase endurance every time you exercise. The program incorporates warm-up and cool-down periods and allows you to select a program time between 30 and 90 minutes. Work and rest intervals appear along with recommended stride rates. The faster pace stride rates, combined with fairly low resistance levels, provides optimal oxygenation to the working muscles. The display prompts you when you need to make changes in your stride rate. To monitor your heart rate during the program, use the touch-sensitive handrail grips or wear a chest strap. Refer to Heart Rate Features.
Use this program if you are beginning or returning to a regular fitness routine. The workout time is fixed at 28 minutes and consists of seven 4-minute intervals. You are not prompted for a workout time.
Owner’s Manual: Programs
Weight Loss Programs
The Weight Loss Programs, available by pressing the WEIGHT LOSS key, provide a variety of programs targeted at lowering body fat while improving muscle tone and conditioning.
Anytime during your exercise session you can use the CROSSRAMP or RESISTANCE arrow keys to override upcoming segments.
The chart be
WEIGHT LOSSProgram
Fat Burner
Weight LossInterval
47
iner Program
ainer Program, available by pressing the NCE key, has preprogrammed CrossRamp and
ettings.
consists of alternating forward and backward vements that focus on working the thigh and calf ps. Display prompts appear indicating when to al direction at select intervals: 25%, 50%, and ram completion.
workout, set a comfortable stride rate. If needed, SSRAMP or RESISTANCE arrow keys to
oming segments. Any adjustments to the or resistance are applied to upcoming rossRamp changes are reflected in the program
e program, select a different PROGRAMS key K.
PERFORMANCE
Owner’s Manual: Programs
Gluteal Program
The Gluteal Program, available by pressing the PERFORMANCE key, is designed to exercise your gluteal muscles. The CrossRamp is preprogrammed and display prompts appear indicating when to reverse pedal direction at select intervals: 25%, 50%, and 75% of program completion.
During your workout, set a comfortable and consistent stride rate. If needed, use the CROSSRAMP or RESISTANCE arrow keys to override upcoming segments. Any adjustments to the CrossRamp or resistance are applied to upcoming segments. CrossRamp changes are reflected in the program profile.
To change the program, select a different PROGRAMS key and press OK.
CrossTra
The CrossTrPERFORMAresistance s
The programpedaling momuscle groureverse ped75% of prog
During your use the CROoverride upcCrossRampsegments. Cprofile.
To change thand press O
PERFORMANCE
48
g
d Programming Tipstart at the Precor banner.nced programming and diagnostic mode is
d by pressing the RESET key at the Precor ny remaining key presses must occur quickly
out pause.CKSTART key is disabled while in advanced ming mode.ber keypad is disabled once you enter advanced ming mode. You need to use the navigational ys to change the blinking prompts. ys provide the same functionality and can be rchangeably while in advanced programming ese keys are:
ENTERnced programming prompts appear sequentially menu format. Pressing the arrow keys in the nal keypad moves you through the programs. to choose or accept the displayed selection. To
the Precor banner without saving any changes, SET.
Owner’s Manual: Advanced Programming and Troubleshooting
Advanced Programming and Troubleshootin
Certain features remain hidden and can only be accessed using special key presses. Read this section if you want to:
• Select the units of measure• Set the pause or cool-down times• Determine the setting for the CrossRamp auto-leveling
feature• View the odometer• Display the number of hours you have used your EFX• View the software versions and part numbers• Check the usage log• Check the error log
Advance• Always s• The adva
accessebanner. Aand with
• The QUIprogram
• The numprogramarrow ke
• Some keused intemode. ThOK and
• The advaand in a navigatioPress OKreturn topress RE

49
a U.S. Standard or Metric Display display measurements in either metric or U.S. e default factory setting is set to display U.S. change this setting, perform the following steps:
LECT UNITS prompt, press OK. Use the nal arrow keys to select a unit of measure (either or U.S.).
u are ready, press OK to accept the displayed nd move to the next program. Or, press RESET l any changes and return to the Precor banner.
Pause Time Limitt how long a user can pause while exercising on ntering a time between 1 and 10 minutes. For ou set the pause time limit to 60 seconds, the matically resets to the Precor banner if no key s within one minute.
T MAX PAUSE TIME prompt, press OK. Use ational arrow keys to change the time limit. between 1 and 10 minutes. The default time is es.
u are ready, press OK to accept the displayed nd move to the next program. Or, press RESET l any changes and return to the Precor banner.
Owner’s Manual: Advanced Programming and Troubleshooting
Changing EFX SettingsThrough a specific set of number key presses, you can customize the pause or cool down times.
To access the menu and change the settings, perform the following steps:
1. At the Precor banner, press the following keys in sequence without pausing between selections:
RESET, 5, 6, 7, 1
Numbers appear on the display as you press the associated key.
DIAGS - SET PARAMETERS appears briefly, and then SELECT UNITS scrolls across the display.
Selecting The EFX canstandard. Thstandard. To
2. At the SEnavigatioMETRIC
3. When yosetting ato cance
Setting a You can limithe unit by eexample, if ydisplay autopress occur
4. At the SEthe navigChoose 10 minut
5. When yosetting ato cance

50
e CrossRamp Auto-Reset Feature an auto-reset feature. The ramp resets to a
ine level when you begin your exercise session a program that has a different initial CrossRamp the previously used program.
T CROSSRAMP prompt, press OK. Use the nal arrow keys to select the desired ramp incline ween 1 and 20 on the EFX5.35 and between 1 n the EFX5.33 or EFX5.31.
u are ready, press OK to accept the displayed nd return to the SELECT UNITS prompt. Or, SET to cancel changes and return to the Precor
Owner’s Manual: Advanced Programming and Troubleshooting
Setting a Cool-Down Time LimitYou can limit how long a user cools down after exercising on the unit by entering a time between 0 and 5 minutes.
Important: It is highly recommended that you set the cool-down period at or above three minutes. It takes time for a user’s heart rate to return to a resting state after vigorous exercise. An effective cool-down period also reduces the amount of lactic acid in muscle tissue.
6. At the SET COOL DOWN TIME prompt, press OK. Use the navigational arrow keys to display the available time limits. The default setting is 5 minutes.
7. When you are ready, press OK to accept the displayed setting and move to the next program. Or, press RESET to cancel changes and return to the Precor banner.
Setting thThe EFX hasspecific incland choose setting then
8. At the SEnavigatiolevel betand 14 o
9. When yosetting apress REbanner.

51
e Odometerecor banner, press the following keys in e and without pause:6, 5
bers 6, 5 appear on the display as you press the ed key.
GS - INFORMATION DISPLAY scrolls across ay followed by ODOMETER.
K to view the odometer value (cumulative strides or press the ▼ arrow key to move to the next onal display.
u are ready, press OK to move to the next hour meter).
Owner’s Manual: Advanced Programming and Troubleshooting
Informational DisplaysThe EFX provides information about its use (odometer and hour meter), as well as software version, usage log, and error codes. In general, you would only access this information if directed to do so by Precor Customer Support.
These instructions guide you through all eight informational displays. Pressing the OK key moves you through the displays. Pressing the navigational arrow keys cycles you through the menu selection. To exit, press RESET at any time.
Viewing th1. At the Pr
sequencRESET,
The numassociat
Then DIAthe displ
2. Press Otraveled)informati
3. When yodisplay (

52
u are ready, press OK to move to the next lower board’s software part number).
SW scrolls across the display.
K to view the lower board software version and ber.
u are ready, press OK to move to the next metrics board’s software part number).
S BOARD SW PART NUMBER scrolls across ay.
numbers below. You will need these numbers ll Customer Support with questions. This on will help rule out any software-related :
BOOT SW: ___________________
BASE SW: ___________________
SW: ___________________
S BOARD SW: ___________________
u are ready, press OK to move to the next usage log).
Owner’s Manual: Advanced Programming and Troubleshooting
Viewing the Hour MeterHOUR METER scrolls across on the display.
4. Press OK to view the number of hours that the unit has been in use or press the ▼ arrow key to move to the next informational display.
The EFX tracks the elapsed minutes, but the value that appears is truncated to the nearest full hour.
5. When you are ready, press OK to move to the next display (software version).
Viewing the Software Part NumbersU-BOOT SW scrolls across the display.
6. Press OK to view the upper board boot software part number (for example, 48996-100) or press the ▼ arrow key to move to the next informational display.
7. When you are ready, press OK to move to the next display (upper base application software part number).
U-BASE SW scrolls across the display.
8. Press OK to view the upper base application software part number or press the ▼ arrow key to move to the next informational display.
9. When yodisplay (
LOWER
10.Press Opart num
11.When yodisplay (
METRICthe displ
12.Write theif you cainformatiproblems
UPPER
UPPER
LOWER
METRIC
13.When yodisplay (
53
e Error Log LOG scrolls across the display.
u are ready, press OK to determine how many ist in the error log or press the ▼ arrow key to ck to the ODOMETER display.
here are no errors in the log, you will see NO S displayed. When you press OK, you return to METER display.
K again to view the first entry in the error log.
through the error log, continue to press the ▼ y. Each error code specifies when it occurred, e error code, odometer, hour meter and current alues.
e the ▲ arrow key to review prior error log o exit the error log, press OK while the code
cross the display.
error code information to paper so you can t to Customer Support if needed. Be sure to xactly as shown.
Owner’s Manual: Advanced Programming and Troubleshooting
Viewing the Usage LogUSAGE LOG scrolls across the display.
14.When you are ready, press OK to view each program, the number of times it has been used, and the associated cumulative minutes. The usage log is helpful in determining user preferences in program selection.
15.Use the navigational arrow keys to select and view usage information about each specific program.
Note: For a list of programs, refer to PROGRAMS Keypad and Table 2.
16.When you are ready, press OK to move to the next display (error log).
Viewing thERROR
17. When yoerrors excycle ba
Note: If tERRORthe ODO
18.Press O
19.To movearrow kelisting th(amps) v
Note: Usentries. Tscrolls a
20.Copy theprovide icopy it e

54
hooting Error Codesodes appear in the center display, turn the unit
If the error continues to occur, call an authorized on for assistance. Refer to Obtaining Service.
0 appears on the display, you have an incorrect connection. Remove the cable and re-insert it r receptacle on the back of the display console. receptacle has the tab opening at its base.
:
Tab location
Owner’s Manual: Advanced Programming and Troubleshooting
21.When you no longer need the information in the error log, press QUICKSTART for at least four seconds to erase it. The message, NO ERRORS, appears on the display and remains static to let you know when the error log has been cleared.
Important: You cannot retrieve the error log once you have cleared it. You may want to resolve any issues you are experiencing with the EFX before clearing the error log.
22.When you are ready, press OK to cycle back to the ODOMETER, or press RESET to return to the Precor banner.
TroublesIf any error cOff and On.service pers
If ERROR 3RJ45 cable into the otheThe correct
For example
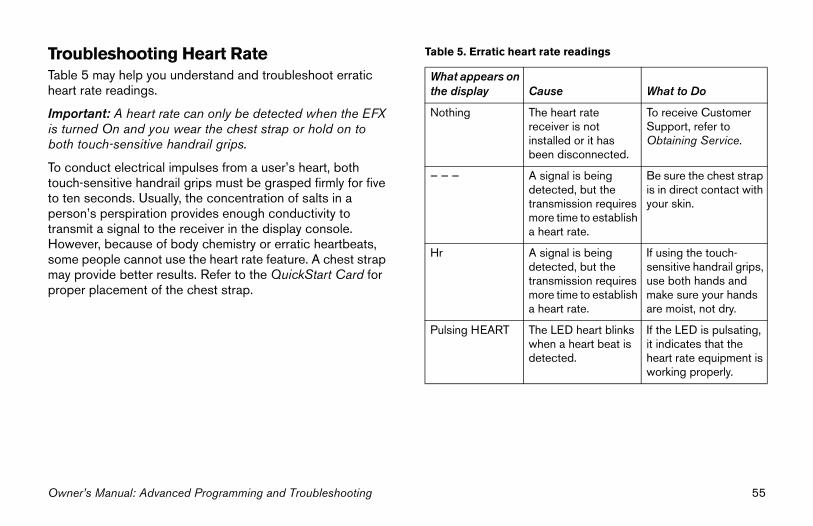
55
tic heart rate readings
rs on Cause What to Do
The heart rate receiver is not installed or it has been disconnected.
To receive Customer Support, refer to Obtaining Service.
A signal is being detected, but the transmission requires more time to establish a heart rate.
Be sure the chest strap is in direct contact with your skin.
A signal is being detected, but the transmission requires more time to establish a heart rate.
If using the touch-sensitive handrail grips, use both hands and make sure your hands are moist, not dry.
RT The LED heart blinks when a heart beat is detected.
If the LED is pulsating, it indicates that the heart rate equipment is working properly.
Owner’s Manual: Advanced Programming and Troubleshooting
Troubleshooting Heart RateTable 5 may help you understand and troubleshoot erratic heart rate readings.
Important: A heart rate can only be detected when the EFX is turned On and you wear the chest strap or hold on to both touch-sensitive handrail grips.
To conduct electrical impulses from a user’s heart, both touch-sensitive handrail grips must be grasped firmly for five to ten seconds. Usually, the concentration of salts in a person’s perspiration provides enough conductivity to transmit a signal to the receiver in the display console. However, because of body chemistry or erratic heartbeats, some people cannot use the heart rate feature. A chest strap may provide better results. Refer to the QuickStart Card for proper placement of the chest strap.
Table 5. Erra
What appeathe display
Nothing
— — —
Hr
Pulsing HEA

56
the Equipmentworking mechanisms are protected inside the ever, for efficient operation, the EFX relies on To keep the friction low, the unit’s rollers, ramp, handlebars, and covers must be as clean as
mmends the EFX be cleaned before and after t. Use mild soap and water; dampen a soft cloth
exposed surfaces. This helps remove any dust
o not use any acidic cleaners. Doing so will paint or powder coatings and void the Precor ranty. Never pour water or spray liquids on any FX. Allow the EFX to dry completely before
acuum the floor around the unit to prevent the n of dust and dirt, which can affect the smooth the unit. Use a soft nylon scrub brush to clean als.
Owner’s Manual: Maintenance
Maintenance
It is important to perform the minor maintenance tasks described in this section. Failure to maintain the EFX as described here could void the Precor Limited Warranty.
To reduce the risk of electrical shock, always unplug the unit from its power source before cleaning it or performing any maintenance tasks.
Inspection
Inspect the EFX before use.Look and listen for slipping belts, loose fasteners, unusual noises, worn or frayed power cords, and any other indications that the equipment may be in need of service. If you notice any of these, obtain service.
Important: If you determine that the EFX needs service, make sure that the EFX cannot be used inadvertently. Turn the unit Off, insert the locking pin and then unplug the power cord from its power source. Make sure other users know that the EFX needs service.
To order parts or to contact a Precor authorized service provider in your area, refer to Obtaining Service.
CleaningMost of the covers. Howlow friction. foot pedals,possible.
Precor recoeach workouand wipe allor dirt.
CAUTION: Dweaken theLimited Warpart of the Eusing.
Frequently vaccumulatiooperation ofthe foot ped
DANGER
57
Owner’s Manual: MaintenanceStoring the Chest StrapStore the chest strap in a place where it remains free of dust and dirt such as, in a closet or drawer. Be sure to protect the chest strap from extremes in temperature. Do not store it in a place that may be exposed to temperatures below 32° F (0° C).
To clean the chest strap, use a sponge or soft cloth dampened in mild soap and water. Dry the surface thoroughly with a clean towel.
Long-Term StorageWhen the EFX is not in use for any length of time, turn it Off. Make sure that the power cord is unplugged from its power source and is positioned so that it will not become damaged or interfere with people or other equipment.

58
ntyAccessories or accessories have components that are connected ounted inside the electronic console. The following termine the warranty for these components. If the onents are installed by the factory or by an authorized t of the original sale and delivery, they have a warranty al to the warranty of the equipment in which they are mounted. If the internal components are not installed or by an authorized dealer as part of the original sale hey have a 90-day parts and labor limited warranty. All that are not internally connected have 90-day parts arranty. Satisfactory proof of purchase is required in
and Restrictions is valid only in accordance with the conditions set
nty applies to the Precor product only while:ins in the possession of the original purchaser and f purchase is demonstratedot been subjected to accident, misuse, abuse, er service, or non-Precor modifications are made within the warranty periodnty does not cover damage or equipment failure electrical wiring not in compliance with electrical recor owner’s manual specifications, or failure to
asonable and necessary maintenance as outlined in ’s manual.
Owner’s Manual: Precor Residential Equipment Limited Warranty
Precor Residential Equipment Limited WarraPLEASE READ THESE WARRANTY TERMS AND CONDITIONS CAREFULLY BEFORE USING YOUR PRECOR INCORPORATED PRODUCT. BY USING THE EQUIPMENT, YOU ARE CONSENTING TO BE BOUND BY THE FOLLOWING WARRANTY TERMS AND CONDITIONS.
Limited WarrantyPrecor Incorporated warrants all new Precor products to be free from defects in materials and manufacture for the warranty period set forth below. The warranty period commences on the invoice date of original purchase. This warranty applies only against defects discovered within the warranty period and extends only to the original purchaser of the product. Parts repaired or replaced under the terms of this warranty will be warranted for the remainder of the original warranty period only. To make claim under warranty, the buyer must notify Precor or their authorized Precor dealer within 30 days after the date of discovery of any nonconformity and make the affected product available for inspection by Precor or its service representative. Precor’s obligations under this warranty are limited and set forth below.
Warranty Periods and CoverageAll residential products and commercial products used in the home are warranted for the following periods:• Lifetime frame and welds• 10 years parts and wear items• 1 year labor• Coverage for options and accessories defined below.
Options / Many optionsinternally or mguidelines deinternal compdealer as parthat is identicconnected orby the factoryand delivery, tcomponents only limited wall cases.
ConditionsThis warrantyforth below:1. The warra
a. It remaproof o
b. It has nimprop
c. Claims2. This warra
caused bycodes or Pprovide rethe owner

59
O HEREBY DISCLAIMS AND EXCLUDES ALL OTHER OR LIABILITIES, EXPRESS OR IMPLIED, ARISING BY
ERWISE, WITH RESPECT TO ANY NONCONFORMANCE ANY PRODUCT, INCLUDING BUT NOT LIMITED TO: (A) ION, LIABILITY, RIGHT, CLAIM OR REMEDY IN TORT, NOT ARISING FROM THE NEGLIGENCE OF PRECOR IERS (WHETHER ACTIVE, PASSIVE OR IMPUTED); AND ATION, LIABILITY, RIGHT, CLAIM, OR REMEDY FOR
DAMAGE TO ANY EQUIPMENT. This disclaimer and pply even if the express warranty set forth above fails l purpose.
Remediesct described above that fails to conform to its
cor will provide, at their option, one of the following: replacement; or (3) refund of the purchase price. d Warranty service may be obtained by contacting the aler from whom you purchased the item. Precor Servicers for warranty trips within their normal service equipment at the owner’s location. You may be charge outside the service area. THESE SHALL BE
D EXCLUSIVE REMEDIES OF THE BUYER FOR ANY ARRANTY.
Owner’s Manual: Precor Residential Equipment Limited Warranty
3. Warranty of all Precor products applies to residential use only and is void when products are used in a nonresidential environment or installed in a country other than where sold.
4. Except in Canada, Precor does not pay labor outside the United States.
5. Warranties outside the United States and Canada may vary. Please contact your local Dealer for details.
This limited warranty shall not apply to:1. Software version upgrades2. Cosmetic items, including, but not limited to the following: grips,
seats, and labels.3. Repairs performed on Precor equipment missing a serial number
or with a serial tag that has been altered or defaced.4. Service calls to correct installation of the equipment or instruct
owners on how to use the equipment.5. Pickup, delivery, or freight charges involved with repairs.6. Any labor costs incurred beyond the applicable labor warranty
period.
Disclaimer and ReleaseThe warranties provided herein are the exclusive warranties given by Precor and supersede any prior, contrary or additional representations, whether oral or written. ANY IMPLIED WARRANTIES, INCLUDING THE WARRANTY OF MERCHANTABILITY OR FITNESS FOR A PARTICULAR PURPOSE THAT APPLY TO ANY PARTS DESCRIBED ABOVE ARE LIMITED IN DURATION TO THE PERIODS OF EXPRESS WARRANTIES GIVEN ABOVE FOR THOSE SAME PARTS. PRECOR HEREBY DISCLAIMS AND EXCLUDES THOSE WARRANTIES THEREAFTER. Some states do not allow limitation on how long an implied warranty lasts, so the above limitation may not apply to you.
PRECOR ALSOBLIGATIONSLAW OR OTHOR DEFECT INANY OBLIGATWHETHER OROR ITS SUPPL(B) ANY OBLIGLOSS OF OR release shall aof its essentia
Exclusive For any produwarranty, Pre(1) repair; (2)Precor Limiteauthorized decompensatesarea to repaircharged a tripTHE SOLE ANBREACH OF W
60
Effective 01 January, 2003P/N 36287-110
Owner’s Manual: Precor Residential Equipment Limited Warranty
Exclusion of Consequential and Incidental DamagesPRECOR AND/OR ITS SUPPLIERS SHALL HAVE NO OBLIGATION OR LIABILITY, WHETHER ARISING IN CONTRACT (INCLUDING WARRANTY), TORT (INCLUDING ACTIVE, PASSIVE, OR IMPUTED NEGLIGENCE AND STRICT LIABILITY), OR OTHERWISE, FOR DAMAGE TO THE EQUIPMENT, PROPERTY DAMAGE, LOSS OF USE, REVENUE OR PROFIT, COST OF CAPITAL, COST OF SUBSTITUTE EQUIPMENT, ADDITIONAL COST INCURRED BY BUYER (BY WAY OF CORRECTION OR OTHERWISE) OR ANY OTHER INCIDENTAL, SPECIAL, INDIRECT, OR CONSEQUENTIAL DAMAGES, WHETHER RESULTING FROM NONDELIVERY OR FROM THE USE, MISUSE OR INABILITY TO USE THE PRODUCT. This exclusion applies even if the above warranty fails of its essential purpose and regardless of whether such damages are sought for breach of warranty, breach of contract, negligence, or strict liability in tort or under any other legal theory. Some states do not allow the exclusion or limitation of incidental or consequential damages, so the above limitation might not apply.This warranty gives you specific legal rights, and you may also have other rights, which vary state to state.

61
Owner’s ManualNotes:

Owner’s Manual 62
Notes:
Fold along dotted line and tape closed before mailing.
RET.
To allow us to serve you better, please take a few moments tocomplete and return your warranty registration.
YOU MAY ALSO REGISTER ONLINE AT
www.precor.com/warranty
If you have questions or need additional information, contact yourlocal dealer or call Precor Customer Support at 800-347-4404.
Thank You and Welcome to Precor
Precor Incorporated20031 142nd Avenue NEPO Box 7202Woodinville, WA 98072-4002
PLACE
STAMP
HERE
TELL US ABOUT YOUR NEW PRECOR PRODUCT
TELL US ABOUT YOU
TELL US ABOUT YOUR PURCHASE
Ple
ase
deta
ch a
nd m
ail i
n th
e w
arra
nty
regi
stra
tion
with
in te
n da
ys o
f pur
chas
e.Gender: Marital status: Age: Annual household income: What are your fitness goals?❑ Male ❑ Married ❑ Under 18 ❑ Under $50,000 ❑ Weight loss/management❑ Female ❑ Divorced ❑ 18-24 ❑ $51,000-75,000 ❑ Muscle tone enhancement
❑ Widowed ❑ 25-34 ❑ $76,000-100,000 ❑ Cardiovascular improvement❑ Never been married ❑ 35-44 ❑ $101,000-150,000 ❑ Overall health
❑ 45-54 ❑ $151,000+ ❑ Increase energy and flexibility❑ 55-64 ❑ Stress reduction❑ 65+ ❑ Rehabilitation
❑ Other
Purchase (check all that apply): How did you FIRST become aware of Precor❑ First Precor product products (choose only one):❑ Replaces a Precor product of the same type ❑ A gift❑ Replaces same type of product – different brand ❑ Friend/relative❑ Addition to equipment currently owned ❑ Physician
❑ Fitness clubWhat factors MOST influenced your decision to ❑ Internetpurchase your Precor product (choose up to three): ❑ News report or product review
❑ Precor reputation ❑ Rebate or sale price ❑ Magazine advertisement or article❑ Prior use of Precor product(s) ❑ Quality/durability ❑ Print advertisement❑ Design/appearance ❑ Warranty ❑ In-store display or demonstration❑ Special product features ❑ Value for the price ❑ Other❑ Physician recommendation Effective 28 June 2004
P/N 45623-102
Purchasedfrom:
Please indicate the type of product purchased:❑ Elliptical Fitness CrossTrainerTM (EFX®)❑ Treadmill❑ Strength Training System
Date ofPurchase:
❑ StretchTrainerTM
❑ Cycle❑ Stair Climber
Month Day Year
Dealer Name
❑ Mr.
❑ Mrs.
❑ Ms.First Name
Apt./Suite:
Middle Initial Last Name
Street Address
Zip CodeCity State
Your Email Address
Area Code Telephone
The serial number is located on the shipping box and on the product.
ProductSerialNumber:
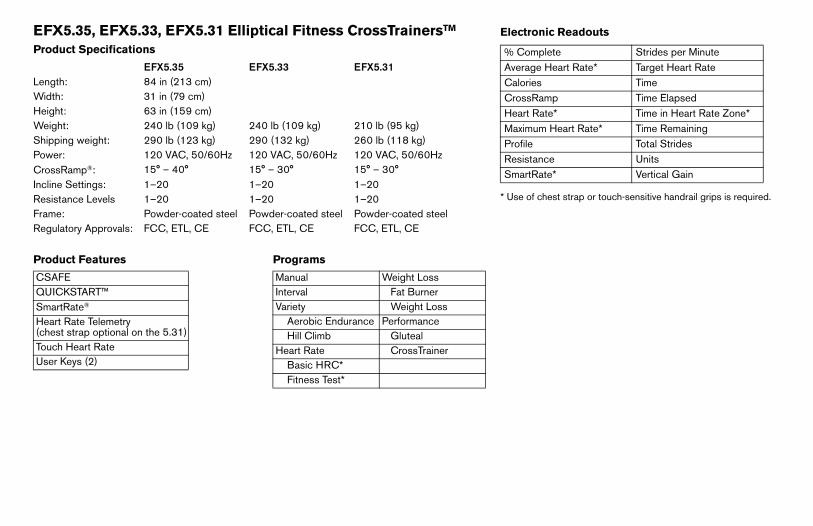
ctronic Readouts
e of chest strap or touch-sensitive handrail grips is required.
Complete Strides per Minuteerage Heart Rate* Target Heart Ratelories TimeossRamp Time Elapsedart Rate* Time in Heart Rate Zone*ximum Heart Rate* Time Remainingfile Total Strides
sistance UnitsartRate* Vertical Gain
OM_5.3x-V_Cover.fm Page 3 Monday, July 30, 2007 3:08 PM
Heart Rate Telemetry (chest strap optional on the 5.31)Touch Heart RateUser Keys (2)
Aerobic Endurance Performance Hill Climb GlutealHeart Rate CrossTrainer Basic HRC* Fitness Test*
EFX5.35, EFX5.33, EFX5.31 Elliptical Fitness CrossTrainersTM
Product Specifications
EFX5.35 EFX5.33 EFX5.31Length: 84 in (213 cm)Width: 31 in (79 cm)Height: 63 in (159 cm)Weight: 240 lb (109 kg) 240 lb (109 kg) 210 lb (95 kg)Shipping weight: 290 lb (123 kg) 290 (132 kg) 260 lb (118 kg)Power: 120 VAC, 50/60Hz 120 VAC, 50/60Hz 120 VAC, 50/60HzCrossRamp®: 15° – 40° 15° – 30° 15° – 30°Incline Settings: 1–20 1–20 1–20Resistance Levels 1–20 1–20 1–20Frame: Powder-coated steel Powder-coated steel Powder-coated steelRegulatory Approvals: FCC, ETL, CE FCC, ETL, CE FCC, ETL, CE
Product Features Programs
CSAFEQUICKSTART™SmartRate®
Manual Weight LossInterval Fat Burner Variety Weight Loss
Ele
* Us
% AvCaCrHeMaProReSm

5.35/5.33/5.31 OM 34236-101, enWarranty # 36287-110, en
Registration Card# 45623-102, en3 July 2007
Precor, C, CrossRamp, EFX, M, Move Beyond, and SmartRate are registered trademarks of Precor Incorporated. Crosstrainer, QuickStart, and StretchTrainer are trademarks of Precor Incorporated.Copyright 2007 Precor Incorporated. Specifications subject to change without notice. www.precor.com
NOTICE: Precor is widely recognized for its innovative, award winning designs of exercise equipment. Precor aggressively seeks U.S. and foreign patents for both the mechanical construction and the visual aspects of its product design. Any party contemplating the use of Precor’s product designs is hereby forewarned that Precor considers the unauthorized appropriation of its proprietary rights to be a very serious matter. Precor will vigorously pursue all unauthorized appropriation of its proprietary rights.
Precor Incorporated20031 142nd Ave NEP.O. Box 7202Woodinville, WA USA 98072-40021-800-347-4404
OM_5.3x-V_Cover.fm Page 4 Monday, July 30, 2007 3:08 PM
1