operating instructions and spare parts list
TRANSCRIPT
Operating Instructions
and
Spare Parts List
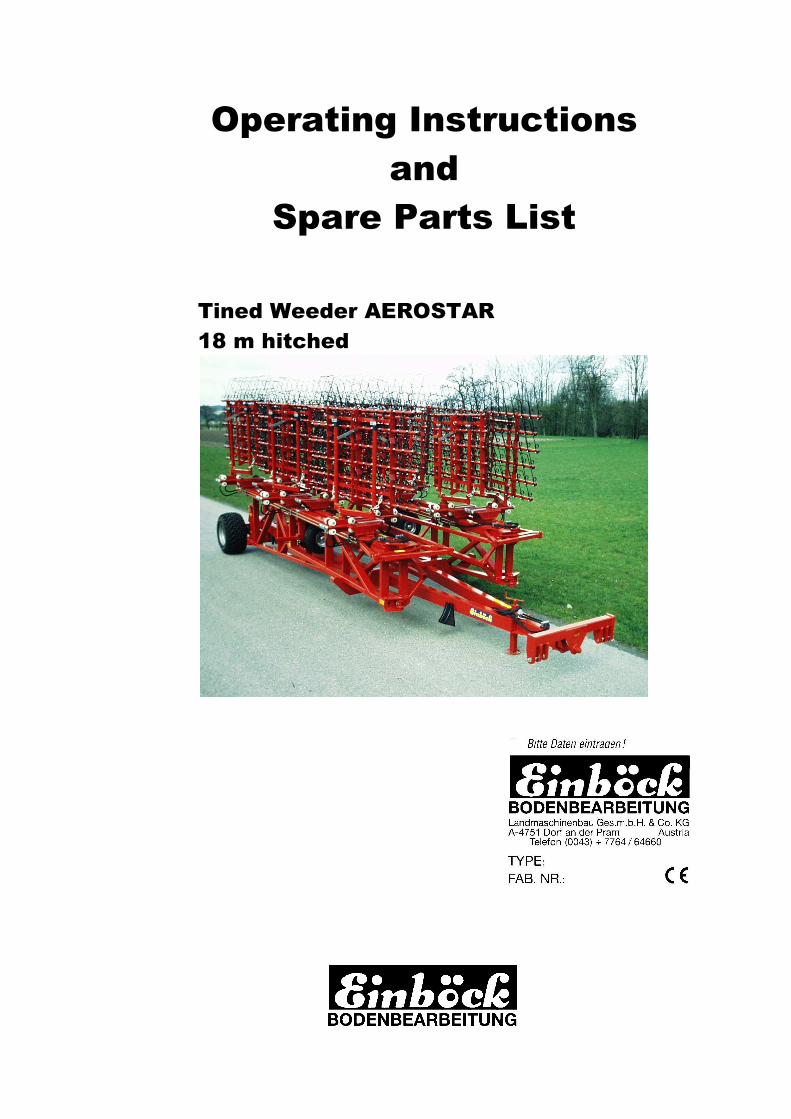
Tined Weeder AEROSTAR
18 m hitched

EC - Conformity Declaration Referring to the EG-regulations 98/37/EC
The producer, the company Einböck GmbH & CoKG ; Schatzdorf 7 ; A-4751 Dorf an der Pram declares that the product
Tined Weeder AEROSTAR 18.00 m Type / Fabrication Number (see at the Delivery declaration) to which the conformity declaration refers, corresponds with the respective basic safety- and health regulations of the EC-instructions 98/37/EC and the requirements of the other respective EC-regulations.
if so: Titel / Number / status of issue of the other EC-instructions
For the skilful realisation of the mentioned safety- and health regulations mentioned in the EC-regulations the following norms and/or technical specifications have been applied: EN 292-1 : 1991; EN 292-2 : 1991 if so: Titel / Number / status of issue Safety and technical requirements for soil treatment equipment ÖNORM L 5224
Dorf /Pram, 14.11.2005 Place, date Signature Einböck Leopold Managing Director
Landmaschinenproduktion Metallverarbeitung
Einböck GmbH. & Co.KG Schatzdorf 7 A-4751 Dorf an der Pram Austria
Tel 43(0)7764/6466-0 Fax 43(0)7764/6466-85 Email [email protected] Internet http://www.einboeck.at
We would like to congratulate you on the purchase you have made and would to wish you a great deal of enjoyment and success, when working with this equipment. Please make sure that you read all the information contained in these instructions before you operate the machine.
Guarantee On receipt of the machine, please examine it immediately for any possible damage incurred during transportation. Delayed complaints for damage incurred during transportation will not be acknowledged. Einböck grants a six moth Company Guarantee, valid from the date of delivery (your invoice or delivery note serves as an insurance document). This guarantee is valid in cases where the materials used, or construction is defective. It does not apply to parts, which are damaged through normal or excessive wear-and-tear!
The guarantee is invalid: • Whenever damages result form the use of excessive force • Whenever the machine is known to have been incorrectly operated • Whenever the stipulated KW/HP limit is exceeded • Whenever the machine is altered, enlarged or equipped with other spare parts without
the manufacturer’s consent. All information, pictures and technical data in this operating instruction comply with the latest state at the time of publication. Design changes are reserved at any time and without notice (publication). Accident Prevention The general accident prevention regulations are to be complied with (those regulations which are relevant to the country concerned). When unhitching the equipment, make sure you secure it against unintentional toppling with the authorised unhitching supports. The machine is only allowed to be used by operators who are aware of the danger positions and are acquainted with the regulations for travelling on public thoroughfares. Transporting on Public Road (The most important regulations) The permitted axle load and the tractor’s total weight must not be exceeded. The attached equipment must be made identifiable with warning signs or red and white striped tape (according to the German, Austrian or relevant industrial norm). Dangerous or other vehicle-endangering parts must be covered, as well as being made identifiable with warning signs or red and white striped tape (as above). Warning signs or tape should be attached a maximum of 150 cm above the carriageway when transporting. Tractor lighting must not be impaired by the attached equipment; otherwise it must also be repeated on the attachment. The attachment is not allowed to impair or diminish the tractor’s steering capability!
Operating Instructions for E i n b ö c kOperating Instructions for E i n b ö c kOperating Instructions for E i n b ö c kOperating Instructions for E i n b ö c k
Tined Weeder Tined Weeder Tined Weeder Tined Weeder ---- Hitched Hitched Hitched Hitched
1) Make sure you read all of the accompanying documents in the operating instructions. Especially the annex “For your safety”
2) Hitching the Tined Weeder on to the tractor 3) Testing the hydraulic function and the folding mechanism of the machine 4) Adjustment of tine aggressiveness in the field 5) Road Transport 6) Servicing and Upkeep 2. Hitching the Tined Weeder on to the tractor: � The tyre pressure of the back wheel of the tractor should be 0, 8 bar, before you
start to work. � Additional wheel load can be profitable under harder working conditions. See also
the operating instruction of the tractor’s manufacturer. � The tractor must be equipped at the front with sufficient ballast load, to grant the
manoeuvrability and the brake horse power. A minimum of 20 % of the tractor’s dead weight is required on the front axle.
� The bottom linkages must be positioned on the left and right side at the same height.
� Hitch the machine on to the tractor’s two-point linkage. � Mind the stickers on the machine. � Run the cable of the electro-magnetic control valve as desired and connect it to a
12 V power source. � Mind the instructions of the tractor’s manufacturer. � Adjust the side-wing so, that the machine can swing freely on the field and that it
can be fixed in the transport position. � Fold in parking supports and hook up the parking chock.
3. Testing of the hydraulic function of the machine and the folding mechanism
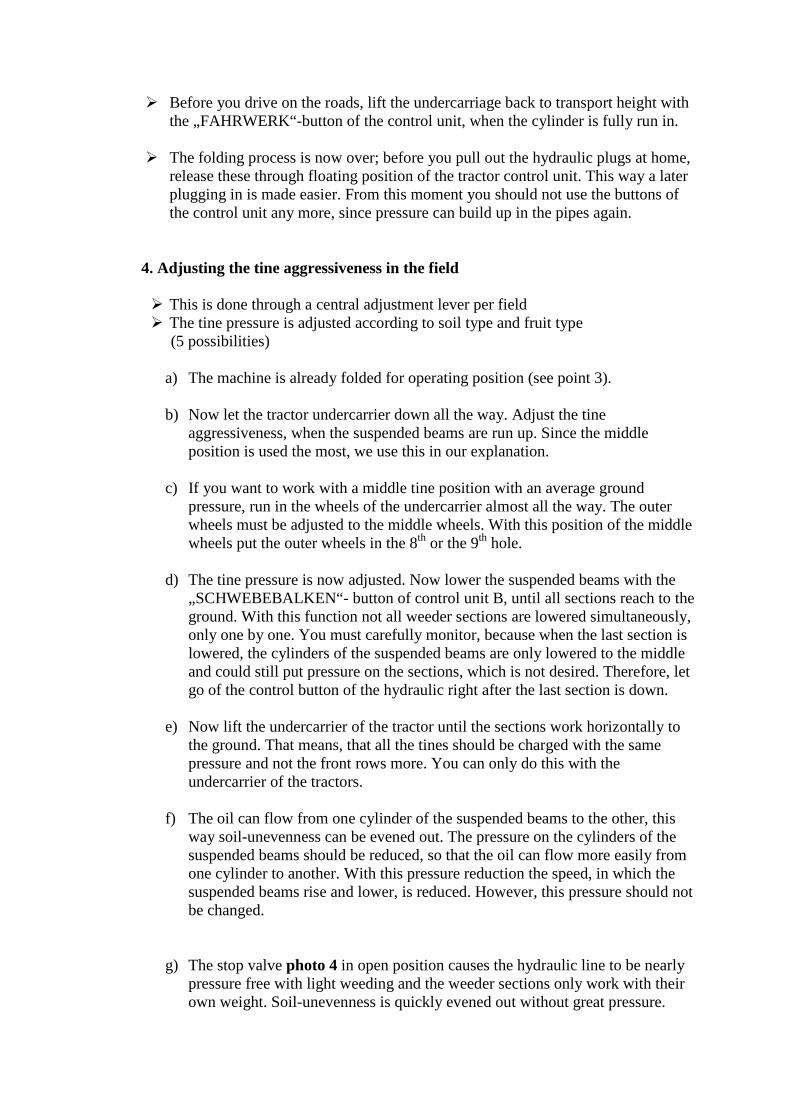
� Connect the hydraulic line with the tractor. One line is marked red, so that the control always works in the same way. This way you cannot confuse them when connecting. The oil flow is regulated with the tractor control unit, as if the cylinder runs in or out. With the manual steering photo 1 only the respective cylinder is controlled.
� Now you must tilt up the machine with the „KIPPEN“ button of the control unit
1/4th of the way, so that the frame does no longer rest on the catch straps photo 5.
� Remove the security chains which are located on the end of the side wings. Now you must fold the machine with the button „KLAPPEN” of the control unit in a horizontal position (“LANGSAM”). (An adjustable throttle is built-in, so that the folding does not go too fast. This throttle should not be adjusted! Photo 3)
� Now you must fully extend the machine with the „Kippen“– button of control unit A until the weeder sections stand horizontally to the ground.
� You can lower the undercarriage with the „FAHRWERK“ button of the control
unit B until the desired depth is reached.
� Now you can hook up the single sections according to the indicated numbers (for first use only!).
� For tining you must extend all suspended beams to the middle with the button
„SCHWEBE-BALKEN“of control unit B (see point 4).
� The aggressiveness can also be adjusted when adjusting the tine angle (manually) or when adjusting the hydraulic undercarriage and through lifting and lowering the tractor hydraulics. Please make sure that the outer support wheels must be manually adjusted to the height of the middle wheels. (see point 3) If you want to fold back to the transport position you must note the following points:
� Extend the suspended beams of all sections upward all the way.
� Now put the tines of the sections all the way back – the lightest position – the
machine should only be folded this way!
� Tilt the back part almost to a vertical position with the „KIPPEN“ button of the control unit A so that the tilt cylinders are run in at 90%. If you want to reverse on the field also run in the tilt cylinders (“KIPPEN” button of control unit A) as desired (about a 1/3rd). The position of the suspended beams can be left in their position.
� Now push the side support wheel photo 6 all the way up and stick the bolt
through the sleeve, without fixing the hole strip of the parking support with the bolt.
� Then fold together the machine with the “KLAPPEN” of the control unit. If the folding should not work, then the machine must be tilted more forward with the “KIPPEN” button of the control unit.
� Important! Please make sure when flapping the side wings, that the outer wings do not rest on the roundings of the catch straps showed in photo 5.1
� When the machine is folded, tilt it downward all the way, until it rests in the catch straps photo 5. Now you must secure the side wings through hooking up the security chain, which is at the end of the side wing, in order to avoid swivelling. This way also the outer wing is held inside and the transport width does not exceed 3 m.
� Before you drive on the roads, lift the undercarriage back to transport height with the „FAHRWERK“-button of the control unit, when the cylinder is fully run in.
� The folding process is now over; before you pull out the hydraulic plugs at home, release these through floating position of the tractor control unit. This way a later plugging in is made easier. From this moment you should not use the buttons of the control unit any more, since pressure can build up in the pipes again.
4. Adjusting the tine aggressiveness in the field
� This is done through a central adjustment lever per field � The tine pressure is adjusted according to soil type and fruit type (5 possibilities)
a) The machine is already folded for operating position (see point 3). b) Now let the tractor undercarrier down all the way. Adjust the tine
aggressiveness, when the suspended beams are run up. Since the middle position is used the most, we use this in our explanation.
c) If you want to work with a middle tine position with an average ground
pressure, run in the wheels of the undercarrier almost all the way. The outer wheels must be adjusted to the middle wheels. With this position of the middle wheels put the outer wheels in the 8th or the 9th hole.
d) The tine pressure is now adjusted. Now lower the suspended beams with the
„SCHWEBEBALKEN“- button of control unit B, until all sections reach to the ground. With this function not all weeder sections are lowered simultaneously, only one by one. You must carefully monitor, because when the last section is lowered, the cylinders of the suspended beams are only lowered to the middle and could still put pressure on the sections, which is not desired. Therefore, let go of the control button of the hydraulic right after the last section is down.
e) Now lift the undercarrier of the tractor until the sections work horizontally to
the ground. That means, that all the tines should be charged with the same pressure and not the front rows more. You can only do this with the undercarrier of the tractors.
f) The oil can flow from one cylinder of the suspended beams to the other, this
way soil-unevenness can be evened out. The pressure on the cylinders of the suspended beams should be reduced, so that the oil can flow more easily from one cylinder to another. With this pressure reduction the speed, in which the suspended beams rise and lower, is reduced. However, this pressure should not be changed.
g) The stop valve photo 4 in open position causes the hydraulic line to be nearly pressure free with light weeding and the weeder sections only work with their own weight. Soil-unevenness is quickly evened out without great pressure.
ATTENTION: If the stop valve is closed again photo 4.1 you can put pressure on the sections as adjusted by Einböck (60 bar). This is advisable for medium to hard soil conditions. After closing the stop valve you must put all the suspended beams in the highest position. Now lower the suspended beams again down to the middle. Please note, only when the cylinder of the suspended beams have rest-stroke, the unevenness of the ground can be evened out. A suspended beam can only even out upward, if one or more other beams are evening out downwards. With opened stop valve nevertheless a suspended beam can even out unevenness of the ground without another suspended beam moving down or upward or is charged with pressure.
ATTENTION:ATTENTION:ATTENTION:ATTENTION: The folding to the transport position is only possible with closed stop valve photo 4.1. Please follow the operating instructions.
5. Road Transport � Make sure that the side wings rest fully on the catch straps photo 5. � Check also if any safety tension pins have been lost whilst working on the fields. � Refer to the Highway Code (Road Traffic Act) whenever transporting on public
thoroughfares. � Always use the parking chocks when parking the machine. 6. Servicing and Upkeep: � Please mind the following instructions, if you want to keep the machine in a good
condition after a long working time:
• In annex “For your safety” you will find some general safety rules for the servicing.
• Parts and accessories are conceived (draft) especially for the machine. • We point out especially, that original parts and accessories which are not
delivered by us, are also not inspected and released by us. • The mounting and the use of such parts can possibly change and impair the
constructional quality of your machine negative. The manufacturer does not undertake liability for damages which are caused for the use of not original parts.
• Independent changes and the use of components and attachment parts on the machine exclude the liability of the manufacturer.
• Tighten all bolt connections after a maximum of 3 working hours, and once again after approx. 20 working hours. Check regularly afterwards. (Loose bolts can cause a great deal of consequential damage which is not covered by the guarantee).

• Regularly grease the greasing points on all joints (Recommended: every 10 operational hours, with all-purpose grease)
• Also grease the linkage slots on equipment with quick – release coupling. • After the first 10 working hours and then after all 50 working hours you should
test for leaks in the hydraulic-aggregate and the pipes and tighten all screws. • Before every operation you should check the hydraulic-pipes of wear. • Attention! Fluid which flows out under high-pressure can cause hurts. Contact
a doctor immediately! • After cleaning grease all lubrication points and distribute the lubricant
consistently good in the bearing (for example a short test run). • Don’t use a high-pressure cleaner for cleaning of gearing- or hydraulic-parts. • Varnish-damages can be caused by cleaning with high-pressure. • After the season protect the machine with non-polluting prophylactic from rust. • Park the machine where you can keep from influence of the weather. • Only park hydraulic and also mechanic machines in folding position. • Unhitch the machine so that the tines are free of any pressure. • Check the tyre pressure (Tyres 10.0/75-15.3 and 13.0/55-16-AW approx. 4 bar,
18 x 8.50 ca. 2,5 bar) Faults:
� If the electromagnetic valve does not react, check if the fuse on the tractor is working.
� In the plug , which is plugged into the electric control unit photo 2, there is a diode (photo 10, pos.38) which stops functioning at a hairline crack. If you need to exchange it, please make sure that you do not mount the fuse laterally reversed.
Adjustment of the Weeder-Flexibility
Soil uneveness should be evened out through the normal spring travel of the single weeder tine, as through the easy flexibility of the weeder section and the hydraulic level regulation. Should however an even bigger flexibility of the section be desired, the nuts as marked in the photo below, must be loosened by a half up to a full rotation.
WEEDER SECTION
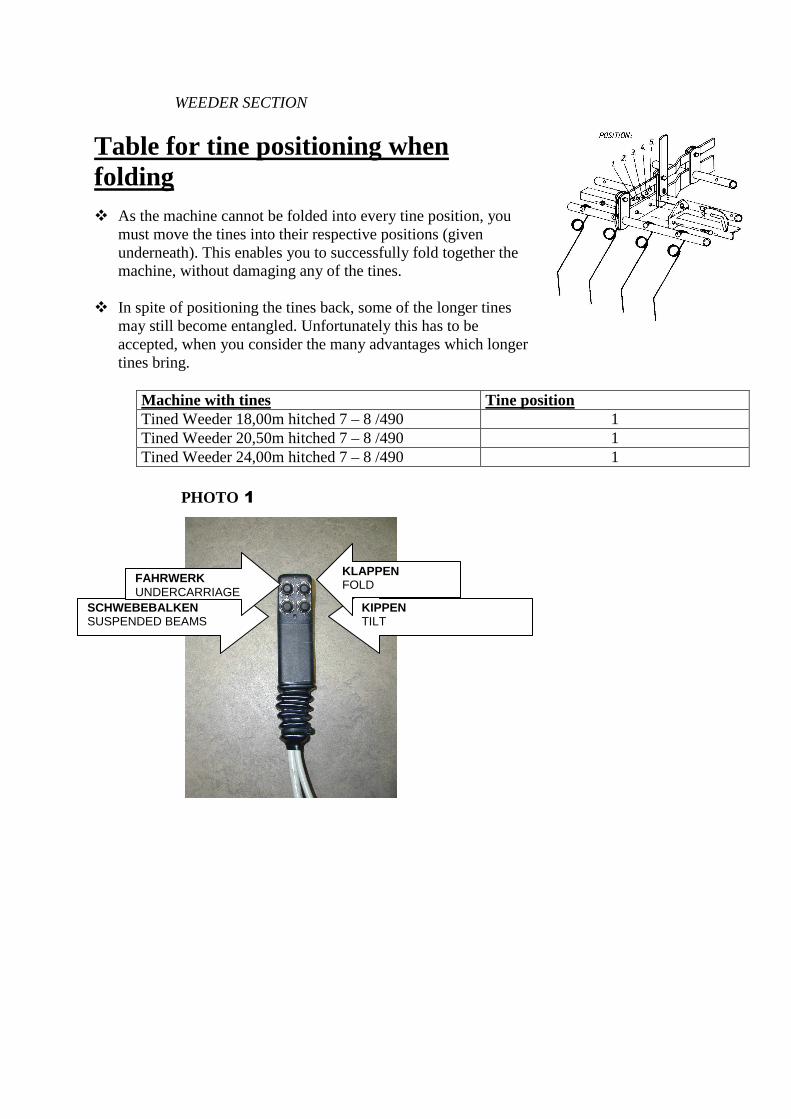
Table for tine positioning when folding � As the machine cannot be folded into every tine position, you
must move the tines into their respective positions (given underneath). This enables you to successfully fold together the machine, without damaging any of the tines.
� In spite of positioning the tines back, some of the longer tines
may still become entangled. Unfortunately this has to be accepted, when you consider the many advantages which longer tines bring.
Machine with tines Tine position Tined Weeder 18,00m hitched 7 – 8 /490 1 Tined Weeder 20,50m hitched 7 – 8 /490 1 Tined Weeder 24,00m hitched 7 – 8 /490 1
PHOTO 1
SCHWEBEBALKEN SUSPENDED BEAMS
FAHRWERK UNDERCARRIAGE
KIPPEN TILT
KLAPPEN FOLD
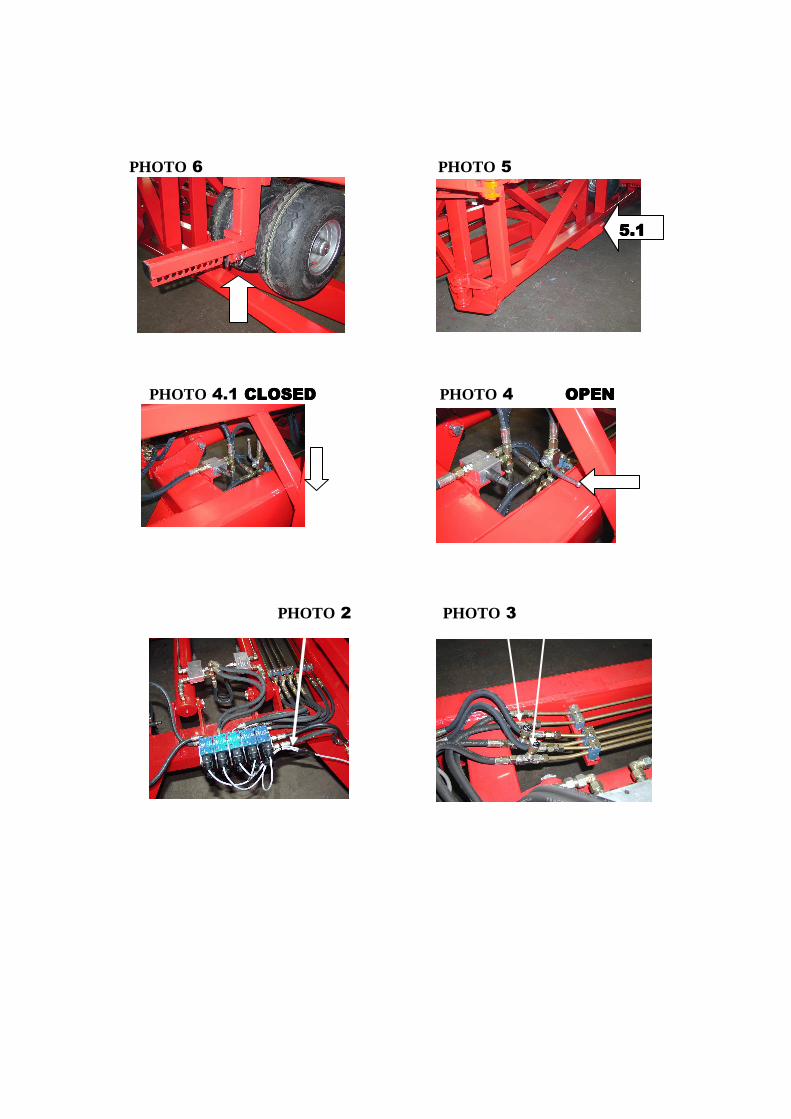
PHOTO 6 PHOTO 5
PHOTO 4.1 CLOSEDCLOSEDCLOSEDCLOSED PHOTO 4 OPENOPENOPENOPEN
PHOTO 2 PHOTO 3
5.15.15.15.1

THE BASICS OF THETHE BASICS OF THETHE BASICS OF THETHE BASICS OF THE
TINED WEEDERTINED WEEDERTINED WEEDERTINED WEEDER The Practical Application of the Einböck Tined Weeder For years the Einböck Tined Weeder has been well established at home and abroad – not only for mechanised crop care, but also as an alternative to chemical weed control. The Einböck Comb achieves decisive results in soil care through its successful application on cereals, maize, turnips, rape, potatoes, vegetables, peas, soy, field beans and grassland. As you can see, no limit can be set on the working area of the Comb.
The Tined Weeder can fit into your whole cultivation process with no problem at all. This includes the rotation of crops to fertilisation, from soil treatment right up to mechanised weed control. The aim of your process will be to keep the weed stock down to a minimum, so that no qualitative and quantitative damage occurs to your plant cultivations. It is however unwise to work towards a completely weed free terrain, as there are also many deciding advantages, which are achieved through the presence of various types of weed growths. Many other effects, which result from the use of the Tined Weeder, contribute positively to the forming of a good stock of plant cultivations: - soil ventilation - regulation of water table - stimulation of stock
However, any success with chemical-free weed control depends strongly on you, as you are urged to monitor any changes in the soil conditions very carefully. You should select the treatment timing, so that the Comb is used around midday in sunny weather, to kill off and dry out the young weed shoots in the sun. Make sure that the ground is not damp. The optimal depth and intensity settings, as well as driving speed and tine adjustment is carried out according to your understanding of the relationship between soil composition and weather conditions. After this series of explanations you ought to now try and see the soil as a highly complex organism, in which more life forms are hidden than there are human beings living on our planet. Einböck has used its experience of more than fifty years in the production of soil working equipment to create a technical and practical as well as functional, high quality weeder for you. For a more accurate machine description, please consult our Tined Weeder leaflet.
70% of the Tined Weeder´s success depends on the burying of the weed in the shoot stage. The actual ripping out of the weeds only amounts to 30%. Due to this fact, various requirements can be given, which will help lead to a successful comb pass:
� The soil should be as well-prepared and as loose as possible. Therefore the PH value from the surface top soil must above all agree with tone rich soils which are prone to crusting. On critical (time) soils, relatively light machines with large working widths for dragging and blind combing are suitable in the spring for the lightest possible pass, in order to minimise any damage from the tracks. When dragging and blind combing, success depends on a good soil adaptability (long tines are the best). You can achieve the best results through machines which can be adjusted or which have as many as possible

folding sections. You should work with a lower or higher tine pressure according to the soil conditions.
� The seedbed within the combing area should be coarsely tilled in September, in order to still provide a loose soil in the spring.
� If you still have a hard frozen soil in spring, you should roll as well and then comb after the initial sprouting of the stock.
� The faster you drive when combing, the greater the strike power and the greater the success with your weed control.
The Correct Growth Meeting The measures which are taken before any expansion of the cultivation are especially effective, therefore when controlling the weeds, the timing must be coordinated with the working of the soil and the sowing.
� Wherever possible the established and tested method of dragging should precede the sowing and blind combing, in order to stimulate a whole stock of weeds to sprout at the right time.
� Blind combing (before any cereal growth) brings about a great deal of success. This can be carried out right up until the cereals reach their peak (Stage: EC 07 to EC 10).
� With weed control, the greatest success (up to 80%) will be achieved right at the germination of the weeds or small leaf stage by burying and uncovering them.
� The correct optimal combing time (i.e. when the weed shoots first break through the seedbed) can be determined with the help of a pane of glass, placed down upon the soil. As the first seed leaves start to appear, the comb should then be used.
� The autumn seedlings of wild grass and agricultural fox tail often cause the most problems with rye, winter barley and early sown wheat if in a cereal – rich crop rotation. With rye and winter barley, a successful combing depends on a timely pre-winter treatment. With wheat, the somewhat later sowing time lengthens the time period for combing and therefore reduces the pressure from weeds.
� If the weeds have gone past the shoot leaf stage and have reached the small rosette stage, then weed control becomes more difficult: here the bed needs to be more intensively combed (with greater pressure and a steeper angle setting of the tines), as the weeds are very hard to rip out and also survive any previous burying.
� It is especially effective to comb on sunny and windy days towards midday. The exposed shoots can then dry out by the afternoon.
Winter Cereals Autumn Treatments: 1. Treatment - blind comb
Aim: • soil ventilation • destruction of any already germinating weeds • shattering of the top soil

2. Treatment - with an earlier sowing, you should treat lightly at the 2 or 3 leaf stage (this is very effective against wild grass).
Spring Treatments: 3. Treatment - as soon as possible on the medium setting.
Aim: • strengthens the stems • stimulates the stock • loosens and airs the soil
4. Treatment – with a 30 cm to 40 cm growth: to motivate the nutrients, control any late
germinations and prevent disease as well as creating balanced growing conditions for plants and micro-organismus.
Summer Cereals 1. Treatment – after a somewhat later sowing, blind comb very carefully 2. Treatment – in the 3 leaf stage on a medium setting 3. Treatment – towards the end of the stock on a relatively high setting, as there is a stronger
weed pressure in the spring
Maize
1. Treatment – blind comb This is only possible with a greater seed depth (4cm to 5cm).
2. Treatment – with a growth of 7cm to 18cm. The Einböck Tined Weeder can be used quite extensively with this growth height. During this stage you should comb on warm days, because the maize plants become suppler with the heat of the sun and therefore do not snap when combed.
3. Treatment – This ought to be carried out with the Einböck Special Maize Harrow.
Turnips
1. Treatment – blind comb on a lower tine setting. 2. Treatment – 3cm to 4cm growth (on a medium tine setting). 3. Treatment – this ought to be carried out with the Einböck Special Maize-Turnip Harrow.
Rape
Blind combing is not possible here and not reasonable, because rape grows very quickly and is also not hindered by early germination. 1. Treatment – in early autumn with a growth of about 20 cm with a very fine setting.
Aim: • loosens the soil • improves the availability of nutrients • destruction of the still invisible autumn growth germination
2. Treatment – as soon as vegetation begins, comb with a medium tine setting. Aim: loosens the soil to stimulate branching

Potatoes
1. Treatment – blind comb with a medium tine setting 2. Treatment – 3cm to 4cm stage, afterwards pile up. 3. Treatment – pile up banks, if the soil and cultivations need it.
Vegetables
1. Treatment – small cuttings and seeds. With a growth of 4cm to 5cm with a low tine setting. Seedling - about 14 days after planting with a low setting
2. Treatment – according to the weed pressure and soil conditions. 3. Treatment – with the Einböck Special Harrow (EMS).
Peas
1. Treatment – blind comb 2. Treatment – 8 leaf - stage
Soja
1. Treatment – blind comb with a low tine setting 2. Treatment – in the 3 to 4 leaf stage with a medium tine setting 3. Treatment – according to the weed braid with a higher tine setting 4. Treatment – shortly before the series end with the Einböck Special Harrow (EMS).
Fieldbeans
1. Treatment – blind comb with the highest tine setting possible 2. Treatment –in the 3 leaf stage of the bean with a medium tine setting 3. Treatment – with a growth of 15cm to 20cm. Aim:
• loosens soil before plant series end • optimal soil ventilation up until the harvest
4. Treatment – best with the EMS
Grassland Care The Tined Weeder in conjunction with the Einböck Special Grassland Plate is suitable for use in levelling out molehills, clearing away cow pats, as well as smoothing out dung and manure and airing the turf. The Einböck Tined Weeder is also well suited for shattering the winter furrow. For an improvement of grassland and pastures (grass seeding) Einböck offers a pneumatic seeding machine “PNEUMATICBOX”, which is mountable on various weeder types. We will be happy to send you a leaflet on request.

For your safety..... This supplement to the operating instructions contains general behaviour rules towards the agreed use of the equipment, as well as safety technical advice, which you really should take notice of in order to ensure you personal safety. The list is very extensive. Some of the advice is not exclusive to the delivered equipment. The advice summary is often however, remembered by you, often without you realising it as you daily operate the machine and equipment. In addition you take notice of the remaining safety rules. 1. Intended Use • The equipment has been built for the exclusive purpose of carrying out agricultural tasks. • Any use exceeding this, counts as not having been agreed upon, and the manufacturer is
therefore not responsible for damage resulting from this. In this case the responsibility is borne solely be the user.
• Adherence to the working, servicing and maintenance requirements as laid down by the
manufacturer is also a part of the agreed usage.

• The equipment may only be used, serviced and maintained by the people familiar with this
task and who have been informed of the dangers. Please also pass on all safety instructions to other users.
• The relevant accident protection regulations as well as the particular generally recognised
safety technical, working medical and road traffic rules are to be adhered to. • The manufacturer accepts no responsibility for damage resulting from unauthorised
alterations to the equipment. 2. General Safety: Technical Advice and Accident Prevention Regulations • Check over the machine and the tractor for traffic and operational safety before every
inauguration. • Take heed of the general current safety and accident prevention regulation. • Attaching warning and advice signs onto the equipment provides important information
which ensures a danger-free operation. • Pay attention to the relevant regulations when using public thoroughfares. • Make sure you are familiar with all the setting up and operation basics as all their
functions before you begin working; it is too late during use. • The user should wear tight-fitting clothing – avoid wearing loose clothing. • Keep the equipment clean to avoid the risk of fire. • Check the surrounding area before driving off and before operating the machine
(children). Ensure that you have sufficient all-round visibility. • Nobody is permitted to ride on the machine whilst working, or whilst being transported. • Couple on the machine according to the regulations and only fasten onto those linkage
points stipulated by the manufacturer. • Special attention is needed when hitching and unhitching from the tractor. • Set up the supports in their respective positions whenever attaching or detaching
equipment. • Always attach loads according to regulations and always to the linkage points provided for
that purpose. • Comply with the permitted axle load, total weight and transporting measurements.
• Check over the transporting equipment e.g. lighting, warning equipment and possible guard fittings.
• Release ropes for the hydraulic coupling must hang loose. They should not be able to
release themselves when working on a deep setting. • Never leave the tractor seat whilst driving. • Driving conditions, steering ability and braking ability are affected by attached or hitched
on equipment and ballast weights. • When turning, take into consideration the extended overhang and/or the swinging affect. • Only operate the machine, when all safety guard devices are attached and in the guard
position. • Staying within the working area is forbidden. • Do not stay within the turning and swing area of the machine. • Hydraulically folding frames may only be operated when nobody is within the swing area. • “Squash and cut spots” are to be found where different power parts are in operation (e.g.
Hydraulic). • Always make sure of a good stable standing position with machines with manual folding. • There is a danger of a run-on swing effect after raising in machines driven at speed with
ground driven tools. Only approach when the equipment is motionless. • Before leaving the tractor seat – lower the machine onto the ground, switch off the engine
and remove the ignition key. • Nobody is permitted to remain in between the tractor and the machine without the vehicle
being secured against further movement by the locking brake and/or wedges placed underneath.
• Secure folded frames and lifting equipment in the transport position. • Swing in the “catching-arm” and look in place before travelling onto the carriage way. • Bolt the track guide into the transport position. 2.1. Attached Equipment • Position the setting-up equipment before hitching or unhitching machines onto and from
the three linkage, to exclude unintentional raising or lowering of the machine.
• The attachment categories of the tractor and equipment must match or agree for the three-point linkage.
• “Squash and Cut” spots constitute a danger within the area of the three point linkage. • Do not stand between the tractor and the machine when operating the external control. • Always make sure that the three-point linkage bars are fastened firmly on the side when
the machine is in the transport position. 2.2. Trailer equipment • Secure the machine after the parking with parking chocks! • Mind the maximum permissible support load of the trailer coupling, swing-axle or hitch! • Pay attention to enough mobility on the trailer point by the tractor hitch! 2.3. Hydraulic Fittings • Hydraulic fittings are highly pressurised • Pay attention to the stipulated connectors of the hydraulic hoses when connecting
hydraulic cylinders and hydraulic motors. • Make sure whenever connecting the hydraulic hose to the tractor’s hydraulics that the
hydraulics both on the tractor as well as on the equipment are depressurised. • If connecting the hydraulic functions between the tractor and the equipment, coupling
sleeves and plugs should be marked, so that mistakes cannot be made. Mixed up connectors will lead to reversed functions (e.g. raising/sinking) – Danger of accidents.
• Regularly check the hydraulic hose leads and replace if damaged or worn out. The
replaced leads must satisfy the technical demand requirements at the equipment manufactures.
• When looking for leaks use a suitable agent because of danger of injury • Escaping high-pressured liquids (hydraulic oil) can penetrate the skin and cause serious
injury. Seek immediate medical assistance if there are injuries (danger of infection). • Before beginning work on the hydraulic fittings, unhitch the machine depressurise the
fittings and switch off the motor. • Only unhook the safety chains after they have gone slack (the cylinder must be filled with
oil). 2.4. Servicing
• Always only undertake maintenance, servicing and cleaning work once the drive has been turned off and the motor is motionless – remove the ignition key.
• Regularly check guards and bolts to make sure they are fitted tightly and if necessary,
tighten them. • Always ensure complete safety when carrying out maintenance work on the raised
machine by using the proper supports. • Use suitable tools and gloves when replacing working parts with cutting edges. • Dispose of oil, grease and filters properly. • Always be sure to disconnect the electricity supply before working on the electrical
fittings. • Always clamp the cable onto the generator and the battery before carrying out electrical
welding work on the tractor and attached equipment. • Spare parts must at the very least satisfy the technical requirements stipulated by the
equipment manufacturer. These requirements are given from the original parts. 2.5. Pin shaft operation (only for pin shaft driven equipment) • Only those joint shafts stipulated by the manufacturer my be used. • Guard/bars and guard guides of the joint as well as pin shaft guards – on the equipment as
well – must be attached and kept in a proper condition. • Ensure the correct stipulated pipe covers of the joint shafts when in the transporting and
working position. • Only connect and disconnect the joint shaft when the pin shaft has been turned off and the
ignition key removed. • Always ensure correct assembly and securing of the joint valves • Joint shaft protection by securing against further movement by hooking on chains. • Make certain that the chosen Tractor’s pin shaft revolutions per minute matches the
permitted revolutions per minute of the equipment before turning on the pin shaft. • Pay attention when using the pin shaft that the revolutions per minute is dependant on
driving speed and the revolutions directions changes when driving backwards. • Before switching on the pin shaft, make sure that nobody is within the equipment’s danger
area. • Never turn on pin shaft when the motor is turned off.

• Nobody is allowed to be within the turning area of the pin or joint shaft when working
with the pin shaft. • Always turn off the pin shaft when big bends arise it is not needed any longer. • Reward of danger after switching off the pin shaft due to the following-on swing load. • During this period, nobody is allowed to approach too close to the equipment. Only after it
is standing completely motionless may work be carried out on it. • Only clean, grease or adjust the pin shaft driven equipment or the joint shafts when the pin
shaft is witched off, the motor is turned off and the ignition key removed. • Remove coupled joint shafts using the stipulated mounting. • After dismantling the joint shafts, cover the shaft stumps with protections covers. • If anything is damaged, immediately remove before carrying out work on the equipment. 2.6. Tyres • Take care that the machine is parked and secured during the work on the tyres (Parking
chocks). • The mounting of wheels and tyres require sufficient knowledge and prescribed mounting
tools! • Repair works on the tyres are allowed to executed only by technical personnel and with
suitable mounting tools! • Check regularly the inflation pressure (air pressure)! Mind the prescribed inflation
pressure

BESONDERS ZU BEACHTEN 1. Verwenden Sie nur Original-Ersatzteile. 2. Machen Sie genaue Angaben über Anschrift, Postamt und Zielbahnhof. Deutlich schreiben! 3. Type, Baujahr und Fabrikationsnummer der Maschine (am Typenschild eingeprägt) angeben. Den zu bestellenden Teil mit
Artikel Nr., Benennung und Stückzahl lt. Ersatzteilliste anführen. 4. Für eventuelle Fehllieferungen, die aus unvollständigen Angaben resultieren, ist der Auftraggeber verantwortlich. Bereiten Sie
daher besonders telefonische Bestellungen sorgfältig vor. 5. Lassen Sie allfällige Reparaturen an Ihrer Maschine möglichst in den Wintermonaten durchführen. Sie ersparen sich dadurch
Kosten und sichern sich für die Ernte ein einsetzbares Gerät. POINTS TO NOTE 1. Use only original spares. 2. Give exact details of address/nearest post office/railway station. Write legibly. 3. Quote machine type, year of manufacture and serial number (punched in data plate). Quote order code, description and quantity
required for each item ordered. 4. The customer is responsible for any mistakes in filling orders that may result providing insufficient information. Particularly
when ordering by phone, prepare data carefully beforehand. 5. If possible, have your machine repaired (should this be necessary) during the winter. This will save you money and ensure that
your machine is fully operational for the harvesting season. A REMARKER SPECIALEMENT 1. N´utiliser que des pièces originales. 2. Veuillez indiquer exactement votre adresse, le bureau postal et la gare destinatrice. Prière d´édire lisiblement. 3. Veuillez mentionner le type, l´année de construction et le numeró de fabrication de la machine (gravés sur la plaquette). Indiquez
la pièce à commander par son numéro, sa désignation et le nombre désirée. 4. Le donneur d´ordre est responsible d´éventuelles fausses livraisons résultant d´indications incomplètes. Préparez donc
soigneusement surtout les ordres téléphoniques. 5. Faites executer si possible en hiver les réparations éventuellement nécessaires. Vous épargnez ainsi des frais et votre machine sera
prête au moment de la recolte. FARE SPECIALE ATTENZIONE 1. Utilizzate esclusivamente pezzi ricambio originale. 2. Evidenziate esattamente il Vs. Indirizzo, l`ufficio postale e la stazione meta. Scrivete chiaramente! 3. Evidenziate il tipo. I`l anno di construzione nonche il no. di fabbicazione dell`attrezzo (evidenziato sull etichetta). Evidenziare
l`articolo desiderato col no. del pezzo la denomiazione e la quan desiderata. 4. L`acqurente sera responsabile di eventuali errori nel fornimento, qualora doveresso risultare da indicazioni non complete.
Eperci`o consigliabile organizzare accuratamente ogni ordinazione, specialmente se fatta per telefono. 5. Possibilmente fate riparare il Vs. attrezzo durante i mesi invernali. In questo modo risparmierete delle spese Vi assicurerete un
attrezzo pronto allùso per il raccolto. BELANGRIJKE PUNTEN 1. Gebruik alleen originele onderdelen. 2. Noteer de juiste gegevens als adres c.p. postbus, postcode en woonplaats. Duidelijk schrijven! 3. Type machine, bouwjaar en seriennummer van de machine (in het machineplaatje geslagen) vermelden. Het te bestellen
onderdeel met onderdeelnnummer, omschrijving en het benodigde aantal doorgeven. 4. Voor eventuele foutieve leveringen, ontstaan door het niet juist opgeven van de delen, is de opdrachtgever verantwoordelijk. Geef
daarom telefonisch orders goed en zorgvulding door. 5. Indien mogelijk, reparaties aan uw machine in de wintermaanden uitvoeren, dit bespaart kosten en verzekert u een goed inzetbare
machine tijdens het seizoen. Sie erreichen uns in Österreich: Einböck GmbH & Co KG Our address in Austria: MASCHINENBAU Voici notre adresse en Autriche: Schatzdorf 7 In Austria potete mettervi in contato con noi: A-4751 Dorf an der Pram U kunt ons bereiken: Tel.: +43/07764/6466 Fax: /6466-85 E-Mail: [email protected] Im Ausland betreut Sie Ihr Händler. (Importeur) Internet: http://www.einboeck.at Abroad please contact your dealer. (Importeur) A l´ètranger nous vous prions de vous adress à votre vendeur. All´estero potete metervi in contato con il vostro mercante. Uw importeur voor Nederland.
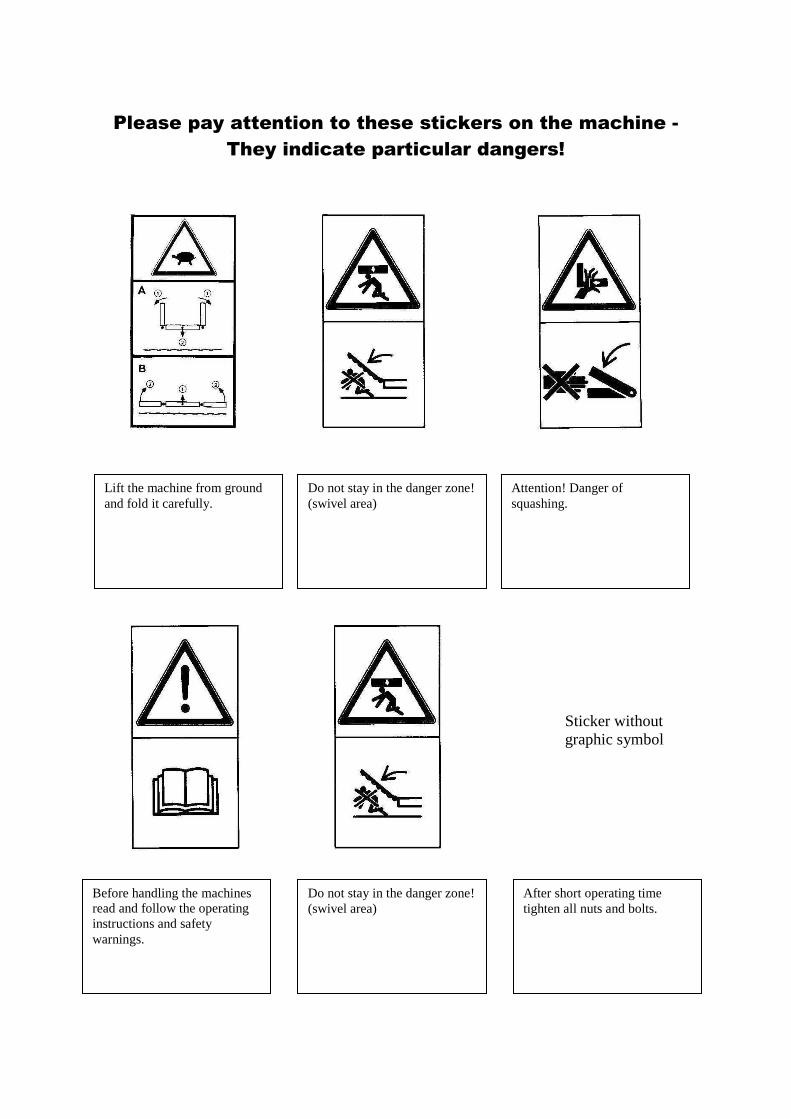
Please pay attention to these stickers on the machine -
They indicate particular dangers!
Sticker without graphic symbol
Before handling the machines read and follow the operating instructions and safety warnings.
Attention! Danger of squashing.
Lift the machine from ground and fold it carefully.
Do not stay in the danger zone! (swivel area)
Do not stay in the danger zone! (swivel area)
After short operating time tighten all nuts and bolts.