openlab cds chemstation edition with content management systems user's guide · ·...
TRANSCRIPT
OpenLAB CDS ChemStation Edition with Content Management Systems
User's GuideChemStation with Content Management Systems User's Guide
Agilent Technologies
Notices© Agilent Technologies, Inc. 2008-2017No part of this manual may be reproduced in any form or by any means (including electronic storage and retrieval or transla-tion into a foreign language) without prior agreement and written consent from Agi-lent Technologies, Inc. as governed by United States and international copyright laws.
Manual Part NumberM8301-90089
Edition09/2017Printed in GermanyAgilent TechnologiesHewlett-Packard-Strasse 8 76337 Waldbronn
WarrantyThe material contained in this docu-ment is provided “as is,” and is sub-ject to being changed, without notice, in future editions. Further, to the max-imum extent permitted by applicable law, Agilent disclaims all warranties, either express or implied, with regard to this manual and any information contained herein, including but not limited to the implied warranties of merchantability and fitness for a par-ticular purpose. Agilent shall not be liable for errors or for incidental or consequential damages in connection with the furnishing, use, or perfor-mance of this document or of any information contained herein. Should Agilent and the user have a separate written agreement with warranty terms covering the material in this document that conflict with these terms, the warranty terms in the sep-arate agreement shall control.
Technology Licenses The hardware and/or software described in this document are furnished under a license and may be used or copied only in accordance with the terms of such license.
Restricted Rights LegendIf software is for use in the performance of a U.S. Government prime contract or sub-contract, Software is delivered and licensed as “Commercial computer software” as defined in DFAR 252.227-7014 (June 1995), or as a “commercial item” as defined in FAR 2.101(a) or as “Restricted computer software” as defined in FAR 52.227-19 (June 1987) or any equivalent agency regu-lation or contract clause. Use, duplication or disclosure of Software is subject to Agi-lent Technologies’ standard commercial license terms, and non-DOD Departments and Agencies of the U.S. Government will
receive no greater than Restricted Rights as defined in FAR 52.227-19(c)(1-2) (June 1987). U.S. Government users will receive no greater than Limited Rights as defined in FAR 52.227-14 (June 1987) or DFAR 252.227-7015 (b)(2) (November 1995), as applicable in any technical data.
Safety Notices
CAUTION
A CAUTION notice denotes a hazard. It calls attention to an operating procedure, practice, or the like that, if not correctly per-formed or adhered to, could result in damage to the product or loss of important data. Do not proceed beyond a CAUTION notice until the indicated condi-tions are fully understood and met.
WARNING
A WARNING notice denotes a hazard. It calls attention to an operating procedure, practice, or the like that, if not correctly performed or adhered to, could result in personal injury or death. Do not proceed beyond a WARNING notice until the indi-cated conditions are fully understood and met.
Software RevisionThis guide is valid for revision C.01.08 of OpenLAB CDS ChemStation Edition.
ChemStation with Content Management Systems User's Guide
In This Guide ...
In This Guide ...
This guide contains information on the interface between Agilent OpenLAB CDS ChemStation Edition and the central data storage provided by OpenLAB ECM or OpenLAB Server. It also describes the settings required by 21 CFR Part 11, and provides information on the workflows for ChemStation using a central data storage.
Table 1 Terms and abbreviations used in this document
Term Description
CDS Chromatography Data System
ChemStation OpenLAB CDS ChemStation Edition
Secure Workstation Secure Workstation for OpenLAB CDS ChemStation Edition
Data Store OpenLAB Data Store; as of rev. 2.1, the product name is OpenLAB Server
OpenLAB Server Data Storage product, formerly known as OpenLAB Data Store.
Content Management Data storage component provided as part of OpenLAB Server
ECM OpenLAB Enterprise Content Manager
AIC Agilent Instrument Controller
Control Panel OpenLAB Control Panel
Microsoft Control Panel Part of the Microsoft Windows operating system
Shared Services Set of components and services for licensing, users and roles, instrument configuration, security policy and more.Installed on all computers; accessed via the OpenLAB Control Panel.
OpenLAB CDS Shared Services Server Server running the Shared Services.Formerly known as OpenLAB Shared Services Server.
ChemStation with Content Management Systems User's Guide 3
In This Guide ...
1 IntroductionThis chapter introduces the integration of OpenLAB CDS ChemStation Edition with a content management system (OpenLAB ECM or OpenLAB Server) and describes the requirements of 21 CFR Part 11.
2 Basic ConceptsThis chapter describes how to log in to OpenLAB CDS ChemStation Edition, explains the user interface items and toolbars related to the central data storage, and describes the main preference settings.
3 Working with ChemStation and Central Data StorageThis chapter describes the basic workflows for ChemStation with a central data storage system. There are four data-related workflows and two workflows for methods, sequence templates, or report templates.
4 Administration Regarding 21 CFR Part 11 ComplianceThis chapter explains the purpose of 21 CFR Part 11 and how the integration of ChemStation with a central data storage system addresses the requirements of 21 CFR Part 11.
5 Filter and Search OptionsThis chapter provides an overview of the filter and search options for ChemStation data in the central data storage system.
6 Troubleshooting
The chapter gives some elementary troubleshooting hints.
4 ChemStation with Content Management Systems User's Guide
Contents
Contents
1 Introduction 7What is a Central Data Storage? 8Using ChemStation with Central Data Storage 9Storage Model in OpenLAB ECM and OpenLAB Server 1621 CFR Part 11 Compliance 18
2 Basic Concepts 19Login and Lock Options 20User Interface in ChemStation Related to the Central Data Repository 23Preferences 28Remote Data Path as Sequence Parameter 40Compressed ChemStation File Formats 42
3 Working with ChemStation and Central Data Storage 43Transferring Data to or from the Central Repository 44Data-related workflows 45Workflows for Methods and Templates 56
4 Administration Regarding 21 CFR Part 11 Compliance 65Introduction to 21 CFR Part 11 67Overview of Configuration Steps Required for Part 11 70Audit Trails and Logbooks 71Security Policy 80Users/Groups/Roles Configuration 85ChemStation Administration Tool 93Electronic Signature 102
5 Filter and Search Options 107Attribute Extraction Services in ECM 108Search Options in OpenLAB Server 112
ChemStation with Content Management Systems User's Guide 5
Contents
6 Troubleshooting 113Error messages at OpenLAB Control Panel Startup 114Alerts and Error Messages at ChemStation Startup 115ECM or OpenLAB Server is not available after login 116Error Messages in the Queue Management 117Other Error Messages 120
7 Appendix 121Privileges in OpenLAB Control Panel 122ECM Privileges related to ChemStation 130
6 ChemStation with Content Management Systems User's Guide
ChemStation with Content Management Systems User's Guide
1IntroductionWhat is a Central Data Storage? 8Using ChemStation with Central Data Storage 9
Overview of data-related workflows 11Overview of workflows for methods/sequence templates/report templates 14
Storage Model in OpenLAB ECM and OpenLAB Server 16File Management in ECM 16File Management in OpenLAB Server 17
21 CFR Part 11 Compliance 18
This chapter introduces the integration of OpenLAB CDS ChemStation Edition with a content management system (OpenLAB ECM or OpenLAB Server) and describes the requirements of 21 CFR Part 11. In the following, the term ChemStation refers to Agilent OpenLAB CDS ChemStation Edition.
7Agilent Technologies
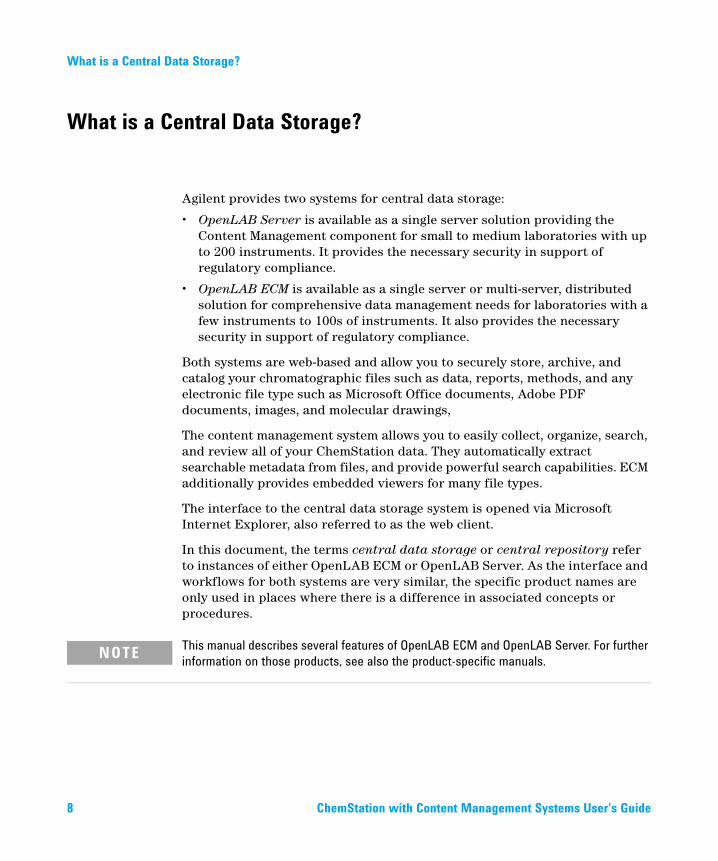
What is a Central Data Storage?
What is a Central Data Storage?
Agilent provides two systems for central data storage:
• OpenLAB Server is available as a single server solution providing the Content Management component for small to medium laboratories with up to 200 instruments. It provides the necessary security in support of regulatory compliance.
• OpenLAB ECM is available as a single server or multi-server, distributed solution for comprehensive data management needs for laboratories with a few instruments to 100s of instruments. It also provides the necessary security in support of regulatory compliance.
Both systems are web-based and allow you to securely store, archive, and catalog your chromatographic files such as data, reports, methods, and any electronic file type such as Microsoft Office documents, Adobe PDF documents, images, and molecular drawings,
The content management system allows you to easily collect, organize, search, and review all of your ChemStation data. They automatically extract searchable metadata from files, and provide powerful search capabilities. ECM additionally provides embedded viewers for many file types.
The interface to the central data storage system is opened via Microsoft Internet Explorer, also referred to as the web client.
In this document, the terms central data storage or central repository refer to instances of either OpenLAB ECM or OpenLAB Server. As the interface and workflows for both systems are very similar, the specific product names are only used in places where there is a difference in associated concepts or procedures.
NOTE This manual describes several features of OpenLAB ECM and OpenLAB Server. For further information on those products, see also the product-specific manuals.
8 ChemStation with Content Management Systems User's Guide
Introduction 1Using ChemStation with Central Data Storage
Using ChemStation with Central Data Storage
OpenLAB CDS ChemStation Edition provides an interface to the central data storage, which enable you to store analytical data and reports in a secure location. From ChemStation, you can log in to the central data storage and store ChemStation files in the central data repository:
• Methods (*.m)
• Sequence templates (*.s)
• Data files (*.d)
• Report templates for Intelligent Reporting (*.rdl)
• Reports (*.pdf, *.xls, *.doc, or *.txt)
• Library files (*.uvl)
• Column databases (*.mdb)
• Easy Sequence templates (*.est)
• Classic report templates (*.frp)
The storage of ChemStation data can be either automatic (that is, at the end of a single run or sequence) or manual. A manual storage is possible only when you already have a version in the system. The data can be downloaded later to ChemStation for review or reprocessing at any time.
Furthermore, OpenLAB CDS ChemStation Edition in combination with central data storage offers features that enable users to comply with 21 CFR Part 11 and similar regulations for electronic records and electronic signatures:
• Mandatory login/connection to the central data storage system
• Configurable session locking
• Configurable ChemStation user roles and privileges
• Full data traceability through audit trails for methods and results
• Full data versioning
You can use OpenLAB ECM in the following installation scenarios:
• Workstation
• Networked Workstation
• Distributed System
ChemStation with Content Management Systems User's Guide 9

1 IntroductionUsing ChemStation with Central Data Storage
You can use OpenLAB Server in the following installation scenarios:
• Secure ChemStation Workstation
• Networked Workstation
• Distributed System
The main workflows for the transfer of raw data and methods/sequence templates/report templates are listed below. These workflows indicate the system activities in relation to the work processes.
Naming ConventionsMake sure you only use the following characters for ChemStation items such as file or directory names, names of sequence templates, or names of ChemStation methods:
Check your names for leading or trailing blanks. They are not allowed, but are easily overlooked.
The following reserved device names cannot be used as the name of a file. Also avoid these names followed by an extension (e.g. Nul.txt):
• CON, PRN, AUX, NUL
• COMx (where x is a number from 1 to 9)
• LPT1x (where x is a number from 1 to 9)
A-Z, a-z, 0-9, _ (underscore), - (hyphen)
NOTE If you use tokens, file names or directory names are automatically created based on information such as instrument names, operator names, or sample names. Make sure that these names follow the same naming convention.
NOTE Automatically created file names may include specific characters for Front and Back injector location. These characters may be localized. They are valid even if they are not part of the characters listed above.
NOTE English, Japanese, and Chinese operating systems are used to test naming conventions. Agilent cannot give a support statement for non-English operating systems and their special characters.
10 ChemStation with Content Management Systems User's Guide
Introduction 1Using ChemStation with Central Data Storage
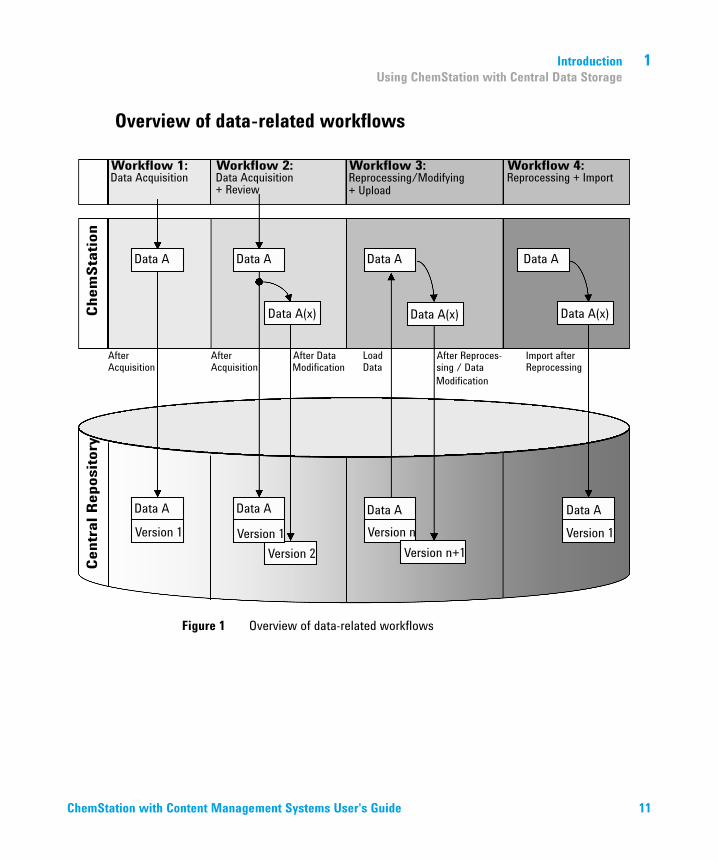
Overview of data-related workflows
Figure 1 Overview of data-related workflows
ChemStation with Content Management Systems User's Guide 11
1 IntroductionUsing ChemStation with Central Data Storage
Workflow 1: Raw data acquisition and automatic transfer to the central repository1 Analytical raw data is acquired using ChemStation.
2 The raw data is automatically uploaded to the central repository using the configured path definitions immediately after the single run/sequence is finished.
3 The data is added to the defined storage location.
Workflow 2: Offline revision during acquisition1 Analytical raw data is acquired using ChemStation.
2 While the acquisition is still running, part of the data is changed using an offline ChemStation.
3 The raw data is automatically uploaded to the central repository using the configured path definitions immediately after the single run/sequence is finished.
The initial version of the data is added to the defined storage location.
4 After work in the offline ChemStation is finished, the changed data is also automatically uploaded to the central repository.
The second version of the data is added to the central repository.
Workflow 3: Reprocessing data and automatic upload to the central repository1 Existing analytical data is loaded from the central repository into
ChemStation.
2 The data is reprocessed in ChemStation.
3 The data is automatically uploaded to the central repository. The storage location in the repository is defined by the original path definitions of the downloaded data.
4 A new version of the data is added to the central repository.
12 ChemStation with Content Management Systems User's Guide
Introduction 1Using ChemStation with Central Data Storage
Workflow 4: Import after reprocessing1 Existing analytical data is opened locally.
2 The data is reprocessed in ChemStation.
3 After reprocessing, the data is automatically uploaded to the central repository. The storage location in the repository is defined by the current preferences in ChemStation.
4 The initial version of the data is added to the central repository.
ChemStation with Content Management Systems User's Guide 13
1 IntroductionUsing ChemStation with Central Data Storage
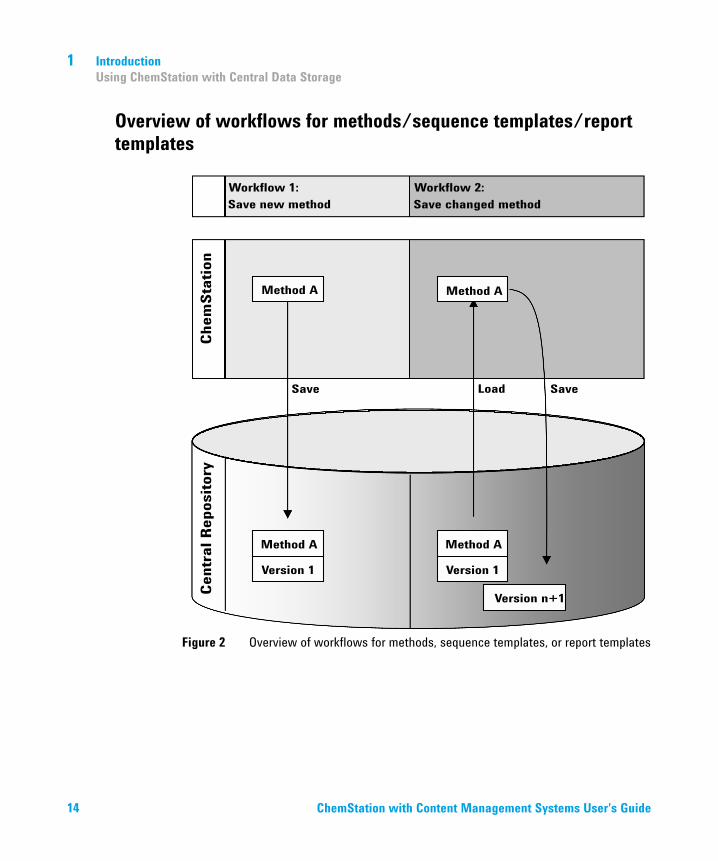
Overview of workflows for methods/sequence templates/report templates
Figure 2 Overview of workflows for methods, sequence templates, or report templates
14 ChemStation with Content Management Systems User's Guide
Introduction 1Using ChemStation with Central Data Storage
Workflow 1: Uploading a new method, sequence template or report template1 A new method, sequence template, or report template is created.
2 The method, sequence template, or report template is uploaded to the central repository using the path selected by the user.
3 The version 1 of the method, sequence template, or report template is automatically created in the central repository.
Workflow 2: Saving a changed method, sequence template or report template1 An existing method, sequence template, or report template is loaded from
the central repository.
2 The method, sequence template, or report template is modified in ChemStation.
3 The changed method, sequence template, or report template is saved to the central repository.
4 A new version of the method, sequence template, or report template is automatically created in the central repository.
ChemStation with Content Management Systems User's Guide 15
1 IntroductionStorage Model in OpenLAB ECM and OpenLAB Server
Storage Model in OpenLAB ECM and OpenLAB Server
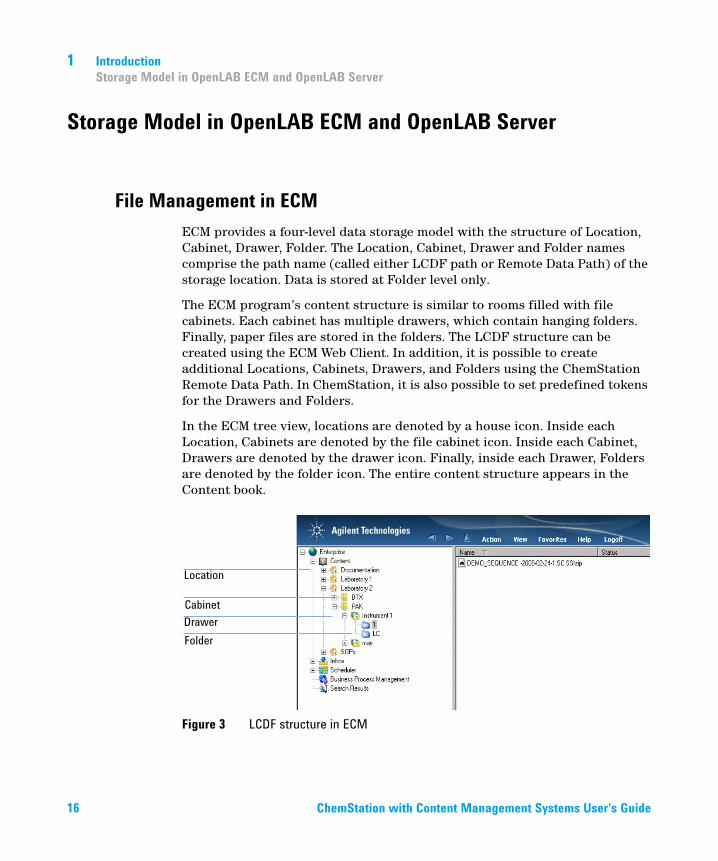
File Management in ECMECM provides a four-level data storage model with the structure of Location, Cabinet, Drawer, Folder. The Location, Cabinet, Drawer and Folder names comprise the path name (called either LCDF path or Remote Data Path) of the storage location. Data is stored at Folder level only.
The ECM program’s content structure is similar to rooms filled with file cabinets. Each cabinet has multiple drawers, which contain hanging folders. Finally, paper files are stored in the folders. The LCDF structure can be created using the ECM Web Client. In addition, it is possible to create additional Locations, Cabinets, Drawers, and Folders using the ChemStation Remote Data Path. In ChemStation, it is also possible to set predefined tokens for the Drawers and Folders.
In the ECM tree view, locations are denoted by a house icon. Inside each Location, Cabinets are denoted by the file cabinet icon. Inside each Cabinet, Drawers are denoted by the drawer icon. Finally, inside each Drawer, Folders are denoted by the folder icon. The entire content structure appears in the Content book.
Figure 3 LCDF structure in ECM
16 ChemStation with Content Management Systems User's Guide
Introduction 1Storage Model in OpenLAB ECM and OpenLAB Server
Uploaded objects can be stored in the lowest (i.e. Folder) level only. It is not possible to upload data to other levels of the hierarchy.
For convenience, you can use tokens for the Location, Cabinet, Drawer, and Folder. The system then automatically creates the corresponding path elements. The following tokens are available: instrument name, operator name, instrument number, or computer name.
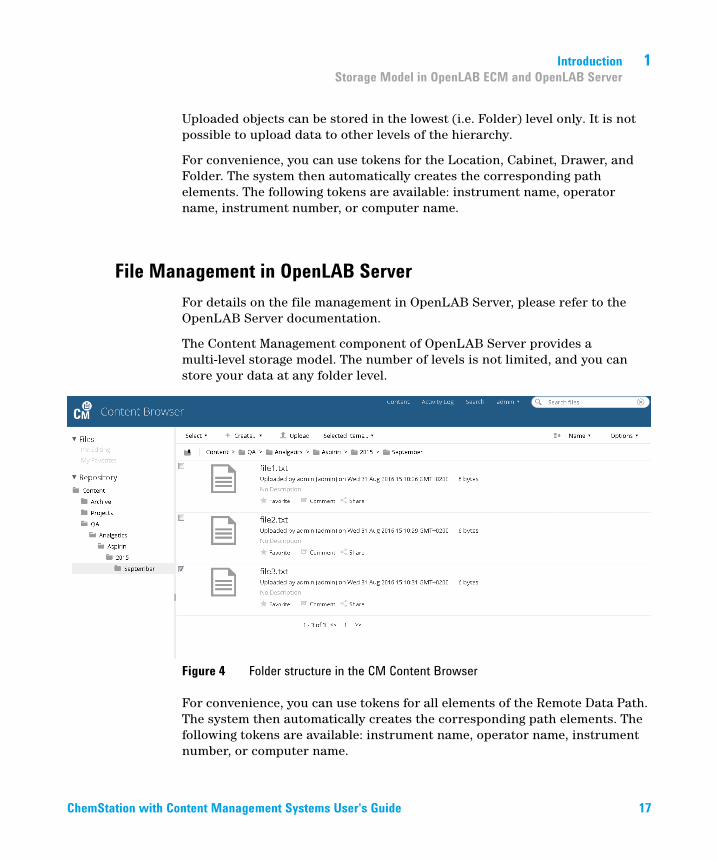
File Management in OpenLAB ServerFor details on the file management in OpenLAB Server, please refer to the OpenLAB Server documentation.
The Content Management component of OpenLAB Server provides a multi-level storage model. The number of levels is not limited, and you can store your data at any folder level.
Figure 4 Folder structure in the CM Content Browser
For convenience, you can use tokens for all elements of the Remote Data Path. The system then automatically creates the corresponding path elements. The following tokens are available: instrument name, operator name, instrument number, or computer name.
ChemStation with Content Management Systems User's Guide 17
1 Introduction21 CFR Part 11 Compliance
21 CFR Part 11 Compliance
Effective August 20, 1997, the U.S. Food and Drug Administration (FDA) released and published a new rule to enable pharmaceutical companies to approve their results with electronic signatures and to transfer paper-based documentation into electronic records. This rule is known as 21 Code of Federal Regulations Part 11 (referred to as 21 CFR Part 11) and applies to all industry segments regulated by the FDA.
21 CFR Part 11 includes the US Federal guidelines for storing and protecting electronic records and applying electronic signatures. The intent of these guidelines is to ensure that electronic records subject to these guidelines are reliable, authentic, and maintained with high integrity.
OpenLAB CDS ChemStation Edition in combination with OpenLAB ECM or OpenLAB Server provides the necessary controls for managing system access, audit trail functions, versioning of ChemStation data, and electronic signature functions. These systems ensure secure record keeping and data archival.
18 ChemStation with Content Management Systems User's Guide
ChemStation with Content Management Systems User's Guide
2Basic ConceptsLogin and Lock Options 20
User Permissions 20User Credentials 21ChemStation Operator Name 21Session lock 22
User Interface in ChemStation Related to the Central Data Repository 23
Overview of the interface elements 23The ECM or CM Menu 25The User menu 27
Preferences 28Remote Data Path 30Automatic Data Transfer Settings 32Transfer Management Settings 33Queue Management 36
Remote Data Path as Sequence Parameter 40Compressed ChemStation File Formats 42
This chapter describes how to log in to OpenLAB CDS ChemStation Edition, explains the user interface items and toolbars related to the central data storage, and describes the main preference settings.
19Agilent Technologies
2 Basic ConceptsLogin and Lock Options
Login and Lock Options
User PermissionsYou start ChemStation from the OpenLAB Control Panel. To prevent unauthorized access, OpenLAB CDS ChemStation Edition with central data storage requires authentication with a user name and password. If you use ECM, the ECM server is used as the authentication provider. With OpenLAB Server, users can be created locally or imported from the Windows Domain. You log in with your user credentials of the corresponding system.
You need specific user privileges for working with OpenLAB CDS as well as for working with the central data storage system. You specify the user privileges as follows:
• OpenLAB CDS privileges are set in the OpenLAB Control Panel.
• ECM privileges are set directly in OpenLAB ECM.
• OpenLAB Server/Content Management privileges are set in the OpenLAB Control Panel.
For more information on roles and user privileges, see “Users, Roles, and Privileges Concept with ECM” on page 90 and “Users, roles, and privileges concept with OpenLAB Server” on page 92.
20 ChemStation with Content Management Systems User's Guide
Basic Concepts 2Login and Lock Options
User CredentialsThe Login dialog requires you to enter a set of valid authorization credentials in order to log in to OpenLAB Control Panel.
You need to enter the following login details:
• Login: the user name defined in the OpenLAB Control Panel.
With ECM, this is the ECM user, which can be a Windows domain user or an ECM built-in user. With OpenLAB Server/Content Management, this is the OpenLAB Control Panel user, which can be a Windows domain user or an internally created user.
• Password: the password provided by your administrator, which can be changed on request (for 'built-in' users), or the password of your Windows domain account, if you are logging in using your Windows domain user name.
• Domain: the domain administrating the users
ChemStation Operator NameChemStation stores the operator name in the sample info (when running single samples) or in the sequence parameters (when running a sequence). This ChemStation operator name is your full user name as configured in the authentication system (e.g. OpenLAB Control Panel with internal authentication, ECM with built-in users, or Windows Domain). The operator name cannot be overwritten.
ChemStation with Content Management Systems User's Guide 21
2 Basic ConceptsLogin and Lock Options
Session lockIf you leave the ChemStation computer for a period of time, you can lock ChemStation so that no other user can access the program. This is a safety feature to ensure that there is no unauthorized access to ChemStation. To unlock the session, a user must first provide a valid login before continuing to work with ChemStation.
In ChemStation, there are the following options to activate the session lock:
• Privately (User > Lock Session > privately): Only the user who activated the session lock, or a user with the Break Session Lock privilege, can log in.
• Non-privately (User > Lock Session > non privately): Any valid user can log in. This is useful, for example, if there is a shift change, and the leaving personnel locks the ChemStation until the personnel of the new shift starts working.
• Toolbar lock button: The toolbar lock button can be configured to lock the ChemStation session privately or non-privately.
• Time-based: ChemStation will automatically lock after a given period of time when there is no user interaction (Inactivity Timeout setting in the Security Policy area of OpenLAB Control Panel).
The time-based session lock can be configured to lock the ChemStation session either privately or non-privately (see “ChemStation Administration Tool” on page 93).
22 ChemStation with Content Management Systems User's Guide
Basic Concepts 2User Interface in ChemStation Related to the Central Data Repository
User Interface in ChemStation Related to the Central Data Repository
Overview of the interface elementsWhen connected to a central data storage system, additional menus and interface elements are available in ChemStation. Depending on the external system, they are automatically labelled either with ECM or with CM.
Menu Element type Description
Method Enable Audit Trail Command
See “Method Audit Trail” on page 71. The Method Audit Trail can also be enabled on a system without central data storage.
Sequence > Sequence Parameters Sequence Parameters Tab See “Remote Data Path as Sequence Parameter” on page 40
Report Report History Command See “Report History” on page 74
View > Preferences Tabs In the Preferences dialog:• Transfer Settings• Audit Trail
See “Preferences” on page 28 and “Audit Trails and Logbooks” on page 71. The Method Audit Trail and Results Audit Trail can also be enabled on a system without central data storage. Therefore the Audit Trail tab is visible in the Preferences also in a system without central data storage.
ECM or CM ECM or CM Menu See “The ECM or CM Menu” on page 25
User User Menu See “The User menu” on page 27. If authentication has been set up, the User menu is also visible on a system without central data storage.
ChemStation with Content Management Systems User's Guide 23
2 Basic ConceptsUser Interface in ChemStation Related to the Central Data Repository
Toolbar (depending on the current view) • Shortcuts to several commands of the ECM or CM and User menus
• LCDF info
• Path info in the Data Analysis view: shows the remote path of a file that has been stored to the central repository.
• Path info in the Method and Run Control view: shows the remote path for automatic upload after acquisition.
• With ECM, the path is shown with backslashes; with Content Management, it uses forward slashes (for example, Location/test/test/test).
Several details related to the central repository in the System Diagram in Method and Run Control view (classic ChemStation only).
Details view The following details are available:• Path• Operator• Automatic transfer after acquisition• Automatic transfer after reprocessing• Automatic transfer after any data
modification• Automatic import after reprocessing
Menu Element type Description
24 ChemStation with Content Management Systems User's Guide
Basic Concepts 2User Interface in ChemStation Related to the Central Data Repository
The ECM or CM MenuAll commands related to the central repository are available in a separate menu. Depending on the central data storage system, the menu is named either ECM or CM. The menu and its commands depend on the view that is currently active. See the following table for details.
NOTE There is no ECM or CM menu in the Verification (OQ/PV) or Diagnosis view.
Command Description Available in ChemStation views
Update Methods ...Update Sequences Templates ...
Update all methods/sequence templates that are stored in the local file system with the current version from the central repository (if it exists there). Local changes are overwritten.
• Method and Run Control
Update Report Templates ... Update all report templates that are stored in the local file system with the current version from the central repository (if it exists there). Local changes are overwritten.
• Report Layout (Intelligent Reporting)
Cleanup Data The Cleanup Data command deletes data or result sets from the local file system that exist in the central repository as well. You can delete all data or selected data. Make sure you uploaded the latest version to the central repository before you confirm this command. See “Cleanup Data on Shutdown” on page 34.
• Data Analysis
Manage Queue With the Manage Queue command you can continue any interrupted data upload to the central repository. See “Manage Queue on Connect” on page 33.
• Method and Run Control• Data Analysis
PreferencesSee “Preferences” on page 28 for more details on the Preferences dialog.
• Method and Run Control• Data Analysis• Report Layout (Intelligent
Reporting)
ChemStation with Content Management Systems User's Guide 25
2 Basic ConceptsUser Interface in ChemStation Related to the Central Data Repository
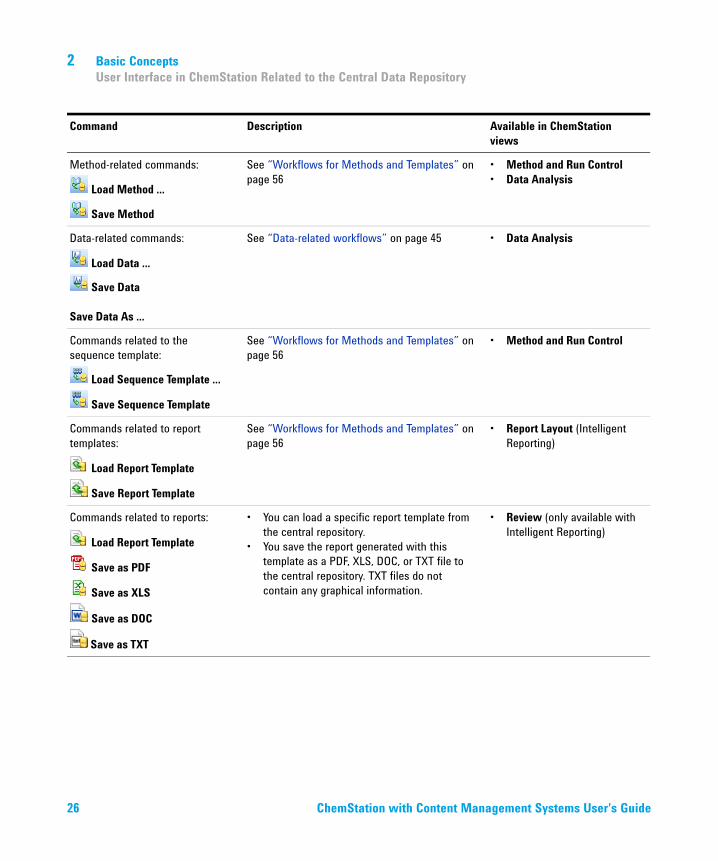
Method-related commands:
Load Method ...
Save Method
See “Workflows for Methods and Templates” on page 56
• Method and Run Control• Data Analysis
Data-related commands:
Load Data ...
Save Data
Save Data As ...
See “Data-related workflows” on page 45 • Data Analysis
Commands related to the sequence template:
Load Sequence Template ...
Save Sequence Template
See “Workflows for Methods and Templates” on page 56
• Method and Run Control
Commands related to report templates:
Load Report Template
Save Report Template
See “Workflows for Methods and Templates” on page 56
• Report Layout (Intelligent Reporting)
Commands related to reports:
Load Report Template
Save as PDF
Save as XLS
Save as DOC
Save as TXT
• You can load a specific report template from the central repository.
• You save the report generated with this template as a PDF, XLS, DOC, or TXT file to the central repository. TXT files do not contain any graphical information.
• Review (only available with Intelligent Reporting)
Command Description Available in ChemStation views
26 ChemStation with Content Management Systems User's Guide
Basic Concepts 2User Interface in ChemStation Related to the Central Data Repository
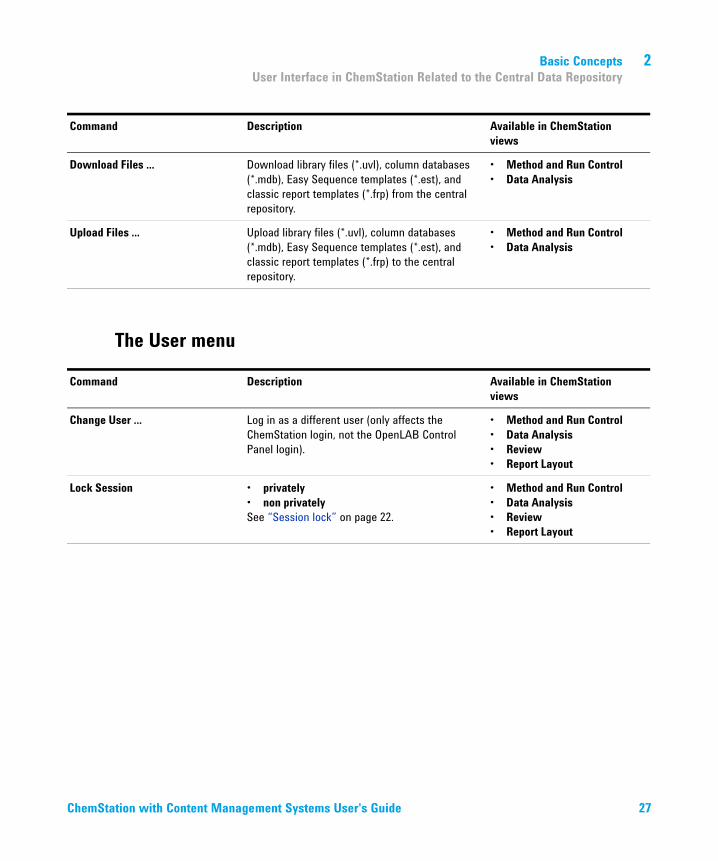
The User menu
Download Files ... Download library files (*.uvl), column databases (*.mdb), Easy Sequence templates (*.est), and classic report templates (*.frp) from the central repository.
• Method and Run Control• Data Analysis
Upload Files ... Upload library files (*.uvl), column databases (*.mdb), Easy Sequence templates (*.est), and classic report templates (*.frp) to the central repository.
• Method and Run Control• Data Analysis
Command Description Available in ChemStation views
Command Description Available in ChemStation views
Change User ... Log in as a different user (only affects the ChemStation login, not the OpenLAB Control Panel login).
• Method and Run Control• Data Analysis• Review• Report Layout
Lock Session • privately• non privatelySee “Session lock” on page 22.
• Method and Run Control• Data Analysis• Review• Report Layout
ChemStation with Content Management Systems User's Guide 27
2 Basic ConceptsPreferences
Preferences
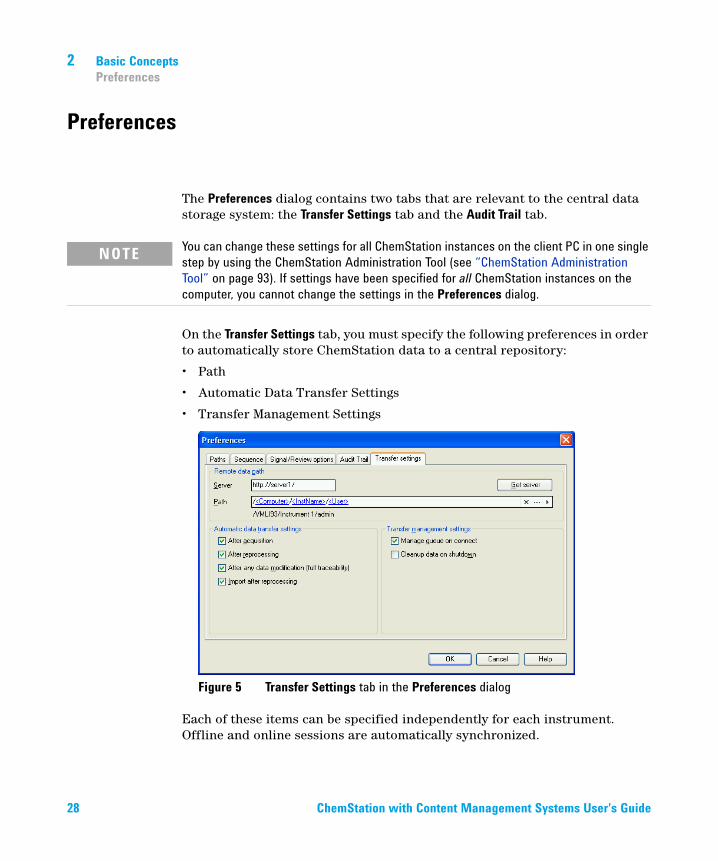
The Preferences dialog contains two tabs that are relevant to the central data storage system: the Transfer Settings tab and the Audit Trail tab.
On the Transfer Settings tab, you must specify the following preferences in order to automatically store ChemStation data to a central repository:
• Path
• Automatic Data Transfer Settings
• Transfer Management Settings
Figure 5 Transfer Settings tab in the Preferences dialog
Each of these items can be specified independently for each instrument. Offline and online sessions are automatically synchronized.
NOTE You can change these settings for all ChemStation instances on the client PC in one single step by using the ChemStation Administration Tool (see “ChemStation Administration Tool” on page 93). If settings have been specified for all ChemStation instances on the computer, you cannot change the settings in the Preferences dialog.
28 ChemStation with Content Management Systems User's Guide
Basic Concepts 2Preferences
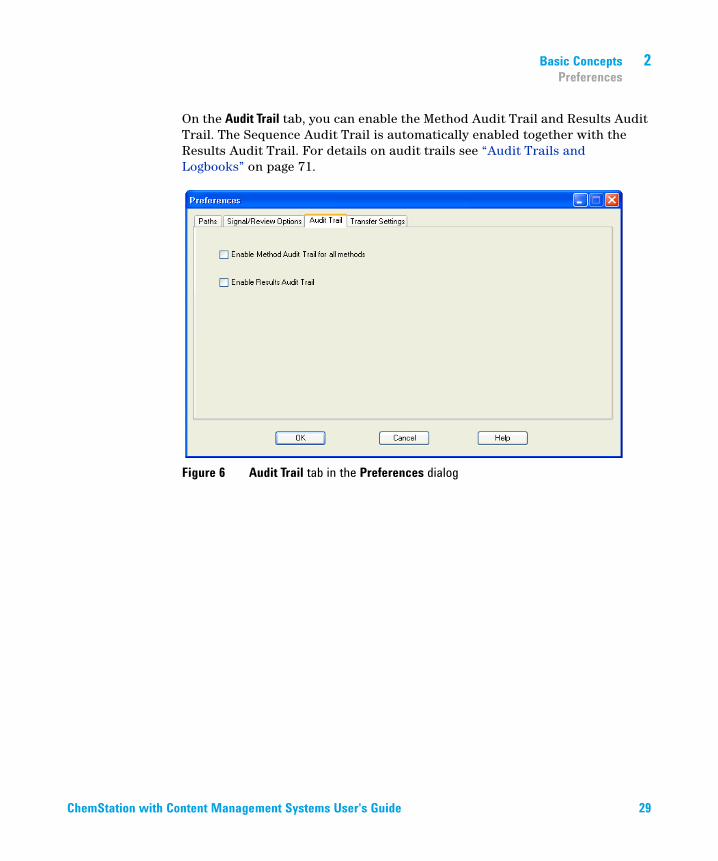
On the Audit Trail tab, you can enable the Method Audit Trail and Results Audit Trail. The Sequence Audit Trail is automatically enabled together with the Results Audit Trail. For details on audit trails see “Audit Trails and Logbooks” on page 71.
Figure 6 Audit Trail tab in the Preferences dialog
ChemStation with Content Management Systems User's Guide 29
2 Basic ConceptsPreferences
Remote Data PathThe remote data path needs to be specified in order to save the data to the correct location in central repository.
In the Preferences dialog, the Transfer Settings tab (see Figure 5 on page 28) allows you to define the Path setting. This path reflects the LCDF structure in ECM, shown with backslashes, or the folder path in Content Management, shown with forward slashes.
ChemStation Rev. B and OpenLAB CDS ChemStation Edition Data in one ECMIn ECM, you may have stored data from different ChemStation revisions, for example, from rev. B and OpenLAB CDS ChemStation Edition (rev. C). If you work with ChemStation rev. C, you can load and process data from ChemStation rev. B. However, if you work with ChemStation rev. B, you can only process data from this revision (or older), you cannot process data from rev. C.
CAUTION Wrong results or incompatible dataIf you reprocess ChemStation rev. C data in ChemStation rev. B, you may obtain wrong or incomplete results.If you reprocess ChemStation rev. B data in ChemStation rev. C, it may no longer be possible to reprocess these data in ChemStation rev. B.
➔ Clearly separate the files from ChemStation rev. B and ChemStation rev. C in ECM.
➔ With OpenLAB ECM Enterprise, we recommend using different ECM Accounts for ChemStation rev. B data and ChemStation rev. C data.
➔ With OpenLAB ECM Workgroup, use clearly separated LCDF locations.
30 ChemStation with Content Management Systems User's Guide
Basic Concepts 2Preferences
Server/AccountUnder Server (see Figure 5 on page 28), you specify the server on which the central data storage system is installed. For ECM, you must also specify the ECM Account.
ChemStation obtains the server and account information automatically from OpenLAB Control Panel. If the fields are empty or do not match the current configuration, you can click Get Server to reset the fields. ChemStation then keeps the information for future sessions.
PathTo specify the storage location in the central repository, you can either browse to a an existing storage location in the central repository using the button with the three dots [ ], or click the arrow [ ] to select predefined tokens for automatic path creation. With these tokens, the system automatically creates the required items if they do not already exist in the central repository. Tokens are available for the instrument name, the user name, the instrument number, or the computer name.
Alternatively, the path can be specified as Sequence Parameter (see “Remote Data Path as Sequence Parameter” on page 40).
With ECM, uploaded files can be stored only at the Folder level. With Content Management, uploaded files can be stored at any level of the folder hierarchy.
NOTE One OpenLAB Shared Services Server is required per ECM Account.
NOTE Do not manually change the server name or ECM Account name in ChemStation. If you do, and the information does not match the configuration used in OpenLAB Control Panel, data upload will fail due to a host mismatch.
NOTE If no path is specified, a warning message will be shown at ChemStation startup.
NOTE In ECM, there are separate privileges to create content and create folders. If you use tokens, make sure you have the required privileges in ECM to create folders! Alternatively, another user who has the required privileges can create the necessary folders in advance.
ChemStation with Content Management Systems User's Guide 31
2 Basic ConceptsPreferences
Automatic Data Transfer SettingsIn the Preferences dialog (View > Preferences), the Transfer Settings tab allows you to specify the automatic settings for the transfer of raw data. The transfer settings, as well as the Remote Data Path, are used to automatically upload data to the central data storage.
After AcquisitionIf you select this check box the data is automatically uploaded to the central repository after an acquisition. The raw data files are written to the local ChemStation file system while the sequence is still running. When the complete sequence is finished, the raw data files are packed in an SSIZip file which is then uploaded to the central repository.
For more information, please refer to “Workflow 1: Acquisition and automatic upload” on page 45.
After Any Data ModificationIf you select this check box, the result set is automatically uploaded to the central repository after you changed the data analysis parameters for a sample and generated a report. The data is uploaded even if you do not reprocess the sequence.
For more information, please refer to “Workflow 2: Offline review during acquisition” on page 47.
NOTE If the connection to the central data storage is lost for any reason, the data cannot be automatically uploaded as specified in the transfer settings. The data is then queued in the Queue Management (see “Queue Management” on page 36).
NOTE If you perform data acquisition from the Diagnosis view or OQ/PV view, the transfer settings are ignored. The analytical raw data is written to the local ChemStation data file system as predefined in the diagnosis or verification methods.
32 ChemStation with Content Management Systems User's Guide
Basic Concepts 2Preferences
After ReprocessingIf you select this check box, the result set is automatically uploaded to the central repository each time after you reprocessed the sequence.
For more information, please refer to “Workflow 3: Reprocessing data and automatic upload” on page 50.
Import after ReprocessingIf you select this check box, a sequence that is only stored locally is automatically uploaded to the central repository after reprocessing. This setting is useful, for example, if you reprocess data from an older version of ChemStation.
For more information, please refer to “Workflow 4: Import after reprocessing” on page 54.
Transfer Management Settings
Manage Queue on ConnectIf the connection to the central data storage is lost for any reason, a running data upload might be interrupted. In this case, the remaining data is written to an internal queue.
If you select the check box Manage Queue on Connect,the queue is shown allowing the user with sufficient privileges to resume the data upload.
Alternatively, you can open the Queue Management dialog (see Figure 7 on page 36) at any time with the ECM > Manage Queue or CM > Manage Queue command in the Data Analysis view. The Queue Management dialog box allows you to manage the export of residual ChemStation data to central data storage after, for example, a network failure. You can process the queue, save selected items to the local computer, or delete items from the queue. If you delete an item from the queue, it will not be transferred to central data storage. If the system activity log has been activated, an entry will be made in the system activity log.
ChemStation with Content Management Systems User's Guide 33
2 Basic ConceptsPreferences
Cleanup Data on ShutdownIf you select this check box, upon shutdown ChemStation checks the local file system for files that will be or have already been stored in the central repository. It deletes all local data and sequence files that are stored in the central repository or are queued for an upload. Methods and sequence templates remain on the local file system.
CAUTION Inadequate check box selectionLoss of data
➔ If you select the Cleanup Data on Shutdown check box, you should also select the Automatic Data Transfer Settings After Acquisition, After Reprocessing, and After Any Data Modification. Otherwise, if the users forget to upload the data to the central data storage before closing ChemStation, data might be lost.
CAUTION Unintentional deletion of dataLoss of data
➔ If you select the Cleanup Data on Shutdown check box and shut down the ChemStation, the item in the Queue may be the only remaining copy of the data. If you want to delete data from the queue while using the Cleanup Data on Shutdown setting, consider saving the item locally first.
NOTE Consider selecting the Cleanup Data on Shutdown check box when the system shall be compliant to 21 CFR Part 11.
34 ChemStation with Content Management Systems User's Guide
Basic Concepts 2Preferences
Alternatively, you can open the Data Cleanup dialog at any time with the Cleanup Data command in the ECM or CM menu. This dialog box lists all data sets that are also kept in the central data storage system apart from the currently loaded data. The following columns are available:
• Directory: Location of the local file
• ECM Information or CM Information: Server of the central data storage system and path for the file in the central repository. For ECM, also the ECM Account is shown.
• Last Modified: Date/Time when the file in the central repository was last changed
• Locally Modified: Information whether the local copy has been modified
• Local Version: ECM or CM version that was downloaded to the local directory
You can now manually select the data sets to be deleted from the local disk.
Alternatively, via a drop down list you can deselect all data sets, select all data sets, select only single runs, select only result sets, select items older than one day, or items older than a week.
After pressing OK, the local copies of the selected data sets are deleted.
Both automatic cleanup on shutdown and manual cleanup are only possible if the following conditions are fulfilled:
• the ChemStation user is logged on to the central data storage system
• no other instance of the ChemStation instrument is open
• the queue in the Queue Management is empty
• the navigation table is empty (no data loaded)
If one of these conditions is not fulfilled, automatic cleanup will not be performed and it is not possible to open the Data Cleanup dialog.
ChemStation with Content Management Systems User's Guide 35
2 Basic ConceptsPreferences
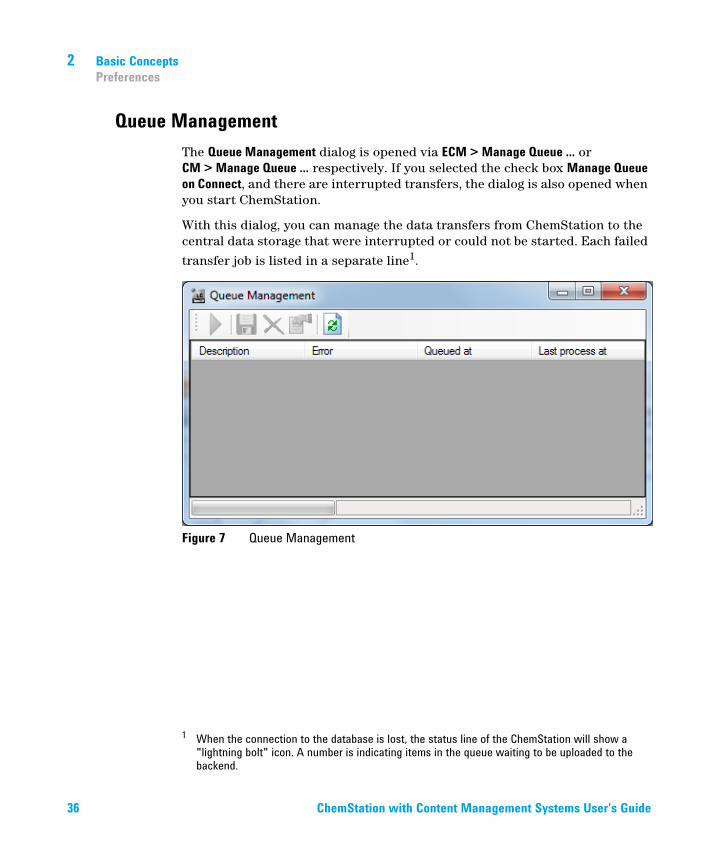
Queue ManagementThe Queue Management dialog is opened via ECM > Manage Queue ... or CM > Manage Queue ... respectively. If you selected the check box Manage Queue on Connect, and there are interrupted transfers, the dialog is also opened when you start ChemStation.
With this dialog, you can manage the data transfers from ChemStation to the central data storage that were interrupted or could not be started. Each failed
transfer job is listed in a separate line1.
Figure 7 Queue Management
1 When the connection to the database is lost, the status line of the ChemStation will show a "lightning bolt" icon. A number is indicating items in the queue waiting to be uploaded to the backend.
36 ChemStation with Content Management Systems User's Guide
Basic Concepts 2Preferences
The following information is provided for each line:
• Description: Information on the version of the data that will be transferred. Two values are possible:
• Import: Generates the first version. No older version of the data exists in the central data storage system at this time. The data has been newly created and will be uploaded as Version 1.
• Commit: There is already at least one version of the data in the central data storage system. The version number of the uploaded data will be increased by one. Reprocessing a sequence for example will create a commit entry (version n + 1).
• Error: Error that disrupted the data transfer. For details on the possible errors, see the Troubleshooting section in this document.
• Queued at: Date when the unsuccessful transfer was queued.
• Last process at: Date when the transfer was last attempted.
The toolbar offers you the following commands to manage the queue:
Table 2 Queue management toolbar
Icon Tooltip Description
Process queue Continue processing the transfer jobs. As long as there is no error, all pending transfer jobs will be processed in the order as they are shown in the list. This function is only active if you select the first line in the list.
Save selected item locally Save the data of the corresponding item to the file system.
Delete selected item Delete the data of the corresponding item from the queue.Note: If you use the Cleanup Data on Shutdown option in the Transfer Management Settings, this may be the only remaining copy of the data. Consider saving the item locally first.
Properties Display the Queue Management dialog box, which shows details of the items in the queue in either summary or detailed form.
Refresh view Update the display of the items in the list.
ChemStation with Content Management Systems User's Guide 37
2 Basic ConceptsPreferences
When items are selected from the queue or saved to the local disk, an audit trail entry will be added to the Audit Trail of the central data storage system.
Queue Management Details Dialog Box
The Queue Management Details dialog box is displayed when you click the tool in the toolbar of the Queue Management dialog box. It shows the command-specific details of the commands in the Queue Management dialog box. The Queue Management Details tabs offer two views of the command details:
• Summary tab
• Details tab
In either tab, the tools in the toolbar allow you to navigate through the command details:
Summary tabThe Summary tab gives the following summary information about the selected item:
NOTE When items are deleted from the queue or information on a failed transfer is saved to the local disk, the items have not yet been uploaded to the central data storage system.
Displays the details of the first command in the list.
Displays the details of previous command in the list.
Displays the details of next command in the list.
Displays the details of last command in the list.
Command Description
The description of the item.
Created The date and time when the item was added to the queue.
Changed The date and time when the item was last processed.
Last Error A description of the error that caused the item to be added to the queue.
38 ChemStation with Content Management Systems User's Guide
Basic Concepts 2Preferences
Details tabThe Details tab gives detailed information about the selected item. You cannot edit the information in this list. The toolbar provides the following tools:
Sorts the properties by category.
Sorts the properties alphanumerically.
ChemStation with Content Management Systems User's Guide 39

2 Basic ConceptsRemote Data Path as Sequence Parameter
Remote Data Path as Sequence Parameter
Instead of specifying the remote data path in the Preferences for all acquisition sequences to be run (see “Remote Data Path” on page 30), the remote data path can also be set directly in the sequence template. This allows you to set up different remote paths for each sequence without having to modify the Preferences. The Path for a sequence template is set up in the Sequence Parameters tab.
Figure 8 Sequence Parameters tab of the Sequence Parameters dialog
40 ChemStation with Content Management Systems User's Guide
Basic Concepts 2Remote Data Path as Sequence Parameter
Use Preferences: When this check box is selected, the remote data path as specified in the Preferences will be used. Any path specified in the Sequence Parameters will be ignored for this sequence. When this check box is cleared, the remote data path will be used as specified when the sequence template is used for data acquisition.
Path: To specify the remote data path, you can select a folder path available in the central data storage system. Click the button with the three dots [ ] to
select the required path. Alternatively, you can click the arrow [ ] to select one of the predefined tokens for automatic path creation. With these tokens, the system automatically creates the items if they do not already exist in the central data storage system.
NOTE In ECM, there are separate privileges to create content and create folders. If you use tokens, make sure you have the required privileges in ECM to create folders! Alternatively, another user who has the required privileges can create the necessary folders in advance.
ChemStation with Content Management Systems User's Guide 41
2 Basic ConceptsCompressed ChemStation File Formats
Compressed ChemStation File Formats
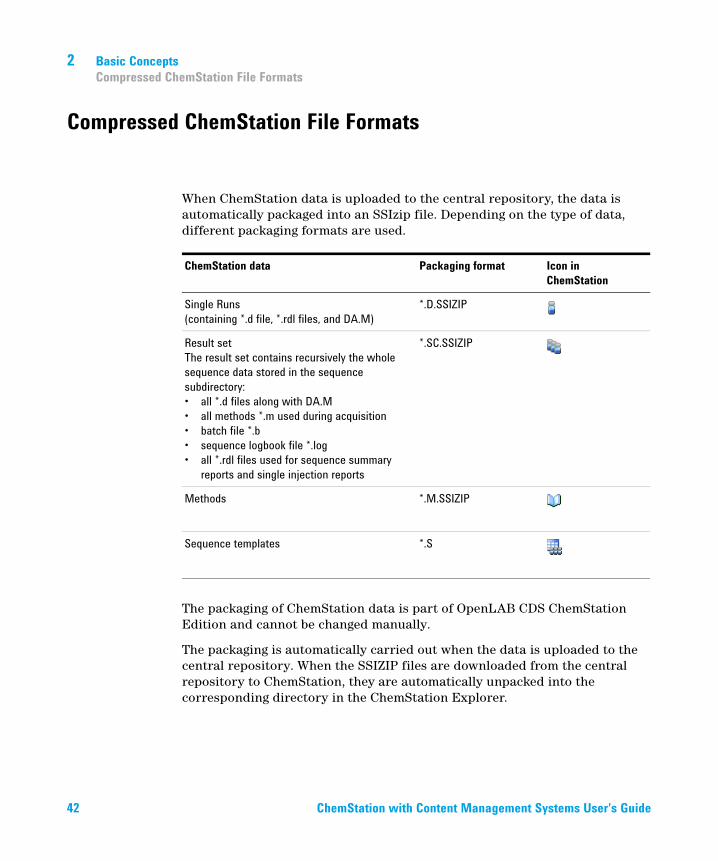
When ChemStation data is uploaded to the central repository, the data is automatically packaged into an SSIzip file. Depending on the type of data, different packaging formats are used.
The packaging of ChemStation data is part of OpenLAB CDS ChemStation Edition and cannot be changed manually.
The packaging is automatically carried out when the data is uploaded to the central repository. When the SSIZIP files are downloaded from the central repository to ChemStation, they are automatically unpacked into the corresponding directory in the ChemStation Explorer.
ChemStation data Packaging format Icon in ChemStation
Single Runs(containing *.d file, *.rdl files, and DA.M)
*.D.SSIZIP
Result setThe result set contains recursively the whole sequence data stored in the sequence subdirectory:• all *.d files along with DA.M• all methods *.m used during acquisition• batch file *.b• sequence logbook file *.log• all *.rdl files used for sequence summary
reports and single injection reports
*.SC.SSIZIP
Methods *.M.SSIZIP
Sequence templates *.S
42 ChemStation with Content Management Systems User's Guide
ChemStation with Content Management Systems User's Guide
3Working with ChemStation and Central Data StorageTransferring Data to or from the Central Repository 44Data-related workflows 45
Workflow 1: Acquisition and automatic upload 45Workflow 2: Offline review during acquisition 47Workflow 3: Reprocessing data and automatic upload 50Workflow 4: Import after reprocessing 54
Workflows for Methods and Templates 56Workflow 1: Save new method 57Workflow 2: Save changed method 59Updating the Local Master Method, Sequence Template, or Report Template 63
This chapter describes the basic workflows for ChemStation with a central data storage system. There are four data-related workflows and two workflows for methods, sequence templates, or report templates.
43Agilent Technologies
3 Working with ChemStation and Central Data StorageTransferring Data to or from the Central Repository
Transferring Data to or from the Central Repository
You can open and save different ChemStation items into their ChemStation contexts:
• Methods
• Sequence templates and Easy Sequence templates
• Report templates for Classic or Intelligent Reporting
• Single run data
• Sequence data
• Library files
• Column databases
Methods, single run data and sequence data are stored in the central repository as SSIZIP file (see “Compressed ChemStation File Formats” on page 42).
When the data is uploaded to the central data storage, local copies of the files still remain in the ChemStation file system. If a file is loaded from the central data storage back into ChemStation, changes made to this file will automatically be saved into its original location in the repository as a new revision.
While Master Methods, Sequence Templates and Report Templates can only be saved manually to the repository, Single runs and sequence data will automatically be uploaded to the repository, see “Data-related workflows” on page 45 for details on the different automatic upload options.
For downloading data from the central data storage, several load commands are available in the ECM or CM menu. Depending on the current view, you can load different files.
• In the Data Analysis view, you can load single run data or sequence data.
• In the Method and Run Control view, you can load methods and sequence templates.
• If you use Intelligent Reporting, you can also download report templates from the central data storage in the Report Layout view.
The following workflows are examples that represent typical tasks done with ChemStation and central data storage.
44 ChemStation with Content Management Systems User's Guide
Working with ChemStation and Central Data Storage 3Data-related workflows
Data-related workflows
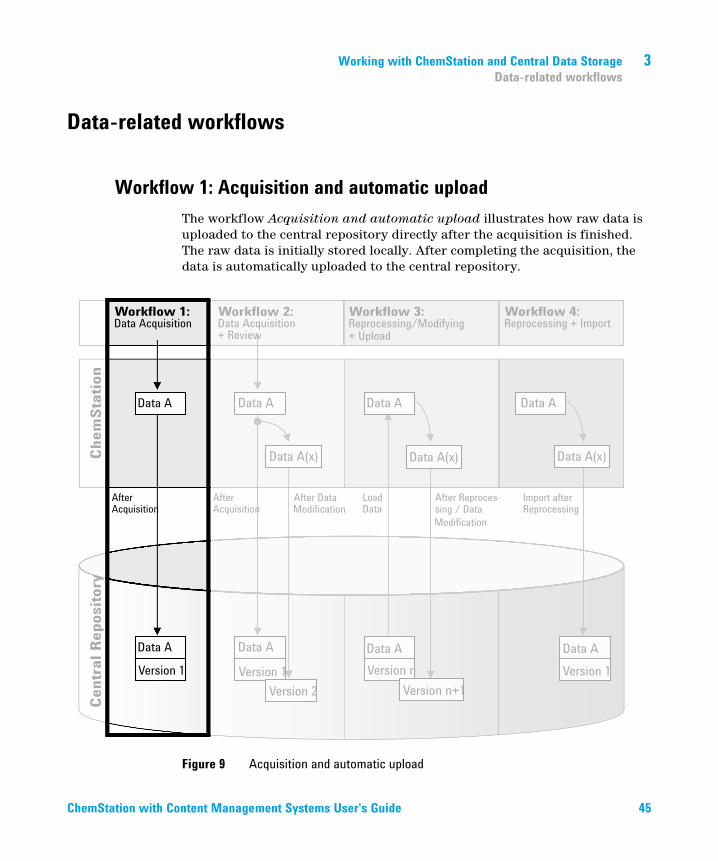
Workflow 1: Acquisition and automatic uploadThe workflow Acquisition and automatic upload illustrates how raw data is uploaded to the central repository directly after the acquisition is finished. The raw data is initially stored locally. After completing the acquisition, the data is automatically uploaded to the central repository.
Figure 9 Acquisition and automatic upload
ChemStation with Content Management Systems User's Guide 45
3 Working with ChemStation and Central Data StorageData-related workflows
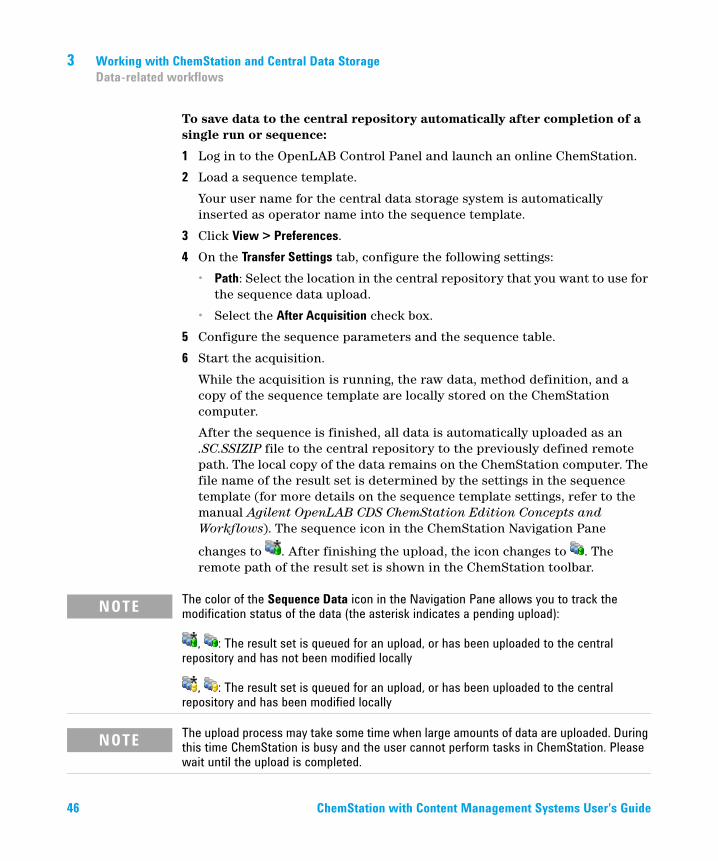
To save data to the central repository automatically after completion of a single run or sequence:
1 Log in to the OpenLAB Control Panel and launch an online ChemStation.
2 Load a sequence template.
Your user name for the central data storage system is automatically inserted as operator name into the sequence template.
3 Click View > Preferences.
4 On the Transfer Settings tab, configure the following settings:
• Path: Select the location in the central repository that you want to use for the sequence data upload.
• Select the After Acquisition check box.
5 Configure the sequence parameters and the sequence table.
6 Start the acquisition.
While the acquisition is running, the raw data, method definition, and a copy of the sequence template are locally stored on the ChemStation computer.
After the sequence is finished, all data is automatically uploaded as an .SC.SSIZIP file to the central repository to the previously defined remote path. The local copy of the data remains on the ChemStation computer. The file name of the result set is determined by the settings in the sequence template (for more details on the sequence template settings, refer to the manual Agilent OpenLAB CDS ChemStation Edition Concepts and Workflows). The sequence icon in the ChemStation Navigation Pane
changes to . After finishing the upload, the icon changes to . The remote path of the result set is shown in the ChemStation toolbar.
NOTE The color of the Sequence Data icon in the Navigation Pane allows you to track the modification status of the data (the asterisk indicates a pending upload):
, : The result set is queued for an upload, or has been uploaded to the central repository and has not been modified locally
, : The result set is queued for an upload, or has been uploaded to the central repository and has been modified locally
NOTE The upload process may take some time when large amounts of data are uploaded. During this time ChemStation is busy and the user cannot perform tasks in ChemStation. Please wait until the upload is completed.
46 ChemStation with Content Management Systems User's Guide
Working with ChemStation and Central Data Storage 3Data-related workflows
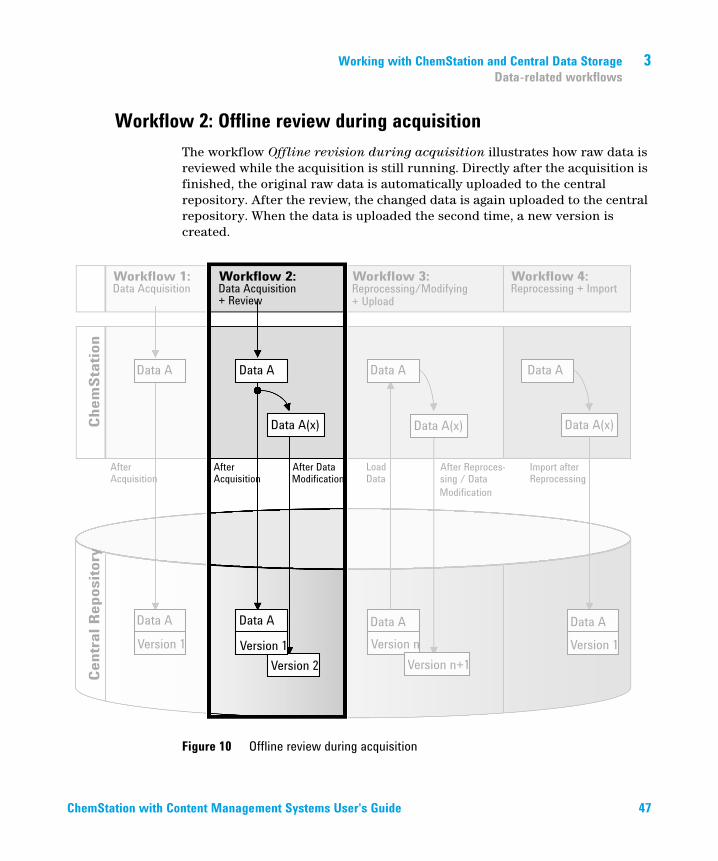
Workflow 2: Offline review during acquisitionThe workflow Offline revision during acquisition illustrates how raw data is reviewed while the acquisition is still running. Directly after the acquisition is finished, the original raw data is automatically uploaded to the central repository. After the review, the changed data is again uploaded to the central repository. When the data is uploaded the second time, a new version is created.
Figure 10 Offline review during acquisition
ChemStation with Content Management Systems User's Guide 47
3 Working with ChemStation and Central Data StorageData-related workflows
To save data to the central repository automatically after modification:
1 Log in to the OpenLAB Control Panel and launch an online ChemStation.
2 Load a sequence template.
Your user name for the central data storage system is automatically inserted as operator name into the sequence template.
3 Click View > Preferences.
4 On the Transfer Settings tab, configure the following settings:
• Path: Select the storage location that you want to use for the sequence data upload.
• Select the After Acquisition check box.
• Select the After Any Data Modification check box.
5 Start the acquisition.
While the acquisition is running, the raw data, method definition, and a copy of the sequence template are stored locally on the ChemStation computer.
6 Open an offline ChemStation and change some data analysis parameters for one of the already finished samples. Save your changes locally.
7 After finishing the acquisition and the work in the offline instance, the following versioning will be done, depending on which occurred first:
a If the acquisition finished before you have completed your offline changes:
• The original raw data is automatically uploaded as an .SC.SSIZIP file, Version 1, to the central repository using the previously defined remote data path. The path of the new sequence is shown in the toolbar in the online ChemStation.
The file name of the result set is determined by the settings in the sequence template (for more details on the sequence template settings refer to the manual Agilent OpenLAB CDS ChemStation Edition Concepts and Workflows).
The sequence icon in the ChemStation Navigation Pane changes from
to . After finishing the upload, the icon changes to .
48 ChemStation with Content Management Systems User's Guide
Working with ChemStation and Central Data Storage 3Data-related workflows
• An Upload dialog opens in the online ChemStation. Click OK to confirm that you finished all work in the offline instance. As soon as you confirm this dialog, the changed data is uploaded as Version 2 to the central repository.
A local copy of the changed data remains on the ChemStation computer.
b If you saved your offline changes before the acquisition has finished:
• Upon confirming that you finished your work in the offline instance, the changed data is uploaded as Version 1 to the central repository.
• The original raw data is automatically uploaded as an .SC.SSIZIP file, Version 2, to the central repository.
NOTE For both versions (the one after acquisition and the one from the parallel offline review) the ChemStation operator is the user who has run the acquisition, even if another user has performed the review in the Offline ChemStation.
ChemStation with Content Management Systems User's Guide 49
3 Working with ChemStation and Central Data StorageData-related workflows
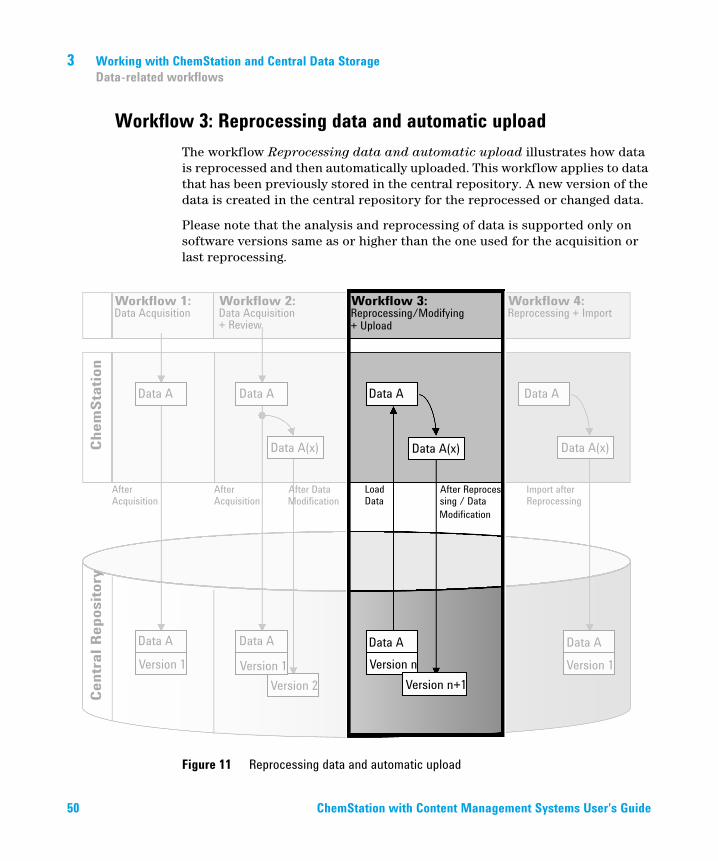
Workflow 3: Reprocessing data and automatic uploadThe workflow Reprocessing data and automatic upload illustrates how data is reprocessed and then automatically uploaded. This workflow applies to data that has been previously stored in the central repository. A new version of the data is created in the central repository for the reprocessed or changed data.
Please note that the analysis and reprocessing of data is supported only on software versions same as or higher than the one used for the acquisition or last reprocessing.
Figure 11 Reprocessing data and automatic upload
50 ChemStation with Content Management Systems User's Guide
Working with ChemStation and Central Data Storage 3Data-related workflows
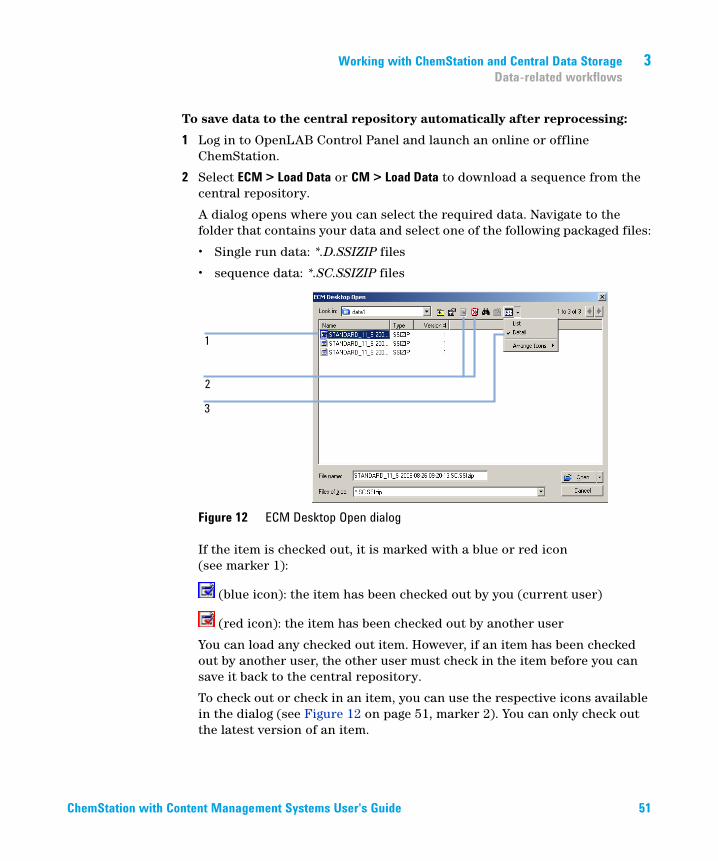
To save data to the central repository automatically after reprocessing:
1 Log in to OpenLAB Control Panel and launch an online or offline ChemStation.
2 Select ECM > Load Data or CM > Load Data to download a sequence from the central repository.
A dialog opens where you can select the required data. Navigate to the folder that contains your data and select one of the following packaged files:
• Single run data: *.D.SSIZIP files
• sequence data: *.SC.SSIZIP files
Figure 12 ECM Desktop Open dialog
If the item is checked out, it is marked with a blue or red icon (see marker 1):
(blue icon): the item has been checked out by you (current user)
(red icon): the item has been checked out by another user
You can load any checked out item. However, if an item has been checked out by another user, the other user must check in the item before you can save it back to the central repository.
To check out or check in an item, you can use the respective icons available in the dialog (see Figure 12 on page 51, marker 2). You can only check out the latest version of an item.
ChemStation with Content Management Systems User's Guide 51
3 Working with ChemStation and Central Data StorageData-related workflows
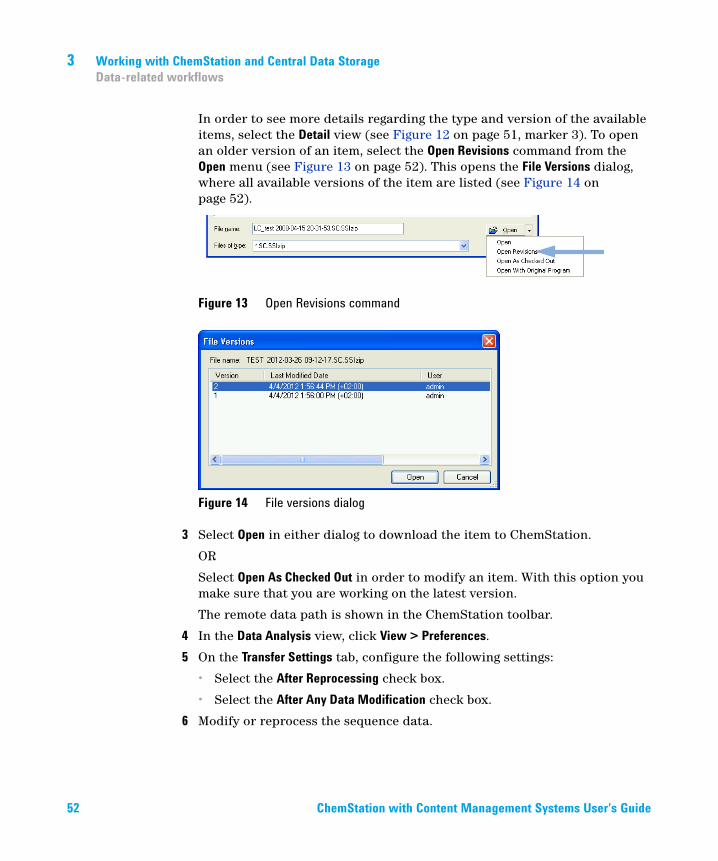
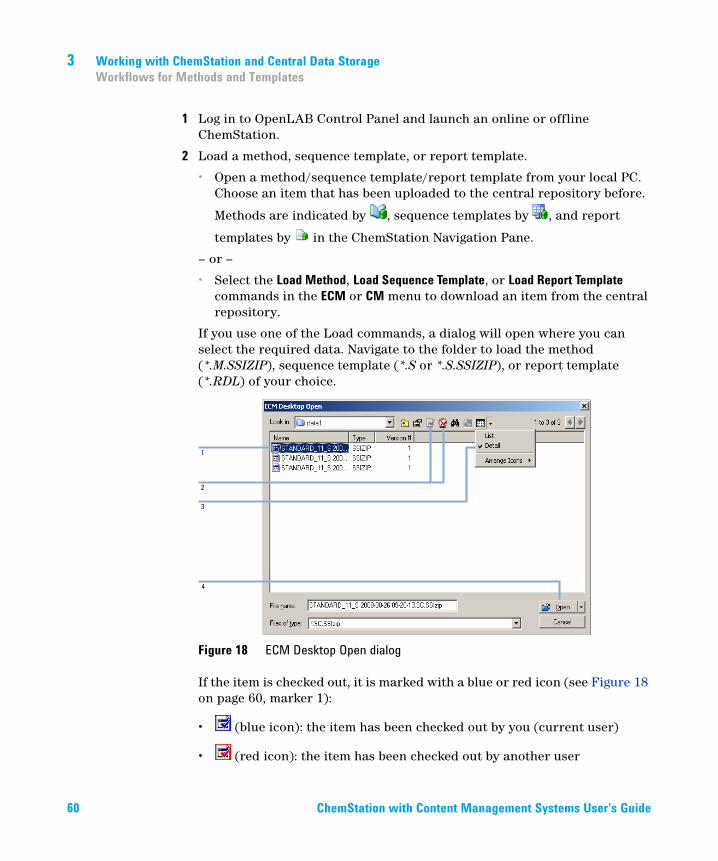
In order to see more details regarding the type and version of the available items, select the Detail view (see Figure 12 on page 51, marker 3). To open an older version of an item, select the Open Revisions command from the Open menu (see Figure 13 on page 52). This opens the File Versions dialog, where all available versions of the item are listed (see Figure 14 on page 52).
Figure 13 Open Revisions command
Figure 14 File versions dialog
3 Select Open in either dialog to download the item to ChemStation.
OR
Select Open As Checked Out in order to modify an item. With this option you make sure that you are working on the latest version.
The remote data path is shown in the ChemStation toolbar.
4 In the Data Analysis view, click View > Preferences.
5 On the Transfer Settings tab, configure the following settings:
• Select the After Reprocessing check box.
• Select the After Any Data Modification check box.
6 Modify or reprocess the sequence data.
52 ChemStation with Content Management Systems User's Guide

Working with ChemStation and Central Data Storage 3Data-related workflows
After the reprocessing is finished, the sequence data is uploaded with its original name to its original remote data path. The version number is increased by one.
The local copy of the reprocessed data remains on the local file system of the ChemStation computer.
ChemStation with Content Management Systems User's Guide 53
3 Working with ChemStation and Central Data StorageData-related workflows
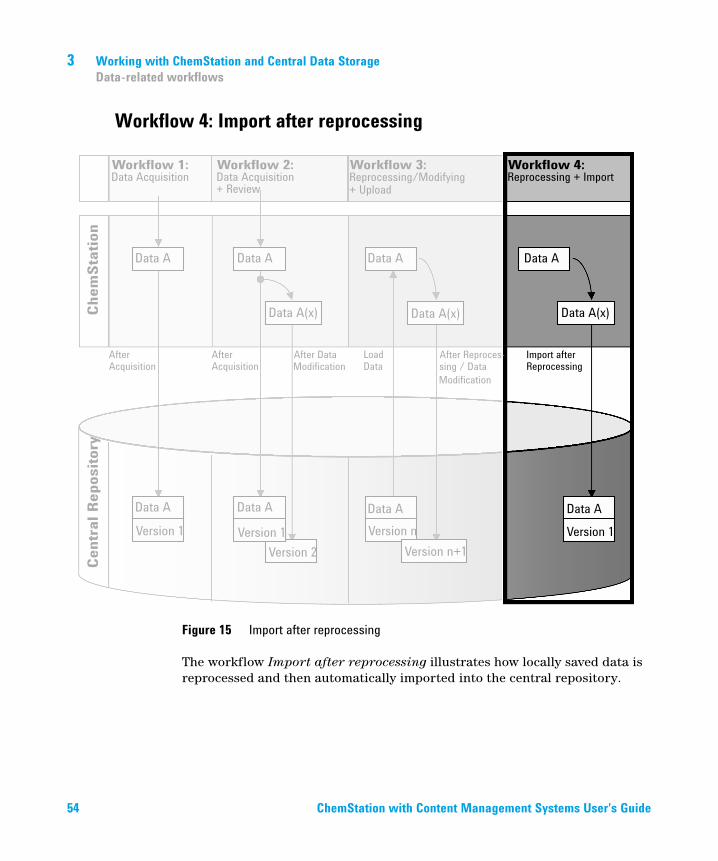
Workflow 4: Import after reprocessing
Figure 15 Import after reprocessing
The workflow Import after reprocessing illustrates how locally saved data is reprocessed and then automatically imported into the central repository.
54 ChemStation with Content Management Systems User's Guide
Working with ChemStation and Central Data Storage 3Data-related workflows
To save data to the central repository automatically after reprocessing:
1 Log in to OpenLAB Control Panel and launch an offline ChemStation.
2 From the local file system, open a sequence that has never been saved to the central repository before.
3 In the Data Analysis view, click View > Preferences.
4 On the Transfer Settings tab, configure the following settings:
• Path: Select the storage location that you want to use for the sequence data upload.
• Select the Import after Reprocessing check box.
5 Reprocess the sequence data.
The sequence data is uploaded as a new .SC.SSIZIP file, version 1, to the previously defined remote data path in the central repository. The file name of the result set is determined by the settings in the sequence template (for more details about the sequence template settings refer to the manual Agilent OpenLAB CDS ChemStation Edition Concepts and Workflows).
The sequence icon in the ChemStation Navigation Pane changes from to .
After finishing the upload, the icon changes to .
The local copy of the reprocessed data remains on the local file system of the ChemStation computer.
NOTE The data will not be uploaded if you only modify it. You need to reprocess the sequence data.
ChemStation with Content Management Systems User's Guide 55
3 Working with ChemStation and Central Data StorageWorkflows for Methods and Templates
Workflows for Methods and Templates
The following workflows are applicable to methods and sequence templates. If you enabled Intelligent Reporting in Instrument Configuration in the OpenLAB Control Panel, these workflows also apply to report templates. The diagrams show the workflows using methods as an example.
56 ChemStation with Content Management Systems User's Guide
Working with ChemStation and Central Data Storage 3Workflows for Methods and Templates
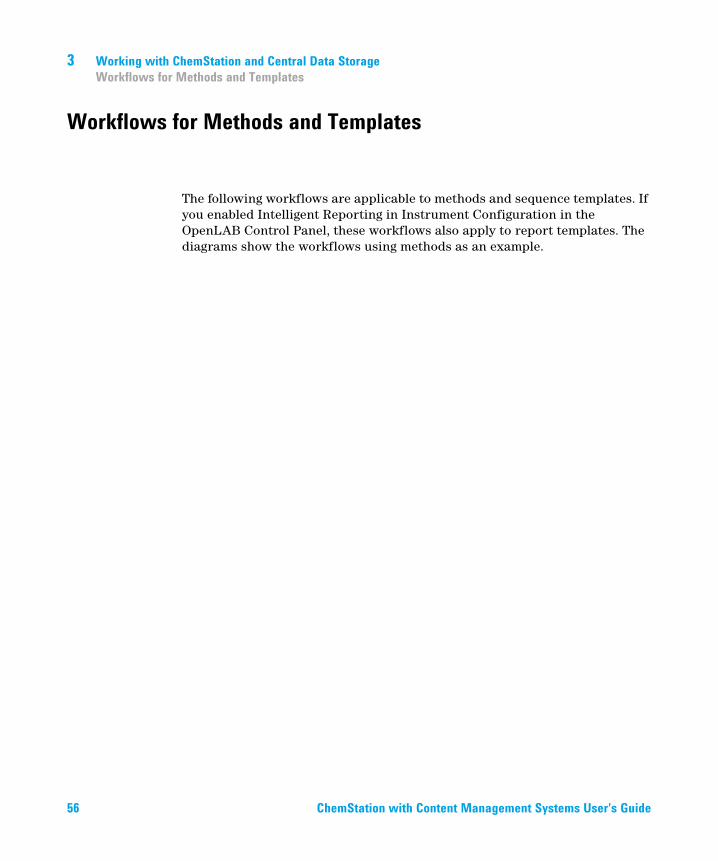
Workflow 1: Save new methodThe workflow Save new method illustrates how newly created or locally stored methods or sequence template can be manually uploaded to the central repository.
Figure 16 Save new method, sequence template, or report template
ChemStation with Content Management Systems User's Guide 57
3 Working with ChemStation and Central Data StorageWorkflows for Methods and Templates
To upload a new method, sequence template, or report template:
1 Log in to OpenLAB Control Panel and launch an offline ChemStation.
2 In ChemStation, load the method/sequence template/report template or create a new one.
3 Select the appropriate Save command from the ECM or CM menu.
In the Method and Run Control view:
• Save Method
• Save Sequence Template
In the Report Layout view (only with Intelligent Reporting):
• Save Report Template
4 In the Save dialog, navigate to the remote data path of your choice to upload the method/sequence template/report template.
In ECM, you can only upload items into a Folder, not into a Location, Cabinet, or Drawer. In Content Management, you can select any path.
5 If necessary, save the item using a different name. The original name is used by default, but you can modify the name.
6 Click Save.
The Add File dialog opens.
7 Enter a reason for the upload and click OK. The reason is then shown in the Audit Trail of the central data storage system (see “Audit Trail of the Central Data Storage” on page 75).
The progress of the upload is displayed in a window until the item is uploaded.
After finishing the upload, the SSIZIP file is available in the central repository as version 1. The file is saved to the remote data path defined in the Preferences (see “Remote Data Path” on page 30).
The method icon in the ChemStation Navigation Pane changes from to
.
The icon for a sequence template changes from to .
The icon for report templates changes from to
58 ChemStation with Content Management Systems User's Guide
Working with ChemStation and Central Data Storage 3Workflows for Methods and Templates
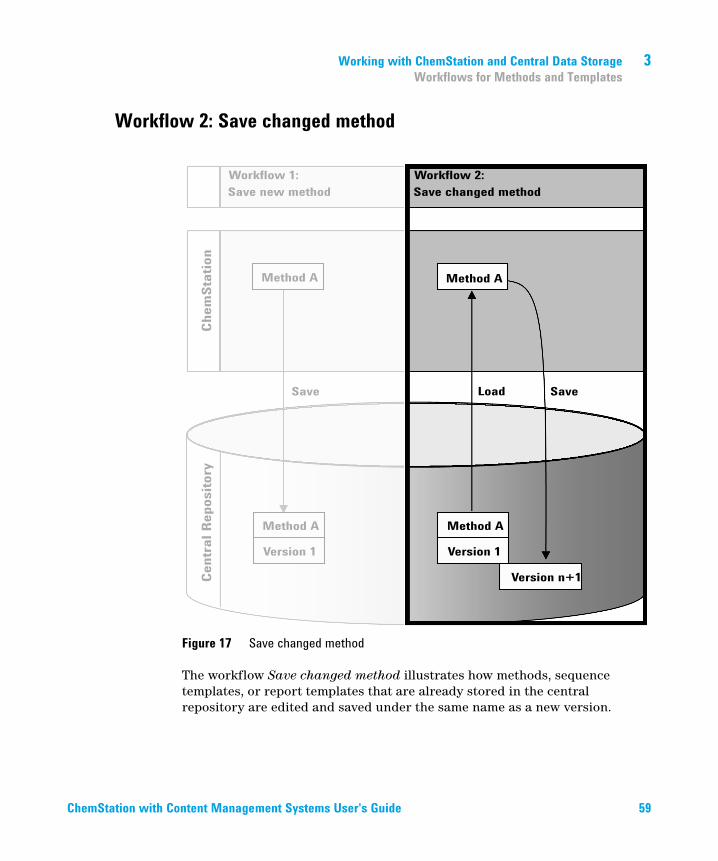
Workflow 2: Save changed method
Figure 17 Save changed method
The workflow Save changed method illustrates how methods, sequence templates, or report templates that are already stored in the central repository are edited and saved under the same name as a new version.
ChemStation with Content Management Systems User's Guide 59
3 Working with ChemStation and Central Data StorageWorkflows for Methods and Templates
1 Log in to OpenLAB Control Panel and launch an online or offline ChemStation.
2 Load a method, sequence template, or report template.
• Open a method/sequence template/report template from your local PC. Choose an item that has been uploaded to the central repository before.
Methods are indicated by , sequence templates by , and report
templates by in the ChemStation Navigation Pane.
– or –
• Select the Load Method, Load Sequence Template, or Load Report Template commands in the ECM or CM menu to download an item from the central repository.
If you use one of the Load commands, a dialog will open where you can select the required data. Navigate to the folder to load the method (*.M.SSIZIP), sequence template (*.S or *.S.SSIZIP), or report template (*.RDL) of your choice.
Figure 18 ECM Desktop Open dialog
If the item is checked out, it is marked with a blue or red icon (see Figure 18 on page 60, marker 1):
• (blue icon): the item has been checked out by you (current user)
• (red icon): the item has been checked out by another user
60 ChemStation with Content Management Systems User's Guide
Working with ChemStation and Central Data Storage 3Workflows for Methods and Templates
You can load any checked out item. However, if an item has been checked out by another user, the other user must check in the item before you can save it back to the central repository.
To check out or check in an item, you can use the respective icons available in the Open dialog (see Figure 18 on page 60, marker 2). Using these icons, you can only check out the latest version of an item.
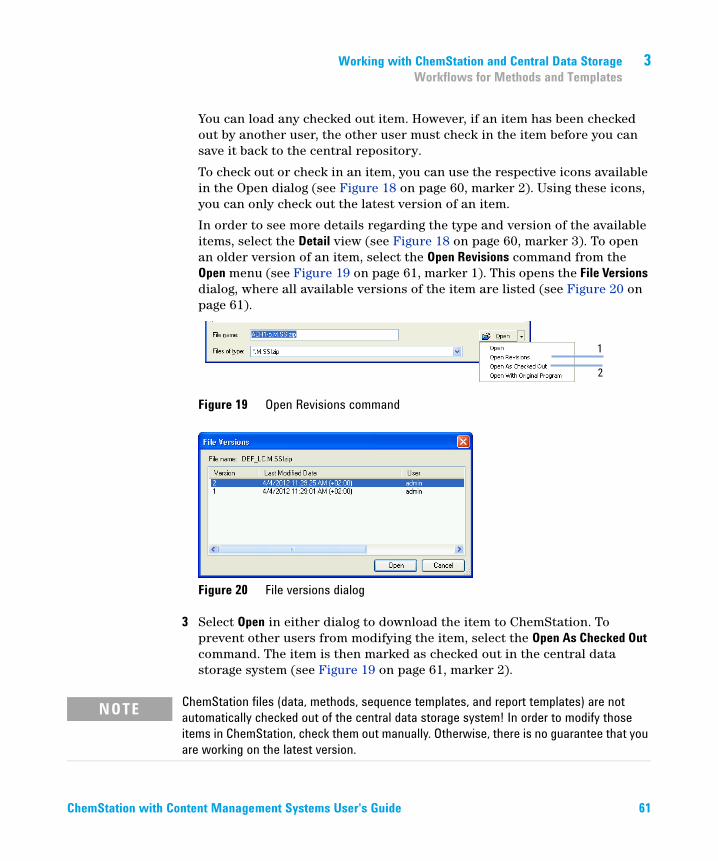
In order to see more details regarding the type and version of the available items, select the Detail view (see Figure 18 on page 60, marker 3). To open an older version of an item, select the Open Revisions command from the Open menu (see Figure 19 on page 61, marker 1). This opens the File Versions dialog, where all available versions of the item are listed (see Figure 20 on page 61).
Figure 19 Open Revisions command
Figure 20 File versions dialog
3 Select Open in either dialog to download the item to ChemStation. To prevent other users from modifying the item, select the Open As Checked Out command. The item is then marked as checked out in the central data storage system (see Figure 19 on page 61, marker 2).
NOTE ChemStation files (data, methods, sequence templates, and report templates) are not automatically checked out of the central data storage system! In order to modify those items in ChemStation, check them out manually. Otherwise, there is no guarantee that you are working on the latest version.
ChemStation with Content Management Systems User's Guide 61
3 Working with ChemStation and Central Data StorageWorkflows for Methods and Templates
If the file already exists on the ChemStation computer in the specified location, you must choose a different download location.
The remote path of methods and templates is shown in the ChemStation toolbar.
4 Make the required changes to the loaded item.
A modified method is indicated by in the navigation pane.
A modified sequence template is indicated by .
A modified report template is indicated by .
5 Select the appropriate Save command in the ECM or CM menu to save the changed item.:
• Save Method
• Save Sequence Template
• Save Report Template
6 When the Add File dialog opens, enter a reason for the upload and click OK. The reason is then shown in the Audit Trail of the central data storage system (see “Audit Trail of the Central Data Storage” on page 75).
The progress of the upload is displayed in a window until the item is uploaded to the central repository.
The .M.SSIZIP/.S/.RDL file is uploaded with its original name to its original remote data path (the path is shown as a tooltip of the method/sequence template/report template in ChemStation). The version number is automatically increased by one.
NOTE If you have not checked out the item before loading it from the central data storage, and another user has checked out the item in the meantime, you cannot proceed with the upload back to the central data storage. A warning message is displayed, and it is not possible to save the item until the other user has released the checked out item.
62 ChemStation with Content Management Systems User's Guide
Working with ChemStation and Central Data Storage 3Workflows for Methods and Templates
Updating the Local Master Method, Sequence Template, or Report Template
A copy of files (Master Method, Sequence Template, or Report Template) uploaded to the central repository is kept locally and may not be the latest version. The update command will allow you to download the latest version from ECM or Content Management and update the local copy.
1 Make sure the master method, sequence template, or report template to be updated is currently not loaded. A currently loaded item is not available for update.
2 Select the appropriate Update command from the ECM or CM menu:
• Update Methods ...
• Update Sequence Templates ...
• Update Report Templates ...
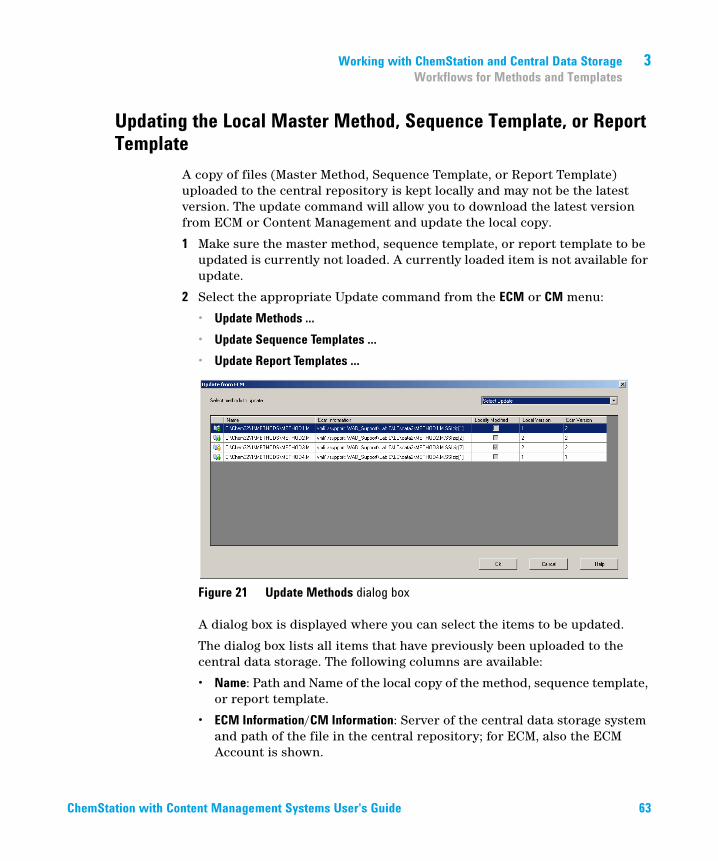
Figure 21 Update Methods dialog box
A dialog box is displayed where you can select the items to be updated.
The dialog box lists all items that have previously been uploaded to the central data storage. The following columns are available:
• Name: Path and Name of the local copy of the method, sequence template, or report template.
• ECM Information/CM Information: Server of the central data storage system and path of the file in the central repository; for ECM, also the ECM Account is shown.
ChemStation with Content Management Systems User's Guide 63
3 Working with ChemStation and Central Data StorageWorkflows for Methods and Templates
• Locally Modified: A check box indicating whether the local copy was modified.
• Local Version: Version number of the local copy of the method, sequence template, or report template.
• ECM Version/CM Version: Version number of the file in the central repository.
3 You can now manually select the items that are to be updated. Alternatively you can use the drop down list to deselect all items, select those items with a higher version number in the central repository, or select all items that have been modified locally.
After clicking OK, the selected local items are updated with the version from the central data storage.
64 ChemStation with Content Management Systems User's Guide
ChemStation with Content Management Systems User's Guide
4Administration Regarding 21 CFR Part 11 ComplianceIntroduction to 21 CFR Part 11 67
21 CFR Part 11 Requirements 68General Aspects of Data Security in Computerized Networks - Open Versus Closed Systems 68
Overview of Configuration Steps Required for Part 11 70Audit Trails and Logbooks 71
Method Audit Trail 71Results Audit Trail 73Sequence Audit Trail 73Report History 74Audit Trail of the Central Data Storage 75System Log of the Central Data Storage 77System Activity Log in OpenLAB Control Panel 78
Security Policy 80Configuration of the Central Data Storage System 80User-Specific Settings 83
Users/Groups/Roles Configuration 85Settings in OpenLAB Control Panel 85Users, Roles, and Privileges Concept with ECM 90Users, roles, and privileges concept with OpenLAB Server 92
ChemStation Administration Tool 93Enabling users to start the ChemStation Administration Tool 94Session Lock Settings 96Data Handling and Audit Trail Configuration 96
65Agilent Technologies
4 Administration Regarding 21 CFR Part 11 ComplianceWorkflows for Methods and Templates
Configuration Profiles 97Folder Protection with Secure File I/O 98
Electronic Signature 102Preparation 102Using electronic signatures 104
This chapter explains the purpose of 21 CFR Part 11 and how the integration of ChemStation with a central data storage system addresses the requirements of 21 CFR Part 11.
66 ChemStation with Content Management Systems User's Guide
Administration Regarding 21 CFR Part 11 Compliance 4Introduction to 21 CFR Part 11
Introduction to 21 CFR Part 11
Effective August 20, 1997, the U.S. Food and Drug Administration (FDA) released and published a new rule to enable pharmaceutical companies to approve their results with electronic signatures and to transfer paper-trail documentation into electronic records. This rule is known as 21 Code of Federal Regulations Part 11 (referred to as 21 CFR Part 11) and applies to all industry segments regulated by the FDA.
The impact of this rule on current work practices and data handling in the pharmaceutical industry has been much higher than expected. “The industry wanted to have a rule on electronic signatures, but what they got was a rule on electronic records.” (Martin Browning, former FDA inspector, during a validation seminar in Washington D.C.)
21 CFR Part 11 places high emphasis on the implementation of all measures to protect and secure electronic records. Notwithstanding the uncertainties and the changes that 21 CFR Part 11 requires in the behavior of both the pharmaceutical industry and the vendors of chemical analysis equipment, it is well worth implementing in today’s laboratories because it can help the industry with one of the most important issues in pharmaceutical research-bringing new drugs on the market faster.
The major benefits of this shift towards electronic data management are in the potential productivity increase for the industry. The industry can decrease its data output on paper, speed up the data review and approval process, and benefit from new automation technology based on computerized system control, for example, in manufacturing or dissolution drug release testing.
In addition to this rule on electronic records, other general requirements for computerized systems are brought to the auditor’s attention. These rules cover the basic requirements of validation which are limiting data access and ensuring data integrity and data traceability.
It is, of course, the industry that must ensure that its work practices support the FDA rules, but most of the requirements also affect the chemical analysis systems and suppliers of these systems.
ChemStation with Content Management Systems User's Guide 67
4 Administration Regarding 21 CFR Part 11 ComplianceIntroduction to 21 CFR Part 11
21 CFR Part 11 RequirementsTo fulfill the FDA rules and guidelines for compliant electronic records and computerized systems, it is important to understand the basic aspects of secure data handling.
• Data security: physical protection of data by limiting access to the system and preventing unauthorized access.
• Data integrity: protecting raw data and metadata and preventing these from unauthorized modification, and linking raw data and results to reproduce the original results at any time, for example, in an audit situation, and document each new result copy.
• Audit traceability: documenting who did what to the results and when, and tracing the user adding new reanalyzed versions to the original raw data.
General Aspects of Data Security in Computerized Networks - Open Versus Closed Systems
Before discussing details of data security in a chromatographic system, some general aspects of data security in a computerized network need to be considered.
It is generally known that data transfer over a public network can be accessed by unauthorized external persons, "hackers", who gain access either for personal amusement or intentional fraud.
If an electronic identification comprising user ID and a password is used to approve confidential or important data, users must be sure that their signatures are unbreakably linked to the data and that nobody can copy this signature or get access to the passwords. In a public system, this would require additional encryption technology, for example, a private/public key combination of data encryption. In contrast, if a computerized system is protected from unauthorized access, users can be sure that their signatures are private and are not accessible to unauthorized individuals.
The FDA also distinguishes between these two scenarios and defines them as open and closed systems. A public network system can therefore only be viewed as an open system and a protected network as a closed system, if it fulfills additional requirements.
68 ChemStation with Content Management Systems User's Guide
Administration Regarding 21 CFR Part 11 Compliance 4Introduction to 21 CFR Part 11
In FDA terms, "closed system means an environment in which access is controlled by persons who are responsible for the content of electronic records on the system" (11.3.5). The evidence of a system being a closed system is not a one-time check but an ongoing process of executing and documenting the system controls that make sure that the system is closed. In contrast, in an open system, "those persons being responsible for the content of electronic records do not control the system access."
As a result, open systems require additional encryption technology for all data transfer over the network.
Agilent OpenLAB CDS is designed for and supported in closed systems.
ChemStation with Content Management Systems User's Guide 69
4 Administration Regarding 21 CFR Part 11 ComplianceOverview of Configuration Steps Required for Part 11
Overview of Configuration Steps Required for Part 11
If you want to configure OpenLAB CDS ChemStation Edition with a central data storage system to be compliant with 21 CFR Part 11, you need to go through the following checklist:
• Directory structure in the central data storage system prepared according to your needs
See “Storage Model in OpenLAB ECM and OpenLAB Server” on page 16.
• Roles/Users/Groups configured in the central data storage system and in OpenLAB Control Panel
See “Users/Groups/Roles Configuration” on page 85.
• Configuration of the central data storage system with active audit trail and mandatory reason
See “Audit Trail of the Central Data Storage” on page 75.
See “Configuration of the Central Data Storage System” on page 80.
• Password policy realized in OpenLAB Control Panel
See “User-Specific Settings” on page 83.
• E-Signatures prepared (messages and privileges)
See “Using electronic signatures” on page 104.
• Automatic Data Transfer Settings and Transfer Management Settings activated
See “Automatic Data Transfer Settings” on page 32.
• Audit trail active for methods and results
See “Method Audit Trail” on page 71 and “Results Audit Trail” on page 73.
• Folders protected from external modification
See “Folder Protection with Secure File I/O” on page 98
• Emergency Plan available, based on options of the Administration Tool
See “ChemStation Administration Tool” on page 93.
70 ChemStation with Content Management Systems User's Guide
Administration Regarding 21 CFR Part 11 Compliance 4Audit Trails and Logbooks
Audit Trails and Logbooks
In order to comply to 21 CRF Part 11, OpenLAB CDS offers various audit trails and logbooks to document all activities associated with methods, results, reports, or any files stored in the repository. These audit trails and logbooks track all changes that are made to any file, including data acquisition, re-analysis, and long-term archiving.
Audit trails are stored in separate files, which are stored together with the sample or method data. The audit trail files are archived together with the other data in the respective SSIZIP files. Logbooks are available only in the Content Management system.
Method Audit TrailEach method has a Method Audit Trail. By default, this Method Audit Trail contains only the comments that you must provide each time when you save a method. As there is no control on the provided text, there is no guarantee that the method changes are reproducible.
With regards to 21 CFR Part 11, OpenLAB CDS ChemStation Edition makes it possible to generate a more detailed Method Audit Trail. If the function is activated, the Method Audit Trail contains not only the user comments, but also each individual changed parameter with its old and new value. All changeable data analysis parameters are tracked. This means that you can reproduce exactly which value has been changed to what, when, and by whom.
Depending on the instrument driver, the Method Audit Trail may also contain an entry for each changed instrument setting.
ChemStation with Content Management Systems User's Guide 71
4 Administration Regarding 21 CFR Part 11 ComplianceAudit Trails and Logbooks
To enable the Method Audit Trail only for the currently open methodYou can also activate the Method Audit Trail only for one method. This might be useful, for example, when you finished the development of new method and want to track all further changes.
1 Select Method > Enable Audit Trail.
2 In the Audit Trail Status dialog, select Enable Method Audit Trail for this method.
To enable the Method Audit Trail for all methodsThis is required if you want to comply to 21 CFR Part 11.
1 Select View > Preferences.
2 On the Audit Trail tab, select Enable Audit Trail for all methods, and click OK.
Once enabled, the Method Audit Trail cannot be disabled.
To view the Method Audit Trail for the currently open method in ChemStation1 Select Method > Method Audit Trail.
NOTE You can also use the ChemStation Administration Tool to enable the Method Audit Trail for all methods and all instruments (see “ChemStation Administration Tool” on page 93).
NOTE Once a method is enabled for the detailed audit trail, you cannot disable it again. You can only save the method under a different method name. The new Audit Trail of the new method will then contain a comment about the method being based on the existing method.
72 ChemStation with Content Management Systems User's Guide
Administration Regarding 21 CFR Part 11 Compliance 4Audit Trails and Logbooks
Results Audit TrailThe Results Audit Trail contains information on manual integration events that are not saved to a method. Manual integration events that are saved to a method are listed in the corresponding Method Audit Trail.
If activated, this Results Audit Trail is added to the existing Data File Logbook (file name RUN.LOG). By default, the Data File Logbook only contains the acquisition parameters and reprocessing information for each sample. The Results Audit Trail additionally tracks the changes of all data analysis parameters for a sample.
To enable the Results Audit TrailIf you enable the Results Audit Trail, the relevant changes are tracked for all samples, independent of the sequence they belong to and independent of the user who carries out the change.
1 Select View > Preferences.
2 On the Audit Trail tab, select Enable Results Audit Trail.
To view the Results Audit Trail for the loaded sample in ChemStation1 In the Data Analysis view, select View > Current Data File Logbook.
Sequence Audit TrailThe Sequence Audit Trail is automatically activated when the Results Audit Trail is enabled and will track changes made to the running sequence. The audit trail is saved along with the sequence, and tracks all changes to:
• the Sequence Table:
• changes to any table cells
• insertion and deletion of sequence lines
• the values in the Sequence Parameters dialog box
• values in sequence-related custom fields
ChemStation with Content Management Systems User's Guide 73
4 Administration Regarding 21 CFR Part 11 ComplianceAudit Trails and Logbooks
For each change, the application logs:
• the date and time of creation of the audit trail entry
• the user who was logged on when the audit trail entry was generated
• a system-generated description of the change that resulted in the audit trail entry
• a user-generated comment
The latest Sequence Audit Trail entry is added to the top of the list. The list can be displayed and printed.
To view the Sequence Audit Trail for the currently loaded sequence1 In either the Method and Run Control view or the Data Analysis view, select
Sequence > Sequence Audit Trail.
Report HistoryIf you create a ChemStation report, you can display the report on the screen, send it to a printer, or save the report as a specific file (report.pdf). These report outputs may easily be lost or overwritten, especially when you create several reports one after another.
ChemStation automatically tracks all reports that have been generated. If you have the results audit trail enabled you may see the Report History, that allows to reproduce an old or overwritten report. Select Report > Report History to see all reports created for the current data file. You can also export or print this history.
74 ChemStation with Content Management Systems User's Guide
Administration Regarding 21 CFR Part 11 Compliance 4Audit Trails and Logbooks
Audit Trail of the Central Data StorageThe Audit Trail of the central data storage system is a record showing who accessed the system and what operations a user performed during a given period of time. Since Data Store 2.0 (now "OpenLAB Server") audit trail has been renamed to Activity Log.
You can view file-related, system administration, folder administration, and (for ECM) scheduler-related entries. For example, you can see when a file was added and who added it.
For each operation, the central data storage system asks the user for a reason. This reason is also shown in the Audit Trail/Activity Log. For automatic uploads default reasons are given by the system.
To enable the ECM Audit TrailYou can enable the ECM Audit Trail only for a complete ECM Account. To activate the ECM Audit Trail, select the check box Enable audit trail for this account when creating a new account.
It is not possible to activate the ECM Audit Trail afterwards for an existing account, or to deactivate the ECM Audit Trail if it has been activated during creation of the account.
NOTE In ECM, you must manually enable the Audit Trail. The entry of a reason for the audit trail can be set to be optional or mandatory. If the system shall be compliant to 21 CFR Part 11, the ECM Audit Trail must be enabled, and providing a reason must be mandatory (see “To configure the ECM Account” on page 80). Using a reason must be regulated by a Standard Operating Procedure (SOP).
ChemStation with Content Management Systems User's Guide 75
4 Administration Regarding 21 CFR Part 11 ComplianceAudit Trails and Logbooks
To view the Audit Trail for a specific file in ChemStationFor both ECM and Content Management, you can view the Audit Trail for a specific file directly in ChemStation.
1 In the ChemStation Explorer, right-click the respective file.
2 Select ECM Properties... or CM Properties... from the context menu.
This command is only available if the file has been uploaded to central data storage.
3 In the File Properties dialog, select the Audit Trail tab.
This tab contains all Audit Trail entries associated with the file.
To view the Audit Trail for a specific file in ECM1 In ECM, right-click the respective file and select Properties from the context
menu.
2 In the File Properties dialog, select the Audit Trail tab.
All actions related to this specific file are listed here, together with the date, ECM user name who performed the action, and a reason provided by the according user.
To view the Audit Trail/Activity Log for a specific file in Content Management 1 In the content browser, move the mouse over the file, then select Activity
Log .
A file preview is shown, together with several document properties and a list of document actions.
To view the Audit Trail for all files in ECM1 In ECM, select the Administration page.
2 In the Navigation Pane, select the Activity Log > Audit Trail node.
All actions related to any ECM file are listed here, together with the file name, date, ECM user name who performed the action, and a reason provided by the respective user.
You can search the entries, for example, for a specific date or date range, or for entries related to specific categories (Files, Folders, System, Scheduler, or Instrument). Also you can print the entries or export them to a file.
76 ChemStation with Content Management Systems User's Guide
Administration Regarding 21 CFR Part 11 Compliance 4Audit Trails and Logbooks
To view the Audit Trail/Activity Log for all files in Content Management1 In the content browser, click Activity Log in the top pane.
You can filter the list by date range and user name.
System Log of the Central Data StorageThe System Log of the central data storage is a record that shows changes to the system, including configuration changes, e-mail notifications, and additions or changes to the directory structure.
You can view file-related, system administration, folder administration, or (for ECM) Scheduler-related entries. For example, you can see when a directory was added and by whom.
The System Log is always active; you do not need to enable it.
To view the ECM System Log1 In ECM, select the Administration page.
2 In the navigation pane, select the Activity Log > System Log node.
All general actions related to ECM are listed here, together with the date, ECM user name who performed the action, and a reason provided by the respective user. Depending on the ECM Account administration, the reason may be optional or mandatory (see “To configure the ECM Account” on page 80).
You can search the entries, for example, for a specific date or date range, or for entries related to specific categories (Files, Folders, System, Scheduler, or Instrument). Also you can print the entries or export them to a file.
NOTE The user name is case sensitive and needs to be an exact match.
ChemStation with Content Management Systems User's Guide 77
4 Administration Regarding 21 CFR Part 11 ComplianceAudit Trails and Logbooks
To view the Content Management System LogIn Content Management, there is only one single activity log for the entire system. System activities are stored at the same place as file activities.
1 In the content browser, click Activity Log in the top pane.
You can filter the list by date range and user name.
System Activity Log in OpenLAB Control PanelThe System Activity Log allows you to centrally access all system activities. It contains information on the various events associated with Shared Services or with specific instruments. You can filter the list in order to view events of a specific type, in a specific time range, created by a specific user, or containing a specific description only.
The following types of events are recorded:
• System (e.g. Control Panel specific events)
• Instrument Management (e.g. Adding instruments)
• Instrument (e.g. instrument specific error messages)
• Instrument Controller (e.g. adding a new Networked Workstation or AIC)
• User (e.g. adding a new user or changing user privileges)
• Group (e.g. adding a new user group or changing group privileges)
• Security (e.g. successful and unsuccessful login events)
• License (e.g adding a new license)
The messages can come from other components, such as the user management, or from an instrument module. Instrument messages include error messages, system messages or event messages. ChemStation records these events in its own environment but also sends the events to the System Activity Log. The System Activity Log records these events irrespective of whether you have been alerted to them or not. To get more information on an event, expand the line of interest in the activity logbook viewer.
NOTE The user name is case sensitive and needs to be an exact match.
78 ChemStation with Content Management Systems User's Guide
Administration Regarding 21 CFR Part 11 Compliance 4Audit Trails and Logbooks
To Enable the System Activity Log1 In the OpenLAB Control Panel, select the Administration > System
Configuration page.
2 In the ribbon, click Activity Log Settings.
3 In the Activity Log Settings dialog, select the Write activity log check box, and confirm your settings.
NOTE By default, activity logging is disabled. To enable it in OpenLAB Control Panel, you must have the Edit activity log properties privilege. Once enabled, activity logging cannot be disabled again.
ChemStation with Content Management Systems User's Guide 79
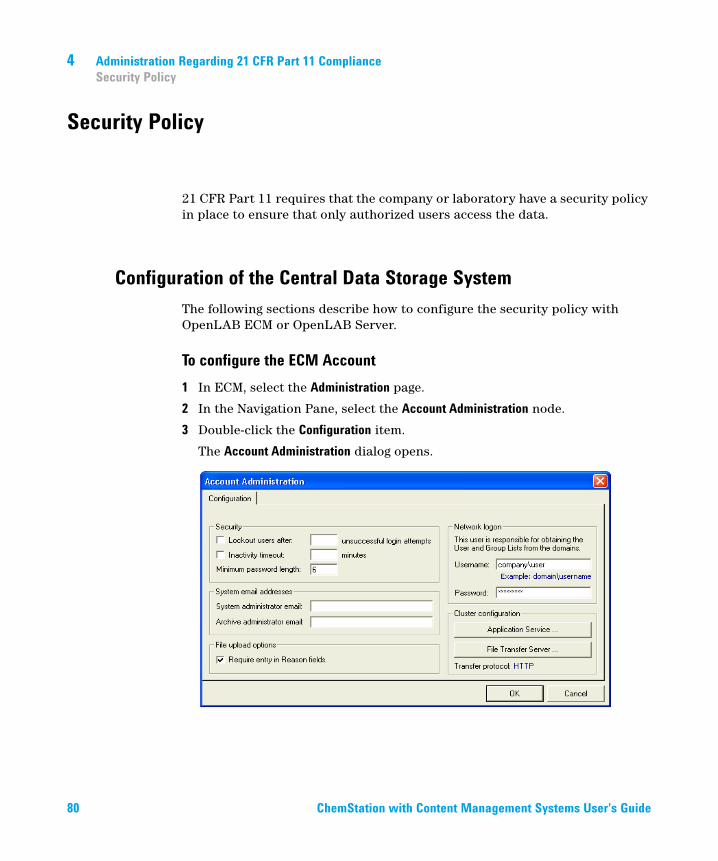
4 Administration Regarding 21 CFR Part 11 ComplianceSecurity Policy
Security Policy
21 CFR Part 11 requires that the company or laboratory have a security policy in place to ensure that only authorized users access the data.
Configuration of the Central Data Storage SystemThe following sections describe how to configure the security policy with OpenLAB ECM or OpenLAB Server.
To configure the ECM Account1 In ECM, select the Administration page.
2 In the Navigation Pane, select the Account Administration node.
3 Double-click the Configuration item.
The Account Administration dialog opens.
80 ChemStation with Content Management Systems User's Guide
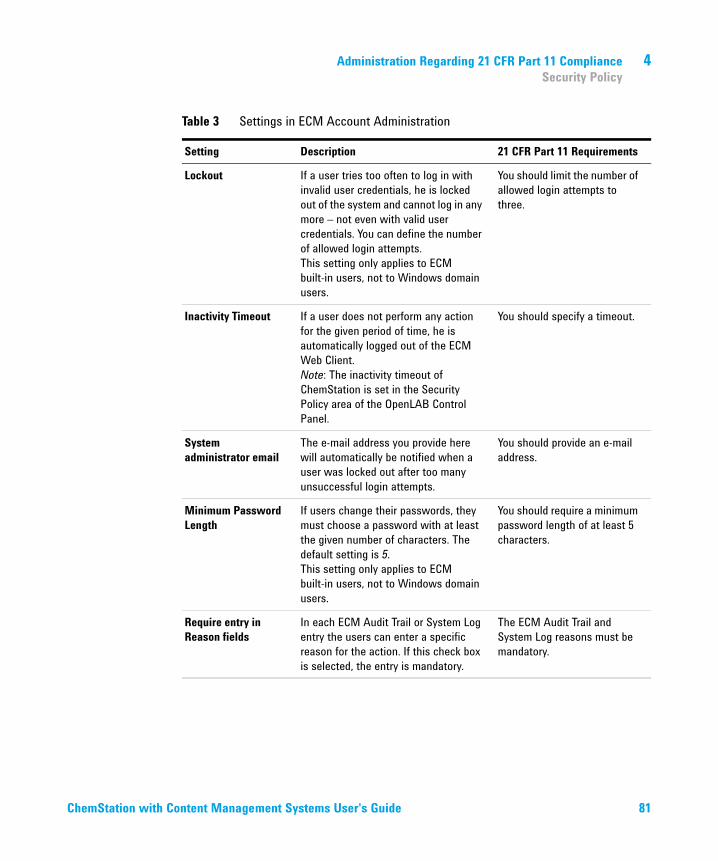
Administration Regarding 21 CFR Part 11 Compliance 4Security Policy
Table 3 Settings in ECM Account Administration
Setting Description 21 CFR Part 11 Requirements
Lockout If a user tries too often to log in with invalid user credentials, he is locked out of the system and cannot log in any more – not even with valid user credentials. You can define the number of allowed login attempts.This setting only applies to ECM built-in users, not to Windows domain users.
You should limit the number of allowed login attempts to three.
Inactivity Timeout If a user does not perform any action for the given period of time, he is automatically logged out of the ECM Web Client.Note: The inactivity timeout of ChemStation is set in the Security Policy area of the OpenLAB Control Panel.
You should specify a timeout.
System administrator email
The e-mail address you provide here will automatically be notified when a user was locked out after too many unsuccessful login attempts.
You should provide an e-mail address.
Minimum Password Length
If users change their passwords, they must choose a password with at least the given number of characters. The default setting is 5.This setting only applies to ECM built-in users, not to Windows domain users.
You should require a minimum password length of at least 5 characters.
Require entry in Reason fields
In each ECM Audit Trail or System Log entry the users can enter a specific reason for the action. If this check box is selected, the entry is mandatory.
The ECM Audit Trail and System Log reasons must be mandatory.
ChemStation with Content Management Systems User's Guide 81
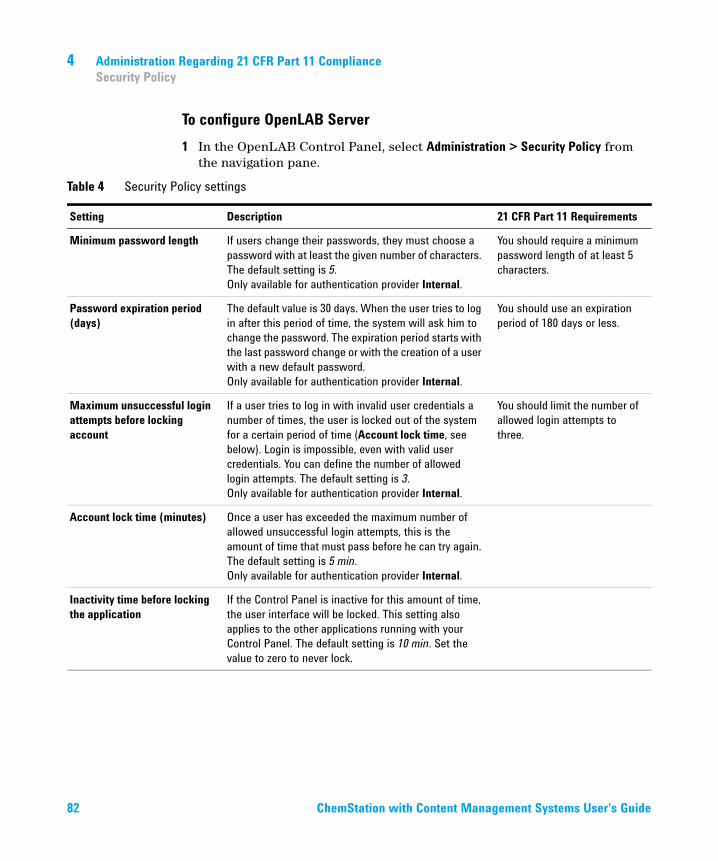
4 Administration Regarding 21 CFR Part 11 ComplianceSecurity Policy
To configure OpenLAB Server1 In the OpenLAB Control Panel, select Administration > Security Policy from
the navigation pane.
Table 4 Security Policy settings
Setting Description 21 CFR Part 11 Requirements
Minimum password length If users change their passwords, they must choose a password with at least the given number of characters. The default setting is 5.Only available for authentication provider Internal.
You should require a minimum password length of at least 5 characters.
Password expiration period (days)
The default value is 30 days. When the user tries to log in after this period of time, the system will ask him to change the password. The expiration period starts with the last password change or with the creation of a user with a new default password.Only available for authentication provider Internal.
You should use an expiration period of 180 days or less.
Maximum unsuccessful login attempts before locking account
If a user tries to log in with invalid user credentials a number of times, the user is locked out of the system for a certain period of time (Account lock time, see below). Login is impossible, even with valid user credentials. You can define the number of allowed login attempts. The default setting is 3.Only available for authentication provider Internal.
You should limit the number of allowed login attempts to three.
Account lock time (minutes) Once a user has exceeded the maximum number of allowed unsuccessful login attempts, this is the amount of time that must pass before he can try again. The default setting is 5 min.Only available for authentication provider Internal.
Inactivity time before locking the application
If the Control Panel is inactive for this amount of time, the user interface will be locked. This setting also applies to the other applications running with your Control Panel. The default setting is 10 min. Set the value to zero to never lock.
82 ChemStation with Content Management Systems User's Guide
Administration Regarding 21 CFR Part 11 Compliance 4Security Policy
User-Specific Settings21 CFR Part 11 does not define any specific rules for the password settings. However, your company must have defined a password policy.
To configure password settings in ECM1 In ECM, select the Administration page.
2 In the navigation pane, select the Account Administration node.
3 Double-click the Users/Groups/Roles item.
You may consider the following settings for ECM built-in users:
• User cannot change password
• User must change password after next login
To configure password settings in OpenLAB Server1 In the OpenLAB Control Panel, select Administration > Users from the
navigation pane.
2 Select a user, and click Edit in the ribbon.
With the authentication provider set to Internal, you can configure the following settings on the General tab:
NOTE The minimum password length for ECM built-in users is defined in the ECM Account configuration (see “To configure the ECM Account” on page 80).
Table 5 User Credentials
Value Description Mandatory
Name Username to log in to the system.
NOTEThe following characters are not allowed as part of a username: < > : " / \ | % * ? ' °
Yes
Description Additional information about the user (e.g. department, function etc.)
No
Password Password for the user; minimum password length is defined in the Security Policy.
Yes
ChemStation with Content Management Systems User's Guide 83
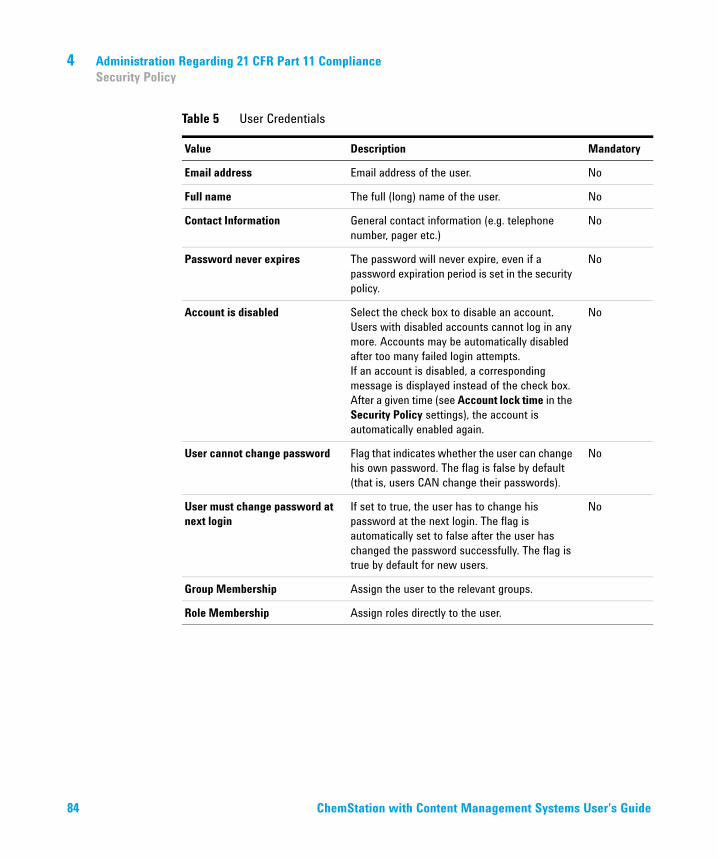
4 Administration Regarding 21 CFR Part 11 ComplianceSecurity Policy
Email address Email address of the user. No
Full name The full (long) name of the user. No
Contact Information General contact information (e.g. telephone number, pager etc.)
No
Password never expires The password will never expire, even if a password expiration period is set in the security policy.
No
Account is disabled Select the check box to disable an account. Users with disabled accounts cannot log in any more. Accounts may be automatically disabled after too many failed login attempts.If an account is disabled, a corresponding message is displayed instead of the check box. After a given time (see Account lock time in the Security Policy settings), the account is automatically enabled again.
No
User cannot change password Flag that indicates whether the user can change his own password. The flag is false by default (that is, users CAN change their passwords).
No
User must change password at next login
If set to true, the user has to change his password at the next login. The flag is automatically set to false after the user has changed the password successfully. The flag is true by default for new users.
No
Group Membership Assign the user to the relevant groups.
Role Membership Assign roles directly to the user.
Table 5 User Credentials
Value Description Mandatory
84 ChemStation with Content Management Systems User's Guide
Administration Regarding 21 CFR Part 11 Compliance 4Users/Groups/Roles Configuration
Users/Groups/Roles Configuration
Users with specific roles and privileges are needed in both the central data storage system and in ChemStation. First, you need to authenticate with a user name and password when you start ChemStation from the OpenLAB Control Panel. Then, additional privileges are required for specific functions in ChemStation as well as in the central data storage system.
In OpenLAB CDS, user management is part of Shared Services, which you access via the OpenLAB Control Panel. Each user can be member of specific groups. To each group, you can assign predefined roles that comprise specific privileges. If you use an external authentication provider, you can import users and groups from the external system.
Settings in OpenLAB Control Panel
Users in OpenLAB Control PanelIf you use an external authentication provider such as ECM, you cannot create new users, but must import users that exist in the authentication systems. A search function helps you find specific users in the authentication system. In the OpenLAB Control Panel, you can manage the roles for those external users, but not the actual user credentials such as user name and password. If you want to remove an external user, you unmap the user in the OpenLAB Control Panel. The user continues to exist in the external authentication system.
GroupsIf you use an external authentication provider, you can either import the names of groups that exist in the external system, or create new internal groups. There is no limit on the number of groups that can be mapped or created.
Assign users to groups either in the external system or in the Control Panel. If you need additional user assignments that are relevant only for OpenLAB
ChemStation with Content Management Systems User's Guide 85
4 Administration Regarding 21 CFR Part 11 ComplianceUsers/Groups/Roles Configuration
CDS, create them in the Control Panel. Otherwise it is sufficient to only import the groups and assign the required roles to the groups.
If you delete or unmap a group, the users who were members in this group remain unchanged.
Roles and Privileges in OpenLAB Control PanelRoles are used to assign privileges to a user or a user group globally or for a specific instrument or location. The system contains a list of predefined roles which are installed as part of the system installation (for example, Instrument Administrator, Instrument User, or Everything). Each role has certain privileges assigned.
Privileges are grouped according to the three main role types (Project role, Instrument role, and Administrative role). When you assign privileges to a role, you first select the required role type and then select the privileges related to this role type. Each role can only have privileges of one specific role type; the only exception is the predefined role Everything, which has all privileges of all role types. Users or groups may require multiple roles to perform system functions. For example, a user with the role ChemStation Operator will always need another role such as Instrument User with the privilege to run an instrument.
You can create a tree of different locations in the OpenLAB Control Panel, and add instruments to the relevant locations. For each instrument or instrument group, you can assign different Instrument roles (see also “Specific Privileges for Individual Nodes” on page 89). For example, a user can have the role Instrument Administrator for one instrument, and Instrument User for another instrument.
With OpenLAB Server/Content Management, you can also create a tree of different projects or project groups in the OpenLAB Control Panel, and assign different Project roles for different projects (see also “Specific Privileges for Individual Nodes” on page 89). For example, a user can have the role Project Administrator in one project, so that he can manage the settings in the OpenLAB Control Panel. In a second project, he may have a role that allows him to edit the content of a project, but not to change the project settings.
With OpenLAB Server/Content Management, you must first enable projects (see “Using Projects with Content Management” on page 89).
86 ChemStation with Content Management Systems User's Guide
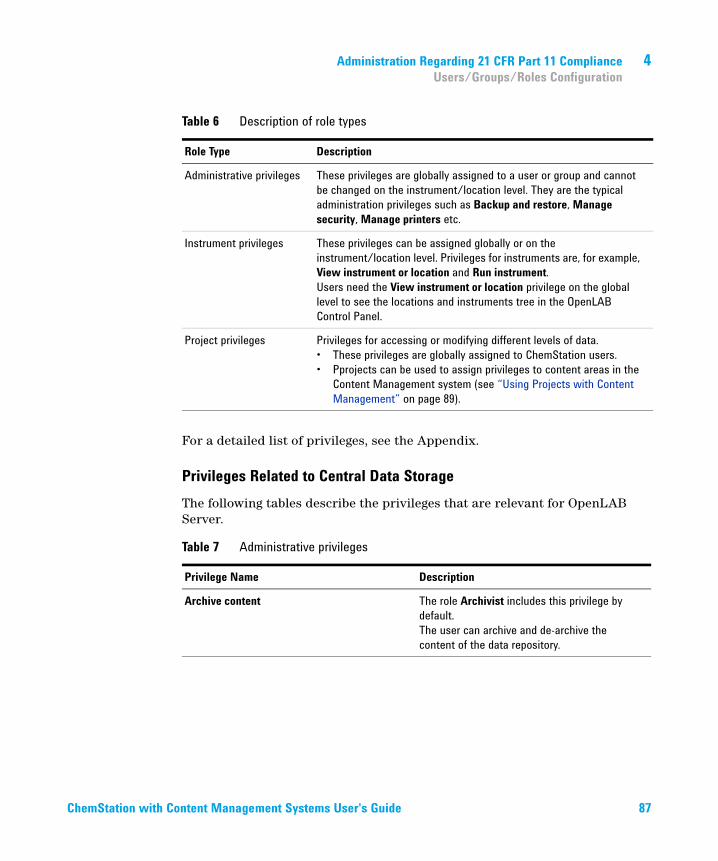
Administration Regarding 21 CFR Part 11 Compliance 4Users/Groups/Roles Configuration
For a detailed list of privileges, see the Appendix.
Privileges Related to Central Data StorageThe following tables describe the privileges that are relevant for OpenLAB Server.
Table 6 Description of role types
Role Type Description
Administrative privileges These privileges are globally assigned to a user or group and cannot be changed on the instrument/location level. They are the typical administration privileges such as Backup and restore, Manage security, Manage printers etc.
Instrument privileges These privileges can be assigned globally or on the instrument/location level. Privileges for instruments are, for example, View instrument or location and Run instrument.Users need the View instrument or location privilege on the global level to see the locations and instruments tree in the OpenLAB Control Panel.
Project privileges Privileges for accessing or modifying different levels of data.• These privileges are globally assigned to ChemStation users.• Pprojects can be used to assign privileges to content areas in the
Content Management system (see “Using Projects with Content Management” on page 89).
Table 7 Administrative privileges
Privilege Name Description
Archive content The role Archivist includes this privilege by default.The user can archive and de-archive the content of the data repository.
ChemStation with Content Management Systems User's Guide 87
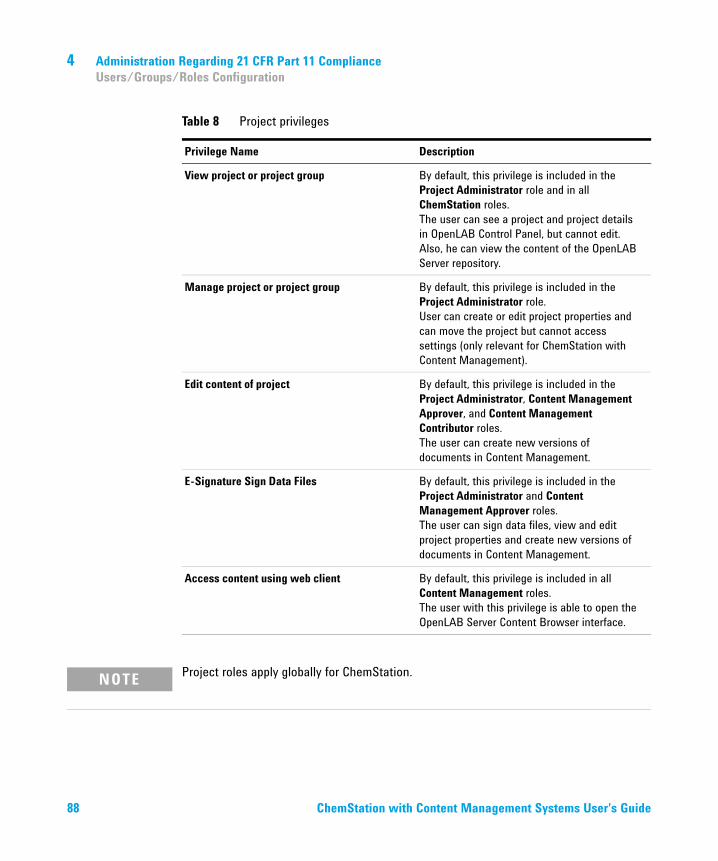
4 Administration Regarding 21 CFR Part 11 ComplianceUsers/Groups/Roles Configuration
Table 8 Project privileges
Privilege Name Description
View project or project group By default, this privilege is included in the Project Administrator role and in all ChemStation roles. The user can see a project and project details in OpenLAB Control Panel, but cannot edit. Also, he can view the content of the OpenLAB Server repository.
Manage project or project group By default, this privilege is included in the Project Administrator role.User can create or edit project properties and can move the project but cannot access settings (only relevant for ChemStation with Content Management).
Edit content of project By default, this privilege is included in the Project Administrator, Content Management Approver, and Content Management Contributor roles.The user can create new versions of documents in Content Management.
E-Signature Sign Data Files By default, this privilege is included in the Project Administrator and Content Management Approver roles.The user can sign data files, view and edit project properties and create new versions of documents in Content Management.
Access content using web client By default, this privilege is included in all Content Management roles.The user with this privilege is able to open the OpenLAB Server Content Browser interface.
NOTE Project roles apply globally for ChemStation.
88 ChemStation with Content Management Systems User's Guide
Administration Regarding 21 CFR Part 11 Compliance 4Users/Groups/Roles Configuration
Using Projects with Content ManagementWith OpenLAB CDS, you can enable projects in the OpenLAB Control Panel. Projects contain a path to a project folder in the Content Management system. For each project, you can assign specific content privileges to the users.
To Enable Projects
1 In the OpenLAB Control Panel, navigate to Administration > System Configuration.
2 In the ribbon, click Enable Projects.
3 In the confirmation dialog box, click OK.
For details on assigning specific privileges to a project, see “Specific Privileges for Individual Nodes” on page 89.
Specific Privileges for Individual NodesBy default, the roles of users or groups are globally set for all locations, instruments, project groups, or projects. The role settings are inherited from the root node Instruments or Projects respectively. In order to assign a different role to a user or group for one specific node, you can deselect the Inherit privileges from parent check box in the Edit Privileges dialog for the required node. Afterwards, you can assign a different role that will be valid only for the specific node.
You can assign Instrument roles to individual locations or instruments.
If you use projects, you can assign Project roles to individual project groups or projects. For more information, see “Using Projects with Content Management” on page 89.
Administrative roles are always set globally.
ChemStation with Content Management Systems User's Guide 89
4 Administration Regarding 21 CFR Part 11 ComplianceUsers/Groups/Roles Configuration
Users, Roles, and Privileges Concept with ECMWith ECM, you must select ECM as an external authentication provider in the OpenLAB Control Panel. In ECM itself, you can either set up internal users or operate with the Windows users (see ECM documentation). Each user can be member of specific groups in ECM and in the OpenLAB Control Panel. The groups available in ECM depend on the ECM configuration. The groups available in the OpenLAB Control Panel can be imported from ECM and supplemented by new internal groups.
There are several default roles in both ECM and OpenLAB CDS. In both systems, you must assign a specific role to each group. Roles and privileges must be configured separately for ECM and ChemStation:
• The privileges set in ECM define the accessible content and functions in ECM.
• The privileges set in the OpenLAB Control Panel define which functions are available in ChemStation, and also which administrative tasks can be carried out in the OpenLAB Control Panel.
Default ECM Roles and ECM PrivilegesThere are a number of default roles and privileges in ECM. The following tables show an overview of these roles and privileges.
In addition, you can create your own roles in ECM, or grant further privileges to the default roles. For detailed information, refer to the ECM Administrator's Guide.
NOTE Once you have created a new ECM user, group, or role, you cannot delete it again. You can only deactivate the unused item.
Name Description
Roles starting with “:” Default ECM roles; can be restored by the Reset Roles function.
Privileges starting with "Content:" Privilege related to creating, modifying or deleting content in ECM.
Privileges starting with "System:" Privilege related to administrative tasks in ECM.
90 ChemStation with Content Management Systems User's Guide
Administration Regarding 21 CFR Part 11 Compliance 4Users/Groups/Roles Configuration
Assigning roles in ECMUsers do not need any specific role in order to log in to ECM. However, in order for users to see a particular Location, Cabinet, Drawer, or Folder in the user interface, they must have the :Reader role as a minimum requirement. As a result, domain users with no global roles might not be able to view anything in the content unless they were granted the appropriate privileges.
You should grant the ChemStation users the :Contributor role. This can be done at the global level for the entire ECM Account, or individually for specific folders (see “Roles and Folders in ECM” on page 92). The :Contributor role allows the ChemStation user to view and add content to ECM. The :Contributor role should be enhanced with the Content: Add Folder privilege. This allows ChemStation ECM users to add folders to the LCDF hierarchy.
In addition to the configuration of ECM roles, you must also configure ChemStation roles and privileges for ChemStation users. The configuration of ChemStation roles and privileges is done in the OpenLAB Control Panel.
You find a complete list of all ECM and ChemStation privileges in the Appendix.
NOTE If the role does not include the Add Folder privilege, the users cannot add a new Remote Data Path (LCDF) in ChemStation.
ChemStation with Content Management Systems User's Guide 91
4 Administration Regarding 21 CFR Part 11 ComplianceUsers/Groups/Roles Configuration
Roles and Folders in ECMECM allows you to assign specific roles to users or user groups. This can be done at the global level for the entire ECM Account, or individually for specific folders. For example, a specific user group may have the Contributor role for folder A, but at the same time have only the Reader role for folder B. The roles you assign in ECM are only related to content storage in ECM; all roles related to ChemStation and instrument settings are assigned in OpenLAB Control Panel.
To enable roles for folders:
1 In ECM, select the Administration page.
2 In the navigation pane, select the Account Administration node.
3 Double-click the Users/Groups/Roles item.
The Account Administration dialog opens.
4 On the Roles tab, select the required role and click Edit.
5 Select the Available in folder access tab check box.
Users, roles, and privileges concept with OpenLAB ServerWith OpenLAB Server, all users, groups, roles, and privileges are configured in the OpenLAB Control Panel. You can use Windows as an external authentication provider, but you set up all roles and privileges related to OpenLAB in the OpenLAB Control Panel. ChemStation and OpenLAB Server refer to these settings.
Preparations If you want to assign roles at the folder level, you must first enable this feature in ECM. The setting is valid for the complete ECM Account.
92 ChemStation with Content Management Systems User's Guide
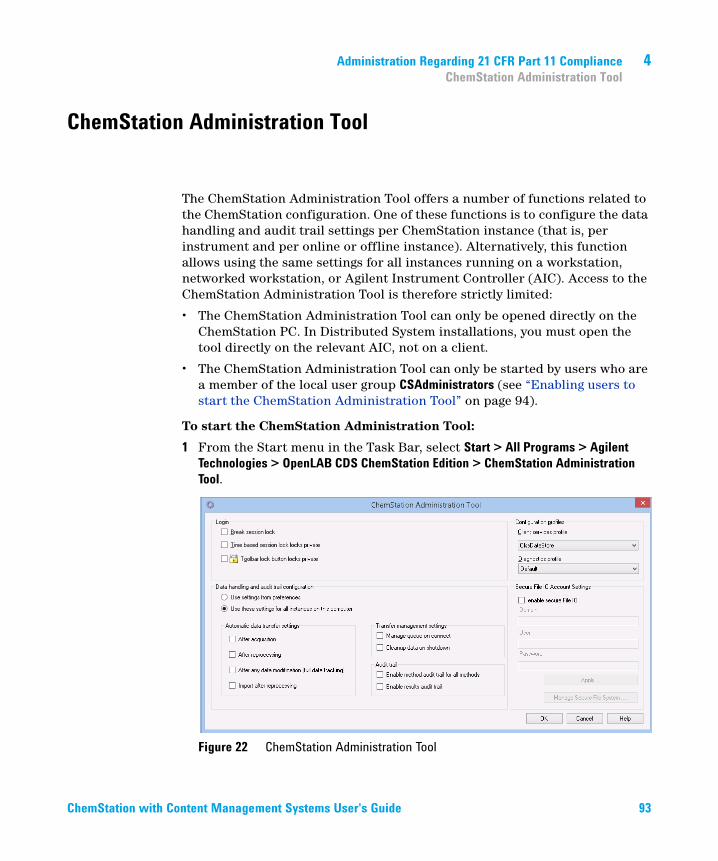
Administration Regarding 21 CFR Part 11 Compliance 4ChemStation Administration Tool
ChemStation Administration Tool
The ChemStation Administration Tool offers a number of functions related to the ChemStation configuration. One of these functions is to configure the data handling and audit trail settings per ChemStation instance (that is, per instrument and per online or offline instance). Alternatively, this function allows using the same settings for all instances running on a workstation, networked workstation, or Agilent Instrument Controller (AIC). Access to the ChemStation Administration Tool is therefore strictly limited:
• The ChemStation Administration Tool can only be opened directly on the ChemStation PC. In Distributed System installations, you must open the tool directly on the relevant AIC, not on a client.
• The ChemStation Administration Tool can only be started by users who are a member of the local user group CSAdministrators (see “Enabling users to start the ChemStation Administration Tool” on page 94).
To start the ChemStation Administration Tool:
1 From the Start menu in the Task Bar, select Start > All Programs > Agilent Technologies > OpenLAB CDS ChemStation Edition > ChemStation Administration Tool.
Figure 22 ChemStation Administration Tool
ChemStation with Content Management Systems User's Guide 93
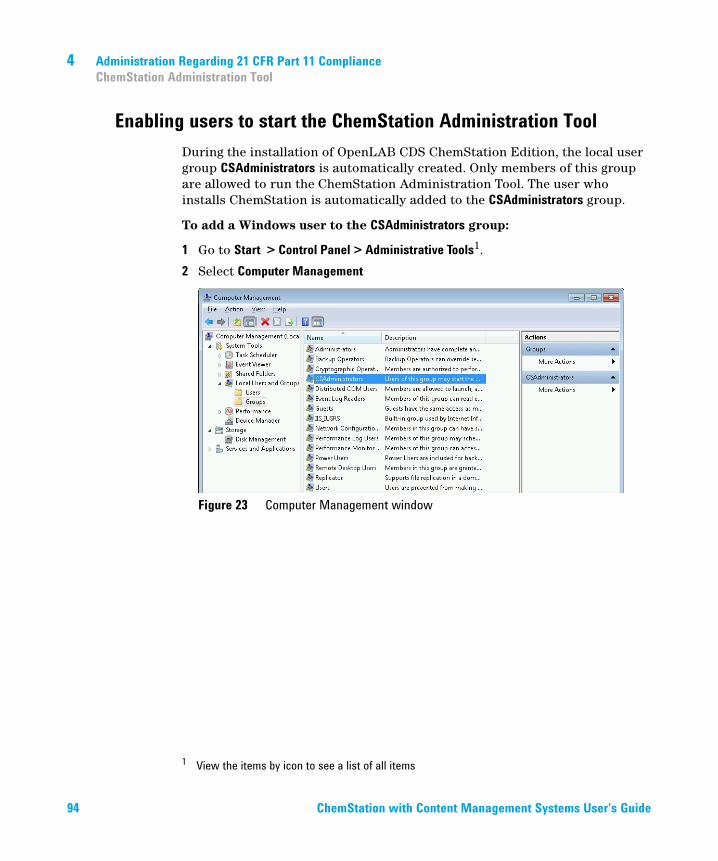
4 Administration Regarding 21 CFR Part 11 ComplianceChemStation Administration Tool
Enabling users to start the ChemStation Administration ToolDuring the installation of OpenLAB CDS ChemStation Edition, the local user group CSAdministrators is automatically created. Only members of this group are allowed to run the ChemStation Administration Tool. The user who installs ChemStation is automatically added to the CSAdministrators group.
To add a Windows user to the CSAdministrators group:
1 Go to Start > Control Panel > Administrative Tools1.
2 Select Computer Management
Figure 23 Computer Management window
1 View the items by icon to see a list of all items
94 ChemStation with Content Management Systems User's Guide
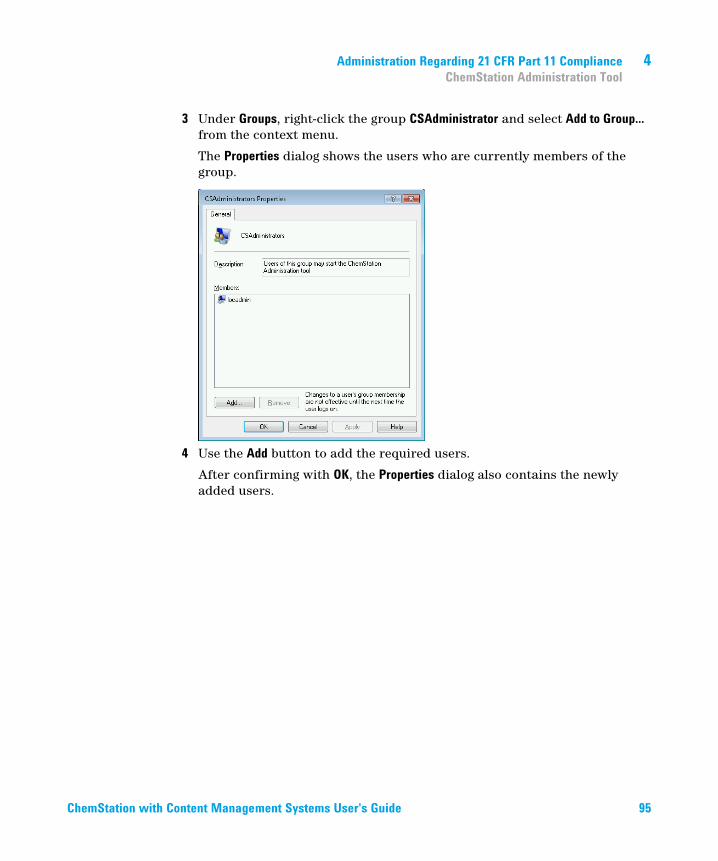
Administration Regarding 21 CFR Part 11 Compliance 4ChemStation Administration Tool
3 Under Groups, right-click the group CSAdministrator and select Add to Group... from the context menu.
The Properties dialog shows the users who are currently members of the group.
4 Use the Add button to add the required users.
After confirming with OK, the Properties dialog also contains the newly added users.
ChemStation with Content Management Systems User's Guide 95
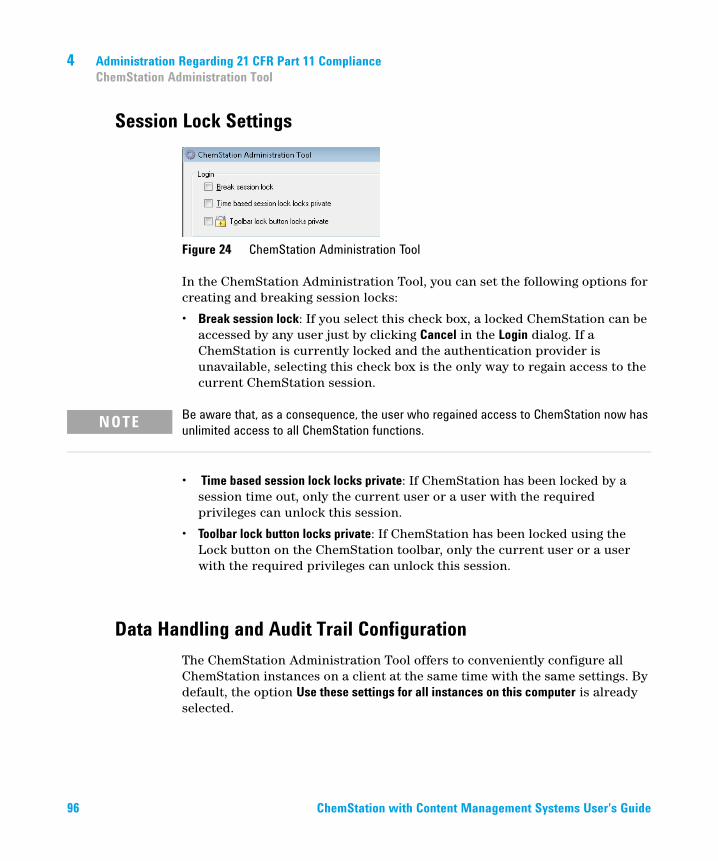
4 Administration Regarding 21 CFR Part 11 ComplianceChemStation Administration Tool
Session Lock Settings
Figure 24 ChemStation Administration Tool
In the ChemStation Administration Tool, you can set the following options for creating and breaking session locks:
• Break session lock: If you select this check box, a locked ChemStation can be accessed by any user just by clicking Cancel in the Login dialog. If a ChemStation is currently locked and the authentication provider is unavailable, selecting this check box is the only way to regain access to the current ChemStation session.
• Time based session lock locks private: If ChemStation has been locked by a session time out, only the current user or a user with the required privileges can unlock this session.
• Toolbar lock button locks private: If ChemStation has been locked using the Lock button on the ChemStation toolbar, only the current user or a user with the required privileges can unlock this session.
Data Handling and Audit Trail Configuration The ChemStation Administration Tool offers to conveniently configure all ChemStation instances on a client at the same time with the same settings. By default, the option Use these settings for all instances on this computer is already selected.
NOTE Be aware that, as a consequence, the user who regained access to ChemStation now has unlimited access to all ChemStation functions.
96 ChemStation with Content Management Systems User's Guide
Administration Regarding 21 CFR Part 11 Compliance 4ChemStation Administration Tool
To force the settings for all ChemStation instances
1 Select the option Use these settings for all instances on this computer.
2 Select the required check boxes. The settings are the same as in the Preferences dialog (see “Preferences” on page 28).
3 Click OK.
Configuration ProfilesBy providing specific client services profiles, you activate specific functions and behaviors in ChemStation.
• Olss
ChemStation communicates with the Shared Services; it sends status information to the Shared Services, and uses the settings defined in the Shared Services (for example, user authentication, roles and privileges, configuration settings, audit trail settings). Use this profile for ChemStation instances that are connected to the Shared Services, but have no connection to a central data storage system.
• OlssEcm
In addition to communication with Shared Services, ChemStation allows transferring data files to and from OpenLAB ECM. Use this profile for ChemStation instances that are connected to both Shared Services and OpenLAB ECM.
In a fail over scenario, where the connection between the workstation and OpenLAB ECM is interrupted, you can set the authentication provider in OpenLAB Shared Service to None. This allows you to log on to ChemStation in the absence of OpenLAB ECM.
In this case, using the OlssEcm profile allows ChemStation to send the data files to the queue. Once the authentication provider in the Shared Services is set back to ECM, the upload can be resumed.
• OlssDataStore
In addition to communication with Shared Services, ChemStation allows transferring data files to and from OpenLAB Server. Use this profile for ChemStation instances that are connected to OpenLAB Server.
ChemStation with Content Management Systems User's Guide 97
4 Administration Regarding 21 CFR Part 11 ComplianceChemStation Administration Tool
Folder Protection with Secure File I/OChemStation metadata such as validated master methods or sequences templates must be stored in secured locations in your content management system. For usage with your instruments these methods or sequence templates are also stored in various local folders. By default, the content of these folders is not protected against modification or deletion from local file browsers or from file dialogs within ChemStation.
To ensure data integrity, enable the Secure File I/O function for ChemStation. All relevant local paths will then be protected. The relevant paths are set by default, but can also be configured. The content of protected paths can no longer be modified by Windows file operations because members of the
Windows user group Interactive1 are denied access. The protected folders can only be used inside ChemStation. If user authentication is enabled, only users with sufficient privileges can delete the locally stored data for housekeeping purposes. If those methods or sequences have been actively used with your instrument, copies are also stored along with results and their associated audit trails.
Prepare Secure File I/O in Windows1 Ensure that all relevant ChemStation folders are on an NTFS file system.
2 Do not use ChemStation folders on removable storage devices (for example, external disks or USB media).
3 Create a standard user account (local or domain) with the same or fewer privileges than a normal ChemStation user. Do not grant administration or power user privileges.
This account will be used by the ChemStation for internal file operations. As the user is not supposed to log on interactively, do not use the option Change password at next logon.
1 In Windows, all users who log on interactively are automatically assigned to the Interactive group. The membership persists for the time the users remain logged in.
NOTE Consider using a password that never expires. If this is not possible due to your security policy, plan a downtime for ChemStation while updating the password.
As long as the password for this user account is expired, do not use the ChemStation. ChemStation will not work properly until you have updated the password in the ChemStation Administration Tool.
98 ChemStation with Content Management Systems User's Guide
Administration Regarding 21 CFR Part 11 Compliance 4ChemStation Administration Tool
Enable Secure File I/O in ChemStation1 Click Start > All Programs > Agilent Technologies > OpenLAB CDS ChemStation
Edition > ChemStation Administration Tool to open the ChemStation Administration Tool.
2 In the ChemStation Administration Tool, select the enable secure file IO check box.
3 Provide the credentials of the special user account that you have prepared.
4 Click Apply.
5 A dialog lists all directories that are going to be protected. Click OK to confirm.
For all paths that are protected, a ProtectionInfo.xml file is stored in the root folder. This protection information file contains the time stamp and the Windows user who enabled protection - that is either the user who enabled the path from the ChemStation Administration tool, or the user who configured a new instrument.
The Protection Information file provides proof for a given folder when the last activation was performed. Any period of time before that date is unspecified. The file can be used to demonstrate the uninterrupted protection status of a folder since it contains the date, time and user who last enabled protection.
Enabling or disabling secure file I/O is not logged to the OpenLAB Control Panel Activity Log or the Windows Event Logs (application or Security).
When the folder is unprotected, the ProtectionInfo.xml file is deleted. Note, deleting this file will not unprotect the folder.
6 For administrative tasks, you can temporarily disable the protection of specific folders:
a Shut down all ChemStation sessions.
b In the ChemStation Administration Tool, click Manage Secure File System
c In the list of directories, find the relevant path and click Unprotect.
The protection information file is deleted to document the interruption of the protection state.
d After finishing your tasks, click Protect All to restore protection for all relevant folders.
New protection information files are created.
e Start ChemStation again.
ChemStation will only start if all folders are protected.
ChemStation with Content Management Systems User's Guide 99
4 Administration Regarding 21 CFR Part 11 ComplianceChemStation Administration Tool
Check privileges for Chemstation usersIn the OpenLAB Control Panel, specific privileges can be configured. Several privileges are relevant for Secure File I/O. They handle occasions when data, methods, or sequences need to be loaded from unprotected locations (which are outside of the secure folders). These privileges are enabled in the default ChemStation Roles to maintain the current workflows.
To ensure data integrity, it is recommended to uncheck these privileges when Secure File I/O is enabled.
The relevant privileges are:
• ChemStation: Data > Load data from not configured path
Required for loading data from unprotected paths, or adding data paths that are not empty to the ChemStation.
• ChemStation: Method > Load method from not configured path
Required for loading a method from an unprotected path, saving a method to an unprotected path, or adding method paths to the ChemStation (Preferences dialog).
• ChemStation: Sequence > Load sequence template from not configured path
Required for loading sequence templates from unprotected paths, saving sequence templates to unprotected paths, or adding paths that are to the ChemStation (Preferences dialog).
Important Notes for Working with Secure File I/OWhen using Secure File I/O to protect your ChemStation folders:
• Do not share protected folders. Sharing a folder will break the protection.
If your data resides within the public documents folder (default setting), do not turn on public sharing.
• Do not log in interactively with the user account provided in the ChemStation Administration Tool.
If this user logs in interactively, you will not be able to save any changed data in ChemStation until the user logs out again.
• If the password for this user account has expired, do not use the ChemStation until you updated the password in the ChemStation Administration Tool. ChemStation will not work properly as long as the password is outdated.
100 ChemStation with Content Management Systems User's Guide
Administration Regarding 21 CFR Part 11 Compliance 4ChemStation Administration Tool
LimitationsThe following features are not supported when Secure File I/O is enabled:
• Import/Export eMethods
• Migration of non-container data to new result sets
• Download files (method, sequence, data) using the content management web interface, and storing them to a protected folder
These files must be downloaded from within the ChemStation application.
• GC Backflush Wizard
• G2887BA SIMDIS
• M8350AA MatchCompare
• M8370AA OpenLAB Data Analysis Add-on
• Easy SamplePrep
• G7818A Cirrus GPC Software
• A2Prep software
• Method Scouting Wizard
ChemStation with Content Management Systems User's Guide 101

4 Administration Regarding 21 CFR Part 11 ComplianceElectronic Signature
Electronic Signature
Electronic signatures provide a means to sign documents as equally binding as a handwritten signature. In addition, electronic signatures are reproducible, because they are recorded in a secure, time stamped audit trail. Manipulation is prevented by enabling only users with specific privileges to sign electronically.
An electronic signature contains the user name (full name), date, and time when the signature was applied, the location where the signing occurred, and a user-configurable definition associated with the signature. The signature is always related to the complete result set, complete data file for a single run or to a report. The signature cannot be applied to a single file inside the SSIZIP file.
CFR 21 Part 11 requires that companies, especially ones that employ any type of approval process, use electronic signatures.
With OpenLAB ECM, you can use the Agilent OpenLAB Business Process Manager (BPM) module as an Add-on to create highly automated review or approval processes including e-mail notification.
Preparation
PrivilegesUsers must have a specific privilege in order to be able to sign electronically.
With ECM, a user must have the privilege Content: File Signatures. This privilege is, for example, assigned to the default role: Approver in ECM.
With OpenLAB Server/Content Management, a user must have the privilege E-Signature Sign Files.
102 ChemStation with Content Management Systems User's Guide
Administration Regarding 21 CFR Part 11 Compliance 4Electronic Signature
Reasons for the signatureWith each signature, the users must either select a given reason or, if they are allowed to, provide their own reason.
With ECM, you can either restrict the users to the given reasons or allow them to provide their own reason. Also, you can configure the list of given default reasons.
With OpenLAB Server/Content Management, the list of given default reasons cannot be configured, and users are always allowed to provide their own reason.
To allow specific signature reasons in ECM:
1 In ECM, select the Administration page.
2 In the navigation pane, select the Account Administration node.
3 Double-click the Electronic Signature item.
The Account Administration dialog opens.
4 To provide a new reason, enter the required text into the Reasons field and
click .
5 To delete an existing reason, select the reason in the Default reasons list and
click .
6 If you want to allow users to provide their own reason with a signature, select the User can specify reason check box.
7 If necessary, adjust the timeout settings:
• The Signature screen timeout defines, how long an e-signature dialog will stay open if no signature is submitted. The default setting is 5 minutes.
• The Consecutive signature timeout is relevant if an ECM user carries out several successive e-signatures. If the next e-signature takes place within the given timeout interval, the location and the reason provided in the first e-signature will be pre-filled in the next dialog. The default setting for the consecutive signature timeout is 5 minutes.
NOTE If you clear this check box, the users can only select one of the given default reasons.
ChemStation with Content Management Systems User's Guide 103
4 Administration Regarding 21 CFR Part 11 ComplianceElectronic Signature
Using electronic signatures
To apply an electronic signature in ECM1 Right-click the required SSIZIP file and select Electronically Sign > Electronic
Signature from the context menu.
The Electronic Signature dialog opens.
2 Enter your ECM user credentials (username, password, and domain).
3 Enter your current location. With this information, the location from where you provide the signature is reproducible.
4 Select a reason for the signature from the Default reason drop-down list.
- Or -
Select the User specified check box and enter a different reason into the text field. Note that this option is only available if the ECM Account is configured accordingly.
5 Click Sign.
The file is now signed electronically. The e-signature is shown in the file properties in the eSig tab. The e-signature is also included in the ECM Audit Trail.
To apply an electronic signature in Content Management1 In the content browser, move the mouse over the respective file, then select
Sign File .
A file preview is shown, together with several document properties and a list of document actions.
2 Under Document Actions, click Sign File.
The Sign File dialog opens.
3 Enter your login credentials for OpenLAB CDS.
4 Select a reason for the signature from the Reason drop-down list.
OR
Select the reason Other, and enter a different reason into the text field.
NOTE The other command in the context menu, Electronically Sign > Acrobat Plug-In Signature, works only for PDF documents and only if you purchased the respective plugin. It enables you to add signatures directly inside PDF documents.
104 ChemStation with Content Management Systems User's Guide
Administration Regarding 21 CFR Part 11 Compliance 4Electronic Signature
5 Click OK.
The file is now signed electronically. The e-signature is shown in the list of signatures under Version History.
To view electronic signatures in ChemStation1 In the ChemStation Explorer, right-click the respective file.
2 Select ECM Properties... or CM Properties... from the context menu.
This command is only available if the file has been uploaded to central data storage.
3 In the File Properties dialog, select the eSig tab.
The electronic signature history for the file, including the date, signer's full name, and reason for each signature are listed.
To view electronic signatures in ECMThe electronic signature itself is shown in the file properties in the eSig tab, and it is also part of the ECM Audit Trail.
The user preferences in ECM can be configured in such a way that the number of e-signatures applied to a file is shown by default in the ECM content display, together with the file name and status.
1 In ECM, select the Administration page.
2 In the navigation pane, select the Account Administration node.
3 Double-click the User Preferences item.
4 Click Modify... to modify the column settings.
5 Select # of signatures and click to add this property to the selected columns.
6 Click OK.
The number of e-signatures is then shown on every content page in ECM.
To view electronic signatures in Content ManagementAll e-signatures applied to a file are listed under Version History in the Properties page of the file.
ChemStation with Content Management Systems User's Guide 105
4 Administration Regarding 21 CFR Part 11 ComplianceElectronic Signature
106 ChemStation with Content Management Systems User's Guide
ChemStation with Content Management Systems User's Guide
5Filter and Search OptionsAttribute Extraction Services in ECM 108
ACAML Filter 110ChemStation XML Attribute Extraction Service 110ChemStation Filter 111
Search Options in OpenLAB Server 112Using the Advanced Search 112
This chapter provides an overview of the filter and search options for ChemStation data in the central data storage system.
107Agilent Technologies
5 Filter and Search OptionsAttribute Extraction Services in ECM
Attribute Extraction Services in ECM
ECM Attribute Extraction Services (AES) provides the following AES for the extraction of metadata from ChemStation data files:
• The ACAML filter extracts all information contained in the .acaml files, which are part of the SSIZIP files uploaded by ChemStation revision B.03.02 and later.
• The ChemStation XML filter extracts peak, compound and result data from the result.xml file generated by the XML export routine in ChemStation revision A.10.02 and later.
• The ChemStation filter extracts basic sample and run data from the header of the channel files (*.ch), *.uv and *.txt files generated by all ChemStation revisions.
AES need to be installed by an ECM Administrator on the ECM Server; in addition, the filters need to be enabled for the system. The keys of an AES that are to be applied to a ChemStation file need to be selected for the respective LCDF structure. These are ECM administration tasks, and are described in the Enterprise Content Manager Administrator’s Guide and the ECM online help.
The metadata can be queried using various search types in ECM. The ECM Search functionality is also available within ChemStation. When opening a file from ECM, the ECM Open dialog allows you to search for files of interest using the ‘magnifying glass’ icon, see Figure 25 on page 109.
Using the Quick Search, you can search through various alphanumeric fields by entering a search key, such as an operator name. On the upcoming search page, you select the Advanced tab where, depending on the enabled filter packages, various keys are enabled, see Figure 26 on page 109.
108 ChemStation with Content Management Systems User's Guide
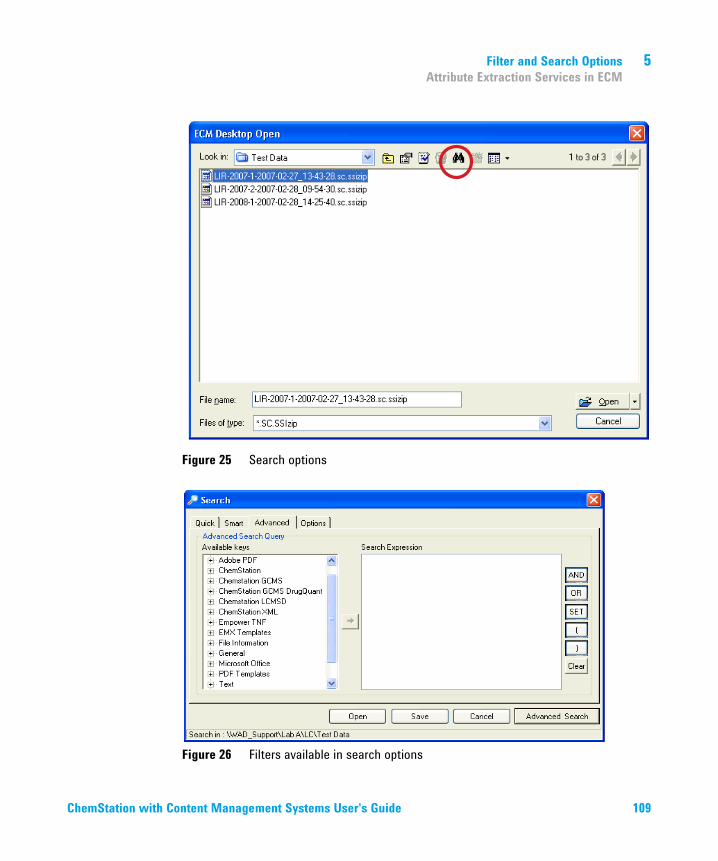
Filter and Search Options 5Attribute Extraction Services in ECM
Figure 25 Search options
Figure 26 Filters available in search options
ChemStation with Content Management Systems User's Guide 109
5 Filter and Search OptionsAttribute Extraction Services in ECM
In the Search dialog, you can specify the available keys, and it is possible to define a search expression by combining two or more of the available keys using boolean operators. For detailed information regarding the use of the various search algorithms, refer to the online help of your ECM system or the Enterprise Content Manager Administrator’s Guide, as well as the AES-related manuals.
ACAML FilterChemStation stores all result data in the ACAML format (ACAML = Agilent Common Analytical Markup Language), which results in .acaml files. There is one .acaml file for each sequence or single run. The .acaml files are always created when acquiring or reprocessing data.
When the data is uploaded to ECM, the .acaml file is part of the SSIZIP file. The ACAML filter extracts information from these files.
Please note that the ACAML filter is only available as of ECM 3.3.2 SP1.
ChemStation XML Attribute Extraction ServiceThe AES for ChemStation XML extracts key information from the following categories of the result.xml generated by ChemStation per data file. Note that ChemStation must be configured to generate the result.xml file, see the ChemStation XML Connectivity Guide.
• Acquisition (for example, instrument name, method information)
• Chromatogram (for example, derivative order, detector name)
• Custom
• Module
• Peaks (for example, peak name, amount, retention time, compound name)
• Sample (for example, calibration method, LIMS ID)
• Signal/noise
110 ChemStation with Content Management Systems User's Guide
Filter and Search Options 5Attribute Extraction Services in ECM
ChemStation FilterThe AES for ChemStation extracts attributes from *.ch, *.uv, and *.txt files created by the 16-Bit ChemStation (Rev A.x.x) or 32-Bit ChemStation (Rev B.x.x or later). It extracts key information from the header of ChemStation *.ch and *.uv data files (for example, sample name, method file, instrument model). From the report.txt file, it extracts key information (for example, sample name, acquisition method, analysis method). In addition, the service extracts information on support files from the category Content.
An ECM Scheduler Add-in for Agilent ChemStation enables the ECM Scheduler to automatically upload data generated by ChemStation to ECM.
ChemStation with Content Management Systems User's Guide 111
5 Filter and Search OptionsSearch Options in OpenLAB Server
Search Options in OpenLAB Server
Using the Advanced SearchChemStation stores all result data in the ACAML format (ACAML = Agilent Common Analytical Markup Language), which results in .acaml files. There is one .acaml file for each sequence or single run. The .acaml files are always created when acquiring or reprocessing data. When the data is uploaded to the central data storage, the .acaml file is part of the SSIZIP file.
When using the advanced search in OpenLAB Server, you can limit your search to specific metadata based on the values given in the .acaml file
1 In the top pane, click Search.
2 From the Select field drop-down list, select the field which you would like to use. You can use, for example, the following fields:
• Acquisition Operator
• Compound
• File name
• Method Name
• Sample Name
• Sequence Name
The corresponding search expression is entered in the search field.
3 In the search field, type your search criteria.
4 Click Search.
For more information, refer to the OpenLAB Server documentation.
112 ChemStation with Content Management Systems User's Guide
ChemStation with Content Management Systems User's Guide
6TroubleshootingError messages at OpenLAB Control Panel Startup 114Alerts and Error Messages at ChemStation Startup 115ECM or OpenLAB Server is not available after login 116Error Messages in the Queue Management 117
Independent of Storage Type 117ECM-Specific Messages 117OpenLAB Server-Specific Messages 119
Other Error Messages 120
The chapter gives some elementary troubleshooting hints.
113Agilent Technologies
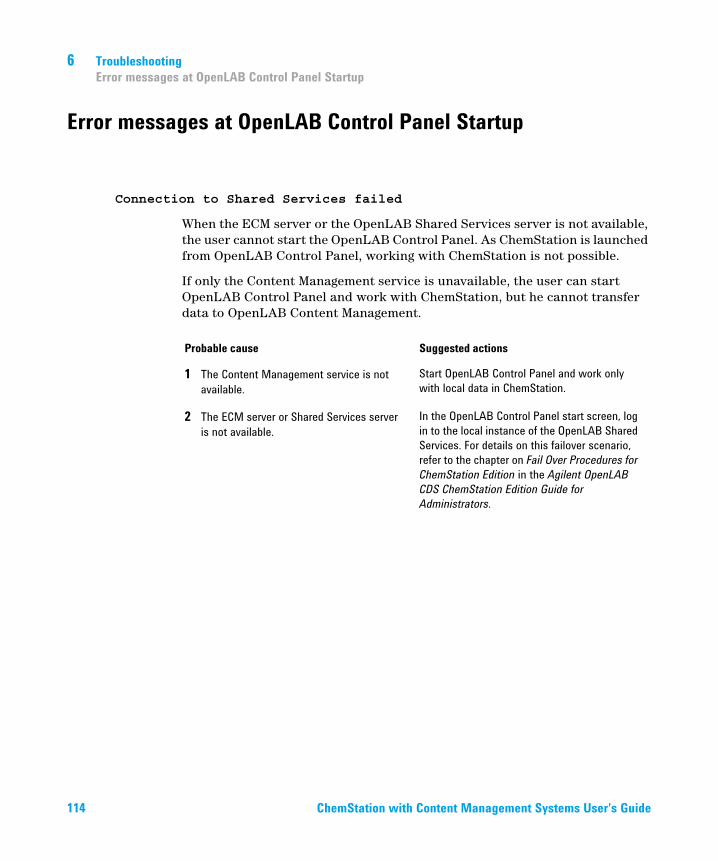
6 TroubleshootingError messages at OpenLAB Control Panel Startup
Error messages at OpenLAB Control Panel Startup
Connection to Shared Services failed
When the ECM server or the OpenLAB Shared Services server is not available, the user cannot start the OpenLAB Control Panel. As ChemStation is launched from OpenLAB Control Panel, working with ChemStation is not possible.
If only the Content Management service is unavailable, the user can start OpenLAB Control Panel and work with ChemStation, but he cannot transfer data to OpenLAB Content Management.
Probable cause Suggested actions
1 The Content Management service is not available.
Start OpenLAB Control Panel and work only with local data in ChemStation.
2 The ECM server or Shared Services server is not available.
In the OpenLAB Control Panel start screen, log in to the local instance of the OpenLAB Shared Services. For details on this failover scenario, refer to the chapter on Fail Over Procedures for ChemStation Edition in the Agilent OpenLAB CDS ChemStation Edition Guide for Administrators.
114 ChemStation with Content Management Systems User's Guide
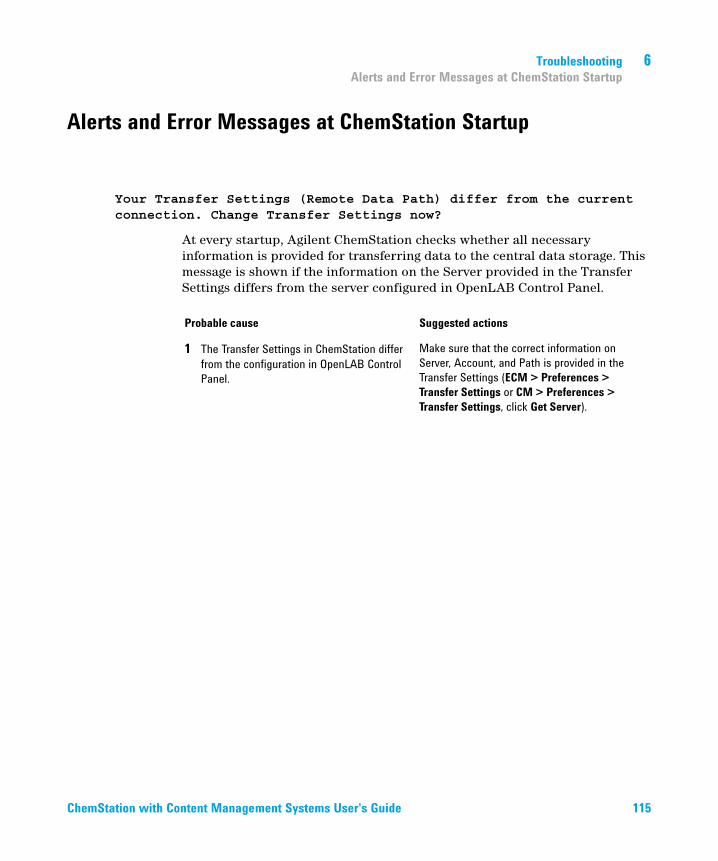
Troubleshooting 6Alerts and Error Messages at ChemStation Startup
Alerts and Error Messages at ChemStation Startup
Your Transfer Settings (Remote Data Path) differ from the current connection. Change Transfer Settings now?
At every startup, Agilent ChemStation checks whether all necessary information is provided for transferring data to the central data storage. This message is shown if the information on the Server provided in the Transfer Settings differs from the server configured in OpenLAB Control Panel.
Probable cause Suggested actions
1 The Transfer Settings in ChemStation differ from the configuration in OpenLAB Control Panel.
Make sure that the correct information on Server, Account, and Path is provided in the Transfer Settings (ECM > Preferences > Transfer Settings or CM > Preferences > Transfer Settings, click Get Server).
ChemStation with Content Management Systems User's Guide 115
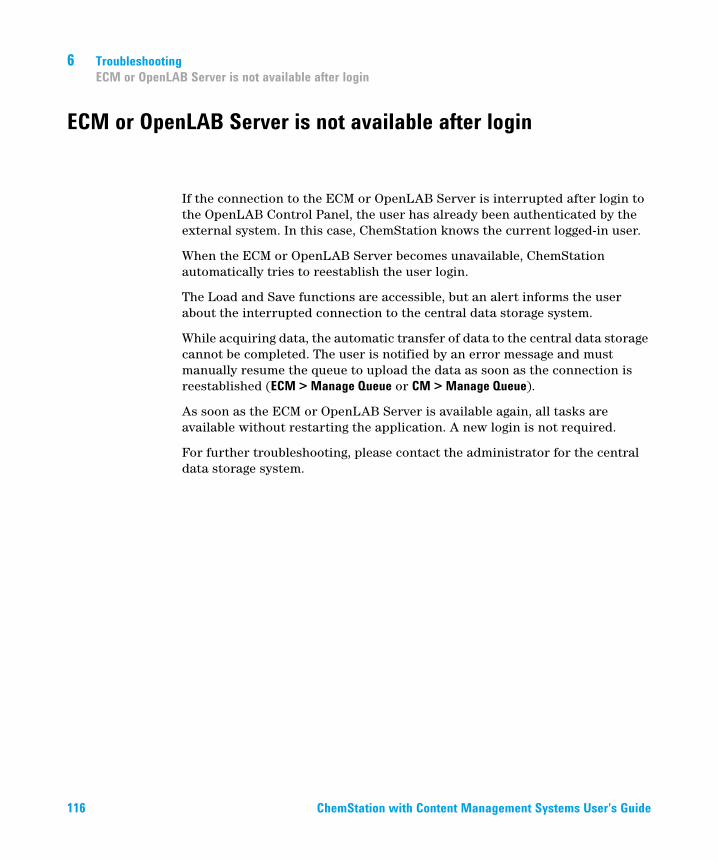
6 TroubleshootingECM or OpenLAB Server is not available after login
ECM or OpenLAB Server is not available after login
If the connection to the ECM or OpenLAB Server is interrupted after login to the OpenLAB Control Panel, the user has already been authenticated by the external system. In this case, ChemStation knows the current logged-in user.
When the ECM or OpenLAB Server becomes unavailable, ChemStation automatically tries to reestablish the user login.
The Load and Save functions are accessible, but an alert informs the user about the interrupted connection to the central data storage system.
While acquiring data, the automatic transfer of data to the central data storage cannot be completed. The user is notified by an error message and must manually resume the queue to upload the data as soon as the connection is reestablished (ECM > Manage Queue or CM > Manage Queue).
As soon as the ECM or OpenLAB Server is available again, all tasks are available without restarting the application. A new login is not required.
For further troubleshooting, please contact the administrator for the central data storage system.
116 ChemStation with Content Management Systems User's Guide
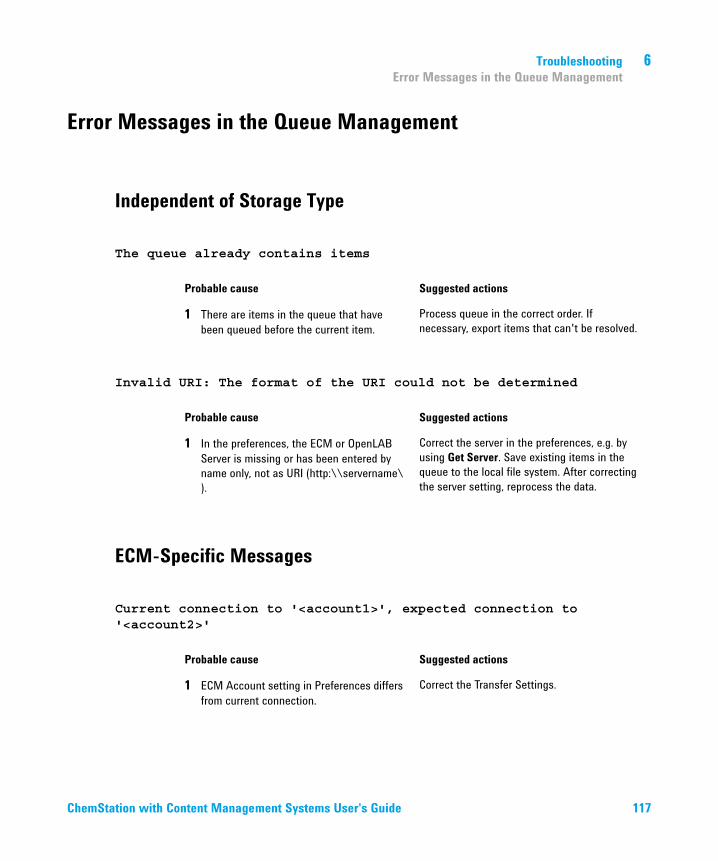
Troubleshooting 6Error Messages in the Queue Management
Error Messages in the Queue Management
Independent of Storage Type
The queue already contains items
Invalid URI: The format of the URI could not be determined
ECM-Specific Messages
Current connection to '<account1>', expected connection to '<account2>'
Probable cause Suggested actions
1 There are items in the queue that have been queued before the current item.
Process queue in the correct order. If necessary, export items that can't be resolved.
Probable cause Suggested actions
1 In the preferences, the ECM or OpenLAB Server is missing or has been entered by name only, not as URI (http:\\servername\).
Correct the server in the preferences, e.g. by using Get Server. Save existing items in the queue to the local file system. After correcting the server setting, reprocess the data.
Probable cause Suggested actions
1 ECM Account setting in Preferences differs from current connection.
Correct the Transfer Settings.
ChemStation with Content Management Systems User's Guide 117
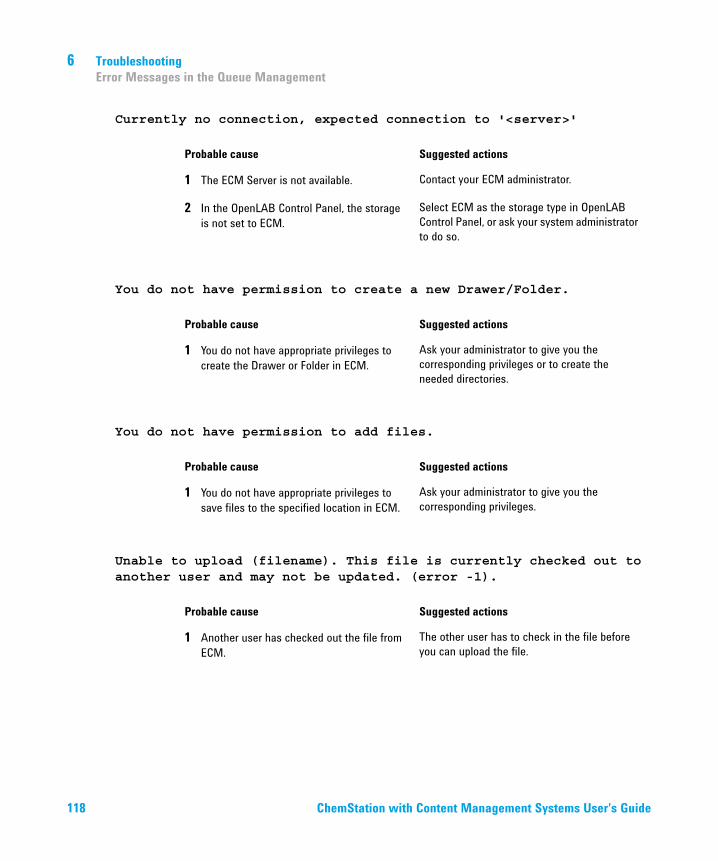
6 TroubleshootingError Messages in the Queue Management
Currently no connection, expected connection to '<server>'
You do not have permission to create a new Drawer/Folder.
You do not have permission to add files.
Unable to upload (filename). This file is currently checked out to another user and may not be updated. (error -1).
Probable cause Suggested actions
1 The ECM Server is not available. Contact your ECM administrator.
2 In the OpenLAB Control Panel, the storage is not set to ECM.
Select ECM as the storage type in OpenLAB Control Panel, or ask your system administrator to do so.
Probable cause Suggested actions
1 You do not have appropriate privileges to create the Drawer or Folder in ECM.
Ask your administrator to give you the corresponding privileges or to create the needed directories.
Probable cause Suggested actions
1 You do not have appropriate privileges to save files to the specified location in ECM.
Ask your administrator to give you the corresponding privileges.
Probable cause Suggested actions
1 Another user has checked out the file from ECM.
The other user has to check in the file before you can upload the file.
118 ChemStation with Content Management Systems User's Guide
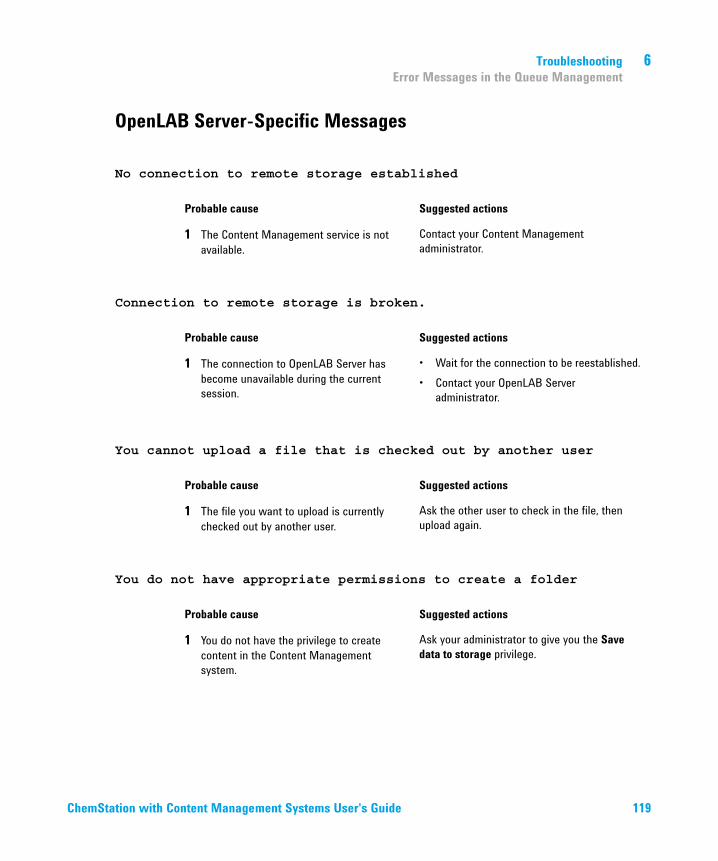
Troubleshooting 6Error Messages in the Queue Management
OpenLAB Server-Specific Messages
No connection to remote storage established
Connection to remote storage is broken.
You cannot upload a file that is checked out by another user
You do not have appropriate permissions to create a folder
Probable cause Suggested actions
1 The Content Management service is not available.
Contact your Content Management administrator.
Probable cause Suggested actions
1 The connection to OpenLAB Server has become unavailable during the current session.
• Wait for the connection to be reestablished.• Contact your OpenLAB Server
administrator.
Probable cause Suggested actions
1 The file you want to upload is currently checked out by another user.
Ask the other user to check in the file, then upload again.
Probable cause Suggested actions
1 You do not have the privilege to create content in the Content Management system.
Ask your administrator to give you the Save data to storage privilege.
ChemStation with Content Management Systems User's Guide 119
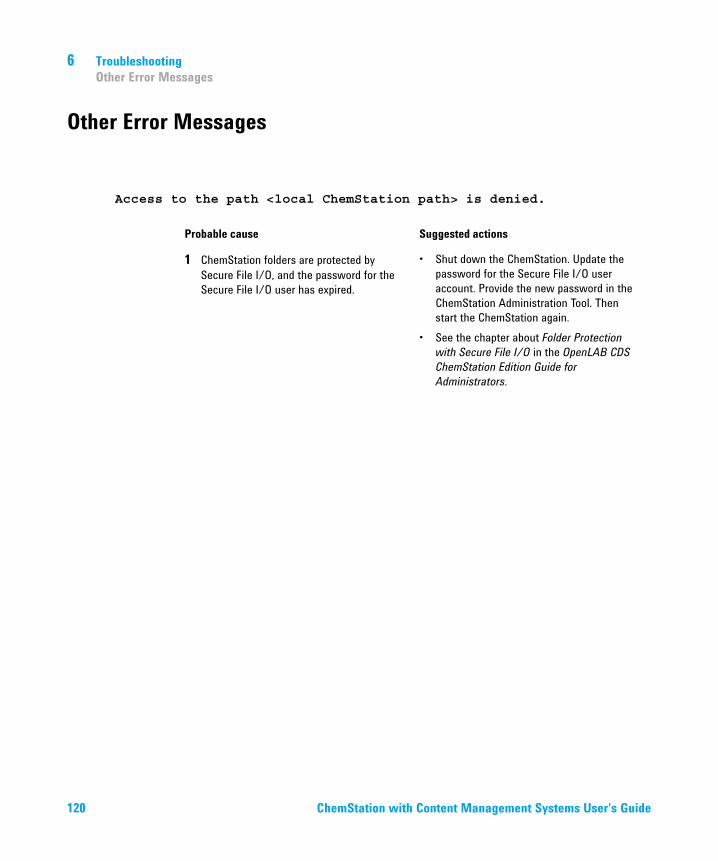
6 TroubleshootingOther Error Messages
Other Error Messages
Access to the path <local ChemStation path> is denied.
Probable cause Suggested actions
1 ChemStation folders are protected by Secure File I/O, and the password for the Secure File I/O user has expired.
• Shut down the ChemStation. Update the password for the Secure File I/O user account. Provide the new password in the ChemStation Administration Tool. Then start the ChemStation again.
• See the chapter about Folder Protection with Secure File I/O in the OpenLAB CDS ChemStation Edition Guide for Administrators.
120 ChemStation with Content Management Systems User's Guide
ChemStation with Content Management Systems User's Guide
7AppendixPrivileges in OpenLAB Control Panel 122
Project Privileges 123Instrument Privileges 128Administrative Privileges 129
ECM Privileges related to ChemStation 130
121Agilent Technologies
7 AppendixPrivileges in OpenLAB Control Panel
Privileges in OpenLAB Control Panel
The privileges described in the following can be associated with different roles in OpenLAB Control Panel. By default, the following roles are available:
• Everything
• System Administrator
• Instrument Administrator
• Project Administrator
• Instrument User
Additional default roles are available depending on the installed components. With ChemStation, the following additional default roles are available:
• ChemStation Administrator
• ChemStation Lab Manager
• ChemStation Analyst
• ChemStation Operator
In OpenLAB Control Panel under Administration > Roles, you can view or change the associated privileges, or create your own roles.
NOTE Roles are only visible if user authentication is required.
122 ChemStation with Content Management Systems User's Guide

Appendix 7Privileges in OpenLAB Control Panel
Project PrivilegesTable 9 Project Management
Name Description
View project or project group User can see a project and project details but cannot edit. With OpenLAB Server: User can view the content of the repository. Note:This privilege is required for all users.
Manage project or project group User can create, edit, or move projects but cannot access settings.
Edit content of project User can create new versions of documents in Content Management.
Manage project or project group acess User can edit project access settings.
Access content using web client User with this privilege is able to open the Content Browser interface.
Table 10 E-Signature
Name Description
E-Signature Sign Data Files User can sign data files if user authentification is on.
Table 11 Intelligent Reporter templates
Privilege Description
Edit Intelligent Reporter report template Only relevant for OpenLAB ECM Intelligent Reporter: This privilege is required to edit report templates in the Reporter Client
Table 12 ChemStation: Control
Privilege Description
Run Acquisition Start acquisition (single sample or sequence).
ChemStation with Content Management Systems User's Guide 123
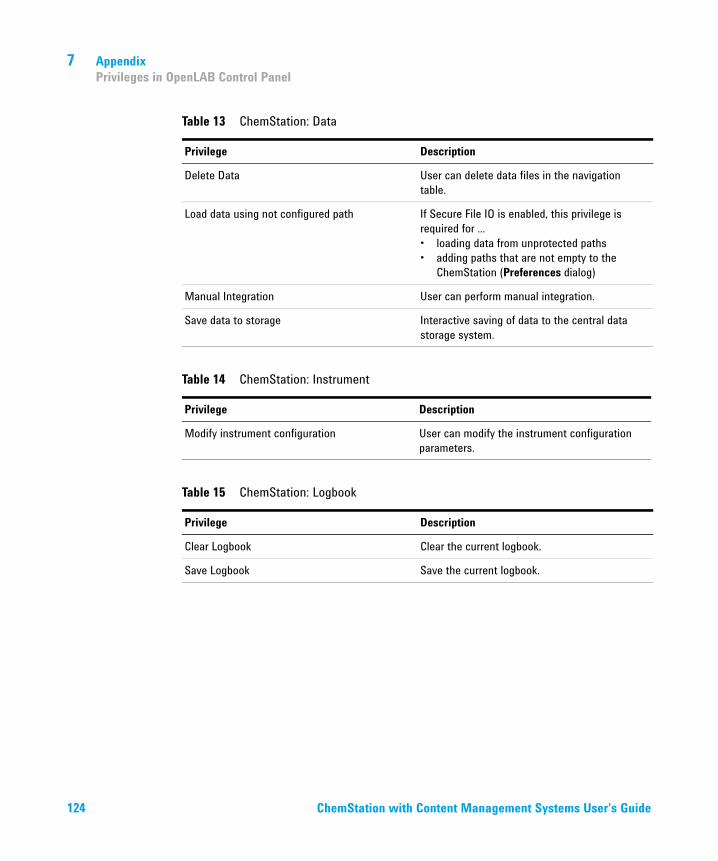
7 AppendixPrivileges in OpenLAB Control Panel
Table 13 ChemStation: Data
Privilege Description
Delete Data User can delete data files in the navigation table.
Load data using not configured path If Secure File IO is enabled, this privilege is required for ... • loading data from unprotected paths• adding paths that are not empty to the
ChemStation (Preferences dialog)
Manual Integration User can perform manual integration.
Save data to storage Interactive saving of data to the central data storage system.
Table 14 ChemStation: Instrument
Privilege Description
Modify instrument configuration User can modify the instrument configuration parameters.
Table 15 ChemStation: Logbook
Privilege Description
Clear Logbook Clear the current logbook.
Save Logbook Save the current logbook.
124 ChemStation with Content Management Systems User's Guide
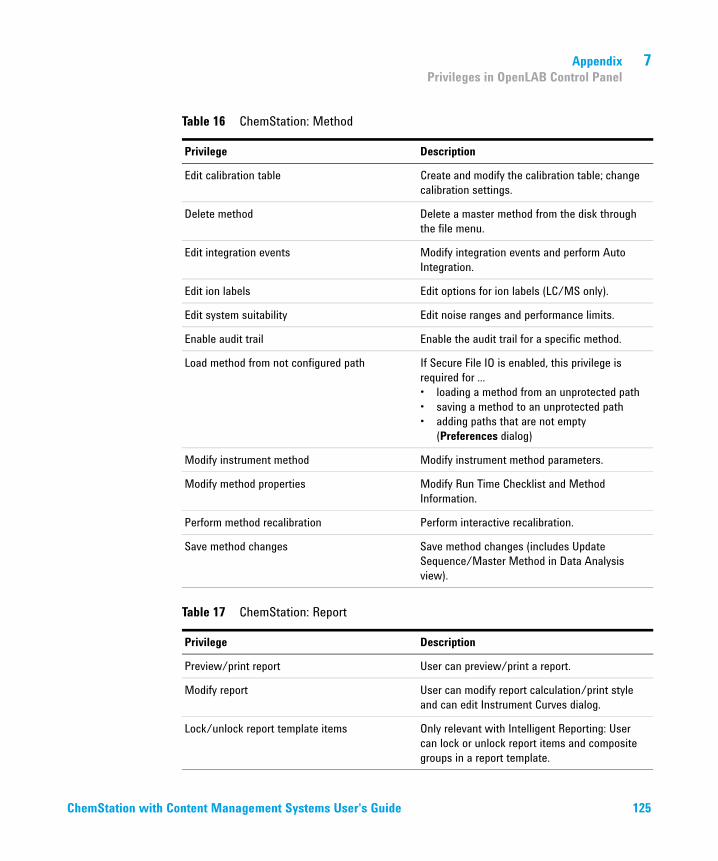
Appendix 7Privileges in OpenLAB Control Panel
Table 16 ChemStation: Method
Privilege Description
Edit calibration table Create and modify the calibration table; change calibration settings.
Delete method Delete a master method from the disk through the file menu.
Edit integration events Modify integration events and perform Auto Integration.
Edit ion labels Edit options for ion labels (LC/MS only).
Edit system suitability Edit noise ranges and performance limits.
Enable audit trail Enable the audit trail for a specific method.
Load method from not configured path If Secure File IO is enabled, this privilege is required for ...• loading a method from an unprotected path• saving a method to an unprotected path• adding paths that are not empty
(Preferences dialog)
Modify instrument method Modify instrument method parameters.
Modify method properties Modify Run Time Checklist and Method Information.
Perform method recalibration Perform interactive recalibration.
Save method changes Save method changes (includes Update Sequence/Master Method in Data Analysis view).
Table 17 ChemStation: Report
Privilege Description
Preview/print report User can preview/print a report.
Modify report User can modify report calculation/print style and can edit Instrument Curves dialog.
Lock/unlock report template items Only relevant with Intelligent Reporting: User can lock or unlock report items and composite groups in a report template.
ChemStation with Content Management Systems User's Guide 125
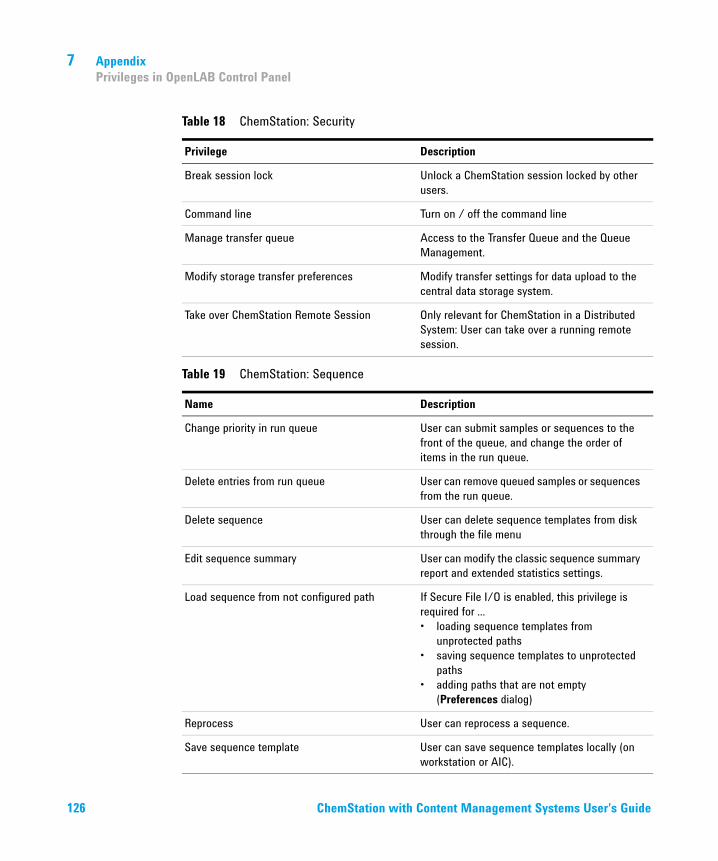
7 AppendixPrivileges in OpenLAB Control Panel
Table 18 ChemStation: Security
Privilege Description
Break session lock Unlock a ChemStation session locked by other users.
Command line Turn on / off the command line
Manage transfer queue Access to the Transfer Queue and the Queue Management.
Modify storage transfer preferences Modify transfer settings for data upload to the central data storage system.
Take over ChemStation Remote Session Only relevant for ChemStation in a Distributed System: User can take over a running remote session.
Table 19 ChemStation: Sequence
Name Description
Change priority in run queue User can submit samples or sequences to the front of the queue, and change the order of items in the run queue.
Delete entries from run queue User can remove queued samples or sequences from the run queue.
Delete sequence User can delete sequence templates from disk through the file menu
Edit sequence summary User can modify the classic sequence summary report and extended statistics settings.
Load sequence from not configured path If Secure File I/O is enabled, this privilege is required for ...• loading sequence templates from
unprotected paths• saving sequence templates to unprotected
paths• adding paths that are not empty
(Preferences dialog)
Reprocess User can reprocess a sequence.
Save sequence template User can save sequence templates locally (on workstation or AIC).
126 ChemStation with Content Management Systems User's Guide
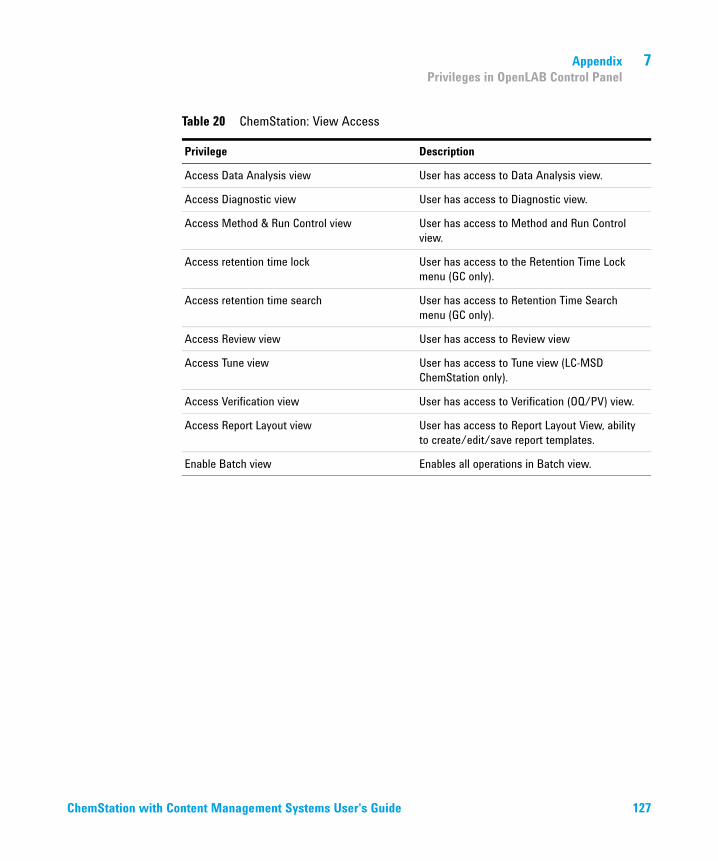
Appendix 7Privileges in OpenLAB Control Panel
Table 20 ChemStation: View Access
Privilege Description
Access Data Analysis view User has access to Data Analysis view.
Access Diagnostic view User has access to Diagnostic view.
Access Method & Run Control view User has access to Method and Run Control view.
Access retention time lock User has access to the Retention Time Lock menu (GC only).
Access retention time search User has access to Retention Time Search menu (GC only).
Access Review view User has access to Review view
Access Tune view User has access to Tune view (LC-MSD ChemStation only).
Access Verification view User has access to Verification (OQ/PV) view.
Access Report Layout view User has access to Report Layout View, ability to create/edit/save report templates.
Enable Batch view Enables all operations in Batch view.
ChemStation with Content Management Systems User's Guide 127
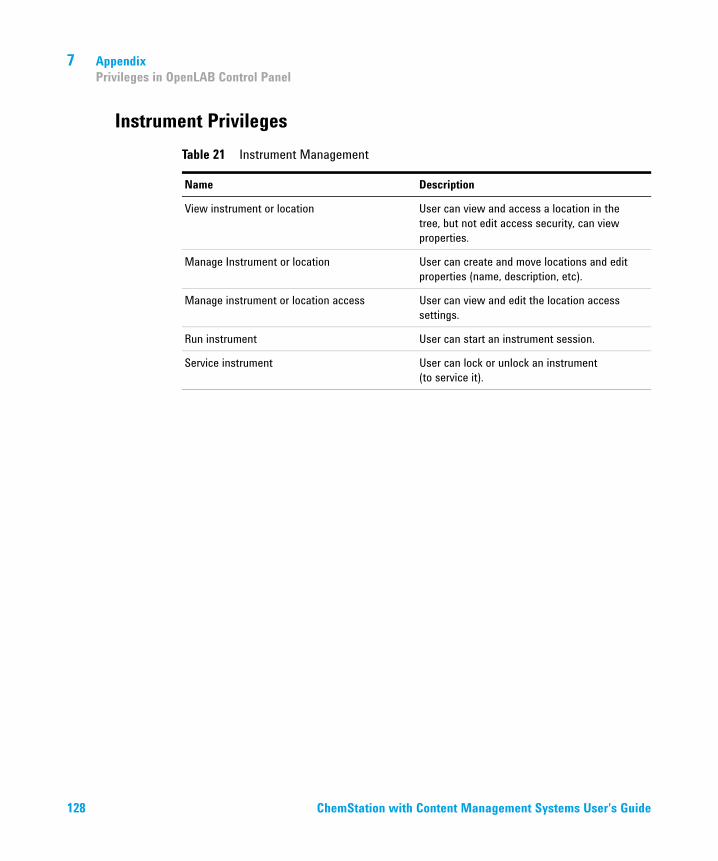
7 AppendixPrivileges in OpenLAB Control Panel
Instrument PrivilegesTable 21 Instrument Management
Name Description
View instrument or location User can view and access a location in the tree, but not edit access security, can view properties.
Manage Instrument or location User can create and move locations and edit properties (name, description, etc).
Manage instrument or location access User can view and edit the location access settings.
Run instrument User can start an instrument session.
Service instrument User can lock or unlock an instrument (to service it).
128 ChemStation with Content Management Systems User's Guide
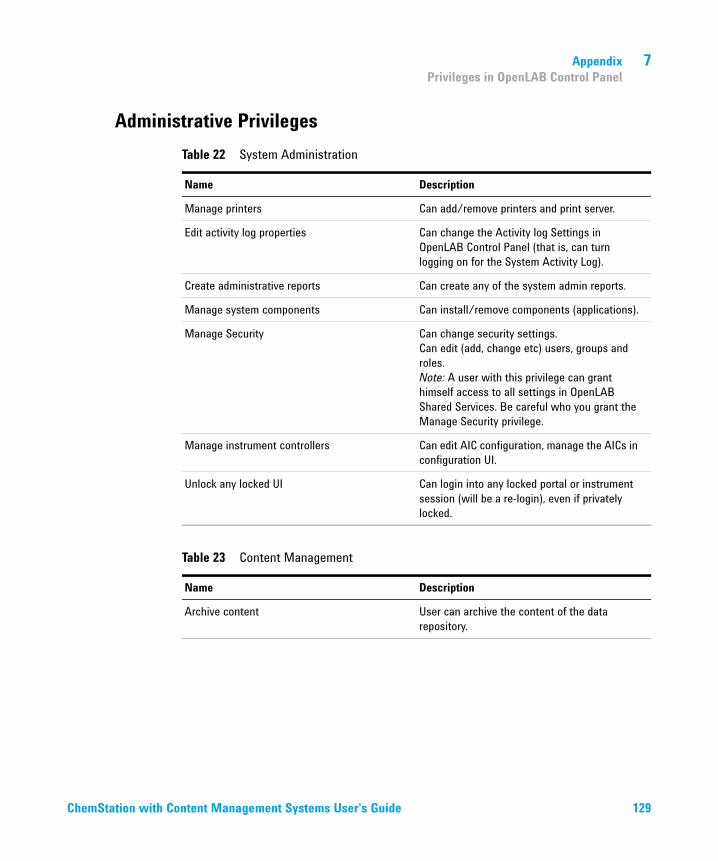
Appendix 7Privileges in OpenLAB Control Panel
Administrative PrivilegesTable 22 System Administration
Name Description
Manage printers Can add/remove printers and print server.
Edit activity log properties Can change the Activity log Settings in OpenLAB Control Panel (that is, can turn logging on for the System Activity Log).
Create administrative reports Can create any of the system admin reports.
Manage system components Can install/remove components (applications).
Manage Security Can change security settings.Can edit (add, change etc) users, groups and roles.Note: A user with this privilege can grant himself access to all settings in OpenLAB Shared Services. Be careful who you grant the Manage Security privilege.
Manage instrument controllers Can edit AIC configuration, manage the AICs in configuration UI.
Unlock any locked UI Can login into any locked portal or instrument session (will be a re-login), even if privately locked.
Table 23 Content Management
Name Description
Archive content User can archive the content of the data repository.
ChemStation with Content Management Systems User's Guide 129
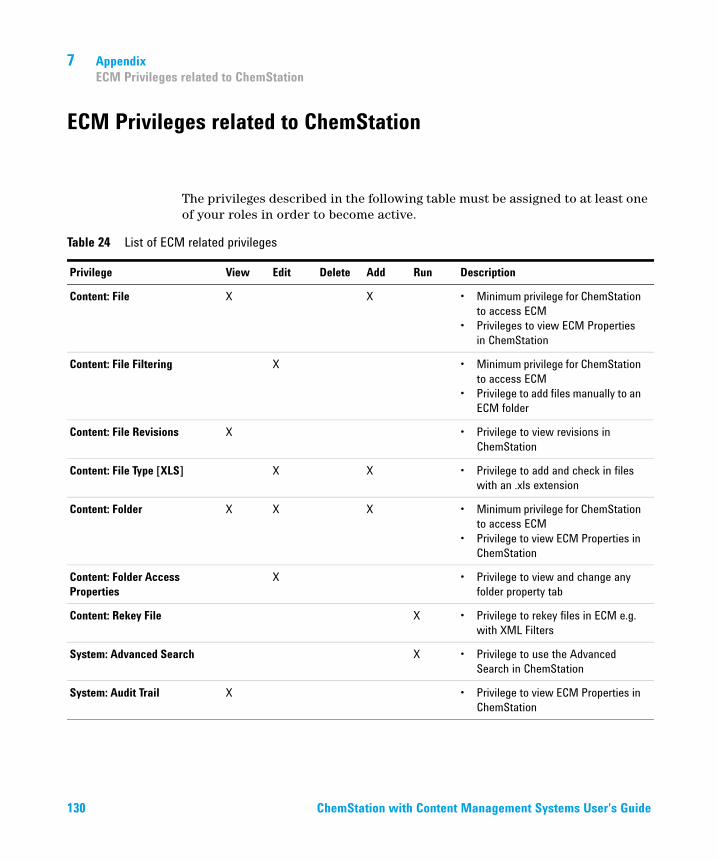
7 AppendixECM Privileges related to ChemStation
ECM Privileges related to ChemStation
The privileges described in the following table must be assigned to at least one of your roles in order to become active.
Table 24 List of ECM related privileges
Privilege View Edit Delete Add Run Description
Content: File X X • Minimum privilege for ChemStation to access ECM
• Privileges to view ECM Properties in ChemStation
Content: File Filtering X • Minimum privilege for ChemStation to access ECM
• Privilege to add files manually to an ECM folder
Content: File Revisions X • Privilege to view revisions in ChemStation
Content: File Type [XLS] X X • Privilege to add and check in files with an .xls extension
Content: Folder X X X • Minimum privilege for ChemStation to access ECM
• Privilege to view ECM Properties in ChemStation
Content: Folder Access Properties
X • Privilege to view and change any folder property tab
Content: Rekey File X • Privilege to rekey files in ECM e.g. with XML Filters
System: Advanced Search X • Privilege to use the Advanced Search in ChemStation
System: Audit Trail X • Privilege to view ECM Properties in ChemStation
130 ChemStation with Content Management Systems User's Guide
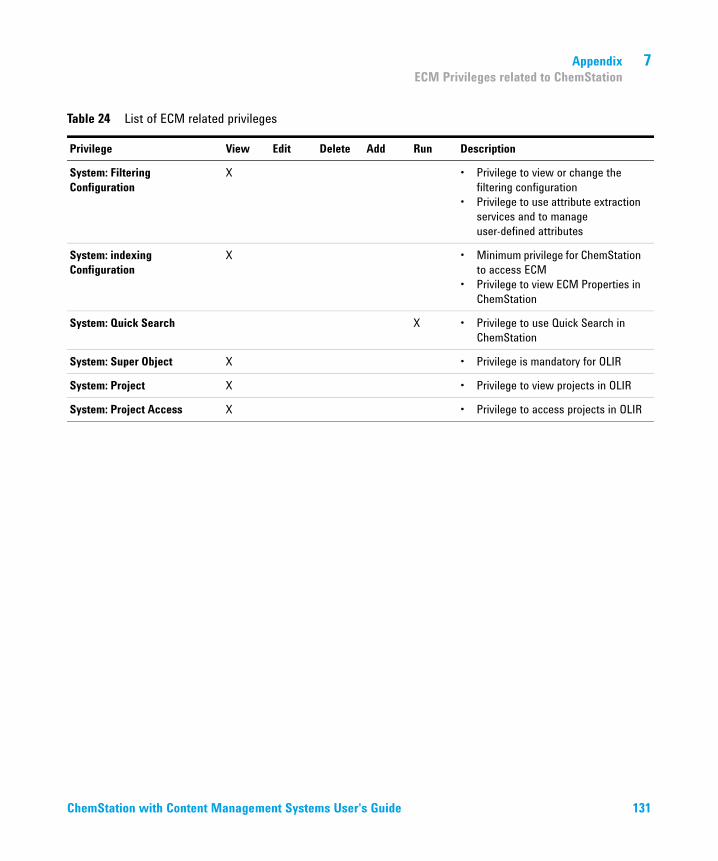
Appendix 7ECM Privileges related to ChemStation
System: Filtering Configuration
X • Privilege to view or change the filtering configuration
• Privilege to use attribute extraction services and to manage user-defined attributes
System: indexing Configuration
X • Minimum privilege for ChemStation to access ECM
• Privilege to view ECM Properties in ChemStation
System: Quick Search X • Privilege to use Quick Search in ChemStation
System: Super Object X • Privilege is mandatory for OLIR
System: Project X • Privilege to view projects in OLIR
System: Project Access X • Privilege to access projects in OLIR
Table 24 List of ECM related privileges
Privilege View Edit Delete Add Run Description
ChemStation with Content Management Systems User's Guide 131

Index
Index
221 CFR Part 11 18, 67
AACAML filter 110access 20, 85account configuration 80account 80activity log 76, 77Add File dialog 58, 62Add Folder privilege 91administration tool 93, 94administrative privileges 87AES 107, 108after acquisition 32, 46, 48after any data modification 32, 48, 52after reprocessing 33, 52attribute extraction service 107, 108audit trail 18, 71authentication 20, 85available in folder access tab 92
Bbreak session lock 96
Ccabinet 16central data storage 8change methods 27checked out 51, 60, 62checkout status 51, 60ChemStation administration tool 94ChemStation filter 108
ChemStation operator 21ChemStation
administration tool 93cleanup data 25, 34client services profile 97closed system 68CM menu 25compliance 98configuration steps for part 11 70consecutive signature timeout 103Contributor role 91, 92CSAdministrators 94
Ddata file logbook 73data integrity 98Data Store Open dialog 60Data Store server 31Data Store 8diagnosis view 25domain 21drawer 16
EECM Account 31ECM Desktop Open dialog 51, 60ECM menu 25ECM Server 31ECM web client 16ECM 8electronic signature 18, 67, 102error messages 115
Ffailover mode 114file format 42filter keys 108filter
ACAML 110folder protection 98folder 16, 92forced upload 49
Ggroup 94groups 85
Iimport after reprocessing 33, 54inactivity timeout 81instrument
privileges 87
Kkeys 108
LLCDF 16, 30, 91load data 50load method 60location 16lock session 27lockout
break session lock 96inactivity time 82lock button 96
132 ChemStation with Content Management Systems User's Guide
Index
lock time 82non-private 22private 22time-based 22, 96
logbook 71login 20, 21, 85
maximum unsuccessful attempts 82
Mmanage queue 25, 33mapping
groups 86metadata 107method audit trail 71minimum password length 81
Nnon privately locked 22
Oopen system 68operator 21OQ/PV view 25
PPart 11 18, 67password
expiration date 82maximum unsuccessful login attempts 82minimum length 82
path 16, 28, 31preferences 28privately locked 22privilege 91, 102privileges
administrative 87for individual nodes 89
instrument 87project 87roles and p. 86
Qqueue management 36quick search 108
RReader role 91remote data path 16, 28, 30report history 74report.txt 111require entry in reason field 81result set 42result.xml 110results audit trail 73role
Everything 86type 86
run.log 73
Ssave method 62search expression 110search types 108search 112Secure File I/O 98server not available 114, 116session lock 22signature screen timeout 103ssizip 42, 44system activity log 78system administrator email 81
Ttime based lock 22timeout 81, 103
To configure OpenLAB Server 82token 31transfer settings 28, 32
Uunauthorized access 20, 85update methods 25update report templates 25update sequences 25user interface 23user
credentials 83
Wweb client 16workflows
data related 45, 11methods/sequence templates/report templates 56, 14
ChemStation with Content Management Systems User's Guide 133
www.agilent.com
In This Book
This guide contains information on the interface between Agilent OpenLAB CDS ChemStation Edition and the central data storage provided by OpenLAB ECM or OpenLAB Server. It also describes the settings required by 21 CFR Part 11, and provides information on the workflows for ChemStation using a central data storage.
© Agilent Technologies 2008-2017
Printed in Germany 09/2017
*M8301-90089**M8301-90089*M8301-90089
Agilent Technologies