northern pump shaft seal replacement 102 mechanical face s… · shaft seal replacement for...
TRANSCRIPT

Shaft Seal Replacement for Northern® 4000 Series Pumps
Bulletin 102
Northern Pump Shaft Seal Replacement Northern® 4000 Series Pumps
340 West Benson Avenue
Grantsburg, WI 54840 1-800-366-1410 715-463-5177
www.northern-pump.com

Shaft Seal Replacement for Northern® 4000 Series Pumps
Bulletin 102
Page 2 of 14
Table of Contents
Northern Shaft Seal Replacement ...........................................................3 Mechanical Seal Replacement.................................................................3 Replacement of Type 21 Mechanical Seal ..............................................4 Replacement of John Crane Type 9, 8-1, and 8B-1 Mechanical Seal ...7 Replacement of High Pressure Hdyro-ergoseal...................................10 Replacement of Shaft Packing Seal ......................................................11 Northern Pump Contact Information.....................................................14

Shaft Seal Replacement for Northern® 4000 Series Pumps
Bulletin 102
Page 3 of 14
Northern Pump Shaft Seal Replacement For best results, it is recommended that your Northern® Pump is returned to the factory for repair and testing. If this is impractical, the following instructions will assist in field maintenance. Please note that it is of great importance that Northern® Pumps are serviced by trained mechanics. Note: Read the entire set of instructions before proceeding with pump repair. The following instructions assume the pump has been removed from its mounting and that all associated items, such as piping, couplings, driver, etc. are no longer assembled to the pump. Where the pump is a through-shaft design with two internal mechanical seals, it is possible to replace the rear (opposite end from drive) seal with the pump in place. CAUTION: Ensure driver is inoperative and locked out before attempting to service pump or remove it from base. To avoid internal damage to pump, use extreme care in removing coupling half. Do not pound or exert force on pump shaft. All new parts to be installed must be provided by Northern® Pump and according to the Bill of Material for the pump model number and serial number. Failure to follow the above instructions may result in serious personal injury or property damage.
Replacement of Mechanical Seals The faying faces of the Mechanical seals and mating rings must be absolutely flat and lapped to a precision finish. This is done at the factory and only new, undamaged parts should be used. Do not replace seals without replacing the mating rings and vice versa. Before sliding the seal components over the shaft, apply a light lubrication oil to the shaft. All elastomers (O-rings) should also be replaced when reassembling. When assembling o-rings, use caution to avoid damage from burrs or metal protrusions. Crocus cloth should be used to smooth all sharp edges over which o-rings must be assembled and a heavy grease should be applied to these areas. Some mechanical face seals, when stored for extended periods of time either assembled in pumps or as spare parts, may leak when put into operation due to distortion in the carbon face. If, after a run-in period, the leakage is objectionable, the seals and mating ring should be replaced.

Bulletin 102REV 1.0
Northern Pump Shaft Seal Replacement for Northern® 4000 Series Pumps
No. Name1 Bearing and Seat Housing2 Capscrews3 Gasket4 Lockwashers5 Mechanical Seal Head
6 Mechanical Seal Seat7 Retaining Ring8 Shaft Support Bearing9 Drive Shaft
Replacement of Type 21 Mechanical Seal
9 48 62 3 5 71
Seal Diagram
Page 4 of 14

Bulletin 102REV 1.0
Northern Pump Shaft Seal Replacement for Northern® 4000 Series Pumps
Loosen the two cap screws that hold the Bearing and Seat Housing. Remove the Bearing and Seat Housing as well as the cap screws. The Mechanical Seal Seat will be retained in the Bearing and Seat Housing.
Remove the Mechanical Seal Seat from the Bearing and Seat Housing. Remove the Mechanical Seal Head from the Pump assembly by sliding it over and off the drive shaft.
Mechanical Seal Seat
Cap Screws (2)
Bearing & Seat Housing
Mechanical Seal Head
Drive Shaft
Step
Step
Page 5 of 14
Bulletin 102REV 1.0
Northern Pump Shaft Seal Replacement for Northern® 4000 Series Pumps
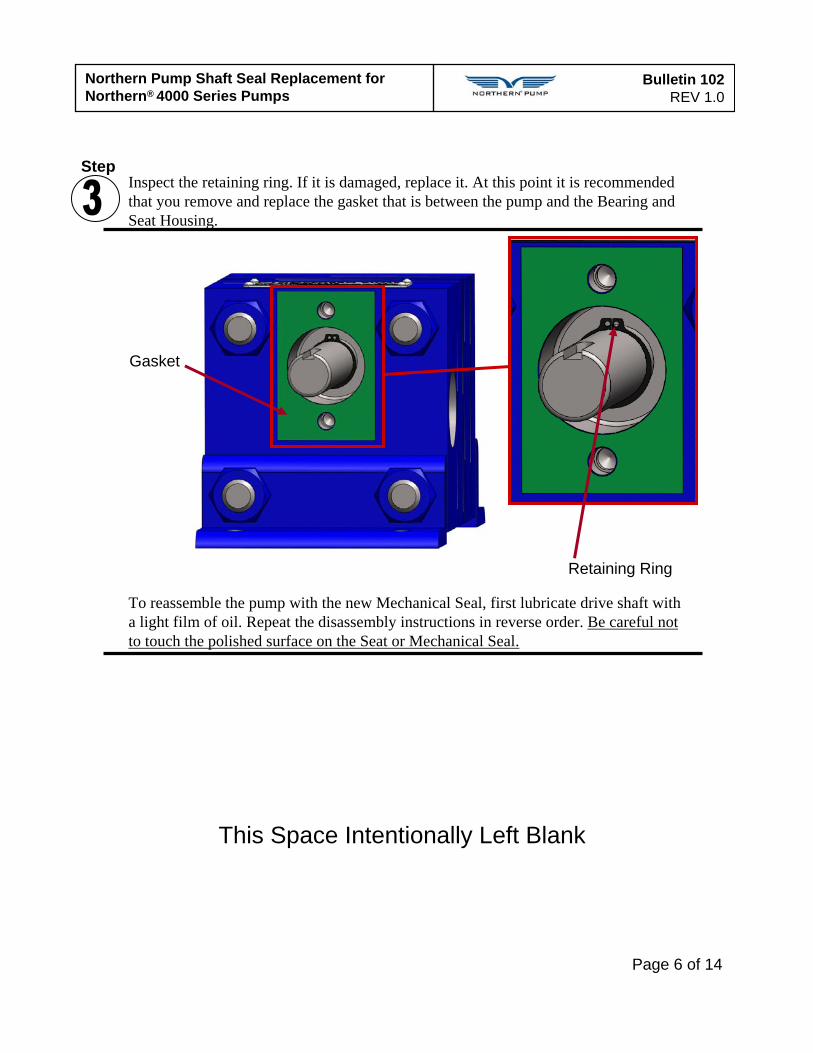
Inspect the retaining ring. If it is damaged, replace it. At this point it is recommended that you remove and replace the gasket that is between the pump and the Bearing and Seat Housing.
To reassemble the pump with the new Mechanical Seal, first lubricate drive shaft with a light film of oil. Repeat the disassembly instructions in reverse order. Be careful not to touch the polished surface on the Seat or Mechanical Seal.
Gasket
Retaining Ring
Step
This Space Intentionally Left Blank
Page 6 of 14

Bulletin 102REV 1.0
Northern Pump Shaft Seal Replacement for Northern® 4000 Series Pumps
No. Name1 Bearing and Seat Housing2 Capscrews3 Gasket4 Lockwashers5 Mechanical Seal Head
6 Mechanical Seal Seat7 Shaft Support Bearing8 Drive Shaft
Replacement of John Crane Type 9, 8-1, and 8B-1 Mechanical Seal
Seal Diagram
8 47 1 3 6 52
Page 7 of 14
Bulletin 102REV 1.0
Northern Pump Shaft Seal Replacement for Northern® 4000 Series Pumps
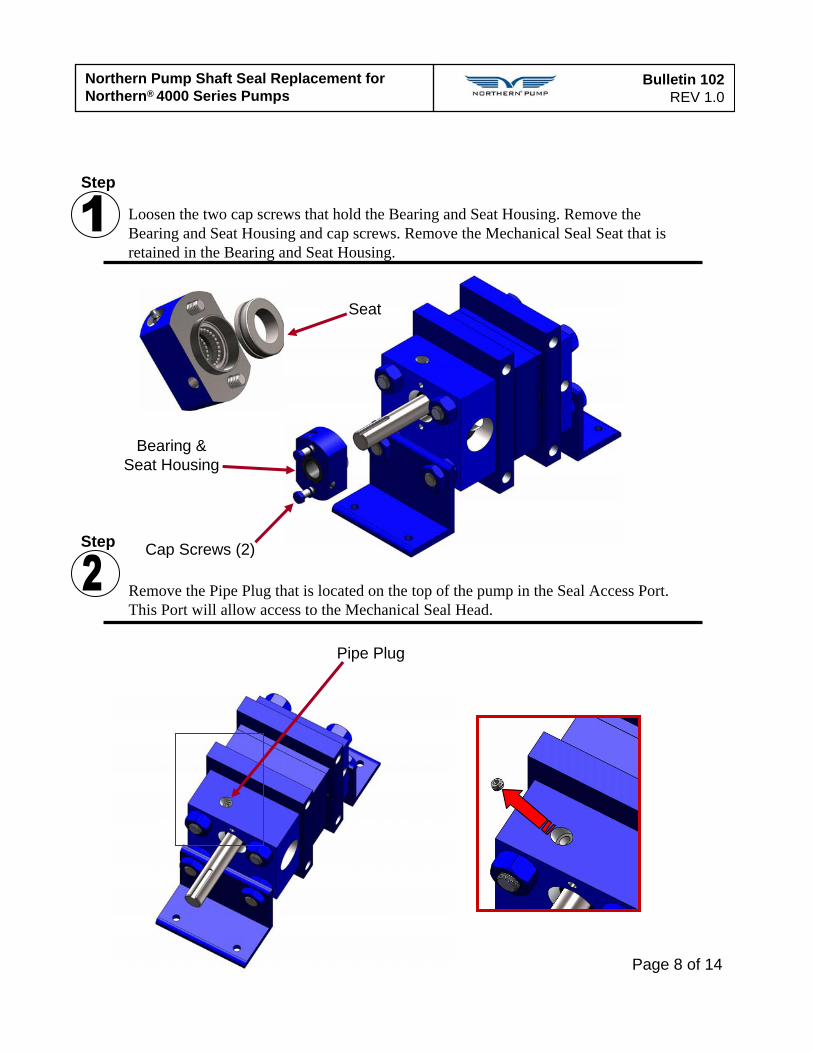
Loosen the two cap screws that hold the Bearing and Seat Housing. Remove the Bearing and Seat Housing and cap screws. Remove the Mechanical Seal Seat that is retained in the Bearing and Seat Housing.
Remove the Pipe Plug that is located on the top of the pump in the Seal Access Port. This Port will allow access to the Mechanical Seal Head.
Seat
Pipe Plug
Cap Screws (2)
Bearing & Seat Housing
Step
Step
Page 8 of 14

Bulletin 102REV 1.0
Northern Pump Shaft Seal Replacement for Northern® 4000 Series Pumps
Use an Allen wrench to loosen the set screws that retain the mechanical seal. Manually rotate the pump shaft so that the set screws are aligned and accessible through the Seal Access hole.
Set Screws3 or 4 equally
spaced
Remove the Mechanical Seal Head by sliding it over and off the drive shaft. To reassemble the pump with the new Mechanical Seal Head, first lubricate drive shaft with a light film of oil. Repeat the disassembly instructions in reverse order. Be careful not to touch the polished surface on the Seat or Mechanical Seal Head. Any minute scratch, burr, or defect could permit the Mechanical Seal to leak.
Step
Step
Page 9 of 14

Bulletin 102REV 1.0
Northern Pump Shaft Seal Replacement for Northern® 4000 Series Pumps
Due to size, number, and the specific arrangement and order of the components, replacement of High Pressure Hydro-ergoseals is complex and can be very difficult. Field maintenance is not recommended. If replacement of High Pressure Hydro-ergo seals is necessary, we recommend that you send your pumps to Northern pump for factory servicing.
Replacement of High Pressure Hdyro-ergoseal.
Page 10 of 14

Bulletin 102REV 1.0
Northern Pump Shaft Seal Replacement for Northern® 4000 Series Pumps
Replacement of Shaft Packing Seal.
1 2 4 3 5
Packing Diagram
Page 11 of 14
No. Name1 Drive Shaft2 Elastic Stop Nut3 Gland Stud4 Packing Gland5 Teflon Packing Set
Bulletin 102REV 1.0
Northern Pump Shaft Seal Replacement for Northern® 4000 Series Pumps
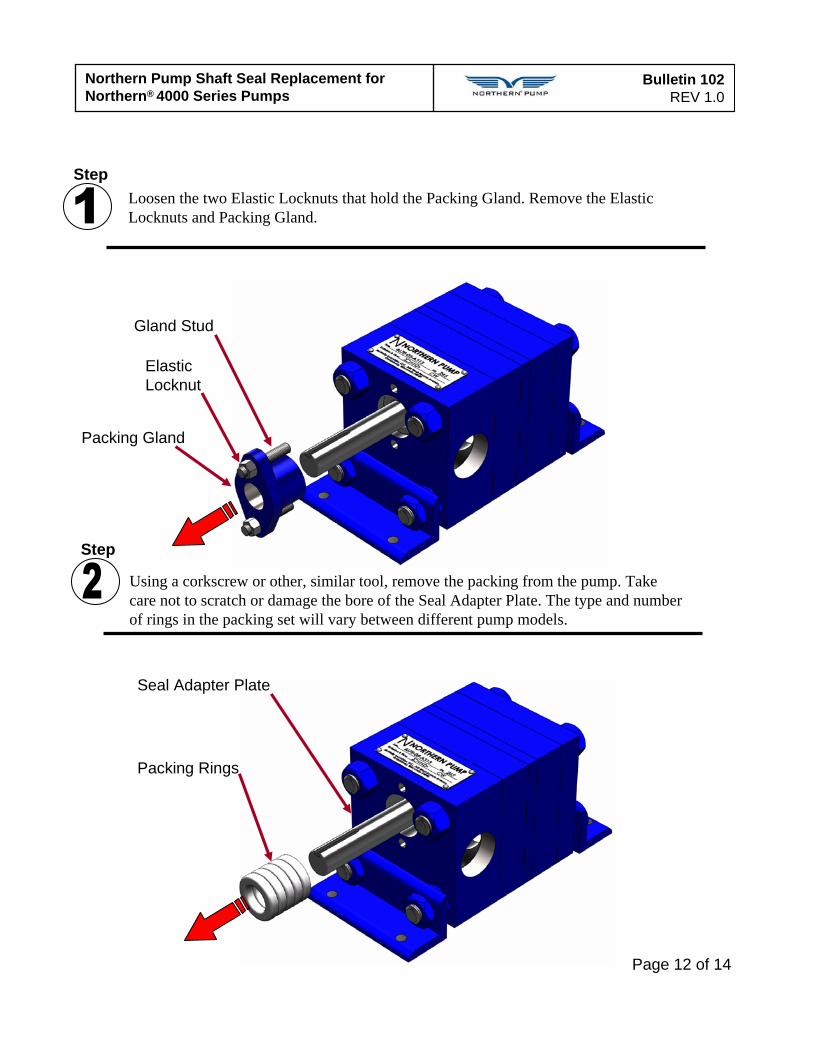
Loosen the two Elastic Locknuts that hold the Packing Gland. Remove the Elastic Locknuts and Packing Gland.
Using a corkscrew or other, similar tool, remove the packing from the pump. Take care not to scratch or damage the bore of the Seal Adapter Plate. The type and number of rings in the packing set will vary between different pump models.
Elastic Locknut
Packing Gland
Gland Stud
Packing Rings
Seal Adapter Plate
Step
Step
Page 12 of 14
Bulletin 102REV 1.0
Northern Pump Shaft Seal Replacement for Northern® 4000 Series Pumps
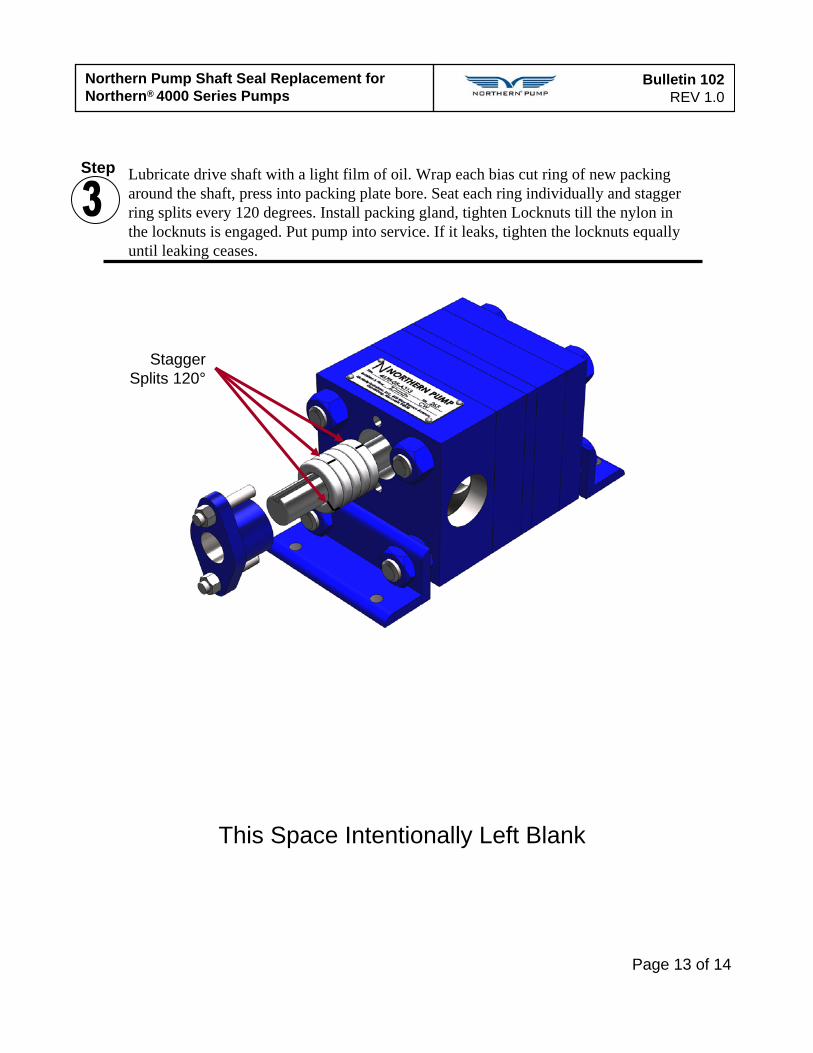
Lubricate drive shaft with a light film of oil. Wrap each bias cut ring of new packing around the shaft, press into packing plate bore. Seat each ring individually and stagger ring splits every 120 degrees. Install packing gland, tighten Locknuts till the nylon in the locknuts is engaged. Put pump into service. If it leaks, tighten the locknuts equally until leaking ceases.
StaggerSplits 120°
This Space Intentionally Left Blank
Page 13 of 14
Step

Bulletin 102REV 1.0
Northern Pump Shaft Seal Replacement for Northern® 4000 Series Pumps
Northern Pump Contact Information
Please contact the Northern Pump Office with any questions relating to this bulletin.
To order replacement parts call our office or visit the following page:http://www.northern-pump.com/parts.htm
To schedule a factory overhaul call our office or visit the following page:http://www.northern-pump.com/pump_maintenance.htm
To order a replacement pump call our office or visit the following page:http://www.northern-pump.com/replacement_pump_quote.htm
340 W. Benson Rd.Grantsburg, WI 54837
(800) 366-1410
www.northern-pump.com
Page 14 of 14