manually installing the p6 eppm microsoft sql server database€¦ · manually installing the p6...
TRANSCRIPT

MMaannuuaallllyy IInnssttaalllliinngg tthhee PP66 EEPPPPMM MMiiccrroossoofftt SSQQLL SSeerrvveerr DDaattaabbaassee
RReelleeaassee 88..33
JJaannuuaarryy 22001144

3
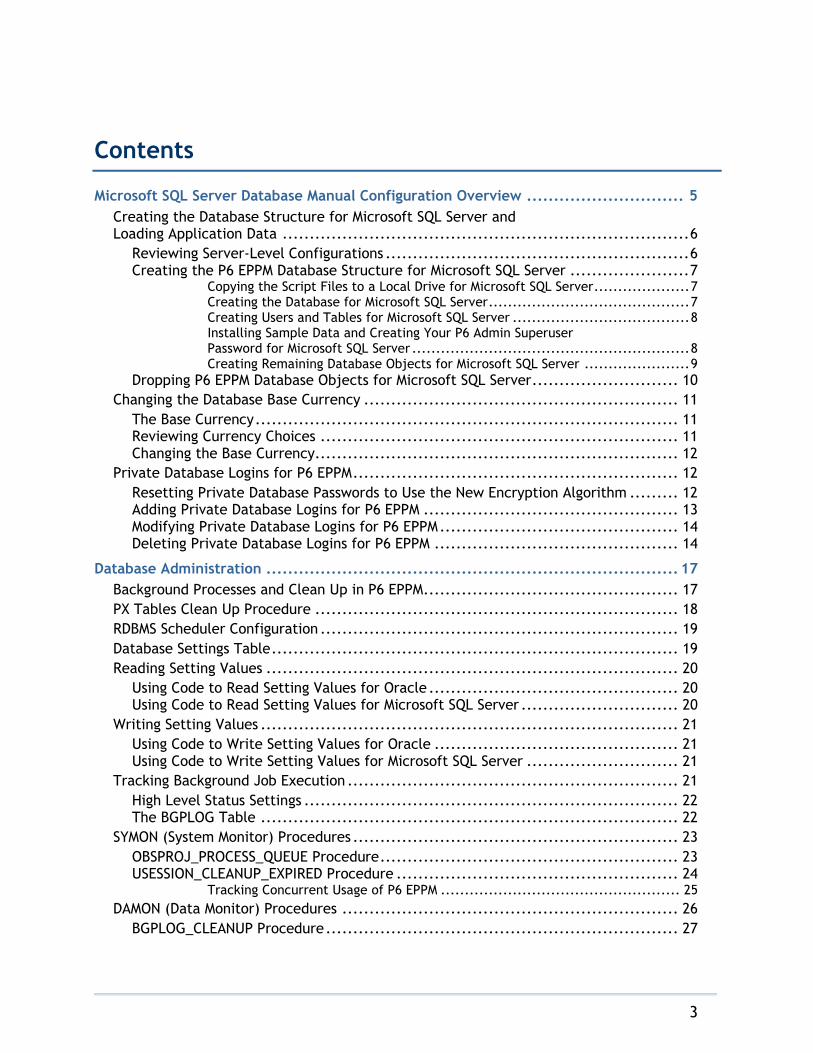
Contents
Microsoft SQL Server Database Manual Configuration Overview ............................. 5
Creating the Database Structure for Microsoft SQL Server and Loading Application Data ........................................................................... 6
Reviewing Server-Level Configurations ........................................................ 6 Creating the P6 EPPM Database Structure for Microsoft SQL Server ...................... 7
Copying the Script Files to a Local Drive for Microsoft SQL Server.................... 7 Creating the Database for Microsoft SQL Server .......................................... 7 Creating Users and Tables for Microsoft SQL Server ..................................... 8 Installing Sample Data and Creating Your P6 Admin Superuser Password for Microsoft SQL Server .......................................................... 8 Creating Remaining Database Objects for Microsoft SQL Server ...................... 9
Dropping P6 EPPM Database Objects for Microsoft SQL Server ........................... 10
Changing the Database Base Currency .......................................................... 11
The Base Currency .............................................................................. 11 Reviewing Currency Choices .................................................................. 11 Changing the Base Currency................................................................... 12
Private Database Logins for P6 EPPM ............................................................ 12
Resetting Private Database Passwords to Use the New Encryption Algorithm ......... 12 Adding Private Database Logins for P6 EPPM ............................................... 13 Modifying Private Database Logins for P6 EPPM ............................................ 14 Deleting Private Database Logins for P6 EPPM ............................................. 14
Database Administration ............................................................................ 17
Background Processes and Clean Up in P6 EPPM ............................................... 17
PX Tables Clean Up Procedure ................................................................... 18
RDBMS Scheduler Configuration .................................................................. 19
Database Settings Table ........................................................................... 19
Reading Setting Values ............................................................................ 20
Using Code to Read Setting Values for Oracle .............................................. 20 Using Code to Read Setting Values for Microsoft SQL Server ............................. 20
Writing Setting Values ............................................................................. 21
Using Code to Write Setting Values for Oracle ............................................. 21 Using Code to Write Setting Values for Microsoft SQL Server ............................ 21
Tracking Background Job Execution ............................................................. 21
High Level Status Settings ..................................................................... 22 The BGPLOG Table ............................................................................. 22
SYMON (System Monitor) Procedures ............................................................ 23
OBSPROJ_PROCESS_QUEUE Procedure ....................................................... 23 USESSION_CLEANUP_EXPIRED Procedure .................................................... 24
Tracking Concurrent Usage of P6 EPPM .................................................. 25
DAMON (Data Monitor) Procedures .............................................................. 26
BGPLOG_CLEANUP Procedure ................................................................. 27
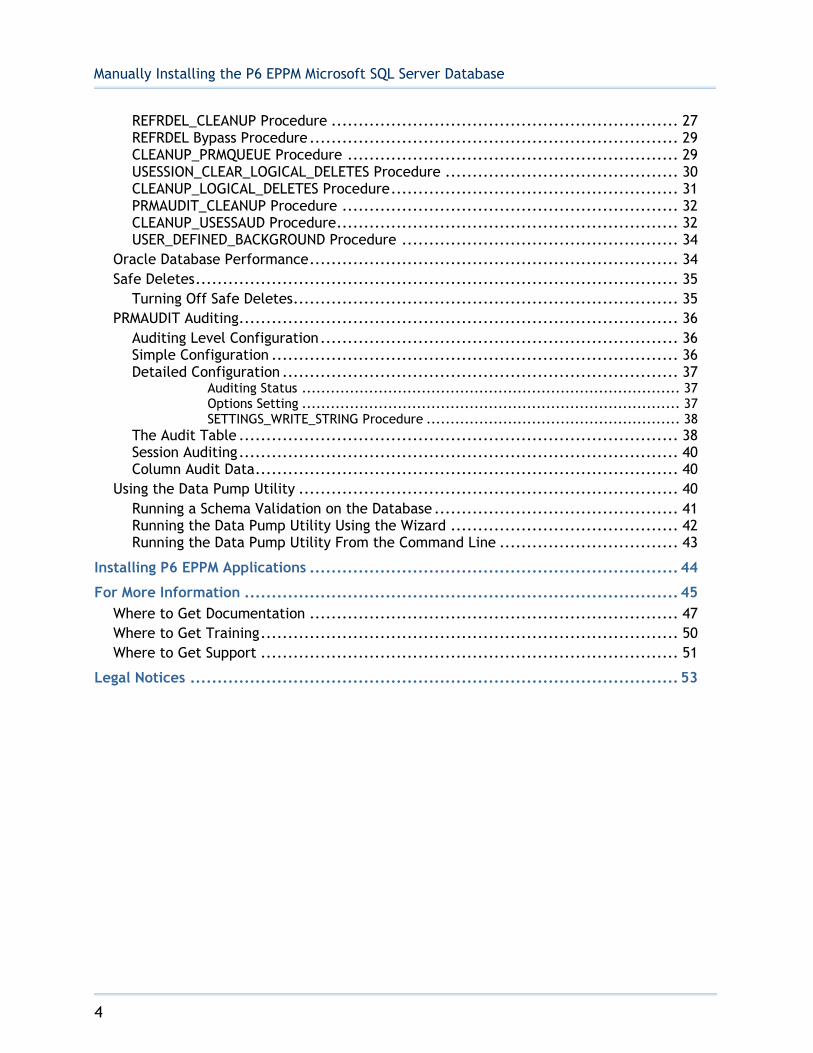
Manually Installing the P6 EPPM Microsoft SQL Server Database
4
REFRDEL_CLEANUP Procedure ................................................................ 27 REFRDEL Bypass Procedure .................................................................... 29 CLEANUP_PRMQUEUE Procedure ............................................................. 29 USESSION_CLEAR_LOGICAL_DELETES Procedure ........................................... 30 CLEANUP_LOGICAL_DELETES Procedure ..................................................... 31 PRMAUDIT_CLEANUP Procedure .............................................................. 32 CLEANUP_USESSAUD Procedure ............................................................... 32 USER_DEFINED_BACKGROUND Procedure ................................................... 34
Oracle Database Performance .................................................................... 34
Safe Deletes ......................................................................................... 35
Turning Off Safe Deletes ....................................................................... 35
PRMAUDIT Auditing ................................................................................. 36
Auditing Level Configuration .................................................................. 36 Simple Configuration ........................................................................... 36 Detailed Configuration ......................................................................... 37
Auditing Status ............................................................................... 37 Options Setting ............................................................................... 37 SETTINGS_WRITE_STRING Procedure ..................................................... 38
The Audit Table ................................................................................. 38 Session Auditing ................................................................................. 40 Column Audit Data .............................................................................. 40
Using the Data Pump Utility ...................................................................... 40
Running a Schema Validation on the Database ............................................. 41 Running the Data Pump Utility Using the Wizard .......................................... 42 Running the Data Pump Utility From the Command Line ................................. 43
Installing P6 EPPM Applications .................................................................... 44
For More Information ................................................................................ 45
Where to Get Documentation .................................................................... 47
Where to Get Training ............................................................................. 50
Where to Get Support ............................................................................. 51
Legal Notices .......................................................................................... 53

5
The P6 EPPM database stores P6 EPPM data used by the P6 EPPM applications.
The database administrator (DBA) should perform the steps in this chapter. You must
install the database server before you can create the database. See the Planning Your
P6 EPPM Implementation guide for details on product versions P6 EPPM supports. See
Installing and Configuring P6 EPPM to use a wizard that automatically creates the
database structures and loads the data.
P6 EPPM R8.3 includes an encryption algorithm that provides enhanced security for
private database logins; however, when you manually configure your database, the
database does not automatically enforce the encryption algorithm. If you manually
configure your database, Oracle recommends that you use this encryption
algorithm. To do so, you must reset the private database login. See Resetting Private
Database Passwords to Use the New Encryption Algorithm (on page 12) for instructions. If
you automatically configure your database, you do not need to configure the
encryption algorithm.
User logins and passwords are not affected.
User Name and Password Tips
P6 EPPM does not support passwords with multi-byte characters.
For security reasons, Oracle strongly recommends that you replace the default
database users' (admuser, privuser, pubuser, bgjobuser, and PxRptUser) passwords
immediately after a manual database installation or an upgrade from P6 version 7.0
and earlier. Do not use special characters in the database name, privileged user,
public user, or PX Reporting user name for example: { } [ ] : ; < > , . ? ! @ # $ % ^ & * ( ) -
_ | / \ ~ `
Oracle recommends using strong passwords. Strong passwords in P6 EPPM contain
between 8 and 20 characters and at least one numeric and one alpha character. To
further strengthen the password, use a mixture of upper and lower case letters.
See Modifying Private Database Logins for P6 EPPM (on page 14) for instructions on
how to replace the private database login. For all other database user names and
passwords, use the tools included with the database.
For security reasons, Oracle strongly recommends that you replace the default
Admin Superuser (admin) immediately after a manual database installation or an
upgrade from P6 version 7.0 and earlier. See information on the default Admin
Superuser in the P6 EPPM Post Installation Administrator's Guide for guidelines on this
process.
Microsoft SQL Server Database Manual Configuration Overview

Manually Installing the P6 EPPM Microsoft SQL Server Database
6
Security Tips
To configure the Microsoft SQL database server for SSL, see Microsoft's
Documentation for instructions on configuring SQL Database Server SSL. Direct
questions about Installation and Configurations to Microsoft.
ANSI_PADDING for a Microsoft SQL Server Database Tips
To prevent duplicate values in P6 EPPM modules appearing due to leading or trailing
spaces, ensure that the ANSI_PADDING setting in Microsoft SQL Server is Off. For
example, if one user enters "Equipment" and another user enters " Equipment" (with a
leading space) for resource codes, the database will store both of these as valid
values if ANSI_PADDING is On. If ANSI_PADDING is Off, the database will remove the
leading space in the second entry and tell the user to enter a unique ID. See the
documentation included with Microsoft SQL Server for more information.
In This Section
Creating the Database Structure for Microsoft SQL Server and Loading
Application Data ........................................................................................................ 6
Changing the Database Base Currency .............................................................. 11
Private Database Logins for P6 EPPM .................................................................... 12
Creating the Database Structure for Microsoft SQL Server and Loading Application Data
The Microsoft SQL Server DBA creates the P6 EPPM database, then runs P6 EPPM SQL
scripts that create each database’s structure (tables, indexes, relationships, etc.).
These instructions assume you are a DBA or are familiar with how to administer Microsoft
SQL Server databases. You must complete these steps in the order specified. If you have
any questions about the manual setup process, please contact Oracle Global Customer
Support before proceeding.
Reviewing Server-Level Configurations
Before you create the Microsoft SQL Server database structure, you should first register to
the server as a system administrator (SA) and review the following server-level
configuration changes in the Microsoft SQL Server Management Studio:
1) Max Worker Threads Specify the number of threads used to support the users
connected to the server. The default setting (255) might be too high for some
configurations, depending on the number of simultaneous users. Each worker thread
allocates, even if it is not being used; if you have fewer simultaneous connections
than allocated worker threads, you could be wasting memory.
2) Memory Keep the setting as Dynamic. Microsoft SQL Server dynamically acquires and
frees memory as needed, up to the maximum available memory on your server.

Microsoft SQL Server Database Manual Configuration Overview
7
3) Open Objects Keep the setting as Dynamic. This setting determines the maximum
number of objects that can open simultaneously on Microsoft SQL Server. The value is
set automatically depending on the current system. You should not have to change
this value.
4) User Connections Keep the setting as 0. This setting designates Microsoft SQL Server to
adjust the number of simultaneous user connections allowed based on how many
are needed, up to the maximum value.
5) Network Packet Size Set to 16384.
6) After configuring the server, stop and start Microsoft SQL Server to ensure that the
changes take effect.
Creating the P6 EPPM Database Structure for Microsoft SQL Server
Complete the following steps to create the P6 EPPM database Microsoft SQL Server
database structure.
Copying the Script Files to a Local Drive for Microsoft SQL Server
To copy the script files:
1) Download the Primavera P6 Enterprise Project Portfolio Management R8.3 for
<platform> folder of the physical media or download to a local drive and extract the
contents.
2) Go to the P6_R8.3\p6suite\database folder within the folder you unzipped for all
instructions in this section.
Creating the Database for Microsoft SQL Server
To create the database:
1) Register to the server as SA user.
2) Open Microsoft SQL Server Management Studio. Go to
\database\scripts\install\PM_08_03_00 and execute the sspm_init_db.sql script. This
script creates a database called PMDB. If you want to change it, you must modify the
sspm_init_db.sql script.
Notes:
Instead of running the sspm_init_db.sql script, you can manually
create a database named PMDB with a data file of 500 MB or
more and a log file of 200 MB or more.
Do not use special characters in the database name,
privileged user, public user, or PX reporting user name, for
example: { } [ ] : ; < > , . ? ! @ # $ % ^ & * ( ) - _ | / \ ~ `
Manually Installing the P6 EPPM Microsoft SQL Server Database
8
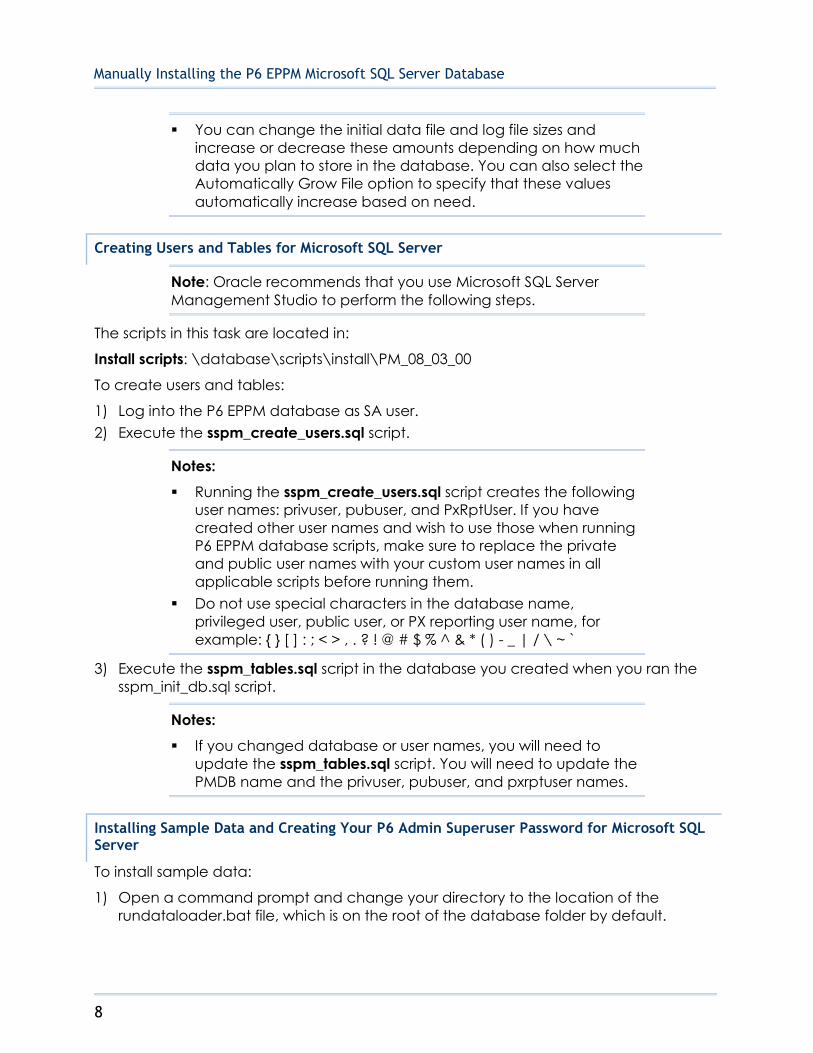
You can change the initial data file and log file sizes and
increase or decrease these amounts depending on how much
data you plan to store in the database. You can also select the
Automatically Grow File option to specify that these values
automatically increase based on need.
Creating Users and Tables for Microsoft SQL Server
Note: Oracle recommends that you use Microsoft SQL Server
Management Studio to perform the following steps.
The scripts in this task are located in:
Install scripts: \database\scripts\install\PM_08_03_00
To create users and tables:
1) Log into the P6 EPPM database as SA user.
2) Execute the sspm_create_users.sql script.
Notes:
Running the sspm_create_users.sql script creates the following
user names: privuser, pubuser, and PxRptUser. If you have
created other user names and wish to use those when running
P6 EPPM database scripts, make sure to replace the private
and public user names with your custom user names in all
applicable scripts before running them.
Do not use special characters in the database name,
privileged user, public user, or PX reporting user name, for
example: { } [ ] : ; < > , . ? ! @ # $ % ^ & * ( ) - _ | / \ ~ `
3) Execute the sspm_tables.sql script in the database you created when you ran the
sspm_init_db.sql script.
Notes:
If you changed database or user names, you will need to
update the sspm_tables.sql script. You will need to update the
PMDB name and the privuser, pubuser, and pxrptuser names.
Installing Sample Data and Creating Your P6 Admin Superuser Password for Microsoft SQL Server
To install sample data:
1) Open a command prompt and change your directory to the location of the
rundataloader.bat file, which is on the root of the database folder by default.

Microsoft SQL Server Database Manual Configuration Overview
9
2) Execute a statement similar to one of the following:
Use this command if you want to load sample data.
rundataloader.bat sample:pmdb_mk.zip
sa@sqlserver:host:port:instance
where sa is the administrator for the system database, host is the server machine
name or IP address where Microsoft SQL Server is installed, sa is the system
administrator or database user, port is the port number that Microsoft SQL Server is
using (the default is 1433), and instance is the database name (for example,
PMDB).
Use this command if you do not want to load sample data. Empty data is
loaded in a secure state and includes only the most basic information needed to
run the P6 EPPM database.
rundataloader.bat sample:pmdb_mk_empty.zip
sa@sqlserver:host:port:instance
where where sa is the administrator for the system database, host is the server
machine name or IP address where Microsoft SQL Server is installed, port is the port
number that Microsoft SQL Server is using (the default is 1433), and instance is the
database name (for example, PMDB).
3) In the Please select a password for the P6 'admin' SuperUser account prompt, enter or
verify your superuser password.
Creating Remaining Database Objects for Microsoft SQL Server
The scripts in this task are located in:
Install scripts: \database\scripts\install\PM_08_03_00
Source scripts: \database\scripts\source\PM_08_03_00
To create remaining database objects:
1) Log on to the P6 EPPM database as SA user.
2) Execute the sspm_querylib.sql install script.
3) Execute the sspm_ins_aux.sql install script.
4) Execute the sspm_settings.sql install script.
Notes:
The sspm_ins_aux.sql script has a grant that reads: GRANT
SELECT ON PUBUSER TO PUBUSER. If you changed the default
pubuser name, do not change the name of the PUBUSER table,
only change the user name. For example: GRANT SELECT ON
PUBUSER TO NEW_PUBUSER_USERNAME
If you changed the default privuser and pubuser names, you
must update the sspm_ins_aux.sql script with your custom
privuser and pubuser names.

Manually Installing the P6 EPPM Microsoft SQL Server Database
10
Do not use special characters in the database name,
privileged user, public user, or PX reporting user name, for
example: { } [ ] : ; < > , . ? ! @ # $ % ^ & * ( ) - _ | / \ ~ `
5) Execute the sspm_src.plb source script.
Notes:
If you changed the default privuser name, you must update the
sspm_src.plb script with your custom privuser name.
Do not use special characters in the database name,
privileged user, public user, or PX reporting user name, for
example: { } [ ] : ; < > , . ? ! @ # $ % ^ & * ( ) - _ | / \ ~ `
6) Execute the sspm_database_version.sql install script.
7) Execute the sspm_init_bgjobs.sql script.
8) Log into the SQL Server Management Studio as pxrptuser, or use your custom PX
reporting user name if you created one.
9) Execute the sspm_px_rpt_src.sql source script.
Notes:
If you changed the default pxrptuser name, you must update
the sspm_px_rpt_src.sql script with your custom pxrptuser name.
Do not use special characters in the database name,
privileged user, public user, or PX reporting user name, for
example: { } [ ] : ; < > , . ? ! @ # $ % ^ & * ( ) - _ | / \ ~ `
10) If you used a non-default privuser name, you must do the following:
a. Log into the databaselogins.bat (on Windows) or databaselogins.sh (on Unix)
database as privuser (use your custom privuser name if you created a custom user
name and password).
b. Update the privuser name and password to match what you used when you
created users in Creating Users and Tables for Microsoft SQL Server (on page 8).
Dropping P6 EPPM Database Objects for Microsoft SQL Server
If you make a mistake or want to recreate the database objects for the P6 EPPM
database:
1) Login to Microsoft SQL Server Management Studio as SA user.
2) Expand Databases.
3) Select the database you want to delete (for example, PMDB).
4) Right-click the database and select Delete.
5) In the Delete Object dialog box, click OK.
6) Start over at Creating the Database for Microsoft SQL Server (on page 7).

Microsoft SQL Server Database Manual Configuration Overview
11
Changing the Database Base Currency
Caution: You cannot change the base currency once projects
begin.
After manually creating and configuring the P6 EPPM database, you must change the
base currency if you do not want the databases to use US dollars ($) as the base
currency.
The Base Currency
The base currency is the monetary unit used to store cost data for all projects in the
database and is controlled by a global administrative setting. The default base currency
for P6 EPPM is US dollars ($). The view currency is the monetary unit used to display cost
data in P6 EPPM and is controlled by a user preference.
The exchange rate for the base currency is always 1.0. When a user selects a different
currency than the base currency to view cost data, the base currency value is multiplied
times the current exchange rate for the view currency to calculate the values displayed
in cost and price fields.
For example, if the base currency is U.S. Dollars, the view currency is Euros, and the
exchange rate for Euros is .75, a value of $10 stored in the database is displayed as 7.5
Euros in cost and price fields. Similarly, if you enter 7.5 Euros in a cost or price field, it is
stored in the database as $10.
When data is displayed in a view currency that is different than the base currency, some
cost and price values can vary slightly (e.g., due to rounding). As long as the correct
base currency is selected during database installation, a user can view completely
accurate cost and price data by changing the view currency to match the base
currency.
Reviewing Currency Choices
To change the base currency you need to edit and run the P6 EPPM script provided. By
default, US dollars is the base currency, and USD is the short name used in the script. To
know which short name to use, review the list of available short names for P6 EPPM by
running the following query on the P6 EPPM database:
select curr_type, curr_short_name from currtype;

Manually Installing the P6 EPPM Microsoft SQL Server Database
12
Changing the Base Currency
To change the base currency:
1) On the P6 EPPM physical media or download:
a. Browse to \Database\scripts\common.
b. Copy this script to a local drive:
For Microsoft SQL Server: ss_set_currency.sql
2) If you copied the script from the physical media, turn off the script's read-only
attribute.
Since files on physical media are read-only, this attribute turns on when you copy a file
from a CD or DVD.
a. In Windows Explorer, right-click the file.
b. Choose Properties.
c. Clear the Read-Only option.
3) Open the script for editing and locate the line containing v_new_base_currency: =
‘USD’
4) Replace USD with the currency short name of your choice.
5) Save your changes and run the modified script.
Private Database Logins for P6 EPPM
Private database logins are used primarily by administrators to gain direct access to a
database. For example, the privileged user login that you use to access the P6 EPPM
database is a private database login. You can add, modify, or delete existing logins
using the Database Logins tool.
P6 EPPM R8.3 includes an encryption algorithm that provides enhanced security for
private database logins; however, when you manually configure your database, the
database does not automatically enforce the encryption algorithm. If you manually
configure your database, Oracle recommends that you use this encryption
algorithm. To do so, you must reset the private database login. See Resetting Private
Database Passwords to Use the New Encryption Algorithm (on page 12) for instructions. If
you automatically configure your database, you do not need to configure the
encryption algorithm.
User logins and passwords are not affected.
Resetting Private Database Passwords to Use the New Encryption Algorithm
Use the steps that follow to reset private database passwords to use the new encryption
algorithm.
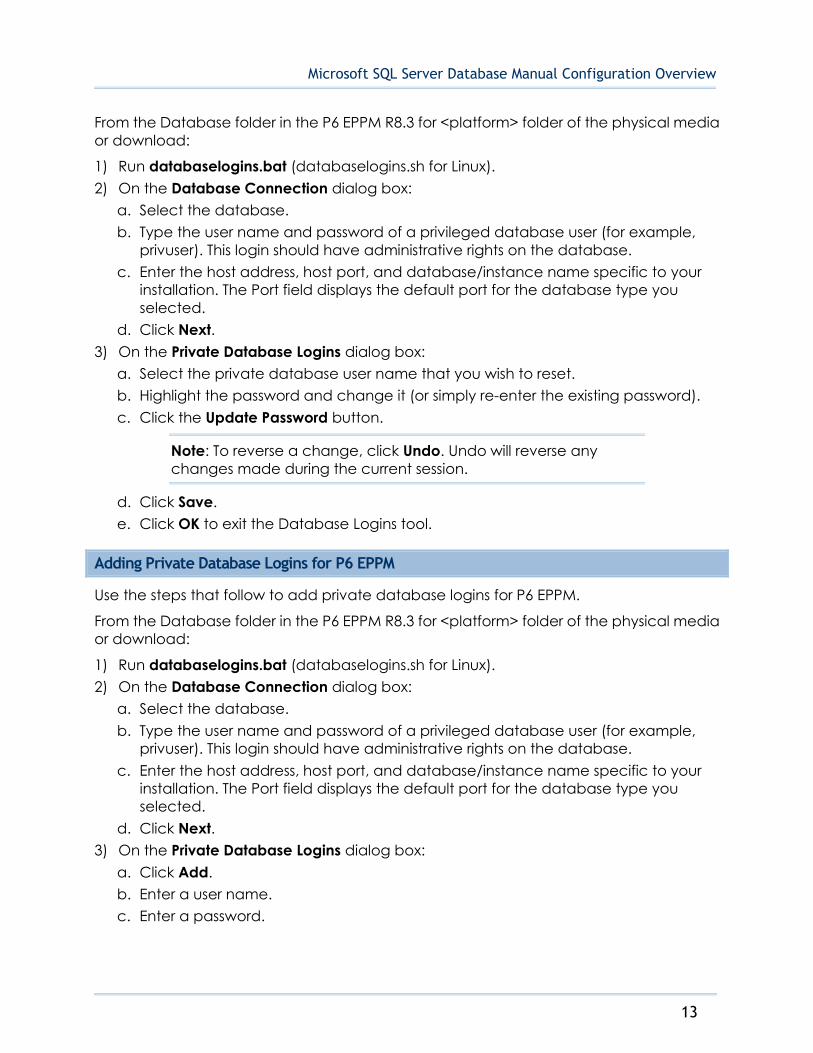
Microsoft SQL Server Database Manual Configuration Overview
13
From the Database folder in the P6 EPPM R8.3 for <platform> folder of the physical media
or download:
1) Run databaselogins.bat (databaselogins.sh for Linux).
2) On the Database Connection dialog box:
a. Select the database.
b. Type the user name and password of a privileged database user (for example,
privuser). This login should have administrative rights on the database.
c. Enter the host address, host port, and database/instance name specific to your
installation. The Port field displays the default port for the database type you
selected.
d. Click Next.
3) On the Private Database Logins dialog box:
a. Select the private database user name that you wish to reset.
b. Highlight the password and change it (or simply re-enter the existing password).
c. Click the Update Password button.
Note: To reverse a change, click Undo. Undo will reverse any
changes made during the current session.
d. Click Save.
e. Click OK to exit the Database Logins tool.
Adding Private Database Logins for P6 EPPM
Use the steps that follow to add private database logins for P6 EPPM.
From the Database folder in the P6 EPPM R8.3 for <platform> folder of the physical media
or download:
1) Run databaselogins.bat (databaselogins.sh for Linux).
2) On the Database Connection dialog box:
a. Select the database.
b. Type the user name and password of a privileged database user (for example,
privuser). This login should have administrative rights on the database.
c. Enter the host address, host port, and database/instance name specific to your
installation. The Port field displays the default port for the database type you
selected.
d. Click Next.
3) On the Private Database Logins dialog box:
a. Click Add.
b. Enter a user name.
c. Enter a password.

Manually Installing the P6 EPPM Microsoft SQL Server Database
14
Note: To reverse a change, click Undo. Undo will reverse any
changes made during the current session.
d. Click Save.
e. Click OK to exit.
Modifying Private Database Logins for P6 EPPM
Use the steps that follow to modify private database logins.
From the Database folder in the P6 EPPM R8.3 for <platform> folder of the physical media
or download:
1) Run databaselogins.bat (databaselogins.sh for Linux).
2) On the Database Connection dialog box:
a. Select the database.
b. Type the user name and password of a privileged database user (for example,
privuser). This login should have administrative rights on the database.
c. Enter the host address, host port, and database/instance name specific to your
installation. The Port field displays the default port for the database type you
selected.
d. Click Next.
3) On the Private Database Logins dialog box:
a. Select the private database user name that you wish to modify.
b. Enter a new user name.
c. Highlight the password, and change it.
d. Click the Update Password button.
Note: To reverse a change, click Undo. Undo will reverse any
changes made during the current session.
e. Click Save.
f. Click OK to exit the Database Logins tool.
Deleting Private Database Logins for P6 EPPM
Use the steps that follow to delete private database logins for P6 EPPM:
From the Database folder in the P6 EPPM R8.3 for <platform> folder of the physical media
or download:
1) Run databaselogins.bat (databaselogins.sh for Linux).
2) On the Database Connection dialog box:
a. Select the database.

Microsoft SQL Server Database Manual Configuration Overview
15
b. Type the user name and password of a privileged database user (for example,
privuser). This login should have administrative rights on the database.
c. Enter the host address, host port, and database/instance name specific to your
installation. The Port field displays the default port for the database type you
selected.
d. Click Next.
3) On the Private Database Logins dialog box:
a. Select the private database user name that you wish to remove.
Note: You must have at least one private user name for the P6
EPPM database at all times.
b. Click Delete.
Note: To reverse a change, click Undo. Undo will reverse any
changes made during the current session.
c. Click Save.
d. Click OK to exit the Database Logins tool.


17
Read this chapter to learn how to configure the job scheduler supplied by your RDBMS,
how to optimize performance of your P6 EPPM database, and how to configure the
PRMAUDIT feature to monitor edits, deletions, and additions to the databases.
In This Section
Background Processes and Clean Up in P6 EPPM ............................................... 17
PX Tables Clean Up Procedure ............................................................................... 18
RDBMS Scheduler Configuration ............................................................................ 19
Database Settings Table .......................................................................................... 19
Reading Setting Values ............................................................................................ 20
Writing Setting Values ............................................................................................... 21
Tracking Background Job Execution ..................................................................... 21
SYMON (System Monitor) Procedures .................................................................... 23
DAMON (Data Monitor) Procedures ...................................................................... 26
Oracle Database Performance.............................................................................. 34
Safe Deletes ............................................................................................................... 35
PRMAUDIT Auditing ................................................................................................... 36
Using the Data Pump Utility ..................................................................................... 40
Background Processes and Clean Up in P6 EPPM
Because clean up tasks can be resource intensive and time consuming, in P6 EPPM,
these tasks are initiated by two background jobs that run on the database server using
the background job processes user name:
SYMON (System Monitor), responsible for running procedures that take less than a few
seconds to complete.
DAMON (Data Monitor), responsible for running procedures that take longer than a
few seconds to complete.
Both of these jobs are pre-configured with default settings. Since the default settings are
optimal for most environments, you generally do not need to tune them. However, if you
need to optimize your background process further, you can use the background job
processes user to change the settings to tune the behavior of the background jobs for
specific environments.
The background process will:
Update the settings table with a record each time a job runs.
Database Administration

Manually Installing the P6 EPPM Microsoft SQL Server Database
18
Update the settings table with a HeartBeatTime record for both the SYMON and
DAMON processes. The background processes regularly refresh the record to
indicate that they are still running.
When you initiate background jobs:
Execute the stored procedure INITIALIZE_BACKGROUND_PROCS.
Locate the logs of background process activity in BPLOGS and SETTINGS tables within
the Primavera database.
PX Tables Clean Up Procedure
To avoid operational problems for P6, PX table entries are not automatically deleted
when you delete data from P6 tables. You can use the following clean up procedure to
clear the obsolete entries in PX tables.
1) Run the CLEAN_PX_DELETE stored procedure to purge obsolete entries in the PX
tables:
For a Microsoft SQL Server database:
USE [ddname]
GO
DECLARE @return_value int
EXEC @return_value = [dbo].[CLEAN_PX_DELETE]
SELECT 'Return Value' = @return_value
GO
where ddname is the is your admin user name
Note: You can run this procedure any time you want or you can run
it as a database background job and schedule a specific time for
it to run.
2) To delete batch size and max delete from each table in a single run, run the following
queries:
Note: You can specify the delete batch size and max delete from
each table in a single run. Delete batch size is the number of rows
deleted before a commit. Max delete is the max number of rows
that will be deleted from a table in a single run. They have default
values if you do not provide your own. They're used to avoid
resource problems with the P6 operations.
insert into settings (namespace, setting_name, setting_value) values
('PxService.Cleanup','DeleteMaxSize','100000');
insert into settings (namespace, setting_name, setting_value) values
('PxService.Cleanup','DeleteBatchSize','5000');

Database Administration
19
RDBMS Scheduler Configuration
Since background jobs are initiated by the job scheduler supplied by the RDBMS, you
need to ensure that the scheduler for your specific RDBMS is properly configured.
For a Microsoft SQL Server Database: P6 EPPM uses the SQL Agent service to
automatically schedule background job execution for Microsoft SQL Server. Background
jobs handles the maintenance of the utilities tables (for example, USESSION and
REFRDEL). As part of background jobs, the agent runs the SYMON and DAMON stored
procedures at specific intervals.
Database Settings Table
Settings Table Overview
The settings table contains name-value pairs that configure the behavior of the
background processes.
Namespace
The namespace component is a dot-notation string representing a formal path to the
parameter.
Setting Name
The setting name identifies the name of the setting.
Value
Values in the SETTINGS table are case-sensitive. The value portion of the pair can be:
String. The string data type is a free text value. The most common string sub-type is
interval which represents an interval of time by combining a numeric portion with a
unit portion as depicted in the table below.
Interval Subtype Table
Unit portion Example Meaning
Numeric portion
+
d ‘30d’ Thirty day interval
h ‘2h’ Two hour interval
m ‘10m’ Ten minute interval
s ‘30s’ Thirty second interval
Numeric. The numeric data type consists of any number.
Boolean. The boolean data type can have one of two values: true or false, where
zero represents false and any non-zero number represents true.
Manually Installing the P6 EPPM Microsoft SQL Server Database
20
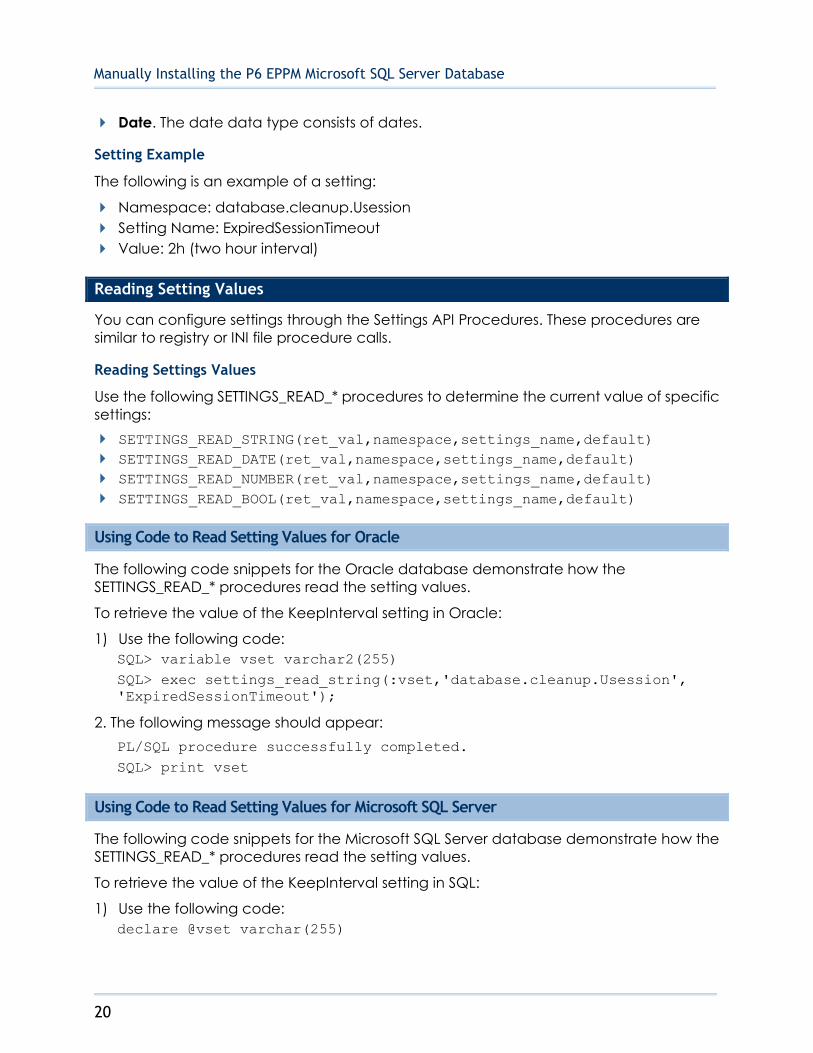
Date. The date data type consists of dates.
Setting Example
The following is an example of a setting:
Namespace: database.cleanup.Usession
Setting Name: ExpiredSessionTimeout
Value: 2h (two hour interval)
Reading Setting Values
You can configure settings through the Settings API Procedures. These procedures are
similar to registry or INI file procedure calls.
Reading Settings Values
Use the following SETTINGS_READ_* procedures to determine the current value of specific
settings:
SETTINGS_READ_STRING(ret_val,namespace,settings_name,default)
SETTINGS_READ_DATE(ret_val,namespace,settings_name,default)
SETTINGS_READ_NUMBER(ret_val,namespace,settings_name,default)
SETTINGS_READ_BOOL(ret_val,namespace,settings_name,default)
Using Code to Read Setting Values for Oracle
The following code snippets for the Oracle database demonstrate how the
SETTINGS_READ_* procedures read the setting values.
To retrieve the value of the KeepInterval setting in Oracle:
1) Use the following code:
SQL> variable vset varchar2(255)
SQL> exec settings_read_string(:vset,'database.cleanup.Usession', 'ExpiredSessionTimeout');
2. The following message should appear:
PL/SQL procedure successfully completed.
SQL> print vset
Using Code to Read Setting Values for Microsoft SQL Server
The following code snippets for the Microsoft SQL Server database demonstrate how the
SETTINGS_READ_* procedures read the setting values.
To retrieve the value of the KeepInterval setting in SQL:
1) Use the following code:
declare @vset varchar(255)

Database Administration
21
exec settings_read_string @vset
OUTPUT,'database.cleanup.Usession','ExpiredSessionTimeout'
print @vset
2) The following message should appear:
PL/SQL procedure successfully completed.
SQL> print vset
Writing Setting Values
Use the SETTINGS_WRITE_STRING procedure to set the value of a specific setting:
SETTINGS_WRITE_STRING(new value,namespace,settings_name);
Using Code to Write Setting Values for Oracle
The following code snippets for Oracle databases demonstrate how the
SETTINGS_WRITE_STRING procedure sets the value of the ExpiredSessionTimeout setting to
twelve hours.
To set the value of the ExpiredSessionTimout setting to twelve hours in an Oracle
database:
1) Log into SQL *Plus using privuser as your user name.
2) Run the following statement:
SQL > exec SETTINGS_WRITE_STRING
('12h','database.cleanup.Usession','ExpiredSessionTimeout');
Using Code to Write Setting Values for Microsoft SQL Server
The following code snippets for Microsoft SQL Server databases demonstrate how the
SETTINGS_WRITE_STRING procedure sets the value of the ExpiredSessionTimeout setting to
twelve hours.
To set the value of the ExpiredSessionTimeout setting to twelve hours in a Microsoft SQL
Server database:
1) Open the Query Analyzer/SSMS and connect as privuser.
2) Select the P6 EPPM database, then run the following statement (using 12 hours as an
example):
exec SETTINGS_WRITE_STRING '12h','database.cleanup.Usession', 'ExpiredSessionTimeout'
Tracking Background Job Execution
You can track the execution of background jobs by monitoring the high level status
settings or by inspecting the BGPLOG table.
Manually Installing the P6 EPPM Microsoft SQL Server Database
22
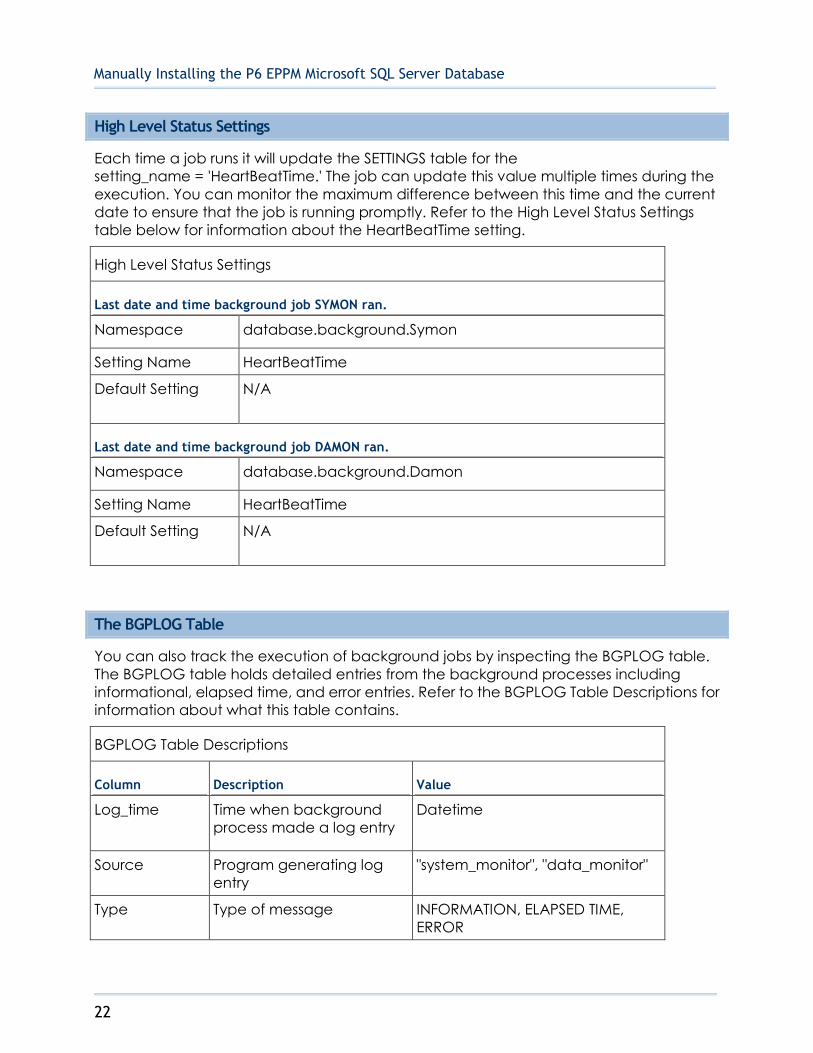
High Level Status Settings
Each time a job runs it will update the SETTINGS table for the
setting_name = 'HeartBeatTime.' The job can update this value multiple times during the
execution. You can monitor the maximum difference between this time and the current
date to ensure that the job is running promptly. Refer to the High Level Status Settings
table below for information about the HeartBeatTime setting.
High Level Status Settings
Last date and time background job SYMON ran.
Namespace database.background.Symon
Setting Name HeartBeatTime
Default Setting N/A
Last date and time background job DAMON ran.
Namespace database.background.Damon
Setting Name HeartBeatTime
Default Setting N/A
The BGPLOG Table
You can also track the execution of background jobs by inspecting the BGPLOG table.
The BGPLOG table holds detailed entries from the background processes including
informational, elapsed time, and error entries. Refer to the BGPLOG Table Descriptions for
information about what this table contains.
BGPLOG Table Descriptions
Column Description Value
Log_time Time when background
process made a log entry
Datetime
Source Program generating log
entry
"system_monitor", "data_monitor"
Type Type of message INFORMATION, ELAPSED TIME,
ERROR
Database Administration
23
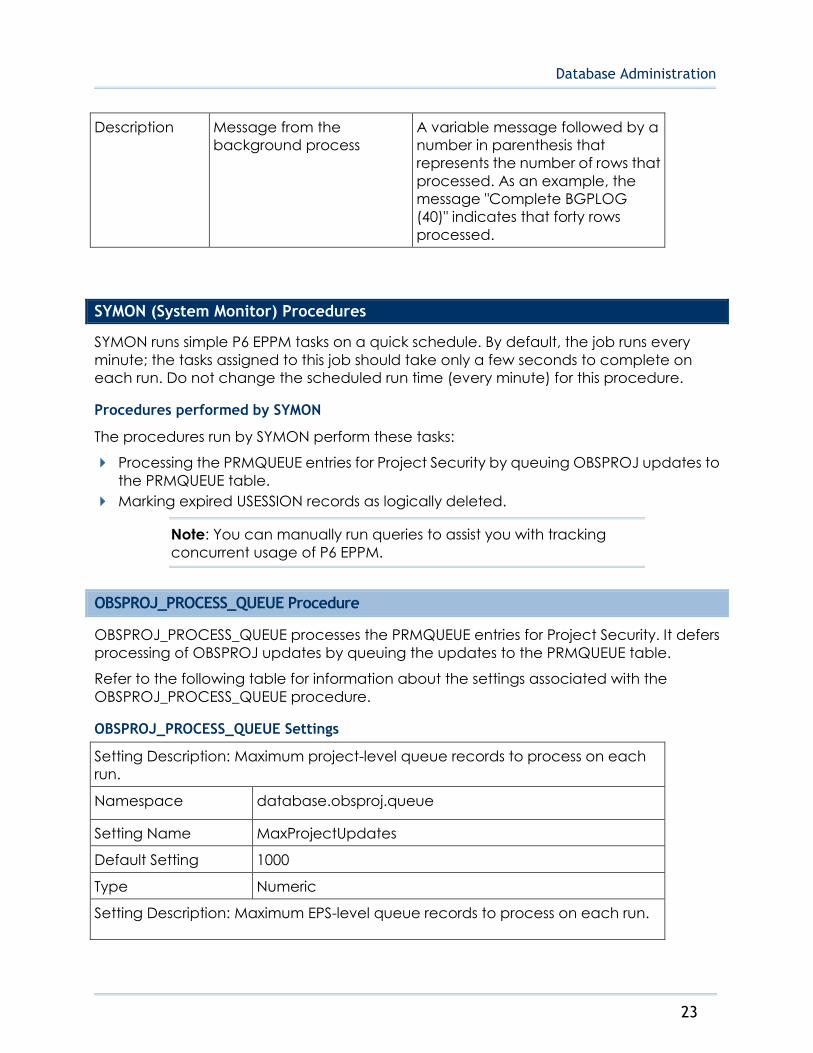
Description Message from the
background process
A variable message followed by a
number in parenthesis that
represents the number of rows that
processed. As an example, the
message "Complete BGPLOG
(40)" indicates that forty rows
processed.
SYMON (System Monitor) Procedures
SYMON runs simple P6 EPPM tasks on a quick schedule. By default, the job runs every
minute; the tasks assigned to this job should take only a few seconds to complete on
each run. Do not change the scheduled run time (every minute) for this procedure.
Procedures performed by SYMON
The procedures run by SYMON perform these tasks:
Processing the PRMQUEUE entries for Project Security by queuing OBSPROJ updates to
the PRMQUEUE table.
Marking expired USESSION records as logically deleted.
Note: You can manually run queries to assist you with tracking
concurrent usage of P6 EPPM.
OBSPROJ_PROCESS_QUEUE Procedure
OBSPROJ_PROCESS_QUEUE processes the PRMQUEUE entries for Project Security. It defers
processing of OBSPROJ updates by queuing the updates to the PRMQUEUE table.
Refer to the following table for information about the settings associated with the
OBSPROJ_PROCESS_QUEUE procedure.
OBSPROJ_PROCESS_QUEUE Settings
Setting Description: Maximum project-level queue records to process on each
run.
Namespace database.obsproj.queue
Setting Name MaxProjectUpdates
Default Setting 1000
Type Numeric
Setting Description: Maximum EPS-level queue records to process on each run.

Manually Installing the P6 EPPM Microsoft SQL Server Database
24
Namespace database.obsproj.queue
Setting Name MaxEpsUpdate
Default Setting 25
Type Numeric
Setting Description: Maximum times to re-process a failed entry before marking it
as an error.
Namespace database.obsproj.queue
Setting Name MaxRetries
Default Setting 50
Type Numeric
USESSION_CLEANUP_EXPIRED Procedure
USESSION_CLEANUP_EXPIRED logically deletes USESSION records that have not updated
their last_active_time based on the Expired Session settings. Marking expired USESSION
records as logically deleted maximizes the number of module access logins that are
available. Since it is not cleaning up the underlying data (physically deleting rows), the
task completes quickly.
Values in the SETTINGS table control the clean up of expired sessions. By default, although
the clean up of expired sessions occurs every two hours, the SETTINGS table does not
contain a value for this setting. Use the SETTINGS_WRITE_STRING (value, namespace,
setting) stored procedure to change the default clean up value.
For example, setting the value to "2d" deletes expired sessions older than two days.
Note: Oracle recommends that you set the
ExpiredLongSessionTimeout sessions to at least one hour longer
than your longest job. For example, if your longest job is a
summarizer job that usually takes 12 hours, you should set the value
in the SETTINGS table to at least 13.
Refer to the table below for information about the USESSION_CLEANUP_EXPIRED Settings.
USESSION_CLEANUP_EXPIRED Settings
Setting Description: ExpiredSessionTimeout determines how long an inactive user
session will remain in the records before it is marked deleted. User sessions are
created when a P6 user logs into P6.
Namespace database.cleanup.Usession

Database Administration
25
Setting Name ExpiredSessionTimeout
Default Setting 2h
Type Interval
Setting Description: ExpiredLongSessionTimeout determines how long a session
that is running a job-like operation (that is still processing) will remain in the
records before it is marked deleted. Job-like operations are processed by job
services and some are performed by logged in P6 users. Operations that are
considered job-like are:
Scheduling
Leveling
Apply Actuals
Update Progress
Copy/Paste Project
Create Project from Template
Maintain Baselines (create new baseline)
Approve Timesheets
Summarize
PX Publish
Export
Import
Namespace database.cleanup.Usession
Setting Name ExpiredLongSessionTimeout
Default Setting 12h
Type Interval
Tracking Concurrent Usage of P6 EPPM
To track concurrent usage of P6 EPPM, you can run queries against the USESSION and
USESSAUD tables to perform self-audits. See sample queries below.
Note: See DAMON (Data Monitor) Procedures (on page 26) for
information on how to set up the USESSAUD procedure. To ensure
accuracy of these queries, run them before physically deleting
remaining USESSION records and cleaning up the USESSAUD table.
Against the USESSION table, run the following query to determine how many users are
logged in at a given time:
select count(*) from usession where delete_session_id is null

Manually Installing the P6 EPPM Microsoft SQL Server Database
26
Against the USESSION table, run the following query to determine how many users are
logged into a specific P6 EPPM product at a given time:
select count (*) from usession where delete_session_id is null and
app_name='P6 EPPM product name'
where P6 EPPM product name is the application abbreviation.
Note: You can view all available application abbreviations by
running the following query as an administrative database user: select distinct(db_engine_type) from usereng
Against the USESSAUD table, run a query similar to the following to determine how
many users logged into P6 EPPM on a specific date during a specified time range.
You can alter the date, time range, and P6 EPPM product as needed. The following
example will search for all users who logged into P6 Professional on February 17, 2010
between 9am and 10am:
For a Microsoft SQL Server database:
select * from usessaud where login_date between
'2010-02-17 09:00' and '2011-02-17 10:00' and app_name='Project
Management'
Tips
See "Counting Users" in the P6 EPPM Post Installation Administrator's Guide for information
on counting users and how to view the total number of licenses assigned for each
module.
DAMON (Data Monitor) Procedures
The second database job is the DAMON data monitor job. The DAMON job runs the
majority of the background processing and is responsible for running background clean
up processes required by the application that can potentially take a relatively long time
to run.
Microsoft SQL Server and DAMON
By default, DAMON runs every Saturday. You can set it to run every two weeks or on a
specific day. To run DAMON every two weeks, use the following command to set the
interval: -eg 2W
To set DAMON to run on a specific day, use the following setting under namespace:
‘Database.background.Damon’ DayOfWeek
DAMON Procedures
DAMON cleans the:
BGPLOG table containing the background logs.
REFRDEL table.

Database Administration
27
PRMQUEUE table.
Remaining USESSION records.
Logically deleted records.
PRMAUDIT table.
USESSION audit table (USESSAUD).
You can also dynamically extend DAMON functionality via the user-defined procedure,
USER_DEFINED_BACKGROUND.
BGPLOG_CLEANUP Procedure
This procedure keeps the BGPLOG table at a reasonable size. The default clean up
interval is 5 days which will result in a table size of about 54,000 records.
Refer to the following table for information about the settings associated with the
BGPLOG_CLEANUP procedure.
BGPLOG_CLEANUP Settings
Setting Description: The oldest records to keep in the BGPLOG table.
Namespace database.cleanup.BackGroundProcessLog
Setting Name KeepInterval
Default Setting 5d
Type Interval
REFRDEL_CLEANUP Procedure
This procedure deletes records from the REFRDEL table based on the value of the
KeepInterval setting. The default setting keeps the REFRDEL records from the last five
days.
Refer to the following table for information about the settings associated with the
REFRDEL_CLEANUP procedure:
REFRDEL_CLEANUP Settings
Setting Description: The oldest records to keep in the REFRDEL table.
Namespace database.cleanup.Refrdel
Setting Name KeepInterval
Default Setting 5d
Type Interval
Manually Installing the P6 EPPM Microsoft SQL Server Database
28
Setting Description: Identifies the maximum number of minutes before records
are deleted from the REFRDEL table.
Namespace database.cleanup.Refrdel
Setting Name DaysToDelete
Default Setting 1
Type Numeric
Setting Description: Determines the number of minutes for each step interval.
Namespace database.cleanup.Refrdel
Setting Name IntervalStep
Default Setting 15
Type Numeric
Setting Description: Identifies the maximum number of rows to delete on each
run.
Namespace database.cleanup.Refrdel
Setting Name MaxRowsToDelete
Default Setting 10,000
Type Numeric
Setting Description: Identifies the percentage of rows to delete per run.
Namespace database.cleanup.Refrdel
Setting Name DeletePercentage
Default Setting 10 (%)
Type Numeric
Setting Description: Determines whether the procedure will delete all of the
logically deleted records possible on each pass.
Namesapce database.cleanup.Refrdel
Setting Name DeleteAll
Default Setting 0 (false)
Type Boolean

Database Administration
29
REFRDEL Bypass Procedure
The REFRDEL table maintains a list of deleted records from P6 database tables. However,
when an entire project is deleted, a large amount of detailed delete records can be
inserted into the REFRDEL table resulting in the potential for downstream performance
degradation when joins are made to the REFRDEL table.
The REFRDEL Bypass procedure is an alternative to inserting REFRDEL records for tracking
delete records on a large scale. This procedure bypasses the REFRDEL table and simply
adds a single delete record for a deleted project and project ID.
By default, the REFRDEL BYPASS procedure is set to 0 (zero).
To enable REFRDEL Bypass, execute the following procedure and set to a non-zero value:
SQL> exec SET_REFRDEL_PROJECT_BYPASS(1);
Database triggers check for the value of the REFRDEL BYPASS value and process
accordingly.
Note: The bypass procedure is meant only for a PROJECT DELETE
operations.
CLEANUP_PRMQUEUE Procedure
This procedure deletes records from the PRMQUEUE table based on the value of the
KeepInterval setting. The remaining settings are similar to the REFRDEL_CLEANUP.
Refer to the following table for information about the settings associated with the
CLEANUP_PRMQUEUE procedure:
CLEANUP_PRMQUEUE Settings
Setting Description: The oldest records to keep in the PRMQUEUE table. Default is
five days.
Namespace database.cleanup.Prmqueue
Setting Name KeepInterval
Default Setting 5d
Type Interval
Setting Description: Determines whether the procedure will delete all of the
PRMQUEUE records possible on each pass.
Namespace database.cleanup.Prmqueue

Manually Installing the P6 EPPM Microsoft SQL Server Database
30
Setting Name DeleteAll
Default Setting 0 (false)
Type Boolean
Setting Description: Determines whether all of the records are cleaned. If the
total record count is less than this number then all the records are cleaned.
Namespace database.cleanup.Prmqueue
Setting Name DeleteAllThreshold
Default Setting 1,000
Type Numeric
Setting Description: Percentage of records to delete on each pass.
Namespace database.cleanup.Prmqueue
Setting Name DeletePercentage
Default Setting 10(%)
Type Numeric
Setting Description: Maximum rows to delete on each pass.
Namespace database.cleanup.Prmqueue
Setting Name MaxRowsToDelete
Default Setting 10,000
Type Numeric
USESSION_CLEAR_LOGICAL_DELETES Procedure
This procedure physically deletes all logically deleted USESSION records. This procedure
does not have settings associated with it: All logically deleted USESSION records are
cleared.

Database Administration
31
CLEANUP_LOGICAL_DELETES Procedure
This procedure removes logically deleted rows based on the value of the KeepInterval
setting. Records in the database can be marked as deleted (logically deleted) by setting
the DELETE_SESSION_ID column to a non-null value. By default, records that were deleted
more than 5 days ago will be deleted by this procedure.
Note: The CLEANUP_LOGICAL_DELETES procedure will not delete
records whose DELETE_SESSION_ID column is set to a negative
value.
Refer to the following table for information about the settings associated with the
CLEANUP_LOGICAL_DELETES procedure:
CLEANUP_LOGICAL_DELETES Settings
Setting Description: The oldest logically deleted records to keep in tables.
Namespace database.cleanup.LogicalDelete
Setting Name KeepInterval
Default Setting 5d
Type Interval
Setting Description: Determines whether the procedure will delete all of the
logically deleted records possible on each pass.
Namespace database.cleanup.LogicalDelete
Setting Name DeleteAll
Default Setting 0 (false)
Type Boolean
Setting Description: Maximum rows to delete on each pass.
Namespace database.cleanup.LogicalDelete
Setting Name MaxRowsToDelete
Default Setting 10,000
Type Numeric

Manually Installing the P6 EPPM Microsoft SQL Server Database
32
PRMAUDIT_CLEANUP Procedure
If the auditing feature is enabled, this procedure will physically delete records from the
table based on the value of the KeepInterval setting.
Refer to the following table for information about the settings associated with the
PRMAUDIT_CLEANUP procedure:
PRMAUDIT_CLEANUP Settings
Setting Description: Should the procedure attempt to clean up PRMAUDIT
records.
Namespace database.cleanup.auditing
Setting Name Enabled
Default Setting 1 (true)
Type Boolean
Setting Description: The oldest audit records to keep in PRMAUDIT.
Namespace database.cleanup.auditing
Setting Name KeepInterval
Default Setting 30d
Type Interval
CLEANUP_USESSAUD Procedure
The CLEANUP_USESSAUD procedure deletes records from the USESSAUD table based on
the KeepInterval parameter setting. All other settings are similar to the REFRDEL_CLEANUP
procedure. The following table describes the settings associated with the
CLEANUP_USESSAUD procedure.
CLEANUP_USESSAUD Settings
Setting Description: Determines the oldest records to keep in the USESSAUD
table. Based on the logout time, data beyond the KeepInterval parameter
value will not deleted. The KeepInterval parameter setting overrides all other
CLEANUP_USESSAUD settings.
Namespace database.cleanup.Usessaud

Database Administration
33
Setting Name KeepInterval
Default Setting 5d
Type Interval
Setting Description: Deletes all the REFRDEL records that satisfy the KeepInterval
setting on each pass. The DeleteAll parameter setting overrides the settings of
DeleteAllThreshold, DeletePercentage, and MaxRowsToDelete parameters.
Namespace database.cleanup.Usessaud
Setting Name DeleteAll
Default Setting 0 (false)
Type Boolean
Setting Description: Determines the minimum number of records to delete after
satisfying the KeepInterval parameter setting. By default, a minimum of 1000
records are deleted. If the total record count is less than this setting, all records
are deleted. The DeleteAllThreshold parameter setting overrides the settings of
the DeletePercentage and MaxRowsToDelete parameters.
Namespace database.cleanup.Usessaud
Setting Name DeleteAllThreshold
Default Setting 1,000
Type Numeric
Setting Description: Determines the maximum rows to delete on each pass after
satisfying the KeepInterval parameter setting. The MaxRowsToDelete parameter
setting overrides the DeletePercentage parameter setting.
Namespace database.cleanup.Usessaud
Setting Name MaxRowsToDelete
Default Setting 10,000
Type Numeric
Setting Description: Determines the percentage of records to delete on each
pass after satisfying the DeleteAllThreshold and MaxRowsToDelete settings.
However, the percentage of records deleted is limited to the default value of
the MaxRowsToDelete setting.
Namespace database.cleanup.Usessaud
Setting Name DeletePercentage
Default Setting 10 (%)

Manually Installing the P6 EPPM Microsoft SQL Server Database
34
Type Numeric
USER_DEFINED_BACKGROUND Procedure
This procedure is an optional customer procedure that DAMON runs. This procedure does
not have settings associated with it.
Oracle Database Performance
You can modify several Oracle database settings to improve the performance of your P6
EPPM database. Run the scripts as described below after you create the database.
Grant access to the V_$TRANSACTION view:
V_$TRANSACTION is a system view in Oracle that lists the active transactions in the
system.
GET_SAFETY DATE (a procedure in the Project Management schema) accesses this view
to get the oldest start time of an active transaction. If the schema owner does not have
privileges to this view, then it returns a safety date using the USESSION table.
V_$Transaction tunes performance during a refresh action. USESSION records the login
time of the logged in user, whereas data in the V_$Transaction view is recorded at a
system level. The logged in user could be logged in for more than an hour (as seen from
the USESSION table), but the V_$Transaction view has the current transaction datetime,
regardless of the time the user logged in.
Note: Access to the V_$TRANSACTION view was built into the
procedure to tune performance with refreshing operations;
however, third party functions could impact performance with
database refresh operations that use an older time in the
V_$TRANSACTION view.
To grant access to this view, connect to Oracle as SYS. Run the RUN_AS_SYS.SQL script
located in the \Database\scripts\common folder of the P6 EPPM physical media or
download, or run the following GRANT statement:
grant select on v_$transaction to admuser;
Gather statistics for cost-based optimization:
Oracle 10g and later supports only cost-based optimization, which relies on accurate
statistics to determine the optimal access path for a query. To gather the appropriate
statistics for the optimizer, which will improve database performance, run the
GATHER_STATS.SQL script located in the \Database\scripts\common folder of the P6
EPPM physical media or download.

Database Administration
35
Safe Deletes
The P6 EPPM database normally handles restoring select deleted data using a safe
delete setting. While using P6 Professional, the Undo command (Edit, Undo) allows users
to restore certain types of data that have been deleted. Deleted data remains in the P6
EPPM database until the CLEANUP_LOGICAL_DELETES procedure clears it (after 5 days,
by default).
See the P6 Professional Help for more information about using undo.
Turning Off Safe Deletes
You can turn off safe deletes to save storage space. Turning off safe deletes disables
undo functionality and instantly clears deleted data from the P6 EPPM database.
To turn off safe deletes:
1) Verify the current state of your safe deletes setting. In the database, if the table
ADMIN_CONFIG has the following row, a CONFIG_VALUE of 'N' means turn off safe
deletes.
CONFIG_NAME = 'SAFEDELETE.ACTIVE' and CONFIG_TYPE = 'SETTINGS'
Note: This is only loaded at startup. If you change CONFIG_VALUE
while a user is running P6 Professional, the setting will not apply until
the user restarts the P6 Professional session.
2) Once you have determined the current state of your safe deletes setting, run one of
the following statements.
To turn off safe deletes for the first time:
INSERT INTO ADMIN_CONFIG (CONFIG_NAME, CONFIG_TYPE, CONFIG_VALUE)
VALUES ('SAFEDELETE.ACTIVE', 'SETTINGS', 'N')
To turn on safe deletes after it has been turned off:
UPDATE ADMIN_CONFIG SET CONFIG_VALUE = 'Y' WHERE CONFIG_NAME =
'SAFEDELETE.ACTIVE' AND CONFIG_TYPE = 'SETTINGS'
To turn off safe deletes after it has been turned on:
UPDATE ADMIN_CONFIG SET CONFIG_VALUE = 'N' WHERE CONFIG_NAME =
'SAFEDELETE.ACTIVE' AND CONFIG_TYPE = 'SETTINGS'

Manually Installing the P6 EPPM Microsoft SQL Server Database
36
PRMAUDIT Auditing
PRMAUDIT auditing permits you to log the edits, additions, and deletions made by users
of P6 EPPM applications. When users make changes, they create a Data Manipulation
Language (DML) INSERT, UPDATE, or DELETE statement. PRMAUDIT auditing uses the Data
Manipulation Language (DML) INSERT, UPDATE, or DELETE statement being executed
against tables in the database schema. Since every application table in the schema has
its own auditing trigger, you can log changes made to each table regardless of who
made the change or when the change was made. The database schema owner owns
the auditing trigger: you can bypass trigger execution.
Auditing Level Configuration
You can adjust the amount of information that is logged by adjusting the audit level for
each table. You can refine the audit further by setting the audit level individually for
insert, updates, and deletes within each table.
Auditing Levels
Level Description
Level 0 No audit.
Level 1 Row-level audit. Audit only the operation without column
details
Level 2 Column-level Audit without blobs. Audit changes to the
data at the column level but without blob changes
Level 3 Full Audit. Audit changes to the data at the column level.
For Microsoft SQL server, column level changes to blobs are
not included.
Simple Configuration
You can use two configuration procedures to provide simple control of the auditing
feature:
auditing_enable(table_name, level)
auditing_disable(table_name)
You can set the audit level on an individual table or the same audit level for all of the
tables. However, the simple configuration procedures do not allow for setting individual
auditing levels for insert, update, or delete operations within a table.

Database Administration
37
Detailed Configuration
You can configure auditing trigger behavior by changing values in the settings table that
enable or disable:
The auditing feature itself
The auditing of specific tables
The auditing of table insert, update, or delete operations within each table
Auditing Status
You can enable or disable the auditing feature by using the database.audit.Enable
setting. Use the settings_write_bool procedure to enable/disable the auditing feature.
Microsoft SQL Server Example:
To enable the auditing feature in Microsoft SQL Server, use the following code:
exec settings_write_bool 1,'database.audit','Enabled'
Options Setting
Each table's auditing settings are controlled by the Options setting in each table's
auditing namespace (for example, database.audit.TASK). The Options setting is a three
character string with a numeric value in each character position representing the audit
level for insert, update, and delete.
Auditing Level Options Setting by Table Operation
Operation
Insert Update Delete Description
Level
0 0 0 No audit.
1 1 1 Row-level audit. Audit only
the operation without
column details.
2 2 2 Column-level audit without
blobs. Audit changes to the
data at the column level but
without blob changes.
3 3 3 Full Audit. Audit changes to
the data at the column level.
For Microsoft SQL server,
column level changes to
blobs are not included.

Manually Installing the P6 EPPM Microsoft SQL Server Database
38
The following table provides some examples of the options setting:
Setting the Auditing Level Options Setting by Table Operation Examples
Namespace Setting Value Description
database.audit.TASK
Options
330 Fully audit any
insert and update
operations. Do not
audit any delete
operations.
database.audit.PROJWBS 001 Row-level audit on
deletes only.
database.audit.TASKRSRC 333 Fully audit.
SETTINGS_WRITE_STRING Procedure
You can change table audit settings using the settings_write_string procedure.
Microsoft SQL Server Example:
To set the table settings to fully audit insert and update operations but ignore any delete
operations, use the following code for Microsoft SQL Server:
exec settings_write_string '330','database.audit.TASK','Options'
Note: Changes to auditing settings will not appear immediately in
the application. The program will need to close the database
connection and then reconnect to the database to get the new
settings.
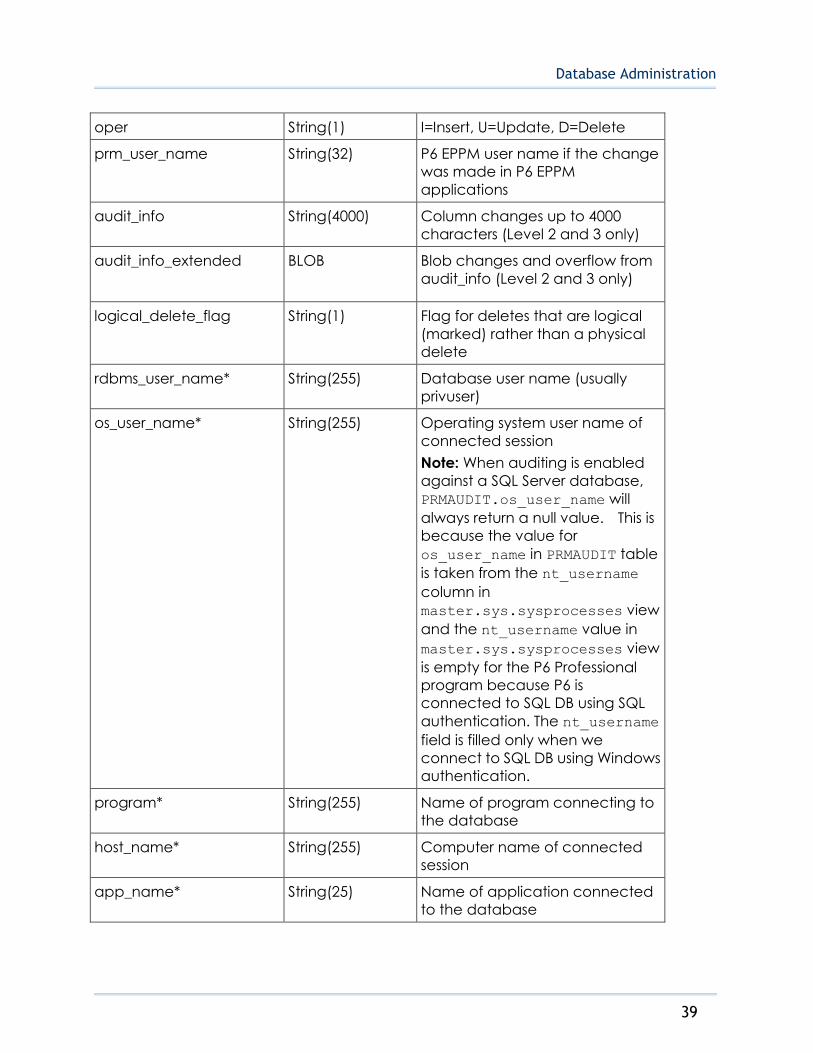
The Audit Table
Audit records are inserted into the PRMAUDIT table. One record is inserted into the audit
table for each row changed in the database.
PRMAUDIT Table
Column Type Description
audit_date Date Date and time of change
table_name String(30) Table Name
pk1, pk2, pk3, pk4 String(255) Primary key values for audited
record
Database Administration
39
oper String(1) I=Insert, U=Update, D=Delete
prm_user_name String(32) P6 EPPM user name if the change
was made in P6 EPPM
applications
audit_info String(4000) Column changes up to 4000
characters (Level 2 and 3 only)
audit_info_extended BLOB Blob changes and overflow from
audit_info (Level 2 and 3 only)
logical_delete_flag String(1) Flag for deletes that are logical
(marked) rather than a physical
delete
rdbms_user_name* String(255) Database user name (usually
privuser)
os_user_name* String(255) Operating system user name of
connected session
Note: When auditing is enabled
against a SQL Server database,
PRMAUDIT.os_user_name will
always return a null value. This is
because the value for
os_user_name in PRMAUDIT table
is taken from the nt_username
column in
master.sys.sysprocesses view
and the nt_username value in
master.sys.sysprocesses view
is empty for the P6 Professional
program because P6 is
connected to SQL DB using SQL
authentication. The nt_username
field is filled only when we
connect to SQL DB using Windows
authentication.
program* String(255) Name of program connecting to
the database
host_name* String(255) Computer name of connected
session
app_name* String(25) Name of application connected
to the database
Manually Installing the P6 EPPM Microsoft SQL Server Database
40
netaddress* String(24) IP or MAC address of connected
session
Note: Grant select privileges to the administrative user on
V_$SESSION to ensure correct values for several auditing table
values.
Session Auditing
Activity for the USESSION table is audited with its own trigger and table. When an
application user logs out of the system they logically delete, or mark, their session record
in the USESSION table. One record is written to the USESSAUD table for each logout. The
format of the USESSAUD table mirrors that of the USESSION table. This audit can be
enabled using the usessaud_enable procedure and disabled using the usessaud_disable
procedure.
Column Audit Data
The data changes for each audit are stored in the audit_info and audit_info_extended
columns. The audit_info column contains all the row changes as long as they do not
exceed 4000 characters. Changes over 4000 characters or any edit to a blob will be
written to the audit_info_extended BLOB column.
Data in the two audit_info columns has a specific format. Each column audit within the
data begins with either ":O" (old data) or ":N" (new data) to distinguish between the audit
of the previous (old) or the changed (new) value (for BLOB columns the data starts with
:BLOBO or :BLOBN). Directly after this is the name of the column in lowercase. Following
the column name is the length of the audited value in a fixed four character field. Finally
the actual data is placed in the audit record. Updates will have both an old and new
value for each change. Inserts will have only a new value and deletes only an old value.
The following is an example of the audit record for TASK to change the task_code from
'A1010' to 'B102:'
audit_info =>:Otask_code: 5:A1010:Ntask_code: 4:B102
Using the Data Pump Utility
The data pump utility is a java-based tool that enables you to pump data from one
database to another at its current version only. Data can be pumped from the following
types of databases:
SQL Server to Oracle
Oracle to SQL Server
Oracle to Oracle
Database Administration
41
SQL Server to SQL Server
Depending on the operating system, use the appropriate file to run the data pump utility:
For Windows operating systems, use migrate.bat.
For Linux/Unix operating systems, use migrate.sh.
Use the data pump utility to:
only import data into a newly created database
repair damaged databases to only correct issues with regard to database objects
(such as constraints, views)
Do not use the data pump utility to:
upgrade from one database version to another
import data into an existing database
correct data-specific issues
correct schema related issues. It is not ideal for large databases (10GB+) due to the
performance of the utility. For larger databases, try to manually resolve schema
related issues first whenever possible.
Prerequisite
Running a Schema Validation on the Database (on page 41).
Running a Schema Validation on the Database
The schema validation utility finds missing, extra, and modified schema objects for a P6
database. Depending on the operating system, use the appropriate file to run the
schema validation.
For Windows, run validate.bat
For Linux/Unix systems, run validate.sh
To run the schema validation, proceed as follows.
1) In the software download, locate the utility in the Database Download folder.
2) Edit the utility similar to the following:
@echo off
REM --------------------------------------
REM Run the Primavera Schema Validation Tool
REM --------------------------------------
SET JAR_FILE_DIR=lib
SET JAR_FILE_NAME=dbmt.jar
SET DB_SCHEMA=ppm
Manually Installing the P6 EPPM Microsoft SQL Server Database
42
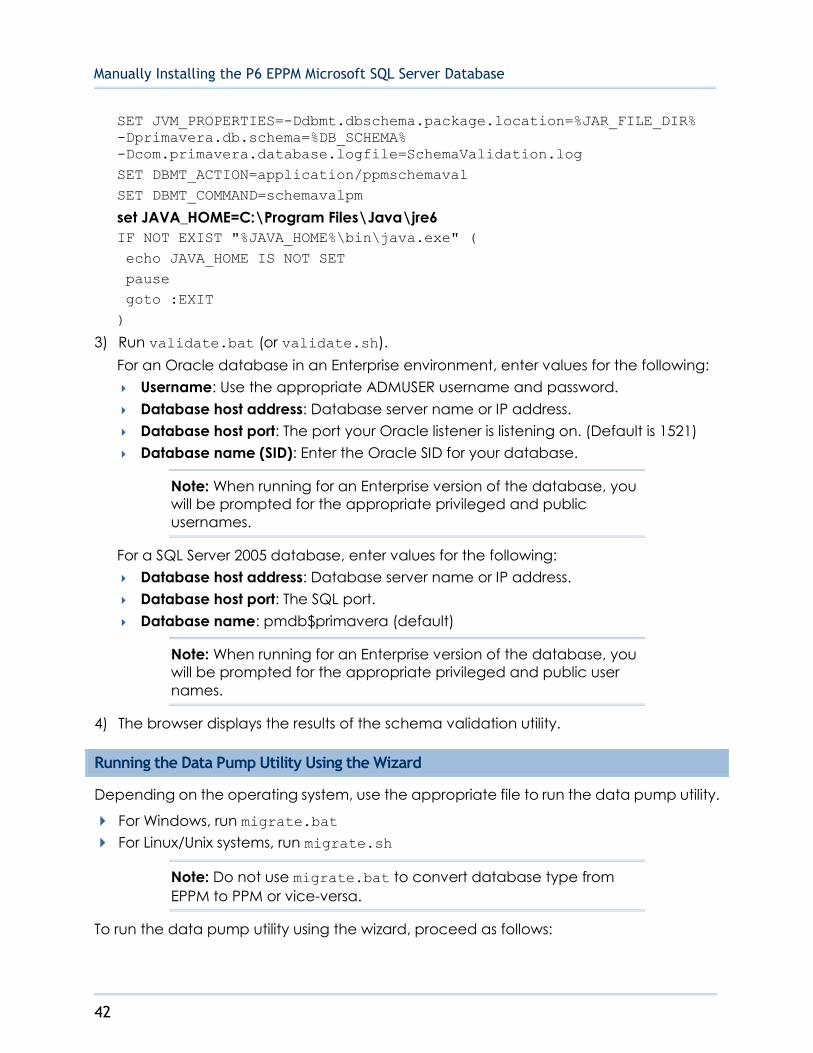
SET JVM_PROPERTIES=-Ddbmt.dbschema.package.location=%JAR_FILE_DIR%
-Dprimavera.db.schema=%DB_SCHEMA%
-Dcom.primavera.database.logfile=SchemaValidation.log
SET DBMT_ACTION=application/ppmschemaval
SET DBMT_COMMAND=schemavalpm
set JAVA_HOME=C:\Program Files\Java\jre6
IF NOT EXIST "%JAVA_HOME%\bin\java.exe" (
echo JAVA_HOME IS NOT SET
pause
goto :EXIT
)
3) Run validate.bat (or validate.sh).
For an Oracle database in an Enterprise environment, enter values for the following:
Username: Use the appropriate ADMUSER username and password.
Database host address: Database server name or IP address.
Database host port: The port your Oracle listener is listening on. (Default is 1521)
Database name (SID): Enter the Oracle SID for your database.
Note: When running for an Enterprise version of the database, you
will be prompted for the appropriate privileged and public
usernames.
For a SQL Server 2005 database, enter values for the following:
Database host address: Database server name or IP address.
Database host port: The SQL port.
Database name: pmdb$primavera (default)
Note: When running for an Enterprise version of the database, you
will be prompted for the appropriate privileged and public user
names.
4) The browser displays the results of the schema validation utility.
Running the Data Pump Utility Using the Wizard
Depending on the operating system, use the appropriate file to run the data pump utility.
For Windows, run migrate.bat
For Linux/Unix systems, run migrate.sh
Note: Do not use migrate.bat to convert database type from
EPPM to PPM or vice-versa.
To run the data pump utility using the wizard, proceed as follows:

Database Administration
43
1) In the \install\database directory, double-click the migrate.bat (or migrate.sh)
utility.
You must launch this utility from within the \install\database directory, because it
has dependencies to other files inside this directory.
2) Follow the prompts on each screen by providing the connection information for the
source and target database being migrated.
Note: When using an Oracle schema, the migration utility will allow
you to create new tables or use existing tables in the target
instance, but new schema users will have to be created through
the migration process. The ability to map to existing schema users is
not currently available through the migration process.
Running the Data Pump Utility From the Command Line
Depending on the operating system, use the appropriate file to run the data pump utility.
For Windows, run migrate.bat
For Linux/Unix, run migrate.sh
Note: Do not use migrate.bat to convert the database type from
EPPM to PPM or vice-versa.
To run the data pump utility from the command line, proceed as follows.
1) Open a new command line console.
2) Change directory to where the utility is located.
3) Enter appropriate parameters to define the migration.
On a Windows Operating System
SQL Server to Oracle Data Migration Syntax
Migrate.bat -source sa/sa@sqlserver:rcgsrv:1433:vader_pmdb -target
system/manager@oracle:rcgsrv:1521:rcg02 -db PM
Oracle to SQL Server Data Migration Syntax
Migrate.bat -source admuser/admuser@oracle:rcgsrv:1521:rcg02
-target sa/sa08@sqlserver:rcgsrv:1433:vader_pmdb -db PM
SQL Server to Oracle Data Migration Syntax Creating Non-Default Oracle Users
Migrate.bat -source sa/sa@sqlserver:rcgsrv:1433:vader_pmdb -target
system/manager@oracle:rcgsrv:1521:rcg02 -db PM -admuser admjeff
-privuser privjeff -pubuser pubjeff
On a Unix/Linux Operating System
SQL Server to Oracle Data Migration Syntax

Manually Installing the P6 EPPM Microsoft SQL Server Database
44
sh migrate.sh -source
sa/sa@sqlserver:saumverm-lap\primavera:1433:PMDB -dattbsp <Name of
data tblspc at target> -ndxtbsp <Name of index tblspc at target>
-pxtbsp <Name of px tblspc at target> -lobtbsp <Name of LOB tblspc at
target> -admuser <admuser at target> -admpass <admuser password at
target> -privuser <privuser at target> -privpass <privuser password
at target> -pubuser <pubuser at target> -pubpass <pubuser password at
target> -pxrptuser <pxrptuser at target> -pxrptpass <pxrptuser
password at target> -bgjobuser <bgjobuser at target> -bgjobpass
<bgjobuser password at target> -target
system/admin@oracle:oldb-orcl:1521:PMDB
For example,
sh migrate.sh -source
sa/sa@sqlserver:saumverm-lap\primavera:1433:PMDB -dattbsp PMDB_DAT1
-ndxtbsp PMDB_NDX1 -pxtbsp PMDB_PX_DAT1 -lobtbsp PMDB_LOB1 -admuser
admuser -admpass admuser -privuser privuser -privpass privuser
-pubuser pubuser -pubpass pubuser -pxrptuser pxrptuser -pxrptpass
pxrptuser -bgjobuser bgjobuser -bgjobpass bgjobuser -target
system/admin@oracle:oldb-orcl:1521:PMDB
Oracle to SQL Server Data Migration Syntax
sh migrate.sh -source privuser/privuser@oracle:oldb-orcl:1521:PMDB
-privuser <privuser at target> -privpass <privuser password at target>
-pubuser <pubuser at target> -pubpass <pubuser password at target>
-pxrptuser <pxrptuser at target> -pxrptpass <pxrptuser password at
target> -target sa/sa@sqlserver:jdoe-lap\primavera:1433:PMDB
For example,
sh migrate.sh -source privuser/privuser@oracle:oldb-orcl:1521:TEST
-privuser privuser -privpass privuser -pubuser pubuser -pubpass
pubuser -pxrptuser pxrptuser -pxrptpass pxrptuser -target
sa/Primavera1@sqlserver:jdoe-lap\primavera:1433:test
Run setup.exe in the Primavera P6 Enterprise Project Portfolio Management physical
media or download to install the following P6 EPPM applications:
Note: You do not have to install all applications; you can pick and
choose what you install. However, you must install P6 to run the
other P6 EPPM applications.
P6 (and its help, tutorials, and Oracle Configuration Management (OCM))
P6 Progress Reporter (and its help)
Installing P6 EPPM Applications

For More Information
45
P6 Team Member (includes P6 Team Member Web, P6 Team Member for iOS, E-mail
Statusing Service)
Notes:
You will need to configure E-mail Statusing Service separately.
The installation wizard will provide the E-mail Statusing Service
files and you will use the config.properties file to set up this
service. See the P6 EPPM Post Installation Administrator's Guide.
P6 Team Member for iOS supports SSL (https) only when it has a
certificate signed by a valid authority.
P6 EPPM Web Services
P6 Professional Cloud Connect
For Release 8.3.2, select the P6 Professional Cloud Connect install option if you plan to
use P6 Professional with an EPPM Oracle database on the cloud by connecting to a
remote service. The wizard sets up a remote method of access to connect to the
EPPM database and the P6 APIs. For more details on establishing the P6 Professional
Cloud Connect database connection in P6 Professional, see the P6 Professional for
EPPM Installation and Configuration Guide.
Note: The wizard will also install P6 Integration API (in remote mode)
by default.
P6 Integration API (remote mode only)
Note: Oracle provides a separate installer for P6 Integration API
local mode. See the P6 Integration API Configuration Guide.
Based on whether you are installing or upgrading, see one of the following books:
Installing and Configuring P6 EPPM
Upgrading and Configuring P6 EPPM
For More Information


47
Where to Get Documentation
For the most up-to-date versions of all manuals and technical documents related to
installing, administering, and using P6 EPPM, go to:
http://download.oracle.com/docs/cd/E29618_01/index.htm
Most documentation assumes a standard setup of the product, with full access rights to
all features and functions.
You can also access the versions of the product manuals and technical documents that
were available at the time of the release from the Documentation Library by clicking
index.htm in the Documentation folder of the physical media or download.
The following table describes the core documents available for P6 EPPM and lists the
recommended readers by role. P6 EPPM roles are described in the Planning Your P6
EPPM Implementation guide.
Title Description
What's New in P6 EPPM Highlights the new and enhanced features included in
this release.
You can also use the P6 EPPM Cumulative Feature
Overview Tool to identify the features that have been
added since a specific release level.
All users should read this guide.
Planning Your P6 EPPM
Implementation
Explains planning your implementation, provides an
installation process overview, frequently asked
questions, client and server requirements, and security
information.
The P6 EPPM network administrator/database
administrator and P6 administrator should read this
guide.
P6 EPPM Installation
and Configuration
Guide
Explains how to install and configure the P6 EPPM using
the P6 EPPM Installation and Configuration wizards.
The P6 EPPM network administrator/database
administrator and P6 administrator should read this
guide.
P6 EPPM Installation
and Manual
Configuration Guide
Explains how to install and configure the P6 EPPM using
the P6 EPPM Installation wizards, and how to manually
configure individual components.
The P6 EPPM network administrator/database
administrator and P6 administrator should read this
guide.
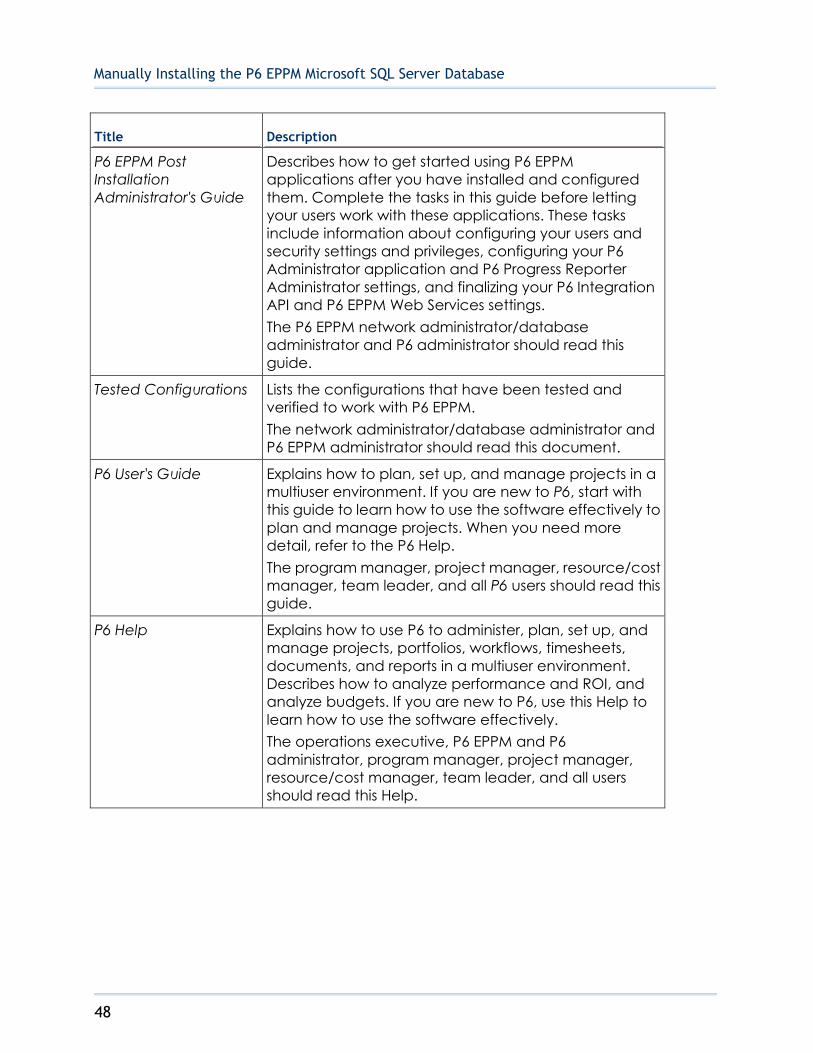
Manually Installing the P6 EPPM Microsoft SQL Server Database
48
Title Description
P6 EPPM Post
Installation
Administrator's Guide
Describes how to get started using P6 EPPM
applications after you have installed and configured
them. Complete the tasks in this guide before letting
your users work with these applications. These tasks
include information about configuring your users and
security settings and privileges, configuring your P6
Administrator application and P6 Progress Reporter
Administrator settings, and finalizing your P6 Integration
API and P6 EPPM Web Services settings.
The P6 EPPM network administrator/database
administrator and P6 administrator should read this
guide.
Tested Configurations Lists the configurations that have been tested and
verified to work with P6 EPPM.
The network administrator/database administrator and
P6 EPPM administrator should read this document.
P6 User's Guide Explains how to plan, set up, and manage projects in a
multiuser environment. If you are new to P6, start with
this guide to learn how to use the software effectively to
plan and manage projects. When you need more
detail, refer to the P6 Help.
The program manager, project manager, resource/cost
manager, team leader, and all P6 users should read this
guide.
P6 Help Explains how to use P6 to administer, plan, set up, and
manage projects, portfolios, workflows, timesheets,
documents, and reports in a multiuser environment.
Describes how to analyze performance and ROI, and
analyze budgets. If you are new to P6, use this Help to
learn how to use the software effectively.
The operations executive, P6 EPPM and P6
administrator, program manager, project manager,
resource/cost manager, team leader, and all users
should read this Help.

For More Information
49
Title Description
P6 Professional Help Explains how to use P6 Professional for EPPM to plan, set
up, and manage projects in a multiuser environment. If
you are new to P6 Professional, use this Help to learn
how to use the software effectively to plan and
manage projects.
The P6 Professional administrator, program manager,
project manager, resource/cost manager, and team
leader should read this Help.
P6 Data Dictionary Defines fields used in P6.
All P6 users should refer to this guide if they need a field
definition.
P6 Team Member
User's Guide
Explains how to status activities using P6 Team Member
interfaces, which are the P6 Team Member for iOS and
P6 Team Member for Android apps, P6 Team Member
Web, and E-mail Statusing Service.
All users of the P6 Team Member interfaces should read
this guide.
P6 Team Member Web
Help
Describes how to use P6 Team Member Web to provide
status on activities.
P6 Team Member Web users should read this Help.
P6 Progress Reporter
Administrator Help
Describes how to enter database connection
information for the P6 Progress Reporter server and
modify P6 Progress Reporter server and application
settings.
The P6 EPPM network administrator/database
administrator should read this Help.
P6 Progress Reporter
Help
Describes how to use P6 Progress Reporter to enter and
update time spent on assignments.
Team members using P6 Progress Reporter should read
this Help.
P6 Progress Reporter
User's Guide
Explains how to report work time and provide status on
assigned activities using P6 Progress Reporter.
Team members using P6 Progress Reporter should read
this guide.
Primavera P6 Visualizer
Help
Describes how to create, modify, and manage
Timescaled Logic Diagrams and Gantt charts. The
Visualizer application can connect to a P6 Professional
or EPPM database. Visualizer can only be installed via

Manually Installing the P6 EPPM Microsoft SQL Server Database
50
Title Description
the P6 Professional setup, but you can run Visualizer
without P6 Professional installed.
All users should read this Help if your organization uses
Primavera P6 Visualizer.
P6 EPPM Web Services
Programmer’s Guide
Describes how to invoke, use, and troubleshoot the
available services and operations within supported
environments. When you need specific information
about the services and operations available, refer to
the P6 EPPM Web Services Reference Manual.
Anyone who wants to develop applications which
interact with P6 should read this guide.
P6 EPPM Web Services
Reference Manual
Describes all services and operations available in P6
EPPM Web Services.
Anyone who wants to develop applications which
interact with P6 should read this guide.
P3 to P6 EPPM
Migration Guide
Provides best practices for migrating your P3 data to P6
EPPM, and details how P3 functionality maps to P6 EPPM
functionality.
All administrators should read this guide if your
organization is moving from P3 to P6.
Distributing Information to the Team
You can copy the online documentation to a network drive for access by project
participants. Team members can then view or print those portions that specifically relate
to their roles in the organization.
Throughout this documentation, the Security Guidance icon helps you to quickly
identify security-related content to consider during the installation and configuration
process.
Where to Get Training
To access comprehensive training for all Primavera products, go to:
http://education.oracle.com

For More Information
51
Oracle Learning Library
The Oracle Learning Library (OLL) provides online learning content covering Primavera
products. Content includes videos, tutorials, articles, demos, step-by-step instructions to
accomplish specific tasks, and self-paced interactive learning modules.
To access the learning library’s Primavera content, go to:
http://www.oracle.com/goto/oll
Where to Get Support
If you have a question about using Oracle products that you or your network
administrator cannot resolve with information in the documentation or help, click
http://support.oracle.com/. This page provides the latest information on contacting
Oracle Global Customer Support, knowledge articles, and the support renewals process.
For more information about working with Support, visit
https://support.oracle.com/epmos/faces/DocumentDisplay?id=888813.2 to view
Support Tools & Tips.
The following knowledge articles are a good place to start your research because they
link to the most frequently referenced articles about P6 EPPM
Primavera Product Master Notes [ID 1489367.1]
Master Note For Primavera P6 Common Application Questions Or Issues [ID 1292929.1]
P6 EPPM integrates with different Oracle applications; when you create a Service
Request, be sure to open the request with the proper Support team. To ensure you reach
the proper Support team, enter the correct product information when you create the
Service Request. Each product has its own support line.
Use the Primavera P6 EPPM support line when you are having installation,
configuration, or connection issues related to P6 EPPM.
Use one of the following support lines when you are having installation or
configuration issues that do not relate to P6 EPPM.
Oracle WebLogic Server
Oracle Database Server
BI Publisher
BPM
Oracle Webcenter Content Core Capabilities (formerly Universal Content
Management)
Oracle Enterprise Manager
Oracle Access Manager
Oracle AutoVue

Manually Installing the P6 EPPM Microsoft SQL Server Database
52
Access to Oracle Support
Oracle customers have access to electronic support through My Oracle Support. For
information, visit http://www.oracle.com/us/support/contact-068555.html or visit
http://www.oracle.com/us/corporate/accessibility/support/index.html if you are hearing
impaired.
Using Primavera's Support Resource Centers
Primavera’s Support Resource Center provides links to important support and product
information. Primavera's Product Information Centers (PICs) organize documents found
on My Oracle Support (MOS), providing quick access to product and version specific
information such as important knowledge documents, Release Value Propositions, and
Oracle University training. PICs also offer documentation on Lifetime Management, from
planning to installs, upgrades, and maintenance.
Visit https://support.oracle.com/epmos/faces/DocumentDisplay?id=1486951.1 to
access links to all of the current PICs.
PICs also provide access to:
Communities which are moderated by Oracle providing a place for collaboration
among industry peers to share best practices.
News from our development and strategy groups.
Education via a list of available Primavera product trainings through Oracle
University. The Oracle Advisor Webcast program brings interactive expertise straight
to the desktop using Oracle Web Conferencing technology. This capability brings you
and Oracle experts together to access information about support services, products,
technologies, best practices, and more.

53
Oracle Primavera Manually Installing the P6 EPPM Microsoft SQL Server Database
Copyright © 1999, 2014, Oracle and/or its affiliates. All rights reserved.
Oracle and Java are registered trademarks of Oracle and/or its affiliates. Other names
may be trademarks of their respective owners.
This software and related documentation are provided under a license agreement
containing restrictions on use and disclosure and are protected by intellectual property
laws. Except as expressly permitted in your license agreement or allowed by law, you
may not use, copy, reproduce, translate, broadcast, modify, license, transmit, distribute,
exhibit, perform, publish or display any part, in any form, or by any means. Reverse
engineering, disassembly, or decompilation of this software, unless required by law for
interoperability, is prohibited.
The information contained herein is subject to change without notice and is not
warranted to be error-free. If you find any errors, please report them to us in writing.
If this is software or related documentation that is delivered to the U.S. Government or
anyone licensing it on behalf of the U.S. Government, the following notice is applicable:
U.S. GOVERNMENT END USERS: Oracle programs, including any operating system,
integrated software, any programs installed on the hardware, and/or documentation,
delivered to U.S. Government end users are “commercial computer software" pursuant
to the applicable Federal Acquisition Regulation and agency-specific supplemental
regulations. As such, use, duplication, disclosure, modification, and adaptation of the
programs, including any operating system, integrated software, any programs installed
on the hardware, and/or documentation, shall be subject to license terms and license
restrictions applicable to the programs. No other rights are granted to the U.S.
Government.
This software or hardware is developed for general use in a variety of information
management applications. It is not developed or intended for use in any inherently
dangerous applications, including applications that may create a risk of personal injury. If
you use this software or hardware in dangerous applications, then you shall be
responsible to take all appropriate failsafe, backup, redundancy, and other measures to
ensure its safe use. Oracle Corporation and its affiliates disclaim any liability for any
damages caused by use of this software or hardware in dangerous applications.
This software or hardware and documentation may provide access to or information on
content, products and services from third-parties. Oracle Corporation and its affiliates
are not responsible for and expressly disclaim all warranties of any kind with respect to
third-party content, products, and services. Oracle Corporation and its affiliates will not
be responsible for any loss, costs, or damages incurred due to your access to or use of
third-party content, products, or services.
Legal Notices

Manually Installing the P6 EPPM Microsoft SQL Server Database
54