manal for gate valve - dembla.com
TRANSCRIPT

Instruction Manaul
9Sep
2015
Instruction ManaulWedge Gate Valve Wedge Gate Valve
Series- GTV - 01Series- GTV - 01
Aiming At PerfectionMore Info - www.dembla.com
Installation Operation
Maintenance
Installation Operation
Maintenance
CONTENTS PAGE NO.
2
1.1 Scope of Instruction Manual 2
1.2 Copyright and Modification Rights Reservation 2
2
2
3
7
6
6
6
5
5
555
5
1.0 Foreword
2.0 Storage & Preservation
4.0 Health & Safety
6.0 Lifting Details
7.0 Operation, Inspection & maintenance
8.0 Disassembly
9.0 Reassembly
10.0 Flow Direction
11.0 Do’s and Dont’s
12.0 Recommended Spares
13.0 Part Illustrated
7.1 Operation7.2 Periodic Inspection and Maintenance 7.3 Lubrication
2
3.0 Valve Marking
4
5.0 Unpacking
1

2
1.0 Foreword1.1 Scope of Instruction Manual:This Instruction Manual covers information regarding Installation and Maintenance of Dembla's Wedge Gate Valve
1.2 Copyrights and Modification Rights Reservation:Dembla Valves Ltd. retains the Copyright on the contents of this Instruction Manual. The Total content of this Instruction Manual described here corresponds to the Information during preparation of the Instruction Manual. It is user's responsibility to refer the latest version. All data, specifications and Illustrations here are subjected to Technical Modifications and improvements and hence Modification can be done by us at any time without any prior notice. No claim to Modification or repair of these Valves, which have already been supplied by us, can be made.
2.0 Storage & Preservation:All Valves are dispatched in the closed/open position as ordered and it is recommended that they are left in this position during storage. All protective packing should remain in position until the Valve is to be installed. Valve should be stored in a clean and dry environment, without disturbing company setting. Protect it from shock & lifting damage.
If hoisting the Valve, use a nylon sling to protect the surface. Also, take care to prevent people from being injured in case the hoist or rigging slips unexpectedly. For Valve Weight refer Valve Packing Slip.
3.0 Valve Marking1) Valve name plate attached on Valve by riveting carrying all Valve Identification Information.2) Markings like Valve Size, Rating, Material etc. are as cast on valve Bodies.3) Valve Serial no. punched on Valve Body Flange for Valve Traceability.
4.0 Health & Safety :
1) Before attending to Valve Installation/Maintenance, the Instruction Manual must be compulsorily read and understood properly.
2) Valve must be operated by qualified personnel.
3) Ensure that the operator handling these Valves must follow Safety and Accident Prevention Rules and Regulations.
4) Follow the Safety Instructions before Installation, Maintenance or removing the Valve.
5) Always wear protective gloves, clothing and eyewear when performing any Installation operations to avoid personal injury.
6) All Safety Messages such as Cautions, Warnings and Notes are highlighted in this Instruction Manual which must be strictly followed to avoid any possibility of arising danger / risk of damage to the equipment / person's life.
7) No Liability on Manufacturer for any wrong handling, improper commissioning and wrong assembly.
8) Line must be fully drained and de-pressurized before Installation or maintenance of Valve.
! Caution

9) Never handle Valves that have been used on harmful substances unless they have been completely decontaminated and certified safe to handle.
10) If the processes or environments that the products are used in are likely to cause temperature (high or low) that may cause injury to person if touched, then adequate insulation / protection must be fitted. It is recommended that the insulation allows easy access for maintenance, to the sealant fittings , and to the Valve operator.
11) Valve must be protected from earthquake loading, traffic & wind.
12) No Modification / Conversions are allowed without written authorization from Dembla Valves Ltd.
5.0 Unpacking :For Carton .Keep Carton in position (Carton ‘up side’ should not be ‘down’). .Cut plastic strip properly which is tied around Carton & remove it. (White in color). .Cut cello tape properly which is stuck on Carton opening. .Open Carton properly. .Remove foam properly along with polythene wrapping. .Lift the valve properly & keep on clean & dry place
For Wooden Box:.Keep Wooden Box in Position (’upside’ of Wooden Box should not ‘down’)..Cut iron strip properly which is tied around Wooden Box & remove it..Remove nail properly from top cover with proper equipment..Loosen and remove Valve fixing nut (from inside of Box)..Lift the valve properly as shown in figure 1.
! Warning
3

6.0 Lifting Details :.Valve should be lifted by using chain.or bearer cables that are looped around.the valve body as shown in figure 1.(Take care valve should not damage while handing).
4
FIG.1

7.0 Operation, Inspection & Maintenance7.1 Operationa) Flush the pipeline carefully when valve is mounted to remove all possible impurities. Before flushing keep the valve fully open. b) Valve should be opened & closed slowly to avoid any hammering effect on the valve as well as pipeline also. c) Valve should be used in accordance with the pressure & temperature chart.
7.2 Periodic Inspection and maintenancea) Annual inspection should be made to check up valve body, Disc, & Stem if worn or pitted, substitute new oneb) It is recommended to be replace seat , body gasket stem packing washers unless the parts in good condition .
7.3 LubricationWhen the lube fitting are provided, valve should be lubricated periodically. Stem threads must be brushed with the lubricants to avoid damage and excessive torque from developing .Valve should never be operated without lubricated stem tread or yoke sleeves.
8.0 Disassembly1) For disassembly hold the valve properly.2) Loosen & remove handwheel lock nut.3) Remove handwheel.4) Loosen & remove the lock nut.5) Loosen and remove stem nut.6) Loosen and remove nuts from (gland packing)eye bolts.7) Remove the gland flange from the stem.( Gland flange assembly for handwheel)8) Remove the gland bush.9) loosen and remove nuts. (Body to bonnet)10)Lift bonnet along with stem & wedge.11) Remove the stem from bonnet along with the wedge.12) Remove the gasket from body.
Note :- 1) Always use new gasket for assembly. 2) Keep all parts clean and dry place.3) Replace damage parts for assembly.4) Make sure wedge lapped surface should not be damage while handling. (Caused Leakage and keep on non metallic surface.)
9.0 Reassembly1) Hold valve body properly.2) Insert gasket in valve body.3) Hold bonnet properly.4) Insert the new gland packing in bonnet. ( If required)5) Insert stem along with the wedge in bonnet properly. ( Make sure gland packing should not damage form stem threads )6) Insert the gland bush is the gland packing .7) Remove the hold from bonnet & put this bonnet along with the stem & wedge on valve body. Make sure wedge should be properly insert in body with maintaining the position of seat refer figure 2 . 8) Bolt the bonnet properly with the help of stud and nut.(Stud &nut tighten slightly full tighten done after total assembly.)9) Insert the gland flange. ( Gland flange assembly for handwheel)10) Insert and tighten the gland or eye bolts nuts properly.11) Insert stem nut properly as shown in figure 2.12) Insert the lock nut on stem nut and lock the stem nut.
5

13) Insert the handwheel on stem nut and lock with the help of handwheel lock nut. refer figure 2 . 14) Operate the valve for open and close properly .15) Tighten the nut body to bonnet fully.
Note :- 1) Tighten the body stud properly to avoid any joint leak from body to bonnet refer cause no 82) Gland packing are provided to avoid to leakage trough the stem . When leakage is detected in from the gland area while the valve is being in services, the gland should immediately retightened tighten the gland slowly and gradually until the leakage stops. While rotating the valve handwheel do not over tighten the packing . Even through valve are provided with back seating feature, its not recommended to change the packing with line pressure. 3) Use two spanners to tighten the joint in sequence as shown .
10.0 Flow DirectionVerify that the direction of the flow in the line corresponds to the arrow indicated on the valve body . However standard valves are bidirectional.
11.0 DO’s and DONT’SDo’s A) Pipe Work
ParallelB) Use the valve within pressure & temperature limits.
DON'T’SA) Pipe Work
B) Do not use the valve for the higher pressure & temperature than maximum limits
12.0Recommended Spares Each body -bonnet assembly is assigned with serial number, which can be found on the valve flange OD . Ordering spares please do not miss to the valve sr. no. Prefix V-12345.........It is recommended to stock the following part as spor are fcommission and routine service.
6
Part NameSr. No. Recommended Quantity
Seat
Body Gasket
Hinge Pin
Seat Ring
One for Every ten Identical
One for Every ten Identical
One for Every ten Identical
Two for Every ten Identical
1
2
3
4
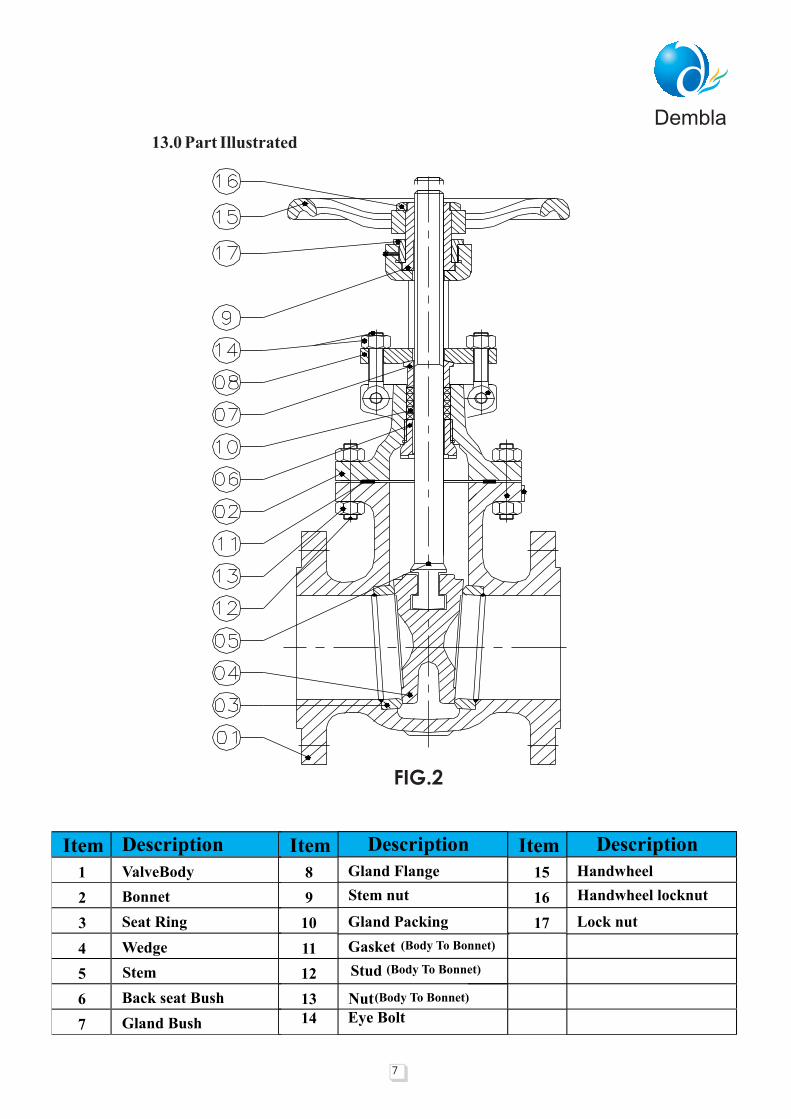
13.0 Part Illustrated
Item Item ItemDescription Description Description
1 8 15 ValveBody
2 9 16Bonnet
3 10 17Seat Ring
4 11Wedge
5 12Stem
6 1314
Back seat Bush
7 Gland Bush
Gland Flange Handwheel
Stem nut Handwheel locknut
Gland Packing
Eye Bolt
Lock nut
Gasket (Body To Bonnet)
Nut(Body To Bonnet)
Stud (Body To Bonnet)
7
FIG.2

Note: While ordering spares, please do not miss to indicate 'Valve Serial No.' appearing on nameplate
fixed on the Actuator Valve Serial No. also appears on the Valve Body dully punched. The valve serial
no. Begins with prefix V, eg V - 12345………
The contents of this publication are presented for informational purposes only, and while every effort has
been made to ensure their accuracy. They are not to be construed as warranties or guarantees, express or
implied, regarding the products or services described herein or their use or applicability. We reserve the
right to modify or improve the designs or specifications of such products at any time without notice.
Dembla does not assume responsibility for the selection, use or maintenance of any product.
Responsibility for proper selection, use and maintenance of any Dembla product remains solely with the
purchaser and end-user.
DemblaSales Office: Works:M/S. Dembla Valves Ltd.C-30, Jai Matadi Compound, KalherVillage,Thane-Bhiwandi-Agra Raod -421302,Maharashtra,India.Tel - +91-9292234790 - 97E-mail - [email protected] info - www.dembla.com
M/S. Dembla Valves Ltd.A/8, Arahm Logistic, Valshind Village,Mumbai -Nashik Highway (NH3),BhiwandiThane - 421302. Maharashtra (India)
Note : After the complete use of valve dispose the valve as per your local laws.