mainstage 2 user manual - apple inc.documentation.apple.com/en/mainstage/usermanual/mainstage 2...
TRANSCRIPT
MainStage 2User Manual
Copyright © 2009 Apple Inc. All rights reserved.
Your rights to the software are governed by theaccompanying software license agreement. The owner orauthorized user of a valid copy of Logic Studio softwaremay reproduce this publication for the purpose of learningto use such software. No part of this publication may bereproduced or transmitted for commercial purposes, suchas selling copies of this publication or for providing paidfor support services.
The Apple logo is a trademark of Apple Inc., registered inthe U.S. and other countries. Use of the “keyboard” Applelogo (Shift-Option-K) for commercial purposes withoutthe prior written consent of Apple may constitutetrademark infringement and unfair competition in violationof federal and state laws.
Every effort has been made to ensure that the informationin this manual is accurate. Apple is not responsible forprinting or clerical errors.
Note: Because Apple frequently releases new versionsand updates to its system software, applications, andInternet sites, images shown in this manual may be slightlydifferent from what you see on your screen.
Apple1 Infinite LoopCupertino, CA 95014–2084408-996-1010www.apple.com
Apple, the Apple logo, FireWire, GarageBand, Logic,Logic Studio, Mac, MainStage, Ultrabeat, and WaveBurnerare trademarks of Apple Inc., registered in the U.S. andother countries.
Finder is a trademark of Apple Inc.
Intel, Intel Core, and Xeon are trademarks of Intel Corp. inthe U.S. and other countries.
Other company and product names mentioned hereinare trademarks of their respective companies. Mention ofthird-party products is for informational purposes onlyand constitutes neither an endorsement nor arecommendation. Apple assumes no responsibility withregard to the performance or use of these products.
Welcome to MainStage7PrefaceAbout MainStage7About the MainStage Documentation8Additional Resources8
Introducing MainStage11Chapter 1What Is MainStage?11Using MainStage with Keyboard Controllers13Using MainStage with Electric Guitars13Using MainStage with Vocals, Drums, and Other Instruments13How to Use MainStage in Your Music Setup13Using MainStage in Live Performance16
Setting Up Your System17Chapter 2Using MIDI Devices with MainStage17Using Audio Devices with MainStage19Using Effects Plug-ins with MainStage19Using MainStage with Time Machine19
The MainStage Interface21Chapter 3The MainStage Window22Layout Mode23Edit Mode24Perform Mode25Full Screen Mode26Customizing the MainStage Window26
Getting Started with MainStage29Chapter 4Before You Begin29Opening MainStage30Choosing a Concert Template30Selecting Patch Settings in the Patch Library31Adding a Patch32Naming a Patch33
3
Contents
Selecting and Playing Patches33Adding a Channel Strip34Changing a Channel Strip Setting36Learning a Controller Assignment37Mapping a Screen Control39Trying Out Full Screen and Perform Modes39
Working in Edit Mode41Chapter 5Working with Patches in Edit Mode41Working with Channel Strips in Edit Mode48Mapping Screen Controls69Editing Screen Control Parameters in Edit Mode77Working with Sets in Edit Mode81Working at the Set Level83Sharing Patches and Sets Between Concerts84Recording the Audio Output of a Concert85
Working with Concerts87Chapter 6Opening and Closing Concerts88Saving Concerts89How Saving Affects Parameter Values89Setting the Time Signature for a Concert90Using Tempo in a MainStage Concert91Defining the Source for Program Change Messages for a Concert92Setting the Pan Law for a Concert93Changing the Tuning for a Concert93Silencing MIDI Notes93Muting Audio Output94Working at the Concert Level95Controlling the Metronome101
Working in Layout Mode103Chapter 7Modifying the Layout of a Concert104Working with Screen Controls104Assigning Hardware Controls to Screen Controls114Editing Screen Control Parameters116How MainStage Passes Through MIDI Messages121Exporting a Layout122Importing a Layout122Changing the Aspect Ratio of a Layout123
Playing Back Audio in MainStage125Chapter 8Adding a Playback Plug-in125
4 Contents
Using the Playback Plug-in130
Performing Live with MainStage133Chapter 9Before the Performance Starts133Using Full Screen Mode and Perform Mode134Selecting Patches in Performance135Using Screen Controls in Performance136Handling Tempo Changes in Performance137Tips for Performing with Keyboard Controllers137Tips for Performing with Guitars and Other Instruments137Using the Tuner138Using the Playback Plug-in in Performance139Recording Your Performances140After the Performance141Tips for Complex Hardware Setups141
Key Commands143Chapter 10Using the Command Editor143MainStage Default Key Commands143
The Playback Plug-in147Appendix AGetting to Know the Playback Interface148Using the Playback Waveform Display149Using the Playback Transport and Function Buttons150Using the Playback Information Display151Using the Playback Sync, Snap To, and Play From Parameters152Using the Playback Group Functions153Using the Playback Action Menu and File Field154Using the Playback Shortcut Menu155
The Loopback Plug-in157Appendix BGetting to Know the Loopback Interface158Using the Loopback Waveform Display159Using the Loopback Transport and Function Controls159Using the Loopback Information Display160Using the Loopback Sync, Snap To, and Play From Parameters161Using the Loopback Group Functions162Using the Loopback Action Menu163Adding Loopback to a Channel Strip164
Setting MainStage Preferences165Appendix CGeneral Preferences165Audio Preferences166MIDI Preferences168
5Contents

Display Preferences168
Using MainStage Actions169Appendix DTable of Actions169
6 Contents
MainStage turns your computer into a powerful and customizable musical instrumentand effects processor that you can use with your music gear (your instruments,microphones, controllers, and other equipment) in live performance.
This preface covers the following:
• About MainStage (p. 7)
• About the MainStage Documentation (p. 8)
• Additional Resources (p. 8)
About MainStageFor performing musicians, MainStage gives you the power and flexibility of Logic Pro inan application optimized for live performance. Whether you are a keyboard player, guitarist,vocalist, drummer, or play another instrument, you can use MainStage in your liveperformance setup.
Some of the things you can do with MainStage include:
• Create custom sounds using a wide variety of software instruments and effects includedin Logic Studio. You can also use third-party plug-ins, ReWire applications, and externalsound modules.
• Organize your sounds for easy access when you perform.
• Create a visual layout that matches your hardware devices, putting the controls youneed at your fingertips.
• Connect MIDI devices to your MainStage concert so you can control parameters of yoursounds in real time.
• Trigger backing tracks and other audio files while you play.
• Loop your performances to create multitextured, dynamic sound environments.
• Record your performances in real time.
This is only a brief list of what you can do with MainStage. For a more detailed introduction,see Introducing MainStage.
7
Welcome to MainStage
Pref
ace
About the MainStage DocumentationLogic Studio includes several documents that will introduce you to MainStage, help youget started working, and provide detailed information about the features and controlsof MainStage.
• MainStage User Manual: This onscreen manual (the MainStage User Manual) describesthe MainStage interface, commands, and menus, and gives step-by-step instructionsfor creating MainStage concerts and for accomplishing specific tasks. It also includesinformation on setting up your system. It is designed to provide the information youneed to get up to speed quickly so you can make use of the intuitive interface andpowerful features of MainStage.
If you want to start by learning how to set up audio and MIDI hardware to use withMainStage, read Setting Up Your System. If you want to learn about the features andcontrols in the MainStage interface, read The MainStage Interface. If you want to jumpright in and start using the application, skip ahead to Getting Started with MainStage,then read the chapters on Edit mode, working with concerts, and Layout mode. If youwant to read about using MainStage in live performance, turn to Performing Live withMainStage.
• Exploring MainStage: This booklet introduces the basics of MainStage in an easy,approachable way. It aims to get new users up and running with MainStage quickly soyou can have confidence and continue learning at your own pace. Each chapter presentsmajor features and guides you in trying things out. This document is a PDF version ofthe printed Exploring MainStage document included in the Logic Studio package.
• Logic Studio Instruments: This onscreen manual provides comprehensive instructionsfor using the powerful collection of instruments included with Logic Pro and MainStage.
• Logic Studio Effects: This onscreen manual provides comprehensive instructions forusing the powerful collection of effects included with Logic Pro, MainStage, andWaveBurner.
• Logic Studio Working with Apogee Hardware: This onscreen manual describes the useof Apogee hardware with Logic Pro.
Additional ResourcesAlong with the documentation that comes with Logic Studio, there are a variety of otherresources you can use to find out more.
Release Notes and New Features DocumentsEach application offers detailed documentation that covers new or changed features andfunctions. This documentation can be accessed in the following location:
• Click the Release Notes and New Features links in the application Help menu.
8 Preface Welcome to MainStage

MainStage WebsiteFor general information and updates, as well as the latest news on MainStage, go to:
• http://www.apple.com/logicstudio/mainstage
Apple Service and Support WebsitesFor software updates and answers to the most frequently asked questions for all Appleproducts, go to the general Apple Support webpage. You’ll also have access to productspecifications, reference documentation, and Apple and third-party product technicalarticles.
• http://www.apple.com/support
For software updates, documentation, discussion forums, and answers to the mostfrequently asked questions for MainStage, go to:
• http://www.apple.com/support/mainstage
For discussion forums for all Apple products from around the world, where you can searchfor an answer, post your question, or answer other users’ questions, go to:
• http://discussions.apple.com
9Preface Welcome to MainStage

This chapter gives you a conceptual overview of MainStage and describes how you canuse it together with your instruments and other musical equipment when you performlive.
This chapter covers the following:
• What Is MainStage? (p. 11)
• Using MainStage with Keyboard Controllers (p. 13)
• Using MainStage with Electric Guitars (p. 13)
• Using MainStage with Vocals, Drums, and Other Instruments (p. 13)
• How to Use MainStage in Your Music Setup (p. 13)
• Using MainStage in Live Performance (p. 16)
What Is MainStage?MainStage is a music application designed for you to use in live performance. MainStageturns your computer into a powerful multi-instrument and effects processor that you canuse on stage when you perform. Whether you play a keyboard, guitar, another instrument,or sing, you can use MainStage with your instruments, microphones, and MIDI hardwarewhen you perform live.
MainStage lets you use the professional-quality instruments and effects included inLogic Studio in your live performances. You access and modify the instruments and effectsin MainStage using the familiar Logic channel strip interface. If you play a USB or MIDIkeyboard controller, you can play and control a wide variety of software instruments,including pianos and other keyboards, synthesizers, strings, horns, percussion, and more.If you play electric guitar, you can perform using Logic Studio effects setups, includingamp simulation, overdrive, reverb, compression, and more. You can create your owneffects setups and switch between them easily. Vocalists and acoustic musicians can alsouse effects setups with sound input through a microphone.
11
Introducing MainStage 1
MainStage provides a flexible interface for organizing and accessing your sounds inconcerts. Concerts are MainStage documents that hold your sounds—a concert can storeall the sounds you’ll use in an entire performance or a series of performances. In aMainStage concert, individual sounds are stored as patches, and each patch can containone or more channel strips, each with its own instruments and effects. You can addchannel strips, choose channel strip settings, add instruments and effects, and edit theirparameters to customize your sounds. You can even mix channel strips of different typesin a single patch.
You can organize patches in a concert by ordering them in the Patch List and also bygrouping them into sets. Sets are folders where you can store patches you want to keeptogether.
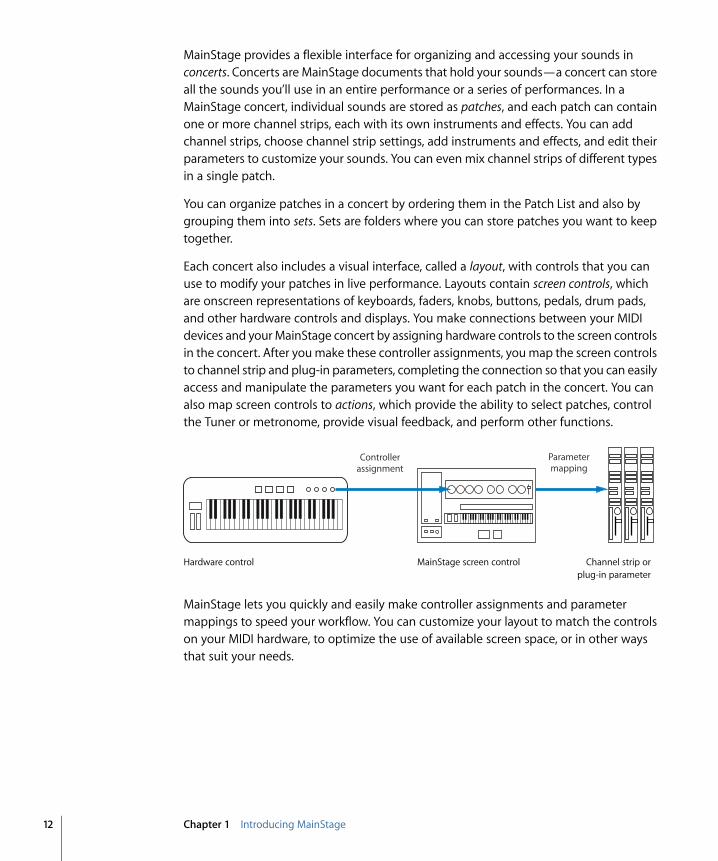
Each concert also includes a visual interface, called a layout, with controls that you canuse to modify your patches in live performance. Layouts contain screen controls, whichare onscreen representations of keyboards, faders, knobs, buttons, pedals, drum pads,and other hardware controls and displays. You make connections between your MIDIdevices and your MainStage concert by assigning hardware controls to the screen controlsin the concert. After you make these controller assignments, you map the screen controlsto channel strip and plug-in parameters, completing the connection so that you can easilyaccess and manipulate the parameters you want for each patch in the concert. You canalso map screen controls to actions, which provide the ability to select patches, controlthe Tuner or metronome, provide visual feedback, and perform other functions.
Parametermapping
MainStage screen control Channel strip or plug-in parameter
Hardware control
Controllerassignment
MainStage lets you quickly and easily make controller assignments and parametermappings to speed your workflow. You can customize your layout to match the controlson your MIDI hardware, to optimize the use of available screen space, or in other waysthat suit your needs.
12 Chapter 1 Introducing MainStage
Using MainStage with Keyboard ControllersIf you perform using a USB or MIDI keyboard controller, you can play and control MainStagepatches with software instruments using your controller. You can assign faders, knobs,buttons, and other controls on the keyboard controller to screen controls in your concert,and then map those screen controls to parameters in your patches. You can chooseexactly the parameters you want to have at your fingertips for each patch and accessthem from your controller as you perform.
You can use MainStage with other MIDI controllers, including sustain pedals, expressionpedals, foot switches, MIDI guitars, and wind controllers that send standard MIDI messages.You can also control external hardware synthesizers, ReWire applications, and other virtualinstruments using external instrument channel strips.
Using MainStage with Electric GuitarsIf you play an electric guitar, you can use MainStage as a powerful, customizablemulti-effects processor. After you connect your instrument to your computer using anaudio interface, you send your guitar’s audio signal to audio channel strips in your patches,where you can add effects including the Amp Designer and Pedalboard plug-ins designedspecifically for use with electric guitar. You can also use EQ, compression, reverb, overdrive,and other Logic Studio effects in your guitar patches. You can control volume, effectblend, or expression with an expression pedal, and use a foot switch to select patcheshands-free when you perform.
Using MainStage with Vocals, Drums, and Other InstrumentsVocalists and acoustic musicians can use MainStage by sending the audio output froma microphone connected to their computer to audio channel strips in their patches. Youcan use MainStage with Core Audio-compatible audio devices, such as audio interfacesand digital mixers, for input from instruments and microphones, and for audio output tospeakers, monitors, a mixing board, or a public address (PA) system. In MainStage, youcan access a wide range of effects in your patches.
Drummers can also use MainStage by sending the audio output from microphones toaudio channel strips in their patches or by using drum pads or a virtual drum kit to controlthe EXS24 mkII sampler, Ultrabeat, and percussion-oriented plug-ins.
How to Use MainStage in Your Music SetupYou can add MainStage to your music equipment setup by following these steps:
13Chapter 1 Introducing MainStage
Stage 1: Creating a Concert from a TemplateYou begin working in MainStage by creating a new concert from a template. MainStageincludes concert templates for keyboard, guitar, and other instruments, making it easyto choose a template suited to your needs. MainStage recognizes many popular MIDIcontrollers and automatically assigns hardware controls on the controller to correspondingscreen controls in the workspace, simplifying hardware setup.
For information about choosing a template to create a concert, see Choosing a ConcertTemplate.
Stage 2: Adding and Editing Patches to Customize Your SoundsAfter you create a concert, you add patches for the sounds you want to play, and editthe patches by adding channel strips, instruments, and effects, and adjusting theirparameters to “dial in” your custom sounds. You edit and organize patches in Edit mode.In Edit mode, your patches are “live” so you can hear the results of your edits instantly.You can select and play patches, choose channel strip settings, and edit channel stripand plug-in parameters. You can quickly define key ranges for channel strips to createkeyboard layers and splits, scale expression and other parameters using transforms, andfilter incoming MIDI messages.
For information about editing patches, see Working with Patches in Edit Mode.
Stage 3: Organizing Your Patches for Easy AccessWhen you open a concert in Edit mode, the patches in the concert appear in the Patch List,where you can select them and start playing. You can edit patch parameters, add channelstrips to existing patches or create new ones, and reorder patches to build your customcollection of sounds to use when you perform.
You can also organize patches in sets for added flexibility. Sets are like folders that canstore groups of patches you want to keep together, which can be useful in several ways.For example, you can store all your favorite lead synth patches in a set or store multiplepatches you intend to use in a single song, and quickly select the patches you want whileperforming. You can also add channel strips at the set level, and have them availablewith every patch in the set.
For information about organizing patches, see Working with Patches in Edit Mode. Forinformation about creating and editing sets, see Working with Sets in Edit Mode.
14 Chapter 1 Introducing MainStage
Stage 4: Customizing the Visual Layout of Your Concert to Match Your HardwareDevicesIn Layout mode, you arrange screen controls in the workspace to create the visual layoutcorresponding to your hardware controls. MainStage features a variety of screen controls,including keyboards, knobs, faders, pitch bend and modulation wheels, foot pedals, drumpads, and more. Also included are screen controls to display parameter and systeminformaton, text and images, and a selector that you can use to view and select patchesor markers while performing.
You can quickly add screen controls to the workspace, and move, resize, and copy themto create your layout. Alignment guides and other tools make it easy to visually arrangescreen controls, and you can customize display color, text labels, and other parametersin the Screen Control Inspector. You can also group controls and arrange the groupedcontrol as a single unit.
For information about working with screen controls in Layout mode, see Working withScreen Controls.
Stage 5: Making Connections Between MainStage and Your Music HardwareIn Layout mode, you connect physical controls on your MIDI hardware to the screencontrols in your concert by assigning the physical controls to the corresponding screencontrols in the workspace. You can move and resize screen controls in the workspaceand customize the display of visual feedback for parameter values and other information.You only need to make hardware controller assignments once for an entire concert,greatly reducing the amount of work required to connect your hardware with yourcomputer.
For information about making hardware assignments, see Assigning Hardware Controlsto Screen Controls.
Stage 6: Mapping Screen Controls to the Parameters You Want to Control inPerformanceEdit mode is where you map screen controls to channel strip parameters. You can mapwhichever parameters you want to modify for each patch to screen controls so they canbe easily manipulated from your hardware when you perform live. You can also mapscreen controls to MainStage actions, such as selecting the next patch you want to play.
For information about mapping screen controls, see Mapping Screen Controls.
You need not follow these steps in a strict order; however, in most cases you will findworking easier if you create your layout before making hardware assignments and makehardware assignments before you map screen controls. If you plan to use one of theexisting concert templates without modifying its layout significantly, you can concentrateon stages 1 to 3 and stage 6.
15Chapter 1 Introducing MainStage
To make setup easier, MainStage divides these tasks into two groups, with separate modesfor each group of tasks. You customize and organize your patches in Edit mode andcustomize your layout and make connections with your hardware in Layout mode. Theadvantage of this division is that it separates tasks you normally perform only once, suchas setting up your layout (the Layout mode tasks), from those you are likely to repeatmore often, such as editing your sounds (the Edit mode tasks).
Using MainStage in Live PerformanceAfter you have created a concert with your custom patches following the steps describedabove, you’re ready to play. When you perform live, you can use your computer as thefinal sound module and effects box in your rig. You can select a patch and start playingit instantly. MainStage switches seamlessly between patches and can sustain notes fromthe previous patch while you start playing the newly selected one. You can view feedbackabout your patches, including names, parameter values, and audio output levels, in realtime. You can also adjust concert-wide effects using auxiliary channels and control otherconcert-wide settings.
MainStage provides two modes optimized for performing live:Perform mode and FullScreen mode. In Perform mode, the workspace fills the MainStage window but lets youretain access to the Finder and to other applications. In Full Screen mode, the workspacefills your entire screen, optimizing available screen space for your onscreen layout. Youcan use whichever mode you prefer.
You can use MainStage with multiple MIDI controllers, microphones, musical instruments,and other music equipment. For time-based effects such as reverb and delay, you canset a pre-defined tempo, use MIDI input for tempo changes, or tap the tempo as youperform.
For tips and other information about using MainStage when you perform live, seePerforming Live with MainStage.
16 Chapter 1 Introducing MainStage
You can use MainStage with a wide variety of MIDI controllers and Core Audio-compliantaudio devices. For basic information about designing and configuring your system,including information about computer requirements, connecting audio and MIDI devices,and configuring your audio hardware, see the “Setting Up Your System” chapter in theLogic Pro User Manual.
Real-time generation and processing of digital audio requires intensive processing byyour computer. If you plan to work on large or complex projects, using a computer witha faster processor and extra random-access memory (RAM) installed can facilitate yourproductivity. Additional RAM is useful particularly when using a large number of effectsplug-ins and when playing sample-based software instruments. It is recommended thatyou do not run other processor- or RAM-intensive applications simultaneously withMainStage, particularly when performing live.
This chapter covers the following:
• Using MIDI Devices with MainStage (p. 17)
• Using Audio Devices with MainStage (p. 19)
• Using Effects Plug-ins with MainStage (p. 19)
• Using MainStage with Time Machine (p. 19)
Using MIDI Devices with MainStageMainStage works with many USB and MIDI keyboard controllers and with other MIDIdevices such as foot pedals and switches. To work with MainStage, MIDI devices mustsend standard MIDI control messages. MainStage receives standard MIDI messages andcan be used to control external MIDI devices using external MIDI instrument channelstrips. For more information about using keyboard controllers and other MIDI devices,see the “Setting Up Your System” chapter in the Logic Pro User Manual.
17
Setting Up Your System 2
Using MIDI Devices That Send Special MIDI Message TypesCertain types of hardware controls such as knobs (rotary controls) and buttons are capableof sending several types of MIDI messages. When you assign these controls to MainStagescreen controls using the Learn process, MainStage analyzes the incoming MIDI data todetermine which type of message the hardware control is sending. In order for MainStageto learn these controls correctly, be sure to turn knobs through their full range of motionand to press buttons exactly three times during the Learn process.
Some MIDI controllers can send nonstandard or proprietary MIDI messages. MainStagecannot process or respond to nonstandard MIDI messages, to “registered” or“non-registered” parameter messages, or to system exclusive (SysEx) messages. MainStagecan process some system real-time messages and MIDI Machine Control (MMC) messageswhen you assign a hardware control that sends these messages to a screen control.
Some devices feature buttons that send program change messages. You can use thesebuttons to send program change messages to MainStage, but you cannot assign themto control other parameters using MainStage screen controls.
Choosing a Controller PresetSome keyboard controllers allow you to choose different presets or “scenes” thatreconfigure the messages sent by the controls on the device. In most cases, you shouldchoose a generic preset that sends standard MIDI messages rather than system exclusivemessages or messages intended for a particular application. After you have assignedhardware controls to screen controls in MainStage, do not change the preset on the MIDIdevice, or your assignments might be lost.
In some cases, you can change the message type the controller sends by choosing adifferent preset or by reprogramming the device. Some devices may include softwarethat you can use to reprogram knobs, buttons, and other controls. For information aboutreprogramming a MIDI device, see the documentation that came with the device.
Using MIDI Devices That Support Automatic ConfigurationMainStage can automatically configure the screen controls in a concert to support manypopular MIDI controllers. If you are using a device that supports automatic configuration,MainStage alerts you to select the appropriate preset on your device when you open anew concert. After you select the preset on your MIDI device, the screen controls in theconcert are assigned to the corresponding controls on your hardware device so you canuse them in MainStage with no further configuration.
18 Chapter 2 Setting Up Your System

Using Audio Devices with MainStageMainStage works with Core Audio-compliant audio devices, including FireWire, USB,ExpressCard, and PCI audio interfaces. You can connect microphones, electronic musicalinstruments, and other musical equipment to your computer, or to an audio interface orother audio device, and use them with MainStage. For detailed information about usingaudio devices, see the “Setting Up Your System” chapter in the Logic Pro User Manual.
MainStage can require a large amount of available RAM, particularly when playingsample-based software instruments. It is recommended that you test your system andthe concerts you plan to use before you perform using MainStage to make sure there isenough available memory to select and play the patches you want to use without causingaudio drop-outs or distortion. Unlike in Logic Pro, you can choose different audio inputand output drivers in MainStage. For more information about choosing audio drivers, seeSetting MainStage Preferences.
Using Effects Plug-ins with MainStageYou can use all of the Logic Studio effects plug-ins, except for surround plug-ins, inMainStage channel strips. For more information about the included effects plug-ins, referto the Logic Studio Instruments and Logic Studio Effects manuals. You can also use Appleand third-party Audio Units effects in MainStage channel strips in the same way you usethem in Logic Pro channel strips.
Some Logic Studio effects, including Space Designer, require intensive realtime processingof the audio signal. Using Space Designer on individual patches can affect the performanceof your concert, and in some cases result in audio dropouts or glitches, particularly if youset the audio buffer to a smaller size. For this reason, it is recommended that you useSpace Designer sparingly in your concerts, and use a few Space Designer instances onauxiliary channel strips shared between multiple patches, rather than in individual patches.
Some Audio Units plug-ins can introduce latency. Using effects that introduce latency,such as compressors and limiters, can produce undesirable or unpredictable results duringlive performance. Other Audio Units plug-ins, particularly instrument and amp modellingplug-ins, require high levels of realtime processing and can affect the performance ofyour concert.
Using MainStage with Time MachineIf you use Time Machine to back up the computer you are using to perform withMainStage, be aware that if Time Machine runs while you are performing in Perform orFull Screen mode the performance of your MainStage concert could be affected. To avoidany impact on performance, it is recommended that you disconnect your Time Machinebackup drive when you perform with MainStage.
19Chapter 2 Setting Up Your System

You do all your work in MainStage in a single window, the MainStage window.
The MainStage window is organized to make it easy to work with your patches and thelayout of your concert. When you open MainStage, the workspace fills the center of thewindow, with Inspectors and other editing areas on the sides and below. When you areready to perform, you can use one of two performance-oriented modes to maximize yourcomputer performance and also maximize your display space for easy viewing on stage.
The first time you open MainStage, the Choose Template dialog appears so that you canchoose a concert template to create a new concert. To learn how to open MainStage, seeOpening MainStage. For information about choosing a template, see Choosing a ConcertTemplate.
This chapter covers the following:
• The MainStage Window (p. 22)
• Layout Mode (p. 23)
• Edit Mode (p. 24)
• Perform Mode (p. 25)
• Full Screen Mode (p. 26)
• Customizing the MainStage Window (p. 26)
21
The MainStage Interface 3
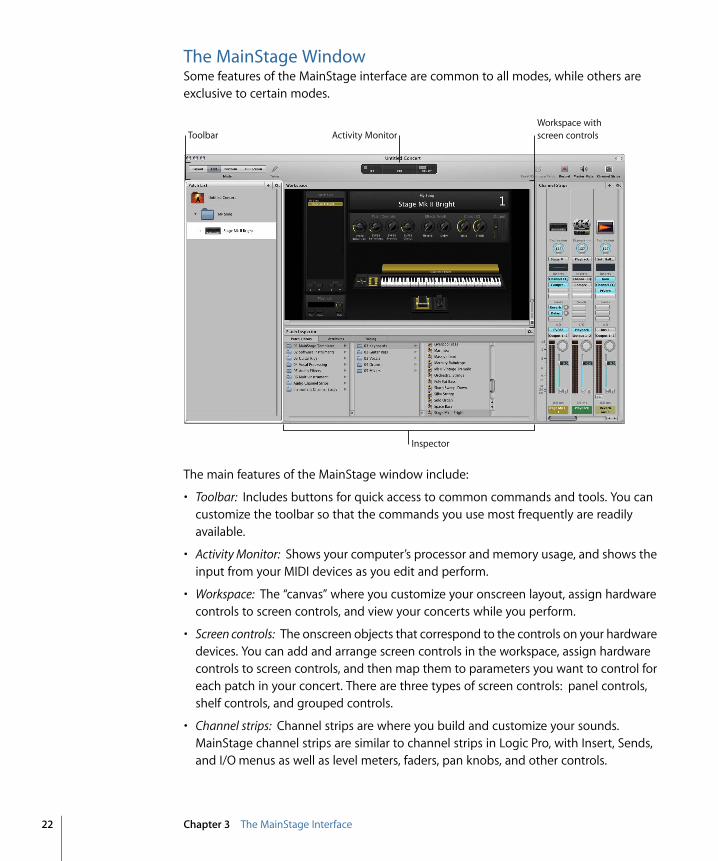
The MainStage WindowSome features of the MainStage interface are common to all modes, while others areexclusive to certain modes.
Inspector
Workspace with screen controlsActivity MonitorToolbar
The main features of the MainStage window include:
• Toolbar: Includes buttons for quick access to common commands and tools. You cancustomize the toolbar so that the commands you use most frequently are readilyavailable.
• Activity Monitor: Shows your computer’s processor and memory usage, and shows theinput from your MIDI devices as you edit and perform.
• Workspace: The “canvas” where you customize your onscreen layout, assign hardwarecontrols to screen controls, and view your concerts while you perform.
• Screen controls: The onscreen objects that correspond to the controls on your hardwaredevices. You can add and arrange screen controls in the workspace, assign hardwarecontrols to screen controls, and then map them to parameters you want to control foreach patch in your concert. There are three types of screen controls: panel controls,shelf controls, and grouped controls.
• Channel strips: Channel strips are where you build and customize your sounds.MainStage channel strips are similar to channel strips in Logic Pro, with Insert, Sends,and I/O menus as well as level meters, faders, pan knobs, and other controls.
22 Chapter 3 The MainStage Interface
• Inspectors: Inspectors appear below (in Edit mode) or along the left side of the MainStagewindow (in Layout mode) when you select different items onscreen. The Inspectorsallow you to edit parameters and attributes for patches, sets, screen controls, channelstrips, and the concert. Most Inspectors feature tabs that make it easy to quickly accessthe parameters you want to edit.
To make working easier, MainStage features four different modes, each suited to a differenttask. You audition, edit, and organize your sounds and map screen controls in Edit mode.You customize the visual arrangement of controls onscreen and make controllerassignments in Layout mode. You use either Perform mode or Full Screen mode whenyou perform live.
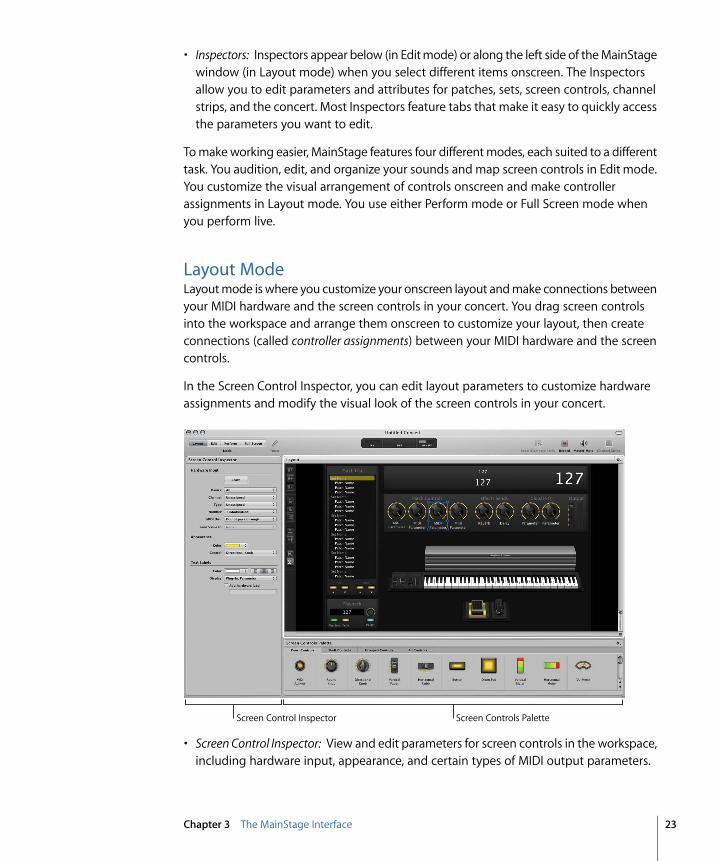
Layout ModeLayout mode is where you customize your onscreen layout and make connections betweenyour MIDI hardware and the screen controls in your concert. You drag screen controlsinto the workspace and arrange them onscreen to customize your layout, then createconnections (called controller assignments) between your MIDI hardware and the screencontrols.
In the Screen Control Inspector, you can edit layout parameters to customize hardwareassignments and modify the visual look of the screen controls in your concert.
Screen Control Inspector Screen Controls Palette
• Screen Control Inspector: View and edit parameters for screen controls in the workspace,including hardware input, appearance, and certain types of MIDI output parameters.
23Chapter 3 The MainStage Interface
• Screen Controls Palette: Drag screen controls from the palette into the workspace toadd them to your onscreen layout. The palette has four tabs so that you can quicklyview all screen controls or only one type of screen control. Panel controls appear astwo-dimensional objects in the workspace, while shelf controls appear on an adjustablethree-dimensional shelf.
• Layout buttons: Along the left side of the workspace is a series of buttons that you canuse to quickly position selected screen controls in the workspace. You can align,distribute, and group selected screen controls.
In Layout mode, unlike the other modes in MainStage, you can’t select or edit individualpatches. To learn what you can do in Layout mode, see Working in Layout Mode.
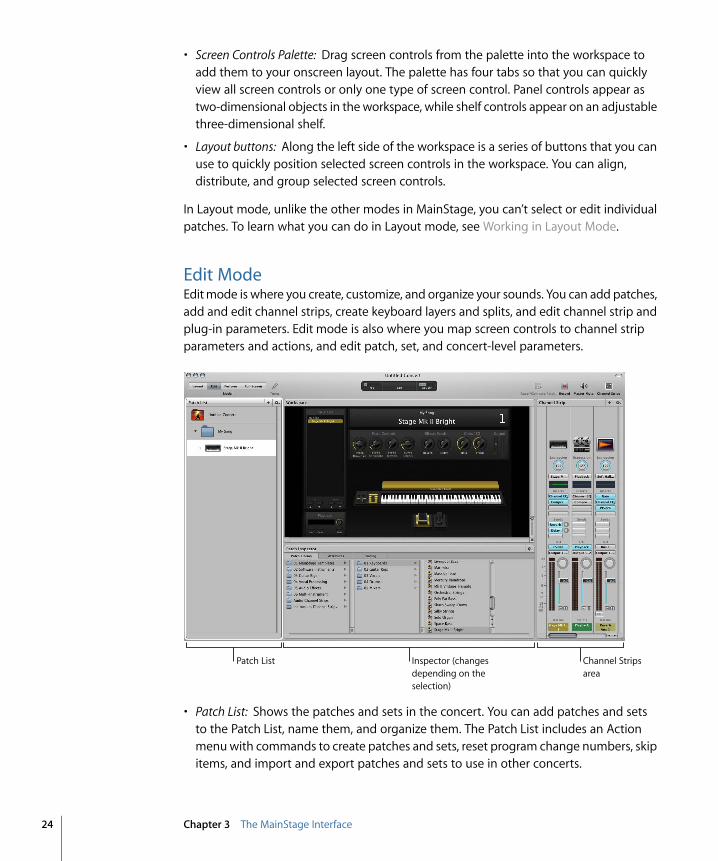
Edit ModeEdit mode is where you create, customize, and organize your sounds. You can add patches,add and edit channel strips, create keyboard layers and splits, and edit channel strip andplug-in parameters. Edit mode is also where you map screen controls to channel stripparameters and actions, and edit patch, set, and concert-level parameters.
Patch List Inspector (changes depending on the selection)
Channel Strips area
• Patch List: Shows the patches and sets in the concert. You can add patches and setsto the Patch List, name them, and organize them. The Patch List includes an Actionmenu with commands to create patches and sets, reset program change numbers, skipitems, and import and export patches and sets to use in other concerts.
24 Chapter 3 The MainStage Interface
• Inspector (varies depending on the type of item selected): View and edit parameters forthe currently selected patch, channel strip, screen control, set, or for the concert. Thename of the Inspector changes to identify the type of item you are currently inspecting.
• Channel Strips area: View and edit the channel strips in your patches or at the concertor set level. Channel strips appear in a vertical format similar to Logic Pro channel strips,with many of the same controls. You can also add channel strips and save channel stripsettings.
To learn what you can do in Edit mode, see Working in Edit Mode and Working withConcerts.
The remaining two modes, Perform mode and Full Screen mode, are both optimized forperforming live. You can use either one when you perform.
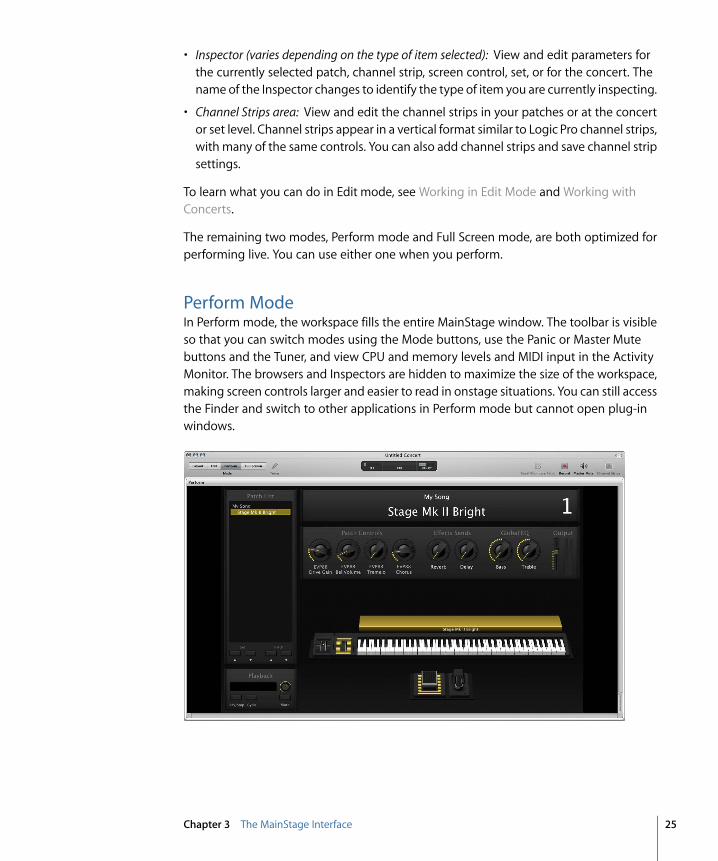
Perform ModeIn Perform mode, the workspace fills the entire MainStage window. The toolbar is visibleso that you can switch modes using the Mode buttons, use the Panic or Master Mutebuttons and the Tuner, and view CPU and memory levels and MIDI input in the ActivityMonitor. The browsers and Inspectors are hidden to maximize the size of the workspace,making screen controls larger and easier to read in onstage situations. You can still accessthe Finder and switch to other applications in Perform mode but cannot open plug-inwindows.
25Chapter 3 The MainStage Interface
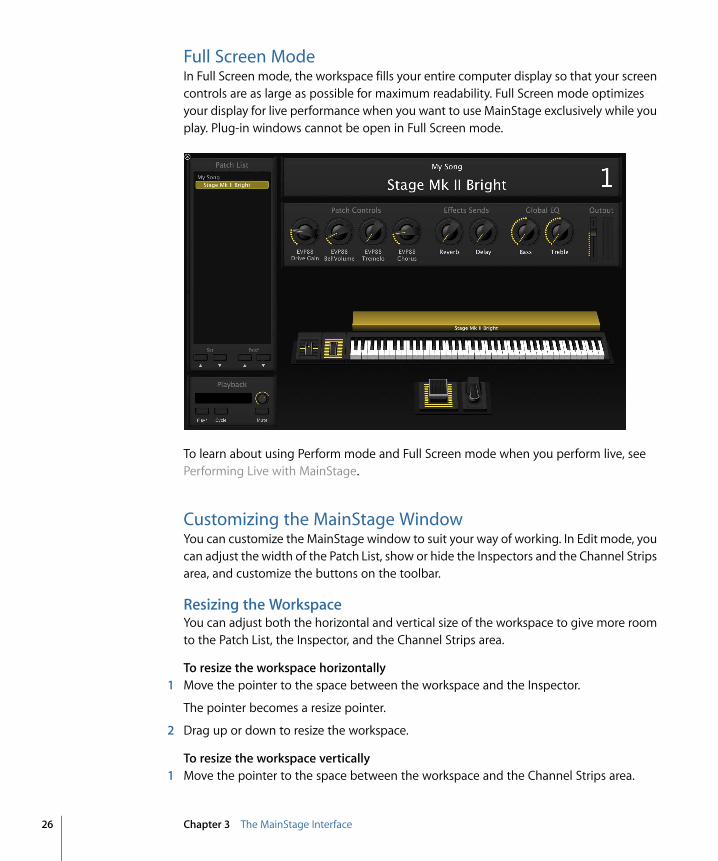
Full Screen ModeIn Full Screen mode, the workspace fills your entire computer display so that your screencontrols are as large as possible for maximum readability. Full Screen mode optimizesyour display for live performance when you want to use MainStage exclusively while youplay. Plug-in windows cannot be open in Full Screen mode.
To learn about using Perform mode and Full Screen mode when you perform live, seePerforming Live with MainStage.
Customizing the MainStage WindowYou can customize the MainStage window to suit your way of working. In Edit mode, youcan adjust the width of the Patch List, show or hide the Inspectors and the Channel Stripsarea, and customize the buttons on the toolbar.
Resizing the WorkspaceYou can adjust both the horizontal and vertical size of the workspace to give more roomto the Patch List, the Inspector, and the Channel Strips area.
To resize the workspace horizontally1 Move the pointer to the space between the workspace and the Inspector.
The pointer becomes a resize pointer.
2 Drag up or down to resize the workspace.
To resize the workspace vertically1 Move the pointer to the space between the workspace and the Channel Strips area.
26 Chapter 3 The MainStage Interface
The pointer becomes a resize pointer.
2 Drag left or right to resize the workspace.
Hiding and Showing the InspectorYou can hide the Inspector or show it if it is hidden.
To hide or show the InspectorDo one of the following:
µ Choose View > Inspectors (or press Command-5).
µ In the toolbar, click the Inspectors button.
Hiding and Showing the Channel Strips AreaYou can hide the Channel Strips area or show it if it is hidden. Hiding the Channel Stripsarea gives you more room for the workspace.
To hide or show the Channel Strips areaDo one of the following:
µ Choose View > Channel Strips (or press Command-6).
µ In the toolbar, click the Channel Strips button.
Customizing the ToolbarThe toolbar at the top of the MainStage window contains buttons for frequently usedcommands. You can customize the toolbar, adding buttons for the functions you usemost often and can return to the default set later.
The default set of toolbar buttons includes buttons for selecting the different windowmodes, hiding the Inspector and the Channel Strips area, activating Master Mute, andother common commands. You can customize the toolbar with additional buttons forother commands and adjust the position and spacing of items. You can also hide thetoolbar to maximize available screen space. You customize the toolbar by dragging itemsfrom the Customize Toolbar dialog to the toolbar.
To show the Customize dialogDo one of the following:
µ Choose View > Customize Toolbar.
µ Control-click the toolbar, then choose Customize Toolbar from the shortcut menu.
The Customize Toolbar dialog appears, and spaces between buttons in the toolbar areoutlined in gray.
27Chapter 3 The MainStage Interface
To add a button to the toolbarµ Drag a button from the Customize dialog to the toolbar.
If you drag a button between two existing buttons, the buttons move to make room forthe new button.
To move a button in the toolbarDo one of the following:
µ If the Customize Toolbar dialog is visible, drag the button to move it.
µ If the Customize Toolbar dialog is not visible, Command-drag the button to move it.
You can also rearrange the toolbar using set-width spaces, flexible spaces, and separators.
To add a space or a separator to the toolbarµ Drag a space, flexible space, or separator from the Customize Toolbar dialog to the toolbar.
To return the toolbar to the default set of buttonsµ Drag the default button set, located at the bottom of the Customize Toolbar dialog, to
the toolbar.
You can also change the toolbar so that it shows only icons or only text by Control-clickingthe toolbar, then choosing Icon Only or Text Only from the shortcut menu.
To show only icons in the toolbarDo one of the following:
µ Control-click the toolbar, then choose Icon Only from the shortcut menu.
µ In the Customize Toolbar dialog, choose Icon Only from the Show pop-up menu.
To show only text in the toolbarDo one of the following:
µ Control-click the toolbar, then choose Text Only from the shortcut menu.
µ In the Customize Toolbar dialog, choose Text Only from the Show pop-up menu.
To show both icons and text in the toolbarDo one of the following:
µ Control-click the toolbar, then choose Icon & Text from the shortcut menu.
µ In the Customize Toolbar dialog, choose Icon & Text from the Show pop-up menu.
To close the Customize dialogµ When you are finishing customizing the toolbar, click Done.
To hide the toolbarµ Choose View > Hide Toolbar.
When the toolbar is hidden, the menu item becomes Show Toolbar.
28 Chapter 3 The MainStage Interface
You can quickly start working in MainStage by choosing a concert template and tryingout the patch settings in the concert. This chapter provides a brief guided “walkthrough”you can follow the first time you open MainStage. If you wish to continue learning themajor features of the application in a hands-on manner, consult the Exploring MainStageguide included in the Logic Studio package.
This chapter covers the following:
• Before You Begin (p. 29)
• Opening MainStage (p. 30)
• Choosing a Concert Template (p. 30)
• Selecting Patch Settings in the Patch Library (p. 31)
• Adding a Patch (p. 32)
• Naming a Patch (p. 33)
• Selecting and Playing Patches (p. 33)
• Adding a Channel Strip (p. 34)
• Changing a Channel Strip Setting (p. 36)
• Learning a Controller Assignment (p. 37)
• Mapping a Screen Control (p. 39)
• Trying Out Full Screen and Perform Modes (p. 39)
Before You BeginBefore you start working in MainStage, you should connect the hardware equipment thatyou plan to use, such as your keyboard controller, audio interface, instruments, ormicrophones, to your computer. To use keyboard controllers and other MIDI devices withMainStage, the devices should be capable of sending standard MIDI messages. If you’renot sure whether this is the case for a particular device, consult the owner’s manual orthe product website. For more information, see Setting Up Your System.
29
Getting Started with MainStage 4
Opening MainStageYou start by opening MainStage and creating a new concert from a template.
To open MainStageµ Double-click the MainStage icon in your Applications folder or in the Dock.
Choosing a Concert TemplateMainStage includes templates for different musical instruments, including Keyboards,Guitar Rigs, Drums, Vocals, and more. You can choose a concert template in the ChooseTemplate dialog, which appears the first time you open MainStage and when you createa new concert or close a concert.
To choose a concert template1 Choose File > New Concert (or press Command-N).
2 In the Choose Template dialog, click the instrument category on the left you want toview templates for.
A brief description below each template describes its features and intended use.
30 Chapter 4 Getting Started with MainStage
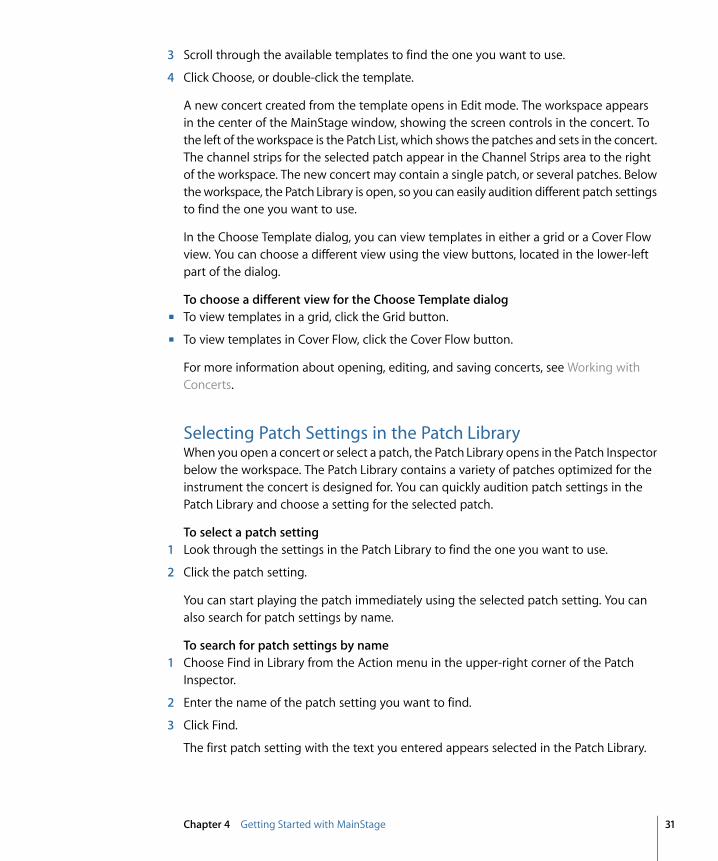
3 Scroll through the available templates to find the one you want to use.
4 Click Choose, or double-click the template.
A new concert created from the template opens in Edit mode. The workspace appearsin the center of the MainStage window, showing the screen controls in the concert. Tothe left of the workspace is the Patch List, which shows the patches and sets in the concert.The channel strips for the selected patch appear in the Channel Strips area to the rightof the workspace. The new concert may contain a single patch, or several patches. Belowthe workspace, the Patch Library is open, so you can easily audition different patch settingsto find the one you want to use.
In the Choose Template dialog, you can view templates in either a grid or a Cover Flowview. You can choose a different view using the view buttons, located in the lower-leftpart of the dialog.
To choose a different view for the Choose Template dialogµ To view templates in a grid, click the Grid button.
µ To view templates in Cover Flow, click the Cover Flow button.
For more information about opening, editing, and saving concerts, see Working withConcerts.
Selecting Patch Settings in the Patch LibraryWhen you open a concert or select a patch, the Patch Library opens in the Patch Inspectorbelow the workspace. The Patch Library contains a variety of patches optimized for theinstrument the concert is designed for. You can quickly audition patch settings in thePatch Library and choose a setting for the selected patch.
To select a patch setting1 Look through the settings in the Patch Library to find the one you want to use.
2 Click the patch setting.
You can start playing the patch immediately using the selected patch setting. You canalso search for patch settings by name.
To search for patch settings by name1 Choose Find in Library from the Action menu in the upper-right corner of the Patch
Inspector.
2 Enter the name of the patch setting you want to find.
3 Click Find.
The first patch setting with the text you entered appears selected in the Patch Library.
31Chapter 4 Getting Started with MainStage
4 To find subsequent patch settings with the same name, choose Find Again in Libraryfrom the Action menu.
Note: If you have saved multiple patches to a .patch file using the Save as Set command(or the Export as Set command in MainStage 1.0) in the Action menu, the saved fileappears as a patch in the Patch Library unless you have selected a different location forsaving the file. Clicking the saved file in the Patch Library causes an alert to appear whilethe individual patches are opened from the .patch file.
Adding a PatchYou can add patches to the concert and organize them in the Patch List. The number ofpatches is limited only by the amount of available memory in your system. When youadd a patch to a concert, the patch is selected so you can easily audition and select apatch setting from the Patch Library.
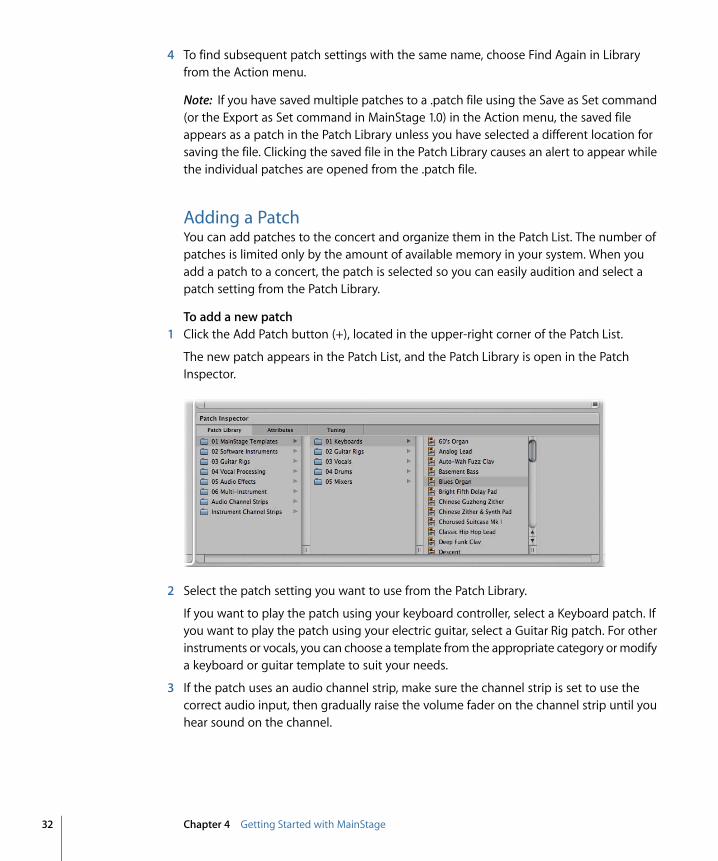
To add a new patch1 Click the Add Patch button (+), located in the upper-right corner of the Patch List.
The new patch appears in the Patch List, and the Patch Library is open in the PatchInspector.
2 Select the patch setting you want to use from the Patch Library.
If you want to play the patch using your keyboard controller, select a Keyboard patch. Ifyou want to play the patch using your electric guitar, select a Guitar Rig patch. For otherinstruments or vocals, you can choose a template from the appropriate category or modifya keyboard or guitar template to suit your needs.
3 If the patch uses an audio channel strip, make sure the channel strip is set to use thecorrect audio input, then gradually raise the volume fader on the channel strip until youhear sound on the channel.
32 Chapter 4 Getting Started with MainStage
Naming a PatchWhen you add a patch, by default it takes the name of the channel strip added with it.You can give each patch a custom name to make it easier to identify and distinguishbetween them.
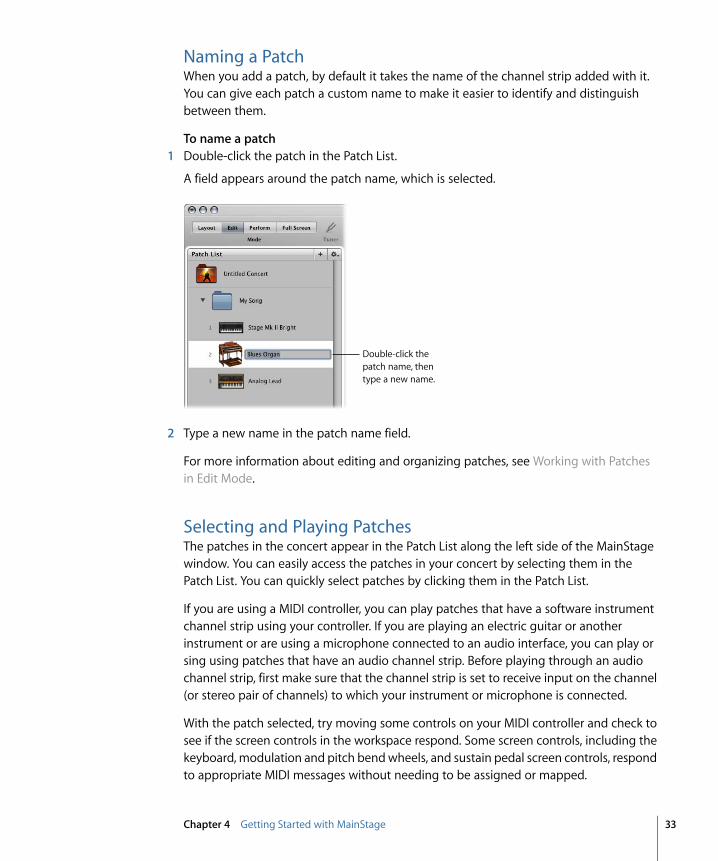
To name a patch1 Double-click the patch in the Patch List.
A field appears around the patch name, which is selected.
Double-click the patch name, then type a new name.
2 Type a new name in the patch name field.
For more information about editing and organizing patches, see Working with Patchesin Edit Mode.
Selecting and Playing PatchesThe patches in the concert appear in the Patch List along the left side of the MainStagewindow. You can easily access the patches in your concert by selecting them in thePatch List. You can quickly select patches by clicking them in the Patch List.
If you are using a MIDI controller, you can play patches that have a software instrumentchannel strip using your controller. If you are playing an electric guitar or anotherinstrument or are using a microphone connected to an audio interface, you can play orsing using patches that have an audio channel strip. Before playing through an audiochannel strip, first make sure that the channel strip is set to receive input on the channel(or stereo pair of channels) to which your instrument or microphone is connected.
With the patch selected, try moving some controls on your MIDI controller and check tosee if the screen controls in the workspace respond. Some screen controls, including thekeyboard, modulation and pitch bend wheels, and sustain pedal screen controls, respondto appropriate MIDI messages without needing to be assigned or mapped.
33Chapter 4 Getting Started with MainStage
You can continue selecting and playing patches in the concert to find sounds you wantto perform with or to use as a starting point for creating your own custom patches. Youcan also add new patches and edit their channel strip settings to create your own uniquesounds.
For more information about organizing and selecting patches in the Patch List, see Workingwith Patches in Edit Mode.
Adding a Channel StripYou can add channel strips to a patch to create layered sounds and keyboard splits. Whenyou add a channel strip to a patch, you choose the type of channel strip, the output, andother settings. You can mix both types in a single patch.
To add a channel strip to a patch1 Make sure the patch is selected in the Patch List.
2 Click the Add Channel Strip button (+) in the upper-right corner of the Channel Stripsarea.
The New Channel Strip dialog appears. You choose settings in the Channel Strip dialogin the same way as when you add a patch.
3 In the New Channel Strip dialog, select the type of channel strip you want to create.
4 Choose the audio output for the channel strip from the Output pop-up menu.
5 For audio channel strips, choose mono or stereo format from the Format pop-up menuand choose the audio input from the Input pop-up menu. For external instrument channelstrips, also choose the MIDI input, MIDI output, and MIDI channel from their respectivepop-up menus.
Important: Audio channel strips can produce feedback, particularly if you are using amicrophone for audio input. When you add an audio channel strip, the volume of thechannel strip is set to silence, and Feedback Protection is turned on to alert you whenfeedback occurs on the channel strip. When you add an external instrument channelstrip, the volume of the channel strip is set to silence, but Feedback Protection is turnedoff.
6 Optionally, you can add multiple channel strips to a patch by typing a number in theNumber field. You can add up to the maximum number for a channel strip type.
7 Click Create.
A new channel strip appears in the Channel Strips area, highlighted in white to indicatethat it is selected. The Channel Strip Inspector appears below the workspace, showingdifferent parameters for the new channel strip.
34 Chapter 4 Getting Started with MainStage
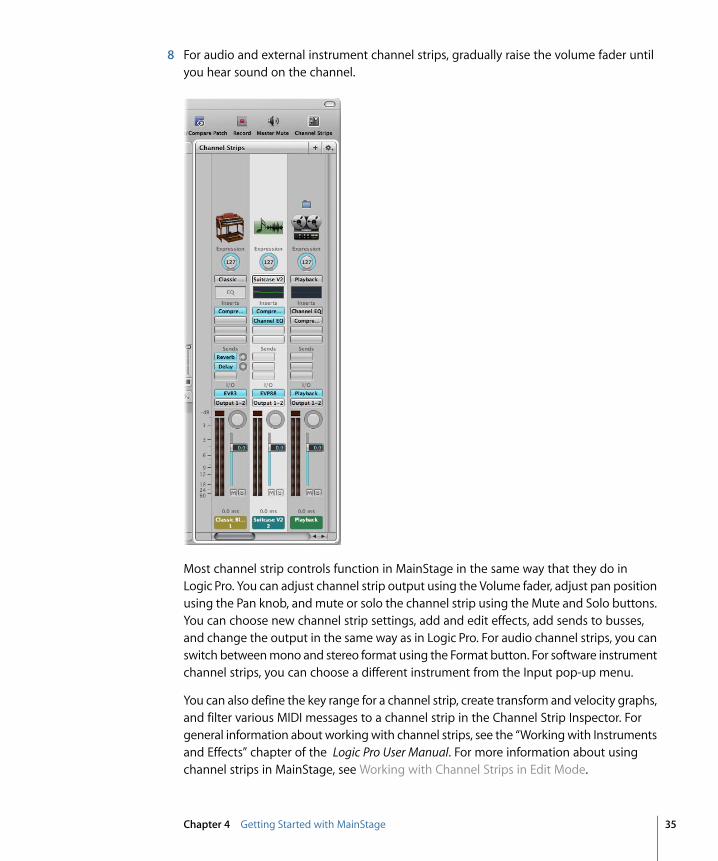
8 For audio and external instrument channel strips, gradually raise the volume fader untilyou hear sound on the channel.
Most channel strip controls function in MainStage in the same way that they do inLogic Pro. You can adjust channel strip output using the Volume fader, adjust pan positionusing the Pan knob, and mute or solo the channel strip using the Mute and Solo buttons.You can choose new channel strip settings, add and edit effects, add sends to busses,and change the output in the same way as in Logic Pro. For audio channel strips, you canswitch between mono and stereo format using the Format button. For software instrumentchannel strips, you can choose a different instrument from the Input pop-up menu.
You can also define the key range for a channel strip, create transform and velocity graphs,and filter various MIDI messages to a channel strip in the Channel Strip Inspector. Forgeneral information about working with channel strips, see the “Working with Instrumentsand Effects” chapter of the Logic Pro User Manual. For more information about usingchannel strips in MainStage, see Working with Channel Strips in Edit Mode.
35Chapter 4 Getting Started with MainStage
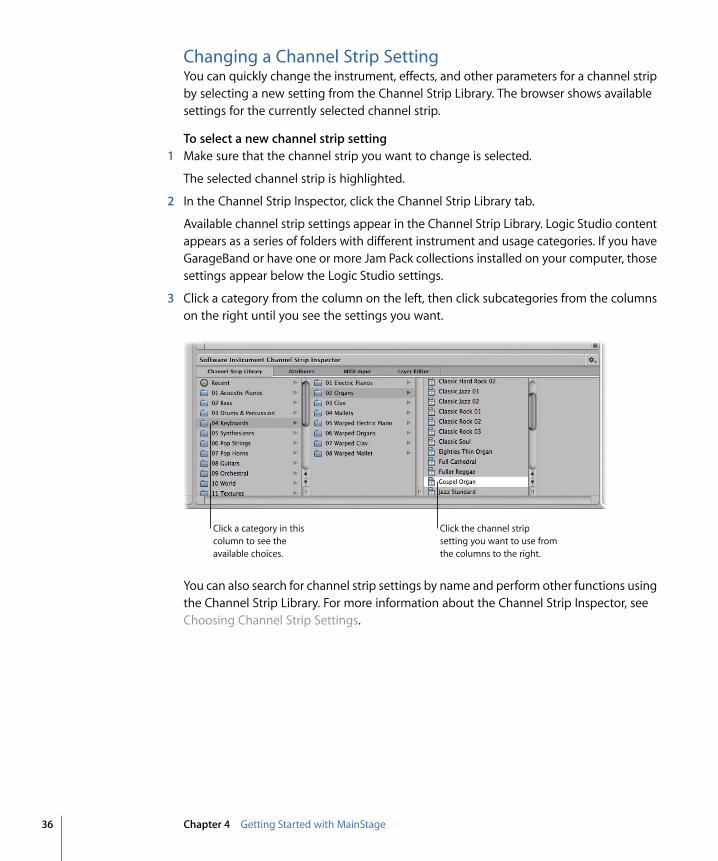
Changing a Channel Strip SettingYou can quickly change the instrument, effects, and other parameters for a channel stripby selecting a new setting from the Channel Strip Library. The browser shows availablesettings for the currently selected channel strip.
To select a new channel strip setting1 Make sure that the channel strip you want to change is selected.
The selected channel strip is highlighted.
2 In the Channel Strip Inspector, click the Channel Strip Library tab.
Available channel strip settings appear in the Channel Strip Library. Logic Studio contentappears as a series of folders with different instrument and usage categories. If you haveGarageBand or have one or more Jam Pack collections installed on your computer, thosesettings appear below the Logic Studio settings.
3 Click a category from the column on the left, then click subcategories from the columnson the right until you see the settings you want.
Click a category in this column to see the available choices.
Click the channel strip setting you want to use from the columns to the right.
You can also search for channel strip settings by name and perform other functions usingthe Channel Strip Library. For more information about the Channel Strip Inspector, seeChoosing Channel Strip Settings.
36 Chapter 4 Getting Started with MainStage
Learning a Controller AssignmentWhen you select a patch or a channel strip setting, some channel strip parameters respondto the controls on your MIDI device instantly. MainStage responds to notes played on akeyboard controller, volume, pan, and expression messages, modulation and pitch bendwheel messages, and sustain pedal messages without your having to configure any screencontrols to receive these messages. For other controls such as faders, knobs, and buttons,you must assign these hardware controls to MainStage screen controls before you canuse them in your concert.
In MainStage, you assign hardware controls to screen controls in the Layout Inspectorusing the Learn process, similar to learning controller assignments for a control surfacein Logic Pro. Learning controller assignments is a quick and easy method for assigninghardware controls to screen controls.
Note: To be able to assign a hardware control to a screen control, the hardware controlmust send standard MIDI messages. For more information, see Using MIDI Devices withMainStage.
To learn a controller assignment1 In the toolbar, click the Layout button.
MainStage switches to Layout mode.
2 In the workspace, select the screen control you want to learn.
The selected control appears highlighted in blue.
3 Click the Learn button in the Screen Control Inspector (or press Command-L).
37Chapter 4 Getting Started with MainStage
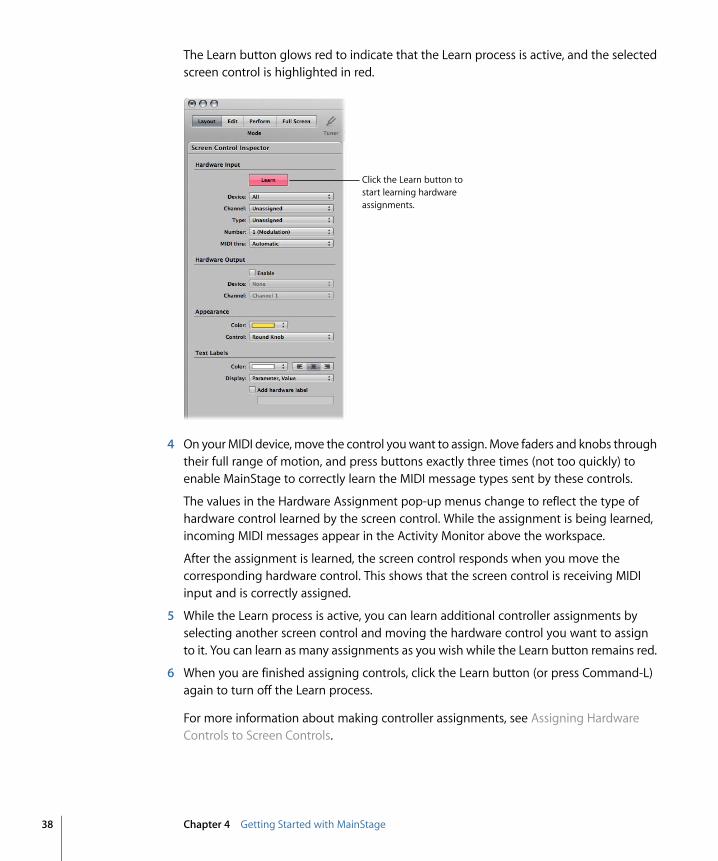
The Learn button glows red to indicate that the Learn process is active, and the selectedscreen control is highlighted in red.
Click the Learn button to start learning hardware assignments.
4 On your MIDI device, move the control you want to assign. Move faders and knobs throughtheir full range of motion, and press buttons exactly three times (not too quickly) toenable MainStage to correctly learn the MIDI message types sent by these controls.
The values in the Hardware Assignment pop-up menus change to reflect the type ofhardware control learned by the screen control. While the assignment is being learned,incoming MIDI messages appear in the Activity Monitor above the workspace.
After the assignment is learned, the screen control responds when you move thecorresponding hardware control. This shows that the screen control is receiving MIDIinput and is correctly assigned.
5 While the Learn process is active, you can learn additional controller assignments byselecting another screen control and moving the hardware control you want to assignto it. You can learn as many assignments as you wish while the Learn button remains red.
6 When you are finished assigning controls, click the Learn button (or press Command-L)again to turn off the Learn process.
For more information about making controller assignments, see Assigning HardwareControls to Screen Controls.
38 Chapter 4 Getting Started with MainStage
Mapping a Screen ControlAfter you have learned controller assignments for the screen controls you want to use,you can map the screen controls to the parameters in your patches you will want tocontrol while you are performing. You will likely want to map screen controls to parametersin each patch in a concert, so that you can easily access and modify the parameters youwant for each patch when you are performing live. You can also map parameters at theconcert level to control master volume, view master levels, or modify concert-wide effects.
There are two ways to map screen controls to parameters: by visually selecting parameterson channel strips or plug-in windows, or by choosing parameters in the ParameterMapping browser. To learn how to map a screen control to a channel strip or plug-inparameter, see Mapping Screen Controls to Channel Strip and Plug-In Parameters. Tolearn how to map a screen control to an action, see Mapping Screen Controls to Actions.
Trying Out Full Screen and Perform ModesNow you can try playing your patches as you would in a performance. MainStage providestwo modes, Full Screen mode and Perform mode, that optimize the display of theworkspace for live performance. In Perform mode, you see the workspace and the toolbar,so you can use the toolbar buttons and access other applications. In Full Screen mode,the workspace occupies the entire screen, presenting the screen controls as large aspossible for easy viewing in concert environments.
To switch to Full Screen modeDo one of the following:
µ Choose View > Full Screen (or press Command-4).
µ Click the Full Screen button.
To switch to Perform modeDo one of the following:
µ Choose View > Perform (or press Command-3).
µ Click the Perform button.
You can try both of these modes, playing the patches you added or modified, and usingthe controls on your MIDI controller to modify the parameters you have mapped to screencontrols.
39Chapter 4 Getting Started with MainStage

In Edit mode, you add and edit patches to create your custom sounds, choose patchsettings in the Patch Library, organize and select patches in the Patch List, edit patchparameters in the Inspector, and map screen controls to parameters and actions. You cancreate custom patches in Edit mode and organize them in the Patch List so that you caneasily access them when you perform.
This chapter covers the following:
• Working with Patches in Edit Mode (p. 41)
• Working with Channel Strips in Edit Mode (p. 48)
• Mapping Screen Controls (p. 69)
• Editing Screen Control Parameters in Edit Mode (p. 77)
• Working with Sets in Edit Mode (p. 81)
• Working at the Set Level (p. 83)
• Sharing Patches and Sets Between Concerts (p. 84)
• Recording the Audio Output of a Concert (p. 85)
Working with Patches in Edit ModePatches are the individual sounds you play using your keyboard controller (for MIDIkeyboardists) and the effects setups you use with your guitar, microphone, or otherinstrument (for guitarists, vocalists, and other instrumentalists). MainStage patches cancontain multiple channel strips, each with a different instrument or effects setup.
Some basic patch operations, including adding and naming patches, selecting and namingpatches, and adding channel strips to patches, are described in Getting Started withMainStage.
If MainStage is currently in Layout, Perform, or Full Screen mode, click the Edit button inthe top-left corner of the MainStage window to begin working in Edit mode.
41
Working in Edit Mode 5
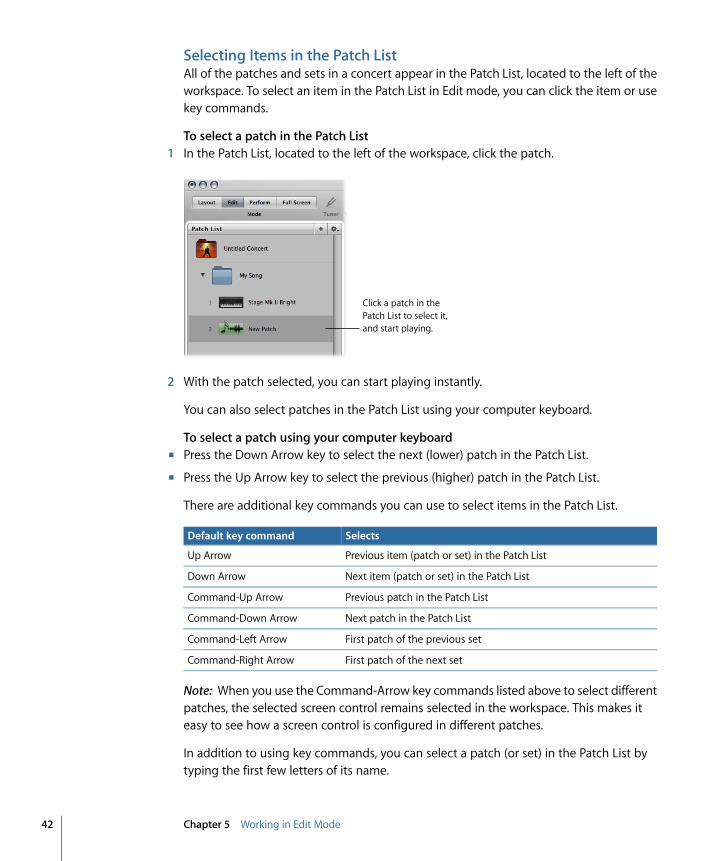
Selecting Items in the Patch ListAll of the patches and sets in a concert appear in the Patch List, located to the left of theworkspace. To select an item in the Patch List in Edit mode, you can click the item or usekey commands.
To select a patch in the Patch List1 In the Patch List, located to the left of the workspace, click the patch.
Click a patch in the Patch List to select it, and start playing.
2 With the patch selected, you can start playing instantly.
You can also select patches in the Patch List using your computer keyboard.
To select a patch using your computer keyboardµ Press the Down Arrow key to select the next (lower) patch in the Patch List.
µ Press the Up Arrow key to select the previous (higher) patch in the Patch List.
There are additional key commands you can use to select items in the Patch List.
SelectsDefault key command
Previous item (patch or set) in the Patch ListUp Arrow
Next item (patch or set) in the Patch ListDown Arrow
Previous patch in the Patch ListCommand-Up Arrow
Next patch in the Patch ListCommand-Down Arrow
First patch of the previous setCommand-Left Arrow
First patch of the next setCommand-Right Arrow
Note: When you use the Command-Arrow key commands listed above to select differentpatches, the selected screen control remains selected in the workspace. This makes iteasy to see how a screen control is configured in different patches.
In addition to using key commands, you can select a patch (or set) in the Patch List bytyping the first few letters of its name.
42 Chapter 5 Working in Edit Mode
To select a patch or set by typing its name1 Click the border of the Patch List to select it.
2 With the Patch List selected, start typing the name of the patch. Once you type enoughletters to uniquely identify its name, the patch or set is selected.
You can also select a patch by typing its name in Perform or Full Screen mode. Forinformation, see Selecting Patches by Typing.
You can also select a patch using your computer keyboard by typing its patch number.Patch numbers appear to the left of the patch names in the Patch List.
To select a patch by typing its patch number1 Click the border of the Patch List to select it.
2 With the Patch List selected, type the patch number using your computer keyboard.
Skipping Items in the Patch ListYou can skip patches or sets in the Patch List. When a patch or set is skipped, you canstill select the item by clicking it. However, when you use the arrow keys together withthe Command key to select items in the Patch List, skipped items are passed over andthe next non-skipped item is selected. Skipped items are also skipped when you use thepatch selector in Full Screen or Perform mode.
To skip a patch or set1 Select the patch or set in the Patch List.
2 Choose Skip from the Action menu for the Patch List.
The item appears as a thin line in the Patch List.
To set a skipped patch or set to no longer be skipped1 Select the item (patch or set) in the Patch List.
2 Choose Don’t Skip from the Action menu for the Patch List.
The item returns to full size in the Patch List.
Patches and sets are skipped only when you use the arrow keys together with theCommand key. Items set to be skipped are still selected when you use the arrow keysalone or when you click them.
Collapsing Sets in the Patch ListYou can collapse sets in the Patch List. When you collapse a set, you can select the setand use any channel strips or busses at the set level but cannot select or play patches inthe set while in Edit mode.
To collapse a setµ In the Patch List, click the disclosure triangle for the set.
43Chapter 5 Working in Edit Mode
You can uncollapse the set by clicking its disclosure triangle again. Collapsing a set hasno effect on whether you can select patches in the set in Full Screen or Perform mode.
For information about creating and using sets, see Working with Sets in Edit Mode.
Copying and Pasting PatchesYou can copy, paste, and duplicate patches in the Patch List using the standard Mac OS Xmenu and key commands or by Option-dragging. When you paste or duplicate a patch,it includes any mappings made to parameters in the original patch.
Reordering Patches in the Patch ListWhen you add a patch to a concert, the new patch appears below the currently selectedpatch in the Patch List. You can reorder patches in the Patch List.
To reorder patches in the Patch Listµ Drag patches up or down in the Patch List until they appear in the order you want.
Moving Patches in the Patch List RepeatedlyThe MainStage command set includes a Move Again command that lets you easily moveselected patches multiple times. You can use Move Again when you drag, paste, create,or delete patches in the Patch List. By default, the Move Again command is not assignedto a key command. To use it, you should first assign it to a key command in the CommandEditor. For information about using the Command Editor, see Using the Command Editor.
Creating a Patch from Several PatchesYou can create a patch by combining several existing patches. The new patch containsall of the channel strips of the selected patches.
To create a patch from several existing patches1 In the Patch List, select the patches you want to use to create the new patch.
2 Choose “Create Patch from Selected Patches” from the Action menu at the upper-rightcorner of the Patch List.
The new “combined” patch appears in the Patch List, labeled “Untitled Patch.”
Note: Creating a patch with more than three channel strips can affect performance,particularly if the channel strips are audio channel strips, or if they use a large number ofplug-ins or processor-intensive plug-ins.
Setting the Time Signature for a PatchYou can set the time signature for a patch. Time signatures can be used with the Playbackplug-in and also control the beats for the metronome. When you set the time signaturefor a patch, it overrides any concert- or set-level time signature.
To set the time signature for a patch1 In the Patch Inspector, select the Attributes tab.
44 Chapter 5 Working in Edit Mode
2 In the Attributes tab, select the Has Time Signature checkbox.
3 Double-click the number in the field to the right, and enter the number of beats for onemeasure of the time signature.
4 Choose the beat value from the pop-up menu to the right.
Changing the Tempo When You Select a PatchYou can give a patch its own tempo setting so that when you select the patch, the tempochanges to the patch tempo setting. MainStage uses the new tempo until you selectanother patch or set with its own tempo setting, tap a new tempo, or until MainStagereceives tempo information from incoming MIDI messages. For more information aboutusing and changing tempo in MainStage, see Using Tempo in a MainStage Concert.
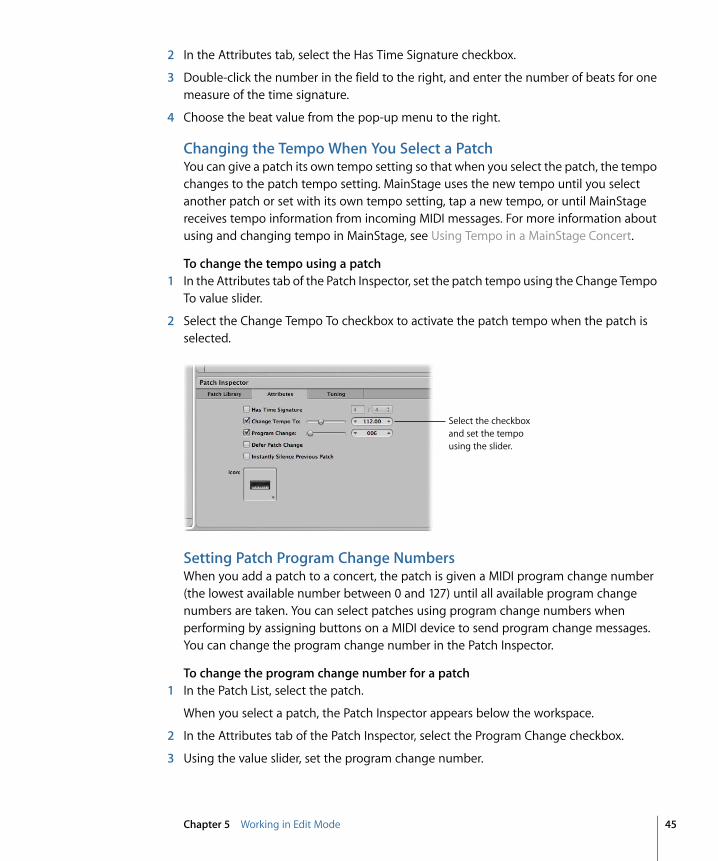
To change the tempo using a patch1 In the Attributes tab of the Patch Inspector, set the patch tempo using the Change Tempo
To value slider.
2 Select the Change Tempo To checkbox to activate the patch tempo when the patch isselected.
Select the checkbox and set the tempo using the slider.
Setting Patch Program Change NumbersWhen you add a patch to a concert, the patch is given a MIDI program change number(the lowest available number between 0 and 127) until all available program changenumbers are taken. You can select patches using program change numbers whenperforming by assigning buttons on a MIDI device to send program change messages.You can change the program change number in the Patch Inspector.
To change the program change number for a patch1 In the Patch List, select the patch.
When you select a patch, the Patch Inspector appears below the workspace.
2 In the Attributes tab of the Patch Inspector, select the Program Change checkbox.
3 Using the value slider, set the program change number.
45Chapter 5 Working in Edit Mode
The MIDI standard allows program change numbers with values from 0 to 127. If allavailable program change numbers in a concert are already in use, any new patchesadded to the concert will be given program change number zero (0), but the number isinactive (the checkbox is not selected). Bank changes are not supported.
If you set a program change number so that it duplicates an existing program changenumber, the word “Duplicate” appears in red next to the Program Change value slider.If two or more patches have the same program change number, and the numbers areactive, the patch that appears first (highest) in the Patch List or patch selector is selectedwhen you send the program change message with the corresponding value.
You can reset program change numbers for all active (non-skipped) patches in a concert.When you reset program change numbers, patches are assigned program change numbersbased on their order in the Patch List, starting from the top. The program change numbersfor skipped (inactive) patches are not reset.
To reset program change numbers for active patches in a concertµ Choose Reset Program Change Numbers from the Action menu for the Patch List (or press
Command-Shift-Option-R).
You can assign buttons and other controls to send program change messages and usethem to select patches in the concert. For information about assigning buttons, seeAssigning Buttons.
Deferring Patch ChangesBy default, when you switch patches, the new patch is ready to play immediately. Youcan “defer” a patch change so that the patch change occurs after the last note of theprevious patch has been released or sustained.
To defer a patch changeµ In the Attributes tab of the Patch Inspector, select the Defer Patch Change checkbox.
Note: Deferring patch change works in Perform mode and Full Screen mode but doesnot work when you are editing patches in Edit mode.
Instantly Silencing the Previous PatchSometimes you may want the sound of the previous patch to continue after you selecta new patch, as when you want to sustain a chord pad while soloing over it. At othertimes, you may want to silence the sound of the previous patch instantly when you selecta new patch.
To instantly silence the previous patch when you select a patchµ In the Attributes tab of the Patch Inspector, select the Instantly Silence Previous Patch
checkbox.
46 Chapter 5 Working in Edit Mode
Changing the Patch IconEach patch has an icon that appears in the Patch List next to the patch name. By default,the patch icon shows the type of channel strip created when the patch was added. Youcan choose a new icon for a patch and use icons to visually distinguish patches in thePatch List.
To change the icon for a patchµ In the Attributes tab of the Patch Inspector, choose an icon from the Icon pop-up menu.
Changing the Tuning for a PatchBy default, patches use the same tuning method as the concert (or the set, if they are ina set with its own tuning method). You can change the tuning for a patch so that it usesa different tuning. When you change the tuning for a patch, it overrides any concert- orset-level tuning method.
To change the tuning for a patch1 In the Patch Inspector, select the Tuning tab.
2 Choose the tuning you want the patch to use from the Method pop-up menu.
Deleting PatchesYou can delete a patch if you decide you no longer want it in the concert.
To delete a patch1 Select the patch in the Patch List.
2 Choose Edit > Delete (or press the Delete key).
47Chapter 5 Working in Edit Mode
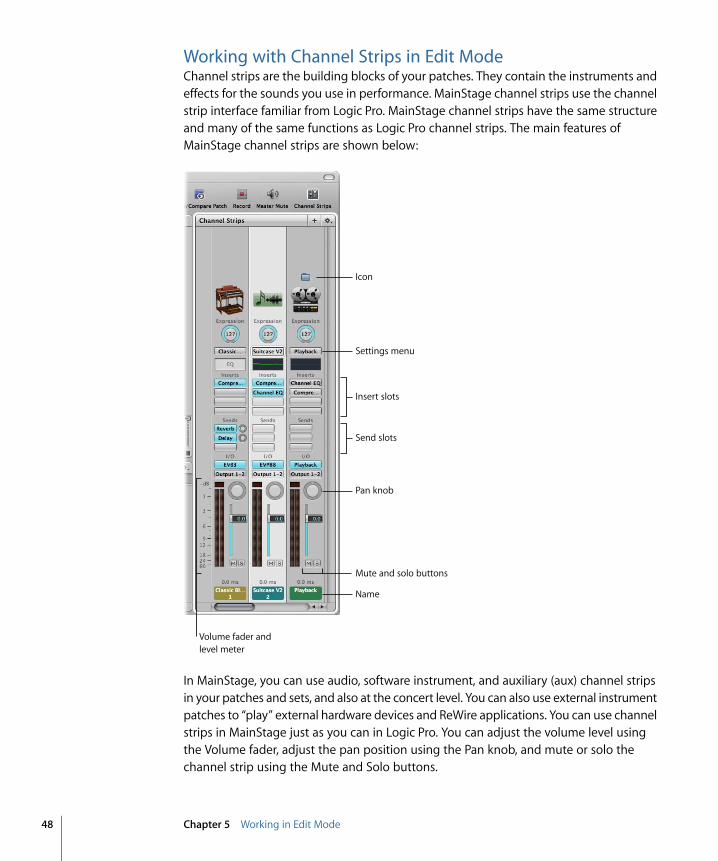
Working with Channel Strips in Edit ModeChannel strips are the building blocks of your patches. They contain the instruments andeffects for the sounds you use in performance. MainStage channel strips use the channelstrip interface familiar from Logic Pro. MainStage channel strips have the same structureand many of the same functions as Logic Pro channel strips. The main features ofMainStage channel strips are shown below:
Settings menu
Pan knob
Icon
Name
Mute and solo buttons
Insert slots
Send slots
Volume fader and level meter
In MainStage, you can use audio, software instrument, and auxiliary (aux) channel stripsin your patches and sets, and also at the concert level. You can also use external instrumentpatches to “play” external hardware devices and ReWire applications. You can use channelstrips in MainStage just as you can in Logic Pro. You can adjust the volume level usingthe Volume fader, adjust the pan position using the Pan knob, and mute or solo thechannel strip using the Mute and Solo buttons.
48 Chapter 5 Working in Edit Mode
A MainStage concert can have a maximum of 1023 software instrument channel strips,512 audio channel strips, 256 external instrument channel strips, and 256 auxiliary (aux)channel strips.
As in Logic Pro, you can add effects using the Insert slots, send the signal to an auxiliarychannel (aux) using the Sends slots, and choose a different output from the Output slot.For audio channel strips, you can change the format between mono and stereo usingthe Format button. For software instrument channel strips, you can change the instrumentusing the Input slot. You can also choose, copy, and save channel strip settings, choosea different channel strip type, or reset the channel strip from the channel strip menu.
Because MainStage is designed for live performance rather than recording and arranging,there are a few differences between MainStage channel strips and Logic Pro channelstrips:
• MainStage channel strips include an Expression dial so that you can easily see thecurrent MIDI Expression being received by the channel strip.
• MainStage channel strips do not have a Record Enable or Bounce button.
• MainStage audio channel strips can use automatic Feedback Protection to alert youwhen feedback occurs on the channel. For information about using Feedback Protection,see Using Feedback Protection with Channel Strips.
• MainStage audio channel strips do not have an input monitoring (i) button. You canuse the Mute button to silence the channel strip.
• In MainStage, you can use the Format button to select mono or stereo format. MainStagedoes not support surround input or surround processing.
• MainStage channel strips do not have Group or Automation Mode pop-up menus.
• MainStage channel strips include a Change All option in both Input and Output pop-upmenus that you can use to change either the input or output for all channel strips ina patch, a set, or for the overall concert.
• In MainStage, the selected channel strip is highlighted in white.
• Only one channel strip in each patch–the first audio channel strip–sends audio to theTuner. The channel strip that sends audio to the Tuner is indicated by a tuning forkicon at the top of the channel strip.
• In MainStage, the name of the channel strip changes when you select a new channelstrip setting, unless you have renamed it.
• In MainStage, the channel strip number (at the bottom of the channel strip) reflects itsorder in the patch, not the concert.
• Surround plug-ins are not available in MainStage.
49Chapter 5 Working in Edit Mode

• You can choose the information displayed on the channel strip, including latencyinformation, by Control-clicking the channel strip and choosing the information youwant to display from the shortcut menu.
• The Playback plug-in is available only in MainStage, not in Logic Pro.
For more information about working with channel strips, see the “Working withInstruments and Effects” and “Mixing” chapters in the Logic Pro User Manual. For completeinformation about the instruments and effects available in Logic Studio, see the Logic StudioInstruments and Logic Studio Effects guides.
To learn how to add a channel strip, see Adding a Channel Strip. To learn how to changea channel strip setting, see Changing a Channel Strip Setting.
Selecting Channel StripsWhen you add a channel strip to a patch (or add a channel strip at the set or concertlevel), the channel strip is selected in the Channel Strips area, and available settings appearin the Channel Strip Settings browser. You can select a channel strip directly by clickingit in the Channel Strips area and also select an adjacent channel strip by using keycommands:
SelectionKey command
The channel strip to the leftLeft Arrow
The channel strip to the rightRight Arrow
Showing Signal Flow Channel StripsIn addition to the channel strips in a patch, you can view and edit signal flow channelstrips in the Channel Strips area. Signal flow channel strips include the Output and Masterchannel strips for the concert, auxes that are receiving signal from a channel strip in thepatch, and any set- or concert-level channel strips that are available when the patch isselected. You can also view signal flow channel strips at the set level.
When you show signal flow channel strips, channel strips at the concert level, includingOutput and Aux channel strips, include a small concert icon near the top of the channelstrip to make it easy to distinguish them from patch-level channel strips. Channel stripsat the set level include a small folder icon so they can also be easily distinguished.
You can edit signal flow channel strips in the Channel Strips area. For example, you canadjust the volume fader or pan slider of a signal flow channel strip, or add effects to anaux channel strip.
To show signal flow channel stripsµ Choose Show Signal Flow Channel Strips from the Action menu in the upper-right corner
of the Channel Strips area.
50 Chapter 5 Working in Edit Mode
Creating an Alias of a Channel StripYou can create an alias of a channel strip and use the alias in different patches or sets.Aliases allow you to share highly memory-intensive plug-ins, such as third-partymulti-channel instruments and samplers, between different patches, rather than creatingmultiple instances of these plug-ins. In some cases, creating an alias can be more efficient(use fewer resources) than adding a concert- or set-level channel strip.
To create an alias of a channel strip1 In the Channel Strips area, select the channel strip.
2 Choose Edit > Copy, or press Command-C (default).
3 In the Patch List, select the patch in which you want to use the alias.
4 Choose Edit > Paste as Alias, or press Command-Option-V (default).
The alias is pasted after the last channel strip in the patch (but before any signal flowchannel strips, if they are visible). An alias icon appears near the top of the alias todistinguish it from the channel strips in the patch.
You can use an alias in multiple patches or sets. When you change any setting on theoriginal channel strip, those changes are reflected in the aliases of the channel strip. Youmay want to audition each patch that uses an alias after changing the settings of theoriginal channel strip, to make sure it sounds the way you want.
Note: You can’t import a patch or set containing an alias, because the aliased channelstrip may not be available.
You can create an alias of a multi-output instrument, such as the EXS24 mkII, to use inanother patch or set in the concert. When you copy a multi-output instrument to createan alias, be sure to select all of the aux channel strips for the instrument so that thecomplete multi-output instrument is pasted as an alias. For information about usingmulti-output instruments in MainStage, see Using Multiple Instrument Outputs inMainStage.
Editing Channel Strips in MainStageYou can add instruments to software instrument channel strips and add effects to anychannel strip in the Channel Strips area. Adding instruments and effects to a channelstrip is the same in MainStage as it is in Logic Pro.
51Chapter 5 Working in Edit Mode
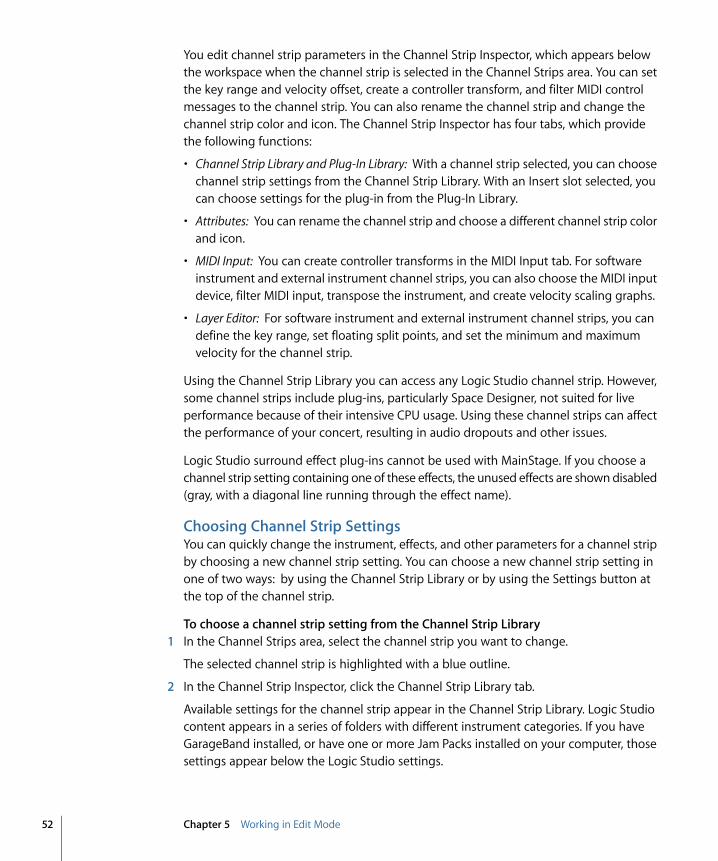
You edit channel strip parameters in the Channel Strip Inspector, which appears belowthe workspace when the channel strip is selected in the Channel Strips area. You can setthe key range and velocity offset, create a controller transform, and filter MIDI controlmessages to the channel strip. You can also rename the channel strip and change thechannel strip color and icon. The Channel Strip Inspector has four tabs, which providethe following functions:
• Channel Strip Library and Plug-In Library: With a channel strip selected, you can choosechannel strip settings from the Channel Strip Library. With an Insert slot selected, youcan choose settings for the plug-in from the Plug-In Library.
• Attributes: You can rename the channel strip and choose a different channel strip colorand icon.
• MIDI Input: You can create controller transforms in the MIDI Input tab. For softwareinstrument and external instrument channel strips, you can also choose the MIDI inputdevice, filter MIDI input, transpose the instrument, and create velocity scaling graphs.
• Layer Editor: For software instrument and external instrument channel strips, you candefine the key range, set floating split points, and set the minimum and maximumvelocity for the channel strip.
Using the Channel Strip Library you can access any Logic Studio channel strip. However,some channel strips include plug-ins, particularly Space Designer, not suited for liveperformance because of their intensive CPU usage. Using these channel strips can affectthe performance of your concert, resulting in audio dropouts and other issues.
Logic Studio surround effect plug-ins cannot be used with MainStage. If you choose achannel strip setting containing one of these effects, the unused effects are shown disabled(gray, with a diagonal line running through the effect name).
Choosing Channel Strip SettingsYou can quickly change the instrument, effects, and other parameters for a channel stripby choosing a new channel strip setting. You can choose a new channel strip setting inone of two ways: by using the Channel Strip Library or by using the Settings button atthe top of the channel strip.
To choose a channel strip setting from the Channel Strip Library1 In the Channel Strips area, select the channel strip you want to change.
The selected channel strip is highlighted with a blue outline.
2 In the Channel Strip Inspector, click the Channel Strip Library tab.
Available settings for the channel strip appear in the Channel Strip Library. Logic Studiocontent appears in a series of folders with different instrument categories. If you haveGarageBand installed, or have one or more Jam Packs installed on your computer, thosesettings appear below the Logic Studio settings.
52 Chapter 5 Working in Edit Mode
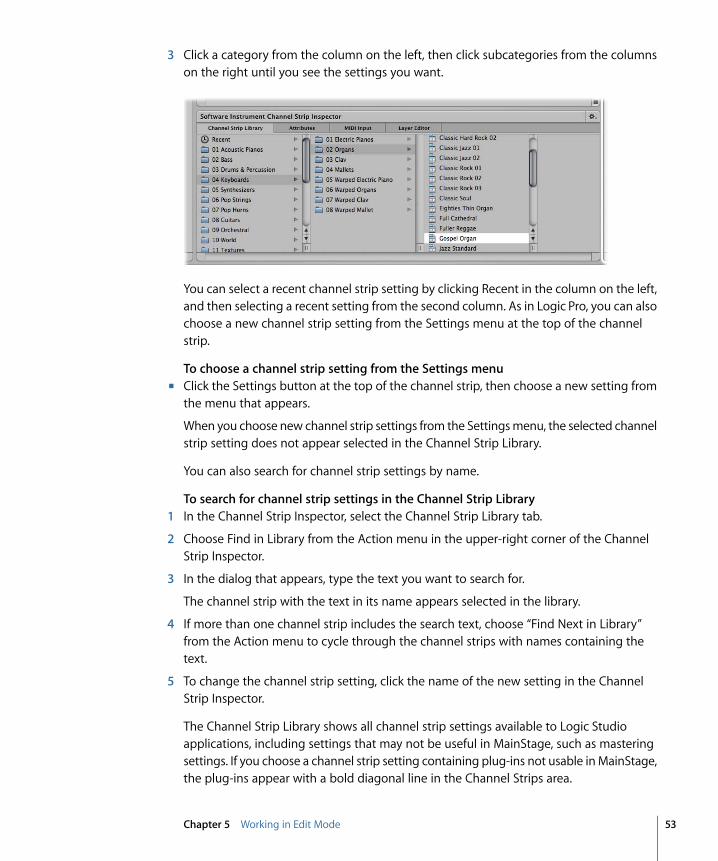
3 Click a category from the column on the left, then click subcategories from the columnson the right until you see the settings you want.
You can select a recent channel strip setting by clicking Recent in the column on the left,and then selecting a recent setting from the second column. As in Logic Pro, you can alsochoose a new channel strip setting from the Settings menu at the top of the channelstrip.
To choose a channel strip setting from the Settings menuµ Click the Settings button at the top of the channel strip, then choose a new setting from
the menu that appears.
When you choose new channel strip settings from the Settings menu, the selected channelstrip setting does not appear selected in the Channel Strip Library.
You can also search for channel strip settings by name.
To search for channel strip settings in the Channel Strip Library1 In the Channel Strip Inspector, select the Channel Strip Library tab.
2 Choose Find in Library from the Action menu in the upper-right corner of the ChannelStrip Inspector.
3 In the dialog that appears, type the text you want to search for.
The channel strip with the text in its name appears selected in the library.
4 If more than one channel strip includes the search text, choose “Find Next in Library”from the Action menu to cycle through the channel strips with names containing thetext.
5 To change the channel strip setting, click the name of the new setting in the ChannelStrip Inspector.
The Channel Strip Library shows all channel strip settings available to Logic Studioapplications, including settings that may not be useful in MainStage, such as masteringsettings. If you choose a channel strip setting containing plug-ins not usable in MainStage,the plug-ins appear with a bold diagonal line in the Channel Strips area.
53Chapter 5 Working in Edit Mode
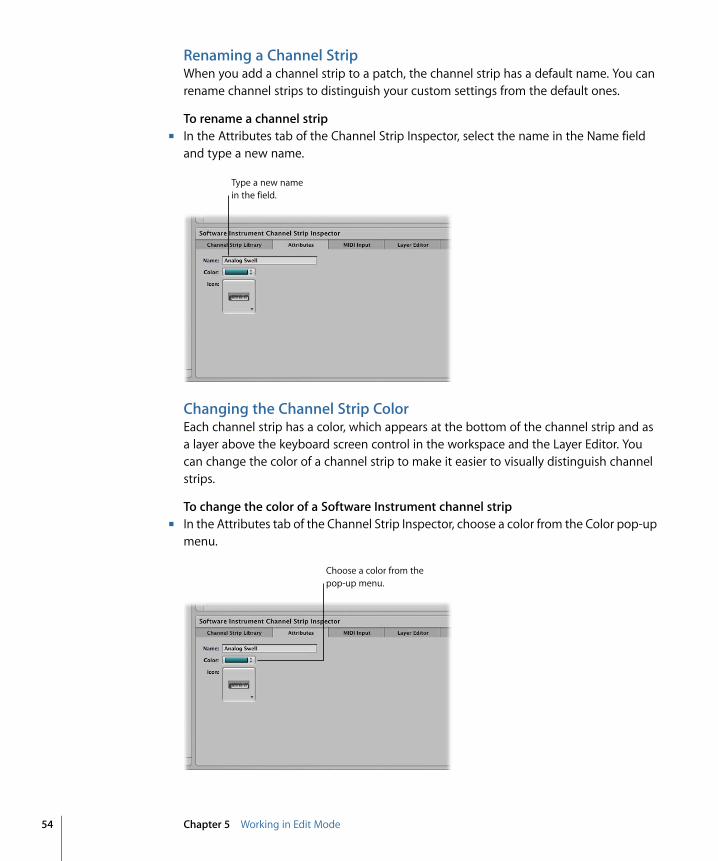
Renaming a Channel StripWhen you add a channel strip to a patch, the channel strip has a default name. You canrename channel strips to distinguish your custom settings from the default ones.
To rename a channel stripµ In the Attributes tab of the Channel Strip Inspector, select the name in the Name field
and type a new name.
Type a new name in the field.
Changing the Channel Strip ColorEach channel strip has a color, which appears at the bottom of the channel strip and asa layer above the keyboard screen control in the workspace and the Layer Editor. Youcan change the color of a channel strip to make it easier to visually distinguish channelstrips.
To change the color of a Software Instrument channel stripµ In the Attributes tab of the Channel Strip Inspector, choose a color from the Color pop-up
menu.
Choose a color from the pop-up menu.
54 Chapter 5 Working in Edit Mode
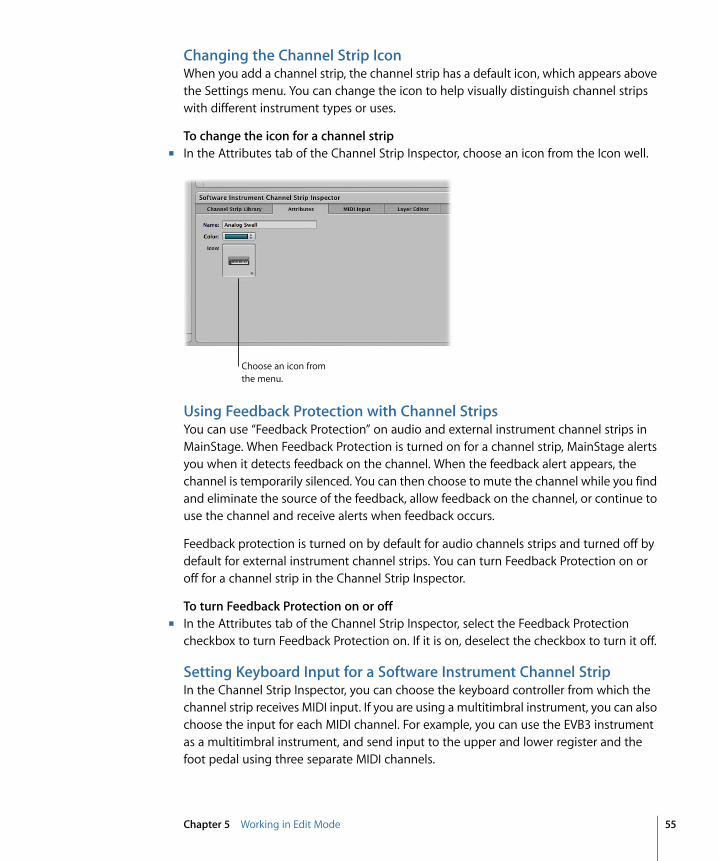
Changing the Channel Strip IconWhen you add a channel strip, the channel strip has a default icon, which appears abovethe Settings menu. You can change the icon to help visually distinguish channel stripswith different instrument types or uses.
To change the icon for a channel stripµ In the Attributes tab of the Channel Strip Inspector, choose an icon from the Icon well.
Choose an icon from the menu.
Using Feedback Protection with Channel StripsYou can use “Feedback Protection” on audio and external instrument channel strips inMainStage. When Feedback Protection is turned on for a channel strip, MainStage alertsyou when it detects feedback on the channel. When the feedback alert appears, thechannel is temporarily silenced. You can then choose to mute the channel while you findand eliminate the source of the feedback, allow feedback on the channel, or continue touse the channel and receive alerts when feedback occurs.
Feedback protection is turned on by default for audio channels strips and turned off bydefault for external instrument channel strips. You can turn Feedback Protection on oroff for a channel strip in the Channel Strip Inspector.
To turn Feedback Protection on or offµ In the Attributes tab of the Channel Strip Inspector, select the Feedback Protection
checkbox to turn Feedback Protection on. If it is on, deselect the checkbox to turn it off.
Setting Keyboard Input for a Software Instrument Channel StripIn the Channel Strip Inspector, you can choose the keyboard controller from which thechannel strip receives MIDI input. If you are using a multitimbral instrument, you can alsochoose the input for each MIDI channel. For example, you can use the EVB3 instrumentas a multitimbral instrument, and send input to the upper and lower register and thefoot pedal using three separate MIDI channels.
55Chapter 5 Working in Edit Mode
To set the keyboard input for a software instrument channel strip1 In the Channel Strip Inspector, click the MIDI Input tab.
2 Choose the MIDI input device from the Keyboard pop-up menu in the Input section.
The names in the Keyboard pop-up menu correspond to keyboard screen controls in theworkspace.
To set multitimbral input for different MIDI channels1 In the Channel Strip Inspector, click the MIDI Input tab.
2 Choose Multitimbral from the Keyboard pop-up menu in the Input section.
3 In the Multitimbral Settings dialog, choose the input device for each MIDI channel youwant to receive MIDI input.
Transposing Software Instrument Channel StripsYou can transpose (change the pitch of ) a software instrument channel strip. When youtranspose a channel strip, every MIDI note received by the channel strip is transposed bythe number of semitones set in the Transpose value slider.
To transpose the MIDI input of a software instrument channel strip1 Select the channel strip in the Channel Strips area.
2 In the MIDI Input tab of the Channel Strip Inspector, set the value using the Transposevalue slider. You can click the value and drag up or down to set the value, click the uparrow or down arrow, or double-click the value and type a new value.
Filtering MIDI MessagesYou can filter some MIDI messages for a channel strip in the Channel Strip Inspector.When you select one or more MIDI message types in the Filter section of the ChannelStrip Inspector, the corresponding MIDI message types are filtered out of any incomingMIDI data and are not sent to the channel strip.
You can filter the following types of MIDI messages:
• Pitch Bend
• Sustain (control message 64)
• Modulation (control message 1)
• Expression (control message 11)
• Aftertouch
To filter incoming MIDI messages1 In the Channel Strip Inspector, click the MIDI Input tab.
2 In the Filter section of the MIDI Input tab, select the checkbox for the MIDI messages youwant to filter.
56 Chapter 5 Working in Edit Mode
If you have created a controller transform, you can filter the input message type, and thecontroller transform will still send its output message type. It is also possible to filter theoutput message type, but in this case the output of the controller transform will be filtered.
Setting a Channel Strip to Ignore Hermode TuningIf a patch (or the concert or set containing the patch) is set to use Hermode tuning, butthe patch contains a channel strip (for example, one with a drum or percussion instrument)that you do not want to use Hermode tuning, you can set the individual channel strip toignore Hermode tuning.
To set a channel strip to ignore Hermode tuningµ In the MIDI Input tab of the Channel Strip Inspector, select the Ignore Hermode Tuning
checkbox.
For information about using Hermode tuning, see the Logic Pro User Manual.
Working with GraphsUsing graphs, you can graphically remap the values for some MIDI control messages sothat input values from your controller produce different output values for the channelstrip or plug-in parameter. Graphs make it easier to see and modify a range of values fora parameter, such as velocity or filter cutoff.
You can use graphs for the following types of parameters:
• Controller transforms
• Velocity scaling (both input velocity and note input)
• Parameters to which a screen control is mapped
You open a graph window by clicking the button for that type of graph in the appropriateInspector. The Transform and Velocity Scaling graphs for the selected channel strip areavailable in the MIDI Input tab of the Channel Strip Inspector. The Parameter graph forthe selected screen control is available in the tab for the individual mapping as well asin the Mappings tab in the (Edit mode) Screen Control Inspector.
The graph shows the range of input values on the horizontal (x) axis, moving from leftto right, and shows the range of output values on the vertical (y) axis, moving from bottomto top.
In the graph window, you have several ways of working. You can edit the graph curvedirectly, edit values numerically using the Precision Editor, or use the Curve buttons toset the graph to one of the predefined curves.
57Chapter 5 Working in Edit Mode
Most of the ways you edit graphs are the same, regardless of the type of graph—althoughthere are a few features specific to one or another type. For Parameter graphs, you canchange the minimum and maximum range values for the graph using the Range Minand Range Max value sliders. For information about controller transforms, see CreatingController Transforms. For information about velocity scaling, see Scaling Channel StripVelocity. For information about parameter mapping graphs, see Using Parameter MappingGraphs.
To edit a graph1 Select the channel strip or screen control you want the graph to apply to.
2 Select the MIDI Input tab (for transform and velocity scaling graphs) or the Mapping tab(for parameter mapping graphs).
3 Click the graph button for the type of graph you want to edit.
The graph window opens.
4 Do one of the following:
• Click one of the Curve buttons to set the graph to one of the preset curves.
• Click the curve at the point where you want to add a node, then drag the node to thedesired value. Drag horizontally to change the input value, or vertically to change theoutput value.
As you drag, the current values of the node appear next to the pointer.
• Double-click the curve at the point where you want to add a node, then edit the valuesfor the node in the Precision Editor.
• Option-click any part of the curve (except a node), then drag the dotted part of thecurve to make the curve nonlinear.
5 Continue adding and adjusting points on the curve until you achieve the result you want.
6 When you are finished, click the close button at the upper-left corner of the graph windowto close it.
To invert the values of the graphDo one of the following:
µ In the graph window, click the Invert button.
µ In the tab for the mapping, select the Invert Parameter Range checkbox.
To reset the graph to its default valuesµ Click the Revert to Default button at the top of the graph window.
After you have edited a graph, the button for the graph in the Inspector shows the editedshape of the graph in a dark blue color to make it easier to identify which graphs youhave edited and how.
58 Chapter 5 Working in Edit Mode
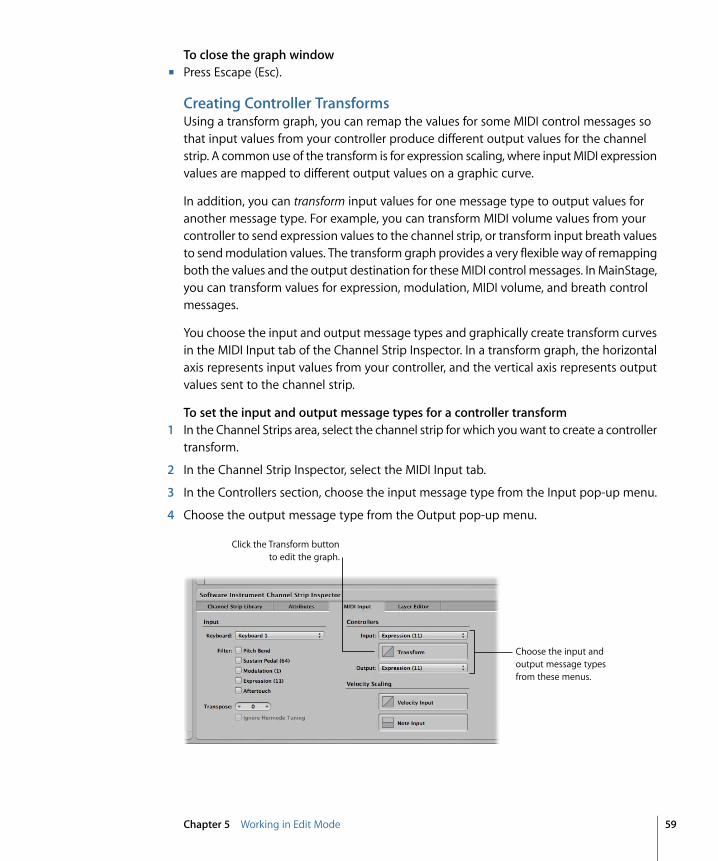
To close the graph windowµ Press Escape (Esc).
Creating Controller TransformsUsing a transform graph, you can remap the values for some MIDI control messages sothat input values from your controller produce different output values for the channelstrip. A common use of the transform is for expression scaling, where input MIDI expressionvalues are mapped to different output values on a graphic curve.
In addition, you can transform input values for one message type to output values foranother message type. For example, you can transform MIDI volume values from yourcontroller to send expression values to the channel strip, or transform input breath valuesto send modulation values. The transform graph provides a very flexible way of remappingboth the values and the output destination for these MIDI control messages. In MainStage,you can transform values for expression, modulation, MIDI volume, and breath controlmessages.
You choose the input and output message types and graphically create transform curvesin the MIDI Input tab of the Channel Strip Inspector. In a transform graph, the horizontalaxis represents input values from your controller, and the vertical axis represents outputvalues sent to the channel strip.
To set the input and output message types for a controller transform1 In the Channel Strips area, select the channel strip for which you want to create a controller
transform.
2 In the Channel Strip Inspector, select the MIDI Input tab.
3 In the Controllers section, choose the input message type from the Input pop-up menu.
4 Choose the output message type from the Output pop-up menu.
Click the Transform button to edit the graph.
Choose the input and output message types from these menus.
59Chapter 5 Working in Edit Mode
To open the Transform graphµ In the MIDI Input tab of the Channel Strip Inspector, click the Transform button.
The Transform graph opens.
If a patch contains more than one channel strip with a transform graph, the transformcurves for the other channel strips in the patch appear in the controller Transform graphwindow behind the current curve. Each channel strip in the patch can have its owncontroller transform.
For information about editing the graph, see Working with Graphs.
Scaling Channel Strip VelocityYou can scale the output velocity of a channel strip using the Velocity Scaling graphs.You can scale output velocity based on note input or input velocity.
When you perform velocity scaling, each input velocity (regardless of the note beingplayed) is scaled to the output velocity.
When you perform note scaling, output velocity is scaled depending on the note in thekey range. This is useful when you want to have a parameter change in different parts ofthe key range; for example, when a filter or attack parameter opens for higher note valuesto give a brighter, sharper sound.
To open a velocity scaling graph1 In the Channel Strips area, select the channel strip on which you want to perform velocity
scaling.
2 In the Channel Strip Inspector, select the MIDI Input tab.
3 In the MIDI Input tab, do one of the following:
• To open the velocity input graph, select the Velocity Input button.
• To open the note input graph, select the Note Input button.
The selected velocity scaling graph opens.
For information about editing the graph, see Working with Graphs.
Creating Keyboard Layers and SplitsIf you play a keyboard controller, you can easily create keyboard layers and splits in yourMainStage patches. You create layers and splits by adding two or more channel strips toa patch and setting the Low Key and High Key for each channel strip to define its keyrange. The key range defines the range of notes on a keyboard controller that triggersound from a software instrument or external instrument in the channel strip. You candefine key ranges so that they overlap (for layered sounds) or are contiguous (for splits).
60 Chapter 5 Working in Edit Mode
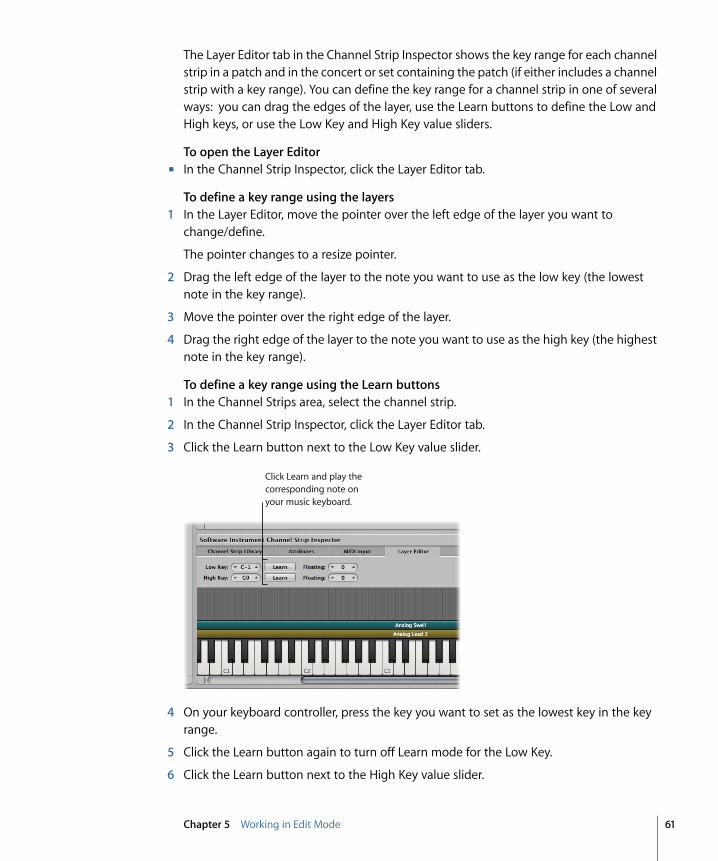
The Layer Editor tab in the Channel Strip Inspector shows the key range for each channelstrip in a patch and in the concert or set containing the patch (if either includes a channelstrip with a key range). You can define the key range for a channel strip in one of severalways: you can drag the edges of the layer, use the Learn buttons to define the Low andHigh keys, or use the Low Key and High Key value sliders.
To open the Layer Editorµ In the Channel Strip Inspector, click the Layer Editor tab.
To define a key range using the layers1 In the Layer Editor, move the pointer over the left edge of the layer you want to
change/define.
The pointer changes to a resize pointer.
2 Drag the left edge of the layer to the note you want to use as the low key (the lowestnote in the key range).
3 Move the pointer over the right edge of the layer.
4 Drag the right edge of the layer to the note you want to use as the high key (the highestnote in the key range).
To define a key range using the Learn buttons1 In the Channel Strips area, select the channel strip.
2 In the Channel Strip Inspector, click the Layer Editor tab.
3 Click the Learn button next to the Low Key value slider.
Click Learn and play the corresponding note on your music keyboard.
4 On your keyboard controller, press the key you want to set as the lowest key in the keyrange.
5 Click the Learn button again to turn off Learn mode for the Low Key.
6 Click the Learn button next to the High Key value slider.
61Chapter 5 Working in Edit Mode
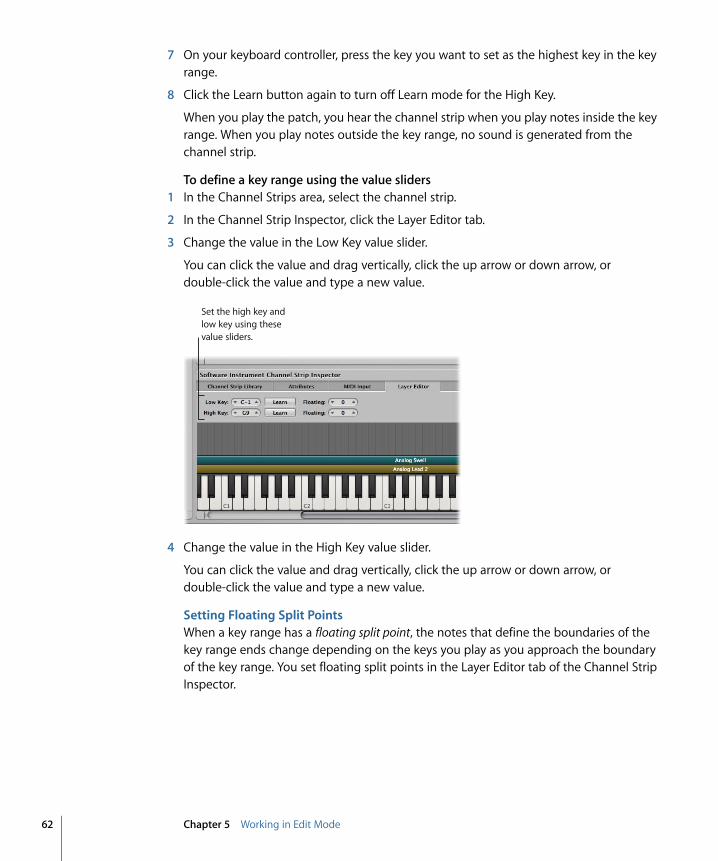
7 On your keyboard controller, press the key you want to set as the highest key in the keyrange.
8 Click the Learn button again to turn off Learn mode for the High Key.
When you play the patch, you hear the channel strip when you play notes inside the keyrange. When you play notes outside the key range, no sound is generated from thechannel strip.
To define a key range using the value sliders1 In the Channel Strips area, select the channel strip.
2 In the Channel Strip Inspector, click the Layer Editor tab.
3 Change the value in the Low Key value slider.
You can click the value and drag vertically, click the up arrow or down arrow, ordouble-click the value and type a new value.
Set the high key and low key using these value sliders.
4 Change the value in the High Key value slider.
You can click the value and drag vertically, click the up arrow or down arrow, ordouble-click the value and type a new value.
Setting Floating Split PointsWhen a key range has a floating split point, the notes that define the boundaries of thekey range ends change depending on the keys you play as you approach the boundaryof the key range. You set floating split points in the Layer Editor tab of the Channel StripInspector.
62 Chapter 5 Working in Edit Mode
Floating split points can be explained using an example. If you set the Low Key of a keyrange to C1, set a floating split point value of 3, then play notes immediately above C1(for example, the notes F1-Eb1-D1), and continue playing downward past C1 (for example,the notes C1-Bb0-A0), the split point moves down to include those notes, up to thefloating split point value (3 semitones). If, however, you start by playing notes immediatelybelow the Low Key (for example, the notes G0-A0-B0) and continue playing upward pastC1 (for example, the notes C1-D1-E1), the split point moves up to include those notes,up to the floating split point value. (In this example, C1 and D1 would be included, butnot E1, which is four semitones above the Low Key.)
To set floating split points for a layer/key range1 In the Layer Editor tab, click the Low Key Floating value slider and drag vertically to change
the value, or double-click the current value and type a new value (the value is the numberof semitones used for the split).
2 Click the High Key Floating value slider and drag vertically to change the value, ordouble-click the current value and type a new value.
You can also create a keyboard split by adding a channel strip at the set level and adjustingthe key range of the channel strips in the patches in the set. The channel strip at the setlevel takes precedence over any channel strips in patches in the set for the notes in itskey range. For information about adding a channel strip at the set level, see Working atthe Set Level.
Setting the Velocity RangeBy default, the velocity of a channel strip extends from 1 to 127. You can limit the velocityrange so that the channel strip only responds when the notes you play on your controllerfall between the Min and Max values of the velocity range.
To set the velocity range for a channel strip1 In the Channel Strips area, select the channel strip.
2 In the Channel Strip Inspector, click the Layer Editor tab.
3 In the Layer Editor, set the minimum velocity that triggers the channel strip using theVelocity Min value slider. (Click the value and drag vertically to change the value, ordouble-click the value and type a new value.)
4 Set the maximum velocity that triggers the channel strip using the Velocity Max valueslider.
Overriding Concert- and Set-Level Key RangesIf a software instrument channel strip exists at the concert level, the concert-level channelstrip takes precedence over any patch-level software instrument channel strips within itskey range. This means that when you play any notes in the key range of the concert-levelchannel strip on a keyboard controller, you hear only the concert-level channel strip, evenwhen a patch is selected.
63Chapter 5 Working in Edit Mode
Similarly, if a software instrument channel strip exists at the set level, the same conditionapplies for all patches in the set. That is, the set-level channel strip takes precedence overany patch-level channel strips within its key range.
You can override concert- or set-level channel strips for a channel strip on an individualpatch, so that the patch-level channel strip takes precedence over the concert-level orset-level channel strips.
To override concert- or set-level key ranges1 In the Patch List, select the patch with the channel strip that you want to override the
concert- or set-level channel strip.
2 In the Channel Strips area, select the channel strip with the key range that you want tooverride the concert- or set-level key range.
3 In the Channel Strip Inspector, select the Layer Editor.
4 Select the “Override parent ranges” checkbox.
The “Override parent ranges” checkbox is available only if there is a concert- or set-levelchannel strip.
Using the EXS24 mkII Instrument Editor in MainStageFor channel strips using the EXS24 mkII sampler instrument, you can edit samplerinstrument zones and groups in the EXS Instrument Editor. The EXS24 mkII InstrumentEditor works exactly the same in MainStage as it does in Logic Pro, with one exception: inMainStage, you cannot open the Sample Editor to edit individual audio samples.
In an EXS24 mkII instrument, a zone is a location into which a single sample (an audiofile) is loaded from a hard disk. You can edit zone parameters in Zone view mode. Zonescan be assigned to groups, which provide parameters that allow you to simultaneouslyedit all zones in the group. You can define as many groups as desired. The InstrumentEditor has two view modes: Zones view and Groups view. You can edit zones in Zonesview and edit group parameters in Groups view.
To open the EXS24 mkII Instrument Editor1 In a channel strip using the EXS24 mkII, double-click the EXS24 slot in the I/O section.
64 Chapter 5 Working in Edit Mode

2 In the upper-right area of the EXS24 mkII plug-in window, click the Edit button.
Click the Edit button to open the Instrument Editor.
The Instrument Editor opens. When you play notes on the keyboard of the EXS24 mkIIInstrument Editor, the notes are played on the selected channel strip. You can switchbetween Zones view and Groups view, click individual zones to view their parameters,click notes on the keyboard to hear the samples assigned to them, create zones andgroups, and edit zone and group parameters just as you can in Logic Pro.
For in-depth information about using the EXS24 mkII Instrument Editor, refer to theLogic Studio Instruments Help.
Using Multiple Instrument Outputs in MainStageMainStage supports the multiple output versions of the EXS24 mkII, Ultrabeat, and someAudio Units instruments. You can insert multi output instruments and use them to routedifferent outputs to different physical outputs, apply different plug-ins or processing todifferent outputs, or for other uses.
65Chapter 5 Working in Edit Mode
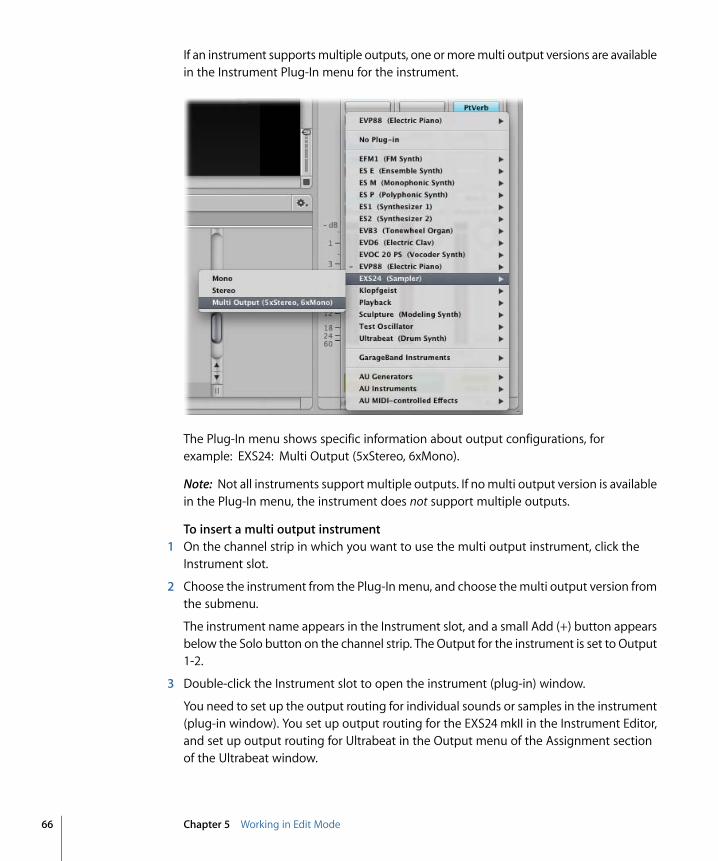
If an instrument supports multiple outputs, one or more multi output versions are availablein the Instrument Plug-In menu for the instrument.
The Plug-In menu shows specific information about output configurations, forexample: EXS24: Multi Output (5xStereo, 6xMono).
Note: Not all instruments support multiple outputs. If no multi output version is availablein the Plug-In menu, the instrument does not support multiple outputs.
To insert a multi output instrument1 On the channel strip in which you want to use the multi output instrument, click the
Instrument slot.
2 Choose the instrument from the Plug-In menu, and choose the multi output version fromthe submenu.
The instrument name appears in the Instrument slot, and a small Add (+) button appearsbelow the Solo button on the channel strip. The Output for the instrument is set to Output1-2.
3 Double-click the Instrument slot to open the instrument (plug-in) window.
You need to set up the output routing for individual sounds or samples in the instrument(plug-in window). You set up output routing for the EXS24 mkII in the Instrument Editor,and set up output routing for Ultrabeat in the Output menu of the Assignment sectionof the Ultrabeat window.
66 Chapter 5 Working in Edit Mode
4 On the channel strip, click the Add button to add additional outputs.
Each time you add an output, a new section of the channel strip is added, with the nextavailable pair of outputs.
Each output uses the same instrument, but each can have its own inserts, volume, pan,and expressions settings and its own effect sends, as well as its own outputs.
For more information about using multiple instrument outputs, see the Logic ProUser Manual and the Logic Studio Instruments manual. Information about specificinstruments (for example, Ultrabeat) can be found in the chapters covering thoseinstruments.
Using External MIDI Instruments in MainStageYou can add an external MIDI instrument channel strip to a patch and use it to play anexternal instrument, such as a hardware synthesizer. You can also use an externalinstrument to “play” a ReWire application.
When you use an external MIDI instrument channel strip, you choose the MIDI channelto send MIDI output from MainStage to the instrument, and choose the audio inputs toreceive audio from the instrument. The audio output from the instrument is routed tothe input of the channel strip, where you can process it using MainStage effects.
To add an external instrument channel strip1 Click the Add Channel Strip (+) button in the upper-right corner of the Channel Strips
area.
2 In the New Channel Strip dialog, select External Instrument.
You can also choose the MIDI input and output, the format, and the audio input andoutput for the channel strip. You can choose an audio channel or a ReWire applicationfor the input, but cannot choose a bus. The MIDI input pop-up menu shows the Keyboardor MIDI Activity screen controls (which receive MIDI note input) currently in the workspace.
Note: When using an external instrument to send MIDI to a ReWire slave application(such as Reason or Live), you should disable any MIDI input the slave application receivesdirectly from the hardware controller. For information about disabling MIDI input froma hardware device, consult the documentation for the application.
For ReWire applications, when you add an external channel strip, set the MIDI port to theReWire slave. The Channel list also updates based on the port. Some ReWire slaves setup multiple ports. To use a ReWire application with MainStage, open the ReWire applicationafter opening MainStage.
67Chapter 5 Working in Edit Mode
When you play your keyboard controller with the patch containing the external MIDIinstrument selected, MainStage sends note and other MIDI messages to the chosen MIDIOutput and MIDI Channel, receives audio from the chosen Input, and sends the audiooutput to the chosen Output. You can also send a program change message to theexternal instrument when you select the patch to control which program the externalinstrument uses.
To send a program change to an external instrument when you select a patch1 In the Channel Strip Inspector, click the MIDI Out tab.
2 In the MIDI Out tab, select the Send Program Change checkbox.
The Program Change value is set to –1 by default, so that no program change is sentwhen you select the Send Program Change checkbox, until you change the value.
3 Set the program change number you want to send using the Send Program Change valueslider.
4 If you want to send a Bank Change message, select the Send Program Change checkbox,then set the most-significant byte (MSB) and least-significant byte (LSB) of the bankchange number using the Bank MSB and Bank LSB value sliders.
When you select the patch, the program change and bank change messages are sent tothe external instrument. Also note that program and bank changes are sent when youedit the program change and bank change value sliders in the Channel Strip Inspector(so you can be sure that the values you enter send the correct program and bank changemessages). For more information about using external MIDI instruments, see the Logic ProUser Manual.
If you want the external instrument to respond to the program change, but do not wantit to receive note or other MIDI information from your controller, click the MIDI Input taband choose None from the Keyboard pop-up menu.
You can also use a knob or fader mapped to the Program Change action to send programchanges to an external instrument.
To send program changes to an external instrument using a screen control1 In the workspace, click the screen control you want to use to send program change
messages.
2 In the Screen Control Inspector, click the Unmapped tab.
3 In the Mapping browser, select the external instrument, then select MIDI Controller folderfrom the submenu.
4 In the third column from the left, select Program Change.
The screen control is mapped to the Program Change parameter. By moving the hardwarecontrol assigned to the screen control, you can send program changes to the externalinstrument.
68 Chapter 5 Working in Edit Mode
Note: If the MIDI Out parameter of the external instrument channel strip is set to theexternal instrument when you map the screen control to the Program change parameter,a program change (Program 0) is sent when you create the mapping. If you are editingthe program on the external instrument, your changes may be lost. To map the screencontrol without sending an immediate program change to the external instrument, chooseNone from the MIDI Out slot of the external instrument before you create the mapping,then choose the external instrument in the MIDI Out slot. No program change is sentuntil you move the knob or fader.
Using the Activity MonitorAs you work on your concert in Edit mode, the Activity Monitor in the toolbar shows thecurrent CPU and memory information as well as received MIDI messages. The CPU sectionof the Activity Monitor glows red to indicate a CPU overload condition.
The Memory section of the Activity Monitor glows yellow to indicate a low-memorycondition. If an extreme low-memory condition occurs, an alert appears, warning you tosave the concert before MainStage quits. Low-memory conditions can be caused byhaving too many memory-intensive channel strips or plug-ins in a concert or by usingother memory-intensive applications (including ReWire applications) together with theconcert. If a low-memory condition occurs, try reopening the concert and consolidatingsome memory-intensive plug-ins or channel strips.
Deleting Channel StripsYou can delete a channel strip if you decide you no longer want it in a patch.
To delete a channel strip1 Select the channel strip in the Channel Strips area.
2 Choose Edit > Delete (or press the Delete key).
Mapping Screen ControlsAfter you have created your patches and learned controller assignments for the screencontrols you want to use, you can map MainStage screen controls to channel strip andplug-in parameters to modify the sound of your patches while you perform, or map themto MainStage actions to control other functions.
You map screen controls to parameters in Edit mode. After you learn controllerassignments (in Layout mode), the screen controls in the workspace do not respond tomovements of physical controls on your MIDI hardware until you map them to channelstrip parameters (in Edit mode). There are two ways to map screen controls toparameters: by visually selecting parameters on channel strips or plug-in windows or bychoosing parameters in the Parameter Mapping browser.
69Chapter 5 Working in Edit Mode
Mapping Screen Controls to Channel Strip and Plug-In ParametersAfter you have made your controller assignments, you can begin mapping screen controlsto the parameters in your patches you will want to control while you are performing. Youwill likely want to map screen controls to parameters in each patch in a concert, so thatyou can easily access and modify the parameters you want for each patch when you areperforming live. You can also map parameters at the concert level to control mastervolume, view master levels, or modify concert-wide effects.
You can map screen controls to channel strip and plug-in parameters in one of twoways: by mapping screen controls visually to parameters on the channel strip or in aplug-in window or by using the Parameter Mapping browser.
You map screen controls to parameters in Edit mode. The screen controls in the workspacedo not respond to movements of physical controls on your MIDI hardware until you mapthem to channel strip parameters.
To map a screen control to a channel strip or plug-in parameter1 In the workspace, click the screen control you want to map.
The screen control is highlighted in blue. The Screen Control Inspector appears belowthe workspace, showing the parameters for the selected screen control. The Screen ControlInspector includes General and Mapping tabs as well as a tab labeled Unmapped.
2 Press Command-L.
The Screen Control Inspector opens to the Unmapped tab, showing the ParameterMapping browser. The Map Parameter button lights red to indicate that mapping is active.
3 To map the screen control to a channel strip parameter, click the control for the parameteron the channel strip in the Channel Strips area.
70 Chapter 5 Working in Edit Mode
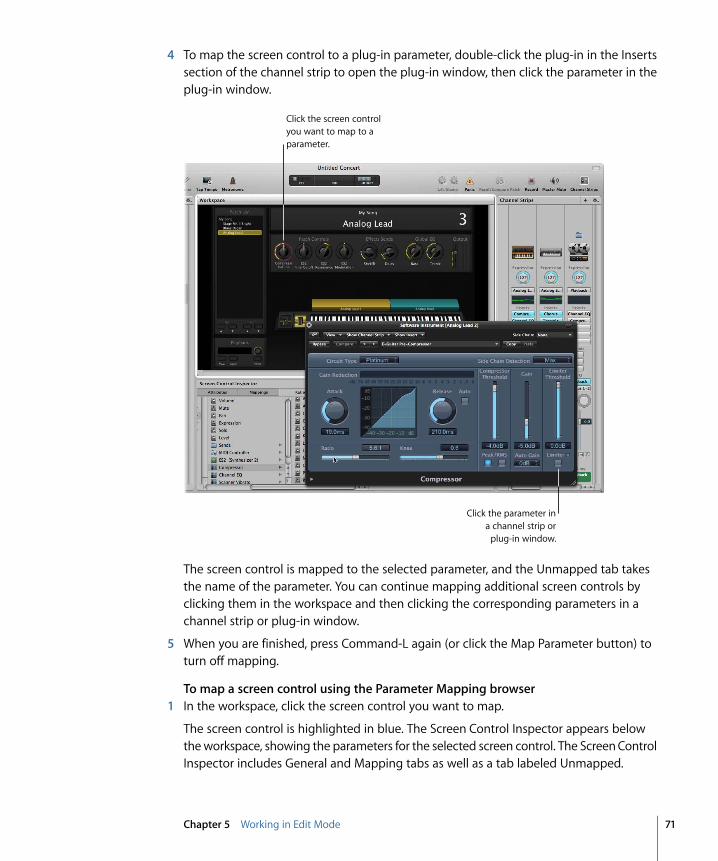
4 To map the screen control to a plug-in parameter, double-click the plug-in in the Insertssection of the channel strip to open the plug-in window, then click the parameter in theplug-in window.
Click the parameter in a channel strip or
plug-in window.
Click the screen control you want to map to a parameter.
The screen control is mapped to the selected parameter, and the Unmapped tab takesthe name of the parameter. You can continue mapping additional screen controls byclicking them in the workspace and then clicking the corresponding parameters in achannel strip or plug-in window.
5 When you are finished, press Command-L again (or click the Map Parameter button) toturn off mapping.
To map a screen control using the Parameter Mapping browser1 In the workspace, click the screen control you want to map.
The screen control is highlighted in blue. The Screen Control Inspector appears belowthe workspace, showing the parameters for the selected screen control. The Screen ControlInspector includes General and Mapping tabs as well as a tab labeled Unmapped.
71Chapter 5 Working in Edit Mode
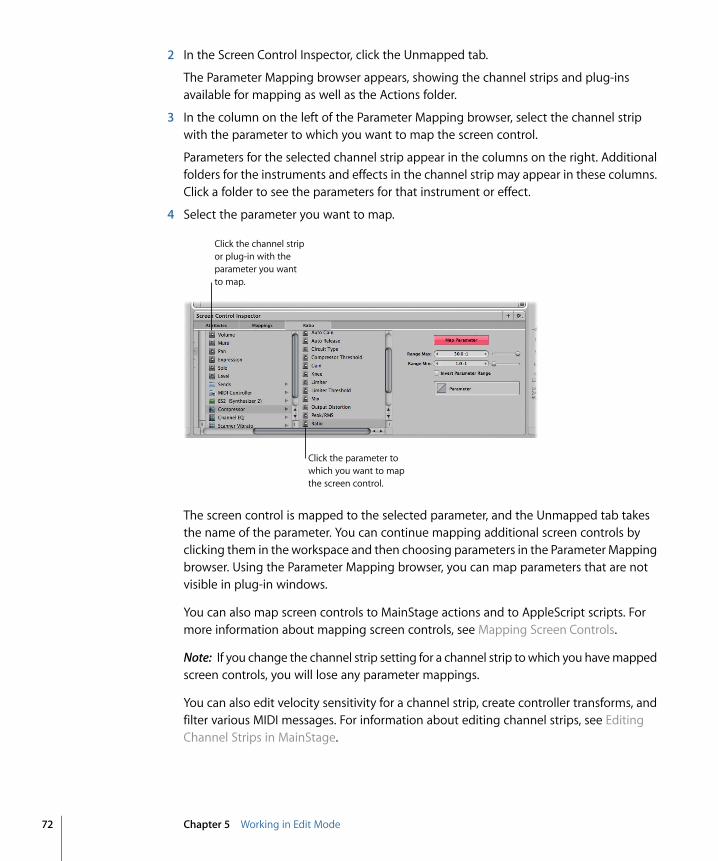
2 In the Screen Control Inspector, click the Unmapped tab.
The Parameter Mapping browser appears, showing the channel strips and plug-insavailable for mapping as well as the Actions folder.
3 In the column on the left of the Parameter Mapping browser, select the channel stripwith the parameter to which you want to map the screen control.
Parameters for the selected channel strip appear in the columns on the right. Additionalfolders for the instruments and effects in the channel strip may appear in these columns.Click a folder to see the parameters for that instrument or effect.
4 Select the parameter you want to map.
Click the parameter to which you want to map the screen control.
Click the channel strip or plug-in with the parameter you want to map.
The screen control is mapped to the selected parameter, and the Unmapped tab takesthe name of the parameter. You can continue mapping additional screen controls byclicking them in the workspace and then choosing parameters in the Parameter Mappingbrowser. Using the Parameter Mapping browser, you can map parameters that are notvisible in plug-in windows.
You can also map screen controls to MainStage actions and to AppleScript scripts. Formore information about mapping screen controls, see Mapping Screen Controls.
Note: If you change the channel strip setting for a channel strip to which you have mappedscreen controls, you will lose any parameter mappings.
You can also edit velocity sensitivity for a channel strip, create controller transforms, andfilter various MIDI messages. For information about editing channel strips, see EditingChannel Strips in MainStage.
72 Chapter 5 Working in Edit Mode
Mapping Screen Controls to ActionsIn addition to mapping screen controls to channel strip and plug-in parameters, you canmap them to MainStage actions. Actions let you select patches and sets; silence MIDInotes; control the Tuner and the metronome; tap a new tempo; display information aboutpatches, MIDI messages, and other information; and perform other functions using screencontrols.
For a complete table of actions, including descriptions and usage notes, see UsingMainStage Actions.
The Actions folder, which appears in the Parameter Mapping browser along with availableparameters, contains actions for selecting patches and sets, showing the Tuner, activatingtap tempo, Master Mute, or Panic, and others. The Actions folder also contains anAppleScript subfolder with useful scripts.
You can map button screen controls to actions for selecting different patches and usephysical buttons on your MIDI device to select patches when you perform. You can alsomap buttons to actions for selecting different sets or selecting the concert. For informationabout assigning buttons, see Assigning Buttons.
To map a screen control to an action1 In the workspace, click the screen control you want to map.
The Screen Control Inspector appears below the workspace, showing the settings for theselected screen control. If the screen control is currently mapped, a tab with the nameof the mapping is visible in addition to the General and Mapping tabs. If the control isunmapped, the tab is labeled “Unmapped.”
2 Click the Unmapped (or name of mapping) tab.
The Parameter Mapping browser appears below the workspace. The Actions folder isavailable in the Parameter Mapping browser.
3 In the column on the left of the Parameter Mapping browser, click the Actions folder.
73Chapter 5 Working in Edit Mode
The available actions appear in the second column of the browser.
Click the Actions folder to see available actions.
Click the action you want to map from the submenu.
4 Select the action you want to map.
Note: If you map a knob screen control to an action to select a patch (such as the−10 Patches, Previous Patch, Next Patch, or +10 Patches action), the screen control jumpsto the value of the hardware control, regardless of the setting of the Respond to HardwareMove parameter in the Screen Control Inspector.
Mapping a Screen Control to Multiple ParametersYou can map a single screen control to multiple parameters and control how the screencontrol modifies each mapped parameter. Mapping a screen control to multiple parametersis also referred to as multimapping. You map a screen control to up to eight parametersby adding mappings in the Screen Control Inspector.
To add a mapping1 Map the screen control to a parameter or action, as described in Mapping Screen Controls
to Channel Strip and Plug-In Parameters and Mapping Screen Controls to Actions.
2 With the screen control selected, click the Add Mapping (+) button at the upper-rightcorner of the Screen Control Inspector.
A new Unmapped tab appears in the Inspector, showing the Parameter Mapping browser.
3 In the Parameter Mapping browser, choose the parameter to which you want to map thescreen control.
If you add a mapping while the Learn process is active (the Map Parameter button is red),you can immediately learn the new mapping. The Command Editor also includes keycommands for selecting the previous and next tab to make mapping to multipleparameters easier. For information about using key commands, see Using the CommandEditor.
74 Chapter 5 Working in Edit Mode

If you frequently map screen controls to multiple parameters, you can speed your workflowby assigning key commands to select the previous and next tab or to select a specific tabin the Screen Control Inspector. For information about assigning key commands, seeUsing the Command Editor.
To view all mappings for a screen controlµ In the Screen Control Inspector, select the Mappings tab.
The mappings appear in a list view that shows the minimum and maximum range valuesand patch change behavior for each mapping and includes buttons to open the Parametergraph and Invert graph values for each mapping.
If you create multiple mappings for a screen control, you can define the relationshipsbetween the first mapping and subsequent mappings. This can be especially useful when,for example, you are mapping the same control to filter cutoff and filter resonance, andyou want to ensure that resonance does not exceed a certain maximum value as youincrease the cutoff value. The default relationship affects all future mappings (for thesame and other screen controls), but does not affect existing mappings. The default isset to Scale the first time you open MainStage.
To define the default relationship between the first mapping and subsequent mappings1 Select a screen control you want to map to multiple parameters.
2 Choose “Default Relation to First Mapping” from the Action menu, located in theupper-right corner of the Screen Control Inspector.
3 Do one of the following:
• To set subsequent mappings to be offset by a fixed value from the first mapping, chooseOffset.
• To set subsequent mappings to scale by a constant ratio, starting from the sameminimum value, choose Scale.
• To set subsequent mappings to scale by a constant ratio to the point defined for themapping, starting from both the same minimum value and maximum value, choosePivot.
Using Parameter Mapping GraphsEach parameter mapping has a Parameter graph. You can edit the graph to remap inputvalues to different output values for the parameter.
To open the Parameter graph for a mappingµ In the tab for the mapping or in the Mappings tab, double-click the Graph button for the
mapping you want to edit.
The Parameter graph window opens. The title of the graph window shows the parametername.
75Chapter 5 Working in Edit Mode
For information about editing graphs, see Working with Graphs.
Mapping Screen Controls to All Channel Strips in a PatchWhen you map a screen control to a channel strip parameter such as volume or pan, youcan map it to control the same parameter in all of the channel strips in the patch. This isparticularly useful when you want to control the overall volume of a layered sound, evenif the different layers are played across multiple keyboards.
To map a screen control to all channel strips in a patch1 Map the screen control following the instructions in the preceding sections.
2 In the column on the left of the Parameter Mapping browser, select the Send to All folder.
3 Select the destination from the second column.
4 Select the parameter to map the screen control to from the third column.
You can map the screen control to actions for transposing software instrument channelstrips, channel strip parameters, and MIDI control message types from the Destinationsfolder. When you map a screen control to all channel strips in a patch, the parameter towhich the screen control is mapped changes to the same value for all channel strips inthe patch when you move the screen control.
Note: When you map a drum map using Send to All, the Send to All folder contains MIDInotes, not controllers.
Undoing Parameter MappingYou can undo parameter mapping if you decide you don’t want to keep the mapping.When you undo parameter mapping, all mappings created in the current Learn mode(either by pressing Command-L or clicking the Map Parameter button) session are undone.
To undo parameter mappingsDo one of the following:
µ Choose Edit > Undo (or press Command-Z).
µ Press the Escape key.
Removing Screen Control MappingsIf you want a screen control to be free of any mappings, you can remove its existingmapping. This can be useful with controls that pass through MIDI messages (for example,for pitch bend and modulation wheels, or expression pedals) when you do not want themto send MIDI messages for their pass-through control type. You do not need to removethe mapping for a screen control when you remap it.
To reset the mapping for a screen control1 In the workspace, click the screen control you want to map.
2 In the column on the left of the Parameter Mapping browser, click None.
76 Chapter 5 Working in Edit Mode
Editing Screen Control Parameters in Edit ModeIn Layout mode, you edit basic screen control parameters that are constant throughoutthe entire concert. In Edit mode, you can edit screen control parameters for a specificpatch or set. You can also override concert- and set-level mappings for an individualpatch or set.
Overriding Concert- and Set-Level MappingsBy default, mappings you make at the concert level (to parameters and actions) takeprecedence over mappings to individual patches or sets in the concert. If you map ascreen control to a parameter at the concert level (for example, to Master Volume), thatscreen control cannot be mapped to a parameter or action in a patch or set, unless youoverride the concert-level mapping.
Similarly, mappings you make at the set level take precedence over mappings for anypatches in the set. If you map a screen control to a parameter at the set level (for example,to an effect on a set-level channel strip), that screen control cannot be mapped to aparameter or action in a patch in the set, unless you override the set-level mapping.
If you try to map a screen control that is mapped at the concert or set level, text appearsin the Screen Control Inspector informing you that the screen control is mapped at anotherlevel, and the parameters in the Screen Control Inspector are dimmed. You can overridethe concert- and set-level mappings for an individual patch, and then map the screencontrol at the patch level.
To override concert-level mappingsµ In the Screen Control Inspector, select the Override Concert Mapping checkbox.
Select the checkbox to override mappings at the concert level.
The parameters in the Screen Control Inspector become active.
To override set-level mappings and other parameters for a patchµ In the Screen Control Inspector, select the Override Set Mapping checkbox.
77Chapter 5 Working in Edit Mode
The Parameter Mapping section becomes active so that you can map the parameter.
Mapping tabs for concert-level mappings are available only at the concert level, andmapping tabs for set-level mappings are available only at the set level. When you overridea concert- or set-level mapping, the mapping tabs become available at the level of theoverride.
Replacing the Parameter LabelYou can replace the parameter label for a screen control (for an individual patch or set),to make the label easier to identify.
To replace the parameter label for a screen control1 Select the screen control in the workspace.
2 In the Screen Control Inspector, select the Attributes tab.
3 Select the Replace Parameter Label checkbox.
4 Enter the new label text in the field.
Choosing a Custom Color for a Screen ControlYou can change the color of the active area of a screen control (for an individual patchor set).
To choose a custom color for a screen control1 Select the screen control in the workspace.
2 In the Screen Control Inspector, select the Attributes tab.
3 Select the Custom Color checkbox.
4 Choose a new color from the Custom Color pop-up menu.
Choosing a Custom Image for a Panel Screen ControlYou can display a custom image for a panel control, and choose a different image foreach patch or set.
To choose a custom image for a panel screen control1 In Edit Mode, Option-click the panel screen control in the workspace.
Panel and Image controls appear in the Screen Control Inspector.
2 In the Screen Control Inspector, select the Custom Image checkbox.
3 Click Image, then click Select...
An Open dialog appears.
4 Browse to the image you want to use, select the image, then click Choose Image.
Choosing Custom Text Color for a Screen ControlYou can change the color of the text for a screen control (for an individual patch or set).
78 Chapter 5 Working in Edit Mode
To choose a custom text color for a screen control1 Select the screen control in the workspace.
2 In the Screen Control Inspector, select the Attributes tab.
3 Select the Custom Label Color checkbox.
4 Choose a new color from the Custom Label Color menu.
Setting a Screen Control to Show the Hardware ValueBy default, screen controls show the value of the parameter the control is mapped to. Insome cases, for example, when the screen control is assigned to a foot pedal, or whenthe screen control is mapped to multiple parameters, it may be better to show the valueof the hardware control assigned to the screen control.
To set a screen control to show the hardware value1 Select the screen control in the workspace.
2 In the Screen Control Inspector, select the Attributes tab.
3 Select the Show Input Value checkbox.
Setting Parameter Change Behavior for Screen ControlsYou can set the behavior for saving parameter values for screen controls in individualpatches. This is useful, for example, when the default for saving parameter values is setto Reset, but you want certain screen controls (for example, concert- and set-level screencontrols) to keep their current value when switching patches.
To set the behavior for saving parameter values in a patch1 Select the patch.
2 Select the screen control for which you want to set the parameter change behavior.
3 In the Attributes tab of the Screen Control Inspector, choose the parameter changebehavior for the screen control from the “When a patch is changed and screen valuediffers from saved patch” pop-up menu:
• To have the screen control use the default behavior set in MainStage preferences,choose Preference.
• To preserve changes to parameter values when you change patches, choose Keep.
• To return values to the last saved value, choose Reset. When this value is chosen, youshould save the concert after making any changes you wish to keep to the patch, beforeselecting another patch.
• To have the screen control use the last received value from the physical control assignedto it, choose Match.
When you choose an item from the pop-up menu, a brief description of its functionappears below the menu.
79Chapter 5 Working in Edit Mode
Important: If you set the behavior for saving parameter values in a patch to Reset,parameter values are also reset when you switch to Layout mode.
Setting Hardware Matching Behavior for Screen ControlsSome hardware synthesizers and music workstations let users control what happenswhen you move a physical control that is set to a different value than the parameter itmodifies. The parameter value can instantly change to the position of the physical control(sometimes called jump), it can change by the same amount (called relative), or it can notchange at all until the physical control matches its current value (called snap).
You can set the behavior for screen controls in MainStage to any of these behaviors whenyou move the physical control assigned to the screen control.
To set the behavior for screen controls when you move a hardware control1 Select the patch.
2 Select the screen control for which you want to set the hardware matching behavior.
3 In the Attributes tab of the Screen Control Inspector, choose the parameter changebehavior for the screen control from the “When hardware value differs from screen value”pop-up menu:
• To have the screen control use the default behavior set in MainStage preferences,choose Preference.
• To have the screen control instantly change to match the hardware value, choose Jump.
• To have the screen control change when the hardware control matches its currentvalue, choose Pickup.
• To have the screen control move relative to the hardware control, choose Relative.
Note: When you choose an item from the menu, a brief description of its function appearsbelow the menu.
Resetting and Comparing Changes to a PatchYou can reset changes to all parameters in a patch that are mapped to screen controlsto their last saved value, letting you hear the patch in its last saved (original) state, andtoggle between the original and modified states of the patch. There are two ways to resetand compare changes to a patch: by using the Reset/Compare Patch button in the toolbaror by using the Reset/Compare Patch action mapped to a screen control at the concertlevel.
To reset changes to mapped patch parameters using the Reset/Compare Patch button1 With the patch selected, click the Reset/Compare Patch button.
The patch is reset to its previously saved state.
2 To hear the patch in its modified state, click the Reset/Compare Patch button.
80 Chapter 5 Working in Edit Mode

To reset and compare changes using the Reset/Compare action1 In Layout mode, add a button screen control to your layout.
2 Assign a button on your hardware controller to the new button screen control.
3 In Edit mode, click the concert icon in the Patch List.
4 Select the new button screen control in the workspace.
5 In the Parameter Mapping browser, select the Actions folder, and then select the Reset/Compare Patch action in the second column.
For more information about mapping a screen control at the concert level, see Controllingthe Overall Volume of a Concert.
Working with Sets in Edit ModeSets are like folders that let you organize patches you want to keep together. Using sets,you can organize patches in any manner. For example, you can put all the patches youwant to use in the first part of a performance together or keep all your lead synth patchestogether. Sets are flexible, so you can use them in whatever way suits your method ofworking.
Here are some different ways you can use sets:
• To group similar or related sounds into “banks”
• To keep multiple patches you’ll use in a single song together
• To share a set-level instrument or channel strip between a group of songs
Creating SetsYou can create a new, empty set or create a set from a group of selected patches.
To create a new, empty setµ Choose New Set from the Action menu in the upper-right corner of the Patch List.
A new set appears in the Patch List.
To create a set from a group of patches1 In the Patch List, select the patches you want to include in the new set.
2 Choose New Set From Selection from the Action menu at the upper-right corner of thePatch List.
The new set appears in the Patch List containing the selected patches. You can add newpatches to the set or drag existing patches into the set.
Renaming SetsWhen you create a set, it is given a default name. You can rename a set in the same wayyou rename a patch in the Patch List.
81Chapter 5 Working in Edit Mode
To rename a set1 Double-click the set in the Patch List.
A text field appears around the set name, which is selected.
2 Type a new name in the set name field.
Setting the Time Signature for a SetYou can set the time signature for a set. Time signatures can be used with the Playbackplug-in and also affect the beats of the metronome. When you set the time signature fora set, it overrides the concert-level time signature (if one is set).
To set the time signature for a set1 In the Set Inspector, select the Has Time Signature checkbox.
2 Double-click the number in the field to the right, and enter the number of beats for onemeasure of the time signature.
3 Choose the beat value from the pop-up menu to the right.
Changing the Tempo When You Select a SetYou can give a set its own tempo setting so that when you select the set, the tempochanges to the set tempo setting. MainStage uses the new tempo until you select anotherpatch or set with its own tempo setting, tap a new tempo, or until MainStage receivestempo information from incoming MIDI messages. For more information about usingand changing tempo in MainStage, see Using Tempo in a MainStage Concert.
To change the tempo using a set1 In the Patch List, select the set.
2 In the Set Inspector, set the set tempo using the “Change Tempo to” value slider.
3 Select the “Change Tempo to” checkbox to activate the set tempo when the set is selected.
Changing the Tuning for a SetBy default, new sets (and most existing ones) use the same tuning method as the concert.You can change the tuning for a set so that it uses a different tuning. When you changethe tuning method for a set, the patches in the set use the set-level tuning unless youchange the tuning at the patch level.
To change the tuning for a set1 In the Set Inspector, select the Tuning tab.
2 Choose the tuning you want the set to use from the Method pop-up menu.
82 Chapter 5 Working in Edit Mode
Overriding Concert-Level Key Ranges for a SetIf a software instrument channel strip exists at the concert level, the concert-level channelstrip takes precedence over any set-level software instrument channel strips within itskey range. This means that when you play any notes in the key range of the concert-levelchannel strip on a keyboard controller, you hear only the concert-level channel strip, evenwhen a patch is selected in a set with a set-level channel strip.
You can override the concert-level channel strip for a channel strip at the set level so thatthe set-level channel strip takes precedence over the concert-level one.
To override concert- or set-level key ranges1 In the Patch List, select the set with the channel strip that you want to override the
concert-level channel strip.
2 In the Channel Strips area, select the channel strip with the key range that you want tooverride the concert-level key range.
3 Select the “Override parent ranges” checkbox.
Deleting SetsYou can delete a set if you decide you no longer want it in the concert.
To delete a set1 Select the set in the Patch List.
2 Choose Edit > Delete (or press the Delete key).
When you delete a set, the patches in the set are also deleted. To delete the set withoutdeleting the patches, move the patches outside the set before you delete it.
Working at the Set LevelYou can add channel strips at the set level and play the set-level channel strips togetherwith every patch in the set. This can be useful, for example, if you want to use the samebass instrument in a single song or group of songs. You can place the patches for all ofthe songs in a set, add a channel strip at the set level, and then add a bass instrument tothe set-level channel strip. You can set the key range of the bass instrument to play onlynotes in the lower octaves so that you can play it together with your patches.
Important: If you add a channel strip at the set level, it takes precedence over all of thechannel strips in all of the patches in the set. For example, if you add a software instrumentchannel strip at the set level, the software instrument for the set takes precedence overall of the software instruments in all of the patches in the set that fall within the samekey range as the set-wide software instrument.
To add a set-level channel strip1 In the Patch List, select the set.
83Chapter 5 Working in Edit Mode
2 Click the Add Channel Strip (+) button at the top of the Channel Strips area.
3 In the New Channel Strip dialog, select the type of channel strip you want to create.
4 Choose the audio output for the channel strip from the Output pop-up menu.
5 For audio channel strips, choose mono or stereo format from the Format pop-up menuand choose the audio input from the Input pop-up menu.
6 Click Create.
Sharing Patches and Sets Between ConcertsYou can export patches and sets from a concert and import them into another concert.When you import a set, all the patches in the set are imported.
To export a patchDo one of the following:
µ Drag the patch from the Patch List to the Finder.
The patch appears as a .patch file in the Finder.
µ Select the patch, choose “Save as Patch” from the Action menu in the Patch List, thenclick Save.
The patch is exported to the ~/Library/Application Support/Logic/MainStage Patchesfolder.
To export a setDo one of the following:
µ Drag the set from the Patch List to the Finder.
The set appears as a .patch file in the Finder.
µ Select the set, choose “Save as Set” from the Action menu in the Patch List, then clickSave.
The set is exported to the MainStage Patches folder.
Note: You can also export an entire concert as a set by selecting the concert and choosingExport Set from the Action menu.
You can export multiple patches or sets. When you export multiple patches by draggingthem to the Finder, each patch is exported as a .patch file. When you select multiplepatches and export them using the Export Patch command, the patches are groupedinto a single exported set. You can import patches or sets from the Finder to anotheropen concert.
84 Chapter 5 Working in Edit Mode
To import a patch or setDo one of the following:
µ In Edit mode, drag the patch or set from the Finder to the Patch List.
µ Choose Load Patch/Set from the Action menu in the Patch List, select the patch or setyou want to import, then click Import.
Recording the Audio Output of a ConcertYou can record the audio output of a MainStage concert. When you record audio output,all audio on the output you choose is recorded (including the metronome, and so on).
Before you record audio output, make sure the correct output, recording location, andfile format are set in the Audio tab of MainStage preferences. For information aboutsetting recording preferences, see Setting MainStage Preferences.
To record audio in Edit modeµ Click the Record button in the toolbar.
To turn off recordingµ Click the Record button again.
You can also map a screen control to the Record action to record audio in Perform andFull Screen modes, and assign a key command to the action to turn recording on or offusing a hardware control.
85Chapter 5 Working in Edit Mode

Concerts are the documents in which you create and organize the sounds you use inyour performances, customize your onscreen layout, and make connections betweenyour MIDI hardware and MainStage.
A concert holds all the sounds you’ll use for an entire performance or a series ofperformances. In a concert, you add, edit, and organize patches, and select patches whileyou are performing. You can reorder patches in the Patch List and also organize theminto sets.
Concerts also contain layouts, where you visually arrange screen controls in the workspaceand make connections between your hardware devices and MainStage. You can add andarrange screen controls and assign physical controls on your hardware MIDI devices toscreen controls in Layout mode. For information about customizing your layout, seeWorking in Layout Mode.
You can also control the volume for an entire concert, add concert-wide effects, and makeother changes at the concert level.
This chapter covers the following:
• Opening and Closing Concerts (p. 88)
• Saving Concerts (p. 89)
• How Saving Affects Parameter Values (p. 89)
• Setting the Time Signature for a Concert (p. 90)
• Using Tempo in a MainStage Concert (p. 91)
• Defining the Source for Program Change Messages for a Concert (p. 92)
• Setting the Pan Law for a Concert (p. 93)
• Changing the Tuning for a Concert (p. 93)
• Silencing MIDI Notes (p. 93)
• Muting Audio Output (p. 94)
• Working at the Concert Level (p. 95)
• Controlling the Metronome (p. 101)
87
Working with Concerts 6
Opening and Closing ConcertsYou can create a new concert from a template, open an existing concert to continueworking, and close and save concerts. You can add patches to a concert and organizethem in the Patch List. The number of patches is limited only by the amount of availablememory. You can add channel strips to an existing patch or to new ones you create andcan organize patches into sets. For information about patches and sets, see Working inEdit Mode.
The process of creating a new concert from a concert template is described in Choosinga Concert Template. You can open an existing concert to play the patches in the concertor continue editing them.
To open an existing concertDo one of the following:
µ Choose File > Open Concert, select the concert you want to open, then click Open.
µ Choose File > New to open the Choose Template dialog, click “Open an Existing Concert,”then choose the concert from the Open dialog.
µ In the Finder, double-click the concert.
µ In the Finder, drag the concert over the MainStage icon in the Dock.
You can also reopen a recently open concert by choosing File > Open Recent Concertand then choosing a concert from the submenu, or by opening the Choose Templatedialog, clicking Recent Concert, then choosing the concert you want to open.
By default, when you open a concert, it opens in Edit mode. You can change the defaultbehavior in MainStage preferences. For more information, see Setting MainStagePreferences.
The first time you open a concert, the first patch is selected, and the Patch Library is openso you can easily choose a patch setting. When you reopen a concert, the patch that wasselected when you last saved the concert is selected.
If any audio files or other assets are not found when you open a concert, a dialog appearsshowing which assets are missing, and asking if you want to search for the assets, locatethem manually, or skip them.
Note: When you open a concert created with an earlier version of MainStage, it opensas an untitled concert, and MainStage prompts you to save the concert as a MainStage 2concert.
To close a concertµ Choose File > Close Concert.
If you have edited the concert since the last time you saved it, you are prompted to saveyour changes.
88 Chapter 6 Working with Concerts
Saving ConcertsWhen you save a concert, all of the changes you made to the patches and sets in theconcert, as well as the concert settings, are saved. To prevent losing your changes, besure to save your work periodically.
To save a concert1 Choose File > Save Concert.
2 The first time you save a concert, the Save dialog appears. Enter a name for the concert,and browse to the location where you want to save it, then click Save.
You can save a copy of a concert with a new name by choosing File > Save Concert As.
You can save a concert together with the assets (audio files, instruments, Ultrabeatsamples, and Space Designer impulse response files) the concert uses, similar to savinga Logic song as a project.
To save a concert including its assets1 Choose File > Save As.
2 In the Save As dialog, select the Include Assets checkbox.
3 Optionally, with the Include Assets checkbox selected, click the Advanced Options triangle,then select the types of assets you want to include with the concert.
4 Click Save.
You can also save a concert as a template. When you save a concert as a template, thetemplate is available in the My Templates section of the Choose Template dialog.
To save a concert as a template1 Choose File > Save as Template.
2 In the Save As dialog, enter a name for the template.
3 Click Save.
By default, templates are saved in the MainStage Concerts folder. When you save a concertas a template, you can choose a different location to save the concert. If you save theconcert in a different location, it will not be available in the Choose Template dialog.
How Saving Affects Parameter ValuesWhile a concert is open, any “performance” changes you make to channel strip parameters(including volume, pan, and expression) or plug-in parameters are retained for as longas the concert is open. If you close the concert without saving, the parameter valuesrevert to their previously saved state when you reopen the concert. If you save the concertbefore closing it, the changed values are saved.
89Chapter 6 Working with Concerts

If you decide not to keep your latest changes, you can revert a concert to its previouslysaved state.
To revert a concert to its last saved stateµ Choose File > Revert to Saved.
All the changes you’ve made since the last time you saved the concert are lost when yourevert the concert to its last saved state.
If you change parameter values in a patch, select another patch, and later select the firstpatch again, the parameter values will be as you left them when you selected the otherpatch. You can also choose the default behavior for saving changes to values of parametersto which screen controls are mapped. You can set the default to either have parameterskeep their current value when changing patches (the default behavior in MainStageversion 1.0), or to reset their values to the last saved value (similar to many hardwaresynthesizers).
To set the default behavior for saving parameter values1 Choose MainStage > Preferences.
2 In the Parameter Values section of the General preferences pane, choose the defaultbehavior from the “On patch changes” pop-up menu.
a To preserve changes to parameter values when you change patches, choose “Keepcurrent value.”
b To return parameters to their last-saved value when you change patches, choose “Revertto saved value.”
You can also set the behavior for saving parameter values for screen controls in individualpatches. For information, see Setting Parameter Change Behavior for Screen Controls.
Setting the Time Signature for a ConcertYou can set the time signature for a concert. Time signatures can be used with the Playbackplug-in and also affect the operation of the metronome. When you set the time signaturefor a patch or set, it overrides the concert-level time signature while the patch or set isselected. When you select a patch or set without a time signature, it uses the concerttime signature.
To set the time signature for a concert1 In the Concert Inspector, select the Has Time Signature checkbox.
2 Double-click the number in the field to the right, and enter the number of beats for onemeasure of the time signature.
3 Choose the beat value from the pop-up menu to the right.
90 Chapter 6 Working with Concerts
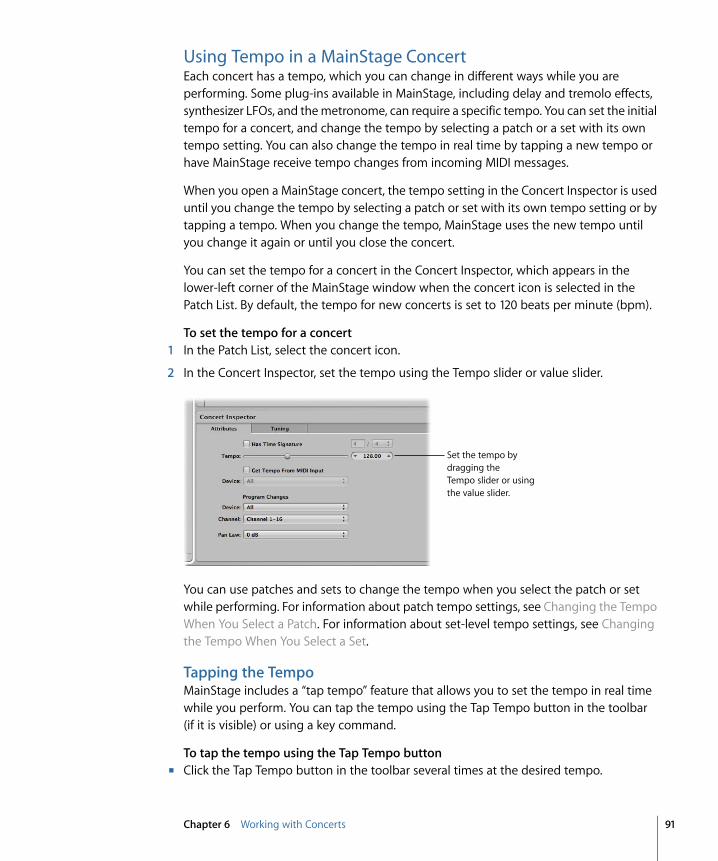
Using Tempo in a MainStage ConcertEach concert has a tempo, which you can change in different ways while you areperforming. Some plug-ins available in MainStage, including delay and tremolo effects,synthesizer LFOs, and the metronome, can require a specific tempo. You can set the initialtempo for a concert, and change the tempo by selecting a patch or a set with its owntempo setting. You can also change the tempo in real time by tapping a new tempo orhave MainStage receive tempo changes from incoming MIDI messages.
When you open a MainStage concert, the tempo setting in the Concert Inspector is useduntil you change the tempo by selecting a patch or set with its own tempo setting or bytapping a tempo. When you change the tempo, MainStage uses the new tempo untilyou change it again or until you close the concert.
You can set the tempo for a concert in the Concert Inspector, which appears in thelower-left corner of the MainStage window when the concert icon is selected in thePatch List. By default, the tempo for new concerts is set to 120 beats per minute (bpm).
To set the tempo for a concert1 In the Patch List, select the concert icon.
2 In the Concert Inspector, set the tempo using the Tempo slider or value slider.
Set the tempo by dragging the Tempo slider or using the value slider.
You can use patches and sets to change the tempo when you select the patch or setwhile performing. For information about patch tempo settings, see Changing the TempoWhen You Select a Patch. For information about set-level tempo settings, see Changingthe Tempo When You Select a Set.
Tapping the TempoMainStage includes a “tap tempo” feature that allows you to set the tempo in real timewhile you perform. You can tap the tempo using the Tap Tempo button in the toolbar(if it is visible) or using a key command.
To tap the tempo using the Tap Tempo buttonµ Click the Tap Tempo button in the toolbar several times at the desired tempo.
91Chapter 6 Working with Concerts
For information about adding buttons to the toolbar, see Customizing the Toolbar.
You can also tap the tempo using your computer keyboard.
To tap the tempo using a computer keyboardµ Press Control-T several times at the desired tempo.
You can also tap the tempo using a screen control mapped to the Tap Tempo action. Forinformation about mapping screen controls to actions, see Mapping Screen Controls toActions.
Getting the Tempo from MIDI InputYou can also have MainStage receive tempo changes from incoming MIDI messages.When the “Get tempo from MIDI input” checkbox is selected, MainStage listens to incomingMIDI clock messages for tempo information. If it receives tempo information, the concerttempo changes to the new tempo value.
To get the tempo from incoming MIDI clock messages1 In the Concert Inspector, select the “Get tempo from MIDI input” checkbox.
2 Choose the MIDI clock source from the Device pop-up menu.
When the “Get tempo from MIDI input” checkbox is selected, the Tempo slider is dimmedand cannot be edited. If MIDI messages MainStage receives do not include MIDI clockinformation, MainStage uses the concert tempo setting and changes the tempo whenyou select a patch or a set with its own tempo setting, or tap a new tempo. If MainStagestops receiving MIDI clock messages, it continues to use the last received value for thetempo until you select a patch or set with its own tempo setting or tap a new tempo.
Defining the Source for Program Change Messages for a ConcertBy default, MainStage receives and responds to program change messages from allconnected MIDI controllers. Some MIDI controllers, however, send program changemessages while performing other operations. You can define the source for programchange messages for a concert, so the concert responds to messages for only one MIDIdevice, port, or channel.
To define the source for program change messages1 In the Attributes tab of the Concert Inspector, choose the device or port from which the
concert will receive program change messages from the Device pop-up menu.
2 If you want to limit messages to a single MIDI channel on the device, choose the MIDIchannel from the Channel pop-up menu.
92 Chapter 6 Working with Concerts

Setting the Pan Law for a ConcertAudio signals panned to the center position may sound louder than signals panned hardleft or right. The Pan Law value determines the amount of volume reduction applied toaudio that is panned to the center position. You can choose from the following settings:
• 0 dB: With no change to the volume level, signals will seem louder when panned tothe center position, in comparison with extreme left or right pan positions.
• −3 dB: A full scale signal (0 dBfs) will have a level of −3 dB when panned to the centerposition.
• −3 dB compensated: A full scale signal (0 dBfs) will have a level of 0 dB when pannedto the center position (or +3 dB when panned to extreme left or right positions).
To set the pan law for a concertµ In the Attributes tab of the Concert Inspector, choose the pan law value for the concert.
Changing the Tuning for a ConcertBy default, concerts use equal tempered tuning. You can change the tuning for a concertso that it uses a different tuning.
To change the tuning for a concert1 In the Concert Inspector, select the Tuning tab.
2 Choose the tuning you want the concert to use from the Method pop-up menu.
When you change the tuning of a concert, the tuning of the patches and sets in theconcert changes if their Tuning Method is set to “Use parent tuning.” Patches and setswith a different tuning method are not affected.
Silencing MIDI NotesMainStage also includes a Panic function, which works like the Panic function in Logic Pro.The Panic function immediately silences any hanging MIDI notes.
To silence all MIDI notesDo one of the following:
µ Press Control-P.
µ Double-click the MIDI Monitor in the toolbar.
µ If the Panic button is visible in the toolbar, click it.
µ If you have mapped the Panic function to a screen control, press or move thecorresponding controller.
93Chapter 6 Working with Concerts
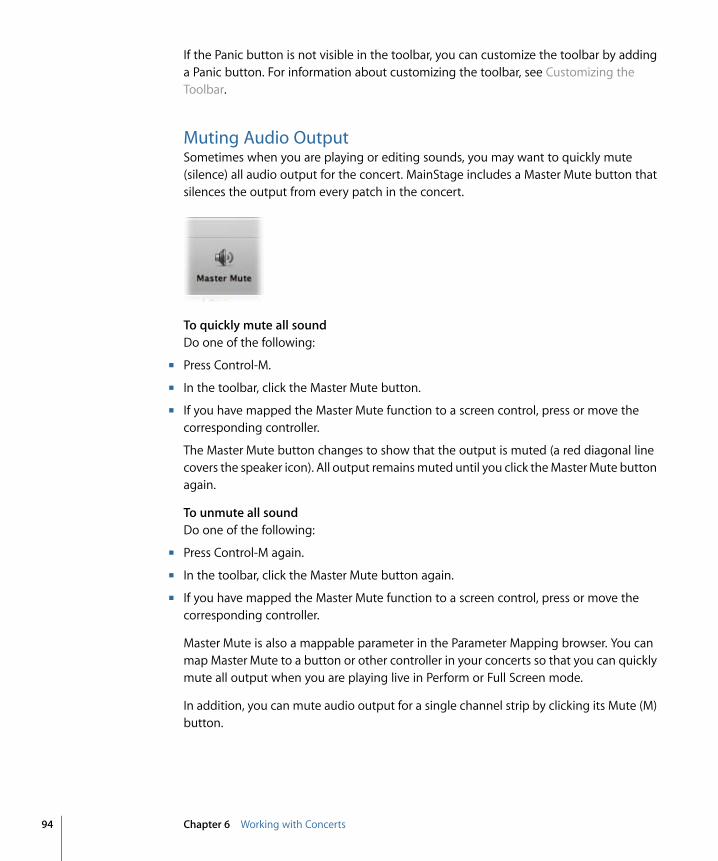
If the Panic button is not visible in the toolbar, you can customize the toolbar by addinga Panic button. For information about customizing the toolbar, see Customizing theToolbar.
Muting Audio OutputSometimes when you are playing or editing sounds, you may want to quickly mute(silence) all audio output for the concert. MainStage includes a Master Mute button thatsilences the output from every patch in the concert.
To quickly mute all soundDo one of the following:
µ Press Control-M.
µ In the toolbar, click the Master Mute button.
µ If you have mapped the Master Mute function to a screen control, press or move thecorresponding controller.
The Master Mute button changes to show that the output is muted (a red diagonal linecovers the speaker icon). All output remains muted until you click the Master Mute buttonagain.
To unmute all soundDo one of the following:
µ Press Control-M again.
µ In the toolbar, click the Master Mute button again.
µ If you have mapped the Master Mute function to a screen control, press or move thecorresponding controller.
Master Mute is also a mappable parameter in the Parameter Mapping browser. You canmap Master Mute to a button or other controller in your concerts so that you can quicklymute all output when you are playing live in Perform or Full Screen mode.
In addition, you can mute audio output for a single channel strip by clicking its Mute (M)button.
94 Chapter 6 Working with Concerts
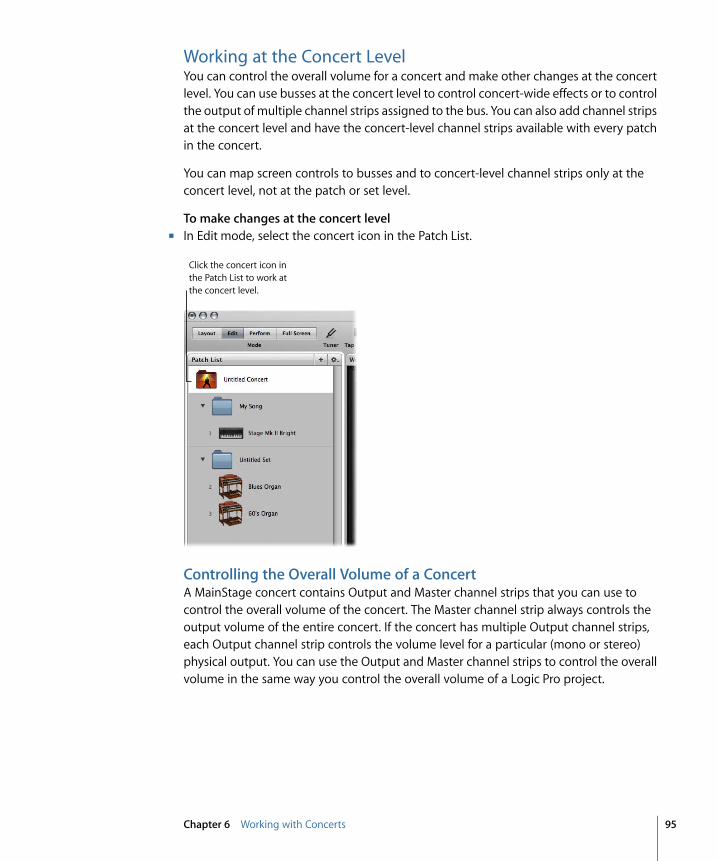
Working at the Concert LevelYou can control the overall volume for a concert and make other changes at the concertlevel. You can use busses at the concert level to control concert-wide effects or to controlthe output of multiple channel strips assigned to the bus. You can also add channel stripsat the concert level and have the concert-level channel strips available with every patchin the concert.
You can map screen controls to busses and to concert-level channel strips only at theconcert level, not at the patch or set level.
To make changes at the concert levelµ In Edit mode, select the concert icon in the Patch List.
Click the concert icon in the Patch List to work at the concert level.
Controlling the Overall Volume of a ConcertA MainStage concert contains Output and Master channel strips that you can use tocontrol the overall volume of the concert. The Master channel strip always controls theoutput volume of the entire concert. If the concert has multiple Output channel strips,each Output channel strip controls the volume level for a particular (mono or stereo)physical output. You can use the Output and Master channel strips to control the overallvolume in the same way you control the overall volume of a Logic Pro project.
95Chapter 6 Working with Concerts
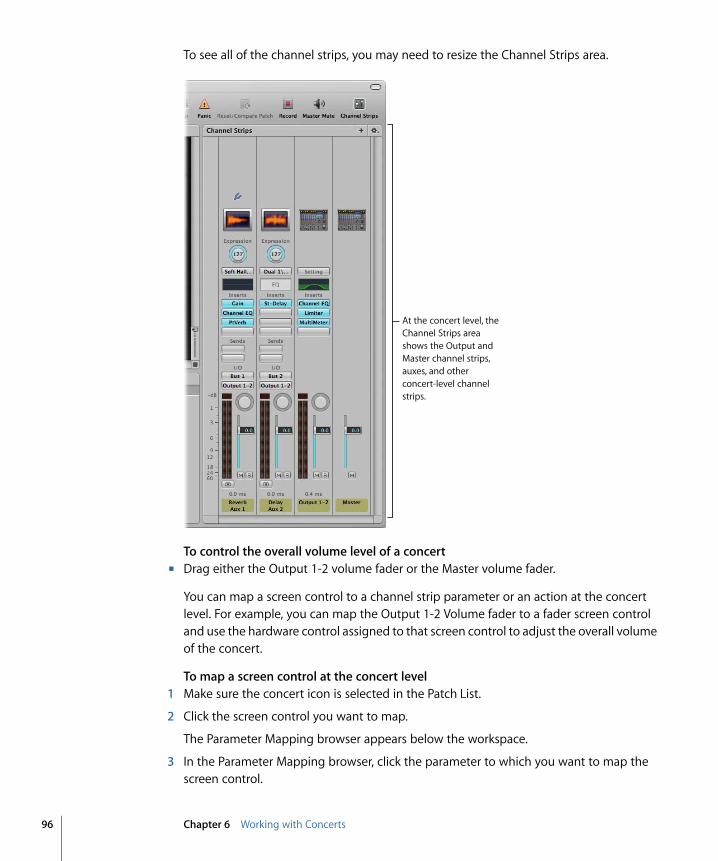
To see all of the channel strips, you may need to resize the Channel Strips area.
At the concert level, the Channel Strips area shows the Output and Master channel strips, auxes, and other concert-level channel strips.
To control the overall volume level of a concertµ Drag either the Output 1-2 volume fader or the Master volume fader.
You can map a screen control to a channel strip parameter or an action at the concertlevel. For example, you can map the Output 1-2 Volume fader to a fader screen controland use the hardware control assigned to that screen control to adjust the overall volumeof the concert.
To map a screen control at the concert level1 Make sure the concert icon is selected in the Patch List.
2 Click the screen control you want to map.
The Parameter Mapping browser appears below the workspace.
3 In the Parameter Mapping browser, click the parameter to which you want to map thescreen control.
96 Chapter 6 Working with Concerts
In the example above, you would click the fader screen control, click Out 1-2 in the leftcolumn of the Parameter Mapping browser, and then click Volume in the second columnof the browser.
Screen controls can also display visual feedback about parameter values, including volumelevel. For example, you can also map the Output 1-2 Volume fader to a level meter screencontrol and have the level meter display the overall volume level while you are performinglive. In this case, you would map the level meter to Level in the second column of thebrowser, rather than to Volume.
When you map a screen control at the concert level, you cannot map the same screencontrol at the patch or set level unless you override the concert-level mapping. Forinformation about overriding concert-level mappings, see Overriding Concert- andSet-Level Mappings.
Adding Concert-Wide EffectsYou can add concert-wide effects such as reverb and delay using auxiliary (aux) channels.When you choose a bus from the Send slot on a channel strip, a corresponding auxappears at the concert level. You can insert effects on the aux and have those effectsapply to every channel strip sending its signal to the aux.
To send a channel strip signal to an aux1 In the Patch List, select the patch you want to use with a concert-wide effect.
The channel strips for the patch appear in the Channel Strips area.
97Chapter 6 Working with Concerts
2 On the channel strip, click one of the Send slots and choose a bus from the menu.
Choose a bus from one of the Send slots.
3 Drag the Send knob next to the slot to set the amount of the signal sent to the aux.
To add a concert-wide effect to an aux1 In the Patch List, select the concert icon.
The auxes in the concert appear in the Channel Strips area along with the concert-levelchannel strips.
2 On an aux, click one of the Insert slots and choose an effect from the menu.
After you add an effect to an aux, you can edit the effect as you would any channel stripeffect, by double-clicking it to open the plug-in window, and then adjusting parametersin the plug-in window. You can add multiple effects to an aux, and adjust the level andpan of the aux using the channel strip controls on the aux.
98 Chapter 6 Working with Concerts
You can also add concert-wide effects to an aux at the patch level if Show Signal FlowChannel Strips is active. For information about showing signal flow channel strips in theChannel Strips area, see Showing Signal Flow Channel Strips.
Using Auxes to Control Channel Strip OutputYou can also send the output of multiple channel strips to an aux (auxiliary channel) andthen use the aux to control the volume level and pan position of the channel strips.Sending the output to an aux is also useful for adding EQ or compression to a group ofpatches.
To send the output of a channel strip to an aux1 In the Patch List, select the patch you want to control using an aux.
2 In the channel strip, click the Output slot and choose a bus from the menu.
When you send channel strip output to an aux, the volume fader of the channel stripcontrols how much of the signal is sent to the aux.
To control the output of channel strips using an aux1 In the Patch List, click the concert.
The concert is selected. The busses added to the concert appear in the Channel Stripsarea along with the concert-level channel strips.
2 Drag the Volume fader on the aux to adjust the volume level of the overall aux output.
3 Drag the Pan knob on the aux to adjust the pan position of the overall aux output.
When you control the output of multiple channel strips using an aux, their relative volumelevels and pan positions are preserved, but the overall volume level and pan position aremodified by the aux Volume fader and Pan knob.
Adding Channel Strips at the Concert LevelYou can add a channel strip at the concert level and use the concert-level channel stripfor a software instrument or audio input you want to use in every patch in the concert.
Important: When you add a channel strip at the concert level, it takes precedence overthe channel strips in the patches and sets in the concert. For example, if you add aconcert-level channel strip containing a software instrument, the software instrumenttakes precedence over all of the software instruments in all of the patches and sets in theconcert, for the notes in its key range. This means that you will hear only the sound ofthe concert-level software instrument and will not be able to play any software instrumentsin a patch or set that fall in the same key range.
To add a concert-level channel strip1 In the Patch List, select the concert.
2 Click the Add Channel Strip (+) button at the top of the Channel Strips area.
3 In the New Channel Strip dialog, select the type of channel strip you want to create.
99Chapter 6 Working with Concerts
4 Choose the audio output for the channel strip from the Output pop-up menu.
5 For audio channel strips, choose mono or stereo format from the Format pop-up menu.
Important: Audio channel strips can produce feedback, particularly if you are using amicrophone for audio input. When you add an audio channel strip, the volume of thechannel strip is set to silence, and Feedback Protection is turned on to alert you whenfeedback occurs on the channel strip. When you add an external instrument channelstrip, the volume of the channel strip is set to silence, but Feedback Protection is turnedoff.
6 Click Create.
7 For software instrument channel strips, you can define the key range for the channel stripin the Channel Strip Inspector so that the concert-level channel strip does not overlapsoftware instruments you plan to use in your patches and sets.
For information about defining the key range of a channel strip, see Creating KeyboardLayers and Splits.
When you add a channel strip at the concert level, you can map screen controls to thechannel strip only at the concert level, not for individual patches or sets.
Using the MainStage ClockSome plug-ins, including the Playback and Ultrabeat plug-ins included with Logic Studio,require a time source, and use beat and tempo information in order to play in time.
Additionally, some third-party applications and plug-ins using their own sequencer orplayback engine may behave differently than sequencer-based plug-ins included inLogic Studio. These plug-ins (which include Reason and other ReWire applications andReaktor) require a play message from the host application to begin playback and requirea stop message to end playback. They may also require a continue (also sometimes called“resume”) message to continue playback from their current time position.
MainStage includes an internal beat clock or “time base” that you can use to control theplayback of these plug-ins. The MainStage clock generates beat, time position, and tempoinformation so sequencer-oriented plug-ins can start, stop, and play in time. The MainStageclock operates similarly to the song position in Logic Pro.
You can send play and stop messages in the following ways:
• Using the Play/Stop button in the toolbar, if it is visible
• Using the Metronome button in the toolbar, if it is visible (turning on the metronomealso starts the MainStage clock, if it is not already running)
• Using a screen control mapped to the Play/Stop, Play, or Stop action
• Using a screen control mapped to the Continue action to resume playback of athird-party plug-in (but not a Playback plug-in)
100 Chapter 6 Working with Concerts
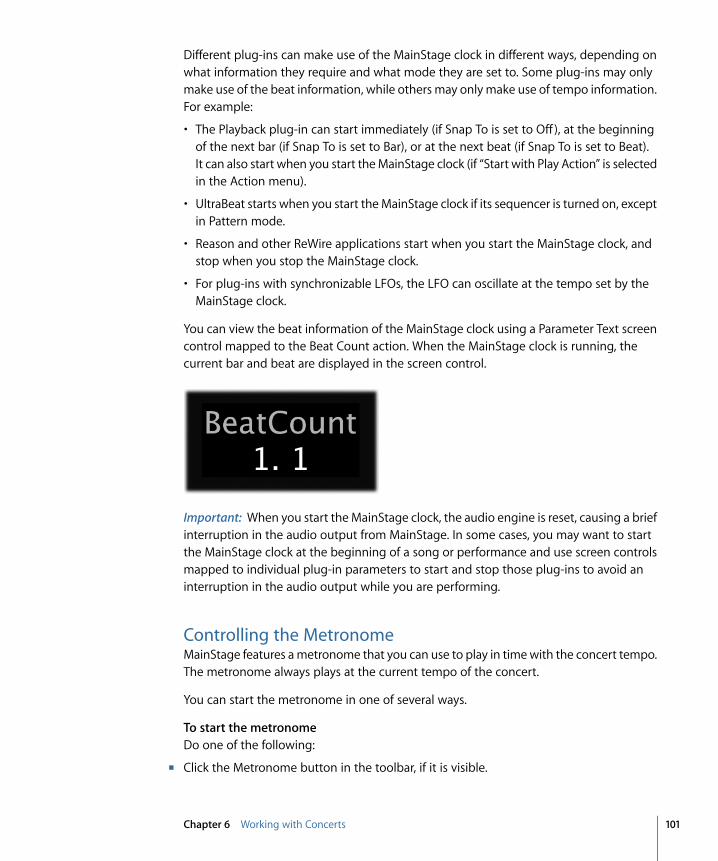
Different plug-ins can make use of the MainStage clock in different ways, depending onwhat information they require and what mode they are set to. Some plug-ins may onlymake use of the beat information, while others may only make use of tempo information.For example:
• The Playback plug-in can start immediately (if Snap To is set to Off ), at the beginningof the next bar (if Snap To is set to Bar), or at the next beat (if Snap To is set to Beat).It can also start when you start the MainStage clock (if “Start with Play Action” is selectedin the Action menu).
• UltraBeat starts when you start the MainStage clock if its sequencer is turned on, exceptin Pattern mode.
• Reason and other ReWire applications start when you start the MainStage clock, andstop when you stop the MainStage clock.
• For plug-ins with synchronizable LFOs, the LFO can oscillate at the tempo set by theMainStage clock.
You can view the beat information of the MainStage clock using a Parameter Text screencontrol mapped to the Beat Count action. When the MainStage clock is running, thecurrent bar and beat are displayed in the screen control.
Important: When you start the MainStage clock, the audio engine is reset, causing a briefinterruption in the audio output from MainStage. In some cases, you may want to startthe MainStage clock at the beginning of a song or performance and use screen controlsmapped to individual plug-in parameters to start and stop those plug-ins to avoid aninterruption in the audio output while you are performing.
Controlling the MetronomeMainStage features a metronome that you can use to play in time with the concert tempo.The metronome always plays at the current tempo of the concert.
You can start the metronome in one of several ways.
To start the metronomeDo one of the following:
µ Click the Metronome button in the toolbar, if it is visible.
101Chapter 6 Working with Concerts
µ Click a button mapped to the Metronome action.
µ If you are using a Playback plug-in, click the Metronome button in the Playback window(or click a button mapped to the Metronome button).
µ Click any of the listed buttons again to stop the metronome.
Note: Starting the metronome also starts the MainStage clock if it is not already running.
By default, the metronome sound is routed to the main outputs (Output 1-2). You canroute the metronome to another output pair, which can be useful in performance whenyou want to hear the metronome sound through a separate audio output (for example,a headphone mix) and not through the main outputs.
To change the audio output for the metronome sound1 Choose MainStage > Preferences.
2 In the Metronome section of the General tab, choose a different audio output from theOutput pop-up menu.
You can also change the volume of the metronome relative to the overall audio output.
To change the relative output of the metronome sound1 Choose MainStage > Preferences.
2 In the Metronome section of the General tab, drag the volume slider left or right to adjustthe relative volume of the metronome sound.
102 Chapter 6 Working with Concerts
You visually arrange your onscreen layout and make connections between your musichardware and MainStage in Layout mode.
You can’t change the position of physical faders, knobs, and other controls on yourinstruments and other music hardware, but you can arrange the screen controls in yourMainStage concert in any order you like by editing the layout. You can modify an existinglayout or create one from a template, and you can export a layout and import it intoanother concert.
Each concert template included with MainStage includes a built-in layout, optimized fora type of musical instrument you use with MainStage.
You modify the layout of a concert in Layout mode. You can add and arrange screencontrols in the MainStage workspace to match your music hardware, optimize your displaysize, and make assignments between controls on your MIDI hardware and the screencontrols in your concert. Below the workspace, the Screen Controls palette containsdifferent types of screen controls you can add to your layout. The Screen Control Inspectorappears to the left of the workspace, where you can learn controller assignments andedit layout parameters.
This chapter covers the following:
• Modifying the Layout of a Concert (p. 104)
• Working with Screen Controls (p. 104)
• Assigning Hardware Controls to Screen Controls (p. 114)
• Editing Screen Control Parameters (p. 116)
• How MainStage Passes Through MIDI Messages (p. 121)
• Exporting a Layout (p. 122)
• Importing a Layout (p. 122)
• Changing the Aspect Ratio of a Layout (p. 123)
103
Working in Layout Mode 7
Modifying the Layout of a ConcertYou can modify an existing layout by adding and arranging screen controls in theworkspace, changing existing controller assignments or making new ones, and editingscreen control parameters. The following sections describe how to add and arrangecontrols onscreen, make hardware assignments, change the appearance of screen controls,and edit layout parameters. You can also export a layout and import the layout into adifferent concert. For information about importing and exporting layouts, see Exportinga Layout.
To work with the layout of a concert, you switch to Layout mode.
To switch to Layout modeµ Click the Layout button at the upper-left corner of the MainStage window.
Working with Screen ControlsScreen controls are objects in a MainStage concert that correspond to the physical controlson your music hardware. Screen controls can also display patch numbers, parametersvalues, and other information and update the displayed information in real time.
You can add screen controls to the workspace of your concert, where you can move andresize them, group them together, and edit their appearance in different ways.
After you have arranged the screen controls for your concert, you make connectionsbetween your MIDI hardware and the concert by assigning physical controls on yourhardware to the screen controls in the workspace. You only need to make hardwareassignments for a concert once, as long as you are using the same music hardware.
After you make controller assignments, you can map screen controls to channel stripparameters in your patches or to actions. You map parameters in Edit mode. Forinformation about mapping parameters, see Mapping Screen Controls.
Screen Control TypesThere are three types of screen controls you can use in a MainStage layout: panel controls,shelf controls, and grouped controls. In the Screen Controls palette, located below theworkspace in Layout mode, each type has its own tab; in addition, there is a tab for allcontrols. You can add screen controls to the workspace by dragging them from the paletteto the workspace.
104 Chapter 7 Working in Layout Mode
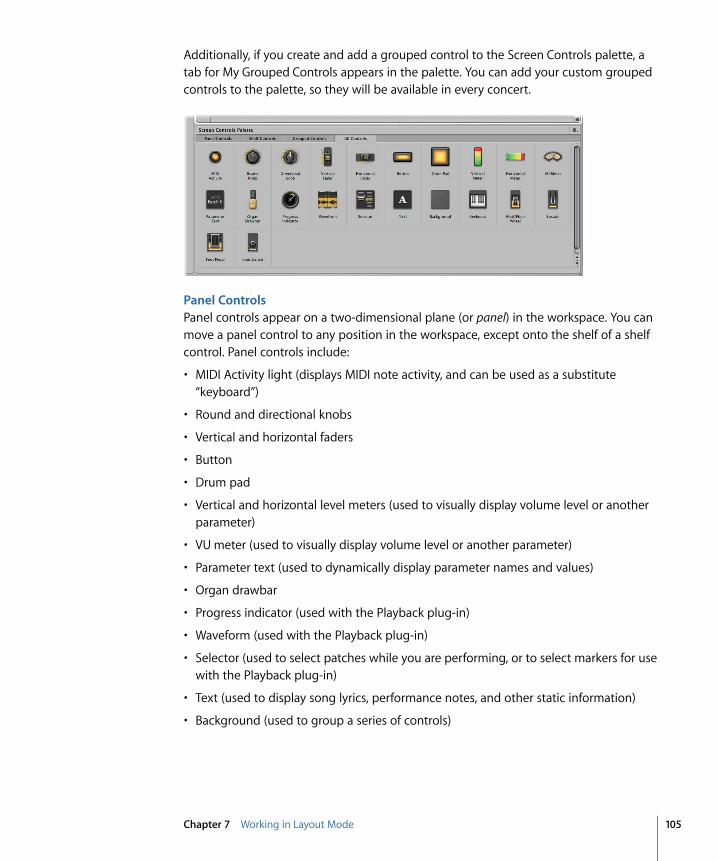
Additionally, if you create and add a grouped control to the Screen Controls palette, atab for My Grouped Controls appears in the palette. You can add your custom groupedcontrols to the palette, so they will be available in every concert.
Panel ControlsPanel controls appear on a two-dimensional plane (or panel) in the workspace. You canmove a panel control to any position in the workspace, except onto the shelf of a shelfcontrol. Panel controls include:
• MIDI Activity light (displays MIDI note activity, and can be used as a substitute“keyboard”)
• Round and directional knobs
• Vertical and horizontal faders
• Button
• Drum pad
• Vertical and horizontal level meters (used to visually display volume level or anotherparameter)
• VU meter (used to visually display volume level or another parameter)
• Parameter text (used to dynamically display parameter names and values)
• Organ drawbar
• Progress indicator (used with the Playback plug-in)
• Waveform (used with the Playback plug-in)
• Selector (used to select patches while you are performing, or to select markers for usewith the Playback plug-in)
• Text (used to display song lyrics, performance notes, and other static information)
• Background (used to group a series of controls)
105Chapter 7 Working in Layout Mode
Shelf ControlsWhen you add a shelf control, it appears on a three-dimensional shelf. You can move theshelf, adjust the angle of the shelf, and place multiple shelf controls on the same shelf.For example, if you have a keyboard screen control in your layout, you can add pitchbend wheel and modulation wheel screen controls to the same shelf as the keyboardscreen control. Shelf controls include:
• Keyboard
• Modulation or pitch bend wheel
• Sustain pedal
• Foot pedal
• Foot switch
Grouped ControlsGrouped controls consist of individual controls that are grouped together to make themeasier to work with as a single unit. Grouped controls include:
• Selector grouped with increment and decrement buttons
• Keyboard grouped with mod wheel, pitch bend wheel, and sustain pedal
• Sustain and expression pedals
• Organ drawbars
• Guitar amp controls
• Guitar pedal controls
• Arrays of knobs and faders with uniform size and spacing
• Effects and tone control knobs
• Arrays of level meters and VU meters
• Arrays of parameter text displays
• Master output fader grouped with stereo level meter
• Arrays of drum pads
• Transport controls for use with Playback plug-in
• Channel strip controls
My Grouped ControlsThe first time you add a custom grouped control to the Screen Controls palette, theMy Grouped Controls tab appears in the palette. You can add custom grouped controlsand name them so they will be accessible from every concert. For information aboutadding custom grouped controls to the Screen Controls palette, see GroupingScreen Controls.
106 Chapter 7 Working in Layout Mode
Adding Screen Controls to a LayoutIn Layout mode you can quickly add screen controls to your layout and arrange them inthe workspace.
To add a screen controlµ Drag the screen control from the Screen Controls palette to the workspace.
As you drag the screen control to the workspace, a white outline appears, showing whereit will be added. You can use the alignment guides to align the screen control with otheritems in the workspace.
You can drag screen controls into the workspace in any order. If you plan to perform witha keyboard controller, you might want to first drag a keyboard screen control into theworkspace, position it near the center, and then drag screen controls for the faders, knobs,wheels, buttons, and other physical controls on the keyboard controller.
When you drag a screen control into the workspace, the control is selected, and theavailable hardware assignments and other parameters for the screen control appear inthe Screen Control Inspector to the left of the workspace. Different types of screen controlshave different parameters, which are described in Editing Screen Control Parameters.
Adding Mod/Pitch Wheel Screen ControlsWhen you add mod/pitch wheels to a layout, by default they are configured to receivethe following MIDI message types:
• The first mod/pitch wheel is configured to receive modulation messages.
• The second mod/pitch wheel is configured to receive pitch bend messages.
• The third mod/pitch wheel is configured to receive aftertouch messages.
By default, modulation and pitch bend screen controls pass through the MIDI messagesfor their common use—that is, mod wheels pass through MIDI modulation messages,and pitch bend wheels pass through MIDI pitch bend messages. In most cases this isdesirable so that you can use them for their standard functions without any additionalsetup. If you want to use these screen controls to control other parameters, choose “Donot pass thru” from the MIDI Thru pop-up menu in the Screen Control Inspector.
Adding Foot Pedal Screen ControlsWhen you add a foot pedal to a layout, by default the first foot pedal you add is configuredto receive expression messages, and the second foot pedal you add is configured toreceive volume messages.
By default, expression pedal screen controls pass through the MIDI messages for theircommon functions (expression or volume). If you want to use an expression pedal screencontrol to control another parameter, choose “Don’t pass thru” from the MIDI thru pop-upmenu in the Screen Control Inspector.
107Chapter 7 Working in Layout Mode
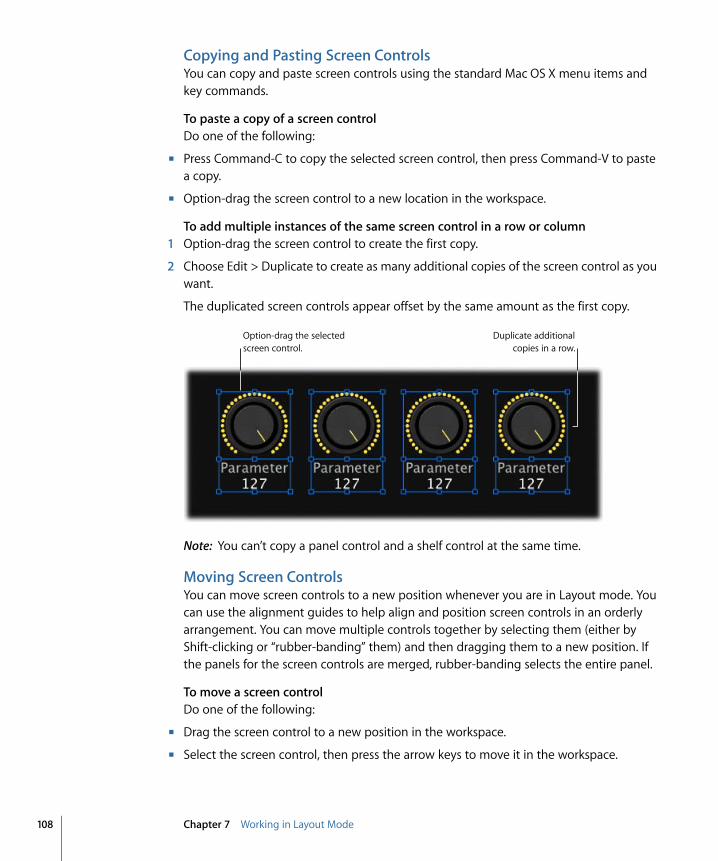
Copying and Pasting Screen ControlsYou can copy and paste screen controls using the standard Mac OS X menu items andkey commands.
To paste a copy of a screen controlDo one of the following:
µ Press Command-C to copy the selected screen control, then press Command-V to pastea copy.
µ Option-drag the screen control to a new location in the workspace.
To add multiple instances of the same screen control in a row or column1 Option-drag the screen control to create the first copy.
2 Choose Edit > Duplicate to create as many additional copies of the screen control as youwant.
The duplicated screen controls appear offset by the same amount as the first copy.
Option-drag the selected screen control.
Duplicate additional copies in a row.
Note: You can’t copy a panel control and a shelf control at the same time.
Moving Screen ControlsYou can move screen controls to a new position whenever you are in Layout mode. Youcan use the alignment guides to help align and position screen controls in an orderlyarrangement. You can move multiple controls together by selecting them (either byShift-clicking or “rubber-banding” them) and then dragging them to a new position. Ifthe panels for the screen controls are merged, rubber-banding selects the entire panel.
To move a screen controlDo one of the following:
µ Drag the screen control to a new position in the workspace.
µ Select the screen control, then press the arrow keys to move it in the workspace.
108 Chapter 7 Working in Layout Mode
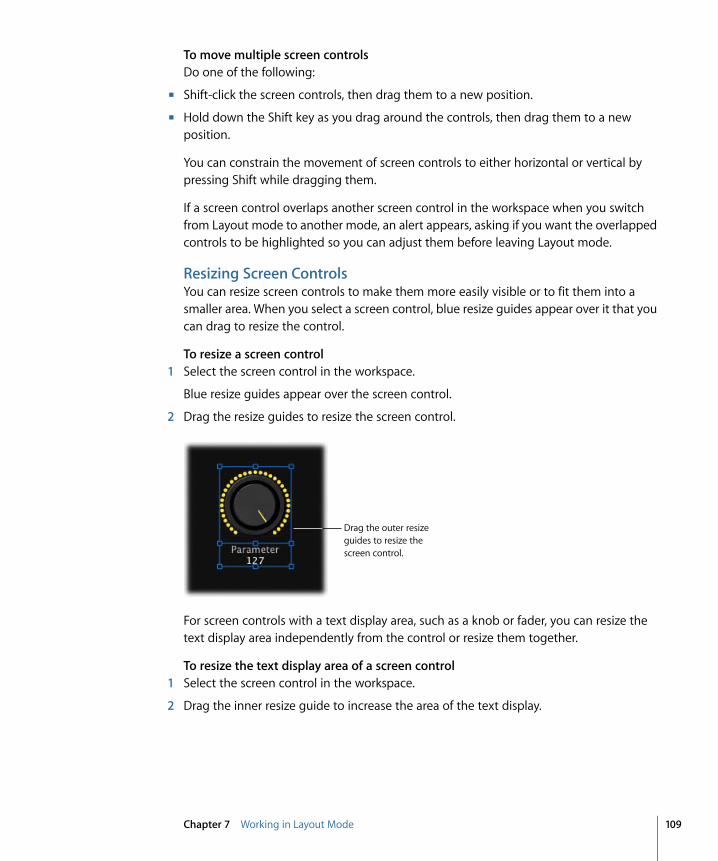
To move multiple screen controlsDo one of the following:
µ Shift-click the screen controls, then drag them to a new position.
µ Hold down the Shift key as you drag around the controls, then drag them to a newposition.
You can constrain the movement of screen controls to either horizontal or vertical bypressing Shift while dragging them.
If a screen control overlaps another screen control in the workspace when you switchfrom Layout mode to another mode, an alert appears, asking if you want the overlappedcontrols to be highlighted so you can adjust them before leaving Layout mode.
Resizing Screen ControlsYou can resize screen controls to make them more easily visible or to fit them into asmaller area. When you select a screen control, blue resize guides appear over it that youcan drag to resize the control.
To resize a screen control1 Select the screen control in the workspace.
Blue resize guides appear over the screen control.
2 Drag the resize guides to resize the screen control.
Drag the outer resize guides to resize the screen control.
For screen controls with a text display area, such as a knob or fader, you can resize thetext display area independently from the control or resize them together.
To resize the text display area of a screen control1 Select the screen control in the workspace.
2 Drag the inner resize guide to increase the area of the text display.
109Chapter 7 Working in Layout Mode
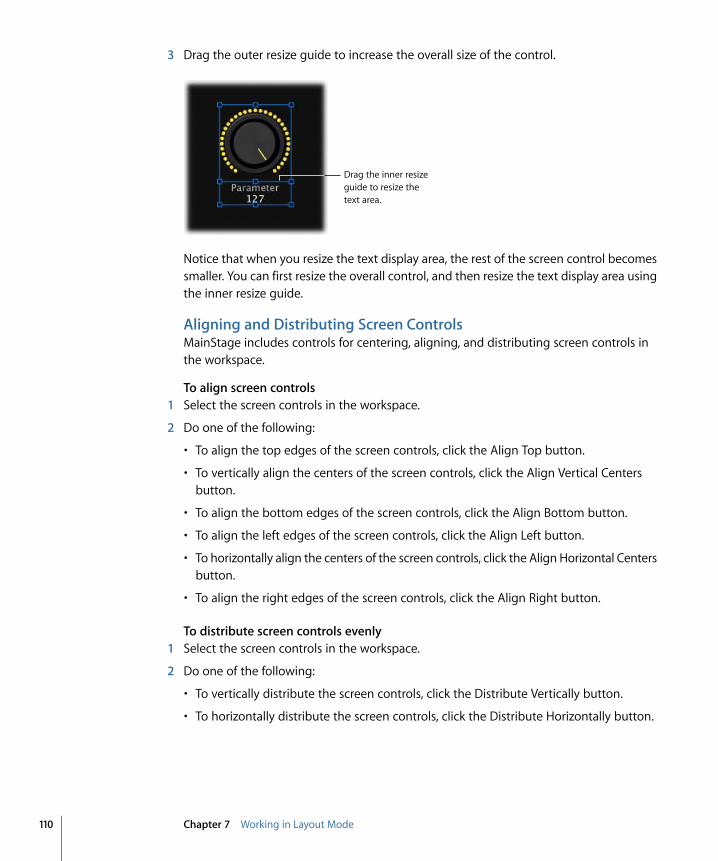
3 Drag the outer resize guide to increase the overall size of the control.
Drag the inner resize guide to resize the text area.
Notice that when you resize the text display area, the rest of the screen control becomessmaller. You can first resize the overall control, and then resize the text display area usingthe inner resize guide.
Aligning and Distributing Screen ControlsMainStage includes controls for centering, aligning, and distributing screen controls inthe workspace.
To align screen controls1 Select the screen controls in the workspace.
2 Do one of the following:
• To align the top edges of the screen controls, click the Align Top button.
• To vertically align the centers of the screen controls, click the Align Vertical Centersbutton.
• To align the bottom edges of the screen controls, click the Align Bottom button.
• To align the left edges of the screen controls, click the Align Left button.
• To horizontally align the centers of the screen controls, click the Align Horizontal Centersbutton.
• To align the right edges of the screen controls, click the Align Right button.
To distribute screen controls evenly1 Select the screen controls in the workspace.
2 Do one of the following:
• To vertically distribute the screen controls, click the Distribute Vertically button.
• To horizontally distribute the screen controls, click the Distribute Horizontally button.
110 Chapter 7 Working in Layout Mode
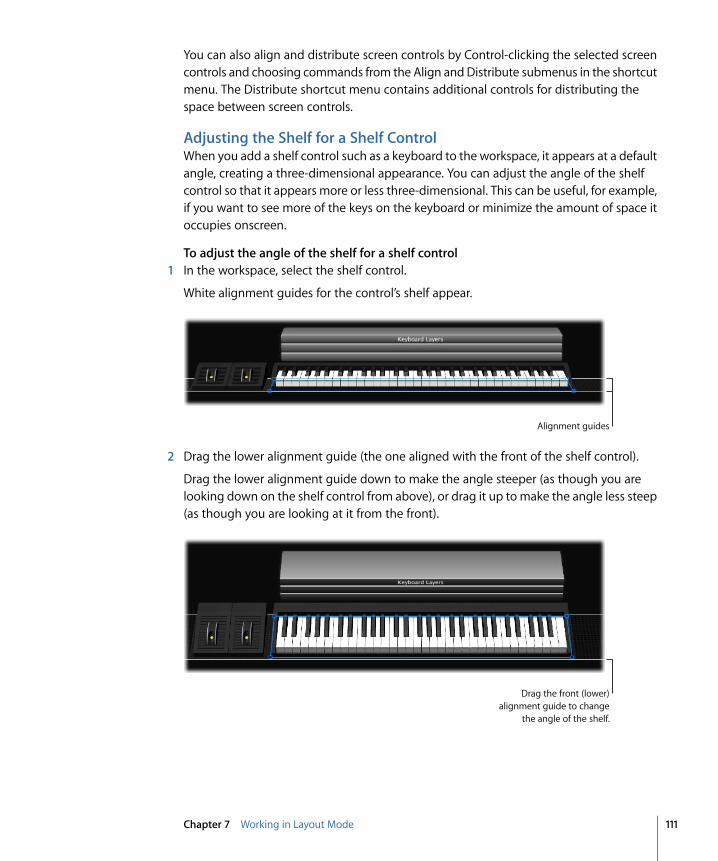
You can also align and distribute screen controls by Control-clicking the selected screencontrols and choosing commands from the Align and Distribute submenus in the shortcutmenu. The Distribute shortcut menu contains additional controls for distributing thespace between screen controls.
Adjusting the Shelf for a Shelf ControlWhen you add a shelf control such as a keyboard to the workspace, it appears at a defaultangle, creating a three-dimensional appearance. You can adjust the angle of the shelfcontrol so that it appears more or less three-dimensional. This can be useful, for example,if you want to see more of the keys on the keyboard or minimize the amount of space itoccupies onscreen.
To adjust the angle of the shelf for a shelf control1 In the workspace, select the shelf control.
White alignment guides for the control’s shelf appear.
Alignment guides
2 Drag the lower alignment guide (the one aligned with the front of the shelf control).
Drag the lower alignment guide down to make the angle steeper (as though you arelooking down on the shelf control from above), or drag it up to make the angle less steep(as though you are looking at it from the front).
Drag the front (lower) alignment guide to change
the angle of the shelf.
111Chapter 7 Working in Layout Mode
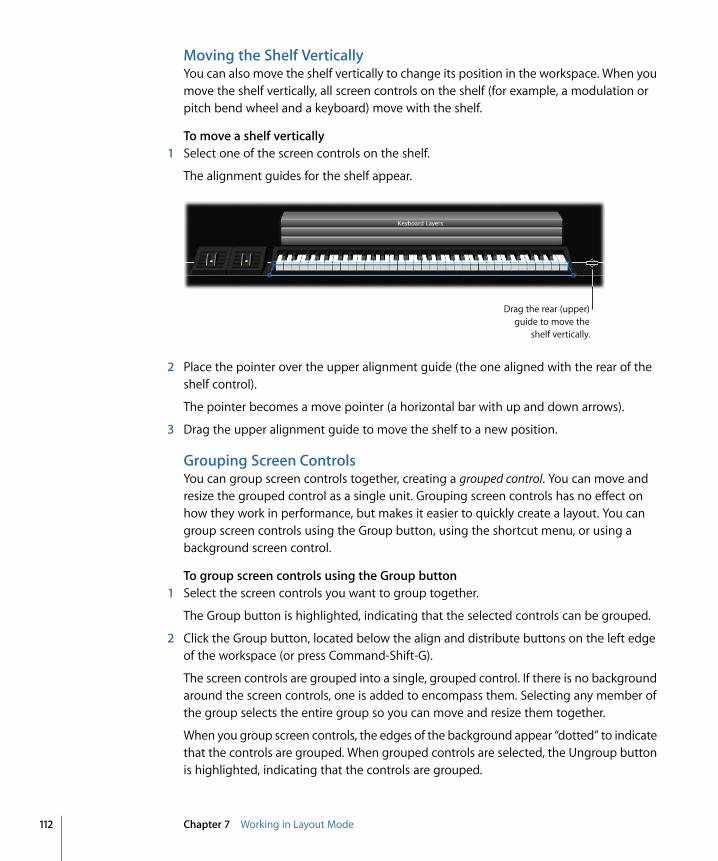
Moving the Shelf VerticallyYou can also move the shelf vertically to change its position in the workspace. When youmove the shelf vertically, all screen controls on the shelf (for example, a modulation orpitch bend wheel and a keyboard) move with the shelf.
To move a shelf vertically1 Select one of the screen controls on the shelf.
The alignment guides for the shelf appear.
Drag the rear (upper) guide to move the
shelf vertically.
2 Place the pointer over the upper alignment guide (the one aligned with the rear of theshelf control).
The pointer becomes a move pointer (a horizontal bar with up and down arrows).
3 Drag the upper alignment guide to move the shelf to a new position.
Grouping Screen ControlsYou can group screen controls together, creating a grouped control. You can move andresize the grouped control as a single unit. Grouping screen controls has no effect onhow they work in performance, but makes it easier to quickly create a layout. You cangroup screen controls using the Group button, using the shortcut menu, or using abackground screen control.
To group screen controls using the Group button1 Select the screen controls you want to group together.
The Group button is highlighted, indicating that the selected controls can be grouped.
2 Click the Group button, located below the align and distribute buttons on the left edgeof the workspace (or press Command-Shift-G).
The screen controls are grouped into a single, grouped control. If there is no backgroundaround the screen controls, one is added to encompass them. Selecting any member ofthe group selects the entire group so you can move and resize them together.
When you group screen controls, the edges of the background appear “dotted” to indicatethat the controls are grouped. When grouped controls are selected, the Ungroup buttonis highlighted, indicating that the controls are grouped.
112 Chapter 7 Working in Layout Mode
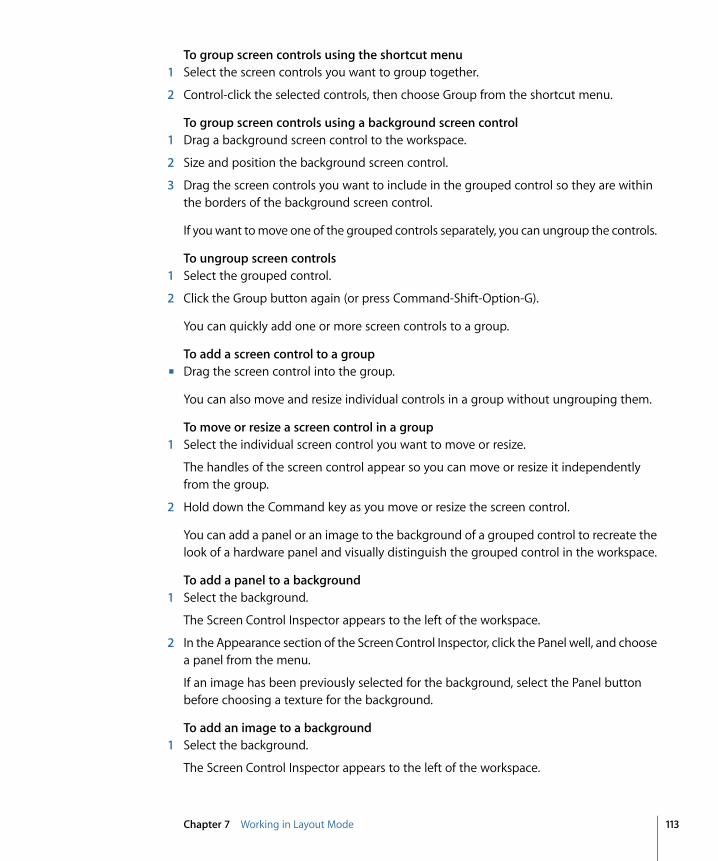
To group screen controls using the shortcut menu1 Select the screen controls you want to group together.
2 Control-click the selected controls, then choose Group from the shortcut menu.
To group screen controls using a background screen control1 Drag a background screen control to the workspace.
2 Size and position the background screen control.
3 Drag the screen controls you want to include in the grouped control so they are withinthe borders of the background screen control.
If you want to move one of the grouped controls separately, you can ungroup the controls.
To ungroup screen controls1 Select the grouped control.
2 Click the Group button again (or press Command-Shift-Option-G).
You can quickly add one or more screen controls to a group.
To add a screen control to a groupµ Drag the screen control into the group.
You can also move and resize individual controls in a group without ungrouping them.
To move or resize a screen control in a group1 Select the individual screen control you want to move or resize.
The handles of the screen control appear so you can move or resize it independentlyfrom the group.
2 Hold down the Command key as you move or resize the screen control.
You can add a panel or an image to the background of a grouped control to recreate thelook of a hardware panel and visually distinguish the grouped control in the workspace.
To add a panel to a background1 Select the background.
The Screen Control Inspector appears to the left of the workspace.
2 In the Appearance section of the Screen Control Inspector, click the Panel well, and choosea panel from the menu.
If an image has been previously selected for the background, select the Panel buttonbefore choosing a texture for the background.
To add an image to a background1 Select the background.
The Screen Control Inspector appears to the left of the workspace.
113Chapter 7 Working in Layout Mode
2 In the Appearance section of the Screen Control Inspector, select the Image button.
3 Do one of the following:
• Drag an image to the Image well.
• Click the Select button, then navigate to the location containing the image you wantto use, and select the image.
You can add custom grouped controls to the Screen Controls palette, and use them inthe same concert or another concert. Grouped screen controls you add to the paletteappear in the My Grouped Controls tab.
To add a grouped control to the Screen Controls paletteDo one of the following:
µ Control-click the grouped control, then choose Add to Palette from the shortcut menu.
µ Select the grouped control, then choose Add to Palette from the Action menu at theupper-right corner of the workspace.
After you add the first grouped control to the Screen Controls palette, theMy Grouped Controls tab appears. Select this tab (or the All tab) to see the custom groupedcontrols you have added to the Screen Controls palette.
Deleting Screen ControlsIf you decide you no longer want a screen control in your layout, you can delete it fromthe workspace.
To delete a screen control1 Select the screen control you want to delete.
2 Choose Edit > Delete (or press the Delete key).
When you delete a screen control, any assignments or mappings for the screen controlare deleted as well.
Assigning Hardware Controls to Screen ControlsTo use MainStage with a MIDI controller, you assign hardware controls on the controller(such as faders, knobs, buttons, drum pads, and pedals) to screen controls in theworkspace. After you assign a hardware control to a screen control, the screen controlreceives the MIDI messages from the hardware control. You only need to make controllerassignments once for a concert as long as you use it with the same hardware.
You assign hardware controls to screen controls using the Learn process, which is similarto the process for learning controller assignments for a control surface in Logic Pro. TheLearn process is described in Learning a Controller Assignment.
114 Chapter 7 Working in Layout Mode
When you assign a hardware control using the Learn button, MainStage determines thetype of MIDI message the control sends when you move it, and the range of values thecontrol is capable of sending. When you map the screen control to a channel stripparameter or an action, MainStage converts (or “maps”) the range of values sent by thehardware control to the optimal range of values usable by the parameter.
For example, many faders, knobs, and other MIDI controls send a range of numeric valuesbetween 0 and 127. You could map a hardware knob with this range of values to controlthe frequency parameter of an EQ effect, which has a range of usable values between20 Hz and 20 kHz. When you map the screen control for the knob to the EQ frequencyparameter, MainStage converts the values sent by the hardware knob to be distributedbetween the minimum (20 Hz) and maximum (20 kHz) values for the parameter.
Assigning KnobsMIDI controllers can have different types of knobs or rotary controllers. Knobs can beeither absolute controllers, which send a fixed value determined by the knob’s positionor can be relative controllers, which increment or decrement the previous value regardlessof their exact position. Knobs can either have a fixed range of movement, or be continuous(sometimes called endless rotary encoders).
When you assign a knob screen control using the Learn button, MainStage attempts todetermine which type of knob or rotary control on your hardware is sending the MIDImessage and sets the value in the Type pop-up menu in the Screen Control Inspector tothe correct value. For absolute controllers, the correct value is Absolute; for relativecontrollers, the correct value can be either Relative (2’s complement) or Relative (Signmagnitude), depending on the type of relative controller. In most cases, there is no needto change the default values unless you intend to use the knob for a specific, non-standardpurpose.
When you assign a knob screen control, be sure Absolute is chosen from the Type pop-upmenu if the hardware controller is an absolute rotary controller, or one of the Relativevalues is chosen if the hardware controller is a continuous rotary encoder. Moving theknob through its full range of motion helps ensure that MainStage correctly determinesthe type of knob you are assigning.
Assigning ButtonsMIDI controllers can have different types of buttons. Some buttons send a single valueeach time you press them, while others alternate between two values when pressed.Other buttons can send separate values when they are pressed and released (this typeof button is called a momentary or temporary button).
115Chapter 7 Working in Layout Mode
When you assign a button screen control using the Learn button, MainStage attemptsto determine which type of button on your hardware is sending the MIDI message, andsets the value in the Type pop-up menu in the Screen Control Inspector to the correctvalue for that button type. To enable MainStage to determine the correct value, pressthe button exactly three times when you are learning it. Pressing the button three timeshelps ensure that MainStage determines if the button is a single value, an alternatingvalue (binary), or a momentary button. In most cases, there is no need to change thedefault values unless you intend to use the button for a specific, non-standard purpose.
You can change the function of a momentary button to match the function of a singlevalue or alternating value button in MainStage.
To change the function of a momentary button1 In Layout mode, be sure the button screen control is selected.
2 In the Screen Control Inspector, choose either Single Value or Alternating Value from theType pop-up menu.
Choose Single Value if you want the button to function as a single value button, or chooseAlternating Value if you want the button to function as an alternating value button. Youcannot change the function of a single value or alternating value button to match thefunction of a momentary button.
Editing Screen Control ParametersWhen you select a screen control in Layout mode, the parameters for the screen controlappear in the Screen Control Inspector where you can edit them. Most screen controlsshare the same common parameters, but some types have different parameters accordingto their function. The parameters for each type are described in the following section.
For most Hardware Input parameters, there is no need to change the default valuesMainStage sets when you learn a controller assignment unless you intend to use thescreen control for a specific, non-standard purpose.
To edit screen control parameters1 In Layout mode, select the screen control. (When you drag a screen control to the
workspace, it is selected.)
2 In the Screen Control Inspector, edit the parameters for the selected screen control bychoosing the menu item, typing text, clicking the button, or selecting the checkbox forthe parameters you want to edit.
116 Chapter 7 Working in Layout Mode
Lifting and Stamping Screen Control ParametersYou can “lift,” or copy, certain parameters from a screen control and “stamp” them ontoother screen controls. This makes it easy to give multiple screen controls the same size,appearance, and text attributes to create a uniform look in your layout. Parameters affectedby lift and stamp include the parameters in the Appearance and Text Labels headings inthe Screen Control Inspector (except the control type), as well as the size of the screencontrol.
To lift parameters from a screen controlµ Control-click the screen control in the workspace, then choose Lift Attributes from the
shortcut menu.
To stamp parameters onto another screen controlµ Control-click the screen control in the workspace, then choose Stamp Attributes from
the shortcut menu.
You can Shift-click to select multiple screen controls, then Control-click the selection.
Common Screen Control ParametersYou can edit the following common parameters for button, knob, fader, knob, pedal,footswitch, mod/pitch wheel, meter, VU meter, organ drawbar, progress indicator, andparameter text screen controls.
Hardware Input• Device pop-up menu: Shows the name of the device containing the assigned control.
The device name may correspond to the name of a keyboard controller, or to a porton the controller, if it has multiple ports. You can choose another device, All, orUnassigned.
• Channel pop-up menu: Choose the MIDI channel on which MainStage receives inputfrom the controller.
If you plan to use more than one keyboard when you perform, be sure that screencontrols such as faders and knobs are assigned to receive input from the correctcontroller using the Device and Channel pop-up menus.
• Type pop-up menu: Choose the type of control messages to which the control responds.Control types include the following three categories:
• Continuous Control: Includes knobs, rotary encoders, faders, and most pedals thatsend values in the range of 0-127. In most cases, these controls are set to Absolute.Some rotary encoders can be set to Relative after you program the hardware deviceto send relative controller messages. The different types of Relative control messagesrepresent different encoding types used by different vendors (who may refer to themby proprietary names).
• Button Control—Toggle Only: Includes buttons that send either one (Single) or two(Alternating) values.
117Chapter 7 Working in Layout Mode
• Button Control—Toggle or Momentary: Includes drum pads and other buttons thatsend a value when the button is released as well as when it is pressed.
• Number pop-up menu: Choose the MIDI control number that the control sends. Forcommon MIDI controls, such as volume, the control name appears in the menu alongwith the number.
• MIDI Thru pop-up menu: Choose whether the control automatically passes MIDI throughor does not pass MIDI through.
• Send Value to pop-up menu: Sends the current value of the screen control to supporteddevices to display using an LED ring around a rotary encoder or to move a motorizedfader.
Appearance• Color selector: Choose the color for the active part of the screen control, which visually
displays its current value in performance. (This parameter is not available for text ormeter screen controls.)
• Control pop-up menu: Choose the type for the screen control. If you change the controlto a different type, you may need to resize it in the workspace.
Text Labels• Color selector: Choose the color for the text labels.
• Display pop-up menu: Choose what information is displayed in the text display area forthe control and how many lines are used to display it.
• Add hardware label checkbox and field: Select the checkbox, then type a hardware labelin the field to display it on the top line of the control’s text display.
Keyboard Screen Control ParametersIf you are using a keyboard controller or another MIDI device that sends MIDI notemessages, your layout should include a keyboard (or MIDI activity) screen control. Youcan edit the following parameters for keyboard screen controls.
Hardware Assignment• Device pop-up menu: Shows the name of the learned keyboard. The device name may
correspond to the name of the keyboard controller, or to a port on the controller, if ithas multiple ports. You can choose another device or choose All.
• Channel pop-up menu: Shows the MIDI channel on which MainStage receives inputfrom the keyboard. You can choose another channel or choose All.
• Velocity Sensitivity slider: Sets the velocity sensitivity for the keyboard. Less means thathigher velocities are required to trigger the maximum value, while More means thatlower velocities trigger the maximum value.
118 Chapter 7 Working in Layout Mode
Settings• Name field: Enter a name for the keyboard. The name appears in the Input pop-up
menu in the Channel Strip Inspector, where you can select the device the channel stripresponds to.
• Number of Keys value slider: Enter the number of keys to display on the keyboard screencontrol.
• Lowest Key value slider: Enter the note name for the lowest key.
• Lowest Key Learn button: Click the Learn button, then press the lowest key to haveMainStage learn it.
The Number of Keys and Low Key affect only the visual appearance of the screen control.They do not affect what notes are received from your keyboard controller.
Layer Display• Display keyboard layers checkbox: When active, a layer is displayed above the keyboard
in the workspace for each software instrument channel strip in a patch. The layers showthe name and color of the channel strip and respond when you play the keyboard.
• Height value slider: Sets the height of the layer display that appears above the keyboard.
MIDI Activity Screen Control ParametersMIDI activity screen controls can indicate when MIDI note messages are received and canalso be used as smaller, “noteless” keyboard screen controls. You can edit the followingparameters for MIDI activity screen controls.
Hardware Input• Device pop-up menu: Shows the name of the device to show MIDI activity for. You can
choose another device, All, or Unassigned.
• Channel pop-up menu: Choose the MIDI channel on which MainStage receives inputfrom the controller.
• Velocity Sensitivity slider: Set the amount of sensitivity for incoming MIDI data.
Settings• Name field: Type a name for the screen control.
Appearance• Color selector: Choose the color for the MIDI activity light.
Drum Pad Screen Control ParametersYou can use drum pad screen controls with hardware drum pads. You can edit thefollowing parameters for drum pad screen controls.
Hardware Input• Device pop-up menu: Shows the name of the hardware device with the drum pad
control. You can choose another device, All, or Unassigned.
119Chapter 7 Working in Layout Mode
Note: If the Device parameter for a drum pad screen control is set to All, the MIDI notethat triggers the drum pad (set in the Note value slider) is not sent to any keyboardscreen controls in the patch, and so does not produce sound from any softwareinstrument plug-ins “played” using those keyboard screen controls.
• Channel pop-up menu: Choose the MIDI channel on which MainStage receives inputfrom the controller.
• Note value slider: Change the MIDI note for the drum pad to a different value than thelearned value.
Appearance• Color selector: Choose the color for the active part of the screen control, so that you
can easily see when the drum pad is pressed.
Text Labels• Color selector: Choose the color for the active part of the text label.
• Justification buttons: Click to set the text justification (left, center, or right).
• Display pop-up menu: Choose what information is displayed in the text display areaand how many lines are used to display text.
• Add hardware label checkbox and field: Select the checkbox, then enter hardware labeltext in the field to display it on the top line of the control’s text display.
Waveform Screen Control ParametersYou can use waveform screen controls to display the audio waveform of the audio filefor a Playback plug-in. You can edit the Color and Hide Ruler parameters for waveformscreen controls.
• Color selector: Choose the color for the waveform display.
• Hide Ruler checkbox: When selected, the ruler at the top of the waveform display is notvisible.
Selector ParametersYou can use selector screen controls to display and select patches and sets, or to displayand select markers in audio files used by a Playback plug-in. You can edit the followingparameters for selector (patch or marker selector) screen controls.
• View Patches and Sets button: When active, both patches and sets are shown in theselector.
• Dual Column Display checkbox: When selected, sets are displayed in the left columnand patches are displayed in the right column.
• Patches or markers button: When active, only patches are shown in the selector.
• Items to Display value slider: Set the number of items (lines) visible in the selector.
• Color selector: Choose the color for selected items in the selector.
120 Chapter 7 Working in Layout Mode
• Set Justification buttons: Click to set whether sets are left, center, or right justified inthe selector.
• Patch Justification buttons: Click to set whether patches are left, center, or right justifiedin the selector.
Text Screen Control ParametersYou can edit the following parameters for text screen controls after adding text to thetext field.
• Font button: Select text, then click to show the Font menu from which you can selectthe font, style, color, and size.
• Alignment buttons: Select whether the selected text is left, right, or center aligned, orjustified.
• Text field: Enter the text you want to display onscreen.
• Show frame around text checkbox: When selected, a darker frame appears around thetext, showing the borders of the screen control.
Background Screen Control ParametersYou can use backgrounds for grouped controls. You can edit the following parametersfor background screen controls.
• Name field: Enter a name for the grouped control in the Name field.
• Description field: Enter a description for the grouped control in the Description field.
• Panel button and well: Click the Panel button, then choose a panel or texture for thebackground from the menu that appears.
• Image button and well: Click the Image button, then drag an image into the well to useit for the background.
• Select button: Click to open an Open File dialog to browse and select an image.
• Stretch to Fit checkbox: When selected, the image stretches to fill the area of thebackground as completely as possible.
How MainStage Passes Through MIDI MessagesSome MIDI messages sent by your keyboard controller (or other MIDI device) are “passedthrough” to any channel strips in the MainStage concert that are mapped to the samecontroller (or device). Whether or not MIDI messages are passed through depends onthe following conditions:
• If there is no screen control in your layout assigned to receive the message type sentby the controller, the messages are passed through.
121Chapter 7 Working in Layout Mode
• If a screen control for that MIDI message type exists, and the MIDI Thru parameter forthe screen control is set to Automatic or to the input device, the messages are passedthrough. This is the default for screen controls set to receive volume, pan, expression,sustain, modulation, pitch bend, and aftertouch messages.
• If a screen control for that MIDI message type exists, and the MIDI Thru parameter forthe screen control is set to “Do not pass through,” the data is not passed through. Thisis the default for most other screen controls.
The reason for these exceptions is so that when you add a screen control for a modulationwheel or a sustain pedal, for example, it “automatically” responds to the appropriate MIDImessage type, without your having to configure it further. If you want to have the screencontrol respond to a different type of MIDI message, you can choose another MIDI messagetype from the Number pop-up menu in the Screen Control Inspector.
Incoming MIDI messages that are passed through are passed to any channel strips mappedto the same device sending those messages (that is, to the keyboard controller you areusing to “play” those channel strips). If there is no matching device, the MIDI messagesare sent to all channel strips.
You can also filter incoming MIDI messages for individual channel strips. For informationon filtering MIDI messages, see Filtering MIDI Messages.
Exporting a LayoutYou can export a layout so that you can save it independently from the concert andimport it into other concerts.
To export a layout1 Choose File > Export Layout (or press Command-Shift-Control-S).
2 In the Save As dialog, type a name for the layout, and browse to a location where youwant to save the layout (or use the default location).
3 Click Save.
Importing a LayoutYou can import an exported layout into another concert, and then adjust it to work withthe mappings in the concert.
To import a layout into a concert1 Choose File > Import Layout (or press Command-Control-O).
2 In the Open dialog, select the layout you want to import.
3 Click Open.
The layout for the concert changes to the imported layout.
122 Chapter 7 Working in Layout Mode
When you import a layout into a concert, MainStage analyzes the layout and attemptsto convert the assignments and mappings in the layout to work with the concert. It usesthe following rules to convert imported assignments and mappings:
• Screen controls are assigned and mapped to screen controls of the same type if theyexist in the imported layout.
• Keyboard screen controls are assigned only to keyboard screen controls.
• If the arrangement of screen controls in the concert is similar to their arrangement inthe imported layout, screen controls are assigned and mapped to screen controls inthe same positions in the workspace.
• If the arrangement of screen controls in the concert is different, MainStage tries toassign and map screen controls starting from the top-left corner of the workspace tothe bottom-right corner.
Because of the wide variety of possible layouts, not all assignments and mappings maybe converted as you intended, depending on the differences between the layouts. Afteryou import a layout into a concert, be sure to try the screen controls in the concert tosee if they work as expected. After importing the layout, you may need to manuallyreassign some controls and then manually remap screen controls in your patches for theconcert to work with the new layout. If the imported layout has fewer screen controlsthan the old layout, or has different types of screen controls, you will likely have to addnew screen controls after importing and then assign physical controls to the screencontrols to maintain the same level of functionality.
Changing the Aspect Ratio of a LayoutYou can change the aspect ratio of a concert layout. Changing the aspect ratio lets youuse the concert with different monitor types: 16:10 (widescreen), 4:3 (standard), and 10:16(portrait).
To change the aspect ratio of a layoutµ In the Action menu located in the upper-right corner of the workspace, choose Aspect
Ratio, then choose the aspect ratio from the submenu.
123Chapter 7 Working in Layout Mode

You can play back audio files in time with your live performance. Playing back audio filescan have a variety of uses, including playing backing tracks to accompany yourperformance, playing song stems that you can mix live, and using a “backing band” whileyou practice your performance.
You play back audio files using the Playback plug-in, which is available in the Instrumentmenu. Using the Playback plug-in, you can start and stop playback of an audio file, cycle(loop) playback, and fade out the audio. Using markers, you can shift playback to differentparts of the audio file. You can have files play at their original speed or synchronizeplayback to the current tempo of the concert. You can also play back several audio filestogether using multiple instances of the Playback plug-in and control them using groups.
The Playback plug-in is available only in MainStage. This chapter provides informationon how you can use the Playback plug-in in a MainStage concert. For detailed informationabout the interface, parameters, and functions of the Playback plug-in and supportedaudio file formats, see The Playback Plug-in.
This chapter covers the following:
• Adding a Playback Plug-in (p. 125)
• Using the Playback Plug-in (p. 130)
Adding a Playback Plug-inThe Playback plug-in is an Instrument plug-in and is available only for software instrumentchannel strips. To use the Playback plug-in, you add it to a software instrument channelstrip, then select an audio file to play. You can add a Playback plug-in to a channel stripin a patch or at the set or concert level.
125
Playing Back Audio in MainStage 8
Where you add an instance of the Playback plug-in depends on how you want to use it.If you want to play back an audio file while you play a single patch, you can add it to thepatch. If you add a Playback plug-in at the set level, you can select different patches inthe set and have the audio file continue playing. This can be useful, for example, if theset includes all the patches you’ll use in a song, and the Playback plug-in plays an audiofile with a backing track for the song. If you add a Playback plug-in at the concert level,you can select different patches in the concert and have the audio file continue playing.The ability to use the plug-in at any level gives you a great deal of creative freedom inhow you use it.
Each instance of the plug-in can play one audio file. You can use audio files in a varietyof file formats including AIFF, WAVE, and CAF. You can play audio files containing markerinformation, including files exported (bounced) from Logic Pro and Apple Loops, andshift playback to markers located at different time positions in the audio file.
There are two ways to add a Playback plug-in: by dragging an audio file to the ChannelStrips area or from the Instrument slot on a channel strip.
To add a Playback plug-in by dragging an audio file1 In the Patch List, select the patch to which you want to add a Playback plug-in. You can
also select a set or the concert icon.
2 Drag an audio file from the Finder to the space between channel strips in the ChannelStrips area.
A black line appears between the channel strips, and the pointer becomes an Add Filepointer as a new channel strip is created. The new channel strip contains a Playbackplug-in with the audio file you dragged to the Channel Strips area.
To add a Playback plug-in from the Instrument slot1 Click the Add Channel Strip button to add a new channel strip to the patch, set, or concert.
2 In the new Channel Strip dialog, select Software Instrument as the type. Leave othersettings at their default values, or change them to suit your setup.
A new software instrument channel strip appears in the Channel Strips area.
3 In the I/O section of the channel strip, click the Instrument slot, choose Playback fromthe menu, then choose either Mono or Stereo from the submenu.
126 Chapter 8 Playing Back Audio in MainStage
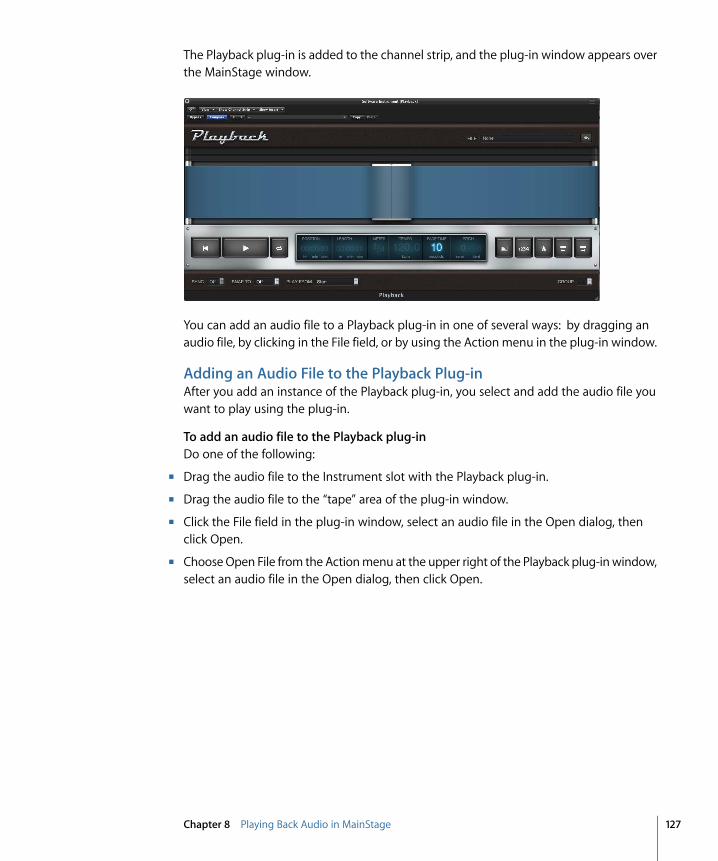
The Playback plug-in is added to the channel strip, and the plug-in window appears overthe MainStage window.
You can add an audio file to a Playback plug-in in one of several ways: by dragging anaudio file, by clicking in the File field, or by using the Action menu in the plug-in window.
Adding an Audio File to the Playback Plug-inAfter you add an instance of the Playback plug-in, you select and add the audio file youwant to play using the plug-in.
To add an audio file to the Playback plug-inDo one of the following:
µ Drag the audio file to the Instrument slot with the Playback plug-in.
µ Drag the audio file to the “tape” area of the plug-in window.
µ Click the File field in the plug-in window, select an audio file in the Open dialog, thenclick Open.
µ Choose Open File from the Action menu at the upper right of the Playback plug-in window,select an audio file in the Open dialog, then click Open.
127Chapter 8 Playing Back Audio in MainStage
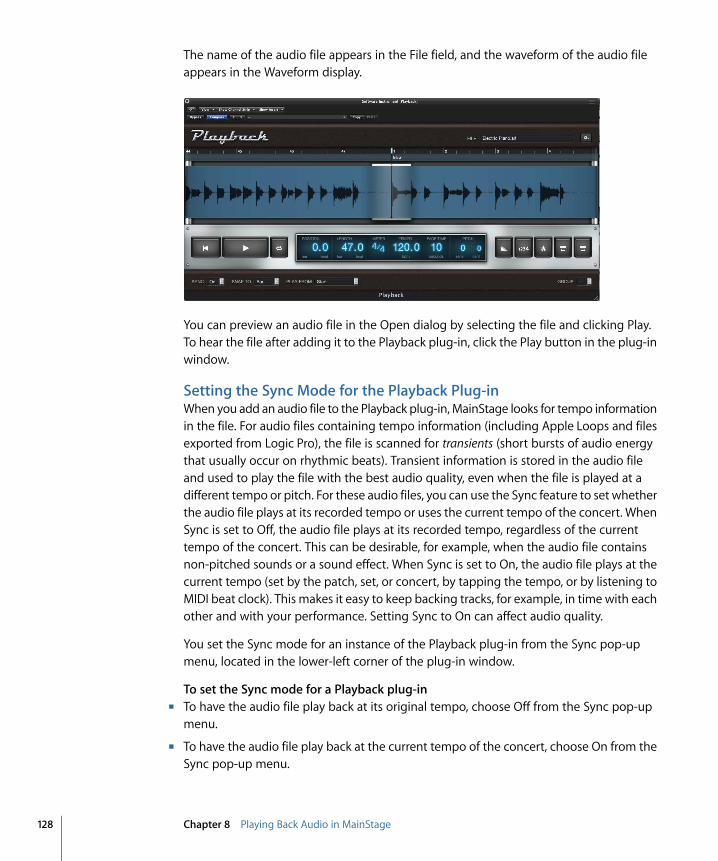
The name of the audio file appears in the File field, and the waveform of the audio fileappears in the Waveform display.
You can preview an audio file in the Open dialog by selecting the file and clicking Play.To hear the file after adding it to the Playback plug-in, click the Play button in the plug-inwindow.
Setting the Sync Mode for the Playback Plug-inWhen you add an audio file to the Playback plug-in, MainStage looks for tempo informationin the file. For audio files containing tempo information (including Apple Loops and filesexported from Logic Pro), the file is scanned for transients (short bursts of audio energythat usually occur on rhythmic beats). Transient information is stored in the audio fileand used to play the file with the best audio quality, even when the file is played at adifferent tempo or pitch. For these audio files, you can use the Sync feature to set whetherthe audio file plays at its recorded tempo or uses the current tempo of the concert. WhenSync is set to Off, the audio file plays at its recorded tempo, regardless of the currenttempo of the concert. This can be desirable, for example, when the audio file containsnon-pitched sounds or a sound effect. When Sync is set to On, the audio file plays at thecurrent tempo (set by the patch, set, or concert, by tapping the tempo, or by listening toMIDI beat clock). This makes it easy to keep backing tracks, for example, in time with eachother and with your performance. Setting Sync to On can affect audio quality.
You set the Sync mode for an instance of the Playback plug-in from the Sync pop-upmenu, located in the lower-left corner of the plug-in window.
To set the Sync mode for a Playback plug-inµ To have the audio file play back at its original tempo, choose Off from the Sync pop-up
menu.
µ To have the audio file play back at the current tempo of the concert, choose On from theSync pop-up menu.
128 Chapter 8 Playing Back Audio in MainStage
Note: For audio files that do not contain tempo information, Sync is set to Off and theSync pop-up menu is unavailable.
Choosing the Flex Mode for the Playback Plug-inFor audio files containing tempo information, you can choose between different flexmodes for playing back audio. Each flex mode is optimized for playback of a certain typeof audio file, and you can choose which flex mode an instance of the Playback plug-inuses to play back the audio file you added. The flex modes available are:
• Slicing: Slices the audio material at transient markers and plays each slice at its originalspeed. Slicing is a good choice for general use, particularly for rhythmic material.
• Rhythmic: Based on the time-stretching algorithm used for Apple Loops, Rhythmic isbest suited for playing non-monophonic material, such as rhythmic guitars, rhythmickeyboard parts, and Apple Loops.
• Speed: Time-stretches material by playing the source material faster or slower, includingchanging the pitch. Speed is recommended for percussive material.
• Polyphonic: Based on a phase vocoder, Polyphonic time-stretches material, deliveringhigh sonic quality with suitable polyphonic material. It is recommended for complexpolyphonic material and is good for all kinds of chords—such as guitar, piano, andchoir—and for complex mixes.
Because each flex mode can produce different results depending on the audio material,it is recommended that you try out different flex modes for each instance of the Playbackplug-in to determine which provides the best playback for your audio files.
To choose the flex mode for a Playback plug-inµ Choose Flex Mode from the Action menu at the upper right of the plug-in window, then
choose the flex mode from the submenu.
Note: For audio files that do not contain tempo information, the Flex Mode menu itemis unavailable.
Adding Screen Controls for the Playback Plug-inYou can use screen controls to control the parameters of the Playback plug-in, displayparameter values and the name of the audio file, and display the audio waveform of theaudio file. The Screen Controls palette includes a waveform screen control that you canuse with the Playback plug-in to view the waveform of the audio file. If the audio filecontains markers, you can also view the markers in the waveform screen control.
To add a waveform screen control to the workspace1 Click the Layout button (in the upper-left corner of the MainStage window) to switch to
layout mode.
2 Drag a waveform screen control to the workspace, and position it as needed.
129Chapter 8 Playing Back Audio in MainStage
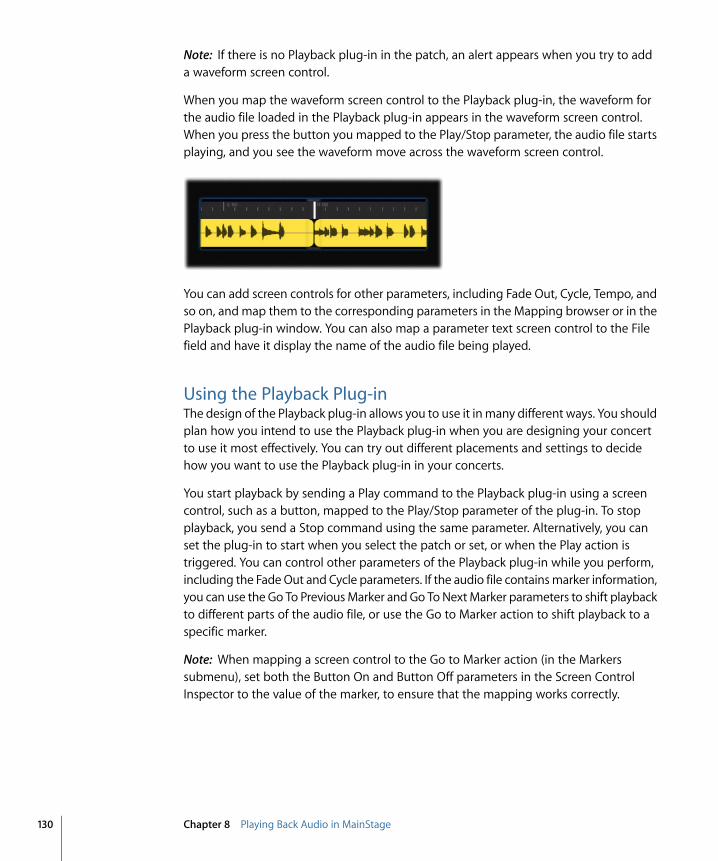
Note: If there is no Playback plug-in in the patch, an alert appears when you try to adda waveform screen control.
When you map the waveform screen control to the Playback plug-in, the waveform forthe audio file loaded in the Playback plug-in appears in the waveform screen control.When you press the button you mapped to the Play/Stop parameter, the audio file startsplaying, and you see the waveform move across the waveform screen control.
You can add screen controls for other parameters, including Fade Out, Cycle, Tempo, andso on, and map them to the corresponding parameters in the Mapping browser or in thePlayback plug-in window. You can also map a parameter text screen control to the Filefield and have it display the name of the audio file being played.
Using the Playback Plug-inThe design of the Playback plug-in allows you to use it in many different ways. You shouldplan how you intend to use the Playback plug-in when you are designing your concertto use it most effectively. You can try out different placements and settings to decidehow you want to use the Playback plug-in in your concerts.
You start playback by sending a Play command to the Playback plug-in using a screencontrol, such as a button, mapped to the Play/Stop parameter of the plug-in. To stopplayback, you send a Stop command using the same parameter. Alternatively, you canset the plug-in to start when you select the patch or set, or when the Play action istriggered. You can control other parameters of the Playback plug-in while you perform,including the Fade Out and Cycle parameters. If the audio file contains marker information,you can use the Go To Previous Marker and Go To Next Marker parameters to shift playbackto different parts of the audio file, or use the Go to Marker action to shift playback to aspecific marker.
Note: When mapping a screen control to the Go to Marker action (in the Markerssubmenu), set both the Button On and Button Off parameters in the Screen ControlInspector to the value of the marker, to ensure that the mapping works correctly.
130 Chapter 8 Playing Back Audio in MainStage
A Playback plug-in in a patch plays only while the patch is selected. If you are using aPlayback plug-in at the set level, you can select different patches in the set (for example,different lead synth or guitar solo patches) and have the audio file continue playing. Ifyou are using a Playback plug-in at the concert level, you can select different patches inthe concert and have the audio file continue playing.
The Playback plug-in provides an additional form of control using groups. If you usemultiple instances of the plug-in in your concert, you can use groups to control whichinstances play together and which are mutually exclusive. When Playback instances arein the same group, a change to the Play/Stop, Cycle, Fade Out, Return to Start, Go toPrevious Marker, or Go To Next Marker parameters in one instance changes that parameterfor every member of the group. You can use up to 26 groups, each identified by a differentletter. Starting one group stops all other groups, while ungrouped instances of the plug-incontinue playing.
If you are using multiple instances of the Playback plug-in in a group, you can start andstop their playback together by starting or stopping any member of the group using ascreen control mapped to the Play/Stop parameter. When playback instances are grouped,playback is “locked” so changes in position affect all members of the group. You cancontrol other aspects of playback, such as having the group fade out or loop playback,using screen controls mapped to the corresponding controls in the plug-in window ofany member of the group. Playback instances that are not members of a group are notaffected.
You assign an instance of the Playback plug-in to a group from the Group pop-up menu,located in the lower-right corner of the plug-in window.
To assign a Playback plug-in to a group1 If the Playback plug-in window is not open, double-click its name in the Input slot to
open it.
2 Choose the letter of the group you want to assign the instance to from the Group pop-upmenu.
131Chapter 8 Playing Back Audio in MainStage

Now that you’ve created and organized your sounds and set up your layout, it’s time toplay! MainStage features two modes, Full Screen mode and Perform mode, optimized forlive performance.
This chapter covers the following:
• Before the Performance Starts (p. 133)
• Using Full Screen Mode and Perform Mode (p. 134)
• Selecting Patches in Performance (p. 135)
• Using Screen Controls in Performance (p. 136)
• Handling Tempo Changes in Performance (p. 137)
• Tips for Performing with Keyboard Controllers (p. 137)
• Tips for Performing with Guitars and Other Instruments (p. 137)
• Using the Tuner (p. 138)
• Using the Playback Plug-in in Performance (p. 139)
• Recording Your Performances (p. 140)
• After the Performance (p. 141)
• Tips for Complex Hardware Setups (p. 141)
Before the Performance StartsHere are a few things to check before you begin performing:
• Make sure your MIDI controllers, instruments, microphones, and other music equipmentis connected to your computer and is working.
• Test the audio output from MainStage using the audio interface and speakers ormonitors you plan to use in performance.
• Select a patch with a software instrument channel strip and play your keyboardcontroller. Watch the Activity Monitor to make sure MainStage is receiving MIDI inputfrom the controller, and make sure you can hear the audio output.
133
Performing Live with MainStage 9
• Make sure any instruments or microphones you plan to play through audio channelstrips are connected to the correct audio inputs on your audio interface. Select a patchwith an audio channel strip and play or sing to make sure you can hear audio output.
• For the best results, close any applications that you do not need while performing,particularly applications with high processor or RAM requirements.
• If you use Time Machine to back up your computer, turn it off.
• Disconnect the computer running MainStage from any network connections.
Using Full Screen Mode and Perform ModeWhen you perform live, you can use either Full Screen mode or Perform mode, dependingon which you prefer. Each mode offers some advantages for different performancesituations.
Working in Full Screen ModeIn Full Screen mode, the MainStage workspace fills the entire screen, and screen controlsappear at the maximum possible size for easy viewing. MainStage receives all keyboardinput (so no other key commands, including Mac OS X key commands, are active). Youcan access the Master Mute and Panic functions and the Tuner using their key commandsor if you have mapped screen controls to these functions.
To switch to Full Screen modeDo one of the following:
µ Choose View > Full Screen (or press Command-4).
µ Click the Full Screen button in the toolbar.
To leave Full Screen modeDo one of the following:
µ Press the Escape (Esc) key.
µ Click the circled “X” in the upper-left corner of the screen.
µ Use the key command for one of the other modes (Command-1 through Command-3).
Working in Perform ModeIn Perform mode, the workspace fills the MainStage window, but the toolbar is still visibleso that you can access the Master Mute, Panic, Tuner, and other toolbar buttons. You canresize the MainStage window and can also change the size of the workspace inside thewindow using the zoom slider. You can access the Finder and other open applicationsby clicking outside the MainStage window.
134 Chapter 9 Performing Live with MainStage
To switch to Perform modeDo one of the following:
µ Choose View > Perform (or press Command-3).
µ Click the Perform button in the toolbar.
By default, when you open MainStage, it opens in Edit mode. You can change the defaultbehavior in the General pane of MainStage preferences so that it opens in Perform or FullScreen mode. For more information, see Setting MainStage Preferences.
Selecting Patches in PerformanceIn Full Screen or Perform mode, you can view and select patches using the patch selectorscreen control in your layout. Patches and sets appear in the patch selector in the sameorder as in the Patch List in Edit mode. Skipped items do not appear in the patch selectorand cannot be selected, but patches in collapsed sets do appear and can be selected.For information about skipping items, see Skipping Items in the Patch List.
When you select a patch, you can start playing it instantly. If you are sustaining notesfrom the previous patch, they will continue to be sustained until you release the notesor the sustain pedal. If the previous patch contains effects (such as a reverb or delay effect)with a release “tail,” the effect tail continues sounding for the amount of time set in theSilence Previous Patch pop-up menu in MainStage preferences. For more information,see Setting MainStage Preferences.
When performing, keep in mind the difference between patch parameters and parameterscontrolled at the concert level. When you select a patch, its parameters are set to thevalues at which you last saved the patch. If you have previously played the patch sinceyou opened the concert, they are set to the values at which you left them when youplayed the patch. Parameters at the concert level, however, remain at their current valuewhen you select new patches. For example, if you select a patch with a channel strip setto a volume 0 dB, but the Master volume fader at the concert level is set to −96 dB, youwill hear silence, not full volume. Similarly, parameters controlled at the set level remainat their current value when you select a different patch in the set.
Also keep in mind that when you select a patch, the screen controls for knobs, faders,and other controls in the workspace show the parameter values for the patch, which maybe different than the positions of the physical controls on your controller. When youmove the physical controls, the screen controls instantly update to show the currentvalue.
Selecting Patches Using Key CommandsYou can select patches in the patch selector using the following key commands:
135Chapter 9 Performing Live with MainStage
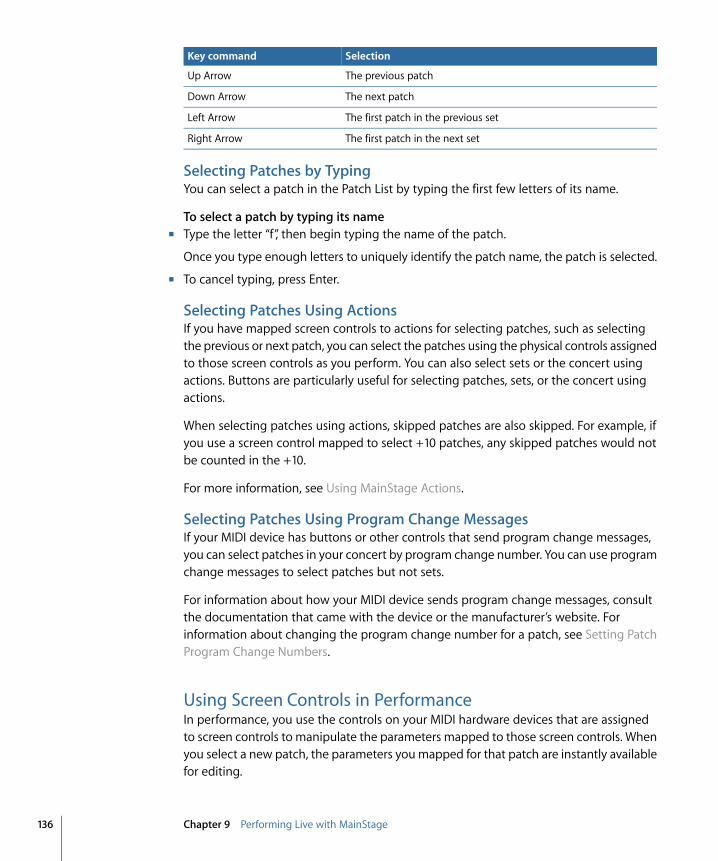
SelectionKey command
The previous patchUp Arrow
The next patchDown Arrow
The first patch in the previous setLeft Arrow
The first patch in the next setRight Arrow
Selecting Patches by TypingYou can select a patch in the Patch List by typing the first few letters of its name.
To select a patch by typing its nameµ Type the letter “f”, then begin typing the name of the patch.
Once you type enough letters to uniquely identify the patch name, the patch is selected.
µ To cancel typing, press Enter.
Selecting Patches Using ActionsIf you have mapped screen controls to actions for selecting patches, such as selectingthe previous or next patch, you can select the patches using the physical controls assignedto those screen controls as you perform. You can also select sets or the concert usingactions. Buttons are particularly useful for selecting patches, sets, or the concert usingactions.
When selecting patches using actions, skipped patches are also skipped. For example, ifyou use a screen control mapped to select +10 patches, any skipped patches would notbe counted in the +10.
For more information, see Using MainStage Actions.
Selecting Patches Using Program Change MessagesIf your MIDI device has buttons or other controls that send program change messages,you can select patches in your concert by program change number. You can use programchange messages to select patches but not sets.
For information about how your MIDI device sends program change messages, consultthe documentation that came with the device or the manufacturer’s website. Forinformation about changing the program change number for a patch, see Setting PatchProgram Change Numbers.
Using Screen Controls in PerformanceIn performance, you use the controls on your MIDI hardware devices that are assignedto screen controls to manipulate the parameters mapped to those screen controls. Whenyou select a new patch, the parameters you mapped for that patch are instantly availablefor editing.
136 Chapter 9 Performing Live with MainStage
When you move a physical control, the screen control updates based on the Respond toHardware Move parameter in the Screen Control Inspector. If the parameter is set toJump, the screen control instantly moves to the position of the hardware control. If theparameter is set to Pickup, the screen control starts moving when the hardware controlreaches its current position. If the parameter is set to Relative, the screen control movesin sync with the hardware control, starting from its current position.
Handling Tempo Changes in PerformanceWhen you open the concert you plan to use in your performance, MainStage uses thetempo for the concert you set in the Concert Inspector. If the “Get tempo from MIDI input”checkbox is selected, MainStage uses incoming MIDI beat clock to set the tempo. Forinformation about setting and changing the tempo in a concert, see Using Tempo in aMainStage Concert.
If you select a patch or set with its own tempo setting, the tempo changes to the newsetting. You can also change the tempo in real time while you perform using the TapTempo feature, either by pressing Control-T repeatedly at the tempo you want to use,by clicking the Tap Tempo button in the toolbar repeatedly, or using a screen controlmapping to the Tap Tempo action.
Tips for Performing with Keyboard ControllersIf you are using one of the Keyboards templates designed for use with a MIDI-compatiblekeyboard controller, you can play your keyboard and use MainStage as a sophisticatedsound module and multi-effects processor. The patches in the template make extensiveuse of the software instrument plug-ins included in Logic Studio as well as a wide rangeof effects plug-ins.
Tips for Performing with Guitars and Other InstrumentsIf you are using one of the Guitar Rigs templates designed for use with electric guitar,you can play your electric guitar and use MainStage as a multi-effects processor. Thepatches in the template make extensive use of the Amp Designer amp simulation plug-inand the Pedalboard effects plug-ins as well as other effects commonly used with guitars.
Guitar patches with Pedalboard-style screen controls can be assigned to a foot switch,allowing you to bypass different effects in the channel strip. Some patches also allow youto switch between channel strips with different effects using an expression pedal.
When playing guitars and other low-impedance instruments, be sure they are connectedto an audio input that matches the impedance of the instrument. Connecting a guitar toa standard line-level audio input may produce a lower volume level for the guitar’s outputthan intended.
137Chapter 9 Performing Live with MainStage
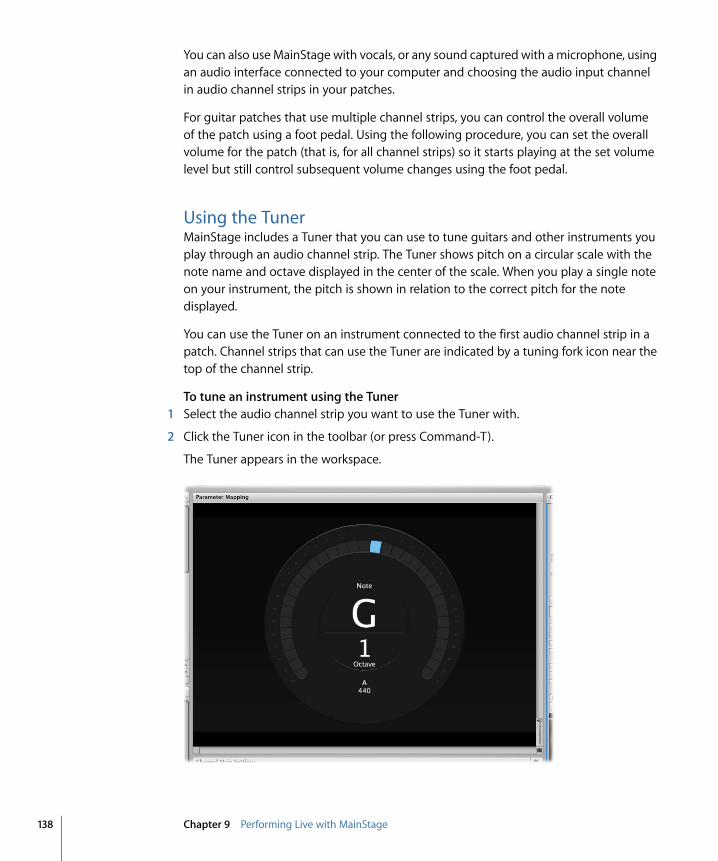
You can also use MainStage with vocals, or any sound captured with a microphone, usingan audio interface connected to your computer and choosing the audio input channelin audio channel strips in your patches.
For guitar patches that use multiple channel strips, you can control the overall volumeof the patch using a foot pedal. Using the following procedure, you can set the overallvolume for the patch (that is, for all channel strips) so it starts playing at the set volumelevel but still control subsequent volume changes using the foot pedal.
Using the TunerMainStage includes a Tuner that you can use to tune guitars and other instruments youplay through an audio channel strip. The Tuner shows pitch on a circular scale with thenote name and octave displayed in the center of the scale. When you play a single noteon your instrument, the pitch is shown in relation to the correct pitch for the notedisplayed.
You can use the Tuner on an instrument connected to the first audio channel strip in apatch. Channel strips that can use the Tuner are indicated by a tuning fork icon near thetop of the channel strip.
To tune an instrument using the Tuner1 Select the audio channel strip you want to use the Tuner with.
2 Click the Tuner icon in the toolbar (or press Command-T).
The Tuner appears in the workspace.
138 Chapter 9 Performing Live with MainStage
3 Play a single note on your instrument, and watch the Tuner display.
As you play, the Tuner shows the note name of the closest note. If the note is not in tune,red vertical bars appear, showing whether the note is sharp or flat. The bars appear tothe right of the note name if the note is sharp, and to the left if the note is flat.
4 Adjust the tuning peg for the string you are tuning.
When the note is in tune, a blue vertical bar appears in the center, above the note name.
Be sure to play only a single note at a time while tuning. The Tuner can’t tune to a chordor interval or if you play different notes rapidly.
When using the Tuner with a patch containing multiple channel strips, only audio fromthe first audio channel strip is sent to the Tuner, even if other channel strips in the patchhave the same input source. Before using the Tuner, make sure that the first audio channelstrip is active and not muted.
In the Channel Strips area, the channel strip that will send audio to the Tuner is indicatedby a tuning fork icon at the top of the channel strip.
If other channel strips in the patch have the same audio input source as the first channelstrip, the sound from those channel strips is still audible (unlike the output from theTuner). For example, if you are using a twin-amp patch from the Rock guitar concerttemplate, the output for the second amp is audible while you tune the guitar, unless youmute its output (by setting the Expression pedal screen control to zero).
Using the Playback Plug-in in PerformanceYou can use the Playback plug-in to play backing tracks or other audio files while you areperforming, and trigger playback either when you select a patch or set, or using a buttonor other screen control. You can control other Playback parameters to which you havemapped screen controls, including fading out the sound and looping playback. For filescontaining marker information, you can also use markers to switch playback to differentsections of the audio file. You can start and stop playback of multiple Playback plug-ininstances using the Group menu.
Where you add an instance of the Playback plug-in depends on how you want to use it.If you want to play back an audio file while you play a single patch, you can add it to thepatch. If you add a Playback plug-in at the set level, you can select different patches inthe set and have the audio file continue playing. This can be useful, for example, if theset includes all the patches you’ll use in a song, and the Playback plug-in plays an audiofile with a backing track for the song. If you add a Playback plug-in at the concert level,you can select different patches in the concert and have the audio file continue playing.The ability to use the plug-in at any level gives you a great deal of creative freedom inhow you use it.
139Chapter 9 Performing Live with MainStage
The Playback plug-in is designed so that it can be used in a variety of ways. Followingare a few ideas for how to use the Playback plug-in in different situations. You can trythem out or use them as a starting point for your own creative uses.
Some Playback Plug-in Usage IdeasYou can use the Playback plug-in in software instrument channel strips in a patch or atthe set or concert level.
• Add a Playback plug-in to a patch and use it to play a backing track while you play aninstrument on another channel strip in the patch.
• Add a Playback plug-in at the set level and use it to play a backing track that continueswhile you select and play different patches in the set.
• Add a Playback plug-in at the concert level and use it to play a backing track or soundeffect while you select and play different patches in the concert.
• Add multiple instances of the Playback plug-in at the set or concert level, and use themto play and remix different backing tracks.
Recording Your PerformancesYou can record a performance to an audio file. Before you record a performance, you canchoose the file format of the recorded audio file.
If you choose AIFF as the file format for recording, the maximum file size for the recordedfile is 2 gigabytes. If you choose WAVE as the file format, the maximum file size is4 gigabytes. If you choose CAF as the file format, there is no practical limit to the file size.You can choose the file format in the Audio pane of MainStage preferences and also setthe location of the recorded file and choose which audio outputs are recorded (if you areusing multiple sets of outputs in your concert). For information about recordingpreferences, see Recording.
You can record in Perform or Full Screen mode by mapping a screen control to the Recordaction. You can also assign a key command to the Record action and use it to record inPerform mode but not in Full Screen mode.
To start recording to an audio fileµ Move the screen control mapped to the Record action (or press Option-R).
To stop recordingµ Move the screen control mapped to the Record action (or press Option-R again).
140 Chapter 9 Performing Live with MainStage
After the PerformanceBefore closing your concert after your performance, remember that, for any screen controlsfor which the On Patch Change parameter is set to “Reset to saved value,” any changesto channel strip parameters or plug-in parameters you made while performing revert totheir previously saved state if you close the concert without saving. If you save the concertbefore closing, the new values are saved in the concert.
Tips for Complex Hardware SetupsIt is highly recommended that you test your concert thoroughly using the same setupyou plan to use in live performance prior to performing, at the performance location orvenue if possible. This is especially important for more complex hardware setups.
Using Multiple Keyboard Controllers in PerformanceIf you plan to use multiple keyboard controllers when you perform, you can choosewhether screen controls respond to MIDI messages from all controllers or only a specificcontroller and whether channel strips receive input from all controllers or only a singlecontroller.
In Layout mode, screen controls can be set to respond to MIDI input on all MIDI portsand channels or to only a specific device or channel. To have a screen control respondto MIDI input from all controllers, choose All from both the Device and Channel pop-upmenus in the Layout Inspector. To have a screen control respond to a specific controlleror to the same channel as the keyboard screen control, choose that controller from theDevice pop-up menu.
In Edit mode, you set the device from which a channel strip receives MIDI input in theKey Range section of the Channel Strip Inspector. By default, channel strips receive inputfrom the first controller in the layout. You can set a channel strip to receive input fromanother device in the Input pop-up menu.
Using a Different Hardware Setup in PerformanceIf you use MainStage with a complex hardware setup, for example, with multiple MIDIcontrollers or MIDI interfaces or with multiple audio inputs, you will achieve the bestresults when you use exactly the same hardware setup you used when you created yourconcert.
If you plan to use MainStage with different controllers, interfaces, or other devices thanthe ones you used to create your concert, you need to relearn your hardware assignmentsusing your performance hardware setup. To facilitate working in this situation, you cancreate two separate layouts, one for your studio setup and another for your performancesetup, with corresponding screen controls in each layout. Before you perform, import theperformance layout into your concert. The hardware assignments for your performancesetup are imported with the layout, and your mappings are maintained.
141Chapter 9 Performing Live with MainStage

This chapter provides tables listing the default key commands for MainStage and describeshow to open the Command Editor to customize key commands.
This chapter covers the following:
• Using the Command Editor (p. 143)
• MainStage Default Key Commands (p. 143)
Using the Command EditorMainStage includes a Command Editor that lets you view and customize key commands.You can assign key commands to functions that do not have a default key command andchange the key command for other functions. You can also create multiple commandsets and switch between them.
You can assign key commands to customize the current command set. You can alsochoose a different command set, and import, export, duplicate, and delete commandsets in the Command Editor.
To open the Command Editorµ Choose MainStage > Commands > Customize.
The Command Editor opens, showing the key commands for the selected command set.
For detailed information about working with the Command Editor, including informationon customizing, exporting, and importing command sets, see “Working with KeyCommands” in the “Basic Operations” chapter of the Logic Pro User Manual.
MainStage Default Key CommandsThe following sections show all of the default key commands for MainStage, grouped byfunction. These can significantly accelerate your workflow, particularly when creatinglarge or complex projects.
143
Key Commands 10
Concerts and LayoutsIncludes key commands for creating, opening, and saving concerts and for exporting andimporting layouts.
FunctionDefault key command
New concertCommand-N
Open concertCommand-O
Close concert, or close the active plug-in windowCommand-W
Save concertCommand-S
Save concert asCommand-Shift-S
Import layoutCommand-Control-O
Export layoutCommand-Shift-Control-S
Patches and Sets (Edit Mode)Includes key commands for adding, selecting, exporting, and importing patches and sets.
FunctionDefault key command
Add a new patchCommand-Option-N
Add a new setCommand-Option-S
Import patches or setsCommand-I
Export patch, export set, or export as set(depending on what is selected)
Command-E
Select the previous patchCommand-Up Arrow
Select the next patchCommand-Down Arrow
Select the first patch in the previous setCommand-Left Arrow
Select the first patch in the next setCommand-Right Arrow
Create a new set from selected patchesCommand-Shift-Option-S
Reset program change numbersCommand-Shift-Option-R
EditingIncludes key commands for cutting, copying, pasting, and other common editing functions.
FunctionDefault key command
Undo the last commandCommand-Z
Redo the last undone commandCommand-Shift-Z
CutCommand-X
CopyCommand-C
PasteCommand-V
DuplicateCommand-D
144 Chapter 10 Key Commands
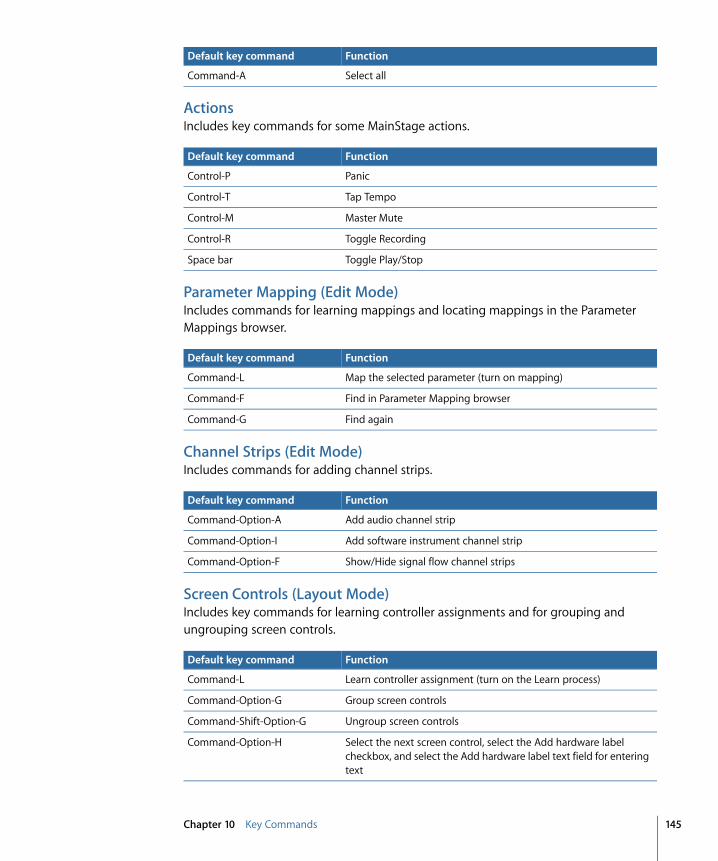
FunctionDefault key command
Select allCommand-A
ActionsIncludes key commands for some MainStage actions.
FunctionDefault key command
PanicControl-P
Tap TempoControl-T
Master MuteControl-M
Toggle RecordingControl-R
Toggle Play/StopSpace bar
Parameter Mapping (Edit Mode)Includes commands for learning mappings and locating mappings in the ParameterMappings browser.
FunctionDefault key command
Map the selected parameter (turn on mapping)Command-L
Find in Parameter Mapping browserCommand-F
Find againCommand-G
Channel Strips (Edit Mode)Includes commands for adding channel strips.
FunctionDefault key command
Add audio channel stripCommand-Option-A
Add software instrument channel stripCommand-Option-I
Show/Hide signal flow channel stripsCommand-Option-F
Screen Controls (Layout Mode)Includes key commands for learning controller assignments and for grouping andungrouping screen controls.
FunctionDefault key command
Learn controller assignment (turn on the Learn process)Command-L
Group screen controlsCommand-Option-G
Ungroup screen controlsCommand-Shift-Option-G
Select the next screen control, select the Add hardware labelcheckbox, and select the Add hardware label text field for enteringtext
Command-Option-H
145Chapter 10 Key Commands
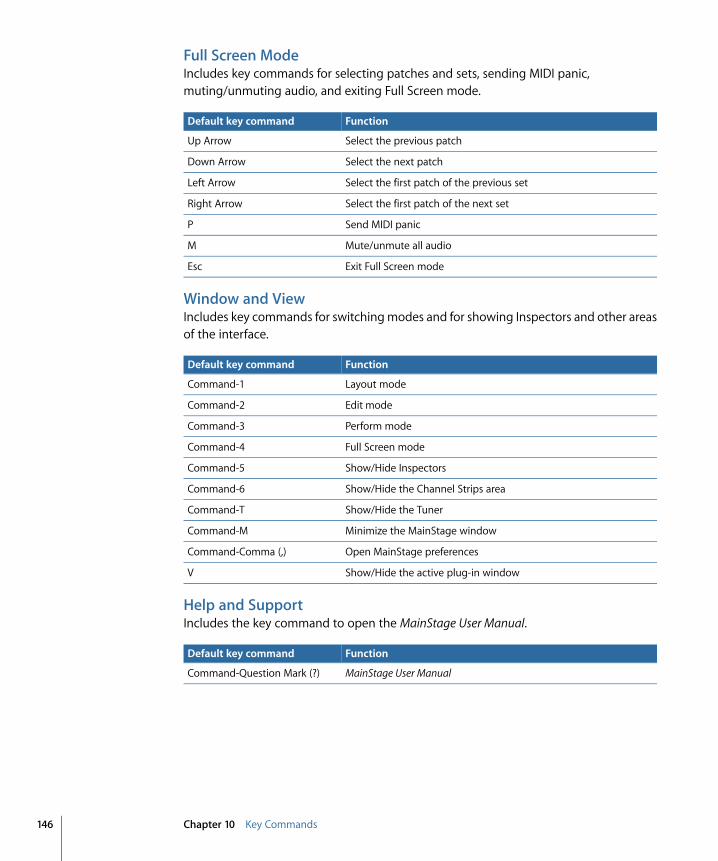
Full Screen ModeIncludes key commands for selecting patches and sets, sending MIDI panic,muting/unmuting audio, and exiting Full Screen mode.
FunctionDefault key command
Select the previous patchUp Arrow
Select the next patchDown Arrow
Select the first patch of the previous setLeft Arrow
Select the first patch of the next setRight Arrow
Send MIDI panicP
Mute/unmute all audioM
Exit Full Screen modeEsc
Window and ViewIncludes key commands for switching modes and for showing Inspectors and other areasof the interface.
FunctionDefault key command
Layout modeCommand-1
Edit modeCommand-2
Perform modeCommand-3
Full Screen modeCommand-4
Show/Hide InspectorsCommand-5
Show/Hide the Channel Strips areaCommand-6
Show/Hide the TunerCommand-T
Minimize the MainStage windowCommand-M
Open MainStage preferencesCommand-Comma (,)
Show/Hide the active plug-in windowV
Help and SupportIncludes the key command to open the MainStage User Manual.
FunctionDefault key command
MainStage User ManualCommand-Question Mark (?)
146 Chapter 10 Key Commands
The Playback plug-in is an audio file player that you can use to play backing tracks, songstems, and other audio files. The Playback plug-in supports uncompressed mono or stereoaudio files in the AIFF, WAV, and CAF formats with a bit depth of 16 or 24 bits. You canbounce a single stem from a Logic project or a set of stems from individual tracks.
You can use Playback to jump to song sections and repeat them. If you assign multipleinstances to groups, each song section can include multiple stems, which expands thepossibilities for live remixing of your material. These and other features make the Playbackplug-in a flexible, powerful, creative tool, both in the studio and in live performance.
This appendix covers the following:
• Getting to Know the Playback Interface (p. 148)
• Using the Playback Waveform Display (p. 149)
• Using the Playback Transport and Function Buttons (p. 150)
• Using the Playback Information Display (p. 151)
• Using the Playback Sync, Snap To, and Play From Parameters (p. 152)
• Using the Playback Group Functions (p. 153)
• Using the Playback Action Menu and File Field (p. 154)
• Using the Playback Shortcut Menu (p. 155)
147
The Playback Plug-in
App
endi
x
A
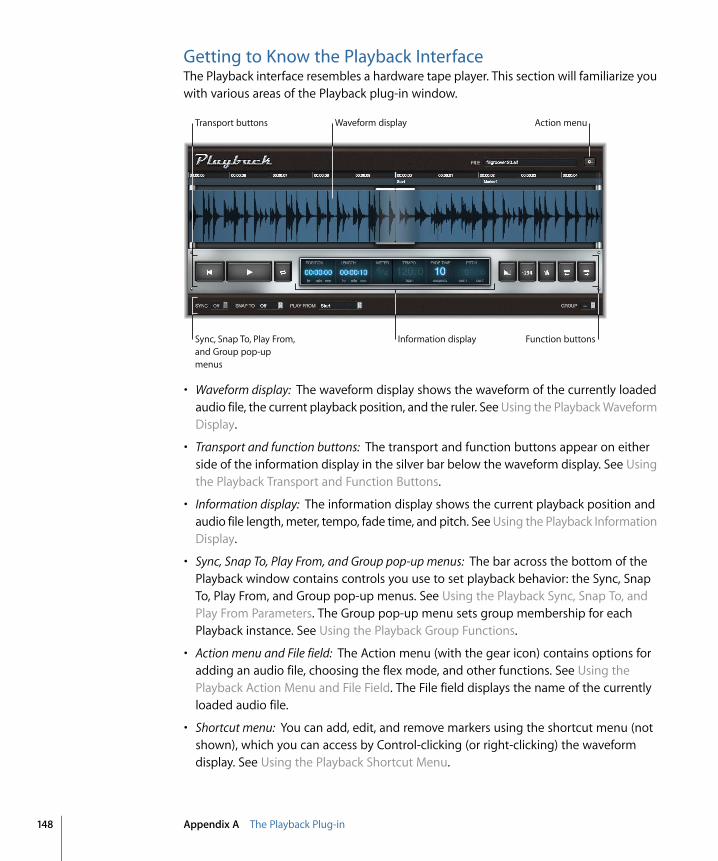
Getting to Know the Playback InterfaceThe Playback interface resembles a hardware tape player. This section will familiarize youwith various areas of the Playback plug-in window.
Waveform display Action menu
Information displaySync, Snap To, Play From, and Group pop-up menus
Transport buttons
Function buttons
• Waveform display: The waveform display shows the waveform of the currently loadedaudio file, the current playback position, and the ruler. See Using the Playback WaveformDisplay.
• Transport and function buttons: The transport and function buttons appear on eitherside of the information display in the silver bar below the waveform display. See Usingthe Playback Transport and Function Buttons.
• Information display: The information display shows the current playback position andaudio file length, meter, tempo, fade time, and pitch. See Using the Playback InformationDisplay.
• Sync, Snap To, Play From, and Group pop-up menus: The bar across the bottom of thePlayback window contains controls you use to set playback behavior: the Sync, SnapTo, Play From, and Group pop-up menus. See Using the Playback Sync, Snap To, andPlay From Parameters. The Group pop-up menu sets group membership for eachPlayback instance. See Using the Playback Group Functions.
• Action menu and File field: The Action menu (with the gear icon) contains options foradding an audio file, choosing the flex mode, and other functions. See Using thePlayback Action Menu and File Field. The File field displays the name of the currentlyloaded audio file.
• Shortcut menu: You can add, edit, and remove markers using the shortcut menu (notshown), which you can access by Control-clicking (or right-clicking) the waveformdisplay. See Using the Playback Shortcut Menu.
148 Appendix A The Playback Plug-in
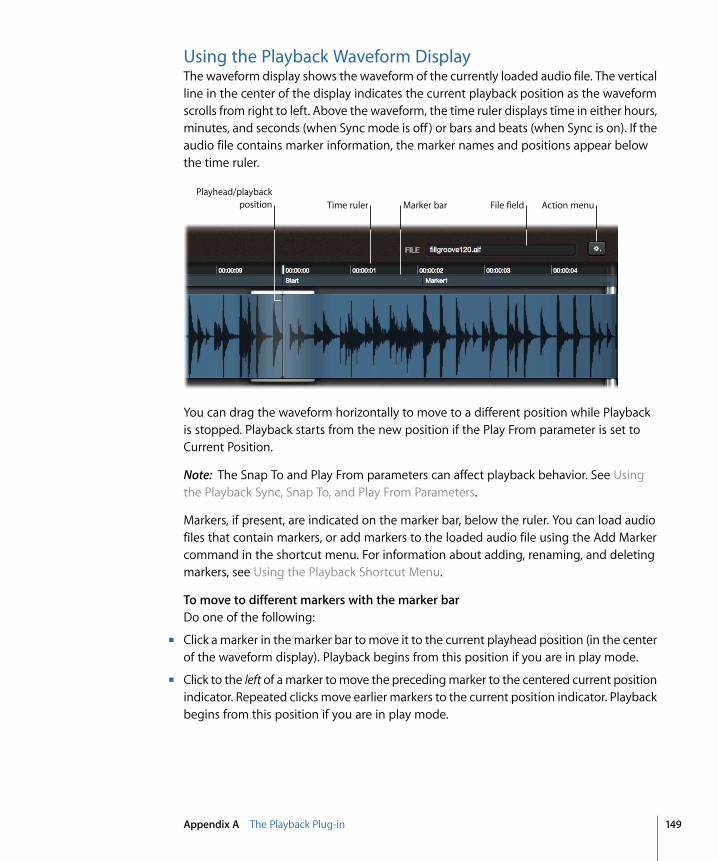
Using the Playback Waveform DisplayThe waveform display shows the waveform of the currently loaded audio file. The verticalline in the center of the display indicates the current playback position as the waveformscrolls from right to left. Above the waveform, the time ruler displays time in either hours,minutes, and seconds (when Sync mode is off ) or bars and beats (when Sync is on). If theaudio file contains marker information, the marker names and positions appear belowthe time ruler.
File field Action menuPlayhead/playback
position Marker barTime ruler
You can drag the waveform horizontally to move to a different position while Playbackis stopped. Playback starts from the new position if the Play From parameter is set toCurrent Position.
Note: The Snap To and Play From parameters can affect playback behavior. See Usingthe Playback Sync, Snap To, and Play From Parameters.
Markers, if present, are indicated on the marker bar, below the ruler. You can load audiofiles that contain markers, or add markers to the loaded audio file using the Add Markercommand in the shortcut menu. For information about adding, renaming, and deletingmarkers, see Using the Playback Shortcut Menu.
To move to different markers with the marker barDo one of the following:
µ Click a marker in the marker bar to move it to the current playhead position (in the centerof the waveform display). Playback begins from this position if you are in play mode.
µ Click to the left of a marker to move the preceding marker to the centered current positionindicator. Repeated clicks move earlier markers to the current position indicator. Playbackbegins from this position if you are in play mode.
149Appendix A The Playback Plug-in
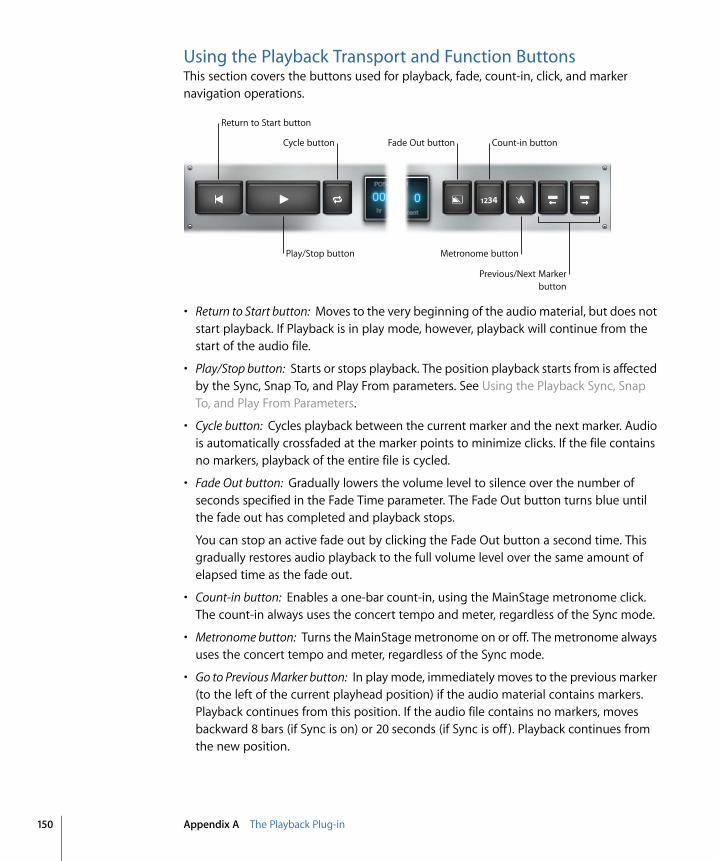
Using the Playback Transport and Function ButtonsThis section covers the buttons used for playback, fade, count-in, click, and markernavigation operations.
Return to Start button
Metronome buttonPlay/Stop button
Cycle button Count-in buttonFade Out button
Previous/Next Marker button
• Return to Start button: Moves to the very beginning of the audio material, but does notstart playback. If Playback is in play mode, however, playback will continue from thestart of the audio file.
• Play/Stop button: Starts or stops playback. The position playback starts from is affectedby the Sync, Snap To, and Play From parameters. See Using the Playback Sync, SnapTo, and Play From Parameters.
• Cycle button: Cycles playback between the current marker and the next marker. Audiois automatically crossfaded at the marker points to minimize clicks. If the file containsno markers, playback of the entire file is cycled.
• Fade Out button: Gradually lowers the volume level to silence over the number ofseconds specified in the Fade Time parameter. The Fade Out button turns blue untilthe fade out has completed and playback stops.
You can stop an active fade out by clicking the Fade Out button a second time. Thisgradually restores audio playback to the full volume level over the same amount ofelapsed time as the fade out.
• Count-in button: Enables a one-bar count-in, using the MainStage metronome click.The count-in always uses the concert tempo and meter, regardless of the Sync mode.
• Metronome button: Turns the MainStage metronome on or off. The metronome alwaysuses the concert tempo and meter, regardless of the Sync mode.
• Go to Previous Marker button: In play mode, immediately moves to the previous marker(to the left of the current playhead position) if the audio material contains markers.Playback continues from this position. If the audio file contains no markers, movesbackward 8 bars (if Sync is on) or 20 seconds (if Sync is off ). Playback continues fromthe new position.
150 Appendix A The Playback Plug-in
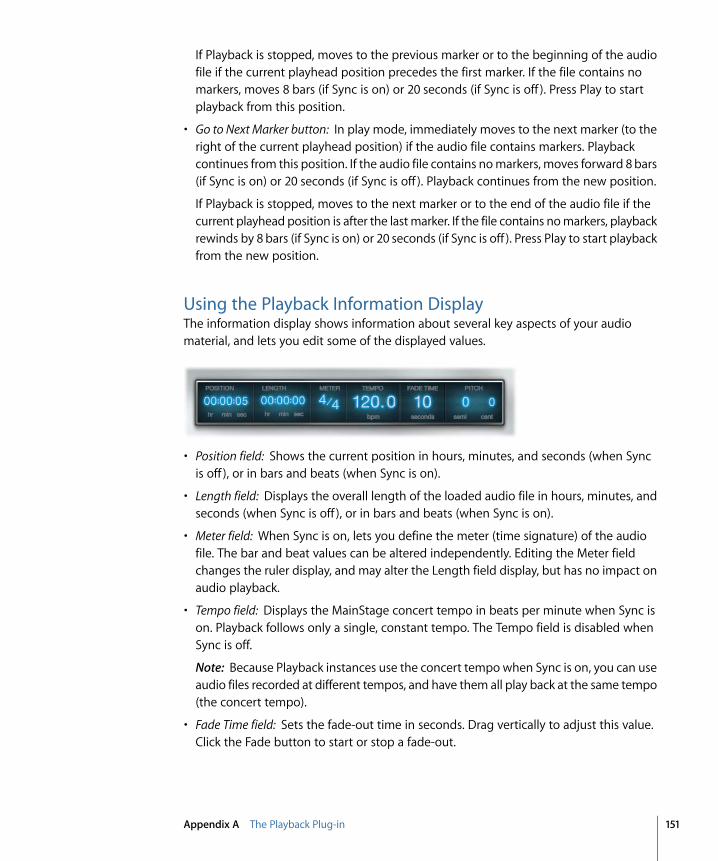
If Playback is stopped, moves to the previous marker or to the beginning of the audiofile if the current playhead position precedes the first marker. If the file contains nomarkers, moves 8 bars (if Sync is on) or 20 seconds (if Sync is off ). Press Play to startplayback from this position.
• Go to Next Marker button: In play mode, immediately moves to the next marker (to theright of the current playhead position) if the audio file contains markers. Playbackcontinues from this position. If the audio file contains no markers, moves forward 8 bars(if Sync is on) or 20 seconds (if Sync is off ). Playback continues from the new position.
If Playback is stopped, moves to the next marker or to the end of the audio file if thecurrent playhead position is after the last marker. If the file contains no markers, playbackrewinds by 8 bars (if Sync is on) or 20 seconds (if Sync is off ). Press Play to start playbackfrom the new position.
Using the Playback Information DisplayThe information display shows information about several key aspects of your audiomaterial, and lets you edit some of the displayed values.
• Position field: Shows the current position in hours, minutes, and seconds (when Syncis off ), or in bars and beats (when Sync is on).
• Length field: Displays the overall length of the loaded audio file in hours, minutes, andseconds (when Sync is off ), or in bars and beats (when Sync is on).
• Meter field: When Sync is on, lets you define the meter (time signature) of the audiofile. The bar and beat values can be altered independently. Editing the Meter fieldchanges the ruler display, and may alter the Length field display, but has no impact onaudio playback.
• Tempo field: Displays the MainStage concert tempo in beats per minute when Sync ison. Playback follows only a single, constant tempo. The Tempo field is disabled whenSync is off.
Note: Because Playback instances use the concert tempo when Sync is on, you can useaudio files recorded at different tempos, and have them all play back at the same tempo(the concert tempo).
• Fade Time field: Sets the fade-out time in seconds. Drag vertically to adjust this value.Click the Fade button to start or stop a fade-out.
151Appendix A The Playback Plug-in

• Pitch fields: Transpose audio playback when Sync is on. Drag vertically in either thesemi or cent field to transpose the audio file in semitones or cents (1/100 of a semitone).The Pitch fields are disabled when Sync is off.
Using the Playback Sync, Snap To, and Play From ParametersThe Sync, Snap To, and Play From pop-up menus control various aspects of playback andsynchronization of the audio file.
• Sync pop-up menu: Controls whether playback is synchronized with the concert tempo.When Sync is off, the audio file plays at its recorded tempo. When Sync is on, the fileplays at the current tempo of the concert.
Note: Only audio files that contain tempo information will play back at the MainStageconcert tempo when Sync is active. If the file contains no tempo information, the Syncparameter is disabled.
• Snap To pop-up menu: Sets the value to which transport functions—including Play,Return to Start, Previous Marker, and Next Marker—snap. The active transport functionis delayed until the next bar, beat, or marker is reached, depending on the current SnapTo setting. The Snap To setting always reflects the concert tempo and time signature,regardless of the Sync setting.
• Off: Transport functions occur immediately, without waiting.
• Beat: Transport functions occur at the start of the next beat.
• Bar: Transport functions occur at the start of the next bar.
• Wait for Marker: Transport functions occur when the next marker is reached.
• Play From pop-up menu: Determines the position from which playback starts.
• Current Position: Playback starts from the current playhead position in the audio file.This can be especially useful when you are setting up Playback instances in Editmode.
• Start: Playback starts from the beginning of the audio file.
• Current Marker: Playback starts from the start of the current marker (the marker tothe left of the current position) in the audio file.
• Relative Position: Playback is synced to the MainStage clock, so stopping and startingplayback follows the MainStage clock position. Using Relative Position is similar tousing a mute button.
152 Appendix A The Playback Plug-in
Using the Playback Group FunctionsIf you have multiple instances of the Playback plug-in in a concert, you can use groupsto control which instances play together and which instances operate independently.Any Playback instance can either be assigned to one of 26 Groups, named A-Z, or not bea member of any group. The linked operation of multiple instances can be used forcreative playback purposes, such as alternative versions of a song verse or chorus.
Only one group can be active at a time. For example, if two Playback instances are inGroup A, and four Playback instances are in Group B, activation of a transport function inany Group A member will stop playback of all Group B members, and vice versa. Instancesthat are not in any group are not affected.
All Playback instances that belong to a group will switch between states for the followingtransport functions when changed in any group member:
• Return to Start
• Play or Stop
• Dragging in the waveform display
• Cycle
• Fade Out (time and action)
• Go to Previous (or Next) Marker
Important: Editing a parameter in one member of a group does not automatically updatethe parameter value in other group members. To change the parameter value in all groupmembers, hold down Shift while you edit the parameter in any group member. Thisapplies to the Meter, Fade Time, Pitch, Sync, Snap To, and Play From parameters. Youneed to set Sync to the same mode for all group members or you will hear playback driftbetween grouped instances.
To assign a Playback instance to a groupµ Open the Group pop-up menu at the lower right of the interface and choose a letter.
Note: When a Playback instance is added to an existing group, some button states maybe different from other group members. If you want all group members to behaveidentically when a transport button is used in any group member, make sure that thestates of all buttons match those of other group members before you add a Playbackinstance to a group.
To remove a Playback instance from all groupsµ Choose the “–” item from the Group pop-up menu.
153Appendix A The Playback Plug-in
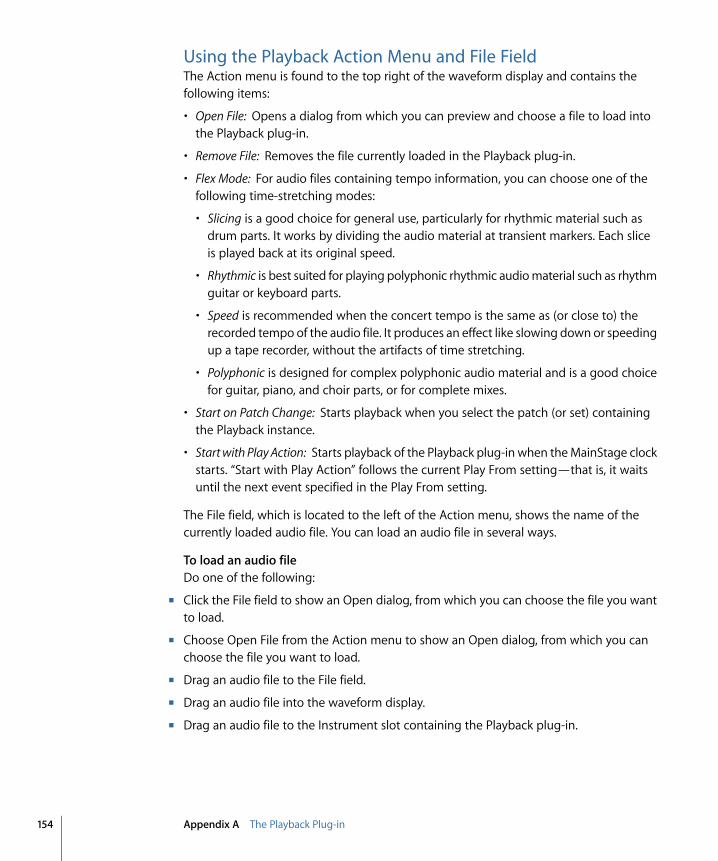
Using the Playback Action Menu and File FieldThe Action menu is found to the top right of the waveform display and contains thefollowing items:
• Open File: Opens a dialog from which you can preview and choose a file to load intothe Playback plug-in.
• Remove File: Removes the file currently loaded in the Playback plug-in.
• Flex Mode: For audio files containing tempo information, you can choose one of thefollowing time-stretching modes:
• Slicing is a good choice for general use, particularly for rhythmic material such asdrum parts. It works by dividing the audio material at transient markers. Each sliceis played back at its original speed.
• Rhythmic is best suited for playing polyphonic rhythmic audio material such as rhythmguitar or keyboard parts.
• Speed is recommended when the concert tempo is the same as (or close to) therecorded tempo of the audio file. It produces an effect like slowing down or speedingup a tape recorder, without the artifacts of time stretching.
• Polyphonic is designed for complex polyphonic audio material and is a good choicefor guitar, piano, and choir parts, or for complete mixes.
• Start on Patch Change: Starts playback when you select the patch (or set) containingthe Playback instance.
• Start with Play Action: Starts playback of the Playback plug-in when the MainStage clockstarts. “Start with Play Action” follows the current Play From setting—that is, it waitsuntil the next event specified in the Play From setting.
The File field, which is located to the left of the Action menu, shows the name of thecurrently loaded audio file. You can load an audio file in several ways.
To load an audio fileDo one of the following:
µ Click the File field to show an Open dialog, from which you can choose the file you wantto load.
µ Choose Open File from the Action menu to show an Open dialog, from which you canchoose the file you want to load.
µ Drag an audio file to the File field.
µ Drag an audio file into the waveform display.
µ Drag an audio file to the Instrument slot containing the Playback plug-in.
154 Appendix A The Playback Plug-in
µ Drag an audio file between two channel strips. This creates a new channel strip with thePlayback plug-in inserted. The (dragged) audio file is automatically loaded into this newPlayback instance. You can drag multiple files between channel strips to create a newchannel strip for each file.
Note: Using either of the first two methods, you can preview files in the dialog beforeadding one to the Playback instance. To preview the selected audio file in the dialog,click the Play button. Click the Stop button in the dialog to stop playback.
Using the Playback Shortcut MenuThe Playback window includes a shortcut menu that lets you add, name, and removemarkers in the waveform display. You access the shortcut menu by Control-clicking thewaveform display. The shortcut menu contains the following commands.
• Add Marker: Adds a marker at the current position of the pointer, and opens a namefield. Enter the name, then press Return or click outside the name field.
• Remove Marker: Removes the marker to the left of the current position.
• Rename Marker: Opens a name field for the marker nearest to the clicked position.Enter a new name, then press Return or click outside the name field.
• Remove All Markers: Removes all markers.
155Appendix A The Playback Plug-in

The Loopback plug-in lets you record virtual “tape loops,” play them back repeatedly,and overdub new recordings while previous ones continue playing. You can use theLoopback plug-in to create simple loops, recurring motifs, or complex, evolving textures.
Using Loopback as an insert plug-in in an instrument channel strip, you can create loopedperformances with a single instrument, your voice, or other audio material. By insertingLoopback in an aux channel strip and using it as a send effect, you can create loops withmultiple instruments, vocal performances, and other audio material routed from otherchannel strips. Relative levels can be controlled with the Send knobs of the source channelstrips.
Loopback lets you create “sound-on-sound” backing tracks or grooves in your MainStageperformance. You can use multiple instances as a rhythm section, and switch between areduced and a full version of your rhythm parts, for example. The Loopback plug-in is aflexible, powerful, creative tool both for the studio and for live performance. You can alsoexport loop performances as standard audio files to use in other plug-ins, including thePlayback plug-in.
This appendix covers the following:
• Getting to Know the Loopback Interface (p. 158)
• Using the Loopback Waveform Display (p. 159)
• Using the Loopback Transport and Function Controls (p. 159)
• Using the Loopback Information Display (p. 160)
• Using the Loopback Sync, Snap To, and Play From Parameters (p. 161)
• Using the Loopback Group Functions (p. 162)
• Using the Loopback Action Menu (p. 163)
• Adding Loopback to a Channel Strip (p. 164)
157
The Loopback Plug-in
App
endi
x
B
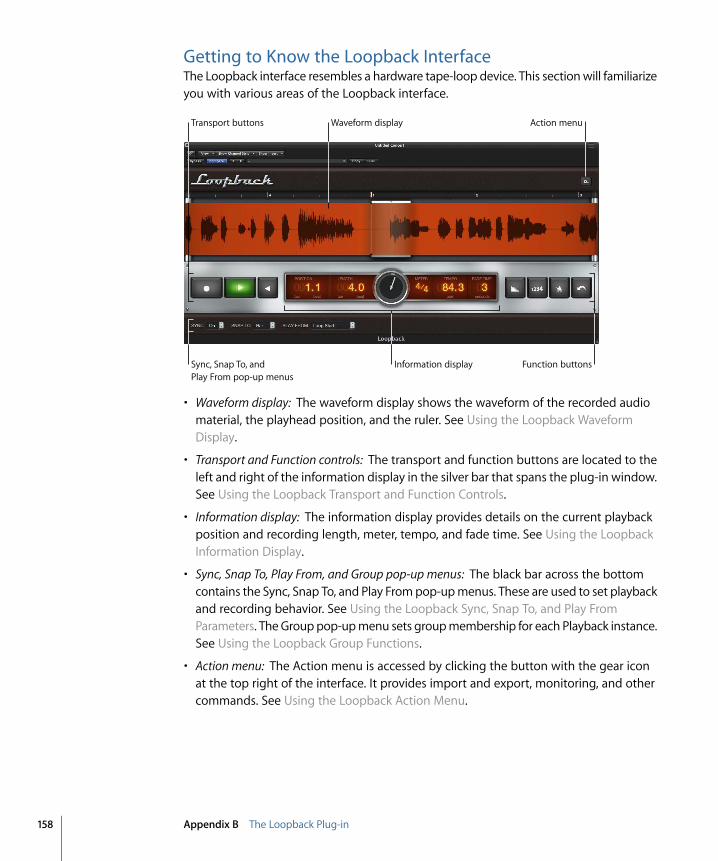
Getting to Know the Loopback InterfaceThe Loopback interface resembles a hardware tape-loop device. This section will familiarizeyou with various areas of the Loopback interface.
Waveform display Action menu
Information displaySync, Snap To, and Play From pop-up menus
Transport buttons
Function buttons
• Waveform display: The waveform display shows the waveform of the recorded audiomaterial, the playhead position, and the ruler. See Using the Loopback WaveformDisplay.
• Transport and Function controls: The transport and function buttons are located to theleft and right of the information display in the silver bar that spans the plug-in window.See Using the Loopback Transport and Function Controls.
• Information display: The information display provides details on the current playbackposition and recording length, meter, tempo, and fade time. See Using the LoopbackInformation Display.
• Sync, Snap To, Play From, and Group pop-up menus: The black bar across the bottomcontains the Sync, Snap To, and Play From pop-up menus. These are used to set playbackand recording behavior. See Using the Loopback Sync, Snap To, and Play FromParameters. The Group pop-up menu sets group membership for each Playback instance.See Using the Loopback Group Functions.
• Action menu: The Action menu is accessed by clicking the button with the gear iconat the top right of the interface. It provides import and export, monitoring, and othercommands. See Using the Loopback Action Menu.
158 Appendix B The Loopback Plug-in
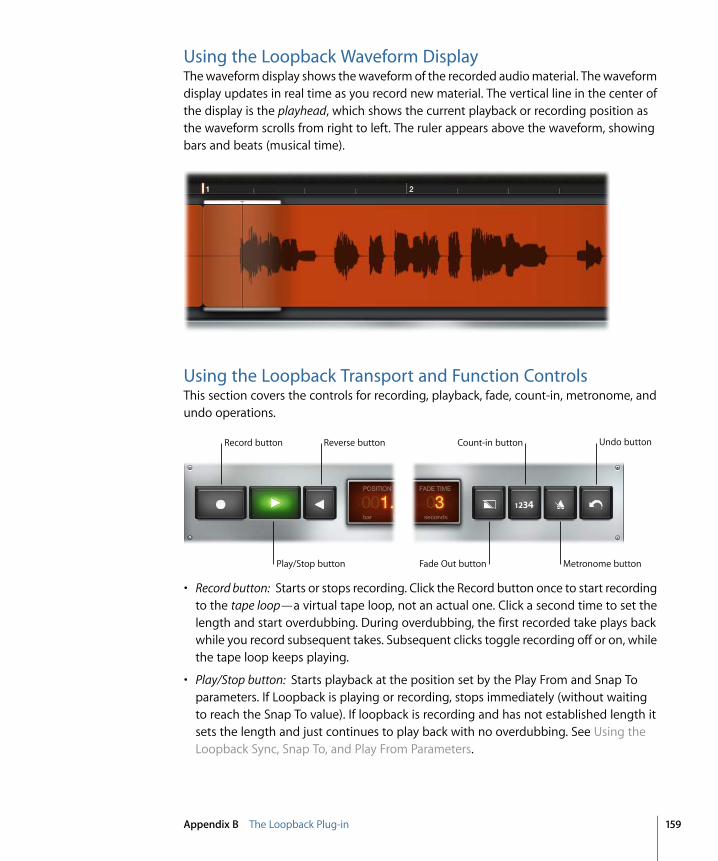
Using the Loopback Waveform DisplayThe waveform display shows the waveform of the recorded audio material. The waveformdisplay updates in real time as you record new material. The vertical line in the center ofthe display is the playhead, which shows the current playback or recording position asthe waveform scrolls from right to left. The ruler appears above the waveform, showingbars and beats (musical time).
Using the Loopback Transport and Function ControlsThis section covers the controls for recording, playback, fade, count-in, metronome, andundo operations.
Record button
Play/Stop button
Reverse button
Fade Out button
Count-in button
Metronome button
Undo button
• Record button: Starts or stops recording. Click the Record button once to start recordingto the tape loop—a virtual tape loop, not an actual one. Click a second time to set thelength and start overdubbing. During overdubbing, the first recorded take plays backwhile you record subsequent takes. Subsequent clicks toggle recording off or on, whilethe tape loop keeps playing.
• Play/Stop button: Starts playback at the position set by the Play From and Snap Toparameters. If Loopback is playing or recording, stops immediately (without waitingto reach the Snap To value). If loopback is recording and has not established length itsets the length and just continues to play back with no overdubbing. See Using theLoopback Sync, Snap To, and Play From Parameters.
159Appendix B The Loopback Plug-in
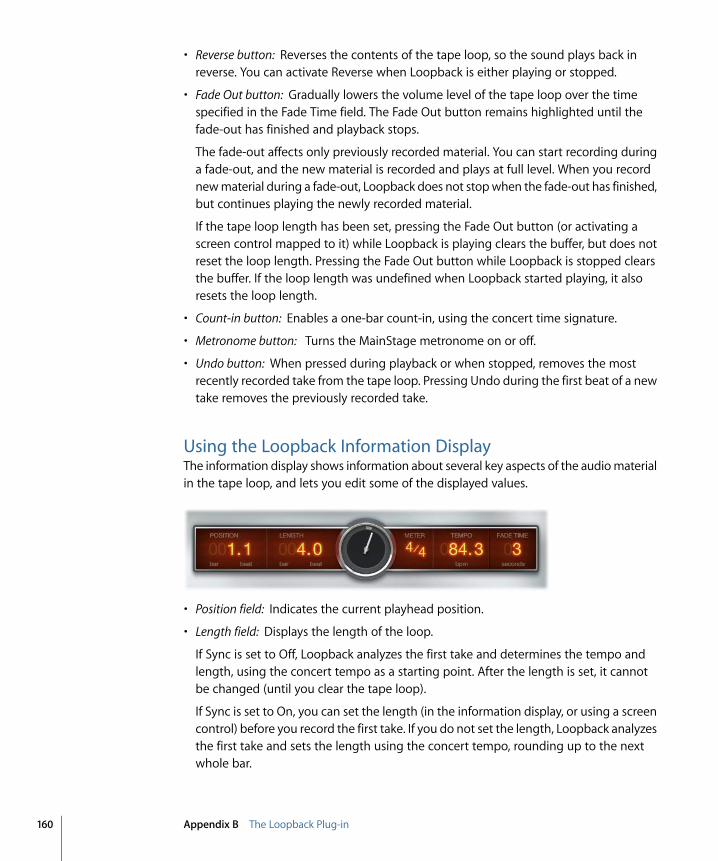
• Reverse button: Reverses the contents of the tape loop, so the sound plays back inreverse. You can activate Reverse when Loopback is either playing or stopped.
• Fade Out button: Gradually lowers the volume level of the tape loop over the timespecified in the Fade Time field. The Fade Out button remains highlighted until thefade-out has finished and playback stops.
The fade-out affects only previously recorded material. You can start recording duringa fade-out, and the new material is recorded and plays at full level. When you recordnew material during a fade-out, Loopback does not stop when the fade-out has finished,but continues playing the newly recorded material.
If the tape loop length has been set, pressing the Fade Out button (or activating ascreen control mapped to it) while Loopback is playing clears the buffer, but does notreset the loop length. Pressing the Fade Out button while Loopback is stopped clearsthe buffer. If the loop length was undefined when Loopback started playing, it alsoresets the loop length.
• Count-in button: Enables a one-bar count-in, using the concert time signature.
• Metronome button: Turns the MainStage metronome on or off.
• Undo button: When pressed during playback or when stopped, removes the mostrecently recorded take from the tape loop. Pressing Undo during the first beat of a newtake removes the previously recorded take.
Using the Loopback Information DisplayThe information display shows information about several key aspects of the audio materialin the tape loop, and lets you edit some of the displayed values.
• Position field: Indicates the current playhead position.
• Length field: Displays the length of the loop.
If Sync is set to Off, Loopback analyzes the first take and determines the tempo andlength, using the concert tempo as a starting point. After the length is set, it cannotbe changed (until you clear the tape loop).
If Sync is set to On, you can set the length (in the information display, or using a screencontrol) before you record the first take. If you do not set the length, Loopback analyzesthe first take and sets the length using the concert tempo, rounding up to the nextwhole bar.
160 Appendix B The Loopback Plug-in

• Position dial: Displays the current playback position in the context of the overall looplength.
• Meter field: Displays the meter (time signature) of the audio material. The bar and beatvalues can be altered independently, which changes the ruler display and may alterthe Length field display, but does not affect audio playback. Cannot be changed oncethe length is set without first clearing the tape loop.
• Tempo field: Displays the tempo in beats per minute. The tempo is “locked” after thefirst recording and cannot be changed.
• Fade Time field: Indicates the fade-out time in seconds. Drag vertically to adjust thisvalue. See Using the Loopback Transport and Function Controls.
Using the Loopback Sync, Snap To, and Play From ParametersThe Sync, Snap To, and Play From pop-up menus in the bar at the bottom of the interfacecontrol various aspects of playback and synchronization of the audio material.
• Sync pop-up menu: Enables or disables synchronization with the MainStage tempo andclock.
• Snap To pop-up menu: Determines how Loopback starts, in play or record mode, whenstopped. It also quantizes the tape loop length “on the fly” by stopping the first take.
• Off: Loopback starts immediately, without waiting.
• Beat: Loopback starts or stops at the start of the next beat.
• Bar: Loopback starts or stops at the start of the next bar.
• Loop: Loopback waits for the amount of time defined by the Length parameter.
• Play From pop-up menu: Determines the playback start position within the audiomaterial.
• Loop Start: Playback starts from the beginning of the audio material.
• Relative Position: When you stop and restart the Loopback instance, playbackcontinues as if the plug-in had been playing continuously, without interruption. Thisis useful when several Loopback instances are playing together, or when you areusing Loopback instances with Playback or Ultrabeat instances, allowing you toeffectively “mute” and “unmute” instances while keeping them in sync with eachother.
161Appendix B The Loopback Plug-in
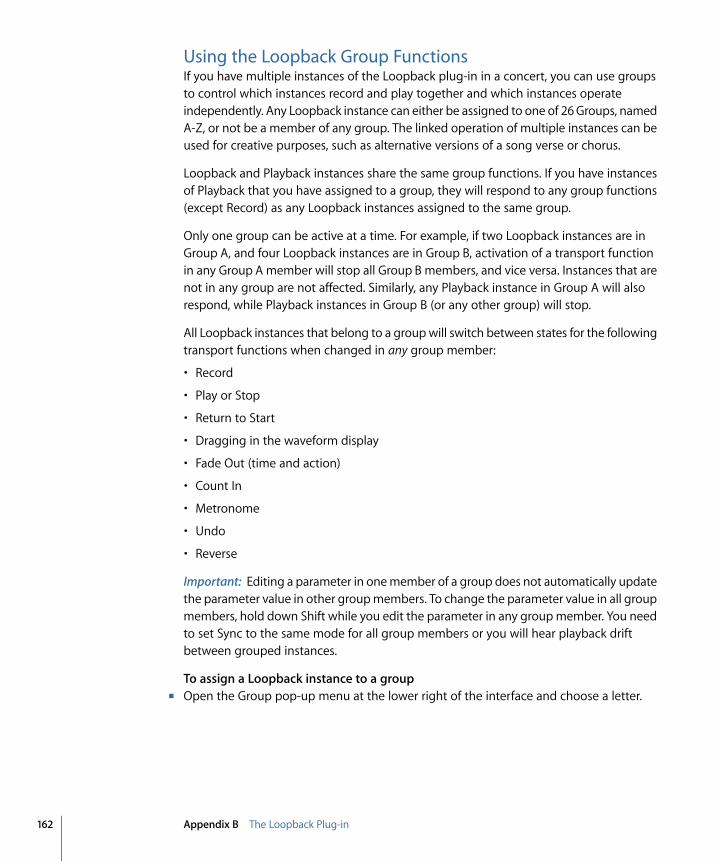
Using the Loopback Group FunctionsIf you have multiple instances of the Loopback plug-in in a concert, you can use groupsto control which instances record and play together and which instances operateindependently. Any Loopback instance can either be assigned to one of 26 Groups, namedA-Z, or not be a member of any group. The linked operation of multiple instances can beused for creative purposes, such as alternative versions of a song verse or chorus.
Loopback and Playback instances share the same group functions. If you have instancesof Playback that you have assigned to a group, they will respond to any group functions(except Record) as any Loopback instances assigned to the same group.
Only one group can be active at a time. For example, if two Loopback instances are inGroup A, and four Loopback instances are in Group B, activation of a transport functionin any Group A member will stop all Group B members, and vice versa. Instances that arenot in any group are not affected. Similarly, any Playback instance in Group A will alsorespond, while Playback instances in Group B (or any other group) will stop.
All Loopback instances that belong to a group will switch between states for the followingtransport functions when changed in any group member:
• Record
• Play or Stop
• Return to Start
• Dragging in the waveform display
• Fade Out (time and action)
• Count In
• Metronome
• Undo
• Reverse
Important: Editing a parameter in one member of a group does not automatically updatethe parameter value in other group members. To change the parameter value in all groupmembers, hold down Shift while you edit the parameter in any group member. You needto set Sync to the same mode for all group members or you will hear playback driftbetween grouped instances.
To assign a Loopback instance to a groupµ Open the Group pop-up menu at the lower right of the interface and choose a letter.
162 Appendix B The Loopback Plug-in
Note: When a Loopback instance is added to an existing group, some button states maybe different from other group members. If you want all group members to behaveidentically when a transport button is used in any group member, make sure that thestates of all buttons match those of other group members before you add a Loopbackinstance to a group.
To remove a Loopback instance from all groupsµ Choose the “–” item from the Group pop-up menu.
Using the Loopback Action MenuThe Action menu is found to the top right of the waveform display and contains thefollowing items:
• Export Tape Loop: Shows an export dialog, where you can name and choose a locationto save the tape loop to an AIFF audio file.
• Import Tape Loop: Shows an import dialog, where you can select and import a previouslyexported tape loop or any short audio file.
• Clear Tape Loop: Deletes the entire tape loop in the Loopback plug-in.
• Monitor: You can choose one of the following monitoring modes for the Loopbackplug-in: On (monitoring is always on); During Record (monitoring is on only duringrecording); or Off (monitoring is disabled).
Note: Some mixer routing configurations may result in no audio being heard throughLoopback. Use this menu command if you encounter this situation.
• When Patch or Set is Selected: You can choose one of the following functions to beperformed when the patch (or set) containing the Loopback plug-in is selected: DoNothing (the default); Clear (empties the entire tape loop); Start Playing (starts theplug-in playing at its current settings); Start Recording (starts recording the first takeat the current plug-in settings); or Clear and Start Recording (clears the existing tapeloop and starts recording the first take at the current plug-in settings).
• On MainStage Clock Start: You can choose one of the following functions to beperformed when the MainStage clock starts: Do Nothing (the default); Clear (emptiesthe entire tape loop); Start Playing (starts the plug-in playing at its current settings);Start Recording (starts recording the tape loop at the current plug-in settings); or Clearand Start Recording (clears the existing tape loop and starts recording a new tape loopat the current plug-in settings).
• Set Concert Tempo After First Take: With this item selected, and Sync set to Off, clickingRecord tarts recording the tape loop but does not start the MainStage clock (if it isstopped). When you click Record a second time (or click Play), recording stops and thetape loop continues playing. MainStage sets the Length and Tempo based on theduration of the recorded take, and starts the MainStage clock.
163Appendix B The Loopback Plug-in

Adding Loopback to a Channel StripThe Loopback plug-in is an insert plug-in. You can use it in any type of channel strip.
To add a Loopback instance to a channel strip1 Click one of the Insert slots in the channel strip you want to use Loopback on.
2 Choose Delay from the shortcut menu that appears, choose Loopback from the submenu,then choose Stereo from the second submenu.
164 Appendix B The Loopback Plug-in
You can set a variety of preferences in the MainStage preferences window. The preferenceswindow includes tabs for general, audio, MIDI, and display preferences, which are describedbelow.
This appendix covers the following:
• General Preferences (p. 165)
• Audio Preferences (p. 166)
• MIDI Preferences (p. 168)
• Display Preferences (p. 168)
General PreferencesThese preferences let you set the tuning of software instruments, set the volume andoutput for the metronome, choose what happens when you open MainStage, reset alerts,and set whether screen controls highlight when their parameter values change.
Tuning• Tuning slider: Sets the tuning for all software instruments in MainStage. Tuning is
centered around A440 Hz, in the range of 100 cents.
Metronome• Output pop-up menu: Choose the audio output (or output pair) that the metronome
sound is routed to.
• Volume slider: Drag the slider to set the relative volume for the metronome sound.
Startup• Startup Action pop-up menu: Choose the startup action when you open MainStage. The
choices are:
• Do Nothing: Does nothing. You can access the Choose Template dialog by choosingFile > New.
• Create New Concert from Template: Opens the Choose Template dialog.
165
Setting MainStage Preferences
App
endi
x
C

• Open Most Recent Concert: Opens the last open concert in the same mode it was inwhen you closed it.
• Open Most Recent Concert in Perform Mode: Opens the last open concert in Performmode.
• Open Most Recent Concert in Full Screen Mode: Opens the last open concert in FullScreen mode.
Alerts• Reset Warnings button: Click to reset the behavior of alerts for which you have selected
the “Do not show again” checkbox, so that they appear in the future when appropriateconditions occur.
Parameter Values• On Patch Change pop-up menu: Choose whether parameter values change or remain
the same when you change patches. By default, the On Patch Change parameter forindividual screen controls is set to Preference, in which case they follow the preferencebehavior. If this parameter is set to another value for a screen control, the control followsthe value of its individual setting. The choices are:
• To preserve changes to parameter values when you change patches, choose “Keepcurrent value.”
• To return values to the last saved value, choose “Reset to saved value.”
• Respond to Hardware Move pop-up menu: Choose how screen controls respond whenyou move the hardware controls assigned to them. By default, the Respond to HardwareMove parameter for individual screen controls is set to Preference, in which case theyfollow the preference behavior. If this parameter is set to another value for a screencontrol, the control follows the value of its individual setting. The choices are:
• To have screen controls instantly change to match the hardware value, choose “Jump.”
• To have screen controls change when the hardware control matches its current value,choose “Pickup.”
• To have screen controls move relative to the hardware control, choose “Relative.”
Audio PreferencesThese preferences let you set the audio output and input drivers, set the size of theI/O buffer, set the audio sample rate, and choose which note is displayed as middle C.
Audio• Audio Output pop-up menu: Choose the device you want to use to hear the audio output
from MainStage.
166 Appendix C Setting MainStage Preferences
• Audio Input pop-up menu: Choose the device you want to use as the source for audioinput.
• Setup buttons: Click the Audio Output Setup button to open the Audio/MIDI Setupwindow and configure audio output. Click the Audio Input Setup button to open theAudio/MIDI Setup window and configure audio input.
• I/O Buffer Size pop-up menu: Choose the size of the buffer for audio input and outputin samples. Smaller buffer sizes reduce the amount of latency, but also require morework from the CPU and may result in playback artifacts. You may want to try differentsettings to find the lowest setting that does not produce any artifacts.
• I/O Safety Buffer checkbox: When selected, MainStage uses an additional buffer to processaudio output streams, providing a safeguard against crackling noises that may occurwhen using very low I/O Buffer Size settings. If turning on this preference doesn’timprove things on your system, disable the checkbox and select a larger I/O buffer sizesetting.
Note: Use of the I/O Safety Buffer preference increases the output latency and thereforethe round trip (input plus output) latency.
The latency for the current buffer size is displayed below the I/O Safety Buffer checkbox.
• Sample Rate pop-up menu: Choose the sample rate for audio input. If you are using anaudio interface or other audio device with MainStage, the Sample Rate value shouldbe set to the sample rate of your audio device.
• Apply Changes button: Click to apply changes to the input, output, sample rate, andbuffer size settings. If you do not click the Apply Changes button, changes are appliedwhen you close the Preferences window.
• Silence Previous Patch: Choose the amount of time sustained notes and effects tailscontinue to sound before falling to silence when you select a new patch.
• Hot-Plug Behavior pop-up menu: Choose what action MainStage takes when you hot-plugan audio device while MainStage is open. The choices are:
• Alert me: Displays an alert when a device is hot-plugged. The alert includes buttonsallowing you to use or ignore the device.
• Automatically Use Device: Switches the audio drivers to allow immediate use of thehot-plugged device for audio input and output.
• Do Nothing: Does not switch the audio drivers.
• Display audio engine overload message: When selected, an alert appears when the audioengine overloads.
Recording• Output pop-up menu: Choose the audio output to record.
167Appendix C Setting MainStage Preferences

• Recordings Folder field and Set button: Click the Set button, then browse to choose thelocation where recordings are saved. The file path of the chosen location appears inthe field.
• File Format pop-up menu: Choose the file format for audio recordings. The choices are:
• AIFF
• CAF
• WAVE
MIDI PreferencesThese preferences let you view the current status of MIDI inputs, set the instrument voicelimiting threshold, and choose which note appears as middle C.
MIDI• MIDI Status field and Setup button: Displays the number of detected MIDI inputs.
Instrument Voice Limiting• CPU Usage Threshold: Set the level (percentage of CPU usage) above which voice limiting
is active. If you experience audio dropouts or glitches when performing with the currentsetting, try lowering the threshold until the dropouts or glitches no longer occur.
MIDI• Display Middle C As pop-up menu: Choose whether middle C is displayed as C3 or C4.
Display PreferencesThis preference let you choose the default size at which plug-in windows are displayed.
• Default size pop-up menu: Choose whether plug-in windows are displayed at theirstandard size (100%) or at a larger size.
168 Appendix C Setting MainStage Preferences
In addition to mapping screen controls to channel strip and plug-in parameters, you canmap them to MainStage actions. Actions let you select patches and sets, silence MIDInotes, control the Tuner and the metronome, tap a new tempo, display information aboutpatches, MIDI messages and other information, and perform other functions using screencontrols.
The Actions folder, which appears in the Parameter Mapping browser along with availableparameters, contains actions for a variety of MainStage functions. The Actions folder alsocontains an AppleScript subfolder with useful scripts. The following table describes eachaction and the type of screen control to map it to.
For information about mapping screen controls to actions, see Mapping Screen Controlsto Actions.
This appendix covers the following:
• Table of Actions (p. 169)
Table of ActionsFor each action in the Actions folder, the Description column describes the function ofthe action, and the Usage column tells which screen controls it is intended to be usedwith.
UsageDescriptionAction
Button screen controlSelects the patch 10 patchesabove the current patch in thePatch List.
−10 Patches
Button screen controlSelects the patch above thecurrent patch in the Patch List.
Prev Patch
Parameter Text screen control(to display); Knob screen control(to select)
Displays the name of the currentpatch and can also be used tochange patches.
Current Patch
Parameter Text screen control(to display); Knob screen control(to select)
Displays the patch number ofthe selected patch and can alsobe used to change patches.
Current Patch Number
169
Using MainStage Actions
App
endi
x
D
UsageDescriptionAction
Parameter Text screen control(to display); Button screencontrol (to change)
Displays the program changenumber of the selected patchand can be used to change to aspecific program.
Current Program Number
Button screen controlSelects the patch below thecurrent patch in the Patch List.
Next Patch
Button screen controlSelects the patch 10 patchesbelow the current patch in thePatch List.
+10 Patches
Button screen controlSelects the set above the currentpatch in the Patch List.
Prev Set
Parameter Text screen controlDisplays the name of the currentset.
Current Set
Button screen controlSelects the set below the currentpatch in the Patch List.
Next Set
Parameter Text screen controlDisplays the name of theconcert.
Concert
Button screen controlShows or hides the Tuner.Tuner
Knob or fader screen controlAdjusts the overall tuning for theconcert, from −100 cents to+100 cents.
Master Tuning
Button screen controlMutes or unmutes all audio(toggle).
Master Mute
Button screen controlUse to tap a new tempo.Tap Tempo
Button screen controlTurns the metronome on or offand starts the “transport”(toggle).
Metronome
Parameter Text screen controlDisplays incoming MIDI beatclock messages.
MIDI Beat Clock
Button screen controlDisplays the current bar andbeat count from the “transport”if it is running.
Beat Count
Button screen controlDisplays incoming MIDImessages, the same as the MIDIActivity display in the toolbar.
MIDI Display
Button screen controlSilences all MIDI notes and resetsthe audio engine.
Panic
Parameter Text screen controlDisplays the current CPU usage,the same as the CPU Activitydisplay in the toolbar.
CPU Load
Button screen controlTurns audio recording on or off(toggle).
Record
170 Appendix D Using MainStage Actions
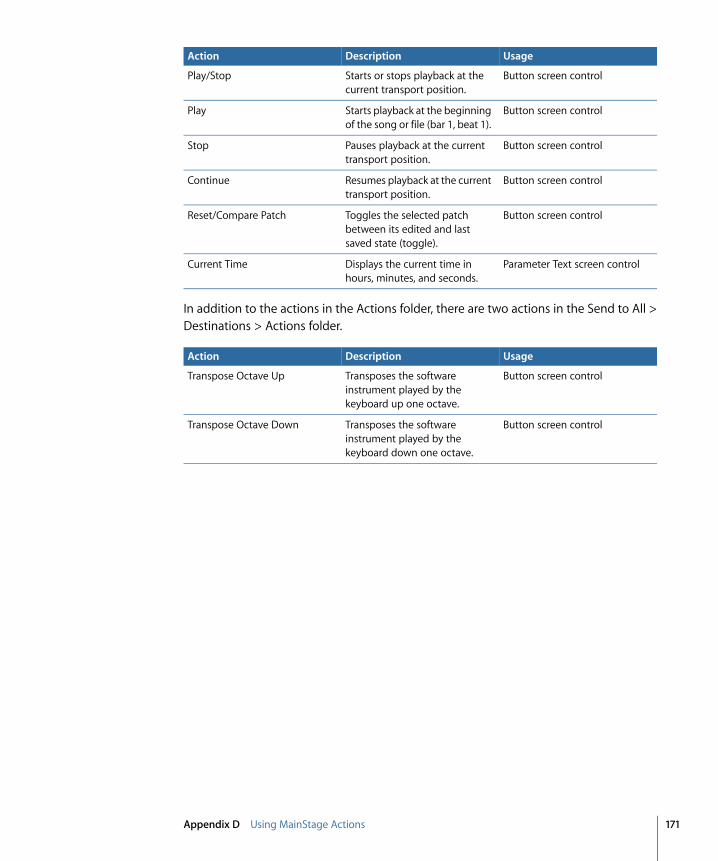
UsageDescriptionAction
Button screen controlStarts or stops playback at thecurrent transport position.
Play/Stop
Button screen controlStarts playback at the beginningof the song or file (bar 1, beat 1).
Play
Button screen controlPauses playback at the currenttransport position.
Stop
Button screen controlResumes playback at the currenttransport position.
Continue
Button screen controlToggles the selected patchbetween its edited and lastsaved state (toggle).
Reset/Compare Patch
Parameter Text screen controlDisplays the current time inhours, minutes, and seconds.
Current Time
In addition to the actions in the Actions folder, there are two actions in the Send to All >Destinations > Actions folder.
UsageDescriptionAction
Button screen controlTransposes the softwareinstrument played by thekeyboard up one octave.
Transpose Octave Up
Button screen controlTransposes the softwareinstrument played by thekeyboard down one octave.
Transpose Octave Down
171Appendix D Using MainStage Actions
