leica em fc7 - nuance center fc7... · any copyrights of this document are retained by leica...
TRANSCRIPT

Leica EM FC7Operating Manual Version 162220032 01/2010

Important Note
Leica reserves the right to change technical specifications as well as manufacturing processes without prior notice. Only in this way is it possible to continuously improve the technology and manufacturing techniques used to provide our customers with excellent products.
Any copyrights of this document are retained by Leica Mikrosysteme GmbH, Vienna. Any reproduction of text and illustrations (or any parts thereof) by printing, photocopy-ing, or other methods (including electronic systems and media) requires express prior permission in writing.
Issued by:
Leica Mikrosysteme GmbH Hernalser Hauptstrasse 219A-1170 Vienna

Leica EM FC7Operating Manual
Leica EM FC7 Serial Number:
Date of purchase:
For the instrument serial number, please refer to the name type label on the back of the instrument!
Please read this instruction manual carefully before operating the instrument.
Page 2 Operating Manual Leica EM FC7 01/10
Foreword This Technical Documentation is intended to provide essential information about the proper operation of the Leica EM FC7 Cryo-chamber.
This user manual describes commissioning of the Leica EM FC7 Cryo-chamber, phased testing and adjustment of all components and movement sequences, and restoring the basic functionality.
Service and operating staff must familiarize themselves with all components of the system before commissioning. Particular attention must be paid to the aspect of safety.
This user manual must be retained for future reference.
Texts, schedules and tables may not be copied, reproduced, or divulged to third parties without our express consent.
It should be noted that this Technical Documentation does not constitute a part of any existing, prior agreement or covenant or legal relationship.
All obligations are derived from the purchase agreement, which is also the sole document of record regarding the terms of the warranty. Contractual provisions are not affected by the Technical Documentation.
The documentation issued by the respective suppliers shall apply in addition to this manufacturer's documentation.
In addition, all generally applicable legal and otherwise binding regulations for preventing accidents and protecting the environment must be observed and communicated.
Page 4 Operating Manual Leica EM FC7 01/10
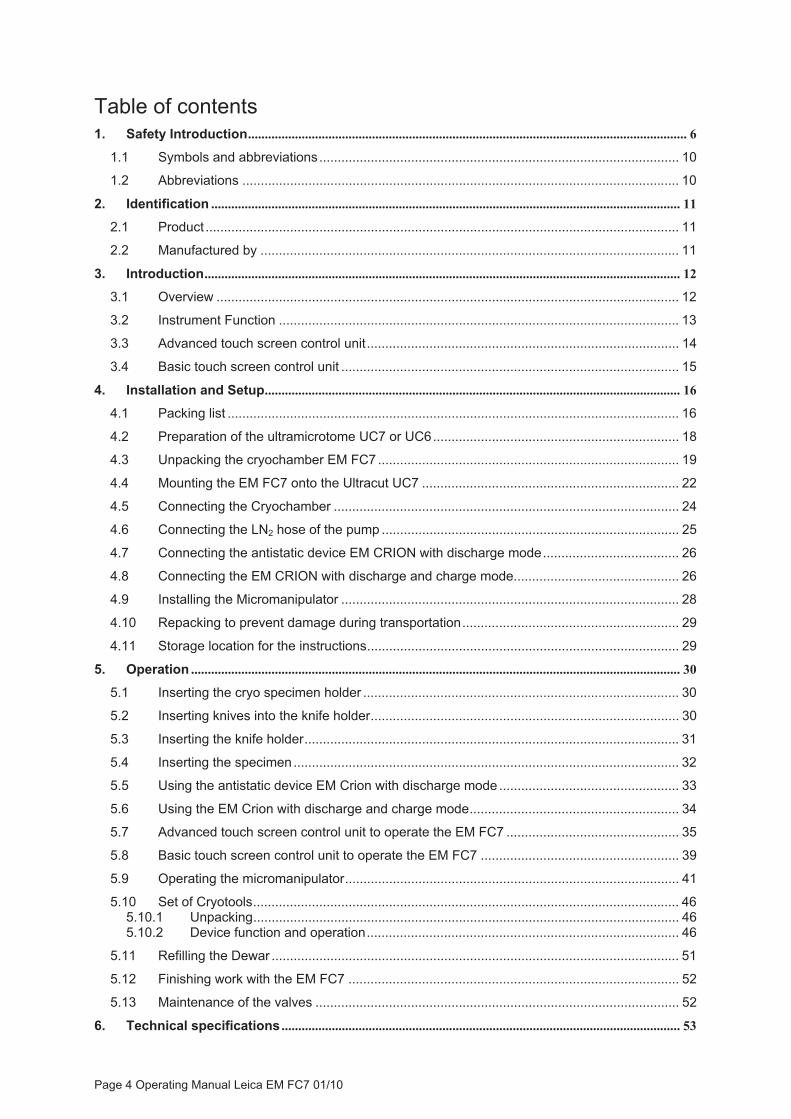
Table of contents 1. Safety Introduction................................................................................................................................... 6
1.1 Symbols and abbreviations.................................................................................................. 10 1.2 Abbreviations ....................................................................................................................... 10
2. Identification ............................................................................................................................................ 11 2.1 Product ................................................................................................................................. 11 2.2 Manufactured by .................................................................................................................. 11
3. Introduction.............................................................................................................................................. 12 3.1 Overview .............................................................................................................................. 12 3.2 Instrument Function ............................................................................................................. 13 3.3 Advanced touch screen control unit..................................................................................... 14 3.4 Basic touch screen control unit ............................................................................................ 15
4. Installation and Setup............................................................................................................................ 16 4.1 Packing list ........................................................................................................................... 16 4.2 Preparation of the ultramicrotome UC7 or UC6................................................................... 18 4.3 Unpacking the cryochamber EM FC7 .................................................................................. 19 4.4 Mounting the EM FC7 onto the Ultracut UC7 ...................................................................... 22 4.5 Connecting the Cryochamber .............................................................................................. 24 4.6 Connecting the LN2 hose of the pump ................................................................................. 25 4.7 Connecting the antistatic device EM CRION with discharge mode..................................... 26 4.8 Connecting the EM CRION with discharge and charge mode............................................. 26 4.9 Installing the Micromanipulator ............................................................................................ 28 4.10 Repacking to prevent damage during transportation........................................................... 29 4.11 Storage location for the instructions..................................................................................... 29
5. Operation .................................................................................................................................................. 30 5.1 Inserting the cryo specimen holder ...................................................................................... 30 5.2 Inserting knives into the knife holder.................................................................................... 30 5.3 Inserting the knife holder...................................................................................................... 31 5.4 Inserting the specimen......................................................................................................... 32 5.5 Using the antistatic device EM Crion with discharge mode ................................................. 33 5.6 Using the EM Crion with discharge and charge mode......................................................... 34 5.7 Advanced touch screen control unit to operate the EM FC7 ............................................... 35 5.8 Basic touch screen control unit to operate the EM FC7 ...................................................... 39 5.9 Operating the micromanipulator........................................................................................... 41 5.10 Set of Cryotools.................................................................................................................... 46
5.10.1 Unpacking.................................................................................................................... 46 5.10.2 Device function and operation..................................................................................... 46
5.11 Refilling the Dewar ............................................................................................................... 51 5.12 Finishing work with the EM FC7 .......................................................................................... 52 5.13 Maintenance of the valves ................................................................................................... 52
6. Technical specifications ....................................................................................................................... 53

Page 5 Operating Manual Leica EM FC7 01/10

Page 6 Operating Manual Leica EM FC7 01/10
1. Safety Introduction
Liquid Nitrogen (LN2)
When working with liquid nitrogen (LN2) please bear in mind LN2 is extremely cold. It boils at -196 °C. Nitrogen gas (GN2) escapes at very low temperature from the boiling LN2. Both LN2 and GN2 as well as cooled elements (e.g. pipes, valves, hoses, containers or stoppers) can cause severe frost bite and burns to the skin and eyes. When LN2 evaporates, it expands in a ratio of 1:700. 1 litre LN2 produces almost 1 m3 of GN2. Care should therefore be taken to ensure that when large quantities of nitrogen evaporate (e.g. when transferring LN2), the room should always be well ventilated. Removing LN2 waste: dump LN2 into an outdoor pit or container filled with gravel, where it will evaporate rapidly and safely. GN2 is odourless and tasteless and will be inhaled like air. GN2 is non-toxic, but a high GN2 content in the air (> 78%) reduces the oxygen-content (< 21%) and produces immediate fainting and deep unconsciousness without any previous symptoms. When there is doubt about the adequacy of ventilation, use an oxygen analyser (0 to 25% scale) to check for oxygen. The content of oxygen must not drop below 18%. If an unconscious person stays in a low oxygen environment then death may occur. If breathing stops, apply artificial respiration at once and notify doctor and ambulance immediately. For the reasons given above, never put LN2 Dewars in a closed storage room or chamber. The evaporation rate from Dewar vessels can rise to several litres a day if they are defective due to improper handling or to natural wear over many years of use. Always keep the working area well ventilated. Bring objects at room temperature carefully into contact with LN2. Initially an insulating gas layer is formed preventing a large transfer of heat. During this initial period little LN2 evaporates. However, once the object has cooled down there may occur unexpected strong boiling and spurting of LN2. In the case of burns from LN2 splashes, rinse the affected skin immediately with plenty of water at hand temperature. For serious burns arrange for a skin specialist to see them at once. In the case of LN2 affecting the eyes, rinse immediately with water at hand temperature and arrange for an eye specialist to see it at once. Never use glass Dewar vessels in the lab (especially glass Dewars larger than 2 litres capacity) without complete metal envelope: Glass Dewars often burst for no obvious reason or due to unintentional mishandling (e.g. contact with metal instruments etc.). Never work without open protective glasses when using LN2 in a glass Dewar.

Page 7 Operating Manual Leica EM FC7 01/10
Fig.1.1: When working with LN2 avoid protective glasses (a), boots (c), walking shoes (e) and protective gloves (g) out of which the LN2 cannot easily escape if entered. LN2 splashing into the closed protective glasses (a), open boots (c), shoes (e) or protective gloves (g) evaporates suddenly and can cause serious burns. Always use protective glasses (b) with side protection which are open at the top and at the bottom. Only use boots if you have loose (not narrow) trousers coming outside the boots (d) and completely covering the gap. Wear only open slip-on sandals (f) in the lab, no walking shoes or court shoes. Always wear cuffless trousers if you wear slip-on sandals. Never wear protective gloves when pouring LN2 or when putting the Dewar head on the Dewar vessel. Just use an open flannel cloth (h) to protect your hands from the cold. Gloves should be used only to grasp dry cold parts. They are unsuitable for LN2 work.

Page 8 Operating Manual Leica EM FC7 01/10
Only use metal Dewars specifically designated for storage of LN2, since only containers of this kind exclude risks during storage. For routine cryopreparation metal troughs (1 cm styrofoam insulation), styrofoam containers or plastic troughs are eminently suitable and ensure low risk cryopreparation. Check the evaporation rate of your metal Dewar regularly every three months and compare these rates with the rate given by the manufacturer. The evaporation rate of an undamaged metal Dewar should be well below 1 litre of LN2 per day. Defective Dewar vessels with higher evaporation rates are a safety risk, and should be taken out of work or repaired. Do not leave LN2 standing in open vessels where it can exchange with the room atmosphere. The boiling point of LN2 (-196 °C) is lower than liquid oxygen’s boiling point (-183 °C). When the exchange surfaces are extensive enough, oxygen from the air will be taken up in exchange for nitrogen. LN2 with high liquid oxygen content has a faintly bluish colour. Concentrated liquid oxygen promotes vigorous burning! Make sure that your Dewar vessel is filled only with LN2. Apply a note in the central distribution place stating clearly ONLY LIQUID NITROGEN or similar if different liquefied gases are delivered from there. Check the colour of cryogen: Bluish colour indicates the presence of a high percentage of liquid oxygen. The concentration of liquid oxygen increases during long periods of storage as its boiling point (-183 °C) is higher than the boiling point (-196 °C) of LN2. Main supply must be assured: 100 – 240 VAC, 50 – 60 Hz The instruments are equipped with protected ground. Before connecting it to the local electrical supply make sure that the mains has the required ground and that the instrument is connected to it according to the local regulations. Unplug the instrument before installing or changing fuses.

Page 9 Operating Manual Leica EM FC7 01/10
HAZARD WARNING LIQUID NITROGEN, LN2 Suffocation - Any vessel containing LN2 is a potential hazard - One litre LN2 produces 700 litres N2 gas - N2 gas is odourless and tasteless - Oxygen levels can quickly drop in confined spaces due to displacement of oxygen - by N2 when using or dispensing large volumes of LN2 - This can cause immediate fainting and unconsciousness - Always use LN2 in well-ventilated areas - Treat it with respect!
Storage - For reasons mentioned above do not store full LN2 Dewars in confined spaces
Burns - LN2 boils at -196°C. It is extremely cold and can cause serious burns. Please read the safety instructions provided with all Leica products for the correct handling of liquid nitrogen!
Page 10 Operating Manual Leica EM FC7 01/10
1.1 Symbols and abbreviations
Caution! This symbol alerts the user to important information which may endanger staff or result in damage to the system if it is ignored. Note! This symbol indicates further information relating to a previous explanation, which does not have a safety-critical function. However, it is important to observe this information to ensure that the system functions optimally.
1.2 Abbreviations
CU = control unit n.i. = not illustrated E-W = East - West LN2 = Liquid Nitrogen N-S = North - South RC = Rapid Cooling RT = room temperature

Page 11 Operating Manual Leica EM FC7 01/10
2. Identification
2.1 Product
Leica EM FC7 Cryo-chamber
2.2 Manufactured by
Leica Mikrosysteme GmbH Hernalser Hauptstrasse 219 A-1170 Vienna
Tel.: +43 1 488 99-0 Fax: +43 1 488 99-350
Internet: http:// www.leica-microsystems.com
Page 12 Operating Manual Leica EM FC7 01/10
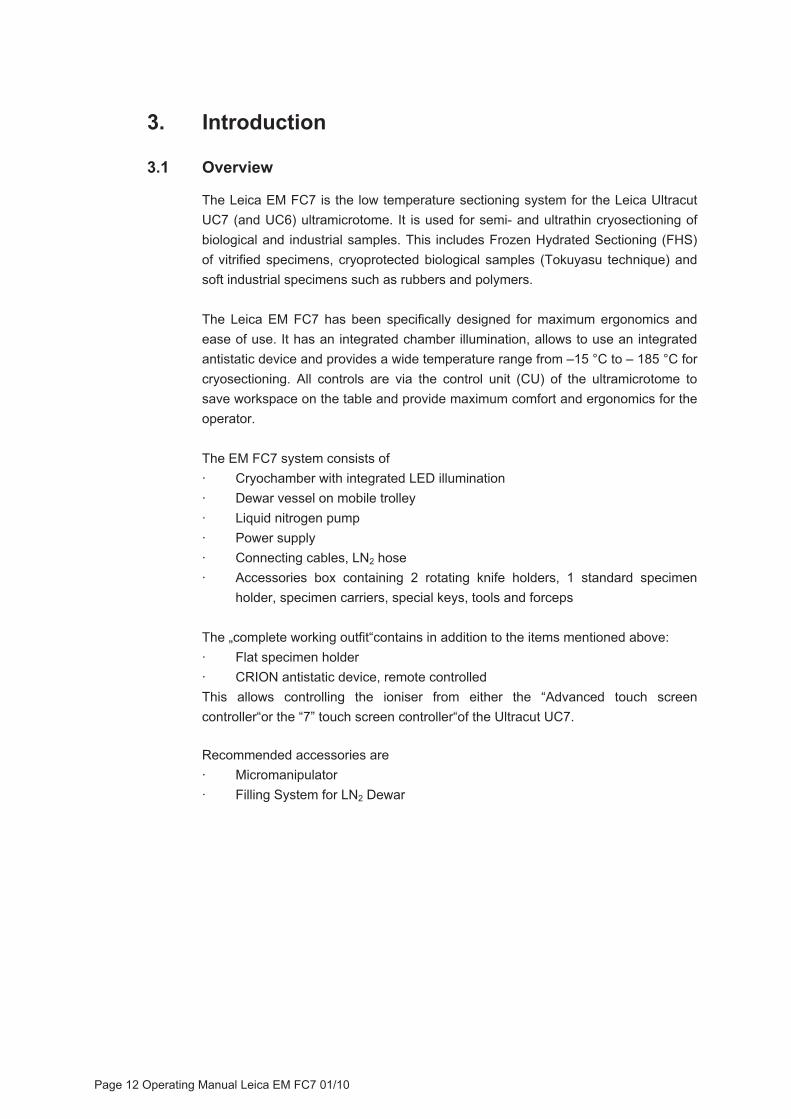
3. Introduction
3.1 Overview
The Leica EM FC7 is the low temperature sectioning system for the Leica Ultracut UC7 (and UC6) ultramicrotome. It is used for semi- and ultrathin cryosectioning of biological and industrial samples. This includes Frozen Hydrated Sectioning (FHS) of vitrified specimens, cryoprotected biological samples (Tokuyasu technique) and soft industrial specimens such as rubbers and polymers. The Leica EM FC7 has been specifically designed for maximum ergonomics and ease of use. It has an integrated chamber illumination, allows to use an integrated antistatic device and provides a wide temperature range from –15 °C to – 185 °C for cryosectioning. All controls are via the control unit (CU) of the ultramicrotome to save workspace on the table and provide maximum comfort and ergonomics for the operator. The EM FC7 system consists of · Cryochamber with integrated LED illumination · Dewar vessel on mobile trolley · Liquid nitrogen pump · Power supply · Connecting cables, LN2 hose · Accessories box containing 2 rotating knife holders, 1 standard specimen holder, specimen carriers, special keys, tools and forceps The „complete working outfit“contains in addition to the items mentioned above: · Flat specimen holder · CRION antistatic device, remote controlled This allows controlling the ioniser from either the “Advanced touch screen controller“or the “7” touch screen controller“of the Ultracut UC7.
Recommended accessories are · Micromanipulator · Filling System for LN2 Dewar
Page 13 Operating Manual Leica EM FC7 01/10
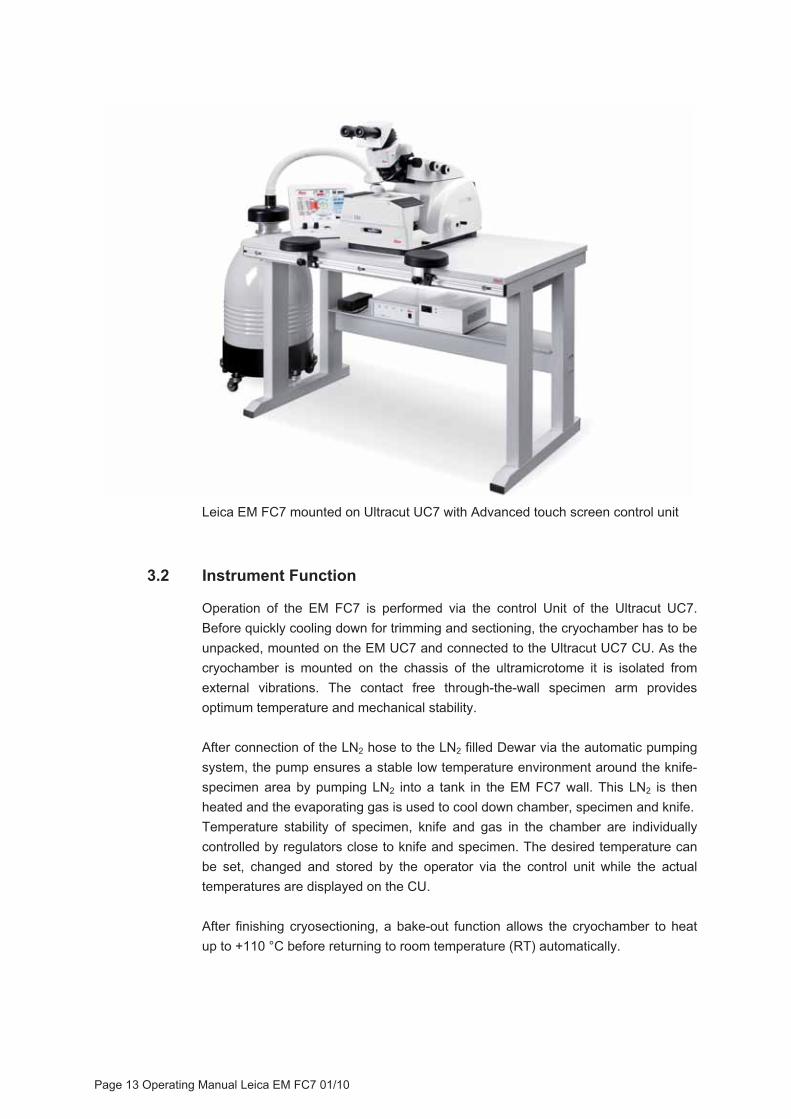
Leica EM FC7 mounted on Ultracut UC7 with Advanced touch screen control unit
3.2 Instrument Function
Operation of the EM FC7 is performed via the control Unit of the Ultracut UC7. Before quickly cooling down for trimming and sectioning, the cryochamber has to be unpacked, mounted on the EM UC7 and connected to the Ultracut UC7 CU. As the cryochamber is mounted on the chassis of the ultramicrotome it is isolated from external vibrations. The contact free through-the-wall specimen arm provides optimum temperature and mechanical stability. After connection of the LN2 hose to the LN2 filled Dewar via the automatic pumping system, the pump ensures a stable low temperature environment around the knife-specimen area by pumping LN2 into a tank in the EM FC7 wall. This LN2 is then heated and the evaporating gas is used to cool down chamber, specimen and knife. Temperature stability of specimen, knife and gas in the chamber are individually controlled by regulators close to knife and specimen. The desired temperature can be set, changed and stored by the operator via the control unit while the actual temperatures are displayed on the CU. After finishing cryosectioning, a bake-out function allows the cryochamber to heat up to +110 °C before returning to room temperature (RT) automatically.

Page 14 Operating Manual Leica EM FC7 01/10
3.3 Advanced touch screen control unit
After connecting and switching on the EM FC7 and the EM CRION to Advanced touch screen control unit of the Ultramicrotome UC7, the touch screen appears as shown below.
Page 15 Operating Manual Leica EM FC7 01/10
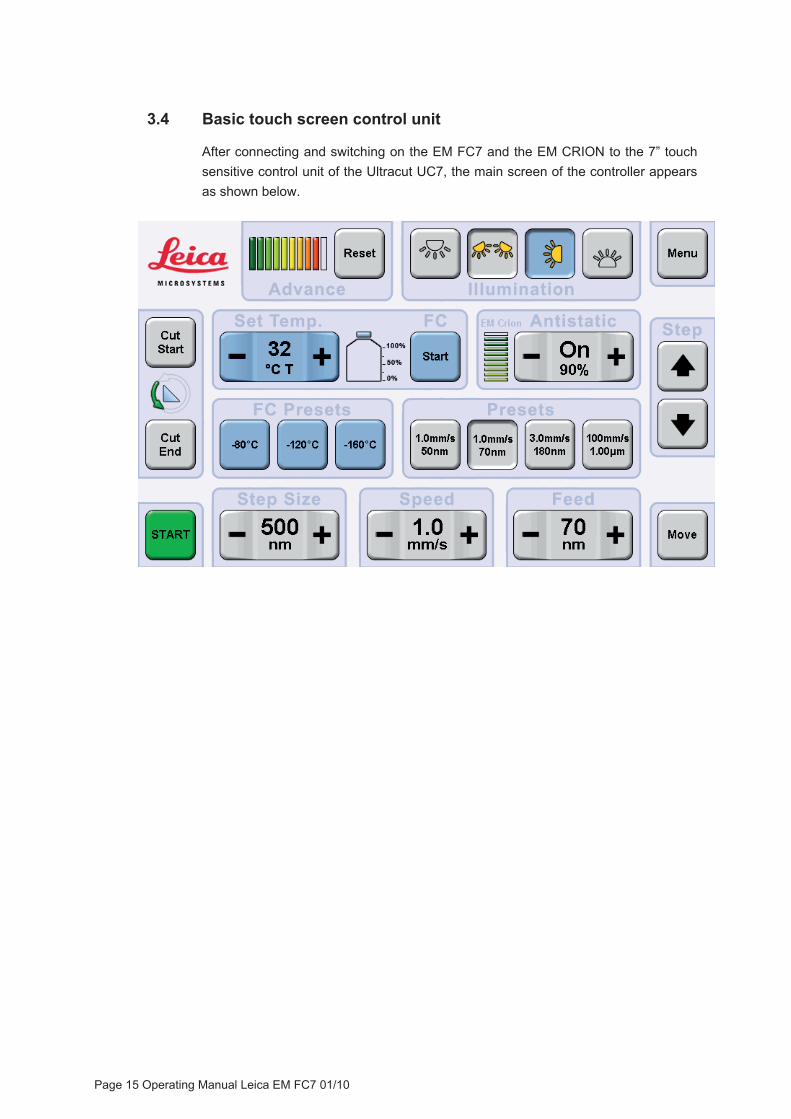
3.4 Basic touch screen control unit
After connecting and switching on the EM FC7 and the EM CRION to the 7” touch sensitive control unit of the Ultracut UC7, the main screen of the controller appears as shown below.

Page 16 Operating Manual Leica EM FC7 01/10
4. Installation and Setup
4.1 Packing list
LEICA EM FC7 Low Temperature Sectioning System contains:
EM FC7 cryochamber Power supply, connecting cables Pressure-less automatic filling system Insulated, threaded connecting hose Dewar for 25l LN2 with special flange and mobile trolley and pump storage holder The case for accessories contains: Specimen carriers 50 pcs. with concentric rings Specimen carriers 50 pcs. with slot Allen key 3 mm Cryotool with M4 thread. Collet specimen clamp Rotating knife holder 2pcs. Preparation plate Allen key 2mm Special long forceps with insulation coating, Black lever, 2 pcs 0.5mm spacer (transparent plastic foil) Transparent cover used during the cooling down process.
The Complete Working Outfit contains in addition: EM CRION antistatic device (either with discharge and charge mode or discharge only), connecting cables

Page 17 Operating Manual Leica EM FC7 01/10
Optionally available accessories:
Micromanipulator for frozen hydrated sectioning
Set of cryotools
Dewar Refilling System
Cryo Mesacut Mirror
Trimming Tool
Different Flat Specimen Holders

Page 18 Operating Manual Leica EM FC7 01/10
4.2 Preparation of the ultramicrotome UC7 or UC6
Remove armrest, knife support and segment arc from the Ultracut EM UC7 or UC6. Switch on the Ultracut.
Ultracut after removal of armrest, knife support and segment arc.
Activate the FC Mount Function of the Ultracut by pushing the FC Mount button of the controller.
With the FC Mount Function of the Ultracut UC6 or UC7, the knife stage will be centered in the E-W direction and to the outmost south direction automatically. The backlight will switch off, the toplight will switch on. This will facilitate mounting the EM FC7.

Page 19 Operating Manual Leica EM FC7 01/10
4.3 Unpacking the cryochamber EM FC7
Open box and lift out EM FC7 cryochamber and LN2 hose:

Page 20 Operating Manual Leica EM FC7 01/10
Remove LN2 hose and take away foam packaging:

Page 21 Operating Manual Leica EM FC7 01/10
Before mounting the EM FC7 on the Ultracut, remove the transport locking screws on rear side and bottom knife plate of the cryochamber:
Keep the transport locking screws in the case for accessories for potential future shipping of the cryochamber.

Page 22 Operating Manual Leica EM FC7 01/10
4.4 Mounting the EM FC7 onto the Ultracut UC7
Make sure that the clamping lever of the knife support and the cryochamber are opened. Move the knife stage of the EM UC7 into the E-W centre position (using the FC Mount button of controller, or with the E-W control wheel).
Take FC7 chamber with both hands and place it above the first indentation lines.
Push aside the chassis of the FC7 the groove on the chassis of the cryochamber should be on the right side of the line.
Slide on the chassis of the Ultracut UC7 until the second indentation line. Turn the hand wheel of the Ultracut UC7 to move the specimen arm to the lowest position. Guide the cryo specimen arm into the specimen arm of the Ultracut UC7. Slide the FC7 cryochamber into the chassis until you reach the end stop. Lock the cryo specimen arm of the FC7 cryochamber to the specimen arm of the Ultracut UC7 by turning the locking screw either manually or using the 3 mm Allen key. Observe the gap between cryo specimen arm and cryochamber (2 red arrows in). The distance of the gap should be approx. 0.5 mm.

Page 23 Operating Manual Leica EM FC7 01/10
Adjusting the distance between specimen arm and cryochamber should be done as follows: Press the cryochamber to the right side and north against the UC7 or UC6 base plate (red arrows). The distance will be adjusted by turning the adjusting screw on the front side of the FC7 cryochamber using the 2 mm Allen key. For accurate setting the 0.5mm spacer (transparent plastic foil) can be used. Lock the FC7 cryochamber to the chassis of the Ultracut UC7 by turning the lever „a“ clockwise until its end stop position. Make sure the FC7 is firmly connected by gently pulling in the south direction. To increase the clamping remove lever „a“ by unscrewing slot screw. Reposition the lever an eighth counter clockwise on the clamping shaft and lock FC7. Repeat procedure until FC7 cannot be removed by gently pulling in south direction. Fix lever by tightening the slot screw. Push the knife plate of the EM FC7 until its north end stop position. Lock the knife plate to the knife stage of the Ultracut UC7 or UC6 by turning the lever b clockwise. Move the cryo specimen arm up and down by turning the hand wheel to make sure that there is no contact to the cryo chamber.
Make sure the cryochamber is levelled out with a spirit-level placed on the top plate of the cryochamber (see operating manual of the EM UC7 as well).
a
b
Page 24 Operating Manual Leica EM FC7 01/10
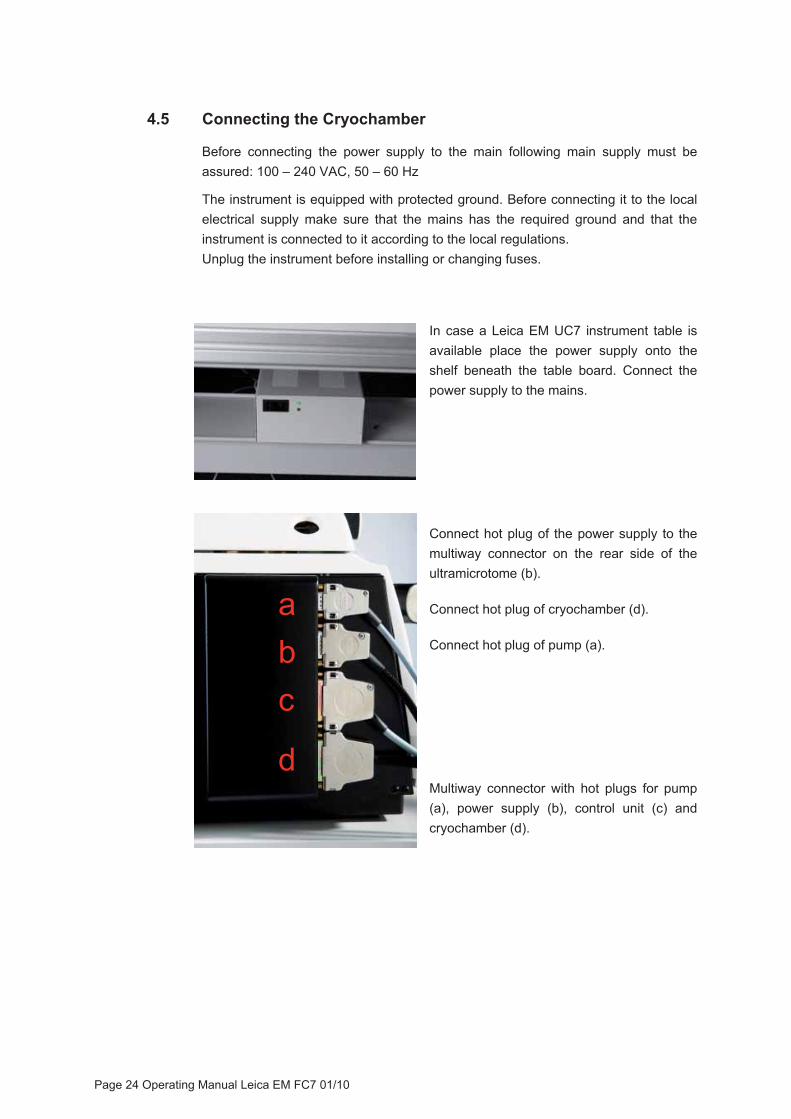
4.5 Connecting the Cryochamber
Before connecting the power supply to the main following main supply must be assured: 100 – 240 VAC, 50 – 60 Hz
The instrument is equipped with protected ground. Before connecting it to the local electrical supply make sure that the mains has the required ground and that the instrument is connected to it according to the local regulations. Unplug the instrument before installing or changing fuses.
In case a Leica EM UC7 instrument table is available place the power supply onto the shelf beneath the table board. Connect the power supply to the mains.
Connect hot plug of the power supply to the multiway connector on the rear side of the ultramicrotome (b).
Connect hot plug of cryochamber (d).
Connect hot plug of pump (a).
Multiway connector with hot plugs for pump (a), power supply (b), control unit (c) and cryochamber (d).
a b c
d
Page 25 Operating Manual Leica EM FC7 01/10
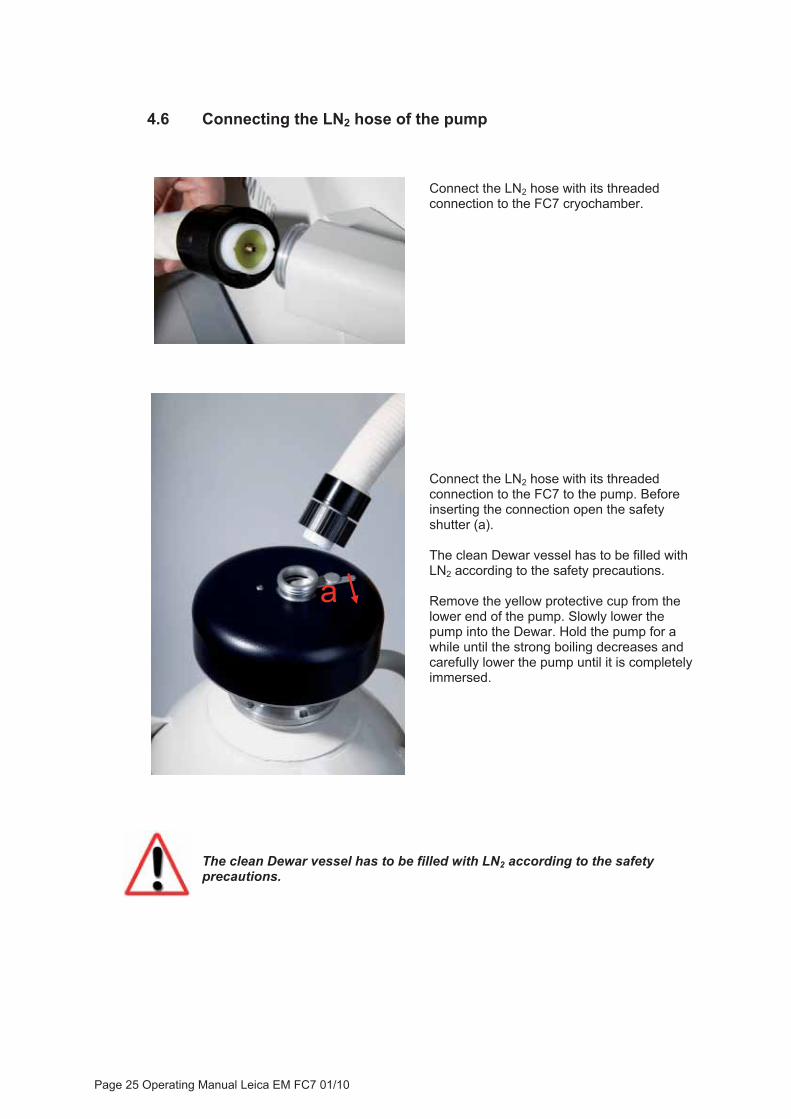
4.6 Connecting the LN2 hose of the pump
Connect the LN2 hose with its threaded connection to the FC7 cryochamber. Connect the LN2 hose with its threaded connection to the FC7 to the pump. Before inserting the connection open the safety shutter (a). The clean Dewar vessel has to be filled with LN2 according to the safety precautions. Remove the yellow protective cup from the lower end of the pump. Slowly lower the pump into the Dewar. Hold the pump for a while until the strong boiling decreases and carefully lower the pump until it is completely immersed.
The clean Dewar vessel has to be filled with LN2 according to the safety precautions.
a

Page 26 Operating Manual Leica EM FC7 01/10
4.7 Connecting the antistatic device EM CRION with discharge mode
Please see Leica EM Crion manual as well.
4.8 Connecting the EM CRION with discharge and charge mode
Please see Leica EM Crion manual as well.
electrode
earth of the electrode
connect cable to earth (in the case the PE ground through the mains cord is not properly functioning)
remote control cable, connect the other end to the rear side of the controller
power cable
electrode
earth of the electrode
connect cable to earth (in case the PE ground through the mains cord is not properly functioning)remote control cable, connect the other end to the rear side of the controller
discharge to footswitch
charge to footswitch
power cable

Page 27 Operating Manual Leica EM FC7 01/10
In case a Leica EM UC7 instrument table is available place the power supply onto the shelf beneath the table board.
EM Crion with discharge and charge mode is operated by footswitches (except setting the intensity). The EM Crion with discharge function only is operated by switching on/off with the button on the screen of the controller, it can be switched on/off if a footswitch is connected on the controller and “Bind Motor to EM Crion” is enabled (see EM UC7 manual)
As soon the Crion is switched on a operating field on the screen of the control unit appears.
The intensity of the ioniser is controlled by pushing +/- buttons on the ANTISTATIC field.
Advanced touch screen control unit
Basic touch screen control unit
Place the antistatic electrode with its holder into its position on the cryochamber.

Page 28 Operating Manual Leica EM FC7 01/10
4.9 Installing the Micromanipulator
Unpack the micromanipulator.
Remove the top plate of the cryochamber by unscrewing the screws and exchange it with the supporting plate of the micromanipulator.
supporting plate
pair of forceps
end stop
grid box holder and two grid boxes
Allen key
screw in the end stop
plug in the ground cable
locating plates for the electrode holder right plate for left-handed operation of the eyelash.

Page 29 Operating Manual Leica EM FC7 01/10
4.10 Repacking to prevent damage during transportation
The Leica EM FC7 must not be transported unless it is in its original packaging; if it is not, the system may be damaged.
If the system needs to be moved again, disassemble and pack it away by following the instructions listed in Unpacking the cryochamber 4.3 in the reverse order.
4.11 Storage location for the instructions
The user manual and associated supplementary documentation (e.g., manual of the EM Crion) must be kept close to the Leica EM FC7 for fast access.

Page 30 Operating Manual Leica EM FC7 01/10
5. Operation
5.1 Inserting the cryo specimen holder
Insert the cryo specimen holder into the specimen arm. Lock the cryo specimen holder with the torque limited screw (a) using the 3 mm Allen key.
If the cryo holder is locked in the 0° position initially, subsequent reading of the next position (turned 90° for trimming) will be easy.
5.2 Inserting knives into the knife holder
Set the desired clearance angle (typically 6°). Insert the desired knives (e.g. a diamond trimming tool and a diamond 35° cryo immuno knife for Tokuyasu technique specimens. Lock the knife by turning the locking screw clockwise. Clearance angle setting and locking/unlocking of knives can also be done with the knife holder in the cooled cryochamber.
a

Page 31 Operating Manual Leica EM FC7 01/10
5.3 Inserting the knife holder
The knife plate in the cryochamber carries a pin (red arrow) that corresponds to the hole in the knife holder (red arrow). Insert the rotating knife holder containing knives into the chamber.
The rotating knife holder is now in the “loading position“. It can only be inserted in this position.
In the loading position the knife holder cannot be locked but is held in position by a magnet.

Page 32 Operating Manual Leica EM FC7 01/10
5.4 Inserting the specimen
Once the cryochamber has cooled down to the desired temperature (e.g. -80 °C for trimming of Tokuyasu technique specimens), insert the specimen pin with the specimen.
Make sure the knife holder is in loading position to avoid touching the delicate knife edge.
Lock the specimen pin in the cryo specimen holder. Turn the small black lever in front clockwise while holding the cryo specimen holder in position with the small black lever in the back. Rotate the knife holder into „trimming position“. Lock the locking screw of the knife holder with the 3 mm Allen key. Start trimming and sectioning. To change from sectioning position 1 (e.g. the trimming knife) to sectioning position 2 (e.g. the sectioning knife), unlock the screw, rotate knife holder and lock again.

Page 33 Operating Manual Leica EM FC7 01/10
5.5 Using the antistatic device EM Crion with discharge mode
For trimming: For perfect ribbons of sections a perfect trimmed sample is mandatory. It is recommended to use the antistatic device for trimming, because it eliminates the sticking of the chips on the specimen and on the blade. Set the intensity for trimming at the full voltage = all 10 indication marks are illuminated. For sectioning: Set the intensity to 5 indication marks. If the sections tend to stick on the knife edge, increase the intensity step by step until the sections begin to float in a nice ribbon over the knife edge. If the sections begin to lift up, decrease the intensity step by step. The electrode will lose its power if its metal tip becomes covered with ice or debris. If this occurs, just clean the ionizer tip with a fine brush with the antistatic device switched off. The electrode tip carries high voltage and must not be touched or allowed to touch any parts of the cryo ultramicrotome while operation. Switch off the antistatic device prior to any manipulation in the chamber. Never heat the chamber with the electrode inside.

Page 34 Operating Manual Leica EM FC7 01/10
5.6 Using the EM Crion with discharge and charge mode
EM Crion with discharge and charge mode is operated by footswitches (except setting the intensity).
For trimming: For perfect ribbons of sections a perfect trimmed sample is mandatory. It is recommended to use the discharge mode for trimming, because it eliminates the sticking of the chips on the specimen and on the blade. Set the intensity for trimming at the full voltage = all 10 indication marks are illuminated. Press the discharge footswitch to enable the antistatic performance or the electrode. For sectioning: Set the intensity to 5 indication marks. If the sections tend to stick on the knife edge, increase the intensity step by step until the sections begin to float in a nice ribbon over the knife edge. If the sections begin to lift up, decrease the intensity step by step. Press the discharge footswitch to enable the antistatic performance or the electrode. For placing the section ribbon on the grid: The ribbon is attached to the grid by pressing the charge footswitch. Thus, the specimen adheres to the grid without the need of a section press. The electrode will lose its power if its metal tip becomes covered with ice or debris. If this occurs, just clean the ionizer tip with a fine brush with the device switched off.
The electrode tip carries high voltage and must not be touched or allowed to touch any parts of the cryo ultramicrotome while operation. Switch off the antistatic device prior to any manipulation in the chamber. Never heat the chamber with the electrode inside.

Page 35 Operating Manual Leica EM FC7 01/10
5.7 Advanced touch screen control unit to operate the EM FC7
1
2
34
5
6
9 8

Page 36 Operating Manual Leica EM FC7 01/10
1: LED chamber illumination. Touch to switch on or off. When activated, brightness can be controlled with + - buttons. 2: Integrated ioniser control. Touch to switch on or off if EM Crion with discharge mode only is used. When activated, intensity can be controlled with + - buttons. 3: Three individual readings for the actual temperature of specimen, knife and gas. Only the actual and not the set temperatures are shown. Touch one, two or all three buttons to activate setting mode. When activated, the temperatures can be set. A number pad appears on the screen. The desired temperature can be keyed in and must be confirmed with „OK“. If only one button was activated (e.g. knife), only the temperature of this button (in this case the knife) will be set. If all three buttons were activated, all three will be set together. 4: Store function. Touch to activate storing mode, followed by one of the four memory fields (5). The set temperatures of specimen, knife and gas are now stored in the desired memory field. 5: Memory fields. Touch to activate the pre stored values. 6: Pump. Touch to switch on or off pump (e.g. for refilling the Dewar it may be necessary to warm up the LN2 hose until it is flexible enough to me moved). 7: LN2 level indicator. Indication of the filling status of the Dewar. An acoustic warning signal will sound if the Dewar is almost empty. Approx. 1 h working time is left. The acoustic signal can be switched off by touching the Dewar symbol. 8: Start: Touch to activate cooling of the chamber to the set temperature. 9: Heat: Touch to activate automatic bake out of the chamber. The automatic safe guard will ask you to touch the button for more then 1 second to prevent activation by accident. Due to the automatic bake out the controller can be switched off and the bake out process will continue to heat up the chamber to about 110°C and stops automatically at room temperature thereafter.

Page 37 Operating Manual Leica EM FC7 01/10
MENU � User- or Sample profile
1
2

Page 38 Operating Manual Leica EM FC7 01/10
1: Temperature Unit. After pushing the menu button on the main screen the temperature unit can be selected in the Edit User menu. 2: FC Mode. The FC7 chamber is equipped to toggle between three different modes. Push the menu button on the main screen and select the Edit or Add New sample menu.
� Standard mode is preferable used for regular sectioning e.g. Tokuyasu or polymer sectioning at dry conditions.
� High Gas Flow is preferable used to increase GN2 gas flow below a temperature of -140°C in order to reduce ice contaminations.
� Wet Sectioning mode is used for polymer sectioning at wet conditions using DMSO or similar liquids in order to set the temperature of knife at a maximum of -40°C and the temperature of the sample minimum of -170°C. To achieve the minimum temperature of the sample the specimen arm must be moved to its lowest position during the cooling process. Thus, parts of the cooling element of the sample holder are placed into LN2 which facilitates cooling down the sample at a minimum of -170°. The temperature will be kept during the sectioning process.

Page 39 Operating Manual Leica EM FC7 01/10
5.8 Basic touch screen control unit to operate the EM FC7
Menu
7 8 6
1
23
4
5

Page 40 Operating Manual Leica EM FC7 01/10
1: LED chamber illumination. Press to switch on or off. 2: Start: press to activate cooling of the chamber to the set temperature. After Start has been pressed the name of the button changes to Heat. Press Heat to activate automatic bake out of the chamber. The heating process can be interrupted by pressing the Heat button again (Stop Heat). Due to the automatic bake out the controller can be switched off and the bake out process will continue to heat up the chamber to about +110°C and stops automatically at room temperature afterwards. 3: Reading for the actual temperature which is selected in the menu as command variable (set point). This temperature can be set with + - buttons. By pressing the displayed value the set temperature will be shown for about 4 seconds. 4: Three memory buttons. Press to activate the stored value. The reading for the actual temperature shows the set value for approx. 4 seconds. To store a new value set temperature (3) and press one of the memory buttons. An acoustic signal confirms the input. 5: LN2 level indicator. Indication of the filling status of the Dewar. An acoustic warning signal will sound if the Dewar is almost empty. Approx. 1 h working time is left. The acoustic signal can be switched off by touching the Dewar symbol (5) or the displayed hint box (appears in the upper left corner on the screen). Menu 6: LN2 stop. Touch to switch on or off pump (e.g. for refilling the Dewar it may be necessary to warm up the LN2 hose until it is flexible enough to me moved). 7: One of four different command variables can be set. The temperature will be controlled according the selected set point. T Average = an average of specimen, sample and gas Tk Knife Ts Sample Tg Gas 8: Temperature Unit: a choice of C, F and K is available. The selected unit will be displayed on the main screen.
Page 41 Operating Manual Leica EM FC7 01/10
5.9 Operating the micromanipulator
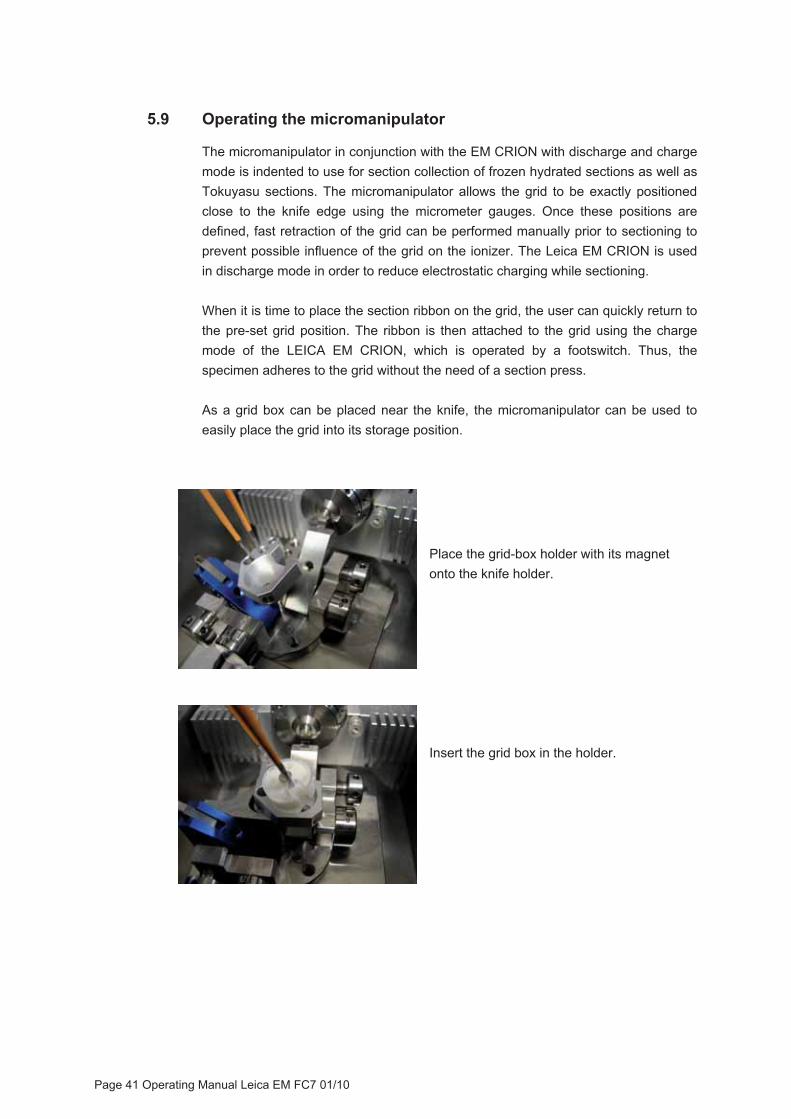
The micromanipulator in conjunction with the EM CRION with discharge and charge mode is indented to use for section collection of frozen hydrated sections as well as Tokuyasu sections. The micromanipulator allows the grid to be exactly positioned close to the knife edge using the micrometer gauges. Once these positions are defined, fast retraction of the grid can be performed manually prior to sectioning to prevent possible influence of the grid on the ionizer. The Leica EM CRION is used in discharge mode in order to reduce electrostatic charging while sectioning. When it is time to place the section ribbon on the grid, the user can quickly return to the pre-set grid position. The ribbon is then attached to the grid using the charge mode of the LEICA EM CRION, which is operated by a footswitch. Thus, the specimen adheres to the grid without the need of a section press. As a grid box can be placed near the knife, the micromanipulator can be used to easily place the grid into its storage position.
Place the grid-box holder with its magnet onto the knife holder.
Insert the grid box in the holder.

Page 42 Operating Manual Leica EM FC7 01/10
Pick up the grid with the forceps. For accurate manipulation hold the forceps close to the tips.
Insert the forceps in its holder of the micromanipulator and slide it towards the end stop position.
With the micrometer gauges set the grid slightly below the knife edge with the z-movement, E-W position of the sample and the N-S position close to the knife. Make sure the shaft of the micrometer gauges are in contact with the magnetic end stop.
E-W movement
N-S movement
Z movement

Page 43 Operating Manual Leica EM FC7 01/10
To prevent possible influence of the grid on the ionizer retract the forceps by pulling back the assembly.
Grip the assembly on the centre to retract the forceps. Due to the backlash of the bearings the grid will be moved towards the knife edge if the assembly will be retracted by gripping on a different area of the assembly (e.g. at the end of the Z-movement assembly).
Avoid turning the micrometer gauges once the forceps is retracted. The preset position would be changed, thus the knife edge can be damaged if repositioning of the forceps is careless performed.
Start sectioning using the discharge mode of the Crion (see chapter 5.6).
When it is time to place the section ribbon on the grid, switch off the motor of the specimen arm and the discharge function of the Crion. For convenience both functions can be switched of by the footswitch simultaneously if “Bind Motor to Crion pedals” is enabled.

Page 44 Operating Manual Leica EM FC7 01/10
Slightly lift up the ribbon with the eyelash and advance the forceps to its pre-set position.
Attach the ribbon on the grid using the charge mode of the Crion operated by the footswitch (discharge).
For further section collection change the E-W position of the grid and repeat as above described.
If you want to place the grid in the grid-box move the grid-box holder aside with tweezers and retract the forceps holding the grid.
Turn the forceps until the grid points downwards. Make sure the grid does not interfere with parts of the knife holder. It might be necessary to move the forceps in a proper E-W position as well.
Lift up the forceps either by using the micrometer gauges or manually by gripping the z-direction lever.

Page 45 Operating Manual Leica EM FC7 01/10
Adjust the grid-box using a pair of tweezers and the grid with the y and x movement of the manipulator in order to position the grid above an empty recess of the grid-box. Lower the forceps slowly until the grid is placed in its position of the grid-box. Open the forceps to release the grid.
To use a new grid take out the forceps and warm it up as long as the forceps is dry. To speed up the process a second forceps is recommended. Or another possibility is to load the second grid holder with empty grids and place it in the chamber. If a new grid has to be inserted into the forceps exchange the grid-boxes and pick up the empty grid using the micrometer gauges of the micromanipulator. In this case the forceps can remain in the cryochamber and will not ice up if moved out of the chamber.

Page 46 Operating Manual Leica EM FC7 01/10
5.10 Set of Cryotools
The Set of cryotools is used for handling frozen hydrated sections, Tokuyasu sections as well as collecting polymer sections.
5.10.1 Unpacking
The set consists of 4 parts: the base (with a flip-over bridge for preloading / releasing of grids), the spring loaded grid holder, the section press and the transfer container.
5.10.2 Device function and operation
The base of the cryotools is mounted on the rotating knife holder with a locking screw. A pre cooled grid is clamped in the spring loaded grid holder (2). The grid holder is shifted forward until the grid is close to the knife edge. Cryosectioning is carried out. Once the ribbon of frozen hydrated sections is on the grid, the holder with the grid is pulled back in south direction. The grid is then placed onto the flip -over bridge (3) and sections are pressed with the section press (4). After flattening the sections on the grid, the grid is transferred to a transfer container (5).
2
4 35
1

Page 47 Operating Manual Leica EM FC7 01/10
Insert cryo knife into knife holder.
Mount base of cryotools on rotating knife holder and lock.
Insert grid holder and transfer container into base of cryotools.
Flip section press over to the right.

Page 48 Operating Manual Leica EM FC7 01/10
Place grid on flip-over bridge.
Open grid holder by pushing on the small indentation at the rear end with a small black lever or a pair of forceps. Move gird holder towards the grid and clamp it by releasing the clamping jaw.
Pull back grid holder towards you and flip bridge to the right using a pair of forceps.
Push grid holder forwards until the grid has reached the desired distance from the knife edge.
Take extra care not to touch the delicate diamond knife edge.

Page 49 Operating Manual Leica EM FC7 01/10
Start cryo sectioning and collect the ribbon on the grid.
Pull back grid holder. Flip over bridge to the left. Push forward grid holder until the grid is placed over the bridge.
Close section press by using a pre-cooled pair of forceps.
Flatten sections under the press by pushing on the small indentation in the centre with a small black lever or a pair of forceps.
Apply pressure perpendicular to the surface to avoid sideways movement of the press.

Page 50 Operating Manual Leica EM FC7 01/10
Flip over section press to the right.
Release grid from the holder by pushing on the small indentation at the rear end with a small black lever or a pair of forceps and retract grid holder.
Transfer flattened grid into the transfer container.
The transfer container can be removed using a pair of forceps.
The ceramic surfaces of the section press should be cleaned with 100% ethyl alcohol before use.
Page 51 Operating Manual Leica EM FC7 01/10
5.11 Refilling the Dewar
The 25l Dewar holds enough LN2 for a 1 day operation. It is recommended to keep the pump in the Dewar until the LN2 has been consumed. The LN2 consumption of the pump when not in use is less than 1l per day.
Refilling can be done in 2 different ways:
1. Lift the pump slightly and refill the Dewar, using the Dewar Refilling System.
2. Take out the pump from the Dewar. The cold pump should always be kept in an upright position to avoid entrance of water and humid air into the valves. Use the yellow protective cap immediately to close the lower end of the pump. Before inserting the pump again, dry pump and take off yellow protective cap.
For ease of operation, one can use a second Dewar and place the pump immediately into the new, full Dewar.
Taking out the pump from the Dewar if the pump is not in use for a longer time: The cold pump should always be kept in an upright position to avoid entrance of water and humid air into the valves. Use the yellow protective cap and the storing bracket that is provided with the pump.
Before removing the pump from the Dewar, switch off pump and wait for a few minutes. The LN2 hose must be flexible enough to be moved.

Page 52 Operating Manual Leica EM FC7 01/10
5.12 Finishing work with the EM FC7
Close down and bake out Pressing the Heat button will activate the automatic bake out of the chamber. The FC7 cryochamber will now heat up to +110 °C. The heating cycle will be switched off automatically and the instruments will go back to room temperature During the heating time (approximately 90 minutes) the FC7 must be connected to the mains. The heating cycle can be stopped and started again any time by pressing the Heat button. Before heating the chamber, to avoid any damage to components and knives: � take out all specimens. � take out antistatic electrode. � take out diamond knives. � unlock torque limited screw holding the cryo specimen holder. This will
prevent mechanical damage of specimen holder and locking screw due to heat expansion.
� unlock knife holder. This will prevent mechanical damage of the locking screw due to heat expansion.
� move stereomicroscope with stereo-carrier to the side. This will prevent steam / condensing water droplets on optical components.
5.13 Maintenance of the valves
Humidity in the valves can cause freezing and sticking of the valves during operation. To prevent this both valves in the block can be easily removed and cleaned with ethanol. Remove both steel valves with a screw driver. The 2nd steel valve is located underneath the 1st valve. Before inserting the valves again, check that the ball inside the valves is free.

Page 53 Operating Manual Leica EM FC7 01/10
6. Technical specifications
Chamber illumination LED brightness controllable max. 2150 lx Top-light LED brightness controllable max. 8250 lx Back-light LED brightness controllable max. 3450 lx Spot-light LED max. 8600 lx Cutting transmission vibration decoupled gravity stroke Specimen advance 200μm Reserve warning 20μm Cutting speed 0.05 -100 mm/s wheel controlled Section thickness 0-15000nm wheel controlled Return speeds 10, 30, 50mm/s Coarse knife-movements N-S: 10 mm stepping motor Step control 0.1 -15 μm steps E-W movement 10mm stepping motor Knife holder for two 6-10 mm knives Temperature range +110°C to -185°C Temperature working range -15°C to -185°C Temperature difference setting knife/sample High gas flow (advanced controller)
-40°C (knife) and -170°C (sample)
Automatic rapid cooling < -165° High gas flow (advanced controller) < -140°C Temperature memories 4 advanced controller / 3 basic controller
EC Declaration
Leica Microsysteme GmbH Tel. +43 1 48899 Hernalser Hauptstrasse 219 Fax +43 1 48899-350 A-1170 Wien www.leica-microsystems.com
EC Declaration of Conformity EG Konformitäts-Erklärung Déclaration CE de Conformité
We/Wir/Nous Leica Mikrosysteme GmbH Hernalser Hauptstrasse 219 A-1170 Wien, Austria
declare in exclusive responsibility that the product erklären in alleiniger Verantwortung, dass das Produkt déclarons sous notre seule responsabilité que le produit
Model LEICA EM FC7
Modell LEICA EM FC7
modèle LEICA EM FC7
Type/Typenbezeichnung/type EM FC7/706030/656002 to which this declaration relates is in conformity with the following standards: auf das sich diese Erklärung bezieht, mit den folgenden Normen übereinstimmt: auquel se réfère cette déclaration est conforme aux normes :
EN 61010-1
EN 61326-1
following the provisions of directive gemäss den Bestimmungen der Richtlinie conformément aux dispositions de directive
2004/108/EC (Electromagnetic compatibility) (Elektromagnetische Verträglichkeit)
2006/95/EC (Low Voltage Equipment) (Niederspannungsrichtlinie)
2006/42/EC (Machinery) (Maschinen)
Wien, 25. June 2009 Dr. Reinhard Lihl Entwicklungsleiter R & D Manager Chef du service développement

Copy
right
© Le
ica M
ikros
ystem
e Gmb
H, H
erna
lser H
aupts
trass
e 219
, 117
0 Vien
na, A
ustria
· Te
l. +43
1 48
899,
Fax +
43 1
4889
9350
LE
ICA
and t
he Le
ica lo
gos a
re re
gister
ed tr
adem
arks
of Le
ica IR
Gmb
H.Or
der n
o of th
e edit
ion: O
pera
ting M
anua
l Leic
a EM
FC7,
Versi
on 16
2220
032
01/20
10
www.leica-microsystems.com