lab 4: the care and feeding of the microscope lab 5: cell
TRANSCRIPT

Lab 4: The Care and Feeding of the Microscope
Lab 5: Cell Structure
Evelyn I. Milian
Instructor
2012
BIOLOGY I - LAB
BIOLOGY I – Labs 4 and 5: Microscope / Cell Structure
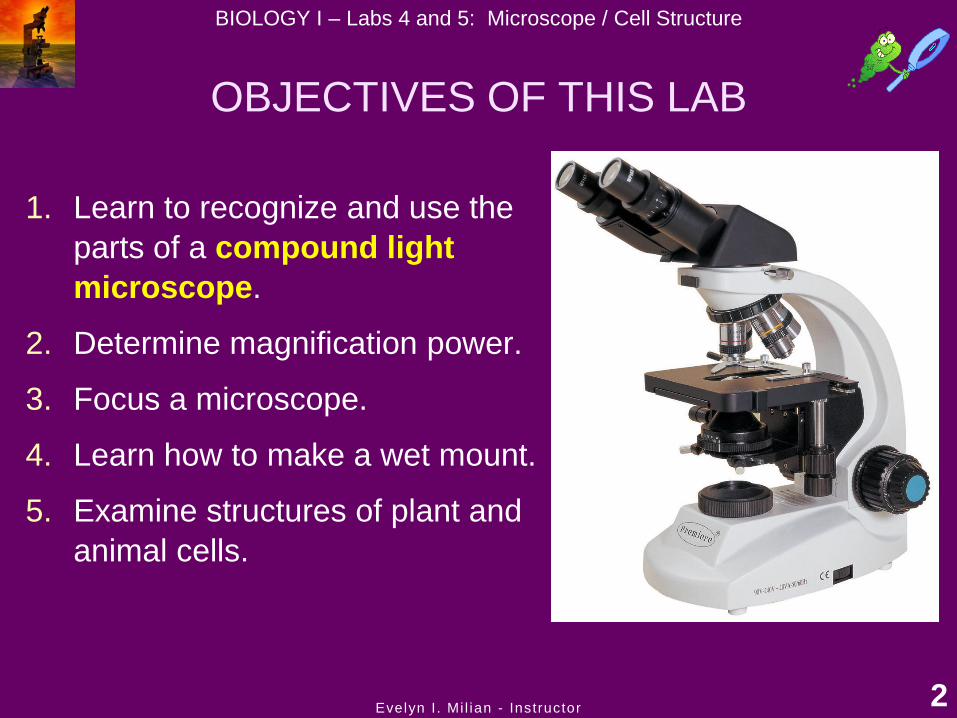
OBJECTIVES OF THIS LAB
1. Learn to recognize and use the
parts of a compound light
microscope.
2. Determine magnification power.
3. Focus a microscope.
4. Learn how to make a wet mount.
5. Examine structures of plant and
animal cells.
Evelyn I . Mi l ian - Instructor 2

BIOLOGY I – Labs 4 and 5: Microscope / Cell Structure
3
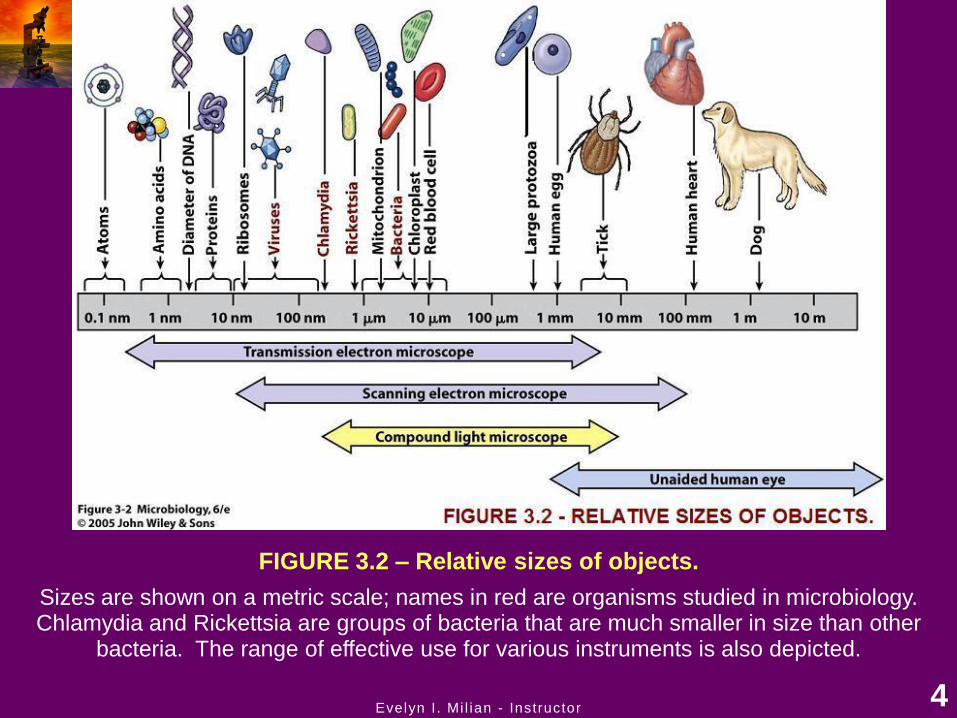
FIGURE 3.2
Relationships between the sizes of various specimens and the resolution of the human eye, light microscope, and electron microscope.
It takes a microscope to see most cells and lower levels of biological organization. Cells are visible with the light microscope, but not in much detail. An electron microscope is necessary to see eukaryotic cell organelles (such as the mitochondrion and the nucleus) in detail and to observe viruses (noncellular parasitic agents) and molecules.
In the metric system, each higher unit is ten times greater than the preceding unit. Measurements: 1 centimeter (cm) = 10-2 meter (m) = 0.4 inch; 1 millimeter (mm) = 10-3 m; 1 micrometer (µm) = 10-3 mm = 10-6 m; 1 nanometer = 10-3 µm = 10-9 m.
Evelyn I . Mi l ian - Instructor
BIOLOGY I – Labs 4 and 5: Microscope / Cell Structure
Evelyn I . Mi l ian - Instructor 4
FIGURE 3.2 – Relative sizes of objects.
Sizes are shown on a metric scale; names in red are organisms studied in microbiology. Chlamydia and Rickettsia are groups of bacteria that are much smaller in size than other
bacteria. The range of effective use for various instruments is also depicted.
BIOLOGY I – Labs 4 and 5: Microscope / Cell Structure
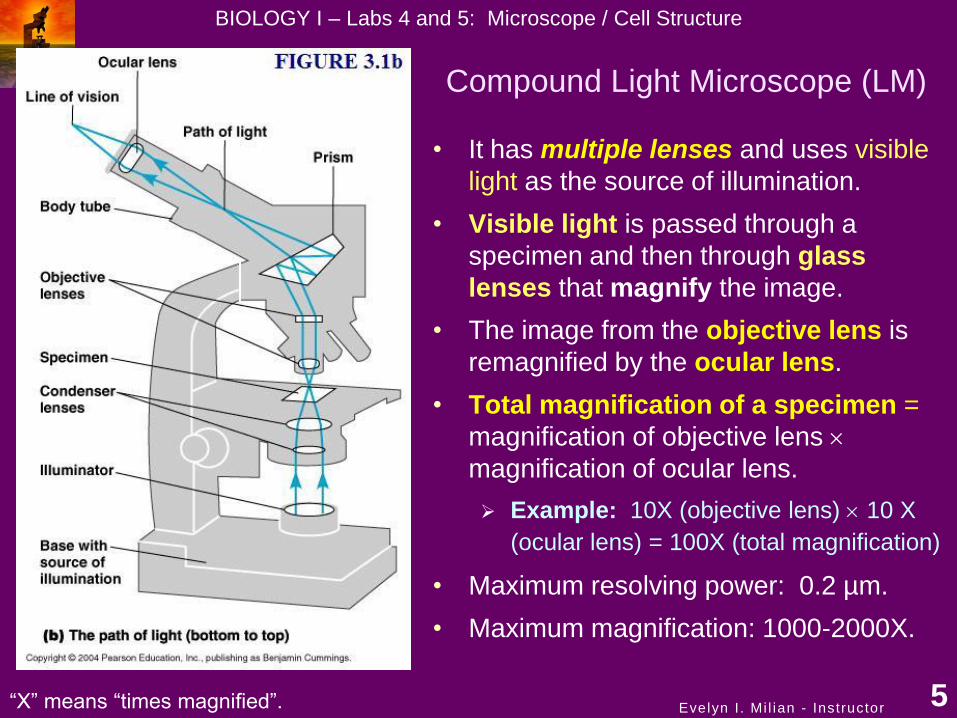
Compound Light Microscope (LM)
• It has multiple lenses and uses visible
light as the source of illumination.
• Visible light is passed through a
specimen and then through glass
lenses that magnify the image.
• The image from the objective lens is
remagnified by the ocular lens.
• Total magnification of a specimen =
magnification of objective lens
magnification of ocular lens.
Example: 10X (objective lens) 10 X
(ocular lens) = 100X (total magnification)
• Maximum resolving power: 0.2 µm.
• Maximum magnification: 1000-2000X.
Evelyn I . Mi l ian - Instructor 5 “X” means “times magnified”.

BIOLOGY I – Labs 4 and 5: Microscope / Cell Structure
COMPOUND LIGHT MICROSCOPE (LM)
• When focusing a specimen with the microscope, the objective lenses must be used from the lowest magnification lens to the highest magnification lens.
• Bring the specimen into sharp focus before trying to observe it with the next higher magnification objective lens.
• The sequential steps for the correct use of the objective lenses are:
4X → 10X → 40X → rotate halfway to the next lens and add one drop of immersion oil directly over the area of the microscopic slide to be observed → 100X. *The immersion oil increases the resolution and is used only with the 100X lens, or “oil immersion objective”.
Evelyn I . Mi l ian - Instructor 6

BIOLOGY I – Labs 4 and 5: Microscope / Cell Structure
Evelyn I . Mi l ian - Instructor 7
COMPOUND LIGHT MICROSCOPE
• Refractive index is the relative
velocity with which light passes
through a substance (the light-
bending ability of the medium).
• When two substances have
different indexes of refraction,
light will bend as it passes from
one material into the other.
• The light may bend in air so much
that it misses the small highest-
magnification lens.
• Immersion oil is used ONLY with
the oil immersion objective lens
(100X, the highest magnification)
to keep light from bending.

BIOLOGY I – Labs 4 and 5: Microscope / Cell Structure
Evelyn I . Mi l ian - Instructor 8

BIOLOGY I – Labs 4 and 5: Microscope / Cell Structure
Using and Focusing the Compound Light Microscope
6. Start with the lowest power objective lens in position, by rotating the nosepiece. The lowest objective is usually 4X (the shortest objective).
7. Move the stage all the way up using the coarse focus knob.
8. Look into the ocular lens in the eyepiece, and use the coarse focus knob to clarify the image.
9. Once you have a nearly clear image, use the fine focus knob to get the clearest image.
10. To increase the magnification, put the 10X objective in position. These parfocal microscopes will automatically be in focus or at least be close to in focus.
11. Use only the fine focus knob after this point to sharpen the image, when using 40X and 100X. * Use immersion oil with the 100X.
Evelyn I . Mi l ian - Instructor 9
1. Switch the microscope on (make sure the light works).
2. Lower the mechanical stage as far as it will go, using the coarse focus knob.
3. Place the microscopic slide on the stage, securing it with a stage clamp. Make sure that the slide is not upside down or backwards.
4. Move the slide with the stage adjustment knobs so that the area of interest is in the center of the light beam.
5. Adjust the amount of light with the diaphragm.

BIOLOGY I – Labs 4 and 5: Microscope / Cell Structure
LIGHT MICROSCOPY:
Dissecting Microscope (Stereo Microscope)
• It differs from the compound microscope in that it has two (rather than one) objective lenses for each magnification.
• Binocular: It has two oculars.
• Objects can be observed in three dimensions.
• The resolution and magnification capabilities are less than in a compound microscope.
• Magnifications usually range from 4X to 50X.
• It is often used for the microscopic dissection of specimens.
Evelyn I . Mi l ian - Instructor 10

BIOLOGY I – Labs 4 and 5: Microscope / Cell Structure
11
MICROSCOPY: Magnification, Resolution, Contrast
• Magnification is the ratio of an object’s image size to its real size; magnification simply makes the objects or specimens appear larger.
• Resolution (resolving power) is the ability of an optical instrument to distinguish between two points that are close together, so that they are seen as separate units; it is the ability of the lenses to distinguish fine detail and structure (or a measure of the clarity of the image).
Example: A microscope with a resolving power of 0.4 nm can distinguish between two points if they are at least 0.4 nm apart.
• Contrast is the effect of a striking difference, as in color or tone, of adjacent parts (for example, in a photograph or image). It is based on the differential absorption of light by parts of the specimen. Contrast accentuates differences in parts of the sample and is also an important parameter in microscopy.

BIOLOGY I – Labs 4 and 5: Microscope / Cell Structure
Preparation of Specimens for Light Microscopy
Evelyn I . Mi l ian - Instructor 12
• Staining increases contrast—a striking difference, as in color or tone, of adjacent parts (for example, in a photograph or image) based on the differential absorption of light by parts of the specimen:
Microscopists improve contrast by coloring specimens with stains (dyes) that bind to cellular structures and absorb light to provide contrast.
Live or unstained cells have little contrast with the surrounding medium. However, researchers do make discoveries about cell behavior looking at live specimens.

BIOLOGY I – Labs 4 and 5: Microscope / Cell Structure
Preparation of Specimens for Light Microscopy
Evelyn I . Mi l ian - Instructor 13
• Wet Mounts
Technique in which a drop of medium containing the organisms or cells is placed on a microscope slide and covered with a coverslip; it can be used to view living microorganisms or to stain specimens to observe them.
1) Take a small amount of the sample to be studied.
2) Place a drop on a
microscope slide.
3) Place one edge of the coverslip on
the drop and carefully pull the drop
along. When the coverslip is in
position, gently let it drop.
4) Sample is ready to observe
under the microscope.

BIOLOGY I – Labs 4 and 5: Microscope / Cell Structure
Place a drop of water on the slide.
Place your sample in the water. In
some cases you may need to spread it.
Gently lower cover slip onto liquid; start with
it upright touching one side of the liquid. If not staining, view
under the scope
If staining, place a drop of stain on
one side of the cover slip and a piece
of absorbent paper on the other side
(to suck the stain through).
View under the microscope .
Preparation of Specimens for Light Microscopy:
Wet Mount with Staining
14 Evelyn I . Mi l ian - Instructor

BIOLOGY I – Labs 4 and 5: Microscope / Cell Structure
Evelyn I . Mi l ian - Instructor 15
Bacteria Microscopic Algae Protozoa Fungi: Molds
Parasitic Microscopic Worms
Fungi: Yeasts

BIOLOGY I – Labs 4 and 5: Microscope / Cell Structure
Evelyn I . Mi l ian - Instructor 16
PROTOZOA: Unpigmented, eukaryotic
microoorganisms; larger than bacteria.
ALGAE: Greenish or golden-
brown eukaryotic microorganisms;
larger than bacteria.
CYANOBACTERIA:
Blue-green, prokaryotic
microorganisms; smaller
than eukaryotic
microorganisms.
Protozoa, Algae, and Cyanobacteria
* To observe the
cyanobacteria, you need
patience!!! Remember
that bacteria are
prokaryotic and are
smaller than eukaryotic
microorganisms.

BIOLOGY I – Labs 4 and 5: Microscope / Cell Structure
COMPARISON OF ANIMAL CELLS AND PLANT CELLS
Evelyn I . Mi l ian - Instructor 17
ELODEA PLANT: Leaf cells in Elodea, an
aquatic plant (weed), showing chloroplasts inside
ONION: Onion cells stained
with iodine (cell walls and
some nuclei are visible)
CHEEK CELLS: Some nuclei are visible inside the cheek cells.
BIOLOGY I – Labs 4 and 5: Microscope / Cell Structure
Similarities and differences to pay attention to:
• Different types of cells have different features, shapes, and sizes.
Those differences usually enable cells to function
differently from one another.
Form follows function!
• In this lab, you will be viewing different types of cells and structures.
• Particularly, you should pay attention to similaries and differences between:
Animal cells, plant cells, protist cells
Evelyn I . Mi l ian - Instructor 18

BIOLOGY I – Labs 4 and 5: Microscope / Cell Structure
Common Mistakes in Microscopy
• Common mistakes that lead to problems:
1. Too little or too much light—check your condenser and diaphragm.
2. Not in the correct focal plane—keep adjusting coarse and fine focus.
3. In a bad field—not all visual fields will contain specimen. Once
focused properly, keep moving the stage side-to-side until you find
your sample.
4. Slide upside down—when preparing your own slides, make sure to
mark the side of the slide that was inoculated with the sample (such as
bacteria or plant cells).
5. Dirty lens will make everything look blurry—Wipe the lens with
alcohol and lens paper. * Do not use regular paper towel or drying
paper for the lens!!!
Evelyn I . Mi l ian - Instructor 19

BIOLOGY I – Labs 4 and 5: Microscope / Cell Structure
References
• Audesirk, Teresa; Audesirk, Gerald & Byers, Bruce E. (2005). Biology: Life on Earth.
Seventh Edition. Pearson Education, Inc.-Prentice Hall. NJ, USA.
• Campbell, Neil A.; Reece, Jane B., et al. (2011). Campbell Biology. Ninth Edition. Pearson
Education, Inc.-Pearson Benjamin Cummings. CA, USA.
• Mader, Sylvia S. (2010). Biology. Tenth Edition. The McGraw-Hill Companies, Inc. NY, USA.
• Presson, Joelle & Jenner, Jan. (2008). Biology, Dimensions of Life. The McGraw-Hill
Companies, Inc. NY, USA.
• Solomon, Eldra; Berg, Linda; Martin, Diana W. (2008). Biology. Eighth Edition. Cengage
Learning. OH, USA.
• Starr, Cecie. (2008). Biology: Concepts and Applications Volume I. Thompson
Brooks/Cole. OH, USA.
• Tortora, Gerard J.; Derrickson, Bryan. (2006). Principles of Anatomy and Physiology.
Eleventh Edition. John Wiley & Sons, Inc. NJ, USA. www.wiley.com/college/apcentral.
• Tortora, Gerard J.; Funke, Berdell R.; Case, Christine L. (2010). Microbiology An
Introduction. Tenth Edition. Pearson Education, Inc.-Benjamin Cummings; CA, USA.
www.microbiologyplace.com.
• Trefil, James & Hazen, Robert M. (2011). The Sciences An Integrated Approach. Sixth
Edition. John Wiley & Sons, Inc. NJ, USA.
Evelyn I . Mi l ian - Instructor 20