kti63224 12 and 20 ton bottle jack 12 and 20 ton ... - … · and common sense. it is essential to...
TRANSCRIPT

KTI63213/KTI63214/KTI63221/KTI63224 07/10/14
SPECIFICATIONS
KTI63213 KTI63214 KTI63221 KTI63224 Capacity 12 Ton 12 Ton Short 20 Ton 20 Ton Short
Closed Height 8.46" 7.48" 9.6" 7.48"
Raised Height 15.75" 13.78" 16.65" 13.39"
Additional Adj. Screw 2.36" 2.36" 2.36" 2.36"
Weight 15.84 lbs. 14.3 lbs. 24.2 lbs. 19.85 lbs.
12 AND 20 TON BOTTLE JACK12 AND 20 TON SHORT BOTTLE JACK
OWNERS MANUAL
KTI63213 \ KTI63214KTI63221 \ KTI63224
KTI63213shown
KTI63213/KTI63214/KTI63221/KTI63224 07/10/142
This is the safety alert symbol. It is used to alert you to potential personal injury hazards. Obey all safety messages that follow this symbol to avoid possible injury or death.
IMPORTANT: READ THESE INSTRUCTIONS BEFORE OPERATING
BEFORE USING THIS DEVICE, READ THIS MANUAL COMPLETELY AND THOROUGHLY, UNDERSTAND ITS OPERATING PROCEDURES, SAFETY WARNINGS AND MAINTENANCE REQUIREMENTS.
It is the responsibility of the owner to make sure all personnel read this manual prior to using the device. It is also the responsibility of the device owner to keep this manual intact and in a convenient location for all to see and read. If the manual or product labels are lost or not legible, contact an authorized K-Tool International repair center for replacements. If the operator is not fluent in English, the product and safety instructions shall be read to and discussed with the operator in the operator's native language by the purchaser/owner or his designee, making sure that the operator comprehends its contents.
THE NATURE OF HAZARDOUS SITUATIONS
The use of bottle jacks is subject to certain hazards that cannot be prevented by mechanical means, but only by the exercise of intelligence, care, and common sense. It is essential to have personnel involved in the use and operation of the jack who are careful, competent, trained, and qualified in the safe operation of the jack and its proper use when servicing motor vehicles and their components. Examples of hazards are dropping, tipping or slipping of loads caused primarily by improperly securing loads, overloading, off-centered loads, use on other than hard level surfaces, and using equipment for a purpose for which it was not intended.
METHODS TO AVOID HAZARDOUS SITUATIONS
• Read,study,understandandfollowallinstructionsbeforeoperatingthisdevice.• Inspectthejackbeforeeachuse.Donotusejackifdamaged,altered,modified,inpoorcondition,leakinghydraulicfluid,orunstableduetoloose or missing hardware or parts. Make corrections before using.• Liftonlyonareasofthevehicleasspecifiedbythevehiclemanufacturer.• UserandbystandersmustweareyeprotectionthatmeetsANSIZ87.1andOSHAstandards.• Donotusejackbeyonditsratedcapacity.• Nopersonshouldbeunderthevehiclewhenjackisinuse.• This is a lifting device only. Immediately after lifting, support the vehicle with jack stands capable of sustaining the load before working on the vehicle.• Noalterationsshallbemadetothisproduct.• Useonlyonahardlevelsurface.• Donotuseanysaddleadaptersorsaddleextendersbetweenthestockliftingsaddleandtheload.• Centerloadonsaddle.Besuresetupisstablebeforeworkingonvehicle.• Alwayslowerthejackslowlyandcarefully.• ThisproductcontainschemicalsknowntotheStateofCaliforniatocausecancerandbirthdefectsorotherreproductiveharm. Wash hands thoroughly after handling.• Failuretoheedthesewarningsmayresultinseriousorfatalpersonalinjury,propertydamageorboth.
CONSEQUENCES OF NOT AVOIDING HAZARDOUS SITUATIONS
Failure to read this manual completely and thoroughly, failure to understand its OPERATING INSTRUCTIONS, SAFETY WARNINGS, MAINTENANCEINSTRUCTIONSandcomplywiththem,andfailuretocomplywiththeMETHODSTOAVOIDHAZARDOUSSITUATIONScould cause accidents resulting in serious or fatal personal injury and/or property damage.
WARNING: Indicates a hazardous situation which, if not avoided, could result in death or serious injury.
WARNING
WARNING
WARNING
WARNING
WARNING

KTI63213/KTI63214/KTI63221/KTI63224 07/10/143
OWNER'S MANUAL
SETUP AND OPERATING INSTRUCTIONS
This is the safety alert symbol used for the SETUP and OPERATING INSTRUCTIONS section of this manual to alert you to potential personal injury hazards. Obey all instructions to avoid possible injury or death.
PLEASE REFER TO THE EXPLODED VIEW DRAWING IN THIS MANUAL IN ORDER TO IDENTIFY PARTS.
1. Assemble the pump handle (#26) sections together to make one complete handle. One end of the handle has a cut out that will fit over the end of the release valve (#28) in the base (#30) of the jack. This connection enables the user to turn the release valve (#28) in a clockwise direction until tight in preparation for pumping the jack and raising the load. Slowly turning the release valve (#28) in a counterclockwise direction will lower the load. It is not necessary to open the release valve (#28) more than two full rotations.2. The opposite end of the pump handle (#26) must be inserted in the handle receiver (#22) in preparation for pumping the jack.3. The ram (#8) is that part of the jack which extends when the jack is pumped. The end of the ram includes an extension screw (#7) that makes contact with the load to be lifted. Extension screw (#7) height can be extended by turning it in a counter clockwise direction. Extending the height is sometimes necessary when the full stroke of the ram (#8) is not adequate to lift a load to its desired work height.4. Sometimes air gets trapped in the hydraulic system during shipment. An air bound hydraulic system feels spongy when pumped and may not allow the jack to pump full incremental strokes.
TO PURGE AIR FROM THE HYDRAULIC SYSTEM a. Open the release valve (#28) by turning the handle (#26) in a counterclockwise direction two full turns from its closed position. b. Pump the handle (#26) ten full strokes. c. Close the release valve (#28) by turning the handle in a clockwise direction until tight. d. Pump the jack until the ram (#8) is extended to maximum height. e. If the condition seems better but is still detectable, repeat steps "a" through "d" until all the air is purged from the system.
5. Do not lift more than one wheel of a vehicle at a time. Activate the hazard warning flasher, turn off ignition, move automatic selector to park position or reverse gear if it is a manual transmission and set parking brake. The wheel diagonally opposite from the wheel being lifted shall be chocked in both directions. Consult the vehicle manufacturer for the tire changing procedure and lift points.6. Position the jack at the appropriate lift point. Estimate the required ram travel to raise the load to the desired height. If the desired height exceeds the entire ram travel, unscrew the extension screw to make up the difference.7. Pump the jack up until the extension screw (#7) comes close to the lift point. Make sure the lift point is flat, parallel to the ground and free from grease, any kind of lubricant, or debris. Continue pumping the jack to lift the load to the desired height. During lifting, inspect the position of the jack in relation to the ground and the extension screw (#7) in relation to the load to prevent any unstable conditions from developing. If conditions look like they are becoming unstable, slowly lower the load and make appropriate setup corrections after the load is fully lowered.8. When the load is lifted to its desired height, immediately place jack stands in their designated locations and adjust the stands' support columns up as close to the designated support points as possible. Although jack stands are individually rated, they are to be used in a matched pair to support the load. Slowly and carefully open the release valve (#28) of the jack in order to gently lower the load onto the jack stands. Make sure the load is safely supported by the jack stands' saddles and not the locating lugs of the saddles. Inspect the relationship of the jack stands with the ground and the jack stand columns and saddles with the load to prevent any unstable conditions. If conditions look unstable, close the jack's release valve (#28) and pump the jack to raise the load off the jack stands. Make the appropriate setup changes and slowly and carefully lower the load onto the jack stand saddles.9. After the work is done, close the release valve (#28) and pump the jack high enough to remove the load from the jack stand saddles. Be sure the load is stable. If it is not, lower the load back onto the jack stands. Make appropriate setup corrections and repeat the step again. Remove the jack stands from under the load, being very careful not to move the load.10. Open the jack's release valve (#28) very slowly and carefully to lower the load to the ground.
PREVENTATIVE MAINTENANCE
This is the safety alert symbol used for the PREVENTATIVE MAINTENANCE section of this manual to alert you to potential personal injury hazards. Obey all instructions to avoid possible injury or death. IMPORTANT: Any jack found to be defective as a result of worn parts due to lack of lubrication, or air/hydraulic system contaminated with water, rust and/or foreign materials from the air supply or other outside source is not eligible for warranty consideration.
1. Always store the jack in a well protected area where it will not be exposed to inclement weather, corrosive vapors, abrasive dust, or any other harmful elements. The jack must be cleaned of water, snow, sand or grit before using.2. The jack must be lubricated periodically in order to prevent premature wearing of parts. A general purpose grease must be applied to the threads on the extension screw. Do not lubricate any portion of the lift saddle and make sure the saddle is free from grease, any kind of lubricant, or debris before using the jack.3. It should not be necessary to refill or top off the reservoir with hydraulic fluid unless there is an external leak. An external leak requires immediate repair which must be performed in a dirt-free environment by qualified hydraulic repair personnel who are familiar with this equipment. Authorized Service Centers are recommended. IMPORTANT: In order to prevent seal damage and jack failure, never use alcohol, hydraulic brake fluid, or transmission oil in the jack. Use Hydraulic Jack Oil.4. Every jack owner is responsible for keeping the jack label clean and readable. Use a mild soap solution to wash external surfaces of the jack but not any moving hydraulic components.
NOTE: Disassembly of this tool by other than an authorized service center will void the war ran ty on this tool.

KTI63213/KTI63214/KTI63221/KTI63224 07/10/144
K-Tool International warrants that all jacks and service-related equipment will be free from defects in material and workmanship for a period of 2 years following the original date of purchase. This warranty is extended to the original retail purchaser only. If any jack or service-related item proves to be defective during this period, it will be replaced or repaired, at K-Tool International’s option, without charge. This warranty does not apply to damage from accident, overload, misuse or abuse, nor does it apply to any equipment which has been altered or used with special attachments other than those recommended. This warranty does not cover repairs made by anyone who is not a K-Tool International Professional Lifting Equipment Authorized Repair Center.
All HD & XD jacks or service-related equipment will be replaced or repaired at K-Tool International’s option during the 2 year warranty period.
During the 2 year warranty period, all alleged defective products must be shipped, freight prepaid, along with proof of date-of-purchase, to your nearest K-Tool International Professional Lifting Equipment Authorized Warranty Center. Be certain to include your name, address and phone number along with proof-of-purchase information, and a brief description of the alleged defect. The product will be returned to the customer, freight prepaid.
ManyallegeddefectivesmaysimplybehandledbycallingyournearestServiceCenter forparts.Seepages15-17fora listingofauthorized warranty service centers.
In no event shall K-Tool International be liable for incidental or consequential damages. The liability on any claim for loss or damage arising out of the sale, resale or use of a jack or related service equipment, shall in no event exceed the purchase price. SOME STATES DO NOT ALLOW THE EXCLUSION OR LIMITATION OF INCIDENTAL OR CONSEQUENTIAL DAMAGES, SO THE ABOVE LIMITATION MAY NOT APPLY TO YOU.
THIS WARRANTY IS THE SOLE AND EXCLUSIVE WARRANTY PROVIDED IN CONNECTION WITH THE SALE OF K-TOOL INTERNATIONAL PROFESSIONAL LIFTING EQUIPMENT. ALL OTHER WARRANTIES, INCLUDING ANY IMPLIED WARRANTIES OF MERCHANTABILITY OR FITNESS FOR A PARTICULAR PURPOSE, ARE EXCLUDED.
THIS WARRANTY GIVES YOU SPECIFIC LEGAL RIGHTS AND YOU MAY ALSO HAVE OTHER RIGHTS WHICH VARY FROM STATE TO STATE.
WARRANTY HANDLING PROCEDURES AND GUIDELINES FOR HD AND XD LIFTING EQUIPMENT

KTI63213/KTI63214/KTI63221/KTI63224 07/10/145
1 Cylinder Nut 1 * 2 O-Ring 1 * 3 Gasket 1 4 Reservoir 1 * 5 KTP6321305 Oil Fill Plug 1 * 6 Gasket 1 7 Extension Screw 1 8 Ram 1 9 Ram Bearing 1 * 10 Back up Ring 1 * 11 O-Ring 1 12 Cylinder 1 * 13 Gasket 1 * 14 Steel Ball 1 * 15 Filter 1 16 Pump plunger 1 * 17 Back Up Ring 1 * 18 O-Ring 1 20 Pump Body 1 * 21 Washer 1
22 Handle Receiver 1 23 Linkage 1 24 Cotter Pin 3 25 Rivet 3 26 KTP6321326 6 & 12 Ton 2 Pc. Handle 1 KTP6322126 20 Ton 2 Pc. Handle 27 Plug 2 28 Release Valve 1 * 29 Seal 1 30 Base 1 * 31 Steel Ball 1 * 32 Ball Locator 1 * 33 Overload Spring 1 34 Adjusting Screw 1 * 35 O-Ring 1 36 Cover 1 not shown KTP63213LK 12 Ton Label Kit 1 not shown KTP63214LK 12 Ton Short Label Kit 1 not shown KTP63221LK 20 Ton Label Kit 1 not shown KTP63224LK 20 Ton Short Label Kit 1
Index No. Part No. Description Qty. Index No. Part No. Description Qty.
14
13
12
11
10
4
6
5
34 33 32 3136 35
2928 14 30
3
2
1
7
9
8
26
27 2725
24
15 14
21
20
2423
18
17
16
24
25
25
22
* Available in KTP63213SK - 12 Ton Bottle Jack Seal Kit. KTP63221SK - 20 Ton Bottle Jack Seal Kit. Only index #'s identified by Part# are available separately.
12 AND 20 TON BOTTLE JACK12 AND 20 TON SHORT BOTTLE JACK
KTI63213 \ KTI63214KTI63221 \ KTI63224
EXPLODED DRAWING / PART LIST

KTI63213/KTI63214/KTI63221/KTI63224 07/10/146
ESPECIFICACIONES
KTI63213 KTI63214 KTI63221 KTI63224 Capacidad 12 Toneladas 12 Toneladas Bajo 20 Toneladas 20 Toneladas Bajo
Altura Baja 8.46" 7.48" 9.6" 7.48"
Máxima Altura 15.75" 13.78" 16.65" 13.39"
Tornillo De Ajuste Adicional 2.36" 2.36" 2.36" 2.36"
Peso de embarque 15.84 libras 14.3 libras 24.2 libras 19.85 libras
12 AND 20 TON GATO DE BOTELLA12 AND 20 TON GATO DE BOTELLA BAJO
MANUAL DE OPERATIÓN
KTI63213 \ KTI63214KTI63221 \ KTI63224
KTI63213ilustrada
KTI63213/KTI63214/KTI63221/KTI63224 07/10/147
Este símbolo indica una alerta de seguridad y se usa paraadvertir sobre peligro de accidentes personales. Observetodala información de seguridad que sigue a este símbolopara evitar la posibilidad de que ocurran lesiones o muerte.
IMPORTANTE: LEA ESTAS INSTRUCCIONES ANTES DE USAR EL DISPOSITIVO
ANTES DE USAR ESTAS BASES DE SOPORTE, LEA ESTE MANUAL COMPLETAMENTE Y DE FORMA DETENIDA,COMPRENDA SUS PROCEDIMIENTOS DE OPERACIÓN , LAS ADVERTENCIAS DE SEGURIDAD Y LOS REQUERIMIENTOSDE MANTENIMIENTO.
El propietario es responsable de asegurarse de que todo el personal lea este manual antes de usar el dispositivo. Asimismo, esresponsabilidad del propietario mantener este manual en buenas condiciones en una ubicación conveniente para su consulta. Silas etiquetas del manual o producto son ilegibles o no están en su lugar, deberá ponerse en contacto con K-Tool Internationalpara obtenerlas gratis. El comprador/propietario o una persona designada deberá leer y comentar el producto y las advertencias deseguridad en la lengua materna del operario que no hable inglés fluido, a fin de asegurarse de que comprende el contenido.
NATURALEZA DE LAS SITUACIONES DE RIESGO
El uso del gato de botella está sujeto of a ciertos riesgos los que no pueden ser prevenidos por medidas mecánicas sino sólo conel ejercicio de inteligencia, cuidado y sentido común. Es imprescindible contar con personal cuidadoso, competente, capacitado ocalificado involucrado en el uso adecuado y operación segura del gato al momento de brindar mantenimiento a los vehículos de motory sus componentes. Los ejemplos de los peligros incluyen las caídas, inclinaciones y deslizamientos de las cargas ocasionados principalmentepor la sujeción inadecuada de la carga, las sobrecargas, las cargas no centradas, su uso en superficies que no son durasni aniveladas y el uso del equipo para propósitos para el cual no fue destinado.
FORMAS DE EVITAR LAS SITUACIONES DE RIESGO
• Lea,estudie,comprendaysigatodaslasinstruccionesantesdeoperarestedispositivo. • Inspeccioneelgatoantesdecadauso.Nouseelgatosiésteestádañado,modificado,cambiado,siestáenpobrescondiciones,
si hay fugas de líquido hidráulico, o si está inestable debido a ferretería o partes flojas o faltantes. Asegúrese de realizar correcciones antes del uso.
• Utiliceeldispositivodeelevaciónúnicamenteenlasáreasdelvehículoespecificadasporsufabricante. • UseprotecciónparalosojosquecumplaconlasnormasANSIZ87.1yOSHA(usuariosyespectadores). • Nouseelgatoparaelevarpesossuperioresasucapacidad. • Ningunapersonadeberáestardebajodelvehículocuandoelgatoestáenuso • Estedispositivosedebeutilizarúnicamenteparalevantarcargas.Nobienhayaelevadolacarga,sujeteelvehículo contorresquetenganlacapacidadparasostenerloantesdecomenzaratrabajar. • Usesólosobreunasuperficieduraynivelada. • Nosedeberánrealizarmodificacionesaestedispositivo. • Centrelacargaenlasilla.Nouselosextremosdelasillaparasoportarlacarga. • Noutiliceningúntipodeadaptadorniextensiónentreelasientodelgatoylacarga. • Bajeelgatosiempredespacioyconcuidado. • EsteproductopuedecontenersustanciasquímicasconsideradasporelEstadodeCaliforniacomocausantesdecáncer,de malformacionescongénitasuotrosdañosenelsistemareproductivo. Lávese bien las manos después de manipular el producto. • Hacercasoomisoaestasadvertenciaspuedeocasionarlesionespersonalespotencialesy/odañosalapropiedad.
CONSECUENCIAS DE NO PREVENIR LAS SITUACIONES DE RIESGO
Hacer caso omiso, al no leer este manual detenidamente y de forma completa, y no comprender sus INSTRUCCIONES DEOPEARACIÓN, ADVERTENCIAS DE SEGURIDAD, INSTRUCCIONES DE MANTENIMIENTO y cumplir con ellas, y desatender losMÉTODOS PARA EVITAR LAS SITUACIONES PELIGROSAS podría ocasionar accidentes, resultando en lesiones personales seriasofatalesy/odañosalapropiedad.
ADVERTENCIA: Indica una situaciónpeligrosa que si no se evita, puedeprovocar la muerte o lesiones graves.
ADVERTENCIA
ADVERTENCIA
ADVERTENCIA
ADVERTENCIA
ADVERTENCIA

KTI63213/KTI63214/KTI63221/KTI63224 07/10/148
MANUAL DE OPERATIÓN
INSTRUCCIONES DE ENSAMBLADO
Este símbolo es el símbolo de advertencia de seguridad usado para la sección de ENSAMBLAJE e INSTRUCCIONES DE OPERACIÓN de este manual para advertirle de los peligros potenciales de lesión personal. Obedezca todas las instrucciones para así evitar lesiones potenciales y aún la muerte.
CONSULTE POR FAVOR EL DIBUJO DE VISTA EN DETALLE EN ESTE MANUAL PARA IDENTIFICAR LAS PARTES.
1. Ensamble juntas las secciones del mango de la bomba (#26) para hacer un sólo mango completo. Un extremo del mango cuenta con un recorte que cabrá sobre el pasador cruzado en la válvula de liberación (#28) en la base (#30) del gato. Esta conexión le permite al usuario girar la válvula de liberación (#28) en el sentido de las agujas del reloj hasta que ésta esté apretada como preparativo para el bombeo del gato y el levantamiento de la carga. Al girar la válvula de liberación (#28) lentamente en el contrasentido de las agujas del reloj, la carga se bajará. No es necesario abrir la válvula de liberación (#28) más de dos rotaciones completas.2. El extremo opuesto del mango (#26) de la bomba debe estar insertado en el acoplamiento receptor del pistón (#22) de la bomba como preparación del bombeo del gato.3. El pistón (#8) es aquella parte del gato que se extiende al momento de bombear el gato. Existe una silla (#7) redonda al final del pistón la cual es la pieza que hace contacto con la carga a levantarse. La silla (#7) de hecho forma parte de un tornillo de extensión roscado el cual se encaja en la parte interior del pistón. La altura de la silla puede extenderse al girarla en el contrasentido de las agujas del reloj. Es necesario a veces extender la altura de la silla cuando el recorrido pleno del pistón (#8) no es lo sufici ente para levantar la carga hasta la altura deseada de trabajo.4. A veces se atrapa aire en el sistema hidráulico durante el envío. Un sistema hidráulico con aire atrapado se siente esponjoso y puede no permitir lograr bombear los recorridos completos incrementales del gato.
PARA PURGAR EL AIRE DEL SISTEMA HYDRÁULICO a. Abra la válvula de liberación (#28) al girar el mango en (#26) el contrasentido de las agujas del reloj dos vueltas completas desde su posición cerrada. b. Bombee el mango (#26) diez recorridos completos. c. Cierre la válvula de liberación (#28) al girar el mango en el sentido de las agujas del reloj hasta que esté apretada. d. Bombee el gato hasta que el pistón (#8) esté extendido hasta su máxima altura. e. Si la condición aparenta ser mejorada pero aún sigue detectable, repita los pasos "A" al "D" hasta que se haya purgado todo el aire del sistema.
5. No levante más de una rueda del vehículo a la vez. Active la luz intermitente de advertencia de peligros, apague la ignición, cambie el selector automático hasta la posición de estacionado o reversa, si sea una transmisión manual, y ponga el freno de estacionamiento. La rueda diagonalmente opuesta a la rueda a levantarse debe estar calzada en los dos sentidos. Consulte el fabricante del vehículo por el procedimiento de cambio de las llantas y por los puntos de elevación.6. Coloque el gato en el punto adecuado de levantamiento. Estime el recorrido requerido del pistón para levantar la carga hasta la altura deseada. Si la altura deseada exceda el recorrido completo del pistón, desatornille el tornillo de extensión para completar la diferencia.7. Bombee el gato hasta que la silla (#7) acerque el punto de elevación. Asegúrese que el punto de elevación esté plano, paralelo al piso y libre de grasa, cualquier lubricante y escombros. Siga bombeando el gato para levantar la carga hasta la altura deseada. Durante el levantamiento, inspeccione la posición del gato con relación al piso y la silla (#7) con relación a la carga para así prevenir el desarrollo de cualquier condición inestable. Si las condiciones aparentan que se están volviendo inestables, baje la carga y realice las correcciones de ensamblaje después de que se haya bajado la carga completamente.8. Cuando la carga se levanta hasta la altura deseada, inmediatamente coloque las bases del gato en sus ubicaciones designadas y ajuste las columnas de soporte de las bases, lo más cercano posible a los puntos de soporte designados. Aunque las bases del gato estén clasificadas individualmente, éstas deben usarse en pares igualados para soportar la carga. Abra la válvula de liberación (#28) del gato lentamente y cuidadosamente con el fin de bajar la carga suavemente sobre las bases del gato. Asegúrese que la carga esté seguramente soportada por las sillas de las bases del gato y no por los birlos de ubicación de las sillas. Inspeccione la relación de las bases del gato respecto el piso y las columnas de las bases y las sillas respecto la carga para así prevenir cualquier condición inestable. Si las condiciones aparentan ser inestables, cierre la válvula de liberación (#28) y bombee el gato para levantar la carga de las bases del gato. Realice los cambios adecuados de montaje y baje la carga lentamente y cuidadosamente sobre las sillas de la base del gato.9. En cuanto se termine el trabajo, cierre la válvula de liberación (#28) y bombee el gato lo suficientemente alto para extraer la carga de las sillas de la base del gato. Asegúrese que la silla esté estable. Si no la está, baje la carga nuevamente sobre las bases del gato. Realice las correcciones adecuadas de montaje y repita los pasos de nuevo. Extraiga las base del gato de debajo de la carga, siendo muy cuidadoso de no mover la carga. 10. Abra la válvula de liberación (#28) muy lentamente y cuidadosamente para bajar la carga hasta el piso.
MANTENIMIENTO DE SEGURIDAD Este símbolo indica una alerta de seguridad y se utiliza en la parte de este manual que versa sobre el MANTENIMIENTO DE SEGURIDAD, con el fin de advertir sobre los peligros de accidentes personales. Observe todas las instrucciones para evitar lesiones o peligros de muerte. IMPORTANTE: A fin de prevenir daños en las juntas herméticas y fallas en el dispositivo, no use alcohol, líquido de frenos hidráulicos ni aceite de transmisión en el gato. Cualquier gato que se encuentra defectuoso como resultado de contaminantes extraños en el sistema hidráulico no es elegible para consideraciones de garantía.1. Siempre guarde el gato en un área protegida, en donde no quede expuesto a las condiciones climáticas, gases corrosivos, sustancias abrasivas otros materiales perjudiciales. Antes de usar, compruebe que el gato no contenga restos de agua, nieve, arena o arcilla.2. El gato se debe lubricar en forma periódica a fin de prevenir el desgaste prematuro de sus partes. Se debe aplicar grasa de uso general en todas las articulaciones, las ruedas pivotantes y del eje delantero, el brazo elevador, los pernos pivotantes de la base de la palanca, el sistema de seguridad y las demás superficies de apoyo.3. No deberá ser necesario rellenar o llenar al tope el depósito el que contiene el líquido hidráulico, al menos que haya una fuga externa. Una fuga externa requiere reparaciones inmediatas las cuales deben realizarse en un ambiente libre de suciedad por parte de personal calificado en las reparaciones hidráulicas y quienes sean familiarizados con este equipo. Se recomienda usar los centros de servicio autorizados. IMPORTANTE: Con el fin de prevenir daños al sello y fallas del gato, nunca use alcohol, líquido de freno hidráulico ni aceite para transmisiones con el gato. Use aceite hidráulico.4. Cada propietario del gato es responsable por mantener limpias y legibles las etiquetas del gato. Use una solución de jabón suave para lavar las superficies externas del gato pero sin mover ninguno de los componentes hidráulicos móviles externos.
NOTA: Desensamblado de esta herramienta que se haga por otro, que no sea un centro autorizado de servicio INVALIDARÁ la garatía para esta herramienta.
KTI63213/KTI63214/KTI63221/KTI63224 07/10/149
K-Tool International garantiza que todos los gatos y equipo de servicio relacionado serán libres de defectos en cuanto al material y la manodeobrase refiereporun2añosposterioresa la fechaoriginaldecompra.Estagarantíase leextenderásóloalcompradordetallista original. Si cualquier gato o artículo relacionado con el servicio demuestra ser defectuoso durante dicho periodo, el mismo serárepuestooreparado,alaopcióndeK-ToolInternational,sincargos.Estagarantíanoaplicaadañosprovenientesdeaccidentes,sobrecarga, mal uso o uso erróneo, ni aplica a ningún equipo el cual haya sido modificado ni usado con complementos especiales excepto los que sean recomendados. Esta garantía no cubrirá las reparaciones hechas por cualquier entidad que no sea algún Centro de Reparaciones de Equipo de Levantamiento Profesional Autorizado de K-Tool International.
Todos los HD y XD gatos o equipo relacionado con el mantenimiento serán repuestos o reparadores a la discreción de K-Tool Internationalduranteelperiododegarantíade2años.
Duranteelperiododegarantíade2años,todoslosproductosdefectuosospresuntosdebenserenviados,conelfletepre-pagado,junto con la comprobación de la fecha de compra, a su Centro de Garantías Autorizado de Equipo de Levantamiento Profesional Autorizado de K-Tool International más cercano. Asegúrese de incluir su nombre, dirección, número telefónico, junto con la información de comprobación de compra, y una breve descripción del defecto presunto. El producto le será devuelto al consumidor, con el flete pre-pagado.
Muchos de los defectuosos presuntos pueden tratarse simplemente al llamar a Centro de Servicio de partes más cercano. Consulte laspáginas15a17porunalistadecentrosdeserviciodegarantíaautorizados.
EnningúncasoseráresponsableK-Tool Internationalporningúndañoincidentalniconsecuencial.Laresponsabilidaddecualquierreclamoporlapérdidaodañosocasionadosporlaventa,re-ventaousodeungatooequipodeserviciorelacionado,nodeberádeninguna forma exceder el precio de compra. ALGUNOS ESTADOS NO PERMITEN LA EXCLUSIÓN NI LIMITACIÓN DE LOS DAÑOS INCIDENTALES NI CONSECUENCIALES, ASÍ QUE LA LIMITACIÓN ANTERIOR PUEDE NO APLICAR A USTED.
ESTA GARANTÍA ES LA ÚNICA Y EXCLUSIVA GARANTÍA BRINDADA EN CONEXIÓN CON LA VENTA DEL EQUIPO DE LEVANTAMIENTO PROFESIONAL DE K-TOOL INTERNATiONAL. TODAS LAS DEMÁS GARANTÍAS, PARA INCLUIR CUALQUIER GARANTÍA IMPLICADA O MERCANTIBILIDAD O APTITUD PARA CUALQUIER DESTINO PARTICULAR, SON EXCLUÍDAS.
ESTA GARANTÍA LE BRINDA UNOS DERECHOS LEGALES ESPECÍFICOS Y USTED PODRÁ TAMBIÉN CONTAR CON OTROS DERECHOS LOS CUALES VARÍAN DE ESTADO A ESTADO.
EQUIPMENT PROCEDIMIENTOS Y DIRECTRICES DE MANEJO DE GARANTÍA PARA EQUIPO DE LEVANTAMIENTO

KTI63213/KTI63214/KTI63221/KTI63224 07/10/1410
SPÉCIFICATIONS
KTI63213 KTI63214 KTI63221 KTI63224 Capacité 12 Tonnes 12 Tonnes Court 20 Tonnes 20 Tonnes Court
Hauteur Basse 8,46 po 7,48 po 9,6 po 7,48 po
Hauteur Maximum 15,75 po 13,78 po 16,65 po 13,39 po
Vis De Réglage Supplémentaire 2,36 po 2,36 po 2,36 po 2,36 po
Poids D’Embarquement 15,84 lbs. 14,3 lbs. 24,2 lbs. 19,85 lbs.
12 AND 20 TON CRIC-BOUTEILLE12 AND 20 TON CRIC-BOUTEILLE COURT
MANUEL D'OPERATIÓN
KTI63213 \ KTI63214KTI63221 \ KTI63224
KTI63213montré

KTI63213/KTI63214/KTI63221/KTI63224 07/10/1411
Ce symbole indique un danger potentiel. Il est utilisé pouravertir l'utilisateur des risques potentiels de blessurescorporelles. Prière de respecter toutes les consignes desécurité qui suivent ce symbole afin d'éviter les blessuresou la mort potentielles.
AVERTISSEMENT : Ce symbole indique une situation dangereuse qui pourrait causer la mort ou des blessures graves si elle n'est pas évitée.
IMPORTANT : LIRE CES CONSIGNES AVANT L'UTILISATION.
AVANTD'UTILISERCESSUPPORTS,LISEZCEMANUELENENTIER,COMPRENEZSESCONSIGNESD'UTILISATIONLESAVERTISSEMENTSDESÉCURITÉETLESSPÉCIFICATIONSD'ENTRETIEN.
Il est de la responsabilité du propriétaire de s'assurer que tout le personnel lit ce manuel avant d'utiliser ces supports. Il estd'également la responsabilité du propriétaire du support de garder ce manuel en bon état et dans un endroit commode afinque tous aient un accès facile au manuel. Si le manuel ou les étiquettes du produit se perdent ou deviennent illisibles, veuillezcontacter K-Tool International pour les faire remplacer. Si l’utilisateur ne parle pas couramment le français, les consignes de sécuritéet le mode d'emploi de l'outil devront lui être lues à haute voix et être discutées avec l'utilisateur, dans sa langue maternelle, par lepropriétaire/acheteur ou une personne désignée, afin d’assurer que l’utilisateur en comprenne les bien le contenu.
LE TYPE DE SITUATIONS DANGEREUSES
L'utilisation de dispositifs de levage portatifs pour automobiles expose l'utilisateur à certains dangers qui ne peuvent pas être évitéspar des moyens mécaniques, mais seulement en faisant preuve d'intelligence, d'attention et de bon sens. Il est donc essentiel que lespropriétaires et les employés qui utiliseront ce dispositif soient prudents, compétents, qualifiés et formés à l’utilisation sécuritaire del’équipement. Des exemples de dangers comprennent le renversement, le glissement ou la chute soudaine de la charge. Ces dangerssont principalement imputables à une charge mal répartie, une utilisation sur une surface meuble ou inclinée, ou une utilisation à desfins autres que celles pour lesquelles le dispositif a été conçu.
MÉTHODES POUR ÉVITER LES SITUATIONS DANGEREUSES
• S’assurer de bien comprendre et de suivre les directives avant d’utiliser cet appareil. • Inspecter le cric avant chaque utilisation. Ne pas utiliser le cric s’il est endommagé, altéré, modifié ou en mauvais état, si le liquidehydrauliquefuitousilecricestinstableenraisondepiècesmanquantesoulâches.Apporterlescorrections(oules réparations)nécessairesavantl’utilisation. • Soulevezetsoutenezseulementlesendroitsduvéhiculecommespécifiéparlefabricantdevéhicules. • PortezuneprotectionoculairequirépondauxnormesANSIZ87.1etdel'OSHA(utilisateuretpersonnesàproximité). • N'utilisezpaslevérindelevageau-delàdelacapacitéévaluée. • Aucunepersonnenedoitêtresouslevéhiculelorsquelecricestenutilisation. • Ilyaunseuldispositifdelevage.Immédiatementaprèslelevage,maintenirlevéhiculeaveclesplateformesducric quisontcapablesdesupporterlachargeavantdetravaillersurlevéhicule. • Utiliserseulementsurunesurfacedureetdeniveau. • Aucunealtérationnedoitêtrefaiteàcedispositif • Centrerlachargesurlaselle.Soyezsûrquel'installationeststableavantlelevage. • Nepasutiliserd’adaptateursdeselleoudesextenseursdeselleentrelaselledelevageetlacharge. • Abaisseztoujourslevérindelevagelentementetprudemment. • Ceproduitpeutcontenirdesproduitschimiquesreconnusparl'étatdelaCaliforniecommecausantlecancer,desanomaliescongé
nitales ou d'autres effets nuisibles sur la reproduction. Se laver minutieusement les mains après avoir utilisé le produit. • Lemanquementd'observercesinscriptionspeutavoircommeconséquencedesblessuressérieusesoumortelleset/oudes
dégâts matériels.
CONSÉQUENCES DE NE PAS ÉVITER DES SITUATIONS DANGEREUSES
Le manquement de lire ce manuel complètement et avec attention et l’incompréhension des CONSIGNES D'UTILISATION,AVERTISSEMENTS DE SÉCURITÉ, INSTRUCTIONS D'ENTRETIEN et de se conformer à elles, et en négligeant les MÉTHODESPOUR ÉVITER DES SITUATIONS DANGEREUSES peut causer des accidents ayant comme conséquence des blessures sérieusesou mortelles et/ou des dégâts matériels.
AVERTISSEMENT
AVERTISSEMENT
AVERTISSEMENT
AVERTISSEMENT
AVERTISSEMENT
KTI63213/KTI63214/KTI63221/KTI63224 07/10/1412
OWNER'S MANUAL
CONSÉQUENCES EN CAS DE SITUATIONS DANGEREUSES
Le manquement de lire ce manuel complètement et avec attention et l’incompréhension des CONSIGNES D'UTILISATION, AVERTISSEMENTS DE SÉCURITÉ, IN-STRUCTIONS D'ENTRETIEN et de se conformer à elles, et en négligeant les MÉTHODES POUR ÉVITER DES SITUATIONS DANGEREUSES peut causer des accidents ayant comme conséquence des blessures sérieuses ou mortelles et/ou des dégâts matériels.
INSTRUCTIONS D'ASSEMBLAGE
Voici le symbole utilisé dans la section RÉGLAGE et DIRECTIVES D’UTILISATION du présent manuel pour avertir du risque de blessure. Suivre toutes les directives pour éviter des blessures potentiellement graves ou mortelles
VEUILLEZ CONSULTER LA VUE ÉCLATÉE POUR IDENTIFIER LES PIÈCES.
1. Assembler les parties du manche pour obtenir un manche (#26) d’un seul tenant. L’une des extrémités du manche est découpée de façon à s’ajuster sur le bouton de la soupape de relâchement (#28) située dans la base (#30) du cric-bouteille. Ainsi, l’utilisateur peut tourner le bouton de la soupape de relâchement (#28) dans le sens horaire jusqu’à ce qu’il soit bien serré avant d’actionner la pompe du cric-bouteille et de lever la charge. Pour descendre la charge, tourner lentement le bouton de la soupape de relâchement (#28) dans le sens antihoraire. Il n’est pas nécessaire de lui faire faire plus de deux tours complets pour ouvrir la soupape (#28).2. L’autre extrémité du manche (#26) doit être insérée dans le tube récepteur (#22) de façon à pouvoir actionner la pompe hydraulique du cric-bouteille.3. Le cric-bouteille est constitué d’un vérin (#8) qui s’allonge lorsque la pompe hydraulique est actionnée. L’extrémité du vérin se termine par une selle (#7) ronde qui entre en contact avec la charge. La selle (#7) est fixée à une vis de levage filetée qui entre dans le vérin. La hauteur de la selle (#7) peut être ajustée en la tournant dans le sens antihoraire. L’ajustement de la hauteur de la selle est parfois nécessaire lorsque le vérin (#8) entièrement déployé n’est pas suffisant pour lever la charge jusqu’à la hauteur désirée.4. Il arrive que de l’air soit piégé dans le système hydraulique durant l’expédition du cric. Il y a présence d’air dans le système hydraulique lorsque le mouvement du manche semble mou lors du pompage et qu’il ne permet pas au cric de produire un mouvement de levée complet et uniforme.
POUR PURGER L’AIR DU SYSTÈME HYDRAULIQUE a. Ouvrir la soupape de relâchement (#28) en tournant deux fois le manche (#26) en sens antihoraire par rapport à sa position fermée. b. Actionner (#26) à fond dix fois la pompe. c. Fermer la soupape de relâchement (#28) en tournant le manche en sens horaire jusqu’à ce que le bouton soit bien serré. d. Pomper le cric jusqu’à ce que le vérin (#8) atteigne la hauteur maximale. e. Si la situation s’améliore sans toutefois être pleinement satisfaisante, répéter les étapes « a » à « d » jusqu’à ce que l’air soit complètement purgé du système.
5. Ne pas soulever plus d’une roue du véhicule à la fois. Allumer les feux de détresse, couper le contact, positionner le levier de vitesse à « Park » dans le cas d’une transmission automatique ou en marche arrière s’il s’agit d’une transmission manuelle et actionner le frein de stationnement. La roue du véhicule diagonalement opposée à la roue soulevée devrait être calée en avant et en arrière. Pour connaître la procédure de changement de pneu et les points de levage recommandés pour un véhicule, se renseigner auprès du fabricant du véhicule.6. Placer le cric sur le point de levage approprié. Déterminez la longueur de vérin nécessaire pour lever la charge jusqu’à la hauteur désirée. Si la hauteur désirée dépasse la longueur totale du vérin, dévisser la vis de levage pour combler la différence.7. Faire monter le cric jusqu’à ce que la selle soit placée près du point de levage. S’assurer que le point de levage est droit, parallèle au sol et exempt de graisse, de lubrifiant et de débris. Continuer à faire monter le cric pour lever la charge jusqu’à la hauteur désirée. Pendant l’opération de levage, vérifier si le cric est bien positionné sur le sol et que la selle est bien en contact avec la charge pour prévenir tout risque d’instabilité. Si la charge semble instable, abaisser lentement et complètement le cric et apporter les ajustements nécessaires.8. Lever de nouveau la charge jusqu’à la hauteur désirée, placer immédiatement des chandelles aux endroits recommandés et ajuster les colonnes de soutien des chandelles le plus près possible sous les points d’appui appropriés. Même si les chandelles possèdent chacune la capacité nominale nécessaire, elles doivent être utilisées par paire pour soutenir la charge. Ouvrir la soupape de relâchement du cric-bouteille lentement et avec précaution de façon à ce que la charge descende doucement et repose sur les chandelles. S’assurer que la charge est soutenue de manière sécuritaire par la selle des chandelles, et non par les mentonnets. Vérifier si les chandelles sont bien position nées sur le sol et que leur colonne et leur selle sont bien en contact avec la charge pour prévenir tout risque d’instabilité. Si la charge semble instable, fermer la soupape de relâchement du cric-bouteille et faire monter le cric afin de retirer la charge des chandelles. Apporter les ajustements nécessaires et abaisser la charge lentement et avec précaution sur la selle des chandelles.9. Une fois le travail terminé, fermer la soupape de relâchement et faire monter le cric suffisamment pour retirer la charge de la selle des chandelles. S’assurer que la charge est stable. Si ce n’est pas le cas, abaisser de nouveau la charge sur les chandelles. Apporter les ajustements nécessaires et répéter les étapes. Retirer les chandelles sous la charge en prenant bien soin de ne pas faire bouger la charge.10. Ouvrir la soupape de relâchement du cric-bouteille lentement et avec précaution pour abaisser la charge jusqu’au sol.
AVERTISSEMENT
KTI63213/KTI63214/KTI63221/KTI63224 07/10/1413
OWNER'S MANUAL
ENTRETIEN PRÉVENTIF
Voici le symbole utilisé pour dans la section ENTRETIEN PRÉVENTIF du présent manuel pour avertir du risque de blessure. Suivre toutes les directives pour éviter des blessures pouvant être graves ou mortelles. IMPORTANT: Tout vérin trouvé défectueux à la suite de pièces usées en raison d’un manque de lubrification ou d’une lubrification insuffisante n’est pas admissible à la considération de garantie.
1. Toujours ranger le cric dans un endroit bien protégé des intempéries, des vapeurs corrosives, de la poussière abrasive ou de tout autre élément dommageable. La neige, l'eau, le sable et la poussière doivent être nettoyés avant d'utiliser le cric.
2. Le cric doit être lubrifié périodiquement afin d'éviter l'usure prématurée des pièces. Une graisse à usage général doit être appliquée sur tous les embouts graisseurs, les roulettes, l'essieu avant, le bras de levage, l'axe d'articulation du support du manche, le mécanisme de dégagement et toutes les surfaces portantes
3. À moins d’une fuite, il ne devrait pas être nécessaire de remplir le réservoir de liquide hydraulique. Toute fuite doit être immédiatement réparée dans un environnement sans poussières par un technicien qualifié en réparation de composantes hydrauliques et familier avec ce type d’équipement. Il est recommandé de faire appel à un centre de service autorisé.
IMPORTANT: Pour prévenir les dommages aux joints d’étanchéité et la défectuosité du cric, ne jamais utiliser d’alcool, de liquide à freins hydrauliques ni d’huile à transmission dans le cric. Utiliser de l’huile pour vérin hydraulique.
4. Le propriétaire du cric doit s’assurer que l’étiquette apposée sur le cric demeure propre et lisible. Utiliser une solution savonneuse douce pour nettoyer les surfaces externes du cric, mais pas les composantes hydrauliques mobiles.
REMARQUE: Le démontage de cet outil par une partie autre qu'un centre de réparation autorisé aura pour effet d'annuler la garantie.

KTI63213/KTI63214/KTI63221/KTI63224 07/10/1414
K-Tool International garantit que tous les crics et équipements de service reliés seront exempts de défauts dans le matériel et la main-d'œuvre, pendant une période de 2 ans, suivant la date d'achat originale. Cette garantie n'est étendue qu'à l'acheteur original au détail. Si tout cric ou élément de service relié est défectueux pendant cette période, il sera remplacé ou réparé sans frais, selon l'option de K-Tool International. Cette garantie ne s'applique pas aux dommages d'accident, de surcharge, mauvaise utilisation ou abus et elle ne s'applique pas non plus à tout équipement qui a été modifié ou utilisé avec des fixations particulières, autres que celles recommandées. Cette garantie ne couvre pas les réparations effectuées par quiconque n'étant pas un Centre de service autorisé de l'équipement de levage professionnel K-Tool International.
Tous les HD et XD crics ou équipements de service reliés seront remplacés ou réparés, selon l'option de K-Tool International, pendant la période de garantie de 2 ans.
Pendant la période de garantie de 2 ans, tous les produits prétendus défectueux doivent être expédiés, frais de transport prépayés, avec la preuve de la date d'achat, à votre Centre professionnel autorisé de garantie d'équipement de levage K-Tool International. Assurez-vous d'inclure votre nom, adresse et numéro de téléphone avec l'information de preuve d'achat et une brève description du défaut prétendu. Le produit sera retourné au client, frais de transport prépayés.
PlusieursdéfautsprétenduspeuventsimplementêtregérésenappelantvotreCentredeservicepourdespièces.Voirlespages15-17pour la liste des centres de service autorisés au titre de la garantie.
En aucun cas, K-Tool International ne sera responsable des dommages indirects ou consécutifs. La responsabilité de toute réclamation pour perte ou dommage découlant de la vente, revente ou utilisation d'un cric ou de l'équipement de service relié, ne devra en aucun cas dépasser le prix d'achat. CERTAINES JURIDICTIONS NE PERMETTENT PAS L'EXCLUSION OU LA LIMITATION DE RESPONSABILITÉ POUR LES DOMMAGES INDIRECTS OU CONSÉCUTIFS, LA LIMITATION CI-DESSUS PEUT NE PAS VOUS CONCERNER.
CETTE GARANTIE EST LA SEULE GARANTIE EXCLUSIVE FOURNIE EN LIEN AVEC LA VENTE D'UN ÉQUIPEMENT DE LEVAGE PROFESSIONNEL K-TOOL INTERNATIONAL. TOUTES LES AUTRES GARANTIES, Y COMPRIS TOUTE GARANTIE IMPLICITE DE QUALITÉ MARCHANDE OU D'ADÉQUATION À UN USAGE PARTICULIER, SONT EXCLUES.
CETTEGARANTIE VOUSDONNEDESDROITS JURIDIQUES PRÉCIS ET VOUS POUVEZ AUSSI AVOIR D'AUTRESDROITSQUIPEUVENTVARIERD'UNÉTAT(OUD'UNEPROVINCE)ÀL'AUTRE.
PROCÉDURES ET DIRECTIVES DE TRAITEMENT AU TITRE DE LA GARANTIE POUR L’ÉQUIPEMENT DE LEVAGE HD ET XD
KTI63213/KTI63214/KTI63221/KTI63224 07/10/1415
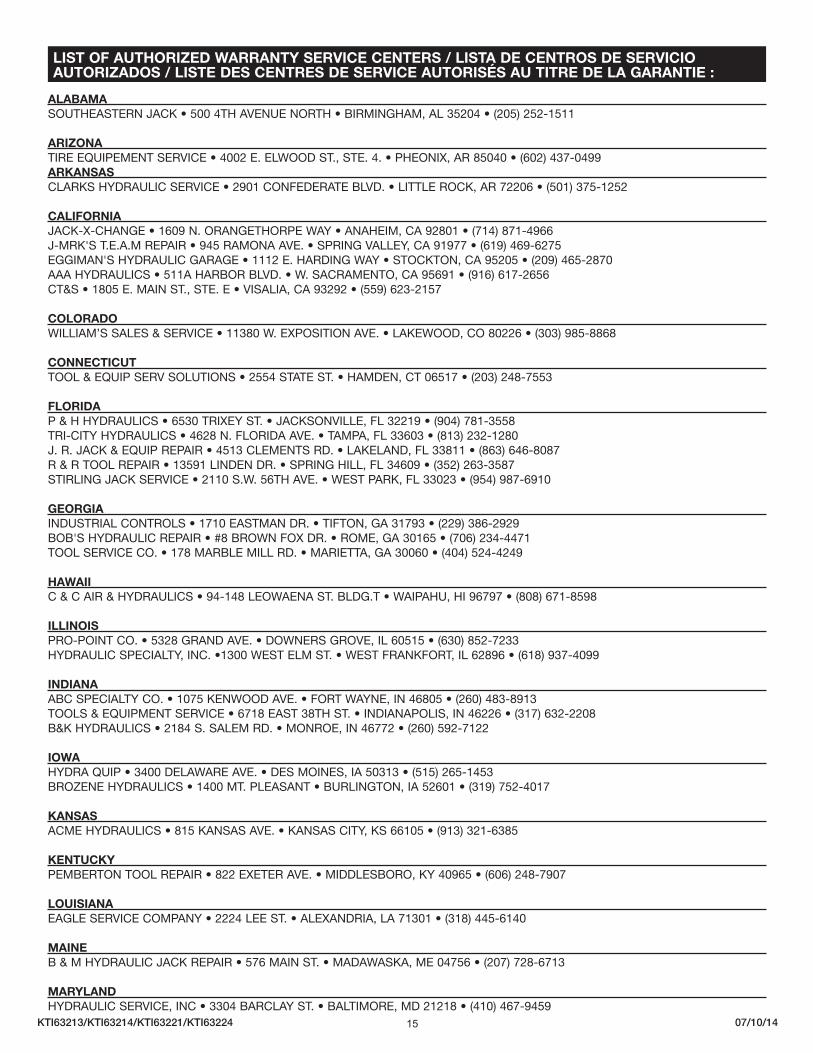
ALABAMASOUTHEASTERNJACK•5004THAVENUENORTH•BIRMINGHAM,AL35204•(205)252-1511
ARIZONATIREEQUIPEMENTSERVICE•4002E.ELWOODST.,STE.4.•PHEONIX,AR85040•(602)437-0499ARKANSASCLARKSHYDRAULICSERVICE•2901CONFEDERATEBLVD.•LITTLEROCK,AR72206•(501)375-1252
CALIFORNIAJACK-X-CHANGE•1609N.ORANGETHORPEWAY•ANAHEIM,CA92801•(714)871-4966J-MRK'ST.E.A.MREPAIR•945RAMONAAVE.•SPRINGVALLEY,CA91977•(619)469-6275EGGIMAN'SHYDRAULICGARAGE•1112E.HARDINGWAY•STOCKTON,CA95205•(209)465-2870AAAHYDRAULICS•511AHARBORBLVD.•W.SACRAMENTO,CA95691•(916)617-2656CT&S•1805E.MAINST.,STE.E•VISALIA,CA93292•(559)623-2157
COLORADOWILLIAM’SSALES&SERVICE•11380W.EXPOSITIONAVE.•LAKEWOOD,CO80226•(303)985-8868
CONNECTICUTTOOL&EQUIPSERVSOLUTIONS•2554STATEST.•HAMDEN,CT06517•(203)248-7553
FLORIDAP&HHYDRAULICS•6530TRIXEYST.•JACKSONVILLE,FL32219•(904)781-3558TRI-CITYHYDRAULICS•4628N.FLORIDAAVE.•TAMPA,FL33603•(813)232-1280J.R.JACK&EQUIPREPAIR•4513CLEMENTSRD.•LAKELAND,FL33811•(863)646-8087R&RTOOLREPAIR•13591LINDENDR.•SPRINGHILL,FL34609•(352)263-3587STIRLINGJACKSERVICE•2110S.W.56THAVE.•WESTPARK,FL33023•(954)987-6910
GEORGIAINDUSTRIALCONTROLS•1710EASTMANDR.•TIFTON,GA31793•(229)386-2929BOB'SHYDRAULICREPAIR•#8BROWNFOXDR.•ROME,GA30165•(706)234-4471TOOLSERVICECO.•178MARBLEMILLRD.•MARIETTA,GA30060•(404)524-4249
HAWAIIC&CAIR&HYDRAULICS•94-148LEOWAENAST.BLDG.T•WAIPAHU,HI96797•(808)671-8598
ILLINOISPRO-POINTCO.•5328GRANDAVE.•DOWNERSGROVE,IL60515•(630)852-7233HYDRAULICSPECIALTY,INC.•1300WESTELMST.•WESTFRANKFORT,IL62896•(618)937-4099
INDIANAABCSPECIALTYCO.•1075KENWOODAVE.•FORTWAYNE,IN46805•(260)483-8913TOOLS&EQUIPMENTSERVICE•6718EAST38THST.•INDIANAPOLIS,IN46226•(317)632-2208B&KHYDRAULICS•2184S.SALEMRD.•MONROE,IN46772•(260)592-7122
IOWAHYDRAQUIP•3400DELAWAREAVE.•DESMOINES,IA50313•(515)265-1453BROZENEHYDRAULICS•1400MT.PLEASANT•BURLINGTON,IA52601•(319)752-4017
KANSASACMEHYDRAULICS•815KANSASAVE.•KANSASCITY,KS66105•(913)321-6385
KENTUCKYPEMBERTONTOOLREPAIR•822EXETERAVE.•MIDDLESBORO,KY40965•(606)248-7907
LOUISIANAEAGLESERVICECOMPANY•2224LEEST.•ALEXANDRIA,LA71301•(318)445-6140
MAINEB&MHYDRAULICJACKREPAIR•576MAINST.•MADAWASKA,ME04756•(207)728-6713
MARYLANDHYDRAULICSERVICE,INC•3304BARCLAYST.•BALTIMORE,MD21218•(410)467-9459
LISTOFAUTHORIZEDWARRANTYSERVICECENTERS/LISTADECENTROSDESERVICIOAUTORIZADOS/LISTEDESCENTRESDESERVICEAUTORISÉSAUTITREDELAGARANTIE:
KTI63213/KTI63214/KTI63221/KTI63224 07/10/1416
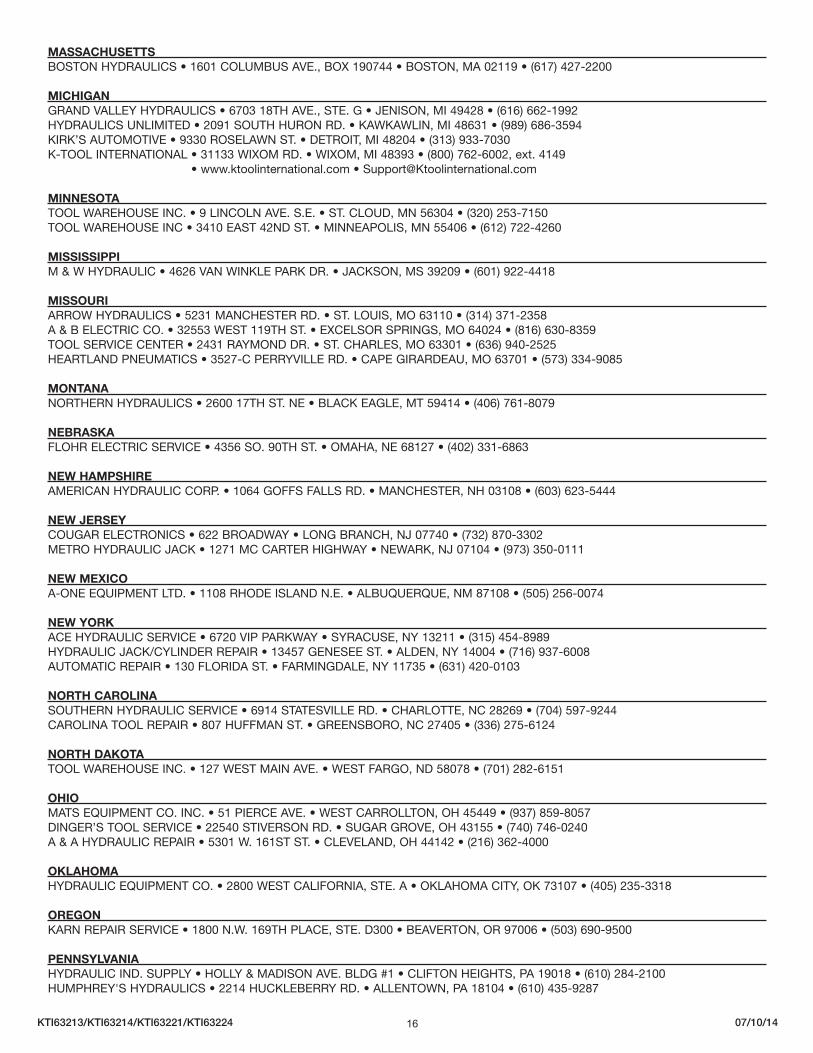
MASSACHUSETTSBOSTONHYDRAULICS•1601COLUMBUSAVE.,BOX190744•BOSTON,MA02119•(617)427-2200
MICHIGANGRANDVALLEYHYDRAULICS•670318THAVE.,STE.G•JENISON,MI49428•(616)662-1992HYDRAULICSUNLIMITED•2091SOUTHHURONRD.•KAWKAWLIN,MI48631•(989)686-3594KIRK’SAUTOMOTIVE•9330ROSELAWNST.•DETROIT,MI48204•(313)933-7030K-TOOLINTERNATIONAL•31133WIXOMRD.•WIXOM,MI48393•(800)762-6002,ext.4149 •www.ktoolinternational.com•[email protected]
MINNESOTATOOLWAREHOUSEINC.•9LINCOLNAVE.S.E.•ST.CLOUD,MN56304•(320)253-7150TOOLWAREHOUSEINC•3410EAST42NDST.•MINNEAPOLIS,MN55406•(612)722-4260
MISSISSIPPIM&WHYDRAULIC•4626VANWINKLEPARKDR.•JACKSON,MS39209•(601)922-4418
MISSOURIARROWHYDRAULICS•5231MANCHESTERRD.•ST.LOUIS,MO63110•(314)371-2358A&BELECTRICCO.•32553WEST119THST.•EXCELSORSPRINGS,MO64024•(816)630-8359TOOLSERVICECENTER•2431RAYMONDDR.•ST.CHARLES,MO63301•(636)940-2525HEARTLANDPNEUMATICS•3527-CPERRYVILLERD.•CAPEGIRARDEAU,MO63701•(573)334-9085
MONTANANORTHERNHYDRAULICS•260017THST.NE•BLACKEAGLE,MT59414•(406)761-8079
NEBRASKAFLOHRELECTRICSERVICE•4356SO.90THST.•OMAHA,NE68127•(402)331-6863
NEWHAMPSHIREAMERICANHYDRAULICCORP.•1064GOFFSFALLSRD.•MANCHESTER,NH03108•(603)623-5444
NEWJERSEYCOUGARELECTRONICS•622BROADWAY•LONGBRANCH,NJ07740•(732)870-3302METROHYDRAULICJACK•1271MCCARTERHIGHWAY•NEWARK,NJ07104•(973)350-0111
NEWMEXICOA-ONEEQUIPMENTLTD.•1108RHODEISLANDN.E.•ALBUQUERQUE,NM87108•(505)256-0074
NEWYORKACEHYDRAULICSERVICE•6720VIPPARKWAY•SYRACUSE,NY13211•(315)454-8989HYDRAULICJACK/CYLINDERREPAIR•13457GENESEEST.•ALDEN,NY14004•(716)937-6008AUTOMATICREPAIR•130FLORIDAST.•FARMINGDALE,NY11735•(631)420-0103
NORTHCAROLINASOUTHERNHYDRAULICSERVICE•6914STATESVILLERD.•CHARLOTTE,NC28269•(704)597-9244CAROLINATOOLREPAIR•807HUFFMANST.•GREENSBORO,NC27405•(336)275-6124
NORTHDAKOTATOOLWAREHOUSEINC.•127WESTMAINAVE.•WESTFARGO,ND58078•(701)282-6151
OHIOMATSEQUIPMENTCO.INC.•51PIERCEAVE.•WESTCARROLLTON,OH45449•(937)859-8057DINGER’STOOLSERVICE•22540STIVERSONRD.•SUGARGROVE,OH43155•(740)746-0240A&AHYDRAULICREPAIR•5301W.161STST.•CLEVELAND,OH44142•(216)362-4000
OKLAHOMAHYDRAULICEQUIPMENTCO.•2800WESTCALIFORNIA,STE.A•OKLAHOMACITY,OK73107•(405)235-3318
OREGONKARNREPAIRSERVICE•1800N.W.169THPLACE,STE.D300•BEAVERTON,OR97006•(503)690-9500
PENNSYLVANIAHYDRAULICIND.SUPPLY•HOLLY&MADISONAVE.BLDG#1•CLIFTONHEIGHTS,PA19018•(610)284-2100HUMPHREY'SHYDRAULICS•2214HUCKLEBERRYRD.•ALLENTOWN,PA18104•(610)435-9287

KTI63213/KTI63214/KTI63221/KTI63224 07/10/1417
SOUTHCAROLINAAIR&HYDRAULICSERVICE•315HAWKINSRD.•TRAVELERSREST,SC29690•(866)867-5359
SOUTHDAKOTAALL-AROUNDAUTOLLC•105ZIEBACHST.•BELLEFOURCHE,SD57717•(605)723-6272
TENNESSEEAUTHORIZEDEQUIPMENTSERVICE•812POLKAVE.•MEMPHIS,TN38126•(901)774-0850LUBRICATIONEQUIPMENT•2501MITCHELLST.•KNOXVILLE,TN37917•(865)525-8401
TEXASAAAPNEUMATICS&SUPPLY•907EDENROCST.•VICTORIA,TX77904•(361)573-9920STARHYDRAULIC&TOOLSERVICE•7012LONGPOINT•HOUSTON,TX77055•(713)681-4105VMWMAINTENANCESOLUTIONS•2328BLANCORD.•SANANTONIO,TX78212•(210)736-4285HYDRAULICSERVICE&SUPPLY•100HOWELLST.•DALLAS,TX75207•(214)748-6015WATCOEQUIPMENTSERVICES•6005MILWEEST.,STE.706•HOUSTON,TX77092•(713)290-9033
UTAHGUSTINHYDRAULIC•151W.2125SOUTH•SALTLAKECITY,UT84115•(801)487-0624
VIRGINIAJACK-MAN•110ANNST.•MADISONHEIGHTS,VA24572•(434)847-6963HYDRAULICSERVICECOMPANY•3215VICTORYBLVD.•PORTSMOUTH,VA23702•(757)487-2513SARVERSHYDRAULICS•2550JOHNSONAVE.•ROANOKE,VA24017•(540)344-0799
WASHINGTONSPOKANEPUMP•3626E.TRENTAVE.•SPOKANE,WA99202•(509)535-9771UNIVERSALREPAIR•1611BOYLSTONAVE.•SEATTLE,WA98122•(206)322-2726
WESTVIRGINIAGILLETTEREPAIRSERVICE•ROUTE8,BOX128-A•FAIRMONT,WV26554•(304)366-3119
WISCONSINAFIDIRECTSERVICES•7515S.10THST.•OAKCREEK,WI53154•(414)764-1160
CANADA
ALBERTAPRECISIONHYDRAULICS•940-48AVE.SE•CALGARY,ALBERTAT2G5B1•(403)243-5997DAN’SPOWERTOOLREPAIR•8149WAGNERRD.NE•EDMONTON,ALBERTAT6E4N6•(780)490-1955OR(780)490-1956
BRITISHCOLUMBIARAMTORCTOOLS,INC.•160-11960HAMMERSMITHWAY•RICHMOND,BRITISHCOLUMBIAV7A5C9•(604)271-3220
MANITOBAACCUTOOLSERVICE•465LUCASAVE.•WINNEPEG,MANITOBAR3C2E6•(204)772-6523
ONTARIOMONARCHREBUILDING,INC.•97BESSEMERRD.UNIT5•LONDON,ONTARION6E1P9•(519)681-5640
QUEBECINSTRUMENTSALES&SERVICE•6059DEMAISONNEUVEBLVD.•W.MONTREAL,QCH4A3R8•(514)481-8111MINIHYDRAULIQUEINC.•2732RUEDELAFAUNE•QUEBEC,QCG3E1H4•(418)843-6177MR.TANGUAY&FILS•1110CROISSIANTCLAIRE•LACHINE,QUEBECH8S1A1•(514)933-8073OR(514)639-8825