ksonik iii ultrasonic level transmitter long range ... · ksonik iii ultrasonic level transmitter...
TRANSCRIPT

KSONIK IIIUltrasonic Level Transmitter
Operating instruction manual OI/KSIII-EN Rev. C
Long range ultrasonic level/flow transmitterK-TEK Products
IntroductionThis operating instruction manual provides the following information: – Quick start guide for distance, level and flow - see page 3 – Guidelines on changing parameters - see page 7 – Installation instructions - see page 8

2 KSONIK III Ultrasonic Level Transmitter | Operating instruction manual
1.0 Introduction .............................................................................................................................................................32.0 Quick Start ..............................................................................................................................................................3 2.1 Quick Start for Distance..................................................................................................................................3 2.2 Quick Start for Level .......................................................................................................................................4 2.3 Quick Start for Flow ........................................................................................................................................5 2.4 Quick Start for Differential Level .....................................................................................................................73.0 Changing Parameters.............................................................................................................................................74.0 Installation ..............................................................................................................................................................8 4.1 Key Description ..............................................................................................................................................9 4.2 Security Code .................................................................................................................................................95.0 Configuration Distance / Level..............................................................................................................................10 5.1 Distance / Level Mode ....................................................................................................................................116.0 Configuration Flow................................................................................................................................................15 6.1 Flow Mode ....................................................................................................................................................167.0 Working with the Key Pad in Run Mode ...............................................................................................................20 7.1 Run Mode Screen in Distance / Level Mode ................................................................................................21 7.2 The Relay State Screen ...............................................................................................................................22 7.3 On Screen KSCOPE ....................................................................................................................................22 7.4 mA Graph Screen .........................................................................................................................................238.0 Examples ..............................................................................................................................................................23 8.1 Distance Measurement.................................................................................................................................23 8.2 Level Measurement ......................................................................................................................................24 8.3 Level Measurement and Engineering Units..................................................................................................24 8.4 Level Measurement Using the Lineariser Function ......................................................................................25 8.5 Level Measurement Using the Lineariser Function with a Non-Linear Vessel .............................................26 8.6 Venturi Flame ...............................................................................................................................................27 8.7 V-Notch .........................................................................................................................................................27 8.8 Differential Level Measurement ....................................................................................................................28 8.9 Working with the Simulator ...........................................................................................................................29 8.10 FIFO (First In First Out) Pump Cycling .........................................................................................................30 8.11 Rotate Pump Cycling ....................................................................................................................................319.0 Fault Finding .........................................................................................................................................................3210.0 Terminal Connections ...........................................................................................................................................3311.0 Dimensions ...........................................................................................................................................................3412.0 Cable Extension ...................................................................................................................................................3913.0 Declaration of Conformity .....................................................................................................................................4014.0 Warranty ...............................................................................................................................................................4115.0 Customer Support ................................................................................................................................................41 15.1 ABB RMA Form .............................................................................................................................................42
Table Of Contents

Operating instruction manual | KSONIK III Ultrasonic Level Transmitter 3
KSONIK III works on the non-contact principle of ultrasonics. A pulse of energy emits from the transducer at the speed of sound and is detected upon its return. The transmitter can distinguish the difference between a correct echo and other ambient noise. When the signal returns, KSONIK III measures the time period and then knowing the speed of sound, it can accurately calculate the distance from the material to the transducer. The KSONIK III can measure distance, level, open channel flow and differential.
In distance mode the KSONIK III measures distance from the trans-ducer. This means the 20mA will be the furthest point and the 4mA will be the closest point. In level mode the KSONIK III measures level in a tank. This means at the furthest point or when the tank is empty, the instrument will read 4mA. At the closest point the tank will be full and the instrument will read 20mA.
The Open Channel flow meter uses a level measurement from the KSONIK III and converts the reading into a flow measurement. The Differential Level uses the dual functionality of the KSONIK III to obtain a differential level reading. The KSONIK III uses both transducer inputs, which take a level measurement. The KSONIK III then compares the two level measurements to get the difference in levels. The output is then proportional to the differential between these two levels. A microprocessor then controls the output functions of the relays, display and the analogue output signals.
2.0 QUICK START
2.1 Quick Start For DistanceKSONIK III was designed with a very simple configuration program. This allows the technician to set up KSONIK III without the aid of a complicated source-code book. There are no references to any codes in KSONIK III. The set up procedure is all menu-driven with the aid of questions and multiple-choice answers.1. Connect up the power and the transducer connections to channel one as de-
scribed on the KSONIK III board or in the KSONIK III manual under terminal connections on page 33.
PLEASE NOTE, ALL CONNECTORS ARE CAPABLE OF BEING UNPLUGGED FROM THE PCB
Connect the second transducer if a dual unit was purchased.
2. Aim the transducer at a wall about 6 ft. away and check the display. It should read the following:• If the reading is above 6.00 ft then move the transducer closer to the wall.• If the reading is below 6.00 ft then move the transducer away from the wall.• You may now proceed and check other parameters.
• Please note if no transducer is connected to Channel Two there will be no reading and the channel will go the loss of echo routine.
• Please note this example is for a K10.• Please note if you have purchased a K20 or K60. You will have to check
the distance at 20 ft. and select the correct transducer first.
1.0 Introduction
Showing Channel One
Dist. 6.00ftmA Output: 7.20mAInstant: 6.00 ftTemperature: 20°CPercentage: 20.00%
K 10Channel One
Dist. 6.00ftmA Output: 7.20mAInstant: 6.00 ftTemperature: 20°CPercentage: 20.00%
K 10Channel Two
Showing Channel Two
KSONIKIIILong Range Ultrasonic Level / Flow Transmitter
4 KSONIK III Ultrasonic Level Transmitter | Operating instruction manual
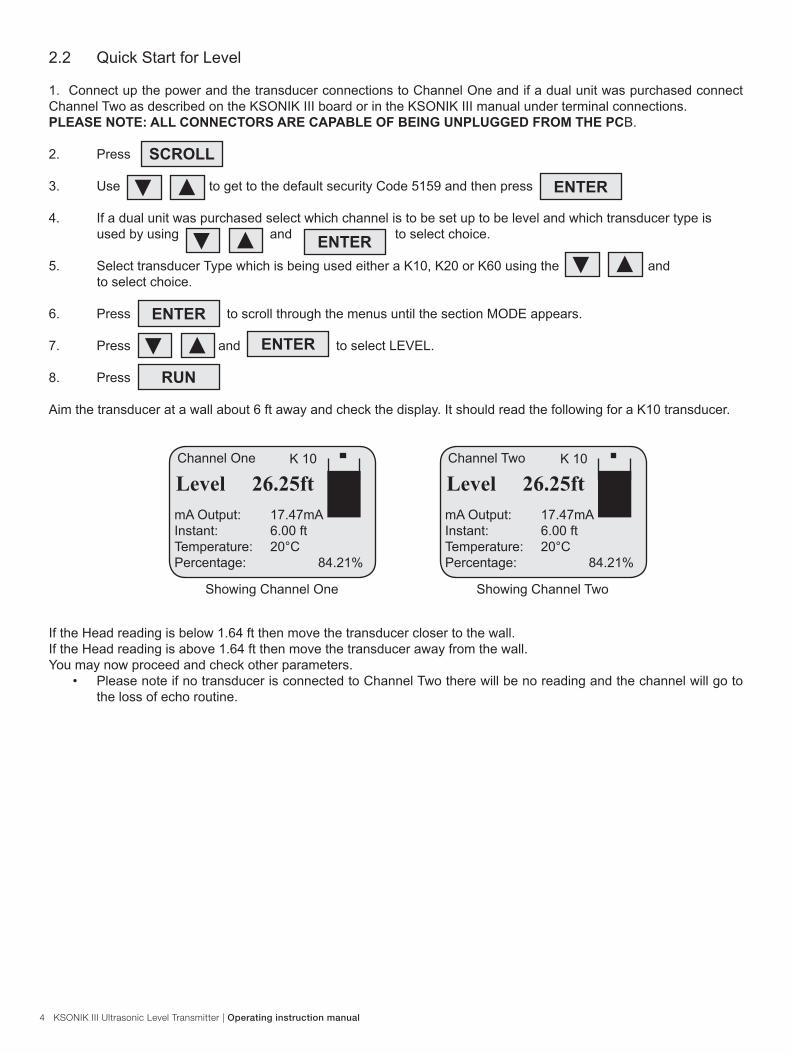
2.2 Quick Start for Level
1. Connect up the power and the transducer connections to Channel One and if a dual unit was purchased connect Channel Two as described on the KSONIK III board or in the KSONIK III manual under terminal connections.PLEASE NOTE: ALL CONNECTORS ARE CAPABLE OF BEING UNPLUGGED FROM THE PCB.
2. Press
3. Use to get to the default security Code 5159 and then press
4. If a dual unit was purchased select which channel is to be set up to be level and which transducer type is used by using and to select choice.
5. Select transducer Type which is being used either a K10, K20 or K60 using the and to select choice.
6. Press to scroll through the menus until the section MODE appears.
7. Press and to select LEVEL.
8. Press
Aim the transducer at a wall about 6 ft away and check the display. It should read the following for a K10 transducer.
If the Head reading is below 1.64 ft then move the transducer closer to the wall.If the Head reading is above 1.64 ft then move the transducer away from the wall.You may now proceed and check other parameters.
• Please note if no transducer is connected to Channel Two there will be no reading and the channel will go to the loss of echo routine.
SCROLL
▼ ENTER
▼
▼
▼
▼
▼
▼ENTER
ENTER
ENTER
RUN
▼
Showing Channel One
Level 26.25ftmA Output: 17.47mAInstant: 6.00 ftTemperature: 20°CPercentage: 84.21%
K 10Channel One
Showing Channel Two
Level 26.25ftmA Output: 17.47mAInstant: 6.00 ftTemperature: 20°CPercentage: 84.21%
K 10Channel Two

Operating instruction manual | KSONIK III Ultrasonic Level Transmitter 5
2.3 Quick Start for Flow
1. Connect up the power and the transducer connections to Channel One and if a dual unit was purchased connect Channel Two as described on the KSONIK III board or in the KSONIK III manual under terminal connections.PLEASE NOTE: ALL CONNECTORS ARE CAPABLE OF BEING UNPLUGGED FROM THE PCB.
2. Press
3. Use to get to the default security Code 5159 and then press
4. If a dual unit was purchased select which channel is to be set up as a flow meter and which transducer type is used by using and to select choice.
5. Select transducer Type which is being used either a K10, K20 or K60 using the and to select choice.
6. Press to scroll through the menus until the section MODE appears.
7. Press and to select FLOW.
8. Press
Aim the transducer at a wall about 4.92 ft away and check the display. It should read the following for a K10 trans-ducer.
If the Head reading is below 1.64 ft then move the transducer closer to the wall.If the Level reading is above 1.64 ft then move the transducer away from the wall.You may now proceed and check other parameters.
• Please note if no transducer is connected to Channel Two there will be no reading and the channel will go to the loss of echo routine.
• The totalizer should increase every second.
SCROLL
▼ ENTER
▼
▼
▼
▼
▼
▼ENTER
ENTER
ENTER
RUN
▼
Showing Channel One
Flow: 64.86 Lt/ST: 00001513408 LtHead: 1.64 ftmA Output: 6.48 mAInstant: 4.93 ftTemperature 20°CPercentage: 6.48%
K 10Channel One
Showing Channel Two
Flow: 64.86 Lt/ST: 00001513408 LtHead: 1.64 ftmA Output: 6.48 mAInstant: 4.93 ftTemperature 20°CPercentage: 6.48%
K 10Channel Two
Connect the second transducer if a dual unit was purchased.
Showing Channel One
Showing Channel Two

6 KSONIK III Ultrasonic Level Transmitter | Operating instruction manual
2.4 Quick Start for Differential Level
1. Connect up the power and the transducer connections to Channel One and Channel Two as described on the KSONIK III board or in the KSONIK III manual under terminal connections.DIFFERENTIAL LEVEL FOR THE KSONIK III IS ONLY AVAILABLE FOR THE DUAL UNIT. PLEASE NOTE: ALL CON-NECTORS ARE CAPABLE OF BEING UNPLUGGED FROM THE PCB.
2. Press
3. Use to get to the default security Code 5159 and then press
4. In the menu, Select channel and choose both transducers by using the and to select choice.
5. Select transducer Type which is being used by either a K10, K20 or K60 using the and to select choice.
6. Press to scroll through the menus until the section MODE appears.
7. Press and to select Diff. for differential.
8. Press
Aim both transducers at a wall about 6.00 ft. away and check the display. It should read the following for a K10 trans-ducer.
If the instant on both channels reading is below 6.0 ft for the level then move the transducer Two closer to the wall.If the instant on both channels reading is above 6.0 ft for the level then move the transducer Two further away from the wall.
Once the level is correct, move transducer One closer to the wall to get an increase in differential output.
You may now proceed and check other parameters.• Please note if no transducer is connected to Channel Two there will be no reading and the channel will go to the
loss of echo routine. Output 1 is the Differential output. Output 2 is Level of transducer Two.
SCROLL
▼ ENTER
▼
▼
▼
▼
▼
▼
ENTER
ENTER
ENTER
ENTER
RUN
▼
Showing the differential Showing the level of Transducer One
Showing Channel One
Diff. 0.00ftmA Output: 4.00mAInstant: 6.00 ftTemperature: 20°CPercentage: 0.00%
K 10Channel One
Showing Channel Two
Level 0.00ftmA Output: 4.00mAInstant: 6.00 ftTemperature: 20°CPercentage: 25.00%
K 10Channel Two

Operating instruction manual | KSONIK III Ultrasonic Level Transmitter 7
3.0 CHANGING PARAMETERS1. Simply press The SECURITY CODE prompt should be displayed.
2. Enter the code 5159 by pressing the keys.
3. To confirm security code press
If Code has been accepted, the screen will display:
Dist. 6.00 ftmA Output: 7.20mAInstant: 6.00 ftTemperature: 20°CPercentage: 20.00%
K 10
SCROLL
Scroll Up Down Enter Run
▼
▼
Scroll Up Down Enter Run
ENTER
Enter the Code: 5159
Scroll Up Down Enter Run
Select Channel: (1)One Two Both
Xducer Type:K10
If Code has not been accepted, the screen will display:
Dist. 6.00 ftmA Output: 7.20mAInstant: 6.00 ftTemperature: 20°CPercentage: 20.00%
K 10
Enter Code: 5000
If the security code has been changed and forgotten then contact the nearest ABB agent for override code. To carry on with programming go to page 8.
Channel One
Channel One

8 KSONIK III Ultrasonic Level Transmitter | Operating instruction manual
4.0 INSTALLATIONThe transmitter is weather proof so it can be mounted outside. Although KSON-IK III is protected to IP65 it is recommended that it be installed inside another suitable enclosure. The LCD display should not be facing direct sunlight as this can cause the display to fail. KSONIK III should be fixed to a wall or chassis plate using the four holes provided.• Do not install KSONIK III in areas of high vibration as this may cause fail-
ure.• Do not install KSONIK III in the close vicinity of electrical cable, SCR's or
variable speed drives.
The installation of the transducer is the most important section of this manual and has been divided into 7 sub sections.1. The transducer must be fitted at the normal blanking distance above the
highest point of level. Check the specification for the blanking distance.2. Always use the plastic isolation kit. This kit must be fitted to a rigid support
and must not be allowed to swing. Use mild steel or a suitable plastic. Do not use stainless steel as this can cause ringing and may increase the blanking distance.
Nut should be hand tight only
Steel support should be fitted here
Transducer screws into isolation kit
3. The transducer must be perpendicular to the material it is measuring with a clear line of sight and not above beams or filling points.
Liquid Level Measurement Solid Level Measurement
Transducer at 90 deg to surface. Transducer at 90 deg to surface.
4. If the transducer is in a coned vessel, it must be positioned over the middle of the cone. This ensures that the transducer receives the true echo and not one from the sides of the cone.

Operating instruction manual | KSONIK III Ultrasonic Level Transmitter 9
5. When a standpipe is being used it must be as wide as possible and preferably be made of plastic. The base MUST have a 45 degree chamfer to reduce the echo size from the bottom of the standpipe. No welding should be present on the inside of the pipe as this causes false echoes. Always increase the blanking 5.91 in / 150 mm past the end of the standpipe.
6. If any large electrical equipment is installed in the vicinity, then earthed steel conduit must be used.7. An extension of up to 328 ft / 100 m using RG62U cable is possible. All connections must be soldered together. It is advisable to install the transducer cable inside steel conduit, especially if large electrical spikes (interference) are present.
4.1 Key Description
KSONIK III is “user friendly” having only 5 keys and a menu driven display. The keys are listed below with their appropri-ate functions.
This is used to initially access the programming and then to run through the various menus.
This key is used to DECREASE the value in the various commands. This key also starts the simulation mode increasing in level. See page 29 for details.
This key is used to INCREASE the value in the various commands. This key also starts the simulation mode increasing in level. See page 29 for details.
When a value has been changed it is only accepted by pressing the ENTER key. The ENTER key while in run mode scrolls through the relay status screen and onscreen KScope screen and mA output graphc. See page 21 for details.
When programming is complete, press RUN to return KSONIK III back to the run mode.
SCROLL
▼
ENTER
RUN
4.2 Security Code
To advance to the programming mode, the correct security code must be entered. The factory default code is 5159. This code can be changed in the programming mode. If you forget the security code please contact your local ABB agent for the override code.
▼
Vessel Roof
45° Chamber
Transducer

10 KSONIK III Ultrasonic Level Transmitter | Operating instruction manual
5.0 CONFIGURATION DISTANCE / LEVELDISTANCE / LEVEL MODE
BASIC OPTIONS DEFAULTSSECURITY CODE 0-9999 5159
CHANNEL SELECT ONE/TWO/BOTH ONE
TRANSDUCER SELECT K10/K20/K60 K10
MODE DISTANCE/LEVEL/FLOW/DIFF DISTANCE
UNITS FEET/METERS FEET
EMPTY DISTANCE 1.3-49.2/3.6-98.4/3.6-196.8 FT 32.81 FT
SPAN 0.33-49.2/0.33-98.4/0.33-196.8 FT 32.81 FT
BLANKING 0.98-48.87/3.28-98.07/3.28-196.47 FT 1.65 FT
RATE OF CHANGE 0.03-65.6 FT/MIN / 0.01-20.0 M/MIN 3.28 FT/MIN
APPLICATION LIQUIDS/SOLIDS LIQUIDS
FACTORY RESET NO/YES NO
TEMPERATURE COMPENSATION OFF/ON OFF
SIMULATE NO/YES NO
SET PASSWORD NO/YES NO
BACKLIGHT OFF/ON (1-6MIN)/PERM 2MIN
LOSSTIME 30-900SEC 300SEC
FAILSAFE 3.6mA, 4.0mA, 20mA, 21mA, HOLD HOLD
ENGINEERING UNITS NONE, aaa-zzz, AAA-ZZZ, 0-9 NONE
MAXIMUM VALUE 0-99999 100000
DECIMAL POINT 0-3 2
ZERO OFF SET -0.16 FT TO 0.16 FT 0
SETUP RELAYS NO/YES NO
RELAY1 TO RELAY 5 OFF/LO/HI OFF
CHANNEL SELECT ONE/TWO/BOTH ONE
SETPOINT SPAN 1.65 FT
PUMP CYCLE OFF/FIFO/ROTATE OFF
CLEAR RELAYS NO/YES NO
SETUP LINEARIZER NO/YES NO
ACTIVATE LINEARIZER NO/YES NO
SETPOINT 1-21 1
HEIGHT 0 FT-SPAN 0 FT
PERCENTAGE 0-100% 0%
Operating instruction manual | KSONIK III Ultrasonic Level Transmitter 11
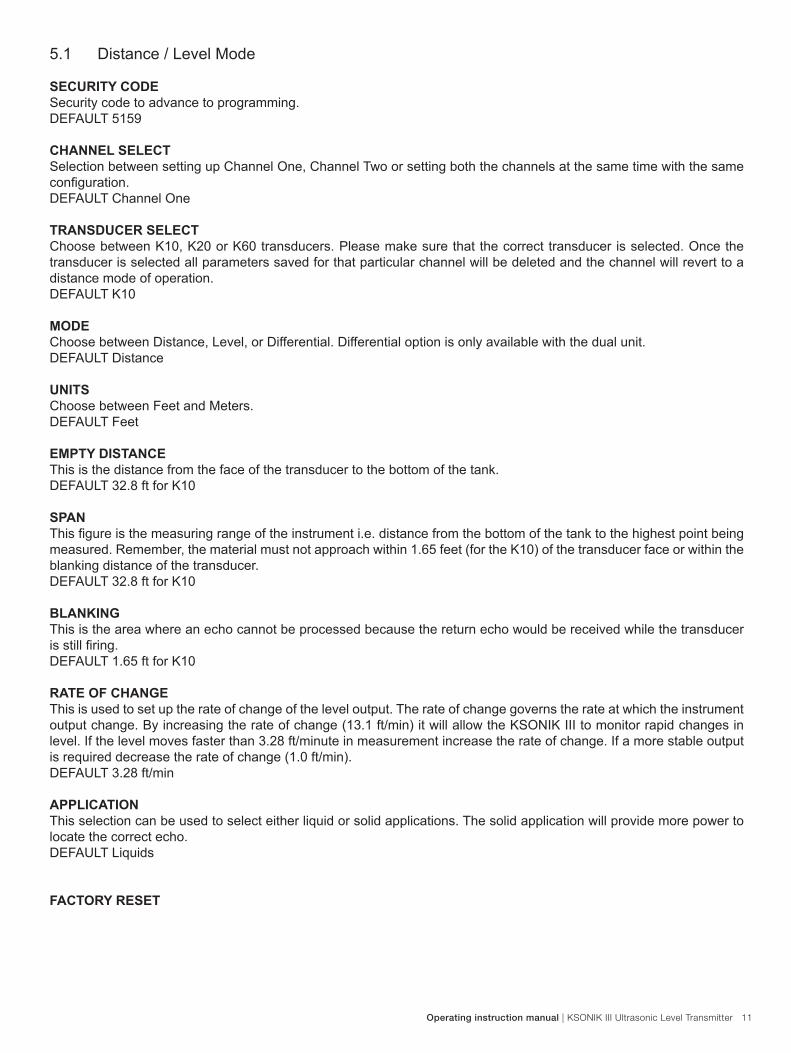
5.1 Distance / Level Mode
SECURITY CODESecurity code to advance to programming.DEFAULT 5159
CHANNEL SELECTSelection between setting up Channel One, Channel Two or setting both the channels at the same time with the same configuration.DEFAULT Channel One
TRANSDUCER SELECTChoose between K10, K20 or K60 transducers. Please make sure that the correct transducer is selected. Once the transducer is selected all parameters saved for that particular channel will be deleted and the channel will revert to a distance mode of operation.DEFAULT K10
MODEChoose between Distance, Level, or Differential. Differential option is only available with the dual unit.DEFAULT Distance
UNITSChoose between Feet and Meters.DEFAULT Feet
EMPTY DISTANCEThis is the distance from the face of the transducer to the bottom of the tank.DEFAULT 32.8 ft for K10
SPANThis figure is the measuring range of the instrument i.e. distance from the bottom of the tank to the highest point being measured. Remember, the material must not approach within 1.65 feet (for the K10) of the transducer face or within the blanking distance of the transducer.DEFAULT 32.8 ft for K10
BLANKINGThis is the area where an echo cannot be processed because the return echo would be received while the transducer is still firing.DEFAULT 1.65 ft for K10
RATE OF CHANGEThis is used to set up the rate of change of the level output. The rate of change governs the rate at which the instrument output change. By increasing the rate of change (13.1 ft/min) it will allow the KSONIK III to monitor rapid changes in level. If the level moves faster than 3.28 ft/minute in measurement increase the rate of change. If a more stable output is required decrease the rate of change (1.0 ft/min). DEFAULT 3.28 ft/min
APPLICATIONThis selection can be used to select either liquid or solid applications. The solid application will provide more power to locate the correct echo.DEFAULT Liquids
FACTORY RESET

12 KSONIK III Ultrasonic Level Transmitter | Operating instruction manual
This prompt will reset all values entered back to factory setting except the password. Please write down all settings before using this function. DEFAULT No
TEMPERATURE COMPENSATIONSet temperature compensation on or off.DEFAULT Off
SIMULATESimulates the level, relay outputs and mA outputs with the rate of change, selected.DEFAULT No
SET PASSWORDThis prompt will allow you to change the default factory code. Should the factory code be forgotten please contact a local ABB agent for an override password.DEFAULT No
BACKLIGHTChoose between switching on the backlight for 1 - 60 minutes, switch off the backlight or to switch the backlight per-manently on.DEFAULT 2 Min
LOSSTIMEThis is the amount of time between last receiving a correct echo and going into the Fail-safe condition. This time period is timed in seconds. This cannot be reduced to less than 30 seconds.DEFAULT 300 Sec FAILSAFEIf a loss of echo condition is reached then the 4-20mA output will follow the configured settings 3.60mA, 4mA, 20mA, 21mA or Hold the reading at the last recognized echo. This is usually due to a cable being cut or the instrument not being set up correctly.DEFAULT Hold
ENGINEERING UNITSThis prompt will allow you to display in your own engineering units and can be made up from alphanumeric charac-ters.DEFAULT None
MAXIMUM VALUE/DECIMAL POINTThis is the maximum value the engineering units can be displayed instead of reading meters (m) or feet (ft).DEFAULT 10000
After the maximum value is set the number of decimal points can be adjusted.DEFAULT 2
ZERO OFFSETChoose between –0.16 ft to 0.16 ft for setting the offset of the instrument.DEFAULT 0
SETUP RELAYSSelect yes to enter the relay menu and set up the relay parameters.DEFAULT No
5.1 DISTANCE / LEVEL MODE (continued)

Operating instruction manual | KSONIK III Ultrasonic Level Transmitter 13
RELAY1The relays can be used either for a high alarm or a low alarm. A high alarm has its reset below the set point, and a low alarm has its reset above the set point. The relays can also be set up to have pump cycling enabled.DEFAULT Off
CHANNEL The channel to which the relay corresponds. DEFAULT ONE
SET POINTThis is the value where the relay will set.DEFAULT 1.65 ft
RESET POINTThis is the value where the relay will reset.DEFAULT 1.65 ft
PUMP CYCLESelect the type of pump control that is required. The KSONIK III has two pump cycling routines which can be used to ef-ficiently distribute the run cycles between various pumps that serve a common purpose. The ROTATE pump routine will use the relay set points configured for the pumps that require cycling, and rotate these set points among the pumps with the COMPLETION of each cycle. NOTE: The COMPLETION of a cycle is reached once all pumps have switched OFF.
The FIFO (First In First Out) routine will use the relay set points configured for the pumps that require cycling, and rotate these set points among the pumps for subsequent cycles.
NOTE: The FIFO routine ensures that the lead pump will always switch off first. HINT: It is advisable to configure the reset points for the pumps that require cycling to the same level.DEFAULT Off
CLEAR RELAYSClears the number of cycles as well as the run hours recorded for the particular relay specified.DEFAULT No
RELAY2As above.DEFAULT Off
RELAY3As above.DEFAULT Off
RELAY4As Above.DEFAULT OFF
RELAY 5As Above.DEFAULT OFF
5.1 DISTANCE / LEVEL MODE (continued)

14 KSONIK III Ultrasonic Level Transmitter | Operating instruction manual
SETUP LINEARISERThis prompt will allow you to input a curve to linearise the vessel. The span is divided by 21 and you can input the new height for each point as well as the corresponding percentage fill at that point. KSONIK III prompts you at each point.DEFAULT No
ACTIVATE LINEARISER This function activates the lineariser.DEFAULT No
SET POINTThis is the number at which point the user is inputting a linearized point.
HEIGHT/PERCENTAGEHeight is the distance from the bottom of the tank to a corresponding point where a suitable percentage can be deter-mined.DEFAULT 0.00 ftEnter the percentage volume of vessel at a corresponding height.DEFAULT 0.00 %
5.1 DISTANCE / LEVEL MODE (continued)
Set point 1Height 0.0 mPercentage 0.00%
Set point 10Height 14.76%Percentage 45.00%
Set point 12Height 18.05 ftPercentage 55.00%
Set point 13Height 19.69 ftPercentage 60.00%
Set point 14Height 21.33 ftPercentage 65.00%
Set point 15Height 22.97 ftPercentage 70.00%
Set point 16Height 24.61 ftPercentage 75.00%
Set point 17Height 26.25 ftPercentage 80.00%
Set point 18Height 27.89 ftPercentage 85.00%
Set point 19Height 29.53 ftPercentage 90.00%
Set point 20Height 31.17 ftPercentage 95.00%
Set point 21Height 32.81 ftPercentage 100.00%
Set point 2Height 1.64 ftPercentage 5.00%
Set point 3Height 3.28 ftPercentage 10.00%
Set point 4Height 4.92 ftPercentage 15.00%
Set point 5Height 6.56 ftPercentage 20.00%
Set point 6Height 8.20 ftPercentage 25.00%
Set point 7Height 9.84 ftPercentage 30.00%
Set point 8Height 11.48 ftPercentage 35.00%
Set point 9Height 13.12 ftPercentage 40.00%
Set point 11Height 16.41 ftPercentage 50.00%

Operating instruction manual | KSONIK III Ultrasonic Level Transmitter 15
6.0 CONFIGURATION FLOW FLOW MODE
BASIC OPTIONS DEFAULTSSECURITY CODE 0-9999 5159
CHANNEL SELECT ONE/TWO/BOTH ONETRANSDUCER SELECT K10/K20/K60 K10
MODE DISTANCE/LEVEL/FLOW DISTANCEUNITS FEET/METER FEETEMPTY DISTANCE 1.31-49.2 ft / 0.4-15.0 m 6.56 FTSPAN 0.33-48.21 ft / 0.1-14.7 m 4.92 FTBLANKING 0.98-48.87 ft. / 0.3-14.9 m 1.64 FTRATE OF CHANGE 0.03-65.6 FT/MIN/ 0.01-20.0 M/MIN 1.64 FT/MINAPPLICATION LIQUIDS/SOLIDS LIQUIDS
FACTORY RESET NO/YES NOTEMPERATURE COMPENSATION ON/OFF OFFSIMULATE NO/YES NOSET PASSWORD NO/YES NOBACKLIGHT OFF/ON (1-60MIN) / PERM 2 MINLOSSTIME 30-900SEC 300SECFAILSAFE 3.6mA, 4.0mA, 20mA, 21mA, HOLD HOLD
FLOW UNITS SEE LIST LT/SECMAXIMUM VALUE 1-99999 1000ZERO OFF SET -0.16 ft TO 0.16 ft 0 ftTOTALIZER COUNT 1-1000000 1TOTALIZER UNITS A-Z, a-z, 0-9 LtTOTALIZER RESET NO/YES NOFLOW CURVE SEE LIST ON PAGE 18 V-NOTCH
SETUP RELAYS NO/YES NO
RELAY1 TO RELAY3 OFF/LO/HI/COUNTER OFF
SETUP LINEARISER NO/YES NOACTIVATE LINEARISER NO/YES YESSETPOINT 1-21 1HEIGHT 0 ft - SPAN 0 FTPERCENTAGE 0-100% 0%

16 KSONIK III Ultrasonic Level Transmitter | Operating instruction manual
6.1 Flow ModeSECURITY CODESecurity code to advance to programming.DEFAULT 5159
CHANNEL SELECTSelection between setting up Channel One, Channel two or setting both the channels at the same time with the same configuration.DEFAULT Channel One
TRANSDUCER SELECTChoose between K10, K20 or K60 transducers. Please make sure that the correct transducer is selected. Once the transducer is selected all parameters saved for that particular channel will be deleted and the channel will revert to a distance mode of operation.DEFAULT K10
MODEChoose Flow.DEFAULT Distance
UNITSChoose between Feet and Meters.DEFAULT Meters
EMPTY DISTANCEThis is the distance from the face of the transducer to the bottom of the flume.DEFAULT 6 ft
SPANThis figure is measuring the range of the instrument i.e. distance from the bottom of the flume to the highest point be-ing measured. Remember, the material must not approach within 1.65 feet of the transducer face or within the blanking distance of the transducer.DEFAULT 4.92 ft
BLANKINGThis is the area where an echo cannot be processed because the return echo would be received while the transducer is still firing.DEFAULT 1.65 ft
RATE OF CHANGEThis is used to set up the rate of change of the level output. The rate of change governs the rate at which the instru-ment outputs changes. By increasing the rate of change (13 ft/min) it will allow the KSONIK III to monitor rapid changes in flow. If the level moves faster than 1.65 ft/min then increase the rate of change. If a more stable output is required decrease the rate of change (1.0 ft/min).DEFAULT 1.65 ft/min
APPLICATION This selection can be used to select either liquid or solid applications. The solid application will provide more power to locate the correct echo..DEFAULT Liquids

Operating instruction manual | KSONIK III Ultrasonic Level Transmitter 17
FACTORY RESETThis prompt will reset all values entered back to factory setting except the password. Please write down all settings before using this function.DEFAULT No
TEMPERATURE COMPENSATIONSets temperature compensation on or off.DEFAULT Off
SIMULATESimulates the head, Relay output and mA output at the rate of change selected.DEFAULT No
SET PASSWORDThis prompt will allow you to change the default factory code. Should the factory code be forgotten please contact a local ABB agent for an override password.DEFAULT No
BACKLIGHTChoose between switching on the backlight for 1-60 minutes, switch off the backlight or to switch the backlight perma-nently on.DEFAULT 2 Min
LOSSTIMEThis is the time, in seconds, between last receiving a correct echo and going into the Fail-safe condition. Minimum 30 seconds.DEFAULT 300 Sec
FAILSAFEIf the loss of echo condition is reached then the 4-20mA output will follow the configured settings 3.6mA, 4mA, 20mA, 21mA or Hold the reading at the last recognized echo. This is usually due to a cable being cut.DEFAULT Hold
FLOW UNITSUnits can be set via the alphanumeric display to the desired value.DEFAULT LT/SEC
MAXIMUM VALUEThis is the maximum flow rate of the flume.DEFAULT 1000
ZERO OFFSETChoose between -0.16 ft to 0.16 ft for small errors on the instrument.DEFAULT 0
TOTALIZER COUNTChoose a value where the counter will increment for a certain unit of flow between 1-1000000 when in Flow mode.DEFAULT 1
TOTALISER UNITSIndication of units the totaliser is set up for.DEFAULT Lt
6.1 FLOW MODE (continued)

18 KSONIK III Ultrasonic Level Transmitter | Operating instruction manual
TOTALISER RESETReset the totaliser counter when in Flow mode.DEFAULT No
FLOW CURVEThe flow element can be selected. Select from the list below:V-notch (5/2)Venturi (3/2)Parshall flume 1- 96 inchRectangular weir (3/2)Own curve (21 point lineariser)DEFAULT V-Notch
SETUP RELAYSThis prompt will allow a user to enter the menu to set up the relay parameters.DEFAULT No
RELAY1The relays can be used either for a high alarm, a low alarm or counter in flow mode. The difference is that a high alarm has its reset below the set point, and a low alarm has its reset above the set point. The counter will output a pulse every time a certain value is reached from the totalizer, which increments by more than a user defined value when in flow mode. The relays can also be set up to have pump cycling enabled.DEFAULT Off
CHANNELThe channel to which the relay corresponds.DEFAULT On
SET POINTThis is the distance value whereby the relay will set.DEFAULT 1.65 ft
RESET POINTThis is the distance value whereby the relay will reset.DEFAULT 1.65 ft
PUMP CYCLESelect the type of pump control that is required. The KSONIK III has two pump cycling routines which can be used to efficiently distribute the run cycles between various pumps that serve a common purpose. The ROTATE pump routine will use the relay set points configured for the pumps that require cycling, and rotate these set points among the pumps with the COMPLETION of each cycle. NOTE: The COMPLETION of a cycle is reached once all pumps have switched OFF. The FIFO (First In First Out) routine will use the relay set points configured for the pumps that require cycling, and rotate these set points among the pumps for subsequent cycles. NOTE: The FIFO routine ensures that the lead pump will always switch off first. HINT: It is advisable to configure the reset points for the pumps that require cycling to the same level.DEFAULT No
COUNT VALUEChoose a value where the relay will pulse between 1-1000000 when in Flow mode.DEFAULT 1000
6.1 FLOW MODE (continued)

Operating instruction manual | KSONIK III Ultrasonic Level Transmitter 19
RELAY2As above.DEFAULT Off
RELAY3 As above.DEFAULT Off
RELAY4As above.DEFAULT Off
RELAYSAs above.DEFAULT Off
SETUP LINEARIZERThis prompt will allow you to input a curve to linearize the flume. The span is divided by 21 and you can input the new height for each point as well as the corresponding percentage fill at that point. KSONIK III prompts you at each point.DEFAULT No
ACTIVATEThis function activates the linearizer.DEFAULT Yes
SETPOINTThis is the number at which point the user is inputting a linearized point.
HEIGHT/PERCENTAGEHeight is the distance of the flume from the bottom to a point where a suitable percentage volume can be determined.DEFAULT 0.00 ft Enter the percentage volume of flume at a corresponding distance away from the bottom of the vessel or flume.DEFAULT 0.00%
6.1 FLOW MODE (continued)CLEAR RELAYSClears the number of cycles as well as the run hours recorded for particular relay specified.DEFAULT No

20 KSONIK III Ultrasonic Level Transmitter | Operating instruction manual
Set point 1Height 0.0 mPercentage 0.00%
Set point 10Height 2.22 ftPercentage 30.19 %
Set point 12Height 2.71 ftPercentage 40.79 %
Set point 13Height 2.95 ftPercentage 46.48 %
Set point 14Height 3.20 ftPercentage 52.40 %
Set point 15Height 3.45 ftPercentage 58.57 %
Set point 16Height 3.69 ftPercentage 64.95 %
Set point 17Height 3.98 ftPercentage 71.55 %
Set point 18Height 4.18 ftPercentage 78.37 %
Set point 19Height 4.43 ftPercentage 85.38 %
Set point 20Height 4.68 ftPercentage 92.59 %
Set point 21Height 4.92 ftPercentage 100.00%
Set point 2Height 0.27 ftPercentage 1.12 %
Set point 3Height 0.49 ftPercentage 3.16 %
Set point 4Height 0.74 ftPercentage 5,80 %
Set point 5Height 0.98 ftPercentage 8.94 %
Set point 6Height 1.23 ftPercentage 12.50 %
Set point 7Height 1.48 ftPercentage 12.50 %
Set point 8Height 1.72 ftPercentage 20.71 %
Set point 9Height 1.97 ftPercentage 25.30 %
Set point 11Height 2.46 ftPercentage 35.36 %
7.0 Working with the Key Pad in Run ModeENTER
Press once. The screen changes to the status screen of the relays.ENTER
Dist. 6.00 ftmA Output: 7.20mAInstant: 6.00 ftTemperature: 20°CPercentage: 20.00%
K 10Channel One
Relay State Hour CyclesREL 1: OFF LO 0 2REL 2: ON HI 1 2REL 3: ON HI 3 5REL 4: OFF LO 0 0REL 5: INACTIVE
In run mode the key has an alternative function.
While in run mode the screen looks similar to the following:
Operating instruction manual | KSONIK III Ultrasonic Level Transmitter 21
Press again and the screen goes to the onscreen KScope.ENTER
E ft
2v E 0.4D 39G 99P 15
49.0
Pressing again while in the onscreen KScope screen will revert
the screen into normal run mode.
ENTER
7.1 Run Mode Screen in Distance/Level Mode
Dist. 6.00 ftmA Output: 7.20mAInstant: 6.00 ftTemperature: 20°CPercentage: 20.00%
K 10
1. Graphical representation of percentage fill.
2. Instantaneous distance3. Temperature of transducer
4. Percentage fill5. mA Output
6. Distance / Level Measurement
7. Type of transducer8. Channel Selected
1. The graphical representation of the percentage fill of the application.2. The instantaneous distance that the instrument is measuring at that specific time. Please note that this value can
change on each pulse.3. The temperature, which is being measured at the transducer, if temperature compensation has been enabled.4. The value of percentage fill of the instrument.5. The mA output of the instrument.6. The average Distance/Level value which is calculated.7. Type of transducer used.8. Channel Selected.
Channel One
4
20
t
mA Output ScreenNote: The screen reverts back to normal run mode within 2 minutes
ENTERPressing again while in the onscreen KScope screen will revert the screen into normal run mode.

22 KSONIK III Ultrasonic Level Transmitter | Operating instruction manual
Relay State Hour CyclesREL 1: OFF LO 0 2REL 2: ON HI 1 2REL 3: ON HI 3 5REL 4: OFF LO 0 0REL 5: INACTIVE
7.2 THE RELAY STATE SCREEN
Press while in run mode to get the RELAY STATE SCREEN.ENTER
1. Relay state headings.2. The number of cycles each relay has been through.3. The number of hours each relay has been on.4. The state at which the relay is at ON, OFF, HI, LO and CO-Counter.5. The relay indication number.
7.3 ONSCREEN KScope
Press twice while in run mode in order to get to the onscreen KScope.ENTER
E ft
2v L299 E 0.4D 39G 50P 15
49.0
1. Echo size in volts2. Instant distance3. Gain4. Power
6. Echo7. Threshold line
8. Indicates E when echo found. Indicates N when there is too much noise. Indicates O when loss of echo.
10. Loss timer: visible when no echo detected
5. Empty distance
9. Maximum voltage
1. The maximum returned echo size in volts e.g. 0.4V2. Displayed instant distance from transducer to substance or object being measured. e.g. 39 ft3. The Gain needed to get the particular returned echo signal to give a particular measurement. e.g. 50%4. The amount of power needed to obtain an echo. e.g. 15% power5. Maximum distance or span. e.g. 49 ft6. Graphical representation of the echo received by the transducer.7. Threshold line whereby any echoes below this line will not be accepted.8. Indication of good echo, noise, or loss of echo. E.g. E for good echo, N for noise or O for loss of echo.9. The maximum voltage scale of the Onscreen KScope.10. The echo loss timer started when no signal is present.
See page 37 for details of KScope
1. Description of column
2. Number of cycles
3. Hours relay has been on4. Relay state
5. Relay number
Operating instruction manual | KSONIK III Ultrasonic Level Transmitter 23
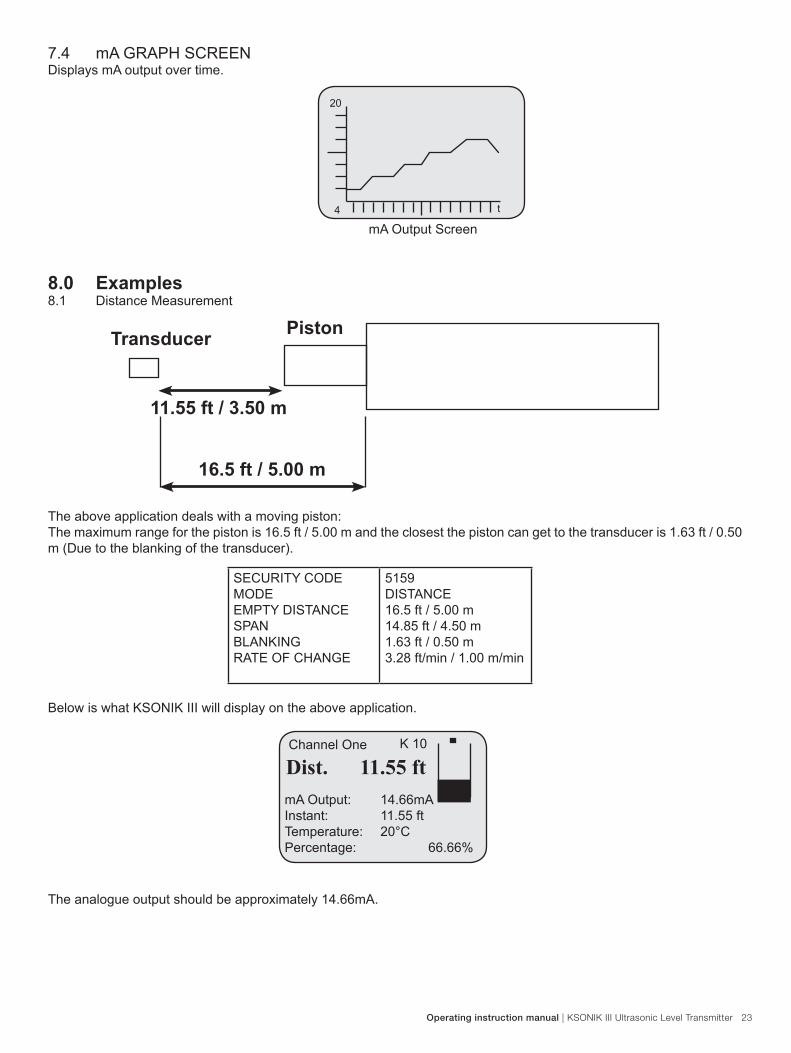
7.4 mA GRAPH SCREENDisplays mA output over time.
8.1 Distance Measurement
11.55 ft / 3.50 m
16.5 ft / 5.00 m
Transducer Piston
The above application deals with a moving piston:The maximum range for the piston is 16.5 ft / 5.00 m and the closest the piston can get to the transducer is 1.63 ft / 0.50 m (Due to the blanking of the transducer).
Below is what KSONIK III will display on the above application.
The analogue output should be approximately 14.66mA.
Dist. 11.55 ftmA Output: 14.66mAInstant: 11.55 ftTemperature: 20°CPercentage: 66.66%
K 10
SECURITY CODEMODEEMPTY DISTANCESPANBLANKINGRATE OF CHANGE
5159DISTANCE16.5 ft / 5.00 m14.85 ft / 4.50 m1.63 ft / 0.50 m3.28 ft/min / 1.00 m/min
Channel One
8.0 Examples
4
20
t
mA Output Screen

24 KSONIK III Ultrasonic Level Transmitter | Operating instruction manual
8.2 Level Measurement
8.3 Level Measurement and Engineering Units
SECURITY CODEMODEEMPTY DISTANCESPANBLANKINGRATE OF CHANGESETUP RELAYSRELAY 1RELAY 1 SETRELAY 1 RESETRELAY 2RELAY 2 SETRELAY 2 RESET
5159LEVEL16.5 ft / 5.00 m14.85 ft / 4.50 m1.63 ft / 0.50 m3.28 ft/min/1.00 m/minYESHI13.2 ft / 4.00 m11.55 ft / 3.50 mLO3.28 ft / 1.00 m4.95 ft / 1.50 m
TIP: Set the relay set and reset point further apart to avoid the relays from chattering. Below is what KSONIK III will display on the application above. Relay 1 will switch on (set) when the level rises above 13.2 ft / 4.00 m and reset when the level goes below 11.55 ft / 3.50 m. Relay 2 will switch on (set) when the level drops below 3.28 ft / 1.00 m and reset when the level goes above 4.95 ft / 1.50 m.
Level 13.94 ftmA Output: 19.11mAInstant: 2.46 ftTemperature: 20°CPercentage: 94.44%
K 10
ENG 37.77 LITmA Output: 19.11mAInstant: 2.46 ftTemperature: 20°CPercentage: 94.44%
K 10
Empty distance16.5 ft / 5.00 m
2.46 ft / 0.75 m Blanking distance 1.63 ft / 0.50 m
RELAY1 SET 13.2 ft / 4.00 mRELAY 1 RESET 11.55 ft / 3.50 m
Span 14.85 ft / 4.50 m
RELAY 2 SET 3.28 ft / 1.00 mRELAY2 RESET 4.95 ft / 1.50 m
Empty distance16.5 ft / 5.00 m
2.46 ft / 0.75 m Blanking distance 1.63 ft / 0.50 m
Span 14.85 ft / 4.50 m
SECURITY CODEMODEEMPTY DISTANCESPANBLANKINGRATE OF CHANGEENGINEERING UNITSMAXIMUM VALUEDECIMAL POINT
5159LEVEL16.5 ft / 5.00 m14.85 ft / 4.50 m1.63 ft / 0.50 m3.28 ft/min / 1 m/minLIT40.0040.00
Below is what KSONIK I will display on the above application.The analogue output should be approximately 19.11 mA.
Channel One
Channel One

Operating instruction manual | KSONIK III Ultrasonic Level Transmitter 25
Before setting up the linearizer, check all other parameters are calculated for your application.
1. Scroll through the menus with either the or until the menu SETUP LINEARIZER ap-pears.
2. Use to select YES and then press
3. A prompt ACTIVATE LINEARIZER will appear. Use to select YES and then press
4. Set up each of the 21 points of the linearizer as needed by using and then pressing when the correct value is entered in each point of the linearizer.
8.4 Level Measurement Using the Lineariser Function
Empty distance16.5 ft / 5.00 m
2.46 ft / 0.75 m
8.20 ft / 2.50 m
Blanking distance 1.63 ft / 0.50 m
Span 14.85 ft / 4.50 m
SECURITY CODEMODEEMPTY DISTANCESPANBLANKINGRATE OF CHANGESETUP LINEARISERACTIVATE LINEARISER0.00 ft8.20 ft14.77 ft
5159LEVEL16.5 ft / 5.00 m14.85 ft / 4.50 m1.63 ft / 0.50 m3.28 ft/min / 1.00 m/minYESYES0%40%100%
100
90
80
70
60
50
40
30
20
10
00.00 2.46 4.92 7.38 9.84 12.30 14.76
LEVEL (FT)
PER
CEN
TAG
E (%
)
PERCENTAGE VS. LEVEL
Note: Due to the curve of the graph being linear only 3 points are needed from the linearizer.
SCROLL
▼
ENTER
ENTER
▼
ENTER▼
▼
ENTER▼
▼
5. When finished press
Shown to the left is what KSONIK III will display on the above applica-tion. The analogue output should be approximately 18.80mA.
RUN
Level 13.94 ftmA Output: 18.80mAInstant: 2.46 ftTemperature: 20°CPercentage: 92.50%
K 10Channel One

26 KSONIK III Ultrasonic Level Transmitter | Operating instruction manual
8.5 Level Measurement Using the Lineariser Function with a Non-Linear Vessel
Empty distance16.5 ft / 5.00 m
2.46 ft / 0.75 m
Span 14.85 ft / 4.50 m
SECURITY CODEMODEEMPTY DISTANCESPANBLANKINGRATE OF CHANGESETUP LINEARISERACTIVATE LINEARISER0.00 ft0.74 ft1.48 ft2.22 ft2.95 ft3.69 ft4.43 ft5.17 ft5.91 ft6.64 ft7.38 ft8.12 ft8.86 ft9.60 ft10.34 ft11.07 ft11.81 ft12.55 ft13.29 ft14.03 ft14.77 ft
5159LEVEL16.5 ft14.76 ft1.63 ft3.28 ft/minYESYES0.00%0.25%1.00%2.25%4.00%6.25%9.00%12.25%16.00%20.25%25.00%30.25%36.00%42.25%49.00%56.25%64.00%72.25%81.00%90.25%100%
100
90
80
70
60
50
40
30
20
10
00.00 2.46 4.92 7.38 9.84 12.30 14.76
LEVEL (FT)
PER
CEN
TAG
E (%
)
PERCENTAGE VS. LEVEL
Note: Due to the curve of the graph being non-linear all 21 points are needed from the lineariser.The display shown to the bottom right is what KSONIK III will display on the above application. The analogue output should be approximately 18.31 mA.
Level 13.94 ftmA Output: 18.31mAInstant: 2.46 ftTemperature: 20°CPercentage: 89.44%
K 10Channel One

Operating instruction manual | KSONIK III Ultrasonic Level Transmitter 27
8.6 Venturi flume
Flow
3.94 ft / 1.20 m
3 X HThis is an example of a Venturi Flume application. The transducer is mounted 3.94 ft / 1.20 m above the zero of the flume, this is the Empty Distance. The Span is 1.97 ft / 0.60 m and the Blanking Distance is 1.97 ft / 0.60 m. The transducer must be fitted 3 x maximum head upstream. There is an external counter connected to the relay counter. The water flow must not dam up and cause a build-up inside the flume.
Please Note! The Empty Distance is to the zero of the flume and not the bottom of the flume.
SECURITY CODEMODEEMPTY DISTANCESPANBLANKINGRATE OF CHANGEFAIL TIMERFAIL SAFEFLOW UNITSMAXIMUM FLOWFLOW CURVESETUP RELAYSRELAY 1RELAY 1 COUNTERVALUERELAY 2RELAY 2 SETRELAY 2 RESETTOTALISER RESETZERO OFFSET
5159FLOW3.94 ft / 1.20 m1.97 ft / 0.60 m1.97 ft / 0.60 m3.28 ft/min / 1.00 m/min300HOLDLt/sec1435VenturiYESCounter1000
HI1.64 ft / 0.50 m1.61 ft / 0.49 mNO0
Shown to the right is what KSONIK III will display on the above application. The relay will drive the counter for every 1000 Lt/s and 1m³ of flow. The analogue out-put should be approximate-ly 14.39 mA. Relay 2 would set at above 1.64 ft / 0.50 m and reset at below 1.61 ft / 0.49 m. TIP: Set the relay set and reset point further apart to avoid the relays from chattering.
Flow: 932.17Lt/sT: 00001513408 Lt Head: 1.48ft.mA Output: 14.39 mAInstant: 2.46 ft.Temperature: 20°CPercentage: 64.95%
K 10
8.7 V-NotchThis is an example of a V-Notch application. The transducer is mounted 6.56 ft / 2.00 m above the Notch in the V, this is the Empty Distance. The Span is 4.92 ft / 1.50 m and the Blanking Distance is 1.64 ft / 0.50 m. The transducer must be fitted 3 x maximum head-height upstream. There is an external counter connected to the relay counter. The water flow must not dam up and cause a build-up behind the weir.
Please Note! The Empty Distance is to the bottom of the V-Notch and not the bottom of the weir.

28 KSONIK III Ultrasonic Level Transmitter | Operating instruction manual
SECURITY CODEMODEEMPTY DISTANCESPANBLANKINGRATE OF CHANGEFAIL TIMERFAIL SAFEFLOW UNITSMAXIMUM FLOWFLOW CURVESETUP RELAYSRELAY 1RELAY 1 COUNTERRELAY 2RELAY 2 SETRELAY 2 RESETTOTALISER RESETZERO OFFSET
5159FLOW6.56 ft / 2.00 m4.92 ft / 1.50 m1.64 ft / 0.50 m3.28 ft/min / 1.00 m/min300HOLDLt/sec1222V-NOTCHYESCounter1000HI4.76 ft / 1.45 m4.43 ft / 1.35 mNO0
TIP: Set the relay set and reset point further apart to avoid the relays from chattering.
Below is what KSONIK III will display on the above application. The relay will drive the counter for every 1000 counts. The ana-logue output should be approximately 9.82 mA. Relay 2 will set above 4.76 ft / 1.45 m and reset below 4.43 ft / 1.35 m.
Flow: 444.60Lt/sT: 00001513408 Lt Head: 3.28ft.mA Output: 9.82mAInstant: 3.28 ft.Temperature: 20°CPercentage: 36.38%
K 10
8.8 Differential Level MeasurementSECURITY CODESELECT CHANNELXDUCER TYPE MODEEMPTY DISTANCESPAN BLANKINGRATE OF CHANGESETUP RELAYSRELAY 1RELAY 1 SETRELAY 1 RESETRELAY 2RELAY 2 SETRELAY 2 RESETZERO OFFSETTEMPERATURECOMPENSATION
5159BOTHK10DIFF9.84 ft / 3.00 m8.20 ft / 2.50 m1.64 ft / 0.50 m3.28 ft/min / 1 m/minYESHI2.30 ft / 0.70 m1.65 ft / 0.50 mHI4.26 ft / 1.3 m3.28 ft / 1.0 mONO
Tip: Set the relay set and reset point further apart to avoid the relays from chattering.
Diff. 1.80 ftmA Output: 9.03 mAInstant: 5.90 ftTemperature: 20°CPercentage: 31.42%
K 10
Level 5.74 ftmA Output: 15.20mAInstant: 4.10 ftTemperature: 20°CPercentage: 70.00%
K 10Channel One Channel Two
Showing the differential Showing the level of the Transducer One
If the downstream level is 3.94 ft / 1.20 m and the upstream level is 5.74 ft / 1.75 m then the differential level is 1.80 ft / 0.55 m. The analogue output should be approximately:
• 15.2 mA for analogue 2• 9.03 mA for analogue 1
Relay 1 will set when the Diff is above 2.30 ft / 0.70 m and reset below 1.64 ft / 0.50 m. Relay 2 will set above 4.26 ft / 1.30 m and reset below 3.28 ft / 1.00 m. This is an upstream level alarm.

Operating instruction manual | KSONIK III Ultrasonic Level Transmitter 29
8.9 Working with the Simulator
Empty distance16.5 ft / 5.00 m
2.46 ft / 0.75 m Blanking distance 1.63 ft / 0.50 m
Span 14.85 ft / 4.50 m
SECURITY CODEMODEEMPTY DISTANCESPANBLANKINGRATE OF CHANGESETUP RELAYSRELAY 1RELAY 1 SETRELAY 1 RESETRELAY 2RELAY 2 SETRELAY 2 RESET
5159LEVEL16.5 ft / 5.00 m14.85 ft / 4.50 m1.63 ft / 0.50 m3.28 ft/min / 1.00 m/minYESHI13.2 ft / 4.00 m11.55 ft / 3.50 mLO3.28 ft / 1.00 m4.95 ft / 1.50 m
TIP: Set the relay set and reset point further apart to avoid the relays from chattering.
In order to activate the simulator proceed with the following:
1. Scroll through the menus with either the or until the option Simulate appears.
2. Use to select YES and then press
3. Press to exit the menu.
4. Press or to start the simulator to increase or decrease the level at the rate of change.
Relay 1 will set above 13.3 ft / 4.00 m and reset below 11.55 ft / 3.50 mRelay 2 will set below 3.28 / 1.00 m and reset above 4.95 ft / 1.50 m.
5. Press to stop or start the simulator.
NOTE: In order for the instrument to go back to normal measurement mode, go back to the menus and select NO for the Simulate option or reset the power to the instrument.
SCROLL ENTER
ENTER
RUN
RUN
▼
▼
▼
▼
Level 11.55 ftmA Output: 16.4mAInstant: 4.95 ftTemperature: 20°CPercentage: 77.77%
K 10Channel One
30 KSONIK III Ultrasonic Level Transmitter | Operating instruction manual
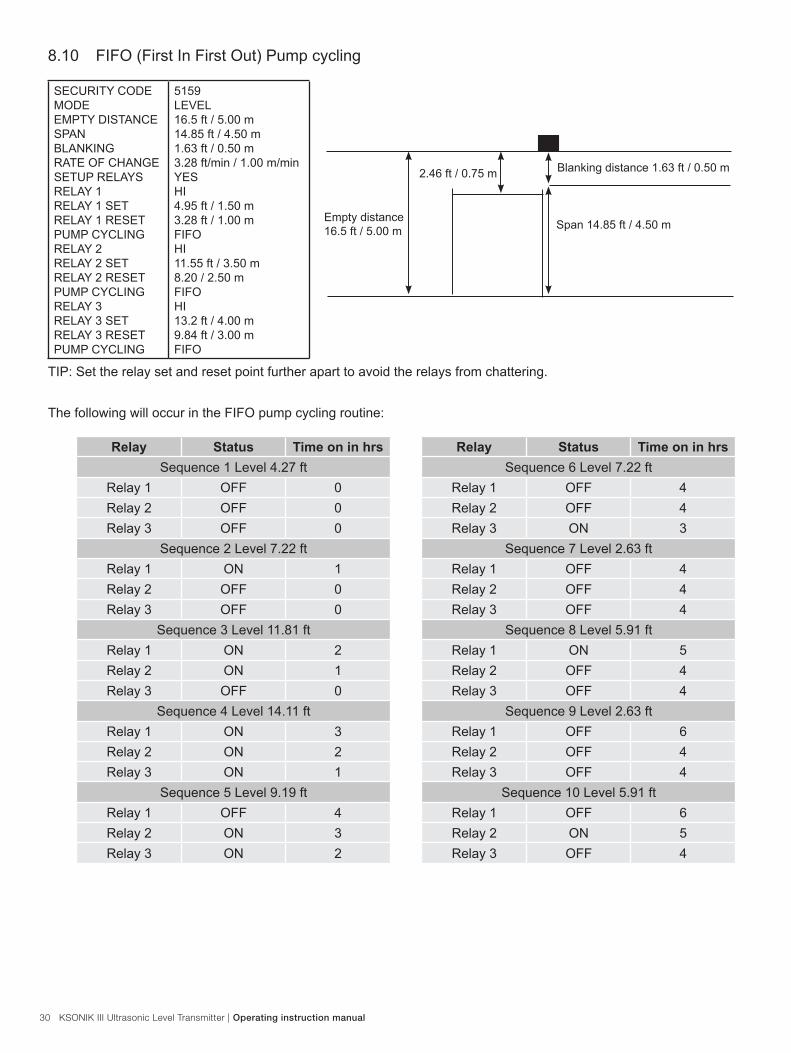
8.10 FIFO (First In First Out) Pump cycling
Empty distance16.5 ft / 5.00 m
2.46 ft / 0.75 m Blanking distance 1.63 ft / 0.50 m
Span 14.85 ft / 4.50 m
SECURITY CODEMODEEMPTY DISTANCESPANBLANKINGRATE OF CHANGESETUP RELAYSRELAY 1RELAY 1 SETRELAY 1 RESETPUMP CYCLINGRELAY 2RELAY 2 SETRELAY 2 RESETPUMP CYCLINGRELAY 3RELAY 3 SETRELAY 3 RESETPUMP CYCLING
5159LEVEL16.5 ft / 5.00 m14.85 ft / 4.50 m1.63 ft / 0.50 m3.28 ft/min / 1.00 m/minYESHI4.95 ft / 1.50 m3.28 ft / 1.00 mFIFOHI11.55 ft / 3.50 m8.20 / 2.50 m FIFOHI13.2 ft / 4.00 m9.84 ft / 3.00 mFIFO
TIP: Set the relay set and reset point further apart to avoid the relays from chattering.
The following will occur in the FIFO pump cycling routine:
Relay Status Time on in hrsSequence 1 Level 4.27 ft
Relay 1 OFF 0Relay 2 OFF 0Relay 3 OFF 0
Sequence 2 Level 7.22 ftRelay 1 ON 1Relay 2 OFF 0Relay 3 OFF 0
Sequence 3 Level 11.81 ftRelay 1 ON 2Relay 2 ON 1Relay 3 OFF 0
Sequence 4 Level 14.11 ftRelay 1 ON 3Relay 2 ON 2Relay 3 ON 1
Sequence 5 Level 9.19 ftRelay 1 OFF 4Relay 2 ON 3Relay 3 ON 2
Relay Status Time on in hrsSequence 6 Level 7.22 ft
Relay 1 OFF 4Relay 2 OFF 4Relay 3 ON 3
Sequence 7 Level 2.63 ftRelay 1 OFF 4Relay 2 OFF 4Relay 3 OFF 4
Sequence 8 Level 5.91 ftRelay 1 ON 5Relay 2 OFF 4Relay 3 OFF 4
Sequence 9 Level 2.63 ftRelay 1 OFF 6Relay 2 OFF 4Relay 3 OFF 4
Sequence 10 Level 5.91 ftRelay 1 OFF 6Relay 2 ON 5Relay 3 OFF 4

Operating instruction manual | KSONIK III Ultrasonic Level Transmitter 31
8.11 Rotate Pump Cycling
Empty distance16.5 ft / 5.00 m
2.46 ft / 0.75 m Blanking distance 1.63 ft / 0.50 m
Span 14.85 ft / 4.50 m
SECURITY CODEMODEEMPTY DISTANCESPANBLANKINGRATE OF CHANGESETUP RELAYSRELAY 1RELAY 1 SETRELAY 1 RESETPUMP CYCLINGRELAY 2RELAY 2 SETRELAY 2 RESETPUMP CYCLINGRELAY 3RELAY 3 SETRELAY 3 RESETPUMP CYCLING
5159LEVEL16.5 ft / 5.00 m14.85 ft / 4.50 m1.63 ft / 0.50 m3.28 ft/in / 1.00 m/minYESHI4.95 ft / 1.50 m3.28 ft / 1.00 mROTATEHI11.55 ft / 3.50 m8.2 ft / 2.50 m ROTATEHI13.2 ft / 4.00 m9.84 ft / 3.00 mROTATE
TIP: Set the relay set and reset point further apart to avoid the relays from chattering.
Relay Status Time on in hrsSequence 1 Level 4.27 ft
Relay 1 OFF 0Relay 2 OFF 0Relay 3 OFF 0
Sequence 2 Level 7.22 ftRelay 1 ON 1Relay 2 OFF 0Relay 3 OFF 0
Sequence 3 Level 11.81 ftRelay 1 ON 2Relay 2 ON 1Relay 3 OFF 0
Sequence 4 Level 14.11 ftRelay 1 ON 3Relay 2 ON 2Relay 3 ON 1
Sequence 5 Level 9.19 ftRelay 1 ON 4Relay 2 ON 3Relay 3 OFF 2
Relay Status Time on in hrsSequence 6 Level 7.22 ft
Relay 1 ON 5Relay 2 OFF 4Relay 3 OFF 2
Sequence 7 Level 2.63 ftRelay 1 OFF 6Relay 2 OFF 4Relay 3 OFF 2
Sequence 8 Level 5.91 ftRelay 1 OFF 6Relay 2 ON 5Relay 3 OFF 2
Sequence 9 Level 2.63 ftRelay 1 OFF 6Relay 2 OFF 6Relay 3 OFF 2
Sequence 8 Level 5.91 ftRelay 1 OFF 6
Relay 2 OFF 6Relay 3 ON 3
The following will occur in the Rotate pump cycling routine:

32 KSONIK III Ultrasonic Level Transmitter | Operating instruction manual
9.0 FAULT FINDINGThere are three categories of possible faults: the malfunction of the instrument, loss of echo, and wrong reading. The biggest problem is to identify the malfunction. If the instrument is not working satisfactorily then remove the transmitter and transducer to the workshop. Connect the power and the transducer directly, not using any extension cable. Aim the transducer to a wall about 4.95 ft / 1.5 m away, making sure that it is perpendicular to the wall. Now reset the instrument by the Factory Reset prompt. The Instrument should now read Distance 4.95 ft / 1.50 m. If it does not read the above then there is a malfunction with the instrument and it should be returned for repair. If the above works and it still does not work in the field then there are many possible problems. A list of possible problems follow.
If the above works and it still does not work in the field then there are many possible problems, which is listed below.Loss of echo.• Check all transducer cable connections and that the joints are soldered together.• Check that you have used RG62U co-axial for an extension cable.• Only use RG62U co-axial cable.• Check the specification of the transducers as agitated surfaces and solids do not reflect as powerful a signal as flat
surfaces.• Aim the transducer straight down if used on liquids and perpendicular if used on solids.• Check if the transducer face is dirty.Wrong reading, always reading close to Transducer• Check to see if the isolation kit has been used correctly and is only hand tight.• If using a flanged transducer always use a rubber gasket and only use plastic nuts and bolts. Only hand tighten the
bolts. • Do not reduce blanking distance below 1.63 ft / 0.5 m unless consultation has been made with ABB.• Electrical noise can cause this error. Remove noise.Wrong reading, anywhere in weir/channel• Check to see if there is a reflection from the wall. Please Note! A piece of wire across a tank can cause a big enough
echo to be accepted.• Are the parameters correct? Reset to factory default and check that KSONIK III reads correctly. If the factory set-
tings are OK then your parameters need to be changed. Re-check these parameters with a tape measure.Wrong reading, erratic.• Reduce Rate of Change. Not many levels move faster than3.28 foot/minute / 1 meter/minute.• Make sure the application is set up correctly. On liquid applications it is very important that the liquid application is
selected. Solid applications are only used for objects or substances being measured, which are in a solid form. Wrong reading, slow• Increase Rate of Change.

Operating instruction manual | KSONIK III Ultrasonic Level Transmitter 33
TERMINAL CONNECTIONS for AC KSONIK III1. Transducer wire black channel 12. Transducer wire red channel 13. Transducer screen channel 14. Transducer wire black channel 25. Trasnducer wire red channel 26. Transducer screen channel 27. Blue wire temperature transducer8. White wire temperature transducer9. Channel 1 + 4-20 mA Output10. Channel 1 - 4-20 mA Output11. Channel 2 + 4-20 mA Output12. Channel 2 - 4-20 mA Output13. Relay 1 normally closed14. Relay 1 common15. Relay 1 normally open16. Relay 2 normally closed17. Relay 2 common18. Relay 2 normally open19. Relay 3 normally closed20. Relay 3 common21. Relay 3 normally open22. Relay 4 normally closed23. Relay 4 common24. Relay 4 normally open25. Relay 5 normally closed
26. Relay 5 common27. Relay 5 normally open28. 220 VAC29. 110 VAC30. Neutral31. GroundPlease see page 36 if extension cable is used.
TERMINAL CONNECTIONS for DC KSONIK III1. Transducer wire black channel 12. Transducer wire red channel 13. Transducer screen channel 14. Transducer wire black channel 25. Transducer wire red channel 26. Transducer screen channel 27. Blue wire temperature transducer8. White wire temperature transducer9. Channel 1 + 4-20 mA Output10. Channel 1 - 4-20 mA Output11. Channel 2 + 4-20 mA Output12. Channel 2 - 4-20 mA Output13. Relay 1 normally closed14. Relay 1 common15. Relay 1 normally open16. Relay 2 normally closed17. Relay 2 common18. Relay 2 normally open19. Relay 3 normally closed20. Relay 3 common21. Relay 3 normally open22. Relay 4 normally closed
23. Relay 4 common24. Relay 4 normally open25. Relay 5 normally closed26. Relay 5 common27. Relay 5 normally open28. 24 VDC29. No connection30. No connection31. 0VPlease see page 36 if extension cable is used.
10.0 TERMINAL CONNECTIONS
Please see page 39 if extension cable is used.
Please see page 39 if extension cable is used.IMPORTANT:Always use a rubber gasket and only use plastic nuts and bolts. Only hand tighten the bolts.

34 KSONIK III Ultrasonic Level Transmitter | Operating instruction manual
11.0 DIMENSIONS
Transmitter
Aiming Kit

Operating instruction manual | KSONIK III Ultrasonic Level Transmitter 35
K10C General Purpose• Maximum Measuring Length (ML) 50 ft. / 15 m• Application: general use non-corrosive liquid• K10C has two extra wires: Blue and white for temperature compensation
4.3 in110 mm
3.2 in80 mm
3.2 in80 mm
36 KSONIK III Ultrasonic Level Transmitter | Operating instruction manual
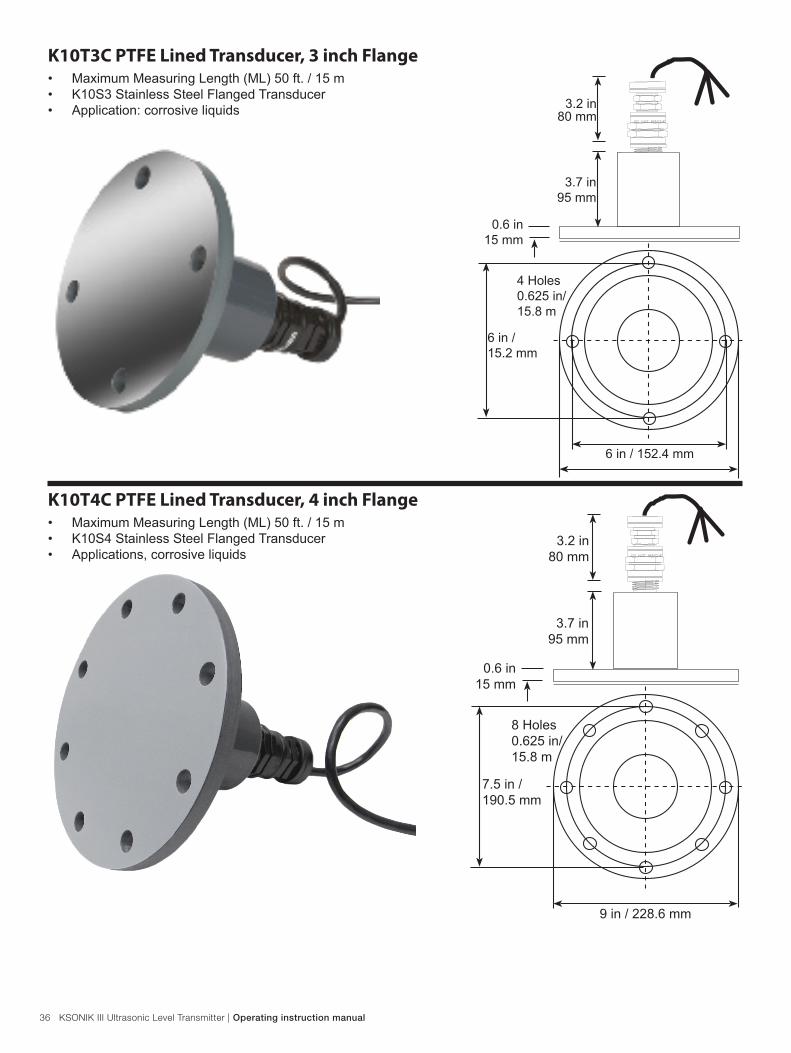
K10T3C PTFE Lined Transducer, 3 inch Flange• Maximum Measuring Length (ML) 50 ft. / 15 m• K10S3 Stainless Steel Flanged Transducer• Application: corrosive liquids
K10T4C PTFE Lined Transducer, 4 inch Flange• Maximum Measuring Length (ML) 50 ft. / 15 m• K10S4 Stainless Steel Flanged Transducer• Applications, corrosive liquids
0.6 in15 mm
3.7 in95 mm
3.2 in80 mm
6 in / 152.4 mm
4 Holes 0.625 in/15.8 m
6 in / 15.2 mm
0.6 in15 mm
3.7 in95 mm
3.2 in80 mm
9 in / 228.6 mm
8 Holes 0.625 in/15.8 m
7.5 in / 190.5 mm

Operating instruction manual | KSONIK III Ultrasonic Level Transmitter 37
K20HC Intermediate Range with Dust• Maximum Measuring Length (ML) 100 ft. / 30 m• Application: solid or dust environments
12.2 in310 mm
6.7 in170 mm
3.2 in80 mm
6.7 in170 mm
K20C Intermediate Range• Maximum Measuring Length (ML) 100 ft. / 30 m• Application: liquids and solids
12.2 in310 mm
6.7 in170 mm
3.2 in 80 mm
3.2 in80 mm

38 KSONIK III Ultrasonic Level Transmitter | Operating instruction manual
K60C Long Range• Maximum Measuring Length (ML) 196 ft. / 60 m• Application: solid or dusty environments
12.2 in310 mm
3.2 in80 mm
6.7 in170 mm
12.2 in310 mm
Operating instruction manual | KSONIK III Ultrasonic Level Transmitter 39
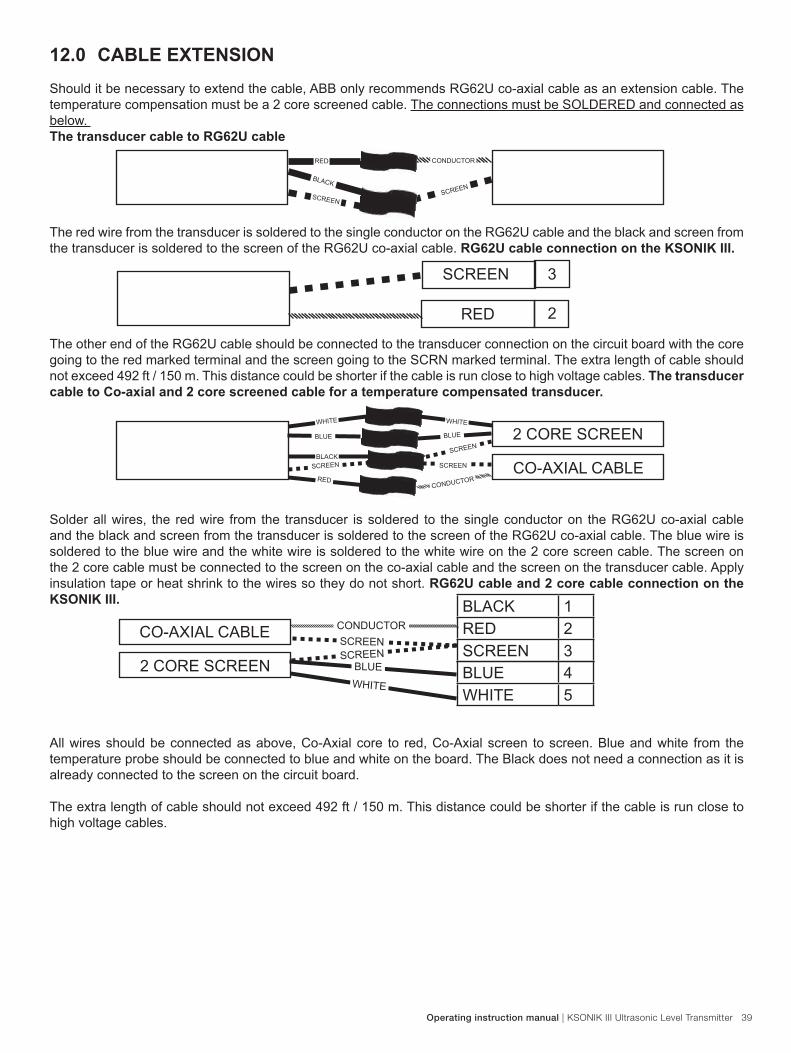
12.0 CABLE EXTENSIONShould it be necessary to extend the cable, ABB only recommends RG62U co-axial cable as an extension cable. The temperature compensation must be a 2 core screened cable. The connections must be SOLDERED and connected as below. The transducer cable to RG62U cable
The red wire from the transducer is soldered to the single conductor on the RG62U cable and the black and screen from the transducer is soldered to the screen of the RG62U co-axial cable. RG62U cable connection on the KSONIK III.
The other end of the RG62U cable should be connected to the transducer connection on the circuit board with the core going to the red marked terminal and the screen going to the SCRN marked terminal. The extra length of cable should not exceed 492 ft / 150 m. This distance could be shorter if the cable is run close to high voltage cables. The transducer cable to Co-axial and 2 core screened cable for a temperature compensated transducer.
Solder all wires, the red wire from the transducer is soldered to the single conductor on the RG62U co-axial cable and the black and screen from the transducer is soldered to the screen of the RG62U co-axial cable. The blue wire is soldered to the blue wire and the white wire is soldered to the white wire on the 2 core screen cable. The screen on the 2 core cable must be connected to the screen on the co-axial cable and the screen on the transducer cable. Apply insulation tape or heat shrink to the wires so they do not short. RG62U cable and 2 core cable connection on the KSONIK III.
All wires should be connected as above, Co-Axial core to red, Co-Axial screen to screen. Blue and white from the temperature probe should be connected to blue and white on the board. The Black does not need a connection as it is already connected to the screen on the circuit board.
The extra length of cable should not exceed 492 ft / 150 m. This distance could be shorter if the cable is run close to high voltage cables.
CONDUCTORRED
BLACKSCREEN
SCREEN
SCREEN 3
2RED
2 CORE SCREEN
CO-AXIAL CABLESCREENSCREEN
RED
BLACKSCREEN
CONDUCTOR
BLUE BLUE
WHITE WHITE
CO-AXIAL CABLE
2 CORE SCREEN
BLACK 1RED 2SCREEN 3BLUE 4WHITE 5
CONDUCTORSCREEN
BLUEWHITE
SCREEN
40 KSONIK III Ultrasonic Level Transmitter | Operating instruction manual
13.0 Declaration of ConformityKSONIK III complies with conformity in accordance with the following tests.
Electromagnetic Compatibility
Susceptibility: EN50082-1 EN801-2,3,4, ENV50204 EN50082-2 ENV50140 ENV50141 EN61000-4-2 EN61000-4-5 EN61000-4-4 EN61000-4-11Emission: EN50081-2 EN55011 EN50081-1 EN55022 EN60555-2, 3Safety: BSEN61010-1
CE Conformity DeclarationKSONIK III is in accordance with EN50081-2 1993 and EN50082-2 1995.Prairieville, Louisiana, December 20, 2002.
Eric Fauveau
Eric Fauveau V.P. R&D, ABB
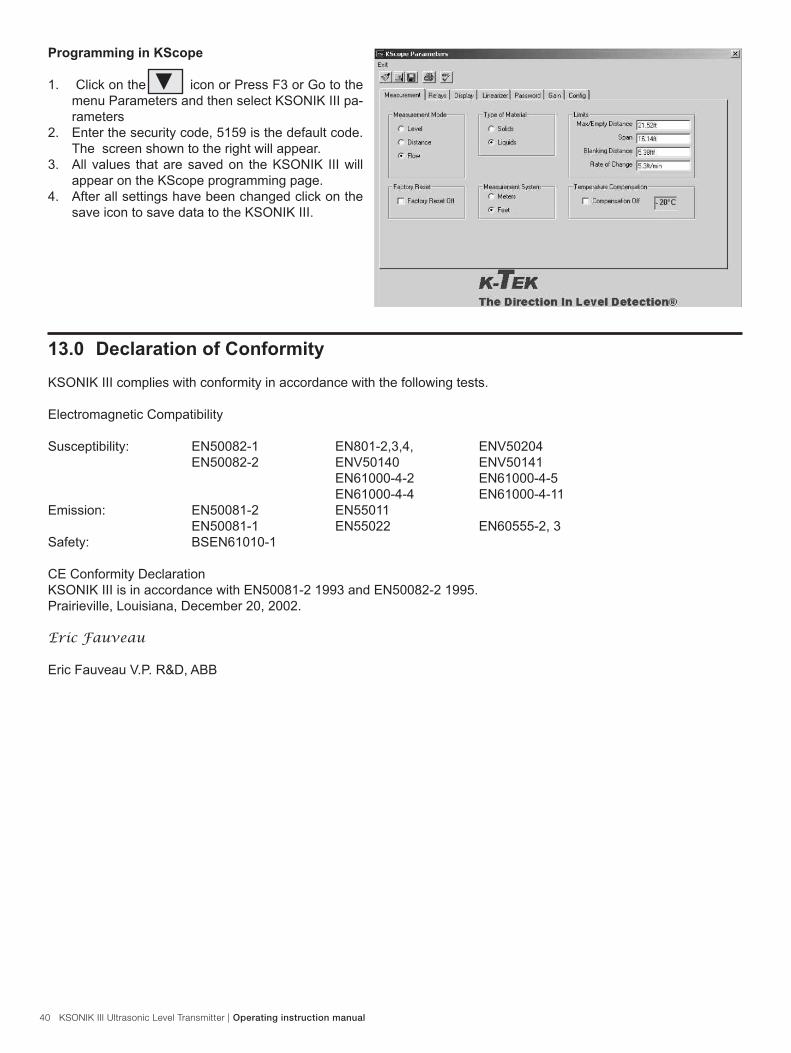
Programming in KScope
1. Click on the icon or Press F3 or Go to the menu Parameters and then select KSONIK III pa-rameters
2. Enter the security code, 5159 is the default code. The screen shown to the right will appear.
3. All values that are saved on the KSONIK III will appear on the KScope programming page.
4. After all settings have been changed click on the save icon to save data to the KSONIK III.
▼

Operating instruction manual | KSONIK III Ultrasonic Level Transmitter 41
14.0 Warranty5 YEAR WARRANTY FOR:KM26 Magnetic Liquid Level Gauges; MagWave Dual Chamber System; LS Series Mechanical Level Switches (LS500, LS550, LS600, LS700, LS800 & LS900); EC External Chambers, STW Stilling Wells and ST95 Seal Pots.
3 YEAR WARRANTY FOR:KCAP300 & KCAP400 capacitance switches. BETA Pressure and Temperature Switches have a limited factory guarantee, excluding wetted parts & consumables.
2 YEAR WARRANTY FOR:AT100, AT100S and AT200 series transmitters; RS80 and RS85 liquid vibrating fork switches; RLT100 and RLT200 reed switch level transmitters; TX, TS, TQ, IX and IM thermal dispersion switches; IR10 and PP10 External Relays; MT2000, MT5000, MT5100 and MT5200 radar level transmitters; RI100 Repeat Indicators; KP paddle switches; A02, A75 & A77 RF capacitance level switches and A38 RF capacitance level transmitters; Buoyancy Level Switches (MS50, MS10, MS8D & MS8F); Magnetic Level Switches (MS30, MS40, MS41, PS35 & PS45).
1 YEAR WARRANTY FOR:KM50 gauging device; AT500 and AT600 series transmitters; LaserMeter and SureShot series laser transmitters; LPM200 digital indicator; DPM100 digital indicators; APM100 analog indicators; KVIEW series digital indicators and controllers; SF50 and SF60 vibrating fork switches, KB Electro-Mechanical Continuous Measuring Devices, KSONIK ultrasonic level switches, transmitters & transducers, ChuteMaster Microwave Transmitter / Receiver and TiltMaster Switches.
SPECIAL WARRANTY CONSIDERATIONS:ABB does not honor OEM warranties for items not manufactured by ABB (i.e. Palm Pilots). These claims should be handled directly with the OEM.
ABB will repair or replace, at ABB’s election, defective items which are returned to ABB by the original purchaser within the period specified above from the shipment date of the item and which is found, upon examination by ABB, to its satisfaction, to contain de-fects in materials or workmanship which arose only under normal use and service and which were not the result of either alterations, misuse, abuse, improper or inadequate adjustments, applications or servicing of the product. ABB’s warranty does not include onsite repair or services. Field service rates can be supplied on request.
If a product is believed to be defective, the original purchaser shall notify ABB and request a Returned Material Authorization be-fore returning the material to ABB, with transportation prepaid by the purchaser. (To expedite all returns/repairs from outside of the United States, consult ABB’s customer service team ([email protected]) to determine an optimal solution for shipping method and turnaround time.) The product, with repaired or replaced parts, shall be returned to the purchaser at any point in the world with transportation prepaid by ABB for best-way transportation only. ABB is not responsible for expedited shipping charges. If the product is shipped to ABB freight collect, then it will be returned to the customer freight collect.
If inspection by ABB does not disclose any defects in material or workmanship, ABB’s normal charges for repair and shipment shall apply (minimum 250.00 USD).
The materials of construction for all ABB products are clearly specified and it is the responsibility of the purchaser to determine the compatibility of the materials for the application.
THE FOREGOING WARRANTY IS ABB’S SOLE WARRANTY AND ALL OTHER WARRANTIES EXPRESSED, IMPLIED, OR STAT-UTORY, INCLUDING ANY IMPLIED WARRANTY OF MERCHANTABILITY OF FITNESS FOR A PARTICULAR PURPOSE, ARE EXCLUDED AND NEGATED TO THE MAXIMUM EXTENT PERMITTED BY LAW. NO PERSON OR REPRESENTATIVE IS AU-THORIZED TO EXTEND ANY OTHER WARRANTY OR CREATE FOR ABB ANY OTHER LIABILITY IN CONNECTION WITH THE SALE OF ABB’S PRODUCTS. THE REMEDIES SET FORTH IN THIS WARRANTY ARE EXCLUSIVE OF ALL OTHER REMEDIES AGAINST ABB. ABB SHALL NOT BE LIABLE FOR ANY CONSEQUENTIAL, INCIDENTAL, OR SPECIAL DAMAGES OF ANY KIND. ABB’S SOLE OBLIGATION SHALL BE TO REPAIR OR REPLACE PARTS (FOUND TO BE DEFECTIVE IN MATERIALS OR WORKMANSHIP) WHICH ARE RETURNED BY THE PURCHASER TO ABB.
15.0 Customer Support
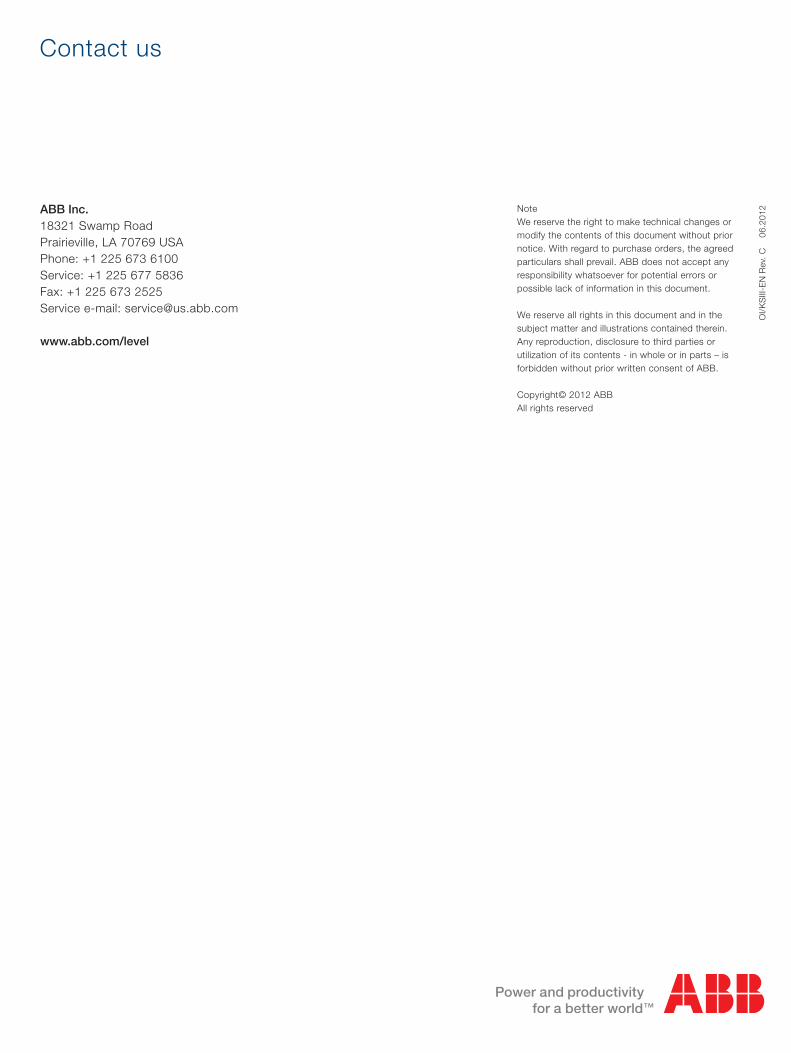
18321 Swamp Road Prairieville, LA 70769 USATel: +(1) 225.673.6100Fax: +(1) 225.673.2525Email: [email protected]: abb.com/level
ABB
42 KSONIK III Ultrasonic Level Transmitter | Operating instruction manual
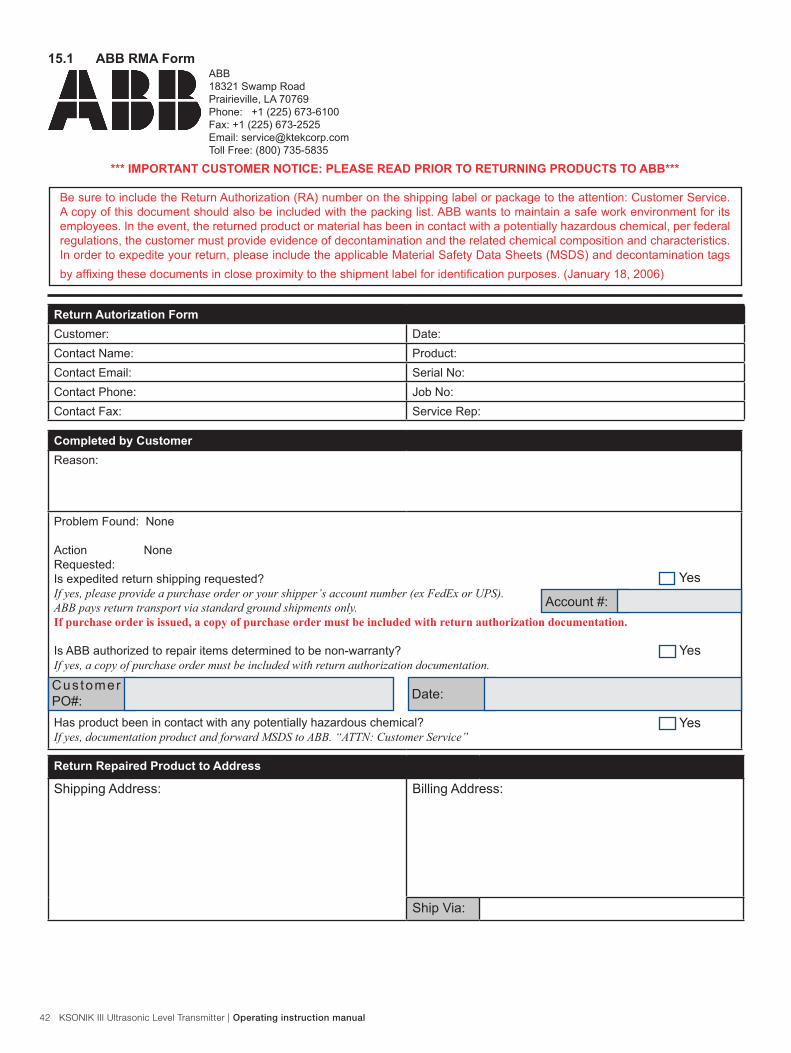
ABB18321 Swamp RoadPrairieville, LA 70769Phone: +1 (225) 673-6100Fax: +1 (225) 673-2525Email: [email protected] Free: (800) 735-5835
*** IMPORTANT CUSTOMER NOTICE: PLEASE READ PRIOR TO RETURNING PRODUCTS TO ABB***
Be sure to include the Return Authorization (RA) number on the shipping label or package to the attention: Customer Service. A copy of this document should also be included with the packing list. ABB wants to maintain a safe work environment for its employees. In the event, the returned product or material has been in contact with a potentially hazardous chemical, per federal regulations, the customer must provide evidence of decontamination and the related chemical composition and characteristics. In order to expedite your return, please include the applicable Material Safety Data Sheets (MSDS) and decontamination tags by affixing these documents in close proximity to the shipment label for identification purposes. (January 18, 2006)
Return Autorization FormCustomer: Date:Contact Name: Product:Contact Email: Serial No:Contact Phone: Job No:Contact Fax: Service Rep:
Completed by CustomerReason:
Problem Found: None
Action NoneRequested:Is expedited return shipping requested?If yes, please provide a purchase order or your shipper’s account number (ex FedEx or UPS). ABB pays return transport via standard ground shipments only.If purchase order is issued, a copy of purchase order must be included with return authorization documentation.
Is ABB authorized to repair items determined to be non-warranty?If yes, a copy of purchase order must be included with return authorization documentation.
Has product been in contact with any potentially hazardous chemical?If yes, documentation product and forward MSDS to ABB. “ATTN: Customer Service”
Account #:
Yes
Yes
Yes
Customer PO#: Date:
Return Repaired Product to Address
Shipping Address:
Billing Address:
Ship Via:
15.1 ABB RMA Form

Operating instruction manual | KSONIK III Ultrasonic Level Transmitter 43
OI/
KS
III-E
N R
ev.
C
06
.201
2
Contact us
NoteWe reserve the right to make technical changes or modify the contents of this document without prior notice. With regard to purchase orders, the agreedparticulars shall prevail. ABB does not accept any responsibility whatsoever for potential errors or possible lack of information in this document.
We reserve all rights in this document and in the subject matter and illustrations contained therein. Any reproduction, disclosure to third parties or utilization of its contents - in whole or in parts – is forbidden without prior written consent of ABB.
Copyright© 2012 ABBAll rights reserved
ABB Inc.18321 Swamp RoadPrairieville, LA 70769 USAPhone: +1 225 673 6100Service: +1 225 677 5836Fax: +1 225 673 2525Service e-mail: [email protected]
www.abb.com/level