kayla, sonny boy body pattern - expressions - dollslettersize).pdf · 14” - standing body pattern...
TRANSCRIPT
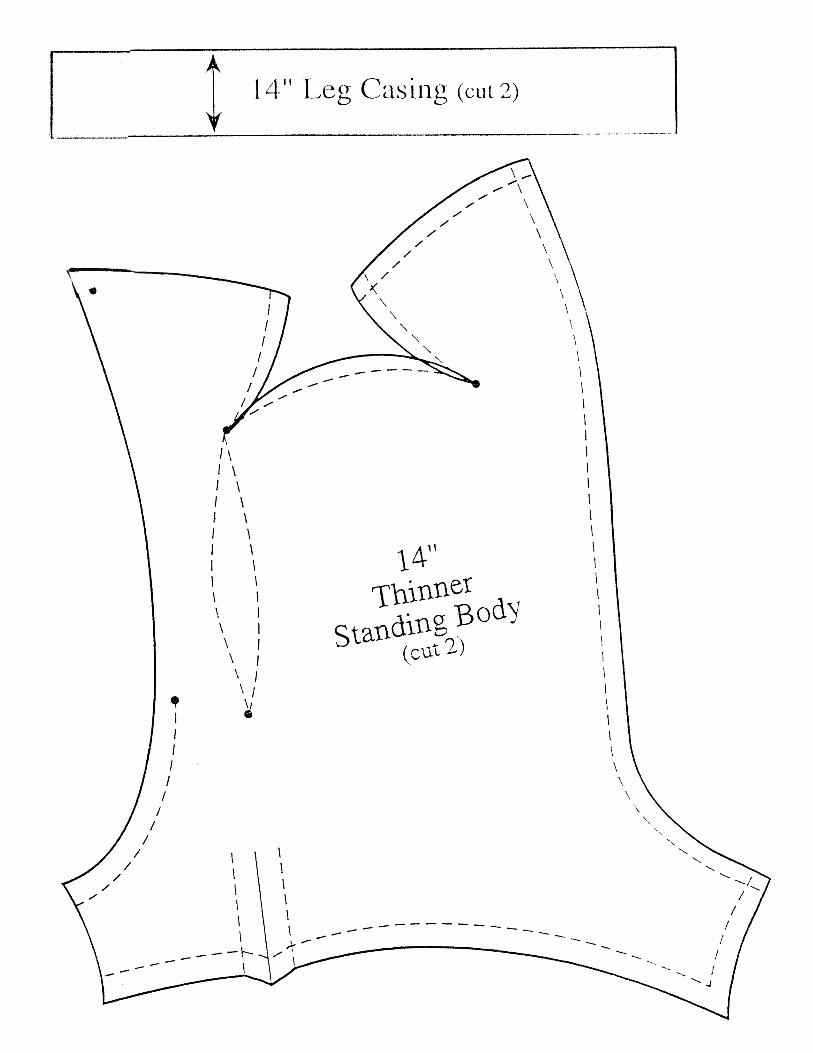
14” - Standing Body Pattern and Assembling Instructions
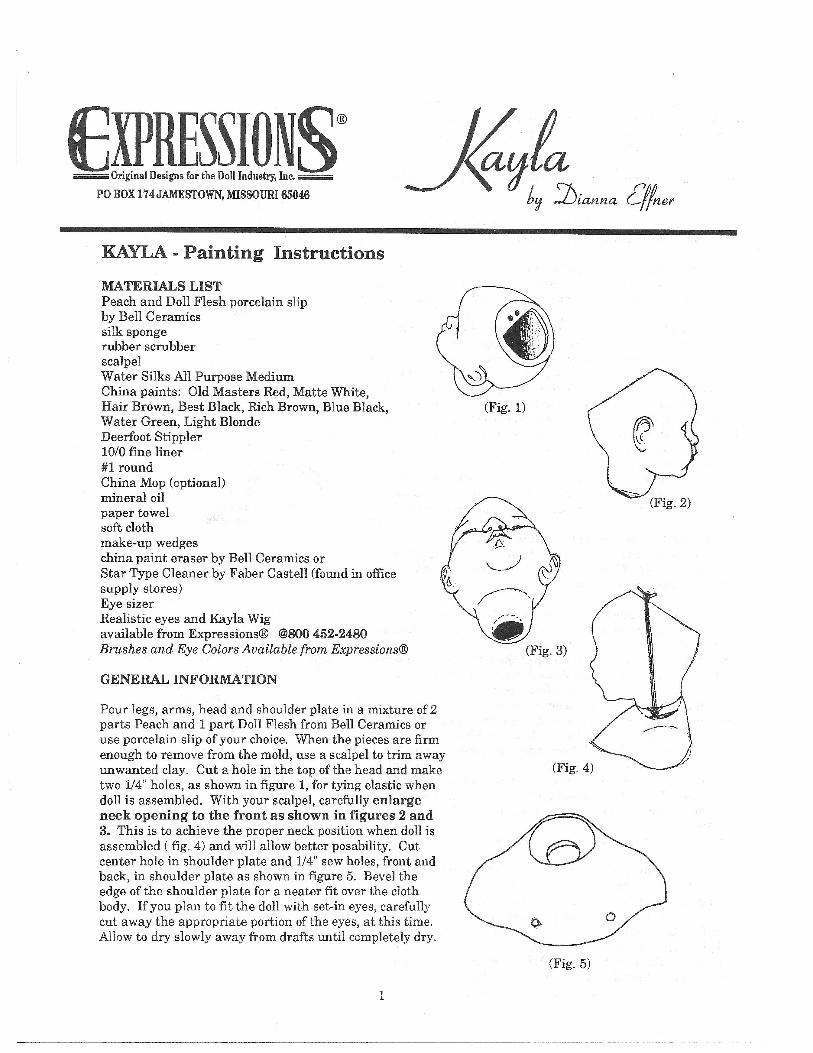
MATERIALS LISTArmature30” of number 10 gauge TW stranded cable (can be purchased at some hardware and electrical supply stores)Polyester fiberfilLong blunt tool (chop stick, etc.)Exacto knife or other sharp blade for stripping plastic casing from cableWire CuttersPolyester fiber-fil or paper towelingLow Temp glue and glue gunFinished porcelain hands, feetshoulder plate and head
Cloth Body1/3 yd. of 45" wide heavy weight muslinThread to match20 gauge copper wire Needle nose pliersPolyester fiber-fil14" of 1/8" round elastic8" of 1/4" twill tapeFray CheckCraft glue such as VelveretteWater soluble marker
GENERAL INFORMATION
Cut pattern carefully on bold line being sure to cut out all pieces. Mark darts and pattern “dots” on wrong side of fabric unless otherwise indicated. All seam allow-ances are 1/4” unless otherwise stated. If you wish to save the original pattern, use vellum or tracing paper for pattern pieces.
Cut out all pattern pieces. You will have:2 body pieces2 arms 2 leg casing pieces
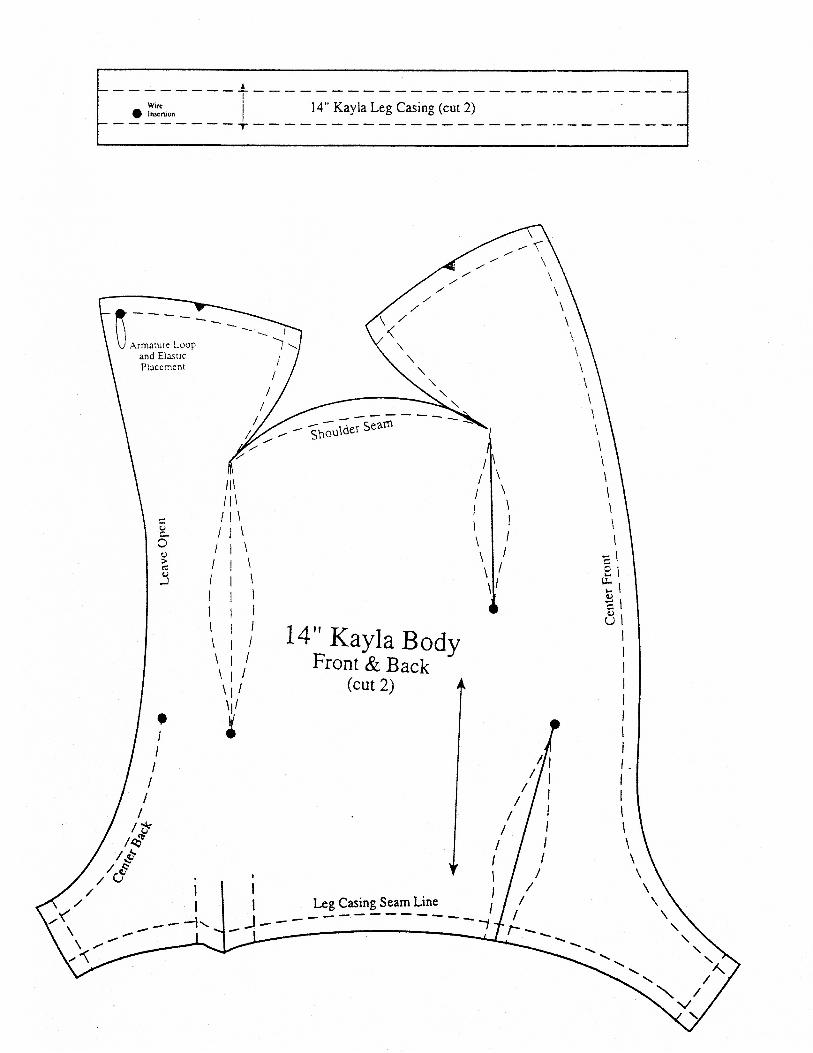
Armature Construction
14”
1
Kayla, Sonny BoyBody Pattern
April 15, 1998(660) 849-2114 fax (660) 849-2358
by Dianna

Cut two 14 1/2” lengths of 10 gauge wire. Strip the casing from a four inch section as shown. (fig. 1)
Twist the two lengths together as shown to form the cen-tral “spine” of the armature. (fig. 2)
Bend limbs at “shoulders” and at “hips” checking the shape against the diagram provided (see insert). Trim if necessary.
Leaving armature over diagram, slip fired and blushed legs into position. Check against diagram to see if wires are cut to proper length. If any part is too long, set aside the porcelain piece and trim away some of the wire. Check against the diagram until everything is in correct alignment and proportion. (Note: mark arm positioning at this time) With armature and legs in standing position (fig. 3), firmly pack polyester fiber-fil inside leg cavity. Be sure to pack tightly around armature. Keep armature centered in leg cavity. Stuff to within 1" of leg rim. Fill remaining cavity with low temp glue, being careful to glue beneath leg rim and around armature beads. Keep armature centered in leg cavity.
WARNING: All glue guns are hot enough to cause burns. Use care when handling.
Cloth Body ConstructionStitch darts on both body pieces. Press toward center seam.
Stitch top seams on both body pieces matching arrows. Clip curves and press (fig. 4).
Ease fabric of shoulder seam. Pin and stitch seams as shown, being sure to taper seam at each end (fig. 5). Clip curves.
Matching top seams and with right sides together, pin and stitch body pieces. Be sure to leave opening for stuff-ing in center back seam. Clip curves.
Fold edges of casing lengthwise. With all raw edges and right sides together, pin to leg opening of body. Sew along casing seam line. Press seam allowance toward body.
With right sides together, pin and stitch crotch seam, matching center back and center front seams (fig. 6). Clip and press.
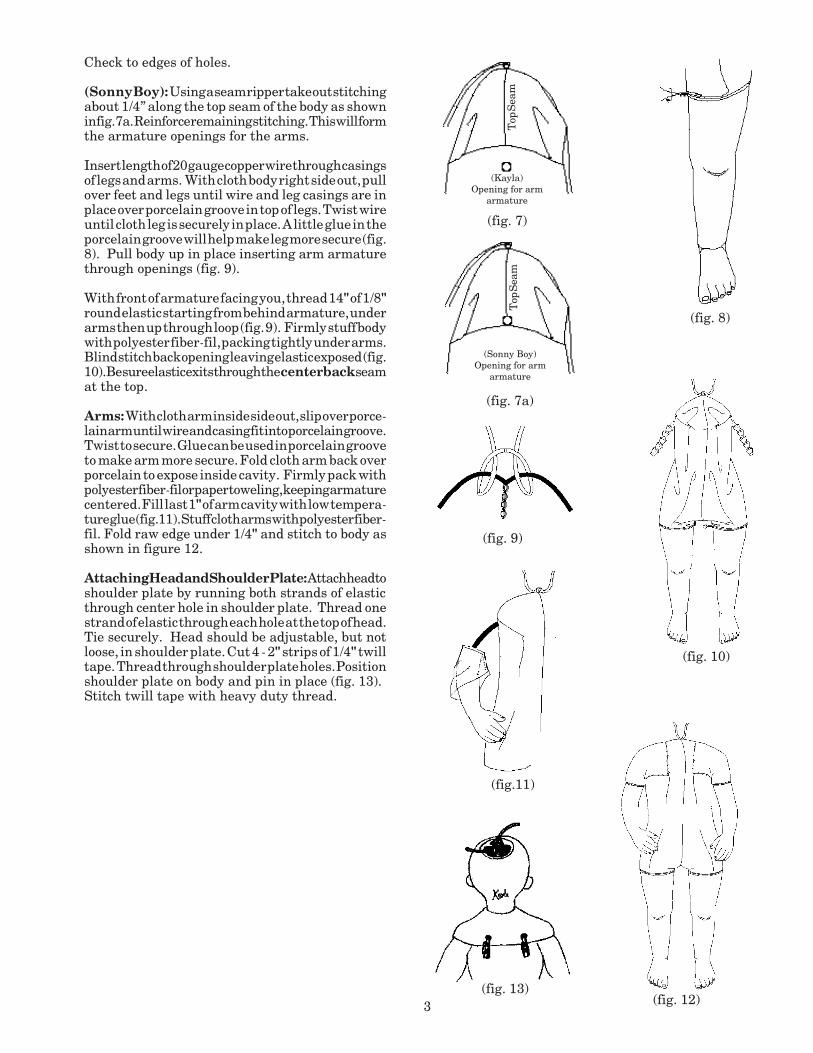
Stitch arms to dot. Do not attach to body at this time. Arms and Body ConstructionCut a small hole on either side of body top, 1/2" below the seam that runs across the top of body (fig. 7). These are the openings for the arm armatures. Apply Fray
Check to edges of holes.
(Sonny Boy): Using a seam ripper take out stitching about 1/4” along the top seam of the body as shown in fig. 7a. Reinforce remaining stitching. This will form the armature openings for the arms.
Insert length of 20 gauge copper wire through casings of legs and arms. With cloth body right side out, pull over feet and legs until wire and leg casings are in place over porcelain groove in top of legs. Twist wire until cloth leg is securely in place. A little glue in the porcelain groove will help make leg more secure (fig. 8). Pull body up in place inserting arm armature through openings (fig. 9).
With front of armature facing you, thread 14" of 1/8" round elastic starting from behind armature, under arms then up through loop (fig. 9). Firmly stuff body with polyester fiber-fil, packing tightly under arms. Blind stitch back opening leaving elastic exposed (fig. 10). Be sure elastic exits through the center back seam at the top.
Arms: With cloth arm inside side out, slip over porce-lain arm until wire and casing fit into porcelain groove. Twist to secure. Glue can be used in porcelain groove to make arm more secure. Fold cloth arm back over porcelain to expose inside cavity. Firmly pack with polyester fiber-fil or paper toweling, keeping armature centered. Fill last 1" of arm cavity with low tempera-ture glue (fig.11). Stuff cloth arms with polyester fiber-fil. Fold raw edge under 1/4" and stitch to body as shown in figure 12.
Attaching Head and Shoulder Plate: Attach head to shoulder plate by running both strands of elastic through center hole in shoulder plate. Thread one strand of elastic through each hole at the top of head. Tie securely. Head should be adjustable, but not loose, in shoulder plate. Cut 4 - 2" strips of 1/4" twill tape. Thread through shoulder plate holes. Position shoulder plate on body and pin in place (fig. 13). Stitch twill tape with heavy duty thread.
(fig. 4)
(fig. 5)
(fig. 6)
(fig. 8)
(fig. 9)
(fig. 7)
(fig. 10)
(fig. 12)
(fig.11)
(Kayla)Opening for arm
armature
32
Top
Sea
m
(fig. 1)
5 1/2”
3 3/4”
5 1/4”
(fig. 2)
(fig. 3)
(fig. 13)
(fig. 7a)
Top
Sea
m
(Sonny Boy) Opening for arm
armature
Cut two 14 1/2” lengths of 10 gauge wire. Strip the casing from a four inch section as shown. (fig. 1)
Twist the two lengths together as shown to form the cen-tral “spine” of the armature. (fig. 2)
Bend limbs at “shoulders” and at “hips” checking the shape against the diagram provided (see insert). Trim if necessary.
Leaving armature over diagram, slip fired and blushed legs into position. Check against diagram to see if wires are cut to proper length. If any part is too long, set aside the porcelain piece and trim away some of the wire. Check against the diagram until everything is in correct alignment and proportion. (Note: mark arm positioning at this time) With armature and legs in standing position (fig. 3), firmly pack polyester fiber-fil inside leg cavity. Be sure to pack tightly around armature. Keep armature centered in leg cavity. Stuff to within 1" of leg rim. Fill remaining cavity with low temp glue, being careful to glue beneath leg rim and around armature beads. Keep armature centered in leg cavity.
WARNING: All glue guns are hot enough to cause burns. Use care when handling.
Cloth Body ConstructionStitch darts on both body pieces. Press toward center seam.
Stitch top seams on both body pieces matching arrows. Clip curves and press (fig. 4).
Ease fabric of shoulder seam. Pin and stitch seams as shown, being sure to taper seam at each end (fig. 5). Clip curves.
Matching top seams and with right sides together, pin and stitch body pieces. Be sure to leave opening for stuff-ing in center back seam. Clip curves.
Fold edges of casing lengthwise. With all raw edges and right sides together, pin to leg opening of body. Sew along casing seam line. Press seam allowance toward body.
With right sides together, pin and stitch crotch seam, matching center back and center front seams (fig. 6). Clip and press.
Stitch arms to dot. Do not attach to body at this time. Arms and Body ConstructionCut a small hole on either side of body top, 1/2" below the seam that runs across the top of body (fig. 7). These are the openings for the arm armatures. Apply Fray
Check to edges of holes.
(Sonny Boy): Using a seam ripper take out stitching about 1/4” along the top seam of the body as shown in fig. 7a. Reinforce remaining stitching. This will form the armature openings for the arms.
Insert length of 20 gauge copper wire through casings of legs and arms. With cloth body right side out, pull over feet and legs until wire and leg casings are in place over porcelain groove in top of legs. Twist wire until cloth leg is securely in place. A little glue in the porcelain groove will help make leg more secure (fig. 8). Pull body up in place inserting arm armature through openings (fig. 9).
With front of armature facing you, thread 14" of 1/8" round elastic starting from behind armature, under arms then up through loop (fig. 9). Firmly stuff body with polyester fiber-fil, packing tightly under arms. Blind stitch back opening leaving elastic exposed (fig. 10). Be sure elastic exits through the center back seam at the top.
Arms: With cloth arm inside side out, slip over porce-lain arm until wire and casing fit into porcelain groove. Twist to secure. Glue can be used in porcelain groove to make arm more secure. Fold cloth arm back over porcelain to expose inside cavity. Firmly pack with polyester fiber-fil or paper toweling, keeping armature centered. Fill last 1" of arm cavity with low tempera-ture glue (fig.11). Stuff cloth arms with polyester fiber-fil. Fold raw edge under 1/4" and stitch to body as shown in figure 12.
Attaching Head and Shoulder Plate: Attach head to shoulder plate by running both strands of elastic through center hole in shoulder plate. Thread one strand of elastic through each hole at the top of head. Tie securely. Head should be adjustable, but not loose, in shoulder plate. Cut 4 - 2" strips of 1/4" twill tape. Thread through shoulder plate holes. Position shoulder plate on body and pin in place (fig. 13). Stitch twill tape with heavy duty thread.
(fig. 4)
(fig. 5)
(fig. 6)
(fig. 8)
(fig. 9)
(fig. 7)
(fig. 10)
(fig. 12)
(fig.11)
(Kayla)Opening for arm
armature
32
Top
Sea
m
(fig. 1)
5 1/2”
3 3/4”
5 1/4”
(fig. 2)
(fig. 3)
(fig. 13)
(fig. 7a)
Top
Sea
m
(Sonny Boy) Opening for arm
armature

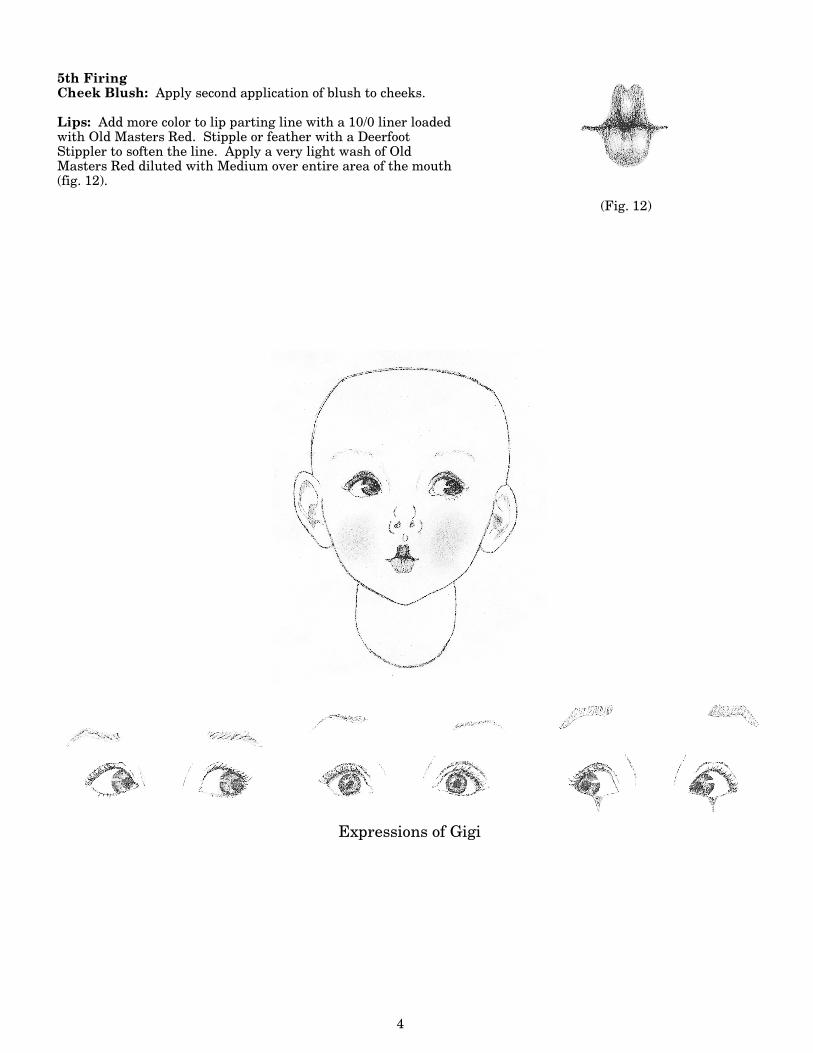
5th Firing Cheek Blush: Apply second application of blush to cheeks.
Lips: Add more color to lip parting line with a 10/0 liner loadedwith Old Masters Red. Stipple or feather with a DeerfootStippler to soften the line. Apply a very light wash of OldMasters Red diluted with Medium over entire area of the mouth(fig. 12).
4
(Fig. 12)
Expressions of Gigi
Original Designs for the Doll Industry, Inc.
PO BOX 174 JAMESTOWN, MISSOURI 65046
®
Gigi - Painting Instructions
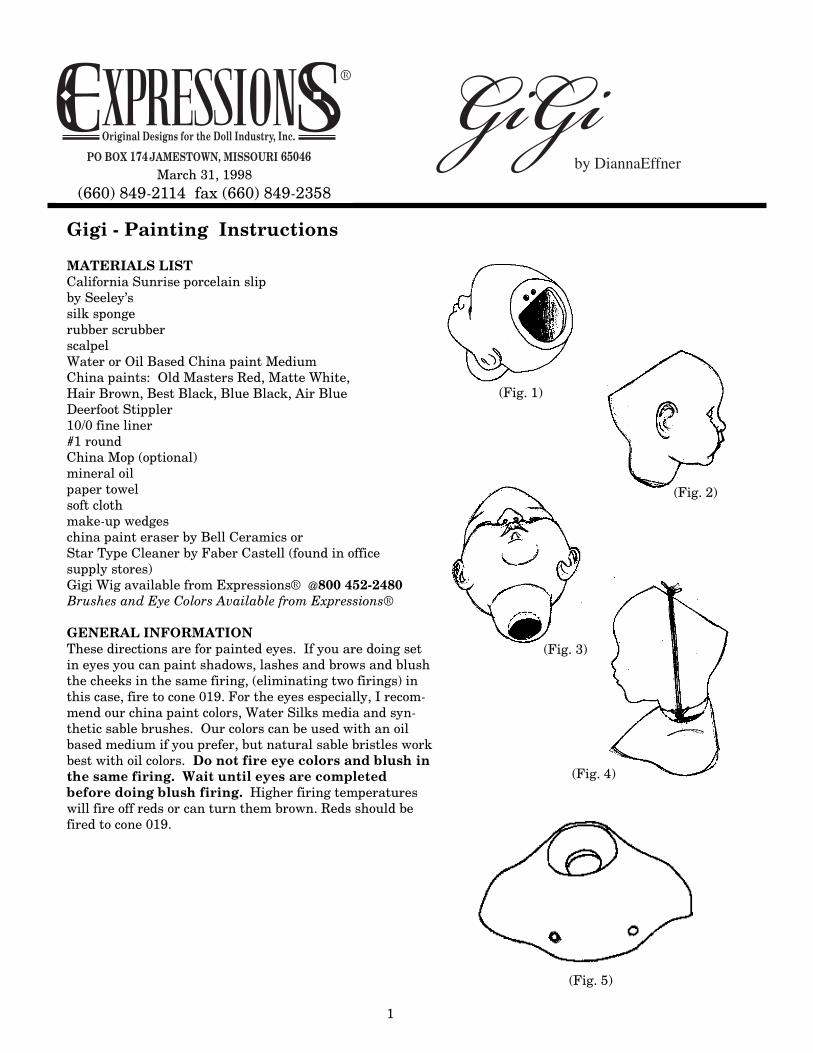
MATERIALS LISTCalifornia Sunrise porcelain slipby Seeley’ssilk spongerubber scrubberscalpelWater or Oil Based China paint MediumChina paints: Old Masters Red, Matte White, Hair Brown, Best Black, Blue Black, Air Blue Deerfoot Stippler10/0 fine liner#1 roundChina Mop (optional) mineral oilpaper towelsoft clothmake-up wedgeschina paint eraser by Bell Ceramics orStar Type Cleaner by Faber Castell (found in office supply stores)Gigi Wig available from Expressions® @800 452-2480Brushes and Eye Colors Available from Expressions®
GENERAL INFORMATIONThese directions are for painted eyes. If you are doing setin eyes you can paint shadows, lashes and brows and blushthe cheeks in the same firing, (eliminating two firings) inthis case, fire to cone 019. For the eyes especially, I recom-mend our china paint colors, Water Silks media and syn-thetic sable brushes. Our colors can be used with an oilbased medium if you prefer, but natural sable bristles workbest with oil colors. Do not fire eye colors and blush inthe same firing. Wait until eyes are completedbefore doing blush firing. Higher firing temperatureswill fire off reds or can turn them brown. Reds should befired to cone 019.
(Fig. 1)
(Fig. 2)
(Fig. 3)
(Fig. 4)
(Fig. 5)
1
14”Gigiby Dianna Effner March 31, 1998
(660) 849-2114 fax (660) 849-2358
GiGi by DiannaEffner

5th Firing Cheek Blush: Apply second application of blush to cheeks.
Lips: Add more color to lip parting line with a 10/0 liner loadedwith Old Masters Red. Stipple or feather with a DeerfootStippler to soften the line. Apply a very light wash of OldMasters Red diluted with Medium over entire area of the mouth(fig. 12).
4
(Fig. 12)
Expressions of Gigi
with some Rich Brown in your palette. Use this color on your10/0 liner to darken and define crease lash line and upper lash-es. Make darker lash strokes a little shorter than the lighterones from the previous firing. Touch up lower lashes with a lit-tle bit of darker color applied lightly with 10/0 fine liner (fig. 9).Refer to illustrations and photo as you work. If you are usingpainted eyes for this doll, continue with the 2nd Firing ForEyes instructions.
If you are going to be using set in eyes, you might put anotherapplication of blush on the cheeks and do the second firing onthe lips. Fire the head to cone 019.
Cheek Blush and Lips - 1st Firing
Cheek Blush: Use the Medium of your choice and Old MastersRed to blush the cheeks. A china mop or make-up sponge workswell for this procedure. Note: Two light applications of blushyields a smoother result than one heavier application.
Lips: With your 10/0 fine liner loaded with old Masters Red,draw a fine line along the crease where the upper and lower lipmeet. Soften this line with a stippler. With a #1 round paintbrush, dilute some paint with a little Medium on your paletteand apply medium soft tint of color to certain accent places onthe lips, such as the curved peaks of the upper lips, in creasesand near the corners of the lower lips. Stipple to soften (fig. 10).Fire to cone 019.
Note: Reds should be fired to cone 019 as they tend to burn offat higher temperatures.
Cheek Blush and Lips - 2nd Firing
Cheek Blush: Apply second application of blush to cheeks.
Lips: Add more color to lip parting line with a 10/0 liner loadedwith Old Masters Red. Stipple or feather with a DeerfootStippler to soften the line. Apply a very light wash of OldMasters Red diluted with Medium over entire area of the mouth(fig. 11). Tint the inner corner of the eye with a touch of dilutedOld Masters Red. Fire to cone 019.
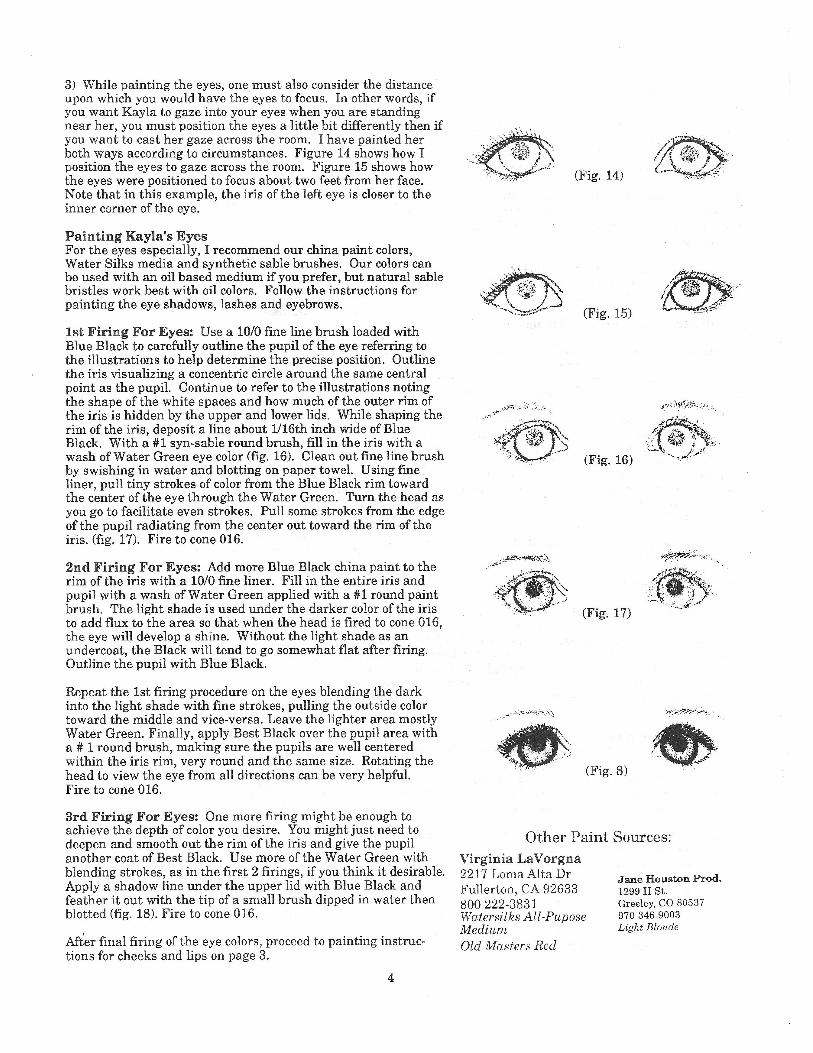
PAINTING THE EYESSome fine points on achieving expressive eyes with china paints:
1) Plan to do several firings to develop the depth of color youdesire. It's much better to apply paint lightly in three or fourthin layers, than to pile it up in one or two firings.
2) Give some thought to the expression you would like to haveon your doll. A slight shift in the position of the eyes can make abig difference in the expression of your doll. Allow me to illus-trate. In figure 12, I have marked the approximate center of theeye with a small dot before beginning to paint the eyes. If I posi-tion the center of the iris of each eye over this center spot as infigure 13, the resulting gaze will be straight ahead and have asomewhat staring expression. Kayla was designed to gaze justslightly to her right and slightly up.
3) While painting the eyes, one must also consider the distanceupon which you would have the eyes to focus. In other words, ifyou want Kayla to gaze into your eyes when you are standingnear her, you must position the eyes a little bit differ-
(Fig. 10)
(Fig. 11)
(Fig. 12)
(Fig. 13)
3
Remove parting lines and so on, with the cleaning method ofyour choice.
Fire porcelain to cone 6. Scrub with a rubber scrubber untilsatiny smooth. Wash and allow to dry.
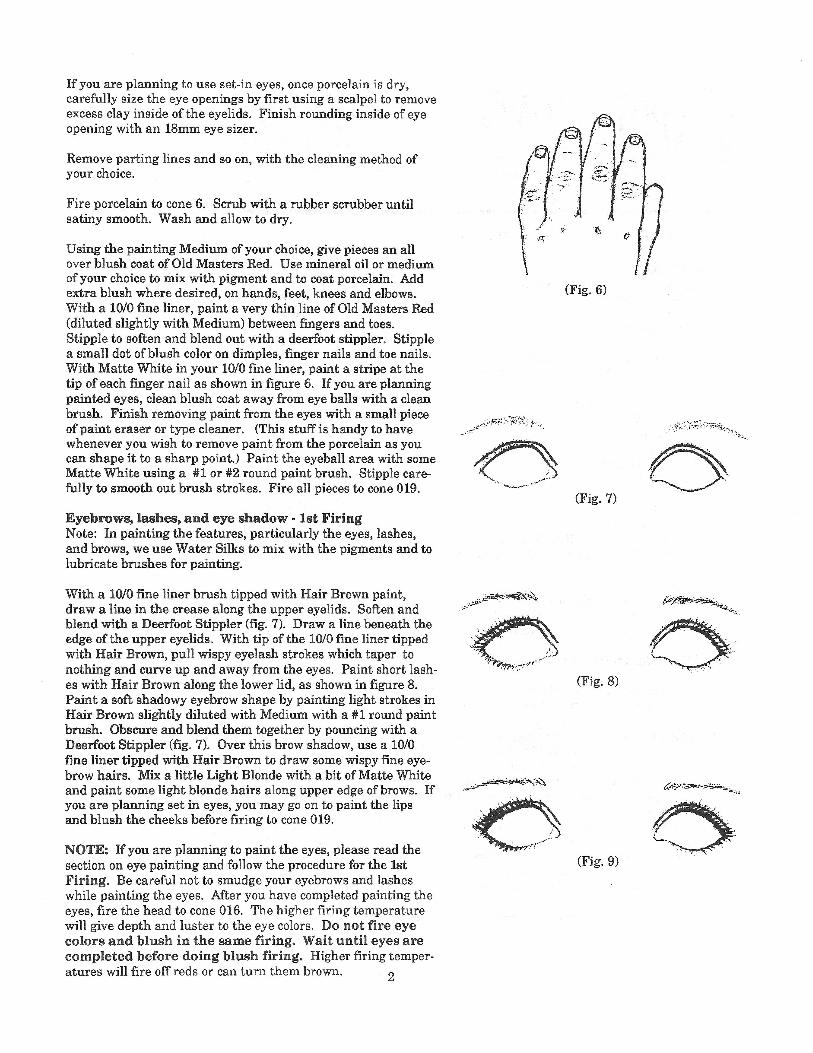
Using the painting Medium of your choice, give pieces an allover blush coat of Old Masters Red. Use mineral oil or mediumof your choice to mix with pigment and to coat porcelain. Addextra blush where desired, on hands, feet, knees and elbows.With a 10/0 fine liner, paint a very thin line of Old Masters Red(diluted slightly with Medium) between fingers and toes.Stipple to soften and blend out with a deerfoot stippler. Stipplea small dot of blush color on dimples, finger nails and toe nails.With Matte White in your 10/0 fine liner, paint a stripe at thetip of each finger nail as shown in figure 6. If you are planningpainted eyes, clean blush coat away from eye balls with a cleanbrush. Finish removing paint from the eyes with a small pieceof paint eraser or type cleaner. (This stuff is handy to havewhenever you wish to remove paint from the porcelain as youcan shape it to a sharp point.) Paint the eyeball area with someMatte White using a #1 or #2 round paint brush. Stipple care-fully to smooth out brush strokes. Fire all pieces to cone 019.
Eyebrows, lashes, and eye shadow - 1st FiringNote: In painting the features, particularly the eyes, lashes,and brows, we use Water Silks to mix with the pigments and tolubricate brushes for painting.
With a 10/0 fine liner brush tipped with Hair Brown paint,draw a line in the crease along the upper eyelids. Soften andblend with a Deerfoot Stippler (fig. 7). Draw a line beneath theedge of the upper eyelids. With tip of the 10/0 fine liner tippedwith Hair Brown, pull wispy eyelash strokes which taper tonothing and curve up and away from the eyes. Paint short lash-es with Hair Brown along the lower lid, as shown in figure 8.Paint a soft shadowy eyebrow shape by painting light strokes inHair Brown slightly diluted with Medium with a #1 round paintbrush. Obscure and blend them together by pouncing with aDeerfoot Stippler (fig. 7). Over this brow shadow, use a 10/0fine liner tipped with Hair Brown to draw some wispy fine eye-brow hairs. Mix a little Light Blonde with a bit of Matte Whiteand paint some light blonde hairs along upper edge of brows. Ifyou are planning set in eyes, you may go on to paint the lipsand blush the cheeks before firing to cone 019.
NOTE: If you are planning to paint the eyes, please read thesection on eye painting and follow the procedure for the 1stFiring. Be careful not to smudge your eyebrows and lasheswhile painting the eyes. After you have completed painting theeyes, fire the head to cone 016. The higher firing temperaturewill give depth and luster to the eye colors. Do not fire eyecolors and blush in the same firing. Wait until eyes arecompleted before doing blush firing. Higher firing temper-atures will fire off reds or can turn them brown.
Eyebrows, lashes, and eye shadow - 2nd FiringAdd more Hair Brown to the crease and upper lash line. Stippleas in first firing. Mix a small amount of Best Black
(Fig. 6)
(Fig. 7)
(Fig. 8)
(Fig. 9)
2

5th Firing Cheek Blush: Apply second application of blush to cheeks.
Lips: Add more color to lip parting line with a 10/0 liner loadedwith Old Masters Red. Stipple or feather with a DeerfootStippler to soften the line. Apply a very light wash of OldMasters Red diluted with Medium over entire area of the mouth(fig. 12).
4
(Fig. 12)
Expressions of Gigi
with some Rich Brown in your palette. Use this color on your10/0 liner to darken and define crease lash line and upper lash-es. Make darker lash strokes a little shorter than the lighterones from the previous firing. Touch up lower lashes with a lit-tle bit of darker color applied lightly with 10/0 fine liner (fig. 9).Refer to illustrations and photo as you work. If you are usingpainted eyes for this doll, continue with the 2nd Firing ForEyes instructions.
If you are going to be using set in eyes, you might put anotherapplication of blush on the cheeks and do the second firing onthe lips. Fire the head to cone 019.
Cheek Blush and Lips - 1st Firing
Cheek Blush: Use the Medium of your choice and Old MastersRed to blush the cheeks. A china mop or make-up sponge workswell for this procedure. Note: Two light applications of blushyields a smoother result than one heavier application.
Lips: With your 10/0 fine liner loaded with old Masters Red,draw a fine line along the crease where the upper and lower lipmeet. Soften this line with a stippler. With a #1 round paintbrush, dilute some paint with a little Medium on your paletteand apply medium soft tint of color to certain accent places onthe lips, such as the curved peaks of the upper lips, in creasesand near the corners of the lower lips. Stipple to soften (fig. 10).Fire to cone 019.
Note: Reds should be fired to cone 019 as they tend to burn offat higher temperatures.
Cheek Blush and Lips - 2nd Firing
Cheek Blush: Apply second application of blush to cheeks.
Lips: Add more color to lip parting line with a 10/0 liner loadedwith Old Masters Red. Stipple or feather with a DeerfootStippler to soften the line. Apply a very light wash of OldMasters Red diluted with Medium over entire area of the mouth(fig. 11). Tint the inner corner of the eye with a touch of dilutedOld Masters Red. Fire to cone 019.
PAINTING THE EYESSome fine points on achieving expressive eyes with china paints:
1) Plan to do several firings to develop the depth of color youdesire. It's much better to apply paint lightly in three or fourthin layers, than to pile it up in one or two firings.
2) Give some thought to the expression you would like to haveon your doll. A slight shift in the position of the eyes can make abig difference in the expression of your doll. Allow me to illus-trate. In figure 12, I have marked the approximate center of theeye with a small dot before beginning to paint the eyes. If I posi-tion the center of the iris of each eye over this center spot as infigure 13, the resulting gaze will be straight ahead and have asomewhat staring expression. Kayla was designed to gaze justslightly to her right and slightly up.
3) While painting the eyes, one must also consider the distanceupon which you would have the eyes to focus. In other words, ifyou want Kayla to gaze into your eyes when you are standingnear her, you must position the eyes a little bit differ-
(Fig. 10)
(Fig. 11)
(Fig. 12)
(Fig. 13)
3
Remove parting lines and so on, with the cleaning method ofyour choice.
Fire porcelain to cone 6. Scrub with a rubber scrubber untilsatiny smooth. Wash and allow to dry.
Using the painting Medium of your choice, give pieces an allover blush coat of Old Masters Red. Use mineral oil or mediumof your choice to mix with pigment and to coat porcelain. Addextra blush where desired, on hands, feet, knees and elbows.With a 10/0 fine liner, paint a very thin line of Old Masters Red(diluted slightly with Medium) between fingers and toes.Stipple to soften and blend out with a deerfoot stippler. Stipplea small dot of blush color on dimples, finger nails and toe nails.With Matte White in your 10/0 fine liner, paint a stripe at thetip of each finger nail as shown in figure 6. If you are planningpainted eyes, clean blush coat away from eye balls with a cleanbrush. Finish removing paint from the eyes with a small pieceof paint eraser or type cleaner. (This stuff is handy to havewhenever you wish to remove paint from the porcelain as youcan shape it to a sharp point.) Paint the eyeball area with someMatte White using a #1 or #2 round paint brush. Stipple care-fully to smooth out brush strokes. Fire all pieces to cone 019.
Eyebrows, lashes, and eye shadow - 1st FiringNote: In painting the features, particularly the eyes, lashes,and brows, we use Water Silks to mix with the pigments and tolubricate brushes for painting.
With a 10/0 fine liner brush tipped with Hair Brown paint,draw a line in the crease along the upper eyelids. Soften andblend with a Deerfoot Stippler (fig. 7). Draw a line beneath theedge of the upper eyelids. With tip of the 10/0 fine liner tippedwith Hair Brown, pull wispy eyelash strokes which taper tonothing and curve up and away from the eyes. Paint short lash-es with Hair Brown along the lower lid, as shown in figure 8.Paint a soft shadowy eyebrow shape by painting light strokes inHair Brown slightly diluted with Medium with a #1 round paintbrush. Obscure and blend them together by pouncing with aDeerfoot Stippler (fig. 7). Over this brow shadow, use a 10/0fine liner tipped with Hair Brown to draw some wispy fine eye-brow hairs. Mix a little Light Blonde with a bit of Matte Whiteand paint some light blonde hairs along upper edge of brows. Ifyou are planning set in eyes, you may go on to paint the lipsand blush the cheeks before firing to cone 019.
NOTE: If you are planning to paint the eyes, please read thesection on eye painting and follow the procedure for the 1stFiring. Be careful not to smudge your eyebrows and lasheswhile painting the eyes. After you have completed painting theeyes, fire the head to cone 016. The higher firing temperaturewill give depth and luster to the eye colors. Do not fire eyecolors and blush in the same firing. Wait until eyes arecompleted before doing blush firing. Higher firing temper-atures will fire off reds or can turn them brown.
Eyebrows, lashes, and eye shadow - 2nd FiringAdd more Hair Brown to the crease and upper lash line. Stippleas in first firing. Mix a small amount of Best Black
(Fig. 6)
(Fig. 7)
(Fig. 8)
(Fig. 9)
2
5th Firing Cheek Blush: Apply second application of blush to cheeks.
Lips: Add more color to lip parting line with a 10/0 liner loadedwith Old Masters Red. Stipple or feather with a DeerfootStippler to soften the line. Apply a very light wash of OldMasters Red diluted with Medium over entire area of the mouth(fig. 12).
4
(Fig. 12)
Expressions of Gigi
Original Designs for the Doll Industry, Inc.
PO BOX 174 JAMESTOWN, MISSOURI 65046
®
Gigi - Painting Instructions
MATERIALS LISTCalifornia Sunrise porcelain slipby Seeley’ssilk spongerubber scrubberscalpelWater or Oil Based China paint MediumChina paints: Old Masters Red, Matte White, Hair Brown, Best Black, Blue Black, Air Blue Deerfoot Stippler10/0 fine liner#1 roundChina Mop (optional) mineral oilpaper towelsoft clothmake-up wedgeschina paint eraser by Bell Ceramics orStar Type Cleaner by Faber Castell (found in office supply stores)Gigi Wig available from Expressions® @800 452-2480Brushes and Eye Colors Available from Expressions®
GENERAL INFORMATIONThese directions are for painted eyes. If you are doing setin eyes you can paint shadows, lashes and brows and blushthe cheeks in the same firing, (eliminating two firings) inthis case, fire to cone 019. For the eyes especially, I recom-mend our china paint colors, Water Silks media and syn-thetic sable brushes. Our colors can be used with an oilbased medium if you prefer, but natural sable bristles workbest with oil colors. Do not fire eye colors and blush inthe same firing. Wait until eyes are completedbefore doing blush firing. Higher firing temperatureswill fire off reds or can turn them brown. Reds should befired to cone 019.
(Fig. 1)
(Fig. 2)
(Fig. 3)
(Fig. 4)
(Fig. 5)
1
14”Gigiby Dianna Effner March 31, 1998
(660) 849-2114 fax (660) 849-2358
GiGi by DiannaEffner
Original Designs for the Doll Industry, Inc.
PO BOX 174 JAMESTOWN, MISSOURI 65046
®
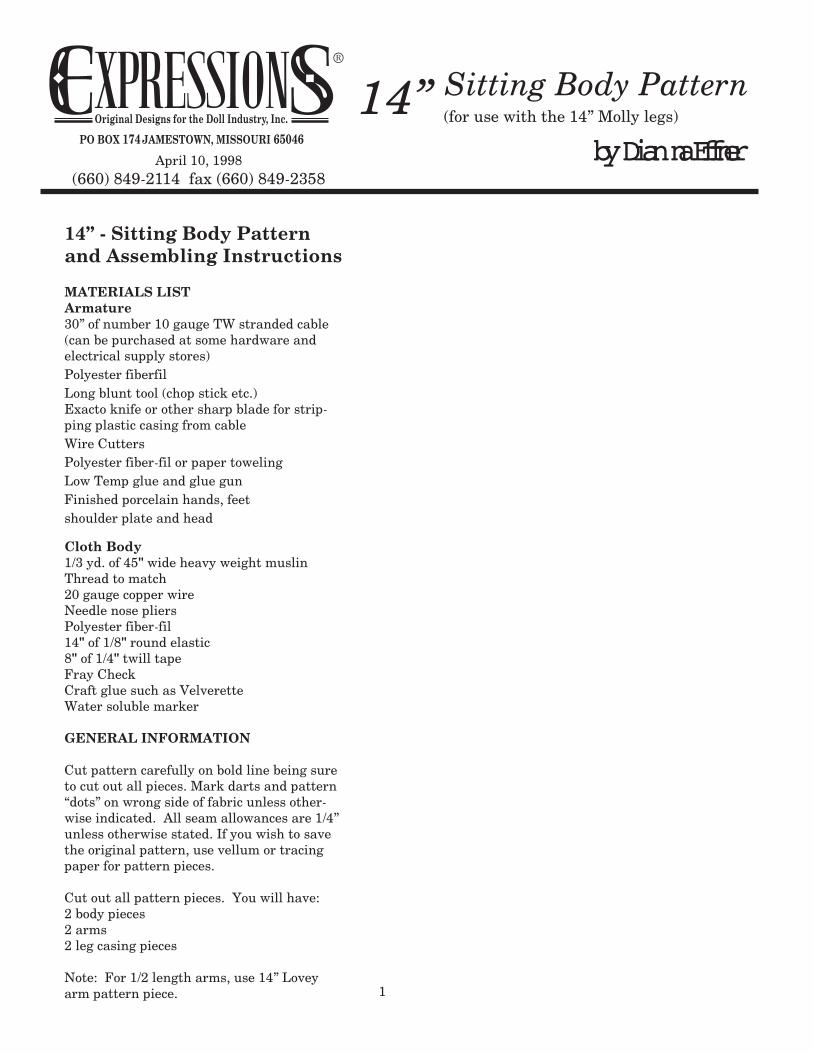
14” - Sitting Body Patternand Assembling Instructions
MATERIALS LISTArmature30” of number 10 gauge TW stranded cable(can be purchased at some hardware andelectrical supply stores)Polyester fiberfilLong blunt tool (chop stick etc.)Exacto knife or other sharp blade for strip-ping plastic casing from cableWire CuttersPolyester fiber-fil or paper towelingLow Temp glue and glue gunFinished porcelain hands, feetshoulder plate and head
Cloth Body1/3 yd. of 45" wide heavy weight muslinThread to match20 gauge copper wire Needle nose pliersPolyester fiber-fil14" of 1/8" round elastic8" of 1/4" twill tapeFray CheckCraft glue such as VelveretteWater soluble marker
GENERAL INFORMATION
Cut pattern carefully on bold line being sureto cut out all pieces. Mark darts and pattern“dots” on wrong side of fabric unless other-wise indicated. All seam allowances are 1/4”unless otherwise stated. If you wish to savethe original pattern, use vellum or tracingpaper for pattern pieces.
Cut out all pattern pieces. You will have:2 body pieces2 arms 2 leg casing pieces
Note: For 1/2 length arms, use 14” Loveyarm pattern piece.
Sitting Body Pattern(for use with the 14” Molly legs)
by Dianna Effner
14”
1
April 10, 1998(660) 849-2114 fax (660) 849-2358
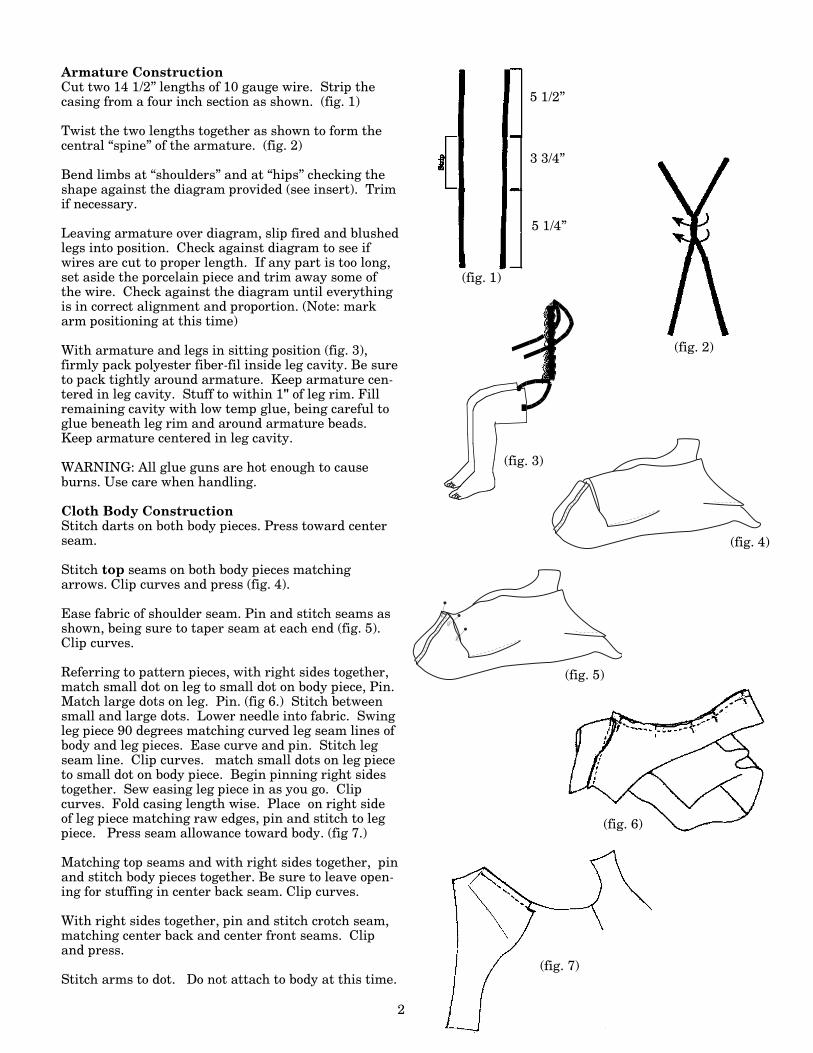
Armature ConstructionCut two 14 1/2” lengths of 10 gauge wire. Strip thecasing from a four inch section as shown. (fig. 1)
Twist the two lengths together as shown to form thecentral “spine” of the armature. (fig. 2)
Bend limbs at “shoulders” and at “hips” checking theshape against the diagram provided (see insert). Trimif necessary.
Leaving armature over diagram, slip fired and blushedlegs into position. Check against diagram to see ifwires are cut to proper length. If any part is too long,set aside the porcelain piece and trim away some ofthe wire. Check against the diagram until everythingis in correct alignment and proportion. (Note: markarm positioning at this time)
With armature and legs in sitting position (fig. 3),firmly pack polyester fiber-fil inside leg cavity. Be sureto pack tightly around armature. Keep armature cen-tered in leg cavity. Stuff to within 1" of leg rim. Fillremaining cavity with low temp glue, being careful toglue beneath leg rim and around armature beads.Keep armature centered in leg cavity.
WARNING: All glue guns are hot enough to causeburns. Use care when handling.
Cloth Body ConstructionStitch darts on both body pieces. Press toward centerseam.
Stitch top seams on both body pieces matchingarrows. Clip curves and press (fig. 4).
Ease fabric of shoulder seam. Pin and stitch seams asshown, being sure to taper seam at each end (fig. 5).Clip curves.
Referring to pattern pieces, with right sides together,match small dot on leg to small dot on body piece, Pin.Match large dots on leg. Pin. (fig 6.) Stitch betweensmall and large dots. Lower needle into fabric. Swingleg piece 90 degrees matching curved leg seam lines ofbody and leg pieces. Ease curve and pin. Stitch legseam line. Clip curves. match small dots on leg pieceto small dot on body piece. Begin pinning right sidestogether. Sew easing leg piece in as you go. Clipcurves. Fold casing length wise. Place on right sideof leg piece matching raw edges, pin and stitch to legpiece. Press seam allowance toward body. (fig 7.)
Matching top seams and with right sides together, pinand stitch body pieces together. Be sure to leave open-ing for stuffing in center back seam. Clip curves.
With right sides together, pin and stitch crotch seam,matching center back and center front seams. Clipand press.
Stitch arms to dot. Do not attach to body at this time.
(fig. 4)
(fig. 5)
2
(fig. 6)
(fig. 7)
5 1/2”
3 3/4”
5 1/4”
(fig. 2)
(fig. 3)
(fig. 1)
Body ConstructionCut a small hole on either side of body top, 1/2"below the seam that runs across the top of body(fig. 8). These are the openings for the armarmatures. Apply Fray Check to edges of holes.
Insert length of 20 gauge copper wire throughcasings of legs and arms. With cloth body rightside out, pull over feet and legs until wire andleg casings are in place over porcelain groove intop of legs. Twist wire until cloth leg is securelyin place. A little glue in the porcelain groove willhelp make leg more secure (fig. 9). Pull body upin place inserting arm armature through open-ings (fig. 10).
With front of armature facing you, thread 14" of1/8" round elastic starting from behind arma-ture, under arms then up through loop (fig. 10).Put poly pellets in seat and leg cavity, 1 inchbelow back opening, then firmly stuff body withpolyester fiber-fil, packing tightly under arms.Firmly stuff body with polyester fiber-fil, pack-ing tightly under arms. Blind stitch back open-ing leaving elastic exposed (fig. 11). Be sureelastic exits through the center back seam atthe top.
Arms: With cloth arm right side out, slip overporcelain arm until wire and casing fit intoporcelain groove. Twist to secure. Glue can beused in porcelain groove to make arm moresecure. Fold cloth arm back over porcelain toexpose inside cavity. Insert armature into armcavity. Firmly pack with polyester fiber-fil orpaper toweling, keeping armature centered. Filllast 1" of arm cavity with low temperature glue(fig.12). Stuff cloth arms with polyester fiber-fil.Fold raw edge under 1/4" and stitch to body asshown in figure 13.
Attaching Head and Shoulder Plate: Attachhead to shoulder plate by running both strandsof elastic through center hole in shoulder plate.Thread one strand of elastic through each holeat the top of head. Tie securely. Head should beadjustable, but not loose, in shoulder plate. Cut4 - 3" strips of 1/4" twill tape. Thread throughshoulder plate holes. Position shoulder plate onbody and pin in place (fig. 14). Stitch twill tapewith heavy duty thread.
(fig. 9)
(fig. 10)
(fig. 11)
(fig. 13)
(fig.12)
Opening for armarmature
3
Top
Sea
m
(fig. 8)
(fig. 14)