isequence for ipad 2 - beepstreet for ipad user... · instrument panel 5 2. pattern editor 11 3....
TRANSCRIPT
iSequence for iPad 2.1
user manual
© Copyright 2011 BeepStreet. All rights reserved.
Table of contents
Introduction 3
Main Screen Overview 4
1. Instrument panel 5
2. Pattern editor 11
3. Transport panel 18
4. Song editor 22
Mixer Section 29
1. Channel mixer 30
2. Effect units 34
3. Song parameters 41
Automation 42
Instrument editor 45
1. ASDR Envelope 45
2. Sampler display 46
3. Importing samples 47
4. Recording via microphone. 52
Song manager 53
FAQ 55
Customer support 56
Introduction
iSequence is one of the most powerful music creation studios designed
exclusively for iPad.
Thanks to intuitive 8-track sequencer, tons of instruments and flexible mixer
with DSP effects, you can easily programme and record professional loops,
beats and melodies.
Now you can control every aspect of your music project. The iPad edition has been
rewritten and redefined to use the advantage of a bigger screen and better performance.
The workflow is extremely fluid: you can record tracks and controls movement in real-time;
edit them using step sequencer and automation editor; switch between instruments, tracks
and views without stopping the playback.
You can compose, jam and mix at the same time!
Main Screen Overview
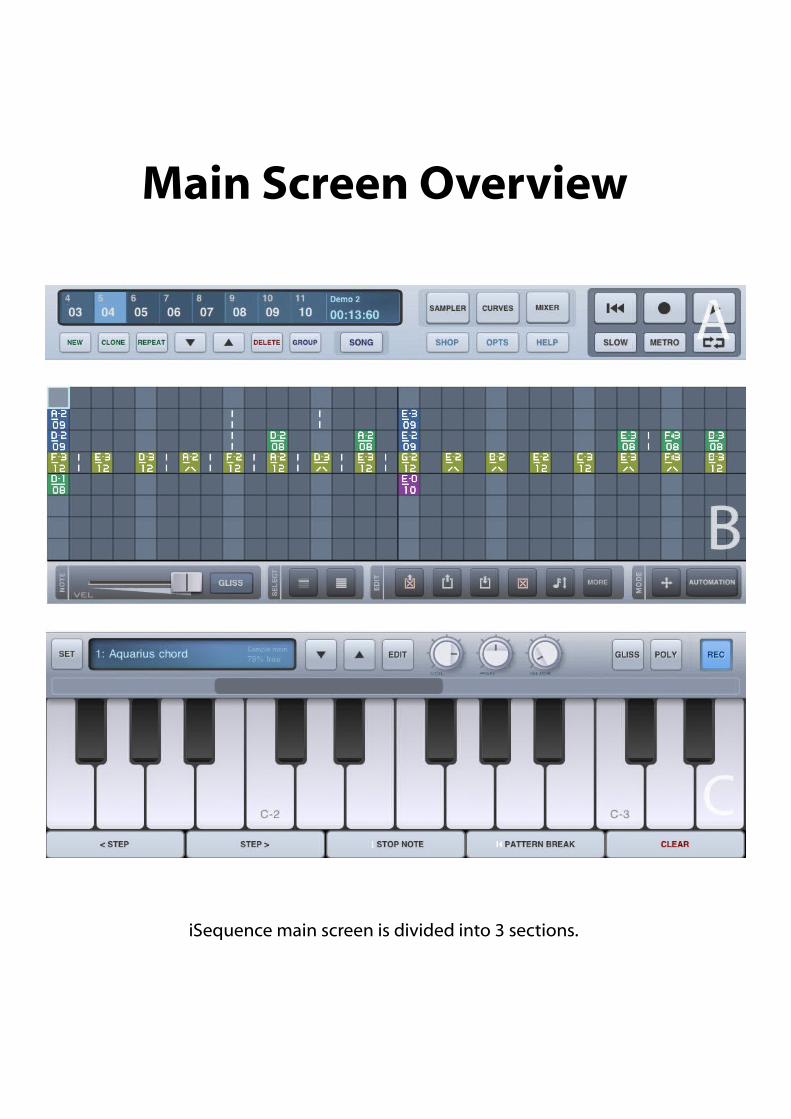
iSequence main screen is divided into 3 sections.

Section A contains a song editor, transport panel and lets you open additional screens like mixer,
song manager, instruments bank shop, etc.
Section B is a 32-step pattern editor where all recorded notes appear.
You can set the sound volume using the slider on the left, and perform various operations like copying, clearing, transposing over selected areas of the pattern.
Section C of the main screen is reserved for the instruments panel, where you can load instruments
in order to use them in your song, and piano-like keyboard / drum pads for playing notes
and triggering sounds.
This section allows both note recording in a song as well as playing live with selected instrument
or drum kit.
1. Instrument Panel
iSequence loads the first instrument automatically when launched.
To play the instrument, use piano-like keyboard.
The blue display in the instrument panel shows the name of a preset ('Elfs pad') which is loaded
into slot #1. We can also see that this leaves us with 97% of memory available for other instruments.
1.1 Instrument selection
To change instruments in slot #1, press the [SET]button.
The instrument browser allows listening to other presets from bank
(in this case bank #1 : Internal).
Pick 'Sawwy' and push the [SET] button in the upper right corner of the browser window.
The selected preset will appear in slot #1 on the blue display. By pressing any key
on the piano keyboard you will notice that now you are playing with 'Sawwy'.
1.2 Adding more instruments to slots
The arrow buttons located next to the display let the user switch between slots and thus decide
which instrument to play.
To add next instrument to your song, press arrow-up button. You will see '2: Set New ' text ← →
on the display. This means slot #2 is empty and ready for loading another instrument into it.
Press the [SET]button to open instrument browser.
Select 'Hyper 909 kit' and press [SET]in the upper right corner of the browser window.
Now two different instruments have been loaded. Arrow buttons can be used to select the instrument
to be played.
Notice that 'Hyper 909 kit' is actually a drum kit , thus choosing it turns the piano-like keyboard into
drum pads.
Repeat this procedure to load preset called 'SQR bass' into slot #3.
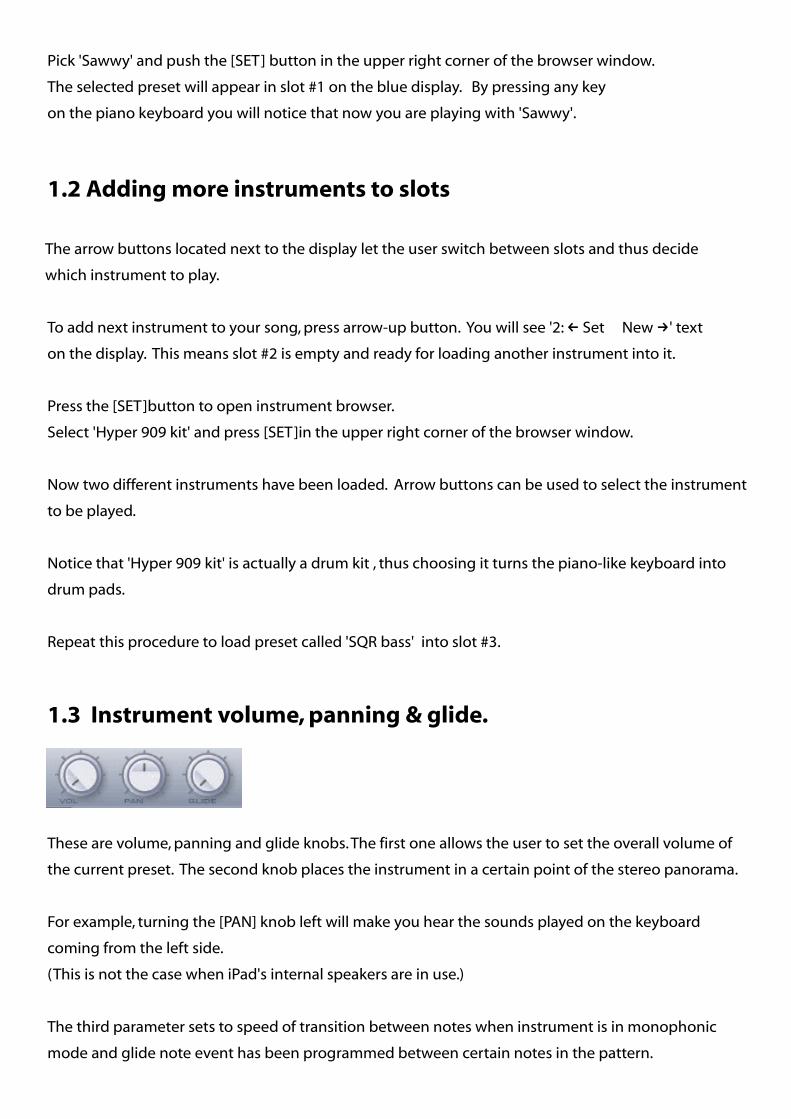
1.3 Instrument volume, panning & glide.
These are volume, panning and glide knobs. The first one allows the user to set the overall volume of
the current preset. The second knob places the instrument in a certain point of the stereo panorama.
For example, turning the [PAN] knob left will make you hear the sounds played on the keyboard
coming from the left side.
(This is not the case when iPad's internal speakers are in use.)
The third parameter sets to speed of transition between notes when instrument is in monophonic
mode and glide note event has been programmed between certain notes in the pattern.
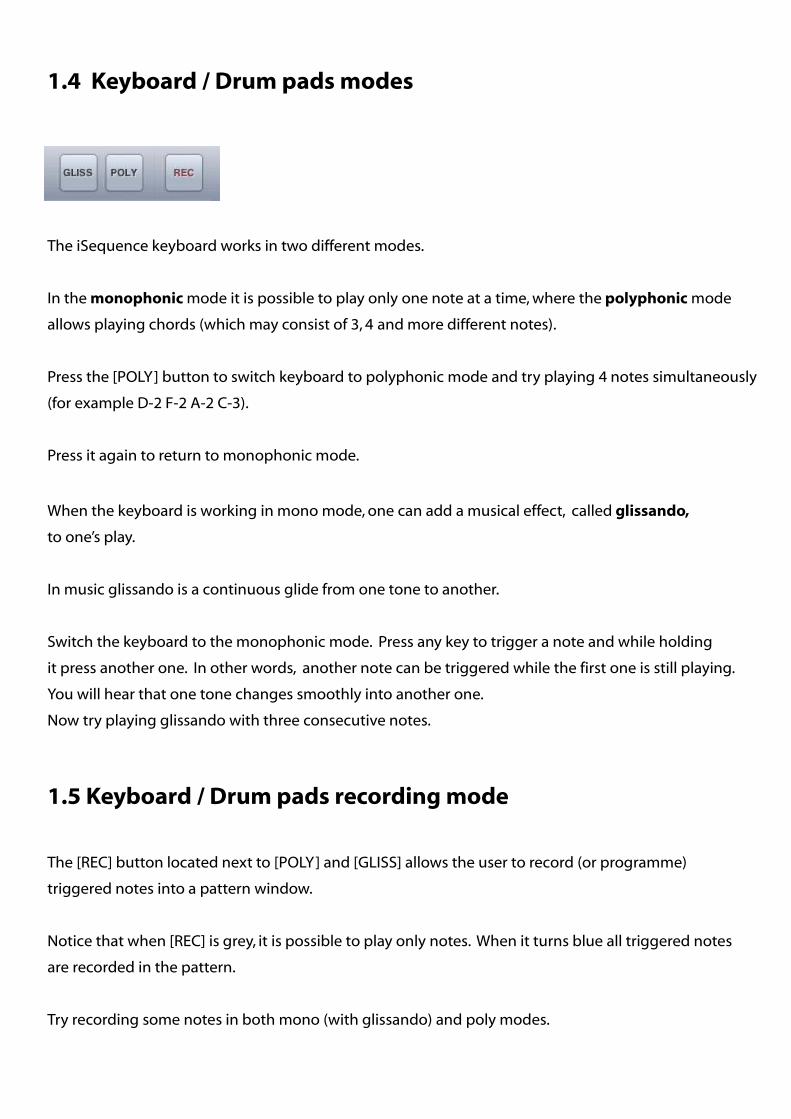
1.4 Keyboard / Drum pads modes
The iSequence keyboard works in two different modes.
In the monophonic mode it is possible to play only one note at a time, where the polyphonic mode
allows playing chords (which may consist of 3, 4 and more different notes).
Press the [POLY] button to switch keyboard to polyphonic mode and try playing 4 notes simultaneously
(for example D-2 F-2 A-2 C-3).
Press it again to return to monophonic mode.
When the keyboard is working in mono mode, one can add a musical effect, called glissando,
to one’s play.
In music glissando is a continuous glide from one tone to another.
Switch the keyboard to the monophonic mode. Press any key to trigger a note and while holding
it press another one. In other words, another note can be triggered while the first one is still playing.
You will hear that one tone changes smoothly into another one.
Now try playing glissando with three consecutive notes.
1.5 Keyboard / Drum pads recording mode
The [REC] button located next to [POLY] and [GLISS] allows the user to record (or programme)
triggered notes into a pattern window.
Notice that when [REC] is grey, it is possible to play only notes. When it turns blue all triggered notes
are recorded in the pattern.
Try recording some notes in both mono (with glissando) and poly modes.
You will see that the first one records only a single selected track while the second one, polyphonic
mode, processes notes on a few tracks simultaneously.
1.6 Programming pattern events.
Example 1.6.1
First, we have to empty our pattern.
Press the [ALL] button in the pattern section on the screen. →
The editor will highlight all cells in the pattern.
Press [CLEAR] to remove the content of this selection.→
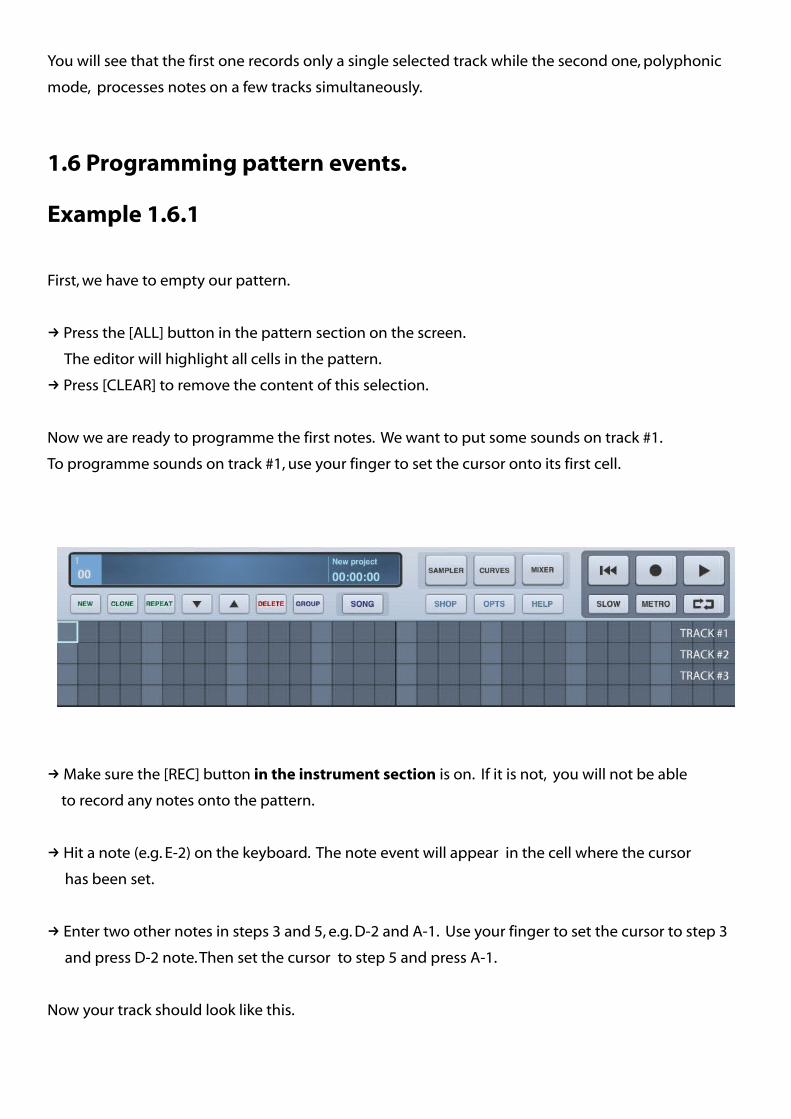
Now we are ready to programme the first notes. We want to put some sounds on track #1.
To programme sounds on track #1, use your finger to set the cursor onto its first cell.
Make sure the [REC] button → in the instrument section is on. If it is not, you will not be able
to record any notes onto the pattern.
Hit a note (e.g. E-2) on the keyboard. The note event will appear in the cell where the cursor →
has been set.
Enter two other notes in steps 3 and 5, e.g. D-2 and A-1. Use your finger to set the cursor to step 3 →
and press D-2 note. Then set the cursor to step 5 and press A-1.
Now your track should look like this.
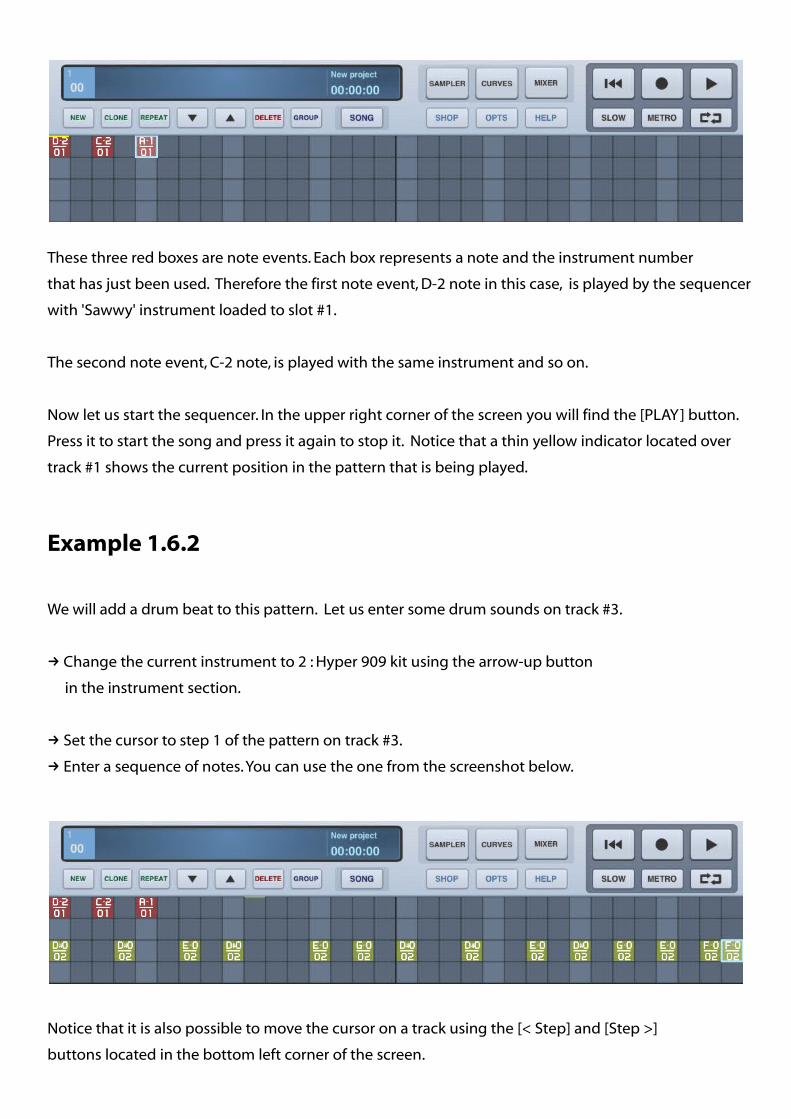
These three red boxes are note events. Each box represents a note and the instrument number
that has just been used. Therefore the first note event, D-2 note in this case, is played by the sequencer
with 'Sawwy' instrument loaded to slot #1.
The second note event, C-2 note, is played with the same instrument and so on.
Now let us start the sequencer. In the upper right corner of the screen you will find the [PLAY] button.
Press it to start the song and press it again to stop it. Notice that a thin yellow indicator located over
track #1 shows the current position in the pattern that is being played.
Example 1.6.2
We will add a drum beat to this pattern. Let us enter some drum sounds on track #3.
Change the current instrument to → 2 : Hyper 909 kit using the arrow-up button
in the instrument section.
Set the cursor to → step 1 of the pattern on track #3.
Enter a sequence of notes. You can use the one from → the screenshot below.
Notice that it is also possible to move the cursor on a track using the [< Step] and [Step >]
buttons located in the bottom left corner of the screen.
To remove any note event, simply highlight a cell with your finger and press the [CLEAR] button.
Press [PLAY] again to listen to the pattern.
Example 1.6.3
It is possible to change the instrument parameters, like volume and panning, at any moment you like.
You can also replace one instrument preset with another.
We will do it while the sequencer is running.
Press [PLAY] to start the sequencer.→
Set the current instrument to 1 : Sawwy and turn the volume knob a little bit to the left to lower →
the volume level of the preset.
Set → the current instrument to 2 : Hyper 909 kit and change it to 'Street kit'.
To do this use arrow-up button to set the current instrument to #2 and press [SET] to open the preset
browser. Choose 'Street kit' and press [SET] in the upper right corner of the browser window.
You will now hear that the new drum kit is playing instead of a previous one.
1.7 Instrument browser
To open the instrument browser press the [SET] button located on the left side of the instrument panel.
This will open a list of all 55 presets available in the current bank. To switch between instrument banks
use arrow keys located next to the blue display.
Choose the preset that you want to use in your song and press the [SET] button in the upper right corner
of the browser.
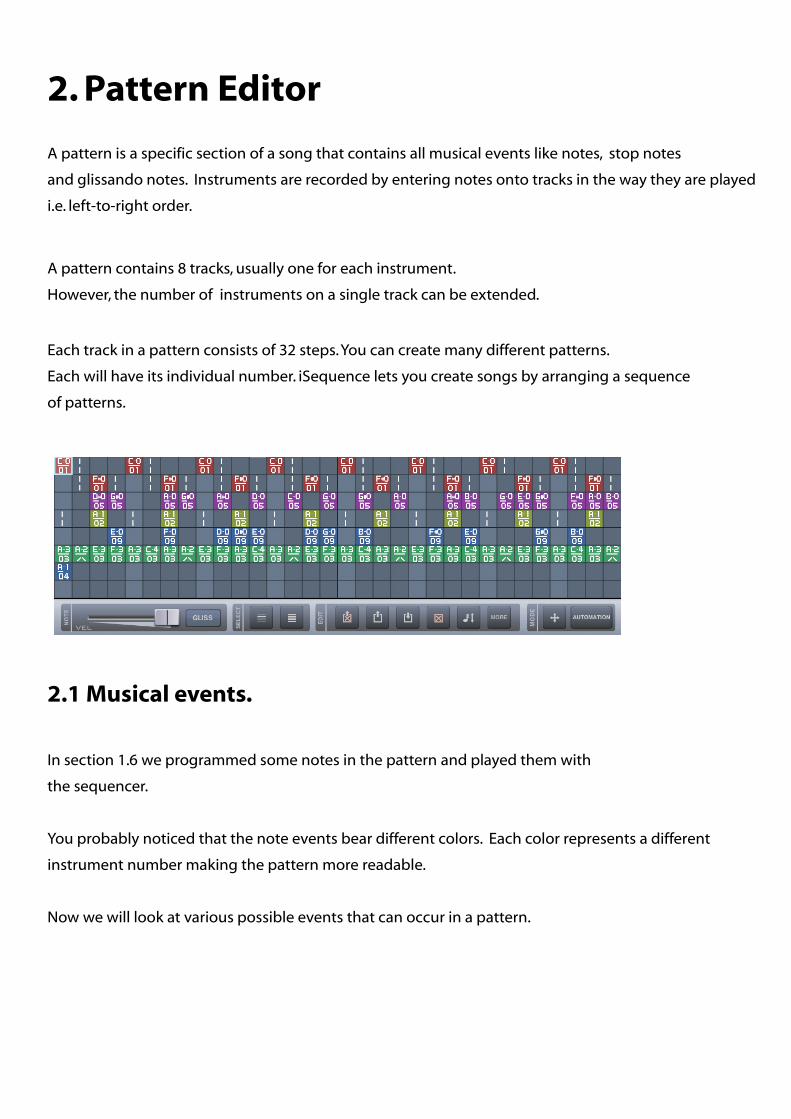
2. Pattern Editor
A pattern is a specific section of a song that contains all musical events like notes, stop notes
and glissando notes. Instruments are recorded by entering notes onto tracks in the way they are played
i.e. left-to-right order.
A pattern contains 8 tracks, usually one for each instrument.
However, the number of instruments on a single track can be extended.
Each track in a pattern consists of 32 steps. You can create many different patterns.
Each will have its individual number. iSequence lets you create songs by arranging a sequence
of patterns.
2.1 Musical events.
In section 1.6 we programmed some notes in the pattern and played them with
the sequencer.
You probably noticed that the note events bear different colors. Each color represents a different
instrument number making the pattern more readable.
Now we will look at various possible events that can occur in a pattern.
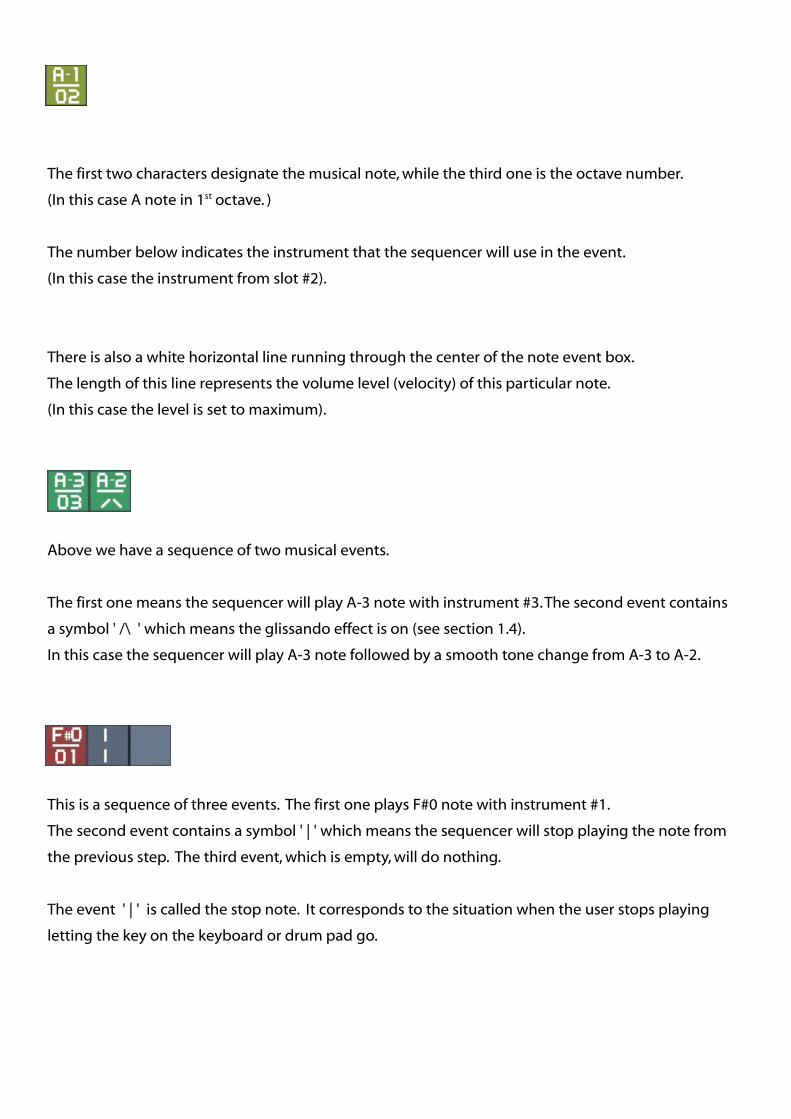
The first two characters designate the musical note, while the third one is the octave number.
(In this case A note in 1st octave. )
The number below indicates the instrument that the sequencer will use in the event.
(In this case the instrument from slot #2).
There is also a white horizontal line running through the center of the note event box.
The length of this line represents the volume level (velocity) of this particular note.
(In this case the level is set to maximum).
Above we have a sequence of two musical events.
The first one means the sequencer will play A-3 note with instrument #3. The second event contains
a symbol ' /\ ' which means the glissando effect is on (see section 1.4).
In this case the sequencer will play A-3 note followed by a smooth tone change from A-3 to A-2.
This is a sequence of three events. The first one plays F#0 note with instrument #1.
The second event contains a symbol ' | ' which means the sequencer will stop playing the note from
the previous step. The third event, which is empty, will do nothing.
The event ' | ' is called the stop note. It corresponds to the situation when the user stops playing
letting the key on the keyboard or drum pad go.
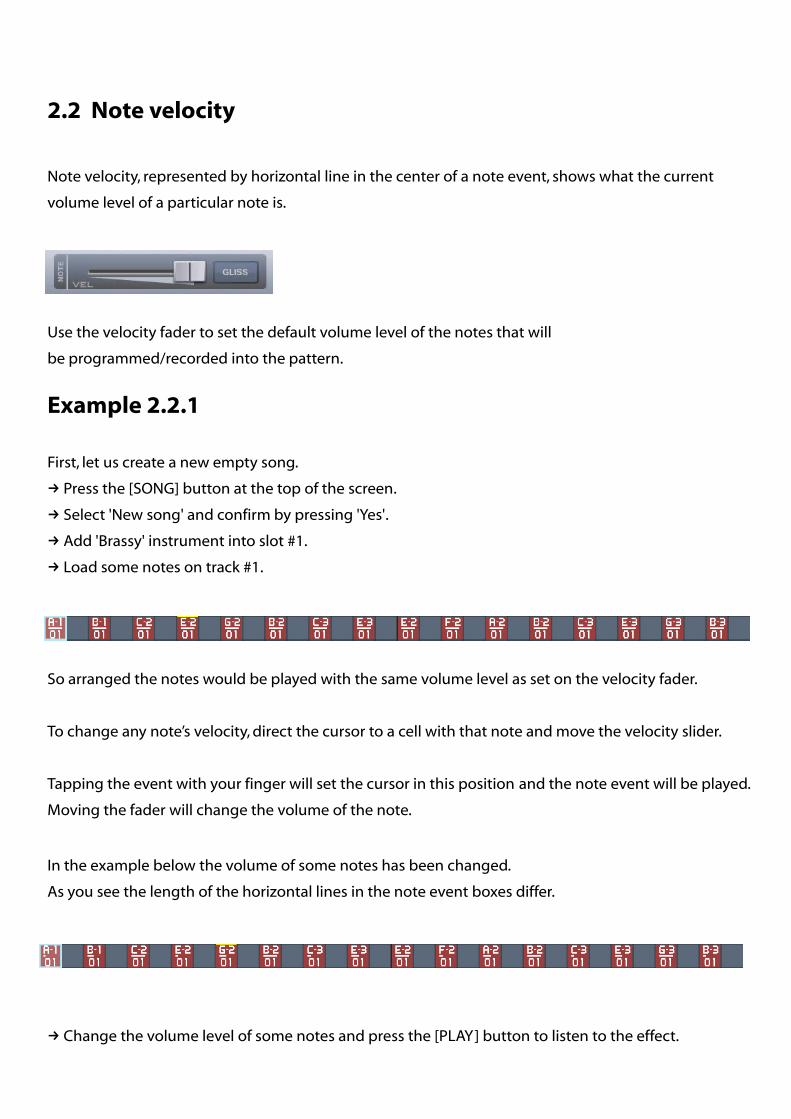
2.2 Note velocity
Note velocity, represented by horizontal line in the center of a note event, shows what the current
volume level of a particular note is.
Use the velocity fader to set the default volume level of the notes that will
be programmed/recorded into the pattern.
Example 2.2.1
First, let us create a new empty song.
Press the [SONG] button at the top of the screen. →
Select 'New song' and confirm → by pressing 'Yes'.
Add → 'Brassy' instrument into slot #1.
→ Load some notes on track #1.
So arranged the notes would be played with the same volume level as set on the velocity fader.
To change any note’s velocity, direct the cursor to a cell with that note and move the velocity slider.
Tapping the event with your finger will set the cursor in this position and the note event will be played.
Moving the fader will change the volume of the note.
In the example below the volume of some notes has been changed.
As you see the length of the horizontal lines in the note event boxes differ.
Change the volume level of some notes and press the [PLAY] button to listen to the effect.→
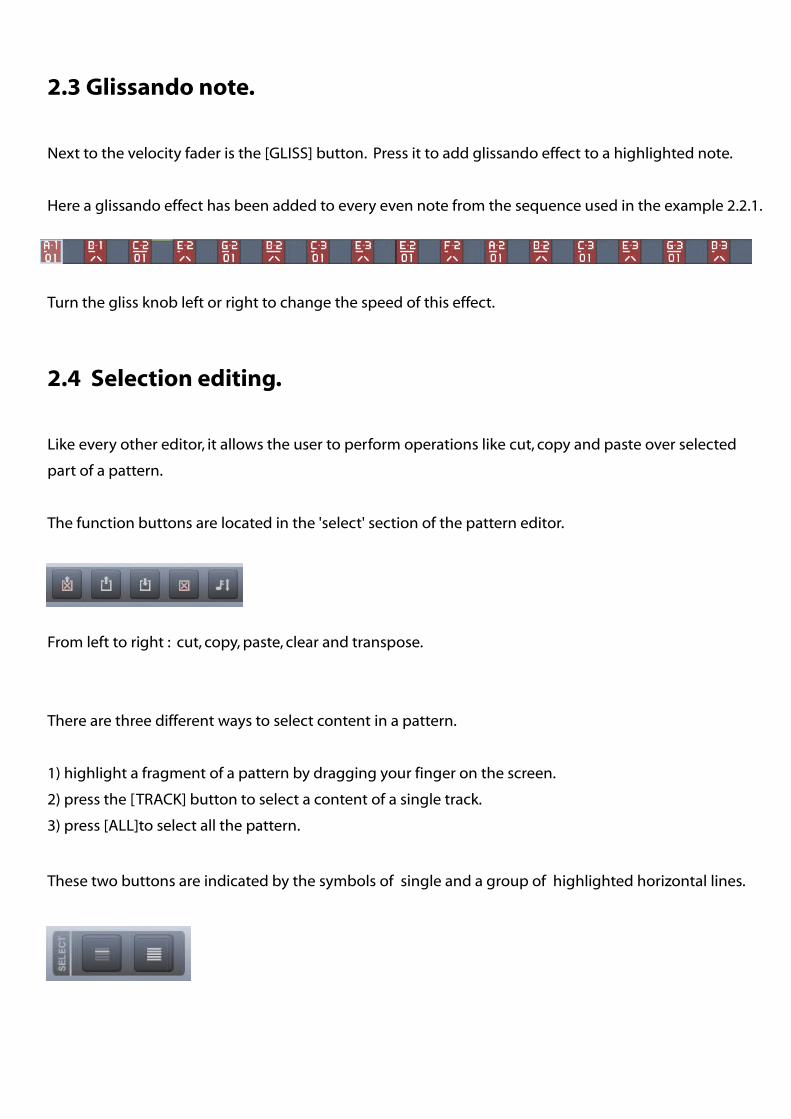
2.3 Glissando note.
Next to the velocity fader is the [GLISS] button. Press it to add glissando effect to a highlighted note.
Here a glissando effect has been added to every even note from the sequence used in the example 2.2.1.
Turn the gliss knob left or right to change the speed of this effect.
2.4 Selection editing.
Like every other editor, it allows the user to perform operations like cut, copy and paste over selected
part of a pattern.
The function buttons are located in the 'select' section of the pattern editor.
From left to right : cut, copy, paste, clear and transpose.
There are three different ways to select content in a pattern.
1) highlight a fragment of a pattern by dragging your finger on the screen.
2) press the [TRACK] button to select a content of a single track.
3) press [ALL]to select all the pattern.
These two buttons are indicated by the symbols of single and a group of highlighted horizontal lines.
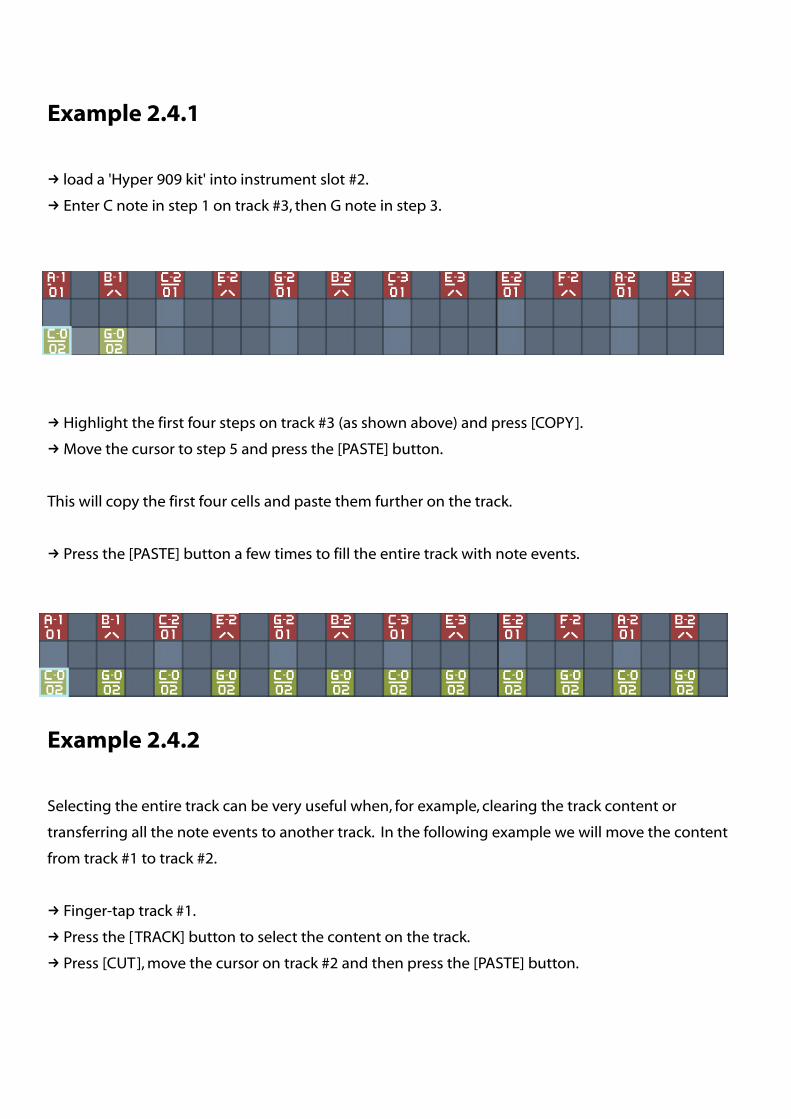
Example 2.4.1
→ load a 'Hyper 909 kit' into instrument slot #2.
Enter → C note in step 1 on track #3, then G note in step 3.
Highlight the first four steps on track #3 (as shown above) and press [COPY].→
Move the cursor to step 5 and press the [PASTE] button.→
This will copy the first four cells and paste them further on the track.
Press the [PASTE] button a few times to fill the entire track with note events.→
Example 2.4.2
Selecting the entire track can be very useful when, for example, clearing the track content or
transferring all the note events to another track. In the following example we will move the content
from track #1 to track #2.
Finger-tap track #1.→
Press the [TRACK] button to select the content on the track.→
Press [CUT], move the cursor on track #2 and then press the [PASTE] button.→
Example 2.4.3
The transpose function allows shifting (up or down) the pitch of selected notes by a certain number
of halftones. In this example we will transpose up all the notes on track #2 by five halftones.
Again, it is possible to carry out these operations regardless whether the sequencer is playing or not.
Press → the [PLAY] button to start the sequencer.
Select the content of track #2 by pressing the [TRACK] button.→
Press → the [Trans] button and choose [+5].
You will hear that the pitch of highlighted notes has been transposed.
Press the [Trans] button again and choose [-5] to transpose the notes five →
halftones down.
Now we will discuss in details two other operations – instrument setting and rotating.
The pattern editor lets the user change any instrument's number in a highlighted group of note events.
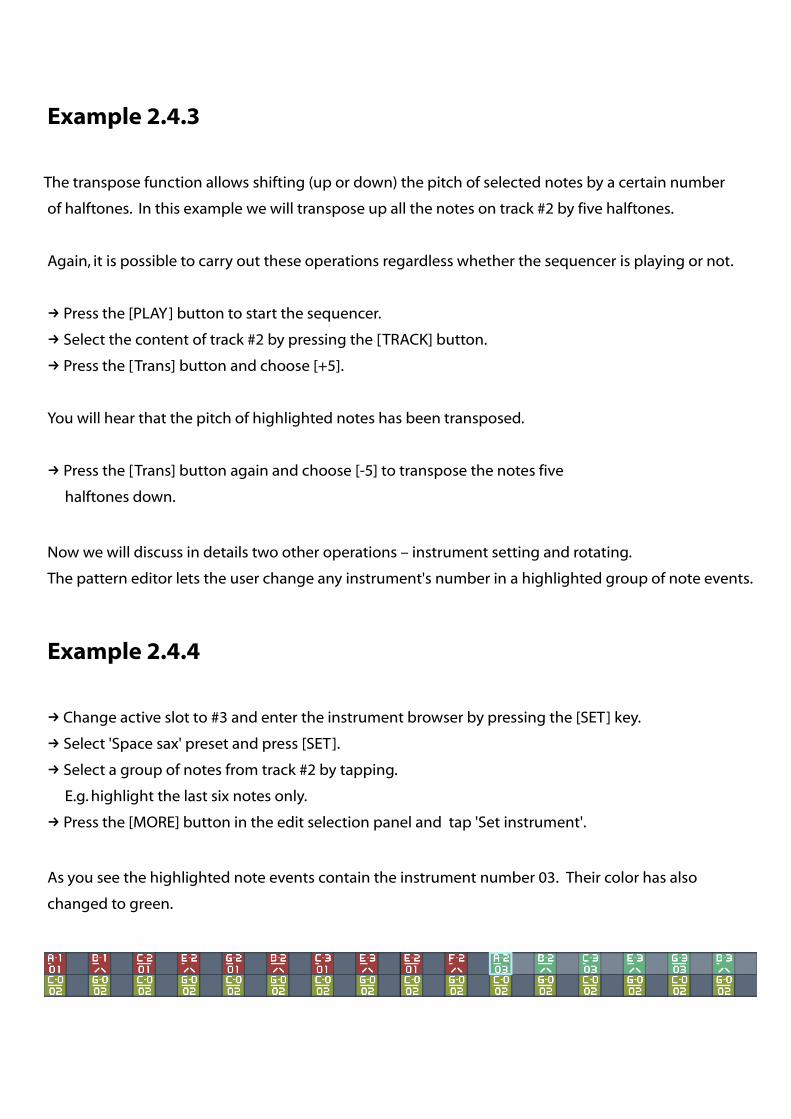
Example 2.4.4
→ Change active slot to #3 and enter the instrument browser by pressing the [SET] key.
Select → 'Space sax' preset and press [SET].
Select a group of notes from track #2 → by tapping.
E.g. highlight the last six notes only.
Press → the [MORE] button in the edit selection panel and tap 'Set instrument'.
As you see the highlighted note events contain the instrument number 03. Their color has also
changed to green.
Another operation with selected events is called Rotate (left or right).
‘Rotate right’ command will move all the note events in the selection one step to the right.
Note that the last note event from the highlighted sequence will always be moved to the first position
in that sequence.
‘Rotate left’ command will move the note events in opposite direction.
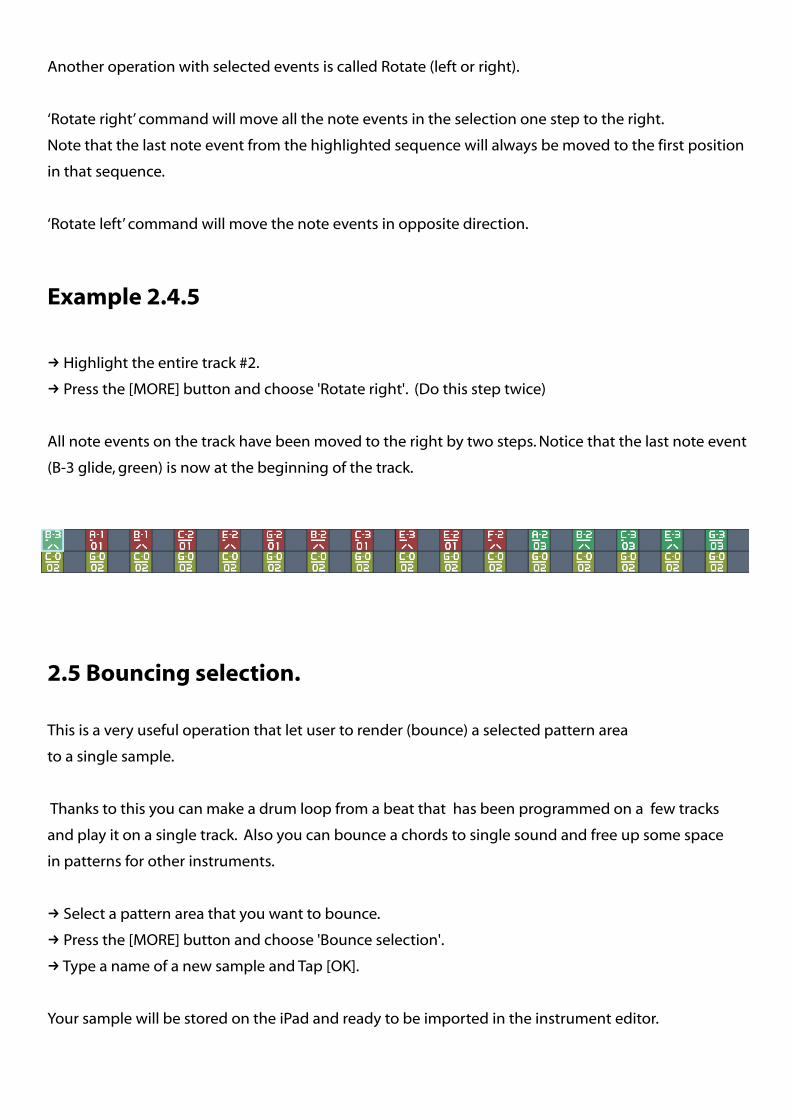
Example 2.4.5
Highlight the entire track #2.→
Press the [MORE] button and choose 'Rotate right'. (Do this step twice)→
All note events on the track have been moved to the right by two steps. Notice that the last note event
(B-3 glide, green) is now at the beginning of the track.
2.5 Bouncing selection.
This is a very useful operation that let user to render (bounce) a selected pattern area
to a single sample.
Thanks to this you can make a drum loop from a beat that has been programmed on a few tracks
and play it on a single track. Also you can bounce a chords to single sound and free up some space
in patterns for other instruments.
Select a pattern area that you want to bounce.→
Press the [MORE] button and choose 'Bounce selection'.→
Type a name of a new sample and Tap [OK].→
Your sample will be stored on the iPad and ready to be imported in the instrument editor.
2.6 Additional settings.
There are six various additional settings that let you specify ways of editing the pattern content.
In order to change them, press the [OPTS] button located on the upper panel of the main screen.
Auto advance on note enter - in this mode, each time your enter a note, the cursor moves automatically
to the next step.
Play note on block touch – allows listening to the sound on tapping a note event.
Play row on step - all the notes in a given step will be played when the [Step] button is tapped.
Change instrument on block touch – changes the current instrument number to the one located
on the activated note event.
Set velocity for selection - allows changing the velocity of all highlighted note events by using
the velocity fader.
Change playback position on touch – this option makes the sequencer jump instantly to a step
in the pattern tapped with a finger.
Transpose drum instruments – allows to transpose the notes related to drumpads in drumkit-type
instruments.
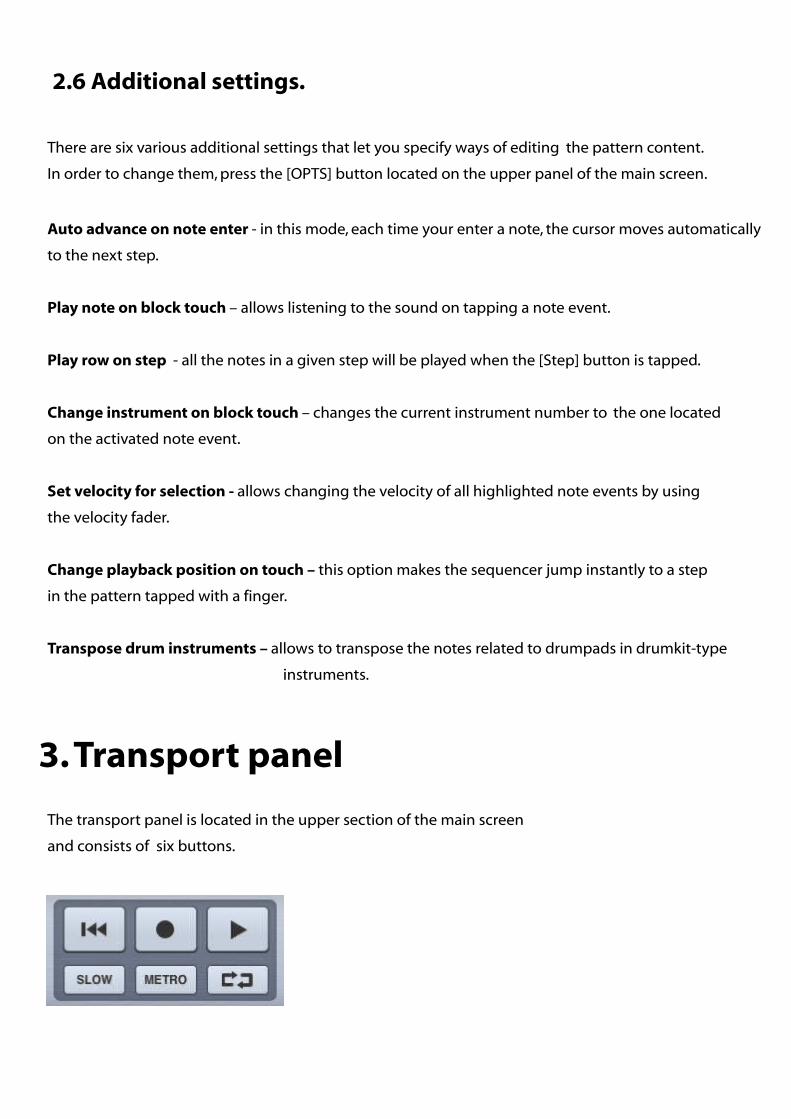
3. Transport panel
The transport panel is located in the upper section of the main screen
and consists of six buttons.
3.1 Live recording
So far we have been programming patterns manually, step by step, by entering note events to
the cells highlighted by a cursor.
The other way to do this is by using 'Live Recording' mode.
In this mode, when the sequencer is running all sounds played with the keyboard or drum pads
will be automatically recorded in the pattern. In fact, this is a common method of recording electronic
music using sequencers.
iSequence offers two additional functions that are very helpful in live recording.
Metronome which generates a sound-click of every four steps.
Slowmotion makes the sequencer work 200% more slowly.
Let us try record a simple drum beat.
Example 3.1.1
Create an empty song by entering Song manager and pressing 'New song'.→
Set 'Funky Kit' to slot #1 and listen to the sounds by hitting individual pads.→
Press the [REC] button located on the right side of the instrument panel.→
Only if its color is blue, all the sounds you play will be recorded.
Press the [METRO] and [SLOW] buttons to turn the metronome and slowmotion mode on.→
Press → the [Record live] button located in the middle of the transport panel.
To start the sequencer press [PLAY].→
Record some notes by → playing the drum pads.
In this case use only Kick sound (pad D) and Snares (pads E and F#).
Press the [METRO] and [SLOW] buttons to turn them off.→
You will now hear what has been recorded. Notice that all the note events have been recorded on
a single track, track #1 in this case, where we initially set the cursor.
Press the [PLAY] button to stop the sequencer. →
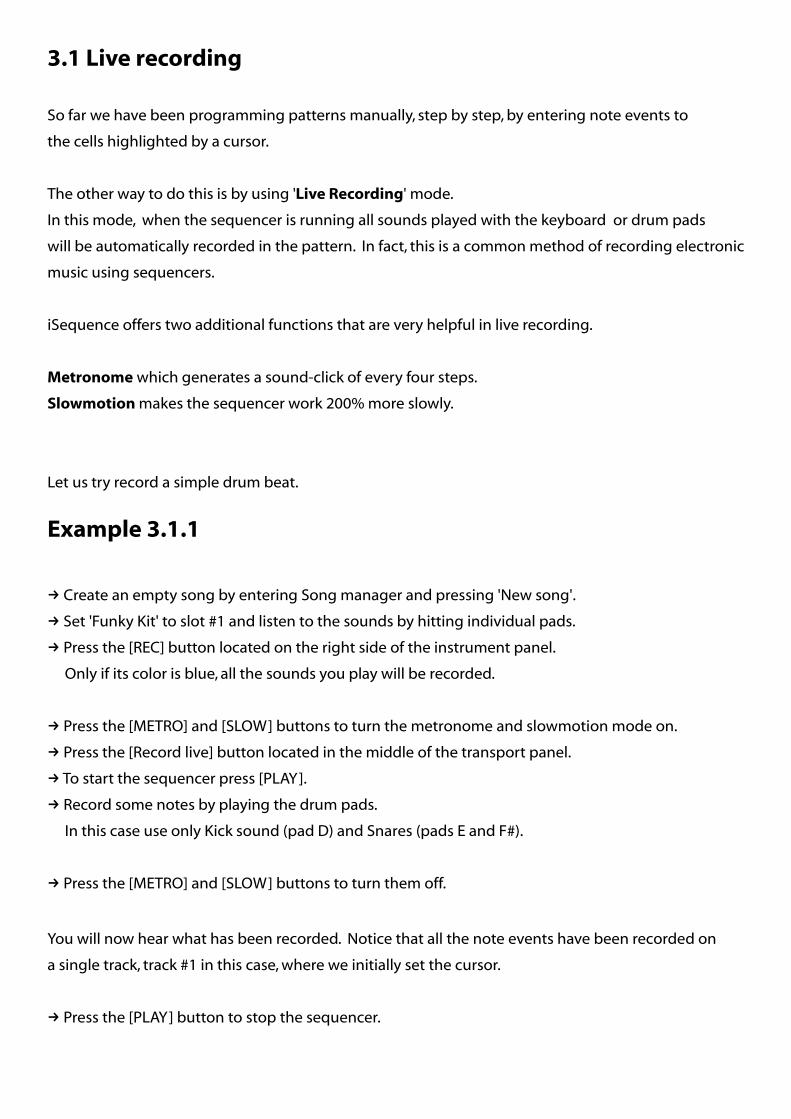
When the [REC] button is still on, by hitting any drum pad you will record the sound onto the pattern
where the cursor has been set.
To deactivate this, simply press the [REC] button again.
Notice that the sequencer recorded in live mode both regular note events and stop note
events. The stop note events appear when no pad is tapped.
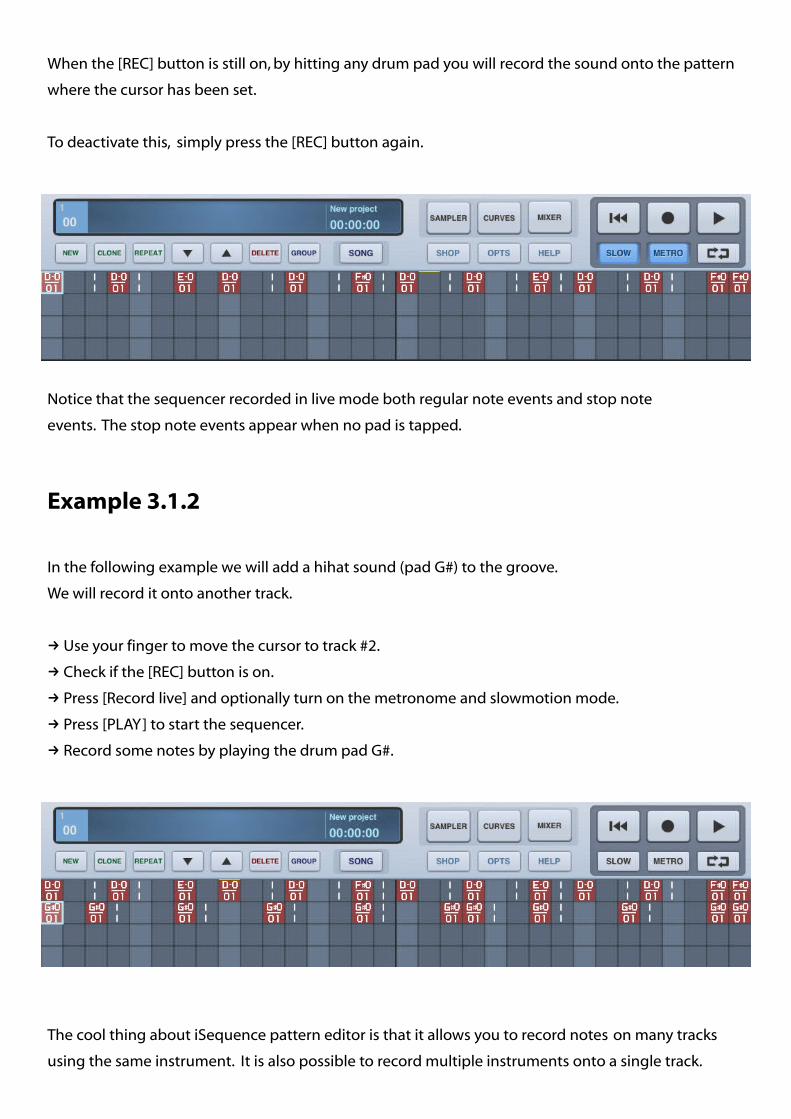
Example 3.1.2
In the following example we will add a hihat sound (pad G#) to the groove.
We will record it onto another track.
Use → your finger to move the cursor to track #2.
Check if the [REC] button is on.→
Press [Record live] and optionally turn → on the metronome and slowmotion mode.
Press [PLAY] to start the sequencer.→
Record some notes by playing the drum pad G#.→
The cool thing about iSequence pattern editor is that it allows you to record notes on many tracks
using the same instrument. It is also possible to record multiple instruments onto a single track.
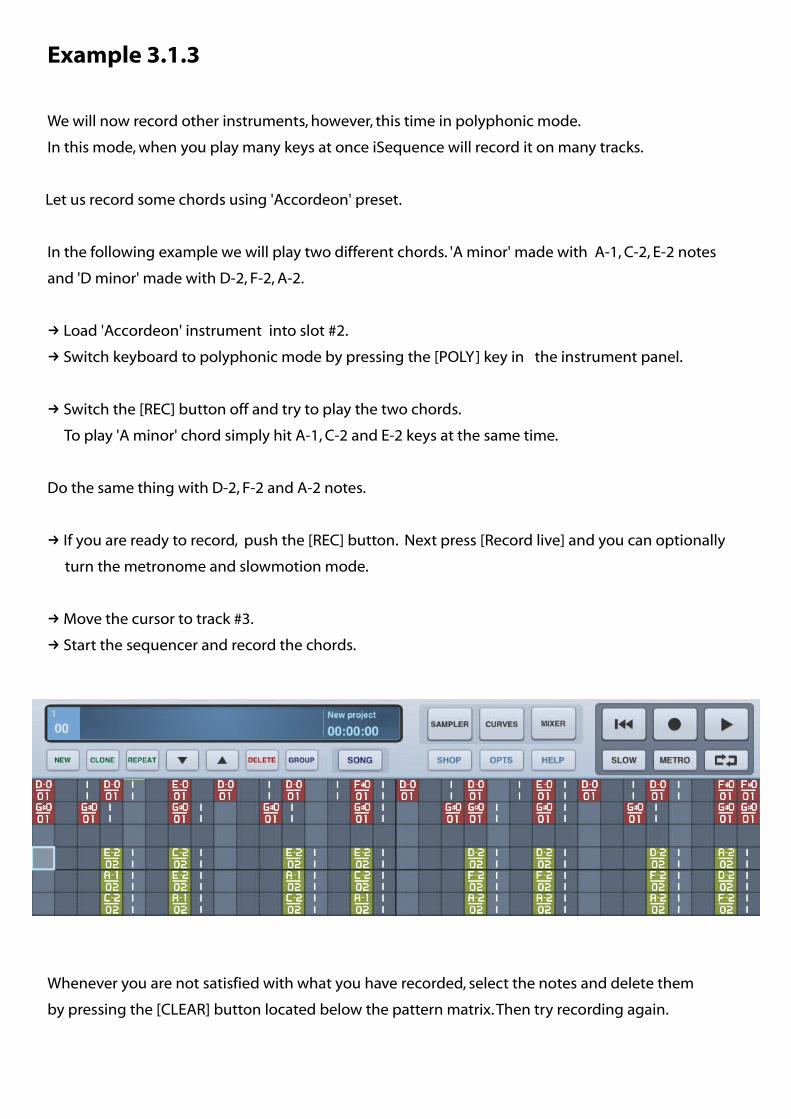
Example 3.1.3
We will now record other instruments, however, this time in polyphonic mode.
In this mode, when you play many keys at once iSequence will record it on many tracks.
Let us record some chords using 'Accordeon' preset.
In the following example we will play two different chords. 'A minor' made with A-1, C-2, E-2 notes
and 'D minor' made with D-2, F-2, A-2.
Load 'Accordeon' instrument into slot #2.→
Switch keyboard to polyphonic mode by pressing the [POLY] key in the instrument panel.→
Switch the [REC] button off and try to play the two chords.→
To play 'A minor' chord simply hit A-1, C-2 and E-2 keys at the same time.
Do the same thing with D-2, F-2 and A-2 notes.
If you are ready to record, push the [REC] button. Next press [Record live] and you can optionally →
turn the metronome and slowmotion mode.
Move the cursor to track #3.→
Start the sequencer and record the chords.→
Whenever you are not satisfied with what you have recorded, select the notes and delete them
by pressing the [CLEAR] button located below the pattern matrix. Then try recording again.
3.2 Looping and restarting a song.
The transport panel also includes the [Rewind] button which makes the sequencer play a song from
the beginning. With a song containing only one pattern (so far we have been using only one pattern
in a song) the sequencer will restart from the beginning of it.
There is also a button with a loop symbol. Its function is simple. When playing a song with many
patterns, the button will make the sequencer play the current pattern only.
4. Song editor
The Song editor is used to create a song's overall progress by defining the order in which patterns
are played. A song begins with a pattern at the very left end of the Song editor. Once the pattern
has finished, the next one in the sequence is launched. This carries on until the final pattern has played
and the end of the song has been reached.
The sequencer refers to patterns via their numbers. If you want to repeat the pattern, then simply create
a new pattern with the same number.
4.1 Editing a song
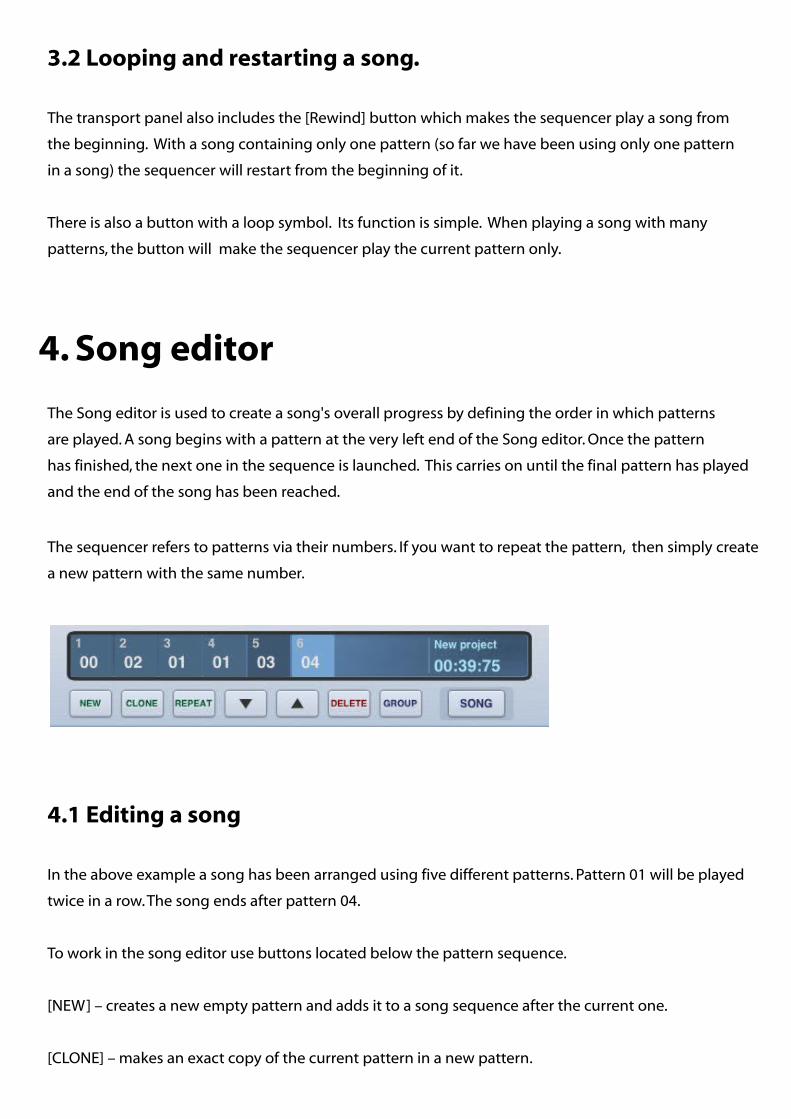
In the above example a song has been arranged using five different patterns. Pattern 01 will be played
twice in a row. The song ends after pattern 04.
To work in the song editor use buttons located below the pattern sequence.
[NEW] – creates a new empty pattern and adds it to a song sequence after the current one.
[CLONE] – makes an exact copy of the current pattern in a new pattern.
[REPEAT] – repeats the current pattern in a song.
[DELETE]– removes a pattern from its current position in a sequence.
Arrow buttons change a pattern’s number in highlighted song position.
Let us make a new song and see how to work with the song editor.
We will create a short song by recording drum sounds into 3 different patterns.
Example 4.1.1
Open the song manager and choose 'New song'.→
Load 'Hyper 909 kit' into slot #1.→
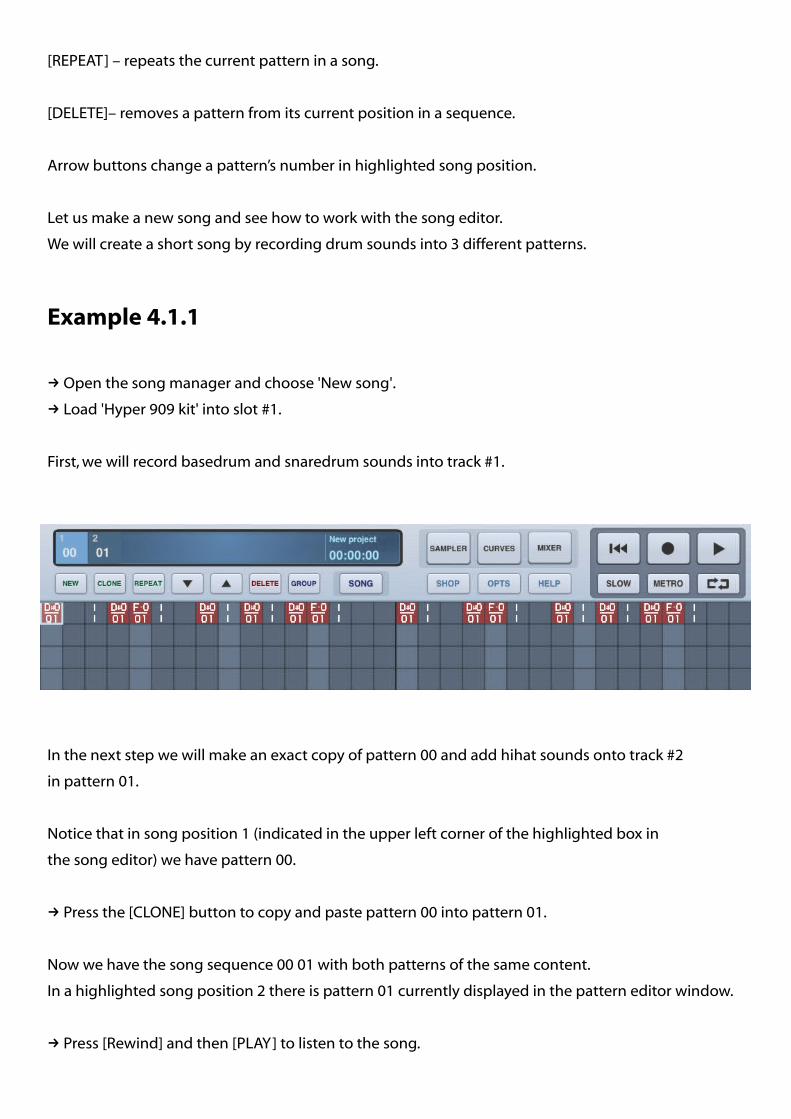
First, we will record basedrum and snaredrum sounds into track #1.
In the next step we will make an exact copy of pattern 00 and add hihat sounds onto track #2
in pattern 01.
Notice that in song position 1 (indicated in the upper left corner of the highlighted box in
the song editor) we have pattern 00.
Press the [CLONE] button to copy and paste pattern 00 into pattern 01.→
Now we have the song sequence 00 01 with both patterns of the same content.
In a highlighted song position 2 there is pattern 01 currently displayed in the pattern editor window.
Press [Rewind] and then [PLAY] to listen to the song. →
The sequencer will play patterns in order 00 01.
The pattern that is being played is highlighted in blue in the song editor and the content of this
pattern is being displayed below in the pattern editor.
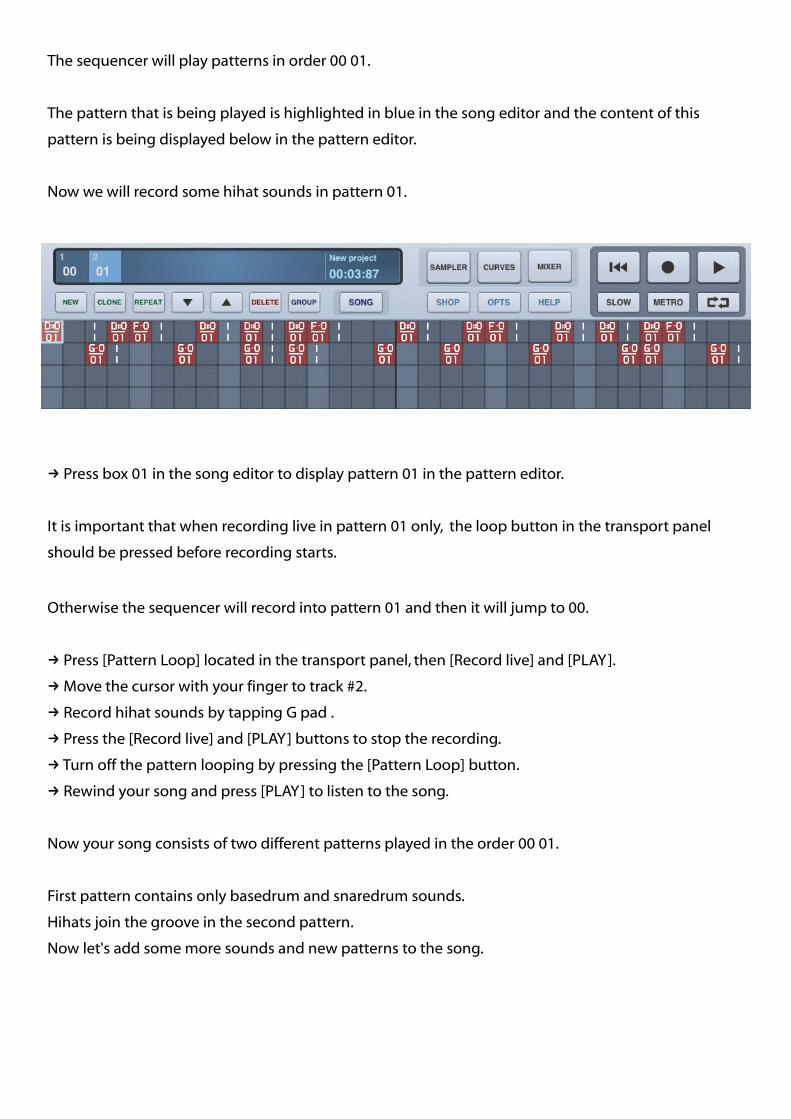
Now we will record some hihat sounds in pattern 01.
Press box 01 in the song editor to display pattern 01 in the pattern editor.→
It is important that when recording live in pattern 01 only, the loop button in the transport panel
should be pressed before recording starts.
Otherwise the sequencer will record into pattern 01 and then it will jump to 00.
Press [Pattern Loop] located in the transport panel, then [Record live] and [PLAY].→
Move the cursor with your finger to track #2. →
Record hihat sounds by tappin→ g G pad .
Press the [Record live] and [PLAY] buttons to stop the recording.→
Turn → off the pattern looping by pressing the [Pattern Loop] button.
Rewind your song and press [PLAY] to listen to the song.→
Now your song consists of two different patterns played in the order 00 01.
First pattern contains only basedrum and snaredrum sounds.
Hihats join the groove in the second pattern.
Now let's add some more sounds and new patterns to the song.
Example 4.1.2
So far we have made a short song with two patterns played in sequence 00 01.
Let's say we want to make the song look like 00 00 01 01.
Go to song position 1 by pressing the box with number 1 in the upper left corner.→
In song position 1 we have pattern 00.
Press [REPEAT]. The pattern 00 has been repeated in position 2. Now the song looks like 00 00 01. →
Go to song position 3 by pressing → the box with number 3.
In this position we have pattern 01.
Press the [REPEAT] button. →
Now the patterns will play in sequence 00 00 01 01 which will make the song four patterns long.
Example 4.1.3
In the next step we would like to remove the last four sounds from a song’s track #1.
We will do it by highlighting relevant note events and pressing the [CLEAR] button.
Here is a tricky thing. If we remove any notes from pattern 01 located on 4th
position in the song sequence, the same will happen in the pattern 01
located on 3rd position. That's because we have used exactly the same pattern on both positions
in the song sequence.
To avoid this we should clone pattern 01 into pattern 02 and remove our last four sounds from this
pattern 02 only.
Now the song looks like this: 00 00 01 01. We want to make it 00 00 01 02 and change pattern 02.
Go to song position 3. →
Press [CLONE] to make a copy of pattern 01 into pattern 02.→
Now the sequence is 00 00 01 02 01, so we just need to delete the last song position.
Go to song position 5 and press [Delete].→
The song should look like this: 00 01 02.
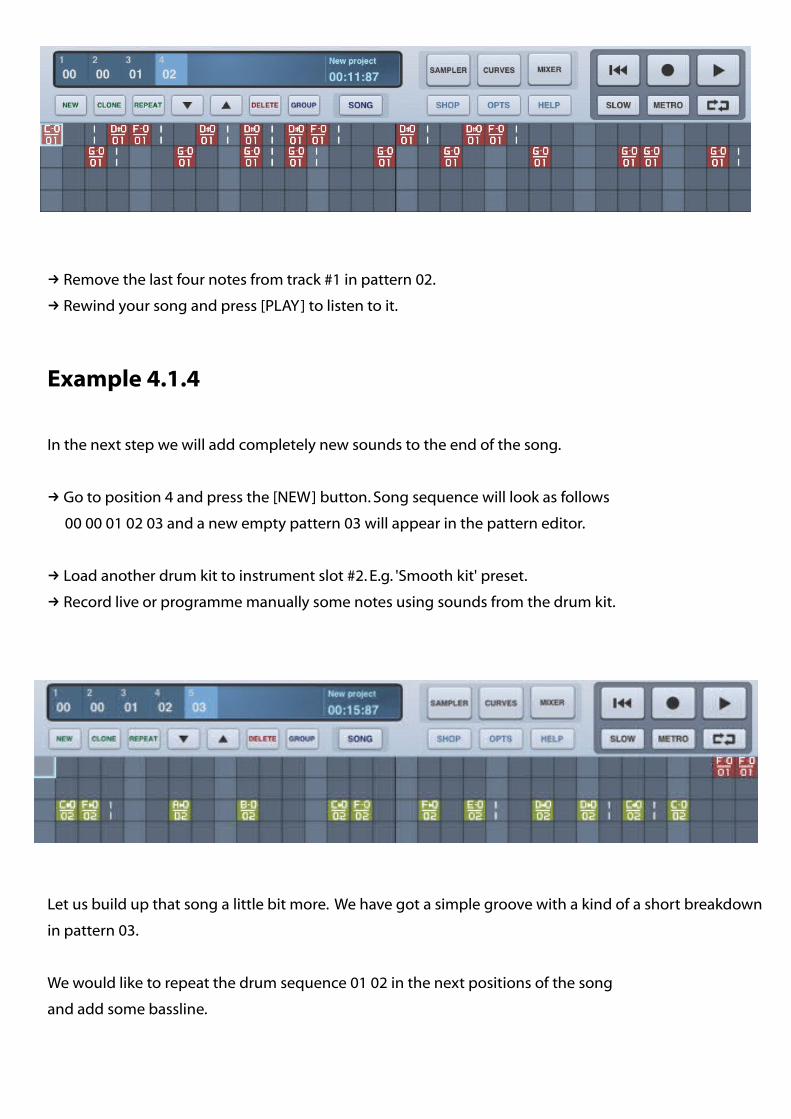
Remove the last four notes from track #1 in pattern 02.→
Rewind your song and press [PLAY] to listen to it. →
Example 4.1.4
In the next step we will add completely new sounds to the end of the song.
Go to position 4 and press the [NEW] button. Song sequence will look as follows→
00 00 01 02 03 and a new empty pattern 03 will appear in the pattern editor.
Load another drum kit to instrument slot #2. → E.g. 'Smooth kit' preset.
Record live or → programme manually some notes using sounds from the drum kit.
Let us build up that song a little bit more. We have got a simple groove with a kind of a short breakdown
in pattern 03.
We would like to repeat the drum sequence 01 02 in the next positions of the song
and add some bassline.

4.2 Cloning and repeating a fragment of a song.
The song editor allows coping or cloning more than one pattern at a time.
As you see in the picture there is a special [Group] button in the song editor section.
[GROUP] performs selecting, coping, repeating and cloning operations on the sequence of patterns.
Example 4.2.1
Press the [GROUP] button and pick 'Select'. We are ready to make a selection.→
→ Tap position 3 and then position 4. They are both highlighted now.
Press the [GROUP] button and choose 'Copy'. The selected sequence 01 02 will be copied →
to the memory buffer.
Now we want to create new copies of these patterns and paste them after position 5 to achieve,
as a result, a sequence 00 00 01 02 03 04 05 (where 04 is a new copy of 01 and 05 is a new copy of 02).
Go to song position 5 and press → the [GROUP] button again.
Choose 'Paste (clone)' to clone selected groups of patterns.→
Now we will record a bassline onto patterns on positions 6 and 7.
To have them looped during live recoding we will select the group again.
Press the [GROUP] button and pick 'Select' from the list.→
→ Tap position 6 and then position 7.
Press the [Pattern loop] button. The sequencer will now loop the 04 05 sequence while playing →
or recording.
Set the instrument slot to #3 and enter the browser.→
Switch the browser to → 'Synthology' bank and choose 'Flat stab' preset.
Record a → bassline with 'Flat stab' instrument in patterns 04 05 on track #4

To extend the song’s length by repeating 04 05 sequence (this time without creating new copies
of these patterns), select group 04 05 and use 'Paste (repeat)' function.
Press the [GROUP] button, pick 'Select' and highlight patterns in positions 6 and 7.→
Press [GROUP] again and pick 'Copy'.→
Press [GROUP] once more and pick 'Paste (repeat)'.→
The song sequence is now 00 00 01 02 03 04 05 04 05.
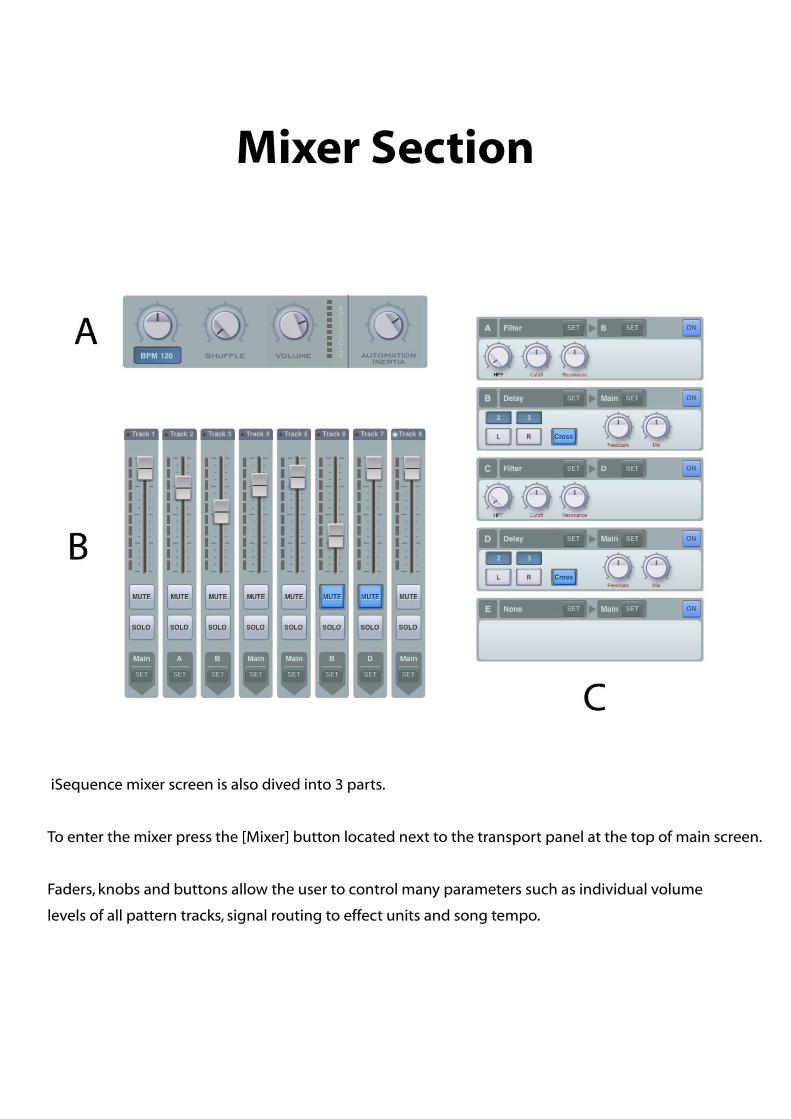
Mixer Section
iSequence mixer screen is also dived into 3 parts.
To enter the mixer press the [Mixer] button located next to the transport panel at the top of main screen.
Faders, knobs and buttons allow the user to control many parameters such as individual volume
levels of all pattern tracks, signal routing to effect units and song tempo.
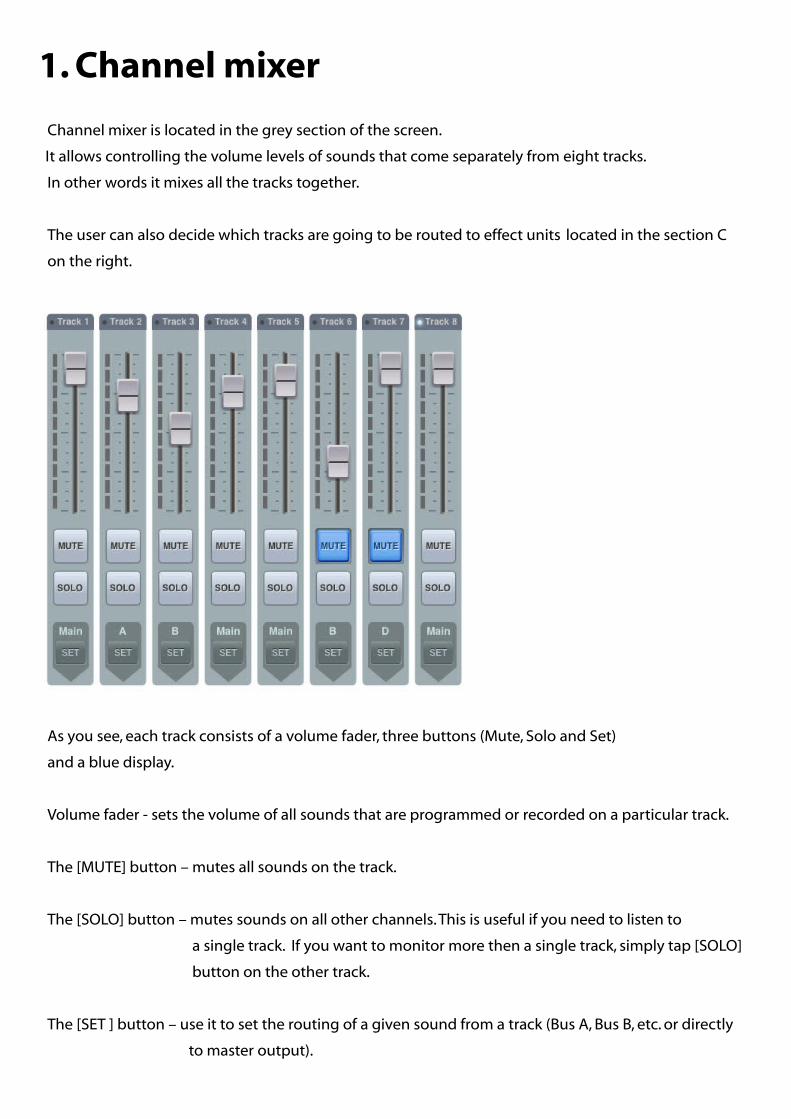
1. Channel mixer
Channel mixer is located in the grey section of the screen.
It allows controlling the volume levels of sounds that come separately from eight tracks.
In other words it mixes all the tracks together.
The user can also decide which tracks are going to be routed to effect units located in the section C
on the right.
As you see, each track consists of a volume fader, three buttons (Mute, Solo and Set)
and a blue display.
Volume fader - sets the volume of all sounds that are programmed or recorded on a particular track.
The [MUTE] button – mutes all sounds on the track.
The [SOLO] button – mutes sounds on all other channels. This is useful if you need to listen to
a single track. If you want to monitor more then a single track, simply tap [SOLO]
button on the other track.
The [SET ] button – use it to set the routing of a given sound from a track (Bus A, Bus B, etc. or directly
to master output).
1.1 Volume level, Mute and Solo.
Example 1.1.1
In this example we will use the song created in the previous section of this manual.
First use the [DELETE] button to trim a sequence of patterns 04 05 04 05.
Switch to mixer screen by pressing the [Mixer] button and press [PLAY]→
Move the fader on → the first channel to alter the volume level on track #1.
You will notice that the loudness of basedrum and snare is changing.
Try → doing the same thing with track #4 where the baseline has been recorded.
Example 1.1.2
Tap [MUTE] on channel 4. You will stop hearing the baseline synth.→
Hit [MUTE] again to hear it again. →
Example 1.1.3
Tap [SOLO] on channel 2 to mute other tracks. You will hear only hihats from track #2.→
Hit [SOLO] again to hear the other tracks.→
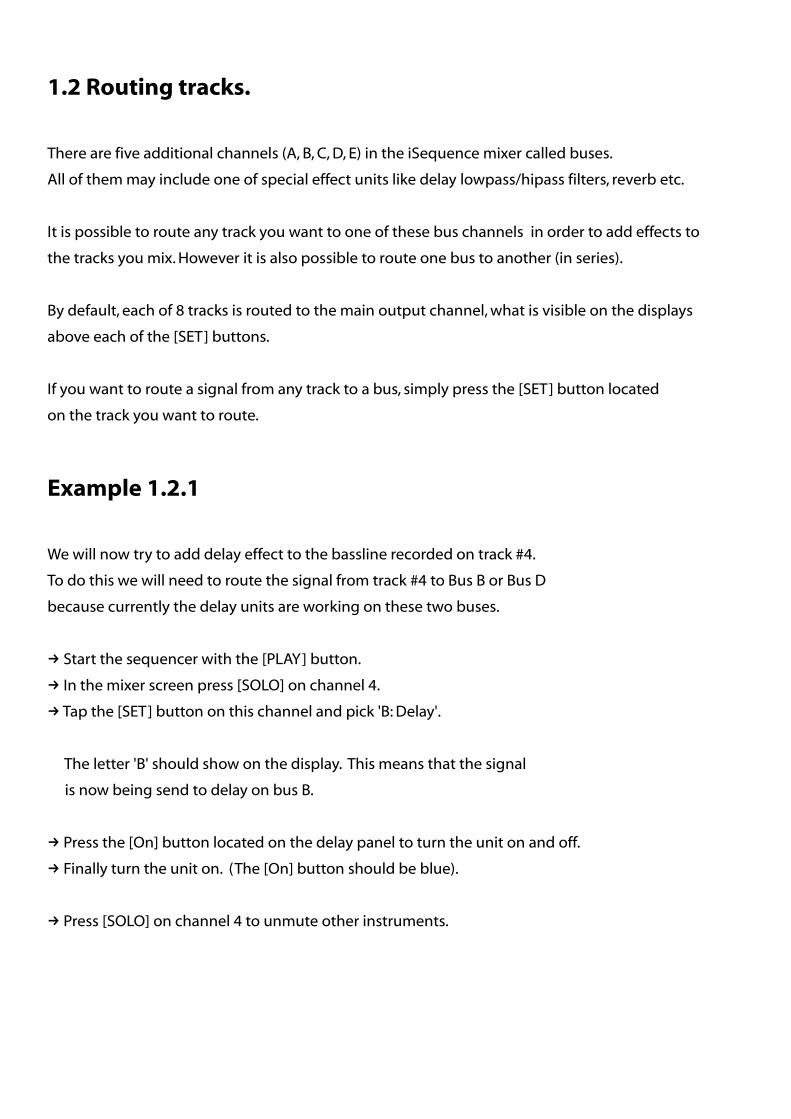
1.2 Routing tracks.
There are five additional channels (A, B, C, D, E) in the iSequence mixer called buses.
All of them may include one of special effect units like delay lowpass/hipass filters, reverb etc.
It is possible to route any track you want to one of these bus channels in order to add effects to
the tracks you mix. However it is also possible to route one bus to another (in series).
By default, each of 8 tracks is routed to the main output channel, what is visible on the displays
above each of the [SET] buttons.
If you want to route a signal from any track to a bus, simply press the [SET] button located
on the track you want to route.
Example 1.2.1
We will now try to add delay effect to the bassline recorded on track #4.
To do this we will need to route the signal from track #4 to Bus B or Bus D
because currently the delay units are working on these two buses.
Start the sequencer with the [PLAY] button.→
In the mixer screen press [SOLO] on channel 4.→
Tap the [SET] button on this channel and pick 'B: Delay'.→
The letter 'B' should show on the display. This means that the signal
is now being send to delay on bus B.
Press the [On] button located on the delay panel to turn the unit on and off.→
Finally turn the unit on. (The [On] button should be blue).→
Press [SOLO] on channel 4 to unmute other instruments.→
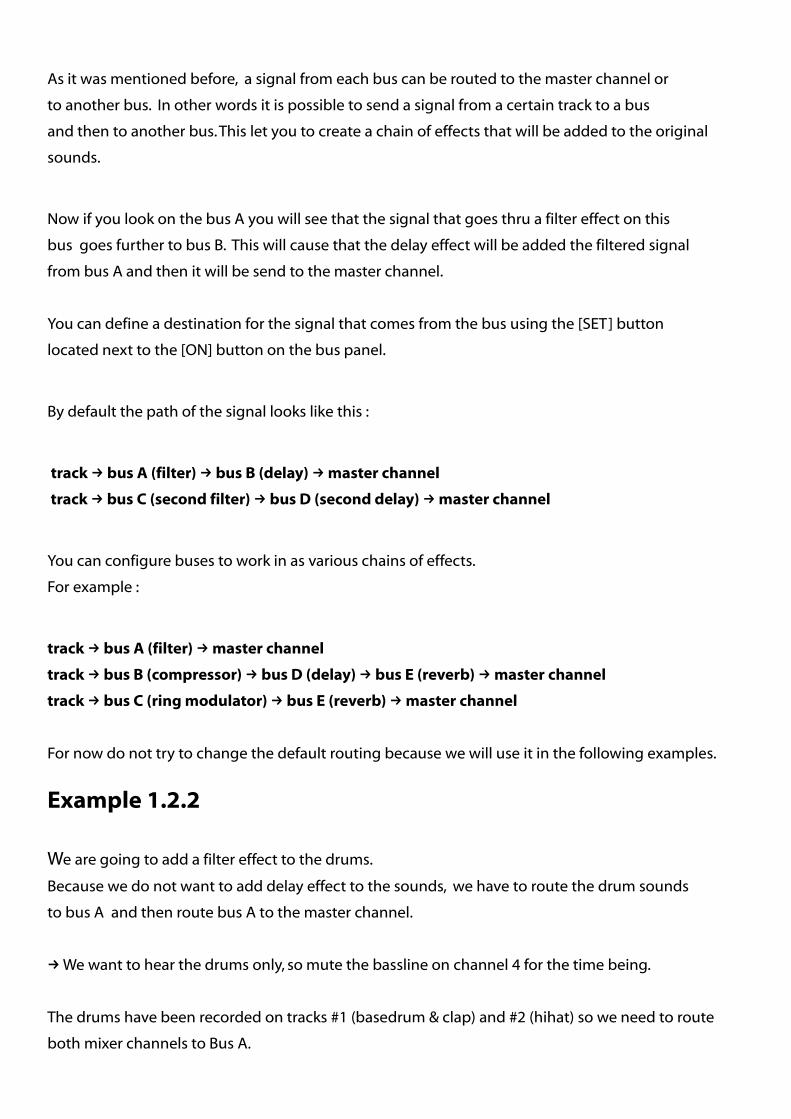
As it was mentioned before, a signal from each bus can be routed to the master channel or
to another bus. In other words it is possible to send a signal from a certain track to a bus
and then to another bus. This let you to create a chain of effects that will be added to the original
sounds.
Now if you look on the bus A you will see that the signal that goes thru a filter effect on this
bus goes further to bus B. This will cause that the delay effect will be added the filtered signal
from bus A and then it will be send to the master channel.
You can define a destination for the signal that comes from the bus using the [SET] button
located next to the [ON] button on the bus panel.
By default the path of the signal looks like this :
track bus A (filter) bus B (delay) master channel→ → →
track bus C (second filter) bus D (second delay) master channel→ → →
You can configure buses to work in as various chains of effects.
For example :
track bus A (filter) master channel→ →
track bus B (compressor) bus D (delay) bus E (reverb) master channel→ → → →
track bus C (ring modulator) bus E (reverb) master channel→ → →
For now do not try to change the default routing because we will use it in the following examples.
Example 1.2.2
We are going to add a filter effect to the drums.
Because we do not want to add delay effect to the sounds, we have to route the drum sounds
to bus A and then route bus A to the master channel.
We want to hear the drums only, so → mute the bassline on channel 4 for the time being.
The drums have been recorded on tracks #1 (basedrum & clap) and #2 (hihat) so we need to route
both mixer channels to Bus A.
Press [SET] on channel 1 and pick 'A: Filter'. →
Do the → same with channel 2.
The letter 'A' should now show on both channels.
If the filter on bus A is on you will hear that the drum sounds that come from track #1 and #2
are being filtered.
Move the cutoff knob to hear how this filter works.
Example 1.2.3
Now let us try to add another effect to the signal path that goes from track #1 and track #2
thru the filter on bus A.
Press the left [SET] button located on the bus E panel and pick 'Lo-Fi crusher' effect.→
Press the right [SET] button located on the bus A panel and pick 'E'. →
Now the filtered signal from bus A is being routed to bus E where 'Lo-Fi crusher' effect
is being apllied.
Move the 'Frequency' knob on panel E to hear the effect. →
2. Effect units
2.1 Delay effect.
Delay effect (also known as Echo) repeats an audio signal and mixes it with the original sound.
It is commonly used to add spatial echoes in rhythmic patterns. Delay times for left and right channels
may be set independently and will be synchronized with a tempo of the song.
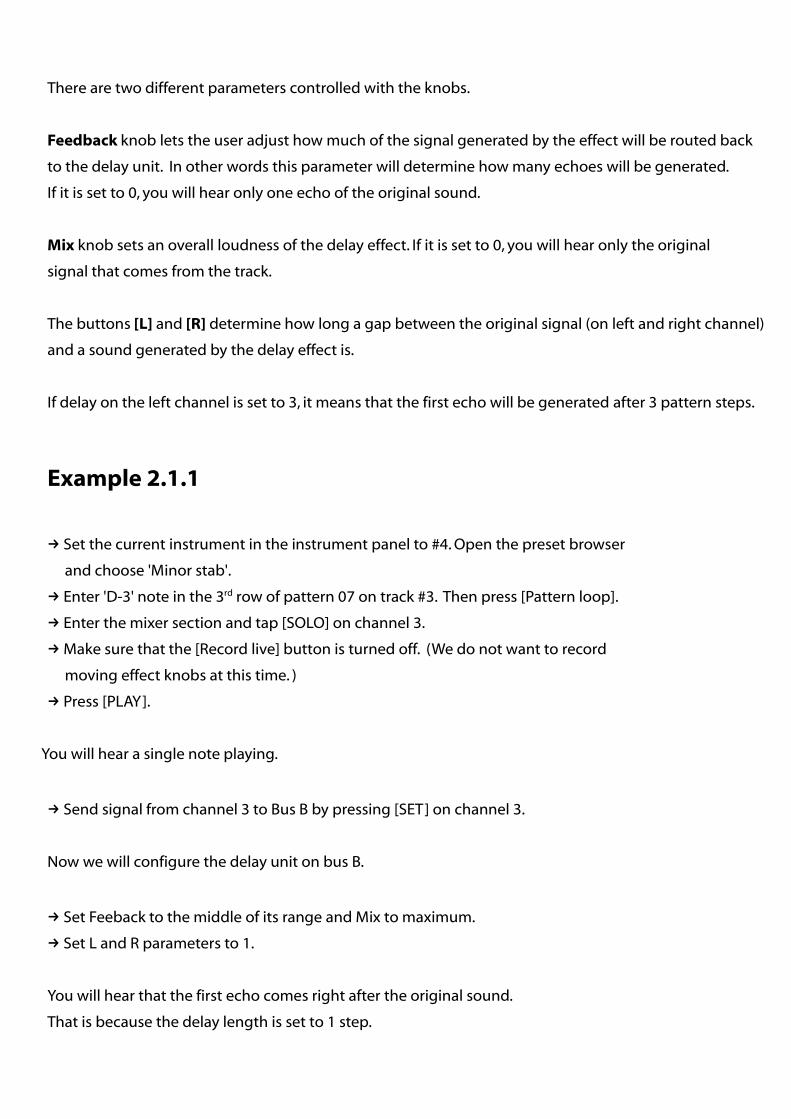
There are two different parameters controlled with the knobs.
Feedback knob lets the user adjust how much of the signal generated by the effect will be routed back
to the delay unit. In other words this parameter will determine how many echoes will be generated.
If it is set to 0, you will hear only one echo of the original sound.
Mix knob sets an overall loudness of the delay effect. If it is set to 0, you will hear only the original
signal that comes from the track.
The buttons [L] and [R] determine how long a gap between the original signal (on left and right channel)
and a sound generated by the delay effect is.
If delay on the left channel is set to 3, it means that the first echo will be generated after 3 pattern steps.
Example 2.1.1
Set the current instrument in the instrument panel to #4. Open the preset browser→
and choose 'Minor stab'.
Enter 'D-3' note in the 3→ rd row of pattern 07 on track #3. Then press [Pattern loop].
Enter the mixer section and tap [SOLO] on channel 3. →
Make sure that → the [Record live] button is turned off. (We do not want to record
moving effect knobs at this time. )
Press [PLAY].→
You will hear a single note playing.
Send signal from channel 3 to Bus B by pressing [SET] on channel 3.→
Now we will configure the delay unit on bus B.
Set Feeback to the middle of its range and Mix to maximum.→
Set L and R parameters to 1.→
You will hear that the first echo comes right after the original sound.
That is because the delay length is set to 1 step.
Now set L to 4 and R to 2. →
You will hear that the first echo on the left appears after 4 steps and the first on the right after 2 steps.
Set Feedback parameter to maximum. →
2.2 Lowpass/Hipass Filter.
Audio filter is an effect which modifies the audible spectrum of a signal.
In other words a filter can be used to remove certain amount of high or low frequencies from
the original signal.
When it comes to electronic music this effect is essential for shaping sounds.
The iSequence filter may work in two different modes - lowpass and hipass.
Lowpass filter passes low frequency signals and attenuates frequencies higher than a certain
value (called cutoff ).
Hipass filter passes high frequencies and attenuates signals below a certain value.
Cutoff and Resonance knobs control how a filter changes an audio signal that flows through the effect.
The [HPF] button determines whether the filter works in Lowpass or Hipass mode.
Cutoff parameter sets the cutoff frequency of the filter.
Resonance parameter boosts the level of the filtered signal for frequencies around the cutoff frequency.
Example 2.2.1
For this example let's program an arpeggio-like part using the synth preset.
Set→ the current instrument to 5.
Open → the instrument browser and choose the 'Sawww' preset.
Program a synth line on track #5. →
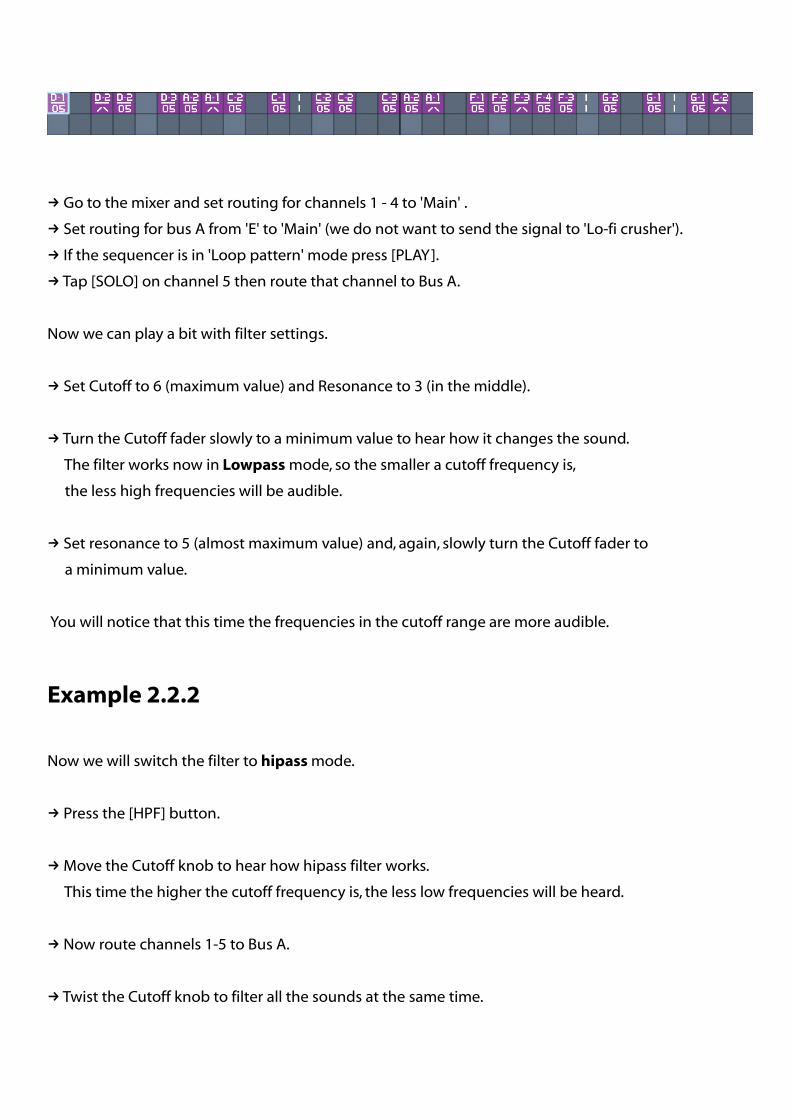
Go to the mixer and set routing for channels 1 - 4 to 'Main' .→
Set routing for bus A from 'E' to 'Main' (we do not want to send the signal to 'Lo-fi crusher').→
If the sequencer is in 'Loop pattern' mode press [PLAY].→
Tap [SOLO] on channel 5 then route that channel to Bus A. →
Now we can play a bit with filter settings.
Set Cutoff to 6 (maximum value) and Resonance to 3 (in the middle).→
Turn → the Cutoff fader slowly to a minimum value to hear how it changes the sound.
The filter works now in Lowpass mode, so the smaller a cutoff frequency is,
the less high frequencies will be audible.
Set resonance to 5 (almost → maximum value) and, again, slowly turn the Cutoff fader to
a minimum value.
You will notice that this time the frequencies in the cutoff range are more audible.
Example 2.2.2
Now we will switch the filter to hipass mode.
Press the [HPF] button.→
Move → the Cutoff knob to hear how hipass filter works.
This time the higher the cutoff frequency is, the less low frequencies will be heard.
Now route channels 1-5 to Bus A.→
Twist → the Cutoff knob to filter all the sounds at the same time.
2.3 Flanger.
Flanger is a popular audio effect that is produced by mixing two identical signals together,
with one signal delayed by a small and gradually changing period.
Part of the output signal is usually fed back to the input (a "re-circulating delay line"),
producing a resonance effect.
Delay - sets the amount of delay between the original signal and the effected one.
Depth - sets the range of the delay values.
Speed - determines how fast the value of the delay parameter will be changed.
Feedback – determines how much of the processed signal will be send back to the effect.
Mix – allows to change the ratio between the original signal and effected signal.
2.4 Compressor.
A compressor is an effect that reduces the dynamic range of an audio signal.
In other words, thanks to this effect a louder sounds become quieter and at the same
time low level sounds become more audible.
Threshold - sets the level above which the signal is reduced.
Ratio - sets how much compression is applied in ratio to the signal level above the threshold level.
Attack - sets how fast the compressor starts to work when the threshold has been exceeded.
Release - This sets how fast the effect stops, once the input signal has dropped back below
the threshold level.
Output – sets the output volume level.
2.5 Lo-Fi crusher.
This effect was designed to degrade the quality of the original signal.
Bits - determines the resolution of the audio signal. Lower values will make the sound more noisy
and aggressive.
Frequency – determines the highest frequencies that are audible in the digital signal.
Mix – allow to set the ratio between the original and 'crushed' sound.
2.6 Ring modulator.
This is an old-school electronic effect that multiplies signals to produce rich in high frequencies,
bell-like or otherwise metallic sounds.
Frequency - determines how fast the original signal will be modulated. Higher values
bring the 'richness' to the effected sound.
Amount - determines the ratio between the original sound and the modulation.
Stereo – controls the difference between the modulation in left and right channels to
add the spatial effect.
2.7 Reverb.
This effect was made to emulate various acoustic properties of different rooms, halls or chambers.
Depending on its configurations it can produce an effect of a phone both or a cathedral.
Room size - determines the length of a reverb tail.
Low cut - sets the range of low frequencies that will be filtered out from the signal.
Predelay - add a short delay between the original signal and the reverb tail.
Dry - sets the volume level of the original signal.
Wet - sets the volume level of the reverb effect.
2.8 3-band equalizer.
This simple equaliser allows to boost or attenuate various ranges of frequencies.
Use the knobs to control the amount of low, mid and hi frequencies in the signal.
2.9 Distortion.
Distortion is similar to fuzz and overdrive guitar effects.
It adds a certain amount of loudness, harshness and noise to the original signal.
2.10 Live looper.
Live looper has been designed to create instant, beat-synchronized loops from the input sound.
It allows to mix looped sound with the original unprocessed signal and user can specify the lenght,
direction of playing and speed of looped audio.
[Play] - loops the signal which is currently in the effect audio buffer.
[Rev] - changes the direction of audio buffer's playback.
[Slow] - changes the playback speed to half of the original.
Mix - allows to set the ratio between original and looped sound.
Volume - controls the volume of the output signal.
3. Song parameters
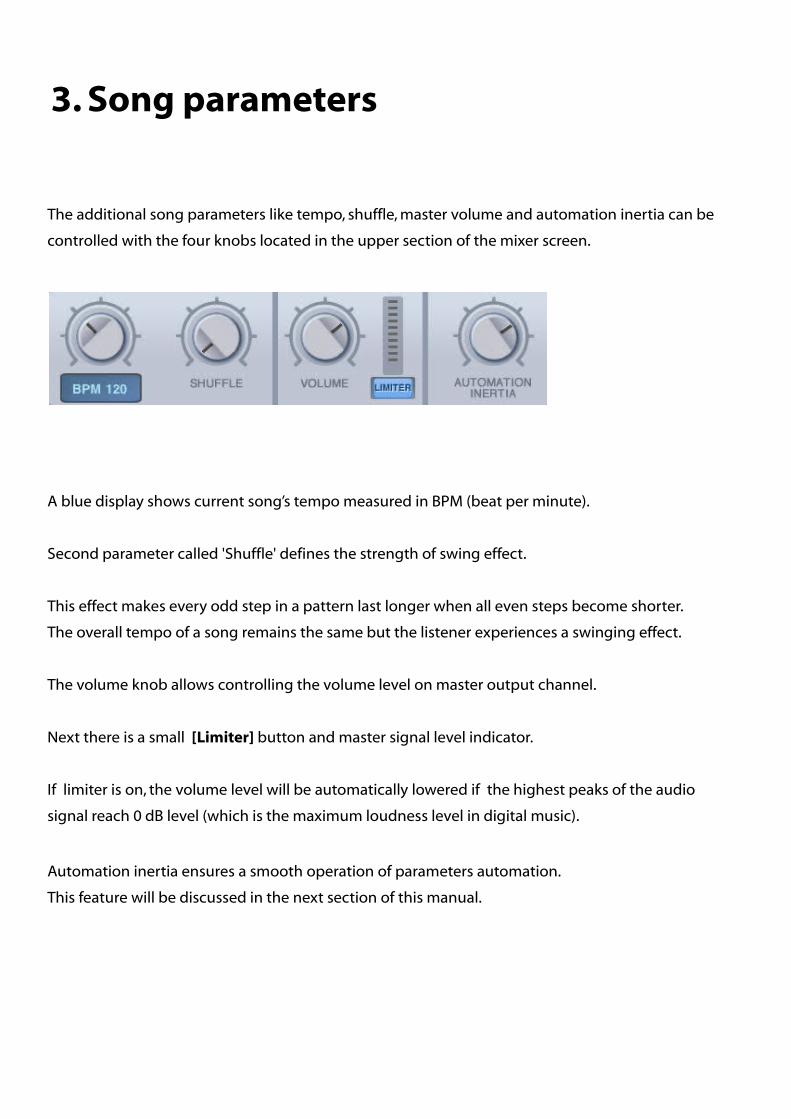
The additional song parameters like tempo, shuffle, master volume and automation inertia can be
controlled with the four knobs located in the upper section of the mixer screen.
A blue display shows current song’s tempo measured in BPM (beat per minute).
Second parameter called 'Shuffle' defines the strength of swing effect.
This effect makes every odd step in a pattern last longer when all even steps become shorter.
The overall tempo of a song remains the same but the listener experiences a swinging effect.
The volume knob allows controlling the volume level on master output channel.
Next there is a small [Limiter] button and master signal level indicator.
If limiter is on, the volume level will be automatically lowered if the highest peaks of the audio
signal reach 0 dB level (which is the maximum loudness level in digital music).
Automation inertia ensures a smooth operation of parameters automation.
This feature will be discussed in the next section of this manual.

Automation
Automation is a process of recording and replaying the movement of faders
and knobs that control many iSequence parameters like delay and filter settings.
When the sequencer works in Live Recording mode, all changes of effect parameters like Cutoff,
Resonance, Feedback or Dry/Wet will be recorded to patterns and automatically replayed
in playback mode.
The values of parameters recorded during Live Recording can be displayed and manually edited
by the user on a special automation display.
The above automation envelope shows values of the Cutoff parameter that controls the filter effect
on Bus A. Each rectangle represents a single value for each one of the 32 steps in a single pattern.
Example 1.1
In the following example we will record movements of Filter and Resonance parameters on Bus A.
Let's do it on the synth part programmed on track #5 in the previous example.
Select the content of track #5 in pattern 04 and copy it into the same track in pattern 05.→
Go to the mixer section and turn the→ filter on.
Keep in mind that it is possible to record the knobs movements only when the Live recording →
button is on. Press the [Record live] button, then turn [Pattern loop] off.
Start the sequencer and play → it with both the Cutoff and Resonance knobs.
Notice that it is possible to move them both at the same time.
Go to the main screen and press [CURVES] button located on the upper panel.→
You will now see the automation display.
Tap the → A : Filter and Cutoff buttons to display the parameter's values that has been
recorded to the current pattern.
Tap → the Resonance button to display recorded values for this parameter.
Move your finger on the display to manually modify the values.→
Go to → the mixer section and start the sequencer.
You will notice that during the playback both knobs are automatically controlled
by the sequencer.
Example 1.2
Now we will programme manually an automation for the filter effect and play a bit with the Inertia
parameter.
Go to the song manager and create a new song. Then open the instrument browser →
and select 'Pro synth' preset from 'Synthology' bank.
Insert C-2 note in the first step on track #1.→
Press → the [CURVES] button located on the upper panel.
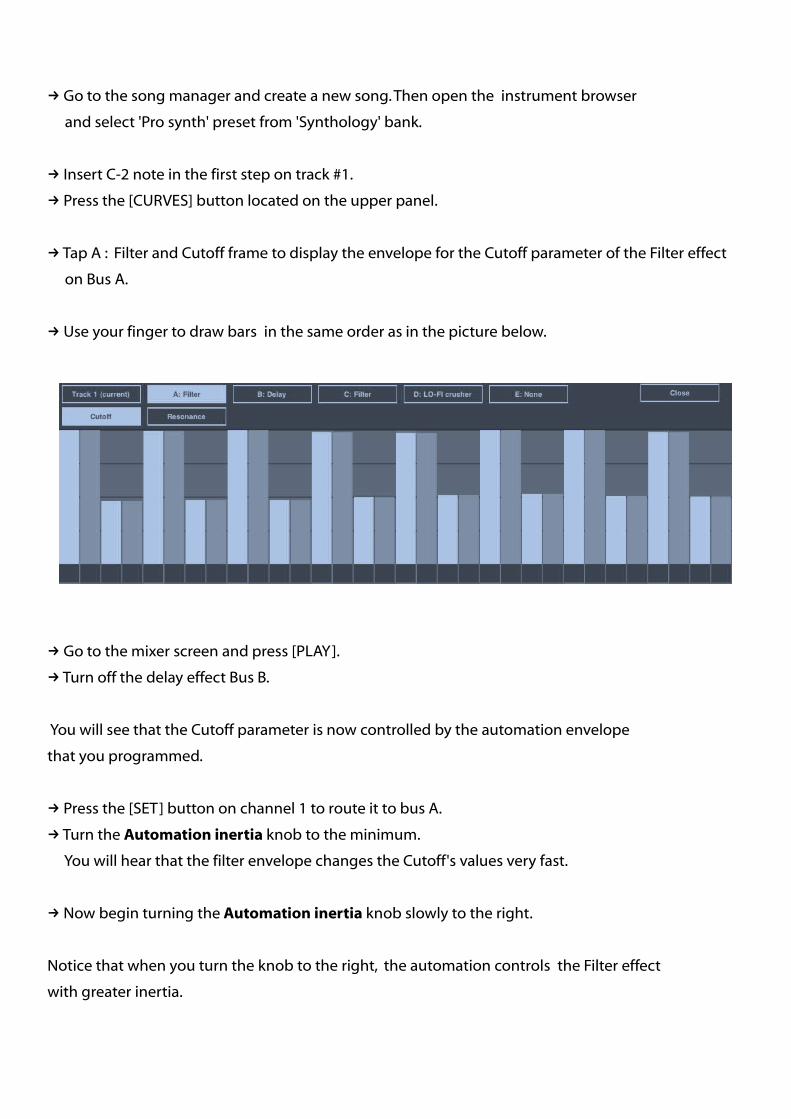
Tap A : Filter and Cutoff frame to display the envelope for the Cutoff parameter of the Filter effect →
on Bus A.
Use your finger to draw bars in the same order as → in the picture below.
Go to the mixer screen and press [PLAY].→
Turn off the delay effect Bus B.→
You will see that the Cutoff parameter is now controlled by the automation envelope
that you programmed.
Press the [SET] button on channel 1 to route it to bus A.→
Turn the → Automation inertia knob to the minimum.
You will hear that the filter envelope changes the Cutoff's values very fast.
→ Now begin turning the Automation inertia knob slowly to the right.
Notice that when you turn the knob to the right, the automation controls the Filter effect
with greater inertia.
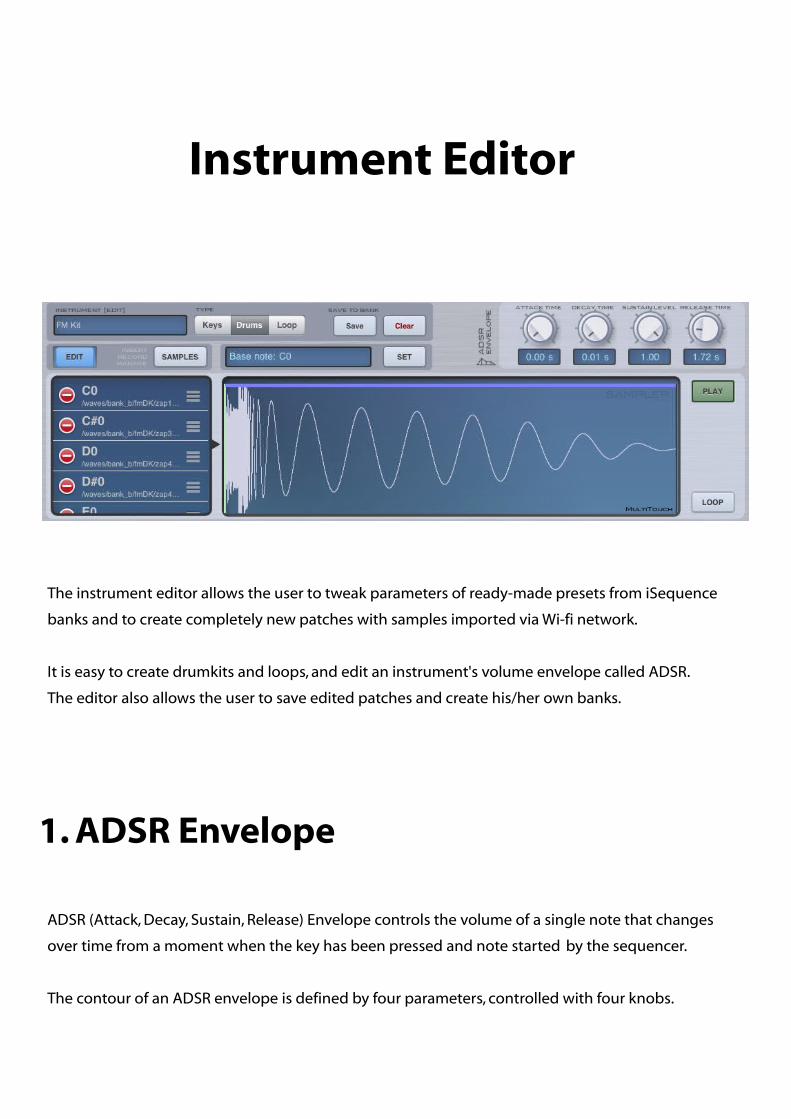
Instrument Editor
The instrument editor allows the user to tweak parameters of ready-made presets from iSequence
banks and to create completely new patches with samples imported via Wi-fi network.
It is easy to create drumkits and loops, and edit an instrument's volume envelope called ADSR.
The editor also allows the user to save edited patches and create his/her own banks.
1. ADSR Envelope
ADSR (Attack, Decay, Sustain, Release) Envelope controls the volume of a single note that changes
over time from a moment when the key has been pressed and note started by the sequencer.
The contour of an ADSR envelope is defined by four parameters, controlled with four knobs.
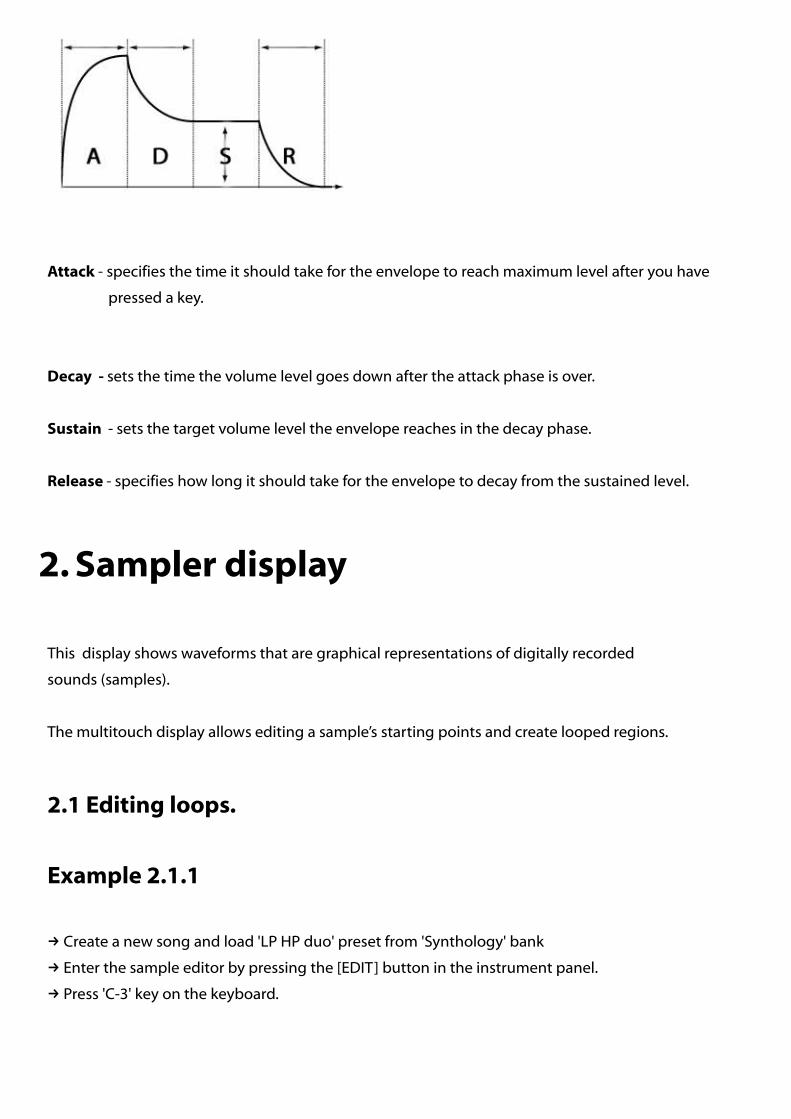
Attack - specifies the time it should take for the envelope to reach maximum level after you have
pressed a key.
Decay - sets the time the volume level goes down after the attack phase is over.
Sustain - sets the target volume level the envelope reaches in the decay phase.
Release - specifies how long it should take for the envelope to decay from the sustained level.
2. Sampler display
This display shows waveforms that are graphical representations of digitally recorded
sounds (samples).
The multitouch display allows editing a sample’s starting points and create looped regions.
2.1 Editing loops.
Example 2.1.1
Create a new song and load 'LP HP duo' preset from 'Synthology' bank→
Enter the sample editor by pressing the [EDIT] button in the instrument panel.→
Press 'C-3' key on the keyboard.→

You will see that the sampler display will automatically show waveforms of the sample that is
being played when 'C-3' key is pressed. This sample has a looped region defined
(indicated by two red markers).
Move both markers with your fingers to define new loop points.→
To zoom in or zoom out, simply pinch a fragment of a wavefor→ m.
3. Importing samples
Since the version 1.60, iSequence has allowed the user to import new samples from desktop
computer or laptop via Wi-Fi network. In this section we will learn how to create new instruments,
drum kits and loops using imported sounds.
It is necessary that all files be recorded in WAV or AIFF format.
Optimal parameters for these sound files are 44.1khz, stereo, 16 bits but it is possible to use higher
bit rates and 24 bits formats.
To import new samples into iSequence perform the following operations:
Go to the instrument editor and tap the [SAMPLES] button. →
The browser window called 'waves' will appear.
Press the [Wi-Fi upload] button and open www browser on your computer.→
Type the address proposed by iSequence in your browser,→
(it should be http://192.168.1.100:8080) and follow the instructions.
When you import samples, it is very important to check that all filenames and file paths
of your sound files DO NOT contain any special characters like: ' “ @ < > & etc.
In other case you will be able to add this samples to your song but then iSequence will
not reload your song file correctly.
3.1 Editing a drum kit.
In the following example we will import a few single shot samples and create a new drum kit.
Example 3.1.1
Go to the instrument editor and press the [CLEAR] button.→
Choose the instrument type you want to create. →
In this example we want to create a drum kit, so tap [Drums].
Press [SAMPLES] and next tap the [Wi-Fi upload] button.→
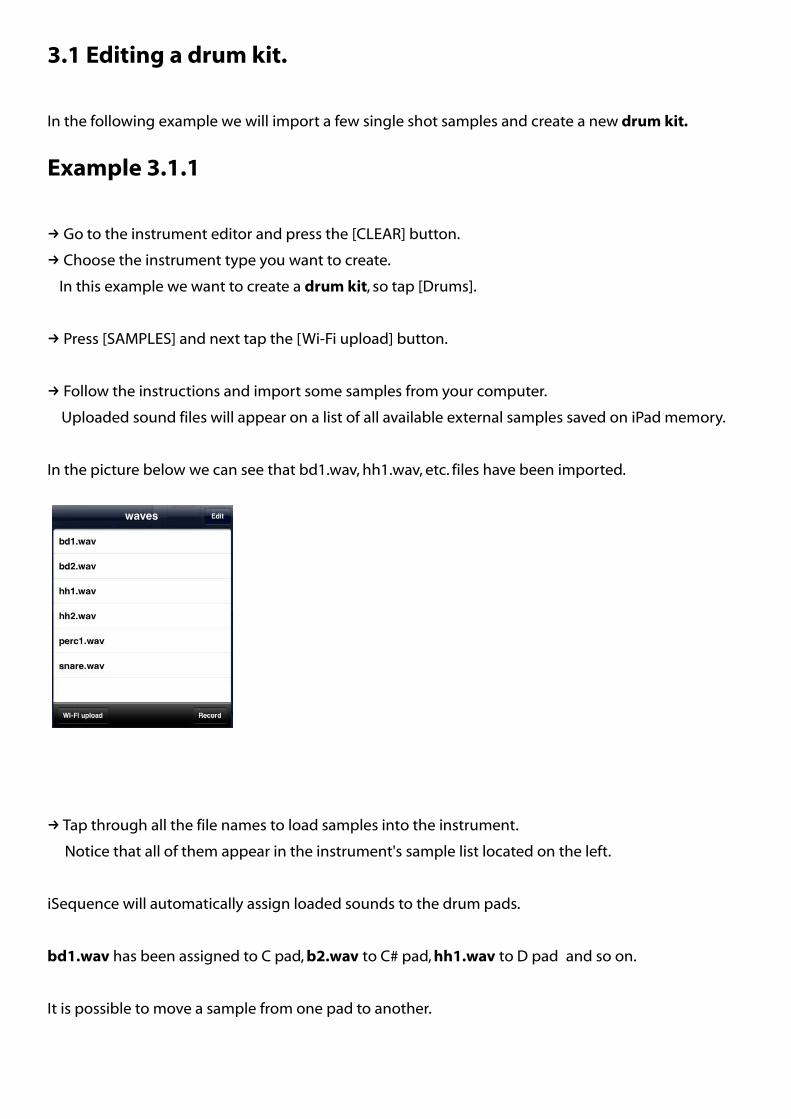
Follow the instructions and import some samples from your computer.→
Uploaded sound files will appear on a list of all available external samples saved on iPad memory.
In the picture below we can see that bd1.wav, hh1.wav, etc. files have been imported.
Tap through all the file names to load samples into the instrument. →
Notice that all of them appear in the instrument's sample list located on the left.
iSequence will automatically assign loaded sounds to the drum pads.
bd1.wav has been assigned to C pad, b2.wav to C# pad, hh1.wav to D pad and so on.
It is possible to move a sample from one pad to another.
Press the [EDIT] button located over the instrument's samples list.→
Let's move hh1.wav sample from D pad to C.
Press ' → ' located on the right side of 'D0 (waves/hh1.wav)' string and move it up to ≡
the top of the list. hh1.wav sample will be assigned to drum C pad.
3.2 Editing a loop-sample.
In the loop-sample mode you can load a single sample so that it will be played by the sequencer
as a loop. When you create an instrument in the loop-sample mode, the sound will be automatically
sliced into a number of fragments.
This allows you to play the sample from different positions using different drum pads,
instead of replaying it from its very begining.
In this mode, rearranging any kind of loops in a pattern is really easy and creative!
Example 3.2.1
Open the instrument editor and tap the [CLEAR] button.→
Switch → the instrument type to Loop.
Press [SAMPLES] and import musical loops via Wi-Fi connection.→
It is important to choose the sound files that have fixed length in musical meaning.
For example it could be a drum loop 2, 4 or 8 bars long.
The imported samples will be listed in the instrument's sample list (on the left) as Loop (16 slices).
Set the → Release time parameter in the ADSR section to 0.25s
Play with the loop using drum pads. Each of the pads will play the sample from a different position →
which is indicated by a black marker on the waveform display.
If your loop is playing way too fast or too slow, tap the [SET]button located above the display →
and set different loop lengths.
Example 3.2.2.
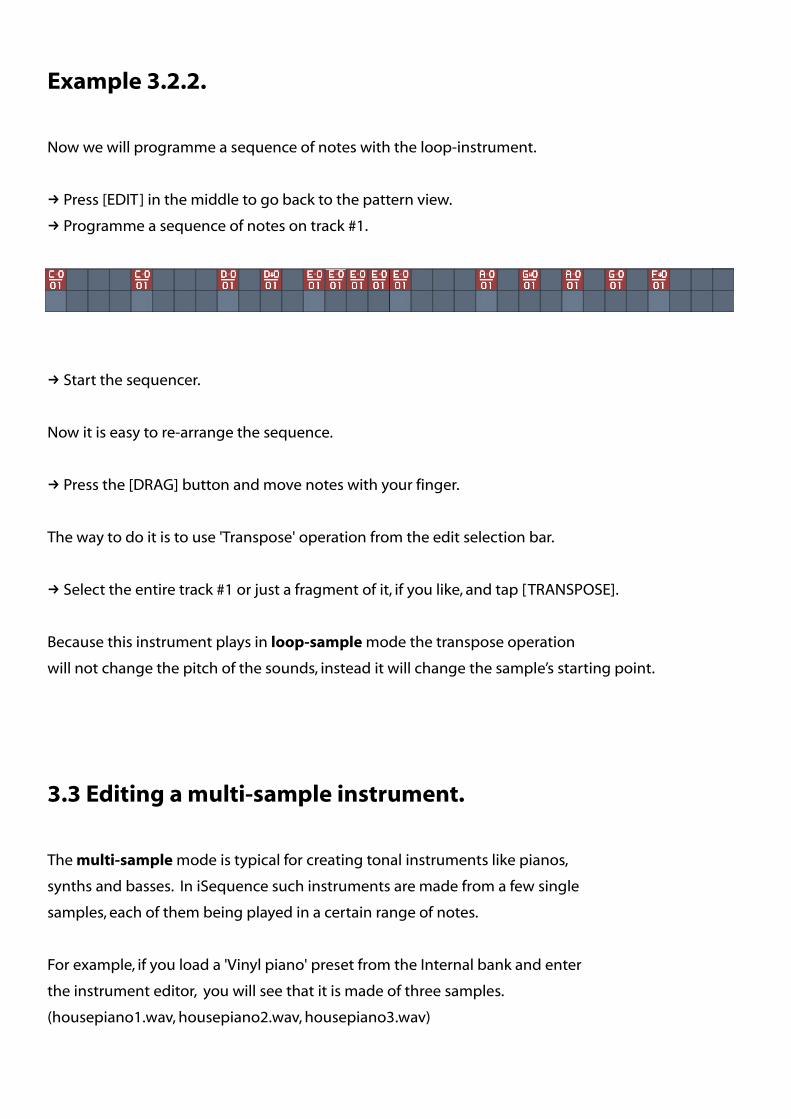
Now we will programme a sequence of notes with the loop-instrument.
Press [EDIT] in the middle to go back to the pattern view. →
Programme a sequence of notes on track #1. →
Start the sequencer.→
Now it is easy to re-arrange the sequence.
Press the [DRAG] button and move notes with your finger. →
The way to do it is to use 'Transpose' operation from the edit selection bar.
Select the entire track #1 or just a fragment of it, if you like, and tap [TRANSPOSE].→
Because this instrument plays in loop-sample mode the transpose operation
will not change the pitch of the sounds, instead it will change the sample’s starting point.
3.3 Editing a multi-sample instrument.
The multi-sample mode is typical for creating tonal instruments like pianos,
synths and basses. In iSequence such instruments are made from a few single
samples, each of them being played in a certain range of notes.
For example, if you load a 'Vinyl piano' preset from the Internal bank and enter
the instrument editor, you will see that it is made of three samples.
(housepiano1.wav, housepiano2.wav, housepiano3.wav)
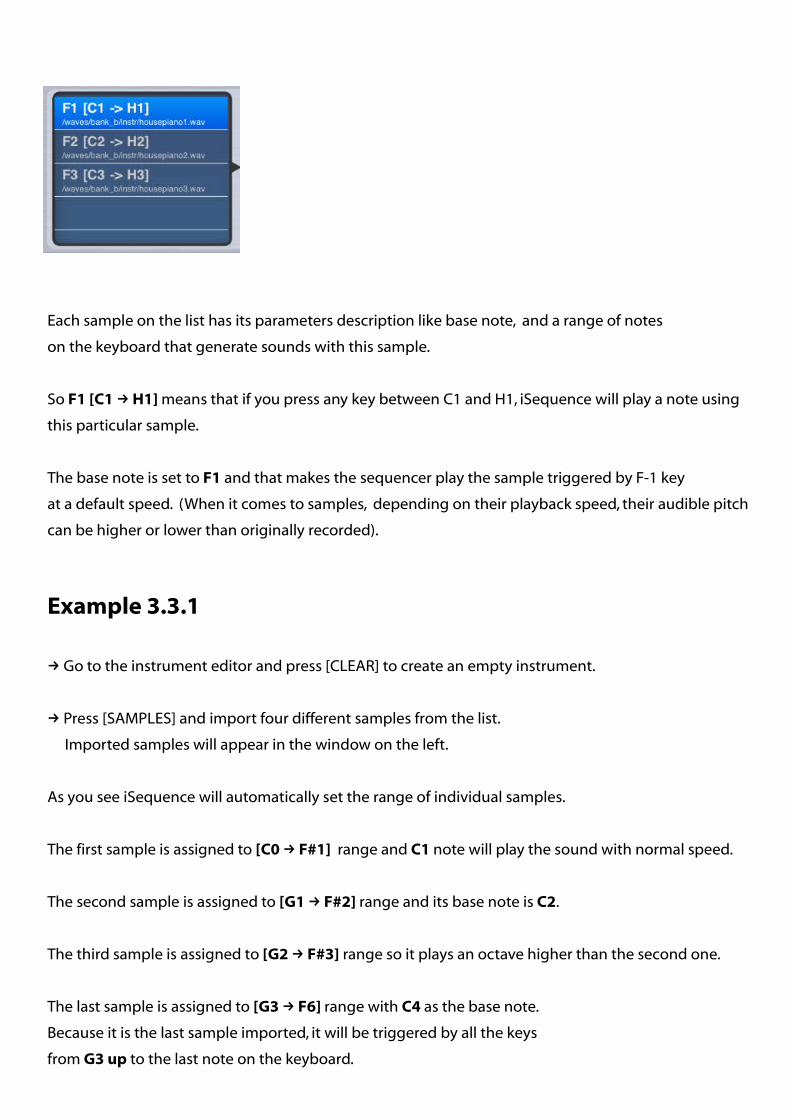
Each sample on the list has its parameters description like base note, and a range of notes
on the keyboard that generate sounds with this sample.
So F1 [C1 H1] → means that if you press any key between C1 and H1, iSequence will play a note using
this particular sample.
The base note is set to F1 and that makes the sequencer play the sample triggered by F-1 key
at a default speed. (When it comes to samples, depending on their playback speed, their audible pitch
can be higher or lower than originally recorded).
Example 3.3.1
Go to the instrument editor and press [CLEAR] to create an empty instrument.→
Press [SAMPLES] and import four different samples from the list.→
Imported samples will appear in the window on the left.
As you see iSequence will automatically set the range of individual samples.
The first sample is assigned to [C0 F#1] → range and C1 note will play the sound with normal speed.
The second sample is assigned to [G1 F#2] → range and its base note is C2.
The third sample is assigned to [G2 F#3]→ range so it plays an octave higher than the second one.
The last sample is assigned to [G3 F6] → range with C4 as the base note.
Because it is the last sample imported, it will be triggered by all the keys
from G3 up to the last note on the keyboard.
To change the base note of any sample, highlight it and tap the [SET] button located next →
to the blue display with 'Base note :' on it.
Then choose a new base note from → the list.
3.4 Saving a preset.
The newly created presets can be stored in the User Banks.
If there are no existing user banks, they can be created by pressing the [SAVE] (Save to bank) button.
Tap [SAVE] and [EDIT] in the 'User banks' window, the press [+] and enter a name for the new bank. →
Next press [CREATE].
Go back to the instrument editor and press [SAVE] once again.→
→ From the list choose the bank where you want to store your instruments.
From now on the bank that you have created will appear in the instrument browser and it will contain
all the instruments made by the user.
4. Recording via a microphone.
iSequence allows recording new samples using a built-in microphone.
If you want to play your patterns while recording, it is important to use ear-phones to avoid
interference with the sound played by the sequencer.
Go to → the istrument editor and create a new instrument.
Tap [SAMPLES] and press the [RECORD] button located at the bottom of the 'Waves' window.→
Press [Start recording]. →
Recorded sound appears on the samples list and it is ready to be imported to the instrument.
Song manager
This section will inform the user how to save composed music onto the iPad's
memory using iSequence native format HSQ as well as how to export it to an external computer
in form of WAV, MIDI files.
It is also possible to copy musical content to an audio buffer and use it in other iPad apps.
To enter the song manager press the [SONG] button located on the upper panel on the main screen.
1. Loading previously saved song.
To load any previously saved song simply choose it from the list of tracks located on the right. →
2. Saving song file and adding song information.
Insert additional song information, like title, author's name or a few words of comment, →
and press the [save] button.
3. Exporting song, audio or midi data.
You can export the entire song or just a fragment of it selected in the Song editor.
Press the [All | Selection] buttons to choose.
Pick HSQ song file, WAV audio or MIDI data to export your work to the external device (laptop→
or desktop computer).
Next follow the instructions showed on the screen. →
Keep in mind that both your iPad and the external device must be connected to the same Wi-Fi network.
The http address (like http://192.168.1.100:8080) is the one you should type in your computer's
web browser. (Do not type this address in your iPad's web browser).
After connecting to the iPad, your computer's web browser will display a link to the file that
you want to export. Right-click on that file and choose 'Download Linked File'.
4. Exporting audio to another app.
You can export the entire song or just a fragment of it selected in the Song editor
to another application that support AudioCopy protocol.
Press [AudioCopy] button and follow the instructions presented on the screen.→
Frequently Asked Questions
− Where can new sound banks be downloaded?
Press the [SHOP] button located in the upper section of the main screen to open bank shop.
− Is it possible to use sounds and instruments from logic studio pro and ableton live
and native instruments in isequence for iPad?
It is not possible because other softwares use their native instrument formats.
Although you can upload to iSequence 44khz/16bit samples in WAV or AIFF format.
− After recording the first pattern, I choose another sound for the next pattern (i.e. third row).
Starting the recording button the playback plays the first pattern with the new choosen sound.
What am I doing wrong?
This happends when you load a new preset to the first instrument slot again.
In fact you replace the instrument from currently selected slot with a different preset.
To add another instrument to your song, change the current slot number from 01 to 02
using arrow buttons located next to the current instrument's number.
Also you can follow the instructions on pages 5 – 6 (sections 1.1 – 1.2).
− Can you do tempo and time signature changes in this app?
To change the tempo of your song use the BPM knob located on the mixer screen.
Time signature feature will be implemented to iSequence soon. At the moment it is possible
to create specific time signatures (for example 3 / 4) by using the pattern break events.
− When I click on the wifi option, a small notice window pops up indicating I must type
a long url of numbers into my browser (nothing else). I copy the long URL into my safari browser and it goes nowhere.
To export your music from the iPad, you need to use web browser on your dektop computer
or laptop. See section „Song Manager” on page 53 of this manual and follow the instructions.
Customer support
Feel free to ask questions and post suggestions. To send us an email simply use
a message form on http://www.beepstreet.com/isequenceipad
or visit BeepStreet forum http://www.beepstreet.com/forums/?page=forums.
You can also find some additional tutorial videos on our YouTube channel.
Go to http://www.youtube.com/user/beepstreetapps .