international association of administrative professionals ... · international association of...
TRANSCRIPT
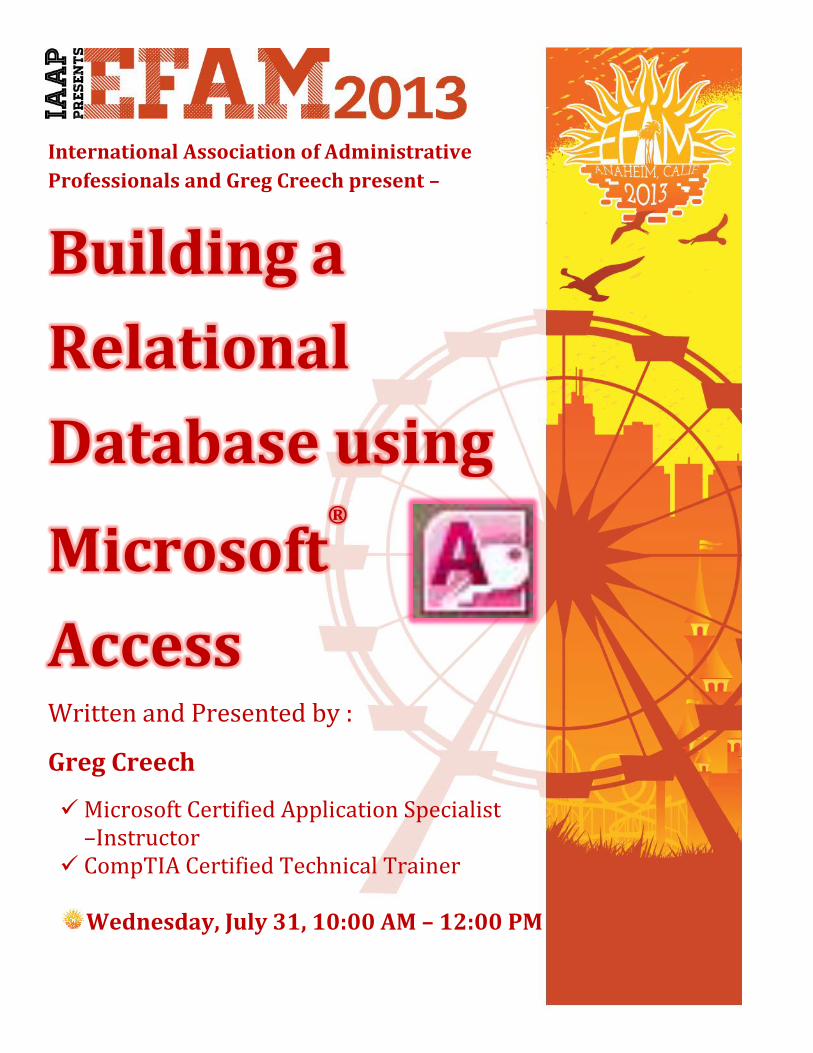
International Association of Administrative
Professionals and Greg Creech present –
Building a
Relational
Database using
Microsoft®
Access Written and Presented by :
Greg Creech
Microsoft Certified Application Specialist –Instructor
CompTIA Certified Technical Trainer Wednesday, July 31, 10:00 AM – 12:00 PM
IAAP & Greg Creech Building a Relational Database with Microsoft Access Page 2
www.iaap-hq.org EFAM 2013 gregcreech.com Greg Creech © 2013 No Distribution or Duplication
Exclusive for IAAP and Techedutainment Services.
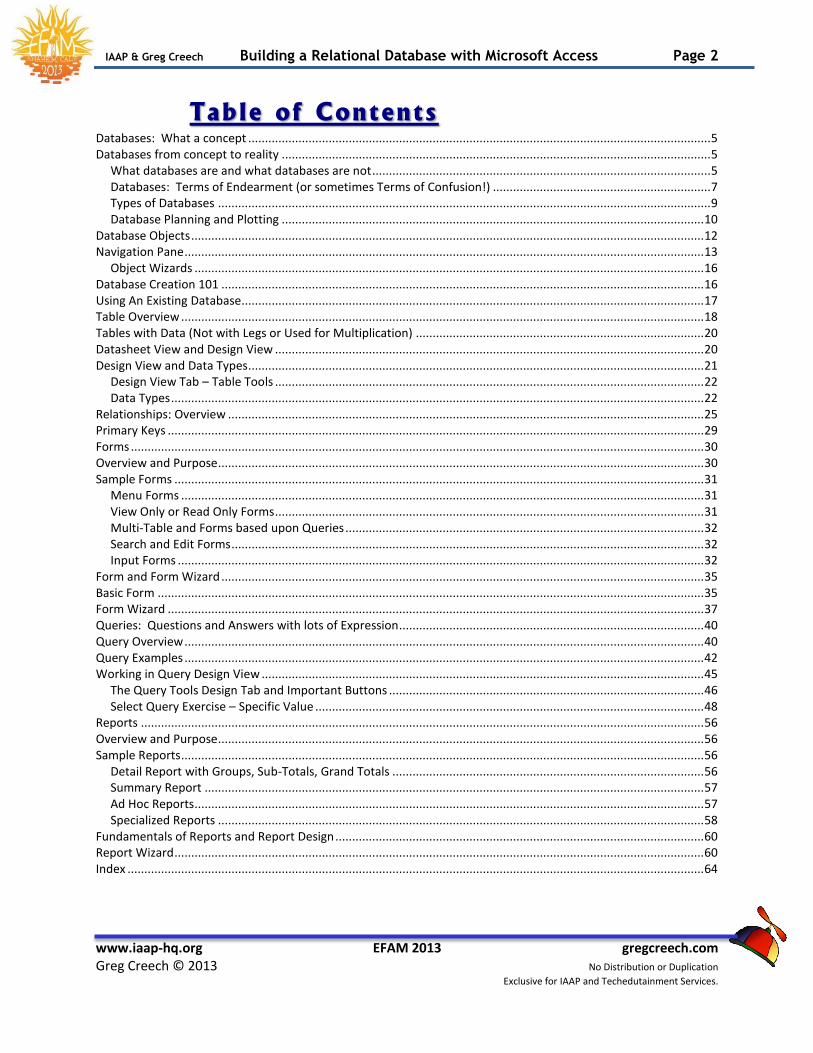
Table of Contents
Databases: What a concept .......................................................................................................................................... 5 Databases from concept to reality ................................................................................................................................ 5
What databases are and what databases are not ..................................................................................................... 5 Databases: Terms of Endearment (or sometimes Terms of Confusion!) ................................................................. 7 Types of Databases ................................................................................................................................................... 9 Database Planning and Plotting .............................................................................................................................. 10
Database Objects ......................................................................................................................................................... 12 Navigation Pane ........................................................................................................................................................... 13
Object Wizards ........................................................................................................................................................ 16 Database Creation 101 ................................................................................................................................................ 16 Using An Existing Database.......................................................................................................................................... 17 Table Overview ............................................................................................................................................................ 18 Tables with Data (Not with Legs or Used for Multiplication) ...................................................................................... 20 Datasheet View and Design View ................................................................................................................................ 20 Design View and Data Types ........................................................................................................................................ 21
Design View Tab – Table Tools ................................................................................................................................ 22 Data Types ............................................................................................................................................................... 22
Relationships: Overview .............................................................................................................................................. 25 Primary Keys ................................................................................................................................................................ 29 Forms ........................................................................................................................................................................... 30 Overview and Purpose ................................................................................................................................................. 30 Sample Forms .............................................................................................................................................................. 31
Menu Forms ............................................................................................................................................................ 31 View Only or Read Only Forms ................................................................................................................................ 31 Multi-Table and Forms based upon Queries ........................................................................................................... 32 Search and Edit Forms ............................................................................................................................................. 32 Input Forms ............................................................................................................................................................. 32
Form and Form Wizard ................................................................................................................................................ 35 Basic Form ................................................................................................................................................................... 35 Form Wizard ................................................................................................................................................................ 37 Queries: Questions and Answers with lots of Expression........................................................................................... 40 Query Overview ........................................................................................................................................................... 40 Query Examples ........................................................................................................................................................... 42 Working in Query Design View .................................................................................................................................... 45
The Query Tools Design Tab and Important Buttons .............................................................................................. 46 Select Query Exercise – Specific Value .................................................................................................................... 48
Reports ........................................................................................................................................................................ 56 Overview and Purpose ................................................................................................................................................. 56 Sample Reports ............................................................................................................................................................ 56
Detail Report with Groups, Sub-Totals, Grand Totals ............................................................................................. 56 Summary Report ..................................................................................................................................................... 57 Ad Hoc Reports ........................................................................................................................................................ 57 Specialized Reports ................................................................................................................................................. 58
Fundamentals of Reports and Report Design .............................................................................................................. 60 Report Wizard .............................................................................................................................................................. 60 Index ............................................................................................................................................................................ 64

IAAP & Greg Creech Building a Relational Database with Microsoft Access Page 3
www.iaap-hq.org EFAM 2013 gregcreech.com Greg Creech © 2013 No Distribution or Duplication
Exclusive for IAAP and Techedutainment Services.
Oops! and Legal Stuff
While I have made every effort to ensure the accuracy of this document, including grammar and
instructions, I make mistakes. (Surprise!) If you find an error or want to provide constructive feedback,
please contact me. Thank you! Enjoy Your new Office and this document.
Greg Creech
Techedutainment Services, Inc.
P. O. Box 1431
Pine Lake, GA 30072
www.gregcreech.com
Association Memberships, Certifications, and Awards: International Association of Administrative Professionals – Atlanta Chapter American Society of Training and Development Member – Atlanta Chapter Society for Human Resources Management – Atlanta Chapter Microsoft Office User Specialist Certification – Instructor A+ Certified through CompTIA Microsoft Certified Technical Trainer 2007 Top Non-Credit Programs (my Microsoft® Office Suite) by University Continuing Education
Associations’ Southern Region 2009 Faculty Award for the Association of Continuing Higher Education (for my work at Emory
University)
Access ® is a most excellent product from Microsoft ® Corporation and is part of the Office ® Suite
(including Office 2007/2010 ® of products and services, including Word, Excel, PowerPoint, Access,
Outlook, and other fantastic programs that help me to be productive and profitable.
Copyright © 2013 Greg Creech, Techedutainment Services, Inc.. All rights reserved. This publication, or
any part thereof, may not be reproduced or transmitted in any form or by any means, electronic or
mechanical, including photocopying, recording, storage in an information retrieval system, or otherwise,
without express written permission of Greg Creech, P. O. Box 1431, Pine Lake, GA 30072-1431,
www.gregcreech.com.

IAAP & Greg Creech Building a Relational Database with Microsoft Access Page 4
www.iaap-hq.org EFAM 2013 gregcreech.com Greg Creech © 2013 No Distribution or Duplication
Exclusive for IAAP and Techedutainment Services.
About Greg Creech and IAAP
On January 5, 1981, I entered the world of being an administrative professional as the only male Steno Clerk in
Columbia, SC at Southern Bell. As my manager, Becky Davis, introduced me to all of the women, one funny woman
exclaimed: “Well, there goes the steno pool; they let a rooster in the hen house!” Later in the day, I used an IBM
Selectric typewriter to type a proposal. As it typed, I noticed the silence in the room and looked up to see
everyone staring at me. The funny woman said: “I’ve never seen a man that could type like that. Who would’ve
thought.” I could type 70 WPM with no mistakes. I worked in Sales and Marketing at AT&T in many clerical,
administrative, and management positions. My longest responsibility for over 10 years was as a Compensation
Manager in Sales and Marketing for various sales organizations , and in 1998, I took an early retirement buy out
package as an Operations Manager. AT&T supported my comedy, musical, and motivational presentations
internally and externally, too, so I had the best of both worlds: administrative position and entertaining presenter.
I continue to enjoy at&t as a customer and supplier as I train on and develop Access databases for at&t.
Since 1998, I have pursued my passion and love of technology, education, comedy/humor, music, and
administration. In April, 2006 for Administrative Professional Day, I presented my musical, humorous stress
management speech at Midlands Technical College with over 650 admins in my home town of Columbia, SC. Four
months later, I and Mary Stuckey, my neighbor, were at a neighborhood meeting and she informed me that she was
being installed as President – Georgia Division of IAAP. Mary and I have been neighbors for 9 years at that point and
we never knew of our administrative connections. I told her about my presentations and programs. In November,
2006 at an IAAP Educational Seminar in Macon, GA I presented my humorous, musical presentation on business
communication, stress management, and career development entitled “SMILE”. I joined IAAP in 2007. The
presentation was a hit and I have been blessed by frequently presenting at chapter meetings, conferences, and
other events. Being at EFAM is an absolute dream come true for me and I owe much thanks to my sisters in Georgia
chapters for all of the good recommendations, referrals, prayers, and compliments. I hope you enjoy my
presentations as much as I enjoy presenting them.
About the Sess ion and manual
This handout is a sample of a much larger Access book/manual that I have written and have available for purchase
at my website – www.gregcreech.com. I concentrate on Access 2007, as many of the features transfer to Office
2010. In October 2010, the IAAP Dogwood Chapter sponsored an Admin education seminar and LaTonya Blount had
me speak on Microsoft’s Access. I built an IAAP chapter membership database in the class and now offer the
database for you to learn and use – there will be future versions for you to practice “Access for Admins” and to
use for your chapter/organization. As an Admin Clerk in the 1980’s knowing relational databases got me promoted
and honored plus I avoided layoffs as a manager that controlled Access and other databases that I developed for
my branches and areas. This session compresses a week’s worth of learning in two hours. You may not be able to
build a database from scratch after this session but you will know the database objects’ purpose, design, and
properties plus you have this manual and database sample to help. You may order my full 350 + manual through my
website – I’ll have an extensive overhaul of the manual for Office 2013/365 available in the September, 2014.
I am updating all of my manuals, materials, files, and videos to Office 2013/Office 365, so look for my updated
materials over the next year (or so) for Access, Excel, PowerPoint, Word, OneNote, Outlook, Windows 8 and
combinations of applications. You may view descriptions and purchase my materials through www.gregcreech.com.
I have free handouts, like this one, and other materials available at my website, too. Finally, since 1981 I have
built, greatly modified/enhanced, and developed Access databases for many organizations including these:
Emory University – Divisions including Department of History, Psychology, and Psychiatry, Candler School of Theology, Facilities Management, Emory Center for Injury Control, Emory/Grady Trauma Center, and School of Medicine
The Carter Center The Epstein School Children’s Health Care of Atlanta AT&T

IAAP & Greg Creech Building a Relational Database with Microsoft Access Page 5
www.iaap-hq.org EFAM 2013 gregcreech.com Greg Creech © 2013 No Distribution or Duplication
Exclusive for IAAP and Techedutainment Services.
Databases: What a concept
D a t a b a s e s f r o m c o n c e p t t o r e a l i t y
What databases are and what databases are not
“This database, that database, and the other database,” we hear the word database in our
everyday language, now. What used to be a little known term to most people, except database
administrators and programmers, the term is now commonplace and can mean different things
to different people.
Databases are tracking mechanisms and designed to ensure accuracy and integrity with the
data it tracks. Databases can act in different ways to resemble spreadsheets , word
processing and other types of programs; however, databases are not designed to be
graphic or presentation programs nor are they designed to replace word processing and
spreadsheet applications. Although some spreadsheet and word processing programs allow
you to create tables that can contain tracking data, these databases are very simple
(comparatively speaking) and cannot be relational databases.
I have misused spreadsheet applications , such as Excel to become tracking systems. This
is a common mistake. Spreadsheet applications are deceptively simple in being used as
tracking systems; however, they offer little in data integrity and are not as easy to extrapolate
data or to perform certain tasks, such as sorting by multiple areas. Spreadsheets cannot
produce powerful and attractive reports and forms without extensive programming. However,
data analysis, statistics, and other number crunching features make using Excel or other
spreadsheet applications popular with a database, such as Pivot Tables and Scenario
Manager .
On the other hand, databases have been misused as spreadsheet programs and “number
crunchers”. For scientific data and complex business calculations as well as dynamic charts,
spreadsheet programs are the best solution. With Open Database Connectivity (OBDC)
we are able to transport data from databases to other programs and other databases with
relative ease. We will examine this later in our course.

IAAP & Greg Creech Building a Relational Database with Microsoft Access Page 6
www.iaap-hq.org EFAM 2013 gregcreech.com Greg Creech © 2013 No Distribution or Duplication
Exclusive for IAAP and Techedutainment Services.
The ability to quickly add, change, and delete data and view the changes instantaneously help
make databases popular in today’s environment. Once upon a time, years ago when databases
had to be refreshed overnight or the good-old days of batch programs. Some of these
databases still exist; however, on-line databases, networking, and other technological
advancements are making life and business easier and quicker to update. Databases that
once required extensive programming and tons of code are more easily accomplished and
Access is a great application for database management.
IAAP & Greg Creech Building a Relational Database with Microsoft Access Page 7
www.iaap-hq.org EFAM 2013 gregcreech.com Greg Creech © 2013 No Distribution or Duplication
Exclusive for IAAP and Techedutainment Services.
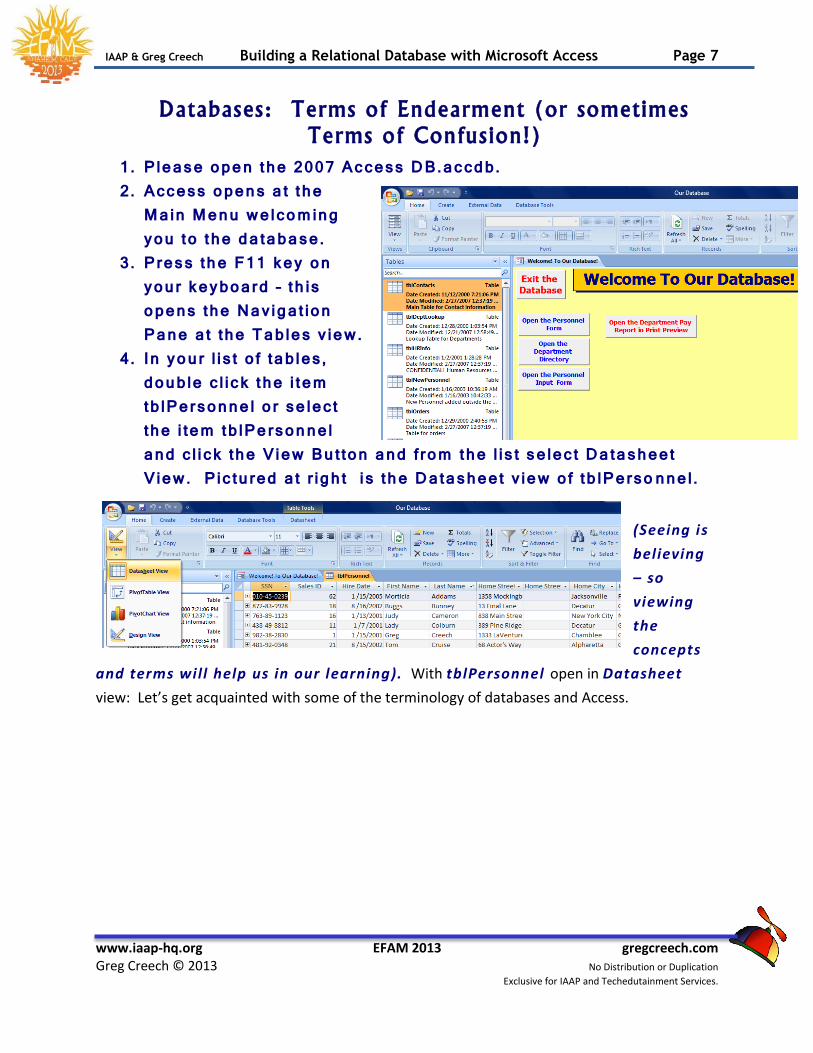
Databases: Terms of Endearment (or sometimes
Terms of Confus ion!)
1. Please open the 2007 Access DB.accdb. 2. Access opens at the
Main Menu welcoming you to the database.
3. Press the F11 key on your keyboard – this opens the Navigation Pane at the Tables view.
4. In your list of tables, double click the item tblPersonnel or select the item tblPersonnel and click the View Button and from the list select Datasheet View. Pictured at right is the Datasheet view of tblPerso nnel.
(Seeing is
believing
– so
viewing
the
concepts
and terms will help us in our learning). With tblPersonnel open in Datasheet
view: Let’s get acquainted with some of the terminology of databases and Access.
IAAP & Greg Creech Building a Relational Database with Microsoft Access Page 8
www.iaap-hq.org EFAM 2013 gregcreech.com Greg Creech © 2013 No Distribution or Duplication
Exclusive for IAAP and Techedutainment Services.
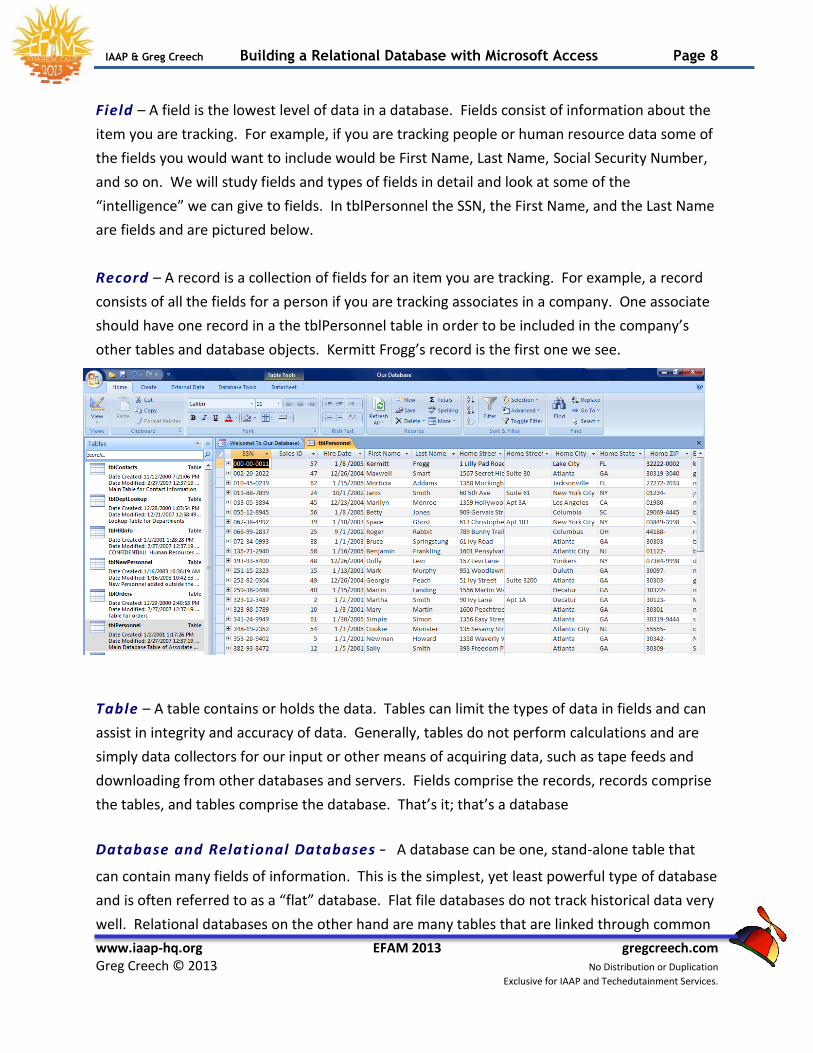
Field – A field is the lowest level of data in a database. Fields consist of information about the
item you are tracking. For example, if you are tracking people or human resource data some of
the fields you would want to include would be First Name, Last Name, Social Security Number,
and so on. We will study fields and types of fields in detail and look at some of the
“intelligence” we can give to fields. In tblPersonnel the SSN, the First Name, and the Last Name
are fields and are pictured below.
Record – A record is a collection of fields for an item you are tracking. For example, a record
consists of all the fields for a person if you are tracking associates in a company. One associate
should have one record in a the tblPersonnel table in order to be included in the company’s
other tables and database objects. Kermitt Frogg’s record is the first one we see.
Table – A table contains or holds the data. Tables can limit the types of data in fields and can
assist in integrity and accuracy of data. Generally, tables do not perform calculations and are
simply data collectors for our input or other means of acquiring data, such as tape feeds and
downloading from other databases and servers. Fields comprise the records, records comprise
the tables, and tables comprise the database. That’s it; that’s a database
Database and Relational Databases – A database can be one, stand-alone table that
can contain many fields of information. This is the simplest, yet least powerful type of database
and is often referred to as a “flat” database. Flat file databases do not track historical data very
well. Relational databases on the other hand are many tables that are linked through common
IAAP & Greg Creech Building a Relational Database with Microsoft Access Page 9
www.iaap-hq.org EFAM 2013 gregcreech.com Greg Creech © 2013 No Distribution or Duplication
Exclusive for IAAP and Techedutainment Services.
fields and can ensure greater accuracy and less input of data. Relational databases increase
flexibility of data and allow ease of collecting and maintain historical data. We will examine
both types of databases, but we will concentrate our study on relational databases.
Database Objects – Many Database management systems (DBMS), such as Access®,
contain objects. These objects generally are: Tables, queries, forms, and reports. These
objects provide functionality and power to your database information. We will examine each of
these objects in detail and other database elements using Access® as our database
management tool. Database management systems are one stop shopping, you have your
tables, queries, forms, and reports in one convenient package rather than separate applications
that huge databases require. Access in not appropriate for large databases, but is terrific for
small and medium size databases with limited users.
Relationships – Relational databases are databases in which common fields of information
join tables. For example, you can have a Social Security Number as a field in two tables and
retrieve information from both tables through using the Social Security Number. The
relationships we will study are one-to-one and one-to-many relationships. We will overview
many-to-many relationships but not concentrate on these types of relationships. Briefly, one-
to-one relationships ensure that one record in one table has a (and only one) matching record
in another table – generally, you should not have a Social Security Number twice in the same
table nor have two SSN’s in a related one-to-one table. One-to-Many relationships allow one
record in one table and many records in another table. For example, in a State Table – all
States are listed once and another table is linked to the State Table to have the states looked-
up; thus, this “many” table can have a state listed several times. We will create, view and
discuss these types of relationships in detail.
Types of Databases
Simply put a database is a collection of records containing fields of data. The process is:
fields comprise records , records comprise a table , the table(s) comprise the database ,
and that is where the process can stop – with one table. More complex databases are
relational databases that can have automated fields looked up from other databases or objects.
Databases can be as “simple” as you like or as complex as your process, tracking, and user
interface demand.
IAAP & Greg Creech Building a Relational Database with Microsoft Access Page 10
www.iaap-hq.org EFAM 2013 gregcreech.com Greg Creech © 2013 No Distribution or Duplication
Exclusive for IAAP and Techedutainment Services.
There are two primary types of databases a stand-alone or flat database and a relational
database. Stand-alone or flat databases can be created in spreadsheet, word processing, and
contact management applications. These databases have one huge table that do not link to
other tables and do not possess the look-up capabilities, data integrity, and other power that
relational databases have. We will concentrate on relational databases.
Relational databases use field linkages to connect tables and data. This provides for ease of
use, data integrity, and information accuracy.
Database Planning and Plotting
Before you begin building your database, understand the process and the data you wish to
automate or to ensure accuracy. Write in detail the process that is currently used and how the
altered and changed process may be more productive and timely. What automation process
can replace manual operations? Two popular methods of detailing a process are flow charts
and storyboarding. I like using both to help map the process and the creativity of building a
database. Flow charts provide symbols for types of decisions and brief descriptions of the
process. Storyboarding is a process that uses pictures, graphs, and descriptions to assist in
database creation and process documentation. Either method or a combination of methods is
appropriate.
As I storyboard and use flow charts for my databases and processes, I begin building the
database understanding that this will not be the final product. Access offers great ways to
document your database and assist in the planning and plotting process though descriptions. I
prefer to use a combination of several process including storyboarding and flow charts with
database creation in Access to ensure that no surprises will occur as the database approaches
production and extensive testing.
Document your process and database from its inception. As soon as the digital or program
database begins, so should your paper and documentation manual. Please do yourself a favor
and begin your paper manual and database methods and process as soon as you begin creating
your database. This will help in the future. I like to begin building my database as soon as
possible with the understanding that this WILL NOT be my ultimate database – the first
database is my “play” or “trial and error” database. However, I use some of the objects and
other components from old databases.

IAAP & Greg Creech Building a Relational Database with Microsoft Access Page 11
www.iaap-hq.org EFAM 2013 gregcreech.com Greg Creech © 2013 No Distribution or Duplication
Exclusive for IAAP and Techedutainment Services.
There are many data gathering questions that should be addressed and that should be
answered as you begin the database creation and storyboarding/flow charts. Here only a few
of the questions to ask as you begin your database planning and plotting:
What are the fields of information?
What type of data is in the fields?
Where is the data coming from – manual input, automated tape feeds, importing?
How many users will the system have?
Do you have repeating information?
What errors have occurred in a manual process that automation can help alleviate?
What type of security is needed?
Your Important Notes : ________________________________________________________________________ ________________________________________________________________________ ________________________________________________________________________ ________________________________________________________________________ ________________________________________________________________________ ________________________________________________________________________
IAAP & Greg Creech Building a Relational Database with Microsoft Access Page 12
www.iaap-hq.org EFAM 2013 gregcreech.com Greg Creech © 2013 No Distribution or Duplication
Exclusive for IAAP and Techedutainment Services.
Database Objects
Access, like other Database Management Systems (DBMS) , includes tables, queries,
forms, reports, and macros as its objects. In programming, several program languages (COBOL,
Visual Basic) can be used to build tables while other program languages can be used to build
queries (Structured Query Language or SQL). Database Management Systems allow for
us to build databases and objects without being programmers. The objects that Access contain
and that we will cover in detail in this entire (a 40 + hour course) Accessing the
Possibil ities course are:
Tables,
Queries,
Forms,
Reports,
Macros.
Briefly here is a description of each object:
T a b l e s – Tables are our data collectors and containers. They hold our data and can add
intelligence to our database, such as validation rules and input masks.
Queries – Queries extrapolate information based upon criteria. Queries are used for
calculation fields and functions. Action queries can change, add, or delete data in tables.
Forms – Forms are designed for viewing tables and queries on a monitor. Forms allow us to
add, edit, delete, and manipulate fields. Forms can contain powerful functions and
calculations. Forms can support multiple tables and queries using forms with subforms.
Reports – Reports are designed for printing. Reports can summarize, group, and sort data for
printing and viewing. Reports can contain functions and advanced operations as well.
Macros – Macros are programmed shortcuts that allow us the create automation of many
types. Macros can provide message box, analyze data, and automate navigation as well as
many, many other uses.
Now, let’s get to work and enjoy our process of learning Access.
IAAP & Greg Creech Building a Relational Database with Microsoft Access Page 13
www.iaap-hq.org EFAM 2013 gregcreech.com Greg Creech © 2013 No Distribution or Duplication
Exclusive for IAAP and Techedutainment Services.
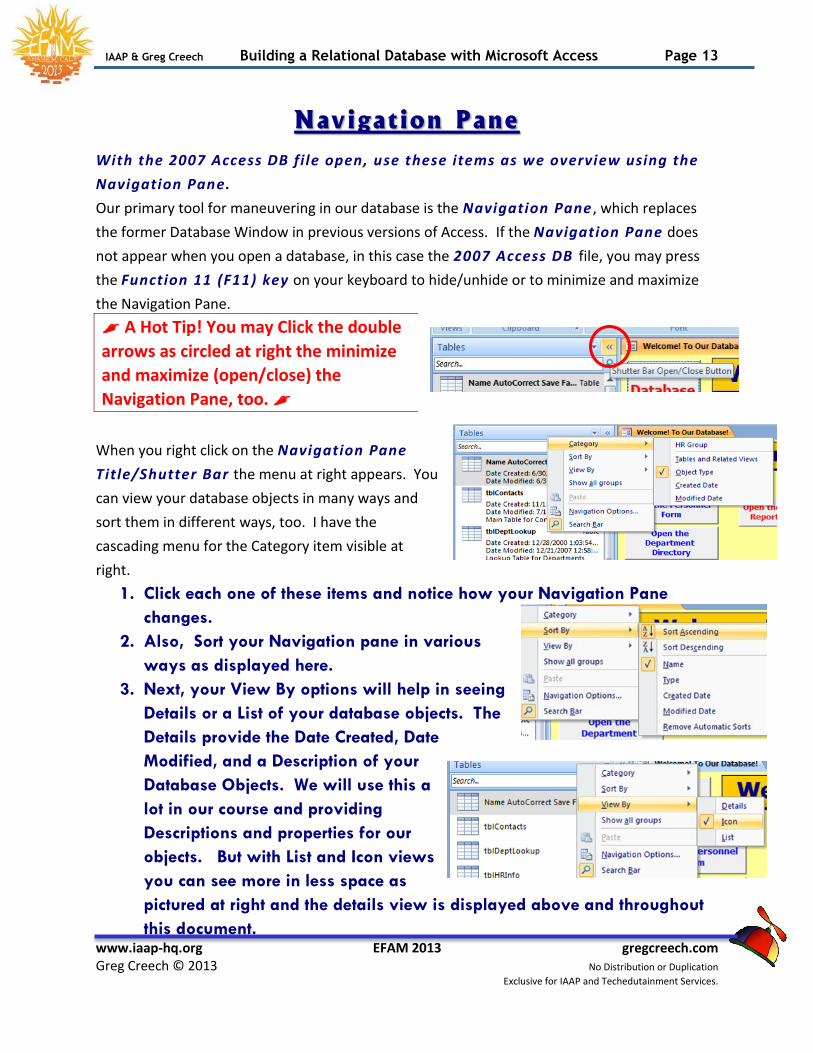
Navigat ion Pane
With the 2007 Access DB fi le open, use these items as we overview using the
Navigation Pane.
Our primary tool for maneuvering in our database is the Navigation Pane , which replaces
the former Database Window in previous versions of Access. If the Navigation Pane does
not appear when you open a database, in this case the 2007 Access DB file, you may press
the Function 11 (F11) key on your keyboard to hide/unhide or to minimize and maximize
the Navigation Pane.
A Hot Tip! You may Click the double
arrows as circled at right the minimize
and maximize (open/close) the
Navigation Pane, too.
When you right click on the Navigation Pane
Title/Shutter Bar the menu at right appears. You
can view your database objects in many ways and
sort them in different ways, too. I have the
cascading menu for the Category item visible at
right.
1. Click each one of these items and notice how your Navigation Pane
changes.
2. Also, Sort your Navigation pane in various
ways as displayed here.
3. Next, your View By options will help in seeing
Details or a List of your database objects. The
Details provide the Date Created, Date
Modified, and a Description of your
Database Objects. We will use this a
lot in our course and providing
Descriptions and properties for our
objects. But with List and Icon views
you can see more in less space as
pictured at right and the details view is displayed above and throughout
this document.

IAAP & Greg Creech Building a Relational Database with Microsoft Access Page 14
www.iaap-hq.org EFAM 2013 gregcreech.com Greg Creech © 2013 No Distribution or Duplication
Exclusive for IAAP and Techedutainment Services.
When you click Show all groups as displayed
here, all of your database objects appear in the
Navigation Pane. You may minimize or
maximize your group using the Shutter arrow.
The short cut menu pictured here for your group
activates when you right click on the shutter/title
bar of the database object, such as Queries
which is minimized here. These short cut menus
will save you lots of time and frustation in using
a huge database in Access.
Using the Navigation Pane, change your views,
your sorts, and groups.
1. Right Click on the Title/Shutter bar of your Navigation Pane and open the
Navigation Pane Options displayed here.
2. From here you may create your own, new group. I have accomplished
this for the HR Group. To add items to your group simply click and drag
the item in the Navigation Pane
from one group to your new group.
3. Create your own Group by clicking
the Add Item in your Categories and
Name it your first name and group.
Next, add a Group to your
Categories as displayed here.
4. Click OK to save and close your Navigation Pane options.
5. Click the Navigation Pane Objects arrow and from the list
Choose your group. Ensure Show All at the bottom displays.
IAAP & Greg Creech Building a Relational Database with Microsoft Access Page 15
www.iaap-hq.org EFAM 2013 gregcreech.com Greg Creech © 2013 No Distribution or Duplication
Exclusive for IAAP and Techedutainment Services.
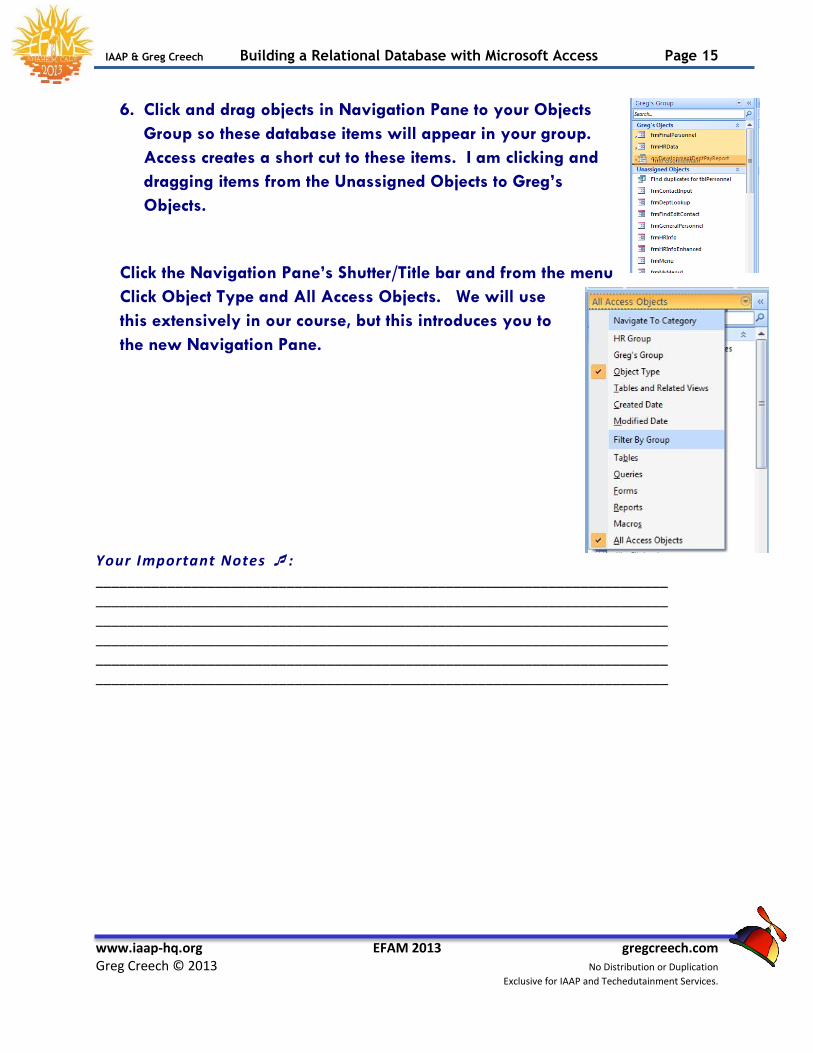
6. Click and drag objects in Navigation Pane to your Objects
Group so these database items will appear in your group.
Access creates a short cut to these items. I am clicking and
dragging items from the Unassigned Objects to Greg’s
Objects.
Click the Navigation Pane’s Shutter/Title bar and from the menu
Click Object Type and All Access Objects. We will use
this extensively in our course, but this introduces you to
the new Navigation Pane.
Your Important Notes : ________________________________________________________________________ ________________________________________________________________________ ________________________________________________________________________ ________________________________________________________________________ ________________________________________________________________________ ________________________________________________________________________

IAAP & Greg Creech Building a Relational Database with Microsoft Access Page 16
www.iaap-hq.org EFAM 2013 gregcreech.com Greg Creech © 2013 No Distribution or Duplication
Exclusive for IAAP and Techedutainment Services.
Object Wizards
Access contains Wizards for Forms, Reports, and Queries. We will build our objects
from “scratch” as well as use the W i z a r d s . While the table templates are excellent, it does
not use the Leszynski Naming Conventions (LNC which we learn about later) and may not
fit your custom needs. The Table Templates do provide the foundation for a table but will
require you to know how to customize the tables and fields for your needs. We will build our
tables without a template so that you can have full knowledge and control over your tables, no
matter how they are initially constructed through a template, wizard, or not.
D a t a b a s e C r e a t i o n 1 0 1
When you open Access you should see the Getting Started window for Access 2007.
From here you can open existing databases or create new database.
Let’s create our database to use throughout this course; here are the steps:
4. At the Getting
Started pane,
Click the Blank
Database
button.
5. Type in your
first name and
the word
database as the
File name as
pictured at
right. I am
naming mine YourDatabase and I changed the directory of where this
database is stored using the folder button next to the File Name area.
6. Click Create. Time to be Dr. Frankenstein and create our own monster of
a database! I will refer to this database in the documentation as
YourDatabase.
7. The Tables Tools Window appears ready to build tables.
8. Close your database – we will overview an existing database and then
begin building our tables and your tremendous database.
IAAP & Greg Creech Building a Relational Database with Microsoft Access Page 17
www.iaap-hq.org EFAM 2013 gregcreech.com Greg Creech © 2013 No Distribution or Duplication
Exclusive for IAAP and Techedutainment Services.
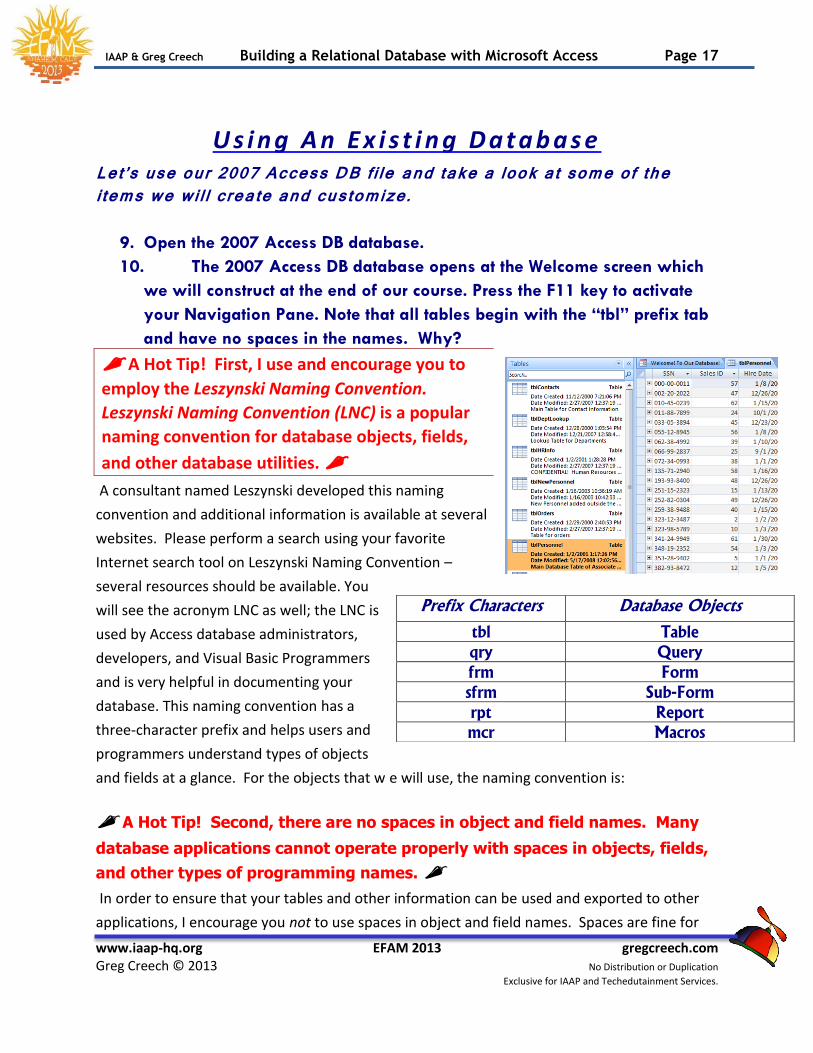
U s i n g A n E x i s t i n g D a t a b a s e Let’s use our 2007 Access DB file and take a look at some of the items we will create and customize.
9. Open the 2007 Access DB database.
10. The 2007 Access DB database opens at the Welcome screen which
we will construct at the end of our course. Press the F11 key to activate
your Navigation Pane. Note that all tables begin with the “tbl” prefix tab
and have no spaces in the names. Why?
A Hot Tip! First, I use and encourage you to
employ the Leszynski Naming Convention.
Leszynski Naming Convention (LNC) is a popular
naming convention for database objects, fields,
and other database utilities.
A consultant named Leszynski developed this naming
convention and additional information is available at several
websites. Please perform a search using your favorite
Internet search tool on Leszynski Naming Convention –
several resources should be available. You
will see the acronym LNC as well; the LNC is
used by Access database administrators,
developers, and Visual Basic Programmers
and is very helpful in documenting your
database. This naming convention has a
three-character prefix and helps users and
programmers understand types of objects
and fields at a glance. For the objects that w e will use, the naming convention is:
A Hot Tip! Second, there are no spaces in object and field names. Many
database applications cannot operate properly with spaces in objects, fields,
and other types of programming names.
In order to ensure that your tables and other information can be used and exported to other
applications, I encourage you not to use spaces in object and field names. Spaces are fine for
Prefix Characters Database Objects
tbl Table
qry Query
frm Form
sfrm Sub-Form
rpt Report
mcr Macros
IAAP & Greg Creech Building a Relational Database with Microsoft Access Page 18
www.iaap-hq.org EFAM 2013 gregcreech.com Greg Creech © 2013 No Distribution or Duplication
Exclusive for IAAP and Techedutainment Services.
captions, labels, titles, and descriptions. Also, special characters may not be used in field names
such as *, ?, [,]. These characters are reserved for many database applications to use for other
purposes. Refer to the documentation of your programming language or database application
to get a complete listing of object and field name requirements. Access help can actually help
you with naming of objects and items; we will see several of the “nasty” error messages when
we do not use proper naming on our Access items..
Table Overview
This course will concentrate on Tables , a lot. My philosophy is if the data is wrong in a table
then none of the other objects matter. If data is not correct in a table, then no matter how
powerful the query or how pretty the form and reports– the data is still wrong and may
compound database inaccuracy. Tables are an important mechanism for controlling data,
accuracy, and integrity and tables contain our data; therefore, we will concentrate on tables
and relationships for a good part of this course. If the table is deleted, the data is deleted, too!
As stated earlier, generally a “Flat Database” is a stand-alone or one table; Relational
Databases have tables that contain the information and can be linked through Primary
and Foreign Key fields .. A table is simply a collection of data and should serve
a specific purpose. The table contains records ; a record is a specific data collection for an
item, i.e. our database contains a record for each person. The record is composed of fields ; a
field is a specific item for the record, for example the phone number is a field, the last name is a
field, etc.
IAAP & Greg Creech Building a Relational Database with Microsoft Access Page 19
www.iaap-hq.org EFAM 2013 gregcreech.com Greg Creech © 2013 No Distribution or Duplication
Exclusive for IAAP and Techedutainment Services.
What tables are: Data collectors and containers Field Descriptors such as Text, Number, Date/Time Field Formatters through input masks such as the dashes in
Social Security Numbers Field Parameter setters (defaults, requirements, other
parameters) Mechanisms for Relationships Organizers of data through simple sorting and fil tering
What tables are not: Number crunchers Reporting mechanisms Complex Sorters and Filters Analytical tools Calculating mechanisms Important considerations in building a database and tables:
Databases and tables do not operate well with empty fields, if possible have some sort of default value,
Having many tables with few fields make database changes easier and more accurate,
Repeating data should be in lookup tables, such as state names, departments, products, services, etc.
Normalizing is a process to ensure that repeating data is placed in lookup tables, that empty fields are avoided, and that the database is able to enforce integrity rules. This process is designed for advanced users, programmers, and database designer/administrators. Our database will be normalized and developed correctly using look -up tables, validation rules, and ensure database integrity.
Your Important Notes : ________________________________________________________________________ ________________________________________________________________________ ________________________________________________________________________
IAAP & Greg Creech Building a Relational Database with Microsoft Access Page 20
www.iaap-hq.org EFAM 2013 gregcreech.com Greg Creech © 2013 No Distribution or Duplication
Exclusive for IAAP and Techedutainment Services.
________________________________________________________________________
Tables with Data (Not with Legs or
Used for Mult ipl icat ion)
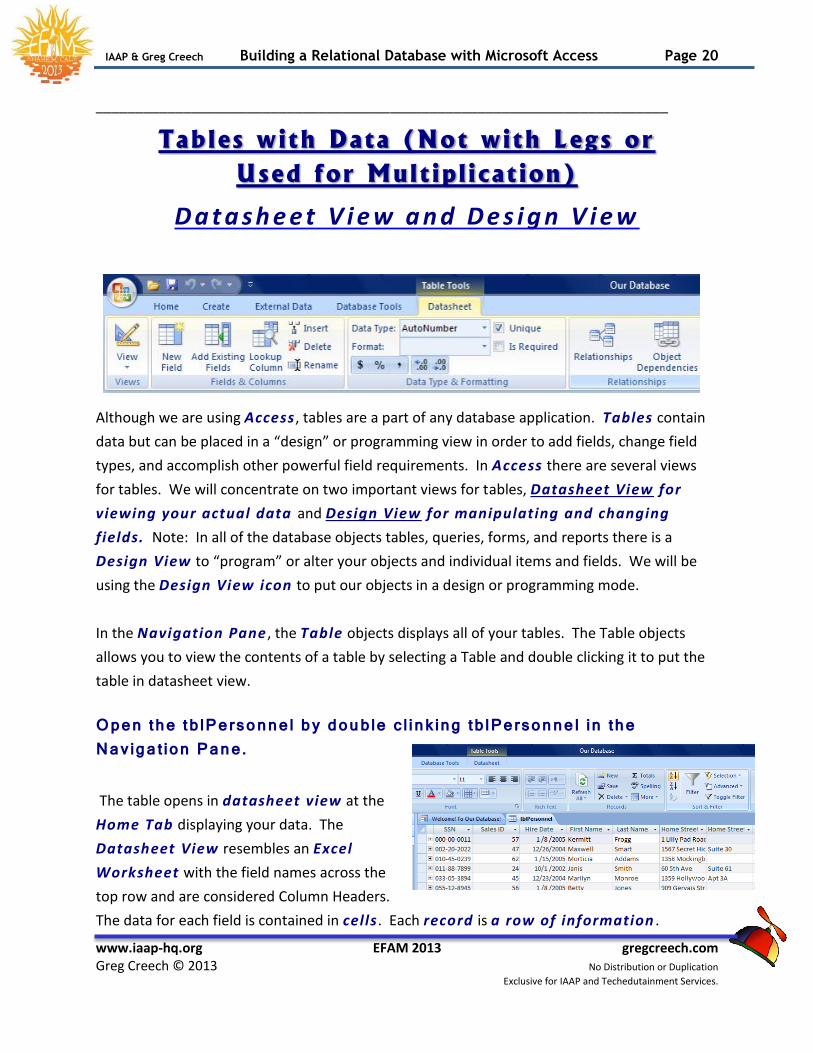
D a t a s h e e t V i e w a n d D e s i g n V i e w
Although we are using Access , tables are a part of any database application. Tables contain
data but can be placed in a “design” or programming view in order to add fields, change field
types, and accomplish other powerful field requirements. In Access there are several views
for tables. We will concentrate on two important views for tables, Datasheet View for
viewing your actual data and Design View for manipulating and changing
fields. Note: In all of the database objects tables, queries, forms, and reports there is a
Design View to “program” or alter your objects and individual items and fields. We will be
using the Design View icon to put our objects in a design or programming mode.
In the Navigation Pane , the Table objects displays all of your tables. The Table objects
allows you to view the contents of a table by selecting a Table and double clicking it to put the
table in datasheet view.
Open the tblPersonnel by double clinking tblPersonnel in the Navigation Pane. The table opens in datasheet view at the
Home Tab displaying your data. The
Datasheet View resembles an Excel
Worksheet with the field names across the
top row and are considered Column Headers.
The data for each field is contained in cells . Each record is a row of information .
IAAP & Greg Creech Building a Relational Database with Microsoft Access Page 21
www.iaap-hq.org EFAM 2013 gregcreech.com Greg Creech © 2013 No Distribution or Duplication
Exclusive for IAAP and Techedutainment Services.
Information may be sorted Ascending or Descending by placing your cursor in a field and
selecting the Ascending or Descending Icon which are pictured above. Datasheet
view is a good mechanism for viewing your data, finding information, and performing simple
sorts/filters. The Datasheet view may be printed and information may be input; however,
Reports are the better utility for printing information and Forms are perfect for data input,
editing, and viewing.
We will examine and work with Datasheet View more after we build tables and enter data.
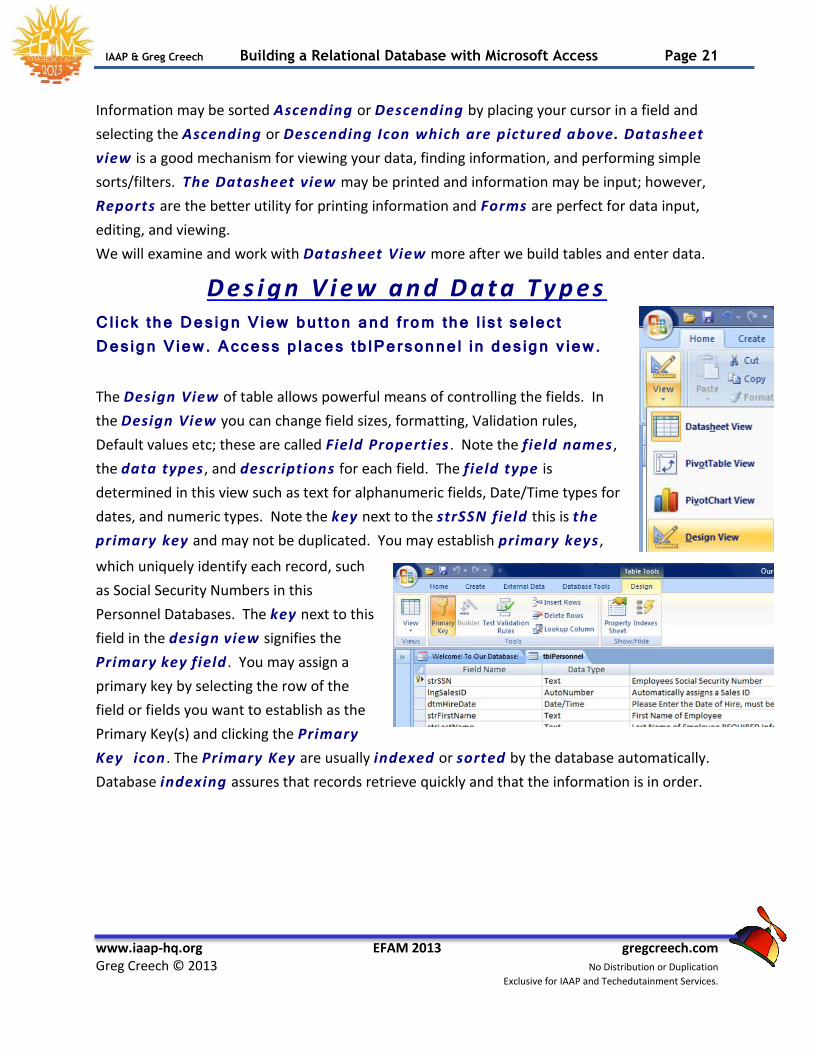
D e s i g n V i e w a n d D a t a T y p e s Click the Design View button and from the list select Design View. Access places tblPersonnel in design view. The Design View of table allows powerful means of controlling the fields. In
the Design View you can change field sizes, formatting, Validation rules,
Default values etc; these are called Field Properties . Note the field names ,
the data types , and descriptions for each field. The field type is
determined in this view such as text for alphanumeric fields, Date/Time types for
dates, and numeric types. Note the key next to the strSSN field this is the
primary key and may not be duplicated. You may establish primary keys ,
which uniquely identify each record, such
as Social Security Numbers in this
Personnel Databases. The key next to this
field in the design view signifies the
Primary key field . You may assign a
primary key by selecting the row of the
field or fields you want to establish as the
Primary Key(s) and clicking the Primary
Key icon . The Primary Key are usually indexed or sorted by the database automatically.
Database indexing assures that records retrieve quickly and that the information is in order.
IAAP & Greg Creech Building a Relational Database with Microsoft Access Page 22
www.iaap-hq.org EFAM 2013 gregcreech.com Greg Creech © 2013 No Distribution or Duplication
Exclusive for IAAP and Techedutainment Services.
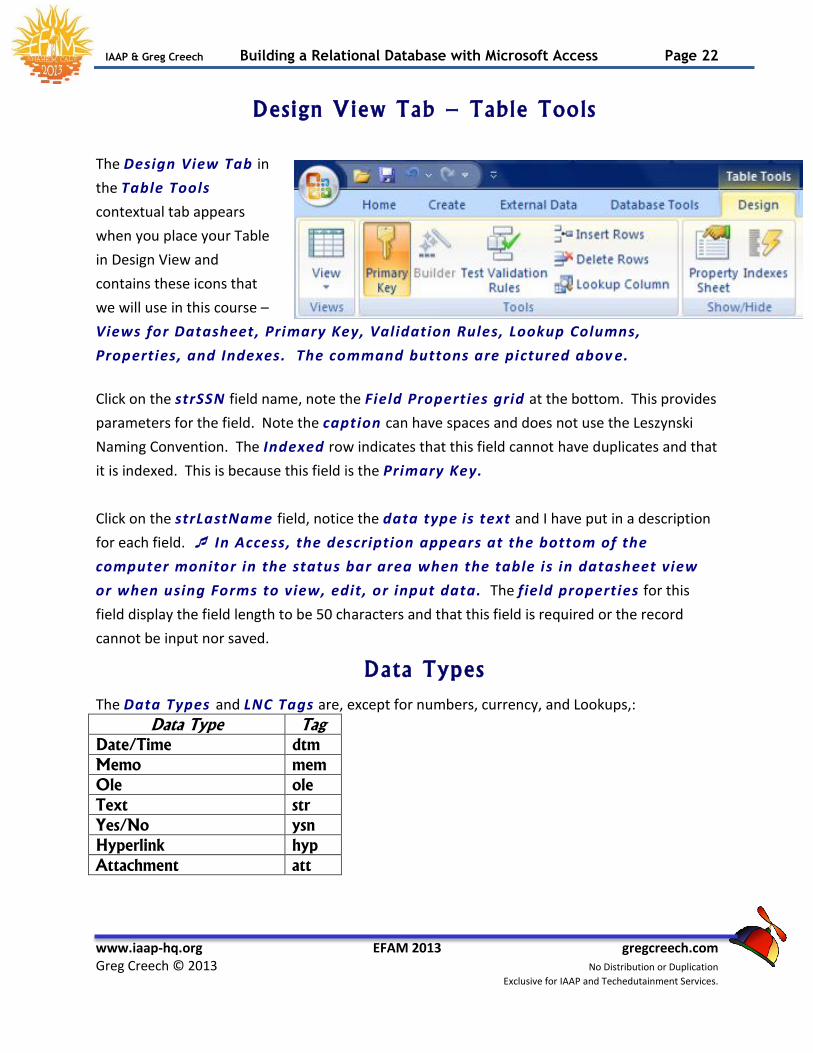
Design View Tab – Table Tools
The Design View Tab in
the Table Tools
contextual tab appears
when you place your Table
in Design View and
contains these icons that
we will use in this course –
Views for Datasheet, Primary Key, Validation Rules, Lookup Columns,
Properties, and Indexes. The command buttons are pictured abov e.
Click on the strSSN field name, note the Field Properties grid at the bottom. This provides
parameters for the field. Note the caption can have spaces and does not use the Leszynski
Naming Convention. The Indexed row indicates that this field cannot have duplicates and that
it is indexed. This is because this field is the Primary Key.
Click on the strLastName field, notice the data type is text and I have put in a description
for each field. In Access, the description appears at the bottom of the
computer monitor in the status bar area when the table is in datasheet view
or when using Forms to view, edit, or input data. The field properties for this
field display the field length to be 50 characters and that this field is required or the record
cannot be input nor saved.
Data Types
The Data Types and LNC Tags are, except for numbers, currency, and Lookups,:
Data Type Tag
Date/Time dtm
Memo mem
Ole ole
Text str
Yes/No ysn
Hyperlink hyp
Attachment att

IAAP & Greg Creech Building a Relational Database with Microsoft Access Page 23
www.iaap-hq.org EFAM 2013 gregcreech.com Greg Creech © 2013 No Distribution or Duplication
Exclusive for IAAP and Techedutainment Services.
Since numbers can have multiple types of data and need more descriptions the Leszynski tags
for specific types of numbers are:
Data Type Tag
Binary bin
Byte byt
AutoNumber lng
Currency cur
Date/Time dtm
Double dbl
Integer int
Long Integer lng
Single sng
Click in the Data Types column and view the types of data. The data types and purpose are:
Text – This is used for characters, text, and numbers that are not used in
calculations, such as Social Security Numbers and ZIP Codes, or where leading
zeros are needed. 255 is the field size limit for Text
Number – Data, except monetary data, that will be used in calculations and are
numeric or digits, such as a quantity field.
Currency – Monetary or financial numbers. Multiple formats are available for
displaying types of currency.
Date/Time – Data that is a date and/or time value. Various date and time
formats are available such as short date. An Important Note: Formatting date fields
as Date/Time and not as text or number is very important in order for the
tables, queries, and other uti l ities to work properly in sorting, f i lter, and
extracting date information.
Yes/No – Yes or No, True or False type of data – data can only be expressed in one of two
choices. A check box is provided to select yes with a check or to leave blank for a no. You may
also perform calculations and used functions based on Yes/No values.
IAAP & Greg Creech Building a Relational Database with Microsoft Access Page 24
www.iaap-hq.org EFAM 2013 gregcreech.com Greg Creech © 2013 No Distribution or Duplication
Exclusive for IAAP and Techedutainment Services.
Memo – For lengthy fields of information such as descriptions, notes, comments, etc. use the
memo type. Another Important Note Memo Fields can store up to 65,536 characters!
AutoNumber – Continuous numbers assigned by Access automatically. If you delete a record
with an AutoNumber field, Access will not reuse that number.
OLE Object – Object Linking and Embedding object created in another application but used in
Access such as jpg files.
Hyperlink – Allows you to format and edit hyperlink data quickly and easily. If you use this for
hyperlinks and are connected to the Internet, clicking this will open the hyperlink of a web
page. Hyperlinks can also be used as bookmarks for files within your database or server/PC.
NEW for 2007! Attachments – Allows you to insert files from other applications in Access.
You may insert multiple files into one record and have a variety of file types, such as Word and
Excel.
Lookup Wizard – This is an Access wizard that allows you to lookup data for input from
another table. Although the strDeptCode field appears to be a Text field, it is in fact a lookup
field from the tblDeptLookup table.
The field properties section is where we may provide default values and validation
rules, such as data that must be within a certain range. Although we are viewing Access for
this information, other database programs and applications contain similar Data Types and
information.
Click view button and click the atasheet view .
Close the table – tblPersonnel.
Your Important Notes : ________________________________________________________________________ ________________________________________________________________________ ________________________________________________________________________ ________________________________________________________________________
IAAP & Greg Creech Building a Relational Database with Microsoft Access Page 25
www.iaap-hq.org EFAM 2013 gregcreech.com Greg Creech © 2013 No Distribution or Duplication
Exclusive for IAAP and Techedutainment Services.
Relat ionships: Overview
Relationships in databases, like human relationships, can be very complicated! Relationships
are a part of all databases, including Access, SQL, etc. We will overview some of the more
common relationships that databases can have. We will be working with relationships
throughout our course and time together. We will overview relationships here and will create
and change relationships as we build tables and work with queries. Don’t worry that this may
be overwhelming as you begin learning about Databases – we’ll be developing and building our
relationships as we construct our tables.
There are three types of relationships that databases can have to connect
tables.
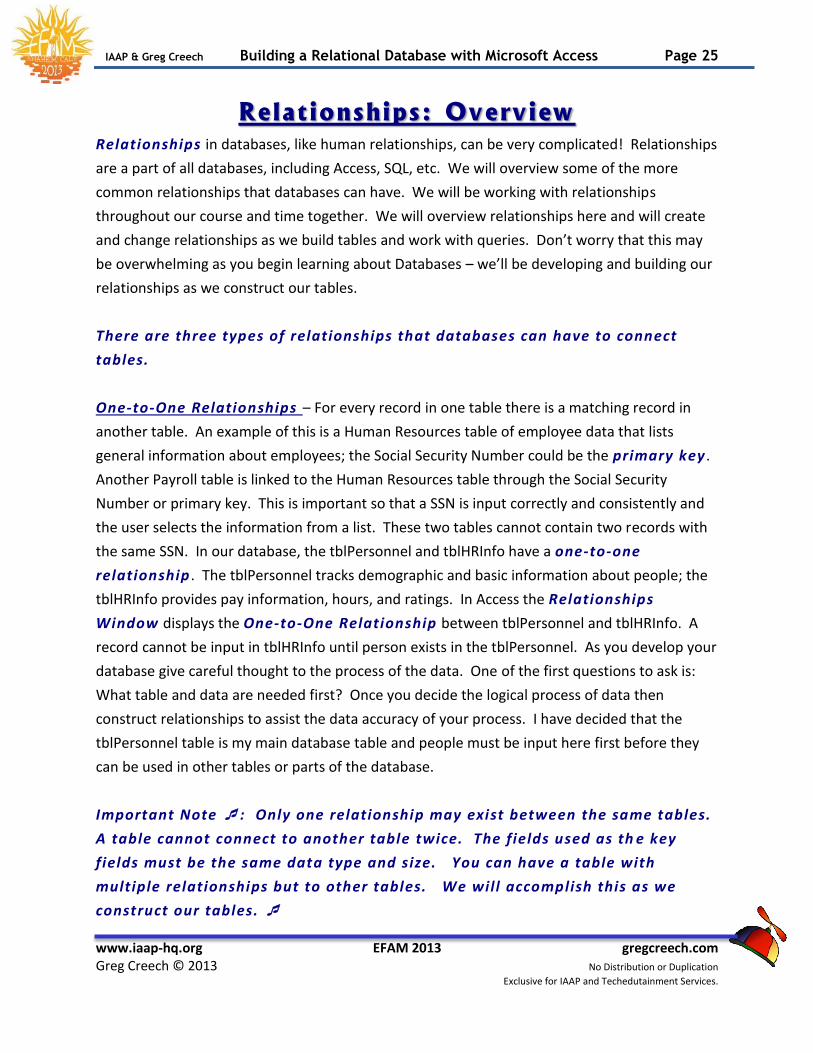
One-to-One Relationships – For every record in one table there is a matching record in
another table. An example of this is a Human Resources table of employee data that lists
general information about employees; the Social Security Number could be the primary key .
Another Payroll table is linked to the Human Resources table through the Social Security
Number or primary key. This is important so that a SSN is input correctly and consistently and
the user selects the information from a list. These two tables cannot contain two records with
the same SSN. In our database, the tblPersonnel and tblHRInfo have a one-to-one
relationship . The tblPersonnel tracks demographic and basic information about people; the
tblHRInfo provides pay information, hours, and ratings. In Access the Relationships
Window displays the One-to-One Relationship between tblPersonnel and tblHRInfo. A
record cannot be input in tblHRInfo until person exists in the tblPersonnel. As you develop your
database give careful thought to the process of the data. One of the first questions to ask is:
What table and data are needed first? Once you decide the logical process of data then
construct relationships to assist the data accuracy of your process. I have decided that the
tblPersonnel table is my main database table and people must be input here first before they
can be used in other tables or parts of the database.
Important Note : Only one relationship may exist between the same tables.
A table cannot connect to another table twice. The fields used as th e key
fields must be the same data type and size. You can have a table with
multiple relationships but to other tables. We will accomplish this as we
construct our tables.
IAAP & Greg Creech Building a Relational Database with Microsoft Access Page 26
www.iaap-hq.org EFAM 2013 gregcreech.com Greg Creech © 2013 No Distribution or Duplication
Exclusive for IAAP and Techedutainment Services.
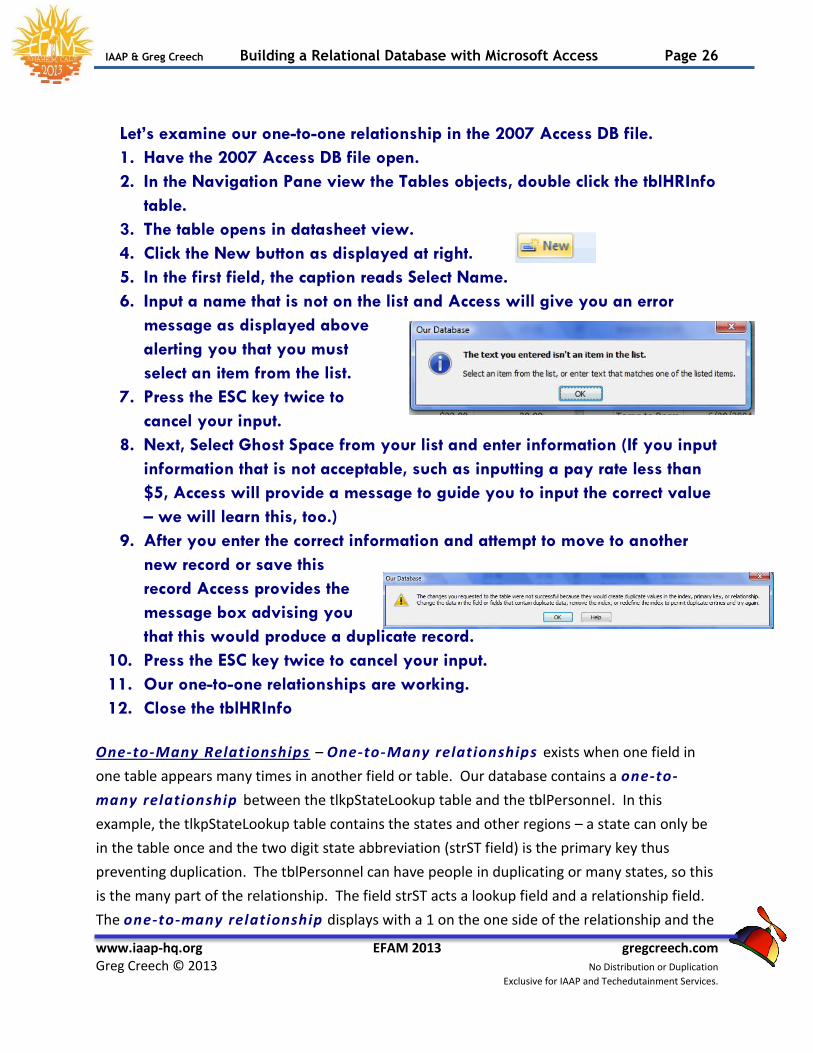
Let’s examine our one-to-one relationship in the 2007 Access DB file.
1. Have the 2007 Access DB file open.
2. In the Navigation Pane view the Tables objects, double click the tblHRInfo
table.
3. The table opens in datasheet view.
4. Click the New button as displayed at right.
5. In the first field, the caption reads Select Name.
6. Input a name that is not on the list and Access will give you an error
message as displayed above
alerting you that you must
select an item from the list.
7. Press the ESC key twice to
cancel your input.
8. Next, Select Ghost Space from your list and enter information (If you input
information that is not acceptable, such as inputting a pay rate less than
$5, Access will provide a message to guide you to input the correct value
– we will learn this, too.)
9. After you enter the correct information and attempt to move to another
new record or save this
record Access provides the
message box advising you
that this would produce a duplicate record.
10. Press the ESC key twice to cancel your input.
11. Our one-to-one relationships are working.
12. Close the tblHRInfo
One-to-Many Relationships – One-to-Many relationships exists when one field in
one table appears many times in another field or table. Our database contains a one-to-
many relationship between the tlkpStateLookup table and the tblPersonnel. In this
example, the tlkpStateLookup table contains the states and other regions – a state can only be
in the table once and the two digit state abbreviation (strST field) is the primary key thus
preventing duplication. The tblPersonnel can have people in duplicating or many states, so this
is the many part of the relationship. The field strST acts a lookup field and a relationship field.
The one-to-many relationship displays with a 1 on the one side of the relationship and the
IAAP & Greg Creech Building a Relational Database with Microsoft Access Page 27
www.iaap-hq.org EFAM 2013 gregcreech.com Greg Creech © 2013 No Distribution or Duplication
Exclusive for IAAP and Techedutainment Services.
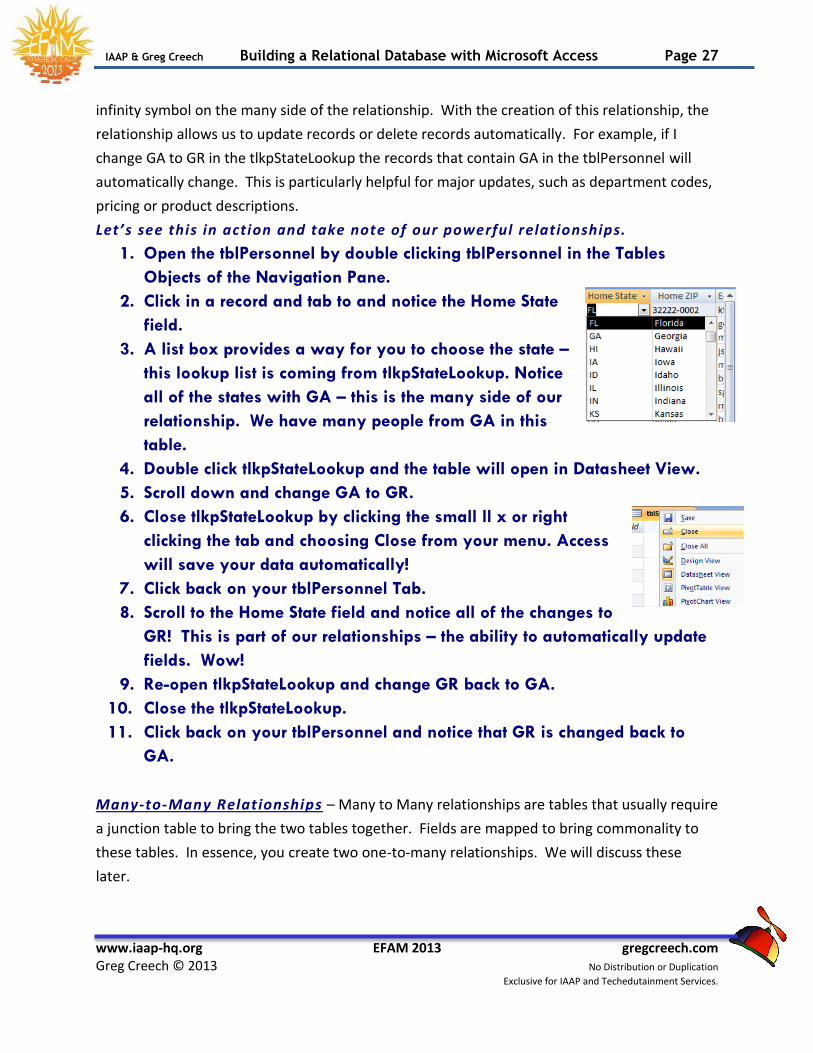
infinity symbol on the many side of the relationship. With the creation of this relationship, the
relationship allows us to update records or delete records automatically. For example, if I
change GA to GR in the tlkpStateLookup the records that contain GA in the tblPersonnel will
automatically change. This is particularly helpful for major updates, such as department codes,
pricing or product descriptions.
Let’s see this in action and take note of our powerful relationships.
1. Open the tblPersonnel by double clicking tblPersonnel in the Tables
Objects of the Navigation Pane.
2. Click in a record and tab to and notice the Home State
field.
3. A list box provides a way for you to choose the state –
this lookup list is coming from tlkpStateLookup. Notice
all of the states with GA – this is the many side of our
relationship. We have many people from GA in this
table.
4. Double click tlkpStateLookup and the table will open in Datasheet View.
5. Scroll down and change GA to GR.
6. Close tlkpStateLookup by clicking the small ll x or right
clicking the tab and choosing Close from your menu. Access
will save your data automatically!
7. Click back on your tblPersonnel Tab.
8. Scroll to the Home State field and notice all of the changes to
GR! This is part of our relationships – the ability to automatically update
fields. Wow!
9. Re-open tlkpStateLookup and change GR back to GA.
10. Close the tlkpStateLookup.
11. Click back on your tblPersonnel and notice that GR is changed back to
GA.
Many-to-Many Relationships – Many to Many relationships are tables that usually require
a junction table to bring the two tables together. Fields are mapped to bring commonality to
these tables. In essence, you create two one-to-many relationships. We will discuss these
later.
IAAP & Greg Creech Building a Relational Database with Microsoft Access Page 28
www.iaap-hq.org EFAM 2013 gregcreech.com Greg Creech © 2013 No Distribution or Duplication
Exclusive for IAAP and Techedutainment Services.
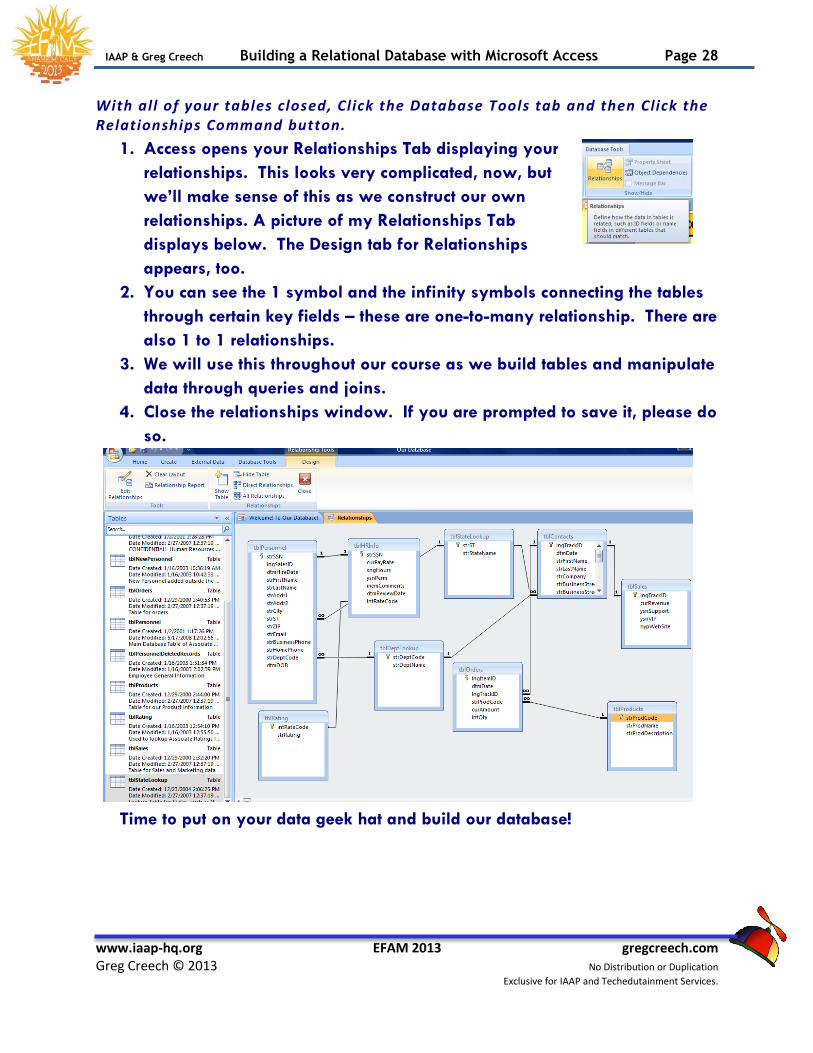
With all of your tables closed, Click the Database Tools tab and then Click the Relationships Command button.
1. Access opens your Relationships Tab displaying your
relationships. This looks very complicated, now, but
we’ll make sense of this as we construct our own
relationships. A picture of my Relationships Tab
displays below. The Design tab for Relationships
appears, too.
2. You can see the 1 symbol and the infinity symbols connecting the tables
through certain key fields – these are one-to-many relationship. There are
also 1 to 1 relationships.
3. We will use this throughout our course as we build tables and manipulate
data through queries and joins.
4. Close the relationships window. If you are prompted to save it, please do
so.
Time to put on your data geek hat and build our database!
IAAP & Greg Creech Building a Relational Database with Microsoft Access Page 29
www.iaap-hq.org EFAM 2013 gregcreech.com Greg Creech © 2013 No Distribution or Duplication
Exclusive for IAAP and Techedutainment Services.
P r i m a r y K e y s
Primary Keys are important to databases as they link our tables and information together.
Access 2007 assumes that you want to use AutoNumber as a Primary Key . While
AutoNumber is a popular and easy field to use as a Primary key , it is not the only type of
field to use and you must have a mechanism of checking for unwanted duplicates using an
AutoNumber as a Primary key . The tlkpStateLookup is a good example – this table
with AutoNumber as an ID allows us to create more than one state code when we only need
one state listed once in this table. We will delete the AutoNumber field and create our own
Primary key for tlkpStateLookup . Here’s the importance of Primary Keys :
What do Primary Keys accomplish?
The Primary Key fields are required and must have data in them;
therefore, they cannot be empty.
The Primary Key field acts as the major sort field for the table; this is
termed – Index – (in Database jargon) and we will examine indexing and
sorting later.
The Primary Key ensures no duplication – no record can have the same
value in this f ield. Other Important Notes for Primary Keys and Tables : You may assign more than one field as Primary Key(s) . Pressing the Control Key and
selecting the rows/fields you want to assign as Primary Keys. If you have existing Primary
Keys , You will need to select the Primary Key row and click the Primary Key icon to
remove the Primary key then you can add your new Primary Keys .
IAAP & Greg Creech Building a Relational Database with Microsoft Access Page 30
www.iaap-hq.org EFAM 2013 gregcreech.com Greg Creech © 2013 No Distribution or Duplication
Exclusive for IAAP and Techedutainment Services.
Forms
O v e r v i e w a n d P u r p o s e
Forms are a method of inputting data, editing data, and viewing data. Forms
are designed for the monitor and viewing data. Although forms may be printed, they are not
designed for printing as much as reports. Forms can be based on Tables or Queries . The
input is stored in the table(s) that is based upon the form architecture. Forms can be very
complex as they can display information from several tables via sub-forms. Forms can restrict
input, be read-only, or allow only certain information for display and updating. Calculations,
functions, and advanced expressions may be coded into forms. Forms can be very simple, too.
Forms help users view data and are popular on the Internet and ordering information on the
World Wide Web using a database form. We would not want to order products or services
without forms – trust me! Forms sure beat inputting and editing data in tables and queries;
our eyes appreciate forms. Forms add functionality, ease of use, and automation. You may
delete forms without deleting information in a table – Remember tables are our data
containers .
Forms are used to build menus and navigation screens. Another popular use of
forms is for menus, navigation, and “splash” screens. In this use of forms, forms are not tied to
data in tables and queries. Menus and navigation screens often contain buttons or hyperlinks
to other areas of the database and objects.
IAAP & Greg Creech Building a Relational Database with Microsoft Access Page 31
www.iaap-hq.org EFAM 2013 gregcreech.com Greg Creech © 2013 No Distribution or Duplication
Exclusive for IAAP and Techedutainment Services.
S a m p l e F o r m s
We will look at several types of forms and discuss their functionality. We will use 2007
Access DB to view these forms.
Menu Forms
When you Open the 2007 Access DB file. A menu appears for you to click buttons. Press the
F11 Key to view the Navigation Pane . Trace to your Form objects and select
frmMenuForm1 . This is the form you are viewing. This form contains buttons that you may
click to navigate to various parts of your database. These types of forms make maneuvering
around a database organized and “user friendly”. Click on each button to view the various
database objects that you may open. After you click and view the object, then close the object.
The Report will prompt you for dates and a department – enter dates as 01/01/2000 and
12/31/2008 and click OK for the Departments.
Generally, menu forms are not tied to tables or queries and contain no data; therefore, they do
not impact data or tables. Access uses the term “Switchboard” for a menu type of form and
contains a powerful Switchboard Manager program and wizard for developing a navigation
menu or “switchboard.” Forms are programmed using programming languages (Access uses a
version of Visual Basic programming language for forms and reports.) These forms simply make
life easier and our databases more organized. We will build our own customized Menu at the
end of our course.
View Only or Read Only Forms
Next, Open the form frmMenu in the 2007 Access DB file. Using our frmMenu form or
the Menu Form, Click the View Employee Data bu tton.
This form is view or read only. Try changing data and try adding or deleting a record. The form
allows you to move from field to field by Pressing your tab key but no changes may be made.
This form is based on the table tblPersonnel. All of the fields from the table are included on this
form, EXCEPT the Social Security Number field. Since all associates may view this form, the SSN
field has been omitted for confidentiality reasons. The records are sorted alphabetically for
this form. You could perform searches, filters, and perform other functions using this form
IAAP & Greg Creech Building a Relational Database with Microsoft Access Page 32
www.iaap-hq.org EFAM 2013 gregcreech.com Greg Creech © 2013 No Distribution or Duplication
Exclusive for IAAP and Techedutainment Services.
layout. Click the Close this Form button. You return to the Main Menu – we will learn how to
this later in our time together.
Multi -Table and Forms based upon Queries
Using the frmMenu or the Menu Form, click the View Payroll Data button.
This opens the frmPayData with is based on the qryPayData . While this form appears
simple, it is based upon a query, which has three linked tables to produce these results, and the
query contains the calculations for the Weekly and Annual Pay. This form is read only because
of the confidential nature of the information and because this form does not have all of the
fields associated with the tables. Therefore, inputting new records could not be accomplished
using this form because not all fields in the table could be input or updated. Close the form.
Search and Edit Forms
Using the frmMenu form, click the Find and Edit A Contact button.
Notice the first f ield at the top of the form “Choose a Contact Name:” – your cursor
should be in this box ready for you to type a namer or ssing the drop down
box select a name and click – Type Que and Suzie Que’s information displays.
The drop down box provides the user with the Last Name, First Name, and Company name
sorted alphabetically by Last Name to assist in selecting the correct contact. Once you select a
name and click it, the information for that person displays. Since this form is used only to edit
existing contacts, new contacts may not be added nor exiting contacts deleted. Change
information on a record . As you move from field to field making changes, Access
automatically saves the information for you. This form is based on tblContacts. Close the form.
Input Forms
Using the frmMenu form, click the Input A New Employee button . The Personnel Input Form opens.
Notice the form opens at the SSN ready for input and that all of the fields are blank. This form
does not allow the user to see any existing records. Notice that the state fields and hire date
take the characteristics of the table, such as the drop down box for State and the default values
for Hire Date. While forms can have the attributes of tables including validation rules and
IAAP & Greg Creech Building a Relational Database with Microsoft Access Page 33
www.iaap-hq.org EFAM 2013 gregcreech.com Greg Creech © 2013 No Distribution or Duplication
Exclusive for IAAP and Techedutainment Services.
default values, there are times that you would not want tables to contain restrictions (when
importing data for example); therefore, you can “program” or edit the form to l imit
data types and ranges for integrity and accuracy just l ike the table could.
This form is really two forms and follows the process of a record needing to be in the
tblPersonnel first and then a record can be added to tblHRData; therefore, this form adds
records to two tables and ensures integrity by not allowing duplicate SSNs to be input. In the
SSN field type 999-99-9999, tab to the Last Name field and type John, tab
through all of the fields until you get to the error message that the field is a
duplicate. Press the ESC key to clear the input. Also, notice that when you input
999-99-9999 the information in the H R Data Input populated since the 999-99-9999 SSN
already existed. Now, input a record using your imagination to populate each
field with data and notice that the Card field automatically populates based
upon the Hire Date. This field is used to send an anniversary card to associates 10 days
after their hire date anniversary. This is a function in the form field. Also, notice that after
typing a birth date, the form provides the age – this is a function we will learn and apply to a
form similar to this.
As stated earlier, forms are a mechanism to add, edit, delete, and view data in tables. This form
can be deleted and the records remain intact in the tables. However, forms can also contain
functions that populate automatically and do not feed data to a table or query if this type of
form were to be deleted the functions and data would disappear. Our Age and Card field
are such expressions; these “fields” or expressions are a function built into the form. If the
form goes away so does this data. Close the form.
As with other Access Objects, Forms have several views, but the there are two important views
in Forms we will use a lot. These two views are: Form View for viewing your data using
the form and Design View for modifying your forms appearance, functionality, fields, and
much more.
Notes Formats and Design View: You can easily change the format of a form in design view.
In the design view select AutoFormat from the Arrange Tab and predefined formats will
appear for you to select. Forms contain labels and fields. The label describes the input field
and can be the same name as the field name.

IAAP & Greg Creech Building a Relational Database with Microsoft Access Page 34
www.iaap-hq.org EFAM 2013 gregcreech.com Greg Creech © 2013 No Distribution or Duplication
Exclusive for IAAP and Techedutainment Services.
In Form View , you can sort data and establish filters to view your information as you can in a
query or table; however, the information will be presented in a fancy form view, not a plain
datasheet view. You can find specific records based upon specific criteria. Aside from the
attractive nature of forms, forms can ensure great data input accuracy and efficiency. Forms
have controls that can restrict input and make input easy. To accomplish this, Forms use
Option Boxes, List Boxes, Check boxes, combo boxes, and a host of other
controls in its Toolbox. Default values can be assigned and input masks (just like tables)
can make input consistent. Forms can contain expressions and calculations, like the age
function, although calculations are great in queries and reports, too.
There are Dialogue Forms , too, that offer the end user choices and criteria for reports and
other forms. You can customize Dialogue Boxes and Message boxes using forms, too.
Your Important Notes : ________________________________________________________________________ ________________________________________________________________________ ________________________________________________________________________ ________________________________________________________________________ ________________________________________________________________________ ________________________________________________________________________
IAAP & Greg Creech Building a Relational Database with Microsoft Access Page 35
www.iaap-hq.org EFAM 2013 gregcreech.com Greg Creech © 2013 No Distribution or Duplication
Exclusive for IAAP and Techedutainment Services.
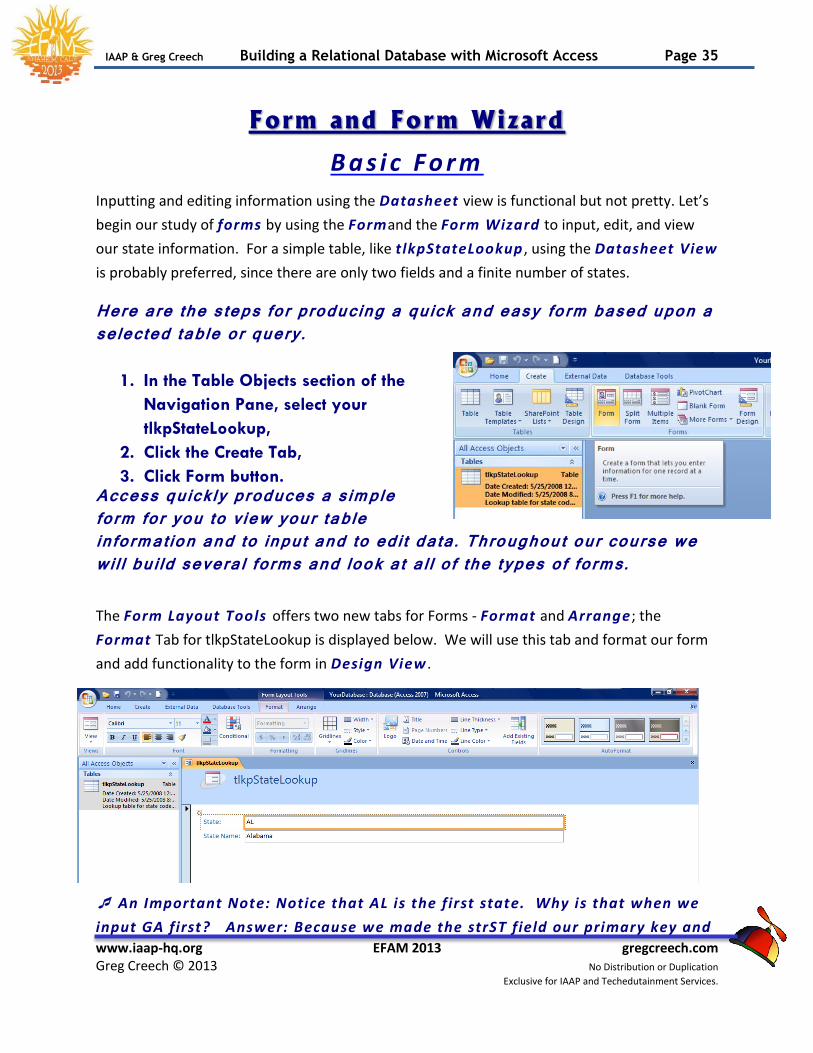
Form and Form Wizard
B a s i c F o r m
Inputting and editing information using the Datasheet view is functional but not pretty. Let’s
begin our study of forms by using the Formand the Form Wizard to input, edit, and view
our state information. For a simple table, like tlkpStateLookup , using the Datasheet View
is probably preferred, since there are only two fields and a finite number of states. Here are the steps for producing a quick and easy form based upon a selected table or query.
1. In the Table Objects section of the
Navigation Pane, select your
tlkpStateLookup,
2. Click the Create Tab,
3. Click Form button. Access quickly produces a simple form for you to view your table information and to input and to edit data. Throughout our course we will build several forms and look at all of the types of forms.
The Form Layout Tools offers two new tabs for Forms - Format and Arrange ; the
Format Tab for tlkpStateLookup is displayed below. We will use this tab and format our form
and add functionality to the form in Design View .
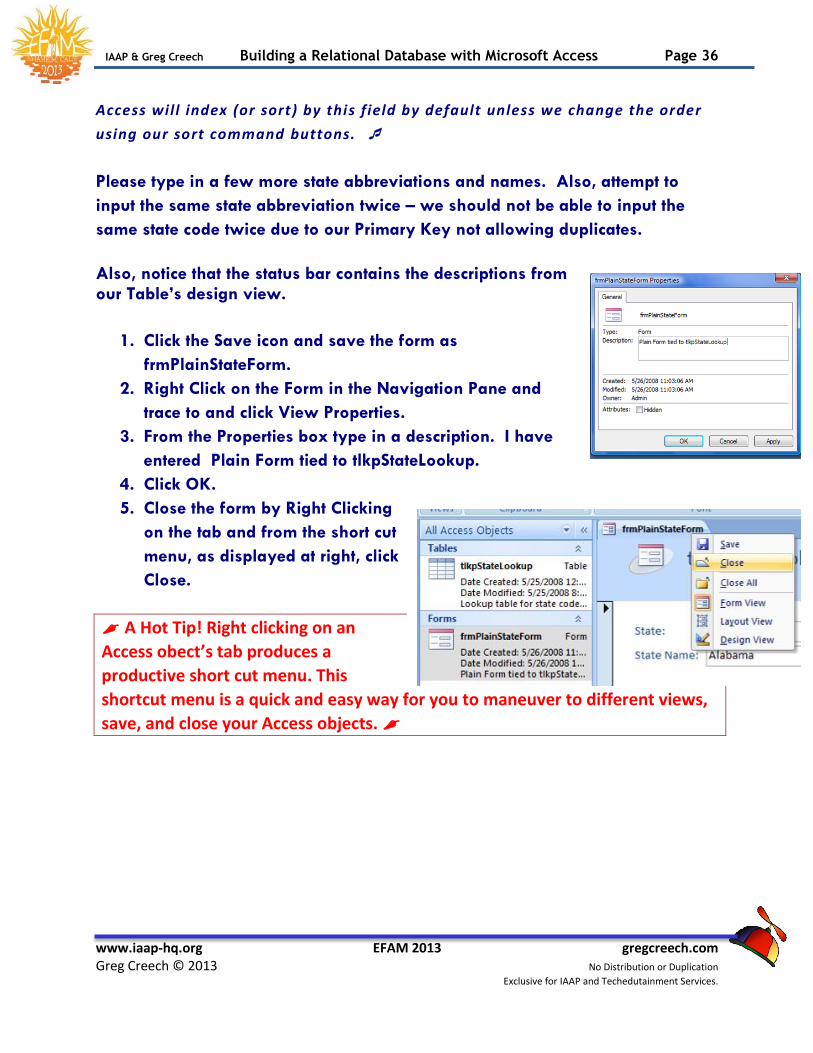
An Important Note: Notice that AL is the first state. Why is that when we
input GA first? Answer: Because we made the strST field our primary key and
IAAP & Greg Creech Building a Relational Database with Microsoft Access Page 36
www.iaap-hq.org EFAM 2013 gregcreech.com Greg Creech © 2013 No Distribution or Duplication
Exclusive for IAAP and Techedutainment Services.
Access will index (or sort) by this f ield by default unless we change the order
using our sort command buttons.
Please type in a few more state abbreviations and names. Also, attempt to
input the same state abbreviation twice – we should not be able to input the
same state code twice due to our Primary Key not allowing duplicates.
Also, notice that the status bar contains the descriptions from our Table’s design view.
1. Click the Save icon and save the form as
frmPlainStateForm.
2. Right Click on the Form in the Navigation Pane and
trace to and click View Properties.
3. From the Properties box type in a description. I have
entered Plain Form tied to tlkpStateLookup.
4. Click OK.
5. Close the form by Right Clicking
on the tab and from the short cut
menu, as displayed at right, click
Close.
A Hot Tip! Right clicking on an
Access obect’s tab produces a
productive short cut menu. This
shortcut menu is a quick and easy way for you to maneuver to different views,
save, and close your Access objects.

IAAP & Greg Creech Building a Relational Database with Microsoft Access Page 37
www.iaap-hq.org EFAM 2013 gregcreech.com Greg Creech © 2013 No Distribution or Duplication
Exclusive for IAAP and Techedutainment Services.
F o r m W i z a r d
Let’s use the Form Wizard to create a “prettier” form for our view and input into the
tlkpStateLookup. We will construct several forms using the wizard and others not using the
wizard.
Here are the steps for building a Form Using the
Form Wizard.
1. Select your tlkpStateLookup Table.
2. Click the Create Tab and click the More Forms
button and from the cascading menu, Click
Form Wizard.
3. The Form Wizard activates.
4. The Available Fields box lists our fields. Send
both of the fields to the Selected Fields box by
clicking the Double Arrow pointing to the right
(>>) and toward the Selected Fields box.
(The Single Arrow pointing to the right sends
the highlighted fields one by one to the
Selected Fields box. You may double click
the field name in the Available Field box and
that will send the field over to the Selected
Field box, too. Since we are inputting data
into a table, using all of the fields is critical so
we don’t erroneously leave fields blank in a
record.
5. Click Next.
6. Choose Columnar layout. Columnar layout
offers one record per screen. Tabular offers
multiple records per screen. Justified places
the labels/captions about the fields in a row
fashion. We have worked in Datasheet layout
already. We will work with all of these layouts so you may determine
which is the best layout for your data.
7. Click Next.
IAAP & Greg Creech Building a Relational Database with Microsoft Access Page 38
www.iaap-hq.org EFAM 2013 gregcreech.com Greg Creech © 2013 No Distribution or Duplication
Exclusive for IAAP and Techedutainment Services.
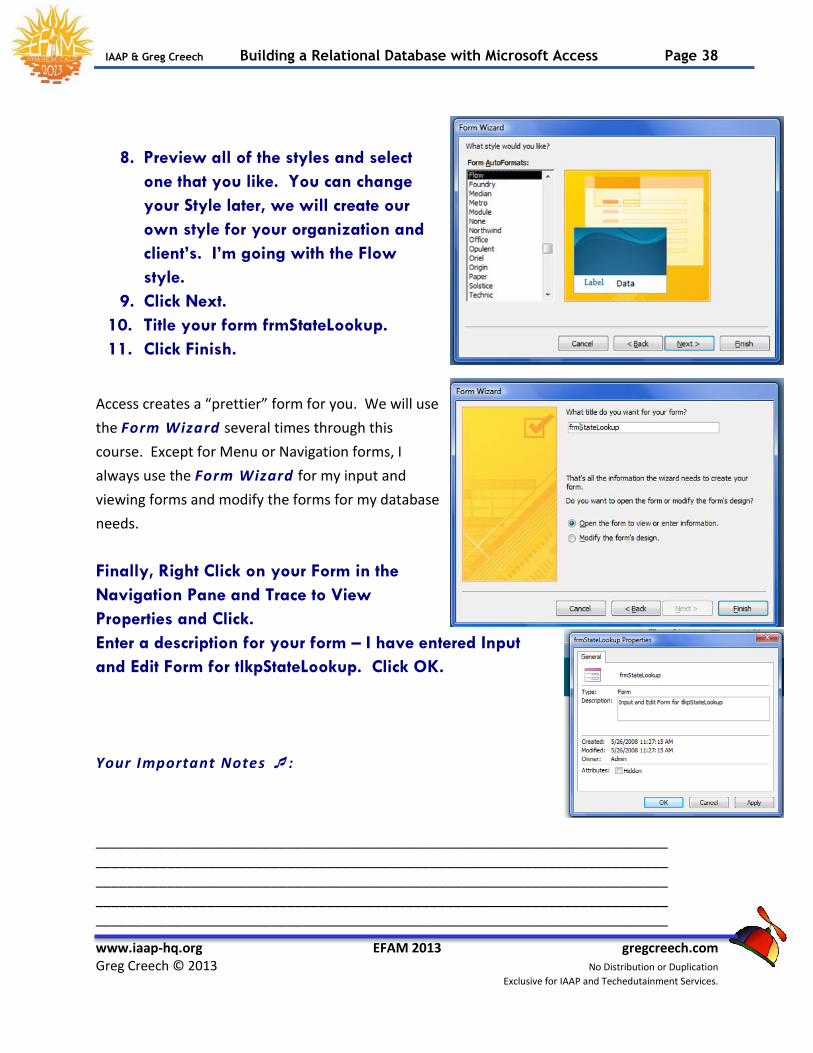
8. Preview all of the styles and select
one that you like. You can change
your Style later, we will create our
own style for your organization and
client’s. I’m going with the Flow
style.
9. Click Next.
10. Title your form frmStateLookup.
11. Click Finish.
Access creates a “prettier” form for you. We will use
the Form Wizard several times through this
course. Except for Menu or Navigation forms, I
always use the Form Wizard for my input and
viewing forms and modify the forms for my database
needs.
Finally, Right Click on your Form in the
Navigation Pane and Trace to View
Properties and Click.
Enter a description for your form – I have entered Input
and Edit Form for tlkpStateLookup. Click OK.
Your Important Notes :
________________________________________________________________________ ________________________________________________________________________ ________________________________________________________________________ ________________________________________________________________________ ________________________________________________________________________

IAAP & Greg Creech Building a Relational Database with Microsoft Access Page 39
www.iaap-hq.org EFAM 2013 gregcreech.com Greg Creech © 2013 No Distribution or Duplication
Exclusive for IAAP and Techedutainment Services.
IAAP & Greg Creech Building a Relational Database with Microsoft Access Page 40
www.iaap-hq.org EFAM 2013 gregcreech.com Greg Creech © 2013 No Distribution or Duplication
Exclusive for IAAP and Techedutainment Services.
Queries: Quest ions and Answers with lots
of Expression
Q u e r y O v e r v i e w
Now that we have data in tables, we want to manipulate, extract, and view certain data. That is
one of the purposes of queries in database applications. We will create all kinds of queries
that are listed below as examples and to provide an overview of queries as we prepare to learn
all about queries.
Queries are database organizers and manipulators; queries can extract information based
upon criteria. We perform calculations in queries using fields and impact data in tables through
Action Queries . Queries allow very complex fi ltering, sorting , and number crunching.
Mathematical operations are performed in Queries using Expressions and
Operators , such as *, +, <. >, =. If you wanted to summarize numbers for total information,
queries perform those operations. If you want to design a tax field based upon the price of an
item, the query design screen performs this task.
Criteria can be set to restrict information, such as showing your address database for people
born before 1999 and after 1970. You can query on everyone whose Last Name begins with B.
We save queries for re-use and they can be the basis for forms and reports. Queries can
automatically update tables. That's right I wrote: TableS (plural). One of the powers of queries
is its ability to manipulate data from many tables and produce results from very differing table
data through relationships, joins , and the primary keys . The information is gathered
based upon the query and saved. The output is not very attractive in datasheet view ;
therefore, Access can base Reports and Forms on Queries . As we will learn, reports
and forms can add to the functionality to the data in tables and queries .
Queries can be very complex and are programmed using various languages, including
Structured Query Language (SQL) . In Access, all queries are translated into SQL , and the
SQL can be viewed using the View button in Query Design for all queries. Structured
Query Language is a popular querying program and very powerful; however, there are
others.
IAAP & Greg Creech Building a Relational Database with Microsoft Access Page 41
www.iaap-hq.org EFAM 2013 gregcreech.com Greg Creech © 2013 No Distribution or Duplication
Exclusive for IAAP and Techedutainment Services.
A Note on Formats : In the Datasheet View for Tables and Queries , you can format
your information using the formatting buttons on the Home tab as we have accomplished for
out tables. Formatting applies to the Datasheet View only, not the actual field data
formatting. Formats apply to the entire table or query datasheet view, not to specific cells,
rows, or columns. Reports and Forms are best for formatting and appearances; Reports for
printed Output and Forms for Viewing, Editing, and Input of records.
Queries change, add, and delete data (Action Queries). Aside from select queries
and calculation fields, Action Queries can change, add, and delete data. Always test your
action queries before using them on a live or actual data restoring the original data can be
difficult, if not impossible. Here are some of the type of action queries and examples of how I
use them.
Action queries can delete specific records based upon criteria. For example, I
archive data from year to year using an Append or Make Table query, and then I delete data for
my active tables for the previous year. A delete query removes records from my active table
based upon the year I enter.
Action queries can update data. For example, when I have a price change on a specific
item. I develop a select query for the items whose I price I want to change, and then I update
the price field to reflect a calculation to increase the price or decrease the price through using
percentages.
Action queries can add data . For example, I use the Append Query in Access to add
records from data I import into a new table; I then take the new table and through the Append
query add data to my existing and main table.
Action queries can build tables. For example, I have complex queries that involve many
calculations and I want to make the query into a table. Access has a Make Table action
query.
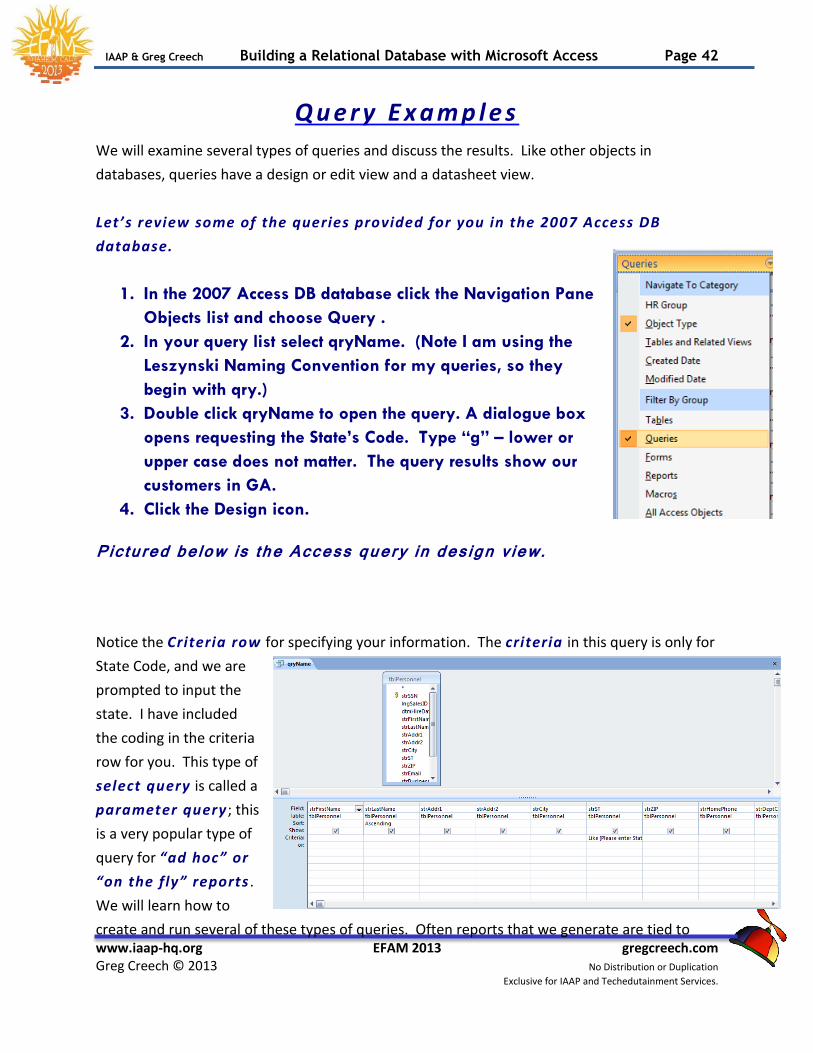
IAAP & Greg Creech Building a Relational Database with Microsoft Access Page 42
www.iaap-hq.org EFAM 2013 gregcreech.com Greg Creech © 2013 No Distribution or Duplication
Exclusive for IAAP and Techedutainment Services.
Q u e r y E x a m p l e s
We will examine several types of queries and discuss the results. Like other objects in
databases, queries have a design or edit view and a datasheet view.
Let’s review some of the queries provided for you in the 2007 Access DB
database.
1. In the 2007 Access DB database click the Navigation Pane
Objects list and choose Query .
2. In your query list select qryName. (Note I am using the
Leszynski Naming Convention for my queries, so they
begin with qry.)
3. Double click qryName to open the query. A dialogue box
opens requesting the State’s Code. Type “g” – lower or
upper case does not matter. The query results show our
customers in GA.
4. Click the Design icon. Pictured below is the Access query in design view.
Notice the Criteria row for specifying your information. The criteria in this query is only for
State Code, and we are
prompted to input the
state. I have included
the coding in the criteria
row for you. This type of
select query is called a
parameter query ; this
is a very popular type of
query for “ad hoc” or
“on the fly” reports .
We will learn how to
create and run several of these types of queries. Often reports that we generate are tied to

IAAP & Greg Creech Building a Relational Database with Microsoft Access Page 43
www.iaap-hq.org EFAM 2013 gregcreech.com Greg Creech © 2013 No Distribution or Duplication
Exclusive for IAAP and Techedutainment Services.
queries for the data selection and calculations, and the queries are based on tables to retrieve
the data.
1. Click the Datasheet View Icon.
2. When you are prompted for a state abbreviation, Type “n”. Notice your
results include NY, NC, and NJ.
3. Press the Shift Key and the F9 simultaneously – this is an Access shortcut
to rerun a parameter query while in datasheet view.
4. At the state abbreviation prompt type “tn; only our customers in
Tennessee display.
5. Click the close button to exit this query. Let’s examine a query that contains several calculations and will prompt you for department and dates
1. In the 2007 Access DB database and in the query section of the
Navigation Pane double click the qryMyPayReport query.
2. At the First Date prompt type 01/01/2001,
3. Press the Enter Key or Click OK button,
4. At the Second Date prompt type 12/31/01,
5. Press the Enter Key or Click OK button.
6. We only want people hired in 2001.
7. At the prompt for Department Code - Click OK to view all Departments,
8. This query displays the associates, the weekly payroll, and annual
payroll.
9. Click the Design button. Pictured below and visible on your screen is the query that includes the following:
Concatenating (Bringing together) two fields to create one expression – the Name
Parameter for Hire dates, Parameter for Department, Calculation for Weekly Totals by multiplying curPayRate
by sngHours, Calculation for Annual Pay using the Weekly Pay
expression,

IAAP & Greg Creech Building a Relational Database with Microsoft Access Page 44
www.iaap-hq.org EFAM 2013 gregcreech.com Greg Creech © 2013 No Distribution or Duplication
Exclusive for IAAP and Techedutainment Services.
Details of Associates from various tables and using the field Department Name, Proof that relationships (one -to-one and one-to-many) are vital to retrieve this type of data.
We will create several types of queries including the one displayed below. We wil l base our reports on the queries we create in our next section.
Your Important Notes : ________________________________________________________________________ ________________________________________________________________________ ____________________________________________ ____________________________ ________________________________________________________________________ ________________________________________________________________________ ________________________________________________________________________
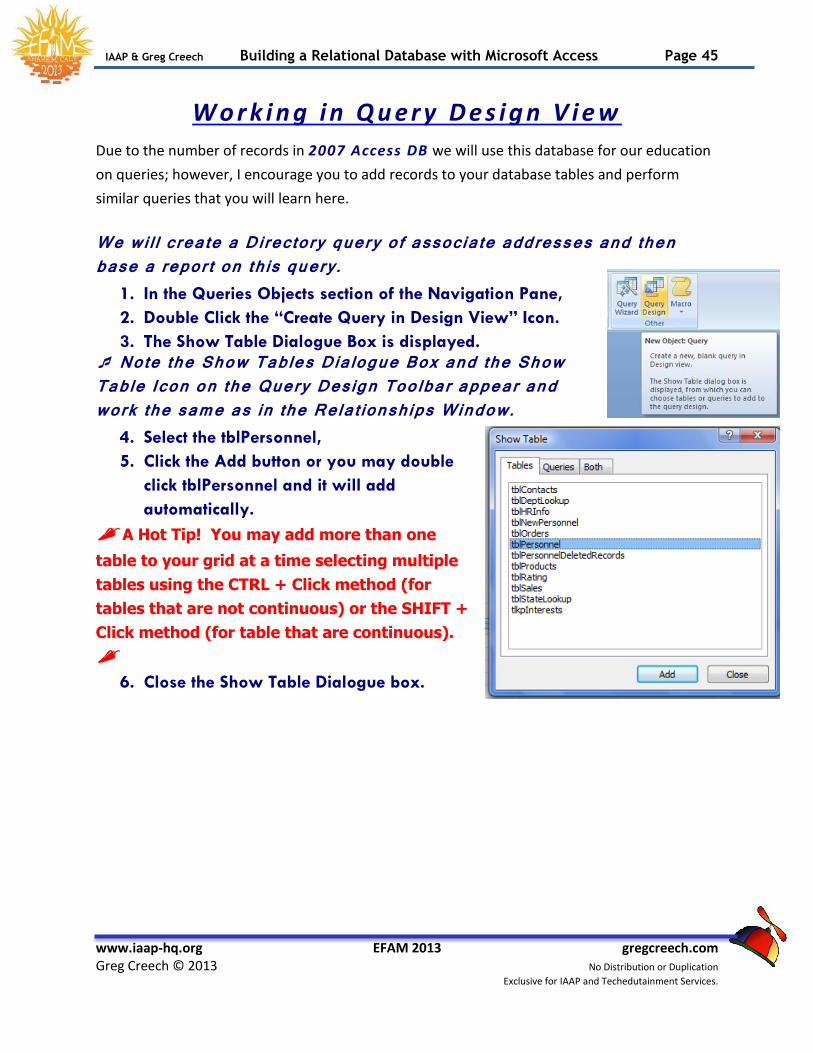
IAAP & Greg Creech Building a Relational Database with Microsoft Access Page 45
www.iaap-hq.org EFAM 2013 gregcreech.com Greg Creech © 2013 No Distribution or Duplication
Exclusive for IAAP and Techedutainment Services.
W o r k i n g i n Q u e r y D e s i g n V i e w
Due to the number of records in 2007 Access DB we will use this database for our education
on queries; however, I encourage you to add records to your database tables and perform
similar queries that you will learn here.
We will create a Directory query of associate addresses and then base a report on this query.
1. In the Queries Objects section of the Navigation Pane,
2. Double Click the “Create Query in Design View” Icon.
3. The Show Table Dialogue Box is displayed.
Note the Show Tables Dialogue Box and the Show Table Icon on the Query Design Toolbar appear and work the same as in the Relationships Window.
4. Select the tblPersonnel,
5. Click the Add button or you may double
click tblPersonnel and it will add
automatically.
A Hot Tip! You may add more than one
table to your grid at a time selecting multiple
tables using the CTRL + Click method (for
tables that are not continuous) or the SHIFT +
Click method (for table that are continuous).
6. Close the Show Table Dialogue box.
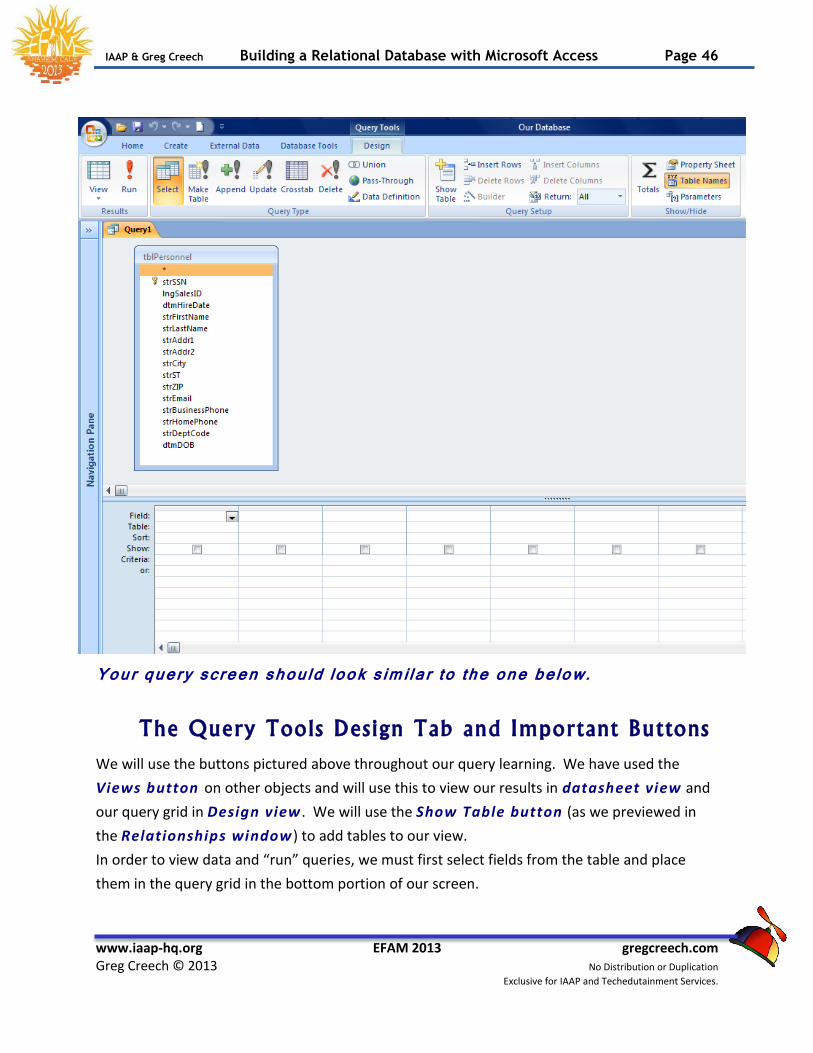
IAAP & Greg Creech Building a Relational Database with Microsoft Access Page 46
www.iaap-hq.org EFAM 2013 gregcreech.com Greg Creech © 2013 No Distribution or Duplication
Exclusive for IAAP and Techedutainment Services.
Your query screen should look similar to the one below.
The Query Tools Design Tab and Important Buttons
We will use the buttons pictured above throughout our query learning. We have used the
Views button on other objects and will use this to view our results in datasheet view and
our query grid in Design view . We will use the Show Table button (as we previewed in
the Relationships window ) to add tables to our view.
In order to view data and “run” queries, we must first select fields from the table and place
them in the query grid in the bottom portion of our screen.
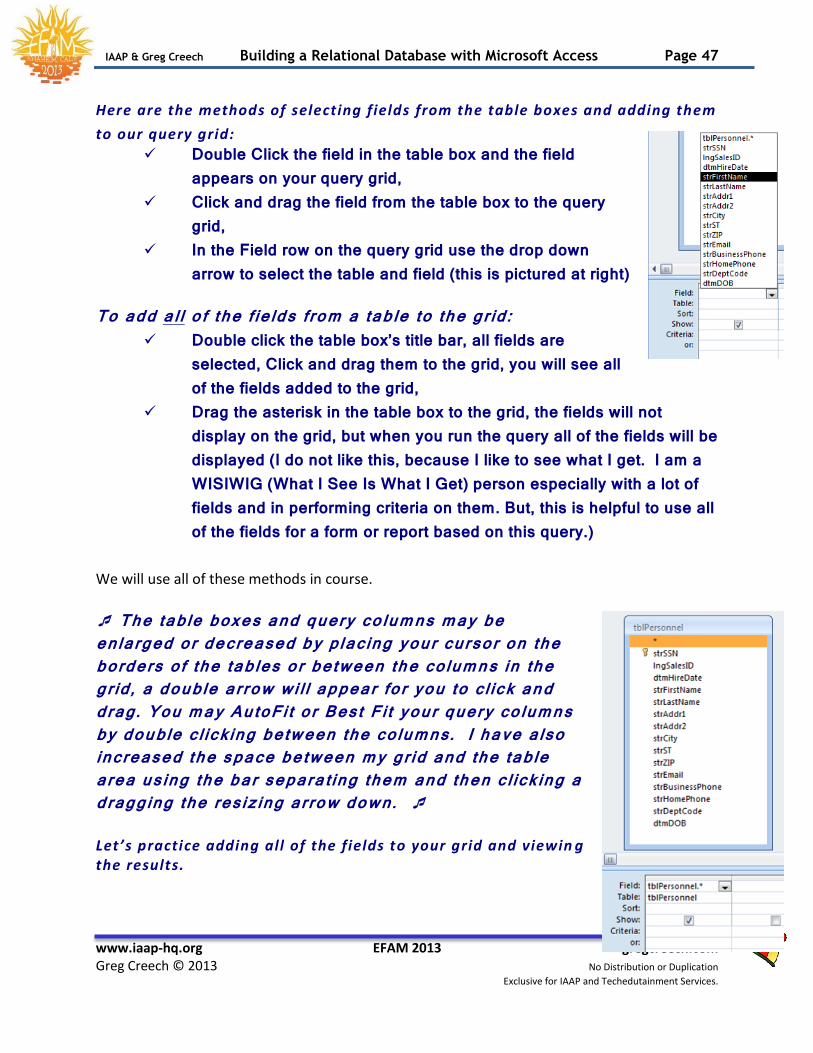
IAAP & Greg Creech Building a Relational Database with Microsoft Access Page 47
www.iaap-hq.org EFAM 2013 gregcreech.com Greg Creech © 2013 No Distribution or Duplication
Exclusive for IAAP and Techedutainment Services.
Here are the methods of selecting fields from the table boxes and adding them
to our query grid:
Double Click the field in the table box and the field appears on your query grid,
Click and drag the field from the table box to the query grid,
In the Field row on the query grid use the drop down arrow to select the table and field (this is pictured at right)
To add all of the fields from a table to the grid:
Double click the table box’s title bar, all fields are selected, Click and drag them to the grid, you will see all of the fields added to the grid,
Drag the asterisk in the table box to the grid, the fields will not display on the grid, but when you run the query all of the fields will be displayed (I do not like this, because I like to see what I get. I am a WISIWIG (What I See Is What I Get) person especially with a lot of fields and in performing criteria on them. But, this is helpful to use all of the fields for a form or report based on this query.)
We will use all of these methods in course. The table boxes and query columns may be enlarged or decreased by placing your cursor on the borders of the tables or between the columns in the grid, a double arrow will appear for you to click and drag. You may AutoFit or Best Fit your query columns by double clicking between the columns. I have also increased the space between my grid and the table area using the bar separating them and then clicking a dragging the resizing arrow down. Let’s practice adding all of the fields to your grid and viewin g the results.
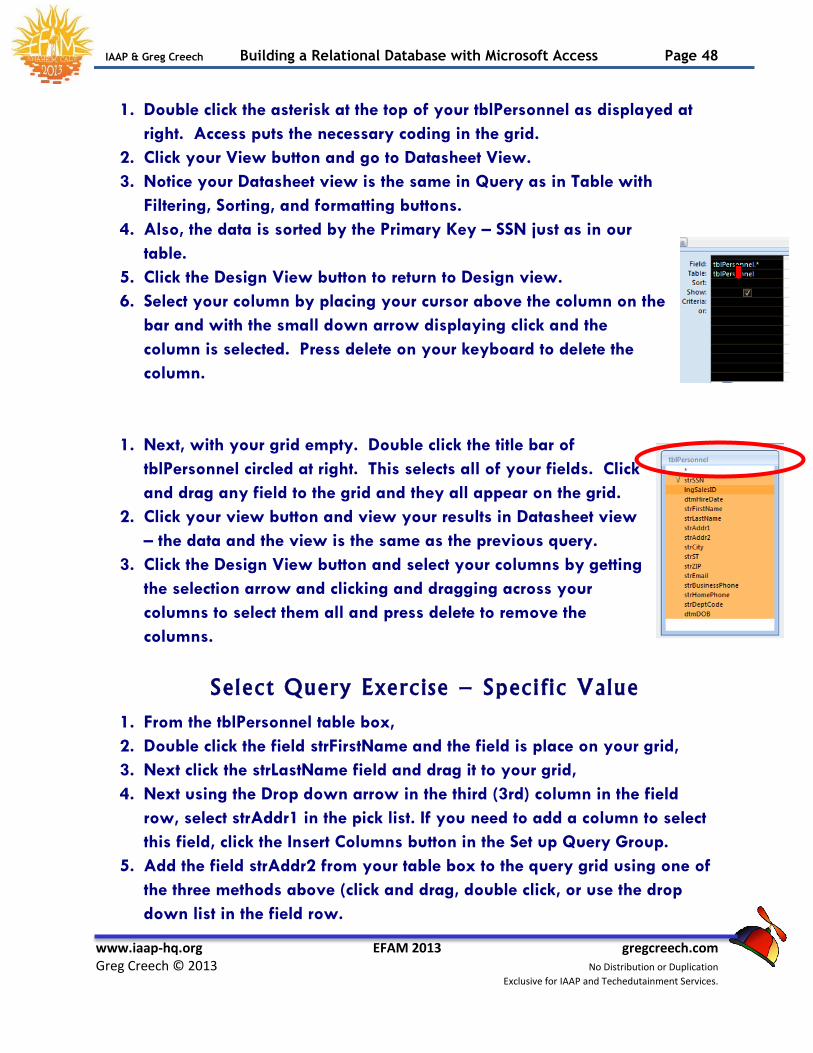
IAAP & Greg Creech Building a Relational Database with Microsoft Access Page 48
www.iaap-hq.org EFAM 2013 gregcreech.com Greg Creech © 2013 No Distribution or Duplication
Exclusive for IAAP and Techedutainment Services.
1. Double click the asterisk at the top of your tblPersonnel as displayed at
right. Access puts the necessary coding in the grid.
2. Click your View button and go to Datasheet View.
3. Notice your Datasheet view is the same in Query as in Table with
Filtering, Sorting, and formatting buttons.
4. Also, the data is sorted by the Primary Key – SSN just as in our
table.
5. Click the Design View button to return to Design view.
6. Select your column by placing your cursor above the column on the
bar and with the small down arrow displaying click and the
column is selected. Press delete on your keyboard to delete the
column.
1. Next, with your grid empty. Double click the title bar of
tblPersonnel circled at right. This selects all of your fields. Click
and drag any field to the grid and they all appear on the grid.
2. Click your view button and view your results in Datasheet view
– the data and the view is the same as the previous query.
3. Click the Design View button and select your columns by getting
the selection arrow and clicking and dragging across your
columns to select them all and press delete to remove the
columns.
Select Query Exercise – Specif ic Value
1. From the tblPersonnel table box,
2. Double click the field strFirstName and the field is place on your grid,
3. Next click the strLastName field and drag it to your grid,
4. Next using the Drop down arrow in the third (3rd) column in the field
row, select strAddr1 in the pick list. If you need to add a column to select
this field, click the Insert Columns button in the Set up Query Group.
5. Add the field strAddr2 from your table box to the query grid using one of
the three methods above (click and drag, double click, or use the drop
down list in the field row.

IAAP & Greg Creech Building a Relational Database with Microsoft Access Page 49
www.iaap-hq.org EFAM 2013 gregcreech.com Greg Creech © 2013 No Distribution or Duplication
Exclusive for IAAP and Techedutainment Services.

IAAP & Greg Creech Building a Relational Database with Microsoft Access Page 50
www.iaap-hq.org EFAM 2013 gregcreech.com Greg Creech © 2013 No Distribution or Duplication
Exclusive for IAAP and Techedutainment Services.
Now, let’s add multiple fields at once – I l ike selecting the fields in the table box and then clicking one of the fields and dragging all of the selected fields to the grid.
1. Click the strCity field,
2. Press your Shift key and keep it pressed,
3. Click the strZIP field and Access selects strCity field
through strZIP.
4. Release your shift key.
5. Press the CTRL key and keep it pressed,
6. Click the strHomePhone field,
7. Click the strDeptCode field.
8. Now, click one of the SELECTED fields and drag it to your grid.
9. Viola! Your selected fields should appear on your grid as displayed
below.
10. Click the Red Exclamation Point (Run) button or Click the
Datasheet View button to “run” and view the query. We can
use either of these buttons for our Select Queries; Action
Queries require you to press the Run button in order to
perform the Action on your data.
Note Since we have not input any criteria, the data is the same as if we viewed this in the Table’s Datasheet view, EXCEPT only the fields we select in the query grid are showing - not all of the fields that would appear in the Table’s Datasheet view .
11. Click the Design View icon.
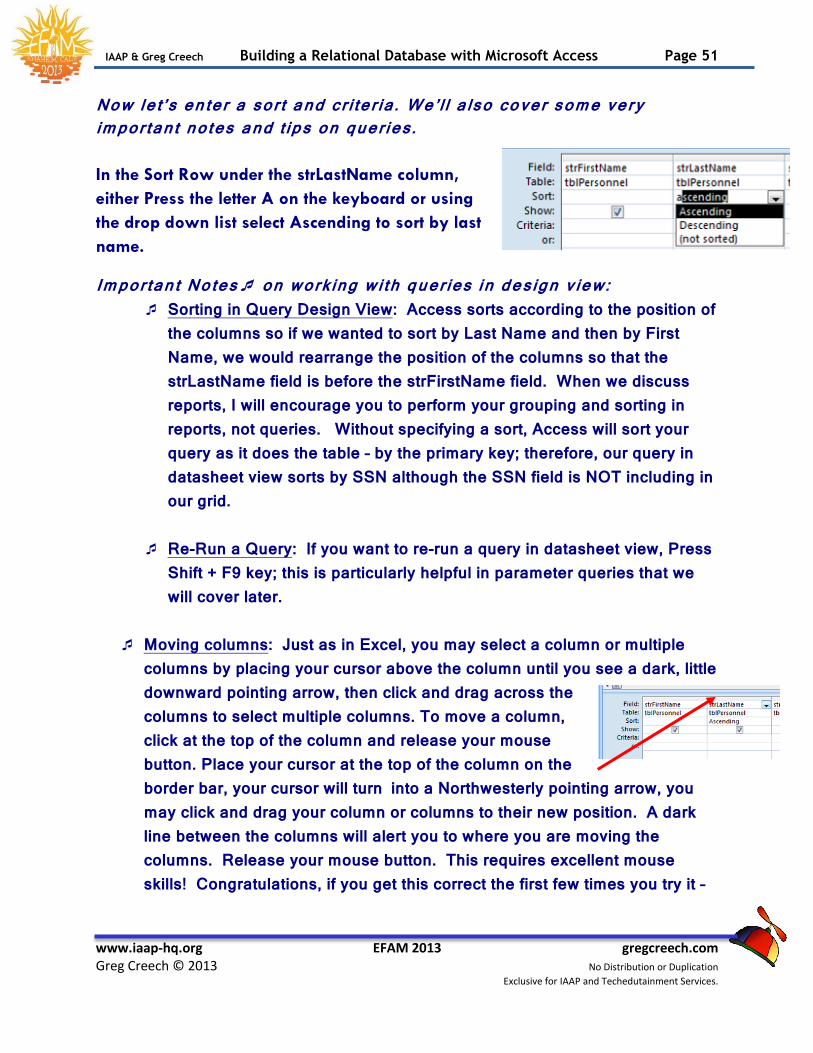
IAAP & Greg Creech Building a Relational Database with Microsoft Access Page 51
www.iaap-hq.org EFAM 2013 gregcreech.com Greg Creech © 2013 No Distribution or Duplication
Exclusive for IAAP and Techedutainment Services.
Now let’s enter a sort and criteria. We’ll also cover some very important notes and tips on queries.
In the Sort Row under the strLastName column,
either Press the letter A on the keyboard or using
the drop down list select Ascending to sort by last
name. Important Notes on working with queries in design view:
Sorting in Query Design View: Access sorts according to the position of the columns so if we wanted to sort by Last Name and then by First Name, we would rearrange the position of the columns so that the strLastName field is before the strFirstName field. When we discuss reports, I will encourage you to perform your grouping and sorting in reports, not queries. Without specifying a sort, Access will sort your query as it does the table – by the primary key; therefore, our query in datasheet view sorts by SSN although the SSN field is NOT including in our grid.
Re-Run a Query: If you want to re-run a query in datasheet view, Press
Shift + F9 key; this is particularly helpful in parameter queries that we will cover later.
Moving columns: Just as in Excel, you may select a column or multiple
columns by placing your cursor above the column until you see a dark, little downward pointing arrow, then click and drag across the columns to select multiple columns. To move a column, click at the top of the column and release your mouse button. Place your cursor at the top of the column on the border bar, your cursor will turn into a Northwesterly pointing arrow, you may click and drag your column or columns to their new position. A dark line between the columns will alert you to where you are moving the columns. Release your mouse button. This requires excellent mouse skills! Congratulations, if you get this correct the first few times you try it –

IAAP & Greg Creech Building a Relational Database with Microsoft Access Page 52
www.iaap-hq.org EFAM 2013 gregcreech.com Greg Creech © 2013 No Distribution or Duplication
Exclusive for IAAP and Techedutainment Services.
you are a genius – I have used this for several years and still get columns all messed up.
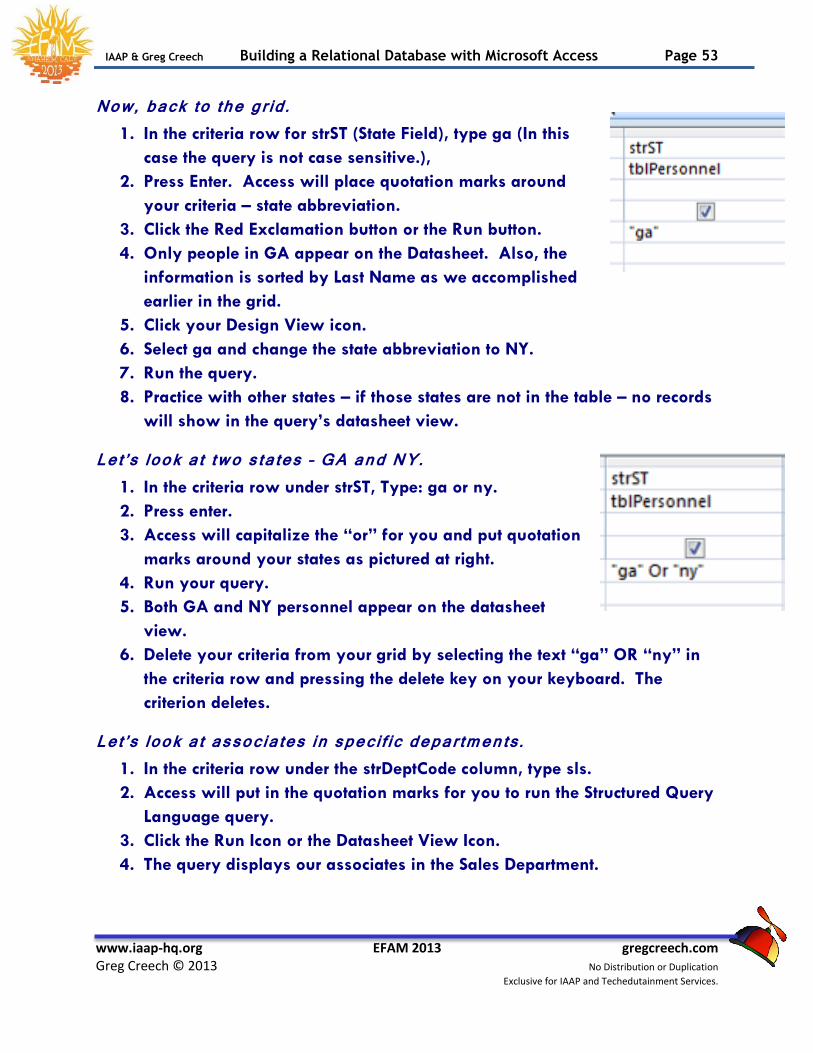
IAAP & Greg Creech Building a Relational Database with Microsoft Access Page 53
www.iaap-hq.org EFAM 2013 gregcreech.com Greg Creech © 2013 No Distribution or Duplication
Exclusive for IAAP and Techedutainment Services.
Now, back to the grid.
1. In the criteria row for strST (State Field), type ga (In this
case the query is not case sensitive.),
2. Press Enter. Access will place quotation marks around
your criteria – state abbreviation.
3. Click the Red Exclamation button or the Run button.
4. Only people in GA appear on the Datasheet. Also, the
information is sorted by Last Name as we accomplished
earlier in the grid.
5. Click your Design View icon.
6. Select ga and change the state abbreviation to NY.
7. Run the query.
8. Practice with other states – if those states are not in the table – no records
will show in the query’s datasheet view. Let’s look at two states – GA and NY.
1. In the criteria row under strST, Type: ga or ny.
2. Press enter.
3. Access will capitalize the “or” for you and put quotation
marks around your states as pictured at right.
4. Run your query.
5. Both GA and NY personnel appear on the datasheet
view.
6. Delete your criteria from your grid by selecting the text “ga” OR “ny” in
the criteria row and pressing the delete key on your keyboard. The
criterion deletes. Let’s look at associates in specific departments.
1. In the criteria row under the strDeptCode column, type sls.
2. Access will put in the quotation marks for you to run the Structured Query
Language query.
3. Click the Run Icon or the Datasheet View Icon.
4. The query displays our associates in the Sales Department.
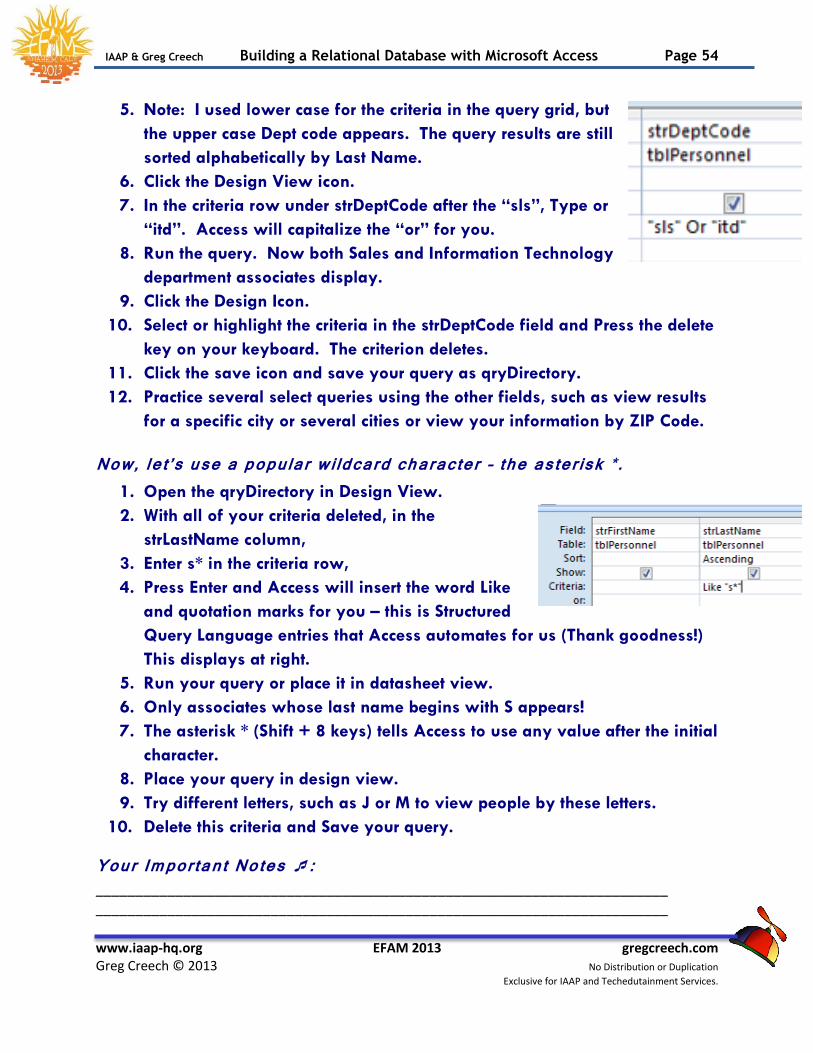
IAAP & Greg Creech Building a Relational Database with Microsoft Access Page 54
www.iaap-hq.org EFAM 2013 gregcreech.com Greg Creech © 2013 No Distribution or Duplication
Exclusive for IAAP and Techedutainment Services.
5. Note: I used lower case for the criteria in the query grid, but
the upper case Dept code appears. The query results are still
sorted alphabetically by Last Name.
6. Click the Design View icon.
7. In the criteria row under strDeptCode after the “sls”, Type or
“itd”. Access will capitalize the “or” for you.
8. Run the query. Now both Sales and Information Technology
department associates display.
9. Click the Design Icon.
10. Select or highlight the criteria in the strDeptCode field and Press the delete
key on your keyboard. The criterion deletes.
11. Click the save icon and save your query as qryDirectory.
12. Practice several select queries using the other fields, such as view results
for a specific city or several cities or view your information by ZIP Code.
Now, let’s use a popular wildcard character – the asterisk *.
1. Open the qryDirectory in Design View.
2. With all of your criteria deleted, in the
strLastName column,
3. Enter s* in the criteria row,
4. Press Enter and Access will insert the word Like
and quotation marks for you – this is Structured
Query Language entries that Access automates for us (Thank goodness!)
This displays at right.
5. Run your query or place it in datasheet view.
6. Only associates whose last name begins with S appears!
7. The asterisk * (Shift + 8 keys) tells Access to use any value after the initial
character.
8. Place your query in design view.
9. Try different letters, such as J or M to view people by these letters.
10. Delete this criteria and Save your query. Your Important Notes : ________________________________________________________________________ ________________________________________________________________________

IAAP & Greg Creech Building a Relational Database with Microsoft Access Page 55
www.iaap-hq.org EFAM 2013 gregcreech.com Greg Creech © 2013 No Distribution or Duplication
Exclusive for IAAP and Techedutainment Services.
Let’s sorting first by Last Name and then by First Name, yet view our
information by F irst Name and then Last Name.
1. With qryDirectory in design view, add the strLastName field to your grid a
second time by clicking the strLastName field in the table box and
dragging the field to the beginning of your grid to place this field first,
since we want to sort first by this field – Remember the query sorts
according to your column order.
2. In the Sort Row box’s drop down pick list choose Ascending or type A in
the sort row and Ascending will appear for you.
3. Next, in the first
strLastName field
Uncheck the Show Box (I
call this the Missouri Box
since it is the Show Me
state – this is the show me box and we do not need to see this field in the
datasheet view; however, we do need to have the field on the grid and
the sort completed.)
4. Next, in the sort row for strFirstName choose Ascending or type A in the
sort row and Ascending will appear for you.
5. Your screen should resemble the one above.
6. Run your query or place it in datasheet view and your information is sort
correctly – scroll to the last name of Jones or Smith.
7. Save and Close your qryDirectory.
IAAP & Greg Creech Building a Relational Database with Microsoft Access Page 56
www.iaap-hq.org EFAM 2013 gregcreech.com Greg Creech © 2013 No Distribution or Duplication
Exclusive for IAAP and Techedutainment Services.
Reports
O v e r v i e w a n d P u r p o s e
Reports are the most popular method of viewing data in a database. Reports are designed
for printing; however, reports can be viewed on a monitor. As stated earlier,
forms are designed for the monitor, yet can be printed – reports are designed for the printer,
yet can be viewed on a monitor. Unlike forms, you cannot input, edit, or delete records using
reports – only view information. Reports provide grouping, sorting, sub-totals,
grand totals, and abil ity to view data in many, many ways. Reports are the
advertising agency for a database and are powerful ways to display detail information or
provide Summary data. Database reports can contain complex mathematical
operations and computations for fields or combination of fields. Again, what
Forms can accomplish for displaying dazzling formats for information on the screen, Reports
accomplish for the printed page
Reports are based on tables OR queries.
S a m p l e R e p o r t s
Detai l Report with Groups, Sub-Totals, Grand Totals
1. In the 2007 Access DB database, Choose the Report Objects in the
Navigation Pane.
2. Double click rptPayReport.
3. Since reports are designed for the printer, Access takes you into Print
Preview for Report Viewing. If you are familiar with the Print Preview
screen in other Microsoft Office applications this screen will look familiar
to you.
4. Use the Navigation buttons at
the bottom of the screen to go to
Page 2. This is similar to the
Record Navigation buttons found in Datasheet view of tables, forms, and
queries, except you move through pages not records.
IAAP & Greg Creech Building a Relational Database with Microsoft Access Page 57
www.iaap-hq.org EFAM 2013 gregcreech.com Greg Creech © 2013 No Distribution or Duplication
Exclusive for IAAP and Techedutainment Services.
This report is a typical database type of report and contai ns the following elements:
Based upon a query named qryMyPayReport Provides a different page for each department Groups sub-totals by Department Lists Detail records for employees Employee records are sorted by Annual Salary in Greatest to Least
order Provides percentages of totals Includes a bottom line Grand Total at the end of the report.
Click the Close Print Preview button on the Print Preview tab.
Summary Report
1. Back in the Reports objects, Double Click the rptPayReportSummary to
open the report.
2. This report is the same as the previous report, except this summarizes
data by Department and only displays the totals for department;
therefore, no detail records are revealed. These reports are preferred
when your database contains thousands of detailed records. However, in
troubleshooting a database and verifying accuracy, detailed records are
needed.
3. Scroll through and review the report.
4. Finally, Close the report by Clicking the Close Print Preview Button.
Ad Hoc Reports
1. At the Navigation Pane and in the Reports Section,
2. Open the rptOrders report.
3. Since this report is based upon a parameter query, a dialogue box
appears requesting a customer – Click OK to view all customers.
4. The report will ask you for the first date – Type 01/01/00,
5. Press the enter key or click the OK button.
6. Next another dialogue box appears requesting the second date – Type
12/31/08.
7. Press the enter key or click the OK button. Your report appears in Print Preview.
IAAP & Greg Creech Building a Relational Database with Microsoft Access Page 58
www.iaap-hq.org EFAM 2013 gregcreech.com Greg Creech © 2013 No Distribution or Duplication
Exclusive for IAAP and Techedutainment Services.
The report illustrates by Customer the products ordered during this period of 01/01/00 through
12/31/08. Reports based upon parameter queries are very popular and allow for quick, yet
powerful, “ad hoc” reporting. Ad hoc reporting allows you to create the fields, time
periods, names, etc. that you want to view rather than “canned” or pre-programmed reports
that do not fit your specific needs. We have used customer and dates for our parameter, but
there are many ways to construct parameters for alphabetical characters, numbers, and so on.
This demonstrates the power of using parameter queries with reports.
1. Scroll through and review the report.
2. Finally, Close the report by Clicking the word Close on the Print Preview
toolbar.
Now, as we did earlier in this course, let’s view the query qryOrders that this report is based upon.
1. In the query objects open qryOrders.
2. As with the reports, the dialogue boxes will appear. At the customer
dialogue box, Click OK.
3. A dialogue box appears requesting the first date – Type 01/01/00,
4. Press the enter key or click the OK button.
5. Next another dialogue box appears requesting the second date – Type
12/31/08.
6. Press the enter key or click the OK button.
Notice that all of the fields in the query are not in the report. As explained earlier, the query
performs the calculations; however, the report performed the sub-totals and grand totals.
Although the query view can be informative, the report is easier to read and provides additional
functionality, such as grouping by department and providing our sub-totals and grand totals
that queries are not designed to do. Most of us prefer looking at the pretty reports and not
datasheet queries.
7. Close the query.
Special ized Reports
Database reports can be highly specialized based upon the application and the
needs of the users. We will look at labels using Access to view labels.
1. In the Report Objects, open the Report rptAddrLables.
IAAP & Greg Creech Building a Relational Database with Microsoft Access Page 59
www.iaap-hq.org EFAM 2013 gregcreech.com Greg Creech © 2013 No Distribution or Duplication
Exclusive for IAAP and Techedutainment Services.
2. Access quickly produces labels ready for printing. Last Name sorts this
report alphabetically. As with all other objects, as information or data is
added or changed to this database these labels will reflect the changes
the next time the report is retrieved.
3. Close your labels.
Now, let’s start building our own fantastic reports.
Your Important Notes : ________________________________________________________________________ ________________________________________________________________________ ________________________________________________________________________ ________________________________________________________________________
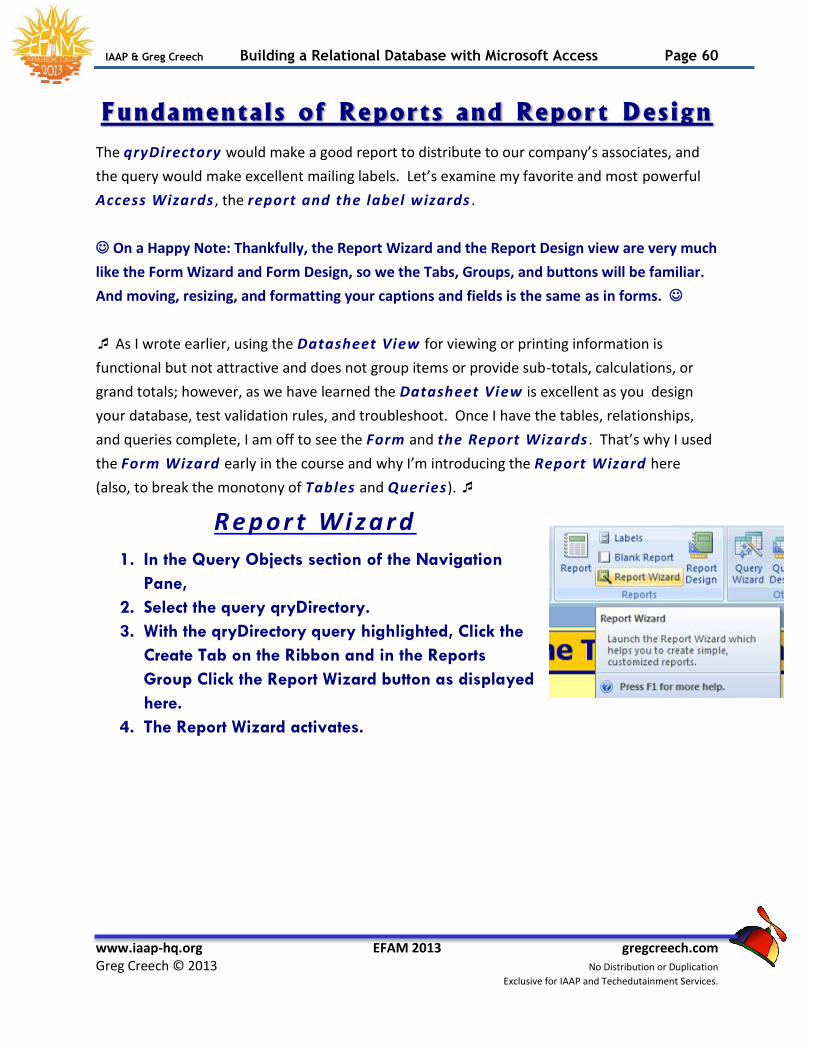
IAAP & Greg Creech Building a Relational Database with Microsoft Access Page 60
www.iaap-hq.org EFAM 2013 gregcreech.com Greg Creech © 2013 No Distribution or Duplication
Exclusive for IAAP and Techedutainment Services.
Fundamentals of Reports and Repor t Design
The qryDirectory would make a good report to distribute to our company’s associates, and
the query would make excellent mailing labels. Let’s examine my favorite and most powerful
Access Wizards , the report and the label wizards .
On a Happy Note: Thankfully, the Report Wizard and the Report Design view are very much
like the Form Wizard and Form Design, so we the Tabs, Groups, and buttons will be familiar.
And moving, resizing, and formatting your captions and fields is the same as in forms.
As I wrote earlier, using the Datasheet View for viewing or printing information is
functional but not attractive and does not group items or provide sub-totals, calculations, or
grand totals; however, as we have learned the Datasheet View is excellent as you design
your database, test validation rules, and troubleshoot. Once I have the tables, relationships,
and queries complete, I am off to see the Form and the Report Wizards . That’s why I used
the Form Wizard early in the course and why I’m introducing the Report Wizard here
(also, to break the monotony of Tables and Queries).
R e p o r t W i z a r d
1. In the Query Objects section of the Navigation
Pane,
2. Select the query qryDirectory.
3. With the qryDirectory query highlighted, Click the
Create Tab on the Ribbon and in the Reports
Group Click the Report Wizard button as displayed
here.
4. The Report Wizard activates.
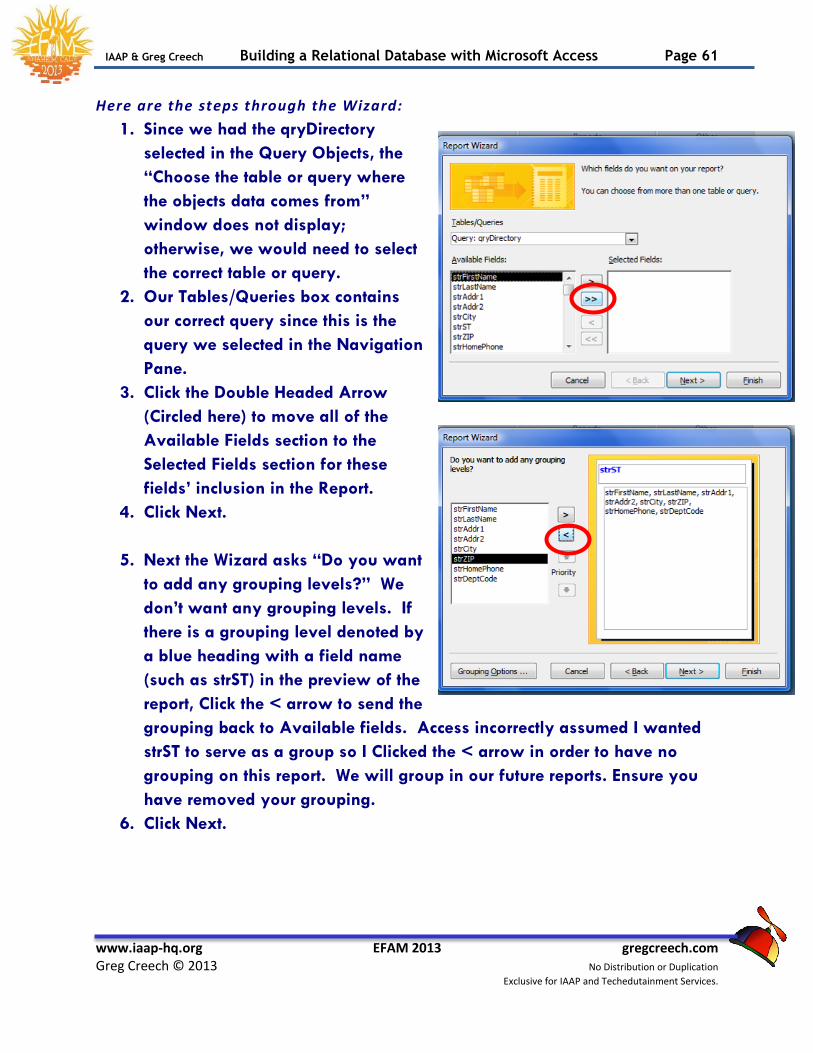
IAAP & Greg Creech Building a Relational Database with Microsoft Access Page 61
www.iaap-hq.org EFAM 2013 gregcreech.com Greg Creech © 2013 No Distribution or Duplication
Exclusive for IAAP and Techedutainment Services.
Here are the steps through the Wizard:
1. Since we had the qryDirectory
selected in the Query Objects, the
“Choose the table or query where
the objects data comes from”
window does not display;
otherwise, we would need to select
the correct table or query.
2. Our Tables/Queries box contains
our correct query since this is the
query we selected in the Navigation
Pane.
3. Click the Double Headed Arrow
(Circled here) to move all of the
Available Fields section to the
Selected Fields section for these
fields’ inclusion in the Report.
4. Click Next.
5. Next the Wizard asks “Do you want
to add any grouping levels?” We
don’t want any grouping levels. If
there is a grouping level denoted by
a blue heading with a field name
(such as strST) in the preview of the
report, Click the < arrow to send the
grouping back to Available fields. Access incorrectly assumed I wanted
strST to serve as a group so I Clicked the < arrow in order to have no
grouping on this report. We will group in our future reports. Ensure you
have removed your grouping.
6. Click Next.
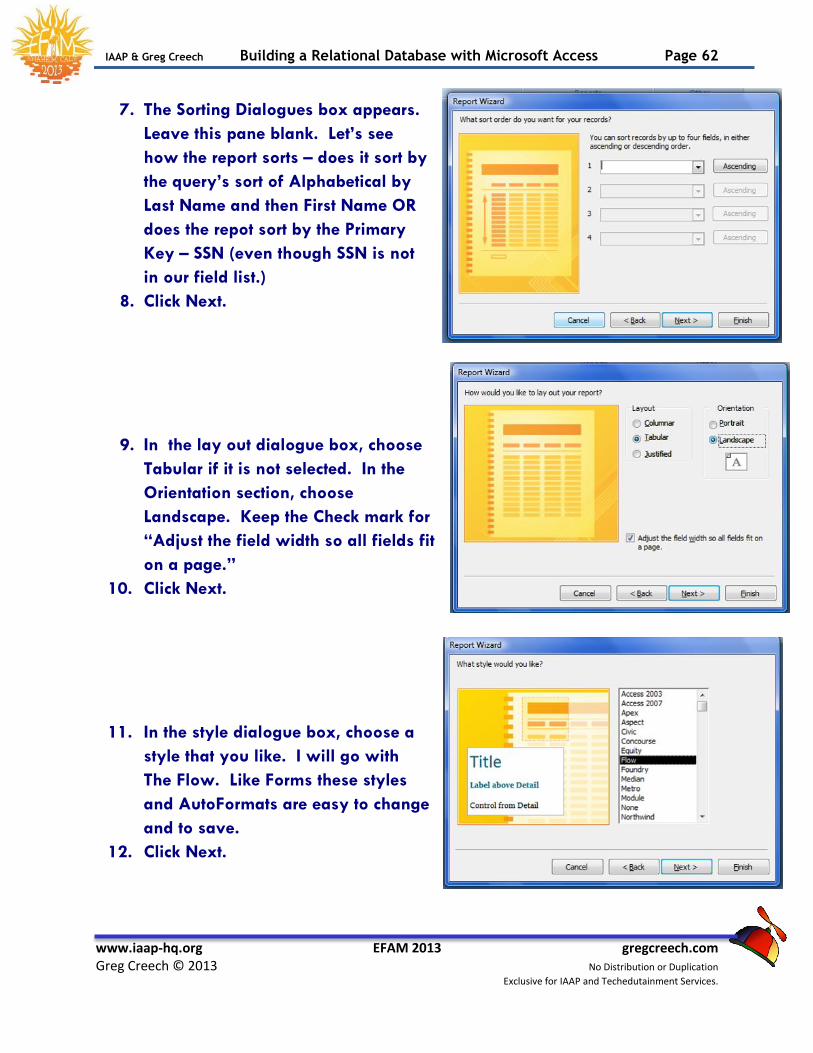
IAAP & Greg Creech Building a Relational Database with Microsoft Access Page 62
www.iaap-hq.org EFAM 2013 gregcreech.com Greg Creech © 2013 No Distribution or Duplication
Exclusive for IAAP and Techedutainment Services.
7. The Sorting Dialogues box appears.
Leave this pane blank. Let’s see
how the report sorts – does it sort by
the query’s sort of Alphabetical by
Last Name and then First Name OR
does the repot sort by the Primary
Key – SSN (even though SSN is not
in our field list.)
8. Click Next.
9. In the lay out dialogue box, choose
Tabular if it is not selected. In the
Orientation section, choose
Landscape. Keep the Check mark for
“Adjust the field width so all fields fit
on a page.”
10. Click Next.
11. In the style dialogue box, choose a
style that you like. I will go with
The Flow. Like Forms these styles
and AutoFormats are easy to change
and to save.
12. Click Next.
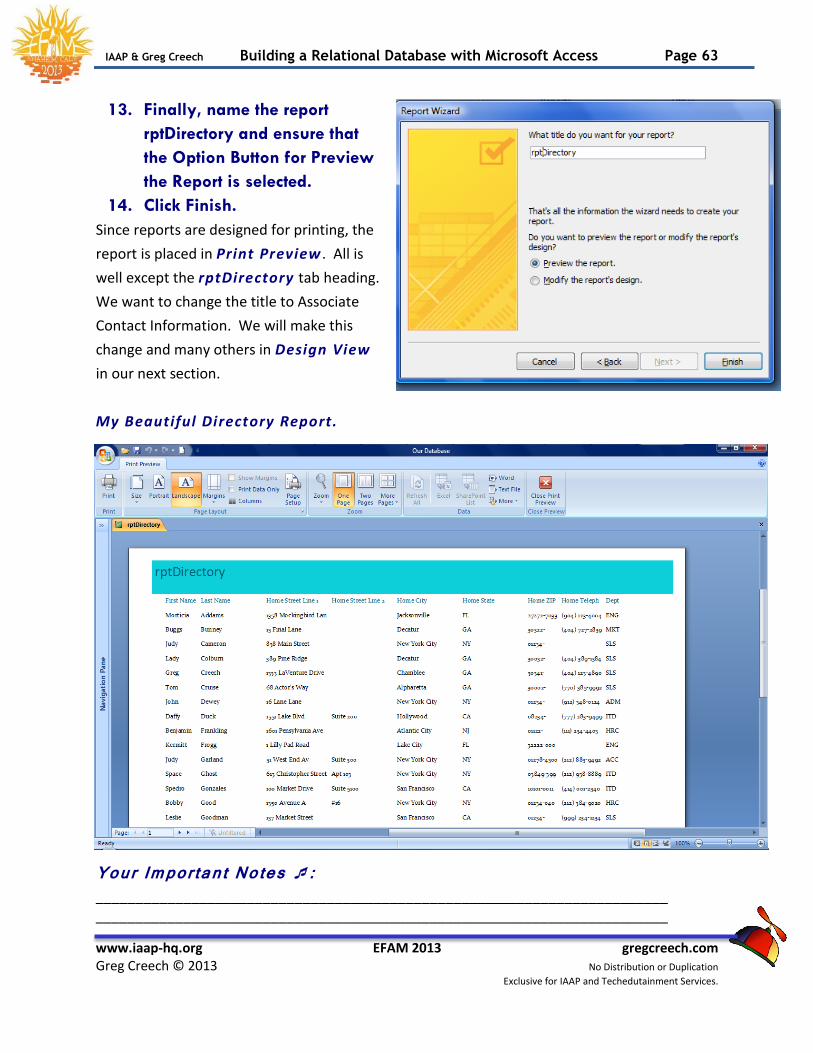
IAAP & Greg Creech Building a Relational Database with Microsoft Access Page 63
www.iaap-hq.org EFAM 2013 gregcreech.com Greg Creech © 2013 No Distribution or Duplication
Exclusive for IAAP and Techedutainment Services.
13. Finally, name the report
rptDirectory and ensure that
the Option Button for Preview
the Report is selected.
14. Click Finish.
Since reports are designed for printing, the
report is placed in Print Preview . All is
well except the rptDirectory tab heading.
We want to change the title to Associate
Contact Information. We will make this
change and many others in Design View
in our next section.
My Beautiful Directory Report.
Your Important Notes : ________________________________________________________________________ ________________________________________________________________________
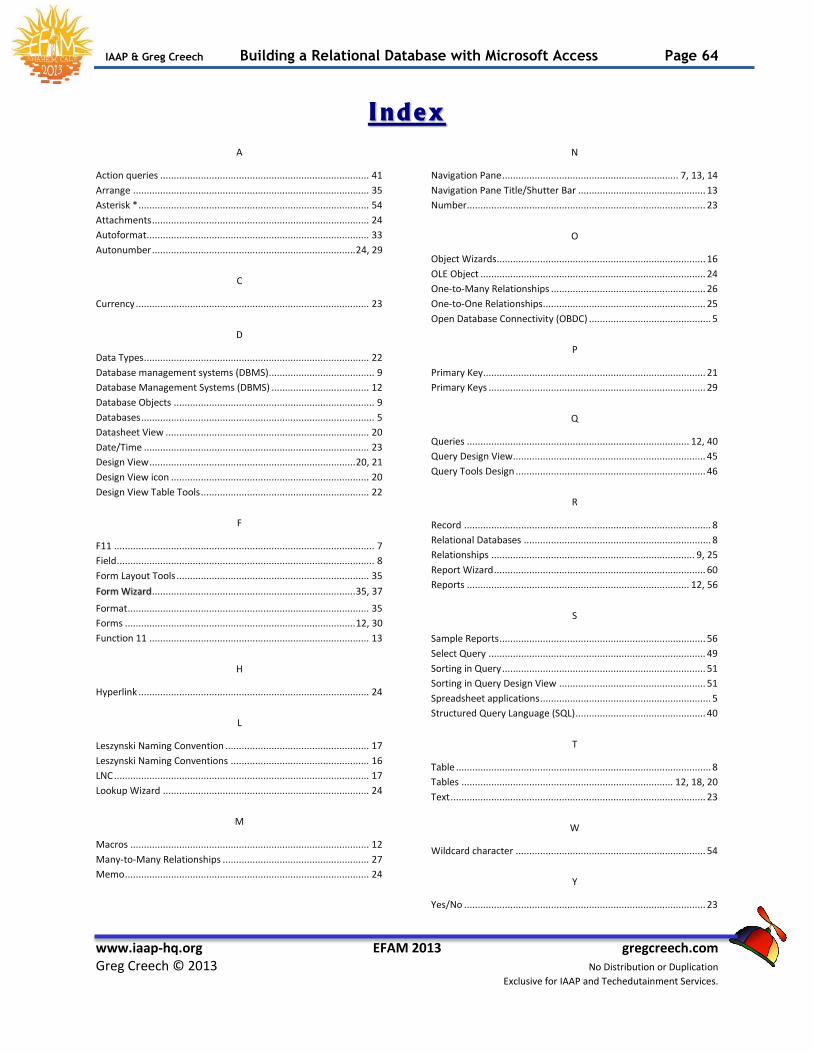
IAAP & Greg Creech Building a Relational Database with Microsoft Access Page 64
www.iaap-hq.org EFAM 2013 gregcreech.com Greg Creech © 2013 No Distribution or Duplication
Exclusive for IAAP and Techedutainment Services.
Index
A
Action queries ............................................................................. 41
Arrange ....................................................................................... 35
Asterisk * ..................................................................................... 54
Attachments ................................................................................ 24
Autoformat .................................................................................. 33
Autonumber ........................................................................... 24, 29
C
Currency ...................................................................................... 23
D
Data Types ................................................................................... 22
Database management systems (DBMS) ....................................... 9
Database Management Systems (DBMS) .................................... 12
Database Objects .......................................................................... 9
Databases ...................................................................................... 5
Datasheet View ........................................................................... 20
Date/Time ................................................................................... 23
Design View ............................................................................ 20, 21
Design View icon ......................................................................... 20
Design View Table Tools .............................................................. 22
F
F11 ................................................................................................ 7
Field ............................................................................................... 8
Form Layout Tools ....................................................................... 35
........................................................................... 35, 37 Form Wizard
Format ......................................................................................... 35
Forms ..................................................................................... 12, 30
Function 11 ................................................................................. 13
H
Hyperlink ..................................................................................... 24
L
Leszynski Naming Convention ..................................................... 17
Leszynski Naming Conventions ................................................... 16
LNC .............................................................................................. 17
Lookup Wizard ............................................................................ 24
M
Macros ........................................................................................ 12
Many-to-Many Relationships ...................................................... 27
Memo .......................................................................................... 24
N
Navigation Pane ................................................................. 7, 13, 14
Navigation Pane Title/Shutter Bar ............................................... 13
Number ........................................................................................ 23
O
Object Wizards............................................................................. 16
OLE Object ................................................................................... 24
One-to-Many Relationships ......................................................... 26
One-to-One Relationships............................................................ 25
Open Database Connectivity (OBDC) ............................................. 5
P
Primary Key .................................................................................. 21
Primary Keys ................................................................................ 29
Q
Queries .................................................................................. 12, 40
Query Design View....................................................................... 45
Query Tools Design ...................................................................... 46
R
Record ........................................................................................... 8
Relational Databases ..................................................................... 8
Relationships ........................................................................... 9, 25
Report Wizard .............................................................................. 60
Reports .................................................................................. 12, 56
S
Sample Reports ............................................................................ 56
Select Query ................................................................................ 49
Sorting in Query ........................................................................... 51
Sorting in Query Design View ...................................................... 51
Spreadsheet applications ............................................................... 5
Structured Query Language (SQL) ................................................ 40
T
Table .............................................................................................. 8
Tables .............................................................................. 12, 18, 20
Text .............................................................................................. 23
W
Wildcard character ...................................................................... 54
Y
Yes/No ......................................................................................... 23