im-090 installation instructions uat mx
TRANSCRIPT

8/10/2019 Im-090 Installation Instructions Uat Mx
http://slidepdf.com/reader/full/im-090-installation-instructions-uat-mx 1/47
OUM
IM.090 I NSTALLATION I NSTRUCTIONS
NII Holdings, INC
Mexico UAT 01
Author: Oracle Consulting
Creation Date: January 19, 2012
Last Updated:
Document Ref:Version: 1
Approvals:
Oracle Consulting Alexis Riveros
NII Holdings
Copy Number _____

8/10/2019 Im-090 Installation Instructions Uat Mx
http://slidepdf.com/reader/full/im-090-installation-instructions-uat-mx 2/47
IM.090 Installation Instructions
i
Document Control
Change Record4
Date Author Version Change Reference
28-Nov-11 Rafael Cuadros 1 No Previous Document
Reviewers
Name Position
Distribution
Copy No. Name Location
1 Library Master Project Library
2 Project Manager
3
4
Note To Holders:
If you receive an electronic copy of this document and print it out, please writeyour name on the equivalent of the cover page, for document control purposes.
If you receive a hard copy of this document, please write your name on the frontcover, for document control purposes.

8/10/2019 Im-090 Installation Instructions Uat Mx
http://slidepdf.com/reader/full/im-090-installation-instructions-uat-mx 3/47
IM.090 Installation Instructions
ii
Contents
Document Control ............................................................................................. ii
Installation Instructions for UAT01 Environment .............................................1
Introduction ..................................................................................................1
Databases ...........................................................................................................4
About Process Installation ...........................................................................4
MXCRM1U Database ..................................................................................4
MXCRM2U Database ..................................................................................5
MXCRM3U Database ..................................................................................5
MXCRM4U Database ..................................................................................5
Oracle Siebel CRM ............................................................................................7
Pre-Requirements .........................................................................................7
Pre-Installation Steps ...................................................................................7
Installation Steps ..........................................................................................8
Components .................................................................................................9
Verification Checklist ................................................................................10
Oracle Data Integrator......................................................................................13
Pre-Requirements .......................................................................................13 Pre-Installation Steps .................................................................................13
Installation Steps ........................................................................................13
Verification Checklist ................................................................................15
Oracle Business Intelligence Applications ......................................................17
Pre-Requirements .......................................................................................17
Pre-Installation Steps .................................................................................17
Installation Steps ........................................................................................17
Verification Checklist ................................................................................20
Data Governance Manager ..............................................................................26
Weblogic Middleware ................................................................................26
Application Development Framework .......................................................27
Weblogic Domain ......................................................................................28
Node Manager ............................................................................................30
Data Governance Manager ........................................................................31
Verification Checklist ................................................................................33
Oracle SOA Suite 11g ......................................................................................35
Pre-Requirements .......................................................................................35
8/10/2019 Im-090 Installation Instructions Uat Mx
http://slidepdf.com/reader/full/im-090-installation-instructions-uat-mx 4/47
IM.090 Installation Instructions
iv
Pre-Installation Steps .................................................................................35
Installation Steps ........................................................................................35
Verification Checklist ................................................................................37
Oracle SOA Suite 10g ......................................................................................39
Pre-Requirements .......................................................................................39
Pre-Installation Steps .................................................................................39
Installation Steps ........................................................................................40
Verification Checklist ................................................................................41
Open and Closed Issues ...................................................................................43
Open Issues ................................................................................................43
Closed Issues ..............................................................................................43

8/10/2019 Im-090 Installation Instructions Uat Mx
http://slidepdf.com/reader/full/im-090-installation-instructions-uat-mx 5/47
IM.090 Installation Instructions
1
Installation Instructions for UAT01 Environment
Environment Name: UAT 01 Machines:
mxxlcn05.nextel.com.mx,
mxextdb01.nextel.com.mx,
mxextdb02.nextel.com.mx,
mxextdb03.nextel.com.mx,
Introduction
The purpose of this paper is to provide the physical installation andconfiguration data of various Oracle products in the UAT 01 environment.Furthermore, the document also addresses the prerequisites and patch levelrequired for this installation.The information is grouped into Seven (7) chapters, as described below:
Chapter 1: Databases creation This chapter provides installation details for all Oracle Databases inExadata UAT Environment
Chapter 2: Oracle Siebel CRM InstallationThis chapter provides configuration details and installation steps for theOracle Siebel CRM products and components in Exalogic UATEnvironment.
Chapter 3: Oracle Data Integrator (ODI)
This chapter provides configuration details and installation steps for theOracle Data Integrator 10.1.3.5.3 products and components.
Chapter 4: Oracle Business Intelligence (OBI)
This chapter provides configuration details and installation steps for theOracle Business Intelligence Applications products and components.
Chapter 5: Data Governance Manager (DGM)
This chapter provides configuration details and installation steps for theData Governance Manager products and components.
Chapter 6 : Oracle SOA Suite 11g Installation This chapter provides configuration details and installation steps for theOracle SOA Suite 11g products.
Chapter 7: Oracle SOA Suite 10g Installation This chapter provides configuration details and installation steps for theOracle SOA Suite 10g products.

8/10/2019 Im-090 Installation Instructions Uat Mx
http://slidepdf.com/reader/full/im-090-installation-instructions-uat-mx 6/47
IM.090 Installation Instructions
2

8/10/2019 Im-090 Installation Instructions Uat Mx
http://slidepdf.com/reader/full/im-090-installation-instructions-uat-mx 7/47
IM.090 Installation Instructions
3
C H A P T E R
1 Databases creation
his chapter provides installation and configuration details for all OracleDatabases.
.
T

8/10/2019 Im-090 Installation Instructions Uat Mx
http://slidepdf.com/reader/full/im-090-installation-instructions-uat-mx 8/47
IM.090 Installation Instructions
4
Databases
Four (4) databases were created in Exadata environment ( 3 RAC ) in order tosupport different products installed in UAT environment.
Below are the details of every database:
MXCRM1U – Database for Siebel CRM
MXCRM2U – Database for SOA 11g + AIA FP 3.0
MXCRM3U – Database for SOA 10g + AIA FP 2.5
MXCRM4U – Database for Oracle OBIEE, DAC/Informatica
About Process Installation
All databases installations were created in 3 nodes RAC environment.
Hardware details are :
Siebel CRM Database Servers
Machine Exadata X2-2 Half rack
Nodes assigned for Database 3
Database Host name Node 1 mxextdb01
Database Host name Node 2 mxextdb02
Database Host name Node 3 mxextdb03
IP Address Node 1 10.103.30.64
IP Address Node 2 10.103.30.65
IP Address Node 3 10.103.30.66
Number of CPUs per node 24
Memory per Node 96 GB
Storage 600 GB
Operating System OEL Server release 5.5
Operating System type 64 bits
MXCRM1U Database

8/10/2019 Im-090 Installation Instructions Uat Mx
http://slidepdf.com/reader/full/im-090-installation-instructions-uat-mx 9/47
IM.090 Installation Instructions
5
This Database was created in the following ORACLE_HOME :
/u01/oracle/product/database/11.2.0/db_MXCRM1U
And was installed to support the Siebel CRM installation
MXCRM2U Database
This Database was created in the following ORACLE_HOME :
/u01/oracle/product/database/11.2.0/db_MXCRM2U
And was installed to support the Oracle SOA Suite 11g + FP 3.0 installation
MXCRM3U Database
This Database was created in the following ORACLE_HOME :
/u01/oracle/product/database/11.2.0/db_MXCRM3U
And was installed to support the Oracle SOA Suite 10g + FP 2.5 installation
MXCRM4U Database
This Database was created in the following ORACLE_HOME :
/u01/oracle/product/database/11.2.0/db_MXCRM4U
And was installed to support Oracle OBIEE, DAC/Informatica and Batch’s jo brelated Staging installation

8/10/2019 Im-090 Installation Instructions Uat Mx
http://slidepdf.com/reader/full/im-090-installation-instructions-uat-mx 10/47
IM.090 Installation Instructions
6
C H A P T E R
2 Oracle Siebel CRM
his chapter provides configuration details and installation steps for theOracle Siebel CRM products and components in Exalogic UAT
environment.
T

8/10/2019 Im-090 Installation Instructions Uat Mx
http://slidepdf.com/reader/full/im-090-installation-instructions-uat-mx 11/47
IM.090 Installation Instructions
7
Oracle Siebel CRM
Oracle Siebel CRM for UAT environment was installed in 2 layers, the databaselayer on RAC configuration as described in Chapter 1 MXCRM1U section andthe application layer on Exalogic server "mxxlcn05".
Below are details of Oracle Siebel CRM installation on the environment UAT01.
Pre-Requirements
The hardware and software for Siebel Installation is supported as specified in
“Siebel System Requirements and Supported Platforms Version 8.1, Rev. KNovember 2010”.
Siebel Database in Exadata UAT environment
The database for Siebel CRM was installed as described in in Chapter 1MXCRM1U section.
Siebel CRM Application in Exalogic environment
* Create a “sblappuc” linux group.
* Create a “sblappuc” linux user.
* Create a Directory “/u01/CRMUAT/appl/crmappuat”.
* Install an Oracle 11gR2 client software.
* Configure tnsnames.ora to connect to database.
* Install Oracle HTTP Server 10.3.0.1 on
* “/u01/CRMUAT/appl/crmappuat/Apache”.
* Assign port 2080 to HTTP webserver.
Pre-Installation Steps
* Check connection between Apps and DB server.

8/10/2019 Im-090 Installation Instructions Uat Mx
http://slidepdf.com/reader/full/im-090-installation-instructions-uat-mx 12/47
IM.090 Installation Instructions
8
* Check connection to Siebel DB with 11g client.
Installation Steps
* Install Siebel Enterprise server at /u01/CRMUAT/appl/crmappuatdirectory.
* Install web Server Extension Server at
* /u01/CRMUAT/appl/crmappuat/sweapp directory.
* Configure gateway name server.
* Configure enterprise for gateway name server.
* Create database configuration
* Add Language repository ENS and PTB.
* Configure Siebel Server.
* Configure sweapp server to work with Oracle HTTP Server.* Apply 8.1.1.5 patch
* Apply Licences
* Enable/Disable Components Definitions
Overview :
Component Name Version Owner Server OS Server Name
Database Server(RDBMS: ) 11.2.0.2 oracle OEL 5.5
mxextdb01,mxextdb02 &mxextdb03
Siebel Servers 8.1.1.5 sblappuc OEL 5.5 mxxlcn05
Web ServerOracle HTTP
10.3.1 sblappuc OEL 5.5 mxxlcn05
Server Names
Siebel EnterpriseName niicrmmxu01
ODBC Data SourceName niicrmmxu01_DSN
Primary Language ENU
Other DeployedLanguages
ENSPTB
Siebel Server Name crmmxu01
HTTP Port 2080
Gateway Port 2320
SCBroker Port 2321
SynchMgr Port 40400
Component NameNetwork Host
NameInstallation Directory

8/10/2019 Im-090 Installation Instructions Uat Mx
http://slidepdf.com/reader/full/im-090-installation-instructions-uat-mx 13/47
IM.090 Installation Instructions
9
Siebel Gateway NameServer Mxxlcn05 /u01/CRMUAT/appl/crmappuat
Siebel Server Mxxlcn05/u01/CRMUAT/appl/crmappuat/siebsrvr
DatabaseConfiguration Utilities Mxxlcn05 /u01/CRMUAT/appl/crmappuat/dbsrvr
Web Server / SiebelWeb Server Extension
(SWSE) Mxxlcn05 /u01/CRMUAT/appl/crmappuat/sweappSiebel File SystemDirectories Mxxlcn05 /u01/CRMUAT/appl/crmappuat/fs
Siebel Account Information
Login/User ID Password
Siebel Service Owner sblappuc *********
Siebel Administrator SADMIN *********
Integrator Admin IADMIN *********
Anonymous User GUESTERM *********High Interactivity orEmployee User TBD TBD
Standard Interactivity orContact User N/A N/A
Security User N/A N/A
Siebel Diagnostic Tool User N/A N/A
Host Name and Static IP Addresses
Server Name Static IP/Host Name Subnet Mask
Siebel Gateway NameServer 10.103.74.94/mxxlcn05 255.255.255.0
Siebel Server 10.103.74.94/mxxlcn05 255.255.255.0
Components
Below is a list of Siebel Components configured in this environment.
Componet Alias Component Name Status
AsgnSrvr Assignment Manager Online
AsgnBatch Batch Assignment Online
BusIntBatchMgr Business Integration Batch Manager Online
BusIntMgr Business Integration Manager Online
CommConfigMgr Communications Configuration Manager Online
CommInboundProcessor Communications Inbound Processor Online
CommInboundRcvr Communications Inbound Receiver Online

8/10/2019 Im-090 Installation Instructions Uat Mx
http://slidepdf.com/reader/full/im-090-installation-instructions-uat-mx 14/47
IM.090 Installation Instructions
10
CommOutboundMgr Communications Outbound Manager Online
CommSessionMgr Communications Session Manager Online
DbXtract Database Extract Online
EAIObjMgr_enu EAI Object Manager (ENU) Online
EAIObjMgr_esn EAI Object Manager (ESN) Online
EAIObjMgr_ptb EAI Object Manager (PTB) Online
MailMgr Email Manager Online
EIM Enterprise Integration Mgr Online
FSMSrvr File System Manager OnlineGenNewDb Generate New Database Online
GenTrig Generate Triggers Online
JMSReceiver JMS Receiver Online
MqSeriesAMIRcvr MQSeries AMI Receiver Online
MqSeriesSrvRcvr MQSeries Server Receiver Online
MSMQRcvr MSMQ Receiver Online
PDbXtract Parallel Database Extract Online
RepAgent Replication Agent Online
SMQReceiver SMQ Receiver Online
ServerMgr Server Manager Runnin
SRBroker Server Request Broker Runnin
SRProc Server Request Processor Runnin
SvrTblCleanup Server Tables Cleanup Runnin
SvrTaskPersist Server Task Persistance Runnin
AdminNotify Siebel Administrator Notification Component Online
SCBroker Siebel Connection Broker Runnin
SynchMgr Synchronization Manager Online
TxnProc Transaction Processor Online
WorkActn Workflow Action Agent Online
WorkMon Workflow Monitor Agent Online
WfProcBatchMgr Workflow Process Batch Manager Online
WfProcMgr Workflow Process Manager Online
WfRecvMgr Workflow Recovery Manager OnlineeCommunicationsObjMgr_enu eCommunications Object Manager (ENU) Online
eCommunicationsObjMgr_esn eCommunications Object Manager (ESN) Online
eCommunicationsObjMgr_ptb eCommunications Object Manager (PTB) Online
Verification Checklist
Verify that the customization has been properly installed by following thesesteps:
* Login on http://mxxlcn05.nextel.com.mx:2080/ecommunications_enu
* Login on http://mxxlcn05.nextel.com.mx:2080/ecommunications_ens
* Login on http://mxxlcn05.nextel.com.mx:2080/ecommunications_ptb
* Navigate trough the application and verify that Siebel tabs and menusare shown correctly

8/10/2019 Im-090 Installation Instructions Uat Mx
http://slidepdf.com/reader/full/im-090-installation-instructions-uat-mx 15/47
IM.090 Installation Instructions
11
* Compile in all languajes installed and confirm that all srf are workingfine
* Verify environment by running EVT Tool

8/10/2019 Im-090 Installation Instructions Uat Mx
http://slidepdf.com/reader/full/im-090-installation-instructions-uat-mx 16/47
IM.090 Installation Instructions
12
C H A P T E R
3 Oracle Data Integrator
his chapter provides configuration details and installation steps for theOracle Data Integrator 10.1.3.5.3 products and components.
T

8/10/2019 Im-090 Installation Instructions Uat Mx
http://slidepdf.com/reader/full/im-090-installation-instructions-uat-mx 17/47
IM.090 Installation Instructions
13
Oracle Data Integrator
Oracle Data Integrator for UAT environment was installed in 2 layers, thedatabase layer on RAC configuration as described in Chapter 1 MXCRM4Usection and the application layer on Exalogic server “mxxlcn05”
Below are details of Oracle Data Integrator installation in Exadata-ExalogicUAT environment.
Pre-Requirements
Oracle Data Integrator schema in Exadata UAT environment
The database for ODI repository was installed as described in in Chapter 1MXCRM4U section .
ODI Application in mxxlcn05 server
* Create a directory system “/u01/CRMUAT/odiuat/Odi_10.1.3.5.0”.
Pre-Installation Steps
* Check connection between Apps and DB server.
* Validate Binaries for each installation.
Installation Steps
* Create Directory Structure
* Install JVM.
* Install Oracle Data Integrator 10.1.3.5.3
* Create Schemas for Master & Work Repositories.
* Create and Configurate Repositories Master & Work using Repcreatetools.

8/10/2019 Im-090 Installation Instructions Uat Mx
http://slidepdf.com/reader/full/im-090-installation-instructions-uat-mx 18/47
IM.090 Installation Instructions
14
Overview :
Component Name Version Owner Server OS Server Name
Database Server(RDBMS: )
11.2.0.2 oracleEnterpriseLinux 5.5
mxextdb01/mxextdb02/mxextdb03
ODI Servers 10.1.3.5 odiappu
Enterprise
Linux 5.5 mxxlcn05
Server Names
Machine mxxlcn05
Node name Network Host Name Port
ODBCmxxlcn05
7602
SCHEDULERmxxlcn05
7601
AGENTmxxlcn05
20910
Repository ODP & QSC
mxxlcn057600
ODI Account Information
Login/User ID Password
ODI Service Owner odiappu ********
ODP & QSC madmin *********Master Repository SNPM ****
Work Repository SNPW ****
User Repository SUPERVISOR ********

8/10/2019 Im-090 Installation Instructions Uat Mx
http://slidepdf.com/reader/full/im-090-installation-instructions-uat-mx 19/47
IM.090 Installation Instructions
15
Host Name and Static IP Addresses
Server Name Static IP/Host Name Subnet Mask
ODI Server 10.103.74.94/ mxxlcn05 255.255.255.0
DB Server 10.103.74.84/ mxextdb0110.103.74.85/ mxextdb02
10.103.74.86/ mxextdb03
255.255.255.0
Verification Checklist
Verify that the customization has been properly installed by following thesesteps:
* Execute “designer.sh” from path“/u01/CRMUAT/odiuat/Odi_10.1.3.5.0/oracledi/bin” and Login with
SUPERVISOR user s, for Designer “ETL Project UAT Mexico”.
* Execute “topology.sh” from path
“/u01/CRMUAT/odiuat/Odi_10.1.3.5.0/oracledi/bin” and Login with
SUPERVISOR users, for Topology Manager “ODI Repository UATMexico” .

8/10/2019 Im-090 Installation Instructions Uat Mx
http://slidepdf.com/reader/full/im-090-installation-instructions-uat-mx 20/47
IM.090 Installation Instructions
16
C H A P T E R
4 Oracle Business
IntelligenceApplications 7.9.6.2
his chapter provides configuration details and installation steps for theOracle Business Intelligence Applications products and components.T

8/10/2019 Im-090 Installation Instructions Uat Mx
http://slidepdf.com/reader/full/im-090-installation-instructions-uat-mx 21/47
IM.090 Installation Instructions
17
Oracle Business Intelligence Applications
Oracle Business Intelligence Applications for UAT environment was installedin 2 layers, the databases layer on RAC configuration as described in ChapterMXCRM4U section for Repository for datawarehouse model database and theapplication layer on Exalogic server “mxxlcn05”
Below are details of Oracle Business Intelligence installation in Exadata-Exalogic UAT environment.
Pre-Requirements
Oracle Business Intelligence databases in Exadata UAT environment
The database for OBI repository and Datawarehouse model was installed asdescribed in in Chapter 1 MXCRM4U section
OBI Application on mxxlcn05 servers
* Create a file system “/u01/CRMUAT/obiuat”.
Pre-Installation Steps
* Create an Installation directory on “/u01/CRMUAT/stage”
* Check connection between Apps and DB server.
* Validate Binaries for each installation.
Installation Steps
* Create Directory Structure
* Install JVM.

8/10/2019 Im-090 Installation Instructions Uat Mx
http://slidepdf.com/reader/full/im-090-installation-instructions-uat-mx 22/47
IM.090 Installation Instructions
18
* Install Oracle Business Intelligence Applications 7.9.6.2
* Install Oracle Business Intelligence Enterprise Edition(OBIEE)
10.1.3.4.1.
* Data Warehouse Administration Console (DAC) versión 10.1.3.4.1with
Patch 10052370 .
* Informatica PowerCenter 8.6.1 hotfix 11
* Oracle Cliente 11.2.0
* Create Schemas for Informática & Dac Repositories in MXCRM4U
database.
* Create and Configurate Repositories Informática & DAC using
configurations tools.
* Create Schema for OBAW model in MXCRM4U database.
* Create and Configurate OBAW model in MXCRM4U database.
Overview :
Component Name Version Owner Server OS Server Name
Database Server(RDBMS: )
11.2.0.2 oracleEnterpriseLinux 5.5
mxextdb01/mxextdb02/mxextdb03
OBI Servers 10.1.3.4.1 ObiappuEnterpriseLinux 5.5
mxxlcn05
DAC Servers 10.1.3.4.1
Obiappu EnterpriseLinux 5.5
mxxlcn05
Informatica Server 8.6.1
Obiappu EnterpriseLinux 5.5
mxxlcn05
Oracle Client 11.2.0.2
Obiappu Enterprise
Linux 5.5
mxxlcn05

8/10/2019 Im-090 Installation Instructions Uat Mx
http://slidepdf.com/reader/full/im-090-installation-instructions-uat-mx 23/47
IM.090 Installation Instructions
19
Server Names
Machine mxxlcn05
Node name Network Host Name Port
Informatica Admin Consolemxxlcn05
8443
HTTPSmxxlcn05
8443
Informatica Nodemxxlcn05
6011
Informatica App Server Process mxxlcn05 6015-6115
Informatica Service Managermxxlcn05
6012
OBIEE Primary Cluster Controllerlistening
mxxlcn059706
OBIEE Oracle BI Schedulermxxlcn05
9705
OBIEE RPC_SERVICE_OR_PORTmxxlcn05
9703
OBIEE MONITOR_SERVICE_PORTmxxlcn05
9701
OBIEEMONITOR_CONTROLLER_PORT
mxxlcn059700
OBIEE Cluster Controller Port mxxlcn05 9708
OBIEECLIENT_CONTROLLER_PORT
mxxlcn059706
OBIEE Presentation Server: mxxlcn059704
Dac Server mxxlcn053141
OBI AppsAccount Information
Login/User ID Password
OBIEE Service OwnerObiappu *******
Informatica Service Owner Obiappu *******
Dac Service OwnerObiappu *******
Oc4j Service OwnerObiappu *******
OBIEE Administrator for :Answer,BI Publisher andDashboard
Administrator ********
Informatica Console Admin Administrator *************Dac Admin Administrator *************
Informatica Repository INFO_REPO *********
Informatica Domain INFO_DOM *********
DAC Repository DAC_REPO ********Oc4j Admin oc4jadmin ********

8/10/2019 Im-090 Installation Instructions Uat Mx
http://slidepdf.com/reader/full/im-090-installation-instructions-uat-mx 24/47
IM.090 Installation Instructions
20
Host Name and Static IP Addresses
Server Name Static IP/Host Name Subnet Mask
OBI Apps Server 10.103.74.94/ mxxlcn05 255.255.255.0
DB Server 10.103.74.84/ mxextdb01,
10.103.74.85/ mxextdb02,
10.103.74.86/ mxextdb03
255.255.255.0
Verification Checklist
Verify that the customization has been properly installed by following thesesteps:
* Login on :
http://10.103.74.94:9704/analytics/saw.dll?Answers&_scid=wduSnAf Y
UScfor Oracle Business Intelligence Enterprise Edition (Answer).

8/10/2019 Im-090 Installation Instructions Uat Mx
http://slidepdf.com/reader/full/im-090-installation-instructions-uat-mx 25/47
IM.090 Installation Instructions
21
* Login on :
http://10.103.74.94:9704/analytics/saw.dll?Dashboard
for Oracle Business Intelligence Enterprise Edition (Dashboard).
* Login on http://10.103.74.94:9704/xmlpserver/login.jsp for OracleBusiness Intelligence Publisher.

8/10/2019 Im-090 Installation Instructions Uat Mx
http://slidepdf.com/reader/full/im-090-installation-instructions-uat-mx 26/47
IM.090 Installation Instructions
22
* Login on http://mxxlcn05:6011/adminconsole for Informatica Console.
* Login on http://mxxlcn05:9704/em for Application Server Control.
* On windows machine execute “C:\Oracle\Obi10g_Home\OracleBI\server\Bin\AdminTool.exe” forOracle Business Intelligence Administration tools. Open the Rpd online with “AnalyticsWeb NII UATMexico” connections:

8/10/2019 Im-090 Installation Instructions Uat Mx
http://slidepdf.com/reader/full/im-090-installation-instructions-uat-mx 27/47
IM.090 Installation Instructions
23
* On windows machine execute “C:\Oracle\Informatica\PowerCenter8.6.1\client\bin\pmwflmgr.exe” for Informatica PowerCenter Repository Manager. Open the “Oracle_BI_DW_Base” repository.
* On windows machine execute “C:\Oracle\Informatica\PowerCenter8.6.1\client\bin\pmdesign.exe” forInformatica PowerCenter Designer. Open the “Oracle_BI_DW_Base” repository

8/10/2019 Im-090 Installation Instructions Uat Mx
http://slidepdf.com/reader/full/im-090-installation-instructions-uat-mx 28/47
IM.090 Installation Instructions
24
* On windows machine execute “C:\Oracle\Dac_Home1\bifoundation\dac\startclient.bat” for DataWarehouse Administration Console.Open the “Dac Repository UAT Mexico” connections.

8/10/2019 Im-090 Installation Instructions Uat Mx
http://slidepdf.com/reader/full/im-090-installation-instructions-uat-mx 29/47
IM.090 Installation Instructions
25
C H A P T E R
5 Data Governance
Manager
his chapter provides configuration details and installation steps for the DataGovernance Manager products and components.
T

8/10/2019 Im-090 Installation Instructions Uat Mx
http://slidepdf.com/reader/full/im-090-installation-instructions-uat-mx 30/47
IM.090 Installation Instructions
26
Data Governance Manager
Data Governance Manager was installed in Exalogic server “mxxlcn05”. Thisinstallation consists in the following products:
Weblogic Middleware Application Development Framework (ADF)
Weblogic Domain
Node Manager
Data Governance Manager (DGM)
Below are details of these Installations :
Weblogic Middleware
PreRequisites
* Create a “dgm” linux user
* Create directories:
* /u01/CRMUAT/dgmuat/
* /u01/CRMUAT/dgmuat/domains
* /u01/CRMUAT/dgmuat/domains/nodemanager
* /u01/CRMUAT/dgmuat/Oracle/middleware
* /u01/CRMUAT/dgmuat/Oracle/jdk
* /u01/CRMUAT/dgmuat/temp
* Install JRockit in the JRockit installation directory.
Installation Steps
Weblogic Middleware
* Set JAVA_HOME and PATH environment variables.
* Run the installation file.
* Click next on the welcome screen.
* Select the new Middleware Home directory.
8/10/2019 Im-090 Installation Instructions Uat Mx
http://slidepdf.com/reader/full/im-090-installation-instructions-uat-mx 31/47
IM.090 Installation Instructions
27
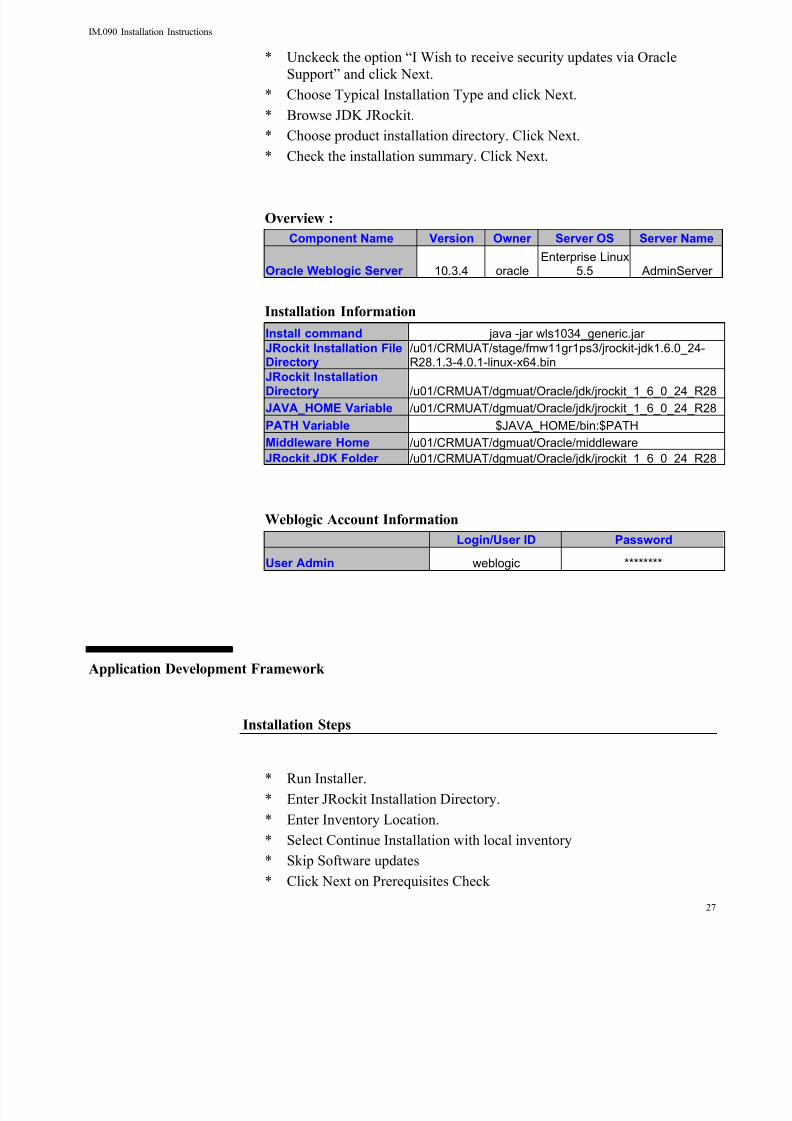
* Unckeck the option “I Wish to receive security updates via Oracle
Support” and click Next.
* Choose Typical Installation Type and click Next.
* Browse JDK JRockit.
* Choose product installation directory. Click Next.
* Check the installation summary. Click Next.
Overview :
Component Name Version Owner Server OS Server Name
Oracle Weblogic Server 10.3.4 oracleEnterprise Linux
5.5 AdminServer
Installation Information
Install command java -jar wls1034_generic.jarJRockit Installation FileDirectory
/u01/CRMUAT/stage/fmw11gr1ps3/jrockit-jdk1.6.0_24-R28.1.3-4.0.1-linux-x64.bin
JRockit InstallationDirectory /u01/CRMUAT/dgmuat/Oracle/jdk/jrockit_1_6_0_24_R28
JAVA_HOME Variable /u01/CRMUAT/dgmuat/Oracle/jdk/jrockit_1_6_0_24_R28
PATH Variable $JAVA_HOME/bin:$PATH
Middleware Home /u01/CRMUAT/dgmuat/Oracle/middleware
JRockit JDK Folder /u01/CRMUAT/dgmuat/Oracle/jdk/jrockit_1_6_0_24_R28
Weblogic Account Information
Login/User ID Password
User Admin weblogic ********
Application Development Framework
Installation Steps
* Run Installer.
* Enter JRockit Installation Directory.
* Enter Inventory Location.
* Select Continue Installation with local inventory
* Skip Software updates
* Click Next on Prerequisites Check

8/10/2019 Im-090 Installation Instructions Uat Mx
http://slidepdf.com/reader/full/im-090-installation-instructions-uat-mx 32/47
IM.090 Installation Instructions
28
* Enter Installation Location.
* Select Weblogic Server.
* Install.
Overview:
Component Name Version Owner Server OS Server Name
Oracle ADF 11.1.1.5.0 oracleEnterprise Linux
5.5 AdminServer
Installation Information
Installation File URLhttp://www.oracle.com/techwork/developer-
tools/adf/downloads/index.html
Installation File ofm_appdev_generic_11.1.1.5.0_disk1_1of1.zip
Installation Location /u01/CRMUAT/dgmuat/Oracle/middleware
Installer Location/u01/CRMUAT/stage/fmw11gr1ps3/dgm/adf11.1.1.5/Disk1/runInstaller
pwJRockit InstallationDirectory
/u01/CRMUAT/dgmuat/Oracle/jdk/jrockit_1_6_0_24_ R28
Inventory Location /u01/CRMUAT/dgmuat/oraInventoryInstallation Location /u01/CRMUAT/dgmuat/Oracle/middleware
Weblogic Domain
Installation Steps
* Run Configuration Wizard
* Choose Create a New WebLogic Domain
* Choose Oracle JRF – 11.1.1.0 (oracle_common)
* Choose Production Mode as Domain Startup Mode and an availableJDK. Click Next.
* Choose Administration configuration.
* Choose Managed Servers, Clusters and Machines configuration.
* Choose Deployments and Services* Configure Administrator Server. Click Next.
* Add a Managed Server and configure it.
* Create Machine
* Assign Managed Server to Machine
* Assign Libraries to Managed Server in Target Deployment to Clusters ofServer
* Target Services to Clusters of Server.

8/10/2019 Im-090 Installation Instructions Uat Mx
http://slidepdf.com/reader/full/im-090-installation-instructions-uat-mx 33/47
IM.090 Installation Instructions
29
* Select Startup Class to DGMManaged
* Check Configuration Summary. Click Create.
* Start servers
* Create DGM Administrative User
* Configure Server Start Parameters
Overview :
Configuration Information
Configuration WizardLocation
/u01/CRMUAT/dgmuat/Oracle/middleware/wlserver_10.3/common/bin/config.sh
Domain Information
Domain Name uatMXDomain
Domains Location /u01/CRMUAT/dgmuat/domainsJDK JRockit SDK 1.6.0_24Server Server Name Listen Address Port
Admin Server AdminServer All Local Addresses 10001Managed Server DGMManaged All Local Addresses 10011Machine Name DGMMachineMachine Node ManagerListen Address All Local AddressesMachine Node ManagerListen Port 10556Machine Servers DGMMAnaged
Weblogic Account Information
Login/User ID Password
User Admin weblogic *******
Weblogic Start script/u01/CRMUAT/dgmuat/domains/uatMXDomain/bin/startWebLogic.sh
Managed Server Start script
/u01/CRMUAT/dgmuat/domains/uatMXDomain/bin/startManagedWebLogic.sh DGMMAnagedt3://mxxlcn05:10001
Create DGM Administrative User
Create User in Weblogic
console Security Realms->myrealm->Users and GroupsLogin/User ID Password
DGM Admin User wlsDgmAdmin ********DGM Admin User Groups Deployers, Monitors, Operators
Server Start Parameters
Start Parameters inWeblogic Console Servers->DGMMAnaged->Server Start
Java Home /u01/CRMUAT/dgmuat/Oracle/jdk/jrockit_1_6_0_24_ R28

8/10/2019 Im-090 Installation Instructions Uat Mx
http://slidepdf.com/reader/full/im-090-installation-instructions-uat-mx 34/47
IM.090 Installation Instructions
30
Java Vendor BEABEA Home /u01/CRMUAT/dgmuat/Oracle/middlewareRoot Directory /u01/CRMUAT/dgmuat/domains/uatMXDomain
Security Policy File/u01/CRMUAT/dgm/Oracle/middleware/wlserver_10.3/server/lib/weblogic.policy
User Name weblogicPassword **********Confirm Password **********
Node Manager
Installation Steps
* Copy startNodeManager.sh “Middleware Common Bin Directory” to“Domain Node Manager Directory”
* Edit startNodeManager.sh in the Node Manager Directory(NODEMGR_HOME, LISTEN_ADDRESS, LISTEN_PORT)
* Register Node Manager using WLST
* Start WebLogic Console
* Configure Node Manager in Weblogic Console:
* Copy nodemanager.domains from “Middleware Node Manager
Directory” to “Domain Node Manager Directory”
* Run Node Manager start File. Nodemanager.properties file will be
generated.
* Edit nodemanager.properties (SecureListener, StartScriptEnabled)
* Restart Node Manager
Overview :
Registration Information
Middleware Common Bin
Directory
/u01/CRMUAT/dgmuat/Oracle/middleware/wlserver_1
0.3/server/binMiddleware Node ManagerDirectory
/u01/CRMUAT/dgmuat/Oracle/middleware/wlserver_10.3/common/nodemanager/
Domain Node ManagerDirectory /u01/CRMUAT/dgmuat/domains/nodemanager
WebLogic Console start file/u01/CRMUAT/dgmuat/domains/uatMXDomain/startWebLogic.sh
Node Manager start File/u01/CRMUAT/dgmuat/domains/nodemanager/startNodeManager.sh

8/10/2019 Im-090 Installation Instructions Uat Mx
http://slidepdf.com/reader/full/im-090-installation-instructions-uat-mx 35/47
IM.090 Installation Instructions
31
Register Node Manager using WLST:
WLST Location/u01/CRMUAT/dgmuat/Oracle/middleware/wlserver_ 10.3/common/bin/wlst.sh
1) connect connect(‘weblogic’,’???????’,’t3://mxxlcn05:10001’)
2) enroll
nmEnroll(‘/u01/CRMUAT/dgmuat/domains/uatMXDomain’,’/u01/CRMUAT/dgmuat/domains/nodemanager’)
3) exit exit()
Weblogic Console Node Manager:
Console LocationEnvironment -> Machines –> DGMMachine -> Node
Manager Tab
Type plain
Listen address mxxlcn05
Port 10556
startNodeManager.sh file Information
NODEMGR_HOME /u01/CRMUAT/dgmuat/domains/nodemanager
LISTEN_ADDRESS mxxlcn05
LISTEN_PORT 10556
nodemanager.properties file Information
SecureListener falseStartScriptEnabled true
Weblogic Account Information
Login/User ID Password
User Admin weblogic *******
Data Governance Manager
Pre-Installation Steps
* Download patch 9329831 from Metalink

8/10/2019 Im-090 Installation Instructions Uat Mx
http://slidepdf.com/reader/full/im-090-installation-instructions-uat-mx 36/47
IM.090 Installation Instructions
32
* Set environment variables
JAVA_HOME=/u01/CRMUAT/dgm/Oracle/jdk/jrockit_1_6_0_24_R28
ANT_HOME=/u01/CRMUAT/dgm/Oracle/middleware/modules/org.apache.ant_1.7.1
PATH=$JAVA_HOME/bin:$ANT_HOME/bin:$PATH
Installation Steps
* Unzip patch file
* Unjar filegroup1.jar
* Edit deploy.properties
* Edit build.xml* Run setDomainEnv.sh
* Generate Ear file & Deploy
Overview :
Patch Information
Patch File p9329831_8111_WINNT.zipFilegroup1.jar Location (in
Patch)
dgm/stage/Disk1/stage/Components/oracle.siebel.dg
m/1.0.0.0.0/1/DataFiles/
Installation Information
Unjar Directory /u01/CRMUAT/dgmuat/installApp/application/
deploy.properties build/deploy.properties
build.xml build/build.xml
setDomainEnv.sh
“./u01/CRMUAT/dgmuat/domains/uatMXDomain/bin/setDomainEnv.sh”
deploy.properties file information
host mxxlcn05
port 10001
username weblogic
password *******
target.server DGMManageddgm_web_service_ end_point (*)
http://10.103.74.94:2090/eai_enu/start.swe?SWEExtSource=SecureWebService&SWEExtCmd=Execute&UserNa

8/10/2019 Im-090 Installation Instructions Uat Mx
http://slidepdf.com/reader/full/im-090-installation-instructions-uat-mx 37/47
IM.090 Installation Instructions
33
me=IADMIN&Password=IADMIN&
siebel_login_url (*)http://10.103.74.94:2090/eai_enu/start.swe?SWEExtSource=SecureWebService&SWEExtCmd=Execute
govern_hier_url (*)http://10.103.74.94:2090/ucm_enu/start.swe?SWECmd=Login&UserName=IADMIN&Password=IADMIN&
Build.xml file information
action Add target goal (without undeploy)
target
<target name="firstdeploy" depends="ear"
description="First Deploy application">
<echo message="Deploying new version dgm..."/>
<wldeploy action="deploy" verbose="true"
debug="true" name="dgm_app"
adminurl="t3://${host}:${port}"
user="${username}" password="${password}"
targets="${target.server}" failonerror="false"
source="./deploy/dgm.ear" remote="true"
upload="true"/>
</target>
Generate Ear file & Deploy
Working directory /u01/CRMUAT/dgmuat/installApp/application/build
For first deployment, run ant firstdeploy
For others deployment, run ant deploy
Verification Checklist
Verify access to the DGM Application:
* Login on http://10.103.74.94:10011/dgm (IADMIN/*****)

8/10/2019 Im-090 Installation Instructions Uat Mx
http://slidepdf.com/reader/full/im-090-installation-instructions-uat-mx 38/47
IM.090 Installation Instructions
34
C H A P T E R
6 Oracle SOA Suite 11g
his chapter provides configuration details and installation steps for theOracle SOA Suite 11g products and components.
T

8/10/2019 Im-090 Installation Instructions Uat Mx
http://slidepdf.com/reader/full/im-090-installation-instructions-uat-mx 39/47
IM.090 Installation Instructions
35
Oracle SOA Suite 11g
Oracle SOA Suite 11g for UAT environment was installed in 2 layers, thedatabase layer on RAC configuration as as described in Chapter 1 MXCRM2Usection and the application layer on Exalogic server “mxxlcn05”.
The products included in this install are:
JRockit version 1.6.0_24-R28.1.3-4.0
Weblogic Server 10.3.4
SOA Suite 11gR1PS3
OSB 11gR1PS3
AIA FP 11gR1PS3
Below are details of Oracle SOA Suite 11g installation in UAT environment.
Pre-Requirements
SOA Application Node – MXXLCN05
* Create a file system “/u01/CRMUAT”.
Pre-Installation Steps
* Create an Installation directory on : /u01/CRMUAT/stage/fmw11gr1ps3.
* Check connection between Exalogic and Exadata DB Oracle RAC .
* Validate Binaries for each installation.
* Validate Ports required for domain (7001, 7003, 8011, 8001)
Installation Steps

8/10/2019 Im-090 Installation Instructions Uat Mx
http://slidepdf.com/reader/full/im-090-installation-instructions-uat-mx 40/47
IM.090 Installation Instructions
36
* Create Directory Structure
* Install JVM.
* Install Weblogic 11gR1 PS3 (10.3.4)
* Create Schemas for SOA Suite 11g using rcu tools.
* Install SOA Suite 11gR1 PS3 (11.1.1.4.0)
* Configure one Domain for soa_server and bam_server instances
* Install Oracle Service Bus 11gR1 PS3 (11.1.1.4.0)* Extend Soa Domain to include one instance of Oracle Service Bus
(osb_server)
* Install Oracle AIA Fundation Pack 11gR1 PS3(11.1.1.4.0)
Overview :
Component Name Version Owner Server OS Server Name
Database Server
(RDBMS: ) 11.2.0.2 oracle
Enterprise
Linux 5.5
mxextdb01,mxextdb02 &
mxextdb03
SOA Servers 11g soaapu11EnterpriseLinux 5.5 mxxlcn05
Server Names
Machine mxxlcn05
Instance Admin AdminServer(admin)
Domain uatSoaDomain
Instances Managed
Node name Network Host Name Port
SOA Admin mxxlcn05 7001
SOA Server mxxlcn05 8001
OSB Server mxxlcn05 8011
BAM Server mxxlcn05 7003
SOA Account Information
Login/User ID Password
SOA Service Owner soaapu11 *********
Admin Console weblogic *********BAM Data Source UAT_ORABAM *********
EDN Data Source UAT _SOAINFRA *********
EDN Local TX Data Source UAT_SOAINFRA *********
MDS-OWSM Data Source UAT_MDS *********MDS-SOA Data Source UAT_MDS *********
ORA SDPM Data Source UAT_SDPM *********
SOA Data Source UAT_SOAINFRA *********
SOA Local TX Data Source UAT_SOAINFRA *********

8/10/2019 Im-090 Installation Instructions Uat Mx
http://slidepdf.com/reader/full/im-090-installation-instructions-uat-mx 41/47
IM.090 Installation Instructions
37
WLSBJMSRP Data Source UAT SOAINFRA *********
Host Name and Static IP Addresses
Server Name Static IP/Host Name Subnet Mask
SOA Suite Server 10.103.74.94/ mxxlcn05 255.255.255.0
Verification Checklist
Verify that the customization has been properly installed by following thesesteps:
* Login on http://mxxlcn05:7001/console for Weblogic SOA SuiteDomain
* Login on http://mxxlcn05:7001/sbconsole for OSB console* Login on http://mxxlcn05:7001/em for Enterprise Manager console
* Login on http://mxxlcn05:8001/AIA for AIA FP admin
* To verify if Nodemanager is running, go to the Weblogic SOA SuiteConsole click on “Machine” at the Domain Structure menu, select
Monitoring tab and verify the status is “recheable”.

8/10/2019 Im-090 Installation Instructions Uat Mx
http://slidepdf.com/reader/full/im-090-installation-instructions-uat-mx 42/47
IM.090 Installation Instructions
38
C H A P T E R
7 Oracle SOA Suite 10g
his chapter provides configuration details and installation steps for theOracle SOA Suite 10g products and components.
T

8/10/2019 Im-090 Installation Instructions Uat Mx
http://slidepdf.com/reader/full/im-090-installation-instructions-uat-mx 43/47
IM.090 Installation Instructions
39
Oracle SOA Suite 10g
Oracle SOA Suite 1og for UAT environment was installed in 2 layers, thedatabase layer on RAC configuration as as described in Chapter 1 MXCRM3Usection and the application layer on Exalogic server “mxxlcn05”.
The products included in this install are:
OAS install 10.1.3.1
SOA Suite 10.1.3.4
AIA FP 2.5
o AIA MDM Customer Hub PIPs
o AIA MDM Product Hub PIPs
o AIA PIP O2B
o AIA PIP O2A
Below are details of Oracle SOA Suite 10g installation in UAT environment.
Pre-Requirements
SOA Application Node – MXXLCN05
* Create a file system “/u01/CRMUAT”.
Pre-Installation Steps
* Create an Installation directory on : /u01/CRMUAT/stage
* Check connection between Exalogic and Exadata DB Oracle RAC.* Validate Binaries for each installation.
* Validate Ports required for domain (7777, 6005)

8/10/2019 Im-090 Installation Instructions Uat Mx
http://slidepdf.com/reader/full/im-090-installation-instructions-uat-mx 44/47
IM.090 Installation Instructions
40
Installation Steps
* OAS install 10.1.3.1
* Install DBClient to create repositoty SOA Suite
* SOA Suite Repository
* SOA Suite Upgrade (Set of paches) from 10.1.3.1 to 10.1.3.5, OK* + Apply Patch 9247257
* + Apply Patch 9804031
* + Apply Patch 10255190
* Install AIA FP 2.5. OK
* + Patch Post Install Patch 9258181 for AIA FP 2.5. OK
* PIP: Install Customer MDM Option for eBS
* PIP: Install Customer MDM Options for Siebel CRM
* PIP: Install Custumer MDM Base Pack.
* PIP Post Install: - Customer MDM Base Pack patch 9072407
* PIP: Install Product MDM for eBS
* PIP: Install Product MDM for Siebel CRM
* PIP: Install Product MDM Base Pack
* PIP: Post Install - Installing Product MDM: EBS Patch 9104744.
* PIP: Post Install - Product MDM: Siebel CRM Patch 9104754
* PIP: Post Install - Product MDM Base Pack Patchs: 9087532, 9104736
* PIP: Post Install - Patch : 9726992
* PIP: Post Install - Patch : 9773226
* PIP: Post Install - Patch : 9848075
* Product Hub Patch : 10091583
* Product Hub Patch : 10091579
* Product Hub Patch : 10091587
* SR = 3-3695239791
* PIP: Comm Billing and Revenue Management Integration Pack forOracle eBusiness
* PIP: Post Install activities for O2B , Patch : 9496941
* PIP: Post Install activities for O2B , Patch : 9249745
* PIP: Post Install activities for O2B , Patch : 9223049
* PIP: Post Install activities for O2B , Patch : 9249745
* PIP: Order to Activate
* PIP: Post Install activities for OTA , Patch 9796481
* PIP: Post Install activities for OTA , Opatch 5912518
* PIP: Post Install activities for OTA , Patch :9800622
* PIP: Post Install activities for OTA , Patch :9431176
* PIP: Post Install activities for OTA , Opatch: 5912518

8/10/2019 Im-090 Installation Instructions Uat Mx
http://slidepdf.com/reader/full/im-090-installation-instructions-uat-mx 45/47
IM.090 Installation Instructions
41
* PIP: Post Install activities for OTA , Patch: 9804031
* PIP: Post Install activities for OTA , Patch: 9496941 included in9804031
Overview :
Component Name Version Owner Server OS Server Name
Database Server(RDBMS: ) 11.2.0.2 oracle
EnterpriseLinux 5.5
mxextdb01,
mxextdb02 &mxextdb03
SOA Servers 10.1.3.5.2 soaapu10EnterpriseLinux 5.5 mxxlcn05
AIA Server 2.5 soaapu10EnterpriseLinux 5.5 mxxlcn05
Server Names
Machine mxxlcn05
Node nameNetwork Host
NamePort
http mxxlcn05 https1:4443,http2:7200,http1:7777
home mxxlcn05 rmi:12401,rmis:12701,jms:12601,ajp:12501
oc4j_soa mxxlcn05 rmi:12402,rmis:12702,jms:12602,ajp:12502
SOA Account Information
Login/User ID Password
SOA Service Owner soaapu10 *********
Admin oc4jadmin *********
Host Name and Static IP Addresses
Server Name Static IP/Host Name Subnet Mask
SOA Suite Server 10.103.74.94/ mxxlcn05 255.255.255.0
Verification Checklist
Basic Services verification:
* Login on http://mxxlcn05:7777 main menu
* Login on http:// mxxlcn05:7777/BPELConsole/ BPEL Console
* Login on http:// mxxlcn05:7777/esb/ ESB console
* Login on http:// mxxlcn05:7777/em/console/ias/cluster/topology Enterprise Manager for SOA Suite Console
* http:// mxxlcn05:7777/AIA/ AIA Console

8/10/2019 Im-090 Installation Instructions Uat Mx
http://slidepdf.com/reader/full/im-090-installation-instructions-uat-mx 46/47
IM.090 Installation Instructions
42

8/10/2019 Im-090 Installation Instructions Uat Mx
http://slidepdf.com/reader/full/im-090-installation-instructions-uat-mx 47/47