ibm workplace web content management version 2.5 ...file/webcontentmanagement-2-5... · user...
TRANSCRIPT

IBM Workplace Web Content ManagementVersion 2.5 - Installation Guide
Copyright (c) 2005 By IBM Corporation. All Rights ReservedLast Updated: 12th October 2005.
Installation Guide.
Planning.
Architectures.
Basic Architectures.
Decentralized Authoring.
Built-in Redundancy.
Delivery Options.
Secured Architecture.
Installation.
Installation Scenarios.
Standard Installation Process.
Custom Installation Process.
Cluster Installation Process.
Removing a Web Content Management application.
Upgrading.
Running the installation program
Configuration Tasks.
The Create Tables Configuration Task.
The Installation Configuration Task.
Update Cluster Configuration Task.
The Authoring Portlet Configuration Task.
The Repository Configuration Task.
The Update Member Manager Configuration Task.
The Remove Authoring Configuration Task.
The Remove Web Content Management Configuration Task.

Web Content Management Parameters in wpconfig.properties.
Installing Web Content Management Portlets.
Installing Portlets.
The Authoring Portlet Configuration Task.
Configuring Portlets.
Configuring the Authoring Portlet.
Authoring Portlet Access Control.
Authoring Portlet Previewing Options.
Authoring Portlet User Interface Options.
Configuring the Local Rendering Portlet.
Content Section.
Portlet Links Section.
Linking Portlets.
Configuring the Remote Rendering Portlet.
Content Section.
Portlet Links Section.
Linking Portlets.
Portlet Credential Section.
Portlet Settings Section.
Enabling Session Handling.
Configuration.
Web Content Management Configuration Files.
The connect.cfg file.
Global Application Settings.
Security Options.
Logging and Trace Levels.
Business Logic.
Business Modules.
Connector Section.
The aptrixjpe.properties file.
The aptrixsearch.properties file.

Caching Options.
Developing a Caching Strategy.
Caching Types.
Web Content Cache Types.
Caching versus Pre-rendering.
Default Server Cache Configuration.
Web Content Cache Configuration.
Data Cache Configuration.
Expiring Strategies.
Data Storage.
The Repository Configuration Task.
Web Content Management Parameters in wpconfig.properties.
Data Repository Settings.
Cloudscape Configuration Options.
DB2 Configuration Options.
IBM Content Manager Configuration Options.
Microsoft SQL Server 2000 Configuration Options.
Oracle Configuration Options.
Resource Storage Settings.
Other Configuration Options.
Enabling SSL.
Uninstalling Web Content Management
Access and Security.
User Management.
Authoring Portlet Access Control.
Administration.
Cache Manager.
Web Content Management Tools
Syndication.
How Syndication Works.
Item Gatherers.

Enabling Syndication.
Configuring Syndication.
Creating a Syndicator.
Syndicator Form.
Common Fields - Identification.
Syndicator Fields.
Common Fields - Security.
Creating a Subscriber.
Subscriber Form.
Common Fields - Identification.
Subscriber Fields.
Common Fields - Security.
Monitoring Syndication.
Syndication Troubleshooting.
Upgrading.
Upgrading Process.
User Migration.
Migrating rendering portlets
Installing a Fix Pack.

Installation Overview.
IBM Workplace Web Content Management is a WebSphere Portal application that can be installed with either WebSphere Portal or IBM Workplace Collaboration Services. Refer to the Requirements topic for a list of supported versions of WebSphere Portal or IBM Workplace Collaboration Services. In addition to the Web Content Management application, there are a set of Web Content Management portlets that are used to create and deliver Web content.
1. Planning.2. Architectures.3. Installation.4. Configuration.5. Uninstalling Web Content Management6. Access and Security.7. Administration.8. Syndication.9. Upgrading.

Planning.
Before installing Web Content Management, you should become familiar with the following:
WebSphere Application Server, WebSphere Portal and IBM Workplace Collaboration Services.
IBM Workplace Web Content Management is a WebSphere Portal application that can be installed with either WebSphere Portal or IBM Workplace Collaboration Services. As such, it is important that you become familiar with these products.
The Information Centers for these products can be found here:
● WebSphere Portal: http://www.ibm.com/developerworks/websphere/zones/portal/proddoc.html
● IBM Workplace Collaboration Serviceshttp://www.lotus.com/ldd/notesua.nsf/find/workplace
● WebSphere Application Server: http://www.ibm.com/software/webservers/appserv/library/index.html
Installation Process.
Web Content Management can only be installed after WebSphere Portal or IBM Workplace Collaboration Services has been installed.
See the WebSphere Portal Information Center or IBM Workplace Collaboration Services Information Center for details on installing WebSphere Portal.
See the Installation Chapter for further information on installing and enabling a Web Content Management application.
Data Repositories.
Web Content Management Data and Resources can be stored in IBM Content Manager, or in JDBC databases such as Cloudscape or DB2.
Refer to the documentation of each data repository product (IBM Content Manager, Cloudscape, DB2 etcetera.) to determine which data repository will be best suited to your Web Content Management installation.
Refer to the Data Storage section of the Configuration chapter for information on enabling different data and resource repositories.
Architectures. Web Content Management installations usually involve more than one installation of a Web Content Management application and Web Content Management portlets. These multiple installations are used to separate authoring from delivery, load-balance a Web Content Management environment, and to provide redundancy.
See the Architectures chapter for further information.

Delivery Options.
There are three methods available to deliver Web Content Management content:
● Via the Web Content Management servlet.● Via a Rendering portlet.● Via a Pre-rendered site.
See the Content Delivery Guide for further information.
Caching. Caching can provide significant performance increases and be implemented very simply in a Web Content Management environment. Web Content Management technology also provides a caching alternative for sites that aggregate information from multiple sources, and can cache on a per-user or per-site basis.
Refer to the Caching sections in the Installation Guide and Content Delivery Guide for further information.
Access and Security.
Access to the Web Content Management Authoring portlet, and to rendered Web Sites, can be restricted to different users and groups.
See the Access and Security chapter for further information.
Parent topic: Installation Overview.

Architectures.
Web Content Management installations usually involve more than one installation of a Web Content Management application and Web Content Management portlets. These multiple installations are used to separate authoring from delivery, load-balance a Web Content Management environment, and to provide redundancy.
● Basic Architectures.
● Decentralized Authoring.
● Built-in Redundancy.
● Delivery Options.
● Secured Architecture.
Parent topic: Installation Overview.

Basic Architectures.
Two-Stage Environments.It is recommended that at least two separate Web Content Management applications be used within a Web Content Management environment.
Authoring. Delivery. Internet / Intranet.
One Web Content Management application is used to create and manage Web content. A second Web Content Management application renders the Site and delivers it to users, either via the Web Content Management servlet, or via the Web Content Management Rendering Portlet. No editing is performed on the Delivery application. These could be installed on the same WebSphere Application Server, but would more often be installed on separate servers to improve performance.
Note: Syndication.
Syndication is used as the transport layer that replicates data from one Web Content Management application to another. Further information can be found in the Syndication chapter later in this guide.
Note: Data Repositories.
Each Web Content Management application in an environment uses a separate data repository. These separate repositories do not need to be the of the same type. E.g. - An Authoring application may use a Cloudscape repository but can Syndicate successfully to a Staging application using a DB2 repository.
Refer to the Data Storage section of the Configuration chapter for information on enabling

different data and resource repositories.
Note: Database Replication versus Syndication.
When first creating a new Web Content Management application, it is better to copy an existing Web Content Management data repository database to a new server, enable your new Web Content Management application to use the new data repository, and then enable Syndication rather than trying to Syndicate an entire Site's data. You must be using the same type of database to be able to do this.
Three-Stage Environments.A third Web Content Management application can be added between the Authoring application and the Delivery application. This server is used as a Staging application.
Authoring. Staging. Delivery. Internet / Intranet.
A Staging application would mostly be used:
● To aggregate changes to a Web Site over time and push these aggregated changes to the Delivery application in "batches".
● To aggregate content from multiple Authoring applications before syndicating to a Delivery application.
Test and Production Environments.
The basic architectures described above can be mirrored in two separate environments. The Test Environment can be used to test and review major changes to a Web Site, and to test and review load-balancing, redundancy, caching and delivery strategies. Once successfully tested,

these changes can be implemented in the Production Environment and delivered to end-users.
Parent topic: Architectures.

Decentralized Authoring.
In most environments, a single Authoring application will be sufficient to manage all authoring activities. In some cases, though, a set of decentralized Authoring applications may be required.
E.g. - if you have users located in different locations it may be more efficient to install a local Authoring application at each location. Two-way syndication is used between all Authoring applications and the Staging application. This allows changes made at all remote locations to be visible to all users.
Authoring 1.
Authoring 2.
All Authoring
applications syndicate to
a Staging application.
The Staging application subscribes from all
Authoring applications.
Staging Application.
Decentralized Authoring creates the risk of conflicting updates between Authoring applications. This may be managed by using different Authoring applications for different Sites, or different sections of a Site. You could also use different Authoring applications for different user roles. E.g. - Content creators could use a different Authoring application than

Presentation Template designers.
Access to each decentralized Authoring application is controlled using a combination of Authoring Portlet access controls and Item Security settings. E.g. - Only users requiring access to the local Authoring application would be granted access to the local Authoring portlet. Users would be given "Read" access to all Items , but only "Edit" access to Items they are required to update. See Access and Security for further information.
Note: Syndication.
Syndication is used as the transport layer that replicates data from one Web Content Management application to another. Further information can be found in the Syndication chapter later in this guide.
Note: The Authoring Portlet and Clustered Environments
A Web Content Management application cannot be used as an "authoring application" in a clustered environment. It can only be used as a staging or delivery application. This means that although the Authoring Portlet is installed on Web Content Management staging and delivery applications in a clustered environment, you cannot use the Authoring Portlet to author content. On staging and delivery applications, the Authoring portlet is only used to manage syndication and caching.
Note: Distributed Session Persistence.
The Web Content Management Authoring portlet and Local Rendering Portlet cannot be used in a clustered environment that has distributed session persistence enabled. To display Web Content Management content in WebSphere Portal pages in a clustered environment that has distributed session persistence enabled you should use a Remote Rendering Portlet pointing to a Web Content Management application located outside the clustered environment.
Parent topic: Architectures.

Built-in Redundancy.
Syndication can be used to supply built-in redundancy to a group of Web Content Management applications.
Example 1: Automatic Redundancy.
In this example, a pair of Staging applications are used to syndicate between Authoring and Delivery applications. Syndication is enabled on both Staging applications to each Authoring and Delivery application. This means that each Staging application contains the same data. If one Staging application goes down, data continues to be automatically syndicated from the Authoring application to the Delivery application via the remaining Staging application.
This architecture is useful when you are continuously syndicating between Authoring, Staging and Delivery applications. This automatic redundancy structure could also be applied to a set of Authoring or Delivery applications.
Both Staging applications subscribe from all Authoring applications.
All Authoring Applications syndicate to both Staging applications.
Staging 1.
Both Staging applications syndicate to all Delivery applications.
All Delivery Applications subscribe from both Staging applications.
Staging 2.

Example 2: Manual Redundancy.
In this example, a primary Staging application is used to syndicate to a Delivery application. This primary Staging application also syndicates to a backup application. If the primary Staging application goes down, you can manually switch to the backup Staging application by enabling syndication between the backup Staging application and any Authoring or Delivery applications.
This architecture is useful if you only manually "batch-syndicate" from a Staging application to a Delivery application. This manual redundancy structure could also be applied to a set of Authoring or Delivery applications.
The primary Staging application subscribes from all Authoring applications.
All Authoring Applications syndicate to the primary
Staging application.
Primary Staging. The primary Staging application syndicates to all
Delivery applications.
All Delivery Applications subscribe from the primary
Staging application.
The primary Staging application syndicates to
the backup Staging application.

Backup Staging.
The backup Staging application subscribes from
the primary Staging application.
Note: Syndication.
Syndication is used as the transport layer that replicates data from one Web Content Management application to another. Further information can be found in the Syndication chapter later in this guide.
Parent topic: Architectures.

Delivery Options.
There are four different methods available to deliver Web Content Management sites:
Local Rendering Portlet. Web Content Management content can be delivered via a Local Rendering Portlet located on the same server as a Web Content Management application. See Displaying Content in a Rendering Portlet for further information.
Remote Rendering Portlet. Web Content Management content can be delivered via a Remote Rendering Portlet located on a WebSphere Portal server. A Web Content Management application is not required. See Displaying Content in a Rendering Portlet for further information.
Web Content Management servlet. Web Content Management content can be delivered as a standard Web Site via the Web Content Management servlet that is installed with the Web Content Management application. See Displaying Content via the Web Content Management Servlet for further information.
Pre-rendered Sites. Web Content Management content can also be delivered as a standard Web Site via a Pre-Rendered site. See the Pre-rendered Sites chapter for further information.
Basic Delivery.
Staging.
The Staging application
syndicates to a Delivery
application.
The Delivery application
subscribes from the
Delivery. Web Content Management content can be delivered:
● via the Web Content Management servlet.
● via a Local Rendering Portlet using the local WebSphere Portal server.
● via a Pre-rendered Site using the local WebSphere HTTP server.

Staging application.
WebSphere Portal.
Web Content Management content can also be displayed in a Remote Rendering portlet located on a separate WebSphere Portal server.
Note: Syndication.
Syndication is used as the transport layer that replicates data from one Web Content Management application to another. Further information can be found in the Syndication chapter later in this guide.
Clustered Delivery.
A set of Delivery applications can be installed as a Cluster. This provides in-built redundancy. A load-balancer can be used in-front of a clustered set of Delivery applications. Syndication is enabled between the Staging application and all Delivery applications.
Staging.
The Staging application
syndicates to all Delivery
applications.
All Delivery applications
Delivery Cluster.
A load balancer is used to spread the load between
the Delivery applications in your cluster.
Internet / Intranet.

subscribe from the Staging application.
Staging applications can Syndicate to more than one cluster of Delivery applications allowing separate Delivery clusters to be installed at different locations.
Staging.
The Staging application syndicates to all Delivery applications in Cluster 1.
All Delivery applications in Cluster 1 subscribe from the Staging application.
Delivery Cluster 1.
The Staging application syndicates to all Delivery applications in Cluster 2.
All Delivery applications in Cluster 2 subscribe from the Staging application.
Delivery Cluster 2.

Note: Syndication.
Syndication is used as the transport layer that replicates data from one Web Content Management application to another. Further information can be found in the Syndication chapter later in this guide.
Note: Clustering.
Refer to the Cluster Installation Process topic for information on installing Web Content Management in a clustered environment. Also refer to the WebSphere Portal Information Center.
Note: Load Balancing.
Refer to the documentation of your Load Balancer for information on how to enable load balancing.
Note: The Authoring Portlet and Clustered Environments
A Web Content Management application cannot be used as an "authoring application" in a clustered environment. It can only be used as a staging or delivery application. This means that although the Authoring Portlet is installed on Web Content Management staging and delivery applications in a clustered environment, you cannot use the Authoring Portlet to author content. On staging and delivery applications, the Authoring portlet is only used to manage syndication and caching.
Note: Distributed Session Persistence.
The Web Content Management Authoring portlet and Local Rendering Portlet cannot be used in a clustered environment that has distributed session persistence enabled. To display Web Content Management content in WebSphere Portal pages in a clustered environment that has distributed session persistence enabled you should use a Remote Rendering Portlet pointing to a Web Content Management application located outside the clustered environment.
Parent topic: Architectures.

Secured Architecture.
Firewalls can used to secure Web Content Management applications.
Staging. Firewall 1.
A firewall can be used
between Staging and
Delivery applications to prevent Users that
have access to your Web
Site from accessing
your Authoring
and Staging applications.
Delivery Cluster. Firewall 2.
A firewall can be used to restrict access to
your Delivery
applications.
Internet / Intranet.
Note: Installing a Firewall.
Refer to the documentation of your Firewall product for information on how to enable a firewall.
Parent topic: Architectures.
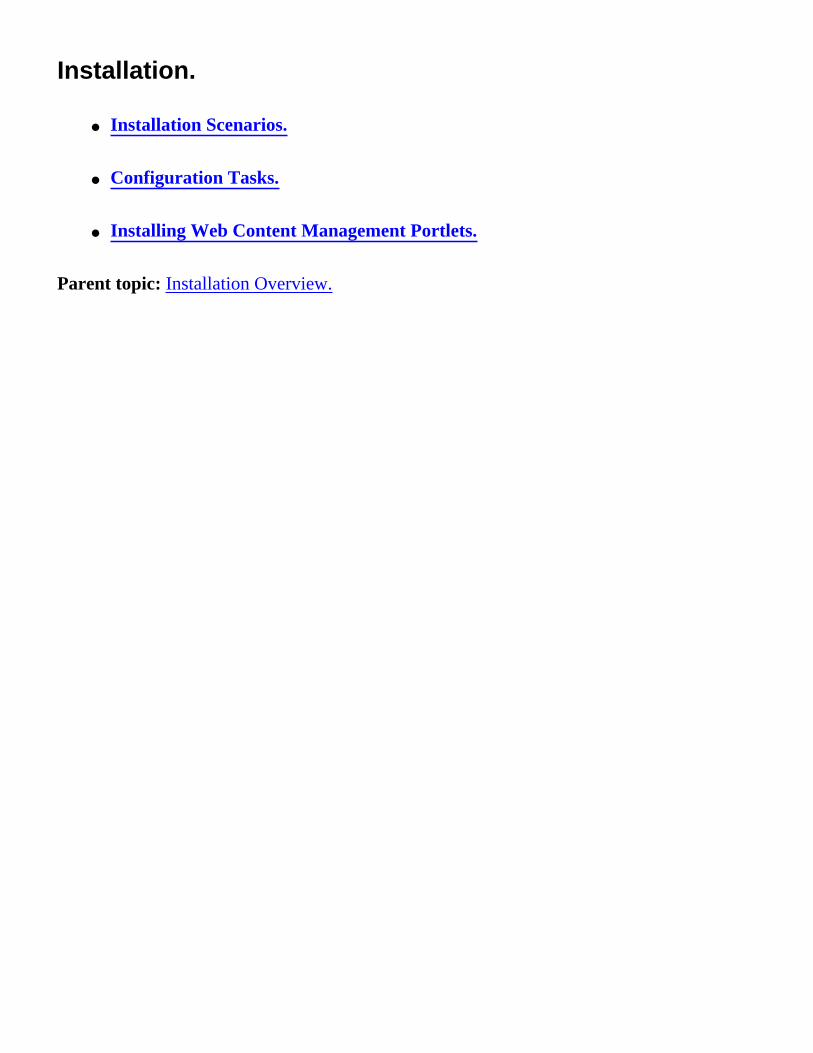
Installation.
● Installation Scenarios.
● Configuration Tasks.
● Installing Web Content Management Portlets.
Parent topic: Installation Overview.

Installation Scenarios.
● Standard Installation Process.
● Custom Installation Process.
● Cluster Installation Process.
● Removing a Web Content Management application.
● Upgrading.
● Running the installation programThis section describes the steps required to install Web Content Management using the installation program. You should first install either IBM Workplace Collaboration Services or WebSphere Portal, then run the Web Content Management installation program as described in this section. This will install the Web Content Management application and a set of Web Content Management portlets that are used to create and deliver Web content.
Parent topic: Installation.

Standard Installation Process.
The Web Content Management installation program may be used to install the application. Web Content Management is configured to use a Cloudscape database as the default data repository. This database is located under PortalServer\wcm\ilwwcm\db\WCMDB . The default Cloudscape Username created is "APP". No password is required.
Note: Installing on i5/OS.
When installing WebSphere Portal and IBM Workplace Web Content Management on i5/OS, the JVM Heap settings for i5/OS needs to remain at 0.
Mandatory Tasks:
The following steps are required to install a standard Web Content Management application:
Install WebSphere Portal or IBM Workplace Collaboration Services.
Web Content Management can only be installed after WebSphere Portal or IBM Workplace Collaboration Services has been installed.
See the WebSphere Portal Information Center or IBM Workplace Collaboration Services Information Center for details on installing WebSphere Portal.

Add the following password settings to the wpconfig.properties file.
The following passwords must be added to the wpconfig.properties file before installing Web Content Management.
For i5/OS:WasPassword= The password for WebSphere Application Server security authentication.
PortalAdminPwd= The password for the WebSphere Portal administrator, as defined in the PortalAdminId property.
WmmDbPassword= The password for the database administrator.
LDAPAdminPwd= The password for the LDAP directory administrator, as defined in the LDAPAdminUId property.
LDAPBindPassword= The password for LDAP Bind authentication.
Other platforms:WmmDbPassword= The password for the database administrator.
LDAPAdminPwd= The password for the LDAP directory administrator, as defined in the LDAPAdminUId property.
LDAPBindPassword= The password for LDAP Bind authentication.
Note: After installation is complete, you can optionally remove these parameters from the

wpconfig.properties file.
Run the Web Content Management installation program.
Web Content Management is installed using its own installation program. Running the installation program topic for details about the installation program panels.
The configure-wcm-authoring task. (Optional)
This task is used to create a Web Content Management portal page and install the Authoring portlet on that page. This is not required if you chose to install an "Authoring Environment" when running the Installation Program. See the Authoring Portlet configuration task topic for further information.
Optional Tasks:
The following tasks are optional and should only be run after completing the default or advanced installation tasks:
The config-wcm-repository task. If you need to change your Web Content Management data repository you will need to run this configuration task. See the Repository Configuration task topic for further information.
The update-wcm-wmm task. This task should be run whenever a WebSphere Member Manager registry type is changed after the initial WebSphere Portal installation. E.g. - if the WebSphere Member Manager registry type is changed from the default database to LDAP. This task will re-configure the custom Web Content Management attributes within Member Manager. See the Update Member Manager task topic for further information.
Migrating Data from previous versions of Web Content Management.

See the Upgrading Web Content Management topic for information on migrating Data from previous versions of Web Content Management.
Parent topic: Installation Scenarios.

Custom Installation Process.
You will only need to perform a Custom Web Content Management installation if:
● You have previously uninstalled Web Content Management using the "Remove Web Content Management" configuration task, or
● You have performed a non-standard installation of WebSphere Portal and have not run any configuration tasks.
Note: Installing on i5/OS.
When installing WebSphere Portal and IBM Workplace Web Content Management on i5/OS, the JVM Heap settings for i5/OS needs to remain at 0.
Mandatory Custom Installation tasks:
Only follow these steps if you have run the Portal Installer without configuring Web Content Management, reinstalling Web Content Management, or are troubleshooting a failed configuration of Web Content Management.
Install WebSphere Portal or IBM Workplace Collaboration Services.
Web Content Management can only be installed after WebSphere Portal or IBM Workplace Collaboration Services has been installed.
See the WebSphere Portal Information Center or IBM Workplace Collaboration Services Information Center for details on installing WebSphere Portal.

Edit the wpconfig.properties file. By default, Web Content Management will be installed using a Cloudscape database as the data repository. If you would like to use this as your data repository you can skip this step.
If you would like to use a different data repository you will need to edit the Web Content Management section of the wpconfig.properties file. This is located under /PortalServer/config. See the Web Content Management Parameters in wpconfig.properties topic for further information.
Run the create-wcm-tables configuration task.
This step is not required if you are using the default Cloudscape data repository.
For other data repositories, you will need to run the create-wcm-tables configuration task to create the necessary Web Content Management tables based on the settings in wpconfig.properties. See the Create Tables configuration task topic for further information.
Run the configure-wcm configuration task.
Running the configure-wcm configuration task will:
● Update the Web Content Management configuration files based on the settings in wpconfig.properties.
● Enable the Data Repository specified in wpconfig.properties.
● See the Installation configuration task topic for further information.
The configure-wcm-authoring task.
This task is used to create a Web Content Management portal page and install the Authoring portlet on that page. See the Authoring Portlet configuration task topic for further information.

Note: WebSphere Portal Administrators.
The WebSphere Portal Administrators group is not automatically added to the wcmadmins group. If you would like WebSphere Portal Administrators to have Administration access to Web Content Management and the Authoring Portlet, you will need to manually add the WebSphere Portal Administrators group to the wcmadmins group in Member Manager.
Optional Tasks:
The following tasks are optional and should only be run after completing the default or advanced installation tasks:
The config-wcm-repository task. If you need to change your Web Content Management data repository you will need to run this configuration task. See the Repository Configuration task topic for further information.
The update-wcm-wmm task. This task should be run whenever a WebSphere Member Manager registry type is changed after the initial WebSphere Portal installation. E.g. - if the WebSphere Member Manager registry type is changed from the default database to LDAP. This task will re-configure the custom Web Content Management attributes within Member Manager. See the Update Member Manager task topic for further information.
Migrating Data from previous versions of Web Content Management.
See the Upgrading Web Content Management topic for information on migrating Data from previous versions of Web Content Management.
Parent topic: Installation Scenarios.

Cluster Installation Process.
Overview.
● Web Content Management applications cannot be clustered themselves, but they can be installed in a clustered environment.
● Web Content Management applications cannot be installed in a vertical cluster.● A Web Content Management application cannot be used as an "authoring application"
in a clustered environment. It can only be used as a staging or delivery application. This means that although the Authoring Portlet is installed on Web Content Management staging and delivery applications in a clustered environment, you cannot use the Authoring Portlet to author content. On staging and delivery applications, the Authoring portlet is only used to manage syndication and caching.
● Each Web Content Management application installed in a clustered environment must use a separate data repository.
● Syndication must be used to keep each Web Content Management application synchronized.
Note: The Authoring Portlet and Clustered Environments
A Web Content Management application cannot be used as an "authoring application" in a clustered environment. It can only be used as a staging or delivery application. This means that although the Authoring Portlet is installed on Web Content Management staging and delivery applications in a clustered environment, you cannot use the Authoring Portlet to author content. On staging and delivery applications, the Authoring portlet is only used to manage syndication and caching.
Note: Distributed Session Persistence.
The Web Content Management Authoring portlet and Local Rendering Portlet cannot be used in a clustered environment that has distributed session persistence enabled. To display Web Content Management content in WebSphere Portal pages in a clustered environment that has distributed session persistence enabled you should use a Remote Rendering Portlet pointing to a Web Content Management application located outside the clustered environment.
Installing Web Content Management in a new WebSphere Portal Cluster

1. Create a primary node:a. Install WebSphere Portal and Web Content Management as specified in either
the Standard Installation Process or the Custom Installation Process topics.b. Once Web Content Management has been successfully installed and
configured, you must then configure WebSphere Portal as a primary node. See the WebSphere Portal Information Center for further information.
2. Create secondary node:a. Install Web Content Management as specified in either the Standard
Installation Process or the Custom Installation Process topics.b. Each Web Content Management application must use a separate data
repository. Each repository can reside on the same database, however they will need unique table names or schema names. If you need to change your Web Content Management data repository you will need to run the Repository configuration task. See the Repository Configuration task topic for further information.
Note: DB2 on z/OS.
You must also ensure that a unique datasource name is used for each Web Content Management data repository. This is specified in the WcmDsName setting in the wpconfig.properties file prior to running the Repository configuration task.
3. Once Web Content Management has been successfully installed and configured, you must then configure WebSphere Portal as a secondary node. See the WebSphere Portal Information Center for further information.
● Enable your WebSphere Portal cluster:
● See the WebSphere Portal Information Center for further information.
● Run the Update Cluster configuration task on each secondary node:
● You must then run the update-wcm-cluster-configuration task on each secondary node. See the Update Cluster Configuration Task topic for further information.
● Syndicate content between the primary authoring instance to all other Web Content

Management databases in the cluster:
Syndication is used as the transport layer that replicates data from one Web Content Management application to another. Perform the following steps to enable Syndication between Nodes
a. Configure a Virtual Host within the Deployment manager to allow access to the individual Web Content Management nodes within the cluster:
❍ Open the WebSphere Administrative Console.❍ Expand Environment. ❍ Select Virtual Hosts->default_host->Host Aliases . ❍ Select New. ❍ Add the hostname and port that correspond to the Web Container HTTP
Transport. E.g. - wpwcm21.ibm.com, port 9081. ❍ Save these settings.
b. Use Web Content Management Syndication to populate each Web Content Management repository in the cluster. Further information can be found in the Syndication chapter later in this guide.
Installing Web Content Management in an existing WebSphere Portal Cluster
1. Install Web Content Management on the Primary node:a. Stop the WebSphere Portal server on all nodes except the primary node and the
deployment manager.b. Install Web Content Management as specified in either the Standard
Installation Process or the Custom Installation Process topics.2. Install Web Content Management on each Secondary node:
a. Stop the WebSphere Portal server on all nodes except the deployment manager and the secondary node you are installing Web Content Management on.
b. Install Web Content Management as specified in either the Standard Installation Process or the Custom Installation Process topics.
c. Each Web Content Management application must use a separate data repository. Each repository can reside on the same database, however they will need unique table names or schema names. If you need to change your Web Content Management data repository you will need to run the Repository configuration task. See the Repository Configuration task topic for further information.

Note: DB2 on z/OS.
You must also ensure that a unique datasource name is used for each Web Content Management data repository. This is specified in the WcmDsName setting in the wpconfig.properties file prior to running the Repository configuration task.
● Enable your WebSphere Portal cluster:
● See the WebSphere Portal Information Center for further information.
● Run the Update Cluster configuration task on each secondary node:
● You must then run the update-wcm-cluster-configuration task on each secondary node. See the Update Cluster Configuration Task topic for further information.
● Syndicate content between the primary authoring instance to all other Web Content Management databases in the cluster:
Syndication is used as the transport layer that replicates data from one Web Content Management application to another. Perform the following steps to enable Syndication between Nodes
a. Configure a Virtual Host within the Deployment manager to allow access to the individual Web Content Management nodes within the cluster:
❍ Open the WebSphere Administrative Console.❍ Expand Environment. ❍ Select Virtual Hosts->default_host->Host Aliases . ❍ Select New. ❍ Add the hostname and port that correspond to the Web Container HTTP
Transport. E.g. - wpwcm21.ibm.com, port 9081. ❍ Save these settings.
b. Use Web Content Management Syndication to populate each Web Content Management repository in the cluster. Further information can be found in the Syndication chapter later in this guide.
Installing On Multiple Portal Instances Using i5/OS
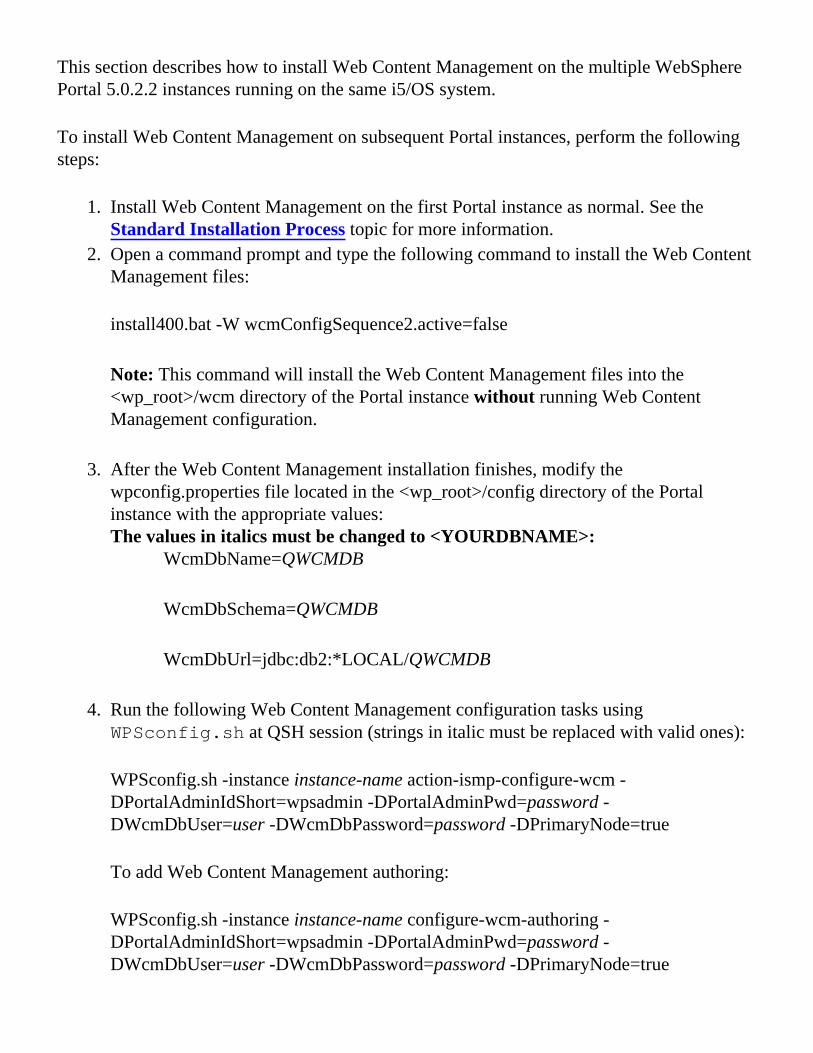
This section describes how to install Web Content Management on the multiple WebSphere Portal 5.0.2.2 instances running on the same i5/OS system.
To install Web Content Management on subsequent Portal instances, perform the following steps:
1. Install Web Content Management on the first Portal instance as normal. See the Standard Installation Process topic for more information.
2. Open a command prompt and type the following command to install the Web Content Management files:
install400.bat -W wcmConfigSequence2.active=false
Note: This command will install the Web Content Management files into the <wp_root>/wcm directory of the Portal instance without running Web Content Management configuration.
3. After the Web Content Management installation finishes, modify the wpconfig.properties file located in the <wp_root>/config directory of the Portal instance with the appropriate values:The values in italics must be changed to <YOURDBNAME>:
WcmDbName=QWCMDB
WcmDbSchema=QWCMDB
WcmDbUrl=jdbc:db2:*LOCAL/QWCMDB
4. Run the following Web Content Management configuration tasks using WPSconfig.sh at QSH session (strings in italic must be replaced with valid ones):
WPSconfig.sh -instance instance-name action-ismp-configure-wcm -DPortalAdminIdShort=wpsadmin -DPortalAdminPwd=password -DWcmDbUser=user -DWcmDbPassword=password -DPrimaryNode=true
To add Web Content Management authoring:
WPSconfig.sh -instance instance-name configure-wcm-authoring -DPortalAdminIdShort=wpsadmin -DPortalAdminPwd=password -DWcmDbUser=user -DWcmDbPassword=password -DPrimaryNode=true

Parent topic: Installation Scenarios.

Removing a Web Content Management application.
To remove a Web Content Management configuration, the following configuration tasks should be run:
remove-wcm-authoring. Running the remove-wcm-authoring configuration task will remove the Web Content Management Authoring Portlet and Portal page. See the Remove Authoring configuration task topic for further information.
remove-wcm. Running the remove-wcm configuration task will uninstall the Web Content Management application. See the Remove Web Content Management configuration task topic for further information.
Parent topic: Installation Scenarios.

Upgrading.
● Upgrading Process.
● User Migration.
● Migrating rendering portletsOld rendering portlets can be migrated to new remote rendering portlets using the portlet migration task. Old rendering portlets cannot be migrated to local rendering portlets.
● Installing a Fix Pack.
Parent topic: Installation Scenarios.Parent topic: Installation Overview.

Running the installation program
This section describes the steps required to install Web Content Management using the installation program. You should first install either IBM Workplace Collaboration Services or WebSphere Portal, then run the Web Content Management installation program as described in this section. This will install the Web Content Management application and a set of Web Content Management portlets that are used to create and deliver Web content.
Before you begin:
● You must have either either IBM Workplace Collaboration Services or WebSphere Portal installed on your machine. Refer to the Installing section of the appropriate product Information Center for details on installing the product.
● The following passwords must be added to the wpconfig.properties file before installing Web Content Management:For i5/OS:
WasPassword= The password for WebSphere Application Server security authentication.
PortalAdminPwd= The password for the WebSphere Portal administrator, as defined in the PortalAdminId property.
WmmDbPassword= The password for the database administrator.
LDAPAdminPwd= The password for the LDAP directory administrator, as defined in the LDAPAdminUId property.
LDAPBindPassword= The password for LDAP Bind authentication.
Other platforms:WmmDbPassword= The password for the database administrator.
LDAPAdminPwd= The password for the LDAP directory administrator, as defined in the LDAPAdminUId property.
LDAPBindPassword= The password for LDAP Bind authentication.
Note: After installation is complete, you can optionally remove these parameters from the wpconfig.properties file.

To install Web Content Management, complete the following steps:
1. Locate the Web Content Management installation program from the Web Content Management distribution.
2. Open a command prompt to the root directory of the Web Content Management distribution and type one of the following commands, depending on your operating system:
❍ Windows: install.bat❍ Unix: ./install.sh❍ i5/OS (*remote): install400.bat❍ i5/OS (local): ./install.sh
*If you are performing an i5/OS remote installation (on Windows workstations), perform the following steps:
a. In the System field, type the fully-qualified host name of the WebSphere Portal 5.0.2.2 installation location. For example: <hostname.yourco.com>
b. In the User ID field, type your i5/OS user name.
c. In the Password field, type your i5/OS password.
d. Click OK.
The installation language panel displays.
3. Select the language to be used for the installation and click OK. The IBM Workplace Web Content Management installation program Welcome panel displays.
4. Click Next to proceed to the next panel. The Software License Agreement displays.
5. Select I accept the terms in the license agreement and click Next. The installation program looks for the appropriate prerequisites, such as WebSphere Portal 5.0.2.2. The default installation directory displays in the Directory Name field. For example, C:\Program Files\WebSphere\PortalServer
6. Specify the WebSphere Portal installation location using one of the following options:❍ Accept the default directory, and click Next to proceed.

❍ Click Browse to specify a different directory location, and click Next to proceed.
If you are performing an i5/OS remote installation, perform the following step:
a. In the Portal Instance Name field, type the name of the WebSphere Portal instance. The Web Content Management code will be installed in the /wcm directory of the Portal instance directory that you specify.
7. Specify whether WebSphere Application Server is security enabled, and click Next to proceed to the next panel.
8. If WebSphere Application Server is security enabled, a new panel opens where you type your WebSphere Application Server administrative user name and password in the fields provided. Click Next to proceed to the WebSphere Portal user ID and password panel.
9. Type your WebSphere Portal administrative user ID and password in the fields provided, and click Next to proceed to the next panel. If you are performing an i5/OS remote installation, perform the following steps:
a. In the OS/400 DB2 Database User Profile field, type your i5/OS DB2 database user name. The user ID that is found in the Portal configuration properties file is initialized - verify that this user ID is valid.
b. In the Password field, type your i5/OS DB2 database user password.
c. Confirm the password.
10. The installation program detects whether you are installing Web Content Management on a managed WebSphere Application Server node. If you are installing on a managed node, a new panel opens where you specify one of the following options:
❍ Select Full Configuration if this is the first installation of Web Content Management to the Deployment Manager, or if this is not part of a clustered environment.
❍ Select Secondary Cluster Configuration if this is an additional installation of Web Content Management to the Deployment Manager, or if this is a standalone WebSphere Application Server.
11. Specify whether you want to configure Web Content Management authoring by

selecting Yes or No. If you select Yes, you will not need to run the Authoring Portlet configuration task (configure-wcm-authoring) task. If you select No, and you want the authoring environment on this system, then you will need to run the configure-wcm-authoring task after the installation is complete. See the Authoring Portlet configuration task topic for further information.
12. Confirm that the information that you provided is correct, and click Next to begin the installation. If you are performing an installation on i5/OS, click Next to begin the installation at this panel. When the installation is finished, the installation program displays a confirmation panel.
13. Click Finish to close the Web Content Management installation program.
Parent topic: Installation Scenarios.

Configuration Tasks.
Configuration tasks are used for all Web Content Management and WebSphere Portal installations. They are used to set configuration parameters in Web Content Management configuration files and to install the Web Content Management application and portlets onto the WebSphere Portal server.
Note: WebSphere Portal Configuration Tasks.
The configuration tasks listed in the Web Content Management Information Center are designed to specifically update Web Content Management configuration files. Other WebSphere Portal configuration tasks not listed in this Information Center may not update Web Content Management configuration files and you may be required to edit the Web Content Management configuration files manually.
The following configuration tasks and procedures are used to enable and configure a Web Content Management application:
● The Create Tables Configuration Task.The Create Tables configuration task is used to create the necessary Web Content Management tables in the data repository you will use to store Web Content Management data. By default, Web Content Management will be installed using a Cloudscape database as the data repository. If you would like to use this as your data repository you can skip this step. This configuration task is only used when you are first installing a Web Content Management application and would like to use a different data repository from the default Cloudscape database.
● The Installation Configuration Task.The Web Content Management Installation configuration task is used to set configuration parameters in Web Content Management configuration files (connect.cfg, aptrixjpe.properties and aptrixsearch.properties) and to install the Web Content Management files onto the WebSphere Portal server.
● Update Cluster Configuration Task.The Update Cluster configuration task should be run when installing Web Content Management on a Secondary Node in a WebSphere Portal cluster. It changes the web path in the aptrixjpe.properties file for each secondary node to point to the primary node. This is required because the secondary node uses the primary node's

"installedApps".
● The Authoring Portlet Configuration Task.The Authoring Portlet configuration task will automatically create Web Content Management Portal Pages and install the Web Content Management Authoring Portlet and Local Rendering Portlets.
● The Repository Configuration Task.By default, Web Content Management uses Cloudscape as a data repository. The Web Content Management Repository configuration task updates the Web Content Management configuration to use a different JDBC data repository such as DB2.
● The Update Member Manager Configuration Task.The Update Member Manager configuration task should be run whenever a WebSphere Member Manager registry type is changed after the initial WebSphere Portal installation. E.g. - if the WebSphere Member Manager registry type is changed from the default database to LDAP. This task will re-configure the custom Web Content Management attributes within Member Manager.
● The Remove Authoring Configuration Task.The Remove Authoring configuration task will uninstall the Web Content Management Authoring Portlet, Local Rendering Portlet and Web Content Management Portal pages.
● The Remove Web Content Management Configuration Task.The Remove Web Content Management configuration task will uninstall the Web Content Management application.
● Web Content Management Parameters in wpconfig.properties.The Web Content Management section of the wpconfig.properties file contains settings that are used by Web Content Management configuration tasks. This is located under the /PortalServer/config folder.
Parent topic: Installation.

The Create Tables Configuration Task.
The Create Tables configuration task is used to create the necessary Web Content Management tables in the data repository you will use to store Web Content Management data. By default, Web Content Management will be installed using a Cloudscape database as the data repository. If you would like to use this as your data repository you can skip this step. This configuration task is only used when you are first installing a Web Content Management application and would like to use a different data repository from the default Cloudscape database.
When performing a standard installation of WebSphere Portal and Web Content Management, this task is run by default. This task should only be run if:
● You have previously uninstalled Web Content Management using the "Remove Web Content Management" configuration task, or
● You have performed a non-standard installation of WebSphere Portal and have not run any configuration tasks.
Before running this configuration task, you will need to edit the Web Content Management section of the wpconfig.properties file and set all appropriate parameters to those of your desired data repository. This file is located under /PortalServer/config. See the Web Content Management Parameters in wpconfig.properties topic for further information.
Note: WebSphere Portal Administrators Password.
Before running this configuration task you should ensure that you have entered the WebSphere Portal Administrators Password in the PortalAdminPwd parameter in the Portal Config Properties section of wpconfig.properties file. This is located under /PortalServer/config.
You should ensure that this password is also removed from wpconfig.properties once the configuration task is completed.
Running the configuration task:
1. Stop the WebSphere_Portal server.2. Open a command prompt.3. Go to the /PortalServer/config4. Run the following command:
Windows: WPSconfig.bat create-wcm-tables

UNIX: WPSconfig.sh create-wcm-tables
i5/OS: WPSconfig.sh -instance [WAS Instance] create-wcm-tables
Parent topic: Configuration Tasks.
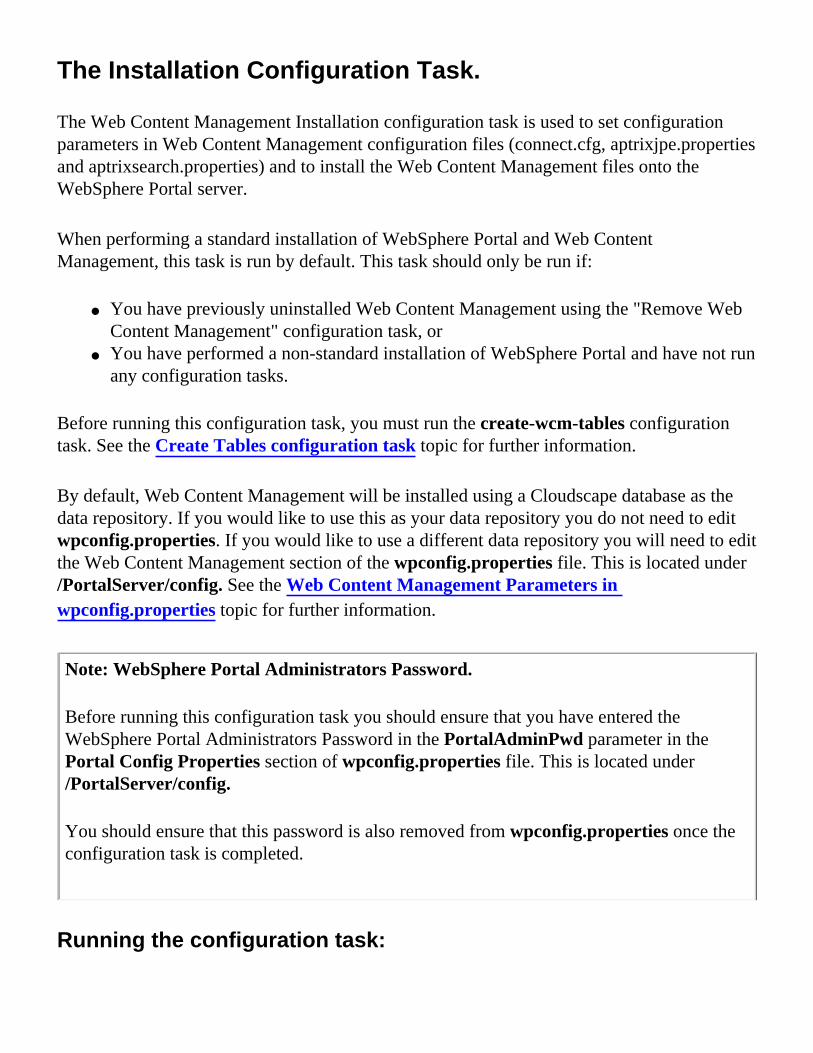
The Installation Configuration Task.
The Web Content Management Installation configuration task is used to set configuration parameters in Web Content Management configuration files (connect.cfg, aptrixjpe.properties and aptrixsearch.properties) and to install the Web Content Management files onto the WebSphere Portal server.
When performing a standard installation of WebSphere Portal and Web Content Management, this task is run by default. This task should only be run if:
● You have previously uninstalled Web Content Management using the "Remove Web Content Management" configuration task, or
● You have performed a non-standard installation of WebSphere Portal and have not run any configuration tasks.
Before running this configuration task, you must run the create-wcm-tables configuration task. See the Create Tables configuration task topic for further information.
By default, Web Content Management will be installed using a Cloudscape database as the data repository. If you would like to use this as your data repository you do not need to edit wpconfig.properties. If you would like to use a different data repository you will need to edit the Web Content Management section of the wpconfig.properties file. This is located under /PortalServer/config. See the Web Content Management Parameters in wpconfig.properties topic for further information.
Note: WebSphere Portal Administrators Password.
Before running this configuration task you should ensure that you have entered the WebSphere Portal Administrators Password in the PortalAdminPwd parameter in the Portal Config Properties section of wpconfig.properties file. This is located under /PortalServer/config.
You should ensure that this password is also removed from wpconfig.properties once the configuration task is completed.
Running the configuration task:

1. Stop the WebSphere_Portal server.2. Open a command prompt.3. Go to the /PortalServer/config4. Run the following command:
Windows: WPSconfig.bat configure-wcm
UNIX: WPSconfig.sh configure-wcm
i5/OS: WPSconfig.sh -instance [WAS Instance] configure-wcm
Parent topic: Configuration Tasks.

Update Cluster Configuration Task.
The Update Cluster configuration task should be run when installing Web Content Management on a Secondary Node in a WebSphere Portal cluster. It changes the web path in the aptrixjpe.properties file for each secondary node to point to the primary node. This is required because the secondary node uses the primary node's "installedApps".
Note: WebSphere Portal Administrators Password.
Before running this configuration task you should ensure that you have entered the WebSphere Portal Administrators Password in the PortalAdminPwd parameter in the Portal Config Properties section of wpconfig.properties file. This is located under /PortalServer/config.
You should ensure that this password is also removed from wpconfig.properties once the configuration task is completed.
● Stop the secondary WebSphere_Portal node.● Open a command prompt:
1. Go to the /PortalServer/config2. Run the following command:
Windows: WPSconfig.bat update-wcm-cluster-configuration
UNIX: WPSconfig.sh update-wcm-cluster-configuration
i5/OS: WPSconfig.sh -instance [WAS Instance] update-wcm-cluster-configuration
Parent topic: Configuration Tasks.

The Authoring Portlet Configuration Task.
The Authoring Portlet configuration task will automatically create Web Content Management Portal Pages and install the Web Content Management Authoring Portlet and Local Rendering Portlets.
Note: WebSphere Portal Administrators Password.
Before running this configuration task you should ensure that you have entered the WebSphere Portal Administrators Password in the PortalAdminPwd parameter in the Portal Config Properties section of wpconfig.properties file. This is located under /PortalServer/config.
You should ensure that this password is also removed from wpconfig.properties once the configuration task is completed.
Note: Portal Administrators.
The WebSphere Portal Administrators group is not automatically added to the wcmadmins group. If you would like WebSphere Portal Administrators to have Administration access to Web Content Management, you will need to manually add the WebSphere Portal Administrators group to the wcmadmins group in WebSphere Portal Administration:
1. Go to Administration->Access->Users and Groups and click "All Portal User Groups".2. Select wcmadmins and click "Add member".3. Select wpsadmins and click "OK". 4. Log out of WebSphere Portal and log back in.
Running the configuration task:
1. Stop the WebSphere Portal server.2. Open a command prompt.3. Go to the /PortalServer/config4. Run the following command:
Windows: WPSconfig.bat configure-wcm-authoring
UNIX: WPSconfig.sh configure-wcm-authoring
i5/OS: WPSconfig.sh -instance [WAS Instance] configure-wcm-authoring

Note: Installing the Authoring Portlet in a clustered environment.
If you are installing the Authoring Portlet in a clustered environment, you will need to stop and restart the WebSphere Portal server before the Authoring Portlet will be available.
Parent topic: Configuration Tasks.Parent topic: Installing Portlets.

The Repository Configuration Task.
By default, Web Content Management uses Cloudscape as a data repository. The Web Content Management Repository configuration task updates the Web Content Management configuration to use a different JDBC data repository such as DB2.
Note: Transferring data to IBM Content Manager.
To transfer data to an IBM Content Manager data repository you will need to follow the instructions in the Storing Data in IBM Content Manager topic.
Note: Transferring data to Microsoft SQL Server.
When transferring data to Microsoft SQL Server, you must enter the WcmDbUser name in uppercase in wpconfig.properties. The WcmDbUser name must also be entered in uppercase in Microsoft SQL Server.
Note: WebSphere Portal Administrators Password.
Before running this configuration task you should ensure that you have entered the WebSphere Portal Administrators Password in the PortalAdminPwd parameter in the Portal Config Properties section of wpconfig.properties file. This is located under /PortalServer/config.
You should ensure that this password is also removed from wpconfig.properties once the configuration task is completed.
Note: Upgrading and Migrating Data.
The Repository configuration task can be used to move data from one data repository to another data repository on a single instance of Web Content Management. This task does not migrate data from one version of Web Content Management to another. If you are upgrading Web Content Management and are using the Repository configuration task to enable your data repository, you must migrate your old data after setting up the new data repository. See the User Migration topic for details on

migrating data from previous versions of Web Content Management.
There are three ways to use the Repository configuration task:
Configuring Web Content Management to use an existing data repository.
This option only configures Web Content Management to use an existing Web Content Management data repository. This existing data repository could be empty, or could contain Web Content Management data.
Before running this task, you need to edit the wpconfig.properties file to include information about the data repository you intend to use. This is located under /PortalServer/config. See the Web Content Management Parameters in wpconfig.properties topic for further information.
To configure Web Content Management to use an existing data repository:
1. Stop the WebSphere_Portal server.2. Open a command prompt:3. Go to the /PortalServer/config4. Remove any existing data repository by running the following command. (This only removes the data repository
references from the Web Content Management configuration. It does not delete data from the data repository.):
Windows: WPSconfig.bat remove-wcm-repository
UNIX: WPSconfig.sh remove-wcm-repository
i5/OS: WPSconfig.sh -instance [WAS Instance] remove-wcm-repository
5. Re-configure Web Content Management by running the following command:

Windows: WPSconfig.bat config-wcm-repository
UNIX: WPSconfig.sh config-wcm-repository
i5/OS: WPSconfig.sh -instance [WAS Instance] config-wcm-repository
6. If using this task to upgrade your Web Content Management application, you will also need to migrate your User data. Refer to the User Migration topic for details on migrating data from previous versions of Web Content Management.
Configuring Web Content Management to use an existing data repository and transfer current data to the existing data repository.
This option is used to transfer data from your current data repository to a new data repository that you have already created. This new data repository must contain two empty tables (that you manually create) with the same name as the tables in the database you are transferring data from.
Before running this task, you need to edit the wpconfig.properties file to include information about the data repository you intend to use. This is located under [WPS_HOME ]/config. See the Web Content Management Parameters in wpconfig.properties topic for further information.
To transfer data to an existing data repository:
1. Stop the WebSphere_Portal server.2. Open a command prompt.3. Go to the /PortalServer/config4. Run the following command:
Windows: WPSconfig.bat transfer-wcm-to-existing-repository
UNIX: WPSconfig.sh transfer-wcm-to-existing-repository

i5/OS: WPSconfig.sh -instance [WAS Instance] transfer-wcm-to-existing-repository
Configuring Web Content Management to use a new data repository and transfer current data to the new data repository.
This option is used to transfer data from your current data repository to an empty database with no tables. This empty database must be created prior to running this task.
Before running this task, you need to edit the wpconfig.properties file to include information about the data repository you intend to use. This is located under /PortalServer/config. See the Web Content Management Parameters in wpconfig.properties topic for further information.
To transfer data to a new data repository:
1. Stop the WebSphere_Portal server.2. Open a command prompt.3. Go to the /PortalServer/config4. Run the following command:
Windows: WPSconfig.bat transfer-wcm-to-new-repository
UNIX: WPSconfig.sh transfer-wcm-to-new-repository
i5/OS: WPSconfig.sh -instance [WAS Instance] transfer-wcm-to-new-repository
Configuring Web Content Management to use a Cloudscape repository and transfer file system data to the Cloudscape data repository.
This option is used to transfer data currently stored on the file system to a new Cloudscape data repository. This task would only be used when upgrading to the current version of Web Content Management.

Before running this task, you need to edit the wpconfig.properties file to include information about the data repository you intend to use and to specify the location of your File System data ("WcmFileSystemDataLocation"). This is located under [WPS_HOME ]/config. See the Web Content Management Parameters in wpconfig.properties topic for further information.
Note: Transferring file system data to other databases.
This task can only be used to transfer file system data to a Cloudscape database. To transfer file system data to other database types you will need to initially transfer the file system data to Cloudscape, and then either:
● transfer this data to another database using "transfer-wcm-to-existing-repository" or transfer-wcm-to-new-repository, or● setup a second Web Content Management application and then syndicate the data to the second Web Content
Management application from the first. E.g. - you would need to do this to transfer file system data to a Content Manager repository.
Note: Transferring file system data to Cloudscape and then to DB2 on z/OS.
When transferring data from file system to Cloudscape, and then to a DB2 on z/OS data repository you must ensure that the data has a valid format. For example:
The XML files from the files system can only have either:
● Carriage return and line feed (CRLF - windows end of line style), or● Just line feed (LF - unix end of line style)
An XML file that combines CRLF and LF in the same file will be classed as invalid and you will have problems when transferring it to z/OS. Even though most windows editors can view these files, they are not technically valid as they have inconsistent end of line styles.

1. Stop the WebSphere_Portal server.2. Open a command prompt.3. Go to the /PortalServer/config4. Run the following command:
Windows: WPSconfig.bat transfer-wcm-filesystem-to-cloudscape
UNIX: WPSconfig.sh transfer-wcm-filesystem-to-cloudscape
i5/OS: WPSconfig.sh -instance [WAS Instance] transfer-wcm-filesystem-to-cloudscape
5. If using this task to upgrade your Web Content Management application, you will also need to migrate your User data. Refer to the User Migration topic for details on migrating data from previous versions of Web Content Management.
Parent topic: Configuration Tasks.Parent topic: Data Storage.

The Update Member Manager Configuration Task.
The Update Member Manager configuration task should be run whenever a WebSphere Member Manager registry type is changed after the initial WebSphere Portal installation. E.g. - if the WebSphere Member Manager registry type is changed from the default database to LDAP. This task will re-configure the custom Web Content Management attributes within Member Manager.
Note: WebSphere Portal Administrators Password.
Before running this configuration task you should ensure that you have entered the WebSphere Portal Administrators Password in the PortalAdminPwd parameter in the Portal Config Properties section of wpconfig.properties file. This is located under /PortalServer/config.
You should ensure that this password is also removed from wpconfig.properties once the configuration task is completed.
● Stop the WebSphere Portal application.● Open a command prompt:
1. Go to the /PortalServer/config2. Run the following command:
Windows: WPSconfig.bat update-wcm-wmm
UNIX: WPSconfig.sh update-wcm-wmm
i5/OS: WPSconfig.sh -instance wps1 update-wcm-wmm
Parent topic: Configuration Tasks.

The Remove Authoring Configuration Task.
The Remove Authoring configuration task will uninstall the Web Content Management Authoring Portlet, Local Rendering Portlet and Web Content Management Portal pages.
Note: WebSphere Portal Administrators Password.
Before running this configuration task you should ensure that you have entered the WebSphere Portal Administrators Password in the PortalAdminPwd parameter in the Portal Config Properties section of wpconfig.properties file. This is located under /PortalServer/config.
You should ensure that this password is also removed from wpconfig.properties once the configuration task is completed.
To remove the Authoring portlet:
1. Stop the WebSphere_Portal server.2. Open a command prompt.3. Go to the /PortalServer/config4. Run the following command:
Windows: WPSconfig.bat remove-wcm-authoring
UNIX and i5/OS: WPSconfig.sh remove-wcm-authoring
Parent topic: Configuration Tasks.

The Remove Web Content Management Configuration Task.
The Remove Web Content Management configuration task will uninstall the Web Content Management application.
Note: Web Content Management Configuration Files.
Web Content Management configuration files are also removed when running this configuration task. If you are planning to reinstall Web Content Management, you should backup these files first.
Note: WebSphere Portal Administrators Password.
Before running this configuration task you should ensure that you have entered the WebSphere Portal Administrators Password in the PortalAdminPwd parameter in the Portal Config Properties section of wpconfig.properties file. This is located under /PortalServer/config.
You should ensure that this password is also removed from wpconfig.properties once the configuration task is completed.
To deploy the Authoring portlet:
1. Stop the WebSphere_Portal server.2. Open a command prompt.3. Go to the /PortalServer/config4. Run the following command:
Windows: WPSconfig.bat remove-wcm
UNIX and i5/OS: WPSconfig.sh remove-wcm
Parent topic: Configuration Tasks.

Web Content Management Parameters in wpconfig.properties.
The Web Content Management section of the wpconfig.properties file contains settings that are used by Web Content Management configuration tasks. This is located under the /PortalServer/config folder.
Note: Further Information.
Many of the settings listed below require knowledge of the databases used as Web Content Management data repositories. It is recommended that you also refer to the User Documentation of the database you are using as a data repository when editing the settings listed below.
Also read the Data Repository Settings topics for further configuration requirements for each Data Repository type.
Note: IBM Content Manager Data Repositories.
Note that the settings in wpconfig.properties can only be used to configure Web Content Management to use an IBM Content Manager data repository when running the config-wcm-repository task. It cannot be used to transfer data to an IBM Content Manager data repository. See the IBM Content Manager Configuration Options topic for further information.
WcmEncoding= This setting is used to set the default encoding for your Site. It is pre-configured as UTF-8. The following languages are supported:
UTF-8.Czech, Danish, Dutch, Finnish, French, German, Greek, Hungarian, Italian, Norwegian Polish, Portuguese, Portuguese (Brazilian), Russian, Spanish, Swedish, and Turkish.
Shift_JIS.Japanese.
EUC-KR.Korean.
GB2312.Simplified-Chinese.
Big5.Traditional-Chinese.
WcmMgrPersistence= The persistencies supported are CM for IBM Content Manager or JDBC for JDBC databases. These parameters are case-sensitive.
WcmResPersistence= The persistencies supported are CM for IBM Content Manager or JDBC for JDBC databases. These parameters are case-sensitive.
WcmTable= This is the name of the database table that will be created to manage Web Content Management items. If this parameter is not included, then the table name will default to AJPE. This parameter is optional.
WcmResourceTable= This is the name of the database table that will be created to manage Web Content Management resources. If this parameter is not included, then the table name will default to AJPE_RESOURCES. This parameter is optional.
WcmReadAhead= The sets the number of items to read ahead when reading all items for index recreation. This parameter would not usually be changed.

WcmResourceMaxSize= This setting (in megabytes) is used to allocate space within a database for Web Content Management resources when Resource persistence is set to JDBC. (This does not apply to Web Content Management item files.) Once set, you cannot store resources larger than the maximum size set in this parameter.
Increasing this setting to accommodate very large files can slow performance. It may be better to reference large files in Web Content Management content via a URL rather than storing them as Web Content Management resources.
Important: DB2 databases.
Once set, this setting cannot be reset in your current DB2 database. It can only be reset by deleting and creating a new DB2 database. If you need to change this setting, you should syndicate your current Site to another server, recreate the DB2 database, and then syndicate the Site back from the backup server.
WcmDbType= The type of database to be used as a Web Content Management repository is set here:
● DB2: WcmDbType=db2● Oracle: WcmDbType=oracle● MS SQL Server: WcmDbType=sqlserver● Cloudscape: WcmDbType=cloudscape● DB2 for z/OS and OS/390: WcmDbType=db2_zos
WcmDbName= The name of the database to be used as a Web Content Management repository is entered here. This value should also appear as the database element in WcmDbUrl.
WcmDbSchema= This is the schema name of the database to be used as a Web Content Management repository. This is required for z/OS DB2 systems only. This should be that same as a valid DB2 username.
● WcmDbSchema=
WcmDbUser= This is the name of the user to connect to the database with. The specified user must have enough access to create a table and execute select, update, insert, and remove SQL statements on that table.
Note: Transferring data to Microsoft SQL Server.
When transferring data to Microsoft SQL Server, you must enter the WcmDbUser name in uppercase in wpconfig.properties. The WcmDbUser name must also be entered in uppercase in Microsoft SQL Server.
WcmDbPassword= This is the password of the user to connect to the database with.
WcmAdminGroupIdShort= The Web Content Management administrators group ID defined in WebSphere Portal. Defaults to wcmadmins.

WcmDbUrl= This is the URL to the database used to store Web Content Management data. The database element of this value should match the database name entered in WcmDbName:
● cloudscape: jdbc:db2j:C:/path/to/WCMDB● db2: jdbc:db2:WCMDB● db2_zos: jdbc:db2:<location>● db2_zos (remote): jdbc:db2://<server address>:<port>/<location>
Note: The <location> parameter is case-sensitive.
● oracle: jdbc:oracle:thin:@[HOST]:[PORT]:WCMDB● sqlserver:
jdbc:microsoft:sqlserver://[HOST]:[PORT];User=wcmuser;Password=password;SelectMethod=cursor;DatabaseName=WCMDB
WcmFileSystemDataLocation= This is the location of the file system data directory to transfer if using the "transfer-wcm-filesystem-to-cloudscape" configuration tasks. See the Repository configuration task topic for further information.
WcmDbDriver= The name of class SqlProcessor will use to import SQL files, also known as "JDBC provider":
● cloudscape: com.ibm.db2j.jdbc.DB2jDriver● db2: COM.ibm.db2.jdbc.app.DB2Driver● db2_zos: com.ibm.db2.jcc.DB2Driver● db2_zos (remote db): com.ibm.db2.jcc.DB2Driver● oracle: oracle.jdbc.driver.OracleDriver● sqlserver: com.microsoft.jdbc.sqlserver.SQLServerDriver
WcmDbDriverDs= The name of class SqlProcessor will use to import SQL files via data source. This is required for DB2 z/OS systems only.
● db2_zos: com.ibm.db2.jcc.DB2ConnectionPoolDataSource
WcmDsName= The name of datasource to be used for Web Content Management. This is required for z/OS systems only.
WcmJdbcProvider= The name of Web Content Management JDBC provider to be used. This is required for z/OS systems only.

WcmDbLibrary= The directory and name of the zip file containing the db.driver class. Use the system specific file separator names. E.g - for Windows use a semicolon and for Unix a colon.
● cloudscape: <PortalServer>shared/app/cloudscape/db2j.jar● db2: <SQLLIB>/java/db2java.zip ● db2_zos:
<SQLLIB>/jcc/classes/db2jcc.jar:<SQLLIB>/jcc/classes/db2jcc_license_cisuz.jar:<SQLLIB>/jcc/classes/db2jcc_javax.jar
For connections to UDB on z/OS, type 4 drivers, as installed with DB2 8.1 Fix Pack 6 or 6a on the distributed platforms (Windows, Linux, Unix), should be used.
● db2_zos (remote): <SQLLIB>/java/db2jcc.jar:<SQLLIB>/java/db2jcc_license_cisuz.jar● oracle: <Oracle>/jdbc/lib/ojdbc14.jar● sqlserver: <SQLServerJDBC>/lib/mssqlserver.jar;<SQLServerJDBC>/lib/msbase.jar;<SQLServerJDBC>/lib/msutil.jar
WcmDbNativeLibrary= The directory of the native DB2 libraries. This is required for z/OS systems only.
WcmDbSqljProperties= The path to and name of the DB2 JDBC property file. This is required for z/OS systems only.
The following settings are used to set parameters for storing "Large Object Binaries" and are required for z/OS systems only. Refer to your z/OS DB2 documentation for further information on these settings.
WcmMaxClobSize= The default CLOB size for maximum allowed CLOB. This is required for z/OS systems only.
WcmSmallClobSize= The default CLOB size for most common CLOB size. This is required for z/OS systems only.
WcmResourceMaxBlobSize= The default BLOB size for maximum allowed BLOB. This is required for z/OS systems only.
WcmResourceSmallBlobSize= The default BLOB size for most common BLOB size. This is required for z/OS systems only.
WcmSmallTable= The default CLOB table name for data. This is required for z/OS systems only.
WcmResourceSmallTable= The default CLOB table name for resources. This is required for z/OS systems only.
WcmLobTable= The default LOB table name for data. This is required for z/OS systems only.
WcmLobSmallTable= The default LOB small table name for data. This is required for z/OS systems only.
WcmLobResourceTable= The default LOB table name for resources. This is required for z/OS systems only.
WcmLobResourceSmallTable= The default LOB small table name for resources. This is required for z/OS systems only.
WcmTableSpaceNameSmallClobs= The tablespace name for WcmTable. This is required for z/OS systems only.
WcmTableSpaceNameLargeClobs= The tablespace name for WcmLargeTable. This is required for z/OS systems only.
WcmTableSpaceNameSmallBlobs= The tablespace name for WcmResourceTable. This is required for z/OS systems only.
WcmTableSpaceNameLargeBlobs= The tablespace name for WcmResourceLargeTable. This is required for z/OS systems only.
WcmLobTableSpaceNameSmallClobs= The lob tablespace name for WcmTable. This is required for z/OS systems only.

WcmLobTableSpaceNameLargeClobs= The lob tablespace name for WcmLargeTable. This is required for z/OS systems only.
WcmLobTableSpaceNameSmallBlobs= The lob tablespace name for WcmResourceTable. This is required for z/OS systems only.
WcmLobTableSpaceNameLargeBlobs= The lob tablespace name for WcmResourceLargeTable. This is required for z/OS systems only.
The following settings are used when configuring Web Content Management to use IBM Content Manager as a data repository.
WcmCmServer= Enter the name of the IBM Content Manager server here.
WcmCmUser= Enter the name of a valid IBM Content Manager User here.
WcmCmPassword= Enter the password of the IBM Content Manager User entered above.
WcmCmSchema= This Parameter is optional. Web Content Management used the "WcmCmUser" property as the default Schema for Content Manager. This parameter can be used to specify a different schema name should the "WcmCmUser" not be the same user that originally created the Content Manager database.
Parent topic: Configuration Tasks.Parent topic: Data Storage.

Installing Web Content Management Portlets.
There are three Portlets shipped with Web Content Management:
Authoring Portlet. The Authoring Portlet is the "user interface" for Web Content Management. It is used to create, edit and manage all Web Content Management items, and to administer Syndication and Caching.
Local Rendering Portlet. The Local Rendering Portlet can be used to display Web Content Management content within a Portlet. This portlet is used with the same instance of WebSphere Portal that Web Content Management is installed with.
Remote Rendering Portlet. The Remote Rendering Portlet can be used to display Web Content Management content within a Portlet located on a different WebSphere Portal server than the instance of WebSphere Portal that Web Content Management is installed with.
● Installing Portlets.
● Configuring Portlets.
● Enabling Session Handling.
Parent topic: Installation.

Installing Portlets.
Installing the Authoring and Local Rendering Portlets.
To install the Authoring and Local Rendering Portlets you must run the Authoring Portlet Configuration Task. See the Authoring Portlet Configuration Task topic for further information.
Installing the Remote Rendering Portlet (Remote Web Content Viewer).
The Remote Rendering Portlet is installed just like any other Portlet:
1. Login to WebSphere Portal as an administrator.2. Go to the Administration view and then Portlet Management.3. Select Web Modules.4. Click Install5. Click Browse.6. Select the file called ilwwcm-remoterendering-portlet.war from the
\PortalServer\installableApps folder of your Web Content Management server.7. Click Open.8. Click Next.9. Click Finish.
You will then need to add the Remote Rendering Portlet (Remote Web Content Viewer) to a WebSphere Portal page. See the WebSphere Portal Information Center for further details on installing portlets.
Anonymous Access.
If a Web Content Management Portlet needs to be accessed by anonymous users, then the user must configure the Portal server to have anonymous sessions. This is done by setting the public.session value to "true" in the NavigatorService.properties configuration file.
● E.g: - public.session=true
This file is located here:
WebSphere Portal Server 5.x
<WPS_HOME>/shared/app/config/services/NavigatorService.properties
Edit Mode Configuration.
WebSphere Portal Administrators can deploy a single instance of the Remote Rendering Portlet onto a

server. The settings set for this portlet in configuration mode are then used by default each time the Remote Rendering Portlet is added to a page. Initially all the portlets will display the same content. The user can then use the edit mode to customize the configuration of each instance. So while all portlets share the same base configuration, each one can customized as required.
Locale Consistency.
The language displayed in the Web Content Management Authoring and Rendering Portlets is determined by the region or locale of the User. There are, however, some elements of the Authoring and Rendering Portlets that use WebSphere Portal functions, such as date selection fields. These will be displayed using the locale of the WebSphere Portal server. For this reason, the language and locales of the Site being created, the client and server should be consistent.
If your Site contains content in different languages, then a separate Web Content Management authoring applications should be setup for each language on different WebSphere Portal Servers. These can then be combined into one Site using a Staging Server.
Multiple Remote Rendering Portlets on separate servers may need to be created to display sites in different languages to enable features such as Portal Search.
Note: If a User changes their locale, any currently opened Web Content Management dialogs will be closed. A User will also have to start a new Web Content Management session before it is displayed using the new locale. It is best practice to have the client's correct locale set prior to using Web Content Management.
● The Authoring Portlet Configuration Task.The Authoring Portlet configuration task will automatically create Web Content Management Portal Pages and install the Web Content Management Authoring Portlet and Local Rendering Portlets.
Parent topic: Installing Web Content Management Portlets.

Configuring Portlets.
Web Content Management Portlets are added configured in the same way as other Portlets.
● The Web Content Management Portlet can be configured by clicking the Configuration button.
● Configuring the Authoring Portlet.
● Configuring the Local Rendering Portlet.
● Configuring the Remote Rendering Portlet.
Parent topic: Installing Web Content Management Portlets.

Configuring the Authoring Portlet.
The Authoring Portlet has the following configuration sections:
● Authoring Portlet Access Control.
● Authoring Portlet Previewing Options.
● Authoring Portlet User Interface Options.
Parent topic: Configuring Portlets.

Authoring Portlet Access Control.
The Access Control section of the Authoring Portlet's configuration view is used to manage each User's access to the different views in the Authoring portlet. You must have administration access in WebSphere Portal to do this.
Access Controls Levels.
There are three levels of access control to the Authoring portlet:
Administrators. Any User belonging to the Web Content Management administration group has full access to all views and items in the Authoring portlet. You do not need to add User's belonging to the Web Content Management administration group in the Access Control section of the Authoring portlet's configuration view.
Note: The Web Content Management administration group is the group selected in the Administration Group parameter of connect.cfg.
View/Read. Users given View/Read access are given limited access to a particular item or view. This includes limiting their access to certain buttons, forms and features. View/Read access can be applied to the items and views listed below.
Note: If a User has Edit access to an item, but only View/Read access to a view in the Authoring Portlet, they will still be able to edit the Item.
Manage. Users given Manage access are given full access to a particular item or view. Manage access can be applied to the items and views listed below.
Note: If a User only has Read access to an item, but Management access to a view in the Authoring Portlet, they still will not be able to edit the Item.

Access Control.
View/Read access.
Management access.
Content Management.
Grants View access to the Content Management view. This includes limiting their access to certain buttons, forms and features.
Grants Read access to each Content item that a User has Read access to.
Grants full access to the Content Management view and related functions.
Grants Read, Edit or Delete access to each Content item that a User has Read, Edit or Delete access to.
Site Management.
Grants View access to the Site Management view. This includes limiting their access to certain buttons, forms and features.
Grants Read access to each Site and Site
Grants full access to the Site Management view and related functions.
Grants Read, Edit or Delete access to each Site and Site Area that a User has Read, Edit or Delete access to.

Area that a User has Read access to.
Category Management.
Grants View access to the Category Management view. This includes limiting their access to certain buttons, forms and features.
Grants Read access to each Taxonomy and Category that a User has Read access to.
Grants full access to the Category Management view and related functions.
Grants Read, Edit or Delete access to each Taxonomy and Category that a User has Read, Edit or Delete access to.
User Profile. Grants View access to the Category Management view. This includes limiting their access to certain buttons, forms and features.
Grants View access to the Category Management view.
Grants access to the User Profile button.
Grants Edit

Grants access to the User Profile button.
Grants Read access to each User Profile, but no access to Taxonomies and Categories.
access to each User Profile, but no access to Taxonomies and Categories.
Component Library.
Grants View access to the Component Library view. This includes limiting their access to certain buttons, forms and features.
Grants Read access to each Library Component that a User has Read access to.
Grants full access to the Component Library view and related functions.
Grants Read, Edit or Delete access to each Library Component that a User has Read, Edit or Delete access to.

Authoring Templates.
Grants View access to the Authoring Templates view. This includes limiting their access to certain buttons, forms and features.
Grants Read access to each Authoring Template that a User has Read access to.
Grants full access to the Authoring Templates view and related functions.
Grants Read, Edit or Delete access to each Authoring Template that a User has Read, Edit or Delete access to.
Presentation Templates.
Grants View access to the Presentation Templates view. This includes limiting their access to certain buttons, forms and features.
Grants Read access to each Presentation Template
Grants full access to the Presentation Templates view and related functions.
Grants Read, Edit or Delete access to each Presentation Template that a User has Read, Edit or Delete access to.

that a User has Read access to.
Search Rules. Grants View access to the Search Rules view. This includes limiting their access to certain buttons, forms and features.
Grants Read access to each Search Rule that a User has Read access to.
Grants full access to the Search Rules view and related functions.
Grants Read, Edit or Delete access to each Search Rule that a User has Read, Edit or Delete access to.
Workflow Management.
Grants View access to the Workflow Management view. This includes limiting their access to certain buttons, forms and features.
Grants Read access to
Grants full access to the Workflow Management view and related functions.
Grants Read, Edit or Delete access to each Workflow, Workflow Stage and

each Workflow, Workflow Stage and Action that a User has Read access to.
Action that a User has Read, Edit or Delete access to.
Version Management.
Grants View access to the Version Management view. This includes limiting their access to certain buttons, forms and features.
Grants Read access to each item in the Version library that a User has Read access to.
Grants full access to the Version Management view and related Version Library functions.

Syndication. Grants View access to both the Syndicators and Subscribers views. This includes limiting their access to certain buttons, forms and features.
Grants Read access to each Syndicator and Subscriber item that a User has Read access to.
Grants full access to both the Syndicators and Subscribers views.
Grants Read, Edit or Delete access to each Syndicator and Subscriber item that a User has Read, Edit or Delete access to.
Cache Management.
Grants View access to the Cache Management view. This includes limiting their access to certain buttons, forms and features.
Grants full access to the Cache Management view and related Cache Management functions.
Creating Role-Based Groups.

It is recommended that rather than add individual Users, that a set of role-based Groups are created in Member Manager and that these are added to the Authoring Portlet's access control. It will then be easier to set a User's access to the Authoring Portlet as you will only need to add them to a single Group in Member Manager, rather than having to add the names multiple time in the Authoring Portlet's access control.
Here are some examples of the types of role-based Groups you could create in Member Manager.
Member Manger Group.
View/Read access. Management access.
Content Creators.
● Content Management.
Site Managers.
● Content Management.
● Site Management.
● Category Management.
Designers. ● Site Management.
● Content Management.
● Presentation Templates.
● Authoring Templates.
● Library Components.
Parent topic: Configuring the Authoring Portlet.Parent topic: Access and Security.

Authoring Portlet Previewing Options.
This section determines what options are available to Users when they click the "Preview" button in the Authoring Portlet. There are three ways in which Web Content Management content can be previewed:
Allow Authors to preview content in a Web Page.
If this is selected, Users are able to preview Web Content Management pages via the Web Content Management servlet. This allows Users to preview Web Pages in a Web Browser.
Allow Authors to preview content in the local Portal Pages selected below:
Users are able to preview Web Content Management content in the Portal Pages selected here. The Portal Pages displayed here are the Portal Pages available on the same instance of WebSphere Portal as your Web Content Management application is installed on. The selected Portal Pages must contain a Web Content Management Local Rendering Portlet.
Allow Authors to preview content using the following URLs:
Users are able to preview Web Content Management content in the URLs entered here. This option is used to preview content in a Portlet located on a different WebSphere Portal server than the instance of WebSphere Portal that Web Content Management is installed with. You must enter the URL of each Portal Page you would like a User to preview content in. The listed Portal Pages must contain a Web Content Management Remote Rendering Portlet.
Parent topic: Configuring the Authoring Portlet.

Authoring Portlet User Interface Options.
The following User Interface options can be set here:
Maximum open tasks per Authoring Portlet instance:
The Authoring Portlet allows Users to open multiple tasks. E.g. - a User could open a Site Area form, a Presentation Template form, two Content forms and ten Component forms at the same time.
By default, Users can open an unlimited number of tasks. In reality, if every User opened a large number of tasks, the performance of your Web Content Management application could drop dramatically, or stop working altogether.
To avoid this, the Maximum open tasks per Authoring Portlet instance can be set here. Simply enter the number of tasks you would like to limit each Authoring Portlet instance to. This number is determined by the number of users, the required tasks each user may need to open, and the capacity of the server Web Content Management is installed on.
Tip: You can test this setting in a test environment before applying it to a production environment.

Maximum selected items per action before warning:
Maximum selected items per action before action denied:
By default, Users can select an unlimited number of items in an index. In reality, if a User selected a large number of items in an Index, the performance of your Web Content Management application could drop dramatically, or stop working altogether.
To avoid this, the Maximum selected items per action before action denied can be set here. Simply enter the number of selected items you would like to limit in an Index. This number is determined by the number of items Users may realistically be required to select, and the capacity of the server Web Content Management is installed on.
You can also set the Maximum selected items per action before warning. This should be smaller than the Maximum selected items per action before action denied as this warning should appear prior to a User reaching the selected items limit.
Tip: You can test these settings in a test environment before applying them to a production environment.
Maximum rows per table: This field allows you to define how many rows appear in an index. If left blank, this defaults to 20. A maximum of 100 rows can set.
Enable people awareness: People Awareness allows you to select User Names that appear in views and forms within the Authoring Portlet, and send those Users an e-mail or Sametime message.
To enable People Awareness, select the check-box.

Parent topic: Configuring the Authoring Portlet.

Configuring the Local Rendering Portlet.
The Local Rendering Portlet has the following configuration sections:
● Content Section.The Content section is used to select the Web Content Management Content or Component you want to display in the Rendering Portlet. If selecting a Content item to display, you can also choose an alternative Presentation Template to use to display the Content with instead of the Content item's default Presentation Template.
● Portlet Links Section.The Links section is used to enter the details of how you would like to Receive and Broadcast Links with other Portlets. This determines whether different Rendering Portlets will be aware of the state or context of other Rendering Portlets.
Parent topic: Configuring Portlets.

Content Section.
The Content section is used to select the Web Content Management Content or Component you want to display in the Rendering Portlet. If selecting a Content item to display, you can also choose an alternative Presentation Template to use to display the Content with instead of the Content item's default Presentation Template.
There are three different views available under this section.
● Select Content to view the Web Content Management Content options.● Select Content Component to view the Web Content Management Content
Component options.● Select Library Component to view the Web Content Management Component
options.
Note: Editing Portlets.
There are three buttons you can click after editing a Portlet:
● Clicking OK saves changes and returns to view mode.● Clicking Cancel clears all changes and returns to view mode.● Clicking Apply saves all changes, but the configure mode remains open.
Content View.
Content. ● Any currently selected Web Content Management Content is displayed in the Content View.
● Click Content to select a new Web Content Management Content item.
● Highlight the Content you wish to display in this Portlet.● Click OK.

Presentation Template. ● You can choose to use a different Presentation Template than the default Presentation Template used by the selected Content item by clicking the Presentation Template button.
● Highlight the Presentation Template you would like to use.
● Click OK.
Content Component View.
Content. ● Any currently selected Web Content Management Content is displayed here.
● Click Content to select a new Web Content Management Content item.
● Highlight the Content you wish to select a Content Component from.
● Click OK.
Content Component. ● Any currently selected Web Content Management Content Component is displayed here.
● Click Content Component to select a Content Component.● Select the Content Component you would like to use from
the pull-down list.● Click OK.
Library Component View.
Library Component. ● Any currently selected Web Content Management Component is displayed here.
● Click Library Component to select a new Web Content Management Component.
● Highlight the Library Component you wish to display in this Portlet.
● Click OK.

Default Context. ● A "default context" for the selected component can be set here. This is useful for dynamic components such as Menus or Navigators. E.g., The "default context" for a Navigator based on the current Site Area could set to the Site Area called "News". When the Portal Page is first opened, the Navigator will behave as if "News" is the current Site Area.
● Click Default Context to specify a "Default Context".● Highlight the item you would like to use as the "default
context" for a Library Component.● Click OK.
Parent topic: Configuring the Local Rendering Portlet.Parent topic: Configuring the Remote Rendering Portlet.

Portlet Links Section.
The Links section is used to enter the details of how you would like to Receive and Broadcast Links with other Portlets. This determines whether different Rendering Portlets will be aware of the state or context of other Rendering Portlets.
See "Linking Portlets" for further information.
Broadcast Links To:
None. If selected, the current state or context of this Rendering Portlet will not be broadcast to other Rendering Portlets.
This Page. If selected, the current state or context of this Rendering Portlet will be broadcast to other Rendering Portlets on the same page.
Another Page. If selected, the current state or context of this Rendering Portlet will be broadcast to other Rendering Portlets on another page. The page to broadcast to is selected via the pull-down.
Note: This option cannot be used with Anonymous Users.
Receive Links From:
None. If selected, this Portlet will remain static and the displayed Content or Component will never change unless updated within Web Content Management.
This Portlet. If selected, the Portlet will maintain the state or context of the Web Content Management Content or Component currently being displayed.
Other portlets and this portlet. If selected, the Portlet will be aware of any Rendering Portlets currently broadcasting their state or context.

Remember: Editing Portlets.
There are three buttons you can click after editing a Portlet:
● Clicking OK saves changes and returns to view mode.● Clicking Cancel clears all changes and returns to view mode.● Clicking Apply saves all changes, but the configure mode remains open.
● Linking Portlets.
Parent topic: Configuring the Local Rendering Portlet.Parent topic: Configuring the Remote Rendering Portlet.

Linking Portlets.
Many Rendering Portlets can be added to a single WebSphere Portal Server page, or a series of pages. Sometimes it will be necessary for different Rendering Portlets to interact with each other.
E.g., A Web Content Management Menu Component could be placed in one Rendering Portlet, and a Web Content Management Content item in another. If you would like the Content item to change when a different link is clicked in the Menu, you will need to "link" the two portlets. This type of behavior is enabled by setting different "broadcasting" and "receiving" parameters in the Links Section of the Rendering Portlet Configuration view.
Broadcasting Links.The state or context of a Rendering Portlet is not sent directly from one Portlet to another. Rather, Rendering Portlets can be configured to broadcast their current state or context to other Rendering Portlets on the same WebSphere Portal page, or to Rendering Portlets on other pages. Any information broadcast by a Rendering Portlet will only be received by Rendering Portlets configured to receive this information.
Receiving Links.A Rendering Portlet can receive information on the state or context of the current Web Content Management Content item or Component being displayed within it, or from Web Content Management Content items or Components displayed within other Rendering Portlets that are "broadcasting".
Stand-Alone Components.Stand-Alone Components are Web Content Management Components displayed within Rendering Portlets that:
● Do not Broadcast Links, and● Receive Links from themselves.
If a Stand-Alone Component contains a link, when clicked the Web Content Management Component will be replaced by the Content of the link. The Rendering Portlet will then take on the behavior of the displayed Content. The originally displayed Web Content Management Component will not be displayed again until a new Portal session is started.
When adding a Stand-Alone Component to a Rendering Portlet, it is possible to also select an Alternative Presentation Template in the Content view of the Content section. When a link is

clicked in the Stand-Alone Component, the Content that is then displayed will use the Alternate Presentation Template.
Example 1 - Menu and Content.In this scenario, one portlet would contain a Web Content Management Menu and another portlet would contain some Web Content Management Content. Links would need to be created between the two portlets to enable the displayed Content to change when a different links in the Menu were selected.
Portlet. Broadcast Links to: Receive Links from:
Menu. This Page None
Content. None Other Portlets and This Portlet
Example 2 - Navigator and Content.In this scenario, one portlet would contain a Item Views Navigator and another portlet would contain some Web Content Management Content. Links would need to be created between the two portlets to enable the displayed Content to change when a different links in the Navigator were selected. The Navigator would also change to reflect the current state of the Content being displayed.
Portlet. Broadcast Links to: Receive Links from:
Navigator This Page Other Portlets and This Portlet
Content. This Page Other Portlets and This Portlet
Parent topic: Portlet Links Section.

Configuring the Remote Rendering Portlet.
The Remote Rendering Portlet has the following configuration sections:
● Content Section.The Content section is used to select the Web Content Management Content or Component you want to display in the Rendering Portlet. If selecting a Content item to display, you can also choose an alternative Presentation Template to use to display the Content with instead of the Content item's default Presentation Template.
● Portlet Links Section.The Links section is used to enter the details of how you would like to Receive and Broadcast Links with other Portlets. This determines whether different Rendering Portlets will be aware of the state or context of other Rendering Portlets.
● Portlet Credential Section.By default, the Remote Rendering Portlet will use the Portal User's Logon to determine access rights to a Remote Rendering Portlet and any Content and Components contained within. Alternately, a valid Credential Vault Slot name can be used instead of the User's logon.
● Portlet Settings Section.The following Settings must be entered to enable the Remote Rendering Portlet.
Parent topic: Configuring Portlets.

Portlet Credential Section.
By default, the Remote Rendering Portlet will use the Portal User's Logon to determine access rights to a Remote Rendering Portlet and any Content and Components contained within. Alternately, a valid Credential Vault Slot name can be used instead of the User's logon.
In most cases, you would only need to override a Portal User's logon if the Portal Server used different logons from Web Content Management or if you wanted all users to have the same Credentials for a particular Remote Rendering Portlet.
Use LTPA or Use Credential Vault Slot.
Select either:
Use LTPA.If selected, Web Content Management will use the Portal User's logon to determine access rights to a Remote Rendering Portlet. See the WebSphere Portal Information Center for further information on LTPA.
Use Credential Vault Slot.
If selected, a valid Credential Vault Slot

name can be used instead of the User's logon. You will need to enter a valid Credential Vault Slot in the field below.
Credential Vault Slot Name.
The Credential Vault Slot to use is entered here.
Remember: Editing Portlets.
There are three buttons you can click after editing a Portlet:
● Clicking OK saves changes and returns to view mode.● Clicking Cancel clears all changes and returns to view mode.● Clicking Apply saves all changes, but the configure mode remains open.
Parent topic: Configuring the Remote Rendering Portlet.

Portlet Settings Section.
The following Settings must be entered to enable the Remote Rendering Portlet.
Web Content Management Server Host.
Enter the details of the Web Content Management Host:
http://[HOST]:[PORT]
Web Content Management Context Path.
Enter the Context path of the Web Content Management application. This is the path specified in the "wcm.context.path" of aptrixjpe.properties. This is located under /PortalServer/wcm/config .
In a standard installation this will be:
/lwp/wcm
Web Content Management Servlet Path.
Enter the path of the Web Content Management servlet. This is the path specified in the "DefaultServletPath" parameter in connect.cfg. This is located under /PortalServer/wcm/config .
In a standard installation this will be:
/connect
Web Content Management Authenticated Servlet Path.
Enter the secured path of the Web Content Management servlet. This is the path specified in the "SecureServletPath" parameter in connect.cfg. This is located under /PortalServer/wcm/config .
In a standard installation this will be:
/myconnect

Fully qualify URLs generated by Web Content Management Server.
Select this option to ensure that URLs generated by Web Content Management are fully qualified. This is enabled by default.
When Web Content Management content is fully qualified, a generated URL will look like this:
http://host:port/lwp/wcm/connect/site/sitearea/content
An unqualified URL will look like this:
/lwp/wcm/connect/site/sitearea/content
If you unselect this option you must ensure that you "redirect" the HTTP server to the Web Content Management Server. You will need to enter the following information in the "redirect" parameter of your HTTP server's configuration.
http://host:port
The HTTP server can then be configured to enable Web Content Management Resources to be load-balanced, and to apply additional security to Web Content Management Resources. Refer to your HTTP server documentation for details.
Remember: Editing Portlets.
There are three buttons you can click after editing a Portlet:
● Clicking OK saves changes and returns to view mode.● Clicking Cancel clears all changes and returns to view mode.● Clicking Apply saves all changes, but the configure mode remains open.
Note: Folder and file locations under i5/OS.
In i5/OS installations, Web Content Management files are located in the "wp user root" directory, not "/PortalServer/wcm/".
E.g. -
● WAS 5.1.1.3 - /QIBM/UserData/WEBAS51/Base/instance name/PortalServer51

Parent topic: Configuring the Remote Rendering Portlet.

Enabling Session Handling.
The default Web Content Management session handling works by initiating a new Web Content Management session for each Web Content Management portlet instance that is on a page. This can cause performance issues if many users access a page containing a large number of Web Content Management portlets.
The following procedures enables a service that is used to keep track of valid sessions. The service will help ensure that only a single session will be active between the instance of Portal and Web Content Management for each user. The service will manage access to the pool of active sessions and queue the requests for sessions that are in the process of being established, but not stop requests for established sessions to other servers or with different credentials.
Enabling Web Content Management Session Handling.
Remove the service jar from the ilwwcm-remoterenderingportlet.war.
The ilwwcm-remoterenderingportlet.war file contains a jar (ilwwcm-remoterenderingportlet-service.jar). This must be removed if the service is to be used. The Jar is added to the class loader instead. It is important it does not appear in both places if the service is to be used.
1. Open the ilwwcm-remoterenderingportlet.war file with an appropriate editing program. E.g. - WinZip. This file is located under:
..\PortalServer\wcm\installableApps\ilwwcm-remoterendering-portlet.war
2. Cut the following jar: ilwwcm-remoterenderingportlet-service.jar .3. Paste this jar file to the following location:
..\PortalServer\wcm\shared\app
Create a new Shared Library.
1. Open the WebSphere Administration console.2. Go to Environment/Shared Library .3. Create a new shared library called WCMRemoteLib.
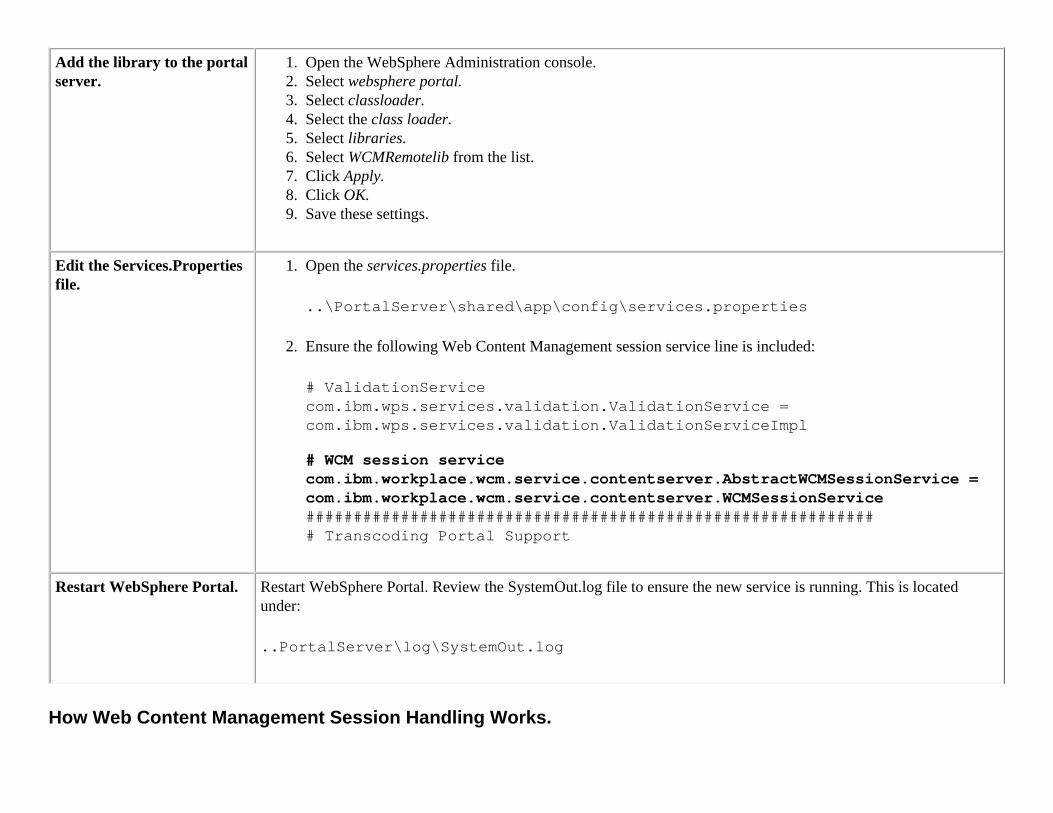
Add the library to the portal server.
1. Open the WebSphere Administration console.2. Select websphere portal.3. Select classloader.4. Select the class loader.5. Select libraries.6. Select WCMRemotelib from the list.7. Click Apply.8. Click OK.9. Save these settings.
Edit the Services.Properties file.
1. Open the services.properties file.
..\PortalServer\shared\app\config\services.properties
2. Ensure the following Web Content Management session service line is included:
# ValidationServicecom.ibm.wps.services.validation.ValidationService = com.ibm.wps.services.validation.ValidationServiceImpl
# WCM session servicecom.ibm.workplace.wcm.service.contentserver.AbstractWCMSessionService = com.ibm.workplace.wcm.service.contentserver.WCMSessionService############################################################# Transcoding Portal Support
Restart WebSphere Portal. Restart WebSphere Portal. Review the SystemOut.log file to ensure the new service is running. This is located under:
..PortalServer\log\SystemOut.log
How Web Content Management Session Handling Works.

When a request is made for a session with Web Content Management for a defined credential vault slot and URL, the WCMSessionService checks to see if this session already exists. If so, this session will be used. If not, a new session will be created.
Parent topic: Installing Web Content Management Portlets.

Configuration.
● Web Content Management Configuration Files.
● Caching Options.
● Data Storage.
● Other Configuration Options.
Parent topic: Installation Overview.

Web Content Management Configuration Files.
Web Content Management technology uses a set of configuration files to customize the behavior of its various features for an individual installation. The configuration files store a series of parameters, one for each of the customizable components of the system. The following files are used to configure a Web Content Management solution:
connect.cfg. This is located under: /PortalServer/wcm/config .
This file is used to configure different parameters relating to the Web Content Management application and Authoring Portlet.
aptrixjpe.properties. This is located under: /PortalServer/wcm/config .
This file is used to configure different parameters relating to the Web Content Management application and Authoring Portlet.
aptrixsearch.properties. This is located under: /PortalServer/wcm/config .
This is used to set parameters used by the Search Module. This can be used to create a basic Search function on keywords in items stored in a Web Content Management environment on a limited scale. See the Search Module chapter in the Advanced User Guide for further information.
Note: Folder and file locations under i5/OS.
In i5/OS installations, Web Content Management files are located in the "wp user root" directory, not "/PortalServer/wcm/".
E.g. -
● WAS 5.1.1.3 - /QIBM/UserData/WEBAS51/Base/instance name/PortalServer51
1. The connect.cfg file.2. The aptrixjpe.properties file.3. The aptrixsearch.properties file.
Parent topic: Configuration.

The connect.cfg file.
Web Content Management technology uses a configuration file (connect.cfg) to customize the behavior of its various features for an individual installation. The configuration file stores a series of settings, one for each of the customizable components of the system. It is located under /PortalServer/wcm/config .
Note: Folder and file locations under i5/OS.
In i5/OS installations, Web Content Management files are located in the "wp user root" directory, not "/PortalServer/wcm/".
E.g. -
● WAS 5.1.1.3 - /QIBM/UserData/WEBAS51/Base/instance name/PortalServer51
● Global Application Settings.
● Security Options.
● Logging and Trace Levels.
● Business Logic.
● Business Modules.
● Connector Section.
Parent topic: Web Content Management Configuration Files.

Global Application Settings.
The following Global settings can be set for a Web Content Management solution:
DefaultEncoding. This setting is used to set the default encoding for your Site. It is pre-configured as UTF-8. The following languages are supported:
UTF-8Arabic, Czech, Danish, Dutch, Finnish, French, German, Greek, Hungarian, Italian, Norwegian Polish, Portuguese, Portuguese (Brazilian), Russian, Spanish, Swedish, and Turkish.
Shift_JISJapanese
EUC-KRKorean
GB2312Simplified-Chinese
Big5Traditional-Chinese
Note: Changing the Default Encoding of a Site.
It is recommended that once the Default Encoding of a Web Content Management server is set, that it should not be changed. This is because any content that already exists in a Site may be corrupted when the default encoding is changed. For this reason, it is very important to determine which default encoding is to be used with your Site when first deploying a Web Content Management solution.
Note: Locale Consistency.
The language displayed in the Web Content Management Authoring and Rendering Portlets is determined by the region or locale of the User. There are, however, some elements of the Authoring and Rendering Portlets that use WebSphere Portal functions, such as date selection fields. These will be displayed using the locale of the WebSphere Portal server. For this reason, the language and locales of the Site being created, the client and server should be consistent.

If your Site contains content in different languages, then a separate Web Content Management authoring applications should be setup for each language on different WebSphere Portal Servers. These can then be combined into one Site using a Staging Server.
Multiple Remote Rendering Portlets on separate servers may need to be created to display sites in different languages to enable features such as Portal Search.
DefaultHost. Defines the default host for Web Content Management. Used with "Connect" tags and URL requests that do not include a full host specifier. This is case-sensitive.
DefaultURL. The URL to retrieve if no tag attributes at all are specified in the request URL. This is case-sensitive.
LogRequestParameters. Enables or disables printing of query parameters and post parameters in the log
MaxConcurrentTasks. The maximum number of concurrent tasks the scheduler can execute. This is equivalent to the size of the schedulers thread pool.
Proxy. Details of Proxy Server.
SchedulerSleepPeriod. This is the number of milliseconds that the scheduler will sleep between checking the pending queue for tasks to execute.
Parent topic: The connect.cfg file.

Security Options.
A Web Content Management solution can be configured to restrict access to various items. The configuration options that control security include:
ProcessContent. Determines whether content will be processed or not.
Customizable username & password parameter names.
You can specify the names of username and password fields to be used to determine a user in a request. That is, any username and password fields in a form etcetera to be used for authenticating the user. These can be specified in the top-level config as values for the following settings:
RequestPasswordParameterName. Key for the parameter that specifies a user's password for authorization.
RequestUsernameParameterName. Key for the parameter that specifies a user's username for authorization.
These values can be used in the request, instead of Authenticate headers.
Parent topic: The connect.cfg file.
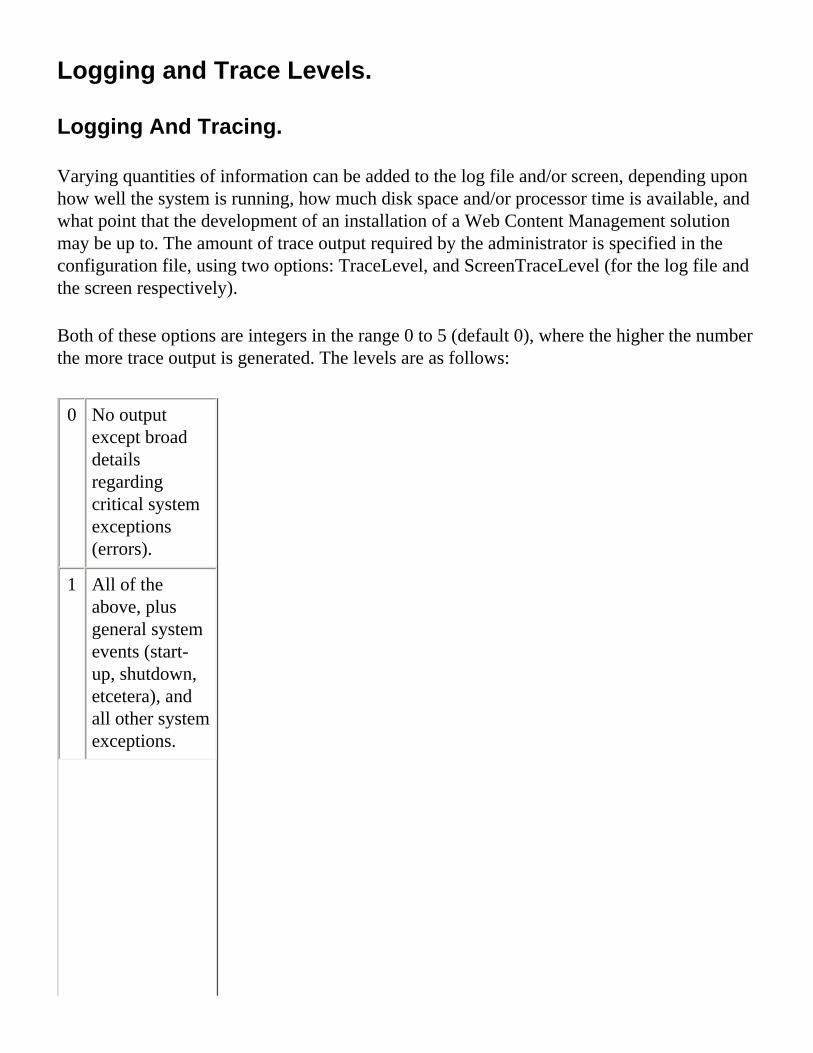
Logging and Trace Levels.
Logging And Tracing.
Varying quantities of information can be added to the log file and/or screen, depending upon how well the system is running, how much disk space and/or processor time is available, and what point that the development of an installation of a Web Content Management solution may be up to. The amount of trace output required by the administrator is specified in the configuration file, using two options: TraceLevel, and ScreenTraceLevel (for the log file and the screen respectively).
Both of these options are integers in the range 0 to 5 (default 0), where the higher the number the more trace output is generated. The levels are as follows:
0 No output except broad details regarding critical system exceptions (errors).
1 All of the above, plus general system events (start-up, shutdown, etcetera), and all other system exceptions.

Note: To use logging levels above 1 (2, 3, 4 etcetera) you will need to use debug jars. These are available on request from Web Content Management support.
2 All of the above, plus common events such as requests from clients.
3
4
5
Various levels of programmer-readable debug, not necessarily readily understandable by anyone but the developer. These levels should not be used unless a Web Content Management solution is not functioning properly and the reasons behind this need to be determined (debugging).

There are two other configuration options relating to trace output.
LogFile. This specifies the location of the system log file.
FlushLog. True.A new log file is created each time the Web Content Management application is started.
False.New trace logs are appended to the existing log file each time the Web Content Management application is started.
Further Configuration Settings

Buffered Buffered Logs are stored in an ordered list as they are written to the Destination rather than immediately writing it to the output stream. The buffer is later flushed, at which time all output stored in the buffer is written to the output stream. In this way, all the formatted LogEntry data is grouped together in the output.
DebugLog Debug log file settings
ErrorLog Error log file settings
FullLog Full Log File Settings

TraceTime If true, each line added to the log file will include a timestamp (exact down to the millisecond). If false, no timestamp is included. Useful for tracking request-processing times.
Parent topic: The connect.cfg file.

Business Logic.
This section contains configuration settings for the Business Layer.
DataProviders. DataProviders available to the template merger module.
FormAction. Defines FormActions available to the Form Processor module.
Hosts. List of hosts to trust.
Module. Defines settings for Business Layer Modules The following attributes can be set within Modules listed in the Business Logic Section.
Class=This defines the Web Content Management class to use for a particular key.
Autoload=True or False
The Web Content Management application can preload modules. If set to True, the module is placed in the business logic cache so they are already loaded, initialized and ready to go as soon as a request comes in. This will improve the performance of a Web Content Management solution.
remoteAccess=True or False
If True, enables modules to be available through GET or POST requests.
ProcessUnknownHosts. If True, only listed hosts will be processed. If False, the Web Content Management application will not process Connect tags from hosts not specified in the <hosts> child of the BLWebServer config.
Parent topic: The connect.cfg file.

Business Modules.
Module Configuration Settings.
AllowFileProtocol. Indicates whether the file protocol can be used. The default value if not specified is false.
FatalMail. FatalMail is used to set an e-mail address to send a notification if a fatal error occurs in the Web Content Management application. The following settings are set for FatalMail:
FatalMailMgrE-mail address to send message to.
FatalMailFromE-mail used by server
FatalMailUserNameUsername (usually the Administrator)
FatalMailPasswordPassword of user.
Form. Used to define XML field definitions used by forms being processed with the Form Processor
Operator Used to define Operators to be used within Field Definitions.
RemoteAccess. Lists the BLWebServer functions available through GET or POST requests. Other business logic functions you want to allow through GET or POST requests can be added. They can be any, including your own business logic functions, checked by calling the checkRemoteAccess() method)
Type. Used to define field types used in Field definitions.
Parent topic: The connect.cfg file.

Connector Section.
This contains a configuration section for each Connector available within the Web Content Management Framework.
MailConnector.
DefaultFromAddress. Default "From" address.
DefaultPassword. Secure SMTP user's password.
DefaultReplyToAddress. Default "Reply To" address.
DefaultSMTPServer. Default SMTP server. Must be a valid mail server.
DefaultUserName. Secure SMTP user's username.
MailDebug. If True, JavaMail debugging is activated.
HttpConnector.
These values are defaults across all HttpConnector instances. These will be overridden by any values set for a specific host or server type if present.
DefaultCache. Used when no cache is specified in a request for data. If true, the data will be stored in the site cache.
DefaultCacheExpires. The expiry date/time for items added to a cache (site or session) if the expiry date/time is not specified in the request.
DenyAccess. Lists hosts not to trust. Unauthorized (403) is returned for all requests to hosts listed if DenyUnknownHosts is false.
DenyUnknownHosts. If true, then an Unauthorized (403) is returned for any requests for hosts not specified in the <Hosts> section.
HttpResponse. Contains a list of HTTP response codes and the Web Content Management class that will handle it when the Web Content Management application receives the code in response to a request.

MaxConnectAttempts. Number of times to attempt to connect to a remote HTTP server for retrieval of a page.
OverrideCacheExpiryHeaders. If true, causes the DefaultCacheExpires config option to take precedence over the cache instructions in the HTTP headers from remote HTTP servers.
Protocols. This section lists values used to override the connector defaults given above for specific protocols. Each protocol is specified in a child of its own. (Overridden by <Hosts> and <ServerTypes>.)
ServerType. The ServerType setting value for a host is used as the key for a child config in the ServerTypes section. It is not the real server type as returned in the SERVER header of a response, but is a name for use only within the config.
ServerTypes. This section lists values used to override the connector defaults given above for specific server types as indicated in the hosts above. Each server is specified in a child of its own. (Overridden by <Hosts>)
TimeoutPeriod. Maximum time to wait to connect to a remote server.
LDAPConnector
ConnectionManager. There are two parameters: MaxConnectionPools or MaxConnectionsPerPool.
DefaultAuthDN. User name to use when searching LDAP database.
DefaultAuthPwd. User's Password
DefaultBaseSearchDN. The base search scope within the DIT
DefaultHost. IP Host name of LDAP server
DefaultPort. LDAP port number.
DefaultScope. Default scope for LDAP searches. E.g.: <DefaultScope value=SUBTREE />
DefaultTimeout. Default Connection Timeout

DefaultVersion. The version identifier: 2 or 3
OrganizationName. Organization Domain Name.
SQLConnector
ConnectionManager. There are two parameters: MaxConnectionPools or MaxConnectionsPerPool.
Databases. Defines the data sources (databases)
DefaultCache. True/False, Determines whether to cache data by default or not.
DefaultHost. Default connector settings which may be overridden by more specific settings below
DefaultRetries. Defines how many times to retry a connection attempt.
DefaultTimeout. Defines the timeout value for connections.
DefaultUsername. Default user name for connections.
Servers. Defines specific configuration for the database application types available.
SQLResponse. Generic response handlers go here.
Parent topic: The connect.cfg file.

The aptrixjpe.properties file.
This file contains parameters that can be edited to change the behavior of a Web Content Management environment. This is located under: /PortalServer/wcm/config .
Many, but not all aptrixjpe.properties parameters are updated when certain Web Content Management configuration tasks are run. See the Running Configuration Tasks topic for further information.
Web Content Management configuration tasks use parameters set in the wpconfig.propertes file to update aptrixjpe.properties. The wpconfig.propertes file is located under /PortalServer/config. See the Web Content Management Parameters in wpconfig.properties topic for further information on these settings.
Note: A "#" can be added to the beginning of a parameter if they are not required. Any parameters beginning with a "#" are not processed.
Note: Folder and file locations under i5/OS.
In i5/OS installations, Web Content Management files are located in the "wp user root" directory, not "/PortalServer/wcm/".
E.g. -
● WAS 5.1.1.3 - /QIBM/UserData/WEBAS51/Base/instance name/PortalServer51
The following settings are not updated by configuration tasks.
These are the only settings you should edit directly in aptrixjpe.properties.
default.system-email= Used by the workflow e-mail action in workflow. This is the default e-mail address to be used as the "From" address when a workflow action is executed. Enter a valid e-mail address.
default.site= The name of the Web Content Management Site to use as the default Site.
indexlibrary.multiThreadRefresh= Determines whether Web Content Management should use multiple threads when refreshing indexes. This is "false" by default. Multiple CPU servers may find it improves index refreshing time by setting this to "true".
resource.nonsecure.retrieveFromWebDir= This parameter determines whether non-secure resources should be retrieved from the web directory (true) or their source (false).
resource.nonsecure.useCachedSourceUrl= This parameter determines whether cached URLs to the source of a non secure resource should be used. Default equals "true".
resource.resourceServerModuleName= This parameter determines the URL to the Resource Server module business logic. This should not be changed.
resourceserver.maxCacheObjectSize= This parameter determines the maximum size of resources to be cached by the Resource Server module (in KB).

resourceserver.cacheExpiryDate= This parameter specifies the expiry date of resources cached by the Resource Server module.
data.dir= This is the path to store data. Usually ILWWCM/data.
transfer.holdingPath= This sets the temporary holding directory for files uploaded/downloaded from the rich text applet. Usually ILWWCM/system/holding.
system.dir= This sets the path to store system related information in. Usually ILWWCM/system.
web.path= This sets the file path to the web application (E.g.: c:/Websphere/AppServer/installedApps/---.ear/---.war)
connect.servlet.name= This is the name of the servlet for Web Content Management. This should not be changed.
control.Content=
control.Style=
control.Template=
control.Taxonomy= .
control.Category=
control.Site=
control.SiteArea=
control.Workflow=
control.WorkflowStage= .
control.WorkflowAction=
control.Cmpnt=
This section allows you to apply Profiling, Version Control or Workflows to Web Content Management items.
To enable Profiling add: com.aptrix.pluto.taxonomy.ProfileControl
To enable Workflows add: com.aptrix.pluto.workflow.WorkflowControl
To enable Version Control add: control.Content=com.aptrix.versioncontrol.VersioningControl
These controls apply to the following Item types:
● control.Content: Content Items.● control.Style: Presentation Templates.● control.Template: Authoring Templates.● control.Taxonomy: Taxonomies.● control.Category: Categories.● control.Site: Sites.● control.SiteArea: Site Areas.● control.Workflow: Workflows.● control.WorkflowStage: Workflow Stages.● control.WorkflowAction: Workflow Actions.● control.Cmpnt: Library Components.
Note: If Workflowing is enabled for the following items, a Workflow view will not be available in the Item Views Navigator.
● Sites and Site Areas.● Taxonomies and Categories.● Workflows, Stages or Actions.
Individual items can still be moved through Workflow Stages by accessing them through the normal Item Views and approving them.

deployment.itemChangedTaskDelay= This sets the recurring task interval (in seconds) for the item changed task. This setting affects how quickly syndication updates are sent to the subscribers. The shorter the interval, the faster the update can be sent, however, it does affect performance and servers with large amounts of data may wish to increase this figure. (E.g., 90)
Once a system has settled down (i.e. the item changed task started and no documents have been added, updated, or deleted since its last run), then any required syndication updates will be sent to the syndication application.
deployment.subscriberOnly= Set this value to true if this Web Content Management instance is only going to be subscribed to. By default, this has a value of false. If it is set to true, then all item gatherers will be deleted and the item changed task will not be added to the scheduler. This will give greater performance and is recommended for production machines that only subscribe.
deployment.recentSyndicatorErrorsSize= The number of recent syndication related errors to store for each syndicator.
deployment.recentSyndicatorDocumentErrorsSize= The number of recent document related syndication errors to store for each syndicator.
deployment.recentSubscriberErrorsSize= The number of recent syndication related errors to store for each subscriber.
deployment.recentSubscriberDocumentErrorsSize= The number of recent document related syndication errors to store for each subscriber.
The following properties are updated by certain configuration tasks.
These settings should not be edited directly in aptrixjpe.properties. These should only be updated by running the appropriate configuration task.
Parameter name in aptrixjpe.properties.
Parameter name in wpconfig.properties.
Updated by these Configuration Tasks.
persistency.encoding= WcmEncoding= ● create-wcm-tables.
● configure-wcm.
● config-wcm-repository.
● transfer-wcm-to-existing-repository.
● transfer-wcm-to-new-repository.
● transfer-wcm-filesystem-to-cloudscape.

manager.persistence= WcmMgrPersistence= ● create-wcm-tables.
● configure-wcm.
● config-wcm-repository.
● transfer-wcm-to-existing-repository.
● transfer-wcm-to-new-repository.
● transfer-wcm-filesystem-to-cloudscape.
resource.persistence= WcmResPersistence= ● create-wcm-tables.
● configure-wcm.
● config-wcm-repository.
● transfer-wcm-to-existing-repository.
● transfer-wcm-to-new-repository.
● transfer-wcm-filesystem-to-cloudscape.
jdbc.url= WcmDbUrl= ● create-wcm-tables.
● configure-wcm.
● config-wcm-repository.
● transfer-wcm-to-existing-repository.
● transfer-wcm-to-new-repository.

● transfer-wcm-filesystem-to-cloudscape.
jdbc.username= WcmDbUser= ● create-wcm-tables.
● configure-wcm.
● config-wcm-repository.
● transfer-wcm-to-existing-repository.
● transfer-wcm-to-new-repository.
● transfer-wcm-filesystem-to-cloudscape.
jdbc.password= WcmDbPassword= ● create-wcm-tables.
● configure-wcm.
● config-wcm-repository.
● transfer-wcm-to-existing-repository.
● transfer-wcm-to-new-repository.
● transfer-wcm-filesystem-to-cloudscape.

jdbc.table= WcmTable= ● create-wcm-tables.
● configure-wcm.
● config-wcm-repository.
● transfer-wcm-to-existing-repository.
● transfer-wcm-to-new-repository.
● transfer-wcm-filesystem-to-cloudscape.
jdbc.resources.table= WcmResourceTable= ● create-wcm-tables.
● configure-wcm.
● config-wcm-repository.
● transfer-wcm-to-existing-repository.
● transfer-wcm-to-new-repository.
● transfer-wcm-filesystem-to-cloudscape.
jdbc.tableSchema= WcmDbPassword= ● create-wcm-tables.
● configure-wcm.
● config-wcm-repository.
● transfer-wcm-to-existing-repository.
● transfer-wcm-to-new-repository.
● transfer-wcm-filesystem-to-cloudscape.

jdbc.readAhead= WcmReadAhead= ● create-wcm-tables.
● configure-wcm.
● config-wcm-repository.
● transfer-wcm-to-existing-repository.
● transfer-wcm-to-new-repository.
● transfer-wcm-filesystem-to-cloudscape.
jdbc.resources.maxSize= WcmResourceMaxSize= ● create-wcm-tables.
● configure-wcm.
● config-wcm-repository.
● transfer-wcm-to-existing-repository.
● transfer-wcm-to-new-repository.
● transfer-wcm-filesystem-to-cloudscape.
jdbc.dbms.name= WcmDbName= ● create-wcm-tables.
● configure-wcm.
● config-wcm-repository.
● transfer-wcm-to-existing-repository.
● transfer-wcm-to-new-repository.

● transfer-wcm-filesystem-to-cloudscape.
jdbc.managerStrategy= This is automatically generated by certain Web Content Management configuration tasks.
● create-wcm-tables.
● configure-wcm.
● config-wcm-repository.
● transfer-wcm-to-existing-repository.
● transfer-wcm-to-new-repository.
● transfer-wcm-filesystem-to-cloudscape.
jdbc.byteContentManagerStrategy= This is automatically generated by certain Web Content Management configuration tasks.
● create-wcm-tables.
● configure-wcm.
● config-wcm-repository.
● transfer-wcm-to-existing-repository.
● transfer-wcm-to-new-repository.
● transfer-wcm-filesystem-to-cloudscape.
zos.maxClobSize= WcmMaxClobSize= ● create-wcm-tables.
● configure-wcm.
● config-wcm-repository.

zos.smallClobSize= WcmSmallClobSize= ● create-wcm-tables.
● configure-wcm.
● config-wcm-repository.
zos.resources.maxBlobSize= WcmResourceMaxBlobSize= ● create-wcm-tables.
● configure-wcm.
● config-wcm-repository.
zos.resources.smallBlobSize= WcmResourceSmallBlobSize= ● create-wcm-tables.
● configure-wcm.
● config-wcm-repository.
zos.smallTable= WcmSmallTable= ● create-wcm-tables.
● configure-wcm.
● config-wcm-repository.
zos.resources.smallTable= WcmResourceSmallTable= ● create-wcm-tables.
● configure-wcm.
● config-wcm-repository.
cm.server= WcmCmServer= ● configure-wcm.
● config-wcm-repository.

cm.username= WcmCmUser= ● configure-wcm.
● config-wcm-repository.
cm.password= WcmCmPassword= ● create-wcm-tables.
● configure-wcm.
● config-wcm-repository.
cm.jpeServerIdentifier= This is automatically generated by certain Web Content Management configuration tasks.
● create-wcm-tables.
● configure-wcm.
● config-wcm-repository.
cm.connectionString= WcmCmSchema== ● create-wcm-tables.
● configure-wcm.
● config-wcm-repository.
deployment.itemDispatcherUrl= This is automatically generated by certain Web Content Management configuration tasks.
● configure-wcm.
deployment.syndicatorUrl= This is automatically generated by certain Web Content Management configuration tasks.
● configure-wcm.
deployment.subscriberUrl= This is automatically generated by certain Web Content Management configuration tasks.
● configure-wcm.
wcm.servlet.url.prefix= This is automatically generated by certain Web Content Management configuration tasks.
● configure-wcm.

wcm.server.base.url= This is automatically generated by certain Web Content Management configuration tasks.
● configure-wcm.
wcm.context.path= This is automatically generated by certain Web Content Management configuration tasks.
● configure-wcm.
wcm.servlet.path= This is automatically generated by certain Web Content Management configuration tasks.
● configure-wcm.
wcm.authoringui.url= This is automatically generated by certain Web Content Management configuration tasks.
● configure-wcm-authoring.
Parent topic: Web Content Management Configuration Files.

The aptrixsearch.properties file.
This file contains parameters that can be edited to change the behavior of the AptrixSearch Module.
Note: See the Advanced User Guide for further details on the AptrixSearch Module.
search.directory= [ILWWCM_HOME]/ilwwcm/search This is the directory where aptrixsearch stores its "hit" indexes. Replace [ILWWCM_HOME] with the location of your Web Content Management directory.
template.results= http://[HOST]:[PORT]/lwp/wcm/html/results.html The URL to the Results template page. (Example path only.)
template.noresults= http://[HOST]:[PORT]/lwp/wcm/html/noresults.html
The URL to the NoResults template page. (Example path only.) This is optional.
refresh.interval=120 The hit-index refresh interval in minutes. Optional.
Note: If you set your refresh interval to a short period of time, the indexing process may refresh before the entire Site has been indexed.

refresh.time=18:00:00;04:00:00 Enter times here if would like to refresh the hit-index at specific times. These times must match the format of your server's locale. This setting is optional.
pageserver.class=com.aptrix.pluto.search.fulltext.AjpePageServer The full class name of the page server to use. This is already configured for a Web Content Management environment and would normally not be changed.
ajpepageserver.url.path= http://[HOST]:[PORT]/lwp/wcm/connect The URL path to the Web Content Management servlet for the Web Content Management application.
ajpepageserver.pathinfos.ignore=/Aptrix A set of paths that should be ignored by AptrixSearch can be entered here (comma separated). Any paths that begin with the paths entered here will not be indexed. Optional.
ajpepageserver.url.suffix=pagedesign=searchpagedesign This sets a suffix to apply to the URL when retrieving. (The suffix is not included in results.) Optional.

ajpepageserver.user.name= A Web Content Management User to use when Indexing a Web Content Management environment is entered here. This parameter is optional. If commented out, then pages will be indexed as the Anonymous User.
resultsfilter.class=com.aptrix.pluto.search.fulltext.AjpeSecurityFilter #resultsfilter.class=com.aptrix.pluto.search.fulltext. AjpeTemplateFilter
The full class name of the results filter to be used. There are two types of results filters. The AjpeSecurityFilter is set as default and is used to hide pages that the User making the query does not have Live access to. The AjpeTemplateFilter is commented out by default, but can be used instead of the AjpeSecurityFilter. The AjpeTemplateFilter can be used to filter pages from a search based on values entered in the AjpeTemplate tag used within Presentation Templates. Only one filter type can be

used at a time.
ajpetemplatefilter.cgi.template=template The cgi name that will contain the template to perform filtering on.
Note: This field does NOT allow multivalue querystrings.
ajpetemplatefilter.cgi.filterout=filterout The cgi name that will contain the filter out flag.
Parent topic: Web Content Management Configuration Files.

Caching Options.
Both Web Content Management generated Web Pages and content from external data sources can be cached by the Web Content Management application. If utilized correctly, Web Content Management Caching can dramatically increase the performance of a Site.
● Developing a Caching Strategy.
● Caching Types.
● Caching versus Pre-rendering.
● Default Server Cache Configuration.
Parent topic: Configuration.

Developing a Caching Strategy.
To implement a successful Caching Strategy, it is recommended that the following steps be taken.
Analysis. Firstly, the Content of your Site should be analyzed to determine the nature of the Content to be Cached.
Things to consider include:
● Whether your Site contains static or dynamic data, or both.
● Whether you use "Connect" tags or URL requests in Presentation Templates or Component Designs.
● Whether you will be displaying data from external sources such as databases.

Strategy Development.
Once your Site and its Content has been Analyzed, and it has been determined that Caching is a realistic option, then the type or types of Caching to be implemented need to be determined. This includes determining:
● Your Server's default Cache type.
● Your Server's default Caching and Expiry settings.
● What Custom Caching and Expiry methods to use.
Test Implementation.
Implementing Caching on a Site for the first time can produce some unexpected results. Before implementing Caching in your Production Environment, it is recommended that Caching is first tested in a Test Environment.

There are two types of tests that should be performed:
Functional Testing:This involves testing for the appropriate caching and expiry settings for data time-lines, security and User personalization issues.
Performance Testing:
This involves testing for improvements in performance.
If the Test Implementation fails, further Analysis and Development may be required.
Final Implementation.
If the Test Implementation is successful, then your Caching Strategy can be implemented in the Production Environment.

Continuous Review.
Over time, the nature and size of your Site will change, as will the nature and numbers of Users. For this reason your overall Cache Strategy will need to be continuously reviewed and tested to ensure that the most appropriate strategy for your Site is currently implemented.
Parent topic: Caching Options.

Caching Types.
There are two types of caching available within a Web Content Management environment:
Web Content Caching. This caches the Web Pages delivered by the Web Content Management application.
See Web Content Caching Types for further information.
Data Caching. Data Caching is used to cache data retrieved by the Web Content Management application from external sources using "Connect" tags or by requests made via URL.
This includes data retrieved from sources such as SQL databases or other Web Pages.
In addition to Web Content Management's caching features, you can also "pre-render" a Site:
Pre-rendering. The Pre-rendering feature takes a "snap-shot" of an entire Web Content Management Site and converts it to HTML. The HTML-based site can then be viewed via a standard HTTP server.
● Web Content Cache Types.
Parent topic: Caching Options.

Web Content Cache Types.
Basic Web Content Caching.
This is the simplest caching option. The first time a Web Page is rendered by the Web Content Management application, it is stored in a Cache. Users then access this page from the Cache until it expires. Only then is the Web Page rendered afresh. The main benefit of this scenario is improved performance. Basic Caching should only be used on static Content that does not require "real-time" access.
Advanced Web Content Caching.
There are two major differences between Basic Caching and Advanced Caching:
● Advanced Caching can cache pages based on different User profiles.● Cache parameters in "Connect" tags and URL requests can be used to override your
Server's default Advanced Web Content Caching settings allowing you to set Custom Cache settings for individual Web Pages or Components.
There are five Advanced Caching types:
Site Caching. This is the same as the Basic Web Content Cache except that Cache parameters in "Connect" tags and URL requests can be used to override your Server's default Advanced Web Content Caching settings.
Session Caching. When Session Caching is enabled, a copy of each Web Page a User visits is stored in the Session Cache. The User accesses the cached version of a Web Page until they start a new session, or until the cached Web Page is expired from the cache.
User Caching. When User Caching is enabled, a copy of each Web Page a User visits is stored in the User Cache. The User accesses the cached version of a Web Page until the cached Web Page is expired from the cache.
Secured Caching. Secured Caching is used on Sites where the item Security features are used to grant different Users access to different Web Pages and Components based on the Groups they belong to.

Personalized Caching. Personalized Caching is used to cache Web Pages of Users who have the same "personalization profile". This means that Users who have selected the same personalization categories and keywords, and who belong to the same Group, share a single cache.
Default Web Content Caching versus Custom Caching.
Cache parameters in "Connect" tags and URL requests can be used to override your Server's default Advanced Web Content Caching settings allowing you to set Custom Cache settings for individual Web Pages or Components.
In most cases, Basic, Site and Session Caching would only be used as your Server's default Web Content Cache. User, Secured and Personalized Caching would mostly be used when using Custom Caching in "Connect" tags and URL requests.
Note: If Basic Caching is used as your default Web Content Cache, Custom Caching cannot be used.
See Web Content Cache Configuration and Using Custom Caching for further information.
Cache Comparisons.
Basic Caching. Advanced Caching.
Memory Usage Per Item. Medium High
Performance Improvement. Very High High
Custom Caching available. No Yes
"Connect" tag processing. No Yes
Parent topic: Caching Types.

Caching versus Pre-rendering.
A Pre-rendered Web Content Management Site can be viewed in two ways:
Via a HTTP server. Viewing a Pre-rendered site via a HTTP server is similar to using Basic Caching as the displayed Content is static and Custom Caching cannot be used.
Via Web Content Management. Viewing a Pre-rendered site via the Web Content Management application is similar to using Advanced Caching as Content can be dynamic and Custom Caching can be used.
Basic Caching versus a Pre-rendered Site delivered via a HTTP server.
At first glance, the Pre-rendering feature and Basic Caching do the same thing. There are however, some major differences that will determine which feature is the best for you.
The main difference between the two features is that Web Content Management's Pre-rendering feature takes a "snap-shot" of the entire Site each time it is run. Basic Caching only caches on a "page by page" basis. If performance is your main issue, then Pre-rendering may be the answer. If not, then Basic may be a better option.
Basic Caching. Pre-rendered Site delivered via a HTTP server.
Performance. Very fast Extremely fast
"Connect" tag processing. No No
Custom Caching. No No
Memory Requirements. Low to Medium. Memory requirements depends on the web server being used.
Disk Requirements. Low to Medium. Potentially very high as the entire site must be able to fit on disk.

Unexpected Broken Links. Yes
As some pages may be cached at different times, there is a small chance that not all the links on a cached page may be currently valid.
No
The Site is Pre-rendered in a single "batch", greatly reducing the chances of inconsistencies in the Site.
Advanced Caching versus a Pre-rendered Site delivered via Web Content Management.
These options are very similar. You may have to test both strategies before deciding which is best for your Site.
Advanced Caching. Pre-rendered Site delivered via Web Content Management.
Performance. Fast when cached, but slower if the requested page has expired from the cache. (As tag processing has a cost, this depends on how many "Connect" tags a page contains.)
Fast, but as tag processing has a cost, this depends on how many "Connect" tags a page contains.
"Connect" tag processing. Yes Yes
Custom Caching. Yes Yes
Memory Requirements. Medium to high. Medium to high.
Disk Requirements. Medium to high. Medium to high.

Unexpected Broken Links. Yes
As some pages may be cached at different times, there is a small chance that not all the links on a cached page may be currently valid.
No
The Site is Pre-rendered in a single "batch", greatly reducing the chances of inconsistencies in the Site.
Parent topic: Caching Options.

Default Server Cache Configuration.
The default cache settings for your Web Content Management server are set in the connect.cfg file.
● Web Content Cache Configuration.
● Data Cache Configuration.
● Expiring Strategies.
Parent topic: Caching Options.

Web Content Cache Configuration.
Setting the Default Web Content Cache Type.
The default Web Content caching environment for your Web Content Management server is set by editing the DefaultCache and DefaultContentCache settings in the connect.cfg file.
DefaultCache value= DefaultContentCache value=
No Caching. False None
Basic Cache. True N.A.
Site Caching. False Site
Session Caching. False Session
User Caching. False User
Secured Caching. False Secured
Personalized Caching. False Personalized
Additional Default Web Content Cache Parameters.
Web Content Cache Configuration settings are located within these sections of connect.cfg:
● The DefaultCache and ModuleResponseCache sub-sections of the BusinessLogic section.
● The ContentCache sub-section of the AJPE section of the ModuleConfig section.● The SessionCacheConfig section.
The following settings can be defined for each cache:

Basic Cache. DefaultCache.❍ DefaultCacheExpires.❍ DefaultCache.
ModuleResponseCache.❍ FlushExpiredInterval.❍ WriteIndexInterval.❍ CacheDir.❍ MemCacheSize.❍ DiskCacheSize.
Advanced Cache: All. ContentCache.❍ DefaultContentCache.❍ ContentCacheExpires.❍ FlushExpiredInterval.❍ WriteIndexInterval.❍ MemCacheSize.❍ DiskCacheSize.
Advanced Cache: Session Cache only. SessionCacheConfig.MemCacheSize.
CacheDir. The directory on your Server used to store cached data.
ContentCacheExpires. This sets the default expiry for all Advanced Caches. It can be either a relative period or an absolute date and time.
DefaultCache. If True, Basic caching is enabled. If False or missing, Advanced Caching is enabled.
DefaultCacheExpires. This sets the default expiry for the Basic Cache. It can be either a relative period or an absolute date and time.
DefaultContentCache. If the Advanced Cache is enabled, the default Advanced Cache is set here.

DiskCacheSize. This is used to set the number of elements that can be held in a disk cache at any one time. If the value is 0, the disk cache will not be created.
FlushExpiredInterval. This sets how often to check for expired items. (In seconds.)
MemCacheSize. This sets the number of elements that can be held in a memory cache at any one time. If the value is 0, the memory cache will not be created.
WriteIndexInterval. This sets how often to write the index to disk in seconds. 0 indicates to write on every change.
Cache Size Strategy.
Content is normally stored in a Cache until it has "expired". However, if your Cache is configured too small, some cached content may be dropped from the Cache to make room for newly cached content. This may result in a drop in performance. For this reason, it is important to configure your Memory Cache and Disk Cache to be large enough to store your most important Content until it expires normally.
Note: Dropping items from Caches.
Items least recently accessed from the cache will be the first dropped from a Cache.
Parent topic: Default Server Cache Configuration.

Data Cache Configuration.
Data Caching is used to cache data retrieved by the Web Content Management application from external sources using "Connect" tags or by requests made via URL. The following default Data Caching settings can be set in the connect.cfg file within the "Connector" section.
HttpConnector. DefaultCache.Used when no cache is specified in a request for data. If true, the data will be stored in the Site cache.
DefaultCacheExpires.The expiry date/time for items added to a cache (site or session) if the expiry date/time is not specified in the request.
OverrideCacheExpiryHeaders.If true, causes the DefaultCacheExpires config option to take precedence over the cache instructions in the HTTP headers from remote HTTP servers.
SQLConnector. DefaultCache.True/False, Determines whether to cache data by default or not.
Parent topic: Default Server Cache Configuration.

Expiring Strategies.
Like Caching Strategies, a Server's default Expiring strategies can be set in connect.cfg. Custom Expiring parameters can also be set in "Connect" tags and URL requests to override a Server's default Expiring strategies.
Note: If Basic Caching is used as your default Web Content Cache, Custom Expiring cannot be used.
In most cases the Expiry schedule is based around how often the source Content is updated. So, if the source Content is updated hourly, then each Cache would be expired hourly. If the source Content is updated daily, then each Cache would be expired daily.
Beyond these examples, a different Expiry schedule would be used. If your Web Pages were only updated weekly, or monthly, you would still schedule your caches to expire daily. Otherwise, when your source content was updated, it could take up to a week for it to appear on your Site.
Data can also be flushed (removed) from the cache while the Web Content Management application is still running via the Web Content Management Administration Interface. This frees up memory or disk space (or both), and causes the Web Content Management application to retrieve fresh versions of any required data.
Caching Expiries versus Workflow Expiries.
The Expires parameter in a Web Content Management Workflow is not related to the Expires parameter in Web Content Management Caching. A Web Content Management page that is set to expire at midnight as part of a Workflow will only do so if it hasn't already been saved in a Web Content Management Cache. The Web Content Management page will remain in the Web Content Management cache until expired by the Web Content Management application regardless of the Expires setting in a Web Content Management Workflow.
Parent topic: Default Server Cache Configuration.

Data Storage.
By default, Web Content Management uses Cloudscape as a data repository. Web Content Management data can also be saved within a JDBC database. It is recommended that large sites should be stored via DB2 or Oracle persistency. This will improve your Site's performance and increase the reliability of data storage. It is possible to use different data storage options in different environment. E.g., You may use DB2 persistency with an Authoring application, but use a Cloudscape repository on the Staging and Delivery applications.
Note: Multiple Web Content Management Applications.
Two Web Content Management applications cannot share a single data repository. Separate data repositories must be created for each Web Content Management application.
Note: Database Replication versus Syndication.
When first creating a new Web Content Management application, it is better to copy an existing Web Content Management data repository database to a new server, enable your new Web Content Management application to use the new data repository, and then enable Syndication rather than trying to Syndicate an entire Site's data. You must be using the same type of database to be able to do this.
Refer to your data repository database documentation for information on copying database data.
● The Repository Configuration Task.By default, Web Content Management uses Cloudscape as a data repository. The Web Content Management Repository configuration task updates the Web Content Management configuration to use a different JDBC data repository such as DB2.
● Web Content Management Parameters in wpconfig.properties.The Web Content Management section of the wpconfig.properties file contains settings that are used by Web Content Management configuration tasks. This is located under the /PortalServer/config folder.
● Data Repository Settings.

When configuring Web Content Management to use a Data Repository you must edit the Web Content Management section of the wpconfig.properties file. Default settings for each supported Data Repository are listed in this file and can be used as the basis for configuring a Data Repository.
● Resource Storage Settings.External files can be imported into Web Content Management. Like Web Content Management data, these resources can be stored in different repositories.
Parent topic: Configuration.

Data Repository Settings.
When configuring Web Content Management to use a Data Repository you must edit the Web Content Management section of the wpconfig.properties file. Default settings for each supported Data Repository are listed in this file and can be used as the basis for configuring a Data Repository.
Note: Data Repository Database Documentation.
When enabling a data repository you should also refer to the documentation of your Data Repository Database.
Note: Backing-up and restoring Data Repository Databases.
Web Content Management does not have any functionality to backup and restore Data Repository Databases. You should refer to the documentation of your Data Repository Database for information on how to backup and restore a database.
Additional settings for specific Data Repositories are listed below:
● Cloudscape Configuration Options.
● DB2 Configuration Options.
● IBM Content Manager Configuration Options.
● Microsoft SQL Server 2000 Configuration Options.
● Oracle Configuration Options.
Parent topic: Data Storage.

Cloudscape Configuration Options.
Configuration.
By Default, the Web Content Management application stores data files in a Cloudscape database. This database is located under PortalServer\wcm\ilwwcm\db\WCMDB . The default Cloudscape Username created is "APP". No password is required.
If you need to change your Web Content Management data repository you will need to run the Repository Configuration task. See the Repository Configuration task topic for further information. The Web Content Management section of the wpconfig.properties file must be edited prior to running the Repository Configuration task. This is located under /PortalServer/config. See the Web Content Management Parameters in wpconfig.properties topic for further information.
The following information can be used to troubleshoot a Cloudscape data repository.
Cloudscape Options.
● The default schema for the Cloudscape database installed with Web Content Management is "APP". If you have changed the default schema of the Cloudscape database, then you should update /PortalServer/config/actions/dbt_cfg.xml with your new values. Refer to the Cloudscape and WebSphere Application Server documentation for further information on creating or changing schemas for Cloudscape.
Adding a path to the JDBC driver in WebSphere.
Ensure the class path is included. Open the WebSphere Administration console and go to:
● Servers->Application Servers-> WebSphere_Portal -> Process Definition-> Java Virtual Machine
● Add the full path to db2j.jar (including db2j.jar) to the Classpath field.
Cloudscape system properties file.
1. Before you start the Cloudscape Network Server, you must place the following

properties in the Cloudscape system properties file, db2j.properties:
❍ db2j.drda.sendLongVarcharAsClob=true❍ db2j.drda.sendLongBitVaryingAsBlob=true
2. If this file does not exist, create it and place it in the directory you will run cloudscape from. The Cloudscape start script must then be modified to use the db2j.properties file for system properties. This is done by setting the system home to the directory containing the db2j.properties file. To do this, add the following option to startNetworkServer.bat:
❍ Ddb2j.system.home=[directory_containing_db2j_properties]
Naming Standards.
For client installations that enforce naming standards within Cloudscape we have supplied a sample Cloudscape "DDL" file to create the required Web Content Management Cloudscape items. These files are located under /PortalServer/wcm/config/templates. Clients must first customize this file according to local naming standards and then execute it against their database to create the necessary Web Content Management items.
Note: This step is optional and only for clients that require Cloudscape customization. The Web Content Management application will create all database items needed during startup (but using default naming conventions for all Cloudscape items).
Note: Folder and file locations under i5/OS.
In i5/OS installations, Web Content Management files are located in the "wp user root" directory, not "/PortalServer/wcm/".
E.g. -
● WAS 5.1.1.3 - /QIBM/UserData/WEBAS51/Base/instance name/PortalServer51
Sample DDL.
CREATE TABLE [SCHEMA] ( "ID" BIGINT NOT NULL PRIMARY KEY, "LAST_MODIFIED" TIMESTAMP NOT NULL,

"XML_CONTENT" LONG VARCHAR NOT NULL, "COMPONENT_TYPE" VARCHAR(255) NOT NULL );
The following tags will need to be replaced with actual settings:
● [SCHEMA]
Parent topic: Data Repository Settings.

DB2 Configuration Options.
Configuration.
By Default, the Web Content Management application stores data files in a Cloudscape database.
If you need to change your Web Content Management data repository you will need to run the Repository Configuration task. See the Repository Configuration task topic for further information. The Web Content Management section of the wpconfig.properties file must be edited prior to running the Repository Configuration task. This is located under /PortalServer/config. See the Web Content Management Parameters in wpconfig.properties topic for further information.
The following information can be used to troubleshoot a DB2 data repository.
DB2 Options.
Note: The default encoding of the database must be set to the same default encoding as the Web Content Management Server as set in connect.cfg. The default (and recommended) encoding of a Web Content Management Server is UTF8.
Note:
The database should use the codeset with an appropriate value, such as "AU" or "US", as specified in the DB2 Administration Guide.
E.g., UTF-8 TERRITORY AU.
This will ensure that no character set conversion problems occur as all data will be stored natively in the database in UTF-8 encoding.
Note: DB2 Driver Types.
Web Content Management supports only type 2 drivers for DB2 on non z/OS platforms. The "app" driver is also valid when aliasing a remote non z/OS DB2 database locally using the DB2 client.
For connections to UDB on z/OS, type 4 drivers should be used. You must use the type 4 drivers installed with the either of the following:
❍ DB2 8.1 Fix Pack 6 or 6a on the distributed platforms (Windows, Linux, Unix):■ <SQLLIB>/java/db2jcc.jar ■ <SQLLIB>/java/db2jcc_license_cisuz.jar
❍ UDB for Z_OS 7.1 ■ <SQLLIB>/jcc/classes/db2jcc.jar■ <SQLLIB>/jcc/classes/db2jcc_license_cisuz.jar■ You will need to copy these drivers to a location on your WebSphere Portal server first
and replace the path to that location in the <SQLLIB> path in the WcmDbLibrary field of wpconfig.properties.

DB2 on z/OS Options.
● For connections to UDB on z/OS, type 4 drivers should be used.● Web Content Management connects to DB2 on z/OS using a WebSphere Application Server datasource.
The details of this connection can be viewed in the WebSphere Administrative Console under Resouces -> JDBC Providers -> wcmJDBC -> Data Sources -> wcmDS.
❍ The connection information displayed under Custom properties. This includes the server name, the location name and the port number.
❍ The Connection Pooling information is in Connection Pool properties. You can increase the maximum number of connections allowed.
❍ The database user/password security information is in J2C Authentication Data Entries. Refer to the WebSphere Application Server documentation for further details on these settings.
Note: Transferring file system data to Cloudscape and then to DB2 on z/OS.
When transferring data from file system to Cloudscape, and then to a DB2 on z/OS data repository you must ensure that the data has a valid format. For example:
The XML files from the files system can only have either:
● Carriage return and line feed (CRLF - windows end of line style), or● Just line feed (LF - unix end of line style)
An XML file that combines CRLF and LF in the same file will be classed as invalid and you will have problems when transferring it to z/OS. Even though most windows editors can view these files, they are not technically valid as they have inconsistent end of line styles.
Adding the path to the JDBC driver in WebSphere.
Ensure the class path is included. Open the WebSphere Administration console and go to:
For type 2 drivers:
● Servers->Application Servers-> WebSphere_Portal -> Process Definition-> Java Virtual Machine
● Add the full path to the DB2 JDBC driver to the Classpath field.
❍ <SQLLIB>/java/db2java.zip.
For DB2 on z/OS:
● Servers->Application Servers-> WebSphere_Portal -> Process Definition-> Java Virtual Machine

● Add the full path to the DB2 JDBC driver to the Classpath field.
❍ <SQLLIB>/java/db2jcc.jar❍ <SQLLIB>/java/db2jcc_license_cisuz.jar
Naming Standards.
For client installations that enforce naming standards within DB2 we have supplied a set of sample DB2 "DDL" files to create the required Web Content Management DB2 items. These files are located under /PortalServer/wcm/config/templates. Clients must first customize this file according to local naming standards and then execute it against their database to create the necessary Web Content Management items.
Note:
● This step is optional and only for clients that require DB2 customization. The Web Content Management application will create all database items needed during startup (but using default naming conventions for all DB2 items).
Note: Folder and file locations under i5/OS.
In i5/OS installations, Web Content Management files are located in the "wp user root" directory, not "/PortalServer/wcm/".
E.g. -
● WAS 5.1.1.3 - /QIBM/UserData/WEBAS51/Base/instance name/PortalServer51
Example DDL.
CONNECT TO [DATABASE];CREATE TABLE [SCHEMA]AJPE ( "ID" BIGINT NOT NULL , "LAST_MODIFIED" TIMESTAMP NOT NULL , "XML_CONTENT" CLOB(16777216) LOGGED NOT COMPACT NOT NULL , "COMPONENT_TYPE" VARCHAR(256) NOT NULL ) IN "[TABLESPACE]" ;ALTER TABLE [SCHEMA]AJPE ADD PRIMARY KEY ("ID");
COMMIT WORK;
CONNECT RESET;
TERMINATE;
The following tags will need to be replaced with actual settings:

● [DATABASE]● [SCHEMA]● [TABLESPACE]
Parent topic: Data Repository Settings.

IBM Content Manager Configuration Options.
By Default, the Web Content Management application stores data files in a Cloudscape database. If you need to change your Web Content Management data repository to a Content Manager data repository, you will need to do the following:
Transferring Data to an IBM Content Manager data repository.
There are two ways that data can be transferred to an IBM Content Manager data repository.
Transferring data from an existing IBM Content Manager data repository.This option would normally be used when upgrading a Web Content Management application. To do this you will need to:
1. Install a new Web Content Management application.2. Edit wpconfig.properties and run the command "config-wcm-repository" to configure your new
Web Content Management application to use your current data repository. See the Repository configuration task topic for further information.
3. Migrate your old Web Content Management data. See the User Migration topic for further information.
Transferring data from an existing JDBC data repository.1. Install a new Web Content Management application.2. Create an IBM Content Manager database to use as a the Web Content Management data
repository. 3. Edit wpconfig.properties and run the command "config-wcm-repository" to configure your new
Web Content Management application to use the new Content Manager data repository. See the Repository configuration task topic for further information.
4. Syndicate the data from the application using JDBC as a data repository to the application using Content Manager.
The Web Content Management application using JDBC must be the same version of Web Content Management that the application using IBM Content Manager as a data repository. If not, then you must first upgrade your Web Content Management application. See the Upgrading Process topic for further information.
IBM Content Manager Requirements.
● IBM Content Manager should be configured with Unicode support enabled.
● If using a remote Content Manager application as your data repository, you must have a Content Manager client installed on the server where Web Content Management is installed. Refer to the IBM Content Manager Information Center for further information on Content Manager client requirements and installation.
Additional Properties.
The following properties are optional and can be set in the aptrixjpe.properties file. You will need to add these parameters to aptrixjpe.properties as they are not included in aptrixjpe.properties by default.

cm.resources.server=[CM_RESOURCES_SERVER_NAME]
cm.resources.username=[CM_RESOURCES_USERNAME]
cm.resources.password=[CM_RESOURCES_PASSWORD]
cm.resources.connectionString=[CM_RESOURCES_CONNECTION_STRING]
Optional Content Manager information. These default to Web Content Management metadata if not specified.
cm.resources.jpeServerIdentifier=[CM_JPE_RESOURCES_SERVER_ID] Optional Web Content Management Resources Unique identifier for the site, defaults to cm.jpeServerIdentifier
cm.jpeServerIdAttribute.name=JPEServerID
cm.jpeServerIdAttribute.displayName=JPE Server ID
cm.jpeServerIdAttribute.maxAttributeSize=256
cm.jpeIdAttribute.name=JPEID
cm.jpeIdAttribute.displayName=JPE ID
cm.jpeIdAttribute.maxAttributeSize=256
cm.nameAttribute.name=Name
cm.nameAttribute.displayName=Name
cm.nameAttribute.maxAttributeSize=256
cm.descAttribute.name=Description
cm.descAttribute.displayName=Description
cm.descAttribute.maxAttributeSize=512
cm.jpeTypeAttribute.name=Type
cm.jpeTypeAttribute.displayName=Type
cm.jpeTypeAttribute.maxAttributeSize=256
cm.xmlAttribute.name=XMLContent
Attribute settings within CM. Name and DisplayName must be 15 characters or less

cm.xmlAttribute.displayName=XML Content
cm.xmlAttribute.maxAttributeSize=4999999
cm.resources.identityTypeAttribute.name=IdentityType
cm.resources.identityTypeAttribute.displayName=Identity Type
cm.resources.identityTypeAttribute.maxAttributeSize=256
cm.resources.jpeServerIdAttribute.name=JPEServerID
cm.resources.jpeServerIdAttribute.displayName=JPE Server ID
cm.resources.jpeServerIdAttribute.maxAttributeSize=256
cm.resources.jpeIdAttribute.name=JPEID
cm.resources.jpeIdAttribute.displayName=JPE ID
cm.resources.jpeIdAttribute.maxAttributeSize=256
cm.resources.nameAttribute.name=Name
cm.resources.nameAttribute.displayName=Name
cm.resources.nameAttribute.maxAttributeSize=256
cm.resources.descAttribute.name=Description
cm.resources.descAttribute.displayName=Description
cm.resources.descAttribute.maxAttributeSize=512
cm.resources.jpeTypeAttribute.name=Type
cm.resources.jpeTypeAttribute.displayName=Type
cm.resources.jpeTypeAttribute.maxAttributeSize=256
Optional Attribute settings for JPE Resources, defaults to Web Content Management Metadata settings

cm.itemType=AJPEData
cm.resources.itemType=AJPEResources
The name of the item type used for Web Content Management Data and Resources. Must be 15 characters or less
Adding a path to the JDBC driver in WebSphere.
To set the class path, in the WebSphere Administration console go to:
● Servers->Application Servers-> WebSphere_Portal -> Process Definition-> Java Virtual Machine
● Add the full path to the IBM Content Manager program folder (usually named Cmgmt)
● Add the full path of the following jar files(including the name of the jar) to the Classpath field❍ cmb81.jar ❍ cmbcm81.jar ❍ cmbdb281.jar ❍ cmbdj81.jar ❍ cmbfed81.jar ❍ cmbicm81.jar ❍ cmbjdbc81.jar ❍ cmblog4j81.jar ❍ cmbsdk81.jar ❍ cmbutil81.jar ❍ cmbutilfed81.jar ❍ cmbutilicm81.jar ❍ cmbutiljdbc81.jar ❍ cmbview81.jar ❍ cmbwas81.jar ❍ esclisrv.jar ❍ essrv.jar ❍ log4j.jar ❍ xerces.jar
● Add the full path to db2java.zip (including db2java.zip) to the Classpath field.
Remote Server Installation.
If your IBM Content Manager installation resides on a different server from the Web Content Management Application Server, then ensure the following have been performed on the Web Content Management Application Server:
● If using DB2 version 7.x, ensure that the DB2 JDBC level has been changed to "2".
● That the CM database on the IBM Content Manager Server has been configured in the DB2 Client Configuration Assistant.

● If using a remote Content Manager application as your data repository, you must have a Content Manager client installed on the server where Web Content Management is installed. Refer to the IBM Content Manager Information Center for further information on Content Manager client requirements and installation.
Restart the Web Content Management Application.
You must always restart the Web Content Management application after making any changes to aptrixjpe.properties or connect.cfg.
Parent topic: Data Repository Settings.

Microsoft SQL Server 2000 Configuration Options.
Configuration.
By Default, the Web Content Management application stores data files in a Cloudscape database.
If you need to change your Web Content Management data repository you will need to run the Repository Configuration task. See the Repository Configuration task topic for further information. The Web Content Management section of the wpconfig.properties file must be edited prior to running the Repository Configuration task. This is located under /PortalServer/config. See the Web Content Management Parameters in wpconfig.properties topic for further information.
Note: Transferring data to Microsoft SQL Server.
When transferring data to Microsoft SQL Server, you must enter the WcmDbUser name in uppercase in wpconfig.properties. The WcmDbUser name must also be entered in uppercase in Microsoft SQL Server.
The following information can be used to troubleshoot a Microsoft SQL Server 2000 data repository.
Adding a path to the JDBC driver in WebSphere.
Ensure the class path is included. Open the WebSphere Administration console and go to:
● Servers->Application Servers-> WebSphere_Portal -> Process Definition-> Java Virtual Machine
● Add the full path of the following jar files(including the name of the jar) to the Classpath field
❍ msbase.jar❍ mssqlserver.jar❍ msutil.jar
Naming Standards.

For client installations that enforce naming standards within Microsoft SQL Server 2000 we have supplied a sample Microsoft SQL Server 2000 "DDL" file to create the required Web Content Management Microsoft SQL Server 2000 items. These files are located under /PortalServer/wcm/config/templates. Clients must first customize this file according to local naming standards and then execute it against their database to create the necessary Web Content Management items. Microsoft SQL Server 2000 does not provide a mechanism for executing DDL files against the database. Clients must instead create the database tables using the Enterprise Manager tool. The following table definition provides information required to create the table to store the Web Content Management items.
Note:
● This step is optional and only for clients that require Microsoft SQL Server 2000 customization. The Web Content Management application will create all database items needed during startup (but using default naming conventions for all Microsoft SQL Server 2000 items).
Note: Folder and file locations under i5/OS.
In i5/OS installations, Web Content Management files are located in the "wp user root" directory, not "/PortalServer/wcm/".
E.g. -
● WAS 5.1.1.3 - /QIBM/UserData/WEBAS51/Base/instance name/PortalServer51
Sample DDL.
Table Name [SCHEMA]"AJPE"
Table columns "ID" BIGINT NOT NULL PRIMARY KEY "LAST_MODIFIED" DATETIME NOT NULL "XML_CONTENT" TEXT NOT NULL "COMPONENT_TYPE" VARCHAR (255) NOT NULL
The following tags will need to be replaced with actual settings:

● [SCHEMA]
Parent topic: Data Repository Settings.

Oracle Configuration Options.
By Default, the Web Content Management application stores data files in a Cloudscape database. If you need to change your Web Content Management data repository to an Oracle data repository, you will need to run the Repository Configuration task. See the Repository Configuration configuration task topic for further information.
The following information can be used to troubleshoot an Oracle data repository.
Configuration.
By Default, the Web Content Management application stores data files in a Cloudscape database.
If you need to change your Web Content Management data repository you will need to run the Repository Configuration task. See the Repository Configuration task topic for further information. The Web Content Management section of the wpconfig.properties file must be edited prior to running the Repository Configuration task. This is located under /PortalServer/config. See the Web Content Management Parameters in wpconfig.properties topic for further information.
Note: Upgrading from a File System repository.
If you would like transfer File System data to an Oracle database, you will need to use "transfer-wcm-filesystem-to-cloudscape" task to transfer the data to a Cloudscape database, and then use the "transfer-wcm" task to transfer the Cloudscape data to another JDBC database. See the Repository configuration task topic for further information.
The following information can be used to troubleshoot an Oracle data repository.
Oracle Options.

Note: These instructions apply to Oracle installations using JDBC Type II or higher drivers.
Note: The default encoding of the database must be set to the same default encoding as the Web Content Management Server as set in connect.cfg. The default (and recommended) encoding of a Web Content Management Server is UTF8.
Adding a path to the JDBC driver in WebSphere.
Ensure the class path is included. Open the WebSphere Administration console and go to:
● Servers->Application Servers-> WebSphere_Portal -> Process Definition-> Java Virtual Machine
● Add the full path to ojdbc14.jar (including ojdbc14.jar) to the Classpath field.
Naming Standards.For client installations that enforce naming standards within Oracle we have supplied a sample Oracle "DDL" file to create the required Web Content Management Oracle items. These files are located under /PortalServer/wcm/config/templates. Clients must first customize this file according to local naming standards and then execute it against their database to create the necessary Web Content Management items.
Note:
● This step is optional and only for clients that require Oracle customization. The Web Content Management application will create all database items needed during startup (but using default naming conventions for all Oracle items).
Note: Folder and file locations under i5/OS.
In i5/OS installations, Web Content Management files are located in the "wp user root" directory, not "/PortalServer/wcm/".
E.g. -
● WAS 5.1.1.3 - /QIBM/UserData/WEBAS51/Base/instance name/PortalServer51

Sample DDL.
CONNECT TO [DATABASE]; CREATE TABLE "[SCHEMA]"."AJPE" ( "ID" NUMBER(19, 0) NOT NULL , "LAST_MODIFIED" DATE NOT NULL , "XML_CONTENT" CLOB NOT NULL , "COMPONENT_TYPE" VARCHAR(256) NOT NULL ) IN "[TABLESPACE]" ; ALTER TABLE "[SCHEMA]"."AJPE" ADD PRIMARY KEY ("ID");COMMIT;CONNECT RESET;TERMINATE;
The following tags will need to be replaced with actual settings:
● [DATABASE]● [SCHEMA]● [TABLESPACE]
Parent topic: Data Repository Settings.

Resource Storage Settings.
External files can be imported into Web Content Management. Like Web Content Management data, these resources can be stored in different repositories.
Web Content Management Resources include the following:
● Image Components.● File Resource Components.● Resources uploaded to a Web Content Management environment when using the
HTML Importer.
Secure and Non-Secure Resources.
Like other Web Content Management items, security levels can be set for Web Content Management Resources. If the [all users] group is given Live access to a Web Content Management Resource, it is considered to be Non-Secure.
Secure Resources.
Secure Resources are always retrieved from the system specified in the resource.persistence parameter defined in aptrixjpe.properties via the Web Content Management Resource Server Module (see below).
Non-Secure Resources.
If Resource Persistence is set to JDBC , Non-Secure resources are always retrieved from the Web-App directory:
/AppServer/installedApps/localhost/wcm.ear/ilwwcm.war/resources
If Resource Persistence is set to CM, then Non-Secure Resources can be retrieved either from the Web-App directory, or direct from IBM Content Manager. This is determined by editing the following settings:
Note: These settings are not active if Resource Persistence is not set to CM.

resource.nonsecure.retrieveFromWebdir=trueIf True, Non-Secure resources are retrieved from the web directory.
[WEB_APP_HOME]/resources/
If False, then Non-Secure resources are retrieved directly from IBM Content Manager.
Note: If non-secure resources are being retrieved directly from IBM Content Manager, any links on a web page to a non-secure resource will cause the browser's open/save dialogue to display instead of the default action of the file type. E.g., A link to a non-secure PDF stored in IBM Content Manager will not open directly in the browser. The open/save dialogue will display instead.
Note: If this setting is changed you will need to run the ResourceChecker utility. See the Web Content Management Tools topic for further information.
resource.nonsecure.useCachedSourceUrl=trueIf True, Non-Secure resources are retrieved directly from IBM Content Manager via a cached URL generated when the resource was first created.
If False, then the URL to IBM Content Manager is retrieved from IBM Content Manager the first time a User accesses the resource and is stored in the Session Cache until the User's session ends.
Note: This setting is only active if resource.nonsecure.retrieveFromWebdir=true and resource.persistence=CM.
Resource Server Module settings.
The Resource Server Module is the Web Content Management Module that processes requests for secure resources. It ensures that the requester has sufficient access to the resource before returning the resource from the chosen storage medium.
resource.resourceServerModuleName=AJPERESThis is the name of the Resource Server Module that is used to generate Secure

Resource requests.
Note: This name must match the name assigned to the Resource Server Module in the Business Logic section of connect.cfg.
resourceserver.maxCacheItemsize=10240Sets the maximum size of an individual resource to be cached by the Resource Server Module (in KB).
resourceserver.cacheExpiryDate="REL 1M"Specifies the expiry date of resources cached by the Resource Server Module
Maximum Resource Size for JDBC Databases.
jdbc.resources.maxSize=10This setting (in megabytes) is used to allocate space within a JDBC database for Web Content Management resources when Resource persistence is set to JDBC. (This does not apply to Web Content Management item files.) Once set, you cannot store resources larger than the maximum size set in this parameter.
Note: DB2 Databases.
Once set, this setting cannot be reset in your current DB2 database. It can only be reset by deleting and creating a new DB2 database. If you need to change this setting, you should syndicate your current Site to another server, recreate the DB2 database, and then syndicate the Site back from the backup server.
Parent topic: Data Storage.

Other Configuration Options.
● Enabling SSL.
Parent topic: Configuration.

Enabling SSL.
Note: For more information on installing and setting up JSSE consult the documentation that comes with the JSSE package from Javasoft and/or the Javasoft home page.
The top-level config setting UseSSL is used to control the use of SSL in a Web Content Management solution. If the value for this setting is false, then SSL support will NOT be used. If the value is true, or if it does not exist in the config file, the SSL support will be used. This should now allow you to browse various sites using HTTPS through a Web Content Management solution (that is, using a Web Content Management solution as a proxy). There should be no need to change any business logic code, as the HTTPConnector will automatically use HTTPS if required.
Web Content Management uses the IBMJSSE SSL provider that comes with Websphere by default. To configure another SSL provider optional settings should be added to connect.cfg. After configuring websphere to work with your new SSL provider, modify/add the following lines, specifying the new SSL Provider class name and https URL handler respectively.
<UseSSL value=true /><SSLProviderClassName value=com.ibm.jsse.IBMJSSEProvider /><SSLProtocolHandlerPkgs value=com.ibm.net.ssl.internal.www.protocol />
Note: For further information on configuring WebSphere to work with a new provider consult the WebSphere Information Center.
You will be able to test your configuration by using a Web Content Management solution as a proxy and browsing sites that use HTTPS and valid certificates. A few to try are:
● https://www.verisign.com● https://www.thawte.com
To try these sites through a Web Content Management solution, use URLs like the following:
● http://[HOST]:[PORT]/lwp/wcm/connect?MOD=Web&SRV=HTML&ACTION=https://www.verisign.com/● http://[HOST]:[PORT]/lwp/wcm/connect?MOD=Web&SRV=HTML&ACTION=https://www.thawte.com/
Certificates.
By default, JSSE (and thus a Web Content Management solution) will only accept valid certificates signed by VeriSign and Thawte. To accept certificates signed by other CAs, you will need to add that CA certificate to your list of CA certificates so that a valid CA certification chain can be established.
To do this, use the program keytool, provided with the JRE and JDK. Keytool is an application for the management of certificates, and can be used to add CA certificates to the store of valid CA certificates, as well as add trusted certificates to the keystore being used to keep valid, trusted certificates.

For more information on using keytool and managing certificates, view the JSSE documentation, and/or the documentation for keytool provided with the JDK. If the certificate for a web site that is accessed using a Web Content Management solution is not valid, you will get an SSLException thrown with the message "untrusted server cert chain".
SSL Troubleshooting.
"Front-end Issues".
You may also need to check the configuration of your web-server to ensure that it is SSL enabled.
Viewing images in secured SSL sites through containment.
To be able to view images in secured SSL sites through containment, the requested server needs to be trusted by the requesting Web Content Management server. To do so, the requesting server needs to import the certification key of the requested server into the java security key file. Refer to the WebSphere Application Server Information Center for information on containment and SSL certification.
Parent topic: Other Configuration Options.

Uninstalling Web Content Management
You can run the graphical uninstallation program to remove the Web Content Management code from your Portal installation. The uninstall tool is located in the wp_root/wcm/uninstall directory.
To uninstall the Web Content Management code using the graphical uninstallation program, run the following command from the wp_root/wcm/uninstall directory:
● Windows: uninstall.bat● UNIX and i5/OS:./uninstall.sh
Note: There is no remote uninstallation on i5/OS.
If you want to remove your Web Content Management configuration only, without uninstalling the Web Content Management code, refer to the Removing a Web Content Management application topic for detailed steps.
Parent topic: Installation Overview.

Access and Security.
The users and groups used by IBM Workplace Web Content Management to set User access and security are managed by IBM WebSphere Member Manager. See the Member Manager chapter in the WebSphere Portal Information Center for further information.
User access and security can be set within a Web Content Management environment in two different ways:
Authoring Portlet (Web Content Authoring) Access controls.
Access control to the Authoring Portlet (Web Content Authoring) is set in the portlet's Configuration View. It controls:
● What views users can access within the Authoring Portlet (Web Content Authoring).● What level of access they have to each view.
Web Content Management Item Security.
Each Web Content Management Item also has a Security feature that controls:
● What items users have access to within the Authoring Portlet (Web Content Authoring).
● What level of access they have to each item in the Authoring Portlet (Web Content Authoring).
● Who has access to items on the live web site.
● User Management.
● Authoring Portlet Access Control.
Parent topic: Installation Overview.

User Management.
The users and groups used by IBM Workplace Web Content Management to grant access to different Web Content Management items are managed by IBM WebSphere Member Manager.
IBM WebSphere Member Manager is a component of WebSphere Portal that manages data for users and groups. Users and groups are referred to as "members" in Member Manager. Member Manager keeps track of the overall attribute set of the users and groups within the system and the values of those attributes for individual users and groups. Member Manager does not assign particular roles to its members. Members can take on different roles depending on the activities in which they participate. See the Member Manager chapter in the WebSphere Portal Information Center for further information.
Creating an Administrators Group.
An Administrators Group can be specified in the AdminGroupCommonName parameter in connect.cfg. This Group has full access to all Web Content Management items, views and functions. Only Users who require full access to all functions within the Authoring Portlet (Web Content Authoring) should be granted Administrators access.
When first installed, a wcmadmins group is setup as the default Administrators Group for Web Content Management. You can specify a different Administrators group by editing the AdminGroupCommonName parameter in connect.cfg.
Note: WebSphere Portal Administrators.
The WebSphere Portal Administrators group is not automatically added to the wcmadmins group. If you would like WebSphere Portal Administrators to have Administration access to Web Content Management, you will need to manually add the WebSphere Portal Administrators group to the wcmadmins group in WebSphere Portal Administration:
1. Go to Administration->Access->Users and Groups and click "All Portal User Groups".
2. Select wcmadmins and click "Add member".3. Select wpsadmins and click "OK". 4. Log out of WebSphere Portal and log back in.
Note: Enabling Web Content Management administration users to have security

access.
To allow Web Content Management administration users to edit the security settings in Web Content Management items, you will need to do the following:
1. Open the WebSphere Administration console.2. Go to Applications -> Enterprise Applications3. Select the wmmApp Enterprise Application.4. Edit the Map Security Roles to Users/Groups section:
❍ Add the Web Content Managers administration group to the Everyone Role. This would normally be the wcmadmins group.
5. Save these changes and restart WebSphere Portal.
Creating Other Groups.
Other Web Content Management specific groups should also be created when deploying a Web Content Management solution:
Authoring Portlet (Web Content Authoring) Groups.
The Web Content Management Authoring Portlet (Web Content Authoring) can be configured to grant access to different Web Content Management items and views. You should create a set of Web Content Management specific groups in Member Manager that can be used to set different levels of access to Web Content Management items and views.
See the Authoring Portlet Access Control chapter for further information.
Rendered Site Groups. You should also create Web Content Management specific groups in Member Manager if you would like to grant different sets of Users access to different sections of your Web Site.
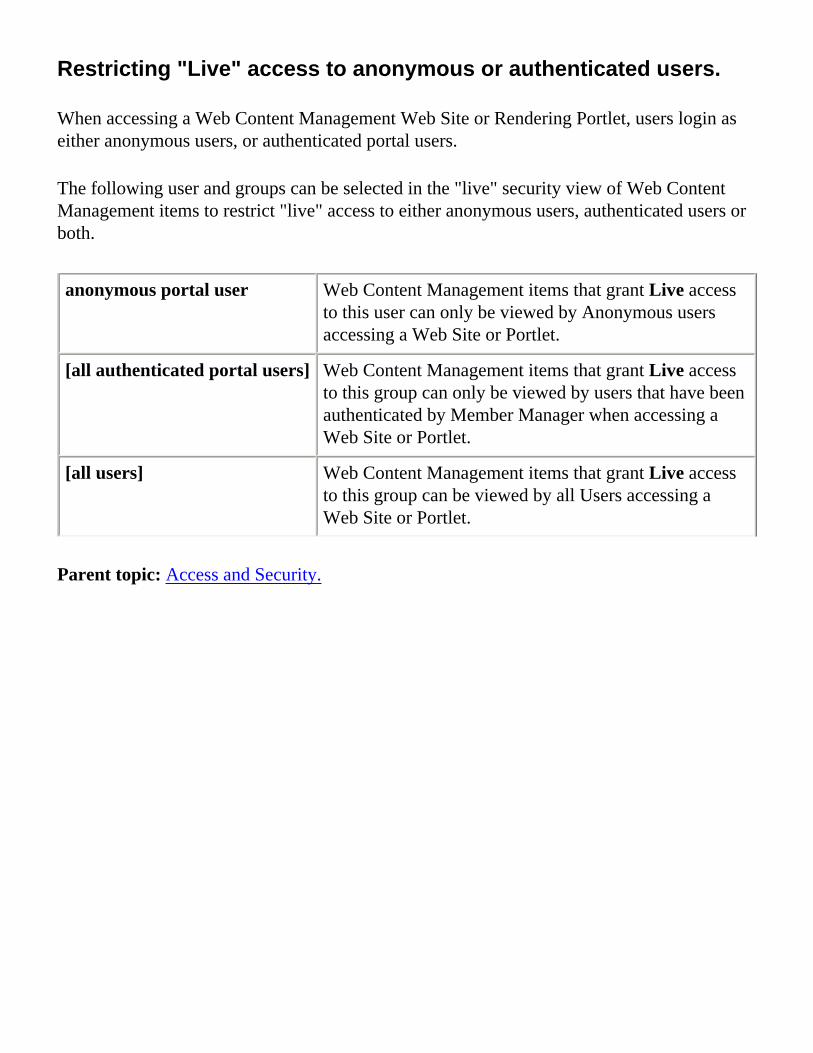
Restricting "Live" access to anonymous or authenticated users.
When accessing a Web Content Management Web Site or Rendering Portlet, users login as either anonymous users, or authenticated portal users.
The following user and groups can be selected in the "live" security view of Web Content Management items to restrict "live" access to either anonymous users, authenticated users or both.
anonymous portal user Web Content Management items that grant Live access to this user can only be viewed by Anonymous users accessing a Web Site or Portlet.
[all authenticated portal users] Web Content Management items that grant Live access to this group can only be viewed by users that have been authenticated by Member Manager when accessing a Web Site or Portlet.
[all users] Web Content Management items that grant Live access to this group can be viewed by all Users accessing a Web Site or Portlet.
Parent topic: Access and Security.

Administration.
Housekeeping.
Some administrative tasks should be periodically run on a live server to release resources that are not being used. The tasks required include:
● Removing expired items from a cache.● Initiating and monitoring Syndication.
The Web Content Management application will perform these tasks automatically. Editing the Web Content Management Configuration file can change how often these tasks are performed. These tasks can also be performed manually through the Web Content Management Administration interface.
Site Administrator.
Each of these functions requires Administrator privileges. For any of these functions to be called, the user of the current session must be a Web Content Management administrator.
● Cache Manager.
● Web Content Management Tools
Parent topic: Installation Overview.

Cache Manager.
The Cache Manager can be useful if there is a suspicion that some cached data may be interfering with the normal viewing of a page. Individual items can be selected and removed from the Cache. The following Caches can be managed:
● Data Cache - using the Module Cache Manager.● Basic Web Content Cache - using the Web Processing Cache Manager.● Advanced Web Content Cache - using the Content Cache Manager.● Processing Cache - using the Site Cache Manager.
Note: The Processing Cache caches data at the various stages of a Web Page being processed by the Web Content Management application when the Advanced Web Content Cache is enabled.
Viewing Items in a Cache.
● Click Module Cache Manager, Web Processing Cache Manager, Content Cache Manager, or Site Cache Manager to view the Disc and Memory Cache.
● Click on Disc Cache or Memory Cache.● The content of either cache is display.
Entries. Displays the name and type of item in the cache.
Delete. Marks cache items for deletion.
Expiry Date. Displays the Expiry date of the cached item.
Last Access. Displays when the cached item was last accessed.
Deleting Items from Cache.
● To delete an item from the cache, select the item's Delete check box.● Then click Delete Checked Items.● Any selected cache items will be deleted.
Flushing the Cache.

● To Flush the Cache, click on Flush Entire Cache.● This deletes all items in the cache.
Parent topic: Administration.

Web Content Management Tools
The Reference Checker Tool.
The Reference Checker Tool checks that all references in an object are valid and removes any invalid references. For example references to objects that don't exist are removed. It then re-saves the object so that the reference registry (a quick lookup for references) is updated with the valid references. This process also adds missing valid references to the registry.
To view a report:
http://[HOST]:[PORT]/lwp/wcm/connect?MOD=AJPEReferenceChecker
To correct Reference errors, use the following URL:
http://[HOST]:[PORT]/lwp/wcm/connect?MOD=AJPEReferenceChecker&fix=true
The Site Checker Tool.
The Site Checker performs integrity checking on the Site Framework. It performs three main tasks:
● Ensures that all Sites are valid. (That their default content resides within the Site.)● Finds orphaned Site Areas. (Site Areas which don't have a parent.)● Looks for Site Areas that are disassociated from the Site Framework index. (Site Areas that have
a parent, but aren't in the Site Framework index.)
When run in fix mode, Sites that are invalid have their default content removed, orphaned Site Areas are re-added to Site Framework under a new Site ("Unlinked Site Areas") and Site Areas that are disassociated from the Site Framework are re-added into the Site Framework.
To view a report, use the following URL:
http://[HOST]:[PORT]/lwp/wcm/connect?MOD=AJPESiteChecker
To correct Site errors, use the following URL:
http://[HOST]:[PORT]/lwp/wcm/connect?MOD=AJPESiteChecker&fix=true
The Resource Checker Tool.
The Resource Checker performs integrity checking on resources. It performs three main tasks:
● Finds orphaned resources. (Resources which are not referred to by any item.)

● Finds orphaned resource byte content. (Resource byte content which do not have an corresponding resource.)
● Rebuilds the "\AppServer\installedApps\localhost\wcm.ear\ilwwcm.war\resources" directory which contains copies of unrestricted resources. (Performed during fix mode only.)
When run in fix mode, the resources directory is rebuilt and orphaned resources and resource byte content are removed.
To view a report, use the following URL:
http://[HOST]:[PORT]/lwp/wcm/connect?MOD=AJPEResourceChecker
To correct Resource errors, use the following URL:
http://[HOST]:[PORT]/lwp/wcm/connect?MOD=AJPEResourceChecker&fix=true
The Member Fixer Tool.
The Member Fixer Tool checks whether any Member Manager Users or Groups referenced in Web Content Management items have been renamed or deleted from Member Manager:
To view a report, use the following URL:
http://[HOST]:[PORT]/lwp/wcm/connect?MOD=MemberFixer
To update changes to Member Manager Users and Groups in Web Content Management items, use the following URL:
http://[HOST]:[PORT]/lwp/wcm/connect?MOD=MemberFixer&fix=true
Parent topic: Administration.

Syndication.
● How Syndication Works.
● Item Gatherers.
● Enabling Syndication.
● Configuring Syndication.
● Creating a Syndicator.
● Creating a Subscriber.
● Monitoring Syndication.
● Syndication Troubleshooting.
Parent topic: Installation Overview.

How Syndication Works.
Syndication is the method used by Web Content Management to replicate data from one instance of Web Content Management to another.
To enable Syndication, two items are defined:
● The Syndicator is the application that contains the data that needs to be copied to another application.
● The Subscriber is the application that retrieves the copies of the data from the Syndicator.
The relationship between Syndicators and Subscribers can be both a one-way or two-way relationship.
Example: One-way Syndication.
Application 1.
Application 1
syndicates to
Application 2.
Application 2
subscribes from
Application 1.
Application 2.
Example: Two-way Syndication.
Application 1.
Both applications syndicate to
Application 2.

each other.
Both applications
subscribe from each
other.
Note: It is possible to setup a syndication relationship between the same two applications more than once. The additional syndication relationships would achieve no purpose and are not required because once a syndication relationship has been established between two applications, no further relationships are established.
Syndicators can syndicate to multiple Subscribers, and Subscribers can subscribe from multiple Syndicators.
Example: Multiple Syndication Relationships.
Application 1.
Application 2.
Both Application
1 and 2 syndicate
to Application
3.
Application
Application 3.

3 subscribes from both
Application 1 and 2.
Note: Data Storage and Syndication.
You can Syndicate between servers that use different Web Content Management data storage methods. E.g. - you can Syndicate between a server that uses Cloudscape to store data and a server that uses DB2 to store data.
Note: Database Replication versus Syndication.
When first creating a new Web Content Management application, it is better to copy an existing Web Content Management data repository database to a new server, enable your new Web Content Management application to use the new data repository, and then enable Syndication rather than trying to Syndicate an entire Site's data. You must be using the same type of database to be able to do this.
Note: Syndication cannot be used to Upgrade a Web Content Management Server.
You can only Syndicate between Servers using the same version of IBM Workplace Web Content Management. This means Syndication cannot be used to send data between different versions of IBM Workplace Web Content Management. E.g. - you can not use Syndication to upgrade from a 1.0 server to a 2.0 server.
Note: Syndicating after deleting indexes.
Occasionally, Web Content Management indexes are required to be deleted by Web Content Management administrators. A full syndicator rebuild should be performed prior to resuming authoring. Otherwise, some recent changes to Web Content Management items may not be successfully syndicated.

Parent topic: Syndication.

Item Gatherers.
Syndicators in a Web Content Management environment uses Item Gatherers to group collections of related documents and keep an audit trail of how and when the collection has changed. When creating a Syndicator, it is necessary to select which Item Gatherer that the syndicator is to use. There are currently two Item Gatherers supported in a Web Content Management environment:
All Items. Gathers a collection of all deployable items. The All Items gatherer should be used when replicating between two development environments, usually for the purposes of distributed editing.
All Live Items. Gathers a collection of all deployable items that either do not use a Workflow or do have a Workflow and are published. The All Live Items gatherer should be used when replicating between a development and production environment as this ensures that the production environment only contains items that can be accessed by end users. It also has the added benefit of reducing the amount of data that needs to be sent to the production server; hence reducing the impact replication has on performance.
Note: There are certain items that are non syndicated:
● All Graphical Authoring Portlet related items.● Administrator User.● Administrators Group. ● All Users Group.● Anonymous User.● UI Group.● Item Gatherers.● Syndicators.● Subscribers.● Indexes (these items are updated automatically based on the data contained on the
Web Content Management server).
All Web Content Management Subscribers do not have Item Gatherers, however they internally store an Item Cabinet that contains references to all documents that they believe are currently associated with the subscription. This Item Cabinet is used when a Rebuild action is performed or when a deletion notice for a document is received.

Item Formatters and Item Transformers.
When Web Content Management servers replicate, the Syndicator provides a URL for the Subscriber to retrieve the document from. This URL points to the Item Dispatcher business logic along with query parameters identifying the item required. The Item Dispatcher formats the document to the format as specified by the Syndicator. When the Subscriber receives the contents of the URL, it transforms the data back into a document. Syndicators and Subscribers must have compatible Item Formatters and Item Transformers otherwise the data transmitted will be incompatible.
When Syndication Occurs.
Automatic Updates. If an Item Gatherer has changed, then the recurring task mentioned above informs all Syndicators using the Item Gatherer that an update is outstanding for them. Once the system has settled down and no documents have changed for the duration between two consecutive runs of the ITEM recurring task, then the next time it runs, it sends update requests to the Syndication application for all Syndicators that are due to send updates to their Subscribers. Note that these updates are always partial.
Manual Updates and Rebuilds. Users are able to manually force a partial update or a full rebuild of the Subscriber through either the Subscriber document or the associated Syndicator items. When the items are in read mode, the following buttons are available:
Rebuild Syndicator.Clicking Rebuild Syndicator will send all documents that currently exist in the Syndicator's Item Gatherer to the Subscriber. The Subscriber will then store all documents that are sent, and if any documents remain in its Item Cabinet that were not sent through from the Syndicator, then they are removed. The rules for finding a winner still apply for Rebuilds like they do for Updates.
Note: Syndicating after deleting indexes.
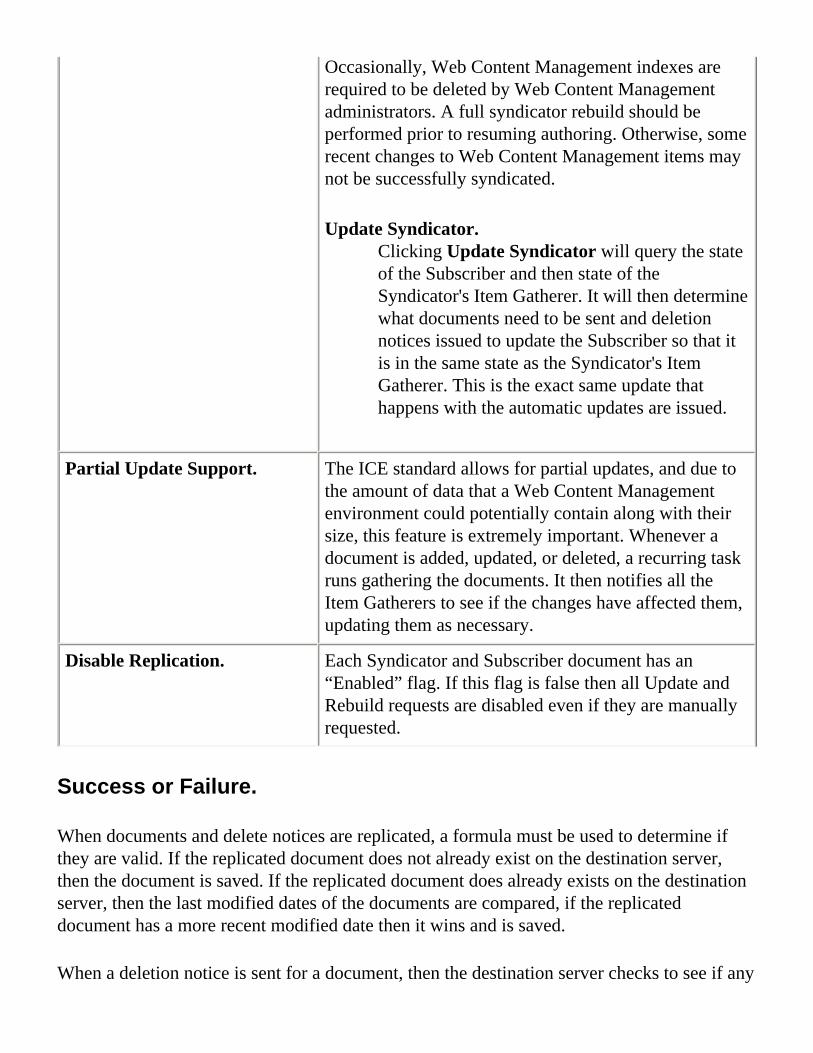
Occasionally, Web Content Management indexes are required to be deleted by Web Content Management administrators. A full syndicator rebuild should be performed prior to resuming authoring. Otherwise, some recent changes to Web Content Management items may not be successfully syndicated.
Update Syndicator.Clicking Update Syndicator will query the state of the Subscriber and then state of the Syndicator's Item Gatherer. It will then determine what documents need to be sent and deletion notices issued to update the Subscriber so that it is in the same state as the Syndicator's Item Gatherer. This is the exact same update that happens with the automatic updates are issued.
Partial Update Support. The ICE standard allows for partial updates, and due to the amount of data that a Web Content Management environment could potentially contain along with their size, this feature is extremely important. Whenever a document is added, updated, or deleted, a recurring task runs gathering the documents. It then notifies all the Item Gatherers to see if the changes have affected them, updating them as necessary.
Disable Replication. Each Syndicator and Subscriber document has an “Enabled” flag. If this flag is false then all Update and Rebuild requests are disabled even if they are manually requested.
Success or Failure.
When documents and delete notices are replicated, a formula must be used to determine if they are valid. If the replicated document does not already exist on the destination server, then the document is saved. If the replicated document does already exists on the destination server, then the last modified dates of the documents are compared, if the replicated document has a more recent modified date then it wins and is saved.
When a deletion notice is sent for a document, then the destination server checks to see if any

other Subscribers contain the document that the deletion notice is for in their Item Cabinets. If none contain the document then the deletion notice is valid and the document is removed.
Parent topic: Syndication.

Enabling Syndication.
The following parameters must be set in the aptrixjpe.properties file to enable syndication.
deployment.itemDispatcherUrl=
http://[HOST]:[PORT]/lwp/wcm/connect?MOD=ItemDispatcher
deployment.syndicatorUrl=
http://[HOST]:[PORT]/lwp/wcm/connect?MOD=Synd.
deployment.subscriberUrl=
http://[HOST]:[PORT]/lwp/wcm/connect?MOD=Subs
These URLs point to where to the connect servlet is located (Used to call the appropriate business logic.) These settings apply to this server only regardless of whether this server is acting as a Subscriber or Syndicator.
Note:
● Never use "localhost" in the URLs. Use the full name or IP address. (You may need to use the IP Address rather than the domain name.).
● You must include the port of your application server. The default port is 9080.

deployment.itemChangedTaskDelay= This sets the recurring task interval (in seconds) for the item changed task. This setting affects how quickly syndication updates are sent to the subscribers. The shorter the interval, the faster the update can be sent, however, it does affect performance and servers with large amounts of data may wish to increase this figure. (E.g., 90)
Once a system has settled down (i.e. the item changed task started and no documents have been added, updated, or deleted since its last run), then any required syndication updates will be sent to the syndication application.
deployment.subscriberOnly= Set this value to true if this Web Content Management instance is only going to be subscribed to. By default, this has a value of false. If it is set to true, then all item gatherers will be deleted and the item changed task will not be added to the scheduler. This will
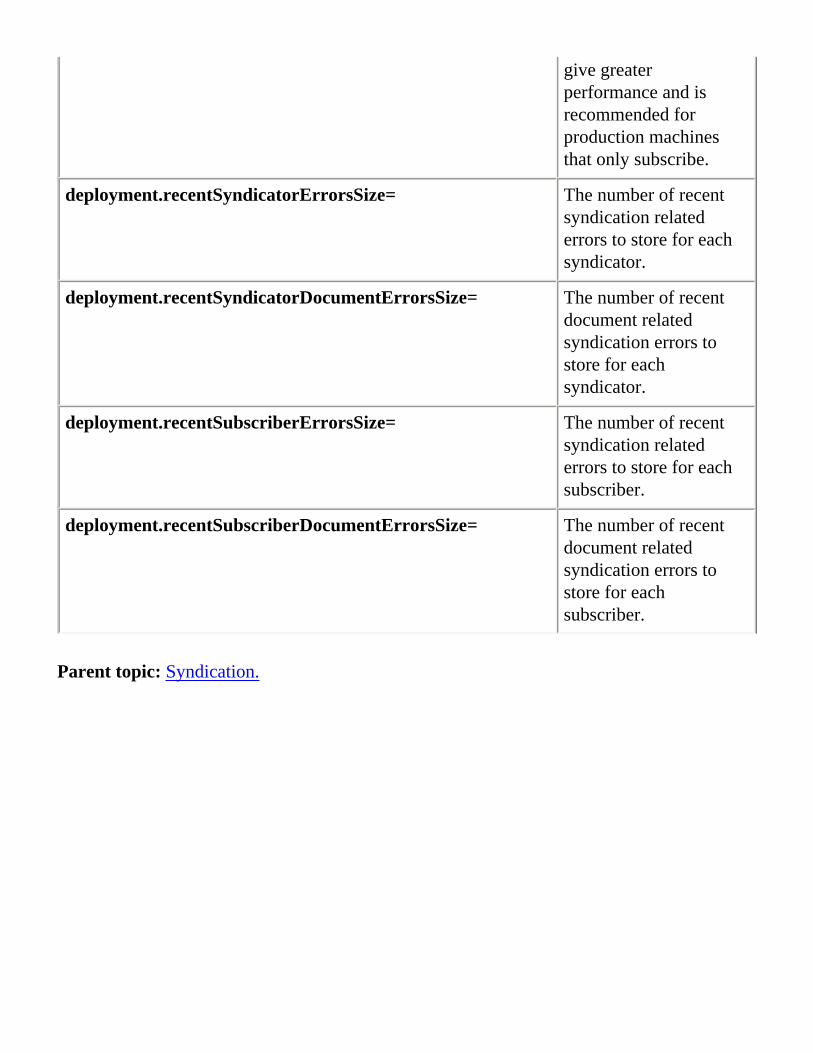
give greater performance and is recommended for production machines that only subscribe.
deployment.recentSyndicatorErrorsSize= The number of recent syndication related errors to store for each syndicator.
deployment.recentSyndicatorDocumentErrorsSize= The number of recent document related syndication errors to store for each syndicator.
deployment.recentSubscriberErrorsSize= The number of recent syndication related errors to store for each subscriber.
deployment.recentSubscriberDocumentErrorsSize= The number of recent document related syndication errors to store for each subscriber.
Parent topic: Syndication.

Configuring Syndication.
Syndication can affect performance if large amounts of data are syndicated. You can define various settings to reduce the impact on performance.
Note: Remote Administration.
As a Web Content Management environment can be accessed remotely, the Site Administrator can create the relationship between Syndicators and Subscribers at the same time on a single computer. They do not require physical access to either Server.
Take things slowly. If you are configuring Syndication remotely, be careful not to lose track of where you are. As the information you are entering for both Syndicators and Subscribers is similar, it is easy to mix them up.
Note: Default Encoding.
The default encoding of a Web Content Management site can be set in the DefaultEncoding setting in the connect.cfg file. Syndicators and Subscribers must use the same default encoding. Otherwise, content may be corrupted when Syndication occurs.
Syndication in a decentralized, multiple author environment.
In a decentralized, multiple author environment there can limitations when trying to merge changes from different authors using different servers.
Example:
● User 1 edits Content A on Server A.● User 2 edits Content A on Server B.● User 2 saves Content A after User 1 saves Content A, but before Syndication occurs.● The changes made last are the ones that are saved. Therefore, the changes made to Content A by User 1 will be
overwritten by the changes made by User 2.
To minimize the impact of this limitation, modify deployment.itemChangedTaskDelay in aptrixjpe.properties to shorten the time needed between edits to start Syndication. Because Syndication is an expensive operation when Syndicating large amounts of data, modification of this property should be carefully considered and tested.
Using partial or full updates.
You can determine whether Syndication will provide partial or full updates.
● A partial update occurs when only those items that have changed are syndicated. ● A full update occurs when all items on the Syndicator are syndicated to the Subscriber. A full update consists of
changed and unchanged items.
The Information and Content Exchange (ICE) protocol allows for partial updates, and due to the amount and size of data that a Web site could contain, a partial update is extremely important. When Syndication runs automatically, only changed items are syndicated, which is a partial update of the Web site.
Since automatic Syndication occurs only when the Changed Task detects no changes in the item gatherer, you might need to

wait for an off-peak period Syndication to occur. If you require immediate Syndication, you can manually syndicate partial updates by clicking the Syndicator Update button in either the Syndicator or Subscriber item windows.
If you require a full update of the Subscriber, click the Syndicator Rebuild button in either the Syndicator or Subscriber item windows. You might need a full update if the data store on the Subscriber is lost or corrupted.
Setting the recurring task interval.
The task that detects if the item gatherer has registered changed items runs every 30 seconds by default. When it detects items have changed in the past 30 seconds, Syndication does not occur. When the task detects that no items have changed in the past 30 seconds but the item gatherer has registered changed items awaiting Syndication, Syndication does occur. The likelihood of Syndication occurring increases with a smaller interval. The longer the interval, the longer the task will take to detect when the item gatherer has not registered new changed items and, therefore, the less often Syndication will occur.
If you change the interval to 6 hours, the server needs to wait for at least 6 hours before Syndication can run. If one change occurs during the 6-hour interval, Syndication cannot run for at least 12 hours. A large interval might result in changes never being syndicated, for example from the development server to the live server.
The following parameter in the aptrixjpe.properties file defines the recurring task interval:
deployment.itemChangedTaskDelay=30
Defining the live server as a Subscriber only.
A Syndicator server contains the two item gatherers and the recurring task, which impact server performance when they run. A Subscriber server does not contain the item gatherers and the recurring task does not run, which gives greater performance. Live servers should only be subscribers.
The following parameter in the aptrixjpe.properties file defines the server as a Subscriber only:
deployment.subscriberOnly=True
Using port 9080.
Syndication uses the Information and Content Exchange (ICE) protocol to transmit data from the Syndicator to the Subscriber, sending XML files over HTTP. The XML files might be fairly large, which might cause issues when posting through the IBM HTTP server. To avoid this issue, use the application server port, which, for WebSphere Application Server, is 9080.
The following parameters in the aptrixjpe.properties file, which include the port tag, define the Syndication modules:
deployment.itemDispatcherUrl=http://[HOST]:[PORT]/lwp/wcm/connect?MOD=ItemDispatcherdeployment.syndicatorUrl=http://[HOST]:[PORT]/lwp/wcm/connect?MOD=Synddeployment.subscriberUrl=http://[HOST]:[PORT]/lwp/wcm/connect?MOD=Subs
Disabling Syndication.
Syndication can be disabled on either the Syndicator or the Subscriber. Disable Syndication if you plan to make a big change to your Web site on the development server and need to first ensure that the change is acceptable. Once the change is accepted enable Syndication.
The Syndicator and Subscriber item windows contain an Enabled checkbox. If you clear the checkbox, all requests for full or

partial Syndication updates are disabled, even if the request is manual.
Parent topic: Syndication.
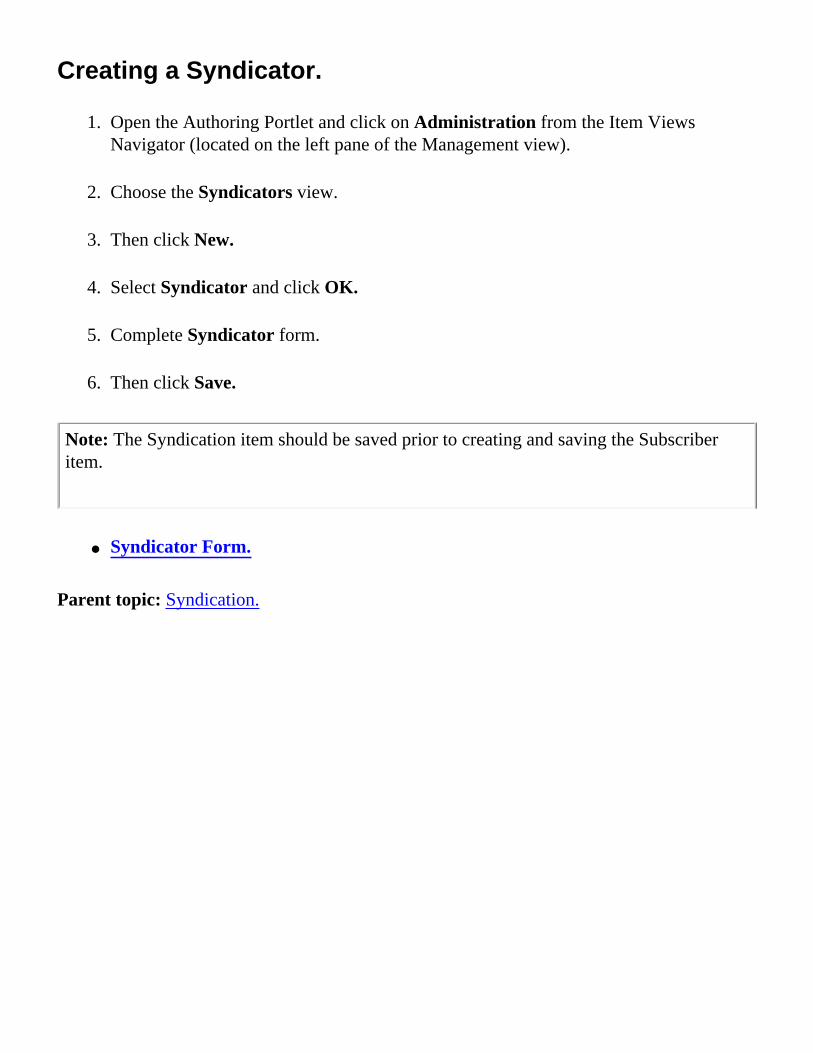
Creating a Syndicator.
1. Open the Authoring Portlet and click on Administration from the Item Views Navigator (located on the left pane of the Management view).
2. Choose the Syndicators view.
3. Then click New.
4. Select Syndicator and click OK.
5. Complete Syndicator form.
6. Then click Save.
Note: The Syndication item should be saved prior to creating and saving the Subscriber item.
● Syndicator Form.
Parent topic: Syndication.

Syndicator Form.
Syndicator forms contain the following sections:
● Common Fields - Identification.This section is used to give this item a unique name, enter a brief description of the item and record Author and Owner information.
● Syndicator Fields.This section is used to enter details of the server Subscribing to the Syndicator, and display Subscription and Syndication information.
● Common Fields - Security.This section is used to determine the default user access to this item, and view the item's Effective security. (Effective security is the combined security of System Defined, User Defined and Workflow Defined.)
Parent topic: Creating a Syndicator.

Common Fields - Identification.
This section is used to give this item a unique name, enter a brief description of the item and record Author and Owner information.
Name. The name of your item. This should be unique. It is recommended that the following characters not be used in the Name field:
+ / \ ? [ ] < > & ' " %
You should also not have trailing spaces at the end of an item Name. Double-byte characters cannot be used in this field. You can use any of these characters in the Display Title.
Note: Non-ascii Characters.
Non-ascii characters can not be used in the query string section of URLs. For this reason, it is best not to name Web Content Management items using Non-ascii characters if you plan to use URLs to call Web Content Management items.
Description. Used to enter a brief description of your item.
Type. Indicates the Web Content Management item type.
Authors. Records who created the item. To edit the list of Authors, click Select Authors.
● To add an Author, click Add. Select either Users or Groups. Enter text to search for in the Search field. Then click Search. (Leave the Search field blank to display all Users or Groups.) Select the requiredUsers or Groups. Then click OK.
● To remove items, first select the required items from the item list, then click Remove.

Owners. Records who has responsibility for the item.
● To add an Owner, click Add. Select either Users or Groups. Enter text to search for in the Search field. Then click Search. (Leave the Search field blank to display all Users or Groups.) Select the requiredUsers or Groups. Then click OK.
● To remove items, first select the required items from the item list, then click Remove.
Parent topic: Syndicator Form.Parent topic: Subscriber Form.

Syndicator Fields.
This section is used to enter details of the server Subscribing to the Syndicator, and display Subscription and Syndication information.
Note: The Syndication item should be saved prior to creating and saving the Subscriber item.
Syndicator ID and Syndicator URL.
Displays the Syndicator's ID and URL. These can be copied and pasted into the relevant fields in the Subscriber item.
Subscriber Name. This is used to enter a name to describe the Subscriber. (Usually the name of the Subscriber Server.)
Subscriber ID. The easiest way to complete this field is to open a second browser and logon to the Subscriber Server. Copy the Subscriber ID from the Subscriber form and paste it here.
Subscriber URL. The easiest way to complete this field is to open a second browser and logon onto the Subscriber Server. Copy the Subscriber URL from the Subscriber form and paste it here.
Item Gatherer. The Item Gatherer mode is displayed here:
All Items:Gathers a collection of all deployable items
All Live Items:Gathers a collection of all deployable items that either do not have a workflow or do have a workflow and are published.
Current State. The Current State's reference is displayed here. If Syndication is working, both the Syndicator and Subscriber should have the same Current State.

Note: Current State.
The apparent difference between a Syndicator's and Subscriber's Current State does not indicate a degree of success or failure. They are either different (not synchronized) or the same (synchronized).
Item Formatter. This indicates the format of the data being sent. At present this is Java Serialization. Both the Syndicator and Subscriber must use compatible formatters and transformers.
Enabled. This indicates whether Syndication is currently enabled or not.
Current Status. This displays the current state of the Syndication process:
Idle:No Syndication is occurring.
Pending:A Request has been made to the Syndicator, but it has yet to initiate a request to the Syndication application.
Queued:The Syndicator has sent a request to the Syndication application, but Syndication is not yet active.
Active:Syndication is occurring between the Syndicator and Subscriber.
Disabled:This indicates that Syndication is currently disabled. If Syndication was already in process prior to being disabled the Status can be a combination of Disabled and Pending, Queued, or Active.
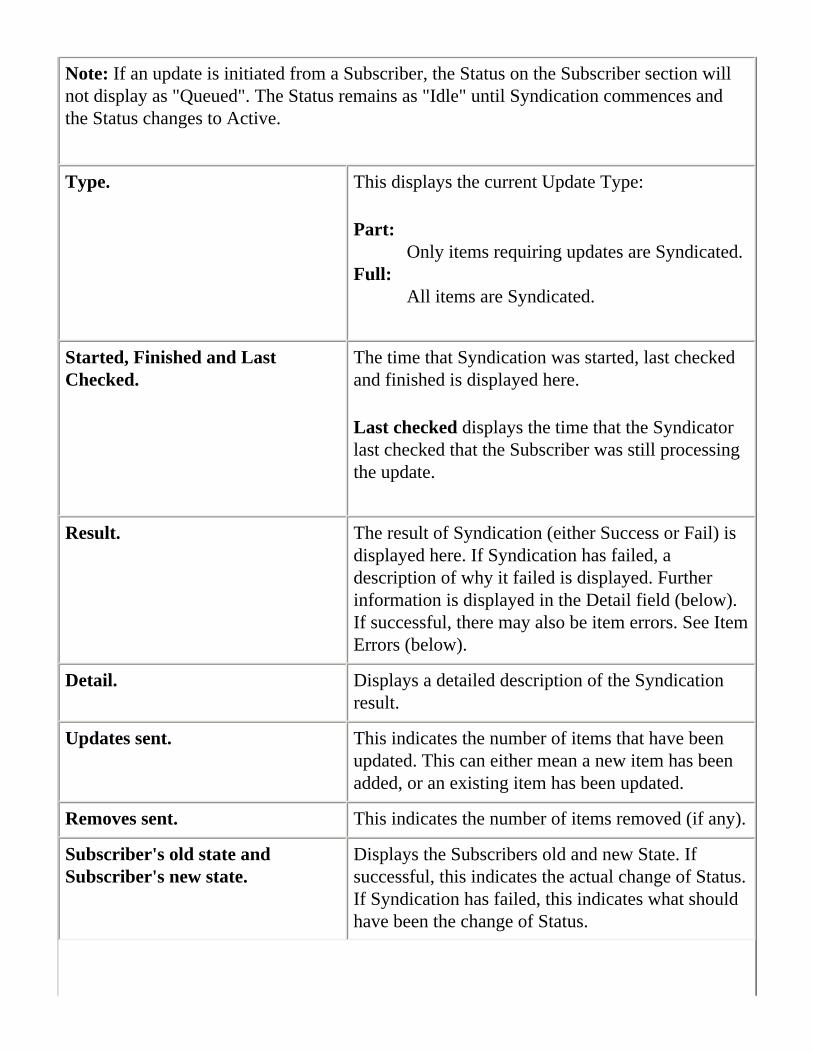
Note: If an update is initiated from a Subscriber, the Status on the Subscriber section will not display as "Queued". The Status remains as "Idle" until Syndication commences and the Status changes to Active.
Type. This displays the current Update Type:
Part: Only items requiring updates are Syndicated.
Full:All items are Syndicated.
Started, Finished and Last Checked.
The time that Syndication was started, last checked and finished is displayed here.
Last checked displays the time that the Syndicator last checked that the Subscriber was still processing the update.
Result. The result of Syndication (either Success or Fail) is displayed here. If Syndication has failed, a description of why it failed is displayed. Further information is displayed in the Detail field (below). If successful, there may also be item errors. See Item Errors (below).
Detail. Displays a detailed description of the Syndication result.
Updates sent. This indicates the number of items that have been updated. This can either mean a new item has been added, or an existing item has been updated.
Removes sent. This indicates the number of items removed (if any).
Subscriber's old state and Subscriber's new state.
Displays the Subscribers old and new State. If successful, this indicates the actual change of Status. If Syndication has failed, this indicates what should have been the change of Status.

Errors. Information on Syndication Errors related to individual items is listed here. If the Syndication has failed for some reason, a description of the cause of the failure is listed in the error log. Information on Syndication Errors related to individual items is listed here.
Note: The number of past Errors or past Item errors displayed can be changed by editing aptrixjpe.properties.
Parent topic: Syndicator Form.

Common Fields - Security.
This section is used to determine the default user access to this item, and view the item's Effective security. (Effective security is the combined security of System Defined, User Defined and Workflow Defined.)
Live. Allows a User or Group to:
● view an item in the rendered web site.
Read. Allows a User or Group to:
● view an item in a Web Content Management environment.● view an item in the rendered web site.
Edit. Allows a User or Group to:
● edit an item.● view an item in a Web Content Management environment.● view an item in the rendered web site.
Delete. Allows a User or Group to:
● delete an item.● edit an item.● view an item in a Web Content Management environment.● view an item in the rendered web site.
Approve. This is displayed under Workflow only. Approve access allows a User or Group to:
● approve an item within a Workflow.● view an item in the Authoring Portlet.● view an item in the rendered web site.

Security Sections.
Effective. This section displays the combined access levels of the three Security types listed below.
User Defined. User defined access can be set in items not participating in a workflow.
Note: A User only has access to edit User-defined access up to the same level as the User-defined access they have for that item. E.g., A User with Read Access can edit the User Defined security for Live and Read access, but not for Edit or Delete access.
Workflow Security. If an item is participating in a Workflow, Workflow security settings are displayed instead of User-Defined. These are the security settings set in the Properties section of a Workflow Stage form.
System Defined. This section displays access levels set by Administrators.
Note: The access that is set in Security section does not overrule access rights set in a Workflow Stage. This means that if a User has only Read access to an item, but Edit/Read access in a Workflow Stage, they will be able to edit the item during that Workflow Stage.
As a rule, the minimum level of security should be set at the item level. Additional access can then be granted within different Workflow Stages.
Parent topic: Syndicator Form.Parent topic: Subscriber Form.

Creating a Subscriber.
1. Open the Authoring Portlet and click on Administration from the Item Views Navigator (located on the left pane of the Management view).
2. Choose the Subscribers view.
3. Then click New.
4. Select Subscriber and click OK.
5. Complete Subscriber form.
6. Then click Save.
Note: The Syndication item should be saved prior to creating and saving the Subscriber item.
● Subscriber Form.
Parent topic: Syndication.

Subscriber Form.
Subscriber forms contain the following sections:
● Common Fields - Identification.This section is used to give this item a unique name, enter a brief description of the item and record Author and Owner information.
● Subscriber Fields.This section is used to enter details of the Syndicator that is being Subscribed to, and display Subscription and Syndication information.
● Common Fields - Security.This section is used to determine the default user access to this item, and view the item's Effective security. (Effective security is the combined security of System Defined, User Defined and Workflow Defined.)
Parent topic: Creating a Subscriber.

Subscriber Fields.
This section is used to enter details of the Syndicator that is being Subscribed to, and display Subscription and Syndication information.
Note: The Syndication item should be saved prior to creating and saving the Subscriber item.
Subscriber ID and Subscriber URL.
Displays the Subscriber's ID and URL. These can be copied and pasted into the relevant fields in the Syndicator item.
Syndicator Name. This is used to enter a name to describe the Syndicator (Usually the name of the Syndicator Server.)
Syndicator ID. The easiest way to complete this field is to open a second browser and logon to the Syndicator. Copy the Syndicator ID from the Syndicator form and paste it here.
Syndicator URL. The easiest way to complete this field is to open a second browser and logon onto the Syndicator Server. Copy the Syndicator URL from the Syndicator form and paste it here.
Current State. The Current State's reference is displayed here. If Syndication is working, both the Syndicator and Subscriber should have the same Current State.
Note: Current State.
The apparent difference between a Syndicator's and Subscriber's Current State does not indicate a degree of success or failure. They are either different (not synchronized) or the same (synchronized).

Item Formatter. This indicates the format of the data being sent. At present this is Java Serialization. Both the Syndicator and Subscriber must use compatible formatters and transformers.
Enabled. This indicates whether Syndication is currently enabled or not.
Current Status. This displays the current state of the Syndication process:
Idle:No Syndication is occurring.
Pending:A Request has been made to the Syndicator, but it has yet to initiate a request to the Syndication application.
Queued:The Syndicator has sent a request to the Syndication application, but Syndication is not yet active.
Active:Syndication is occurring between the Syndicator and Subscriber.
Disabled:This indicates that Syndication is currently disabled. If Syndication was already in process prior to being disabled the Status can be a combination of Disabled and Pending, Queued, or Active.
Note: If an update is initiated from a Subscriber, the Status on the Subscriber section will not display as "Queued". The Status remains as "Idle" until Syndication commences and the Status changes to Active.

Type. This displays the current Update Type:
Part: Only items requiring updates are Syndicated.
Full:All items are Syndicated.
Started, Finished and Last Checked.
The time that Syndication was started, last checked and finished is displayed here.
Last checked displays the time that the Syndicator last checked that the Subscriber was still processing the update.
Result. The result of Syndication (either Success or Fail) is displayed here. If Syndication has failed, a description of why it failed is displayed. Further information is displayed in the Detail field (below). If successful, there may also be item errors. See Item Errors (below).
Detail. Displays a detailed description of the Syndication result.
Updates sent. This indicates the number of items that have been updated. This can either mean a new item has been added, or an existing item has been updated.
Removes sent. This indicates the number of items removed (if any).
Subscriber's old state and Subscriber's new state.
Displays the Subscribers old and new State. If successful, this indicates the actual change of Status. If Syndication has failed, this indicates what should have been the change of Status.
Errors. Information on Syndication Errors related to individual items is listed here. If the Syndication has failed for some reason, a description of the cause of the failure is listed in the error log. Information on Syndication Errors related to individual items is listed here.

Note: The number of past Errors or past Item errors displayed can be changed by editing aptrixjpe.properties.
Parent topic: Subscriber Form.

Monitoring Syndication.
The Web Content Management system records information on the progress and the success or failure of Syndication in a log. These can be viewed on the Syndicator and Subscriber tabs of the Syndicator and Subscriber items.
Note: Refreshing a View.
The "real-time" progress of Syndication can be followed on both Syndicators and Subscribers by clicking the Refresh button on both the Syndicator and Subscriber item windows. This will refresh the fields listed below and show the current state of Syndication.
Current Settings and Status.
Item Gatherer. The Item Gatherer mode is displayed here:
All Items:Gathers a collection of all deployable items
All Live Items:Gathers a collection of all deployable items that either do not have a workflow or do have a workflow and are published.
Current State. The Current State's reference is displayed here. If Syndication is working, both the Syndicator and Subscriber should have the same Current State.
Note: Current State.
The apparent difference between a Syndicator's and Subscriber's Current State does not indicate a degree of success or failure. They are either different (not synchronized) or the same (synchronized).
Item Formatter. This indicates the format of the data being sent. At present this is Java Serialization. Both the Syndicator and Subscriber must use compatible formatters and transformers.

Enabled. This indicates whether Syndication is currently enabled or not.
Current Status. This displays the current state of the Syndication process:
Idle:No Syndication is occurring.
Pending:A Request has been made to the Syndicator, but it has yet to initiate a request to the Syndication application.
Queued:The Syndicator has sent a request to the Syndication application, but Syndication is not yet active.
Active:Syndication is occurring between the Syndicator and Subscriber.
Disabled:This indicates that Syndication is currently disabled. If Syndication was already in process prior to being disabled the Status can be a combination of Disabled and Pending, Queued, or Active.
Note: If an update is initiated from a Subscriber, the Status on the Subscriber section will not display as "Queued". The Status remains as "Idle" until Syndication commences and the Status changes to Active.
Update Information.
Type. This displays the current Update Type:
Part: Only items requiring updates are Syndicated.
Full:All items are Syndicated.

Started.
Finished.
Last Checked.
The time that Syndication was started, last checked and finished is displayed here.
Last checked displays the time that the Syndicator last checked that the Subscriber was still processing the update.
Result. The result of Syndication (either Success or Fail) is displayed here. If Syndication has failed, a description of why it failed is displayed. Further information is displayed in the Detail field (below). If successful, there may also be item errors. See Item Errors (below).
Detail. Displays a detailed description of the Syndication result.
Updates Sent. This indicates the number of items that have been updated. This can either mean a new item has been added, or an existing item has been updated.
Removes Sent. This indicates the number of items removed (if any).
Subscriber's old state.
Subscriber's new state.
Displays the Subscribers old and new State. If successful, this indicates the actual change of Status. If Syndication has failed, this indicates what should have been the change of Status.
Error History.
Previous "Failed" Result Details and Item Errors are stored in an Error Log. If the Syndication has failed for some reason, a description of the cause of the failure is listed in the error log. Information on Syndication Errors related to individual items is listed here.
Note: The number of past Errors or past Item errors displayed can be changed by editing aptrixjpe.properties.
Parent topic: Syndication.

Syndication Troubleshooting.
Document (Item) Errors.
The document could not be retrieved from the Syndicator by the Subscriber:During the syndication update process, the Syndicator sends to the subscriber a package that contains the URLs of all the documents that it needs to retrieve to be up to date. The Subscriber works through this package retrieving each document from the specified URL. However, the Syndicator may not always be able to dispatch the document. There could be several reasons for this:
❍ The document no longer exists: if this is the case, the next update will send through the deletion notice for the document.
❍ The document could not be retrieved: this could be due to the document being corrupted or not being complete. E.g., Some documents rely on external data for completeness. This includes resources and users. Check the Syndicator's document errors and you will find a message describing which document it could not retrieve and why. You will need to correct the data for the document in question to be syndicated.
The document could not be saved by the Subscriber:Once the Subscriber has all the documents from the Syndicator, it then goes ahead and starts to save them (as long as they are valid replication-wise). Some documents may not save because they are expecting other documents to exist. Check the Subscriber's document errors and you will find a message describing which document it could not save and why.
"OutOfMemory" Error.
This error can occur when the trace level of logging is too high, or to logging being buffered. To avoid this, either make the tracing level of your file logging lower (1 should be good enough) or set the buffered attribute to false.
See the Server Configuration Section in the Installation Guide for further information.
Resource Issues. A tool has been included to help clean up resources. This tool can be called by appending ?MOD=AJPEResourceChecker to the servlet path.
http://[HOST]:[PORT]/lwp/wcm/connect?MOD=AJPEResourceChecker
You will have to login as Administrator to use it. The tool may take a while to run if you have a large site.
Unable to reach Host.
This is a common reason why syndication does not work. The URL for the Syndicator or the Subscriber may not be valid. You may need to use the IP Address rather than the domain name.
Deleting Indexes. Occasionally, Web Content Management indexes are required to be deleted by Web Content Management administrators. A full syndicator rebuild should be performed prior to resuming authoring. Otherwise, some recent changes to Web Content Management items may not be successfully syndicated.
Parent topic: Syndication.

Upgrading Process.
Note: Before Upgrading.
● Backup your current Web Content Management data.● Ensure that you refer to the Release-Notes for details on any particular upgrade steps that may
exist between particular releases.● Test your upgrade in a test environment before upgrading your production environment.
Note: You can upgrade from any previous version of IBM Workplace Web Content Management.
To upgrade Web Content Management, the following steps are required:
Backup your current data repository.
You should always backup or copy your current Web Content Management data prior to upgrading.
Web Content Management does not have a backup feature. You should backup your data using whatever backup solution is recommended by the data repository you are using to store Web Content Management data.
You should also copy or backup the [ILWWCM_HOME]\connect\users folder. This will be required for User Migration.
Install Web Content Management.
Install a new instance of WebSphere Portal and IBM Workplace Web Content Management. See the Installation section for further information.
Configure your Data Repository.
By default, Web Content Management uses Cloudscape as a data repository. You will need to transfer your old Web Content Management data into your new Web Content Management application.
JDBC Databases.The Web Content Management Repository configuration task updates the Web Content Management configuration to use different JDBC data repositories such as DB2.
You need to run this task to configure your new Web Content Management application to use your current JDBC data repository data. See the Repository configuration task topic for further information.

This task can be used in different ways:❍ The simplest method is to use the command "config-wcm-
repository" to configure your new Web Content Management application to use your current data repository. You will then need to migrate your user data (See below.)
❍ A second option would be to use the command "config-wcm-repository" to configure your new Web Content Management application to use your current data repository. You can then use either "transfer-wcm-to-existing-repository" or "transfer-wcm-to-new-repository" to transfer this data to a different database. You will then need to migrate your user data (See below.)
❍ A third option is to physically copy your current data repository to a new database and then run the "config-wcm-repository" command to configure your new Web Content Management application to use the new database as the data repository. You will then need to migrate your user data (See below.)
File System Data.
If you data is currently stored on a file system, you will need to run the "transfer-wcm-filesystem-to-cloudscape" command. This will transfer your file system data to a new Cloudscape database. See the Repository configuration task topic for further information. You will then need to migrate your user data (See below.)
If you would like to transfer File System data to a JDBC database, you will need to follow these instructions, and then use the "transfer-wcm" task to transfer the Cloudscape data to another JDBC database. See the Repository configuration task topic for further information.
If you would like to transfer File System data to an IBM Content Manager data repository, you will need to follow these instructions, and then setup a second Web Content Management application using Content Manager as a data repository. (See the next item.) You then Syndicate the data from the application using JDBC as a data repository to the application using Content Manager.
IBM Content Manager.To transfer data from an IBM Content Manager data repository you will need to follow the instructions in the IBM Content Manager Configuration Options topic.

Migrate your Web Content Management users and update Web Content Management items.
After configuring your data repository, you will then need to migrate any existing Web Content Management users to WebSphere Member Manager. Any changes to user or group names will need to be updated in Web Content Management items. See the User Migration topic for further information.
Test your upgraded data. Web Content Management has a set of tools that are used to test and correct for various errors in Web Content Management data. See the Web Content Management Tools topic for further information.
Optional Steps.
The following steps are optional and are not required for all upgrades:
Enabling Version Control.
The aptrixjpe.properties file can be edited to enable the Version Control of different items.
To enable Version Control, add com.aptrix.versioncontrol.VersioningControl to any of the control.[item] settings.
E.g. - control.Content=com.aptrix.versioncontrol.VersioningControl
Only Items created after enabling Version Control are version-enabled. If you did not have Version Control enabled prior to upgrading your data, you will need to run the Versioning Enablement tool by entering the following URL in a browser:
Lotus Workplace installations: http://[HOST]:[PORT]/lwp/wcm/connect?MOD=VersioningEnablement
WebSphere Portal installations: http://[HOST]:[PORT]/wps/wcm/connect?MOD=VersioningEnablement
This will version-enable your old Web Content Management data.
Migrating Rendering Portlets
You will need to migrate any old rendering portlets to the current version. See Migrating rendering portlets for further information.
Parent topic: Upgrading.

User Migration.
Overview.
The users and groups used by IBM Workplace Web Content Management to set User access and security are managed by IBM WebSphere Member Manager. See the Member Manager chapter in the WebSphere Portal Information Center for further information.
In previous versions of Web Content Management, Users and Groups were created and managed with Web Content Management itself.
Important: LDAP Users and Groups.
The User Migration process detailed in this topic only relates to the migration of Web Content Management Users and Groups to Member Manager. If you used LDAP Users and Groups with an earlier version of Web Content Management you must either:
● Configure Member Manager to use your existing LDAP server, or● Copy your existing LDAP Users or Groups into the LDAP server being used by Member Manager.
Both these steps should be performed prior to migrating your current Web Content Management Users or Groups.
Note: Custom LDAP Attributes.
Custom LDAP attributes used to map Web Content Management profiling to LDAP Users and Groups cannot be migrated.
Note: WebSphere Portal Security.
WebSphere Portal security should be enabled prior to running the User Migrator. If WebSphere Portal security is enabled at any time after User Migration has been run, you will need to perform User Migration again.
The User Migration Process.
To migrate your current Users and Groups you must:
● Upgrade your Web Content Management application as detailed in the Upgrading topic. Ensure that you copy or backup the [ILWWCM_HOME]\connect\users folder. This will be required for User Migration.
● Open the WebSphere Administration Console and add the Web Content Management Migration jar file to the Web Content Management Shared Library.

● Restart WebSphere Portal.● Open the Migration JSP page and migrate the Users and Groups. You can either:
❍ Migrate the Users directly, or❍ Generate, review and then process a User Migration Mapping file.
Note: The User Migration process can be repeated more than once if required.
User Migration Scenarios.
When a Web Content Management User or Group is migrated to Member Module, there are two possible results:
● If the Web Content Management User or Group name does not exist in Member Manager, a new User or Group is created in Member Manager. All references to the Web Content Management User or Group in Web Content Management data (Authors, Owners, Approvers, Live Users etcetera) are changed to the new Member Manager User or Group.
● If the Web Content Management User or Group name already exists in Member Manager, all references to the Web Content Management User or Group in Web Content Management data (Authors, Owners, Approvers, Live Users etcetera) are changed to the existing Member Manager User or Group.
This process has some potential issues. For example:
● The Web Content Management User, "John Smith", may also have a Member Manager user name of "John A Smith". The migration process would result in John Smith having two user IDs in Member Manager.
● There may be two users with the name of "Mary Jones" in your organization, one a Web Content Management user, and one a Member Manager User. The migration process would result in all the references to the Web Content Management "Mary Jones" in Web Content Management data being changed to the Member Manager "Mary Jones". Web Content Management "Mary Jones" would no longer have access to her Web Content Management data.
There are two possible migration scenarios when migrating Web Content Management Users and Groups to Member Manager:
Migrating directly to Member Manager. If you know of no potential conflicts with existing Web Content Management and Member Manager Users and Groups, you can migrate your Web Content Management Users and Groups directly to Member Manager.

Migrating via a User Migration Mapping file. If there are potential conflicts with existing Web Content Management and Member Manager Users and Groups, you can Generate a User Migration Mapping file.
You can then edit this file and map your Web Content Management Users and Groups to the correct Member Manager Users and Groups.
Enabling User Migration.
1. Open the WebSphere Administration Console.
Tip: Ensure you use port "9090" when accessing the WebSphere Administration Console. Otherwise you will not have access to the required Shared Libraries in Step 2.
2. Navigate to Environment -> Shared Libraries.3. Select WCMLib.4. Add full path to the ilwwcm-migration.jar in the "path" section. In a standard installation this will be:
${WPS_HOME}/wcm/migration/ilwwcm-migration.jar
5. Select Apply.6. Select Save.7. Click on Save to save the Master Configuration.8. Restart your Portal Server.
Migrating Users directly to Member Manager.
If you know of no potential conflicts with existing Web Content Management and Member Manager Users and Groups, you can migrate your Web Content Management Users and Groups directly to Member Manager.
1. Enter the following URL to access the Migration Interface:
http://[HOST]:[PORT]/wps/wcm/jsp/migration/migration.jsp
2. Enter the WebSphere Portal Administrator name.3. Enter the path to the [ILWWCM_HOME]\connect\users folder from your old Web Content
Management server. 4. If migrating the Administrator Group, check the Administrator Group box. The Administrator Group
will be mapped to the Administrator Group defined in connect.cfg. The default value for this group is wcmadmins. (See the User Management topic for more information on the Administrators Group.)
5. Select Update WMM.

Important: User and Group Names.
To use the Update WMM command, the user and group names in Web Content Management should match the users in Member Manager exactly. If not, "Update WMM" will create a new user and group for all users and groups that do not match.
E.g. - If your Web Content Management users or groups include spaces in their names, or if they use a different case from the equivalent name in Member Manager, "Update WMM" will create a new user and group for each of these occurrences.
If any user or group names do not match, you should use the "Generate and Use Migration Mapping File" option. See below.
Migrating via a User Migration Mapping file.
If there are potential conflicts with existing Web Content Management and Member Manager Users and Groups, you can Generate a User Migration Mapping file. You can then edit this file and map your Web Content Management Users and Groups to the correct Member Manager Users and Groups.
Generating a User Migration Mapping file.
1. Enter the following URL to access the Migration Interface:
http://[HOST]:[PORT]/wps/wcm/jsp/migration/migration.jsp
2. Enter the WebSphere Portal Administrator name.3. Enter the path to the [ILWWCM_HOME]\connect\users folder from your old Web Content
Management server. 4. If migrating the Administrator Group, check the Administrator Group box. The Administrator Group
will be mapped to the Administrator Group defined in connect.cfg. The default value for this group is wcmadmins. (See the User Management topic for more information on the Administrators Group.)
5. Select Generate User Migration Mapping File.
Reviewing and Editing the User Migration Mapping File.
Before processing the User Migration Mapping file, you must modify the migrationUsers.properties file located at <wcm_home>/migration/migrationUsers.properties.
The original Web Content Management Users and Groups are listed on the left, and the Member Manager names are listed on the right. You should only change the proposed Member Manager names.
You must use a Distinguished Name when entering the Member Manager name on the right hand side. For example:
● uid=username,o=default organization

● cn=group name,o=default organization
You should ensure that you do not use the "&" character in user or group names as this will cause errors:
Example: To change a group named "All Staff" to "All WP Staff", edit the property as follows:
● All\ Staff=All\ WP\ Staff● To use distinguished names: All\ Staff=cn=All_WP_Staff,ou=groups,dc=ibm,dc=com
Processing the User Mapping file.
1. Enter the following URL to access the Migration Interface:
http://[HOST]:[PORT]/wps/wcm/jsp/migration/migration.jsp
2. Enter the WebSphere Portal Administrator name.3. Select Use User Migration Mapping File.4. Your current Web Content Management Users and Groups will be updated to match the entries in the
edited Mapping file.
Adding new Users or Groups to Member Manager.
When you process the User Mapping File it only updates the names of the Users and Groups in Web Content Management. If any of your current Web Content Management Users and Groups do not exist in Member Manager, you must also run the xmlaccess command.
1. Open a command prompt.2. Go to /PortalServer/bin3. Run the following command:
Windows: xmlaccess.bat -in /path/PortalServer/wcm/migration/migrationUsers.xml -user portalAdmin -pwd password -url http://host:port/wps/config
UNIX and i5/OS: xmlaccess.sh -in /path/PortalServer/wcm/migration/migrationUsers.xml -user portalAdmin -pwd password -url http://host:port/wps/config
Ensure you replace "path", "portalAdmin", "password", "host" and "port" with the actual setting of you Web Content Management installation.

Note: Folder and file locations under i5/OS.
In i5/OS installations, Web Content Management files are located in the "wp user root" directory, not "/PortalServer/wcm/".
E.g. -
● WAS 5.1.1.3 - /QIBM/UserData/WEBAS51/Base/instance name/PortalServer51
Final Steps.
1. Shut down the WebSphere Portal server that Web Content Management is installed on.2. Delete the contents of the Web Content Management System directory:
PortalServer\wcm\ilwwcm\system
3. Restart the WebSphere Portal server.
Authoring Portlet Access Control.
The Access Control section of the Authoring Portlet's configuration view is used to manage each User's access to the different views in the Authoring portlet. You will need to ensure that all migrated users are granted access to the relevant views within the Authoring Portlet. Refer to the Authoring Portlet Access Control topic for further information.
Verifying Migration.
● Open WebSphere Portal administration to verify the creation of users and groups.● Open the Web Content Management Authoring Portlet to verify the update of Categories and
Keywords.● Logon to the Authoring Portlet with different users to verify that security and access controls are
working.● Logon to a rendered Site as different users to verify access to rendered content.● Run the Member Fixer tool in "non-update" mode to make ensure Web Content Management and
Member Manager data matches. See the Web Content Management Tools topic for further information.
Disabling User Migration.
Once you have successfully migrated your Users and Groups, you should disable the User Migration system.
1. Open the WebSphere Administration Console.2. Navigate to Environment -> Shared Libraries.3. Select WCMLib.

4. Remove the path to the ilwwcm-migration.jar in the "path" section.5. Select Apply.6. Select Save.7. Click on Save.8. Restart your Portal Server.
Parent topic: Upgrading.

Migrating rendering portlets
Old rendering portlets can be migrated to new remote rendering portlets using the portlet migration task. Old rendering portlets cannot be migrated to local rendering portlets.
Before running the portlet migration task:
1. You must have the migration task installed on the server where the migrated remote rendering portlet will be located:❍ If Web Content Management is installed on this server, you must install fix pack PK12259. The Web Content
Management server must have already been upgraded to version 2.5. ❍ If Web Content Management is not installed on this server, you must copy the portlet migration files from a Web Content
Management server where fix pack PK12259 has already been installed. Copy the following folder to the server where the migrated remote rendering portlet will be located:
[WPS_ROOT]\wcm\migration\portlet\
2. Export the WebSphere Portal configuration of the server where the migrated remote rendering portlet will be located by running the following task:
Windows:[WPS_ROOT]\bin\xmlaccess.bat -in [WPS_ROOT]\wcm\migration\portlet\export.xml -user [WPSADMIN_USERNAME] -pwd [WPSADMIN_PASSWORD] -url http://[WPS_HOST]:[WPS_PORT] -out portal_config.xml
UNIX:[WPS_ROOT]\bin\xmlaccess.sh -in [WPS_ROOT]\wcm\migration\portlet\export.xml -user [WPSADMIN_USERNAME] -pwd [WPSADMIN_PASSWORD] -url http://[WPS_HOST]:[WPS_PORT] -out portal_config.xml
Copy the WebSphere Portal configuration to server where the migrated remote rendering portlet will be located if it is a different server.
3. Uninstall any old rendering portlets from the server where the migrated remote rendering portlet will be located using
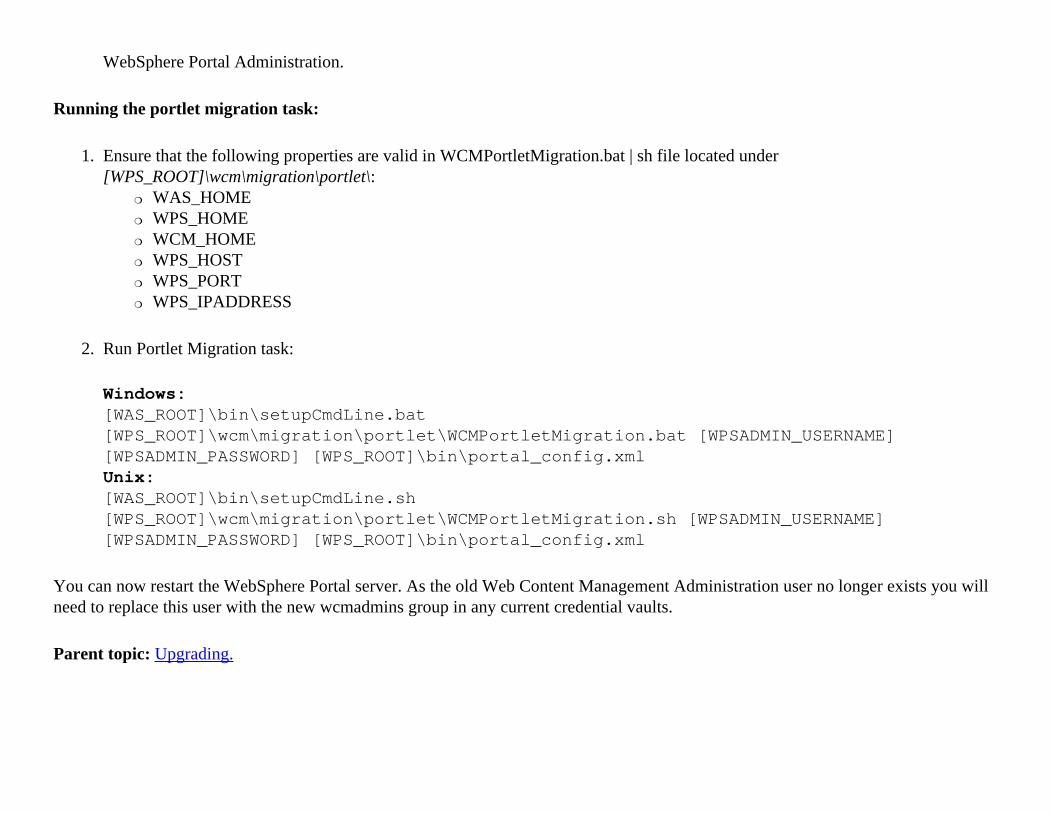
WebSphere Portal Administration.
Running the portlet migration task:
1. Ensure that the following properties are valid in WCMPortletMigration.bat | sh file located under [WPS_ROOT]\wcm\migration\portlet\:
❍ WAS_HOME❍ WPS_HOME❍ WCM_HOME❍ WPS_HOST❍ WPS_PORT❍ WPS_IPADDRESS
2. Run Portlet Migration task:
Windows:[WAS_ROOT]\bin\setupCmdLine.bat[WPS_ROOT]\wcm\migration\portlet\WCMPortletMigration.bat [WPSADMIN_USERNAME] [WPSADMIN_PASSWORD] [WPS_ROOT]\bin\portal_config.xml Unix:[WAS_ROOT]\bin\setupCmdLine.sh[WPS_ROOT]\wcm\migration\portlet\WCMPortletMigration.sh [WPSADMIN_USERNAME] [WPSADMIN_PASSWORD] [WPS_ROOT]\bin\portal_config.xml
You can now restart the WebSphere Portal server. As the old Web Content Management Administration user no longer exists you will need to replace this user with the new wcmadmins group in any current credential vaults.
Parent topic: Upgrading.

Installing a Fix Pack.
For information on installing Web Content Management Fix Packs, refer to the Fix Pack's Release Notes.
Parent topic: Upgrading.