hydraulic bottle jacks - draper tools · bottle jacks. 1. title page ... this jack is designed for...
TRANSCRIPT
These instructions accompanying the product are the original instructions. This document is part of the product, keep it for the life of the product passing it on to any subsequent holder of the product. Read all these instructions before assembling, operating or maintaining this product.This manual has been compiled by Draper Tools describing the purpose for which the product has been designed, and contains all the necessary information to ensure its correct and safe use. By following all the general safety instructions contained in this manual, it will ensure both product and operator safety, together with longer life of the product itself.AlI photographs and drawings in this manual are supplied by Draper Tools to help illustrate the operation of the product.Whilst every effort has been made to ensure the accuracy of information contained in this manual, the Draper Tools policy of continuous improvement determines the right to make modifications without prior warning.
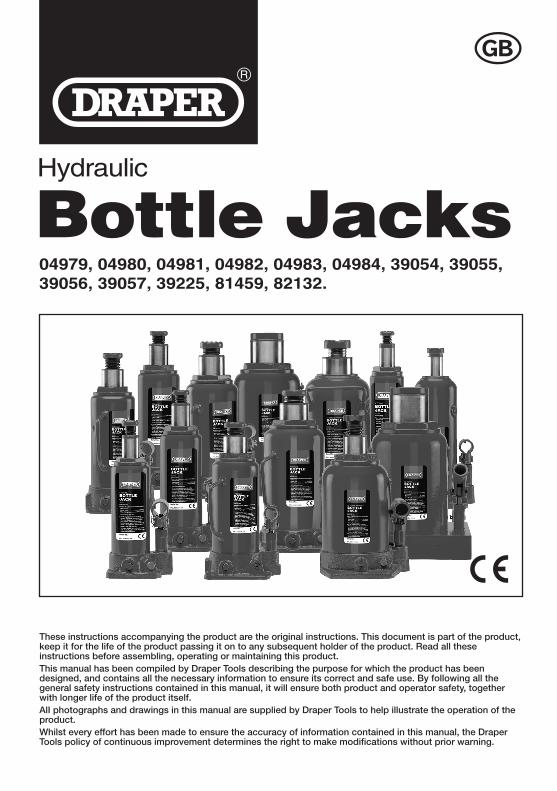
04979, 04980, 04981, 04982, 04983, 04984, 39054, 39055,39056, 39057, 39225, 81459, 82132.
�
Hydraulic
Bottle Jacks
1. TITLE PAGE
1.1 INTRODUCTION:USER MANUAL FOR: Hydraulic Bottle JacksStock No’s: 04979, 04980, 04981, 04982, 04983, 04984, 39054, 39055, 39056, 39057, 39225, 81459, 82132.Part No’s: BJ8, BJ10, BJ15, BJ32, BJ4HL, BJ10HL, BJ2, BJ4, BJ6, BJ12, BJ20, BJ50, BJ12HL-B.
As our user manuals are continually updated, users should make sure that they use the very latest version.
Downloads are available from: http://drapertools.com/manuals
Draper Tools Limited Hursley Road Chandler’s Ford EastleighHampshireSO53 1YFUK
Website: drapertools.comProduct Helpline: +44 (0) 23 8049 4344General Fax: +44 (0) 23 8026 0784
1.3 UNDERSTANDING THIS MANUALS SAFETY CONTENT:WARNING! – Information that draws attention to the risk of injury or death.CAUTION! – Information that draws attention to the risk of damage to the product or surroundings.
1.4 COPYRIGHT © NOTICE:Copyright © Draper Tools Limited.Permission is granted to reproduce this publication for personal and educational use only. Commercial copying, redistribution, hiring or lending is prohibited.No part of this publication may be stored in a retrieval system or transmitted in any other form or means without written permission from Draper Tools Limited.
In all cases this copyright notice must remain intact.
1.2 REVISIONS:Date first published August 2017.
- 3 -
2. CONTENTS1. TITLE PAGE 1.1 INTRODUCTION.......................................................................................................... 2 1.2 REVISION HISTORY .................................................................................................. 2 1.3 UNDERSTANDING THIS MANUAL ............................................................................. 2 1.4 COPYRIGHT NOTICE ................................................................................................. 22. CONTENTS 2.1 CONTENTS .................................................................................................................... 33. GUARANTEE 3.1 GUARANTEE ...............................................................................................................44. INTRODUCTION 4.1 SCOPE......................................................................................................................... 5 4.2 SPECIFICATION .......................................................................................................... 55. HEALTH AND SAFETY INFORMATION 5.1 HEALTH AND SAFETY................................................................................................ 66. BEFORE USE 6.1 PURGING AIR FROM HYDRAULIC SYSTEM............................................................. 77. INSTRUCTIONS FOR USE 7.1 TO RAISE - STEPS 1-2 ............................................................................................... 8 7.2 TO LOWER .................................................................................................................. 88. MAINTENANCE 8.1 MAINTENANCE ......................................................................................................... 179. TROUBLESHOOTING 9.1 TROUBLESHOOTING .................................................................................................. 18DECLARATION OF CONFORMITY .............................................................................. ENCLOSED
- 4 -
3. GUARANTEE
3.1 GUARANTEEDraper tools have been carefully tested and inspected before shipment and are guaranteed to be free from defective materials and workmanship.Should the tool develop a fault, please return the complete tool to your nearest distributor or contact: Draper Tools Limited, Chandler's Ford, Eastleigh, Hampshire, SO53 1YF. England. Telephone Sales Desk: (023) 8049 4333 or: Product Helpline (023) 8049 4344.A proof of purchase must be provided.If upon inspection it is found that the fault occurring is due to defective materials or workmanship, repairs will be carried out free of charge. This guarantee period covering parts/labour is 12 months from the date of purchase except where tools are hired out when the guarantee period is 90 days from the date of purchase. This guarantee does not apply to normal wear and tear, nor does it cover any damage caused by misuse, careless or unsafe handling, alterations, accidents, or repairs attempted or made by any personnel other than the authorised Draper warranty repair agent.Note: If the tool is found not to be within the terms of warranty, repairs and carriage charges will be quoted and made accordingly.This guarantee applies in lieu of any other guarantee expressed or implied and variations of its terms are not authorised.Your Draper guarantee is not effective unless you can produce upon request a dated receipt or invoice to verify your proof of purchase within the guarantee period.Please note that this guarantee is an additional benefit and does not affect your statutory rights.Draper Tools Limited.
- 5 -
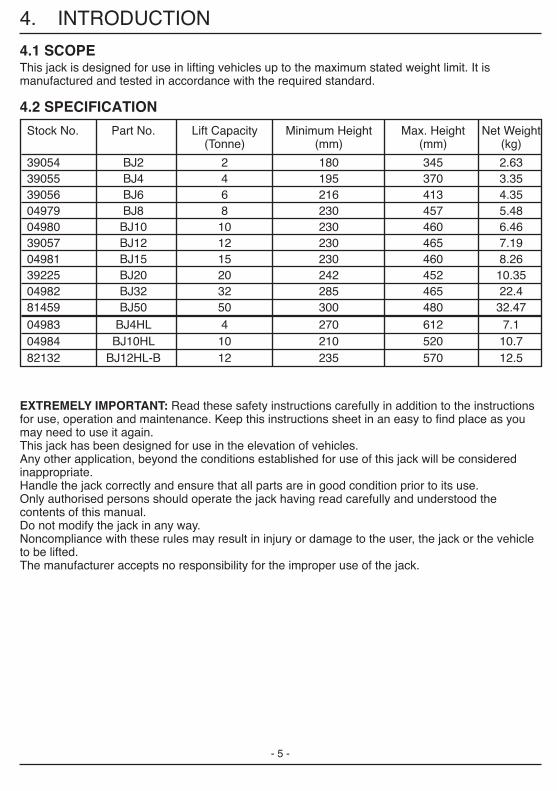
4. INTRODUCTION
4.1 SCOPEThis jack is designed for use in lifting vehicles up to the maximum stated weight limit. It is manufactured and tested in accordance with the required standard.
4.2 SPECIFICATION
EXTREMELY IMPORTANT: Read these safety instructions carefully in addition to the instructions for use, operation and maintenance. Keep this instructions sheet in an easy to find place as you may need to use it again.This jack has been designed for use in the elevation of vehicles.Any other application, beyond the conditions established for use of this jack will be considered inappropriate.Handle the jack correctly and ensure that all parts are in good condition prior to its use.Only authorised persons should operate the jack having read carefully and understood the contents of this manual.Do not modify the jack in any way.Noncompliance with these rules may result in injury or damage to the user, the jack or the vehicle to be lifted.The manufacturer accepts no responsibility for the improper use of the jack.
Stock No. Part No. Lift Capacity Minimum Height Max. Height Net Weight (Tonne) (mm) (mm) (kg)
39054 BJ2 2 180 345 2.6339055 BJ4 4 195 370 3.3539056 BJ6 6 216 413 4.3504979 BJ8 8 230 457 5.4804980 BJ10 10 230 460 6.4639057 BJ12 12 230 465 7.1904981 BJ15 15 230 460 8.2639225 BJ20 20 242 452 10.3504982 BJ32 32 285 465 22.481459 BJ50 50 300 480 32.4704983 BJ4HL 4 270 612 7.104984 BJ10HL 10 210 520 10.782132 BJ12HL-B 12 235 570 12.5
- 6 -
5. HEALTH AND SAFETY INFORMATION
5.1 HEALTH AND SAFETY INFORMATIONThe vehicle to be lifted should never exceed the rated capacity of the jack.
The maximum lift height of the jack indicated on the label should never be exceeded.
The jack should be supported on a solid, level and horizontal surface which is well illuminated and free of obstructions. Never stand the jack on a surface which may sink, concrete is preferred.
Ensure that there are no persons inside the vehicle to be lifted. Switch off the engine and apply the brake. Ensure the vehicle, or element to be lifted is protected against any type of sliding. Use chocks if appropriate. Do not enter the vehicle or start the engine whilst it is supported on the jack or appropriate stands. The jack is a lifting device only and should never be used to move the vehicle.
Position the jack under the manufacturer’s recommended lifting point for the vehicle and ensure that it is not corroded, dirty or greasy. This point should remain centred over the jack saddle. All off-centred loads can slip and accidents may result.
During raising and lowering of the load, all precautions should be taken to avoid movement of the vehicle load. Traffic may cause the raised vehicle to rock during roadside use of the jack.
The jack should be positioned so as to avoid the need for the user to introduce any part of his/her body underneath the vehicle. Never work under a raised vehicle without supporting it with axle stands or other appropriate methods. Never position any part of your body near the movable elements of the jack.
It is necessary for the operator to be able to observe the lifting device and the load during all movements. In the presence of dangerous conditions, such as movement of the vehicle, etc, the lifting process must be interrupted or stopped immediately.
Ensure that there are no persons or obstructions underneath the vehicle prior to lowering.
As an additional safety measure against overload, the jack is fitted with an overload valve set at the factory and which should not be adjusted under any circumstances. If the capacity of the jack is exceeded, the overload valve will stop the lifting operation.
No modifications of any type are advised or allowed with this product.
- 7 -
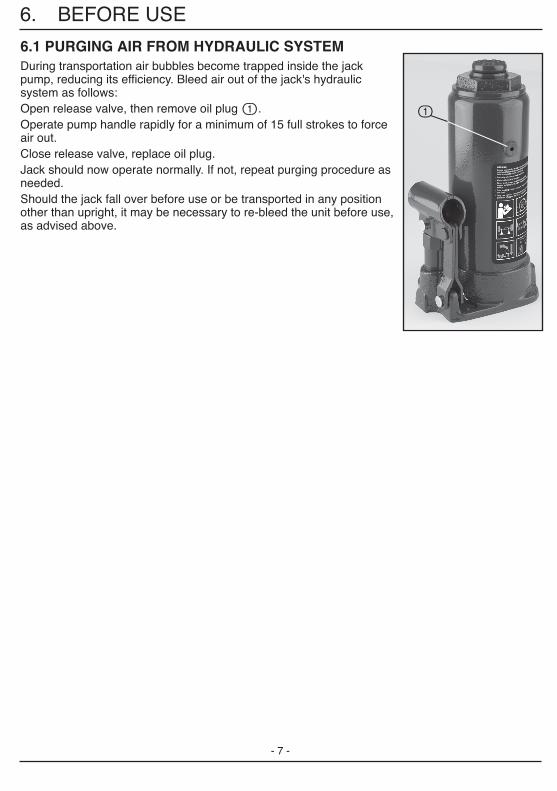
6.1 PURGING AIR FROM HYDRAULIC SYSTEMDuring transportation air bubbles become trapped inside the jack pump, reducing its efficiency. Bleed air out of the jack's hydraulic system as follows:Open release valve, then remove oil plug .Operate pump handle rapidly for a minimum of 15 full strokes to force air out.Close release valve, replace oil plug.Jack should now operate normally. If not, repeat purging procedure as needed.Should the jack fall over before use or be transported in any position other than upright, it may be necessary to re-bleed the unit before use, as advised above.
6. BEFORE USE
- 8 -
7. INSTRUCTIONS FOR USE
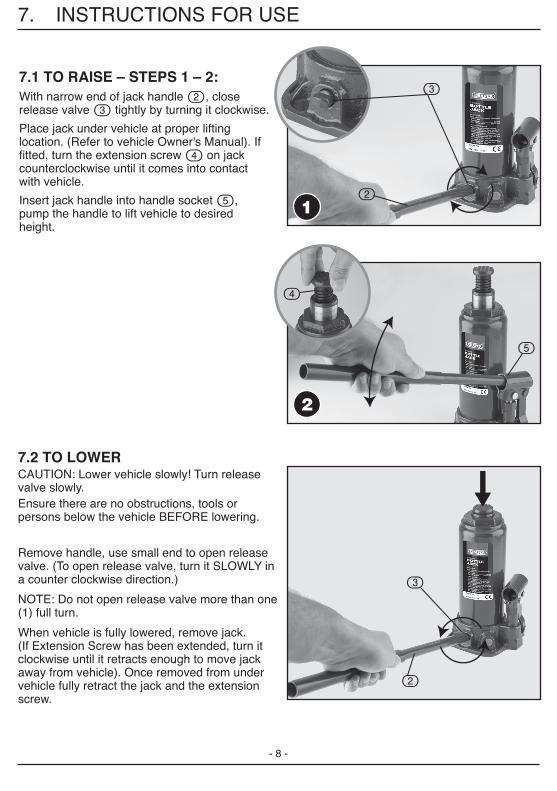
7.1 TO RAISE – STEPS 1 – 2:With narrow end of jack handle , close release valve tightly by turning it clockwise.
Place jack under vehicle at proper lifting location. (Refer to vehicle Owner's Manual). If fitted, turn the extension screw on jack counterclockwise until it comes into contact with vehicle.
Insert jack handle into handle socket , pump the handle to lift vehicle to desired height.
7.2 TO LOWERCAUTION: Lower vehicle slowly! Turn release valve slowly.Ensure there are no obstructions, tools or persons below the vehicle BEFORE lowering.
Remove handle, use small end to open release valve. (To open release valve, turn it SLOWLY in a counter clockwise direction.)
NOTE: Do not open release valve more than one (1) full turn.
When vehicle is fully lowered, remove jack. (If Extension Screw has been extended, turn it clockwise until it retracts enough to move jack away from vehicle). Once removed from under vehicle fully retract the jack and the extension screw.
1
2
- 9 -
8. MAINTENANCE
8.1 MAINTENANCEIMPORTANT: Both the maintenance and repair of the jack may only be performed by qualified persons, who have sufficient knowledge of the hydraulic systems used in these devices as a result of their training and experience.
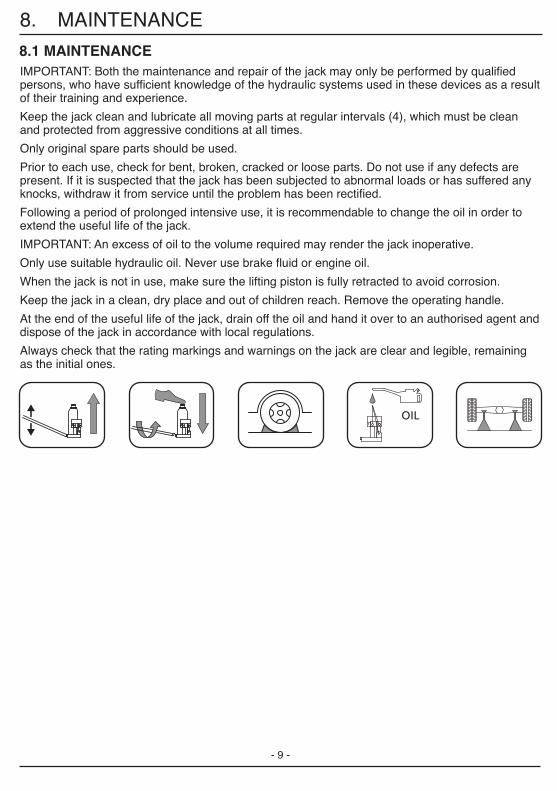
Keep the jack clean and lubricate all moving parts at regular intervals (4), which must be clean and protected from aggressive conditions at all times.
Only original spare parts should be used.
Prior to each use, check for bent, broken, cracked or loose parts. Do not use if any defects are present. If it is suspected that the jack has been subjected to abnormal loads or has suffered any knocks, withdraw it from service until the problem has been rectified.
Following a period of prolonged intensive use, it is recommendable to change the oil in order to extend the useful life of the jack.
IMPORTANT: An excess of oil to the volume required may render the jack inoperative.
Only use suitable hydraulic oil. Never use brake fluid or engine oil.
When the jack is not in use, make sure the lifting piston is fully retracted to avoid corrosion.
Keep the jack in a clean, dry place and out of children reach. Remove the operating handle.
At the end of the useful life of the jack, drain off the oil and hand it over to an authorised agent and dispose of the jack in accordance with local regulations.
Always check that the rating markings and warnings on the jack are clear and legible, remaining as the initial ones.
- 10 -
9. TROUBLESHOOTING
9.1 TROUBLESHOOTING
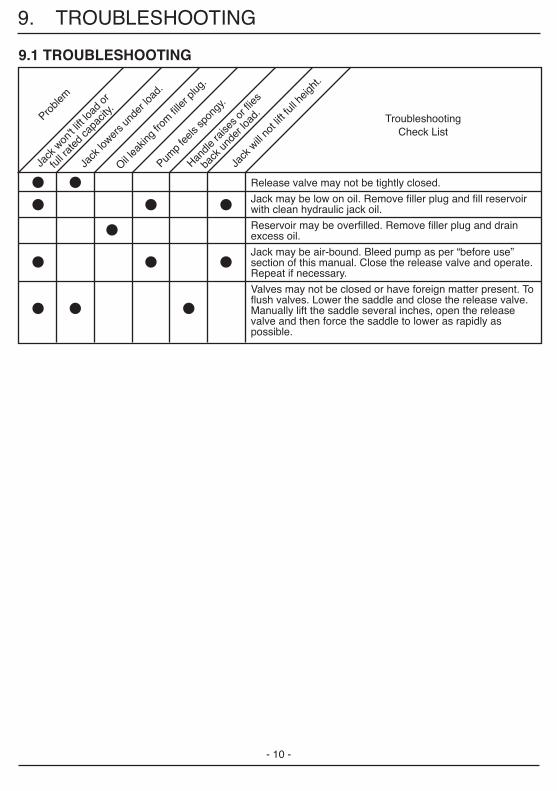
Release valve may not be tightly closed.
Jack may be low on oil. Remove filler plug and fill reservoir with clean hydraulic jack oil.
Reservoir may be overfilled. Remove filler plug and drain excess oil.
Jack may be air-bound. Bleed pump as per “before use” section of this manual. Close the release valve and operate. Repeat if necessary.
Valves may not be closed or have foreign matter present. To flush valves. Lower the saddle and close the release valve. Manually lift the saddle several inches, open the release valve and then force the saddle to lower as rapidly as possible.
Jack
will
not li
ft fu
ll heig
ht.
Handle
raise
s or f
lies
ba
ck u
nder
load
.
Pump
feels
spon
gy.
Oil lea
king
from
filler
plug
.
Jack
lower
s und
er lo
ad.
Jack
won
't lift
load
or
fu
ll rat
ed ca
pacit
y.Pro
blem
TroubleshootingCheck List

NOTES
Draper Tools Limited, Hursley Road,Chandler's Ford, Eastleigh, Hampshire. SO53 1YF. U.K.
Helpline: (023) 8049 4344
Sales Desk: (023) 8049 4333
Internet: drapertools.com
E-mail: [email protected]
General Enquiries: (023) 8026 6355
Service/Warranty Repair Agent:For aftersales servicing or warranty repairs, please contact the Draper Tools Helpline for details of an agent in your local area.
©Published by Draper Tools Limited.No part of this publication may be reproduced, stored in a retrieval system or transmitted in any form or by any means, electronic, mechanical photocopying, recording or otherwise without prior permission in writing from Draper Tools Ltd.
CONTACTS
YOUR DRAPER STOCKIST
PJMC1117