how to teach unforgettable lessons & classes on zoom
TRANSCRIPT

CHAPTER 1
How to Teach Unforgettable Lessons & Classes
A Step-by-Step Guide for Educators
Here, you’ll find everything you need to know to teach amazing lessons online today.
On Zoom & Google Meet

CHAPTER 1
You’re in the right place. While it can feel overwhelming at first to navigate the world of teaching online, there are some straightforward steps you can take right now (yes, today!) to create outstanding online lessons and classes that you and your students absolutely love.
You don’t have to be a tech wiz to teach online. In fact, a huge majority of the best online educators aren’t naturally tech-savvy, and most would say they’re not even particularly good with computers. The best online teachers have simply done some researching, preparing, and experimenting, and come up with strategies that work wonders for online teaching.
That’s what this guide is all about. Here, you’re going to find super easy, step-by-step guidance for setting up your online teaching environment, pedagogical advice for connecting with your students and helping your lessons transcend the two-dimensional screen, and technical guidance including simple tips for setting up your Zoom or Google meet account, and - if you want to get fancy - in-depth instructions for choosing mics, mixers, interfaces, lighting, cameras, and other gear.
Whether you’re looking to teach cello or piano, yoga or salsa, chess or language arts, this guide is for you. You’ll learn how to lead big group classes where students collaborate with one another, and design engaging, one-on-one lessons that keep students focused from the very first moment.
You can use this guide to start teaching online for the very first time, and you can also use it to up your game if you’re an experienced online teacher.
The biggest secret about teaching online? Everyone is learning something new ALL the time. Online education is an exciting and constantly evolving field, and if you haven’t already, it’s time to dip your toe in the water and see what amazingness you can create through your lessons.
Best, The TakeLessons Team
Looking to Up Your Game as an Online Teacher?

CHAPTER 1
While it can feel like a lot to take on at first, teaching online is actually simple, straightforward, and easy. In this guide, we’re going to focus specifically on teaching via Zoom and Google Meet.
Teaching on another platform? No worries, the steps in this guide will be super valuable for you, too. You can go ahead and skip the getting started section and move to Chapter 2, where you’ll find in-depth advice about equipment and gear.
We’ll start here by identifying the specific benefits of the Zoom and Google Meet platforms, so you can choose the best online teaching tool for your needs.
There are big benefits to both Zoom and Google Meet, and the platform you choose will be informed by your specific teaching style, your students, and also, the subject you teach. Let’s take a look at some of the differences.
First Off, How Do You Choose Between Zoom & Google Meet?
Getting Started
The most straightforward online teaching option, Google Meet is simple to start with, while giving you a little less power to customize your sound and video settings.
Google Meet is a great option if:
You’re new to online teaching and want the simplest solution possible
You’re teaching non-music lessons like academics or hobbies
You’re only teaching one-on-one lessons
Google Meet
CHAPTER 1
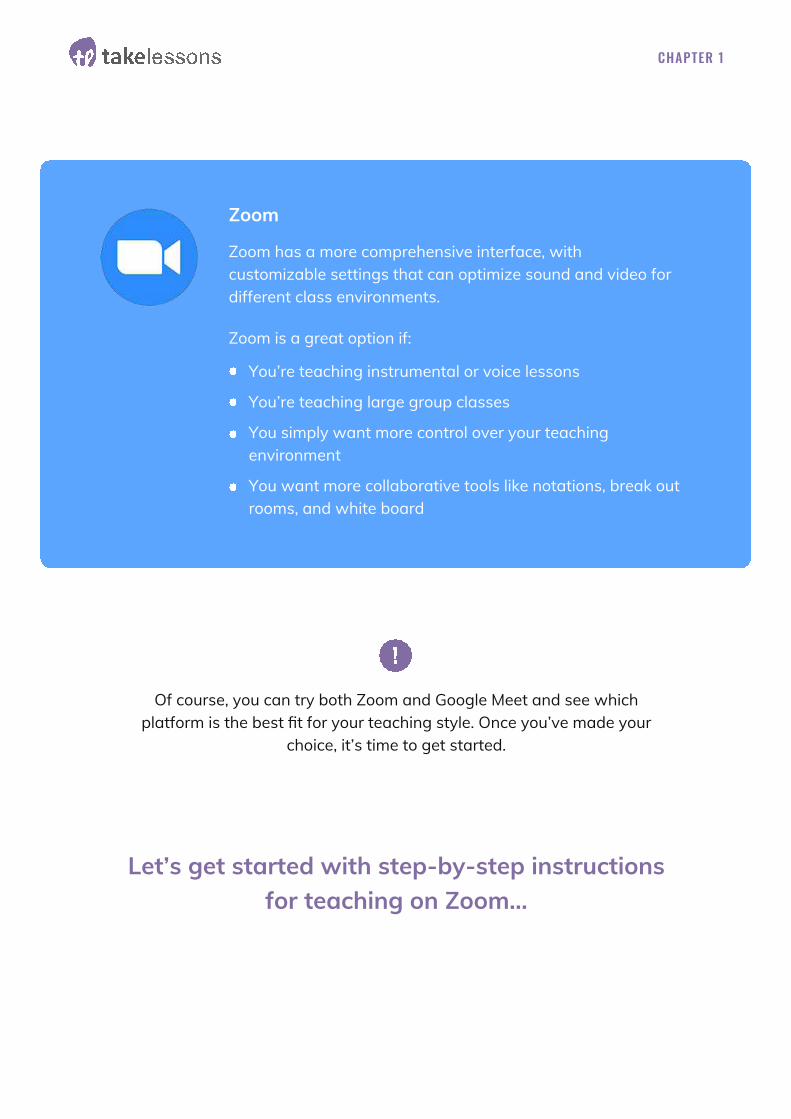
Zoom has a more comprehensive interface, with customizable settings that can optimize sound and video for different class environments.
Zoom is a great option if:
You’re teaching instrumental or voice lessons
You’re teaching large group classes
You simply want more control over your teaching environment
You want more collaborative tools like notations, break out rooms, and white board
Zoom
Of course, you can try both Zoom and Google Meet and see which platform is the best fit for your teaching style. Once you’ve made your
choice, it’s time to get started.
Let’s get started with step-by-step instructions for teaching on Zoom...

CHAPTER 1
Teaching on Zoom gives you the power to customize sound and video settings, and design the perfect teaching environment. We’re going to walk step-by-step through the very basic elements of setting up your Zoom account and optimizing your settings.
Already got a Zoom setup? Skip forward to dive into the details of online teaching, gear, space optimization, and pedagogy.
Set up your Zoom account at us04web.zoom.us, and choose your plan. The Basic plan is free to use and great for private lessons. For group lessons longer than 40 minutes, lessons with lots of participants, or to record your lessons to the cloud, you’ll need to upgrade to the Pro Plan.
First, Set Up Your Account
So, Just How Do You Teach On Zoom?
Friendly Note: the following screenshots were taken in October, 2020. Keep in mind that Zoom and Google Meet
update their platforms from time to time.
CHAPTER 1
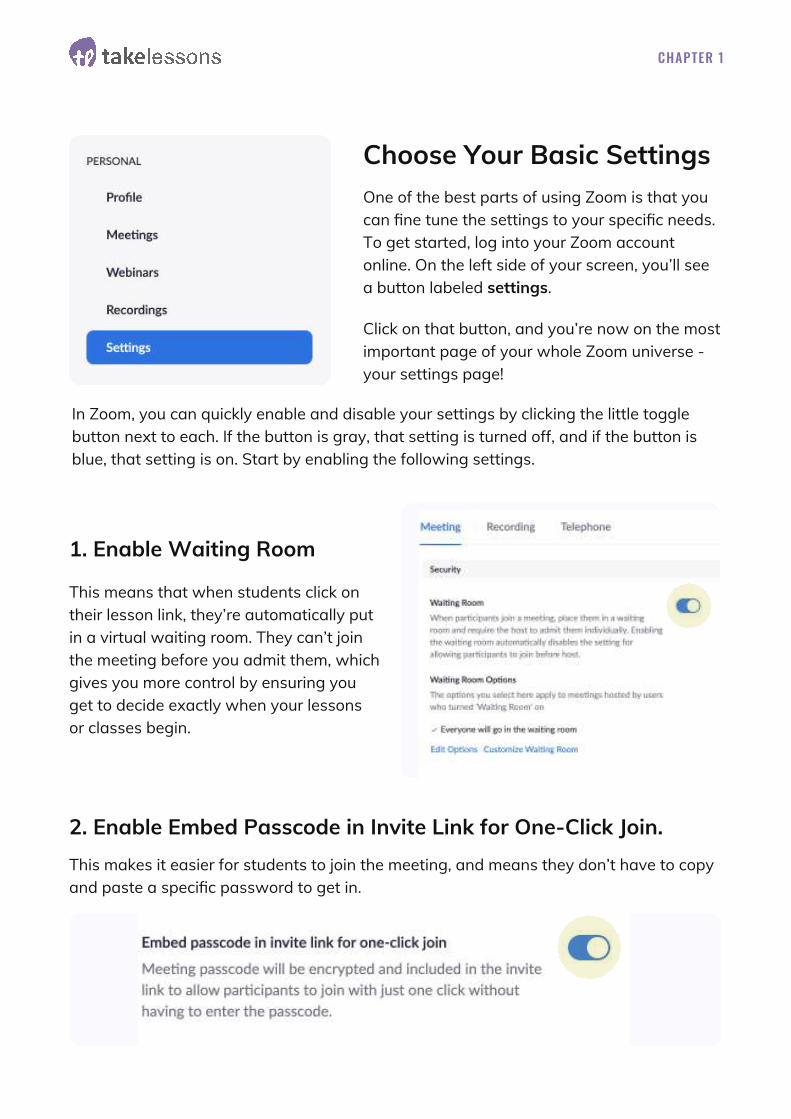
One of the best parts of using Zoom is that you can fine tune the settings to your specific needs. To get started, log into your Zoom account online. On the left side of your screen, you’ll see a button labeled settings.
Click on that button, and you’re now on the most important page of your whole Zoom universe - your settings page!
In Zoom, you can quickly enable and disable your settings by clicking the little toggle button next to each. If the button is gray, that setting is turned off, and if the button is blue, that setting is on. Start by enabling the following settings.
This means that when students click on their lesson link, they’re automatically put in a virtual waiting room. They can’t join the meeting before you admit them, which gives you more control by ensuring you get to decide exactly when your lessons or classes begin.
1. Enable Waiting Room
This makes it easier for students to join the meeting, and means they don’t have to copy and paste a specific password to get in.
2. Enable Embed Passcode in Invite Link for One-Click Join.
Choose Your Basic Settings

CHAPTER 1
Enable your Personal Meeting ID to schedule meetings and start instant meetings.
3. Enable Personal Meeting ID
This is an especially helpful setting for big group classes, where you might have lots of students entering your virtual classroom.
4. Enable Mute Participants Upon Entry.

CHAPTER 1
Now, scroll all the way down until you see Whiteboard, Annotation, and Screen Sharing. These settings make it possible to quickly and easily share information with your students.
5. Enable Screen Sharing, Annotation, & White Board

CHAPTER 1
Breakout rooms mean you can create separate meeting rooms for participants to work together one-on-one during your lessons. Not everyone uses this feature, and beginning students may feel overwhelmed working in smaller groups. However, it’s a valuable tool to have available if you’d like students to collaborate directly with each other.
6. Enable Breakout Rooms
Now, turn on stereo audio and original sound settings. These are especially helpful for musicians. If you play a low, resonant instrument like the upright bass, you may want to turn off original sound, so that your low notes aren’t cut out by Zoom’s interface.
7. Enable Audio Settings
Of course, you can get even more specific with your settings, let’s take a look at Advanced Settings...
CHAPTER 1
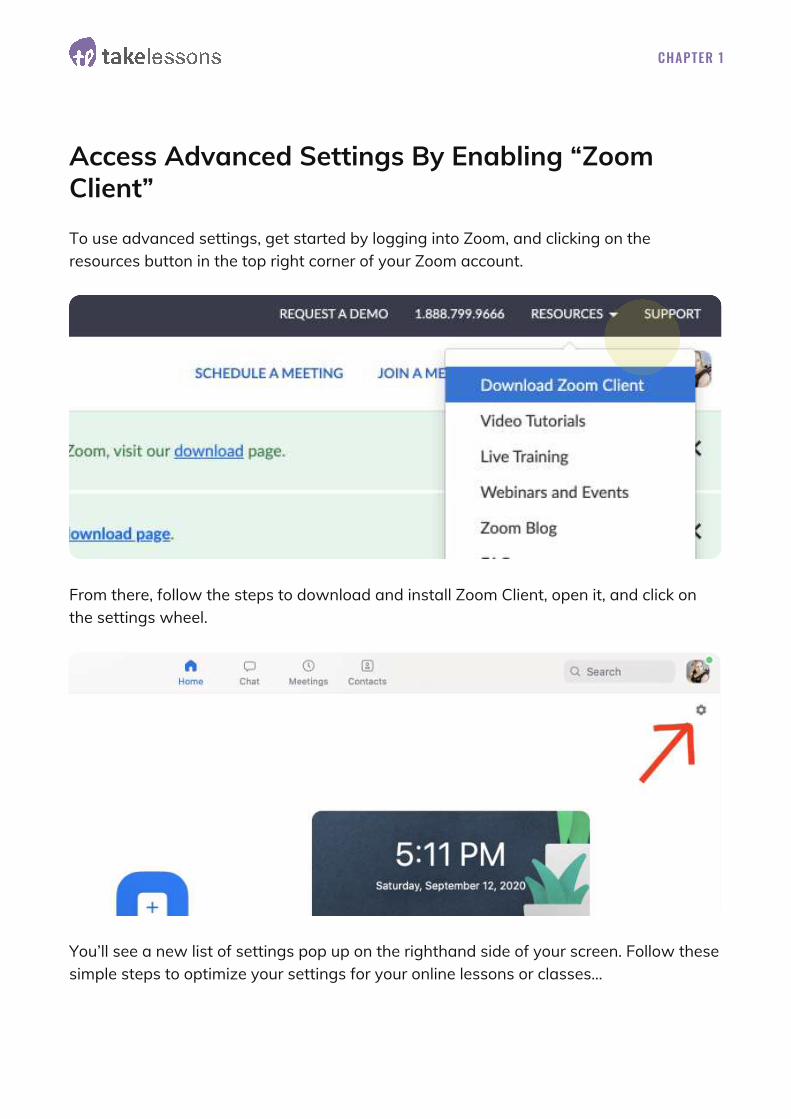
To use advanced settings, get started by logging into Zoom, and clicking on the resources button in the top right corner of your Zoom account.
From there, follow the steps to download and install Zoom Client, open it, and click on the settings wheel.
You’ll see a new list of settings pop up on the righthand side of your screen. Follow these simple steps to optimize your settings for your online lessons or classes...
Access Advanced Settings By Enabling “Zoom Client”

CHAPTER 1
Turn off automatically adjust microphone volume and set suppress background noise to low. And then click the advanced link.
1. Reduce Background Noise
Set echo cancellation to auto (and if you’re using headphones and still hearing an echo, change this setting to aggressive). Turn on show in meeting option to enable original sound, as well a high fidelity music mode and use stereo audio.
2. Use Echo Cancellation & Enable High Fidelity Music
CHAPTER 1
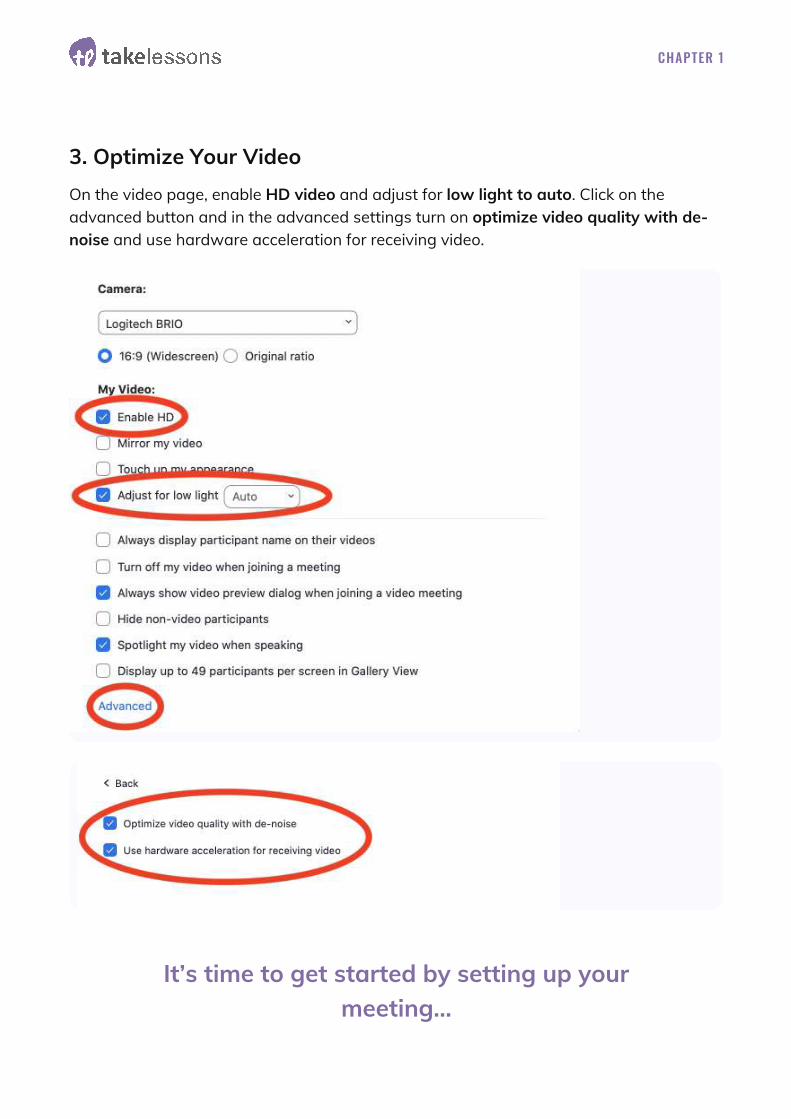
On the video page, enable HD video and adjust for low light to auto. Click on the advanced button and in the advanced settings turn on optimize video quality with de-noise and use hardware acceleration for receiving video.
3. Optimize Your Video
It’s time to get started by setting up your meeting...

CHAPTER 1
OPTION #1:
Scheduling or Starting an Instant “Lesson Room” Okay - you’ve opened your account and you’ve got your settings enabled. Now, just how do you actually start a lesson? What if you want to start a lesson immediately, or what if you want to put a lesson on the calendar for next week - can you do that?
The answer is a resounding “yes”. Zoom has a couple of different options for setting up your meetings. You can either schedule individual links for each of your students, or you can have one single link that all your students have access to. Let’s take a look at your options.
By clicking the New Meeting button, you can instantly start your lessons with just one click. This is optimal if you’re new to online teaching, or if you have tons of students and want a streamlined way to enter your virtual classroom.
Start an Instant Meeting With Your Personal Meeting ID

CHAPTER 1
By using just your Personal Meeting ID, you simply have one virtual “lesson room” where students enter and exit. All students use the same meeting link, so you don’t have to worry about keeping lots of links organized.
Some teachers share the Personal Meeting ID with their students via email thread. Another option is to create a password protected area of your website where current students can find your wonderful lesson link, and login at their appointed time.
Using a Personal Meeting ID is a little less secure than giving each student their own link, but it certainly makes life simpler for you and for your students.
Here’s how you start a lesson using just your Personal Meeting ID:
By using the schedule button, you can create a meeting for each private student or group lesson.
Click new meeting to start an instant meeting using your Personal Meeting ID, located on the profile page of your account.
Simply copy and send the Personal Meeting ID to your student through email or another app.
Your student can access the meeting by simply clicking on the link, or copying and pasting into a web browser.
OPTION #2:
Schedule a Recurring Meeting Using the Schedule Button

CHAPTER 1
The benefit of this option is that it’s secure. You won’t run the risk of having students popping up in your virtual waiting room while you’re teaching someone else. However, it does mean you need to stay organized in order to keep track of lesson links for each of your students.
Here’s how you set up recurring or scheduled meetings on Zoom:
First, click on the schedule button (circled above), and a new window will open where you can set the topic, date, and time. If you set a recurring meeting, you will only have to do this for the first lesson, and simply make sure you enable the recurring meeting option.
When you’re ready to start the meeting, simply click the start button to the right of the three dots in your Zoom client browser.
Next, set the Meeting ID to generate automatically. This will give each meeting a unique Meeting ID, which will heighten your security.
Save your meeting by clicking the blue save button in the lower right hand corner, and after you save, your meeting will show up on your Zoom Client panel under the scheduled time.
Send the meeting information to your student by clicking on the three dots next to the meeting, clicking copy invitation, paste to an email, and send.

CHAPTER 1
When you’re in your meeting room, you’ll notice a toolbar at the bottom of the meeting screen.
If you don’t see all the options you’re looking for, simply double check your account settings in your Zoom profile to make sure you have enabled all the buttons you need. If you’re still missing, take a moment to check that your software is up to date and compatible with Zoom Client.
Once you start your meeting, click on the buttons on the bottom tool bar that say chat and participants. Clicking these will open a new tab on the right side of the Zoom window. Here, you’ll be able to see if a student joins your waiting room, and admit them by pressing the admit button next to their name.
If you’re new to teaching on Zoom, it might be helpful to give yourself a little reminder that students will need to be manually let into your lesson room from the virtual waiting room. It can be easy to forget!
Testing Your Settings & Admitting Students to Your Lesson Room

CHAPTER 1
Look down at the lower bottom left corner of the tool bar. If you see slashes through the microphone or video icons, that means you’re muted and have stopped your video. Simply click those buttons again to unmute and start your video.
Next, click on the little arrows next to these icons. This will bring up options to change your camera, speaker, and microphone. You can also use these arrows to select a virtual background.
Once You’re In Your Lesson
If you select audio settings, it will bring up the same audio settings you already set up in Zoom Client.
Students will have access to the same audio settings here and should select their settings the same way.

CHAPTER 1
Now, takes look at the buttons in the upper left hand corner. If you click on the circled “i”, a window will drow down and display your meeting ID, password, and link. To the right of that it wil say, “Turn on original sound,” click it so now it says “Turn off original sound”.
This will improve audio quality for music lessons. Have your students make the same selection on their screen. You should only have to make this change once, and it will remain on for future meetings.
When you’re demonstrating, ask your students to click on speaker view, so they can see a full version of you. If they’re sharing their work, you can have them switch to gallery view, so they can see themselves better for posture and technique.
Now, in the top right hand corner, there’s only one button, and this button will say, “view”. Click on this and a window will drow down that says speaker or gallery. Speaker view shows one large box and one small box. Gallery view shows two equal sized boxes with both speakers, or many different boxes with each of your lesson participants.
Once You’re In Your Lesson

CHAPTER 1
When you’re ready to end the lesson, you’ll see two buttons in the lower right corner, end meeting for all, and leave meeting. Click end meeting for all to end your lesson or class.
Make sure you log out of your Zoom application and close all windows at the end of your lesson. While this seems like a no-brainer, it’s an all-too-easy step to forget, and it’s important to protect yourself and your family’s privacy.
Ending Your Lesson
Educators who are deeply familiar with their equipment and technology tend to feel more relaxed during their lessons. And this sense of ease can be felt by students, leading to better and smoother lessons. Let’s take a look at some useful Zoom features to use during your meeting. Take some time to familiarize yourself with these features, so you feel confident using them in your lessons.
Get To Know Your Zoom Features

CHAPTER 1
Click the screen share button at the bottom of your Zoom window to show students what’s on your screen. Screen sharing can be useful for sharing documents, sheet music, and presentations.
Note that you have the option to share your entire desktop, a white board, your iPhone/iPad screen, a specific document, program, or browser window. Be sure you have the document, program, or browser window open before you click share screen, otherwise it won’t show up for your students. If you’re planning on playing a video, or anything that requires sound, make sure you click the “share computer sound” button on this window before clicking share.
1. Screen Sharing
The chat button opens a window where you and your students can share written messages with each other. This feature is helpful for doing a roll call at the beginning of a group class, or if you want students to answer and ask questions.
2. Chat

CHAPTER 1
Click the record button at the bottom of your screen to record the footage of your meeting. To customize what parts of your meeting are recorded (i.e. audio only, video only) go to the settings tab in your Zoom profile, and click on recording at the top of the screen.
Here, you can choose whether to record your meeting directly to your computer or to the cloud, and you can customize all the different elements of your Zoom recording. As soon as you end your lesson, your footage will be available to you, and you can either share the cloud recording with them, upload as an unlisted video on YouTube, or select footage to review and share via Zoom in your next lesson.
Sharing video footage of your lessons with students can be a useful tool for students who may benefit from reviewing learned material outside of class, or reviewing specific details later on.
3. Record
To change how you view students during a class, click the change view button in the upper right hand corner. Click speaker to display a large view of the person currently speaking, thumbnail to display the speaker while also viewing participants, and gallery to display up to 25 participants on your screen at one time.
4. Change View
Zoom gives you a virtual whiteboard that makes it easy to present ideas for your students in real time. To use this, click on share screen, and then click on the share whiteboard button.
A whiteboard will open up on your screen, which will be visible both to your students and to you. You’ll have a toolbar available to you that includes a pen, an eraser, a spotlight tool, and more. Best of all, the whiteboard will save any notes that you write for the duration of your meeting. So you can close the whiteboard and go back to video, and then return to your notes on the whiteboard when you’re ready.
5. Whiteboard
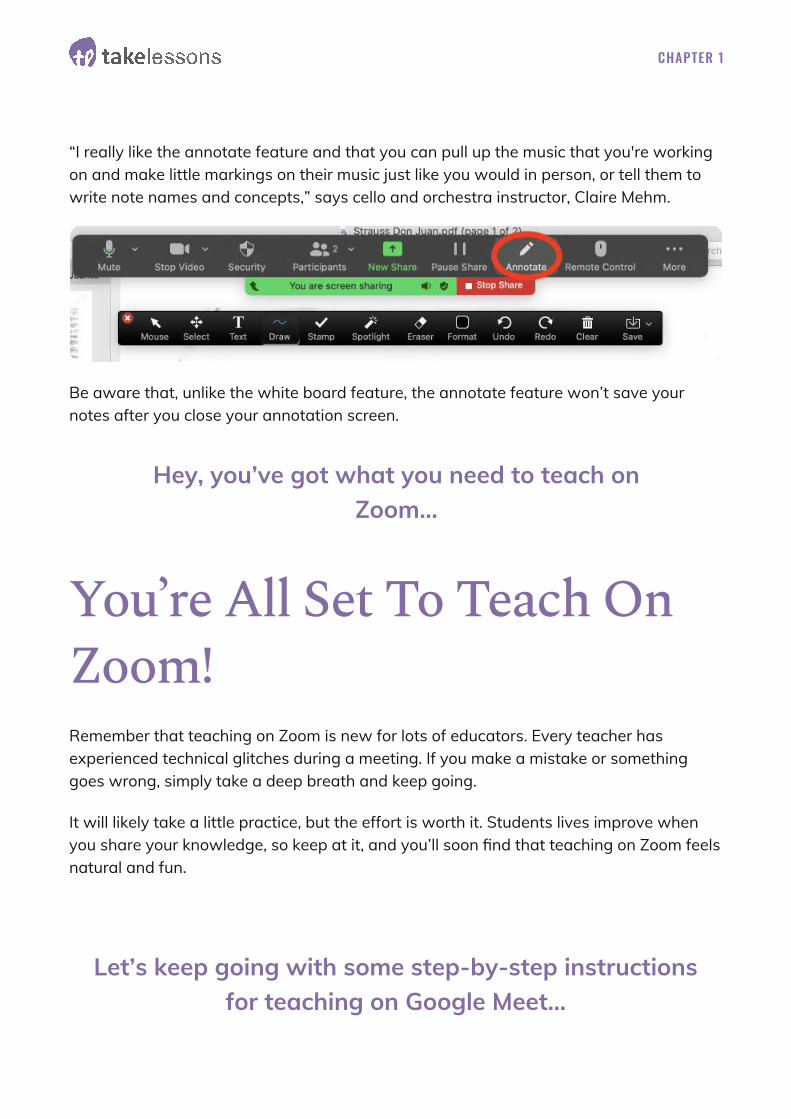
Annotation allows you to share your screen, and then make notes or drawings on the screen as you share. To access the annotate feature, click on the annotate button on the toolbar at the top of your screen. Once you click annotate, a second toolbar will appear, which gives you different annotation options like text, erasers, and more.
6. Annotation
CHAPTER 1
“I really like the annotate feature and that you can pull up the music that you're working on and make little markings on their music just like you would in person, or tell them to write note names and concepts,” says cello and orchestra instructor, Claire Mehm.
Be aware that, unlike the white board feature, the annotate feature won’t save your notes after you close your annotation screen.
Hey, you’ve got what you need to teach on Zoom...
Let’s keep going with some step-by-step instructions for teaching on Google Meet…
You’re All Set To Teach On Zoom!Remember that teaching on Zoom is new for lots of educators. Every teacher has experienced technical glitches during a meeting. If you make a mistake or something goes wrong, simply take a deep breath and keep going.
It will likely take a little practice, but the effort is worth it. Students lives improve when you share your knowledge, so keep at it, and you’ll soon find that teaching on Zoom feels natural and fun.
CHAPTER 1
While Google Meet gives you far fewer customizable options, it has a simple and user-friendly interface which makes it easy to start teaching online right away.
To get started with Google Meet, you’ll need a Gmail account. If you don’t have one, you can open an account for free right now. Get started by either going to the Google Meet home page, or logging into your Gmail account.
Once you’re logged into your account, you can either instantly start your meeting, schedule your meeting for a future date, or even schedule a recurring weekly meeting.
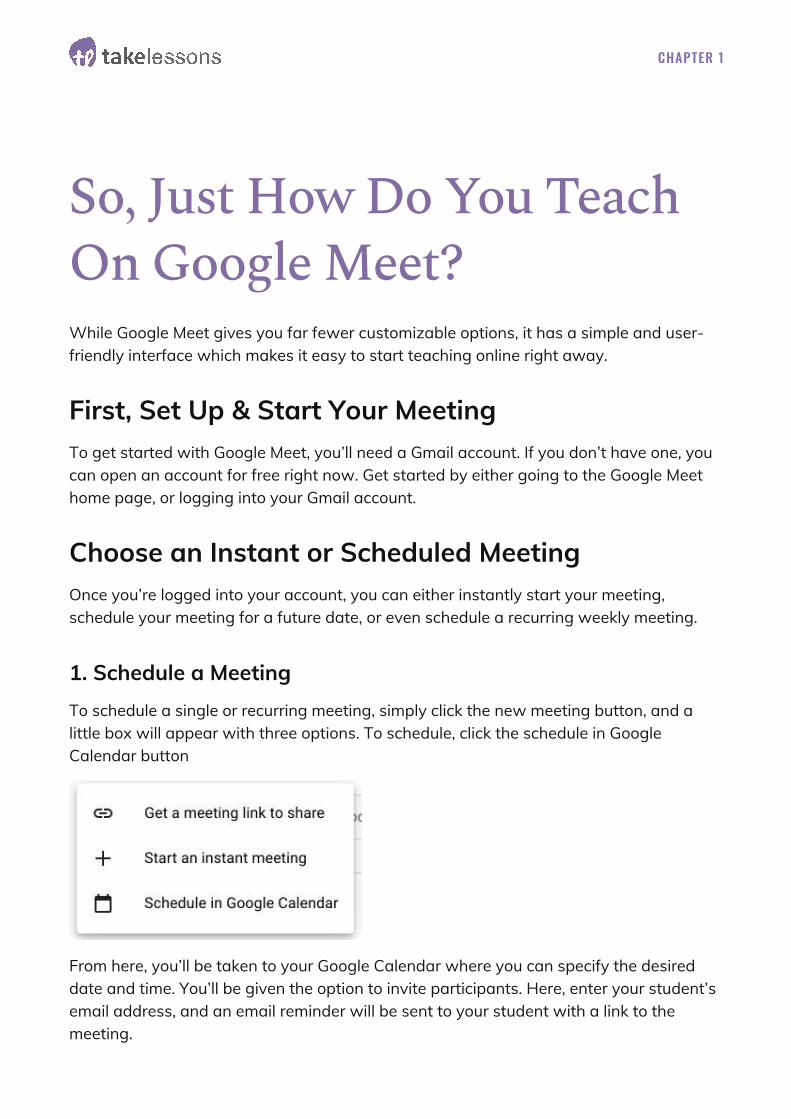
To schedule a single or recurring meeting, simply click the new meeting button, and a little box will appear with three options. To schedule, click the schedule in Google Calendar button
1. Schedule a Meeting
From here, you’ll be taken to your Google Calendar where you can specify the desired date and time. You’ll be given the option to invite participants. Here, enter your student’s email address, and an email reminder will be sent to your student with a link to the meeting.
First, Set Up & Start Your Meeting
Choose an Instant or Scheduled Meeting
So, Just How Do You Teach On Google Meet?
CHAPTER 1
To share a meeting link, simply click the get a meeting link to share button, and paste the meeting details into an email or other app. Include the date and time for the meeting in the body of your message. Students can access the meeting by either copying and pasting into a browser or by entering the code into the meeting link box once on Google Meet’s home page.
2. Share a Link
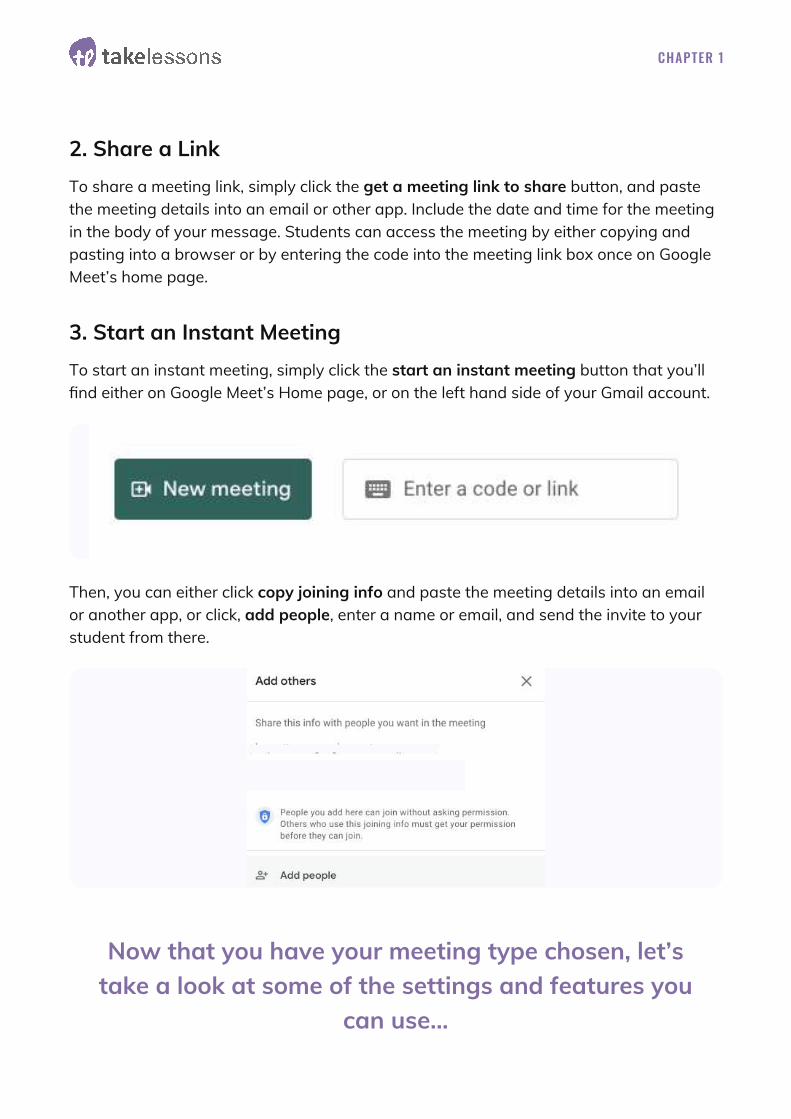
To start an instant meeting, simply click the start an instant meeting button that you’ll find either on Google Meet’s Home page, or on the left hand side of your Gmail account.
Then, you can either click copy joining info and paste the meeting details into an email or another app, or click, add people, enter a name or email, and send the invite to your student from there.
3. Start an Instant Meeting
Now that you have your meeting type chosen, let’s take a look at some of the settings and features you
can use…

CHAPTER 1
You’re all set up for your meeting. To start, you’ll want to click on your meeting link, whether it’s an instant meeting or a scheduled meeting. Once you’ve clicked on this link, a window will open where you can see yourself, and a little button that says join now.
Before you click this button, you’ll want to enable your desired mic.
To enable the mic you want to use, you’ll first need to go to system preferences and click on the sound icon. From here, click on the input button, and select the mic you want to use, whether that’s a USB mic, mixer, or built-in computer mic.
Now, you’ll want to test that your camera and microphone within the Google Meet interface. To do this:
1. Enable Mic in System Preferences on your computer
This tab shows your connected mic and speakers. From here, you can turn your microphone on and off, and make sure you have your mic enabled before starting your lesson. Not hearing anything? Make sure you have your desired mic selected in your computer’s preferences.
2. Microphone Tab
Click on the 3 white dots in the upper right hand corner of your video screen.
Click on the settings button
Test Your Equipment

CHAPTER 1
This shows the connected camera and gives you the option to change the sending and receiving resolution. For a clearer resolution, change both resolutions to 720p. Not seeing anything? Make sure you have your desired camera selected in your computer’s preferences.
3. Camera Tab
Let’s take a look at some of the features you can use to make your lessons even better...
Once you’re in your Google Meet class or lesson, you’ll see several buttons at the bottom of your screen. These are helpful tools you can use to enhance your teaching.
To share your screen, click on the present now button. This feature is useful for pointing out specific places in a piece of sheet music or for demonstrating a written concept.
1. Screen Sharing
Review Your Features

CHAPTER 1
The CC feature at the bottom of your screen creates closed captions throughout your lesson. This is helpful for making content available and accessible to all students.
The next set of features can be found by clicking the three little dots at the bottom right hand of your screen.
3. Captioning
The enter full screen button widens your Google Meet window into full screen mode. This can be great for focusing on your class without distraction. To exit full screen, either click the esc button on your computer, or slide your arrow to the top of the screen, and click the green button in the upper left hand corner.
3. Full Screen
The chat button opens up a chat window where you can communicate with students via text. Helpful for having students sign in at the start of class, or submit questions in group class environment.
4. Chat

CHAPTER 1
Adjust how you view your students. For private lessons, you can simply leave this on auto. For big group classes, you may want to spotlight students who are speaking, or change to a tiled view when you’re speaking to the full class.
5. Change Layout
The help button takes you to helpful Google Meet articles and chat support. Always a great option if you find yourself stuck.
6. Help
Let’s take a look at some of the features you can use to make your lessons even better...
Remember that teaching on Google Meet is a brand new experience for many teachers. Everyone has experienced technical trouble or unexpected glitches. If you make a mistake or something goes wrong, take a deep breath and move forward.
Most importantly, remember that the work you do as a teacher is important. You’re making a true difference in your students’ lives, and by spending a little time getting set up, you can continue to make that magic happen.
Teaching online can be challenging. But with a little preparation, you can create an education experience that’s rewarding for both you and your students.
If you haven’t already, now’s a great time to start teaching with TakeLessons, and if you’re looking for more resources for teaching and learning online, check out the TakeLessons Blog.
Hey… You Got This!
You’re All Set to Teach on Google Meet