growing mushrooms by mrca - philosophy of …...mushroom cultivation on a bale of straw preparations...
TRANSCRIPT

soma rights re-served 1 since 11.02.2015 at http://www.en.psilosophy.info/
Growing Mushrooms by Mrcaby
Mrca
original source: https://gluckspilze.com/uebersicht-1
Table of Contents:Introduction to cultivating mushrooms What is a mushroom? Three distinguished groupsProduction of spore printsMicroscopic examination of sporesPreparation of Agar - Medium in Petri Dishes Mixing the substrate Sterilisation of the agar medium Pouring the Petri dishesMycelium germination from spores Inoculation of agar medium Mycelium growthProduction of spore syringesMushroom Cloning Inoculating the nutrient medium with a mushroom clone Mycelium growth after cloningSelection of Mycelium Strains Transferring rhizomorph mycelium Mycelium growth after selection of strainSterilising rye substrate for grain spawn Preparing the rye substrate Mixing proportion of substrate Filling glasses with substrate Filling bags with substrate Sterilising the substrateInoculation of grain spawn with mycelium on agar medium Inoculation Mycelium growth after inoculation Reproduction of grain spawnSterilisation of wood substrate Preparing the substrate Mixing proportion Filling bags with wood substrate Sterilising the wood substrateInoculating wood substrates with grain spawn Inoculation of wood substrate Mycelium growth on wood substrateLaying of a mushroom bed Bed preparation Inoculating the bed Further care Wintering and feeding Fighting snailsInoculation of wood logs with spawn dowels Preparations of log

growing mushrooms by mrca www.en.psilosophy.info/jaaoakplbgimbbcgczafbzjb
soma rights re-served 2 since 11.02.2015 at http://www.en.psilosophy.info/
Inoculating the logs Mycelium growth at log Setup in the garden and further care Wintering of log Fighting snails at log Special tips for Lentinula edodes (Shiitake)Mushroom cultivation on a bale of straw Preparations of a bale Inoculation of a bale Mycelium growth on a bale - Spawn run Fruiting of a bale Fighting snails at bale"PF-technique" Mixing the PF substrate Filling the substrate Sterilise the substrate Inoculation of the substrate Mycelium growth PF FruitingInoculation of substrat bags with sporesyringes Disinfect the surface of bag Inoculation bag with syringe Seal the inoculation area and distribute the spores Spawn run in bagInstruction for indoor mushroom propagator Main principle Use as Incubator Use as fruiting chamber
Introduction to cultivating mushrooms
What is a mushroom?Due to the lack of scientific knowledge fungi were classified as plants for a long time. Today's understanding ofgenetic and physiological facts show that fungi are more closely related to animals than plants. Unlike plantsthey neither are able to carry out photosynthesis nor can they produce the carbohydrates they need.
Mushrooms are dependent on organic carbohydrates, built up and provided by other creatures to feedthemselves. In the life cycle of organic matter they operate as biodegradant destruents, who disintegrateorganic material and dissolve soluble minerals.

growing mushrooms by mrca www.en.psilosophy.info/jaaoakplbgimbbcgczafbzjb
soma rights re-served 3 since 11.02.2015 at http://www.en.psilosophy.info/
Three distinguished groups
On reference to their different nutrient sources fungi can be distinguished into three groups:
Saprophytes decompose organic material like cow dung, wood waste or straw. These fungi are the mostimportant recyclers within the ecological system. This group includes the majority of cultivated mushrooms. Itmust be mentioned that fungi - like most other live forms - grown in vitro react differently in comparison totheir natural forms: With idealised mushroom substrate at hand, bounteous harvest can be reached.Mushroom substrate is a highly specific, nutrient-rich product consisting of selected organic and inorganicmatter for the purpose of cultivating mushrooms.Under natural conditions only a few mushroom heads arise out of a vast amount of mycelia. And they onlyappear during short periods of the year.
Mushrooms can also live as parasites. These fungi develop at the expenses of another living organism (=host).True parasites are dependent on their host, who provides shelter and nutrition, though they usually do not killthem. Worth mentioning: honey fungi (Armillaria spp.) are probably the largest living creatures on earth withindividuals expanding to a surface area of several thousands of square meters, reaching up to 800 meters indepth.
Some fungi live as Symbionts in a mutual beneficial relationship. If a fungus interacts with the roots of a plant,mycorrhiza is formed and establishes a bidirectional flow of nutrients. The fungus provides inorganic nutrientsto the plant since it dissolves inorganic matter a lot easier. In exchange the plant affords carbohydrateassembled in photosynthesis. Furthermore the mushroom mycelium retains a great amount of water which isdisposed to mycorrhizal plants in periods of dry weather.
Table of Contents
Production of spore printsSpores are the "seeds" of mushrooms. They are microscopic and are mainly produced at the under part of thecap. After its fully-fledged they are released. To collect the spores, the fully developed caps are placed on acarrier material. The obtained spore print can be used to start a new mushroom culture. Placing spores onconvenient substrate (most common are malt-agar substrates in Petri dishes) induces mycelium growth.
Recommended Tools:
Aluminium foil, paper (as large that you can place 1 mushroom cap on it)Bazillol - workspace desinfectLatex GlovesFacemask and hairnetSkalpellCover (zb Tupperbox)Zipp-Lock Bags to pack the prints
Sterile working area: Glove Bag/Glove Box or sterile air flow (HEPA-filter, Laminar Flow Hood)

growing mushrooms by mrca www.en.psilosophy.info/jaaoakplbgimbbcgczafbzjb
soma rights re-served 4 since 11.02.2015 at http://www.en.psilosophy.info/
Proceed cautiously as sterile and clean as possible. The spores should not get in contact with contaminationswhile taking the print. Put on face mask, hairnet and gloves; clean the working area in front of the HEPA-filteror the Glove Box inside and disinfect the container and the aluminium foil. (The needed tools are already insidethe Glove Box). Finally disinfect your gloves and allow drying off.
Cut off the designated mushroom cap carefully at the upper end of its stem; try not to damage the gills andpores. The disinfected aluminium foil collects the spores dropping out; transfer the cap with its lower surfacebriskly on to the foil. Cover them up in the disinfected container, for best result the caps should not dry outand stay clean while donating spores.

growing mushrooms by mrca www.en.psilosophy.info/jaaoakplbgimbbcgczafbzjb
soma rights re-served 5 since 11.02.2015 at http://www.en.psilosophy.info/
After 12 to 24 hours the spores should have been released, favourably they adhere to the foil by themselves.(Wear protective clothing, clean and disinfect working area and tools!) Remove the cap by impaling the uppersurface on a scalpel. Do not touch the foil or spore print to avoid contamination. Besure the residual moistureis allowed to evaporate before packing the print. Sealed in an airtight zip-lock bag, spores stay viable for aboutone year. Store your spore prints at room temperature in a dark and clean place.
Table of Contents
Microscopic examination of sporesRecommended Tools:
Sporeprint orSporesyringeMicroscop (40x - 1000x)Pipette or syringeInoculation loopWaterObject slide
General Procedure:
Form, colour and size of spores are almost distinctive trait for classification of mushrooms.
Take a clear object slide and put a drop of water on it. Now use the inoculation loop to stir a few spores intothe water. Put the object slide under the microscope to view the spores.
An other method is to put a drop of sporesolution from a sporesyringe on the object slide. If you use asporesyringe we recommend to shake the syringe well to disperse the spores well in the water.
It is important the microscope be firmly fixed on a flat stable surface!
Table of Contents

growing mushrooms by mrca www.en.psilosophy.info/jaaoakplbgimbbcgczafbzjb
soma rights re-served 6 since 11.02.2015 at http://www.en.psilosophy.info/
Preparation of Agar - Medium in Petri DishesThe following formula makes 1 liter of "MEA" - malt extract agar medium, convenient for most species ofcultivatable mushrooms. Especially for working with spores, antibacterial agar media is recommended. Readyto use formulas are offered, that only need to be mixed with water.
Recommended equipment:
20 g agar-agar20 g malt extract2 g dry yeast1 g peptone1 litre drinking water
Erlenmeyer flaskSterile disposable Petri dishes or glass Petri dishesMeasuring containerScaleParafilmLatex glovesFace mask and hairnetDisinfectant solutions for surfaces and handsPressure cookerSterile working area: Glove Bag/Glove Box orSterile air flow (HEPA-filter, Laminar Flow Hood)
Mixing the substratePour the ingredients into the Erlenmeyer flask along with hand-hot water, close the lid and shake well untilmixed thoroughly. The maximum level of filling the flasks is reached at two-thirds of their volume. Remove thelid and wrap some aluminium around the flask's neck forming a tube which you bend down at its free end. Thisattached duct will ban condensate water to enter the unlocked flask during sterilisation.
Sterilisation of the agar mediumAgar medium should be sterilised for 45 minutes using a pressure cooker. Overlying a 2-3 centimetre waterlevel at the bottom of the cooker a separating insert keeps the flasks above the water line. Assure yourself thatthere is no contact between water and the upright standing flasks, decant some water if necessary. (Mind thehandling instructions given by manufacturers of your pressure cooker!)
Get the lid locked and put the cooker on a hotplate. Sterilise for 45 minutes, counting from the moment as thepressure gauge reaches its highest stage (for household pressure cookers). If you've got a professional
growing mushrooms by mrca www.en.psilosophy.info/jaaoakplbgimbbcgczafbzjb
soma rights re-served 7 since 11.02.2015 at http://www.en.psilosophy.info/
pressure steriliser at your disposal sterilise at 121°C/ 259°F/ 15 psi/ 1.05 bar.
Attention: Do not exceed temperatures specified above for a longer span of time. By overheating the nutrients,the culture medium can degrade and the solutions colour darkens from yellowish to brownish. If so, themedium is useless. Substrates which are composed of other ingredients may have different colours.
After 45 minutes of sterilisation, let the cooker cool off in front of a HEPA-filter or in a clean place. Duringpressure equalisation air is sucked in; a clean and wet cloth over the cooker's cover filters the aspired air, ifyou do not use a HEPA-filter.
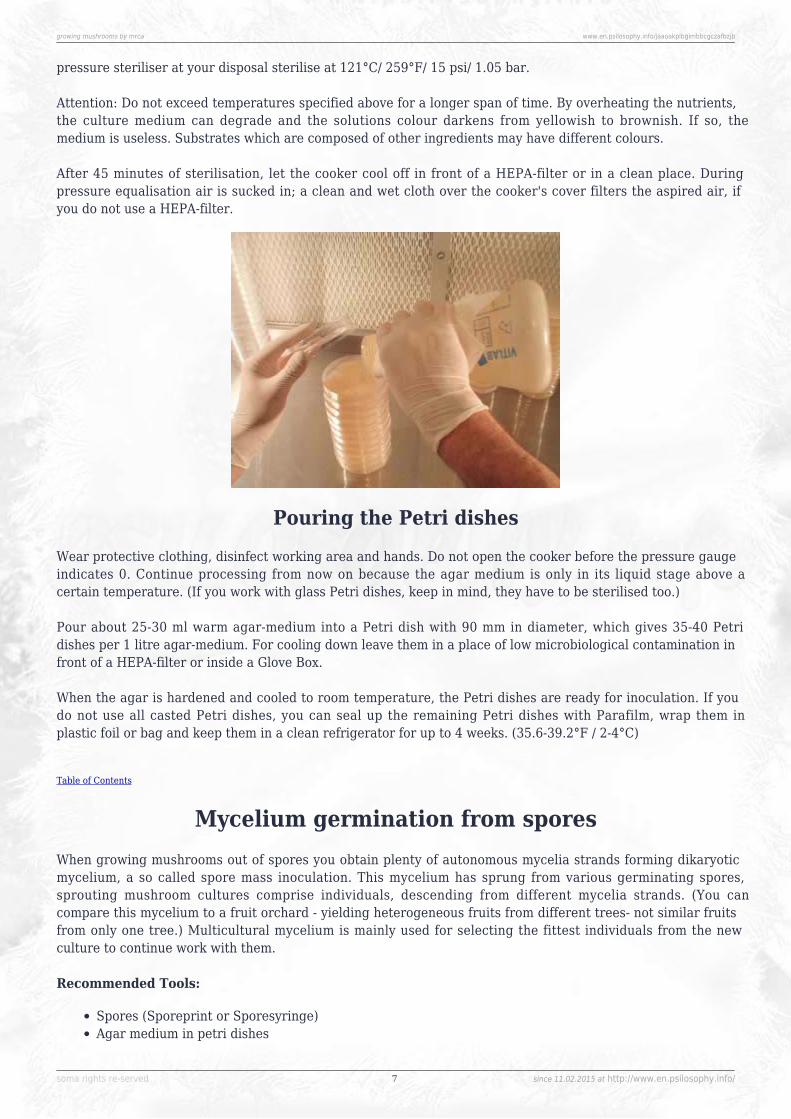
Pouring the Petri dishesWear protective clothing, disinfect working area and hands. Do not open the cooker before the pressure gaugeindicates 0. Continue processing from now on because the agar medium is only in its liquid stage above acertain temperature. (If you work with glass Petri dishes, keep in mind, they have to be sterilised too.)
Pour about 25-30 ml warm agar-medium into a Petri dish with 90 mm in diameter, which gives 35-40 Petridishes per 1 litre agar-medium. For cooling down leave them in a place of low microbiological contamination infront of a HEPA-filter or inside a Glove Box.
When the agar is hardened and cooled to room temperature, the Petri dishes are ready for inoculation. If youdo not use all casted Petri dishes, you can seal up the remaining Petri dishes with Parafilm, wrap them inplastic foil or bag and keep them in a clean refrigerator for up to 4 weeks. (35.6-39.2°F / 2-4°C)
Table of Contents
Mycelium germination from sporesWhen growing mushrooms out of spores you obtain plenty of autonomous mycelia strands forming dikaryoticmycelium, a so called spore mass inoculation. This mycelium has sprung from various germinating spores,sprouting mushroom cultures comprise individuals, descending from different mycelia strands. (You cancompare this mycelium to a fruit orchard - yielding heterogeneous fruits from different trees- not similar fruitsfrom only one tree.) Multicultural mycelium is mainly used for selecting the fittest individuals from the newculture to continue work with them.
Recommended Tools:
Spores (Sporeprint or Sporesyringe)Agar medium in petri dishes

growing mushrooms by mrca www.en.psilosophy.info/jaaoakplbgimbbcgczafbzjb
soma rights re-served 8 since 11.02.2015 at http://www.en.psilosophy.info/
Oneway Inoculation loop or Needelholder with inoculation loopParafilm to seal the petrisSpiritus Lamp (only for metal inoucluation loop)Facemask and HairnetLatex glovesWorkspace desinfectionHanddesinfectionGlove Bag (sterile workspace)
Inoculation of agar mediumTo minimise the risk of contamination of agar medium by other organisms (e.g. bacteria, moulds, ...) we adviseworking in a Glove Box/Glove Bag or in front of a HEPA-filter. Clean the workspace, wash hands and forearms,put on a protective face mask, hairnet and gloves, then disinfect your worktop well. Disinfect hands again andallow drying before starting. Antibacterial agar has proven to be successful with spore prints gained fromoutdoor collected mushrooms, for those often carry bacterial contamination.
If working with a reusable inoculation loop, heat the inoculation loop red hot in the flame of a alcohol lamp andlet it cool down in your hand. Do not touch the spore print, inoculation loop or agar medium. Now rub thespore print until the whole loop has gathered some spores. Open the Petri dish ajar, and import the spores tothe agar drawing a "S" through the media. In case of inoculation with a spore syringe, 1-2 ml solution per Petridish will suffice.

growing mushrooms by mrca www.en.psilosophy.info/jaaoakplbgimbbcgczafbzjb
soma rights re-served 9 since 11.02.2015 at http://www.en.psilosophy.info/
Do not take off the lid fully and work quickly to lessen contamination risks. Close the lid and seal it withParafilm. It is advisable always to inoculate several Petri dishes with a spore print since they thrive andprosper varyingly.
Label the Petri dishes giving information about date, genus name, strain (strain means different type specieswithin one genus - comparable with different kinds of apples) and consecutive number. A CD-marker, Edding-marker or permanent marker will stick to it.
Mycelium growthDuring spawn-run (development and growing of the mycelium) the sealed Petri dishes are stored in a dark andneat place. The appropriate temperature depends on the genus cultivated. Ensure that the incubator in whichthe mycelium is grown provides enough ventilation. After a few days up to one week the spores startgermination. As soon as rhizomorph mycelium strands become visible, they are ready for selection. (Look upthe instruction for "Selection of mycelium strands".)
Table of Contents
Production of spore syringesSpore syringes contain spores dissolved in water and are being used to inoculate substrates. Hobby-mycologists tend to work with spore syringes because even if used in a not 100% sterile environment, thesubstrates seldom contaminates.
It's rather easy to produce small to medium amounts of substrates or grain spawn with spore syringes. If youinoculate substrates with a spore syringe, you get a "Multi-culture" (look up "Growing mycelium out of

growing mushrooms by mrca www.en.psilosophy.info/jaaoakplbgimbbcgczafbzjb
soma rights re-served 10 since 11.02.2015 at http://www.en.psilosophy.info/
spores"), which mostly result in less crop yield, compared do usage of selected rhizomorph mycelium strains.
Recommended Tools:
Spore printGlasses (sterilisable!!!)Scalpell with sterile bladesEmpty syringes and needlesLatex GlovesFacemask and HairnetFilter DiskWorkspace desinfect - BazillolHanddesinfectWaterGlove Bag (sterile workspace)
We recommend using about 100 ml water and one spore print per glass. The lid of the glass needs a hole ofabout 1 cm in diameter; via this hole you will later fill the syringes. Fill the gasses with water (2/3 of the glass)and put the lid with the hole on during sterilisation. Wrap aluminium foil around the lid, sterilise the glassesand the lid without a hole (also wrap it in aluminium foil), for about 30 minutes.We recommend using a pressure cooker for sterilization.
Counting the sterilisation time form the moment, the pressure gauge reaches its highest stage (for householdpressure cookers). If you've got a professional pressure steriliser at your disposal sterilise at 121°C/ 250°F/ 15psi/ 1.05 bar.
Leave the cooker to cool out in clean place or in front of HEPA-filter after sterilization. You can put a clean wetpiece of cloth over the cooker during the cooling process to filter the air streaming into the cooker if workingwithout a HEPA-filter.

growing mushrooms by mrca www.en.psilosophy.info/jaaoakplbgimbbcgczafbzjb
soma rights re-served 11 since 11.02.2015 at http://www.en.psilosophy.info/
To keep contamination risk low, please work clean! Use a new, sterile skalpell blade for each spore print.
Open the lid as soon as the pressure has vanished. Wash and disinfect your hands and lower arms and uselatex gloves. Store the glasses in a clean place (in front of a HEPA-filter or in a glove box). Proceed as soon asthe glasses have cooled down to room temperature (less than 86°F or 30°C).
Before you start, please wash your hands, lower and upper arms with hot water and soap. Clean and disinfectyour working space. Put on hairnet, face mask and latex gloves. Disinfect your gloves and wait till they're dry.
Use a scalpel to scrape the spores off the spore print into the water. Make sure not to touch the spores whileholding the spore prints. After you have scraped the spores into the water, put on the lid (without hole) andshake the glass well. Change the lid to the one with the hole. Stick the syringes needle through the hole andfill the syringe. To avoid contamination, be careful not to touch the lid with the needle or needle with yourhands.

growing mushrooms by mrca www.en.psilosophy.info/jaaoakplbgimbbcgczafbzjb
soma rights re-served 12 since 11.02.2015 at http://www.en.psilosophy.info/
We recommend packing the syringes airtight using a zip-lock bag. Stored in a dark and cool place (max. 20°C)

growing mushrooms by mrca www.en.psilosophy.info/jaaoakplbgimbbcgczafbzjb
soma rights re-served 13 since 11.02.2015 at http://www.en.psilosophy.info/
the spores will be viable for about one year (depending on mushroom species).
To test their ability to germinate, put a few ml (1 or 2 drops) on a Petri dish with agar medium. The myceliumwill start to grow after a few days. (For detailed instructions kindly have a look on chapter: "Growing myceliumout of spores").
Table of Contents
Mushroom CloningGaining new cultures out of a fresh mushroom involves asexual reproduction. A mycelium achieved throughcloning is called "pure culture", it is genetically identical to the original mushroom. The successfully breedingof a mycelium out of spores on the other hand is the way of sexual reproduction the creation of a neworganism with a new genetically code. When working with pure cultures, just one individual develops on thesubstrate, so there is no competition for nutrient elements. This will lead to a higher and well predictable yieldwith stable quality.
Recommended Tools:
Hairnet and FacemaskLatex GlovesAlcohol LampScalpell with sterile bladesWorkspace desinfectHanddesinfectPetridishes with Agar-MediumParafilm to seal the petrisGlove Bag (sterile workspace)
Inoculating the nutrient medium with a mushroom cloneOnly select the most vital and gratifying mushroom fruit bodies. If you are not able to make a cloneimmediately after picking, keep them neatly stored in the refrigerator for maximal 48 hours. Do not store amushroom longer than absolutely necessary because it´s harder to gain germination of mycelium out of olderfruit bodies and the risks of bacterial contamination increases.
As in every laboratory working step during the life cycle of mushrooms, clean and sterile working is essentialfor success! Put on face mask, hairnet and gloves; clean the working area in front of the HEPA-filter or theGlove Box in-depth and disinfect working area and gloves. If you intend to clone more than one mushroom,disinfect the working space, change gloves and put on a fresh scalpel blade (or flame it until glowing red andlet cool down) before carrying on with a new fruit body.

growing mushrooms by mrca www.en.psilosophy.info/jaaoakplbgimbbcgczafbzjb
soma rights re-served 14 since 11.02.2015 at http://www.en.psilosophy.info/
Fruiting bodies are basically composed of compacted mycelium, thus flesh intended to clone can be won fromevery part of the mushroom. Most suitable are interior parts of the upper stem and cap. Split the near-groundpart of the stem half a centimetre deep and tear apart the mushroom without touching the inlying flesh withyour fingers.
Flame-sterilise the scalpel until glowing red over the alcohol lamp, let cool off and put on a sterile blade. Fortissue harvesting we recommend to graft tissue from the most internal parts of a mushroom which providesgreatest cleanliness and the lowest contamination risk. A piece of fruit sized 3x3 mm will suffice. Impale thesmall piece of flesh on the scalpel and transfer it onto agar medium. Seal the inoculated Petri dishes withParafilm and shelve them in a dark place to stimulate the mycelium growth. The adequate temperaturedepends on the genus cultivated. A few days up to one week later the mycelium starts germination.
It has proved itself to inoculate several Petri dishes with internal mushroom grafts of the individual you wish toclone since the results sometimes strongly vary. Even under best laboratory conditions you will have to facefailure rates at 10%. Amateurs and freshmen should bargain for failure rates around 25% or even more. Do notget discouraged, with a little practice in cloning you will amend quickly.
Label the Petri dishes giving information about date, genus name, strain (strain means different type specieswithin one genus - comparable with different kinds of apple) and consecutive number. A CD-marker, Edding-marker or permanent marker will stick to it.
Mycelium growth after cloningDuring the spawn-run (development and growing of the mycelium) the sealed Petri dishes are stored in a darkand neat place. The appropriate temperature depends on the genus being cultivated. Ensure that the incubatorin which the mycelium is grown provides enough ventilation. After three to five days (depending on species)new mycelium filaments will start to grow out of the piece of flesh. As soon as rhizomorph mycelium strandsbecome visible, they are ready for selection. (Look up the instruction for "Selection of mycelium strands".)

growing mushrooms by mrca www.en.psilosophy.info/jaaoakplbgimbbcgczafbzjb
soma rights re-served 15 since 11.02.2015 at http://www.en.psilosophy.info/
Table of Contents
Selection of Mycelium StrainsIf you cultivate mushroom mycelium on agar medium there will appear different form of mycelium. The twomain forms are: rhizomorph mycelium and fluffy mycelium (looks like cotton). For further cultivation andintroduction of fruiting only the rhizomorph mycelium is suitable. The rhizomorph mycelium looks like theroots of plants. The primordia which later become fruit bodies are built from it. If you cultivate mushroomcultures on petri dishes, you have to select the fluffy mycelium from the rhizomorph. Only the rhizomoprhgrowing mycelium is used for further cultivation.
Rhizomorph and fluffy mycelium strains on one petri dish.It was selceted for one time before.
Rhizomorph and fluffy mycelium strains on one petri dish.It was selected for one time before.
Recommended Tools:
Hairnet and FacemaskLatex GlovesAlcohol LampScalpell with sterile bladesWorkspace desinfectHanddesinfectPetridishes with Agar-MediumParafilm to seal the petrisGlove Bag (sterile workspace)
Transferring rhizomorph myceliumAs soon as an entire Petri dish is overgrown with mycelium it should be proceeded. If you wait too long thefluffy mycelium outreaches and overgrows the rhizomorph shaped form and the Petri dish becomes unusable.As in every laboratory working step during the life cycle of mushrooms, clean and sterile working is essentialfor success! Put on face mask, hairnet and gloves; clean the working area in front of the HEPA-filter or theGlove Box in-depth and disinfect working area and gloves.

growing mushrooms by mrca www.en.psilosophy.info/jaaoakplbgimbbcgczafbzjb
soma rights re-served 16 since 11.02.2015 at http://www.en.psilosophy.info/
This petri dish is ready for selection.
If you intend to clone more than one fruit body, scrap the used blade; disinfect the working space and changegloves. Flame-sterilise the anterior part of the scalpel over the alcohol lamp until it is glowing red, let cooldown to room temperature and put on a fresh blade before carrying on. Do not get the mycelium in contactwith hot tools!Please be cautious about flame sterilising. Alcohol-containing disinfectants and gloves easily catch fire!
Choose a rhizomorph growing mycelium strain from the Petri dish and slice it into pieces measuring 3x3 mm.Skewer one piece with the blade and transfer it to a fresh Petri dish containing agar medium. Seal the Petridishes with Parafilm, handle them with care for the piece of mycelium should not slip out of place!
This petri dish is selected for the first time,
and this one is selcted for the second time.

growing mushrooms by mrca www.en.psilosophy.info/jaaoakplbgimbbcgczafbzjb
soma rights re-served 17 since 11.02.2015 at http://www.en.psilosophy.info/
Advice: It's easier to distinguish between rhizomorph and fluffy growing mycelium, if you hold the Petri dish infront of a lamp.
It has proved well to inoculate several Petri dishes with pieces of the same mycelium, since the results canstrongly vary. Even under best laboratory conditions you will have to face failure rates of 10%. Newcomersshould not lose courage if they have to cope with failure rates up to 25% or even beyond.
Usually it is necessary to select a strain several times to get Petri dishes with rhizomorph mycelium only.Moreover the selected mycelium is able to mutate, for example grow fluffy again, and become unfit forutilisation.
Label the Petri dishes giving information about date, genus name, strain (strain means different type specieswithin one genus - comparable with different kinds of apple) and consecutive number. A CD marker, Eddingmarker or permanent marker will stick to it.
The mycelium pieces are placed on petri dishes filled with agarmedium.
Mycelium growth after selection of strainDuring the spawn-run (development and growing of the mycelium) the sealed Petri dishes are stored in a darkand neat place. The appropriate temperature depends on the genus being cultivated. Ensure that the incubatorin which the mycelium is grown gives enough ventilation. After three to five days new mycelium filaments willstart to grow out of the piece you transferred. As soon as you have gained a Petri dish almost completelyovergrown with rhizomorph mycelium, it is ready for inoculating grain spawn.

growing mushrooms by mrca www.en.psilosophy.info/jaaoakplbgimbbcgczafbzjb
soma rights re-served 18 since 11.02.2015 at http://www.en.psilosophy.info/
The mycelium have to be selected as long as it grows uniformlyrhizomorph.
Table of Contents
Sterilising rye substrate for grain spawnIn mushroom cultivation, cereal substrate is being used to produce grain spawn. This production stage ismainly used to multiply mycelium mass, you get from the agar plate, for inoculation of fruiting substrate.
Recommended equipment:
Rye grainVermiculite mediumGypsumAutoclave Bags Unicorn type 3 T orGlasses with lids with a hole (1 cm in diameter) and filter diskScaleBag sealer or strong adhesive tapeSieveContainer for mixingPressure cooker

growing mushrooms by mrca www.en.psilosophy.info/jaaoakplbgimbbcgczafbzjb
soma rights re-served 19 since 11.02.2015 at http://www.en.psilosophy.info/
Preparing the rye substrateSoak the rye in 167°F/ 75°C warm water, allow the water level to be 4 - 5 cm higher and leave it overnight (12- 18 hours). Put the soaked rye grain into a sieve and let it drain for around a quarter of an hour, then put itinto the mixing container. Moisturise the vermiculite using the sieve, until entirely soggy, watch out not tosoak it too much. Make sure that the vermiculite is even wet, but not as wet that water drops out of the sieve.Let it drain for a moment. Now mix the gypsum equally with the rye grain, then add the vermiculite and mix itagain very well.
Mixing proportion of substrateFor 1 glass with volume of one litre we recommend to use 200 g (approx. 0.25 l) rye grain, 200 ml vermiculitemedium and 1.5 g gypsum. This formula will result in 400 g rye grain substrate. Time needed to sterilise: 90minutes.
If you work with Bags, for grain substrates we recommend to use original Unicorn Bags Type 3 T. Use for eachbag 1.3 kg rye grain, 1.4 litre vermiculite and 8 g gypsum. This formula will result in 2.7 kg rye grainsubstrate. Time needed to sterilise: 3 - 4 hours.

growing mushrooms by mrca www.en.psilosophy.info/jaaoakplbgimbbcgczafbzjb
soma rights re-served 20 since 11.02.2015 at http://www.en.psilosophy.info/
Filling glasses with substrateFill the glasses up to two-thirds of their volume. For a one litre glass that will be about 400 grams of rye -vermiculite - substrate. The lids should be perforated (pierce a hole 1 cm in diameter) to ensure that fresh airis given to the mycelium. The filter disk attached to the lid prevents contamination. Do not screw down the lidstoo firm during sterilisation to ensure pressure compensation (and prevent the glasses from breaking).

growing mushrooms by mrca www.en.psilosophy.info/jaaoakplbgimbbcgczafbzjb
soma rights re-served 21 since 11.02.2015 at http://www.en.psilosophy.info/
Filling bags with substrateRoll down the autoclave bag about 10 cm and pour in 2.7 kg of the grain substrate mixture. Be careful not tospill any substrate on the upper regions of the bag (in case you did, clean the bag with a wet piece of cloth).Then wrap the bag twice.
Sterilising the substrateA pressure cooker is used for the sterilising process. Overlying a 2-3 centimetre water level at the bottom ofthe cooker a separating insert keeps the bags above the water line. Assure yourself that there is no contactbetween water and the bags, decant some water if necessary. (Mind the handling instructions given by themanufacturer of your pressure cooker!) Now load the glasses or bags.
If the cooker is big enough you can make two levels of bags. Place the upper layer on a separating tray overthe left spare zones of the lower layer. This ensures that the steam gets evenly distributed.

growing mushrooms by mrca www.en.psilosophy.info/jaaoakplbgimbbcgczafbzjb
soma rights re-served 22 since 11.02.2015 at http://www.en.psilosophy.info/
Get the lid locked and put the cooker on a hotplate. Counting the sterilisation time from the moment, thepressure gauge reaches its highest stage (for household pressure cookers). If you've got a professionalpressure steriliser at your disposal sterilise at 121°C/ 250°F/ 15 psi/ 1.05 bar. Once the sterilisation time haspassed the cooker must cool down in a clean place, preferably in front of a HEPA - filter (sterile air flow). Ifworking without laminar flow hood put a clean wet piece of cloth over the cooker during the cooling process tofilter the air streaming into the pot while pressure equalisation.
After the cooker is fully depressurised, open the lid. If you work with glasses close the lid of the glasses fastand tight to minimise contamination risk. The glasses/ bags should cool down to room temperature in front of aHEPA-filter or in a Glove Box.
As soon as the substrate has cooled down bellow 30 ° C / 86 ° F, it is ready for inoculation. If your are up tocontinue at a later date close the bags / glasses tightly, store the substrates in the refrigerator (35.6-39.2°F,2-4°C) and use them within 4 weeks.

growing mushrooms by mrca www.en.psilosophy.info/jaaoakplbgimbbcgczafbzjb
soma rights re-served 23 since 11.02.2015 at http://www.en.psilosophy.info/
Ready sterilized substrates!
Table of Contents
Inoculation of grain spawn with mycelium on agar mediumRecommended Tools:
Petri dish (at least 3/4 colonised, not mutated)Sterilised rye substrateScalpel with sterile bladeBag sealer or strong adhesive tapeLatex glovesFace mask and hairnetDisinfectants for workspace and handsSterile working area: Glove Bag/Glove Box orSterile air flow (HEPA-filter, Laminar Flow Hood)
InoculationPerform this working step as aseptic as possible to prevent the grain from contamination by bacteria or mould.Clean your worktop, wash hands and forearms, put on a protective face mask, hairnet and gloves and disinfectyour worktop well.
Use the mycelium of 1 Petri dish for inoculating 1 glass of sterilised grain (about 400 grams substrate), forsubstrate in bags take more petri dishes. Avoid inoculation of 1 grain substrate with different mycelia strains;use only copies of one clone per glass / bag.

growing mushrooms by mrca www.en.psilosophy.info/jaaoakplbgimbbcgczafbzjb
soma rights re-served 24 since 11.02.2015 at http://www.en.psilosophy.info/
Remove the Parafilm from a Petri dish only inside the Glove Box or only in front of a HEPA-filter. Take thescalpel and carve eight lines in star like array and a circle at half the diameter into the mycelium. Thereby yougot 16 small pieces.
Unscrew the glasses or open the autoclave bags on their top. Spear the mycelium slice with the scalpel andtransfer them carefully to the sterilised substrate. Close the glass / bag tight after this is done. Now distributethe mycelium pieces evenly by shaking the glass or bag, to achieve fast and equal colonisation. In case thatmycelium pieces stick on the wall of the glass or bag, the can be released by knocking soft on the outside, toget again contact with the substrate.
Mycelium growth after inoculationStore the inoculated substrate in a dark and clean place at convenient temperature for spawn run of thismushroom species. Ensure that the incubator in which the mycelium is places provides enough ventilation.
After a few days mycelium strands become visible growing out of the small agar pieces and colonise the grain.One or two weeks after inoculation the glasses and bags should be given a good shake to redistribute thealready colonised matter amongst the unsettled material. This will accelerate the colonisation of the grain.Under convenient conditions rye grain should be fully colonised about 3 to 4 weeks after inoculation.
As soon as all rye grains are overgrown with white mycelium, the grain spawn is ready to be used forinoculation of the fruiting substrate (e.g. compost, straw, wood - depending on the mushroom species). Use 2to 10 % of grain spawn for inoculation of fruiting substrate, according to mushroom species and type ofsubstrate.

growing mushrooms by mrca www.en.psilosophy.info/jaaoakplbgimbbcgczafbzjb
soma rights re-served 25 since 11.02.2015 at http://www.en.psilosophy.info/
Reproduction of grain spawnTo produce more inoculation material you can use grain spawn to inoculate sterilised rye grain substrate. Foroptimum result use 10% of ready colonised grain spawn, based on the weight of the fresh rye substrate. Pleasemake sure to perform this step under sterile conditions to prevent contamination.
Unscrew the glasses or open the autoclave bags on their top. Separate the grain kernels of the colonisedspawn by shaking and plumping them repeatedly. The fresh rye substrate can now be inoculated with grainspawn. Close the glass / bag tightly after this is done. Now distribute the colonised grain evenly into the freshsubstrate, by shaking the glass / bag, to achieve fast and equal colonisation.

growing mushrooms by mrca www.en.psilosophy.info/jaaoakplbgimbbcgczafbzjb
soma rights re-served 26 since 11.02.2015 at http://www.en.psilosophy.info/
For mycelium growth stage, store the inoculated substrate in a dark and clean place at convenienttemperature (spawn run) for this mushroom species. Ensure that the incubator in which the mycelium isgrown gives enough ventilation.
Table of Contents
Sterilisation of wood substrateMost fungi won't develop fruiting bodies on rye grain substrate, that's why an adequate fruiting substrate mustbe inoculated with the grain spawn. In this instruction we want to introduce a standard substrate, which issuitable for a wide range of wood habitant mushrooms.
Recommended equipment:
WoodchipsSaw dust largeGypsumRye branWaterAutoclave Bags Unicorn type 14#ScaleBag sealer or strong adhesive tapeSieveContainer for mixingPressure cooker

growing mushrooms by mrca www.en.psilosophy.info/jaaoakplbgimbbcgczafbzjb
soma rights re-served 27 since 11.02.2015 at http://www.en.psilosophy.info/
Preparing the substrateLet the wood chips soak in cold water overnight (12-18h).Use as much water until all the chips are floating.Put the soaked wood chips in to a sieve and let it drain for around a quarter of an hour. In the meantime put alldry ingredients (sawdust, rye brain and gypsum) into the mixing container and mix it very well. After the dryingredients are mixed, add the soaked wood chips and mix the substrate again. To conclude, add the water andmix it again very well.
Mixing proportionFor filling of 1 autoclave bag, (please use the original unicorn bags type 14# for wooden substrates) you'llneed 368 g wood chips, 735 g saw dust large, 31 g gypsum, 200 g rye bran and 950 ml water. This willproduce approximately 2,5 kg substrate. Sterilisation time: about 3 - 4 hours.
Filling bags with wood substrateRoll down the autoclave bag about 10 cm and pour in 2.5 kg of the wood substrate mixture. Be careful not tospill any substrate on the upper regions of the bag (in case you did, clean the bag with a wet piece of cloth).Then wrap the bag twice.
Sterilising the wood substrateA pressure cooker is used for the sterilising process. Overlying a 2-3 centimeter water level at the bottom ofthe cooker a separating insert keeps the bags above the water line. Assure yourself that there is no contactbetween water and the bags, decant some water if necessary. (Mind the handling instructions given by themanufacturer of your pressure cooker!) Now load the bags. If the cooker is big enough you can make twolevels of bags. Place the upper layer on a separating tray over the left spare zones of the lower layer. Thisensures that the steam gets evenly distributed.

growing mushrooms by mrca www.en.psilosophy.info/jaaoakplbgimbbcgczafbzjb
soma rights re-served 28 since 11.02.2015 at http://www.en.psilosophy.info/
Get the lid locked and put the cooker on a hotplate. Counting the sterilisation time from the moment, thepressure gauge reaches its highest stage (for household pressure cookers). If you've got a professionalpressure steriliser at your disposal sterilise at 121°C/ 250°F/ 15 psi/ 1.05 bar.
Once the sterilisation time has passed the cooker must cool down in a clean place, preferably in front of aHEPA - filter (sterile air flow). If working without laminar flow hood put a clean wet piece of cloth over thecooker during the cooling process to filter the air streaming into the pot while pressure equalisation.
After the cooker is fully depressurised, open the lid. If you work with glasses close the lid of the glasses fastand tight to minimise contamination risk. The bags should cool down to room temperature in front of a HEPA-filter or in a Glove Box. As soon as the substrate has cooled down bellow 30 ° C / 86 ° F, it is ready forinoculation. If your are up to continue at a later date close the bags tightly, store the substrates in therefrigerator (35.6-39.2°F, 2-4°C) and use them within 4 weeks.
Table of Contents
Inoculating wood substrates with grain spawnMost fungi won't develop fruiting bodies on rye grain substrate, that's why an adequate fruiting substrate mustbe inoculated with the grain spawn. This method is suitable for most wood habitant mushroom species.
Recommended equipment:
Grain spawn, ready colonisedSterilised wood substrateBag sealer or strong adhesive tapeLatex glovesFace mask and hairnetDisinfectants for workspace and handsSterile working area: Glove Bag/Glove Box orSterile air flow (HEPA-filter, Laminar Flow Hood)

growing mushrooms by mrca www.en.psilosophy.info/jaaoakplbgimbbcgczafbzjb
soma rights re-served 29 since 11.02.2015 at http://www.en.psilosophy.info/
Inoculation of wood substratePerform this working step under aseptic conditions to prevent the grain from contamination. Clean yourworktop, wash hands and forearms, put on a protective face mask, hairnet and gloves and disinfect yourworktop well.
Open the sterilised wood substrate bag. Shake Separate the grains of the colonised spawn by shaking andplumping them repeatedly. Use 2 to 8 % (of the weight) of grain spawn for inoculation of wood substrate.
Add about 50 - 200 g of grain spawn per 1 bag containing 2,5 kg of wood substrate.Close the inoculated substrate bag using a bag sealer or strong adhesive tape. Now distribute the colonisedgrain evenly into the fresh substrate, by shaking the bag, to achieve fast and equal colonisation.
Mycelium growth on wood substrateFor mycelium growth stage, store the inoculated substrate in a dark and clean place at convenienttemperature (spawn run) of this mushroom species. Ensure that the incubator in which the mycelium is grownprovides enough ventilation. After about 2 - 3 weeks the mycelium should have grown through the bag and thesubstrate should be overgrown by white mycelium. (Please note that some different species of fungi could havedifferent mycelia colours.) Now the mycelium is ready for the fruiting phase.
Table of Contents
Laying of a mushroom bedPreparing a mushroom bed with wood inhabitant mushrooms is a very easy thing! The best time to start isspring, as soon as the nights are frost-free. We recommend the use of spawn on wood basis (spawn describes asubstrate, which is fully colonised by mushroom mycelia, used for inoculation of the fruiting substrate). Theusage of grain based spawn may attract mice, rats or other vermin. Just mix the spawn with an convenient

growing mushrooms by mrca www.en.psilosophy.info/jaaoakplbgimbbcgczafbzjb
soma rights re-served 30 since 11.02.2015 at http://www.en.psilosophy.info/
base material and keep it moist.
Depending on the species of mushroom and weather conditions the mycelia often develop their first fruitingbodies only a few months after the inoculation. The mushroom fruits until all nutrients have been consumed.With little luck, the mushroom will settle permanently in your garden.
Recommended equipment:
Completely colonised wood substrate (spawn)Wood chips(for 1 autoclave bag with 2,5 kg spawn we recommend 15 kg wood chips)Covering material (bark mulch approximately 25 litres, straw or soil)Corrugated card boardSpade or shovelWater (garden hose)
Bed preparationMushrooms breeding in your garden need a shadowy place, preferably either near trees or underneath bushes.If you want to lay several beds side by side, leave enough space between the beds. With proper nurture theywill expand and develop fruits for several years.
With one spawn bag (2,5 kg capacity) a mushroom bed of 80 x 80 cm can be inoculated. Excavate about 10 cmof soil and spread out cardboard as a bottom layer of your bed. Now disperse one half of the wood chips evenlyon the bed and irrigate them for about 10 minutes using a hosepipe.

growing mushrooms by mrca www.en.psilosophy.info/jaaoakplbgimbbcgczafbzjb
soma rights re-served 31 since 11.02.2015 at http://www.en.psilosophy.info/
Inoculating the bedThe spawn bag needs to be properly shaken because mycelium populated wood substrate tends to be closelyclotted. By fluffing and rubbing of the bag with the whole palm of your hand, the substrate can be separated.Make sure you separate the substrate thoroughly to ensure a consistent and quick colonisation of the woodchips.
Now spread out the spawn over the watered wood chip layer as evenly as possible and cover it with theremaining wood chips. Afterwards the mushroom bed needs to be watered again for about 10 minutes. Toprevent the bed from drying out we recommend a 5 cm thick cover layer of bark mulch or straw. This coverlayer needs to be moisturised as well.
Some mushrooms even allow you to use a cover layer made out of soil. We recommend using mushroom casingsoil. Fluff up the soil in the bag, evenly spread out a 5 cm thick layer over the bed and water the bed for a fewminutes.

growing mushrooms by mrca www.en.psilosophy.info/jaaoakplbgimbbcgczafbzjb
soma rights re-served 32 since 11.02.2015 at http://www.en.psilosophy.info/
Further careCheck the moisture of the mushroom bed periodical. If the bed isn't moist under 3 cm depth or more, pleasewater it again. During the harvesting season we recommend to harvest the fruiting bodies daily. The simplestmethod to do this is twisting the fruiting bodies on their base. Take care to remove the whole shaft to preventbacterial contaminations.

growing mushrooms by mrca www.en.psilosophy.info/jaaoakplbgimbbcgczafbzjb
soma rights re-served 33 since 11.02.2015 at http://www.en.psilosophy.info/
Wintering and feedingTo ensure your mushroom bed survives the winter, we recommend spreading out a 5 cm thick layer of woodchips before the first frost. This new layer offers your mushroom bed fresh nutrients. In the next spring, assoon as the nights are frost-free again, the mushroom bed should be controlled for moisture and be watered incase it dries out.
Fighting snailsSnails love mushrooms! To prevent these voracious creatures from destroying the whole crop, we recommendbuilding a snail fence around the mushroom bed. Don't use slug and snail bait or other chemical pest controlsubstances, the poison might end up in the fruiting bodies!

growing mushrooms by mrca www.en.psilosophy.info/jaaoakplbgimbbcgczafbzjb
soma rights re-served 34 since 11.02.2015 at http://www.en.psilosophy.info/
Table of Contents
Inoculation of wood logs with spawn dowelsThe inoculation of wood logs or stumps with spawn dowels can be done throughout the whole year, if the logs /stumps are stored frost-free during spawn run, until they are fully colonised. Depending on the species, themushroom fruits for several seasons untill all the nutrients of the wood have been consumed.
Recommended equipment:
Wood logs or stumpsWood sawTub for soakingDrilling machine and 9 mm (0,35 inch) drillSpawn dowels (wood dowels, fully colonised with mycelium)Jute bagSealing waxHammer
Preparations of logThe quality of the wood is crucial for successful cultivation. After you have cut the wood, make sure to store itin a dry place for 2 -3 weeks, then prepare it as follows:
Soak the entire log for 3 days in a tub and leave it to dry on a canvas outdoors for one day. The primarychoices of material are wood logs with bark, with 20 - 35 cm (7 - 14 inch) in diameter and 90 - 120 cm (35 - 47inch) long.
After it's deliverance the spawn dowels should be left in rest 2 to 3 days at room temperature (maximum 29 °C / 84 ° F) to give the mycelium time to recuperate from it's journey. If you don't plan to use the spawn dowelsimmediately after the recuperation, please store in the fridge at 2 - 4°C/ 36 - 39°F and use it within a fewweeks time.
Inoculating the logsCut off about 2 cm on each end of the trunk directly before inoculation to prevent unwanted fungal growth andcontamination and throw the pieces away. Now drill about 50 holes of 3 - 4 cm (1,2 - 1,6 inch) depth all aroundthe log evenly. Take care to work slowly, if the wood heats up too much it might affect it's quality! Now placethe dowels into the holes carefully. Take care not to injure the mycelium. We recommend to inoculate the cutsurfaces too, to reach even better results.
growing mushrooms by mrca www.en.psilosophy.info/jaaoakplbgimbbcgczafbzjb
soma rights re-served 35 since 11.02.2015 at http://www.en.psilosophy.info/
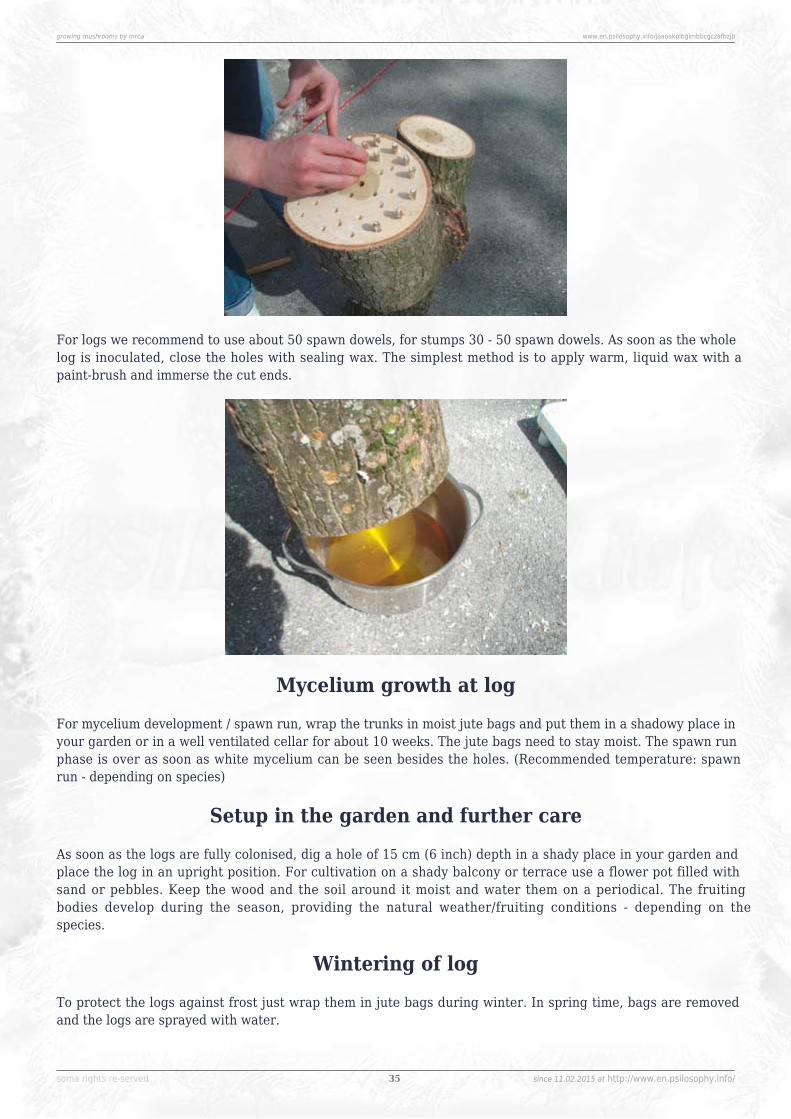
For logs we recommend to use about 50 spawn dowels, for stumps 30 - 50 spawn dowels. As soon as the wholelog is inoculated, close the holes with sealing wax. The simplest method is to apply warm, liquid wax with apaint-brush and immerse the cut ends.
Mycelium growth at logFor mycelium development / spawn run, wrap the trunks in moist jute bags and put them in a shadowy place inyour garden or in a well ventilated cellar for about 10 weeks. The jute bags need to stay moist. The spawn runphase is over as soon as white mycelium can be seen besides the holes. (Recommended temperature: spawnrun - depending on species)
Setup in the garden and further careAs soon as the logs are fully colonised, dig a hole of 15 cm (6 inch) depth in a shady place in your garden andplace the log in an upright position. For cultivation on a shady balcony or terrace use a flower pot filled withsand or pebbles. Keep the wood and the soil around it moist and water them on a periodical. The fruitingbodies develop during the season, providing the natural weather/fruiting conditions - depending on thespecies.
Wintering of logTo protect the logs against frost just wrap them in jute bags during winter. In spring time, bags are removedand the logs are sprayed with water.

growing mushrooms by mrca www.en.psilosophy.info/jaaoakplbgimbbcgczafbzjb
soma rights re-served 36 since 11.02.2015 at http://www.en.psilosophy.info/
Fighting snails at logSnails love mushrooms! To prevent these voracious creatures from destroying the whole crop, we recommendbuilding a snail fence around the log. Don't use slug and snail bait or other chemical pest control substances,the poison might end up in the fruiting bodies!
Special tips for Lentinula edodes (Shiitake)Shiitake doesn't need contact with soil. The logs also can also be placed and fixed at a fence. We recommendusing wood logs (with bark) of about 70 - 120 cm (27 - 47 inch) length and a diameter of about 15 - 20 cm (6 - 8inch).
To start the fruit cropping prepare the logs as following: Dunk them in cold water for approx. 24 h (the logshould be complete covered with water). The best yield can be made if the water has a ph value of 5 (to adjustthe ph value use 0,1 % N hydrochloride). After dunking, pitch the log for 3 times on a stone plate. Now it takes10-14 days fort he pins (mini mushrooms) to appear. After harvesting, let the log rest for 6 weeks then you candunk and pitch it again!
Table of Contents
Mushroom cultivation on a bale of strawSeveral mushroom species are straw inhabitant. You can use wheat, rye or barley straw. One of the mostsuccessful ways for these species is the cultivation on bales of straw in the garden.
Only use dry and healthy bales of straw, because the quality of the fruiting substrate always has a biginfluence on the crop yield. The colour of the straw (golden yellow) and the almost tear-proof blades indicatethe health of the straw. Furthermore it should smell fresh, if it doesn't, don't use it, a musty smell either comesfrom mould or other fungi which are already populating the bale. Musty bales are not suitable for mushroomcultivation!
Recommended equipment:
Bale of straw (27cm x 20cm x 40cm)Tub for soakingGrain or wood spawn (completely colonised)Jute Hessian Cloth (200 x 100 cm)String (2 m)Water

growing mushrooms by mrca www.en.psilosophy.info/jaaoakplbgimbbcgczafbzjb
soma rights re-served 37 since 11.02.2015 at http://www.en.psilosophy.info/
Preparations of a baleSoak the bale in water overnight (12 -16 h) before inoculation. Take care that the whole bale is covered withwater. Immediately before the inoculation take the bale out of the water and drain the spare water for half anhour.
Inoculation of a balePlease wash your hands and arms thoroughly before you touch the spawn. For one bale of straw (27cm x 20cmx 40cm) we recommend the use 1 liter spawn. To assure a consistent population form one 5 -10 cm (2 - 4 inch)deep hole on each side. Use a clean stick to drill the holes. Divide the 1 liter spawn evenly on the 6 holes.
To keep the spawn in the bale and ensure that it grows through it, close the inoculated holes with straw fromthe outside. Now wrap the bale in the jute fleece and tie the string around it.

growing mushrooms by mrca www.en.psilosophy.info/jaaoakplbgimbbcgczafbzjb
soma rights re-served 38 since 11.02.2015 at http://www.en.psilosophy.info/
Mycelium growth on a bale - Spawn runFor spawn run store the bale in a shady place in the garden. Depending on the species, temperature andhumidity, it will take 2 - 4 weeks till the bale is fully colonised with mushroom mycelium.
Control the humidity in the bale periodically. Humidify the bale again, if more than 3 cm of the outmost layerare dry. Please apply only small doses of water, because the spawn could die if the bale gets too wet.Depending on the weather it will be sufficient to use 2 - 3 litre per bale 1 to 3 times a week. Control thehumidity inside the bales with your hand. Do this on a regular basis and adjust it with small amounts of waterto prevent the spawn from drowning.
Fruiting of a baleAs soon as the bale is completely colonised, you can initiate the fruiting by increased air supply. Just removethe jute fleece on one broad side of the bale. If the weather conditions are right, the first pinheads should showup after 2 - 4 weeks.
The mycelium will fruit in several flushes until all the nutrients in the bale have been consumed. Afterwardsyou can still use the bale as a commodity for composting. Take care to harvest all the fruiting bodies. Pleasecheck the humidity in the bales during the harvest periods and also adjust the humidity if necessary.
Fighting snails at baleSnails love mushrooms! To prevent these voracious creatures from destroying the whole crop, we recommendbuilding a snail fence around the bale. Don't use slug and snail bait or other chemical pest control substances,the poison might end up in the fruiting bodies!
Table of Contents
"PF-technique"The PF-technique aka BRF-Tech (Brown Rice Flour technique) is a method developed by hobby mushroomcultivators for growing mushrooms in the simplest way. Over the last centuries many different versions of thismethod have developed. The following instruction is based on our experience.
Mushrooms need a convenient substrate to develop fruits. The substrate has to be produced under sterileconditions to avoid contamination through mould or bacteria. Contamination destroys not only the fungi butalso the substrate. The substrate is inoculated with spores. In the next phase, the so called spawn run, themycelium grows on the substrate. As soon as the substrate is fully colonised with mycelium, it is ready for the

growing mushrooms by mrca www.en.psilosophy.info/jaaoakplbgimbbcgczafbzjb
soma rights re-served 39 since 11.02.2015 at http://www.en.psilosophy.info/
fruiting phase.
Recommended materials:
Micro-Boxes or PF-glassesMeasuring cupVermiculitbrown rice flourSporesyringe (ATTENTION, not every mushroom species is suitable for cultivation on PF-substrate.)Fruiting chamberPressure cookerContainer for mixingWater
Mixing the PF substrateBlend one litre (about 700g) of rice flour with three litres of vermiculite medium, then add one litre of waterand mix again. That should result in five litres of PF-substrate for 10 micro-boxes with 500 ml each.
Filling the substrateUse your hands to fill the substrate into the boxes or glasses. Use your fingers to push the substrate into formto eliminate any hollow spaces, but don't press too much. Fill the boxes or glasses up till 1,5 cm under theedge of the box remains free, and smoothen the surface of the substrate. Clean the edge of the box or glasswith a wet piece of cloth, and fill the rest with dry vermiculite. The dry vermiculite acts as a filter to preventgrowth of contamination from the outside into the substrate. Close the boxes/glasses. If you are using micro-boxes remember to make sure the lid is lying loose on the box to ensure pressure balance. If you using glassespierce the lid four times (make holes of about 2 - 3 mm / 0,1 inch in diameter), these will later be used toinoculate the substrate.
Sterilise the substrateA pressure cooker is used for the sterilising process. Overlying a 2-3 centimetre water level at the bottom ofthe cooker with a separating insert keeps the boxes / glasses above the water line. Assure yourself that there isno contact between the water and the boxes / glasses, decant some water if necessary. (Mind the handlinginstructions given by manufacturers of your pressure cooker!) Now fill in the glasses or boxes. If the cooker isbig enough you can make two levels. Place the upper layer on a separating tray over the left spare zones of thelower layer. This ensures that the steam gets evenly distributed.
Get the lid locked and put the cooker on a hotplate. Start counting the sterilisation time as, the pressure gauge

growing mushrooms by mrca www.en.psilosophy.info/jaaoakplbgimbbcgczafbzjb
soma rights re-served 40 since 11.02.2015 at http://www.en.psilosophy.info/
reaches its highest stage (for household pressure cookers). If you've got a professional pressure steriliser atyour disposal sterilise at 121°C/ 250°F/ 15 psi/ 1.05 bar.Once the sterilisation time has passed the cooker must cool down in a clean place, preferably in front of aHEPA - filter (sterile air flow). If working without laminar flow hood put a clean wet piece of cloth over thecooker during the cooling process to filter the air streaming into the pot while pressure equalisation.After the steriliser is fully depressurised, open the lid. The glasses/ boxes should cool down to roomtemperature in front of a HEPA-filter or in a Glove Box. As soon as the substrate has cooled down bellow 30 °C / 86 ° F, it is ready for inoculation. If your intend to continue later close the boxes / glasses tightly, store thesubstrates in the neatly clean refrigerator (35.6-39.2°F, 2-4°C) and use them within 4 weeks.
Inoculation of the substratePerform this working step as aseptic as possible to prevent the substrate from contamination by bacteria ormoulds. Clean the worktop, wash your hands and forearms, put on a protective face mask, hairnet and glovesand disinfect your worktop well.
Give the spore syringe a good shake to ensure that the spores are well spread throughout the water. If usingmicro-boxes you can pierce the lid with the syringe (please disinfect the spot you choose to pierce). Thesubstrate glasses will be inoculated through the four holes in the lid. If you use ready sterilised PF-substratesplease remove the tape from the holes on the lid before inoculating the substrate and leave the holes openafterwards, to ensure sufficient air exchange!Remove the protective cover from the cannula just before inoculation. You mustn't touch the sterile needle.Stick the needle through the holes of your box or glass towards the wall and inoculate the substrate, spreadingthe liquid along the wall of the box. Use 1 - 4ml of the spore-water mixture per each box/glass (filled with500ml substrate), portioned in all 4 holes.
Should the needle touch anything unsterile, you will have to sterilise it again. Therefore hold the nip of theneedle into a flame (Bunsen burner or lighter) till the nip turns red and let it cool down again. (Do not overheatthe needle as the stand is made of plastic which could melt!)

growing mushrooms by mrca www.en.psilosophy.info/jaaoakplbgimbbcgczafbzjb
soma rights re-served 41 since 11.02.2015 at http://www.en.psilosophy.info/
Mycelium growth PFAfter all substrates have been inoculated, they should be stored in a warm (up to 30°C) and dark place. Thesubstrate is ready for the next step as soon as the whole box / glass is grown through with white mycelium(this normally takes 2 - 3 weeks). Only the 1,5 cm layer of dry vermiculite stay free of mycelium.
FruitingRub off the layer of dry vermiculite from the top of the boxes/glasses and take out the mycelium. Put themushroom mycelia into a growing chamber or similar under the convenient environmental conditions for "thePrimordia formation". As soon as the first small mushrooms (Primordia) appear change the temperature andhumidity to the recommended fruiting conditions. According to the species, it takes about 1 or more weeksuntill the Primordia appear, a few days later you can harvest your first own mushrooms.
Table of Contents
Inoculation of substrat bags with sporesyringesThis is a very simple method of mushroom cultivation and suitable for hobby-mycologists. Use a convenientsubstrat depending on the mushroom species you want to cultivate. Detailed information about the convenientsubstrate can be found in the product description of our spores. When you bring spores onto an appropriatenutrient medium, the spores start germination. As soon as the substrate is fully colonised by the mushroom,you can set up the bag for fruiting.
Recommended materials:
SubstratbagSpore SyringeWorkspace DisinfectionKitchen paperTape (cloth tape)
Disinfect the surface of bagTo avoid invasion of any contamination during inoculation, we recommend to disinfect the surface (just a fewcm large - the place you want to put the needle in). Kindly spray disinfection (i.e. Bacillol) on the bag, let itreact for about 20 - 30 seconds, then dry it with a clean ktichen paper or similar.

growing mushrooms by mrca www.en.psilosophy.info/jaaoakplbgimbbcgczafbzjb
soma rights re-served 42 since 11.02.2015 at http://www.en.psilosophy.info/
Inoculation bag with syringeShake the syringe to dispense the spores equally. Now put the needle into the bag (at the disinfected area) andpush the the sporesolution into the bag. We recommend to use about 5 ml - thats 1/2 syringe - for small bags(2,5 l content). For larger bags (4,5 l content) we recommend to use 10 ml sporesolution - thats 1 sporesyringe.
ATTENTION:If the needle get in contact with any unsterile thing, you have to sterilize it. There for heat the forefront of theneedle with a alcohol lamp (or with a lighter). The forefront of the needle should glow red. After that let theneedle cool down for a few seconds.
Seal the inoculation area and distribute the sporesClose the inoculation area immediately with the tape. To distribute the spores equally in the substrate, shakethe bag careful.
Spawn run in bagFor colonisation of the substrate, store the bag at the convenient spawn run - temperature (see in the productdescription in a dark place. After the substrat is fully colonised by the mushroom, you can put it into fruiting. Ifyou work with rye grain substrate it is also possible to use the grain for inoculation of a different fruitingsubstrate.
TIP: If the substrat is not colonised even, kindly shake the bag after a few days.
Table of Contents

growing mushrooms by mrca www.en.psilosophy.info/jaaoakplbgimbbcgczafbzjb
soma rights re-served 43 since 11.02.2015 at http://www.en.psilosophy.info/
Instruction for indoor mushroom propagatorFor successful growth mushrooms need suitable substrate, the right temperature and humidity, aswell as oxygen and a little light. Our grow-kits are especially designed to provide these cultivationparameters in an easy to handle way.
It's easy to upgrade a customary greenhouse into a hobby-mushroom-grow-set. The main principle alwaysstays the same, no matter how much space you cultivate, only the machinery used to regulate the climaticconditions gets more complex, the more space you occupy.
Recommended equipment:
GreenhouseDigital temperature controlElectric heat pad or heating cableHumidity/CO2 Apparel SetPerlitSpray bottleDisinfectant
Main principleThroughout their different stages of development fungi need a variety of environmental conditions. Duringmycelium growth most mushrooms need relatively high temperatures (27 - 29°C), during fruiting they needhigh humidity.
The electric heat pad or the heating cable is used, to provide the right temperature. To set the suitabletemperature for each mushroom species, the electric heat pad or cable will be triggered by the digitaltemperature control. The humidity will be the result of humidity or CO2 pump, which is also supplying oxygen,and the wet perlit on the floor of the greenhouse.
Use as IncubatorInoculated substrates have to be kept in clean place, under suitable conditions, during mycelium growth.Installing the grow-set for mycelium growing stage:
Clean and dark spaces are ideal for setting up your grow-set (you may as well cover the greenhouse withopaque material). If the set is stored in a cupboard make sure it gets enough oxygen. Open the cupboard atleast once a day.

growing mushrooms by mrca www.en.psilosophy.info/jaaoakplbgimbbcgczafbzjb
soma rights re-served 44 since 11.02.2015 at http://www.en.psilosophy.info/
Place the heating pad under the greenhouse. If possible put some heat isolating material beneath the pad. Ifyou are using a heating cable make sure it is lying snake-wise on the floor of the greenhouse, try to spread itsymmetrical over the floor.
Place the sensor for the temperature control system on the floor of the greenhouse. Plug the heat-pad or cableinto the temperature control and plug the control into a socket.
Take one of the pumps silicon tubes and connect one end to the hole of the greenhouses lid and the other tothe pump. Keep the pump running at all times, as it helps the ventilation during the "spawn run" phase. Theknob above the connection point regulates the amount of air. If you are using a tube-micro filter, cut the pipeopen and install it in the middle section.
Adjust the system to the necessary conditions for mycelium growth of your fungi genus. Try to keep thegreenhouse as dark as possible during this phase (except for your daily control).
Use as fruiting chamberAs soon as the whole substrate is grown through with mycelium, the environmental conditions have to bechanged to initiate the fruiting phase. The basic structure of the greenhouse stays the same as in the growthphase, the Humidity/CO2 pump as well as perlit will also be needed.
Moisten the perlit in a sieve or a plastic bag and spread it symmetrically on the floor of the hothouse. Theperlit has to stay wet during the whole fruiting phase. Evaporated water can be refilled using a spray bottle.Substrate grown through with mycelium - blank or in opened bags - can be place directly on the perlit.
Installing the humidifier: First connect both of the silicone tubes to the hole in the lid of plastic box, one ofthem stuck about 1 cm through the hole, the other about 4-5 cm. The tube, stuck 4-5 cm through the hole, hasto be connected to the ceramic diffuser. If you use an additional micro-filter connect it to the same tube as theceramic diffuser.
Fill the plastic box with fresh tap water till ¾ of the volume are full and close the lid. Important: The ceramicdiffuser has to be completely under water, the second tube must hang in the air above the water level.
The last step is to connect the tube, attached to the ceramic diffuser, to the air pump and stick the second pipeinto the greenhouse. The button above the pumps connection regulates the amount of air, enabling us tocontrol ventilation and humidity inside the hothouse. Change the water every 2-3 weeks. Adjust the system tothe necessary conditions for mycelium growth of your fungi genus.
Adjust the system to the necessary conditions for fruiting of your fungi genus.
Table of Contents