getting started with dps web service - wordpress.com · dps web service is a secure,...
TRANSCRIPT

Getting Started With
DPS Web Service
1900 51st Street NE


Table of Contents
Logging In to DPS Web Service..............................................1
Managing Cases......................................................2
View Case Status..............................................................3
Search Case History........................................................5
View Case Invoice............................................................6
Upload Files/Images to a Case.....................................7
Add a Note to a Case..................................................10
Cancel a Case.................................................................12
Create a New Case....................................................14
Request a Remake........................................................19
Managing Pickups ................................................21
Schedule a Pickup.........................................................21
View Pickups..................................................................23
Billing............................................................25
View Account Balance...................................................25
View Invoices..................................................................26
User Setup.............................................................29
Add a New User............................................................29
Deactivate a User..........................................................31
Change Password..........................................................32

DPS Web Service 1
Getting Started with DPS Web Service
DPS Web Service is a secure, HIPPA-compliant Web portal for you to manage cases, upload images, request pick ups, and view invoices.
To use DPS Web Service, you will need a username and password. Please call Deborah or Rebecca at 800-332-3341 to set up your username and password.
Monday - Friday 8am-5pm CST
Logging in to DPS Web Service1. Go to www.DPSdental.com
2. Click on Dentist Login
3. Enter your Username and Password. Click Sign In

2 DPS Web Service
Managing Cases
When you login to the Web Service, you will be taken to the manage cases screen. Cases are automatically sorted by patient last name. You can sort by Patient, Order Date, or Status by clicking on the arrow in the sort field.
Sort Buttons
Using the Manage Cases Screen, you are able to:• View case status• Search case history• View the case invoice• Upload files/images to a case• Add case notes• Cancel a case• Create a new case• Request a remake

DPS Web Service 3
vieW caSe StatuSYou can view case status from the Manage Cases screen. Case statuses are:
• Accepted: The case has been input through DPS Web Service and is awaiting arrival of the physicalcase in the lab.
• Scheduled: The physical case has arrived in the lab and has been matched to the Web Services infor-mation.
• In Process: The case is in production in the lab.
• Hold: The case is awaiting action from another party, i.e., new impressions, try-in, printing
• Completed: The case has been completed in the lab. Once the case has been shipped and invoiced,the shipped and invoiced boxes will be checked in the status field.

4 DPS Web Service
1. To view more detailed information about a case, click on the Patient Name.
2. Once you click on the name, you will see more detailed information
• Case Number: This is a unique, auto-generated number that is given to each case in the lab.
• Case Type: This can be either New, Remake, Invoice. The Case Type will read Invoice when an officehas ordered supplies.
• Order Date: This is the date the case was checked in at the lab or was entered in to Web Service.
• Case Status: This indicates where the case is in the manufacturing process.
• Ship Date: This is an auto-generated date. It is the date the case is scheduled to leave the lab.
• Case Pan Number: This is an internal tracking number for the lab.
• Delivery Date: This is the date the case is scheduled to be delivered to your office.
• Case Carrier: This is the delivery route to which your office is assigned.
Case Number

DPS Web Service 5
Search caSe hiStoryWhen using the case history search function, you can search by date, patient name, or case status.
1. To search by date, enter the date range in to the Date Range fields. Click Search Cases
2. To search by patient name, enter all or part of the patient last name in the Last Name field. Click Search Cases
3. You may also filter by Case Status.

6 DPS Web Service
vieW caSe invoice1. Click on the patient name of the invoice you would like to view
2. Click the Invoices tab

DPS Web Service 7
3. To print the page, click the Print Page tab.
uPLoaD FiLeS/imageS to a caSe1. Click on the patient name of the case you would like to add pictures to.
8 DPS Web Service
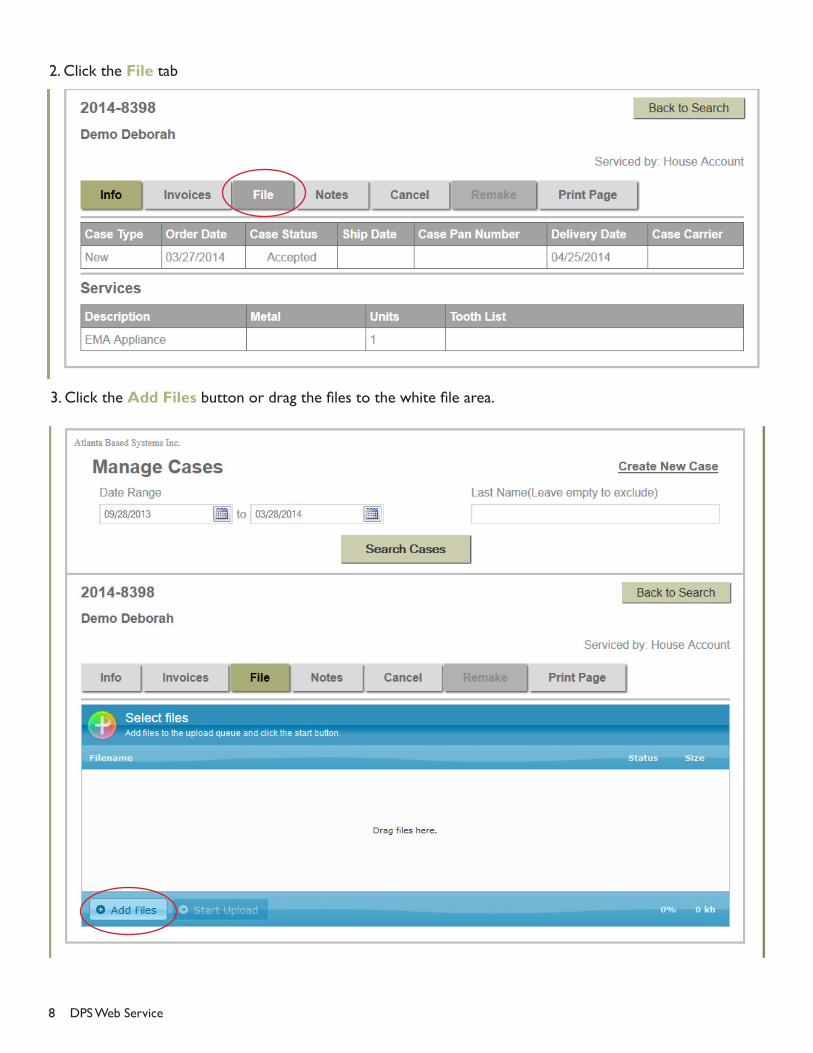
2. Click the File tab
3. Click the Add Files button or drag the files to the white file area.

DPS Web Service 9
4. Locate the file on your computer. Click Open
4. Click Start Upload

10 DPS Web Service
4. Once the file is uploaded, the status will read 100% and a check mark will appear at the far right-hand side.
aDD a note to a caSe1. Click on the patient name of the case you would like to add a note to.

DPS Web Service 11
2. Click the Notes tab
3. Click Create Note
4. Choose Note Type. Please use the Call note type.

12 DPS Web Service
5. Insert a Subject and Note. Be sure to sign your note. Once completed, click Submit
canceL a caSeNote: You can only cancel a case that has the status of Accepted. All other cases must be canceled by DPS. Please call the lab to cancel any other cases.
1. Click on the patient name of the case you would like to cancel.

DPS Web Service 13
2. Click the Cancel tab
3. A warning message will appear. Click Yes
4. Click OK

14 DPS Web Service
create a neW caSeNote: A prescription, signed by the Dentist, is still required with your case.
1. Click on Create New Case

DPS Web Service 15
2. Complete Patient Information
3. Complete Case Information
• Due Date is the date you would like the case delivered to your office. If you select a date faster than our standard case turnaround, we will contact you to confirm that we are able to complete your case or to request another date.
• Appointment Date and Time are the date and time the patient appointment is scheduled.
• Rush Order. If you select rush order, we will contact you to confirm that we are able complete your case in the time you request.
• Delivery Address. If you have multiple locations listed under one account, please choose the address to which the case will be delivered.
16 DPS Web Service
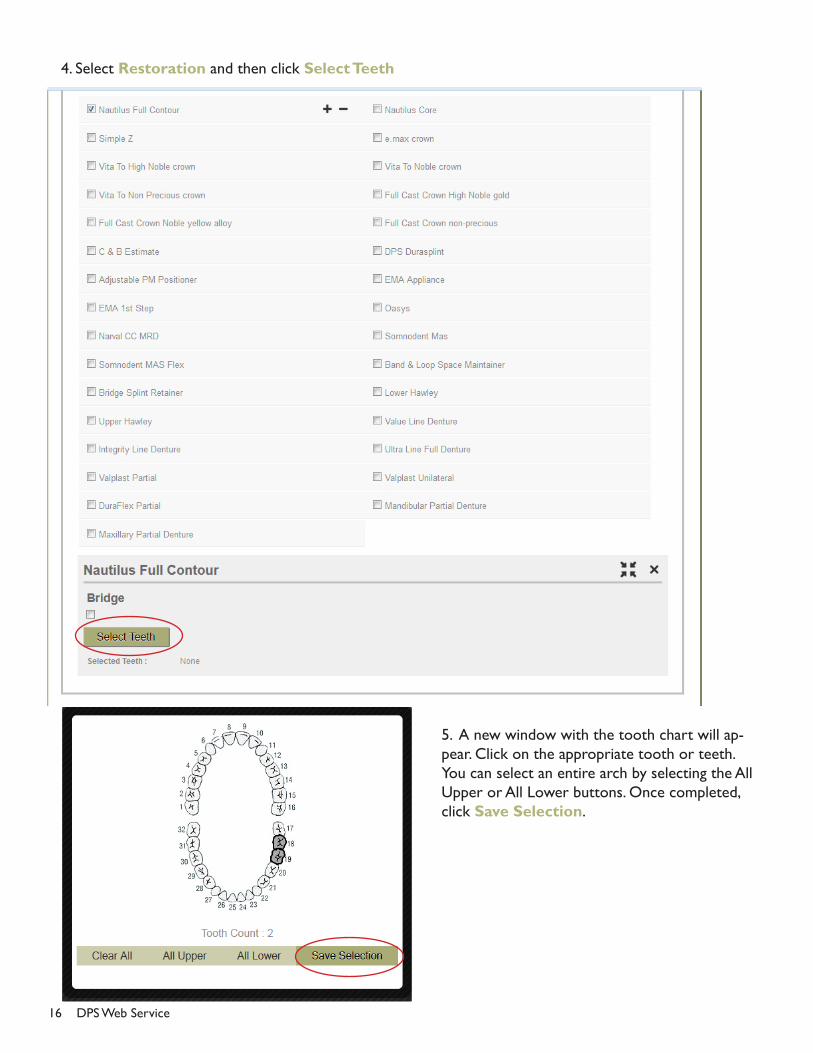
4. Select Restoration and then click Select Teeth
5. A new window with the tooth chart will ap-pear. Click on the appropriate tooth or teeth.You can select an entire arch by selecting the AllUpper or All Lower buttons. Once completed,click Save Selection.

DPS Web Service 17
6. Once you have entered all of the information, scroll back to the top of the page and click Save.

18 DPS Web Service
7. Your case is now visible in the Manage Cases screen and has been assigned a Case Number.
Please write your Case Number and Patient Name on your prescription and fill out other information, including shade, stump shade, characterization, or design specifics. Send the Rx along with your impressions, models, and other material.
DPS Web Service 19
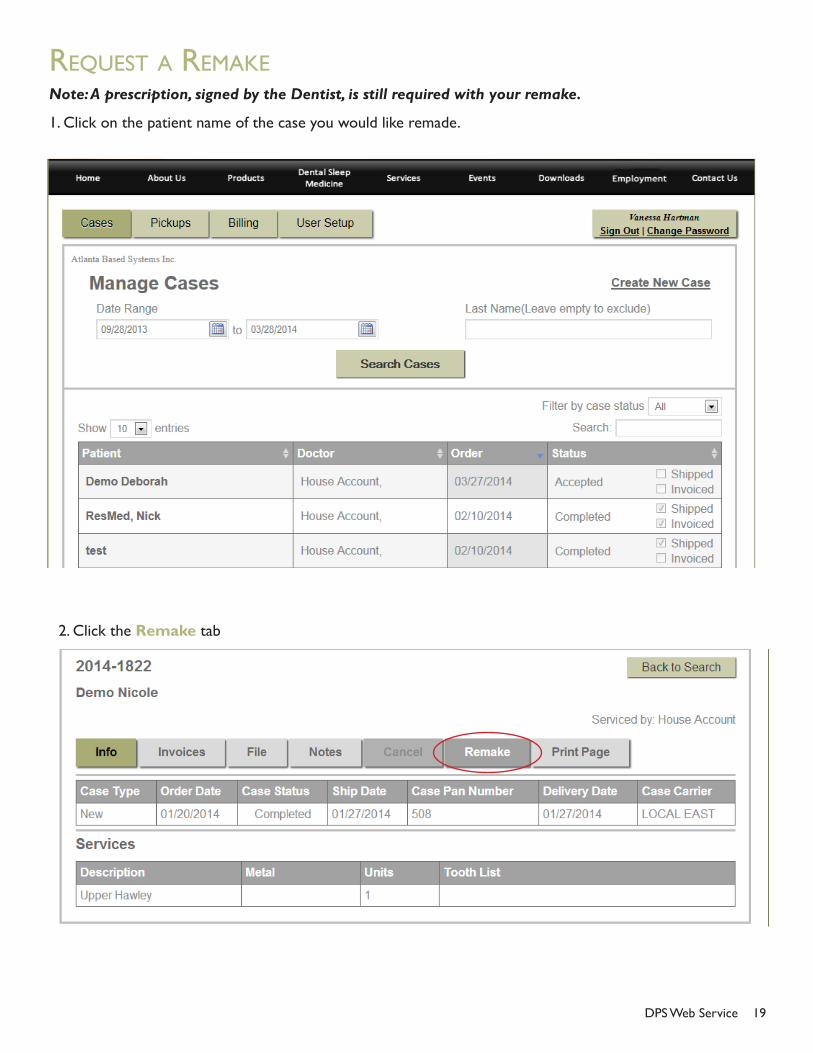
requeSt a remakeNote: A prescription, signed by the Dentist, is still required with your remake.
1. Click on the patient name of the case you would like remade.
2. Click the Remake tab

20 DPS Web Service
3. Complete Case Information
• Due Date is the date you would like the case delivered.
• Appointment Date and Time are the date and time the patient appointment is scheduled.
4. Click Save

DPS Web Service 21
Managing Pickups
To access case pickups, login to your account and click on the Pickup tab. From this tab you will be able to request a pickup and view pending pickups. Note: This feature is only available for offices on a delivery route. UPS, FedEx, USPS, and SpeeDee customers are unable to schedule pickups through this system at this time.
ScheDuLe a PickuP1. When you click on the Pickup tab, you will automatically be taken to the Schedule a Pickup section.

22 DPS Web Service
2. To schedule a pickup, select the address where we will pick up the case. Your primary address will be your default pickup location.
3. Select the Pick Up Date. You will not be able to request a same day pickup. Pickups must be scheduled at least 24 hours in advance. To request a same day pickup, please call the lab at 800-332-3341.

DPS Web Service 23
3. Include any Notes regarding your pickup. Once complete, click Save.
vieW PickuPS1. To view a pickup, click the Pickups tab and then click View Pickups

24 DPS Web Service
2. Enter the Date Range you wish to view pickups and click Search.
3. Pickups that you have scheduled through Web Services will appear on the screen. If you called in to the lab,you will not see a pickup request.
DPS Web Service 25
Billing
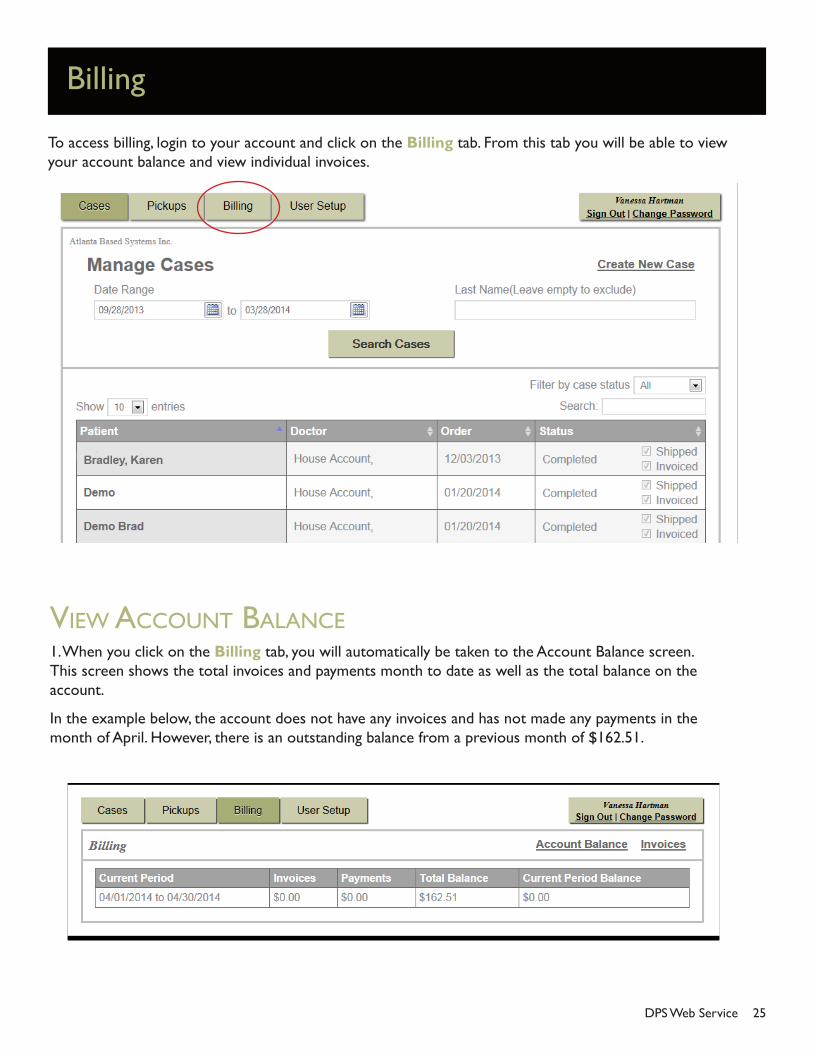
To access billing, login to your account and click on the Billing tab. From this tab you will be able to view your account balance and view individual invoices.
vieW account baLance1. When you click on the Billing tab, you will automatically be taken to the Account Balance screen. This screen shows the total invoices and payments month to date as well as the total balance on the account.
In the example below, the account does not have any invoices and has not made any payments in the month of April. However, there is an outstanding balance from a previous month of $162.51.

26 DPS Web Service
vieW invoiceS1. To view basic invoice information, click on Invoices. If you would like detailed invoice information, see View a Case Invoice in the Managing Cases section.
2. Invoices are searchable by date, patient name, case number and invoice status. To search by Date, input your start date and end date and click Search.

DPS Web Service 27
3. To search by Name, type any part of the patient’s name in the Search bar. To search by Case Number, type the last 5 digits of the case number in the Search bar.

28 DPS Web Service
4. To search by Invoice Status, select the status from the invoice status bar.

DPS Web Service 29
User Setup
To access User Set Up, login to your account and click on the User Setup tab. From this tab you can add, deactivate, and manage the users for the Web Service. Only Admin Users are able to access this tab.
aDD a neW uSer1. There are two types of users for the Web Service: Admin User and Standard User. The Admin User can add other users and has access to all areas of Web Service. The Admin User can also dictate the level of ac-cess granted to Standard Users. You may want to add Standard Users to your account so that staff members can view case information and schedule pickups. To add a Standard User, click Add New User.

30 DPS Web Service
2. Fill out User Information. Each user must have their own email address. Their email address will serve as their Username. You will also assign the user their password on this screen. Once the user has logged in for the first time, they may change their password.
3. Fill out Functions Allowed For This User. Click the boxes of the areas you would like the user to be able to access.

DPS Web Service 31
4. If there are multiple doctors associated with one account, select the doctor for which the user will be managing cases. If there is only one doctor associated with the account will default to the doctor’s name or practic name. Once complete, click Save.
Deactivate a uSer1. To deactivate a user, select the user you would like to deactivate from the Existing Users menu.

32 DPS Web Service
2. Uncheck the Account Status box so that the status reads Inactive. Once complete, click Save.
change PaSSWorD1. To change your password, click on Change Password

DPS Web Service 33
2. Enter your old password, enter your new password and then enter your new password again underconfirm password. Once complete, click Save.

34 DPS Web Service