geneart type iis assembly kits - thermo fisher scientific
TRANSCRIPT

user guide
GeneArt® Type IIs Assembly KitsFor highly-efficient, simultaneous, and seamless in vitro assembly of multiple dNA fragments, including sequences non-clonable by homologous recombination, into a vector in a pre-determined order
Catalog Numbers A15916, A15917, A15918
Publication Number MAN0009114
Revision A.0
For Research Use Only. Not for use in diagnostic procedures.

For Research Use Only. Not for use in diagnostic procedures.
Information in this document is subject to change without notice.
DISCLAIMER LIFE TECHNOLOGIES CORPORATION AND/OR ITS AFFILIATE(S) DISCLAIM ALL WARRANTIES WITH RESPECT TO THIS DOCUMENT, EXPRESSED OR IMPLIED, INCLUDING BUT NOT LIMITED TO THOSE OF MERCHANTABILITY, FITNESS FOR A PARTICULAR PURPOSE, OR NON-INFRINGEMENT. TO THE EXTENT ALLOWED BY LAW, IN NO EVENT SHALL LIFE TECHNOLOGIES AND/OR ITS AFFILIATE(S) BE LIABLE, WHETHER IN CONTRACT, TORT, WARRANTY, OR UNDER ANY STATUTE OR ON ANY OTHER BASIS FOR SPECIAL, INCIDENTAL, INDIRECT, PUNITIVE, MULTIPLE OR CONSEQUENTIAL DAMAGES IN CONNECTION WITH OR ARISING FROM THIS DOCUMENT, INCLUDING BUT NOT LIMITED TO THE USE THEREOF.
IMPORTANT LICENSING INFORMATION
These products may be covered by one or more Limited Use Label Licenses. By use of these products, you accept the terms and conditions of all applicable Limited Use Label Licenses.
TRADEMARKS
The trademarks mentioned herein are the property of Life Technologies Corporation and/or its affiliate(s) or their respective owners. GenBank® is a registered trademark of the United States Department of Health and Human Services. ColiRollers is a trademark of Merck KgAA. Bio-Rad and Gene Pulser are registered trademarks of Bio-Rad Laboratories, Inc. © 2013 Life Technologies Corporation. All rights reserved.

iii
Contents
Kit Contents and Storage ................................................................................................................................ 1
Description of the System ............................................................................................. 2
GeneArt® Type IIs Assembly Kits ................................................................................................................. 2
GeneArt® Type IIs Assembly Workflow ...................................................................................................... 8
Methods ...................................................................................................................... 10
Guidelines for GeneArt® Type IIs Assembly ............................................................................................. 10
Preparing DNA Inserts by PCR ................................................................................................................... 14
Pre-Cloning .................................................................................................................................................... 17
GeneArt® Type IIs Assembly Reaction ....................................................................................................... 19
E. coli Transformation ................................................................................................................................... 22
Analyzing Transformants ............................................................................................................................ 24
Troubleshooting ............................................................................................................................................. 26
Appendix A: Tools for Construct Design ..................................................................... 28
GeneArt® Primer and Construct Design Tool............................................................................................ 28
Appendix B: Support Protocols ................................................................................... 31
Recipes ............................................................................................................................................................ 31
Appendix C: Vectors .................................................................................................... 32
pType IIs Vector ............................................................................................................................................ 32
pType IIs-CTRL Vector ................................................................................................................................. 34
Appendix D: Ordering Information .............................................................................. 36
GeneArt® Products ........................................................................................................................................ 36
Additional Products ...................................................................................................................................... 37
Documentation and Support ....................................................................................... 38
Obtaining Support ......................................................................................................................................... 38
References ....................................................................................................................................................... 39

1
Kit Contents and Storage
Types of kits This user guide supports the products listed below
Product Catalog no.
GeneArt® Type IIs Assembly, AarI A15916
GeneArt® Type IIs Assembly, BsaI A15917
GeneArt® Type IIs Assembly, BbsI A15918
Kit components The GeneArt® Type IIs Assembly Kits are shipped on dry ice and they contain the
components listed below. Each GeneArt® Type IIs Assembly Kit contains sufficient reagents for 10 assembly reactions at 20 μL of total volume per reaction. Upon receipt, store the kit components at –80°C.
Component Cap color
Catalog no.
A15916 A15917 A15918
GeneArt® AarI Enzyme Mix Red 100 µL — —
GeneArt® BsaI Enzyme Mix Orange — 100 µL —
GeneArt® BbsI Enzyme Mix Pink — — 100 µL
pType IIs recipient vector (75 ng/µL) Green 10 µL 10 µL 10 µL
pType IIs–CTRL vector (75 ng/µL) Yellow 8 µL 8 µL 8 µL
2
Description of the System
GeneArt® Type IIs Assembly Kits
Overview of kits The GeneArt® Type IIs Assembly Kits are used for the highly efficient, simultaneous, and seamless assembly of multiple DNA fragments in a pre-determined order in a single-tube, consolidated restriction-ligation reaction.
The GeneArt® Type IIs Assembly Kits are particularly adept at assembling difficult-to-clone sequences such as repetitive and very small sequences, gene variants, and TAL (transcription activator-like) effector genes (Weber et al., 2011). Furthermore, the kits can use PCR fragments directly or pre-cloned into donor plasmids, thus allowing the shuffling of DNA fragments from a central repository donor clone into different customized vectors geared towards different applications (see Figure 2 and Figure 3, page 6).
• When assembling ≤ 5 fragments using the recommended protocols, at least half of resulting clones will contain the correct fragments in the correct order and orientation. When cloning 6 or more fragments, we recommend screening more colonies as cloning efficiency may be slightly lower.
• Although we recommend using the GeneArt® Type IIs Assembly Kit for assembling up to 8 DNA fragments plus a vector, totaling up to 13 kb in length, you can use it to create constructs that are up to 20 kb in size; however, the cloning efficiency and the number of transformants will be lower.
Principle behind GeneArt® Type IIs assembly
GeneArt® Type IIs Assembly Kits share the same single-step precision cloning strategy, popularly known as “Golden Gate cloning”, that relies on the unique properties of type IIs restriction enzymes to generate compatible ends on DNA fragments that are then joined together by the T4 DNA ligase (Engler et al., 2009; Engler et al., 2008; Engler & Marillonnet, 2013).
Type IIs restriction enzymes cleave DNA at a defined distance from their non-palindromic asymmetric recognition sites, resulting in DNA overhangs that can consist of any nucleotide (Pingoud & Jeltsch, 2001; Szybalski et al., 1991). With proper design, these restriction sites can be strategically placed at the ends of the fragments that one intends to clone, so that upon DNA cleavage the exogenous sequences including the restriction site are removed, and compatible overhangs are generated (see Figure 1, page 3).
Because the recognition sites are eliminated during cleavage, ligated fragments are immune from further digestion by the restriction enzyme. Thus, the restriction and ligation reactions can be consolidated into a single reaction. In the final construct the junctions between any pair of adjacent fragments carry no added or deleted sequences, thereby representing a true seamless assembly.
Continued on next page

3
GeneArt® Type IIs Assembly Kits, continued
Figure 1 Diagram of the seamless GeneArt® Type IIs assembly of two fragments. (A) The
fragments and their corresponding sequences at their ends are shown in blue and green. Adaptors containing the Type IIs recognition sequences that are added to the fragments are shown in red. Underlined characters represent the recognition site for the type IIS restriction enzyme BsaI. (B) Digestion by BsaI leaves compatible overhangs on the fragments. (C) Ligation joins the fragments seamlessly.
Components of GeneArt® Type IIs Assembly Kits
The GeneArt® Type IIs Assembly Kits contain the following components, which are sufficient for 10 assembly reactions.
• GeneArt® AarI, BsaI, or BbsI Enzyme Mix is used for the simultaneous and seamless assembly of up to 8 DNA inserts into a recipient E. coli vector in a single-step restriction-ligation reaction
• pType IIs, the 3,490-bp recipient vector containing the ampicillin and chloramphenicol resistance genes and the recognition sites for AarI, BsaI, and BbsI, serves as the backbone for the seamless assembly of DNA inserts.
• pType IIs-CTRL, the 7,377-bp donor vector encoding the kanamycin and Zeocin™ resistance genes, carries 5 control fragments that can be excised by AarI, BsaI, or BbsI restriction endonucleases, and is used as a positive control in the assembly reaction. Fragment 5 contains the lacZ-α gene.
Continued on next page

4
GeneArt® Type IIs Assembly Kits, continued
GeneArt® Type IIs Enzyme Mix
To maximize the applicability of the system, the GeneArt® Type IIs Assembly Kits are available in three different enzyme blends based on the non-palindromic recognition sites of varying lengths and the GC% content: AarI (7 bp, 71% GC), BbsI (6 bp, 50% GC), and BsaI (6 bp, 66% GC ). Each of the three blends contains all required enzymatic and non-enzymatic components and comes as a single 2X concentrated mix, thereby simplifying experimental design and minimizing pipetting. The table below lists the recognition sequences of each of the enzyme choices.
Enzyme Recognition sequence* Comments
AarI 5’...CACCTGCNNNN......3’ 3’...GTGGACGNNNNNNNN..5’
Generates 5’ overhang of 4 nucleotides
BbsI 5’...GAAGACNN.........3’ 3’...CTTCTGNNNNNN.....5’
Generates 5’ overhang of 4 nucleotides
BsaI 5’...GGTCTCN..........3’ 3’...CCAGAGNNNNN......5’
Generates 5’ overhang of 4 nucleotides Blocked by overlapping dcm methylation
* Cleavage occurs to the right of the rightmost “N” in both strands.
pType IIs vector pType IIs recipient vector is a 3,490-bp E. coli plasmid that serves as the backbone
for the seamless assembly of DNA inserts and the final expression construct. The vector contains two symmetrically arranged multiple cloning sites (MCS) separated by a ccdB counter-selectable marker, with each MCS consisting of the recognition sequences for AarI, BsaI, and BbsI endonucleases. The vector also contains the resistance genes for ampicillin and chloramphenicol for selection in E. coli.
For a map and features of the pType IIs recipient vector, see page 32.
pType IIs-CTRL vector
pType IIs-CTRL vector is a 7,377-bp donor vector encoding the kanamycin and Zeocin™ resistance genes, and it is used as a positive control in the assembly reaction. The pType IIs-CTRL vector carries 5 control fragments ranging in size from 785 bp to 1265 bp, which can be released and reassembled using any of the GeneArt® Type IIs Enzyme mixes available (i.e., GeneArt® AarI, BsaI, or BbsI Enzyme Mix). One of the control fragments, Fragment 5, contains the lacZ-α gene useful for identifying positive clones on X-Gal containing plates using blue-white screening. Note that the pType IIs-CTRL vector itself is unstable in certain strains, such as DH10B™ E. coli cells, yielding two clonal populations that show as blue and white colonies in LB X-Gal plates. Thus, Stbl3 E. coli cells were used to propagate this vector.
For a map and features of the pType IIs-CTRL vector, see page 34.
Continued on next page

5
GeneArt® Type IIs Assembly Kits, continued
GeneArt® Primer and Construct Design Tool
Uncovering a viable solution for the assembly of one or multiple fragments into a vector using the seamless type IIs restriction endonuclease approach is not trivial as it requires, among other steps, positioning the recognition site at appropriate places and in the right orientation, so that the base complementarity of the overhangs at the end of each fragment triggers the self assembly of the expected construct.
To facilitate the design, we recommend using the free, web-based GeneArt® Primer and Construct Design Tool. The tool takes the DNA sequence of up to 8 DNA fragments plus a recipient vector and returns the GenBank® formatted sequence of the final assembled constructs, as well as the required oligonucleotides and the individually modified DNA fragments with end-terminal type IIs recognition sequences needed for the assembly. The GeneArt® Primer and Construct Design Tool is available at http://www.lifetechnologies.com/order/oligoDesigner. For more information, see page 28.
How GeneArt® Type IIs Assembly works
To seamlessly assemble up to 8 DNA inserts into a recipient vector using the GeneArt® Type IIs Assembly Kit:
1. Generate the DNA inserts you wish to assemble by PCR amplification. You can also use synthetic DNA fragments, such as the high-quality GeneArt® Strings™ DNA Fragments available from Life Technologies. Note: GeneArt® Strings™ DNA Fragments are custom-made linear, double-stranded DNA fragments assembled from synthetic oligonucleotides using the same process developed for GeneArt® high-quality gene synthesis. For more information on GeneArt® Strings™ DNA Fragments, refer to www.lifetechnologies.com/strings. To use Strings™ DNA Fragments in GeneArt® Type IIs assembly, see page 12.
2. Optional: Pre-clone your DNA insert(s) into donor plasmid(s). Note: We recommend using the pCR™-Blunt II-TOPO® vector (Cat. no. K2800) as the pre-cloning donor vector. Do not use other TOPO® vectors or other vectors with additional AarI, BsaI, and BbsI recognition sites as pre-cloning vectors.
3. Combine the recipient vector, the DNA inserts or the pre-cloning donor vector, and the GeneArt® Type IIs Enzyme Mix in a single, thin-wall PCR tube on ice. Note: You may also retrofit your own E. coli plasmid to use as a recipient vector (see page 11).
4. Place the reaction mixture in a Thermal cycler and incubate using the appropriate cycling parameters.
5. Transform the assembled DNA molecule into competent E. coli cells. Note: For best results, we recommend chemically competent One Shot® MAX Efficiency™ DH10B™ T1 Phage Resistant (Cat. no. 12331-013) or electrocompetent ElectroMAX™ DH10B™ (Cat. no. 18290-015) E. coli cells for transformations.
Continued on next page

6
GeneArt® Type IIs Assembly Kits, continued
Figure 2 Diagram showing the cloning of two PCR fragments or Strings™ DNA fragments into
a vector (left) and the transfer and assembly of fragments from two donor plasmids into a single vector (right). The black arrows indicate the orientation of the restriction sites, starting at the restriction site and pointing towards to the cleavage sites. Amp, ampicillin resistance gene; Kan, kanamycin resistance gene; ccdB, ccdB counter-selectable marker.
Figure 3 Diagram showing the transfer of a single fragment from a donor plasmid into
multiple vectors with varying features. Arrows and abbreviations are as in Figure 2, above.
Continued on next page

7
GeneArt® Type IIs Assembly Kits, continued
Advantages of the GeneArt® Type IIs Assembly Kit
• Speed – Facilitates the simultaneous assembly of up to 8 DNA inserts totaling up to 10 kb in length plus the vector, for a total construct size of 13 kb.
• Simplicity – Allows the assembly of multiple DNA fragments in a single-tube, consolidated restriction-ligation reaction, thereby greatly reducing the in vitro handling of DNA.
• Precision – Enables true seamless assembly of DNA inserts in a precise and pre-determined order.
• Flexibility – Permits the assembly of difficult-to-clone sequences such as repetitive and very small sequences, gene variants, and TAL (transcription activator-like) effector genes with fairly high cloning efficiencies.
• Efficiency – Generates up to 90% positive clones depending on the number and type of DNA inserts assembled.
• Broad range – Facilitates the assembly of multiple PCR fragments or GeneArt® Strings™ DNA fragments directly, or using inserts pre-cloned into donor plasmids, thus allowing the shuffling of DNA fragments from a central repository donor clone into different customized vectors geared towards different applications.
Possible applications
Using the GeneArt® Type IIs Assembly Kits, you can clone multiple DNA inserts into a single vector, create modular expression vectors with interchangeable parts, construct seamless fusion proteins, delete and replace DNA segments, make internal protein fusions, swap tags on a gene, add UTRs to a cDNA, insert restriction sites, and more.
Some of the many applications that will benefit from the GeneArt® Type IIs Assembly Kits are the following:
• Cloning and protein expression, including difficult and large-inserts cloning
• Synthetic biology-related applications
• Drug discovery
• Biofuels
• Bioremediation
• Plant biotechnology
• Synthetic vaccines
• Bioproduction of chemicals and drugs
• Metabolic engineering
Typical results For typical results obtained using the GeneArt® Type IIs Assembly Kits, refer to
Peng et al., 2013.

8
GeneArt® Type IIs Assembly Workflow
Workflow Figure 4 The diagram below summarizes the comprehensive workflow for the GeneArt® Type IIs Assembly Kit.
Continued on next page

9
GeneArt® Type IIs Assembly Workflow, continued
Experimental outline
The table below describes the major steps required to assemble your recombinant DNA molecule using the GeneArt® Type IIs Assembly Kit. Refer to the specified pages for details to perform each step.
Step Action Page
1 Using the GeneArt® Primer and Construct Design Tool, develop your DNA assembly strategy and design the required oligonucleotides and modified DNA fragments necessary for assembly.
28
2 Optional: Retrofit your own E. coli plasmid for use as a recipient vector.
11
3 PCR amplify your DNA inserts to add the adaptor sequences containing the appropriately placed Type IIs recognition sites. Alternatively, you can purchase high-quality, synthetic GeneArt® Strings™ DNA Fragments to use in the assembly.
13
4 Pre-clone you insert(s), if necessary. 17
5 Perform the GeneArt® Type IIs assembly reaction. 19
6 Transform chemically competent or electrocompetent E. coli. 22
7 Analyze positive colonies by restriction analysis and/or sequencing.
23

10
Methods
Guidelines for GeneArt® Type IIs Assembly
Number of DNA inserts and final construct size
Cloning efficiency and colony output in a GeneArt® Type IIs assembly reaction are greatly influenced by the type, number, and size of the DNA fragments used. For a successful assembly reaction, consider the following the criteria.
• Most efficient assembly is achieved with pre-cloned DNA fragments. When using pre-cloned fragments, you can assemble up to 8 DNA inserts ranging in size from 25 bp to 10 kb into a recipient vector for a total insert size of 10 kb plus the vector, totaling up to 13 kb. While it is possible to create constructs of up to 20 kb in size; however, the cloning efficiency and the number of transformants will be lower.
• You can assemble up to 5 PCR-generated or synthetic DNA fragments of 250 bp and 2 kb directly into a recipient vector for a total construct size of 13 kb, including the vector.
• Difficult-to-clone sequences such as repetitive and very small sequences can be readily assembled using the GeneArt® Type IIs Assembly Kits; however, the cloning efficiency and colony output usually decrease with increasing number of fragments, especially if PCR-generated DNA fragments are used directly in the assembly reaction.
• For best results, we recommend using pre-cloned fragments for the assembly of repetitive/homologous sequences of at least 80% identity. You can assemble up to 4 pre-cloned DNA fragments containing repetitive/homologous sequences into a recipient vector for a total construct size of 2.4 kb plus the vector. The pre-cloned fragments must be between 150 bp and 600 bp in size.
• When using PCR fragments with repetitive/homologous sequences directly in an assembly reaction, only 2 of the 4 fragments may contain these difficult-to-clone sequences. Each of the DNA fragments in the assembly must be between 250 bp and 500 bp in size, with the total assembled construct size not exceeding 2 kb plus the vector.
• The size of the recipient vector can vary with the total size of the assembled DNA fragments. If the total size of the assembled DNA fragments is 10 kb, we recommend using a recipient vector of < 3 kb in size.
The table below summarizes the requirements for the type, number, and size of the DNA fragments, and the total construct size for a successful assembly reaction.
Fragment type Maximum no. of fragments Fragment size Total construct size
Pre-cloned 8 + vector 25 bp–10 kb 10 kb + vector
PCR 5 + vector 250 bp–2 kb 10 kb + vector
Pre-cloned, with rep/hom* 4 + vector 150 bp–600 bp 2.4 kb + vector
PCR, with rep/hom* 2 + 2 + vector** 250 bp–500 bp 2 kb + vector
* Fragments with repetitive/homologous sequences of at least 80% identity ** Only 2 of the 4 fragments may contain repetitive/homologous sequences
Continued on the next page

11
Guidelines for Successful Cloning and Assembly, continued
Recipient vector We recommend using pType IIs, included in the GeneArt® Type IIs Assembly Kit,
as the recipient vector in your assembly reaction. pType IIs vector is a 3,490-bp E. coli plasmid containing the ampicillin and chloramphenicol resistance genes. The recognition sites for the AarI, BsaI, and BbsI endonucleases are located in two symmetrically arranged multiple cloning sites (MCS) on the vector backbone and that are separated by a ccdB counter-selectable marker. Note that vectors containing the ccdB gene (e.g., pType IIs) must be propagated in ccdB survival cells.
Retrofitting E. coli plasmids for use as recipient vectors
If desired, you may also retrofit your own E. coli plasmid to use as a recipient vector. The retrofitted vector must contain ccdB as a counter-selectable marker, flanked by at least one pair of identical recognition sites for the AarI, BsaI, and BbsI endonucleases. If more than one type of Type IIs recognition site is present in the vector, they must be included in symmetrically arranged MCSs separated by the ccdB counter-selectable marker. The vector must not contain any other copy of the Type IIs recognition sites outside of these MCSs.
Pre-cloning donor vector
For best results, we recommend using the pCR™-Blunt II-TOPO® vector, available separately from Life Technologies (Cat. no. K2800), as your pre-cloning donor vector. Do not use other TOPO® vectors as a pre-cloning vector.
Although the pCR™-Blunt II-TOPO® vector contains an internal BsaI restriction site, the overhang generated by its digestion by BsaI endonuclease has been taken into account by the GeneArt® Primer and Construct Design Tool, thereby excluded from possible misassemblies.
Sequence requirements for 5’ DNA overhangs
Type IIs restriction enzymes used in GeneArt® Type IIs Assembly Kits cleave DNA at a defined distance from their non-palindromic and asymmetric recognition sites to generate the compatible 5’ DNA overhangs, thus allowing the recognition sites to be independent from the sequence of the fragments to be assembled.
However, to allow directional cloning for ordered assembly, and to prevent self-ligation of identical DNA fragment as well as the religation of the empty recipient vector, the recognition sites for the Type IIs enzyme on each DNA fragment must be placed in such a way that, upon cleavage, the resulting 5’ DNA overhangs are compatible only with the overhangs from the adjacent fragment or the recipient vector, and incompatible with overhangs from non-adjacent fragments. Therefore, the overhang sequences must:
• be non-palindromic, • share ≤ 50% identity with overhangs in other junctions that are limited to
positions 2 and 3 of the 4-nucleotide 5’ overhang. For more information and graphical representation of primer design parameters to generate Type IIs recognition sites in the appropriate context for GeneArt® Type IIs assembly, see Preparing DNA Inserts by PCR, page 14.
Continued on next page

12
Guidelines for Successful Cloning and Assembly, continued
Positioning the Type IIs restriction enzyme recognition sites at the appropriate place and in the correct orientation on multiple DNA fragments to trigger fragment self assembly is not a trivial undertaking. To facilitate the design of required PCR primers and the modified DNA fragments, we recommend using the GeneArt® Primer and Construct Design Tool at http://www.lifetechnologies.com/order/oligoDesigner. For more information on using the GeneArt® Primer and Construct Design Tool for GeneArt® Type IIs assembly, see page 28.
Guidelines for generating DNA inserts
• DNA fragments to be assembled can be synthesized or generated by PCR amplification to be used directly, or excised from a pre-cloning donor vector during the single-step GeneArt® Type IIs assembly reaction. Regardless of the method used for their generation, adjacent DNA inserts must contain the Type IIs restriction enzyme recognition sites at the appropriate place and in the correct orientation to trigger fragment self assembly (see Sequence requirements for 5’ DNA overhangs, page 11).
• For synthesized DNA fragments, we recommend using the GeneArt® Strings™ DNA Fragments, which are custom-made linear, double-stranded DNA fragments, assembled from synthetic oligonucleotides using the same process developed for GeneArt® high-quality gene synthesis. For more information on Strings™ DNA Fragments, refer to www.lifetechnologies.com/strings. For guidelines on using the Strings™ DNA Fragments in GeneArt® Type IIs assembly, see below.
• If you are using DNA fragments prepared by PCR, you must purify the DNA inserts through a PCR cleanup kit. We recommend that you use the PureLink® PCR Purification Kit (Cat. no. K3100-01). For more information on generating DNA fragments by PCR amplification, see Preparing DNA Inserts by PCR, page 14.
Using GeneArt® Strings™ DNA Fragments in GeneArt® Type IIs assembly
• To use Strings™ DNA Fragments in GeneArt® Type IIs assembly, determine the required cloning sequences at the 5´ and 3´ termini of the DNA fragments using the GeneArt® Primer and Construct Design Tool and then add 20 nucleotides of random stuffer sequences on both ends of the fragment sequences recommended by the webtool to offset any possible small terminal truncations.
• Order your Strings™ DNA Fragments from www.lifetechnologies.com/strings.
• Strings™ DNA Fragments are delivered dried, ready for resuspension and direct use. Upon receipt, resuspend the Strings™ DNA Fragments in nuclease-free water to the desired DNA concentration and use immediately after resuspension. For longer storage, dispense resuspended fragments into aliquots and freeze at –20°C. Avoid freeze-thaw cycles.
Continued on next page

13
Guidelines for Successful Cloning and Assembly, continued
General guidelines for GeneArt® Type IIs assembly
• Cloning efficiency and colony output in a GeneArt® Type IIs assembly reaction are greatly influenced by the type, number, and size of the DNA fragments used. Although these factors can be optimized for a successful assembly, cell toxicity and the rearrangements of the final assembled construct once inside the cell cannot be ruled out.
• You may assemble multiple PCR fragments directly into a recipient vector or use plasmids as donors (i.e., use pre-cloned fragments). You can also purchase synthesized DNA fragments (e.g., GeneArt® Strings™ DNA Fragments) and bypass the PCR step typically required for GeneArt® Type IIs assembly. Regardless of the method used to generate them, adjacent DNA inserts must contain the appropriately positioned restriction enzyme recognition sites in the right orientation for successful assembly and maximum cloning efficiency.
• You may use any combination of PCR fragments, synthetic DNA fragments (e.g., GeneArt® Strings™ DNA Fragments), and pre-cloned fragments (i.e., donor plasmids), provided that each fragment fits the criteria listed on page 10. For example, if one of the fragments is less than 250 bp in size, it must be pre-cloned into a donor vector, but another fragment larger than 250 bp can be used in the same assembly reaction directly from PCR without the need for pre-cloning.
• Difficult-to-clone sequences such as repetitive and very small sequences can be readily assembled using the GeneArt® Type IIs Assembly Kits, the cloning efficiency and colony output usually decreases with increasing number of fragments, especially if PCR-generated DNA fragments are used directly in the assembly reaction.
• Cloning efficiency declines dramatically when more than 5 PCR fragments are cloned. In such cases, picking and screening of up to 20 colonies might be necessary to isolate the correctly assembled construct. To ensure higher cloning efficiencies, we recommend pre-cloning the DNA fragments into the pCR™-Blunt II-TOPO® vector, available separately from Life Technologies (Cat. no. K2800).
• In our experience, pre-cloned DNA fragments are superior to those generated by PCR amplification, especially when assembling difficult-to-clone fragments with repetitive sequences of at least 80% identity.
• Make sure that your inserts do not contain the recognition site for the Type IIs restriction endonuclease internally. This can be confirmed with the GeneArt® Primer and Construct Design Tool.
• Determine the amounts of DNA (vector and DNA fragments) needed for the assembly reaction using the GeneArt® Primer and Construct Design Tool (see page 28), which also provides instructions and reaction conditions optimized for the vector and DNA fragment set used.
• Perform the assembly reaction in a thermal cycler using the cycling conditions given for the specific GeneArt® Type IIs Enzyme mix.
• For best results, we recommend using chemically competent MAX Efficiency® DH10B™ (Cat. no. 18297-010) or electrocompetent ElectroMAX™ DH10B™ (Cat. no. 18290-015) E. coli cells for transformations.

14
Preparing DNA Inserts by PCR
Guidelines for PCR primers
DNA fragments used in GeneArt® Type IIs assembly must be flanked by AarI, BsaI, or BbsI sites in such a way that the recognition sites of the enzyme are located on the outside of the fragment relative to the cleavage site. Furthermore, upon cleavage, the resulting 5’ DNA overhangs must be compatible only with the overhangs from the adjacent fragments or the recipient vector, and incompatible with overhangs from non-adjacent fragments.
Positioning the Type IIs restriction enzyme recognition sites at the appropriate place and in the correct orientation on multiple DNA fragments to trigger fragment self assembly is not a trivial undertaking. The design guidelines for PCR primers given below are for informational purposes only. To facilitate the design of required PCR primers, we recommend using the GeneArt® Primer and Construct Design Tool, available at http://www.lifetechnologies.com/order/oligoDesigner.
• Design your PCR primers such that each DNA fragment to be assembled is between 25 bp and 10 kb in length. Note: Large inserts (>5 kb) are more susceptible to damage in a gel extraction procedure. Furthermore, many PCR enzymes are not processive enough to amplify inserts >5 kb. Therefore, we recommend that you assemble multiple inserts of ≤5 kb in one reaction rather than a single large insert.
• 5’ ends of each primer pair (forward and reverse) must contain a 6-nucleotide end-cushion segment followed by the restriction enzyme recognition sequence (6 to 7 nucleotides, depending on the enzyme) (see Figure 5, page 15).
• 3’ ends of each primer pair must have at least 12 nucleotides of template specific sequence that is unique (see Figure 5, page 15).
• Primers must not contain internally complementary sequences to avoid hairpin formation. Similarly, there must be no complementary sequences between primer pairs.
• When possible, primer pairs should contain a G or C at the 3' end for a stronger bond. However, this is not an absolute requirement because gene-specific sequences in the primers are relatively short and other constraints are very stringent.
• Best results are obtained using primers with a sequence-specific partial Tm of 50–68°C.
• Quality of the primers used for generating the DNA fragments is essential for the success of the subsequent assembly as only a single mutation in the restriction recognition site or in the overhang sequence can be sufficient to obliterate a multi-fragment assembly.
• Each primer pair should be prepared at a stock concentration of 100 µM in DNase- and RNase-free water.
Continued on next page

15
Preparing DNA Inserts by PCR, continued
Guidelines for PCR primers, continued
Figure 5 The graphical guidelines for PCR design provided below are intended for informational purposes only. We highly recommend using the GeneArt® Primer and Construct Design Tool. The fragments and their corresponding sequences at their ends are shown in blue and green. The recognition site for the Type IIs restriction enzyme BsaI is shown in red, and the 6-nucleotide end-cushion segment is shown black.

16
Preparing DNA Inserts by PCR, continued
Guidelines for PCR • When using plasmid DNA, 5–20 ng of plasmid DNA is usually sufficient as a
PCR template in a reaction volume of 100 µL. When using E. coli or human genomic DNA, you can increase the amount of template DNA to 20–200 ng.
• We recommend using PCR primers (forward and reverse) at a final concentration of 200 nM each. If the PCR efficiency is not optimal, repeat the reaction with different primer concentrations from 100 nM to 500 nM, in 100 nM increments.
• The reaction mixtures and PCR protocols recommended in the GeneArt® Type IIs Assembly Kit have been optimized using the AccuPrime™ Pfx SuperMix (Cat. no. 12344-040), because the AccuPrime™ Pfx DNA polymerase is ideal for high-fidelity, high-specificity amplification of DNA fragments. Reaction conditions may need to be optimized for other enzymes.
• Use PCR cycling parameters that are appropriate for your primers and template. Make sure to optimize PCR conditions to produce a single, discrete PCR product.
• If you are using DNA inserts prepared by PCR, you must purify the DNA inserts through a PCR cleanup kit. We recommend that you use the PureLink® PCR Purification Kit (Cat. no. K3100-01).
• After preparing your DNA inserts by PCR, verify the PCR products by gel electrophoresis. If you obtain multiple bands, you must gel purify your DNA inserts. Failure to do so will result in a failed assembly or greatly reduced cloning efficiency. We recommend using the PureLink® Quick Gel Extraction Kit for best results (Cat. no. K2100-12).
• Elute the DNA inserts from the PureLink® column using water or 10 mM Tris buffer, pH 8.0. Do not use TE buffer to elute or resuspend your DNA.
• When gel purifying your DNA inserts, employ extra caution to minimize any potential damage to the ends of the DNA inserts by leaving the gel on the gel tray when exposing it to UV light, using low UV power, and minimizing the time the gel is exposed to UV light. Note that an additional isopropanol precipitation after gel solubilization might be required to obtain the best results. Note: Gel purifying DNA inserts will result in somewhat lower cloning efficiency.
• Large inserts (>5 kb) are more susceptible to damage in a gel extraction procedure. Therefore, we recommend that you assemble multiple inserts of ≤5 kb in one reaction rather than a single large insert.
• You can skip the PCR purification step and use an unpurified insert in a single insert assembly (i.e., cloning a single insert into the cloning vector) without significant decrease in cloning efficiency; however, we recommend using purified PCR inserts in a multi-insert assembly.

17
Pre-Cloning
Introduction Pre-cloning involves cloning a DNA insert generated by PCR amplification into an intermediate vector (“pre-cloning donor vector”, usually ~3 kb in size) and then using the pre-cloning construct carrying the insert directly in the GeneArt® Type IIs assembly, which relies on a single-step, consolidated restriction-ligation reaction to create the final recombinant construct. For best results, we recommend using the pCR™-Blunt II-TOPO® vector, available separately from Life Technologies (Cat. no. K2800), as your pre-cloning donor vector.
Figure 6 Pre-cloning workflow using the pCR™-Blunt II-TOPO® vector as a pre-cloning donor
vector.
Continued on next page

18
Pre-Cloning, continued
Guidelines for pre-cloning
• We recommend using pre-cloned fragments for assemblies of more than 5 fragments, assemblies using fragments that are <250 bp or > 2kb to increase the cloning efficiency and colony output during final assembly.
• We recommend using pre-cloned fragments for the assembly of repetitive or homologous sequences of at least 80% identity. You can assemble up to 4 pre-cloned DNA fragments containing repetitive/homologous sequences into a recipient vector for a total construct size of 2.4 kb plus the vector. The pre-cloned fragments must be between 150 bp and 600 bp in size.
• For best results, we recommend using the pCR™-Blunt II-TOPO® vector, available separately from Life Technologies (Cat. no. K2800), as your pre-cloning donor vector. Do not use other TOPO® vectors as a pre-cloning vector.
• We highly recommend that you use the GeneArt® Primer and Construct Design Tool to verify the sequence of your DNA inserts and your assembly strategy, and to design your PCR primers that generate the required Type IIs endonuclease recognition sites for each DNA insert.

19
GeneArt® Type IIs Assembly Reaction
Before you begin Before you set up your GeneArt® Type IIs assembly reaction, make sure that you have:
• Devised your DNA assembly strategy and verified it by performing in silico cloning using the GeneArt® Primer and Construct Design Tool.
• Designed your PCR primers using the GeneArt® Primer and Construct Design Tool.
• Generated your DNA inserts according to the guidelines on pages 10–13. Do not use TE buffer to elute or resuspend your DNA; use only water or 10 mM Tris buffer, pH 8.0.
Materials needed • DNA fragments to assemble (PCR-generated, synthesized, or pre-cloned; see
Number of DNA inserts and final construct size, page 10)
• pType IIs recipient vector or your own retrofitted E. coli recipient vector (75 ng)
• pType IIs–CTRL vector (for assessing the efficiency of the assembly reaction)
• GeneArt® 2X AarI, BsaI, or BbsI Enzyme Mix
• Deionized, sterile water
• Thermal cycler
• Thin-wall PCR tubes
Amount of DNA When devising the DNA fragment assembly strategy, the GeneArt® Primer and
Construct Design Tool also provides the required amount of each DNA fragment to use in the assembly reaction. The following guidelines for determining the DNA amounts used in the assembly reaction are provided for informational purposes only. For best results, use the GeneArt® Primer and Construct Design Tool to determine the amount of each DNA fragment to use (see page 28).
• Use 75 ng of the recipient vector and 75 ng of 1 kb PCR fragment in the assembly reaction regardless of the size of the vector.
• For PCR fragments of other sizes, calculate the amount to use as 1:1 molar ratio of the insert against 75 ng of 1 kb PCR fragment used as a molar reference size.
• With pre-cloned fragments, use a 1:1 molar ratio of insert to 75 ng of 1 kb PCR reference size, but set the minimum amount to 75 ng to account for the backbone of the pre-cloning donor vector.
Continued on next page

20
GeneArt® Type IIs Assembly Reaction, continued
Calculating molar ratios
1. Determine the concentration of your DNA insert solutions (PCR-generated or pre-cloned) in µg/mL by OD260 or fluorescence.
2. Use the following formula to calculate the amount of insert needed to give a molar ratio of 1:1 between the 75 ng of 1 kb PCR fragment used as a molar reference size and the DNA insert.
x ng insert =
(bp DNA insert) (75 ng 1 kb reference)
(1,000 bp 1 kb reference)
3. Based on the calculation above, calculate the volumes needed for each of the DNA inserts to be used in the GeneArt® Type IIs assembly reaction.
GeneArt® Type IIs assembly reaction
1. Set up the GeneArt® Type IIs assembly reaction in a thin-wall PCR tube on ice as shown below.
Recipient vector (75 ng/µL) 1 µL
PCR fragment or donor vector* x µL
Deionized water (9 – x) µL
GeneArt® Type IIs Enzyme mix 10 µL
Total reaction volume 20 µL
* Add at 1:1 molar ratio of insert to 75 ng of 1 kb PCR reference size. For best results, use the GeneArt® Primer and Construct Design Tool to determine the amount of each DNA fragment to use (see page 28).
2. Mix the reaction components completely by pipetting them up and down 3 times, and then briefly centrifuge to collect the reaction components to the bottom of the tube.
3. Place the reaction in a Thermal cycler and incubate using the cycling parameters indicated below.
Enzyme mix Temperature Time Cycle
AarI or BbsI with either PCR fragment or pre-cloned inserts or BsaI with pre-cloned inserts
37°C 1 minute 30×
16°C 1 minute
4°C hold —
BsaI with PCR fragment inserts
37°C 1 hour 1×
55°C 5 minutes
4°C hold —
4. After the assembly reaction is completed, place the reaction mix on ice and proceed to E. coli Transformation, page 22.
Continued on next page

21
GeneArt® Type IIs Assembly Reaction, continued
Control reactions When using the GeneArt® Type IIs Assembly Kit for the first time, we strongly
recommend that you perform the positive and negative control reactions in parallel with your GeneArt® Type IIs assembly reaction to verify that the kit components are performing properly. Note: The GeneArt® Type IIs Assembly Kit contains sufficient reagents for 10 assembly reactions. If you wish to perform both the positive and negative control reactions, the remaining reagents are sufficient for only 8 assembly reactions.
1. Set up the GeneArt® Type IIs assembly reaction in a thin-wall PCR tube on ice as described above. For the positive control reaction, add 1 µL of pType IIs recipient vector and 2 µL of pType IIs-CTRL vector. For the negative reaction, do not add any DNA fragments or the pType IIs-CTRL vector.
2. Perform the assembly reaction in a Thermal cycler with the protocol appropriate for the GeneArt® Type IIs Enzyme Mix you are using.
3. After the assembly reaction is completed, place the reaction mix on ice and proceed to E. coli Transformation, page 22.

22
E. coli Transformation
E. coli transformation method
You may use any method of your choice for E. coli transformation. Chemical transformation is the most convenient for most researchers. Electroporation is the most efficient and the method of choice for large assemblies.
For best results, we recommend using chemically competent One Shot® MAX Efficiency™ DH10B™ T1 Phage Resistant (Cat. no. 12331-013) or electrocompetent ElectroMAX™ DH10B™ (Cat. no. 18290-015) E. coli cells for transformations.
Materials needed • GeneArt® Type IIs assembly reaction mix (from step 4, page 20)
• Chemically competent One Shot® MAX Efficiency™ DH10B™ T1 Phage Resistant E. coli cells (Cat. no. 12331-013) or electrocompetent ElectroMAX™ DH10B™ (Cat. no. 18290-015) E. coli cells
• S.O.C. medium
• 37°C water bath
• LB plates containing the appropriate selection antibiotic.
If you have used the pType IIs recipient vector for cloning, use LB plates containing 50–100 µg/mL ampicillin (see Recipes, page 31). If you have performed positive control reactions using the pType IIs–CTRL vector as donor and the pType IIs recipient vector, use LB plates containing 50–100 µg/mL ampicillin and 30–100 µg/mL X-Gal (see Recipes, page 31). Note: Fragment 5 on the pType IIs–CTRL vector encodes the LacZ-α gene, allowing you to perform blue-white screening for the presence of the insert; most of the blue colonies should contain the vector inserts, while the white ones should mostly have the empty vector.
• 37°C shaking and non-shaking incubator
• Optional: ColiRollers™ plating glass beads (Novagen, Cat. no. 71013)
• Optional: pUC19 Control DNA for the transformation control reaction to verify the transformation efficiency
For chemical transformation
• 42°C water bath
For electroporation
• 0.1-cm electroporation cuvettes (Cat. no. P410-50)
• Electroporation device such the Bio-Rad® Gene Pulser® II
Continued on next page

23
E. coli Transformation, continued
Transformation procedure
1. Use 3 µL of the assembly reaction to transform chemically competent, or use 1 µL of the reaction to transform electrocompetent E. coli cells, following the instructions provided with the competent cells.
2. Plate the transformations on appropriate pre-warmed selective LB plates. Plate the positive control on LB plates containing 50–100 µg/mL ampicillin and 30–100 µg/mL X-Gal for blue-white screening. We recommend that you plate two different volumes to ensure that at least one plate has well-spaced colonies.
3. Incubate the plates overnight at 37°C.
4. The next day, pick individual colonies (pick blue colonies if you have used the control vector) and isolate the plasmid DNA, or screen for the presence of the insert(s) by colony PCR. See Analyzing Transformants, page 24, for more information.
Expected results If you have used pType IIs-CTRL vector, you can expect >80% blue colonies on
your positive control plates.

24
Analyzing Transformants
Introduction Once you have performed the GeneArt® Type IIs assembly reaction and the transformation procedure, screen for “positive” colonies containing your assembled recombinant DNA molecule by isolating the plasmid DNA and sequencing or by performing restriction analysis followed by agarose gel electrophoresis. You can also screen for the presence of the insert(s) by colony PCR.
For typical cloning and assembly results obtained with GeneArt® Type IIs Assembly Kits, refer to Peng et al., 2013.
Analyzing positive clones
1. Pick 5–20 colonies and culture them overnight in LB medium containing the appropriate selection antibiotic for your cloning vector (50–100 µg/mL ampicillin if you have used pType IIs recipient vector for cloning). Note: Pick 20 colonies for an assembly reaction involving difficult-to-clone sequences, such as those that contain repetitive or homologous sequences of >80% identity. For assembly reactions without difficult-to-clone sequences, 5–10 colonies should suffice.
2. Isolate plasmid DNA using your method of choice. If you need ultra-pure plasmid DNA for automated or manual sequencing, we recommend using the PureLink® HQ Mini Plasmid Purification Kit (Cat. no. K2100-01) or the PureLink® HiPure Plasmid Miniprep Kit (Cat. no. K2100-03). Refer to www.lifetechnologies.com or contact Technical Support for more information on a large selection of plasmid purification columns.
3. Analyze the plasmids by restriction analysis and/or by sequencing. We highly recommend that you perform sequence analysis when assembling inserts that were PCR amplified to rule out any errors made by the DNA polymerase during amplification.
Analyzing transformants by colony PCR
You may use PCR to directly analyze positive transformants.
• For PCR primers, use a pair of “diagnostic primers” (forward and reverse) so that the colony PCR products would span the insert.
• If your insert is too large to amplify in a single PCR, you may pick a diagnostic primer on the vector and another on one of the inserts.
• You will have to determine the amplification conditions.
• If this is the first time you have used this technique, we recommend that you perform restriction analysis in parallel to confirm that the PCR gives you the correct result.
Materials Needed
• PCR SuperMix (Cat. no. 10572-014)
• Appropriate forwards and reverse PCR primers (20 µM each); see page 25 for recommended primer sequences for assembly reactions using the pType IIs recipient vector
• LB plates containing the appropriate selection antibiotic
Continued on next page

25
Analyzing Transformants, continued
Analyzing transformants by colony PCR, continued
Procedure 1. For each sample, aliquot 48 µL PCR SuperMix into a 0.5 mL microcentrifuge
tube. Add 1 µL each of the forward and reverse PCR primer at 10 μM working concentration.
2. Pick 5–20 colonies and resuspend them individually in 50 µL of the PCR cocktail from step 1, above. Note: Pick 20 colonies for an assembly reaction involving difficult-to-clone sequences, such as those that contain repetitive or homologous sequences of >80% identity. For assembly reactions without difficult-to-clone sequences, 5–10 colonies should suffice.
3. Streak each colony on an LB plate plates containing the appropriate selection antibiotic to save for preparing glycerol stocks (see Long Term Storage, below).
4. Incubate the reaction for 2–3 minutes at 94°C to lyse the cells and to inactivate the nucleases.
5. Amplify your samples for 20 to 30 cycles using the amplification conditions you have determined.
6. For the final extension, incubate the reaction at 72°C for 10 minutes. Store at the reactions at 4°C.
7. Visualize the results by agarose gel electrophoresis.
Primer sequences The following primer sequence work well in both colony PCR and sequencing for
the final construct assembled on the pType IIs recipient vector.
Forward primer: 5’-CAC GGA AAT GTT GAA TAC TCA TAC TC-3’
Reverse primer: 5’-GGG TTT CGC CAC CTC TGA CTT GAG C-3’
Long-term storage After you have identified the correct clone, purify the colony and make a glycerol
stock for long term storage. Keep a DNA stock of your plasmid at –20°C.
1. Streak the original colony out on an LB agar plate containing the appropriate selection antibiotic for your cloning vector. Incubate the plate at 37°C overnight. Note: If you have used the pType IIs recipient vector for assembly, use LB plates containing 50–100 µg/mL ampicillin
2. Isolate a single colony and inoculate with it 1–2 mL of LB containing the appropriate selection antibiotic for your cloning vector.
3. Grow the cells until the culture reaches stationary phase (OD600 = 1–2).
4. Mix 0.85 mL of the culture with 0.15 mL of sterile glycerol and transfer the mix to a cryovial.
5. Store the glycerol stocks at –80°C.
26
Troubleshooting
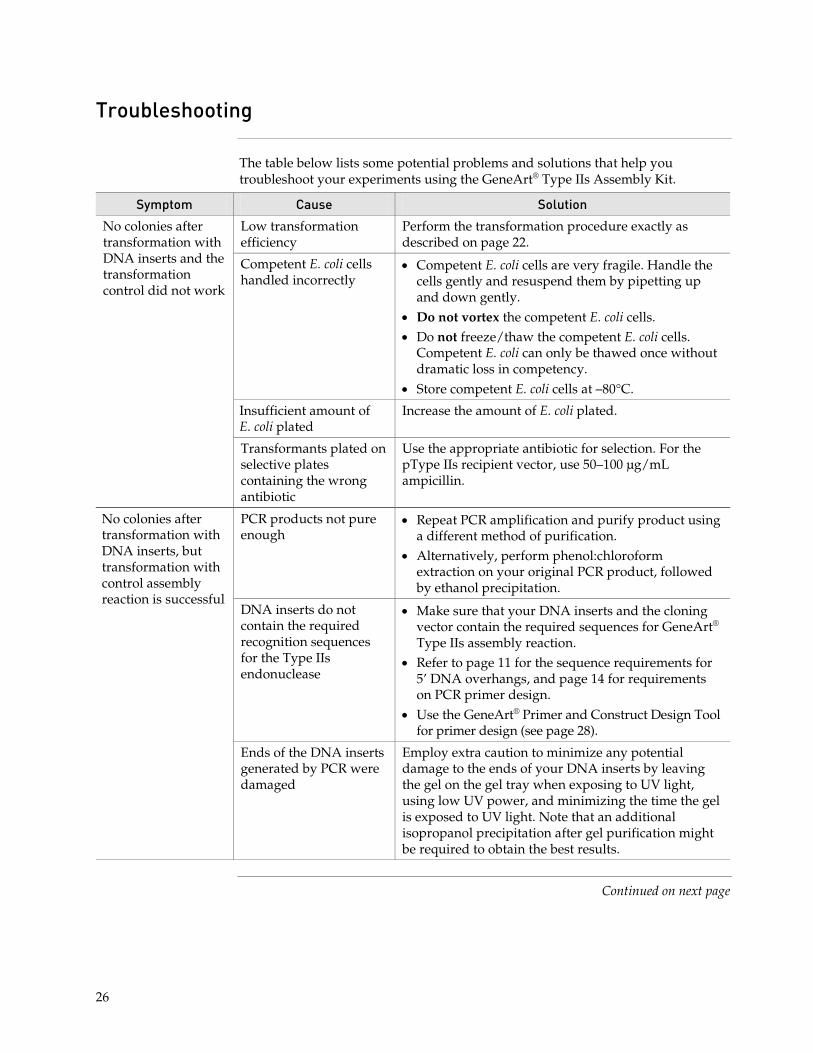
The table below lists some potential problems and solutions that help you troubleshoot your experiments using the GeneArt® Type IIs Assembly Kit.
Symptom Cause Solution
No colonies after transformation with DNA inserts and the transformation control did not work
Low transformation efficiency
Perform the transformation procedure exactly as described on page 22.
Competent E. coli cells handled incorrectly
• Competent E. coli cells are very fragile. Handle the cells gently and resuspend them by pipetting up and down gently.
• Do not vortex the competent E. coli cells. • Do not freeze/thaw the competent E. coli cells.
Competent E. coli can only be thawed once without dramatic loss in competency.
• Store competent E. coli cells at –80°C.
Insufficient amount of E. coli plated
Increase the amount of E. coli plated.
Transformants plated on selective plates containing the wrong antibiotic
Use the appropriate antibiotic for selection. For the pType IIs recipient vector, use 50–100 µg/mL ampicillin.
No colonies after transformation with DNA inserts, but transformation with control assembly reaction is successful
PCR products not pure enough
• Repeat PCR amplification and purify product using a different method of purification.
• Alternatively, perform phenol:chloroform extraction on your original PCR product, followed by ethanol precipitation.
DNA inserts do not contain the required recognition sequences for the Type IIs endonuclease
• Make sure that your DNA inserts and the cloning vector contain the required sequences for GeneArt® Type IIs assembly reaction.
• Refer to page 11 for the sequence requirements for 5’ DNA overhangs, and page 14 for requirements on PCR primer design.
• Use the GeneArt® Primer and Construct Design Tool for primer design (see page 28).
Ends of the DNA inserts generated by PCR were damaged
Employ extra caution to minimize any potential damage to the ends of your DNA inserts by leaving the gel on the gel tray when exposing to UV light, using low UV power, and minimizing the time the gel is exposed to UV light. Note that an additional isopropanol precipitation after gel purification might be required to obtain the best results.
Continued on next page

27
Troubleshooting, continued
Symptom Cause Solution
No colonies after transformation with DNA inserts, but transformation with control assembly reaction is successful
Incorrect amounts of DNA inserts and/or vector were used
Make sure that you use the correct amounts of DNA inserts, and/or vector for cloning. For best results, use the GeneArt® Primer and Construct Design Tool to determine the amount of each DNA fragment to use (see page 28).
Primers used for generating the DNA fragments were of low quality
Make sure to use high quality primers devoid of mutations as only a single mutation in the restriction recognition site or in the overhang sequence can be sufficient to obliterate a multi-fragment assembly.
DNA inserts contain multiple repetitive sequences
Multiple repetitive sequences might result in lethal phenotypes.
No colonies after transformation, but the control transformation is successful
GeneArt® Type IIs Enzyme Mix handled incorrectly
• Quickly thaw the GeneArt® Type IIs Enzyme Mix on ice, and immediately return to –80°C after use.
• Do not subject the enzyme mix to more than 6 freeze/thaw cycles.
• Do not leave the enzyme mix at room temperature or on ice for extended periods of time.
• Use the reaction cocktail and the enzyme mix promptly; do not keep them for any extended period of time before starting the cloning reaction.
Large number of the transformants contain no insert
Plates too old or contained incorrect antibiotic
Makes sure to use freshly prepared LB plates containing the selection antibiotic appropriate for your cloning vector.

28
Appendix A: Tools for Construct Design
GeneArt® Primer and Construct Design Tool
Introduction Use the web-based GeneArt® Primer and Construct Design Tool to guide you when you are designing your DNA inserts. Based on your input, the tool designs the PCR primers used for amplifying your DNA inserts and generating the appropriate end-terminal type IIs recognition sequences for GeneArt® Type IIs assembly, identifies potential pitfalls linked to your specific sequences, performs in silico cloning using your sequences, and allows one-click online ordering for custom primers (for countries with enabled online ordering). The GeneArt® Primer and Construct Design Tool is available at http://www.lifetechnologies.com/order/oligoDesigner.
Guidelines for using the GeneArt® Primer and Construct Design Tool
• Select GeneArt® Type IIs Assembly Kit as the product type. Note: If you are uncertain about which GeneArt® Seamless Assembly Kit is most applicable to your fragment set, consider the new product selection tool. Click Recommend and the tool will guide you through fragment import and analysis steps, and list all the assembly kits recommended for your construct. Select your preferred kit from the list, and the correct webtool will open with your fragments already imported.
• Select the recommended vector, pType IIs, or click Import vector to upload your own vector sequence. You can also copy and paste your sequence into the text box. Accepted input formats are FASTA (.fasta, .faa) and plain text.
• Click Import fragment(s) to upload your fragment (i.e., insert) sequences one by one, in the 5’ to 3’ order you want to assemble them. You can also copy and paste your sequence into the text box, or import multiple sequences simultaneously using a multi-sequence FASTA file.
• After you have entered all of your fragment sequences, click Next to select the restriction enzyme you wish to use (i.e., AarI, BsaI, or BbsI).
• Click Assemble and design oligos to perform in silico cloning using your uploaded sequences. The tool will verify the uploaded sequences and determine the next steps in the design process (pre-cloning, primer design, etc.).
• The GeneArt® Primer and Construct Design Tool will present you with a graphical representation of your final assembled DNA construct and a list of the DNA oligonucleotides you will need (see page 30 for an example output). The tool also provides you with the sizes and sequences of PCR primers as well as their melting temperature (Tm).
• Click the Download Gen Bank to save the output for your DNA sequences in GenBank® format, which is compatible with Vector NTI® and other software tools.
Continued on next page

29
GeneArt® Primer and Construct Design Tool, continued
Guidelines for using the GeneArt® Primer and Construct Design Tool, continued
• The GeneArt® Primer and Construct Design Tool also provides step-by-step instructions for the assembly reaction, including the amount of each DNA fragment to add to the assembly reaction mix, as well as the incubation conditions. Click Download Oligo List & Assembly Instructions to download the instructions. Note: For best results, follow the assembly reactions provided by the GeneArt® Primer and Construct Design Tool exactly. We do not recommend calculating the required amounts of DNA fragments to use in the assembly reaction by hand.
• If you wish to order your PCR primers and the recommended assembly kit directly from Life Technologies, check the boxes next to each product and click Add to Cart.
• The GeneArt® Primer and Construct Design Tool analyzes a random subset of possible solutions for a given assembly. Using the same sequences more than once does not guarantee that the same exact solution for the assembly can be found.
• Occasionally, when no solution can be found for an assembly, running the analysis again with the same sequences may result in a working solution.
• When a solution requiring long primers is found, running the analysis again may result in a solution with shorter primers.

30
GeneArt® Primer and Construct Design Tool, continued
Output example from GeneArt® Primer and Construct Design Tool
The example below shows the output from GeneArt® Primer and Construct Design Tool for a 4-insert assembly into the recommended vector pType IIs using the BbsI enzyme mix. In this example, all of the inserts were PCR amplified and used directly in the assembly reaction without pre-cloning. Because the vector is digested during the assembly, and only the useful part of it is included in the final construct, the final size of the assembly is smaller than the sum of all fragments plus the undigested vector. Note: Once digested with AarI, BsaI, and BbsI, the useful portion of the vector is 1817, 1847, and 1870 bp respectively. These are the sizes taken into account by the webtool for the calculation of the final construct size.

31
Appendix B: Support Protocols
Recipes
LB (Luria-Bertani) Medium and Plates
LB medium:
1. For 1 liter, dissolve 10 g tryptone, 5 g yeast extract, and 10 g NaCl in 950 mL of deionized water.
2. Adjust the pH of the solution to 7.0 with NaOH and bring the volume up to 1 liter.
3. Autoclave the solution on liquid cycle for 20 minutes at 15 psi. Allow the solution to cool to 55°C and add the appropriate antibiotics, if needed. Note: Use ampicillin at a final concentration of 50–100 µg/mL.
4. Store the medium at room temperature or at 4°C.
LB agar plates
1. Prepare LB medium as above, but add 15 g/L agar before autoclaving.
2. Autoclave the medium plus agar on liquid cycle for 20 minutes at 15 psi.
3. After autoclaving, cool the medium to ~55°C, add the appropriate antibiotics, and pour into 10 cm plates.
4. Let the agar harden, then invert the plates and store them at 4°C, in the dark.
X-Gal Stock Solution
1. To prepare a 40 mg/mL X-Gal stock solution, dissolve 400 mg of X-Gal in 10 mL of dimethylformamide. Protect the X-Gal solution from light by storing it in a brown bottle at –20°C.
2. To add X-Gal to previously made agar plates, warm the plate to 37°C. Add 40 µL of the 40 mg/mL X-Gal stock solution onto the plate, spread it evenly, and let it dry for 15 minutes. Protect the plates from light.

32
Appendix C: Vectors
pType IIs Vector
Map of pType IIs vector
The figure below summarizes the features of the pType IIs recipient vector (3,490 bp). The complete sequence and the restriction map of pType IIs is available online at www.lifetechnologies.com or by contacting Technical Support (see page 38).
Continued on next page

33
pType IIs Vector, continued
Features of pType IIs vector
The pType IIs recipient vector (3,490 bp) contains the following elements. All features have been functionally tested.
Feature Benefit
ccdB gene (ccdB) Counter-selectable marker between the two symmetrical MCSs; used for propagating the plasmid in ccdB survival cells
AarI, BsaI, BbsI Type IIs endonuclease recognition sites that are used for generating compatible 5’ overhangs for GeneArt® Type IIs assembly
pUC origin (pUC ori) Allows high-copy replication and growth in E. coli
Ampicillin resistance gene (β-lactamase) (AmpR)
Allows selection of the final assembled construct in E. coli
bla promoter (Pbla) Allows the expression of Ampicillin resistance gene
Chloramphenicol resistance gene (CamR)
Allows selection of the plasmid in E. coli

34
pType IIs-CTRL Vector
Map of pType IIs-CTRL vector
The figure below summarizes the features of the pType IIs-CTRL vector (7,377 bp). The complete sequence and the restriction map of the pType IIs-CTRL vector is available online at www.lifetechnologies.com or by contacting Technical Support (see page 38).

35
pType IIs-CTRL Vector, continued
Features of pType IIs-CTRL vector
The pType IIs-CTRL vector (7,377 bp) contains the following elements. All features have been functionally tested.
Feature Benefit
pUC origin (pUC ori) Allows high-copy replication and growth in E. coli
Lac promoter (PLAC) Drives the expression of lacZα (for alpha complementation)
Lac repressor binding site Allows repression in lacI cells
SP6 promoter (PSP6) Allows high-level transcription using Sp6 polymerase
Kan promoter (PKan) Allows the expression of kanamycin resistance gene
Kanamycin resistance gene (KanR)
Allows selection of the plasmid in E. coli
bla promoter (Pbla) Allows the expression of Zeocin™ resistance gene
Zeocin™ resistance gene (ZeoR) Allows selection of the plasmid in E. coli
Fragment 1 (876 bp), Fragment 2 (764 bp), Fragment 3 (785 bp), Fragment 4 (1076 bp), Fragment 5 (1265 bp)
Control fragments that can be released and reassembled using any of the GeneArt® Type IIs Enzyme Mixes; Fragment 5 encodes the lacZα gene useful for identifying positive clones on X-Gal plates

36
Appendix D: Ordering Information
GeneArt® Products
GeneArt® Type IIs Assembly Kits
Some of the components of the GeneArt® Type IIs Assembly Kit are also available separately from Life Technologies. These products are listed below. For more information, refer to www.lifetechnologies.com or contact Technical Support (see page 38).
Product Amount Cat. no.
GeneArt® Type IIs Assembly Kit, AarI 1 kit A15916
GeneArt® Type IIs Assembly Kit, BsaI 1 kit A15917
GeneArt® Type IIs Assembly Kit, BbsI 1 kit A15918
Other GeneArt® Products
Life Technologies also offers other GeneArt® products that can be used for seamless assembly of up to 10 DNA inserts and vector. For more information, refer to www.lifetechnologies.com or contact Technical Support (see page 38).
Product Amount Cat. no.
GeneArt® Seamless PLUS Cloning and Assembly Kit
1 kit A14603
GeneArt® Seamless Cloning and Assembly Enzyme Mix
20 reactions A14606
GeneArt® Linear pUC19L Vector for Seamless Cloning
20 reactions A13289
GeneArt® Seamless Cloning and Assembly Kit 1 kit A13288
GeneArt® High-Order Genetic Assembly System 1 kit A13285
GeneArt® High-Order Genetic Assembly System (with Yeast Growth Media)
1 kit A13286
GeneArt® High-Order Linear pYES1L Vector with Sapphire™ Technology
10 reactions A13287
GeneArt® Vector Conversion Cassette with Sapphire™ Technology
10 reactions A13291
CSM Media for MaV203 Yeast Cells 1 kit A13292
GeneArt® Site-Directed Mutagenesis System 1 kit A13282
GeneArt® Site-Directed Mutagenesis PLUS Kit 1 kit A14551

37
Additional Products
Accessory Products The products listed below may be used with the GeneArt® Type IIs Assembly Kit. For more information, refer to www.lifetechnologies.com or contact Technical Support (see page 38).
Product Amount Cat. no.
AccuPrime™ Pfx SuperMix 200 reactions 12344-040
PCR SuperMix 100 reactions 10572-014
PCR SuperMix High Fidelity 100 reactions 10790-020
Platinum® Taq DNA Polymerase 100 reactions 500 reactions
10966-018 10966-034
Platinum® PCR SuperMix High Fidelity 100 reactions 12532-016
PureLink® PCR Purification Kit 50 preps K3100-01
PureLink® Quick Gel Extraction Kit 1 kit K2100-12
PureLink® HiPure Plasmid Miniprep 25 preps 100 preps
K2100-02 K2100-03
PureLink® HQ Mini Plasmid Purification Kit 100 reactions K2100-01
One Shot® MAX Efficiency™ DH10B™ T1 Phage Resistant E. coli Cells
20 reactions 12331-013
ElectroMAX™ DH10B™ E. coli Cells 0.5 mL 18290-015
Electroporation Cuvettes, 0.1 cm 50 each P410-50
LB Broth (1X), liquid 500 mL 10855-021
LB Agar 500 g 22700-025
Ampicillin, sodium salt 200 mg 11593-027
Zeocin™ Selection Reagent 8 × 1.25 mL R25001
GeneArt® Strings™ DNA Fragments
GeneArt® Strings™ DNA Fragments are custom-made linear, double-stranded DNA fragments assembled from synthetic oligonucleotides using the same process developed for GeneArt® high-quality gene synthesis. For more information on GeneArt® Strings™ DNA Fragments, refer to www.lifetechnologies.com/strings.

38
Documentation and Support
Obtaining Support
Technical Support For the latest services and support information for all locations, go to www.lifetechnologies.com.
At the website, you can:
• Access worldwide telephone and fax numbers to contact Technical Support and Sales facilities
• Search through frequently asked questions (FAQs)
• Submit a question directly to Technical Support ([email protected])
• Search for user documents, SDSs, vector maps and sequences, application notes, formulations, handbooks, certificates of analysis, citations, and other product support documents
• Obtain information about customer training
• Download software updates and patches
Safety Data Sheets (SDS)
Safety Data Sheets (SDSs) are available at www.lifetechnologies.com/sds.
Limited Product Warranty
Life Technologies Corporation and/or its affiliate(s) warrant their products as set forth in the Life Technologies’ General Terms and Conditions of Sale found on Life Technologies’ website at www.lifetechnologies.com/termsandconditions. If you have any questions, please contact Life Technologies at www.lifetechnologies.com/support.

39
References Engler, C., Gruetzner, R., Kandzia, R., and Marillonnet, S. (2009) Golden gate shuffling: a one-pot DNA
shuffling method based on type IIs restriction enzymes. PLoS One 4, e5553.
Engler, C., Kandzia, R., and Marillonnet, S. (2008) A one pot, one step, precision cloning method with high throughput capability. PLoS One 3, e3647.
Engler, C., and Marillonnet, S. (2013) Combinatorial DNA assembly using Golden Gate cloning. Methods Mol Biol 1073, 141-156.
Peng, L., Liang, X., Baek, C. H., Clark, J., and Katzen, F. (2013) One-Step Cloning: Cloning Made Easy Using Type IIs Restriction Endonucleases. Genetic Engineering & Biotechnology News 33, 28-29.
Pingoud, A., and Jeltsch, A. (2001) Structure and function of type II restriction endonucleases. Nucleic Acids Res 29, 3705-3727.
Szybalski, W., Kim, S. C., Hasan, N., and Podhajska, A. J. (1991) Class-IIS restriction enzymes--a review. Gene 100, 13-26.
Weber, E., Gruetzner, R., Werner, S., Engler, C., and Marillonnet, S. (2011) Assembly of designer TAL effectors by Golden Gate cloning. PLoS One 6, e19722.

Headquarters5791 Van Allen Way | Carlsbad, CA 92008 USA | Phone +1 760 603 7200 | Toll Free in USA 800 955 6288For support visit lifetechnologies.com/support or email [email protected]
lifetechnologies.com15 November 2013