fs-c8100dn clearing paper jams - kyoceraoracle.kyocera.co.uk/data/support/jams/jams...
TRANSCRIPT

Page 1 of 12 FS-C8100DN
FS-C8100DN Clearing Paper JamsIf the paper jams in the paper transport system, or no paper sheets were fed at all, the Paper j ammessage appears and the location of the paper jam (the component where the paper jam hasoccurred) is also indicated. The printer automatically goes off-line when this message is displayed.Remove the jammed paper. After removing the jammed paper, the printer will re-start printing.
Possible Paper Jam LocationsThe figure below explains the printer’s paper paths including the options. The locations where paperjams might occur are also shown here, with each location explained in the table below. Paper jamscan occur in more than one component on the paper paths.
Mail BoxMT-710
Document FinisherDF-710/DF-730
Booklet FolderBF-710
Paper FeederPF-710/PF-750
Paper jam message Paper jamlocation
Description Reference page
Paper j amCasse t t e 1
A Paper is jammed at the upper cassette orinside the printer.
3
Paper j amCasse t t e 2
B Paper is jammed at the lower cassette orinside the printer.
4
Paper j amCasse t t e 3
Paper j amCasse t t e 4
C Paper is jammed at an optional paperfeeder cassette. (PF-710 upper cassette,PF-750)
D Paper is jammed at an optional paperfeeder cassette. (PF-710 lower cassette)
5
5
Paper j amMP Tray
E Paper is jammed at the MP tray. 6
Paper j amFeed Un i t
F Paper is jammed in the feed unit. 6
Paper j amLe f t Cove r 1
G Paper is jammed in the left cover section. 9

Page 2 of 12 FS-C8100DN
Paper jam message Paper jamlocation
Description Reference page
Paper j amLe f t Cove r 2
H Paper is jammed in a left cover section. 11
Paper j amLe f t Cove r 3
I Paper is jammed in the left cover sectionof an option unit. (PF-710, PF-750)
11
Paper j amTop Cover
J Paper is jammed in a top cover section. 12
Paper j amF in i sher
K Paper is jammed in the paper stackerof the optional document finisher.
DF-710 orDF-730OperationGuide
Paper j amFo ld i ng Un i t
Paper j amMai l box
L Paper is jammed in the booklet folder. DF-710OperationGuide
M Paper is jammed at the mailbox. DF-710OperationGuide
General considerations for clearing jamsBear in mind the following considerations when attempting jam removal:
CAUTION: When pulling the paper, pull it gently so as not to tear it. Torn pieces of paper are difficultto remove and may be easily overlooked, deterring the jam recovery.
• If paper jams occur frequently, try using a different type of paper, replace the paper with paperfrom another ream, flip the paper stack over, or rotate the paper stack 180 degrees. Selection ofpaper is fully discussed in the Handling Paper section in the Advanced Operation Guide. Theprinter may have problems if paper jams recur after the paper was replaced.
• Whether or not the jammed pages are reproduced normally after printing is resumed dependson the location of the paper jam.
Utilizing Online Help MessagesOnline help messages are available in the printer’s message display to provide simple instructionsfor clearing jams. Press ( ) when the paper jam message has appeared. Then a help message willappear to facilitate jam clearing in the location.

Page 3 of 12 FS-C8100DN
Paper Cassette
Paper Cassette 1Remove the paper if a paper jam occurred in the paper cassette 1. Follow the instructions below.
1 Open the left cover 1.
2 Remove the jammed paper.
3 Open the duplex unit A1.
4 Remove the jammed paper.

Page 4 of 12 FS-C8100DN
5 Pull out paper cassette 1.
6 Remove the jammed paper.
7 Slowly close paper cassette 1.
8 Close the duplex unit A1 and the left cover 1.
IMPORTANT: Push the indicated position to close leftcover 1 securely.
Paper Cassette 2Remove the paper if a paper jam occurred in paper cassette 2. Follow the instructions below.
1 Open the left cover 2.
2 Remove the jammed paper.

Page 5 of 12 FS-C8100DN
3 Pull out paper cassette 2.
4 Remove the jammed paper.
5 Slowly close paper cassette 2.
6 Close the left cover 2.
Paper Cassette 3 or 4 (option)Remove the paper if a paper jam occurred in the optional paper feeder (PF-710/PF-750). Follow theinstructions below.
1 Open the left cover 3.
2 Remove the jammed paper.

Page 6 of 12 FS-C8100DN
3 Pull out the paper cassette being used.
4 Remove the jammed paper.
5 Slowly close the paper cassette.
6 Close the left cover 3.
MP TrayRemove the paper if a paper jam occurred in the MP tray or feed unit. Follow the instructions below.
1 Open the left cover 1.
2 Remove the jammed paper.

Page 7 of 12 FS-C8100DN
3 Open the duplex unit A1.
4 Remove the jammed paper.
5 Open the feed guide B1.
6 Remove the jammed paper.
7 Remove all the paper set in the MP tray.

Page 8 of 12 FS-C8100DN
8 Pull out paper cassette 1.
9 Turn the handle B2 counterclockwise 10 times ormore. The jammed paper will be moved to the inside ofthe left cover.
10 Remove the jammed paper. If paper cannot beremoved, perform the steps described below.
11 Pull out the feed unit B3.
12 Open the cover B4 and remove the jammed paper.

Page 9 of 12 FS-C8100DN
13 If paper is torn, pull out the feed unit B3completely, and uninstall it with the unit pulled up.
14 Pull out paper cassette 1 completely, and uninstallit with the cassette pulled up.
15 Remove the jammed paper.
16 Replace paper cassette 1 and feed unit B3.
17 Close the feed guide B1, the duplex unit A1 andthe left cover 1.
IMPORTANT: Push the indicated position to close leftcover 1 securely.
18 Replace the paper in the MP tray.
Left Cover 1Remove the paper if a paper jam occurred inside the left cover 1. Follow the instructions below.
WARNING: The printer’s fixing unit is extremely hot. Take sufficient care when working inthis area, as there is a danger of getting burned.

Page 10 of 12 FS-C8100DN
1 Open the left cover 1.
2 Remove the jammed paper.
3 Open the duplex unit A1.
4 Remove the jammed paper.
5 Open the fixing unit cover A2.
Page 11 of 12 FS-C8100DN
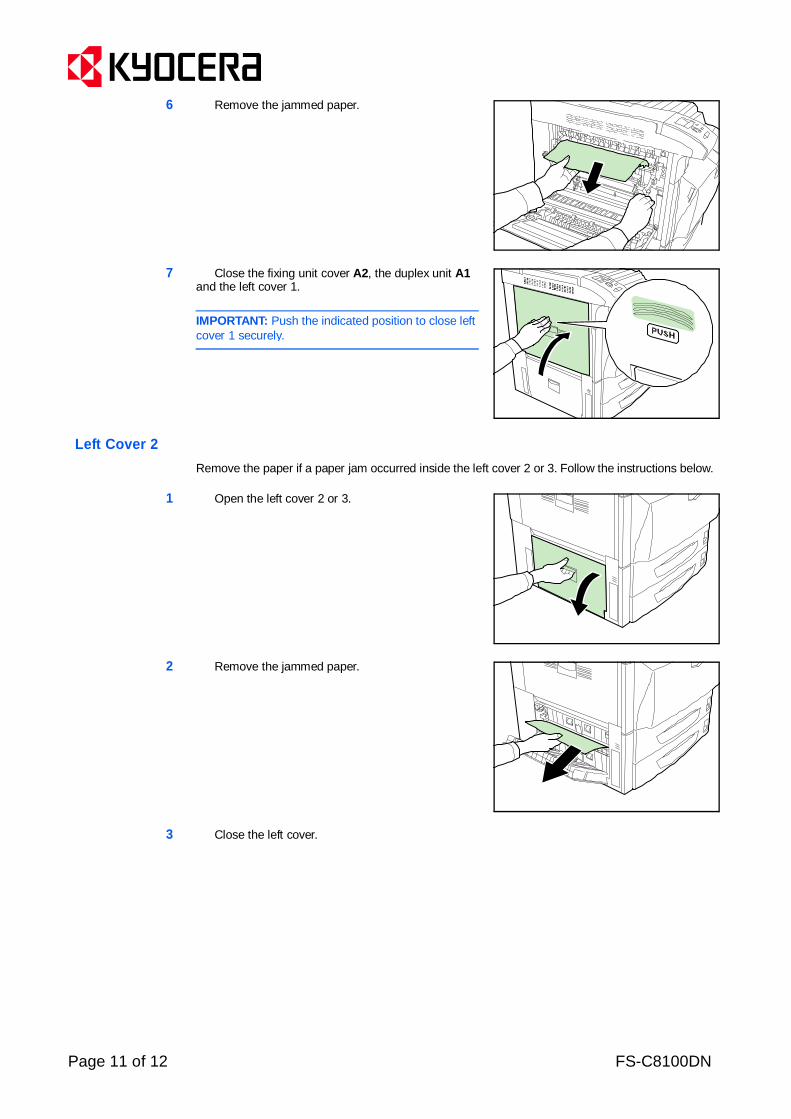
6 Remove the jammed paper.
7 Close the fixing unit cover A2, the duplex unit A1and the left cover 1.
IMPORTANT: Push the indicated position to close leftcover 1 securely.
Left Cover 2Remove the paper if a paper jam occurred inside the left cover 2 or 3. Follow the instructions below.
1 Open the left cover 2 or 3.
2 Remove the jammed paper.
3 Close the left cover.

Page 12 of 12 FS-C8100DN
Top CoverRemove the paper if a paper jam occurred inside the top cover. Follow the instructions below.
1 If you can see jammed paper from the exit, pull it out.
2 Open the top cover and remove the jammed paper.
3 Close the top cover.